124 страницы подробных инструкций и пользовательских руководств по эксплуатации
 05:13
05:13
Установка и настройка принтера Zebra GK420d
 14:33
14:33
Как настроить печать на принтере Zebra GK420
 04:39
04:39
Zebra GK420T, impresora codigo de barras,colocación de suministros, www.buyscan.com
 03:12
03:12
Калибровка и внутренний тест принтера штрих-кода gk420t
 03:21
03:21
Zebra GK420T Printer Setup
 02:03
02:03
Changing Ribbon on a Zebra GK420T Printer
 10:05
10:05
Zebra Designer (GK420t) شرح تنصيب
 02:30
02:30
Loading Media In The Zebra GK420t Thermal Transfer Printer

Устранение неполадок
Описание состояний индикатора
78
980610-151 Вер. C
GK420t™ Руководство пользователя
26.10.2010
Описание состояний индикатора
Значения индикатора и состояния принтера
Состояние и цвет индикатора
Состояние принтера
Для решения
проблемы
см. номер
Выключен
Выключен
1
Непрерывный зеленый
Горит
2
Непрерывный янтарный
Остановлен
3
Мигающий зеленый
Нормальная работа
4
Мигающий красный
Остановлен
5
Двойной мигающий зеленый
Пауза
6
Мигающий янтарный
Пауза
7
Попеременно мигающий зеленый и красный
Требуется
обслуживание
8
Мигающий красный, красный и зеленый
Требуется
обслуживание
9
Мигающий красный, янтарный и зеленый
(* НЕ выключайте питание!)
Дефрагментация
памяти
10*

Описание состояния принтера, Принтер не получает питание от сети, Принтер включен и готов к выполнению заданий
Произошла ошибка памяти, Принтер принимает данные
- Изображение
- Текст
79
Устранение неполадок
Описание состояния принтера
26.10.2010
GK420t™ Руководство пользователя
980610-151 Вер. C
Описание состояния принтера
Следующие номера описаний состояния принтера соответствуют таблице описаний
состояния индикатора, приведенной на предыдущей странице. Для каждого номера
ошибки приводится один или более вариантов устранения этой ошибки.
1. Принтер не получает питание от сети.
• Убедитесь, что принтер включен.
• Проверьте разъемы питающего кабеля между настенной розеткой и блоком питания,
а также блоком питания и принтером. См.
Подключение питания на стр. 12
.
• Отсоедините кабель принтера от розетки на 30 секунд, а затем подключите
его повторно.
2. Принтер включен и готов к выполнению заданий.
Не требует вмешательства.
3. Принтеру не удалось провести начальное самотестирование
(POST).
• Если ошибка возникает сразу после включения принтера, обратитесь за помощью
к авторизованному дилеру. Если принтер работает исправно, индикатор состояния
принтера будет светиться янтарным в течение 10 секунд, а затем изменит цвет на
зеленый (непрерывный или мигающий).
Произошла ошибка памяти.
• Если ошибка возникает после начала печати, отключите и заново включите питание
принтера, а затем возобновите печать.
Необходимо подождать, пока остынет печатающая головка.
• Если ошибка появится снова, выключите принтер на пять или более минут, а затем
снова включите. Если индикатор продолжает гореть янтарным цветом, принтеру
требуется обслуживание.
4. Принтер принимает данные.
• После полного получения данных цвет индикатора изменится на зеленый, и принтер
автоматически продолжит работу.

Отсутствует носитель, Отсутствует лента, Открыта печатающая головка
Принтер приостановлен, Перегрев печатающей головки, Флэш-память не запрограммирована, Принтер выполняет дефрагментацию памяти
- Изображение
- Текст
Устранение неполадок
Описание состояния принтера
80
980610-151 Вер. C
GK420t™ Руководство пользователя
26.10.2010
5. Отсутствует носитель.
• Следуйте соответствующим инструкциям раздела
Загрузка рулонного носителя
на стр. 13
в главе «Приступая к работе», а затем нажмите клавишу «Подача» (Feed),
чтобы возобновить печать.
Отсутствует лента.
• Принтер достиг конца рулона ленты. Замените рулон с лентой.
Открыта печатающая головка.
• Закройте крышку и нажмите клавишу «Подача» (Feed) для возобновления печати.
6. Принтер приостановлен.
• Для продолжения печати нажмите клавишу «Подача» (Feed).
7. Перегрев печатающей головки.
• Печать будет остановлена, пока головка не остынет до допустимой температуры
печати. После этого принтер автоматически продолжит работу.
8. Флэш-память не запрограммирована.
• Верните принтер авторизованному дилеру.
9. В печатающей головке или электродвигателе возникла
критическая ошибка.
• Верните принтер авторизованному дилеру.
10. Принтер выполняет дефрагментацию памяти.
Внимание! • НЕ отключайте питание принтера во время дефрагментации. Это может
повредить принтер.
• Дефрагментация — это обычная операция в работе принтера, необходимая
для оптимального использования пространства памяти. Принтер выполняет
дефрагментацию памяти после восстановления заводских настроек и в случае,
когда принтер определяет, что требуется дефрагментация.
Когда принтер находится в этом состоянии, дождитесь завершения дефрагментации.
Если это предупреждение возникает часто, проверьте форматы этикеток.
При использовании форматов, в которых часто и многократно осуществляется запись
данных в память и удаление данных из памяти, принтер может часто выполнять
дефрагментацию. Использование форматов, в которых отсутствуют частые
и повторяющиеся операции записи и удаления, уменьшит потребность
в дефрагментации.
• Если это состояние предупреждения не проходит, обратитесь в службу технической
поддержки. Принтеру требуется обслуживание.

Проблемы с качеством печати, После печати этикетка остается чистой, Неудовлетворительное качество изображения
Страница 95
- Изображение
- Текст
81
Устранение неполадок
Проблемы с качеством печати
26.10.2010
GK420t™ Руководство пользователя
980610-151 Вер. C
Проблемы с качеством печати
После печати этикетка остается чистой.
• Возможно, носитель не предназначен для прямой термопередачи при печати
без ленты (или печати термопереносом). Возможно, носитель не предназначен
для прямой термопечати. См. процедуру тестирования носителя в разделе
Типы
носителей для термопереноса на стр. 38
.
• В принтерах с функцией печати термопереносом носитель, возможно, не намотан
покрытием наружу либо не соответствует типу принтера G-Series. См. процедуры
тестирования рулонов ленты
Проверка ленты клейким материалом на стр. 43
и
Проверка ленты процарапыванием на стр. 44
.
• Возможно, носитель загружен неправильно. Следуйте соответствующим
инструкциям раздела
Загрузка рулонного носителя на стр. 13
в главе «Приступая
к работе». Подробнее о печати с помощью ленты термопереноса см. раздел
Загрузка
ленты переноса на стр. 16
.
Неудовлетворительное качество изображения.
• Печатающая головка загрязнена. Очистите печатающую головку.
• Печатающая головка недостаточно нагрета.
• Настройте уровень яркости и/или скорость печати.
•
Используйте команды
^PR
(скорость) и
~SD
(яркость), указанные в руководстве
по программированию ZPL.
•
Используйте команды
D
(яркость/плотность) и
S
(скорость), указанные
в Руководстве по программированию EPL.
•
Вручную настройте яркость принтера с помощью последовательности сигналов
индикатора (шесть миганий). См. раздел
Режимы клавиши «Подача» (Feed)
на стр. 88
.
•
Драйвер принтера для Windows и программные приложения могут изменить эти
настройки и потребовать оптимизировать качество печати.
• Используемый носитель несовместим с принтером. Всегда пользуйтесь только
рекомендованными для приложения носителями, а также применяйте ярлыки
и этикетки, одобренные компанией Zebra.
• Печатающая головка изношена. Печатающая головка является расходным
материалом и со временем изнашивается в результате трения носителя
о печатающую головку. Использование несертифицированных носителей может
сократить срок службы или повредить головку. Замените печатающую головку.
• Возможно, требуется чистка или замена валика. Валик может потерять сцепление
в результате следующих действий.
•
Прилипание посторонних предметов к поверхности валика.
•
Гладкая поверхность ленты стала слишком скользкой.
•
Нарушение гладкости и ровности печатающей поверхности в результате
машинной обрезки.

Устранение неполадок
Проблемы с качеством печати
82
980610-151 Вер. C
GK420t™ Руководство пользователя
26.10.2010
При печати возникают длинные непропечатанные полосы
(вертикальные линии) на нескольких этикетках.
• Печатающая головка загрязнена. Очистите печатающую головку.
• Повреждены элементы печатающей головки.
Печать начинается не с начала этикетки или возникает пропуск
этикеток при печати.
• Возможно, неверно установлен носитель. Следуйте соответствующим инструкциям
раздела
Загрузка рулонного носителя на стр. 13
в главе «Приступая к работе».
• Необходимо выполнить калибровку принтера. См. последовательность сигналов
индикатора (два мигания) в разделе
Режимы клавиши «Подача» (Feed) на стр. 88
данной главы.
• Форматы этикеток ZPL — возможно, не активирован соответствующий датчик
носителя. Ручная калибровка позволяет выбрать метод определения носителя для
этикеток (подробнее см. команду
^MN
в Руководстве по программированию ZPL).
• Форматы этикеток ZPL — убедитесь, что команда «Верх этикетки» (
^LT
) правильно
установлена в приложении (см. Руководство по программированию ZPL).
• Форматы этикеток EPL — возможно, не активирован необходимый для носителя
датчик отделителя (выдачи этикеток) либо датчик промежутков (в рулоне), черной
линии и зубцов. Ручная калибровка позволяет выбрать метод определения носителя
для этикеток (подробнее см. команды
O
и Q в Руководстве по программированию
EPL).
• Форматы этикеток EPL — убедитесь, что команда «Настройка длины наклейки» (Q)
правильно установлена в приложении (см. Руководство по программированию
EPL).
Формат этикетки ZPL был отправлен, но не распознан
принтером.
• Возможно, принтер был приостановлен. Если да, нажмите клавишу «Подача»
(Feed).
• Если индикатор включен или мигает, см.
Значения индикатора и состояния
принтера на стр. 78
.
• Убедитесь, что кабель передачи данных подключен правильно.
• Произошло нарушение обмена данными. Убедитесь, что на компьютере выбран
правильный порт для обмена данными. См.
Подключение принтера к компьютеру
на стр. 24
в главе «Приступая к работе».
• Убедитесь также, что формат и префикс управления принтера и формата,
запрограммированного с помощью ZPL, соответствуют друг другу. Формат
по умолчанию (COMMAND CHAR) — это знак вставки (^), а префикс управления
(CONTROL CHAR) — тильда (~). Проверьте символы с помощью печати состояния
конфигурации. См. последовательность сигналов индикатора (одно мигание)
в разделе
Режимы клавиши «Подача» (Feed) на стр. 88
данной главы.

83
Устранение неполадок
Проблемы с качеством печати
26.10.2010
GK420t™ Руководство пользователя
980610-151 Вер. C
Формат этикетки EPL был отправлен, но не распознан
принтером.
• Возможно, принтер был приостановлен. Если да, нажмите клавишу «Подача»
(Feed).
• Если принтер имеет отделитель наклеек, он может ожидать, пока будет вынута
напечатанная наклейка. Для правильной работы отделителя наклеек необходимо
правильно пропустить через него подложку или этикетки в рулоне, см. раздел
Отделитель наклеек на стр. 54
.
• Если индикатор включен или мигает, см.
Значения индикатора и состояния
принтера на стр. 78
.
• Убедитесь, что кабель передачи данных подключен правильно.
• Произошло нарушение обмена данными.
Убедитесь, что на компьютере выбран правильный порт (USB) для обмена
данными. См.
Подключение принтера к компьютеру на стр. 24
в главе «Приступая
к работе».

Устранение неполадок
Ручная калибровка
84
980610-151 Вер. C
GK420t™ Руководство пользователя
26.10.2010
Ручная калибровка
Калибровку необходимо выполнять вручную, если используется носитель
с предварительной печатью или если принтер неправильно выполняет автоматическую
калибровку.
1.
Убедитесь, что носитель загружен.
2.
Включите принтер.
3.
Нажмите и удерживайте клавишу «Подача» (Feed), пока индикатор не мигнет
зеленым один раз, затем два раза, а затем продолжит мигать до начала циклов
из семи миганий. Отпустите клавишу подачи.
4.
Принтер настроит датчик носителя в соответствии с используемой подложкой.
После этого рулон будет автоматически подаваться до тех пор, пока этикетка
не разместится на печатающей головке. Будет напечатан профиль параметров
датчика носителя (аналогично примеру ниже). После этого новые параметры будут
сохранены в памяти принтера, а принтер будет готов для работы в нормальном
режиме.
5.
Нажмите клавишу «Подача» (Feed). Будет подана одна целая пустая этикетка.
Если этого не произойдет, попытайтесь восстановить заводские настройки
(см. последовательность сигналов индикатора из четырех миганий в разделе
«Режимы клавиши «Подача» (Feed)» данной главы) и выполнить перекалибровку
принтера.
Примечание •
При выполнении калибровки вручную функция автоматической
калибровки будет отключена. Чтобы снова включить режим автоматической
калибровки, восстановите настройки принтера по умолчанию (см. последовательность
сигналов индикатора из четырех миганий в разделе
Режимы клавиши «Подача» (Feed)
на стр. 88
данной главы).

Тестовая печать для выявления неполадок, Печать этикетки с конфигурацией, Перекалибровка
Печать этикетки с конфигурацией перекалибровка
- Изображение
- Текст
85
Устранение неполадок
Тестовая печать для выявления неполадок
26.10.2010
GK420t™ Руководство пользователя
980610-151 Вер. C
Тестовая печать для выявления неполадок
Печать этикетки с конфигурацией
Чтобы напечатать список параметров текущей конфигурации принтера,
см. последовательность сигналов индикатора (одно мигание) в разделе
Режимы
клавиши «Подача» (Feed) на стр. 88
данной главы. Интерпретацию этикетки
см. в разделе
Приложение. Конфигурация ZPL на стр. 101
.
Перекалибровка
Выполните перекалибровку принтера при появлении симптомов нестабильной работы,
например при пропуске этикеток. См. последовательность сигналов индикатора
(два мигания) в разделе
Режимы клавиши «Подача» (Feed) на стр. 88
данной главы.

Восстановление заводских настроек, Диагностика обмена данными
Страница 100
- Изображение
- Текст
Устранение неполадок
Восстановление заводских настроек
86
980610-151 Вер. C
GK420t™ Руководство пользователя
26.10.2010
Восстановление заводских настроек
В некоторых случаях восстановление заводских настроек принтера помогает успешно
решить проблему. См. последовательность сигналов индикатора (четыре мигания)
в разделе
Режимы клавиши «Подача» (Feed) на стр. 88
данной главы.
Диагностика обмена данными
Если при обмене данными между компьютером и принтером возникла проблема,
переключите принтер в режим диагностики обмена данными. Принтер напечатает
символы ASCII и соответствующие им шестнадцатеричные значения (см. пример ниже)
для обозначения данных, полученных от управляющего компьютера.
Существуют различные способы перехода в режим шестнадцатеричного дампа.
• Команда ZPL ~JD.
• Команда EPL dump.
• Нажатие клавиши «Подача» (Feed) во время включения принтера. См. процедуру
выключения питания в разделе
Режимы клавиши «Подача» (Feed) на стр. 88
данной
главы.
Принтер напечатает: Now in DUMP (Вход в режим DUMP) (см. ниже) и перейдет
к началу следующей этикетки.

Комментарии
by Tashreef Shareef
Tashreef Shareef is a software developer turned tech writer. He discovered his interest in technology after reading a tech magazine accidentally. Now he writes about everything tech from… read more
Updated on December 13, 2022
- The Zebra printer not working issue can occur due to several reasons.
- You can quickly fix the problem by performing an effective power cycle.
- Additionally, cancel any print jobs, and check that all cables are connected properly.
- If the issue persists, try resetting the printer to factory default, which will reset the entire experience but is to be used as a last resort.

XINSTALL BY CLICKING THE DOWNLOAD FILE
This software will repair common computer errors, protect you from file loss, malware, hardware failure and optimize your PC for maximum performance. Fix PC issues and remove viruses now in 3 easy steps:
- Download Restoro PC Repair Tool that comes with Patented Technologies (patent available here).
- Click Start Scan to find Windows issues that could be causing PC problems.
- Click Repair All to fix issues affecting your computer’s security and performance
- Restoro has been downloaded by 0 readers this month.
Zebra printers are popular for label and receipts prints. However, several users have reported the printer not working issue when trying to print labels.
Your Zebra printer may stop working due to several reasons. Some common reasons include temporary glitches, corrupted configuration, incorrect label width calibration, etc.
In this article, we show you a few quick ways to troubleshoot your Zebra printer and get it working again.
What are the common causes of the printer not working?
Your Zebra printer may stop working because of a variety of reasons which include settings, connection, and compatibility issues with your source system.
That being said, there are some other elements that you might want to check before diving deeper into this guide’s solutions:
- Check if the cables are firmly plugged into the port
- Make sure the network and power cables are directly plugged in and not through an extension cord
- No paper in the printer – some printers automatically stop any active tasks if the sensors detect that no papers is present in the paper tray. If you added more and more tasks after that moment, the printer will not work.
- No paint left in the printer – as you might expect, if the printer’s ink cartridges are empty, the printer is not able to print out anything
- Temporary glitches
- Check printer’s status – cancel and schedule some new tasks
In some other cases, the issue could be caused by a bad configuration profile, and this guide will also cover how to configure the default printing device on your PC.
Another common impediment when dealing with Zebra printers appears if the drivers are not updated to the latest version, and that’s another important topic that we will discuss below.
What can I do if my Zebra printer is not working?
- What are the common causes of the printer not working?
- What can I do if my Zebra printer is not working?
- 1. Perform a power cycle
- 2. Cancel and reassign print jobs
- 3. Set Zebra printer as default
- 4. Update printer drivers
- 5. Reset to Factory Default
- 6. Perform label width calibration
- How do I reset my Zebra printer?
- Why is the Zebra printer flashing red?
- Why is the Zebra printer offline?
1. Perform a power cycle
- Make sure the printer is powered on.
- Press the switch near the power socket in the rear.
- Disconnect all cables – including power cable, network cable, and any USB cables.
- Wait for a few minutes so every component resets.
- Turn the printer back on and check if the issue is resolved.
2. Cancel and reassign print jobs
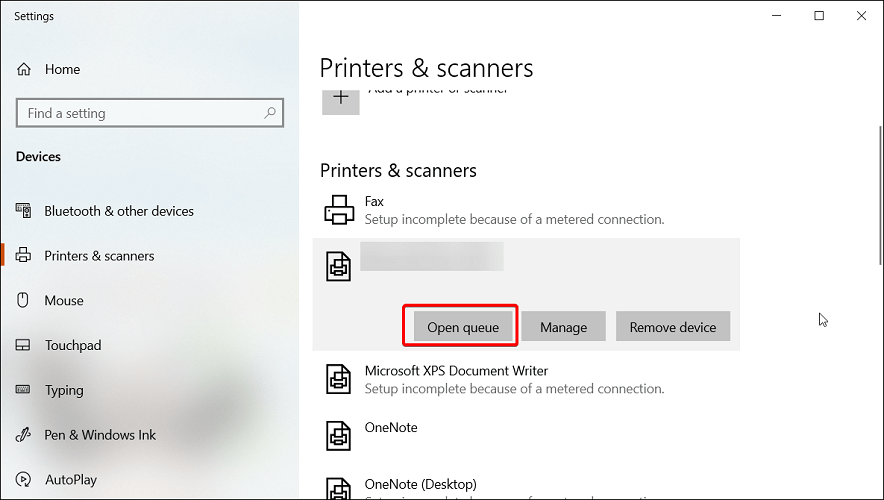
- Double-click on the printer icon in the notification area of your computer. You can also open it by searching for Printers & Scanners, selecting your printer in the list, and clicking Open Queue.
- Right-click on the print job you want to cancel and click Cancel.
In case your printer is not printing anything, try canceling all the pending print jobs. It is essential, as the more your computer attempts to print without success, the more it can affect your hardware.
Also, check your printer toner for proper printing. If the labels get stuck, try cleaning the roller from both ends. It may also mean you may have issues with the inside gears.
3. Set Zebra printer as default
- Click on Start and choose Settings.
- Go to Devices and open the Printers and Scanners tab.
- Uncheck the Let Windows manage my default printer option.

- Choose your printer from the list and click on Manage.

- Select Set as default to set this printer as your primary printing device.
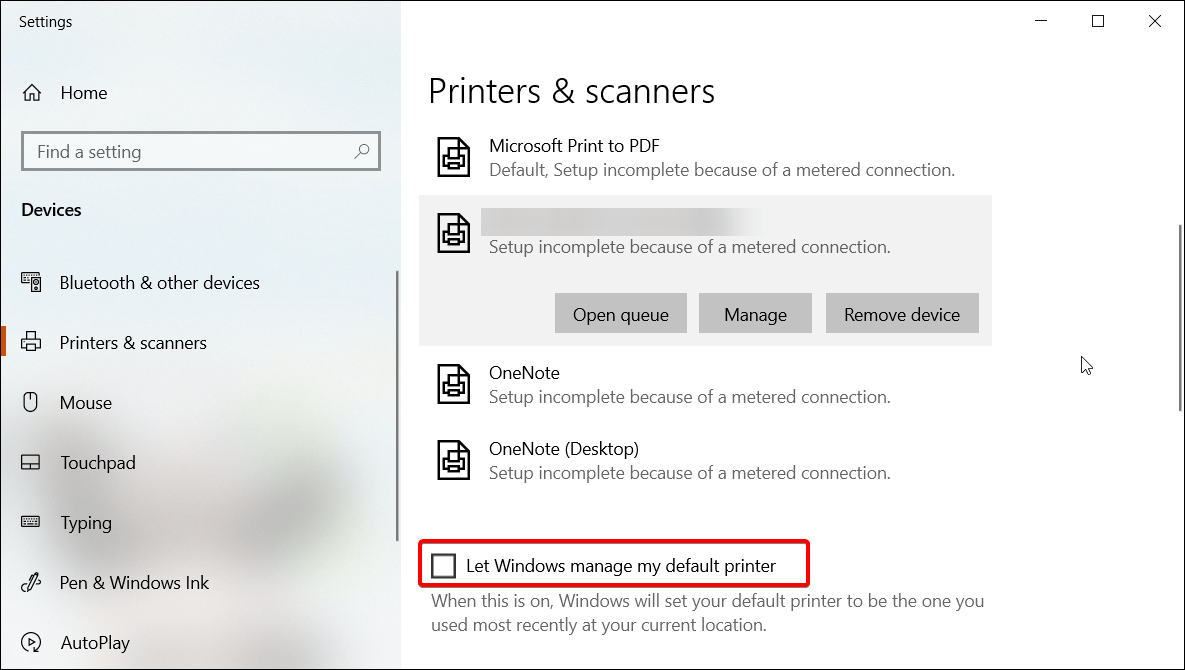
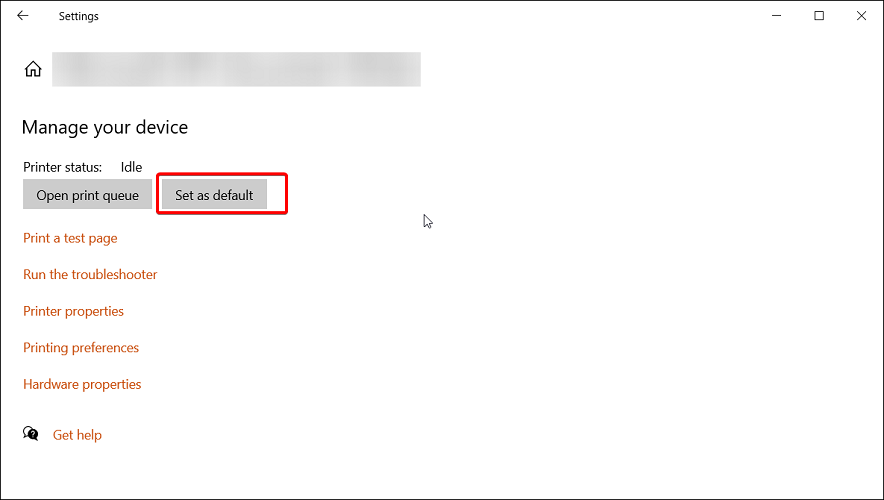
Selecting a default printer makes it easy for the programs to send print jobs to the right device. You can also do this from the Control Panel’s Devices and Printers section.
4. Update printer drivers
Outdated or missing printer drivers can cause your printing device to malfunction. For example, it may stop printing or print incorrectly. To avoid this, make sure you have the latest printer drivers installed on your computer.
Some PC issues are hard to tackle, especially when it comes to corrupted repositories or missing Windows files. If you are having troubles fixing an error, your system may be partially broken.
We recommend installing Restoro, a tool that will scan your machine and identify what the fault is.
Click here to download and start repairing.
You can manually install printer drivers or use third-party driver updater utilities like DriverFix. It scans your system for missing and outdated device drivers and installs them with one click.
Most of the time, the generic drivers for your PC’s hardware and peripherals are not properly updated by the system. There are key differences between a generic driver and a manufacturer’s driver.Searching for the right driver version for each of your hardware components can become tedious. That’s why an automated assistant can help you find and update your system with the correct drivers every time, and we strongly recommend DriverFix. Here’s how to do it:
- Download and install DriverFix.
- Launch the software.
- Wait for the detection of all your faulty drivers.
- DriverFix will now show you all the drivers that have issues, and you just need to select the ones you’d liked fixed.
- Wait for the app to download and install the newest drivers.
- Restart your PC for the changes to take effect.

DriverFix
Keep your PC components drivers working perfectly without putting your PC at risk.
Disclaimer: this program needs to be upgraded from the free version in order to perform some specific actions.
5. Reset to Factory Default
- Press and hold the single round button on the front panel of your printer.
- Keep it pressed until the indicator light starts a flash sequence.
- When the indicator light flashes four times, release the button to complete the reset.
Resetting your Zebra printer to factory default will remove all the saved configurations. However, this is an ideal solution to deal with printer configuration corruption.
After resetting your printer, you would have to perform a label width calibration. Here’s how to do it.
6. Perform label width calibration
- Press and hold the round button on the front panel.
- As it starts a flash sequence, wait for the light to flash five times and release the button.
- This will trigger the printer width calibration process, where it will print a series of widths. The width will get wider with each print on a label.
- Press the round button once you have found the correct width for your labels.
After completing width calibration, you need to perform a calibration for other properties. To do this, press and hold the round button until the light flashes twice. Then, release the button, and that should complete the set of all other calibrations.
Zebra printer not working issues usually occur due to temporary glitches or incorrect printer configuration. To resolve the issue, perform a power cycle, cancel the pending job or set the printer as default. If that does not work, check for driver issues or try to reset the device to factory default as a last resort.
How do I reset my Zebra printer?
To reset your Zebra printer, make sure it is completely turned off. Next, press and hold the Pause + Feed key and turn on the printer. Keep the buttons pressed until the Status indicator is the only indicator lit.
Once the printer is reset, you will have to recalibrate and set it up again to get it working.
Alternatively, some Zebra printers come with a dedicated Reset button. Turn your printer flat on an even surface. Use a paper clip or small needle-like object to press the Reset button.
Why is the Zebra printer flashing red?
Your Zebra printer will flash red if the print head is open. Close the top cover and then press the Feed button to resume printing.
Why is the Zebra printer offline?
Your Zebra printer may show offline if there is a delay on the network, issues with the printer spooler, print server, etc.
As you can see, there are plenty of solutions for encountering issues with your printer, and we would suggest that you try each of these solutions in order, for the best results.
Don’t hesitate to share with us which of these solutions proved efficient in your case. You can do so by using the comment section below.
![]()
Newsletter
by Tashreef Shareef
Tashreef Shareef is a software developer turned tech writer. He discovered his interest in technology after reading a tech magazine accidentally. Now he writes about everything tech from… read more
Updated on December 13, 2022
- The Zebra printer not working issue can occur due to several reasons.
- You can quickly fix the problem by performing an effective power cycle.
- Additionally, cancel any print jobs, and check that all cables are connected properly.
- If the issue persists, try resetting the printer to factory default, which will reset the entire experience but is to be used as a last resort.
XINSTALL BY CLICKING THE DOWNLOAD FILE
This software will repair common computer errors, protect you from file loss, malware, hardware failure and optimize your PC for maximum performance. Fix PC issues and remove viruses now in 3 easy steps:
- Download Restoro PC Repair Tool that comes with Patented Technologies (patent available here).
- Click Start Scan to find Windows issues that could be causing PC problems.
- Click Repair All to fix issues affecting your computer’s security and performance
- Restoro has been downloaded by 0 readers this month.
Zebra printers are popular for label and receipts prints. However, several users have reported the printer not working issue when trying to print labels.
Your Zebra printer may stop working due to several reasons. Some common reasons include temporary glitches, corrupted configuration, incorrect label width calibration, etc.
In this article, we show you a few quick ways to troubleshoot your Zebra printer and get it working again.
What are the common causes of the printer not working?
Your Zebra printer may stop working because of a variety of reasons which include settings, connection, and compatibility issues with your source system.
That being said, there are some other elements that you might want to check before diving deeper into this guide’s solutions:
- Check if the cables are firmly plugged into the port
- Make sure the network and power cables are directly plugged in and not through an extension cord
- No paper in the printer – some printers automatically stop any active tasks if the sensors detect that no papers is present in the paper tray. If you added more and more tasks after that moment, the printer will not work.
- No paint left in the printer – as you might expect, if the printer’s ink cartridges are empty, the printer is not able to print out anything
- Temporary glitches
- Check printer’s status – cancel and schedule some new tasks
In some other cases, the issue could be caused by a bad configuration profile, and this guide will also cover how to configure the default printing device on your PC.
Another common impediment when dealing with Zebra printers appears if the drivers are not updated to the latest version, and that’s another important topic that we will discuss below.
What can I do if my Zebra printer is not working?
- What are the common causes of the printer not working?
- What can I do if my Zebra printer is not working?
- 1. Perform a power cycle
- 2. Cancel and reassign print jobs
- 3. Set Zebra printer as default
- 4. Update printer drivers
- 5. Reset to Factory Default
- 6. Perform label width calibration
- How do I reset my Zebra printer?
- Why is the Zebra printer flashing red?
- Why is the Zebra printer offline?
1. Perform a power cycle
- Make sure the printer is powered on.
- Press the switch near the power socket in the rear.
- Disconnect all cables – including power cable, network cable, and any USB cables.
- Wait for a few minutes so every component resets.
- Turn the printer back on and check if the issue is resolved.
2. Cancel and reassign print jobs
- Double-click on the printer icon in the notification area of your computer. You can also open it by searching for Printers & Scanners, selecting your printer in the list, and clicking Open Queue.
- Right-click on the print job you want to cancel and click Cancel.
In case your printer is not printing anything, try canceling all the pending print jobs. It is essential, as the more your computer attempts to print without success, the more it can affect your hardware.
Also, check your printer toner for proper printing. If the labels get stuck, try cleaning the roller from both ends. It may also mean you may have issues with the inside gears.
3. Set Zebra printer as default
- Click on Start and choose Settings.
- Go to Devices and open the Printers and Scanners tab.
- Uncheck the Let Windows manage my default printer option.
- Choose your printer from the list and click on Manage.
- Select Set as default to set this printer as your primary printing device.
Selecting a default printer makes it easy for the programs to send print jobs to the right device. You can also do this from the Control Panel’s Devices and Printers section.
4. Update printer drivers
Outdated or missing printer drivers can cause your printing device to malfunction. For example, it may stop printing or print incorrectly. To avoid this, make sure you have the latest printer drivers installed on your computer.
Some PC issues are hard to tackle, especially when it comes to corrupted repositories or missing Windows files. If you are having troubles fixing an error, your system may be partially broken.
We recommend installing Restoro, a tool that will scan your machine and identify what the fault is.
Click here to download and start repairing.
You can manually install printer drivers or use third-party driver updater utilities like DriverFix. It scans your system for missing and outdated device drivers and installs them with one click.
Most of the time, the generic drivers for your PC’s hardware and peripherals are not properly updated by the system. There are key differences between a generic driver and a manufacturer’s driver.Searching for the right driver version for each of your hardware components can become tedious. That’s why an automated assistant can help you find and update your system with the correct drivers every time, and we strongly recommend DriverFix. Here’s how to do it:
- Download and install DriverFix.
- Launch the software.
- Wait for the detection of all your faulty drivers.
- DriverFix will now show you all the drivers that have issues, and you just need to select the ones you’d liked fixed.
- Wait for the app to download and install the newest drivers.
- Restart your PC for the changes to take effect.
DriverFix
Keep your PC components drivers working perfectly without putting your PC at risk.
Disclaimer: this program needs to be upgraded from the free version in order to perform some specific actions.
5. Reset to Factory Default
- Press and hold the single round button on the front panel of your printer.
- Keep it pressed until the indicator light starts a flash sequence.
- When the indicator light flashes four times, release the button to complete the reset.
Resetting your Zebra printer to factory default will remove all the saved configurations. However, this is an ideal solution to deal with printer configuration corruption.
After resetting your printer, you would have to perform a label width calibration. Here’s how to do it.
6. Perform label width calibration
- Press and hold the round button on the front panel.
- As it starts a flash sequence, wait for the light to flash five times and release the button.
- This will trigger the printer width calibration process, where it will print a series of widths. The width will get wider with each print on a label.
- Press the round button once you have found the correct width for your labels.
After completing width calibration, you need to perform a calibration for other properties. To do this, press and hold the round button until the light flashes twice. Then, release the button, and that should complete the set of all other calibrations.
Zebra printer not working issues usually occur due to temporary glitches or incorrect printer configuration. To resolve the issue, perform a power cycle, cancel the pending job or set the printer as default. If that does not work, check for driver issues or try to reset the device to factory default as a last resort.
How do I reset my Zebra printer?
To reset your Zebra printer, make sure it is completely turned off. Next, press and hold the Pause + Feed key and turn on the printer. Keep the buttons pressed until the Status indicator is the only indicator lit.
Once the printer is reset, you will have to recalibrate and set it up again to get it working.
Alternatively, some Zebra printers come with a dedicated Reset button. Turn your printer flat on an even surface. Use a paper clip or small needle-like object to press the Reset button.
Why is the Zebra printer flashing red?
Your Zebra printer will flash red if the print head is open. Close the top cover and then press the Feed button to resume printing.
Why is the Zebra printer offline?
Your Zebra printer may show offline if there is a delay on the network, issues with the printer spooler, print server, etc.
As you can see, there are plenty of solutions for encountering issues with your printer, and we would suggest that you try each of these solutions in order, for the best results.
Don’t hesitate to share with us which of these solutions proved efficient in your case. You can do so by using the comment section below.
![]()
Newsletter
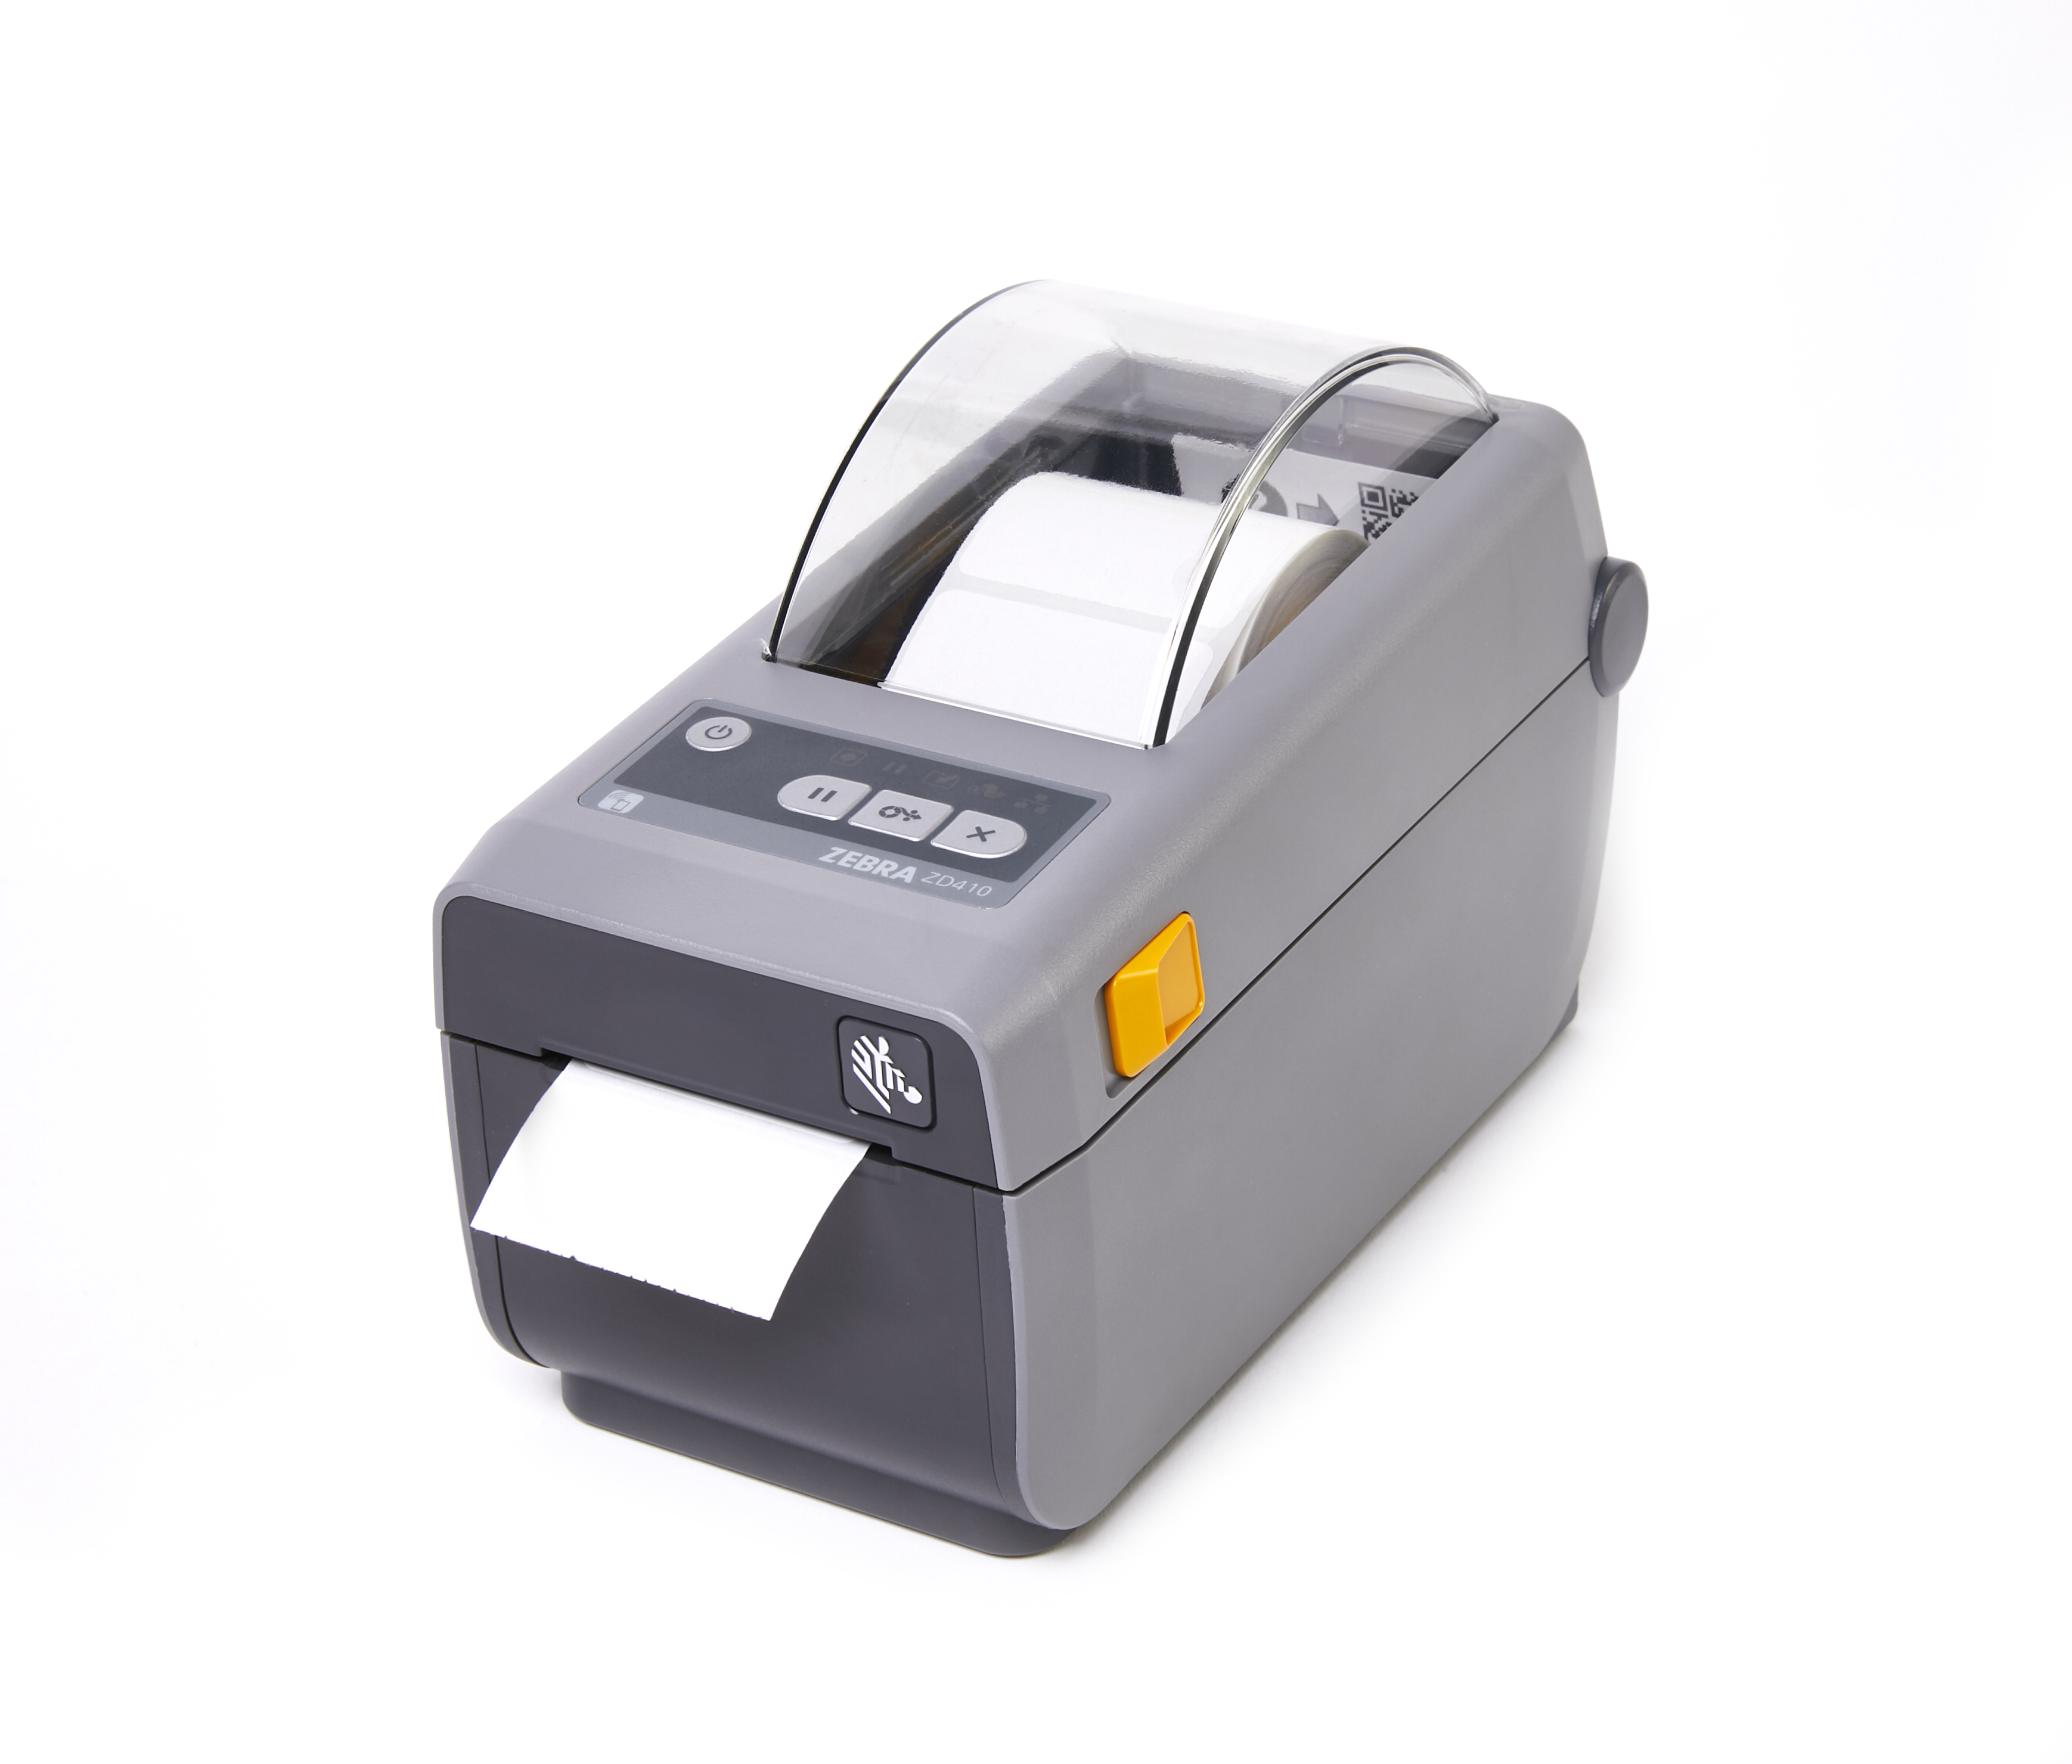
When printing with your Zebra ZD410, ZD420 or ZD421 label printer, Retail POS is designed to help you troubleshoot the below errors:
- Printer is not connected
- Printer is open
- Printer is out of paper
If you’re printing from your computer with Lightspeed Hub, the status of your printer will also update in Lightspeed Hub and on the Devices page in Retail POS.
In case your printer still doesn’t work correctly, you can also reset it back to its default factory settings.
Fixing the printer not connected error
If your printer is disconnected, you will see the below error message in Retail POS:
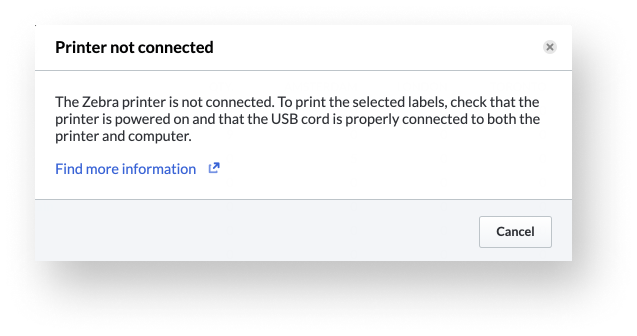
To fix this error, make sure your printer is connected correctly:
- Connect the power supply to the back of your label printer.

- Connect the power cord to the power supply and an electrical outlet.

- Connect one end of the USB cable to your label printer.

-
Connect the other end of the USB cable to your computer.
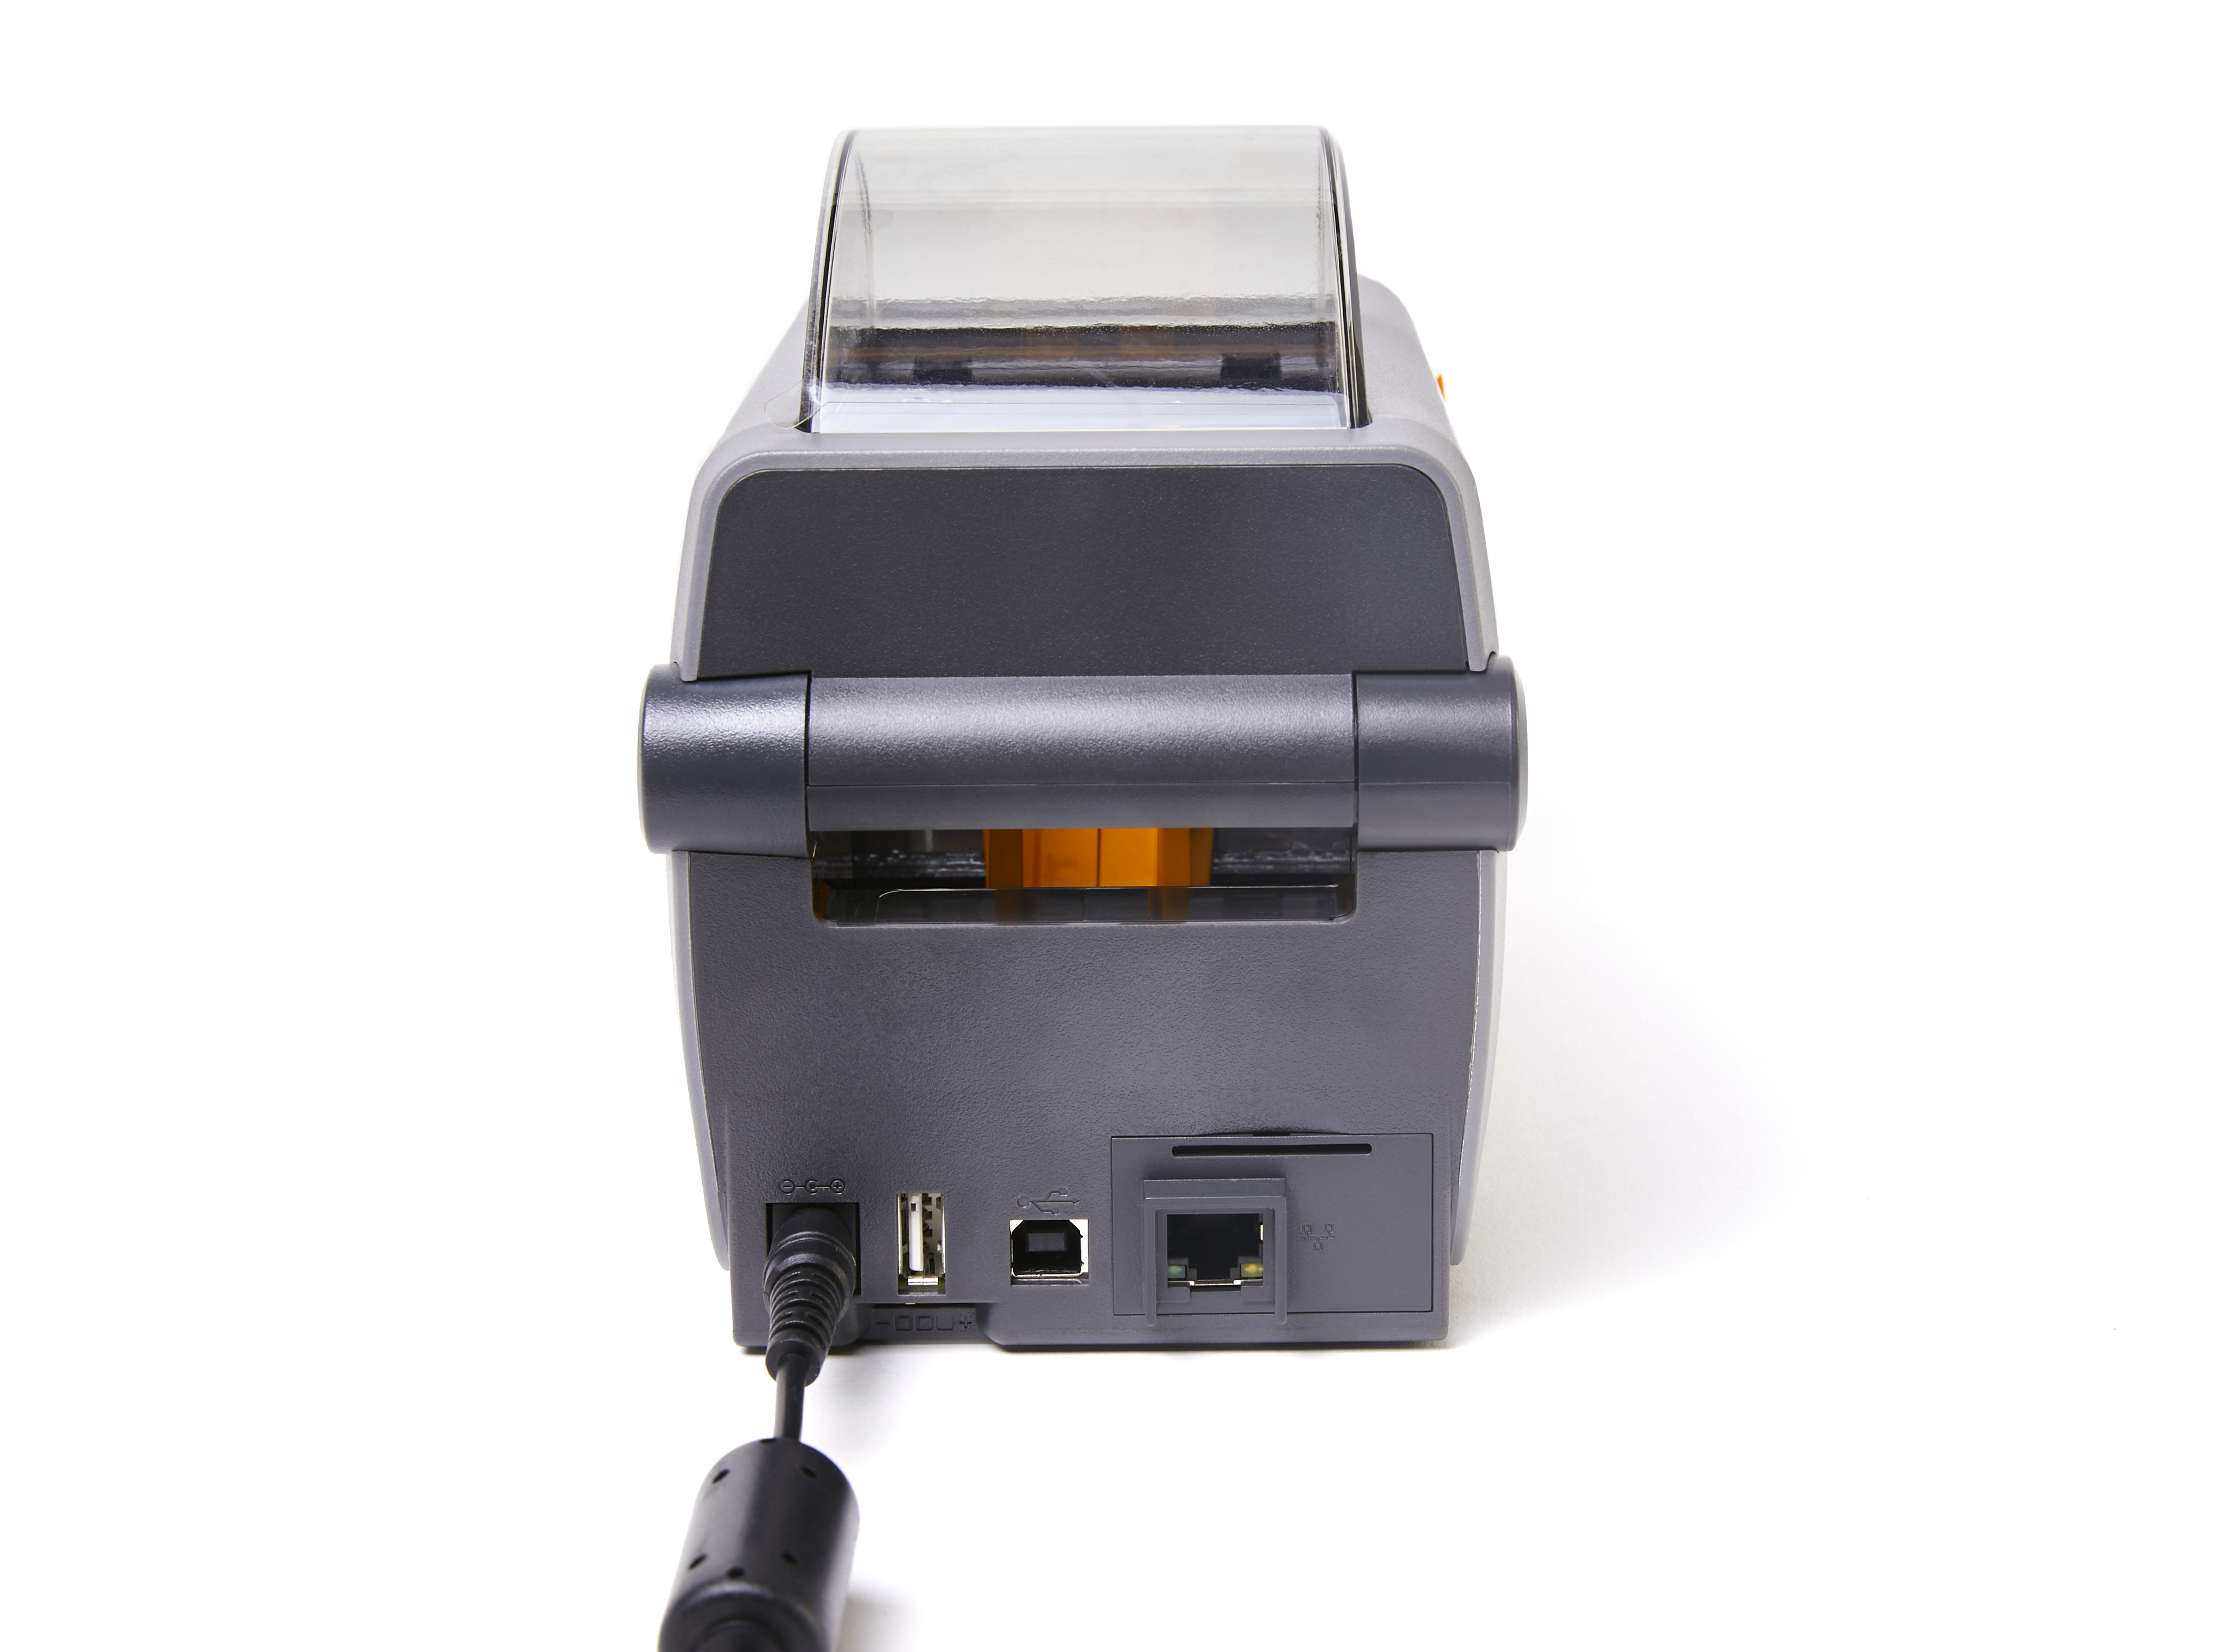

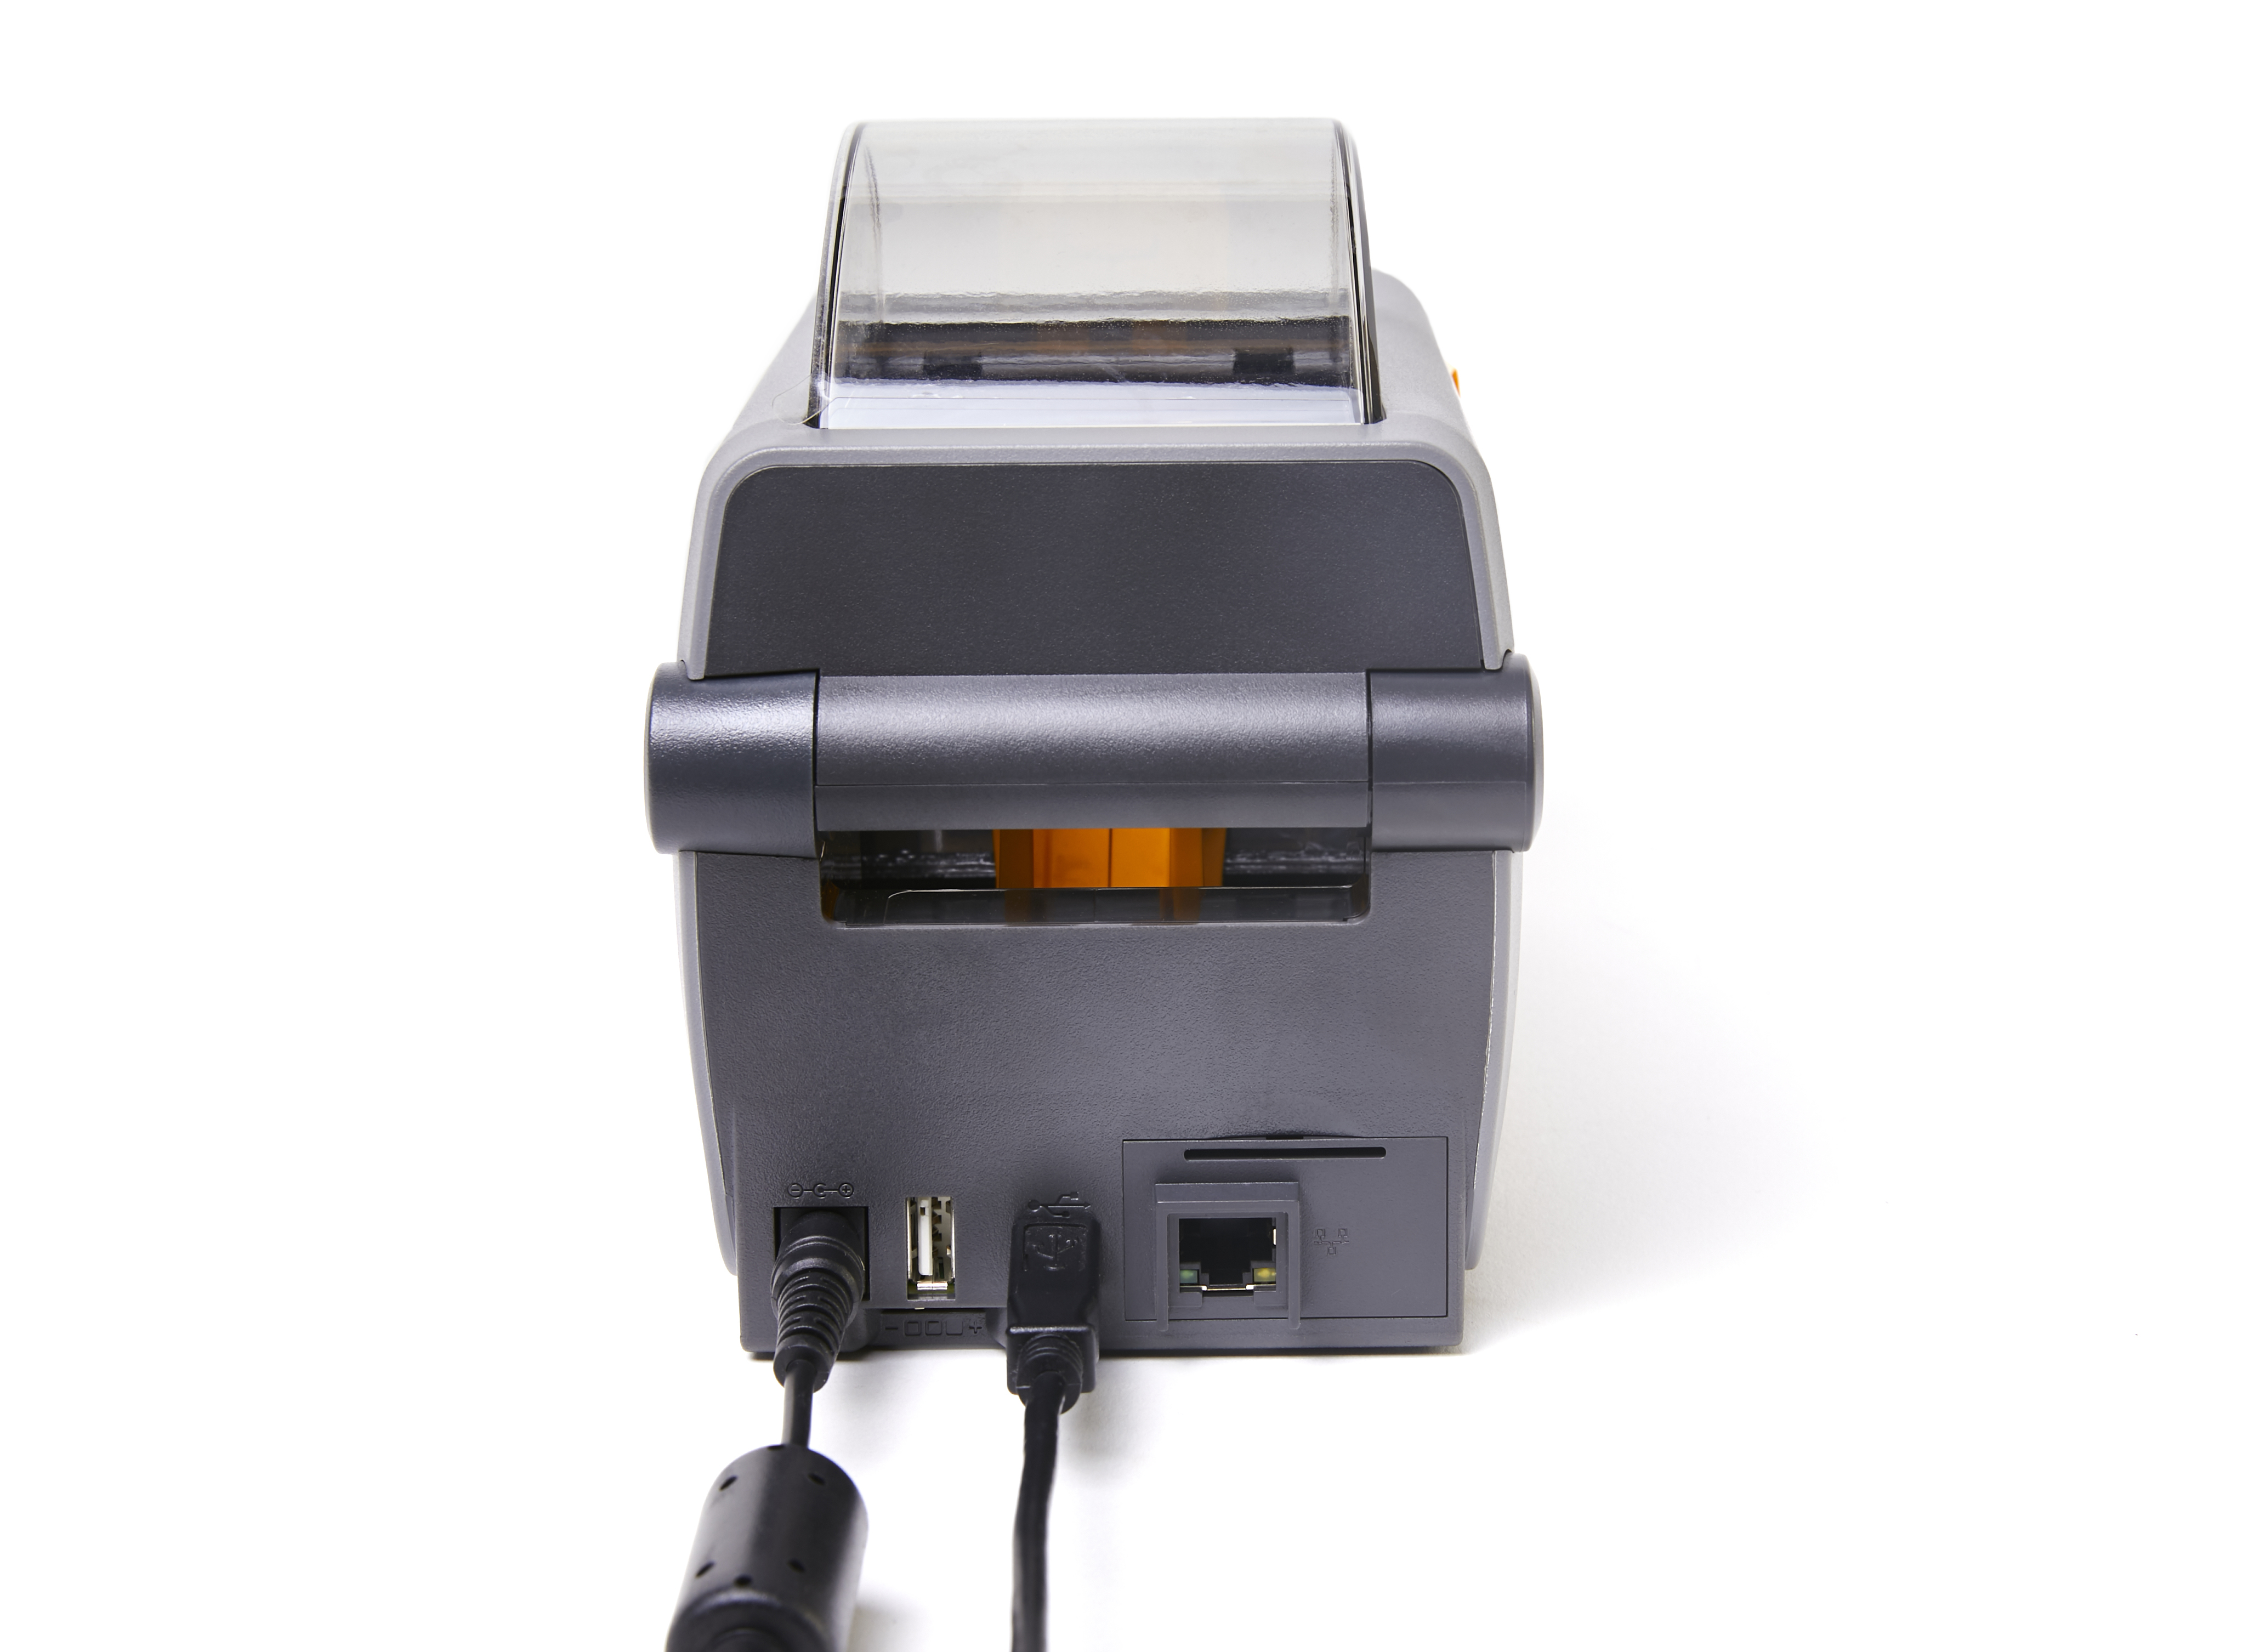

You should now be able to print labels again. If you’re printing from your computer with Lightspeed Hub, the status of your printer will also update from Disconnected to Connected in Lightspeed Hub and on the Devices page in Retail POS.
Note: We recommend connecting your printer directly to a USB port on your computer and directly to an electrical outlet. Using a USB hub or a power cord/bar could cause connection issues with Retail POS and Hub.
Fixing the printer is open error
If the cover of your printer is open, you will see the below error message in Retail POS:
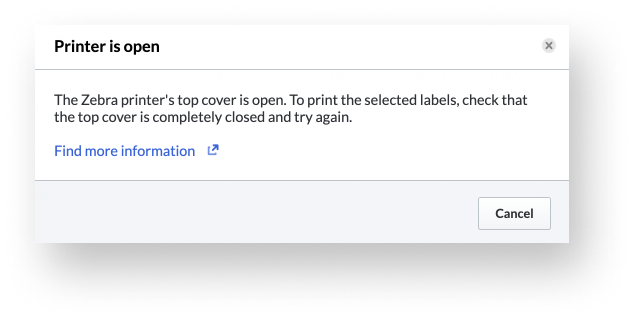
To fix this error, make sure the cover of your printer is securely shut:
- Open the cover fully.

- Push the cover closed until both yellow latches snap shut.

You should now be able to print labels again. If you’re printing from your computer with Lightspeed Hub, the status of your printer will also update from Cover open to Connected in Lightspeed Hub and on the Devices page in Retail POS.
Fixing the out of paper error
If your printer is out of labels, you will see the below error message:
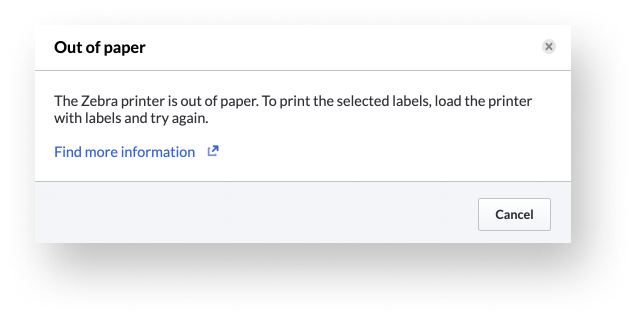
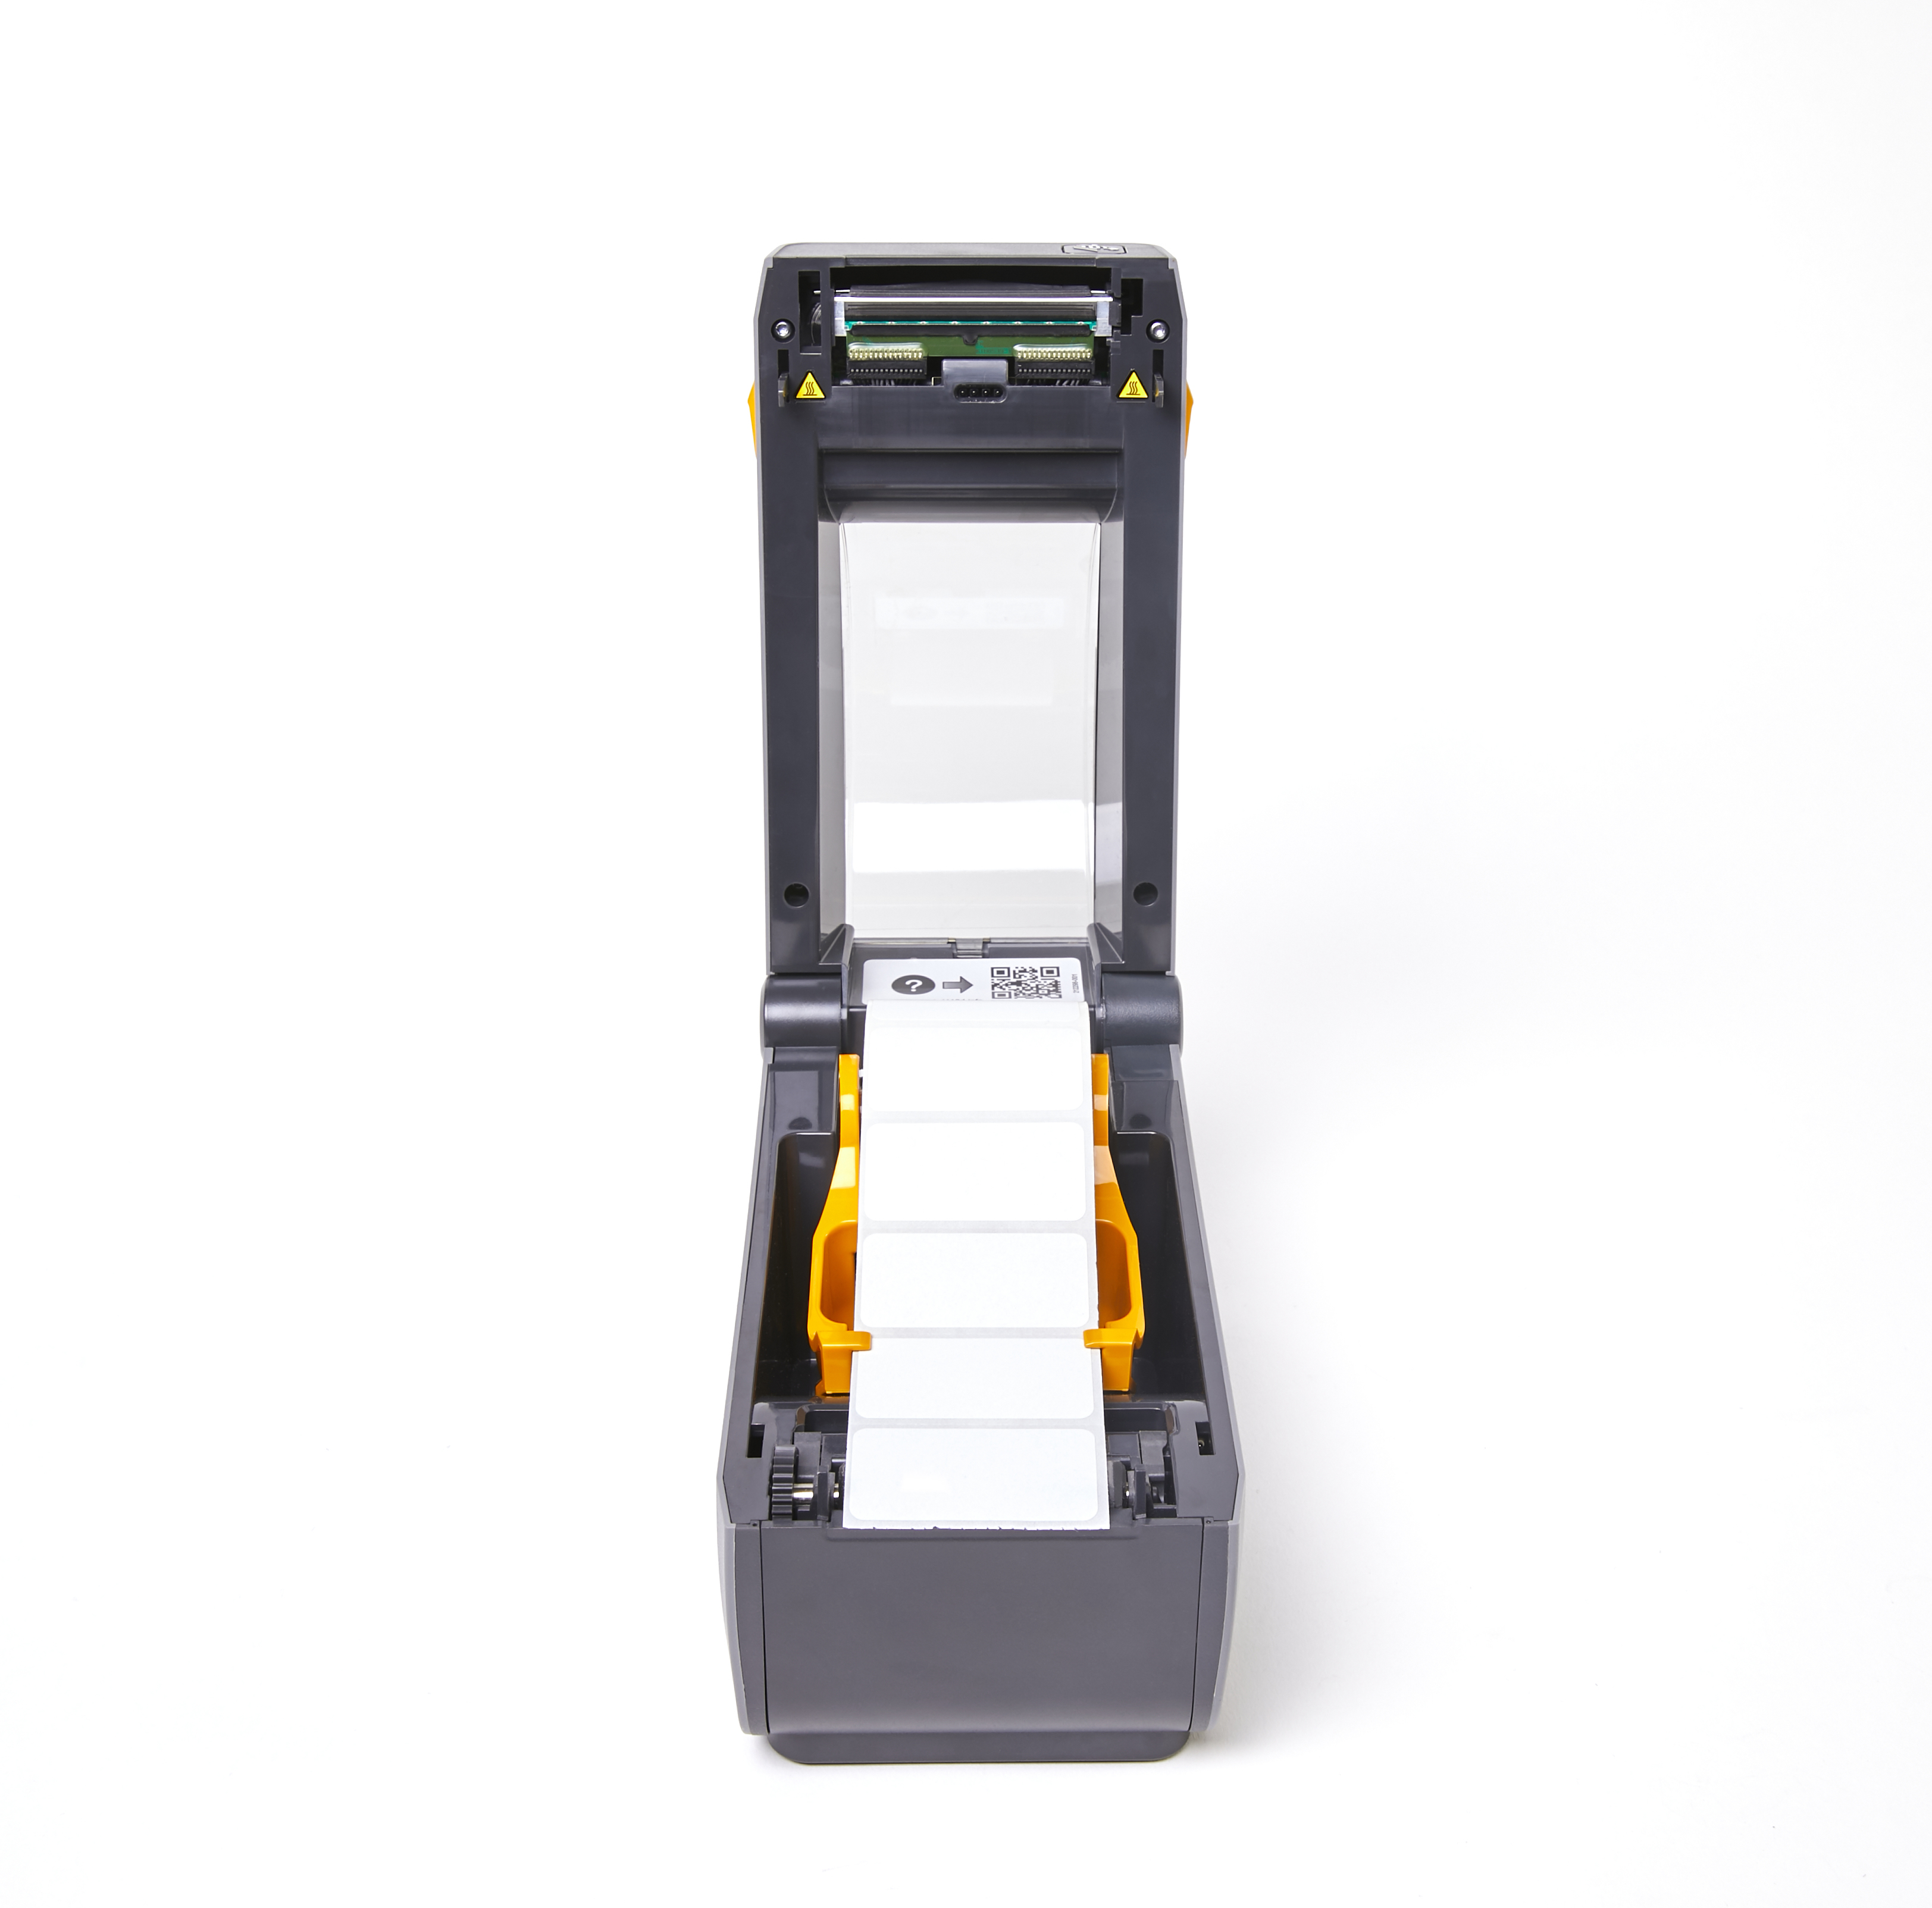
To fix this error, change the label roll in your printer:
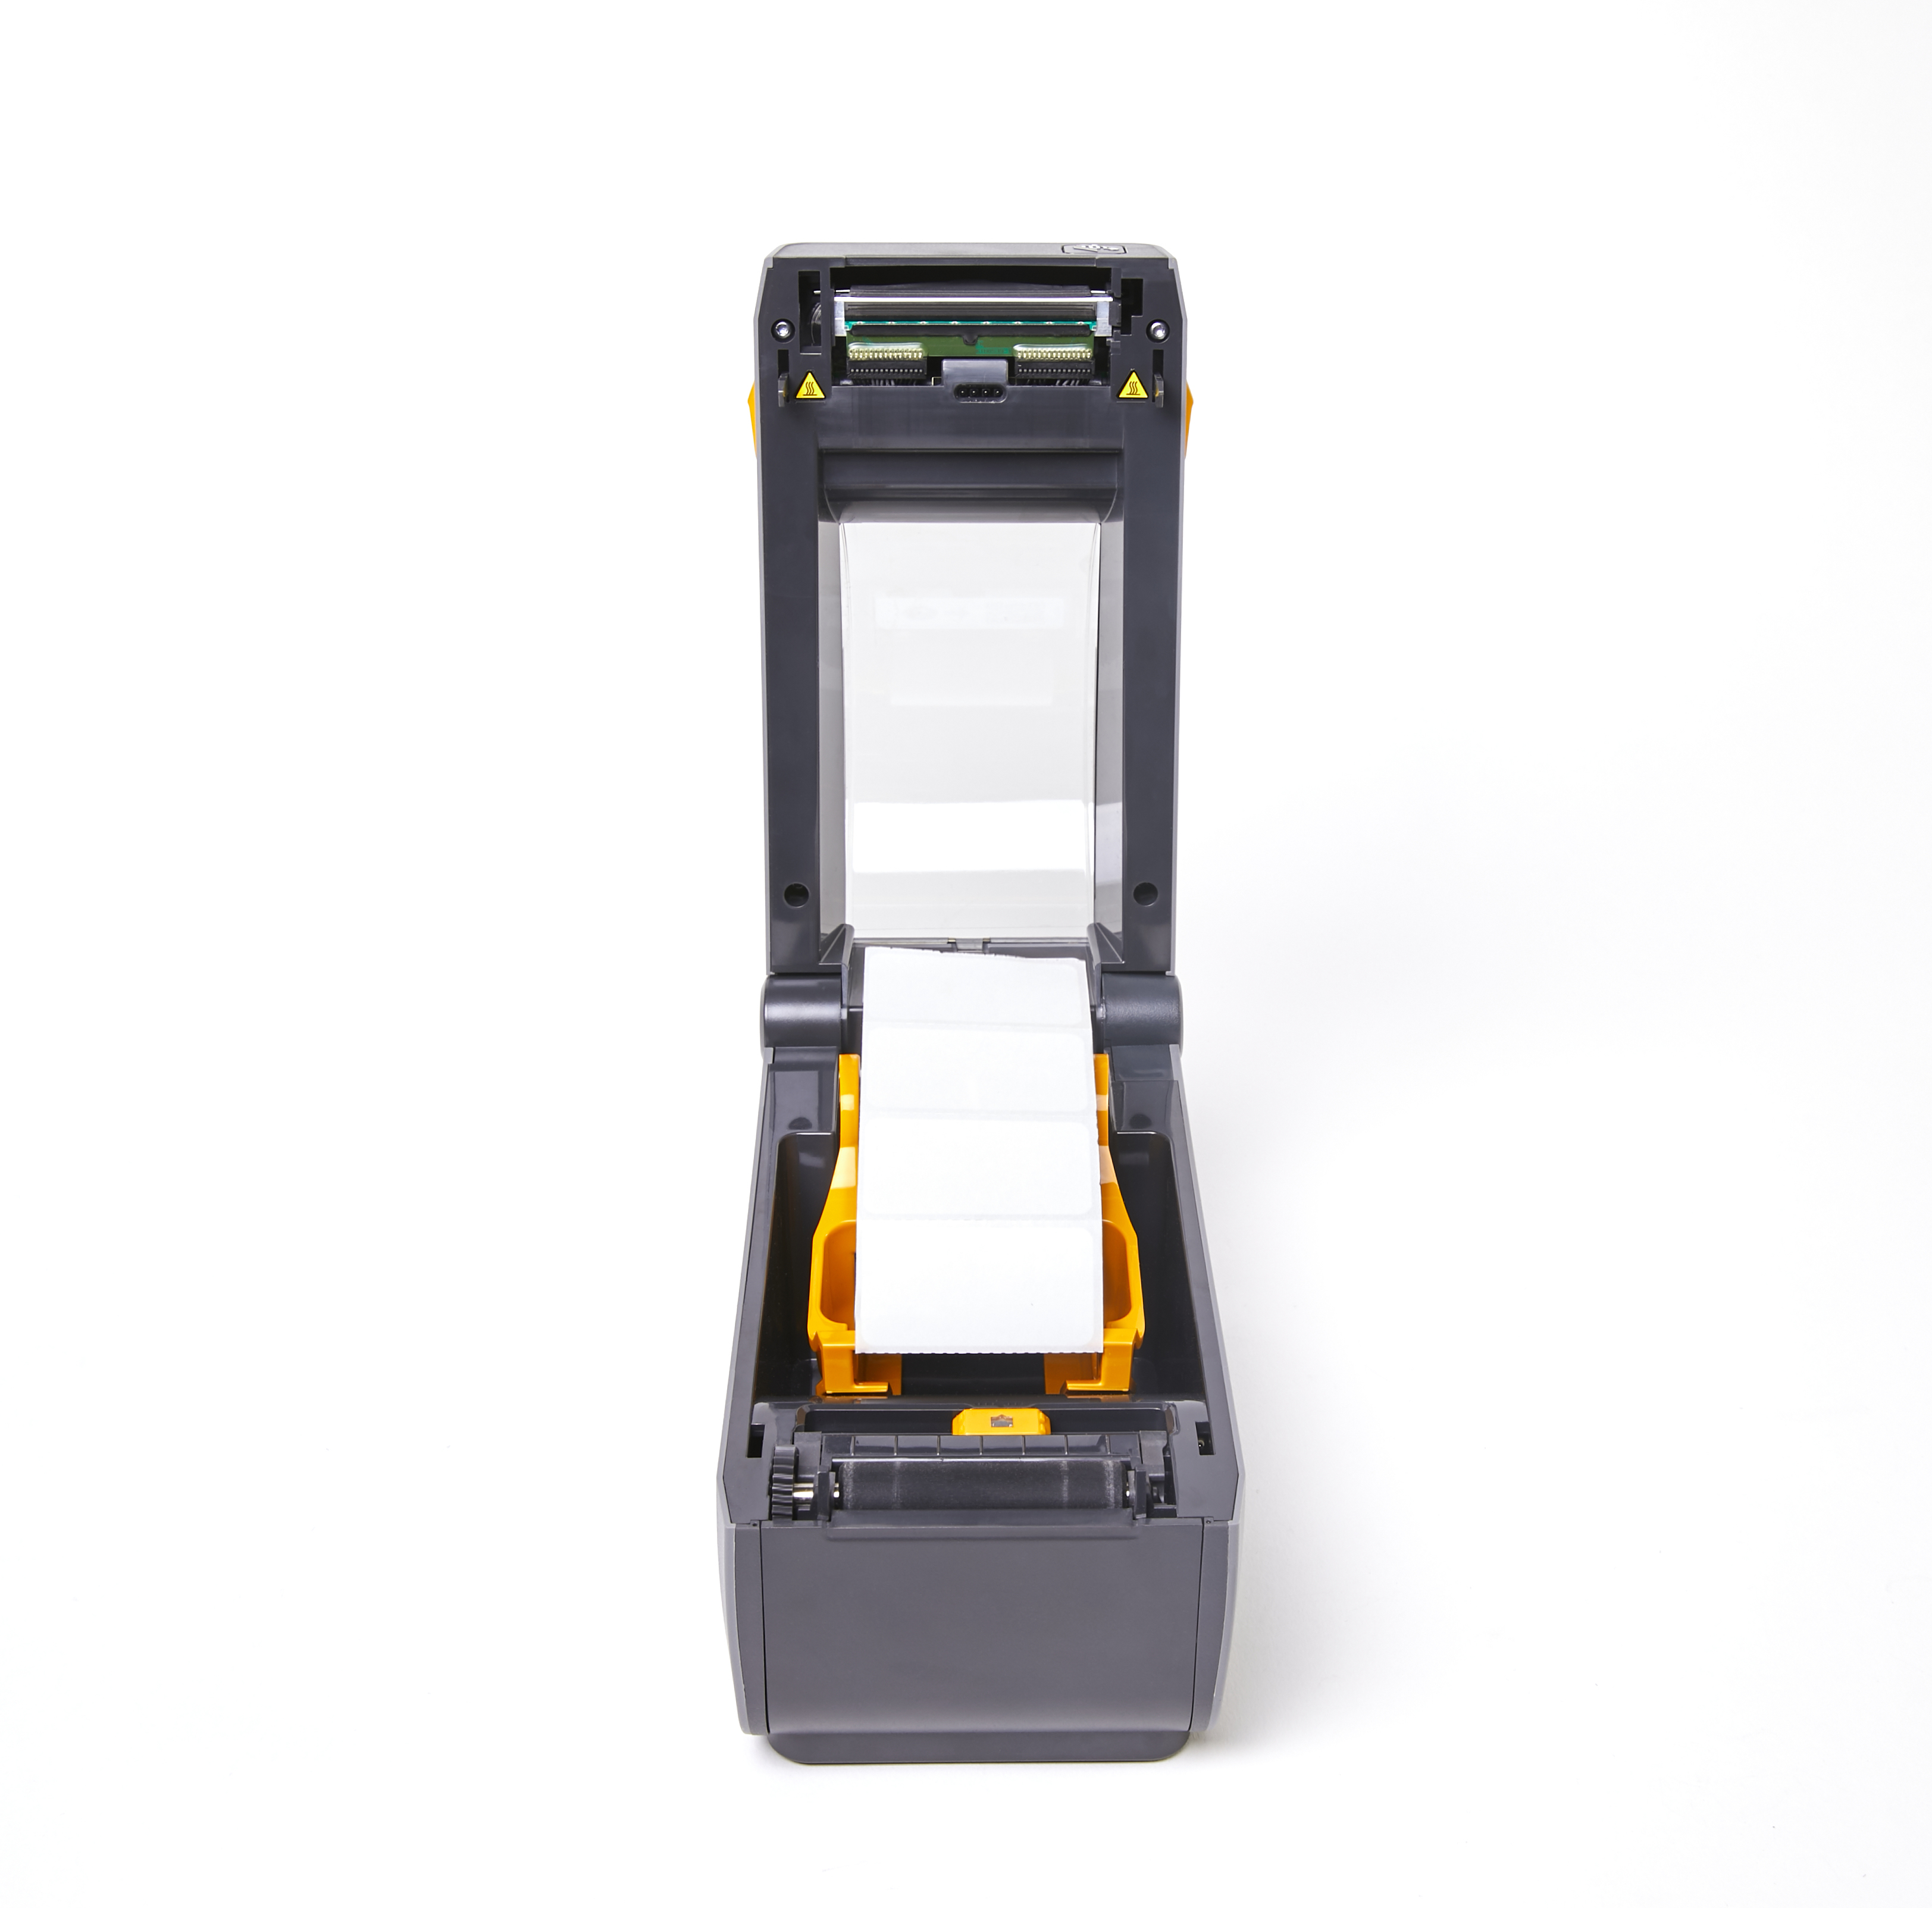
- Pull the yellow latches on both sides of the printer towards you and lift the printer’s lid open.
- Pull the yellow roll guides apart and insert the label roll with the labels facing upwards.
- Release the roll guides and push them together. Make sure the label roll is secure and turning freely.

- Pull the labels out past the cutter at the front of the printer.
- Push the labels under the roll guides.
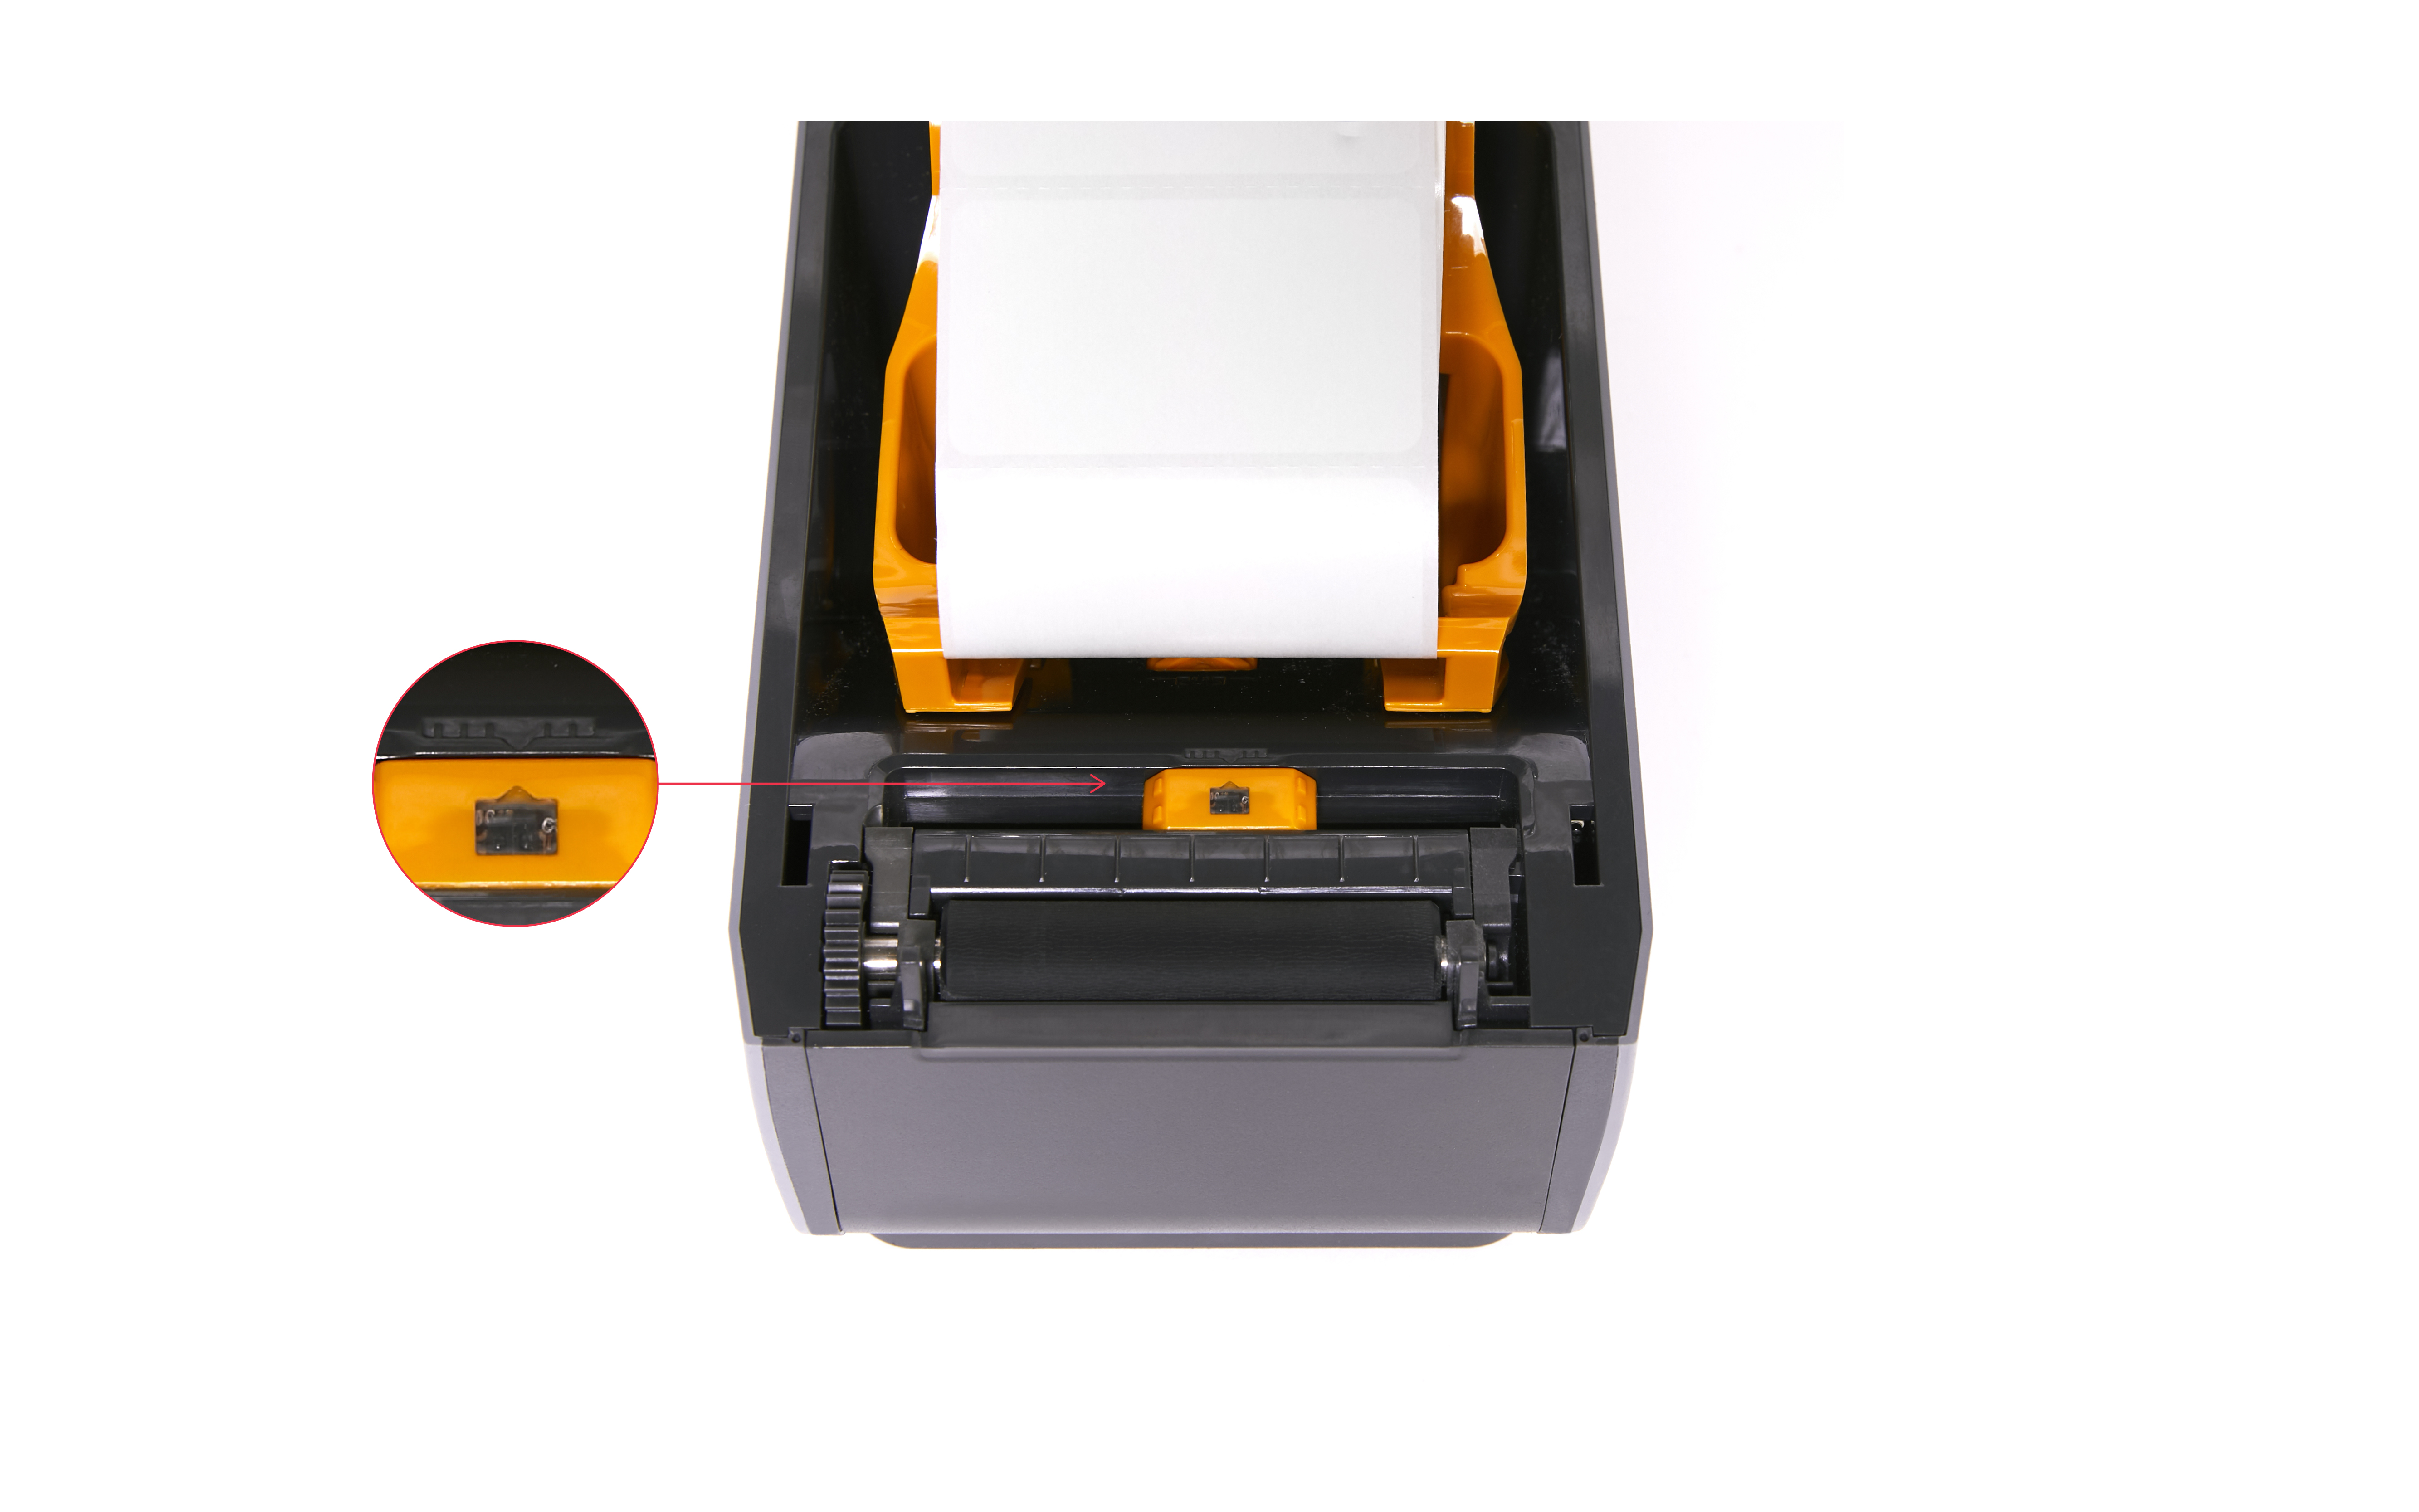
- Flip the labels up and align the movable sensor to the center position.

- Push the lid closed until both yellow latches snap shut.
Note: If you are troubleshooting the Zebra ZD421 label printer, make sure the yellow roll guides for your labels are not squeezing your label roll too tightly. Or else, your labels will not feed properly and risk getting damaged when you print.
You should now be able to print labels again. If you’re printing from your computer with Lightspeed Hub, the status of your printer will also update from Out of paper to Connected in Lightspeed Hub and on the Devices page in Retail POS.
Need to reset your printer?
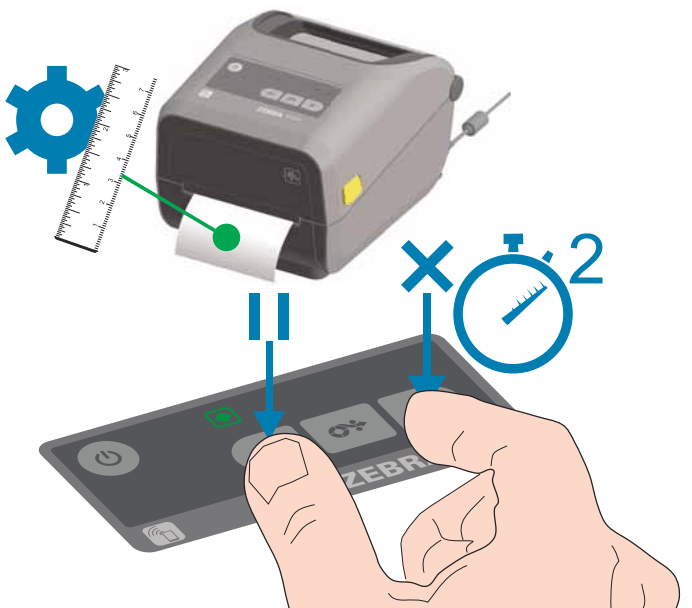
You can reset your printer back to its default factory settings by following these simple steps:
- Press the Power button to turn off your printer.
- Press and hold the Pause and Feed buttons while also pressing the Power button to turn on your printer
- Hold the Pause and Feed buttons until the status indicator is the only indicator lit.
Was this article helpful?
0 out of 8 found this helpful
На чтение 1 мин Просмотров 524 Опубликовано 13.10.2022
Выполнение интеллектуальной калибровки носителя SmartCal на принтере Zebra zd420
Для оптимальной работы необходимо перед печатью настроить в принтере параметры носителя. Принтер автоматически определяет тип носителя (с перфорацией/промежутками, с черными метками/просечками или сплошной) и измеряет характеристики носителя.
Примечание. После выполнения первоначальной калибровки для определенного носителя не требуется осуществлять дополнительную калибровку при каждой замене носителя. Принтер автоматически измеряет характеристики носителя, чтобы учитывать при печати незначительные их изменения. После установки нового рулона носителя (из той же партии) нажмите кнопку подачи один или два раза для синхронизации этикеток. После этого можно продолжить печать.
Процедура SmartCal
- Убедитесь, что носитель и кассета с лентой (при печати термопереносом) правильно загружены в принтер, а верхняя крышка принтера закрыта.
- Нажмите кнопку POWER (ПИТАНИЕ), чтобы включить принтер.
- Когда принтер перейдет в состояние готовности (индикатор состояния (
 ) непрерывно светится зеленым), нажмите кнопки PAUSE (ПАУЗА) и CANCEL (ОТМЕНА) и удерживайте их в течение двух (2) секунд, прежде чем отпустить.
 - Принтер измерит несколько этикеток и выполнит настройку уровней считывания носителя.
- После остановки принтера индикатор состояния () начнет непрерывно светиться зеленым.
На этом настройка калибровка носителя принтера Zebra zd420 завершена.

Администратор
«Админы делятся на тех, кто не делает бэкапы, и тех, кто уже делает». Народная мудрость.
инструкцияZebra ZD420

Link-OS 4 inch Desktop Printers
ZD620 and ZD420
User’s Guide
212485-003 Rev. A
Посмотреть инструкция для Zebra ZD420 бесплатно. Руководство относится к категории tiskárny štítků, 10 человек(а) дали ему среднюю оценку 7.9. Руководство доступно на следующих языках: Angličtina. У вас есть вопрос о Zebra ZD420 или вам нужна помощь? Задайте свой вопрос здесь
- Terms of Use
- Publication Date
- About
- Contents
- Introduction
- Printer Features
- Install Hardware Options
- Printer Configuration Menus
- Setup
- Setup for Windows® OS
- Print Operations
- USB Host Port and Link-OS Usage Examples
- Maintenance
- Troubleshooting
- Tools
- Media
- ZPL Configuration
Главная
| Zebra | |
| ZD420 | ZD42042-C01M00EZ | |
| tiskárna štítků | |
| Angličtina | |
| Руководство пользователя (PDF), Инструкция по установке (PDF) |
Tisk
| Tisková technologie | Tepelný přenos |
| Barva | Ne |
| Maximální rozlišení | 203 x 203 DPI |
| Rychlost tisku | 152 mm/s |
| Maximální tisková výška | — mm |
| Maximální šířka tisku | 104 mm |
Výkon
| Jazyk popisu stránky | EPL2, XML, ZPL II |
| Vnitřní paměť | 256 MB |
| Paměť flash | 512 MB |
| Obsahuje čárové kódy | 1D, 2D, AZTECCODE, CODABAR (NW-7), Code 11, Code 128 (A/B/C), Code 39, Code 49, Code 93, Data Matrix, EAN13, EAN8, MaxiCode, PDF417, QR Code, UPC-A, UPC-E |
| Vestavěný modul RFID | Ne |
| Certifikace | IEC 60950-1, EN55022 Class B, EN55024, EN61000-3-2, nEN61000-3-3, FCC Class B, ICES-003, FCC 15.209; 15.247(d), IC RSS 247, EN 300 328, EN 301 893, EN 62311, cTUVusnCE Marking, VCCI, C-Tick, S-Mark, CCC, CU, BSMI, KCC, SABS, IN-Metro, BIS, NOM |
Vzhled
| Displej | — |
| Barva | Černá |
| Základní materiál | Plast |
Možnosti připojení
| Připojení na síť Ethernet | Ne |
| Wi-Fi | Ne |
| Počet portů USB 2.0 | 2 |
| Bluetooth | Ano |
| USB port | Ano |
Ruční podavač
| Maximální šířka štítku | 118 mm |
| Maximální délka štítku | 991 m |
| Maximální průměr role | 127 mm |
| Tloušťka média | 0.08 — 0.305 mm |
Systémové požadavky
| Podporované mobilní operační systémy | Android, iOS |
| Podporované operační systémy Windows | Ano |
| Podporované operační systémy Mac | Ano |
Další charakteristiky
| LED indikátory | Ano |
| Funkce hodin | Ano |
Technické detaily
| Osvědčení o udržitelnosti | ENERGY STAR |
Příkon
| Vstupní střídavé napětí | 90 — 265 V |
| Frekvence vstupního střídavého napětí | 50 — 60 Hz |
Hmotnost a rozměry
| Šířka | 202 mm |
| Hloubka | 254 mm |
| Výška | 177 mm |
| Hmotnost | 2300 g |
Provozní podmínky
| Doporučená provozní relativní vlhkost | 10 — 90 % |
| Rozsah relativní vlhkosti při skladování (H-H) | 5 — 95 % |
| Provozní rozsah teplot (T-T) | 4.4 — 41 °C |
| Rozsah teplot při skladování (T-T) | -40 — 60 °C |
показать больше
Не можете найти ответ на свой вопрос в руководстве? Вы можете найти ответ на свой вопрос ниже, в разделе часто задаваемых вопросов о Zebra ZD420.
Не нашли свой вопрос? Задайте свой вопрос здесь
124 страницы подробных инструкций и пользовательских руководств по эксплуатации
05:13
Установка и настройка принтера Zebra GK420d
14:33
Как настроить печать на принтере Zebra GK420
04:39
Zebra GK420T, impresora codigo de barras,colocación de suministros, www.buyscan.com
03:12
Калибровка и внутренний тест принтера штрих-кода gk420t
03:21
Zebra GK420T Printer Setup
02:03
Changing Ribbon on a Zebra GK420T Printer
10:05
Zebra Designer (GK420t) شرح تنصيب
02:30
Loading Media In The Zebra GK420t Thermal Transfer Printer
Устранение неполадок
Описание состояний индикатора
78
980610-151 Вер. C
GK420t™ Руководство пользователя
26.10.2010
Описание состояний индикатора
Значения индикатора и состояния принтера
Состояние и цвет индикатора
Состояние принтера
Для решения
проблемы
см. номер
Выключен
Выключен
1
Непрерывный зеленый
Горит
2
Непрерывный янтарный
Остановлен
3
Мигающий зеленый
Нормальная работа
4
Мигающий красный
Остановлен
5
Двойной мигающий зеленый
Пауза
6
Мигающий янтарный
Пауза
7
Попеременно мигающий зеленый и красный
Требуется
обслуживание
8
Мигающий красный, красный и зеленый
Требуется
обслуживание
9
Мигающий красный, янтарный и зеленый
(* НЕ выключайте питание!)
Дефрагментация
памяти
10*
Описание состояния принтера, Принтер не получает питание от сети, Принтер включен и готов к выполнению заданий
Произошла ошибка памяти, Принтер принимает данные
- Изображение
- Текст
79
Устранение неполадок
Описание состояния принтера
26.10.2010
GK420t™ Руководство пользователя
980610-151 Вер. C
Описание состояния принтера
Следующие номера описаний состояния принтера соответствуют таблице описаний
состояния индикатора, приведенной на предыдущей странице. Для каждого номера
ошибки приводится один или более вариантов устранения этой ошибки.
1. Принтер не получает питание от сети.
• Убедитесь, что принтер включен.
• Проверьте разъемы питающего кабеля между настенной розеткой и блоком питания,
а также блоком питания и принтером. См.
Подключение питания на стр. 12
.
• Отсоедините кабель принтера от розетки на 30 секунд, а затем подключите
его повторно.
2. Принтер включен и готов к выполнению заданий.
Не требует вмешательства.
3. Принтеру не удалось провести начальное самотестирование
(POST).
• Если ошибка возникает сразу после включения принтера, обратитесь за помощью
к авторизованному дилеру. Если принтер работает исправно, индикатор состояния
принтера будет светиться янтарным в течение 10 секунд, а затем изменит цвет на
зеленый (непрерывный или мигающий).
Произошла ошибка памяти.
• Если ошибка возникает после начала печати, отключите и заново включите питание
принтера, а затем возобновите печать.
Необходимо подождать, пока остынет печатающая головка.
• Если ошибка появится снова, выключите принтер на пять или более минут, а затем
снова включите. Если индикатор продолжает гореть янтарным цветом, принтеру
требуется обслуживание.
4. Принтер принимает данные.
• После полного получения данных цвет индикатора изменится на зеленый, и принтер
автоматически продолжит работу.
Отсутствует носитель, Отсутствует лента, Открыта печатающая головка
Принтер приостановлен, Перегрев печатающей головки, Флэш-память не запрограммирована, Принтер выполняет дефрагментацию памяти
- Изображение
- Текст
Устранение неполадок
Описание состояния принтера
80
980610-151 Вер. C
GK420t™ Руководство пользователя
26.10.2010
5. Отсутствует носитель.
• Следуйте соответствующим инструкциям раздела
Загрузка рулонного носителя
на стр. 13
в главе «Приступая к работе», а затем нажмите клавишу «Подача» (Feed),
чтобы возобновить печать.
Отсутствует лента.
• Принтер достиг конца рулона ленты. Замените рулон с лентой.
Открыта печатающая головка.
• Закройте крышку и нажмите клавишу «Подача» (Feed) для возобновления печати.
6. Принтер приостановлен.
• Для продолжения печати нажмите клавишу «Подача» (Feed).
7. Перегрев печатающей головки.
• Печать будет остановлена, пока головка не остынет до допустимой температуры
печати. После этого принтер автоматически продолжит работу.
8. Флэш-память не запрограммирована.
• Верните принтер авторизованному дилеру.
9. В печатающей головке или электродвигателе возникла
критическая ошибка.
• Верните принтер авторизованному дилеру.
10. Принтер выполняет дефрагментацию памяти.
Внимание! • НЕ отключайте питание принтера во время дефрагментации. Это может
повредить принтер.
• Дефрагментация — это обычная операция в работе принтера, необходимая
для оптимального использования пространства памяти. Принтер выполняет
дефрагментацию памяти после восстановления заводских настроек и в случае,
когда принтер определяет, что требуется дефрагментация.
Когда принтер находится в этом состоянии, дождитесь завершения дефрагментации.
Если это предупреждение возникает часто, проверьте форматы этикеток.
При использовании форматов, в которых часто и многократно осуществляется запись
данных в память и удаление данных из памяти, принтер может часто выполнять
дефрагментацию. Использование форматов, в которых отсутствуют частые
и повторяющиеся операции записи и удаления, уменьшит потребность
в дефрагментации.
• Если это состояние предупреждения не проходит, обратитесь в службу технической
поддержки. Принтеру требуется обслуживание.
Проблемы с качеством печати, После печати этикетка остается чистой, Неудовлетворительное качество изображения
Страница 95
- Изображение
- Текст
81
Устранение неполадок
Проблемы с качеством печати
26.10.2010
GK420t™ Руководство пользователя
980610-151 Вер. C
Проблемы с качеством печати
После печати этикетка остается чистой.
• Возможно, носитель не предназначен для прямой термопередачи при печати
без ленты (или печати термопереносом). Возможно, носитель не предназначен
для прямой термопечати. См. процедуру тестирования носителя в разделе
Типы
носителей для термопереноса на стр. 38
.
• В принтерах с функцией печати термопереносом носитель, возможно, не намотан
покрытием наружу либо не соответствует типу принтера G-Series. См. процедуры
тестирования рулонов ленты
Проверка ленты клейким материалом на стр. 43
и
Проверка ленты процарапыванием на стр. 44
.
• Возможно, носитель загружен неправильно. Следуйте соответствующим
инструкциям раздела
Загрузка рулонного носителя на стр. 13
в главе «Приступая
к работе». Подробнее о печати с помощью ленты термопереноса см. раздел
Загрузка
ленты переноса на стр. 16
.
Неудовлетворительное качество изображения.
• Печатающая головка загрязнена. Очистите печатающую головку.
• Печатающая головка недостаточно нагрета.
• Настройте уровень яркости и/или скорость печати.
•
Используйте команды
^PR
(скорость) и
~SD
(яркость), указанные в руководстве
по программированию ZPL.
•
Используйте команды
D
(яркость/плотность) и
S
(скорость), указанные
в Руководстве по программированию EPL.
•
Вручную настройте яркость принтера с помощью последовательности сигналов
индикатора (шесть миганий). См. раздел
Режимы клавиши «Подача» (Feed)
на стр. 88
.
•
Драйвер принтера для Windows и программные приложения могут изменить эти
настройки и потребовать оптимизировать качество печати.
• Используемый носитель несовместим с принтером. Всегда пользуйтесь только
рекомендованными для приложения носителями, а также применяйте ярлыки
и этикетки, одобренные компанией Zebra.
• Печатающая головка изношена. Печатающая головка является расходным
материалом и со временем изнашивается в результате трения носителя
о печатающую головку. Использование несертифицированных носителей может
сократить срок службы или повредить головку. Замените печатающую головку.
• Возможно, требуется чистка или замена валика. Валик может потерять сцепление
в результате следующих действий.
•
Прилипание посторонних предметов к поверхности валика.
•
Гладкая поверхность ленты стала слишком скользкой.
•
Нарушение гладкости и ровности печатающей поверхности в результате
машинной обрезки.
Устранение неполадок
Проблемы с качеством печати
82
980610-151 Вер. C
GK420t™ Руководство пользователя
26.10.2010
При печати возникают длинные непропечатанные полосы
(вертикальные линии) на нескольких этикетках.
• Печатающая головка загрязнена. Очистите печатающую головку.
• Повреждены элементы печатающей головки.
Печать начинается не с начала этикетки или возникает пропуск
этикеток при печати.
• Возможно, неверно установлен носитель. Следуйте соответствующим инструкциям
раздела
Загрузка рулонного носителя на стр. 13
в главе «Приступая к работе».
• Необходимо выполнить калибровку принтера. См. последовательность сигналов
индикатора (два мигания) в разделе
Режимы клавиши «Подача» (Feed) на стр. 88
данной главы.
• Форматы этикеток ZPL — возможно, не активирован соответствующий датчик
носителя. Ручная калибровка позволяет выбрать метод определения носителя для
этикеток (подробнее см. команду
^MN
в Руководстве по программированию ZPL).
• Форматы этикеток ZPL — убедитесь, что команда «Верх этикетки» (
^LT
) правильно
установлена в приложении (см. Руководство по программированию ZPL).
• Форматы этикеток EPL — возможно, не активирован необходимый для носителя
датчик отделителя (выдачи этикеток) либо датчик промежутков (в рулоне), черной
линии и зубцов. Ручная калибровка позволяет выбрать метод определения носителя
для этикеток (подробнее см. команды
O
и Q в Руководстве по программированию
EPL).
• Форматы этикеток EPL — убедитесь, что команда «Настройка длины наклейки» (Q)
правильно установлена в приложении (см. Руководство по программированию
EPL).
Формат этикетки ZPL был отправлен, но не распознан
принтером.
• Возможно, принтер был приостановлен. Если да, нажмите клавишу «Подача»
(Feed).
• Если индикатор включен или мигает, см.
Значения индикатора и состояния
принтера на стр. 78
.
• Убедитесь, что кабель передачи данных подключен правильно.
• Произошло нарушение обмена данными. Убедитесь, что на компьютере выбран
правильный порт для обмена данными. См.
Подключение принтера к компьютеру
на стр. 24
в главе «Приступая к работе».
• Убедитесь также, что формат и префикс управления принтера и формата,
запрограммированного с помощью ZPL, соответствуют друг другу. Формат
по умолчанию (COMMAND CHAR) — это знак вставки (^), а префикс управления
(CONTROL CHAR) — тильда (~). Проверьте символы с помощью печати состояния
конфигурации. См. последовательность сигналов индикатора (одно мигание)
в разделе
Режимы клавиши «Подача» (Feed) на стр. 88
данной главы.
83
Устранение неполадок
Проблемы с качеством печати
26.10.2010
GK420t™ Руководство пользователя
980610-151 Вер. C
Формат этикетки EPL был отправлен, но не распознан
принтером.
• Возможно, принтер был приостановлен. Если да, нажмите клавишу «Подача»
(Feed).
• Если принтер имеет отделитель наклеек, он может ожидать, пока будет вынута
напечатанная наклейка. Для правильной работы отделителя наклеек необходимо
правильно пропустить через него подложку или этикетки в рулоне, см. раздел
Отделитель наклеек на стр. 54
.
• Если индикатор включен или мигает, см.
Значения индикатора и состояния
принтера на стр. 78
.
• Убедитесь, что кабель передачи данных подключен правильно.
• Произошло нарушение обмена данными.
Убедитесь, что на компьютере выбран правильный порт (USB) для обмена
данными. См.
Подключение принтера к компьютеру на стр. 24
в главе «Приступая
к работе».
Устранение неполадок
Ручная калибровка
84
980610-151 Вер. C
GK420t™ Руководство пользователя
26.10.2010
Ручная калибровка
Калибровку необходимо выполнять вручную, если используется носитель
с предварительной печатью или если принтер неправильно выполняет автоматическую
калибровку.
1.
Убедитесь, что носитель загружен.
2.
Включите принтер.
3.
Нажмите и удерживайте клавишу «Подача» (Feed), пока индикатор не мигнет
зеленым один раз, затем два раза, а затем продолжит мигать до начала циклов
из семи миганий. Отпустите клавишу подачи.
4.
Принтер настроит датчик носителя в соответствии с используемой подложкой.
После этого рулон будет автоматически подаваться до тех пор, пока этикетка
не разместится на печатающей головке. Будет напечатан профиль параметров
датчика носителя (аналогично примеру ниже). После этого новые параметры будут
сохранены в памяти принтера, а принтер будет готов для работы в нормальном
режиме.
5.
Нажмите клавишу «Подача» (Feed). Будет подана одна целая пустая этикетка.
Если этого не произойдет, попытайтесь восстановить заводские настройки
(см. последовательность сигналов индикатора из четырех миганий в разделе
«Режимы клавиши «Подача» (Feed)» данной главы) и выполнить перекалибровку
принтера.
Примечание •
При выполнении калибровки вручную функция автоматической
калибровки будет отключена. Чтобы снова включить режим автоматической
калибровки, восстановите настройки принтера по умолчанию (см. последовательность
сигналов индикатора из четырех миганий в разделе
Режимы клавиши «Подача» (Feed)
на стр. 88
данной главы).
Тестовая печать для выявления неполадок, Печать этикетки с конфигурацией, Перекалибровка
Печать этикетки с конфигурацией перекалибровка
- Изображение
- Текст
85
Устранение неполадок
Тестовая печать для выявления неполадок
26.10.2010
GK420t™ Руководство пользователя
980610-151 Вер. C
Тестовая печать для выявления неполадок
Печать этикетки с конфигурацией
Чтобы напечатать список параметров текущей конфигурации принтера,
см. последовательность сигналов индикатора (одно мигание) в разделе
Режимы
клавиши «Подача» (Feed) на стр. 88
данной главы. Интерпретацию этикетки
см. в разделе
Приложение. Конфигурация ZPL на стр. 101
.
Перекалибровка
Выполните перекалибровку принтера при появлении симптомов нестабильной работы,
например при пропуске этикеток. См. последовательность сигналов индикатора
(два мигания) в разделе
Режимы клавиши «Подача» (Feed) на стр. 88
данной главы.
Восстановление заводских настроек, Диагностика обмена данными
Страница 100
- Изображение
- Текст
Устранение неполадок
Восстановление заводских настроек
86
980610-151 Вер. C
GK420t™ Руководство пользователя
26.10.2010
Восстановление заводских настроек
В некоторых случаях восстановление заводских настроек принтера помогает успешно
решить проблему. См. последовательность сигналов индикатора (четыре мигания)
в разделе
Режимы клавиши «Подача» (Feed) на стр. 88
данной главы.
Диагностика обмена данными
Если при обмене данными между компьютером и принтером возникла проблема,
переключите принтер в режим диагностики обмена данными. Принтер напечатает
символы ASCII и соответствующие им шестнадцатеричные значения (см. пример ниже)
для обозначения данных, полученных от управляющего компьютера.
Существуют различные способы перехода в режим шестнадцатеричного дампа.
• Команда ZPL ~JD.
• Команда EPL dump.
• Нажатие клавиши «Подача» (Feed) во время включения принтера. См. процедуру
выключения питания в разделе
Режимы клавиши «Подача» (Feed) на стр. 88
данной
главы.
Принтер напечатает: Now in DUMP (Вход в режим DUMP) (см. ниже) и перейдет
к началу следующей этикетки.
Комментарии
by Tashreef Shareef
Tashreef Shareef is a software developer turned tech writer. He discovered his interest in technology after reading a tech magazine accidentally. Now he writes about everything tech from… read more
Updated on December 13, 2022
- The Zebra printer not working issue can occur due to several reasons.
- You can quickly fix the problem by performing an effective power cycle.
- Additionally, cancel any print jobs, and check that all cables are connected properly.
- If the issue persists, try resetting the printer to factory default, which will reset the entire experience but is to be used as a last resort.
XINSTALL BY CLICKING THE DOWNLOAD FILE
This software will repair common computer errors, protect you from file loss, malware, hardware failure and optimize your PC for maximum performance. Fix PC issues and remove viruses now in 3 easy steps:
- Download Restoro PC Repair Tool that comes with Patented Technologies (patent available here).
- Click Start Scan to find Windows issues that could be causing PC problems.
- Click Repair All to fix issues affecting your computer’s security and performance
- Restoro has been downloaded by 0 readers this month.
Zebra printers are popular for label and receipts prints. However, several users have reported the printer not working issue when trying to print labels.
Your Zebra printer may stop working due to several reasons. Some common reasons include temporary glitches, corrupted configuration, incorrect label width calibration, etc.
In this article, we show you a few quick ways to troubleshoot your Zebra printer and get it working again.
What are the common causes of the printer not working?
Your Zebra printer may stop working because of a variety of reasons which include settings, connection, and compatibility issues with your source system.
That being said, there are some other elements that you might want to check before diving deeper into this guide’s solutions:
- Check if the cables are firmly plugged into the port
- Make sure the network and power cables are directly plugged in and not through an extension cord
- No paper in the printer – some printers automatically stop any active tasks if the sensors detect that no papers is present in the paper tray. If you added more and more tasks after that moment, the printer will not work.
- No paint left in the printer – as you might expect, if the printer’s ink cartridges are empty, the printer is not able to print out anything
- Temporary glitches
- Check printer’s status – cancel and schedule some new tasks
In some other cases, the issue could be caused by a bad configuration profile, and this guide will also cover how to configure the default printing device on your PC.
Another common impediment when dealing with Zebra printers appears if the drivers are not updated to the latest version, and that’s another important topic that we will discuss below.
What can I do if my Zebra printer is not working?
- What are the common causes of the printer not working?
- What can I do if my Zebra printer is not working?
- 1. Perform a power cycle
- 2. Cancel and reassign print jobs
- 3. Set Zebra printer as default
- 4. Update printer drivers
- 5. Reset to Factory Default
- 6. Perform label width calibration
- How do I reset my Zebra printer?
- Why is the Zebra printer flashing red?
- Why is the Zebra printer offline?
1. Perform a power cycle
- Make sure the printer is powered on.
- Press the switch near the power socket in the rear.
- Disconnect all cables – including power cable, network cable, and any USB cables.
- Wait for a few minutes so every component resets.
- Turn the printer back on and check if the issue is resolved.
2. Cancel and reassign print jobs
- Double-click on the printer icon in the notification area of your computer. You can also open it by searching for Printers & Scanners, selecting your printer in the list, and clicking Open Queue.
- Right-click on the print job you want to cancel and click Cancel.
In case your printer is not printing anything, try canceling all the pending print jobs. It is essential, as the more your computer attempts to print without success, the more it can affect your hardware.
Also, check your printer toner for proper printing. If the labels get stuck, try cleaning the roller from both ends. It may also mean you may have issues with the inside gears.
3. Set Zebra printer as default
- Click on Start and choose Settings.
- Go to Devices and open the Printers and Scanners tab.
- Uncheck the Let Windows manage my default printer option.
- Choose your printer from the list and click on Manage.
- Select Set as default to set this printer as your primary printing device.
Selecting a default printer makes it easy for the programs to send print jobs to the right device. You can also do this from the Control Panel’s Devices and Printers section.
4. Update printer drivers
Outdated or missing printer drivers can cause your printing device to malfunction. For example, it may stop printing or print incorrectly. To avoid this, make sure you have the latest printer drivers installed on your computer.
Some PC issues are hard to tackle, especially when it comes to corrupted repositories or missing Windows files. If you are having troubles fixing an error, your system may be partially broken.
We recommend installing Restoro, a tool that will scan your machine and identify what the fault is.
Click here to download and start repairing.
You can manually install printer drivers or use third-party driver updater utilities like DriverFix. It scans your system for missing and outdated device drivers and installs them with one click.
Most of the time, the generic drivers for your PC’s hardware and peripherals are not properly updated by the system. There are key differences between a generic driver and a manufacturer’s driver.Searching for the right driver version for each of your hardware components can become tedious. That’s why an automated assistant can help you find and update your system with the correct drivers every time, and we strongly recommend DriverFix. Here’s how to do it:
- Download and install DriverFix.
- Launch the software.
- Wait for the detection of all your faulty drivers.
- DriverFix will now show you all the drivers that have issues, and you just need to select the ones you’d liked fixed.
- Wait for the app to download and install the newest drivers.
- Restart your PC for the changes to take effect.
DriverFix
Keep your PC components drivers working perfectly without putting your PC at risk.
Disclaimer: this program needs to be upgraded from the free version in order to perform some specific actions.
5. Reset to Factory Default
- Press and hold the single round button on the front panel of your printer.
- Keep it pressed until the indicator light starts a flash sequence.
- When the indicator light flashes four times, release the button to complete the reset.
Resetting your Zebra printer to factory default will remove all the saved configurations. However, this is an ideal solution to deal with printer configuration corruption.
After resetting your printer, you would have to perform a label width calibration. Here’s how to do it.
6. Perform label width calibration
- Press and hold the round button on the front panel.
- As it starts a flash sequence, wait for the light to flash five times and release the button.
- This will trigger the printer width calibration process, where it will print a series of widths. The width will get wider with each print on a label.
- Press the round button once you have found the correct width for your labels.
After completing width calibration, you need to perform a calibration for other properties. To do this, press and hold the round button until the light flashes twice. Then, release the button, and that should complete the set of all other calibrations.
Zebra printer not working issues usually occur due to temporary glitches or incorrect printer configuration. To resolve the issue, perform a power cycle, cancel the pending job or set the printer as default. If that does not work, check for driver issues or try to reset the device to factory default as a last resort.
How do I reset my Zebra printer?
To reset your Zebra printer, make sure it is completely turned off. Next, press and hold the Pause + Feed key and turn on the printer. Keep the buttons pressed until the Status indicator is the only indicator lit.
Once the printer is reset, you will have to recalibrate and set it up again to get it working.
Alternatively, some Zebra printers come with a dedicated Reset button. Turn your printer flat on an even surface. Use a paper clip or small needle-like object to press the Reset button.
Why is the Zebra printer flashing red?
Your Zebra printer will flash red if the print head is open. Close the top cover and then press the Feed button to resume printing.
Why is the Zebra printer offline?
Your Zebra printer may show offline if there is a delay on the network, issues with the printer spooler, print server, etc.
As you can see, there are plenty of solutions for encountering issues with your printer, and we would suggest that you try each of these solutions in order, for the best results.
Don’t hesitate to share with us which of these solutions proved efficient in your case. You can do so by using the comment section below.
![]()
Newsletter
![]()
ZD620and ZD420
Desktop Printers with Link-OS®
User’s Guide
212485-002 Rev.B

Copyright
© 2017 ZIH Corp and/or its affiliates. All rights reserved. ZEBRA and the stylized Zebra head are trademarks of ZIH Corp., registered in many jurisdictions worldwide. All other trademarks are the property of their respective owners.
COPYRIGHTS AND TRADEMARKS: For complete copyright and trademark information, go to www.zebra.com/copyright WARRANTY: For complete warranty information, go to www.zebra.com/warranty
END USER LICENSE AGREEMENT: For complete EULA information, go to www.zebra.com/eula
Terms of Use
Proprietary Statement: This manual contains proprietary information of Zebra Technologies Corporation and its subsidiaries (“Zebra Technologies”). It is intended solely for the information and use of parties operating and maintaining the equipment described herein. Such proprietary information may not be used, reproduced, or disclosed to any other parties for any other purpose without the express, written permission of Zebra Technologies.
Product Improvements: Continuous improvement of products is a policy of Zebra Technologies. All specifications and designs are subject to change without notice.
Liability Disclaimer: Zebra Technologies takes steps to ensure that its published Engineering specifications and manuals are correct; however, errors do occur. Zebra Technologies reserves the right to correct any such errors and disclaims liability resulting therefrom.
Limitation of Liability: In no event shall Zebra Technologies or anyone else involved in the creation, production, or delivery of the accompanying product (including hardware and software) be liable for any damages whatsoever (including, without limitation, consequential damages including loss of business profits, business interruption, or loss of business information) arising out of the use of, the results of use of, or inability to use such product, even if Zebra Technologies has been advised of the possibility of such damages. Some jurisdictions do not allow the exclusion or limitation of incidental or consequential damages, so the above limitation or exclusion may not apply to you.
2

About
This guide is for integrators and operators of Zebra Link-OS ZD620 and ZD420 desktop printers. Use this guide to install, change configuration, operate, and physically support these printers.
Other Online resources are available to support this printer include:
•“How To” videos
•ZD620 or ZD420 Desktop Printer Product page links for printer specifications
•Printer accessory, supplies, parts, and software links
•Various setup and configuration guides
•Programmer’s manuals,
•Printer Drivers (Windows, Apple, OPOS, etc.)
•Printer Firmware
•Printer Fonts
•Utilities
•Knowledge base and support contacts
•Printer warranty and repair links
Use these links to get to your Online printer support resources:
•ZD620 Thermal Transfer Printer — www.zebra.com/zd620t-info
•ZD620 Direct Thermal Printer — www.zebra.com/zd620d-info
•ZD420 Thermal Transfer Ribbon Cartridge Printer — www.zebra.com/zd420c-info
•ZD420 Thermal Transfer Printer — www.zebra.com/zd420t-info
•ZD420 Direct Thermal Printer — www.zebra.com/zd420d-info
3

About
Other Valuable Printer Resources
Zebra has a large suite of free and fee based software, Apps (applications), and other technical resources for your Zebra Link-OS printer.
These are just some of the extensive software and resource areas available Online:
•Label Design software
•Printer Management tools
•Virtual Devices for legacy languages normally associated with other printer brands
•Cloud based Enterprise printer management and printing
•XML and PDF format file printing
•Oracle and SAP support
•IoT data tools (Zatar)
•A suite of Link-OS Mobile Apps (applications for phones, tablets, etc.)
•Link-OS software development kit (SDK)
•Additional Operating Systems (OS) and Service platforms
See ZebraLink, Zebra Link-OS, and Zatar from this Online link: www.zebra.com/software
Zebra OneCare Printer Service and Support
For maximum productivity, we can help your business ensure its Zebra printers are Online and ready for business. See the descriptions of the Zebra OneCare service and support options available for your printers Online at this link: www.zebra.com/zebraonecare
Using This Document and Its Internally Attached Files
This document is best used with Adobe Reader or Adobe DC. This user’s guide includes attached User Programming Example Files for sample printer operations.
Go to the Adobe Web site to load Adobe Reader (for free at the release time of this publication): www.adobe.com
4

About
Document Conventions
The following graphic icons are used throughout the documentation set. These icons and their associated meanings are described below.
Caution • If the precaution is not heeded, the user could receive minor or moderate injury.
Eye Injury Caution • If the precaution is not taken, the user’s eyes could be damaged. EXAMPLE: Wear protective eyewear when installing or removing E-rings, C-clips, snap rings, springs, and mounting buttons. These are under tension and could fly off.
ElectricalShockCaution•Iftheprecautionisnottaken,theusercouldreceiveanelectricalshock. EXAMPLE: Turn off (O) the printer and disconnect it from the power source before performing the following procedure.
Hot Surface Caution • If the precaution is not taken, the user could be burned. EXAMPLE: The printhead may be hot and could cause sever burns. Allow the printhead to cool.
Product Damage Caution • If the precaution is not taken, the product could be damaged. EXAMPLE:Unpluggingthecomputerwithoutproperlyshuttingitdownmaycorrupt thedataon your hard drive.
ESD Caution • If the precaution is not taken, the product electronics could be damaged by an electrostatic discharge. EXAMPLE: Observe proper electrostatic safety precautions when handling static-sensitive components such as circuit boards and printheads.
Important • The text here indicates information that is important for the user to know. EXAMPLE: Run the setup.exe file for the product BEFORE connecting the product to your printer.
Note • The text here indicates information that is supplemental for the user to know and that is not required to complete a task. EXAMPLE: Refer to zebra.com for complete information on product warranties.
5

Contents
Copyright . . . . . . . . . . . . . . . . . . . . . . . . . . . . . . . . . . . . . . . . . . . . . . . . . . . . . . . . . . . .2 Terms of Use . . . . . . . . . . . . . . . . . . . . . . . . . . . . . . . . . . . . . . . . . . . . . . . . . . . . . . . . .2
• About . . . . . . . . . . . . . . . . . . . . . . . . . . . . . . . . . . . . . . . . . . . . . . . . . . . . . . . .3
Other Valuable Printer Resources . . . . . . . . . . . . . . . . . . . . . . . . . . . . . . . . . . . . . .4 Zebra OneCare Printer Service and Support. . . . . . . . . . . . . . . . . . . . . . . . . . . . . .4 Using This Document and Its Internally Attached Files . . . . . . . . . . . . . . . . . . . . . .4 Document Conventions . . . . . . . . . . . . . . . . . . . . . . . . . . . . . . . . . . . . . . . . . . . . . . . . .5
• Contents . . . . . . . . . . . . . . . . . . . . . . . . . . . . . . . . . . . . . . . . . . . . . . . . . . . . . .6
• Introduction . . . . . . . . . . . . . . . . . . . . . . . . . . . . . . . . . . . . . . . . . . . . . . . . . .18
Link-OS 4 inch Desktop Thermal Printers . . . . . . . . . . . . . . . . . . . . . . . . . . . . . . . . . .18 Common Desktop Link-OS Printer Features:. . . . . . . . . . . . . . . . . . . . . . . . . . . . .19 Link-OS 4 inch Desktop Printer Options: . . . . . . . . . . . . . . . . . . . . . . . . . . . . . . . .20 Zebra Label Printing Solution. . . . . . . . . . . . . . . . . . . . . . . . . . . . . . . . . . . . . . . . . . . .22 Modes of Printing . . . . . . . . . . . . . . . . . . . . . . . . . . . . . . . . . . . . . . . . . . . . . . . . . .23 What’s in the Box? . . . . . . . . . . . . . . . . . . . . . . . . . . . . . . . . . . . . . . . . . . . . . . . . . . . .24 Unpack and Inspect the Printer . . . . . . . . . . . . . . . . . . . . . . . . . . . . . . . . . . . . . . .25 Open the Printer. . . . . . . . . . . . . . . . . . . . . . . . . . . . . . . . . . . . . . . . . . . . . . . . . . .26 Closing the printer . . . . . . . . . . . . . . . . . . . . . . . . . . . . . . . . . . . . . . . . . . . . . . . . .26
• Printer Features . . . . . . . . . . . . . . . . . . . . . . . . . . . . . . . . . . . . . . . . . . . . . . .27
Printer Features . . . . . . . . . . . . . . . . . . . . . . . . . . . . . . . . . . . . . . . . . . . . . . . . . . . . . .28 Inside the ZD620 Dual Capacity Ribbon Roll Printer . . . . . . . . . . . . . . . . . . . . . . .29 Dual Capacity Ribbon Chassis — Ribbon Roll Holders . . . . . . . . . . . . . . . . . . . . . .30 Media Dancer — ZD620 Printer Models Only . . . . . . . . . . . . . . . . . . . . . . . . . . . . .30 Inside the ZD620 and ZD420 Direct Thermal Printers. . . . . . . . . . . . . . . . . . . . . .31 Inside the ZD420 Ribbon Cartridge Printer . . . . . . . . . . . . . . . . . . . . . . . . . . . . . .32
6

Contents
Accessing the Printhead of the Ribbon Cartridge Printer. . . . . . . . . . . . . . . . . . . .33 Label Dispenser Option (field installable) — All Models. . . . . . . . . . . . . . . . . . . . . .34 Cutter Option (field installable) — All Models. . . . . . . . . . . . . . . . . . . . . . . . . . . . . .34 Linerless Media Tear-Off Option (Direct Thermal Models Only) . . . . . . . . . . . . . .35 Linerless Cutter Option (Direct Thermal Models Only). . . . . . . . . . . . . . . . . . . . . .35 Identifying Platen Drive Rollers Types . . . . . . . . . . . . . . . . . . . . . . . . . . . . . . . . . .36 Printer Power Supply Options . . . . . . . . . . . . . . . . . . . . . . . . . . . . . . . . . . . . . . . .37 Attached Power Supply Base. . . . . . . . . . . . . . . . . . . . . . . . . . . . . . . . . . . . . . . . .37 Battery Power Base and Power Pack . . . . . . . . . . . . . . . . . . . . . . . . . . . . . . . . . .37 ZD620 and ZD420 Locking Printer Features . . . . . . . . . . . . . . . . . . . . . . . . . . . . .38
Zebra Print Touch. . . . . . . . . . . . . . . . . . . . . . . . . . . . . . . . . . . . . . . . . . . . . . . . . . . . .39
• Install Hardware Options . . . . . . . . . . . . . . . . . . . . . . . . . . . . . . . . . . . . . . .40
Field Installable printer Accessories and Options . . . . . . . . . . . . . . . . . . . . . . . . . . . .41 Printer Connectivity Modules . . . . . . . . . . . . . . . . . . . . . . . . . . . . . . . . . . . . . . . . .41 Media Handling Options. . . . . . . . . . . . . . . . . . . . . . . . . . . . . . . . . . . . . . . . . . . . .41 Power Base Options. . . . . . . . . . . . . . . . . . . . . . . . . . . . . . . . . . . . . . . . . . . . . . . .41 Printer Connectivity Modules . . . . . . . . . . . . . . . . . . . . . . . . . . . . . . . . . . . . . . . . . . . .42 Power Failure Recovery Mode Jumper (OFF by Default) . . . . . . . . . . . . . . . . . . .42 Accessing the Connectivity Module Slot . . . . . . . . . . . . . . . . . . . . . . . . . . . . . . . .42 Installing the Serial Port Module. . . . . . . . . . . . . . . . . . . . . . . . . . . . . . . . . . . . . . .43 Installing the Internal Ethernet (LAN) Module . . . . . . . . . . . . . . . . . . . . . . . . . . . .44 Removing Printer Connectivity Modules . . . . . . . . . . . . . . . . . . . . . . . . . . . . . . . .45 Media Handling Options. . . . . . . . . . . . . . . . . . . . . . . . . . . . . . . . . . . . . . . . . . . . . . . .46 Removing the Standard Bezel . . . . . . . . . . . . . . . . . . . . . . . . . . . . . . . . . . . . . . . .46 Installing the Label Dispenser . . . . . . . . . . . . . . . . . . . . . . . . . . . . . . . . . . . . . . . .47 Installing the Standard Media Cutter . . . . . . . . . . . . . . . . . . . . . . . . . . . . . . . . . . .48 Installing the Linerless Media Cutter . . . . . . . . . . . . . . . . . . . . . . . . . . . . . . . . . . .49 Installing the Linerless Media ‘Tear-Off’ Bezel. . . . . . . . . . . . . . . . . . . . . . . . . . . .50 Media Roll Core Size Adapters . . . . . . . . . . . . . . . . . . . . . . . . . . . . . . . . . . . . . . .51 Installing Media Roll Adapters . . . . . . . . . . . . . . . . . . . . . . . . . . . . . . . . . . . . . . . .51 Print Resolution Upgrade Kits . . . . . . . . . . . . . . . . . . . . . . . . . . . . . . . . . . . . . . . .53 Installing the Printhead Resolution Upgrade Kits. . . . . . . . . . . . . . . . . . . . . . . . . .53 Installing the Attached Power Supply Base Options . . . . . . . . . . . . . . . . . . . . . . . . . .54
• Controls and Indicators . . . . . . . . . . . . . . . . . . . . . . . . . . . . . . . . . . . . . . . .56
User Interface. . . . . . . . . . . . . . . . . . . . . . . . . . . . . . . . . . . . . . . . . . . . . . . . . . . . . . . .57 Standard Interface Controls . . . . . . . . . . . . . . . . . . . . . . . . . . . . . . . . . . . . . . . . . .58 LCD User Interface. . . . . . . . . . . . . . . . . . . . . . . . . . . . . . . . . . . . . . . . . . . . . . . . . . . .62 Meaning of the Indicator Light Patterns . . . . . . . . . . . . . . . . . . . . . . . . . . . . . . . . . . . .63 Status — Typical Operating Conditions . . . . . . . . . . . . . . . . . . . . . . . . . . . . . . . . . .63 Printer Ready . . . . . . . . . . . . . . . . . . . . . . . . . . . . . . . . . . . . . . . . . . . . . . . . . . . . .63 Pause. . . . . . . . . . . . . . . . . . . . . . . . . . . . . . . . . . . . . . . . . . . . . . . . . . . . . . . . . . .63 Media Out. . . . . . . . . . . . . . . . . . . . . . . . . . . . . . . . . . . . . . . . . . . . . . . . . . . . . . . .63
7

Contents
Ribbon Out. . . . . . . . . . . . . . . . . . . . . . . . . . . . . . . . . . . . . . . . . . . . . . . . . . . . . . .63 Ribbon Low (Ribbon Cartridge Printers Only) . . . . . . . . . . . . . . . . . . . . . . . . . . . .63 Ribbon In (Ribbon Cartridge Printers Only) . . . . . . . . . . . . . . . . . . . . . . . . . . . . . .64 Transferring Data . . . . . . . . . . . . . . . . . . . . . . . . . . . . . . . . . . . . . . . . . . . . . . . . . .64 Data Transfers Paused . . . . . . . . . . . . . . . . . . . . . . . . . . . . . . . . . . . . . . . . . . . . .64 Out of Memory . . . . . . . . . . . . . . . . . . . . . . . . . . . . . . . . . . . . . . . . . . . . . . . . . . . .64 Cover Open/Printhead (PH) Open . . . . . . . . . . . . . . . . . . . . . . . . . . . . . . . . . . . . .64 Cut Error (Binding) . . . . . . . . . . . . . . . . . . . . . . . . . . . . . . . . . . . . . . . . . . . . . . . . .64 Cartridge Authentication Failed . . . . . . . . . . . . . . . . . . . . . . . . . . . . . . . . . . . . . . .64 Status — Printhead Operation . . . . . . . . . . . . . . . . . . . . . . . . . . . . . . . . . . . . . . . . .65 Printhead Over Temp. . . . . . . . . . . . . . . . . . . . . . . . . . . . . . . . . . . . . . . . . . . . . . .65 Printhead Under Temp. . . . . . . . . . . . . . . . . . . . . . . . . . . . . . . . . . . . . . . . . . . . . .65 Printhead Shutdown. . . . . . . . . . . . . . . . . . . . . . . . . . . . . . . . . . . . . . . . . . . . . . . .65 Printhead Resolution Error. . . . . . . . . . . . . . . . . . . . . . . . . . . . . . . . . . . . . . . . . . .65 Unauthorized Printhead Error. . . . . . . . . . . . . . . . . . . . . . . . . . . . . . . . . . . . . . . . .65 Status — Bluetooth Low Energy (BTLE) Option. . . . . . . . . . . . . . . . . . . . . . . . . . . .66 Bluetooth LE Paired . . . . . . . . . . . . . . . . . . . . . . . . . . . . . . . . . . . . . . . . . . . . . . . .66 Bluetooth LE Failed to Pair. . . . . . . . . . . . . . . . . . . . . . . . . . . . . . . . . . . . . . . . . . .66 Status — Ethernet (LAN) Option . . . . . . . . . . . . . . . . . . . . . . . . . . . . . . . . . . . . . . .66 Ethernet (LAN) No Link . . . . . . . . . . . . . . . . . . . . . . . . . . . . . . . . . . . . . . . . . . . . .66 Ethernet (LAN) 100base Link. . . . . . . . . . . . . . . . . . . . . . . . . . . . . . . . . . . . . . . . .66 Ethernet (LAN) 10base Link. . . . . . . . . . . . . . . . . . . . . . . . . . . . . . . . . . . . . . . . . .66 Ethernet (LAN) Link Error. . . . . . . . . . . . . . . . . . . . . . . . . . . . . . . . . . . . . . . . . . . .66 Status — Wi-Fi (WLAN) Option . . . . . . . . . . . . . . . . . . . . . . . . . . . . . . . . . . . . . . . .67 Wi-Fi Connecting to WLAN . . . . . . . . . . . . . . . . . . . . . . . . . . . . . . . . . . . . . . . . . .67 Wi-Fi (WLAN) 100base Link. . . . . . . . . . . . . . . . . . . . . . . . . . . . . . . . . . . . . . . . . .67 Wi-Fi (WLAN) 10base Link. . . . . . . . . . . . . . . . . . . . . . . . . . . . . . . . . . . . . . . . . . .67 Wi-Fi (WLAN) Link Error. . . . . . . . . . . . . . . . . . . . . . . . . . . . . . . . . . . . . . . . . . . . .67
Display Controls and Menus . . . . . . . . . . . . . . . . . . . . . . . . . . . . . . . . . . . . . . . . . . . .68 Navigating through Menu Display Screens . . . . . . . . . . . . . . . . . . . . . . . . . . . . . .69 Idle Display (Default Start-up Screen) . . . . . . . . . . . . . . . . . . . . . . . . . . . . . . . . . .69 Home Menu . . . . . . . . . . . . . . . . . . . . . . . . . . . . . . . . . . . . . . . . . . . . . . . . . . . . . .69
• Printer Configuration Menus . . . . . . . . . . . . . . . . . . . . . . . . . . . . . . . . . . . .72
Adjust Printer Settings . . . . . . . . . . . . . . . . . . . . . . . . . . . . . . . . . . . . . . . . . . . . . . . . .73 User Menus . . . . . . . . . . . . . . . . . . . . . . . . . . . . . . . . . . . . . . . . . . . . . . . . . . . . . .73
8

Contents
SETTINGS Menu . . . . . . . . . . . . . . . . . . . . . . . . . . . . . . . . . . . . . . . . . . . . . . . . . . . . .75 DARKNESS . . . . . . . . . . . . . . . . . . . . . . . . . . . . . . . . . . . . . . . . . . . . . . . . . . . . . .75 PRINT SPEED . . . . . . . . . . . . . . . . . . . . . . . . . . . . . . . . . . . . . . . . . . . . . . . . . . . .76 MEDIA TYPE . . . . . . . . . . . . . . . . . . . . . . . . . . . . . . . . . . . . . . . . . . . . . . . . . . . . .77 PRINT METHOD . . . . . . . . . . . . . . . . . . . . . . . . . . . . . . . . . . . . . . . . . . . . . . . . . .78 TEAR OFF . . . . . . . . . . . . . . . . . . . . . . . . . . . . . . . . . . . . . . . . . . . . . . . . . . . . . . .79 PRINT WIDTH . . . . . . . . . . . . . . . . . . . . . . . . . . . . . . . . . . . . . . . . . . . . . . . . . . . .80 PRINT MODE. . . . . . . . . . . . . . . . . . . . . . . . . . . . . . . . . . . . . . . . . . . . . . . . . . . . .81 LABEL TOP . . . . . . . . . . . . . . . . . . . . . . . . . . . . . . . . . . . . . . . . . . . . . . . . . . . . . .82 LEFT POSITION . . . . . . . . . . . . . . . . . . . . . . . . . . . . . . . . . . . . . . . . . . . . . . . . . .83 REPRINT MODE . . . . . . . . . . . . . . . . . . . . . . . . . . . . . . . . . . . . . . . . . . . . . . . . . .84 LABEL LENGTH MAX . . . . . . . . . . . . . . . . . . . . . . . . . . . . . . . . . . . . . . . . . . . . . .85
TOOLS Menu. . . . . . . . . . . . . . . . . . . . . . . . . . . . . . . . . . . . . . . . . . . . . . . . . . . . . . . .86 PRINT INFORMATION . . . . . . . . . . . . . . . . . . . . . . . . . . . . . . . . . . . . . . . . . . . . .86 IDLE DISPLAY. . . . . . . . . . . . . . . . . . . . . . . . . . . . . . . . . . . . . . . . . . . . . . . . . . . .88 POWER UP ACTION. . . . . . . . . . . . . . . . . . . . . . . . . . . . . . . . . . . . . . . . . . . . . . .89 HEAD CLOSE ACTION . . . . . . . . . . . . . . . . . . . . . . . . . . . . . . . . . . . . . . . . . . . . .90 LOAD DEFAULTS . . . . . . . . . . . . . . . . . . . . . . . . . . . . . . . . . . . . . . . . . . . . . . . . .91 MEDIA/RIBBON CAL. . . . . . . . . . . . . . . . . . . . . . . . . . . . . . . . . . . . . . . . . . . . . . .92 DIAGNOSTIC MODE. . . . . . . . . . . . . . . . . . . . . . . . . . . . . . . . . . . . . . . . . . . . . . .93 ZBI ENABLED? . . . . . . . . . . . . . . . . . . . . . . . . . . . . . . . . . . . . . . . . . . . . . . . . . . .94 RUN ZBI PROGRAM . . . . . . . . . . . . . . . . . . . . . . . . . . . . . . . . . . . . . . . . . . . . . . .95 STOP ZBI PROGRAM . . . . . . . . . . . . . . . . . . . . . . . . . . . . . . . . . . . . . . . . . . . . . .96 PRINT USB FILE . . . . . . . . . . . . . . . . . . . . . . . . . . . . . . . . . . . . . . . . . . . . . . . . . .97 COPY USB FILE TO E: . . . . . . . . . . . . . . . . . . . . . . . . . . . . . . . . . . . . . . . . . . . . .98 STORE E: FILE TO USB . . . . . . . . . . . . . . . . . . . . . . . . . . . . . . . . . . . . . . . . . . . .99 PRINT STATION . . . . . . . . . . . . . . . . . . . . . . . . . . . . . . . . . . . . . . . . . . . . . . . . .100 PASSWORD PROTECT . . . . . . . . . . . . . . . . . . . . . . . . . . . . . . . . . . . . . . . . . . .101 PRINT TEST FORMAT . . . . . . . . . . . . . . . . . . . . . . . . . . . . . . . . . . . . . . . . . . . .102
9

Contents
NETWORK. . . . . . . . . . . . . . . . . . . . . . . . . . . . . . . . . . . . . . . . . . . . . . . . . . . . . . . . .103 ACTIVE PRINT SERVER. . . . . . . . . . . . . . . . . . . . . . . . . . . . . . . . . . . . . . . . . . .103 PRIMARY NETWORK . . . . . . . . . . . . . . . . . . . . . . . . . . . . . . . . . . . . . . . . . . . . .104 WIRED IP ADDRESS. . . . . . . . . . . . . . . . . . . . . . . . . . . . . . . . . . . . . . . . . . . . . .105 WIRED SUBNET MASK. . . . . . . . . . . . . . . . . . . . . . . . . . . . . . . . . . . . . . . . . . . .106 WIRED GATEWAY . . . . . . . . . . . . . . . . . . . . . . . . . . . . . . . . . . . . . . . . . . . . . . .107 WIRED IP PROTOCOL . . . . . . . . . . . . . . . . . . . . . . . . . . . . . . . . . . . . . . . . . . . .108 WIRED MAC ADDRESS . . . . . . . . . . . . . . . . . . . . . . . . . . . . . . . . . . . . . . . . . . .109 WLAN IP ADDRESS . . . . . . . . . . . . . . . . . . . . . . . . . . . . . . . . . . . . . . . . . . . . . .110 WLAN SUBNET MASK . . . . . . . . . . . . . . . . . . . . . . . . . . . . . . . . . . . . . . . . . . . .111 WLAN GATEWAY . . . . . . . . . . . . . . . . . . . . . . . . . . . . . . . . . . . . . . . . . . . . . . . .112 WLAN IP PROTOCOL . . . . . . . . . . . . . . . . . . . . . . . . . . . . . . . . . . . . . . . . . . . . .113 WLAN MAC ADDRESS . . . . . . . . . . . . . . . . . . . . . . . . . . . . . . . . . . . . . . . . . . . .114 ESSID . . . . . . . . . . . . . . . . . . . . . . . . . . . . . . . . . . . . . . . . . . . . . . . . . . . . . . . . .115 CHANNEL . . . . . . . . . . . . . . . . . . . . . . . . . . . . . . . . . . . . . . . . . . . . . . . . . . . . . .116 SIGNAL . . . . . . . . . . . . . . . . . . . . . . . . . . . . . . . . . . . . . . . . . . . . . . . . . . . . . . . .117 IP PORT. . . . . . . . . . . . . . . . . . . . . . . . . . . . . . . . . . . . . . . . . . . . . . . . . . . . . . . .118 IP ALTERNATE PORT. . . . . . . . . . . . . . . . . . . . . . . . . . . . . . . . . . . . . . . . . . . . .119 RESET NETWORK . . . . . . . . . . . . . . . . . . . . . . . . . . . . . . . . . . . . . . . . . . . . . . .120 VISIBILITY AGENT . . . . . . . . . . . . . . . . . . . . . . . . . . . . . . . . . . . . . . . . . . . . . . .121
BATTERY Menu. . . . . . . . . . . . . . . . . . . . . . . . . . . . . . . . . . . . . . . . . . . . . . . . . . . . .122 BATTERY STATUS . . . . . . . . . . . . . . . . . . . . . . . . . . . . . . . . . . . . . . . . . . . . . . .122 LANGUAGE Menu . . . . . . . . . . . . . . . . . . . . . . . . . . . . . . . . . . . . . . . . . . . . . . . . . . .123 LANGUAGE . . . . . . . . . . . . . . . . . . . . . . . . . . . . . . . . . . . . . . . . . . . . . . . . . . . . .123 COMMAND LANGUAGE . . . . . . . . . . . . . . . . . . . . . . . . . . . . . . . . . . . . . . . . . . .124 COMMAND CHAR. . . . . . . . . . . . . . . . . . . . . . . . . . . . . . . . . . . . . . . . . . . . . . . .125 CONTROL CHAR. . . . . . . . . . . . . . . . . . . . . . . . . . . . . . . . . . . . . . . . . . . . . . . . .126 DELIMITER CHAR. . . . . . . . . . . . . . . . . . . . . . . . . . . . . . . . . . . . . . . . . . . . . . . .127 ZPL MODE. . . . . . . . . . . . . . . . . . . . . . . . . . . . . . . . . . . . . . . . . . . . . . . . . . . . . .128 VIRTUAL DEVICE . . . . . . . . . . . . . . . . . . . . . . . . . . . . . . . . . . . . . . . . . . . . . . . .129 SENSORS . . . . . . . . . . . . . . . . . . . . . . . . . . . . . . . . . . . . . . . . . . . . . . . . . . . . . . . . .130 SENSOR TYPE . . . . . . . . . . . . . . . . . . . . . . . . . . . . . . . . . . . . . . . . . . . . . . . . . .130 LABEL SENSOR . . . . . . . . . . . . . . . . . . . . . . . . . . . . . . . . . . . . . . . . . . . . . . . . .131 TAKE LABEL . . . . . . . . . . . . . . . . . . . . . . . . . . . . . . . . . . . . . . . . . . . . . . . . . . . .132 PORTS. . . . . . . . . . . . . . . . . . . . . . . . . . . . . . . . . . . . . . . . . . . . . . . . . . . . . . . . . . . .133 BAUD RATE. . . . . . . . . . . . . . . . . . . . . . . . . . . . . . . . . . . . . . . . . . . . . . . . . . . . .133 DATA BITS. . . . . . . . . . . . . . . . . . . . . . . . . . . . . . . . . . . . . . . . . . . . . . . . . . . . . .134 PARITY . . . . . . . . . . . . . . . . . . . . . . . . . . . . . . . . . . . . . . . . . . . . . . . . . . . . . . . .135 HOST HANDSHAKE . . . . . . . . . . . . . . . . . . . . . . . . . . . . . . . . . . . . . . . . . . . . . .136 WML. . . . . . . . . . . . . . . . . . . . . . . . . . . . . . . . . . . . . . . . . . . . . . . . . . . . . . . . . . .137
10
![]()
Contents
BLUETOOTH . . . . . . . . . . . . . . . . . . . . . . . . . . . . . . . . . . . . . . . . . . . . . . . . . . . . . . .138 BLUETOOTH ADDRESS. . . . . . . . . . . . . . . . . . . . . . . . . . . . . . . . . . . . . . . . . . .138 MODE . . . . . . . . . . . . . . . . . . . . . . . . . . . . . . . . . . . . . . . . . . . . . . . . . . . . . . . . .139 DISCOVERY . . . . . . . . . . . . . . . . . . . . . . . . . . . . . . . . . . . . . . . . . . . . . . . . . . . .140 CONNECTED. . . . . . . . . . . . . . . . . . . . . . . . . . . . . . . . . . . . . . . . . . . . . . . . . . . .141 BT SPEC VERSION. . . . . . . . . . . . . . . . . . . . . . . . . . . . . . . . . . . . . . . . . . . . . . .142 MIN SECURITY MODE . . . . . . . . . . . . . . . . . . . . . . . . . . . . . . . . . . . . . . . . . . . .143
• Setup . . . . . . . . . . . . . . . . . . . . . . . . . . . . . . . . . . . . . . . . . . . . . . . . . . . . . .144
Printer Setup Overview . . . . . . . . . . . . . . . . . . . . . . . . . . . . . . . . . . . . . . . . . . . . . . .144 Select a Location for the Printer. . . . . . . . . . . . . . . . . . . . . . . . . . . . . . . . . . . . . . . . .145 Install Printer Options and Connectivity Modules. . . . . . . . . . . . . . . . . . . . . . . . . . . .146 Attaching Power. . . . . . . . . . . . . . . . . . . . . . . . . . . . . . . . . . . . . . . . . . . . . . . . . . . . .147 Getting Ready to Print . . . . . . . . . . . . . . . . . . . . . . . . . . . . . . . . . . . . . . . . . . . . . . . .148
Preparing and Handling Media. . . . . . . . . . . . . . . . . . . . . . . . . . . . . . . . . . . . . . .148 Media Storage Tips . . . . . . . . . . . . . . . . . . . . . . . . . . . . . . . . . . . . . . . . . . . . . . .148 Loading Roll Media. . . . . . . . . . . . . . . . . . . . . . . . . . . . . . . . . . . . . . . . . . . . . . . . . . .148 Setting Media Sensing by Media type . . . . . . . . . . . . . . . . . . . . . . . . . . . . . . . . .149 Instructions for media loading: . . . . . . . . . . . . . . . . . . . . . . . . . . . . . . . . . . . . . . .150 Using the Movable Sensor. . . . . . . . . . . . . . . . . . . . . . . . . . . . . . . . . . . . . . . . . .153 Loading Roll Media (continued) . . . . . . . . . . . . . . . . . . . . . . . . . . . . . . . . . . . . . .155 Loading Thermal Transfer Roll Ribbon . . . . . . . . . . . . . . . . . . . . . . . . . . . . . . . . . . .156 Loading Zebra Transfer Roll Ribbon . . . . . . . . . . . . . . . . . . . . . . . . . . . . . . . . . .157 Loading Non-Zebra 300 Meter Transfer Ribbon . . . . . . . . . . . . . . . . . . . . . . . . .161 Loading the ZD420 Ribbon Cartridge. . . . . . . . . . . . . . . . . . . . . . . . . . . . . . . . . . . . .167 Run a SmartCal Media Calibration. . . . . . . . . . . . . . . . . . . . . . . . . . . . . . . . . . . . . . .168 SmartCal Procedure. . . . . . . . . . . . . . . . . . . . . . . . . . . . . . . . . . . . . . . . . . . . . . .168 Test Printing with the Configuration Report . . . . . . . . . . . . . . . . . . . . . . . . . . . . . . . .169 Detecting a Media Out Condition . . . . . . . . . . . . . . . . . . . . . . . . . . . . . . . . . . . . . . . .170 Detecting a Ribbon Out Condition . . . . . . . . . . . . . . . . . . . . . . . . . . . . . . . . . . . . . . .171
Connecting your Printer to a Computer . . . . . . . . . . . . . . . . . . . . . . . . . . . . . . . . . . .172 Pre-install Windows® Printer Drivers . . . . . . . . . . . . . . . . . . . . . . . . . . . . . . . . . .172
Interface Cable Requirements . . . . . . . . . . . . . . . . . . . . . . . . . . . . . . . . . . . . . . .173 USB Interface. . . . . . . . . . . . . . . . . . . . . . . . . . . . . . . . . . . . . . . . . . . . . . . . . . . .174 Serial Interface. . . . . . . . . . . . . . . . . . . . . . . . . . . . . . . . . . . . . . . . . . . . . . . . . . .175 Ethernet (LAN, RJ-45) . . . . . . . . . . . . . . . . . . . . . . . . . . . . . . . . . . . . . . . . . . . . .176 Wi-Fi and Bluetooth Classic Wireless Connectivity Option . . . . . . . . . . . . . . . . . . . .178 Update Printer Firmware to Finish Option Installations . . . . . . . . . . . . . . . . . . . .178
• Setup for Windows® OS . . . . . . . . . . . . . . . . . . . . . . . . . . . . . . . . . . . . . . .179
Windows to Printer Communication Setup (Overview). . . . . . . . . . . . . . . . . . . . . . . .179 Pre-install Windows® Printer Drivers . . . . . . . . . . . . . . . . . . . . . . . . . . . . . . . . . . . . .180
Setting Up the Wi-Fi Print Server Option . . . . . . . . . . . . . . . . . . . . . . . . . . . . . . . . . .181
11

Contents
Configure Using the ZebraNet Bridge’s Connectivity Wizard. . . . . . . . . . . . . . . . . . .182 Using a Configuration Script. . . . . . . . . . . . . . . . . . . . . . . . . . . . . . . . . . . . . . . . .188 Saving a Configuration Script. . . . . . . . . . . . . . . . . . . . . . . . . . . . . . . . . . . . . . . .189 Bluetooth Option Configuration . . . . . . . . . . . . . . . . . . . . . . . . . . . . . . . . . . . . . . . . .190 Connecting to a Windows XP® SP2 Master Device. . . . . . . . . . . . . . . . . . . . . . .192 Connecting to a Windows Vista® SP2 or Windows 7® Master Device. . . . . . . . .193 Connecting the Printer to a Windows 8 . . . . . . . . . . . . . . . . . . . . . . . . . . . . . . . .196 Connecting the Printer to a Windows 10 PC . . . . . . . . . . . . . . . . . . . . . . . . . . . .197 After Your Printer is Connected . . . . . . . . . . . . . . . . . . . . . . . . . . . . . . . . . . . . . . . . .200 Testing Communications by Printing . . . . . . . . . . . . . . . . . . . . . . . . . . . . . . . . . .200
• Print Operations . . . . . . . . . . . . . . . . . . . . . . . . . . . . . . . . . . . . . . . . . . . . .202
Thermal Printing. . . . . . . . . . . . . . . . . . . . . . . . . . . . . . . . . . . . . . . . . . . . . . . . . .202 Determining Your Printer’s Configuration Settings. . . . . . . . . . . . . . . . . . . . . . . .202 Select a Print Mode . . . . . . . . . . . . . . . . . . . . . . . . . . . . . . . . . . . . . . . . . . . . . . . . . .203 Adjusting the Print Quality . . . . . . . . . . . . . . . . . . . . . . . . . . . . . . . . . . . . . . . . . . . . .204 Darkness Control . . . . . . . . . . . . . . . . . . . . . . . . . . . . . . . . . . . . . . . . . . . . . . . . . . . .205 Adjusting the Print Width . . . . . . . . . . . . . . . . . . . . . . . . . . . . . . . . . . . . . . . . . . . . . .206 Replacing Supplies while Using the Printer . . . . . . . . . . . . . . . . . . . . . . . . . . . . .206 Printing on Fan-Fold Media . . . . . . . . . . . . . . . . . . . . . . . . . . . . . . . . . . . . . . . . . . . .207 Printing with Externally Mounted Roll Media . . . . . . . . . . . . . . . . . . . . . . . . . . . . . . .209 Externally Mounted Roll Media Considerations:. . . . . . . . . . . . . . . . . . . . . . . . . .209 Using the Label Dispenser Option . . . . . . . . . . . . . . . . . . . . . . . . . . . . . . . . . . . . . . .210 Using the Linerless Options . . . . . . . . . . . . . . . . . . . . . . . . . . . . . . . . . . . . . . . . . . . .214 Linerless Printing . . . . . . . . . . . . . . . . . . . . . . . . . . . . . . . . . . . . . . . . . . . . . . . . .214 Sending Files to the Printer . . . . . . . . . . . . . . . . . . . . . . . . . . . . . . . . . . . . . . . . . . . .215 Ribbon Cartridge Programming Commands . . . . . . . . . . . . . . . . . . . . . . . . . . . .215 Printer Fonts. . . . . . . . . . . . . . . . . . . . . . . . . . . . . . . . . . . . . . . . . . . . . . . . . . . . . . . .216 Identifying Fonts in Your Printer. . . . . . . . . . . . . . . . . . . . . . . . . . . . . . . . . . . . . .217 Localizing the Printer with Code Pages . . . . . . . . . . . . . . . . . . . . . . . . . . . . . . . .217 Asian fonts and Other Large Font Sets . . . . . . . . . . . . . . . . . . . . . . . . . . . . . . . .218 Getting Asian Fonts . . . . . . . . . . . . . . . . . . . . . . . . . . . . . . . . . . . . . . . . . . . . . . .218 EPL Line Mode — Direct Thermal Printers only. . . . . . . . . . . . . . . . . . . . . . . . . . . . . .219 Zebra® ZKDU — Printer Accessory. . . . . . . . . . . . . . . . . . . . . . . . . . . . . . . . . . . . . .220 ZD620 and ZD420 Locking Printer Option. . . . . . . . . . . . . . . . . . . . . . . . . . . . . . . . .221 ZBI 2.0 ™ — Zebra Basic Interpreter. . . . . . . . . . . . . . . . . . . . . . . . . . . . . . . . . . . . .222 Setting the Power Failure Recovery Mode Jumper . . . . . . . . . . . . . . . . . . . . . . . . . .223
• USB Host Port and Link-OS Demonstration Examples . . . . . . . . . . . . . .225
USB Host . . . . . . . . . . . . . . . . . . . . . . . . . . . . . . . . . . . . . . . . . . . . . . . . . . . . . . . . . .225 Using USB Host for Firmware Updates . . . . . . . . . . . . . . . . . . . . . . . . . . . . . . . .226 Flash Drive Preparation and Firmware Update . . . . . . . . . . . . . . . . . . . . . . . . . .226
12

Contents
USB Host and Printer Usage Examples. . . . . . . . . . . . . . . . . . . . . . . . . . . . . . . . . . .227 Items Required for the USB Host Exercises . . . . . . . . . . . . . . . . . . . . . . . . . . . .227 Files for Completing the Exercises. . . . . . . . . . . . . . . . . . . . . . . . . . . . . . . . . . . .227 File 1: ZEBRA.BMP . . . . . . . . . . . . . . . . . . . . . . . 227 File 2: SAMPLELABEL.TXT . . . . . . . . . . . . . . . . . . . . 227 File 3: LOGO.ZPL . . . . . . . . . . . . . . . . . . . . . . . 227 File 4: USBSTOREDFILE.ZPL . . . . . . . . . . . . . . . . . . . 228 File 5: VLS_BONKGRF.ZPL . . . . . . . . . . . . . . . . . . . . 228 File 6: VLS_EIFFEL.ZPL. . . . . . . . . . . . . . . . . . . . . 228 File 7: KEYBOARDINPUT.ZPL . . . . . . . . . . . . . . . . . . . 229 File 8: SMARTDEVINPUT.ZPL . . . . . . . . . . . . . . . . . . . 229
Exercise 1: Copy Files to a USB Flash Drive and Perform USB Mirror . . . . . . . .230 Exercise 2: Print a Label Format from a USB Flash Drive. . . . . . . . . . . . . . . . . .232 Exercise 3: Copy Files to/from a USB Flash Drive. . . . . . . . . . . . . . . . . . . . . . . .233 Exercise 4: Enter Data for a Stored File with a USB Keyboard and Print a Label235 Using the USB Hosts Port and the NFC Capabilities. . . . . . . . . . . . . . . . . . . . . . . . .236 Exercise 5: Enter Data for a Stored File with a Smart Device and Print a Label .237
• Maintenance . . . . . . . . . . . . . . . . . . . . . . . . . . . . . . . . . . . . . . . . . . . . . . . . .239
Cleaning. . . . . . . . . . . . . . . . . . . . . . . . . . . . . . . . . . . . . . . . . . . . . . . . . . . . . . . . . . .239 Cleaning Supplies . . . . . . . . . . . . . . . . . . . . . . . . . . . . . . . . . . . . . . . . . . . . . . . .239 Recommended Cleaning Schedule . . . . . . . . . . . . . . . . . . . . . . . . . . . . . . . . . . .240 Printhead . . . . . . . . . . . . . . . . . . . . . . . . . . . . . . . . . . . . . . . . . . . . . . . . . . . . . . .240 Standard Platen (Drive) Roller . . . . . . . . . . . . . . . . . . . . . . . . . . . . . . . . . . . . . . .240 Linerless Platen (Drive) Roller . . . . . . . . . . . . . . . . . . . . . . . . . . . . . . . . . . . . . . .240 Media Path. . . . . . . . . . . . . . . . . . . . . . . . . . . . . . . . . . . . . . . . . . . . . . . . . . . . . .241 Interior . . . . . . . . . . . . . . . . . . . . . . . . . . . . . . . . . . . . . . . . . . . . . . . . . . . . . . . . .241 Exterior. . . . . . . . . . . . . . . . . . . . . . . . . . . . . . . . . . . . . . . . . . . . . . . . . . . . . . . . .241 Label Dispenser Option . . . . . . . . . . . . . . . . . . . . . . . . . . . . . . . . . . . . . . . . . . . .241 Cutter Option . . . . . . . . . . . . . . . . . . . . . . . . . . . . . . . . . . . . . . . . . . . . . . . . . . . .242 Cleaning the Printhead. . . . . . . . . . . . . . . . . . . . . . . . . . . . . . . . . . . . . . . . . . . . .243 ZD620 / ZD420 Direct Thermal Printers. . . . . . . . . . . . . . . . . . . . . . . . . . . . . . . .243 ZD620 / ZD420 Thermal Transfer Printers. . . . . . . . . . . . . . . . . . . . . . . . . . . . . .244 ZD420 Ribbon Cartridge Printers. . . . . . . . . . . . . . . . . . . . . . . . . . . . . . . . . . . . .245 Media Path Cleaning . . . . . . . . . . . . . . . . . . . . . . . . . . . . . . . . . . . . . . . . . . . . . .246 Lower Half of ZD60/ZD420 Printers. . . . . . . . . . . . . . . . . . . . . . . . . . . . . . . . . . .246 Upper Half of ZD620/ZD420 Direct Thermal Printers. . . . . . . . . . . . . . . . . . . . . .247 Upper Half of ZD620/420 Thermal Transfer Printers . . . . . . . . . . . . . . . . . . . . . .247 Upper Half of ZD420 Thermal Transfer Ribbon Cartridge Printers . . . . . . . . . . .248 Cleaning the Cutter and Label Dispenser Options. . . . . . . . . . . . . . . . . . . . . . . .249 Cutter Option Cleaning. . . . . . . . . . . . . . . . . . . . . . . . . . . . . . . . . . . . . . . . . . . . .249 Label Dispenser Option Cleaning. . . . . . . . . . . . . . . . . . . . . . . . . . . . . . . . . . . . .250 Sensor Cleaning. . . . . . . . . . . . . . . . . . . . . . . . . . . . . . . . . . . . . . . . . . . . . . . . . .251
13

Contents
Lower Half of ZD60/ZD420 Printers. . . . . . . . . . . . . . . . . . . . . . . . . . . . . . . . . . .251 Upper Half of ZD620/ZD420 Direct Thermal Printers. . . . . . . . . . . . . . . . . . . . . .252 Upper Half of ZD620/ZD420 Thermal Transfer Printers. . . . . . . . . . . . . . . . . . . .252 Upper Half of ZD420 Ribbon Cartridge Printers. . . . . . . . . . . . . . . . . . . . . . . . . .253 Platen Cleaning and Replacement. . . . . . . . . . . . . . . . . . . . . . . . . . . . . . . . . . . .255 Removing the Platen Roller . . . . . . . . . . . . . . . . . . . . . . . . . . . . . . . . . . . . . . . . .256
Replacing the Printhead. . . . . . . . . . . . . . . . . . . . . . . . . . . . . . . . . . . . . . . . . . . . . . .259 ZD620 and ZD420 Direct Thermal. . . . . . . . . . . . . . . . . . . . . . . . . . . . . . . . . . . .260 Removing the Printhead. . . . . . . . . . . . . . . . . . . . . . . . . . . . . . . . . . . . . . . . . . . .260 Replacing the Printhead. . . . . . . . . . . . . . . . . . . . . . . . . . . . . . . . . . . . . . . . . . . .262 ZD620 and ZD420 Thermal Transfer Ribbon Roll . . . . . . . . . . . . . . . . . . . . . . . .265 Removing the Printhead. . . . . . . . . . . . . . . . . . . . . . . . . . . . . . . . . . . . . . . . . . . .265 Replacing the Printhead. . . . . . . . . . . . . . . . . . . . . . . . . . . . . . . . . . . . . . . . . . . .267 ZD420 Thermal Transfer Ribbon Cartridge . . . . . . . . . . . . . . . . . . . . . . . . . . . . .270 Printhead Removal. . . . . . . . . . . . . . . . . . . . . . . . . . . . . . . . . . . . . . . . . . . . . . . .270
Updating Printer Firmware . . . . . . . . . . . . . . . . . . . . . . . . . . . . . . . . . . . . . . . . . . . . .274 Other Printer Maintenance . . . . . . . . . . . . . . . . . . . . . . . . . . . . . . . . . . . . . . . . . . . . .275 RTC Battery . . . . . . . . . . . . . . . . . . . . . . . . . . . . . . . . . . . . . . . . . . . . . . . . . . . . . . . .275 Fuses . . . . . . . . . . . . . . . . . . . . . . . . . . . . . . . . . . . . . . . . . . . . . . . . . . . . . . . . . . . . .275
• Troubleshooting . . . . . . . . . . . . . . . . . . . . . . . . . . . . . . . . . . . . . . . . . . . . .276
Resolving Alerts and Errors . . . . . . . . . . . . . . . . . . . . . . . . . . . . . . . . . . . . . . . . . . . .276 Alert: Printhead Open. . . . . . . . . . . . . . . . . . . . . . . . . . . . . . . . . . . . . . . . . . . . . .276 Possible Cause — 1. . . . . . . . . . . . . . . . . . . . . . . . . . . . . . . . . . . . . . . . . . . . . . . .276 Possible Cause — 2. . . . . . . . . . . . . . . . . . . . . . . . . . . . . . . . . . . . . . . . . . . . . . . .276 Alert: Media Out . . . . . . . . . . . . . . . . . . . . . . . . . . . . . . . . . . . . . . . . . . . . . . . . . .277 Possible Cause — 1. . . . . . . . . . . . . . . . . . . . . . . . . . . . . . . . . . . . . . . . . . . . . . . .277 Possible Cause — 2. . . . . . . . . . . . . . . . . . . . . . . . . . . . . . . . . . . . . . . . . . . . . . . .277 Possible Cause — 3. . . . . . . . . . . . . . . . . . . . . . . . . . . . . . . . . . . . . . . . . . . . . . . .277 Possible Cause — 4. . . . . . . . . . . . . . . . . . . . . . . . . . . . . . . . . . . . . . . . . . . . . . . .277 Possible Cause — 5. . . . . . . . . . . . . . . . . . . . . . . . . . . . . . . . . . . . . . . . . . . . . . . .278 Possible Cause — 6. . . . . . . . . . . . . . . . . . . . . . . . . . . . . . . . . . . . . . . . . . . . . . . .278 Alert: Ribbon In (ZD420 Cartridge Printer only) . . . . . . . . . . . . . . . . . . . . . . . . . .279 Possible Cause — 1. . . . . . . . . . . . . . . . . . . . . . . . . . . . . . . . . . . . . . . . . . . . . . . .279 Possible Cause — 2. . . . . . . . . . . . . . . . . . . . . . . . . . . . . . . . . . . . . . . . . . . . . . . .279 Alert: Ribbon Out . . . . . . . . . . . . . . . . . . . . . . . . . . . . . . . . . . . . . . . . . . . . . . . . .280 Possible Cause — 1. . . . . . . . . . . . . . . . . . . . . . . . . . . . . . . . . . . . . . . . . . . . . . . .280 Possible Cause — 2 (ZD420 Cartridge Printer only) . . . . . . . . . . . . . . . . . . . . . . .280 Possible Cause — 3 (ZD420 Cartridge Printer only) . . . . . . . . . . . . . . . . . . . . . . .280 Possible Cause — 4 (Standard Roll — Thermal Transfer Printers) . . . . . . . . . . . . .280 Alert: Ribbon Low (ZD420 Cartridge Printer only) . . . . . . . . . . . . . . . . . . . . . . . .281 Possible Cause — 1. . . . . . . . . . . . . . . . . . . . . . . . . . . . . . . . . . . . . . . . . . . . . . . .281 Alert: CUT ERROR. . . . . . . . . . . . . . . . . . . . . . . . . . . . . . . . . . . . . . . . . . . . . . . .282
14

Contents
Possible Cause — 1. . . . . . . . . . . . . . . . . . . . . . . . . . . . . . . . . . . . . . . . . . . . . . . .282 Alert: PRINTHEAD OVER TEMP. . . . . . . . . . . . . . . . . . . . . . . . . . . . . . . . . . . . .283 Possible Cause — 1. . . . . . . . . . . . . . . . . . . . . . . . . . . . . . . . . . . . . . . . . . . . . . . .283 Possible Cause — 2. . . . . . . . . . . . . . . . . . . . . . . . . . . . . . . . . . . . . . . . . . . . . . . .283 Alert: PRINTHEAD SHUTDOWN. . . . . . . . . . . . . . . . . . . . . . . . . . . . . . . . . . . . .284 Possible Cause — 1. . . . . . . . . . . . . . . . . . . . . . . . . . . . . . . . . . . . . . . . . . . . . . . .284 Alert: PRINTHEAD UNDER TEMP . . . . . . . . . . . . . . . . . . . . . . . . . . . . . . . . . . .285 Possible Cause — 1. . . . . . . . . . . . . . . . . . . . . . . . . . . . . . . . . . . . . . . . . . . . . . . .285 Possible Cause — 2. . . . . . . . . . . . . . . . . . . . . . . . . . . . . . . . . . . . . . . . . . . . . . . .285 Alert: OUT OF MEMORY. . . . . . . . . . . . . . . . . . . . . . . . . . . . . . . . . . . . . . . . . . .286 Possible Cause — 1. . . . . . . . . . . . . . . . . . . . . . . . . . . . . . . . . . . . . . . . . . . . . . . .286
Resolving Print Issues . . . . . . . . . . . . . . . . . . . . . . . . . . . . . . . . . . . . . . . . . . . . . . . .287 Issue: General Print Quality Issues . . . . . . . . . . . . . . . . . . . . . . . . . . . . . . . . . . .287 Possible Cause — 1. . . . . . . . . . . . . . . . . . . . . . . . . . . . . . . . . . . . . . . . . . . . . . . .287 Possible Cause — 2. . . . . . . . . . . . . . . . . . . . . . . . . . . . . . . . . . . . . . . . . . . . . . . .287 Possible Cause — 3. . . . . . . . . . . . . . . . . . . . . . . . . . . . . . . . . . . . . . . . . . . . . . . .287 Possible Cause — 4. . . . . . . . . . . . . . . . . . . . . . . . . . . . . . . . . . . . . . . . . . . . . . . .287 Possible Cause — 5. . . . . . . . . . . . . . . . . . . . . . . . . . . . . . . . . . . . . . . . . . . . . . . .287 Possible Cause — 6. . . . . . . . . . . . . . . . . . . . . . . . . . . . . . . . . . . . . . . . . . . . . . . .288 Issue: No Print on the Label. . . . . . . . . . . . . . . . . . . . . . . . . . . . . . . . . . . . . . . . .288 Possible Cause — 1. . . . . . . . . . . . . . . . . . . . . . . . . . . . . . . . . . . . . . . . . . . . . . . .288 Possible Cause — 2. . . . . . . . . . . . . . . . . . . . . . . . . . . . . . . . . . . . . . . . . . . . . . . .288 Issue: Labels Are Distorted in Size or Print Area Start Position Varies . . . . . . . .289 Possible Cause — 1. . . . . . . . . . . . . . . . . . . . . . . . . . . . . . . . . . . . . . . . . . . . . . . .289 Possible Cause — 2. . . . . . . . . . . . . . . . . . . . . . . . . . . . . . . . . . . . . . . . . . . . . . . .289 Possible Cause — 3. . . . . . . . . . . . . . . . . . . . . . . . . . . . . . . . . . . . . . . . . . . . . . . .289 Possible Cause — 4. . . . . . . . . . . . . . . . . . . . . . . . . . . . . . . . . . . . . . . . . . . . . . . .289
Communication Issues. . . . . . . . . . . . . . . . . . . . . . . . . . . . . . . . . . . . . . . . . . . . . . . .290 Issue: Label Job Sent, No Data Transfer. . . . . . . . . . . . . . . . . . . . . . . . . . . . . . .290 Possible Cause . . . . . . . . . . . . . . . . . . . . . . . . . . . . . . . . . . . . . . . . . . . . . . . . . .290 Issue: Label Job Sent, Skips Labels or Prints Bad Content. . . . . . . . . . . . . . . . .290 Possible Cause . . . . . . . . . . . . . . . . . . . . . . . . . . . . . . . . . . . . . . . . . . . . . . . . . .290 Issue: Label Job Sent, Data Transfers, But No Print . . . . . . . . . . . . . . . . . . . . . .291 Possible Cause — 1. . . . . . . . . . . . . . . . . . . . . . . . . . . . . . . . . . . . . . . . . . . . . . . .291 Possible Cause — 2. . . . . . . . . . . . . . . . . . . . . . . . . . . . . . . . . . . . . . . . . . . . . . . .291 Possible Cause — 3. . . . . . . . . . . . . . . . . . . . . . . . . . . . . . . . . . . . . . . . . . . . . . . .291
Miscellaneous Issues. . . . . . . . . . . . . . . . . . . . . . . . . . . . . . . . . . . . . . . . . . . . . . . . .292 Issue: Settings are Lost or Ignored . . . . . . . . . . . . . . . . . . . . . . . . . . . . . . . . . . .292 Possible Cause — 1. . . . . . . . . . . . . . . . . . . . . . . . . . . . . . . . . . . . . . . . . . . . . . . .292 Possible Cause — 2. . . . . . . . . . . . . . . . . . . . . . . . . . . . . . . . . . . . . . . . . . . . . . . .292 Possible Cause — 3. . . . . . . . . . . . . . . . . . . . . . . . . . . . . . . . . . . . . . . . . . . . . . . .292 Possible Cause — 4. . . . . . . . . . . . . . . . . . . . . . . . . . . . . . . . . . . . . . . . . . . . . . . .292 Issue: Non-continuous labels act as Continuous labels. . . . . . . . . . . . . . . . . . . .293
15

Contents
Possible Cause — 1. . . . . . . . . . . . . . . . . . . . . . . . . . . . . . . . . . . . . . . . . . . . . . . .293 Possible Cause — 2. . . . . . . . . . . . . . . . . . . . . . . . . . . . . . . . . . . . . . . . . . . . . . . .293 Issue: Printer Locks-Up . . . . . . . . . . . . . . . . . . . . . . . . . . . . . . . . . . . . . . . . . . . .294 Possible Cause — 1. . . . . . . . . . . . . . . . . . . . . . . . . . . . . . . . . . . . . . . . . . . . . . . .294 Issue: Erroneous Ribbon Cartridge Faults. . . . . . . . . . . . . . . . . . . . . . . . . . . . . .294 Possible Cause . . . . . . . . . . . . . . . . . . . . . . . . . . . . . . . . . . . . . . . . . . . . . . . . . .294
• Tools . . . . . . . . . . . . . . . . . . . . . . . . . . . . . . . . . . . . . . . . . . . . . . . . . . . . . . .295
Printer Diagnostics. . . . . . . . . . . . . . . . . . . . . . . . . . . . . . . . . . . . . . . . . . . . . . . . . . .295 Power—On Self Test . . . . . . . . . . . . . . . . . . . . . . . . . . . . . . . . . . . . . . . . . . . . . . .295 SmartCal Media Calibration . . . . . . . . . . . . . . . . . . . . . . . . . . . . . . . . . . . . . . . . .296 Configuration Report (CANCEL Self Test). . . . . . . . . . . . . . . . . . . . . . . . . . . . . .297 Printer Network (and Bluetooth) Configuration Report. . . . . . . . . . . . . . . . . . . . .298 Print Quality Report (FEED self test) . . . . . . . . . . . . . . . . . . . . . . . . . . . . . . . . . .298 Reset Printer Factory Defaults (PAUSE + FEED Self Test). . . . . . . . . . . . . . . . .302 Reset Network Factory Defaults (PAUSE + CANCEL Self Test). . . . . . . . . . . . .302 Reset Button . . . . . . . . . . . . . . . . . . . . . . . . . . . . . . . . . . . . . . . . . . . . . . . . . . . .303 Communication Diagnostics Test. . . . . . . . . . . . . . . . . . . . . . . . . . . . . . . . . . . . .304 Sensor Profile. . . . . . . . . . . . . . . . . . . . . . . . . . . . . . . . . . . . . . . . . . . . . . . . . . . .305
Advanced Mode . . . . . . . . . . . . . . . . . . . . . . . . . . . . . . . . . . . . . . . . . . . . . . . . . . . . .307 Manual Media Calibration. . . . . . . . . . . . . . . . . . . . . . . . . . . . . . . . . . . . . . . . . . .308 Manual Print Width Adjustment . . . . . . . . . . . . . . . . . . . . . . . . . . . . . . . . . . . . . .309 Manual Print Darkness Adjustment . . . . . . . . . . . . . . . . . . . . . . . . . . . . . . . . . . .310 Factory Test Modes . . . . . . . . . . . . . . . . . . . . . . . . . . . . . . . . . . . . . . . . . . . . . . . . . .311
• Interface Connector Wiring . . . . . . . . . . . . . . . . . . . . . . . . . . . . . . . . . . . .312
Universal Serial Bus (USB) Interface . . . . . . . . . . . . . . . . . . . . . . . . . . . . . . . . . . . . .312 Serial Port Interface . . . . . . . . . . . . . . . . . . . . . . . . . . . . . . . . . . . . . . . . . . . . . . . . . .313 Connecting the Printer to a DTE Device . . . . . . . . . . . . . . . . . . . . . . . . . . . . . . .313 Connecting the Printer to a DCE Device . . . . . . . . . . . . . . . . . . . . . . . . . . . . . . .314
• Dimensions . . . . . . . . . . . . . . . . . . . . . . . . . . . . . . . . . . . . . . . . . . . . . . . . .315
ZD620 / ZD420 Thermal Transfer Models . . . . . . . . . . . . . . . . . . . . . . . . . . . . . . . . .316 ZD620 / ZD420 Ribbon Cartridge Thermal Transfer Models . . . . . . . . . . . . . . . . . . .323 ZD620 / ZD420 Direct Thermal Models . . . . . . . . . . . . . . . . . . . . . . . . . . . . . . . . . . .330
• Media . . . . . . . . . . . . . . . . . . . . . . . . . . . . . . . . . . . . . . . . . . . . . . . . . . . . . .335
Types of Thermal Media. . . . . . . . . . . . . . . . . . . . . . . . . . . . . . . . . . . . . . . . . . . . . . .336 Determining Thermal Media Types . . . . . . . . . . . . . . . . . . . . . . . . . . . . . . . . . . .336 General Media and Print Specifications. . . . . . . . . . . . . . . . . . . . . . . . . . . . . . . .337 Label Dispenser (Peeler) . . . . . . . . . . . . . . . . . . . . . . . . . . . . . . . . . . . . . . . . . . .338 Standard (Media) Cutter. . . . . . . . . . . . . . . . . . . . . . . . . . . . . . . . . . . . . . . . . . . .339 Linerless (Media) Cutter — Direct Thermal only. . . . . . . . . . . . . . . . . . . . . . . . . . .339
16

Contents
• ZPL Configuration . . . . . . . . . . . . . . . . . . . . . . . . . . . . . . . . . . . . . . . . . . . .342
Managing the ZPL Printer Configuration . . . . . . . . . . . . . . . . . . . . . . . . . . . . . . . . . .342 ZPL Printer Configuration Format . . . . . . . . . . . . . . . . . . . . . . . . . . . . . . . . . . . .343 Configuration Setting to Command Cross-reference . . . . . . . . . . . . . . . . . . . . . . . . .344 Printer Memory Management and Related Status Reports . . . . . . . . . . . . . . . . . . . .347 ZPL Programming for Memory Management. . . . . . . . . . . . . . . . . . . . . . . . . . . .347
17

Introduction
This section introduces the award winning Zebra® Link-OS 4-inch desktop thermal label printers, the ZD620 and ZD420. It has an overview of the Link-OS printer’s features and options, and what ships with your new printer.
This document covers the following ZD-series desktop printer models:
•ZD620 Thermal Transfer Printer — www.zebra.com/zd620t-info
•ZD620 Direct Thermal Printer — www.zebra.com/zd620d-info
•ZD420 Thermal Transfer Ribbon Cartridge Printer — www.zebra.com/zd420c-info
•ZD420 Thermal Transfer Printer — www.zebra.com/zd420t-info
•ZD420 Direct Thermal Printer — www.zebra.com/zd420d-info
Link-OS 4 inch Desktop Thermal Printers
The Zebra® Link-OS 4 inch Desktop printers are compact label printers with a wide range of features and options.
•Direct Thermal and Thermal Transfer printer models available.
•Includes ZD420 Healthcare printer models with plastics that withstand common hospital cleaning chemicals and include a medical grade power supply.
•ZD620 printers can support printing speeds* up to 203.4 mm/s per second (8 ips — inches per second) for 203 dpi (dots per inch print density) printers and
152.4 mm/s (6 ips) for 300 dpi version printers.
•ZD420 printers can support printing speeds* up to 152.4 mm/s per second (6 ips) for 203 dpi printers and 101.6 mm/s (4 ips) for 300 dpi version printers.
•These printers support ZPL™ and EPL Zebra printer programming languages and a wide variety of other printer control languages via Link-OS Virtual Devices.
* -Maximum print speeds vary by model, print resolution, and the type of media in use.
18

Introduction
Common Desktop Link-OS Printer Features:
•OpenAccess ™ design for simplified media loading.
•Color-coded “touch points” for operator controls and media guides.
•Enhanced user interface featuring three buttons and five status indicators.
•Easy, field installable media handling options.
•Media roll support:
•Outer Diameter (O.D.): Up to 127 mm (5 inch) and
•Inner Diameter (I.D.) roll cores:12.7 mm (0.5 inch), 25.4 mm (1 inch) and additional core sizes with optional media core adapters.
•Movable Sensor provides compatibility with the widest range of media types:
•Compatible with full or partial width black mark media.
•Compatible with notched or slotted media.
•Multi-center position transmissivity sensor for use with label gap/web media.
•Universal Serial Bus (USB) Host Port that can be used for easy firmware upgrades.
•Universal Serial Bus (USB) 2.0 interface
•Modular Connectivity Slot for field installable 10/100 Ethernet (802.3 RJ-45) or Serial (RS-232 DB-9) interface options.
•On–the–fly OpenType and TrueType font scaling and import, Unicode, resident scalable font (Swiss 721 Latin 1 font), and a selection of resident bitmap fonts.
•Backwards compatibility focused technology eases printer replacement:
•Drop in replacement of legacy Zebra desktop printers. The printer accepts both EPL and ZPL programming languages.
•Supports Link-OS virtual devices to interpret non-Zebra printer programming languages.
•XML-Enabled printing—allows XML communications for barcode label printing, eliminating license fees and print server hardware and lowering customization and programming costs.
•Zebra ™ Global Printing Solution – supports Microsoft Windows keyboard encoding (and ANSI), Unicode UTF-8 and UTF 16 (Unicode Transformation Formats), XML, ASCII (7 and 8 bit used by legacy programs and systems), basic single and double byte font encoding, JIS and Shift-JIS (Japanese International Standards), Hexadecimal encoding, and custom character mapping (DAT table creation, font linking, and character remapping).
•Supports printer configuration via a setup utility running on mobile devices.
•Zebra’s Print Touch (Near Field Communication — NFC) ‘tap’ to pair devices, access printer information, and access mobile applications.
•Zebra’s Link-OS — an open platform that connects operating systems for smart Zebra devices with powerful software apps (applications), making the devices easy to integrate, manage and maintain from any location.
19

Introduction
•Printhead maintenance reporting enabled and customizable by the user.
•Easy tool-less replacement of printhead and platen (driver) roller.
•A minimum of 64 MB of internal (E:) printer memory for storing forms, fonts, and graphics.
Link-OS 4 inch Desktop Printer Options:
•A Color LCD User Interface for easy setup, print configuration, printing, and a range of Link-OS features.
•Healthcare printer models:
•Healthcare wipe-able plastics for disinfecting and cleaning.
•IEC 60601-1 certified power supply.
•Wi-Fi (802.11ac – includes a/b/g/n) and Bluetooth Classic 4.1 (3.X compatible) wireless connectivity as a factory installed option.
•Thermal Transfer Printing — A choice of easy loading thermal transfer ribbon cartridge or dual capacity ribbon roll (74 m and 300 m ribbons) models.
•ZD620 and select ZD420 printers have an factory installed, on-board Real Time Clock (RTC) in printers that have Bluetooth Low Power (BTLE) or Wi-Fi with Classic Bluetooth configurations.
•Field installable connectivity modules:
•Internal Ethernet Print Server (LAN, RJ-45 connector) — supports 10Base-T, 100Base-TX and fast Ethernet 10/100 auto-switching networks.
•Serial (RS-232 DB-9) Port
•Field installable media handling options:
•Label Dispenser (Peel-Off liner and present the label for the operator).
•General purpose media cutter.
•Linerless Label Tear-Off printing with a ‘Label Taken’ sensor.
•Linerless Label Cutter with a ‘Label Taken’ sensor.
20
![]()
Introduction
•Media Core Adapter kit include adapters for media rolls with Outer Diameters (O.D.) up to 127 mm (5 inches):
•38.1 mm (1.5 inch) I.D. media cores.
•50.8 mm (2.0 inch) I.D. media cores.
•76.2 (3.0 inch) I.D. media cores.
•Field upgrade kit to change printer resolution is available. Change your printer from 203 dpi to 300 dpi — or — from 300 dpi to 203 dpi printing with these tool-less upgrade kits.
•Asian Language support with printer configuration options for the large Simplified and Traditional Chinese, Japanese, or Korean character sets.
•Printers sold in China have the Simplified Chinese SimSun font pre-installed.
•Zebra® ZBI 2.0 ™ (Zebra BASIC Interpreter) programming language. ZBI allows you to create custom printer operations that can automate processes, use peripherals (i.e. scanners, scales, keyboards, Zebra® ZKDU ™ , etc.) all without being attached to a PC or network.
•Locking Media Cabinet for ZD620 Direct Thermal Healthcare printer models. This special Healthcare model includes for additional security, Kensington ™ Slot for Kensington locking devices to secure the printer.
21

Introduction
Zebra Label Printing Solution
The printer is just one of three (3) parts of a printing solution. To print; you need a printer (ZD620 or ZD420), compatible media (thermal transfer ribbon cartridge or rolls, and thermal transfer media; or just direct thermal media), and software (driver, applications or programming) to tell the printer what to do and print. The printer can print without being connected to other devices or systems.
The media may be labels, tags, tickets, receipt paper, fan-fold stacks, tamper proof labels, etc.
Zebra assists you with label design and print with the free label and form design software: ZebraDesigner ™ for Windows PC operating systems.
Zebra provides a complete suite of free Link-OS software applications and drivers to configure printer settings, print labels and receipts, get printer status, import graphics and fonts, send programming commands, update firmware, and download files.
The Zebra web site or your reseller will be able to help you identify media for your desired use case.
22

Introduction
Modes of Printing
You can operate this printer in many different modes and media configurations:
•Direct thermal printing (which uses heat sensitive media to print).
•Thermal transfer printing with easy to use thermal transfer ribbon cartridge or rib— bon rolls (heat and pressure transfers ink from the ribbon to media).
•Standard Tear-Off mode allows you to tear off each label/receipt or batch print a strip of labels and tear them off after it is printed.
•Label Dispense Mode: If an optional dispenser is installed, the backing material can be peeled away from the label as it is printed. After this label is removed, the next one is printed.
•Media Cutting: If an optional media cutter is installed, the printer can cut the label liner between labels, receipt paper or tag stock.
•Linerless media printing with Cut or Tear-Off label options for easy pick and place label applications.
•Stand-alone: The printer can print without being directly connected to a computer.
•A printer with the color LCD display option can use menus to access and print a label format/form.
•A Link-OS App connecting via Bluetooth (Wireless option).
•An auto running label format/form (programming based).
•A data input device connected to the printer’s USB Host port or serial port. This mode accommodates data input devices, such as scanners, weigh scales, a Zebra Keyboard Display Unit (ZKDU), etc.
•Shared network printing: Printers configured with Ethernet (LAN) and Wi-Fi interface options include an internal print server.
23
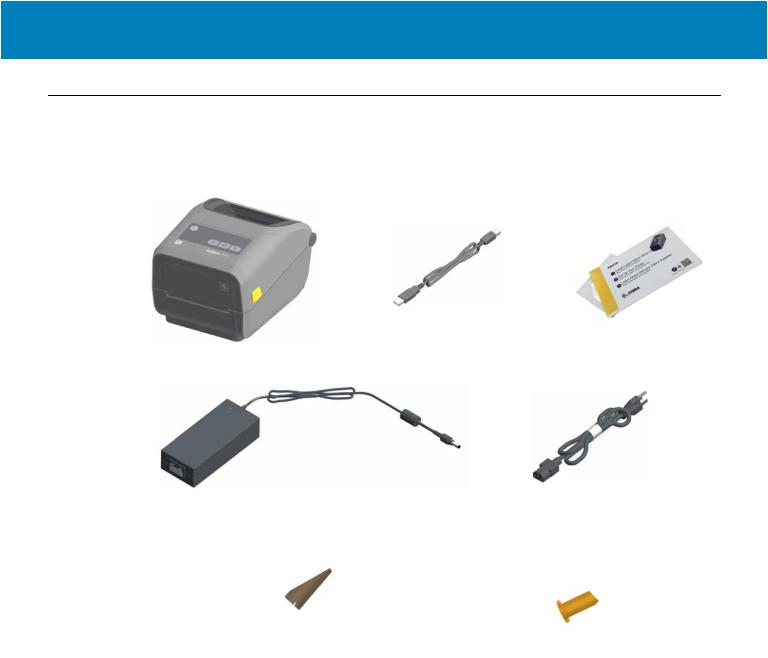
Introduction
What’s in the Box?
After unpacking, make sure you have all parts shown below. Follow the procedures for inspecting the printer to familiarize yourself with printer parts so you can follow the instructions in this book.
|
Printer |
USB Cable |
Printer Documentation |
Power
Supply
Included with Thermal Transfer Printer (uses ribbon rolls)
|
Empty Starter Ribbon Cores |
Non-Zebra 300 Meter Ribbon |
|
Adapters |
24

Introduction
Unpack and Inspect the Printer
When you receive the printer, immediately unpack it and inspect for shipping damage.
•Save all packing materials.
•Check all exterior surfaces for damage.
•Open the printer and inspect the media compartment for damage to components.
If you discover shipping damage upon inspection:
•Immediately notify the shipping company and file a damage report. Zebra Technologies Corporation is not responsible for any damage to the printer incurred during shipment, and will not cover the repair of this damage under its warranty policy.
•Keep all packaging material for shipping company inspection.
•Notify your authorized Zebra® reseller.
See the Zebra Web site for ‘How To’ videos on packing and unpacking your printer. See About section for links to one of these 5 basic Link-OS printer variations.
25
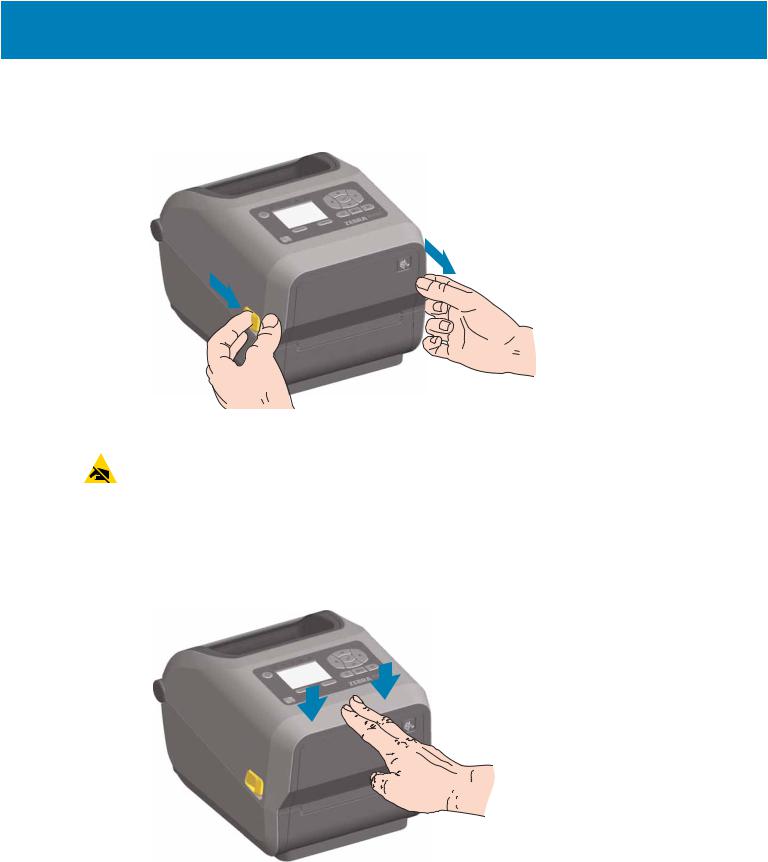
Introduction
Open the Printer
To access the media compartment, pull the release latches towards you and lift the cover. Check the media compartment for loose or damaged components.
ESD Caution • The discharge of electrostatic energy that accumulates on the surface of the human body or other surfaces can damage or destroy the printhead and other electronic components used in this device. You must observe static-safe procedures when
working with the printhead or the electronic components under the top cover.
Closing the printer
Lower the top cover. Press down in the middle of the cover in front until the cover snaps closed.
26

Printer Features
ThissectionwillhelpyouidentifyfeaturesoftheseZebra®Link-OS4-inchdesktopthermal label printers, the ZD620 and ZD420. ‘How to’ videos on the Zebra Web site include a Printer Features video; as well as; other printer setup and task specific videos. Links to these five (5) Link-OS 4- inch desktop printers are:
•ZD620 Thermal Transfer Printer — www.zebra.com/zd620t-info
•ZD620 Direct Thermal Printer — www.zebra.com/zd620d-info
•ZD420 Thermal Transfer Ribbon Cartridge Printer — www.zebra.com/zd420c-info
•ZD420 Thermal Transfer Printer — www.zebra.com/zd420t-info
•ZD420 Direct Thermal Printer — www.zebra.com/zd420d-info
27
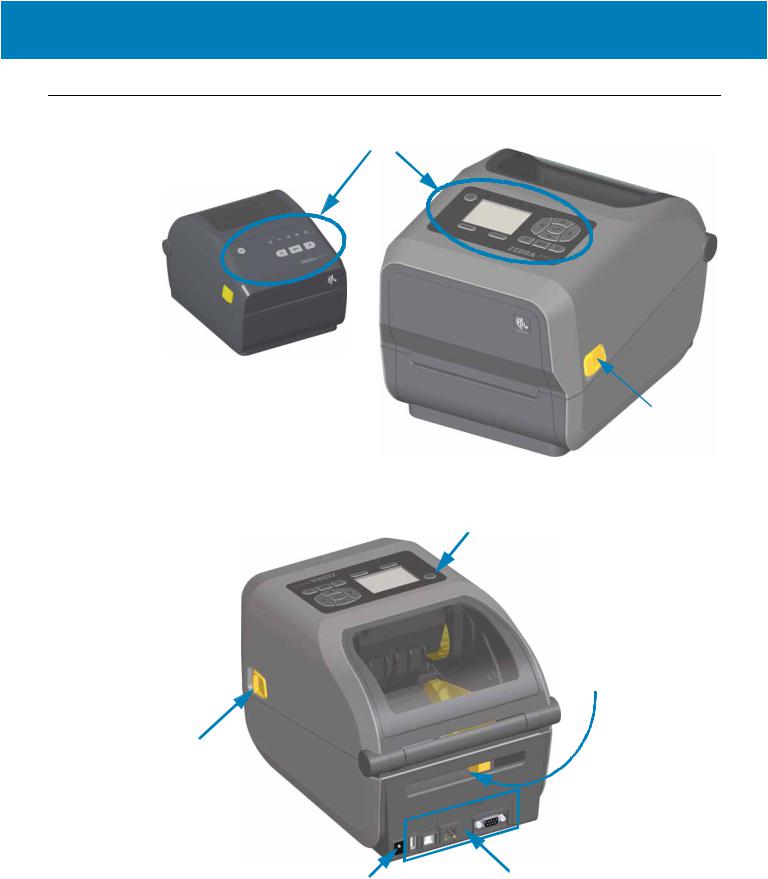
Printer Features
Printer Features
User Interface
Release
Latch
For more details on printer controls, see Controls and Indicators
Power Button
Fan-Fold Media
Entry Slot
Release
Latch
|
DC Power |
Interface and Connectivity |
|
Receptacle |
Module Slot Access |
28
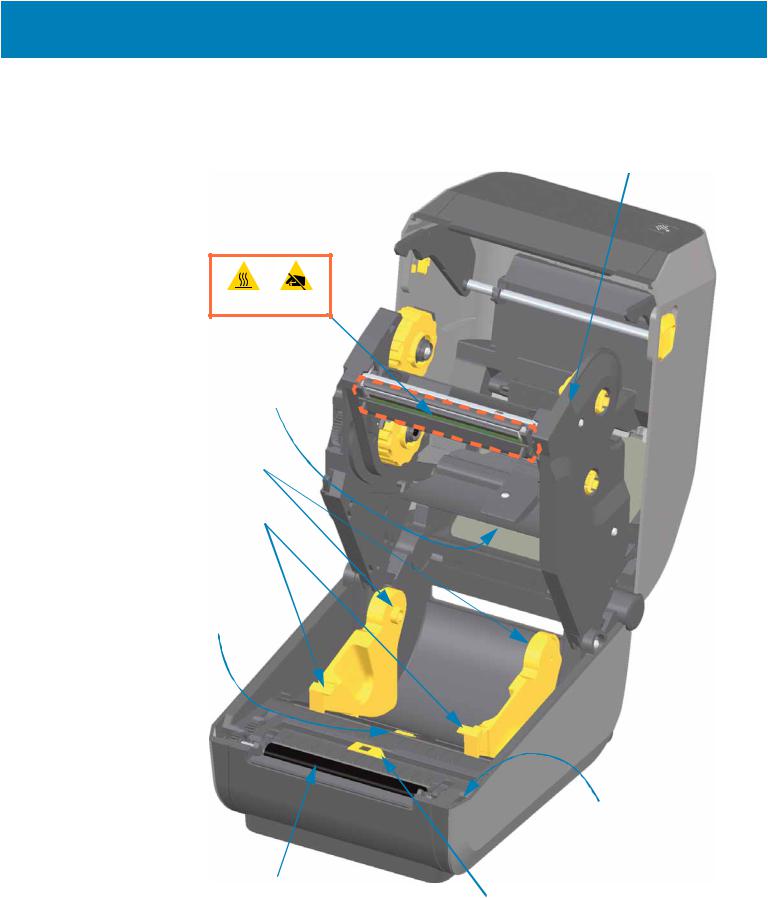
Printer Features
Inside the ZD620 Dual Capacity Ribbon Roll Printer
Ribbon Carriage
Upper Web (Gap)
Array Sensor
(other side)
Roll Holders
Media Guides
Media Guide Stop
Adjustment
Head-Up Sensor
(inside)
Platen (Drive) Roller
Movable Sensor
(Black Mark and Lower Web/Gap)
29
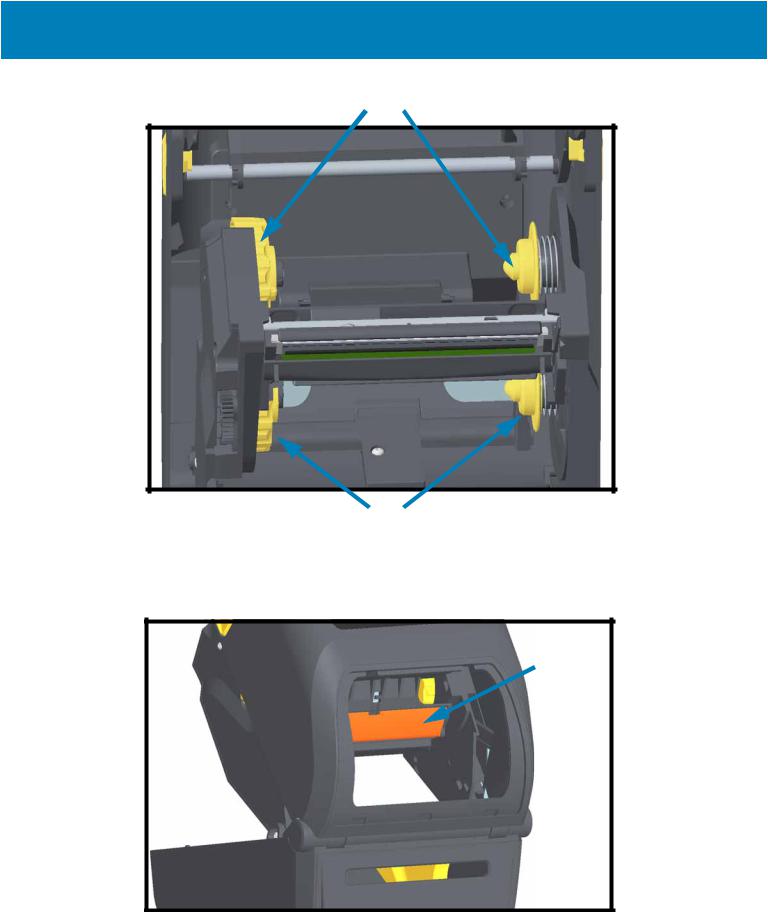
Printer Features
Dual Capacity Ribbon Chassis — Ribbon Roll Holders
Take Up Spindles
Supply Spindles (full ribbon rolls)
Media Dancer — ZD620 Printer Models Only
The printer’s window is removed to show the Media Dancer (plate). the Media Dancer is re-colored to make it easier to see. It is the same color as the dark gray parts adjacent to it.
Media
Dancer
(ZD620 Only)
30
![]()
Printer Features
Inside the ZD620 and ZD420 Direct Thermal Printers
Printhead
Upper Web (Gap) 
Array Sensor
Roll Holders
Media Guides
Media Guide Stop
Adjustment
Platen (Drive) Roller
Movable Sensor
Media Dancer
(ZD620 Only)
Head-Up Sensor
(inside)
(Black Mark and Lower Web/Gap)
31

Printer Features
Inside the ZD420 Ribbon Cartridge Printer
Ribbon Drive
Transport
Ribbon Cartridge
Shown Installed
(sold separately)
Upper Web (Gap)
Array Sensor
Roll Holders
Media Guides
Media Guide Stop
Adjustment
Release
Arms (2)
Head-Up Sensor
(inside)
Platen (Drive) Roller
 Movable Sensor
(Black Mark and Lower Web/Gap)
32

Printer Features
Accessing the Printhead of the Ribbon Cartridge Printer
PRINTHEAD ACCESS
1.Pull both release arms out (green highlighted black parts).
2.Ribbon drive transport drops down.
3.Lift printhead actuator arm up to access the printhead
Printhead
Actuator Arm
Backside of
Printhead


Ribbon Sensor
Ribbon Cartridge
Authentication and
Status Interface
Ribbon Sensor’s 
Reflector
33

Printer Features
Label Dispenser Option (field installable) — All Models
|
Label Taken |
Label Liner |
|
Sensor |
Exit Area |
|
Label Peel Bar |
|
|
Door Latch |
Dispenser Door |
|
Peel Roll |
Cutter Option (field installable) — All Models
Cutter Module
Media Exit Slot
34

Printer Features
Linerless Media Tear-Off Option (Direct Thermal Models Only)
 Label Taken
Sensor
Linerless Cutter Option (Direct Thermal Models Only)
Label Taken
Sensor
Cut Label Landing
Area
35

Printer Features
Identifying Platen Drive Rollers Types
The platen (drive) rollers are colored differently to identify the platen type and print resolution of your printer (and the platen). Do not exchange platen types unless instructed to by an upgrade procedure or Zebra technical support. The printer will not operate correctly and may cause a variety of problems requiring maintenance.
203 dpi Standard Platen (black)
300 dpi Standard Platen (gray)
203 dpi Linerless Platen (reddish-brown)
300 dpi Linerless Platen (brown)
36

Printer Features
Printer Power Supply Options
ZD-Series printers offer field installable attached power options: an attached power supply base or a battery power base (available in Q2 2018). These options easily attach with screws and replace the power supply that was included with your printer.
Attached Power Supply Base
Attached Power
Supply Base
Battery Power Base and Power Pack
|
Battery Power Base |
|
|
Battery Power Base |
and Accessories |
|
(artist rendering) |
available after Q2 2018 |
37

Printer Features
ZD620 and ZD420 Locking Printer Features
This option is only available in a Healthcare ZD620 printer model. It includes a lock and key access to the printer’s media compartment and a Kensington Lock Slot on the back panel of the printer to secure the printer. For more information on the Locking Printer option, see ZD620 and ZD420 Locking Printer Option.
Cabinet Lock
Kensington Lock Slot
38
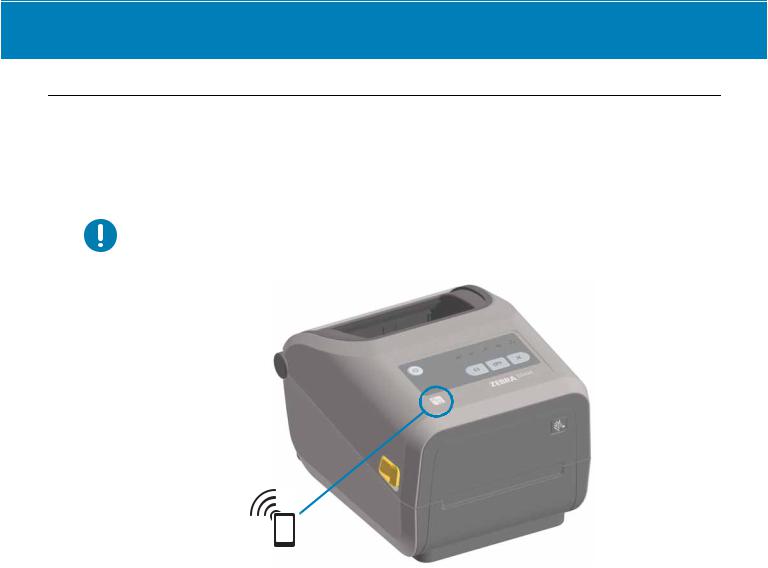
Printer Features
Zebra Print Touch
The Zebra Print Touch ™ feature allows you to touch an Android ™ -based, Near Field Communication (NFC)—enabled device such as a smart phone or tablet to the printer’s Print Touch logo to pair the device to the printer. This capability allows you to use your device to provide information for which you are prompted and then print a label using that information.
Important • Some mobile devices may not support NFC communication with the printer until you configure the required NFC settings in your device. If you encounter difficulties, consult your service provider or your smart device manufacturer for more information.
Print Touch Location
(Passive NFC)
Data encoded into the tag includes:
•A URL for a Zebra QuickHelp style support web page
•The printer’s unique Bluetooth Low Energy MAC address
•The printer’s Bluetooth Classic MAC address (if present)
•The printer’s Wi-Fi (WLAN) MAC address (if present)
•The printer’s Ethernet (LAN) MAC address (if present)
•The printer SKU – ex. ZD42022-D01W01EZ
•The printer’s unique serial number
The NFC tag can be used to:
•Facilitate Bluetooth pairing with a compatible mobile device
•Launch an application
•Launch a mobile browser to a web page
39

Install Hardware Options
This section assists you installing common printer connectivity modules and media handling options.
Important • To simplify and speed up the setup process, install all connectivity modules and media handling options before setting up and using your printer for the first time.
Important • It is strongly recommended that you update your printer’s firmware after the printerhascompletedthesetupprocess.Manyoftheseoptionshaveinternalfirmwarethat require an update to operate properly with the printer’s Main Logic Board’s installed firmware version.
40
![]()
Install Hardware Options
Field Installable printer Accessories and Options
Printer Connectivity Modules
The connectivity module’s access door must be removed prior to installing the following options — Accessing the Connectivity Module Slot.
•ZD420 Serial Port — Installing the Serial Port Module
•RS-232 DB-9 connector with DTE/DTC auto-switching — Serial Port Interface
•ZD420 Internal Ethernet (LAN — wired) — Installing the Internal Ethernet (LAN) Module
•RJ-45 connector
•Fast Ethernet 10/100 auto-switching, 10Base-T, and 100Base-TX networks.
Media Handling Options
The printer’s standard bezel must be removed prior to installing the following options — Removing the Standard Bezel.
•Label Dispenser (Peel-Off Liner and Present Label for Operator) — Installing the Label Dispenser
•General Purpose Media Cutter — Installing the Standard Media Cutter
•Linerless Media Cutter — Installing the Linerless Media ‘Tear-Off’ Bezel
•Linerless Media ‘Tear-Off’ Label Bezel —
•Printer Resolution Upgrade Kits (203 dpi and 300 dpi) — Print Resolution Upgrade Kits
•Media Roll Adapters for 38.1 mm (1.5 inches), 50.8 mm (2.0 inches), or 76.2 mm (3.0 inches) I.D. media cores — Media Roll Core Size Adapters
Power Base Options
The ZD-Series (ZD620 and ZD420) printers are supported with power base field upgrade kits for each the direct thermal and thermal transfer versions of these printers.
•Attached Power Supply Base (power supply included)
•Battery Power Base and Battery Pack — Not Available until after Q2 2018. The battery power base is designed to install like the AC Power Base
41

Install Hardware Options
Printer Connectivity Modules
The connectivity modules can be easily installed without tools.
ESD Caution • The discharge of electrostatic energy that accumulates on the surface of the human body or other surfaces can damage or destroy the printhead or electronic components used in this device. You must observe static-safe procedures when working
with the printhead or the electronic components.
Power Failure Recovery Mode Jumper (OFF by Default)
All of the Printer Connectivity Modules have a Power Failure Recovery jumper. It is set to the OFF position by default. With the jumper set to ON, the printer will automatically Power ON when plugged into an active (ON) AC power source (and not power off). See Standard Interface Controls — Power Button — Power Failure Recovery Mode for power ON/OFF behaviors. See Setting the Power Failure Recovery Mode Jumper for instructions on activating the mode.
Note • The Power Failure Recovery Mode is only available on printers with a Printer
Connectivity Module installed in your printer.
Accessing the Connectivity Module Slot
1.Disconnect the DC power plug from the rear of the printer.
2.Open the module access door by pushing down on the top of the door with your finger tip. This releases the latch. Pull the door away and down to remove.
42

Install Hardware Options
Installing the Serial Port Module
1.With the DC power plug and module’s access door removed, slide the serial port module into the printer. Push the circuit card in slowly but firmly until the card is just past the inside lip of the access door.
2.Align the bottom of the serial port’s door cover to the bottom lip of the module access opening. Swing the door up and snap the cover closed.
Serial Port (RS-232)
Note • For best printer performance, update the printer’s firmware after installing options or immediately after the printer’s initial setup. See Updating Printer Firmware.
43

Install Hardware Options
Installing the Internal Ethernet (LAN) Module
1.With the DC power plug and module’s access door removed, slide the Ethernet module into the printer. Push the circuit card in slowly but firmly until the card is just past the inside lip of the access door.
2.Align the bottom of the Ethernet port’s door cover to the bottom lip of the module access opening. Swing the door up and snap the cover closed.
Ethernet Port (RJ-45)
Note • For best printer performance, update the printer’s firmware after installing options or immediately after the printer’s initial setup. See Updating Printer Firmware.
44

Install Hardware Options
Removing Printer Connectivity Modules
Connectivity modules can easily be removed for the purpose of reconfiguring a printer or repair. You should not remove and replace connectivity modules as a general practice.
1.Remove the interface cable (Ethernet or Serial).
2.Remove the module access door. Push down on the top of the door with your finger tip. This releases the latch. Pull the door away and down to remove.
3.Re-attach the interface cable to the connectivity module and secure the cable.
4.Gently pull on the interface cable that is secured to the connectivity module. Slowly pull the module out of the printer.
5.Install a different connectivity module or re-install the connectivity module’s access door. Align it to the bottom lip of the access opening and swing it up to snap and lock in place.
45

Install Hardware Options
Media Handling Options
ESD Caution • The discharge of electrostatic energy that accumulates on the surface of the human body or other surfaces can damage or destroy the printhead or electronic components used in this device. You must observe static-safe procedures when working
with the printhead or the electronic components.
Removing the Standard Bezel
The standard bezel must be removed to mount your media handling option.
1.Disconnect the printer’s DC power input plug from the rear of the printer.
2.Turn the printer upside down. Remove the two (2) mounting screws with the supplied Torx wrench. Save the screws.
3.Slide the bezel down the front about 12.5 mm (0.5 inch) and pull the loose bezel out.
46

Install Hardware Options
Installing the Label Dispenser
The standard bezel must be removed and DC input power disconnected before the Label Dispenser can be installed. See Removing the Standard Bezel.
1.Place the label dispenser module and printer right side up with the top of the module 12.5 mm (0.5 inch) below the bottom of the top cover. Center and push the module into the front of the printer and slide it up until it stops.
2.Turn the printer upside down and attach the module to the printer with the two screws using the Torx wrench.
Note • For best printer performance, update the printer’s firmware after installing options or immediately after the printer’s initial setup. See Updating Printer Firmware.
47

Install Hardware Options
Installing the Standard Media Cutter
The standard bezel must be removed and DC input power disconnected before the Label Dispenser can be installed. See Removing the Standard Bezel.
Cut Warning • There are no operator serviceable parts in the cutter unit. Never remove the cutter cover (bezel). Never attempt to insert objects or fingers in to the cutter
mechanism.
Important• Using un-approved tools, cotton swabs, solvents, etc. all may damage or shorten the cutter’s usable life or cause the cutter to jam.
1.Place the Cutter module and printer right side up with the top of the module even with the bottom of the top cover. Center and push the module into the front of the printer and slide it up until it stops.
2.Turn the printer upside down and attach the module to the printer with the two screws using the Torx wrench.
Note • For best printer performance, update the printer’s firmware after installing options or immediately after the printer’s initial setup. See Updating Printer Firmware.
48

Install Hardware Options
Installing the Linerless Media Cutter
The standard bezel must be removed and DC input power disconnected before the Linerless Media Cutter Module can be installed. See Removing the Standard Bezel.
1.Open the printer and remove replace the standard platen roller with the Linerless platen roller. See Platen Cleaning and Replacement for a replacement procedure. See Installing the Printhead Resolution Upgrade Kits to help you identify platen rollers.
2.Place the Cutter module and printer right side up with the top of the module even with the bottom of the top cover. Center and push the module into the front of the printer and slide it up until it stops.
3.Turn the printer upside down and attach the module to the printer with the two screws using the Torx wrench.
Note • For best printer performance, update the printer’s firmware after installing options or immediately after the printer’s initial setup. See Updating Printer Firmware.
49

Install Hardware Options
Installing the Linerless Media ‘Tear-Off’ Bezel
The standard bezel must be removed and DC input power disconnected before the Linerless Tear-Off Bezel module can be installed. See Removing the Standard Bezel.
1.Open the printer and remove replace the standard platen roller with the Linerless platen roller. See Platen Cleaning and Replacement for a replacement procedure. See Installing the Printhead Resolution Upgrade Kits to help you identify platen rollers.
2.Place the Tear-Off bezel module and printer right side up with the top of the module even with the bottom of the top cover. Center and push the module into the front of the printer and slide it up until it stops.
3.Turn the printer upside down and attach the module to the printer with the two screws using the Torx wrench.
Note • For best printer performance, update the printer’s firmware after installing options or immediately after the printer’s initial setup. See Updating Printer Firmware.
50
 Loading…

Устранение неполадок
Описание состояний индикатора
68
980608-151 Вер. C
GK420d™ Руководство пользователя
26.10.2010
Описание состояний индикатора
Значения индикатора и состояние принтера
Состояние и цвет индикатора
Состояние принтера
Для решения
проблемы
см. номер
Не горит
Выключен
1
Непрерывный зеленый
Горит
2
Непрерывный янтарный
Остановлен
3
Мигающий зеленый
Нормальная работа
4
Мигающий красный
Остановлен
5
Двойной мигающий зеленый
Пауза
6
Мигающий янтарный
Пауза
7
Попеременно мигающий зеленый и красный
Требуется
обслуживание
8
Мигающий красный, красный и зеленый
Требуется
обслуживание
9
Мигающий красный, янтарный и зеленый
(* НЕ выключайте питание!)
Дефрагментация
памяти
10*
by Tashreef Shareef
Tashreef Shareef is a software developer turned tech writer. He discovered his interest in technology after reading a tech magazine accidentally. Now he writes about everything tech from… read more
Updated on
- The Zebra printer not working issue can occur due to several reasons.
- You can quickly fix the problem by performing an effective power cycle.
- Additionally, cancel any print jobs, and check that all cables are connected properly.
- If the issue persists, try resetting the printer to factory default, which will reset the entire experience but is to be used as a last resort.
Zebra printers are popular for label and receipts prints. However, several users have reported the printer not working issue when trying to print labels.
Your Zebra printer may stop working due to several reasons. Some common reasons include temporary glitches, corrupted configuration, incorrect label width calibration, etc.
In this article, we show you a few quick ways to troubleshoot your Zebra printer and get it working again.
What are the common causes of the printer not working?
Your Zebra printer may stop working because of a variety of reasons which include settings, connection, and compatibility issues with your source system.
That being said, there are some other elements that you might want to check before diving deeper into this guide’s solutions:
- Check if the cables are firmly plugged into the port
- Make sure the network and power cables are directly plugged in and not through an extension cord
- No paper in the printer – some printers automatically stop any active tasks if the sensors detect that no papers is present in the paper tray. If you added more and more tasks after that moment, the printer will not work.
- No paint left in the printer – as you might expect, if the printer’s ink cartridges are empty, the printer is not able to print out anything
- Temporary glitches
- Check printer’s status – cancel and schedule some new tasks
In some other cases, the issue could be caused by a bad configuration profile, and this guide will also cover how to configure the default printing device on your PC.
Another common impediment when dealing with Zebra printers appears if the drivers are not updated to the latest version, and that’s another important topic that we will discuss below.
What can I do if my Zebra printer is not working?
- What are the common causes of the printer not working?
- What can I do if my Zebra printer is not working?
- 1. Perform a power cycle
- 2. Cancel and reassign print jobs
- 3. Set Zebra printer as default
- 4. Update printer drivers
- 5. Reset to Factory Default
- 6. Perform label width calibration
- How do I reset my Zebra printer?
- Why is the Zebra printer flashing red?
- Why is the Zebra printer offline?
1. Perform a power cycle
- Make sure the printer is powered on.
- Press the switch near the power socket in the rear.
- Disconnect all cables – including power cable, network cable, and any USB cables.
- Wait for a few minutes so every component resets.
- Turn the printer back on and check if the issue is resolved.
2. Cancel and reassign print jobs
- Double-click on the printer icon in the notification area of your computer. You can also open it by searching for Printers & Scanners, selecting your printer in the list, and clicking Open Queue.
- Right-click on the print job you want to cancel and click Cancel.
In case your printer is not printing anything, try canceling all the pending print jobs. It is essential, as the more your computer attempts to print without success, the more it can affect your hardware.
Also, check your printer toner for proper printing. If the labels get stuck, try cleaning the roller from both ends. It may also mean you may have issues with the inside gears.
3. Set Zebra printer as default
- Click on Start and choose Settings.
- Go to Devices and open the Printers and Scanners tab.
- Uncheck the Let Windows manage my default printer option.
- Choose your printer from the list and click on Manage.
- Select Set as default to set this printer as your primary printing device.
Selecting a default printer makes it easy for the programs to send print jobs to the right device. You can also do this from the Control Panel’s Devices and Printers section.
4. Update printer drivers
Outdated or missing printer drivers can cause your printing device to malfunction. For example, it may stop printing or print incorrectly. To avoid this, make sure you have the latest printer drivers installed on your computer.
You can manually install printer drivers or use third-party driver updater tool which scans your system for missing and outdated device drivers and installs them with one click.
Often, your computer system might not be able to update the generic drivers for your hardware and peripherals correctly. There are vital differences between a generic driver and a manufacturer’s driver. Finding the correct driver versions for every hardware component can become tiresome.That’s why a dependable updater can help you find and update your drivers automatically. We strongly suggest the Outbyte Driver Updater, and here’s how to do it:
- Download and install the Outbyte Driver Updater app.
- Launch the software and wait for the app to detect all incompatible drivers.
- Now, it will show you a list of all outdated drivers to select the ones to Update or Ignore.
- Click on Update & Apply Selected to download and install the latest versions.
- Restart your PC to ensure the applied changes.


Outbyte Driver Updater
Maintain your device healthy by letting OutByte Driver Updater find the latest driver options.
Disclaimer: You may need to upgrade the app from the free version to perform specific actions.
5. Reset to Factory Default
- Press and hold the single round button on the front panel of your printer.
- Keep it pressed until the indicator light starts a flash sequence.
- When the indicator light flashes four times, release the button to complete the reset.
Resetting your Zebra printer to factory default will remove all the saved configurations. However, this is an ideal solution to deal with printer configuration corruption.
After resetting your printer, you would have to perform a label width calibration. Here’s how to do it.
6. Perform label width calibration
- Press and hold the round button on the front panel.
- As it starts a flash sequence, wait for the light to flash five times and release the button.
- This will trigger the printer width calibration process, where it will print a series of widths. The width will get wider with each print on a label.
- Press the round button once you have found the correct width for your labels.
After completing width calibration, you need to perform a calibration for other properties. To do this, press and hold the round button until the light flashes twice. Then, release the button, and that should complete the set of all other calibrations.
Zebra printer not working issues usually occur due to temporary glitches or incorrect printer configuration. To resolve the issue, perform a power cycle, cancel the pending job or set the printer as default. If that does not work, check for driver issues or try to reset the device to factory default as a last resort.
How do I reset my Zebra printer?
To reset your Zebra printer, make sure it is completely turned off. Next, press and hold the Pause + Feed key and turn on the printer. Keep the buttons pressed until the Status indicator is the only indicator lit.
Once the printer is reset, you will have to recalibrate and set it up again to get it working.
Alternatively, some Zebra printers come with a dedicated Reset button. Turn your printer flat on an even surface. Use a paper clip or small needle-like object to press the Reset button.
Why is the Zebra printer flashing red?
Your Zebra printer will flash red if the print head is open. Close the top cover and then press the Feed button to resume printing.
Why is the Zebra printer offline?
Your Zebra printer may show offline if there is a delay on the network, issues with the printer spooler, print server, etc.
As you can see, there are plenty of solutions for encountering issues with your printer, and we would suggest that you try each of these solutions in order, for the best results.
Don’t hesitate to share with us which of these solutions proved efficient in your case. You can do so by using the comment section below.
![]()