Try the following:
Step 1: Release a Held for Resources Job From the Active Jobs Screen
Jobs can be held or paused for various reasons. For example, if the printer is out of paper, or the correct paper Size, Type, or Color requested from the print job is not loaded or properly configured on one of the trays, the job is Held for Resources. Additionally, if you send a sample job, the first copy of the job prints and the rest of the copies hold until you release them. If the system administrator has configured the Hold All Jobs feature, any job sent to the printer is held until you release it.
Releasing a Held Print Jobs
- At the Control Panel, press the Jobs button.
- Select Active Jobs.
- To determine why a job was held, select the job to view the Details.
- Do one of the following:
- To print the job held for resources, replenish the resources required. Be sure to configure the tray settings for the media loaded. The job resumes automatically when the required resources are available. If the job does not print automatically, touch Resume.
- To delete the print job, touch Delete. At the prompt, touch Delete.
- To release all held jobs, select Release All Jobs.
- To return to the Home screen, press the Home button.
NOTE: If the job does not delete, cancel all held jobs by pressing and holding down the Power button until the machine shuts down. Wait until the Power light stops flashing before powering the printer back on.
Step 2: Make Sure the Tray Being Used for the Job is Configured With the Correct Paper Size and Type
When loading paper trays, make sure to program the tray with the correct paper size and paper type.
Step 3: Make Sure the Paper Type and Size is Set Correctly in the Print Driver
NOTE: These steps were performed on a computer with a Microsoft Windows 7 operating system. Steps will vary with other operating systems.
Select the Correct Paper Type and Size:
- Open the file to be printed.
- Click on File > Print.
- Click on Printing Preferences or Properties to access the Xerox print driver settings.
- Click on the Printing Options tab.
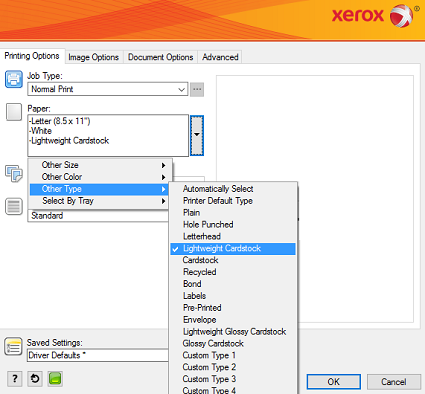
- Click on the Paper pull-down menu, select Other Type, and then select the correct paper type. For example, Plain or Lightweight Cardstock.

- Click on the Paper pull-down menu again, select Other Size, and then select the correct paper size.
- Select any other required printing options.
- Click on OK.
- Click on OK or Print to send the job to the printer.
Step 4: Make Sure a Supported Print Driver is Being Used
Make sure a supported print driver is being used. It is recommended to use the PostScript (PS) print driver. Visit www.support.xerox.com to locate print drivers for this printer.
Try the following:
Step 1: Release a Held for Resources Job From the Active Jobs Screen
Jobs can be held or paused for various reasons. For example, if the printer is out of paper, or the correct paper Size, Type, or Color requested from the print job is not loaded or properly configured on one of the trays, the job is Held for Resources. Additionally, if you send a sample job, the first copy of the job prints and the rest of the copies hold until you release them. If the system administrator has configured the Hold All Jobs feature, any job sent to the printer is held until you release it.
Releasing a Held Print Jobs
- At the Control Panel, press the Jobs button.
- Select Active Jobs.
- To determine why a job was held, select the job to view the Details.
- Do one of the following:
- To print the job held for resources, replenish the resources required. Be sure to configure the tray settings for the media loaded. The job resumes automatically when the required resources are available. If the job does not print automatically, touch Resume.
- To delete the print job, touch Delete. At the prompt, touch Delete.
- To release all held jobs, select Release All Jobs.
- To return to the Home screen, press the Home button.
NOTE: If the job does not delete, cancel all held jobs by pressing and holding down the Power button until the machine shuts down. Wait until the Power light stops flashing before powering the printer back on.
Step 2: Make Sure the Tray Being Used for the Job is Configured With the Correct Paper Size and Type
When loading paper trays, make sure to program the tray with the correct paper size and paper type.
Step 3: Make Sure the Paper Type and Size is Set Correctly in the Print Driver
NOTE: These steps were performed on a computer with a Microsoft Windows 7 operating system. Steps will vary with other operating systems.
Select the Correct Paper Type and Size:
- Open the file to be printed.
- Click on File > Print.
- Click on Printing Preferences or Properties to access the Xerox print driver settings.
- Click on the Printing Options tab.
- Click on the Paper pull-down menu, select Other Type, and then select the correct paper type. For example, Plain or Lightweight Cardstock.
- Click on the Paper pull-down menu again, select Other Size, and then select the correct paper size.
- Select any other required printing options.
- Click on OK.
- Click on OK or Print to send the job to the printer.
Step 4: Make Sure a Supported Print Driver is Being Used
Make sure a supported print driver is being used. It is recommended to use the PostScript (PS) print driver. Visit www.support.xerox.com to locate print drivers for this printer.
Если копировальная функция работает стабильно, но есть проблема с распечаткой любых форматов файлов, обычно достаточно выполнить чистку реестра и очереди печати. Сама ошибка 024 747 в аппаратах Xerox указывает на неверно установленные параметры печати. Это означает, что настройки, указанные в программе, из которой осуществляется распечатка, в драйверах и в самом устройстве не совпадают. Из-за конфликта данных принтер перестает выполнять свою прямую задачу.
Указанная ошибка может появляться, когда вручную в настройках выбран тип бумаги (Б или С), а в параметрах драйвера указано, что выбор бумаги осуществляется автоматически. Для восстановления корректной работы устройства нужно в драйвере также указать лоток, откуда будет распечатываться документ.
Когда документы, созданные в Microsoft Word, или слайды презентации Power Point распечатываются без проблем, а картинки, имеющие расширение .jpg, .jpeg или .png и др. на бумагу не выводятся, нужно проверить установленный размер печати. Вероятно, данный параметр имеет значение «оригинальный формат». Решение – выбрать другой размер. Для этого нужно открыть изображение через «Просмотр фотографий Windows», нажать Ctrl + P, в правой установить распечатку макета «во всю страницу».
Чтобы задать правильные параметры, потребуется зайти в настройки принтера. Для этого:
- открыть меню «Пуск»;
- выбрать в списке пункт «Устройства и принтеры»;
- в открывшемся окне нажать на нужное устройство правой кнопкой мыши и выбрать строку «Настройка печати»;
- для цветных и черно-белых лазерных принтеров содержание диалоговых окон с настройками будет отличаться;
- установить необходимые параметры печати и сохранить данные нажатием на кнопку «ОК».
Если проблема не решилась, следующий шаг — проверка настроек драйвера. Может потребоваться переустановка программного обеспечения. Последний этап – проверка, как настроена опция в самой программе.
Так, при печати pdf-файла из программы Acrobat Reader некоторые изображения на листах могут быть пропущены. Это указывает на несовместимость документа с программой. Для решения проблемы потребуется разрешить печать листов в виде изображений, т.е. в программе активировать опцию «Print As Image». Это займет больше времени, но распечатка файла пройдет успешно.
Если самостоятельно устранить ошибку и возобновить стабильную работу принтера не получилось, обратитесь в наш сервисный центр. Диагностика и ремонт осуществляются на дому или в офисе заказчика, за исключением случаев, когда требуется использование специального оборудования или в нестандартных ситуациях. Тогда наш курьер отвезет устройство Xerox в мастерскую, а по окончанию работ вернет вместе с гарантийным талоном.
024-746, 024-747 Print Request Failure RAP
024-746 There are parameters that are incompatible with the specified paper type.
024-747 The specified combination of parameters (stored file size, paper size, paper tray, duplex command, output tray) cannot be executed or continued.
Procedure
Advise the customer to use the correct print parameters.
**This RAP is from Xerox Service Manual. All brand names and trademarks are their respective owner’s property.**
You may be also interested in below toner and drum chip (CRUM) for Xerox VersaLink C7020, C7025, C7030, C7000.
Toner Chip (For North America and West Europe Region):
• 106R03741 106R03744 106R03743 106R03742
• 106R03757 106R03760 106R03759 106R03758
• 106R03737 106R03740 106R03739 106R03738
Toner Chip (For South America and East Europe Region):
• 106R03749 106R03752 106R03751 106R03750
• 106R03745 106R03748 106R03747 106R03746
• 106R03765 106R03768 106R03767 106R03766
Toner Chip (For Metered Machine):
• 106R03733 106R03736 106R03735 106R03734
Drum Chip:
• 113R00780 113R00782
Re: xerox 7100dn Code Error 024-747 problem?
Originally Posted by Killeromantic
Hi buy a xerox 7100dn to try printing the demo page the same printer fails in Tray 1 024-747 and not print, also tried to bypass tray when you are printing gives me the error of paper jam which it is false because there is no paper jam.
I am seeking a solution for this.
thanks
Hello , it seems you have not set the right tray paper paramaters for your printer,
Can you read the infomation below:Print Request Failure — Paper
The paper type specified by the job is incompatible with options such as Paper Tray, Output Tray, or
Automatic 2 Sided Print.
Applicable Fault Code
� 024-746: There are parameters that are incompatible with the specified paper type.
Initial Actions
� Power cycle the printer.
� If the problem persists, perform the following procedure.
Troubleshooting ProcedureStep Actions and Questions
1. Replace the paper with fresh paper and resend the print job.
Troubleshooting Procedure
Step Actions and Questions
1. Do not specify parameters that are incompatible with the specified paper type.
Error Troubleshooting
Xerox Internal Use Only Phaser 7100 Service Manual 2-189
Print Instruction Fail
The Job cannot be executed or continued with the specified combination of parameters (Stored File
Size, Paper Size, Paper Tray, Duplex Settings, and Output Tray). This error will also appear in cases
where a Job had been paused due to the occurrence of component malfunction in the middle of
printing and the Job is unable to be continued even by pressing the Start button due to the
malfunctioning component.
Applicable Fault Code� 024-747: Unable to Continue the Operation as the Combination of Parameters (Stored File Size,
Paper Size, Paper Tray, Duplex Settings, and Output Tray) Cannot be Printed.
Initial Actions
� Power cycle the printer.
� If the problem persists, perform the following procedure.
Bates Numbering Digit Over
When printing the Bates Numbering, the maximum 9 digits or user defined digits was exceeded.
Applicable Fault Code� 024-748: Bates Numbering No. of Digits Over
Initial Actions
� Power cycle the printer.
� If the problem persists, perform the following procedure.
Troubleshooting Procedure
Step Actions and Questions
1. Split the print job into smaller batches and print again.
Troubleshooting Procedure
Step Actions and Questions
1. Reduce the number of documents to be lower than the user defined number of sheets or increase the
print digits to be higher than the user-specified no. of sheets and print again.

Category
Error Code
C P S M O
016-786
016-787
016-788
016-789
016-791
016-792
016-793
016-799
021-750
021-751
021-770
021-771
021-772
024—746
024-747
X er o x 4 5 90 / 4110 C o pi e r /P r i n te r U s er G u i de
Cause and Remedy
When using the scan feature, hard disk capacity is
Cause
insufficient for writing to a file.
Either remove unnecessary data from the hard disk to
Remedy
increase free disk space or initialize the hard disk.
Invalid server IP address specified in job template.
Cause
Specify the correct job template.
Remedy
Failed to load a file from the Web browser.
Cause
Perform the following actions, and try again.
Remedy
• Reload the browser page
• Restart the browser
• Power-cycle the machine
Insufficient space available for mail processing.
Cause
Processing was interrupted.
Reduce resolution or reduction/enlargement ratio to
Remedy
decrease the data size, or send in several pieces.
In the scanner (save to PC) or job template scan, the
Cause
forwarding destination or job template save location
could not be accessed.
Check whether you can access the specified forwarding
Remedy
destination.
Specified job history could not be acquired when printing
Cause
Job Counter Report
Specified job history does not exist.
Remedy
The hard disk has run out free space.
Cause
Either remove unnecessary data from the hard disk to
Remedy
increase free disk space or initialize the hard disk.
An illegal print parameter is included.
Cause
Confirm the print data and option and specify the print
Remedy
data again.
During an inspection or maintenance request a
Cause
transmission error occurred and our Customer Support
Center could not be contacted.
Check that the phone lines are connected and try
Remedy
sending an inspection or maintenance request again
after a short time.
If the error persists, contact the Customer Support
Center.
A feature (one of paper size, tray, output tray, or 2 sided
Cause
printing) that is incompatible with the specified paper
quality has been specified.
Check the print data.
Remedy
An illegal print parameter combination was set. For
Cause
example, a non-standard size was specified and
Tray Selection was set to Auto.
Check the print data. In the above case, select Tray 5
Remedy
(Bypass).
11 . P r o b le m S o l vi n g
11-39
024-746, 024-747 Print Request Failure RAP
024-746 There are parameters that are incompatible with the specified paper type.
024-747 The specified combination of parameters (stored file size, paper size, paper tray, duplex command, output tray) cannot be executed or continued.
Procedure
Advise the customer to use the correct print parameters.
**This RAP is from Xerox Service Manual. All brand names and trademarks are their respective owner’s property.**
You may be also interested in below toner and drum chip (CRUM) for Xerox VersaLink C7020, C7025, C7030, C7000.
Toner Chip (For North America and West Europe Region):
• 106R03741 106R03744 106R03743 106R03742
• 106R03757 106R03760 106R03759 106R03758
• 106R03737 106R03740 106R03739 106R03738
Toner Chip (For South America and East Europe Region):
• 106R03749 106R03752 106R03751 106R03750
• 106R03745 106R03748 106R03747 106R03746
• 106R03765 106R03768 106R03767 106R03766
Toner Chip (For Metered Machine):
• 106R03733 106R03736 106R03735 106R03734
Drum Chip:
• 113R00780 113R00782
Category
Error Code
C P S M O
016-786
016-787
016-788
016-789
016-791
016-792
016-793
016-799
021-750
021-751
021-770
021-771
021-772
024—746
024-747
X er o x 4 5 90 / 4110 C o pi e r /P r i n te r U s er G u i de
Cause and Remedy
When using the scan feature, hard disk capacity is
Cause
insufficient for writing to a file.
Either remove unnecessary data from the hard disk to
Remedy
increase free disk space or initialize the hard disk.
Invalid server IP address specified in job template.
Cause
Specify the correct job template.
Remedy
Failed to load a file from the Web browser.
Cause
Perform the following actions, and try again.
Remedy
• Reload the browser page
• Restart the browser
• Power-cycle the machine
Insufficient space available for mail processing.
Cause
Processing was interrupted.
Reduce resolution or reduction/enlargement ratio to
Remedy
decrease the data size, or send in several pieces.
In the scanner (save to PC) or job template scan, the
Cause
forwarding destination or job template save location
could not be accessed.
Check whether you can access the specified forwarding
Remedy
destination.
Specified job history could not be acquired when printing
Cause
Job Counter Report
Specified job history does not exist.
Remedy
The hard disk has run out free space.
Cause
Either remove unnecessary data from the hard disk to
Remedy
increase free disk space or initialize the hard disk.
An illegal print parameter is included.
Cause
Confirm the print data and option and specify the print
Remedy
data again.
During an inspection or maintenance request a
Cause
transmission error occurred and our Customer Support
Center could not be contacted.
Check that the phone lines are connected and try
Remedy
sending an inspection or maintenance request again
after a short time.
If the error persists, contact the Customer Support
Center.
A feature (one of paper size, tray, output tray, or 2 sided
Cause
printing) that is incompatible with the specified paper
quality has been specified.
Check the print data.
Remedy
An illegal print parameter combination was set. For
Cause
example, a non-standard size was specified and
Tray Selection was set to Auto.
Check the print data. In the above case, select Tray 5
Remedy
(Bypass).
11 . P r o b le m S o l vi n g
11-39
Содержание
- 1 Ошибка 092-910 на принтерах Xerox WorkCentre 5024
- 2 Треск при работе WC 6015
- 2.1 Треск в узле ксерографии
- 2.2 Треск Xerox WC 6015 в области печки
- 3 Ошибка 024-360
- 4 Ремонт контактной группы картриджей
- 5 Ошибка 092-651
- 5.1 Подкоды ошибки 092-651
- 6 WC 6015 не печатает с компьютера
- 7 Треск при работе WC 6015
- 7.1 Треск в узле ксерографии
- 7.2 Треск Xerox WC 6015 в области печки
- 8 Major Causes of the error code 024-747 of Xerox printers
- 9 Ремонт МФУ Xerox WC 6015
- 10 WC 6015 не печатает с компьютера
- 11 Замятие бумаги WC 6015
- 12 Как сбросить ошибку 092-910?
Ошибка 092-910 на принтерах Xerox WorkCentre 5024
Ошибка 092-910 в Xerox WorkCentre 5024 возникает по разным причинам:
- выход из строя датчика плотности тонера ATC;
- отсутствие тонера в картридже;
- проблемы с барабанным блоком и так далее.
Если чистка датчика ATC, а также замена расходных материалов не решили проблему, процесс печати может остановиться из-за поломки основной платы или ее отдельных компонентов.
Треск при работе WC 6015
Треск в узле ксерографии
В другом МФУ Xerox WC 6015 был слышен громкий треск при включении и работе. Пришлось разбирать МФУ еще дальше.
Сильный треск был вызван засорением пути отработанного тонера синим цветом. После тщательной очистки спрессованного тонера, превратившегося в камень, потрескивание исчезло. Отработанный тонер начал поступать в картридж.
Треск Xerox WC 6015 в области печки
Трещина в районе печки означает, что шестерни буксуют. В Xerox WC 6015 такое скорее всего, если сломалось крепление для плиты. При такой неисправности шестерня духовки не прижимается к шестерне редуктора принтера. Поэтому происходит проскальзывание и сильный треск.
Духовка в этом МФУ крепится двумя винтами сзади. А снизу печка цепляется к основанию с помощью полукруглых железных стопоров.
Если пробка отсутствует, печь не выдержит. В нашем случае полукруглая пробка была отломана.
Ошибка 024-360
Снова разберите весь принтер и проверьте разъемы на целостность и правильность соединения. Особенно тщательно проверьте контактные концы кабелей. Если они повреждены, отремонтируйте.
Ремонт контактной группы картриджей
Для ремонта разъема необходимо разобрать МФУ, снять разъемную группу и отремонтировать поврежденную контактную пластину.
Ошибка 092-651
Расшифровка субкодов не найдена. Особенностью ошибки 092-651 является то, что после этой ошибки принтер не перекачивает тонер из картриджей в ксерограф, и простого выхода из этой ситуации, похоже, нет.
Первая причина ошибки 092-651 — загрязнение датчиков CTD, расположенных на задней панели принтера под лентой переноса. CTD — датчик плотности цветного тонера. То есть это датчики плотности тонера для калибровки цвета в каждом цветном лазерном принтере. Они расположены за лентой переноса. Для решения этой проблемы протираем датчики спиртом и перезагружаем МФУ.
Если проблема не устранена, перейдите к следующей процедуре.
Вторая причина заключается в том, что в ксерографическом блоке, который переносит тонер, не хватает проявителя. Этот вариант возникает, если вы заправляете картридж не тем тонером. Например, универсальный тонер Samsung. В этом случае проявитель уходит и принтер слабо печатает. Чтобы добавить проявитель в блок ксерографии, необходимо разобрать весь МФУ.
Третья причина – в ксерографическом блоке не хватает тонера одного цвета. Причиной может быть неисправный картридж. В нашем случае это была ошибка 092-651 код 2440000. Причина — дешевые китайские картриджи, выходное отверстие которых заклеено липкой бумагой. После удаления бумаги клей остался. После установки картриджей клей плотно пристал к уплотнительной резинке принтера. Иногда это происходит из-за того, что выпускное отверстие для тонера заблокировано.
Решение таково. При включении подавайте тонер вручную для каждого цвета, пока тонер не появится в ксерографическом блоке. При ее появлении принтер оживет и начнет самостоятельно выкачивать тонер.
Подкоды ошибки 092-651
Иногда ошибка 092-651 28f0000 возникает из-за плохого тонера. С этим кодом полностью отсутствуют цвета желтый, красный, синий при калибровке. Это просто черный.
Решение. Замена тонера в цветных картриджах. С помощью сервисного меню можно запустить моторы каждого картриджа отдельно. Но не более 3 секунд на каждую.
После этого все цвета будут отображаться, но могут возникать ошибки 092-651 2880000. Это действительно плохо. Скорее всего, код означает, что яркости черного недостаточно для калибровки. Это означает, что в ксерографическом блоке плохой тонер или недостаточно проявителя. Но мы не берем на заправку застройщика. Слишком много геморроя.
WC 6015 не печатает с компьютера
Очень типичная ситуация. При подключении Xerox WC 6015 к компьютеру с Windows 7 драйверы автоматически устанавливаются через Центр обновлений Windows. Потом пытаешься что-то напечатать и ничего не происходит — задания на печать никуда не уходят, даже ошибки не появляется.
Это связано с неправильным драйвером для Windows 7, а также, возможно, для Windows 8 и 10.
Решение: скачайте и установите драйвер с официального сайта Xerox (весит около 200 МБ). После установки оригинального драйвера принтер Xerox WC 6015, ранее не печатавший с компьютера, начал печатать под Windows 7 и Windows 10.
Треск при работе WC 6015
Треск в узле ксерографии
В другом МФУ Xerox WC 6015 был слышен громкий треск при включении и работе. Пришлось разбирать МФУ еще дальше.
Сильный треск был вызван засорением пути отработанного тонера синим цветом. После тщательной очистки спрессованного тонера, превратившегося в камень, потрескивание исчезло. Отработанный тонер начал поступать в картридж.
Треск Xerox WC 6015 в области печки
Трещина в районе печки означает, что шестерни буксуют. В Xerox WC 6015 такое скорее всего, если сломалось крепление для плиты. При такой неисправности шестерня духовки не прижимается к шестерне редуктора принтера. Поэтому происходит проскальзывание и сильный треск.
Духовка в этом МФУ крепится двумя винтами сзади. А снизу печка цепляется к основанию с помощью полукруглых железных стопоров.

Если пробка отсутствует, печь не выдержит. В нашем случае полукруглая пробка была отломана.
Ремонт производился следующим образом.

Полукруг не нужен.

Major Causes of the error code 024-747 of Xerox printers
Ошибка с кодом ошибки принтера Xerox 024-747 может быть вызвана повреждением системных файлов Windows. Поврежденные системные файлы представляют реальную опасность для вашего компьютера. Есть много событий, которые показывают результат в ошибках системных файлов. Другими причинами этой ошибки являются неполная установка, неправильное определение оборудования, незавершенный процесс установки. Это происходит, если ваш компьютер обнаружен в результате атаки вредоносного ПО. Неправильное завершение может вызвать эту ошибку. Все вышеперечисленные действия могут привести к удалению или повреждению записей в системных файлах Windows. Этот поврежденный системный файл приведет к отсутствию и неправильному подключению информации и файлов, необходимых для правильной работы приложения.
Ремонт МФУ Xerox WC 6015

WC 6015 не печатает с компьютера
Очень типичная ситуация. При подключении Xerox WC 6015 к компьютеру с Windows 7 драйверы автоматически устанавливаются через Центр обновлений Windows. Потом пытаешься что-то напечатать и ничего не происходит — задания на печать никуда не уходят, даже ошибки не появляется.
Это связано с неправильным драйвером для Windows 7, а также, возможно, для Windows 8 и 10.
Решение: скачайте и установите драйвер с официального сайта Xerox (весит около 200 МБ). После установки оригинального драйвера принтер Xerox WC 6015, ранее не печатавший с компьютера, начал печатать под Windows 7 и Windows 10.
Замятие бумаги WC 6015
МФУ Xerox WC 6015 пришел в ремонт с постоянным сообщением о замятии бумаги, бумаги нигде не было.
После разборки устройства добираемся до датчика бумаги. Фактический датчик прохождения бумаги расположен сзади и показан стрелкой.

Замените поврежденный датчик. На этом ремонт МФУ Xerox завершен.
Второй датчик находится в блоке крепления.
Как сбросить ошибку 092-910?
Простой замены изношенного блока фотокондуктора или использованного картриджа иногда недостаточно для сброса ошибки 092-910 .
Для завершения операции необходимо войти в сервисное меню принтера Xerox 5024 и выполнить следующий алгоритм действий:

- включить устройство;
- зажать кнопку с цифрой «0» на 5 секунд, не отпуская ее, нажать кнопку «Старт»;
- введите набор цифр «6789» и снова нажмите «Старт»;
- после открытия сервисного меню набрать «752», завершить комбинацию кнопкой «Старт»;
- затем вызовите «059» — «Старт»;
- на экране должна появиться цифра «1», нажмите «Старт» — «000» — «Старт»;
- когда появится подтверждение сброса ошибки «ОК», зажать цифру «0» на 5 секунд, не отпуская кнопку, нажать «Старт».
После перезапуска машина должна запуститься без отображения ошибки 092-910 .
Датчики плотности цветного тонера (CTD) измеряют оптическую плотность тонера, нанесенного на маркировочный блок во время калибровки в процессе печати. Датчик установлен с каждой стороны маркерного блока. Это обеспечивает одинаковую плотность тонера по всей длине ленты. Для достижения оптимального качества печати принтер проверяет работу датчиков CTD в начале каждого цикла калибровки. Датчики CTD следует очищать, когда датчик CTD выходит из строя, или на панели управления появляется сообщение, или в меню Setup
принтер предоставляет эту инструкцию.
Если тонер попал на кожу или одежду, не удаляйте его горячей водой или моющими средствами. Использование горячей воды приведет к тому, что тонер прилипнет и его будет трудно удалить. Если тонер попал на кожу или одежду, стряхните его, сдуйте или смойте холодной водой с мылом.
Чтобы очистить датчики CTD:
- Выключите принтер и выньте шнур питания из розетки.
- откройте заднюю крышку, нажав на защелку.
- Очистите датчики CTD, протерев отверстия чистым сухим ватным тампоном.
- Не прикасайтесь к отмеченной области на нагревательном ролике фьюзера или рядом с ним. Вы можете обжечься.
Источники
- https://kodyoshibok03.ru/oshibka-092-651-kod-2110000/
- https://shamrin.ru/092-910-ochistite-datchik-ctd/
- https://manualza.ru/xerox/d110/czbn181
- https://errorcode0x.com/fix-xerox-printer-error-code-024-747/
[свернуть]
Try the following:
Step 1: Release a Held for Resources Job From the Active Jobs Screen
Jobs can be held or paused for various reasons. For example, if the printer is out of paper, or the correct paper Size, Type, or Color requested from the print job is not loaded or properly configured on one of the trays, the job is Held for Resources. Additionally, if you send a sample job, the first copy of the job prints and the rest of the copies hold until you release them. If the system administrator has configured the Hold All Jobs feature, any job sent to the printer is held until you release it.
Releasing a Held Print Jobs
- At the Control Panel, press the Jobs button.
- Select Active Jobs.
- To determine why a job was held, select the job to view the Details.
- Do one of the following:
- To print the job held for resources, replenish the resources required. Be sure to configure the tray settings for the media loaded. The job resumes automatically when the required resources are available. If the job does not print automatically, touch Resume.
- To delete the print job, touch Delete. At the prompt, touch Delete.
- To release all held jobs, select Release All Jobs.
- To return to the Home screen, press the Home button.
NOTE: If the job does not delete, cancel all held jobs by pressing and holding down the Power button until the machine shuts down. Wait until the Power light stops flashing before powering the printer back on.
Step 2: Make Sure the Tray Being Used for the Job is Configured With the Correct Paper Size and Type
When loading paper trays, make sure to program the tray with the correct paper size and paper type.
Step 3: Make Sure the Paper Type and Size is Set Correctly in the Print Driver
NOTE: These steps were performed on a computer with a Microsoft Windows 7 operating system. Steps will vary with other operating systems.
Select the Correct Paper Type and Size:
- Open the file to be printed.
- Click on File > Print.
- Click on Printing Preferences or Properties to access the Xerox print driver settings.
- Click on the Printing Options tab.
- Click on the Paper pull-down menu, select Other Type, and then select the correct paper type. For example, Plain or Lightweight Cardstock.
- Click on the Paper pull-down menu again, select Other Size, and then select the correct paper size.
- Select any other required printing options.
- Click on OK.
- Click on OK or Print to send the job to the printer.
Step 4: Make Sure a Supported Print Driver is Being Used
Make sure a supported print driver is being used. It is recommended to use the PostScript (PS) print driver. Visit www.support.xerox.com to locate print drivers for this printer.
Если копировальная функция работает стабильно, но есть проблема с распечаткой любых форматов файлов, обычно достаточно выполнить чистку реестра и очереди печати. Сама ошибка 024 747 в аппаратах Xerox указывает на неверно установленные параметры печати. Это означает, что настройки, указанные в программе, из которой осуществляется распечатка, в драйверах и в самом устройстве не совпадают. Из-за конфликта данных принтер перестает выполнять свою прямую задачу.
Указанная ошибка может появляться, когда вручную в настройках выбран тип бумаги (Б или С), а в параметрах драйвера указано, что выбор бумаги осуществляется автоматически. Для восстановления корректной работы устройства нужно в драйвере также указать лоток, откуда будет распечатываться документ.
Когда документы, созданные в Microsoft Word, или слайды презентации Power Point распечатываются без проблем, а картинки, имеющие расширение .jpg, .jpeg или .png и др. на бумагу не выводятся, нужно проверить установленный размер печати. Вероятно, данный параметр имеет значение «оригинальный формат». Решение – выбрать другой размер. Для этого нужно открыть изображение через «Просмотр фотографий Windows», нажать Ctrl + P, в правой установить распечатку макета «во всю страницу».
Как исправить ошибку 024 747 в Xerox?
Чтобы задать правильные параметры, потребуется зайти в настройки принтера. Для этого:
- открыть меню «Пуск»;
- выбрать в списке пункт «Устройства и принтеры»;
- в открывшемся окне нажать на нужное устройство правой кнопкой мыши и выбрать строку «Настройка печати»;
- для цветных и черно-белых лазерных принтеров содержание диалоговых окон с настройками будет отличаться;
- установить необходимые параметры печати и сохранить данные нажатием на кнопку «ОК».
Если проблема не решилась, следующий шаг — проверка настроек драйвера. Может потребоваться переустановка программного обеспечения. Последний этап – проверка, как настроена опция в самой программе.
Так, при печати pdf-файла из программы Acrobat Reader некоторые изображения на листах могут быть пропущены. Это указывает на несовместимость документа с программой. Для решения проблемы потребуется разрешить печать листов в виде изображений, т.е. в программе активировать опцию «Print As Image». Это займет больше времени, но распечатка файла пройдет успешно.
Если самостоятельно устранить ошибку и возобновить стабильную работу принтера не получилось, обратитесь в наш сервисный центр. Диагностика и ремонт осуществляются на дому или в офисе заказчика, за исключением случаев, когда требуется использование специального оборудования или в нестандартных ситуациях. Тогда наш курьер отвезет устройство Xerox в мастерскую, а по окончанию работ вернет вместе с гарантийным талоном.
06.01.2014
Вопрос:
Здравствуйте! подскажите пожалуйста как исправить ошибку 024-747 Xerox Phasher 7100 .Делал диагностику, ошибок не находит , все параметры соответствуют .
Ответ:
Данная ошибка означает, что задано неразрешенное сочетание параметров печати. Внимательно проверьте, что все параметры печати соответствуют друг другу, т.е. что в настройках печати из программы, в настройках драйвера и в настройках самого аппарата стоят одинаковые параметры бумаги, лотков и.т.д.
Задайте свой вопрос
Чтобы задать вопрос, Вам необходимо авторизоваться
Если копировальная функция работает стабильно, но есть проблема с распечаткой любых форматов файлов, обычно достаточно выполнить чистку реестра и очереди печати. Сама ошибка 024 747 в аппаратах Xerox указывает на неверно установленные параметры печати. Это означает, что настройки, указанные в программе, из которой осуществляется распечатка, в драйверах и в самом устройстве не совпадают. Из-за конфликта данных принтер перестает выполнять свою прямую задачу.
Указанная ошибка может появляться, когда вручную в настройках выбран тип бумаги (Б или С), а в параметрах драйвера указано, что выбор бумаги осуществляется автоматически. Для восстановления корректной работы устройства нужно в драйвере также указать лоток, откуда будет распечатываться документ.
Когда документы, созданные в Microsoft Word, или слайды презентации Power Point распечатываются без проблем, а картинки, имеющие расширение .jpg, .jpeg или .png и др. на бумагу не выводятся, нужно проверить установленный размер печати. Вероятно, данный параметр имеет значение «оригинальный формат». Решение – выбрать другой размер. Для этого нужно открыть изображение через «Просмотр фотографий Windows», нажать Ctrl + P, в правой установить распечатку макета «во всю страницу».
Чтобы задать правильные параметры, потребуется зайти в настройки принтера. Для этого:
- открыть меню «Пуск»;
- выбрать в списке пункт «Устройства и принтеры»;
- в открывшемся окне нажать на нужное устройство правой кнопкой мыши и выбрать строку «Настройка печати»;
- для цветных и черно-белых лазерных принтеров содержание диалоговых окон с настройками будет отличаться;
- установить необходимые параметры печати и сохранить данные нажатием на кнопку «ОК».
Если проблема не решилась, следующий шаг — проверка настроек драйвера. Может потребоваться переустановка программного обеспечения. Последний этап – проверка, как настроена опция в самой программе.
Так, при печати pdf-файла из программы Acrobat Reader некоторые изображения на листах могут быть пропущены. Это указывает на несовместимость документа с программой. Для решения проблемы потребуется разрешить печать листов в виде изображений, т.е. в программе активировать опцию «Print As Image». Это займет больше времени, но распечатка файла пройдет успешно.
Если самостоятельно устранить ошибку и возобновить стабильную работу принтера не получилось, обратитесь в наш сервисный центр. Диагностика и ремонт осуществляются на дому или в офисе заказчика, за исключением случаев, когда требуется использование специального оборудования или в нестандартных ситуациях. Тогда наш курьер отвезет устройство Xerox в мастерскую, а по окончанию работ вернет вместе с гарантийным талоном.
024-746, 024-747 Print Request Failure RAP
024-746 There are parameters that are incompatible with the specified paper type.
024-747 The specified combination of parameters (stored file size, paper size, paper tray, duplex command, output tray) cannot be executed or continued.
Procedure
Advise the customer to use the correct print parameters.
**This RAP is from Xerox Service Manual. All brand names and trademarks are their respective owner’s property.**
You may be also interested in below toner and drum chip (CRUM) for Xerox VersaLink C7020, C7025, C7030, C7000.
Toner Chip (For North America and West Europe Region):
• 106R03741 106R03744 106R03743 106R03742
• 106R03757 106R03760 106R03759 106R03758
• 106R03737 106R03740 106R03739 106R03738
Toner Chip (For South America and East Europe Region):
• 106R03749 106R03752 106R03751 106R03750
• 106R03745 106R03748 106R03747 106R03746
• 106R03765 106R03768 106R03767 106R03766
Toner Chip (For Metered Machine):
• 106R03733 106R03736 106R03735 106R03734
Drum Chip:
• 113R00780 113R00782
Re: xerox 7100dn Code Error 024-747 problem?
Hi buy a xerox 7100dn to try printing the demo page the same printer fails in Tray 1 024-747 and not print, also tried to bypass tray when you are printing gives me the error of paper jam which it is false because there is no paper jam.
I am seeking a solution for this.
thanks
Hello , it seems you have not set the right tray paper paramaters for your printer,
Can you read the infomation below:Print Request Failure — Paper
The paper type specified by the job is incompatible with options such as Paper Tray, Output Tray, or
Automatic 2 Sided Print.
Applicable Fault Code
� 024-746: There are parameters that are incompatible with the specified paper type.
Initial Actions
� Power cycle the printer.
� If the problem persists, perform the following procedure.
Troubleshooting ProcedureStep Actions and Questions
1. Replace the paper with fresh paper and resend the print job.
Troubleshooting Procedure
Step Actions and Questions
1. Do not specify parameters that are incompatible with the specified paper type.
Error Troubleshooting
Xerox Internal Use Only Phaser 7100 Service Manual 2-189
Print Instruction Fail
The Job cannot be executed or continued with the specified combination of parameters (Stored File
Size, Paper Size, Paper Tray, Duplex Settings, and Output Tray). This error will also appear in cases
where a Job had been paused due to the occurrence of component malfunction in the middle of
printing and the Job is unable to be continued even by pressing the Start button due to the
malfunctioning component.
Applicable Fault Code� 024-747: Unable to Continue the Operation as the Combination of Parameters (Stored File Size,
Paper Size, Paper Tray, Duplex Settings, and Output Tray) Cannot be Printed.
Initial Actions
� Power cycle the printer.
� If the problem persists, perform the following procedure.
Bates Numbering Digit Over
When printing the Bates Numbering, the maximum 9 digits or user defined digits was exceeded.
Applicable Fault Code� 024-748: Bates Numbering No. of Digits Over
Initial Actions
� Power cycle the printer.
� If the problem persists, perform the following procedure.
Troubleshooting Procedure
Step Actions and Questions
1. Split the print job into smaller batches and print again.
Troubleshooting Procedure
Step Actions and Questions
1. Reduce the number of documents to be lower than the user defined number of sheets or increase the
print digits to be higher than the user-specified no. of sheets and print again.
Category
Error Code
C P S M O
016-786
016-787
016-788
016-789
016-791
016-792
016-793
016-799
021-750
021-751
021-770
021-771
021-772
024—746
024-747
X er o x 4 5 90 / 4110 C o pi e r /P r i n te r U s er G u i de
Cause and Remedy
When using the scan feature, hard disk capacity is
Cause
insufficient for writing to a file.
Either remove unnecessary data from the hard disk to
Remedy
increase free disk space or initialize the hard disk.
Invalid server IP address specified in job template.
Cause
Specify the correct job template.
Remedy
Failed to load a file from the Web browser.
Cause
Perform the following actions, and try again.
Remedy
• Reload the browser page
• Restart the browser
• Power-cycle the machine
Insufficient space available for mail processing.
Cause
Processing was interrupted.
Reduce resolution or reduction/enlargement ratio to
Remedy
decrease the data size, or send in several pieces.
In the scanner (save to PC) or job template scan, the
Cause
forwarding destination or job template save location
could not be accessed.
Check whether you can access the specified forwarding
Remedy
destination.
Specified job history could not be acquired when printing
Cause
Job Counter Report
Specified job history does not exist.
Remedy
The hard disk has run out free space.
Cause
Either remove unnecessary data from the hard disk to
Remedy
increase free disk space or initialize the hard disk.
An illegal print parameter is included.
Cause
Confirm the print data and option and specify the print
Remedy
data again.
During an inspection or maintenance request a
Cause
transmission error occurred and our Customer Support
Center could not be contacted.
Check that the phone lines are connected and try
Remedy
sending an inspection or maintenance request again
after a short time.
If the error persists, contact the Customer Support
Center.
A feature (one of paper size, tray, output tray, or 2 sided
Cause
printing) that is incompatible with the specified paper
quality has been specified.
Check the print data.
Remedy
An illegal print parameter combination was set. For
Cause
example, a non-standard size was specified and
Tray Selection was set to Auto.
Check the print data. In the above case, select Tray 5
Remedy
(Bypass).
11 . P r o b le m S o l vi n g
11-39
Try the following:
Step 1: Release a Held for Resources Job From the Active Jobs Screen
Jobs can be held or paused for various reasons. For example, if the printer is out of paper, or the correct paper Size, Type, or Color requested from the print job is not loaded or properly configured on one of the trays, the job is Held for Resources. Additionally, if you send a sample job, the first copy of the job prints and the rest of the copies hold until you release them. If the system administrator has configured the Hold All Jobs feature, any job sent to the printer is held until you release it.
Releasing a Held Print Jobs
- At the Control Panel, press the Jobs button.
- Select Active Jobs.
- To determine why a job was held, select the job to view the Details.
- Do one of the following:
- To print the job held for resources, replenish the resources required. Be sure to configure the tray settings for the media loaded. The job resumes automatically when the required resources are available. If the job does not print automatically, touch Resume.
- To delete the print job, touch Delete. At the prompt, touch Delete.
- To release all held jobs, select Release All Jobs.
- To return to the Home screen, press the Home button.
NOTE: If the job does not delete, cancel all held jobs by pressing and holding down the Power button until the machine shuts down. Wait until the Power light stops flashing before powering the printer back on.
Step 2: Make Sure the Tray Being Used for the Job is Configured With the Correct Paper Size and Type
When loading paper trays, make sure to program the tray with the correct paper size and paper type.
Step 3: Make Sure the Paper Type and Size is Set Correctly in the Print Driver
NOTE: These steps were performed on a computer with a Microsoft Windows 7 operating system. Steps will vary with other operating systems.
Select the Correct Paper Type and Size:
- Open the file to be printed.
- Click on File > Print.
- Click on Printing Preferences or Properties to access the Xerox print driver settings.
- Click on the Printing Options tab.
- Click on the Paper pull-down menu, select Other Type, and then select the correct paper type. For example, Plain or Lightweight Cardstock.
- Click on the Paper pull-down menu again, select Other Size, and then select the correct paper size.
- Select any other required printing options.
- Click on OK.
- Click on OK or Print to send the job to the printer.
Step 4: Make Sure a Supported Print Driver is Being Used
Make sure a supported print driver is being used. It is recommended to use the PostScript (PS) print driver. Visit www.support.xerox.com to locate print drivers for this printer.
Если копировальная функция работает стабильно, но есть проблема с распечаткой любых форматов файлов, обычно достаточно выполнить чистку реестра и очереди печати. Сама ошибка 024 747 в аппаратах Xerox указывает на неверно установленные параметры печати. Это означает, что настройки, указанные в программе, из которой осуществляется распечатка, в драйверах и в самом устройстве не совпадают. Из-за конфликта данных принтер перестает выполнять свою прямую задачу.
Указанная ошибка может появляться, когда вручную в настройках выбран тип бумаги (Б или С), а в параметрах драйвера указано, что выбор бумаги осуществляется автоматически. Для восстановления корректной работы устройства нужно в драйвере также указать лоток, откуда будет распечатываться документ.
Когда документы, созданные в Microsoft Word, или слайды презентации Power Point распечатываются без проблем, а картинки, имеющие расширение .jpg, .jpeg или .png и др. на бумагу не выводятся, нужно проверить установленный размер печати. Вероятно, данный параметр имеет значение «оригинальный формат». Решение – выбрать другой размер. Для этого нужно открыть изображение через «Просмотр фотографий Windows», нажать Ctrl + P, в правой установить распечатку макета «во всю страницу».
Как исправить ошибку 024 747 в Xerox?
Чтобы задать правильные параметры, потребуется зайти в настройки принтера. Для этого:
- открыть меню «Пуск»;
- выбрать в списке пункт «Устройства и принтеры»;
- в открывшемся окне нажать на нужное устройство правой кнопкой мыши и выбрать строку «Настройка печати»;
- для цветных и черно-белых лазерных принтеров содержание диалоговых окон с настройками будет отличаться;
- установить необходимые параметры печати и сохранить данные нажатием на кнопку «ОК».
Если проблема не решилась, следующий шаг — проверка настроек драйвера. Может потребоваться переустановка программного обеспечения. Последний этап – проверка, как настроена опция в самой программе.
Так, при печати pdf-файла из программы Acrobat Reader некоторые изображения на листах могут быть пропущены. Это указывает на несовместимость документа с программой. Для решения проблемы потребуется разрешить печать листов в виде изображений, т.е. в программе активировать опцию «Print As Image». Это займет больше времени, но распечатка файла пройдет успешно.
Если самостоятельно устранить ошибку и возобновить стабильную работу принтера не получилось, обратитесь в наш сервисный центр. Диагностика и ремонт осуществляются на дому или в офисе заказчика, за исключением случаев, когда требуется использование специального оборудования или в нестандартных ситуациях. Тогда наш курьер отвезет устройство Xerox в мастерскую, а по окончанию работ вернет вместе с гарантийным талоном.
Если копировальная функция работает стабильно, но есть проблема с распечаткой любых форматов файлов, обычно достаточно выполнить чистку реестра и очереди печати. Сама ошибка 024 747 в аппаратах Xerox указывает на неверно установленные параметры печати. Это означает, что настройки, указанные в программе, из которой осуществляется распечатка, в драйверах и в самом устройстве не совпадают. Из-за конфликта данных принтер перестает выполнять свою прямую задачу.
Указанная ошибка может появляться, когда вручную в настройках выбран тип бумаги (Б или С), а в параметрах драйвера указано, что выбор бумаги осуществляется автоматически. Для восстановления корректной работы устройства нужно в драйвере также указать лоток, откуда будет распечатываться документ.
Когда документы, созданные в Microsoft Word, или слайды презентации Power Point распечатываются без проблем, а картинки, имеющие расширение .jpg, .jpeg или .png и др. на бумагу не выводятся, нужно проверить установленный размер печати. Вероятно, данный параметр имеет значение «оригинальный формат». Решение – выбрать другой размер. Для этого нужно открыть изображение через «Просмотр фотографий Windows», нажать Ctrl + P, в правой установить распечатку макета «во всю страницу».
Чтобы задать правильные параметры, потребуется зайти в настройки принтера. Для этого:
- открыть меню «Пуск»;
- выбрать в списке пункт «Устройства и принтеры»;
- в открывшемся окне нажать на нужное устройство правой кнопкой мыши и выбрать строку «Настройка печати»;
- для цветных и черно-белых лазерных принтеров содержание диалоговых окон с настройками будет отличаться;
- установить необходимые параметры печати и сохранить данные нажатием на кнопку «ОК».
Если проблема не решилась, следующий шаг — проверка настроек драйвера. Может потребоваться переустановка программного обеспечения. Последний этап – проверка, как настроена опция в самой программе.
Так, при печати pdf-файла из программы Acrobat Reader некоторые изображения на листах могут быть пропущены. Это указывает на несовместимость документа с программой. Для решения проблемы потребуется разрешить печать листов в виде изображений, т.е. в программе активировать опцию «Print As Image». Это займет больше времени, но распечатка файла пройдет успешно.
Если самостоятельно устранить ошибку и возобновить стабильную работу принтера не получилось, обратитесь в наш сервисный центр. Диагностика и ремонт осуществляются на дому или в офисе заказчика, за исключением случаев, когда требуется использование специального оборудования или в нестандартных ситуациях. Тогда наш курьер отвезет устройство Xerox в мастерскую, а по окончанию работ вернет вместе с гарантийным талоном.
024-746, 024-747 Print Request Failure RAP
024-746 There are parameters that are incompatible with the specified paper type.
024-747 The specified combination of parameters (stored file size, paper size, paper tray, duplex command, output tray) cannot be executed or continued.
Procedure
Advise the customer to use the correct print parameters.
**This RAP is from Xerox Service Manual. All brand names and trademarks are their respective owner’s property.**
You may be also interested in below toner and drum chip (CRUM) for Xerox VersaLink C7020, C7025, C7030, C7000.
Toner Chip (For North America and West Europe Region):
• 106R03741 106R03744 106R03743 106R03742
• 106R03757 106R03760 106R03759 106R03758
• 106R03737 106R03740 106R03739 106R03738
Toner Chip (For South America and East Europe Region):
• 106R03749 106R03752 106R03751 106R03750
• 106R03745 106R03748 106R03747 106R03746
• 106R03765 106R03768 106R03767 106R03766
Toner Chip (For Metered Machine):
• 106R03733 106R03736 106R03735 106R03734
Drum Chip:
• 113R00780 113R00782
Re: xerox 7100dn Code Error 024-747 problem?
Hi buy a xerox 7100dn to try printing the demo page the same printer fails in Tray 1 024-747 and not print, also tried to bypass tray when you are printing gives me the error of paper jam which it is false because there is no paper jam.
I am seeking a solution for this.
thanks
Hello , it seems you have not set the right tray paper paramaters for your printer,
Can you read the infomation below:Print Request Failure — Paper
The paper type specified by the job is incompatible with options such as Paper Tray, Output Tray, or
Automatic 2 Sided Print.
Applicable Fault Code
� 024-746: There are parameters that are incompatible with the specified paper type.
Initial Actions
� Power cycle the printer.
� If the problem persists, perform the following procedure.
Troubleshooting ProcedureStep Actions and Questions
1. Replace the paper with fresh paper and resend the print job.
Troubleshooting Procedure
Step Actions and Questions
1. Do not specify parameters that are incompatible with the specified paper type.
Error Troubleshooting
Xerox Internal Use Only Phaser 7100 Service Manual 2-189
Print Instruction Fail
The Job cannot be executed or continued with the specified combination of parameters (Stored File
Size, Paper Size, Paper Tray, Duplex Settings, and Output Tray). This error will also appear in cases
where a Job had been paused due to the occurrence of component malfunction in the middle of
printing and the Job is unable to be continued even by pressing the Start button due to the
malfunctioning component.
Applicable Fault Code� 024-747: Unable to Continue the Operation as the Combination of Parameters (Stored File Size,
Paper Size, Paper Tray, Duplex Settings, and Output Tray) Cannot be Printed.
Initial Actions
� Power cycle the printer.
� If the problem persists, perform the following procedure.
Bates Numbering Digit Over
When printing the Bates Numbering, the maximum 9 digits or user defined digits was exceeded.
Applicable Fault Code� 024-748: Bates Numbering No. of Digits Over
Initial Actions
� Power cycle the printer.
� If the problem persists, perform the following procedure.
Troubleshooting Procedure
Step Actions and Questions
1. Split the print job into smaller batches and print again.
Troubleshooting Procedure
Step Actions and Questions
1. Reduce the number of documents to be lower than the user defined number of sheets or increase the
print digits to be higher than the user-specified no. of sheets and print again.
Category
Error Code
C P S M O
016-786
016-787
016-788
016-789
016-791
016-792
016-793
016-799
021-750
021-751
021-770
021-771
021-772
024—746
024-747
X er o x 4 5 90 / 4110 C o pi e r /P r i n te r U s er G u i de
Cause and Remedy
When using the scan feature, hard disk capacity is
Cause
insufficient for writing to a file.
Either remove unnecessary data from the hard disk to
Remedy
increase free disk space or initialize the hard disk.
Invalid server IP address specified in job template.
Cause
Specify the correct job template.
Remedy
Failed to load a file from the Web browser.
Cause
Perform the following actions, and try again.
Remedy
• Reload the browser page
• Restart the browser
• Power-cycle the machine
Insufficient space available for mail processing.
Cause
Processing was interrupted.
Reduce resolution or reduction/enlargement ratio to
Remedy
decrease the data size, or send in several pieces.
In the scanner (save to PC) or job template scan, the
Cause
forwarding destination or job template save location
could not be accessed.
Check whether you can access the specified forwarding
Remedy
destination.
Specified job history could not be acquired when printing
Cause
Job Counter Report
Specified job history does not exist.
Remedy
The hard disk has run out free space.
Cause
Either remove unnecessary data from the hard disk to
Remedy
increase free disk space or initialize the hard disk.
An illegal print parameter is included.
Cause
Confirm the print data and option and specify the print
Remedy
data again.
During an inspection or maintenance request a
Cause
transmission error occurred and our Customer Support
Center could not be contacted.
Check that the phone lines are connected and try
Remedy
sending an inspection or maintenance request again
after a short time.
If the error persists, contact the Customer Support
Center.
A feature (one of paper size, tray, output tray, or 2 sided
Cause
printing) that is incompatible with the specified paper
quality has been specified.
Check the print data.
Remedy
An illegal print parameter combination was set. For
Cause
example, a non-standard size was specified and
Tray Selection was set to Auto.
Check the print data. In the above case, select Tray 5
Remedy
(Bypass).
11 . P r o b le m S o l vi n g
11-39
024-746, 024-747 Print Request Failure RAP
024-746 There are parameters that are incompatible with the specified paper type.
024-747 The specified combination of parameters (stored file size, paper size, paper tray, duplex command, output tray) cannot be executed or continued.
Procedure
Advise the customer to use the correct print parameters.
**This RAP is from Xerox Service Manual. All brand names and trademarks are their respective owner’s property.**
You may be also interested in below toner and drum chip (CRUM) for Xerox VersaLink C7020, C7025, C7030, C7000.
Toner Chip (For North America and West Europe Region):
• 106R03741 106R03744 106R03743 106R03742
• 106R03757 106R03760 106R03759 106R03758
• 106R03737 106R03740 106R03739 106R03738
Toner Chip (For South America and East Europe Region):
• 106R03749 106R03752 106R03751 106R03750
• 106R03745 106R03748 106R03747 106R03746
• 106R03765 106R03768 106R03767 106R03766
Toner Chip (For Metered Machine):
• 106R03733 106R03736 106R03735 106R03734
Drum Chip:
• 113R00780 113R00782
Если копировальная функция работает стабильно, но есть проблема с распечаткой любых форматов файлов, обычно достаточно выполнить чистку реестра и очереди печати. Сама ошибка 024 747 в аппаратах Xerox указывает на неверно установленные параметры печати. Это означает, что настройки, указанные в программе, из которой осуществляется распечатка, в драйверах и в самом устройстве не совпадают. Из-за конфликта данных принтер перестает выполнять свою прямую задачу.
Указанная ошибка может появляться, когда вручную в настройках выбран тип бумаги (Б или С), а в параметрах драйвера указано, что выбор бумаги осуществляется автоматически. Для восстановления корректной работы устройства нужно в драйвере также указать лоток, откуда будет распечатываться документ.
Когда документы, созданные в Microsoft Word, или слайды презентации Power Point распечатываются без проблем, а картинки, имеющие расширение .jpg, .jpeg или .png и др. на бумагу не выводятся, нужно проверить установленный размер печати. Вероятно, данный параметр имеет значение «оригинальный формат». Решение – выбрать другой размер. Для этого нужно открыть изображение через «Просмотр фотографий Windows», нажать Ctrl + P, в правой установить распечатку макета «во всю страницу».
Как исправить ошибку 024 747 в Xerox?
Чтобы задать правильные параметры, потребуется зайти в настройки принтера. Для этого:
- открыть меню «Пуск»;
- выбрать в списке пункт «Устройства и принтеры»;
- в открывшемся окне нажать на нужное устройство правой кнопкой мыши и выбрать строку «Настройка печати»;
- для цветных и черно-белых лазерных принтеров содержание диалоговых окон с настройками будет отличаться;
- установить необходимые параметры печати и сохранить данные нажатием на кнопку «ОК».
Если проблема не решилась, следующий шаг — проверка настроек драйвера. Может потребоваться переустановка программного обеспечения. Последний этап – проверка, как настроена опция в самой программе.
Так, при печати pdf-файла из программы Acrobat Reader некоторые изображения на листах могут быть пропущены. Это указывает на несовместимость документа с программой. Для решения проблемы потребуется разрешить печать листов в виде изображений, т.е. в программе активировать опцию «Print As Image». Это займет больше времени, но распечатка файла пройдет успешно.
Если самостоятельно устранить ошибку и возобновить стабильную работу принтера не получилось, обратитесь в наш сервисный центр. Диагностика и ремонт осуществляются на дому или в офисе заказчика, за исключением случаев, когда требуется использование специального оборудования или в нестандартных ситуациях. Тогда наш курьер отвезет устройство Xerox в мастерскую, а по окончанию работ вернет вместе с гарантийным талоном.
024-746, 024-747 Print Request Failure RAP
024-746 There are parameters that are incompatible with the specified paper type.
024-747 The specified combination of parameters (stored file size, paper size, paper tray, duplex command, output tray) cannot be executed or continued.
Procedure
Advise the customer to use the correct print parameters.
**This RAP is from Xerox Service Manual. All brand names and trademarks are their respective owner’s property.**
You may be also interested in below toner and drum chip (CRUM) for Xerox VersaLink C7020, C7025, C7030, C7000.
Toner Chip (For North America and West Europe Region):
• 106R03741 106R03744 106R03743 106R03742
• 106R03757 106R03760 106R03759 106R03758
• 106R03737 106R03740 106R03739 106R03738
Toner Chip (For South America and East Europe Region):
• 106R03749 106R03752 106R03751 106R03750
• 106R03745 106R03748 106R03747 106R03746
• 106R03765 106R03768 106R03767 106R03766
Toner Chip (For Metered Machine):
• 106R03733 106R03736 106R03735 106R03734
Drum Chip:
• 113R00780 113R00782
With no doubts, Xerox is a well-known brand for manufacturing printers which are efficient and thus, widely used. Among the best features of the Xerox printers are their durability, reliability and a high-class performance at a reasonable price. But sometimes, users encounter many issues due to several causes. Xerox Printer Error Code 024-747 is one of the common error. Do not worry about it because this error message is pretty ordinary and is often faced by too many people across the globe.
This error shows up due to improper configuration of system settings or some erratic entries added in your registry file. Therefore, you have to deal with this common annoying issue. So, first of all, you have to go through the description of error 024-747. Then, you should resolve it with effective strategies.
A Brief Description of the Xerox printer error code 024-747 Error
The Xerox Printer error code 024-747 error is the reference format of the error caused. This is a common error code configuration used by Windows and other Windows reliable software and driver dealer.
This code is used by the vendor to identify the error caused. This error code 024-747 has a numeric error number and a technical description. In some cases, the error may have more parameters in the code 024-747 format of the Xerox printer error. This additional hexadecimal code is the address of the memory locations where the instruction(s) was loaded at the time of the error.
Major Causes of the error code 024-747 of Xerox printers
The Xerox Printer error code 024-747 error may be caused by Windows system files damage. The damaged system files are a real hazard of your computer. There are many events which show a result in the system file errors. The other reasons for this error are an incomplete installation, improper detection of hardware, an incomplete installation process. It occurs if your computer is detected from a malware attack. Improper shutdown can cause this error. All the above activities may result in the deletion or the entries to become corrupted in the Windows system files. This corrupted system file will lead to the missing and wrongly linked information and files needed for the proper working of the application.
Observe some sensible Methods step-by-step to Fix Xerox Printer Error Code 024-747
By continuing with the steps, always remember that these troubleshooting steps are sometimes more difficult to follow and more time is taken. Instead, if you follow these steps in the right series will take less time and efforts and prevent you from errors and unnecessary trouble. Here how to do it:
Method 1: Check all connections
- Confirm that you are using the correct driver in the printer.
- After that, check the paper size you set on the printer.
- Alternatively, if you try to set the paper size in Excel or Word to the ‘Original document size.’
- Otherwise, power off the device by pressing the power button.
- Then, restart the device and press the power on button again.
Try to print with Xerox printer, if still error persists follow the next solution discussed below.
Method 2: Identifying file location

Follow the given steps for identifying the file location. Here’s how to do it:
- Firstly, Right-press the option to save the link.
- Then, click on the ‘Download option to download the file.
- After that, search for the file and click twice on it.
- Once completed, it automatically starts the installation procedure in a few minutes.
- After the program is successfully installed, a welcome screen will appear on the device.
- A checkbox option appears on the screen, uncheck that box just to allow repair tool to scan automatically.
- Finally, click on the ‘Install’ logo to run the installation process. Now, you have to check the issue. If you have to go to the next method to get rid of this error.
Method 3: Update your system Manually

To update the system manually, go to the following steps:
- First of all, open your computer and then log in as an administrator.
- After that, choose all programs, accessories, system tools from the Start button and then tap on the ‘System Restore’ option.
- In the new window, go to the ‘Restore my computer to an earlier time’ section by clicking on it and then, tap on Next.
- Then, select the most current system restore point below the ‘On this list, click a restore point’ menu, and then tap on ‘Next’.
- Now, also tap on Next on the confirmation window.
- At last, restarts the computer when the restoration is completed.
Now check the issue once if it is solved. If the issue is not gone, then head over to the next method carefully.
Method 4: Reimage Welcome screen

Users will be prompted with a welcome screen on the computer which will download all the necessary updates. But, to ensure that internet connection is needed at this point in time. The tool will automatically start a preparatory scan of a printer to help determine the health of your printer. Once completed with the above step, users will be allowed to point out which all areas of the Printers are found to be in a damaged state. If necessary, click the start icon which will appear in the bottom right corner of the screen. After this process is completely finished, it will be a repair process of the printer that needs to be fixed properly. Users may, however, be asked to restart the computer to complete the process.
Final recommendation
If still the issue is not solved then, do approach us at below section to get rid of such critical error codes while working with the Xerox printers. We are always happy to assist you by fixing Xerox printer error code 024-747 with all possible means at one desk.
Содержание
- 1 Ошибка 092-910 на принтерах Xerox WorkCentre 5024
- 2 Треск при работе WC 6015
- 2.1 Треск в узле ксерографии
- 2.2 Треск Xerox WC 6015 в области печки
- 3 Ошибка 024-360
- 4 Ремонт контактной группы картриджей
- 5 Ошибка 092-651
- 5.1 Подкоды ошибки 092-651
- 6 WC 6015 не печатает с компьютера
- 7 Треск при работе WC 6015
- 7.1 Треск в узле ксерографии
- 7.2 Треск Xerox WC 6015 в области печки
- 8 Major Causes of the error code 024-747 of Xerox printers
- 9 Ремонт МФУ Xerox WC 6015
- 10 WC 6015 не печатает с компьютера
- 11 Замятие бумаги WC 6015
- 12 Как сбросить ошибку 092-910?
Ошибка 092-910 на принтерах Xerox WorkCentre 5024
Ошибка 092-910 в Xerox WorkCentre 5024 возникает по разным причинам:
- выход из строя датчика плотности тонера ATC;
- отсутствие тонера в картридже;
- проблемы с барабанным блоком и так далее.
Если чистка датчика ATC, а также замена расходных материалов не решили проблему, процесс печати может остановиться из-за поломки основной платы или ее отдельных компонентов.
Треск при работе WC 6015
Треск в узле ксерографии
В другом МФУ Xerox WC 6015 был слышен громкий треск при включении и работе. Пришлось разбирать МФУ еще дальше.
Сильный треск был вызван засорением пути отработанного тонера синим цветом. После тщательной очистки спрессованного тонера, превратившегося в камень, потрескивание исчезло. Отработанный тонер начал поступать в картридж.
Треск Xerox WC 6015 в области печки
Трещина в районе печки означает, что шестерни буксуют. В Xerox WC 6015 такое скорее всего, если сломалось крепление для плиты. При такой неисправности шестерня духовки не прижимается к шестерне редуктора принтера. Поэтому происходит проскальзывание и сильный треск.
Духовка в этом МФУ крепится двумя винтами сзади. А снизу печка цепляется к основанию с помощью полукруглых железных стопоров.
Если пробка отсутствует, печь не выдержит. В нашем случае полукруглая пробка была отломана.
Ошибка 024-360
Снова разберите весь принтер и проверьте разъемы на целостность и правильность соединения. Особенно тщательно проверьте контактные концы кабелей. Если они повреждены, отремонтируйте.
Ремонт контактной группы картриджей
Для ремонта разъема необходимо разобрать МФУ, снять разъемную группу и отремонтировать поврежденную контактную пластину.
Ошибка 092-651
Расшифровка субкодов не найдена. Особенностью ошибки 092-651 является то, что после этой ошибки принтер не перекачивает тонер из картриджей в ксерограф, и простого выхода из этой ситуации, похоже, нет.
Первая причина ошибки 092-651 — загрязнение датчиков CTD, расположенных на задней панели принтера под лентой переноса. CTD — датчик плотности цветного тонера. То есть это датчики плотности тонера для калибровки цвета в каждом цветном лазерном принтере. Они расположены за лентой переноса. Для решения этой проблемы протираем датчики спиртом и перезагружаем МФУ.
Если проблема не устранена, перейдите к следующей процедуре.
Вторая причина заключается в том, что в ксерографическом блоке, который переносит тонер, не хватает проявителя. Этот вариант возникает, если вы заправляете картридж не тем тонером. Например, универсальный тонер Samsung. В этом случае проявитель уходит и принтер слабо печатает. Чтобы добавить проявитель в блок ксерографии, необходимо разобрать весь МФУ.
Третья причина – в ксерографическом блоке не хватает тонера одного цвета. Причиной может быть неисправный картридж. В нашем случае это была ошибка 092-651 код 2440000. Причина — дешевые китайские картриджи, выходное отверстие которых заклеено липкой бумагой. После удаления бумаги клей остался. После установки картриджей клей плотно пристал к уплотнительной резинке принтера. Иногда это происходит из-за того, что выпускное отверстие для тонера заблокировано.
Решение таково. При включении подавайте тонер вручную для каждого цвета, пока тонер не появится в ксерографическом блоке. При ее появлении принтер оживет и начнет самостоятельно выкачивать тонер.
Подкоды ошибки 092-651
Иногда ошибка 092-651 28f0000 возникает из-за плохого тонера. С этим кодом полностью отсутствуют цвета желтый, красный, синий при калибровке. Это просто черный.
Решение. Замена тонера в цветных картриджах. С помощью сервисного меню можно запустить моторы каждого картриджа отдельно. Но не более 3 секунд на каждую.
После этого все цвета будут отображаться, но могут возникать ошибки 092-651 2880000. Это действительно плохо. Скорее всего, код означает, что яркости черного недостаточно для калибровки. Это означает, что в ксерографическом блоке плохой тонер или недостаточно проявителя. Но мы не берем на заправку застройщика. Слишком много геморроя.
WC 6015 не печатает с компьютера
Очень типичная ситуация. При подключении Xerox WC 6015 к компьютеру с Windows 7 драйверы автоматически устанавливаются через Центр обновлений Windows. Потом пытаешься что-то напечатать и ничего не происходит — задания на печать никуда не уходят, даже ошибки не появляется.
Это связано с неправильным драйвером для Windows 7, а также, возможно, для Windows 8 и 10.
Решение: скачайте и установите драйвер с официального сайта Xerox (весит около 200 МБ). После установки оригинального драйвера принтер Xerox WC 6015, ранее не печатавший с компьютера, начал печатать под Windows 7 и Windows 10.
Треск при работе WC 6015
Треск в узле ксерографии
В другом МФУ Xerox WC 6015 был слышен громкий треск при включении и работе. Пришлось разбирать МФУ еще дальше.
Сильный треск был вызван засорением пути отработанного тонера синим цветом. После тщательной очистки спрессованного тонера, превратившегося в камень, потрескивание исчезло. Отработанный тонер начал поступать в картридж.
Треск Xerox WC 6015 в области печки
Трещина в районе печки означает, что шестерни буксуют. В Xerox WC 6015 такое скорее всего, если сломалось крепление для плиты. При такой неисправности шестерня духовки не прижимается к шестерне редуктора принтера. Поэтому происходит проскальзывание и сильный треск.
Духовка в этом МФУ крепится двумя винтами сзади. А снизу печка цепляется к основанию с помощью полукруглых железных стопоров.
Если пробка отсутствует, печь не выдержит. В нашем случае полукруглая пробка была отломана.
Ремонт производился следующим образом.
Полукруг не нужен.
Major Causes of the error code 024-747 of Xerox printers
Ошибка с кодом ошибки принтера Xerox 024-747 может быть вызвана повреждением системных файлов Windows. Поврежденные системные файлы представляют реальную опасность для вашего компьютера. Есть много событий, которые показывают результат в ошибках системных файлов. Другими причинами этой ошибки являются неполная установка, неправильное определение оборудования, незавершенный процесс установки. Это происходит, если ваш компьютер обнаружен в результате атаки вредоносного ПО. Неправильное завершение может вызвать эту ошибку. Все вышеперечисленные действия могут привести к удалению или повреждению записей в системных файлах Windows. Этот поврежденный системный файл приведет к отсутствию и неправильному подключению информации и файлов, необходимых для правильной работы приложения.
Ремонт МФУ Xerox WC 6015
WC 6015 не печатает с компьютера
Очень типичная ситуация. При подключении Xerox WC 6015 к компьютеру с Windows 7 драйверы автоматически устанавливаются через Центр обновлений Windows. Потом пытаешься что-то напечатать и ничего не происходит — задания на печать никуда не уходят, даже ошибки не появляется.
Это связано с неправильным драйвером для Windows 7, а также, возможно, для Windows 8 и 10.
Решение: скачайте и установите драйвер с официального сайта Xerox (весит около 200 МБ). После установки оригинального драйвера принтер Xerox WC 6015, ранее не печатавший с компьютера, начал печатать под Windows 7 и Windows 10.
Замятие бумаги WC 6015
МФУ Xerox WC 6015 пришел в ремонт с постоянным сообщением о замятии бумаги, бумаги нигде не было.
После разборки устройства добираемся до датчика бумаги. Фактический датчик прохождения бумаги расположен сзади и показан стрелкой.
Замените поврежденный датчик. На этом ремонт МФУ Xerox завершен.
Второй датчик находится в блоке крепления.
Как сбросить ошибку 092-910?
Простой замены изношенного блока фотокондуктора или использованного картриджа иногда недостаточно для сброса ошибки 092-910 .
Для завершения операции необходимо войти в сервисное меню принтера Xerox 5024 и выполнить следующий алгоритм действий:
- включить устройство;
- зажать кнопку с цифрой «0» на 5 секунд, не отпуская ее, нажать кнопку «Старт»;
- введите набор цифр «6789» и снова нажмите «Старт»;
- после открытия сервисного меню набрать «752», завершить комбинацию кнопкой «Старт»;
- затем вызовите «059» — «Старт»;
- на экране должна появиться цифра «1», нажмите «Старт» — «000» — «Старт»;
- когда появится подтверждение сброса ошибки «ОК», зажать цифру «0» на 5 секунд, не отпуская кнопку, нажать «Старт».
После перезапуска машина должна запуститься без отображения ошибки 092-910 .
Датчики плотности цветного тонера (CTD) измеряют оптическую плотность тонера, нанесенного на маркировочный блок во время калибровки в процессе печати. Датчик установлен с каждой стороны маркерного блока. Это обеспечивает одинаковую плотность тонера по всей длине ленты. Для достижения оптимального качества печати принтер проверяет работу датчиков CTD в начале каждого цикла калибровки. Датчики CTD следует очищать, когда датчик CTD выходит из строя, или на панели управления появляется сообщение, или в меню Setup
принтер предоставляет эту инструкцию.
Если тонер попал на кожу или одежду, не удаляйте его горячей водой или моющими средствами. Использование горячей воды приведет к тому, что тонер прилипнет и его будет трудно удалить. Если тонер попал на кожу или одежду, стряхните его, сдуйте или смойте холодной водой с мылом.
Чтобы очистить датчики CTD:
- Выключите принтер и выньте шнур питания из розетки.
- откройте заднюю крышку, нажав на защелку.
- Очистите датчики CTD, протерев отверстия чистым сухим ватным тампоном.
- Не прикасайтесь к отмеченной области на нагревательном ролике фьюзера или рядом с ним. Вы можете обжечься.
Источники
- https://kodyoshibok03.ru/oshibka-092-651-kod-2110000/
- https://shamrin.ru/092-910-ochistite-datchik-ctd/
- https://manualza.ru/xerox/d110/czbn181
- https://errorcode0x.com/fix-xerox-printer-error-code-024-747/
[свернуть]
Category
Error Code
C P S M O
016-786
016-787
016-788
016-789
016-791
016-792
016-793
016-799
021-750
021-751
021-770
021-771
021-772
024—746
024-747
X er o x 4 5 90 / 4110 C o pi e r /P r i n te r U s er G u i de
Cause and Remedy
When using the scan feature, hard disk capacity is
Cause
insufficient for writing to a file.
Either remove unnecessary data from the hard disk to
Remedy
increase free disk space or initialize the hard disk.
Invalid server IP address specified in job template.
Cause
Specify the correct job template.
Remedy
Failed to load a file from the Web browser.
Cause
Perform the following actions, and try again.
Remedy
• Reload the browser page
• Restart the browser
• Power-cycle the machine
Insufficient space available for mail processing.
Cause
Processing was interrupted.
Reduce resolution or reduction/enlargement ratio to
Remedy
decrease the data size, or send in several pieces.
In the scanner (save to PC) or job template scan, the
Cause
forwarding destination or job template save location
could not be accessed.
Check whether you can access the specified forwarding
Remedy
destination.
Specified job history could not be acquired when printing
Cause
Job Counter Report
Specified job history does not exist.
Remedy
The hard disk has run out free space.
Cause
Either remove unnecessary data from the hard disk to
Remedy
increase free disk space or initialize the hard disk.
An illegal print parameter is included.
Cause
Confirm the print data and option and specify the print
Remedy
data again.
During an inspection or maintenance request a
Cause
transmission error occurred and our Customer Support
Center could not be contacted.
Check that the phone lines are connected and try
Remedy
sending an inspection or maintenance request again
after a short time.
If the error persists, contact the Customer Support
Center.
A feature (one of paper size, tray, output tray, or 2 sided
Cause
printing) that is incompatible with the specified paper
quality has been specified.
Check the print data.
Remedy
An illegal print parameter combination was set. For
Cause
example, a non-standard size was specified and
Tray Selection was set to Auto.
Check the print data. In the above case, select Tray 5
Remedy
(Bypass).
11 . P r o b le m S o l vi n g
11-39
Если копировальная функция работает стабильно, но есть проблема с распечаткой любых форматов файлов, обычно достаточно выполнить чистку реестра и очереди печати. Сама ошибка 024 747 в аппаратах Xerox указывает на неверно установленные параметры печати. Это означает, что настройки, указанные в программе, из которой осуществляется распечатка, в драйверах и в самом устройстве не совпадают. Из-за конфликта данных принтер перестает выполнять свою прямую задачу.
Указанная ошибка может появляться, когда вручную в настройках выбран тип бумаги (Б или С), а в параметрах драйвера указано, что выбор бумаги осуществляется автоматически. Для восстановления корректной работы устройства нужно в драйвере также указать лоток, откуда будет распечатываться документ.
Когда документы, созданные в Microsoft Word, или слайды презентации Power Point распечатываются без проблем, а картинки, имеющие расширение .jpg, .jpeg или .png и др. на бумагу не выводятся, нужно проверить установленный размер печати. Вероятно, данный параметр имеет значение «оригинальный формат». Решение – выбрать другой размер. Для этого нужно открыть изображение через «Просмотр фотографий Windows», нажать Ctrl + P, в правой установить распечатку макета «во всю страницу».
Чтобы задать правильные параметры, потребуется зайти в настройки принтера. Для этого:
- открыть меню «Пуск»;
- выбрать в списке пункт «Устройства и принтеры»;
- в открывшемся окне нажать на нужное устройство правой кнопкой мыши и выбрать строку «Настройка печати»;
- для цветных и черно-белых лазерных принтеров содержание диалоговых окон с настройками будет отличаться;
- установить необходимые параметры печати и сохранить данные нажатием на кнопку «ОК».
Если проблема не решилась, следующий шаг — проверка настроек драйвера. Может потребоваться переустановка программного обеспечения. Последний этап – проверка, как настроена опция в самой программе.
Так, при печати pdf-файла из программы Acrobat Reader некоторые изображения на листах могут быть пропущены. Это указывает на несовместимость документа с программой. Для решения проблемы потребуется разрешить печать листов в виде изображений, т.е. в программе активировать опцию «Print As Image». Это займет больше времени, но распечатка файла пройдет успешно.
Если самостоятельно устранить ошибку и возобновить стабильную работу принтера не получилось, обратитесь в наш сервисный центр. Диагностика и ремонт осуществляются на дому или в офисе заказчика, за исключением случаев, когда требуется использование специального оборудования или в нестандартных ситуациях. Тогда наш курьер отвезет устройство Xerox в мастерскую, а по окончанию работ вернет вместе с гарантийным талоном.
024-746, 024-747 Print Request Failure RAP
024-746 There are parameters that are incompatible with the specified paper type.
024-747 The specified combination of parameters (stored file size, paper size, paper tray, duplex command, output tray) cannot be executed or continued.
Procedure
Advise the customer to use the correct print parameters.
**This RAP is from Xerox Service Manual. All brand names and trademarks are their respective owner’s property.**
You may be also interested in below toner and drum chip (CRUM) for Xerox VersaLink C7020, C7025, C7030, C7000.
Toner Chip (For North America and West Europe Region):
• 106R03741 106R03744 106R03743 106R03742
• 106R03757 106R03760 106R03759 106R03758
• 106R03737 106R03740 106R03739 106R03738
Toner Chip (For South America and East Europe Region):
• 106R03749 106R03752 106R03751 106R03750
• 106R03745 106R03748 106R03747 106R03746
• 106R03765 106R03768 106R03767 106R03766
Toner Chip (For Metered Machine):
• 106R03733 106R03736 106R03735 106R03734
Drum Chip:
• 113R00780 113R00782
Re: xerox 7100dn Code Error 024-747 problem?
Hi buy a xerox 7100dn to try printing the demo page the same printer fails in Tray 1 024-747 and not print, also tried to bypass tray when you are printing gives me the error of paper jam which it is false because there is no paper jam.
I am seeking a solution for this.
thanks
Hello , it seems you have not set the right tray paper paramaters for your printer,
Can you read the infomation below:Print Request Failure — Paper
The paper type specified by the job is incompatible with options such as Paper Tray, Output Tray, or
Automatic 2 Sided Print.
Applicable Fault Code
� 024-746: There are parameters that are incompatible with the specified paper type.
Initial Actions
� Power cycle the printer.
� If the problem persists, perform the following procedure.
Troubleshooting ProcedureStep Actions and Questions
1. Replace the paper with fresh paper and resend the print job.
Troubleshooting Procedure
Step Actions and Questions
1. Do not specify parameters that are incompatible with the specified paper type.
Error Troubleshooting
Xerox Internal Use Only Phaser 7100 Service Manual 2-189
Print Instruction Fail
The Job cannot be executed or continued with the specified combination of parameters (Stored File
Size, Paper Size, Paper Tray, Duplex Settings, and Output Tray). This error will also appear in cases
where a Job had been paused due to the occurrence of component malfunction in the middle of
printing and the Job is unable to be continued even by pressing the Start button due to the
malfunctioning component.
Applicable Fault Code� 024-747: Unable to Continue the Operation as the Combination of Parameters (Stored File Size,
Paper Size, Paper Tray, Duplex Settings, and Output Tray) Cannot be Printed.
Initial Actions
� Power cycle the printer.
� If the problem persists, perform the following procedure.
Bates Numbering Digit Over
When printing the Bates Numbering, the maximum 9 digits or user defined digits was exceeded.
Applicable Fault Code� 024-748: Bates Numbering No. of Digits Over
Initial Actions
� Power cycle the printer.
� If the problem persists, perform the following procedure.
Troubleshooting Procedure
Step Actions and Questions
1. Split the print job into smaller batches and print again.
Troubleshooting Procedure
Step Actions and Questions
1. Reduce the number of documents to be lower than the user defined number of sheets or increase the
print digits to be higher than the user-specified no. of sheets and print again.
Category
Error Code
C P S M O
016-786
016-787
016-788
016-789
016-791
016-792
016-793
016-799
021-750
021-751
021-770
021-771
021-772
024—746
024-747
X er o x 4 5 90 / 4110 C o pi e r /P r i n te r U s er G u i de
Cause and Remedy
When using the scan feature, hard disk capacity is
Cause
insufficient for writing to a file.
Either remove unnecessary data from the hard disk to
Remedy
increase free disk space or initialize the hard disk.
Invalid server IP address specified in job template.
Cause
Specify the correct job template.
Remedy
Failed to load a file from the Web browser.
Cause
Perform the following actions, and try again.
Remedy
• Reload the browser page
• Restart the browser
• Power-cycle the machine
Insufficient space available for mail processing.
Cause
Processing was interrupted.
Reduce resolution or reduction/enlargement ratio to
Remedy
decrease the data size, or send in several pieces.
In the scanner (save to PC) or job template scan, the
Cause
forwarding destination or job template save location
could not be accessed.
Check whether you can access the specified forwarding
Remedy
destination.
Specified job history could not be acquired when printing
Cause
Job Counter Report
Specified job history does not exist.
Remedy
The hard disk has run out free space.
Cause
Either remove unnecessary data from the hard disk to
Remedy
increase free disk space or initialize the hard disk.
An illegal print parameter is included.
Cause
Confirm the print data and option and specify the print
Remedy
data again.
During an inspection or maintenance request a
Cause
transmission error occurred and our Customer Support
Center could not be contacted.
Check that the phone lines are connected and try
Remedy
sending an inspection or maintenance request again
after a short time.
If the error persists, contact the Customer Support
Center.
A feature (one of paper size, tray, output tray, or 2 sided
Cause
printing) that is incompatible with the specified paper
quality has been specified.
Check the print data.
Remedy
An illegal print parameter combination was set. For
Cause
example, a non-standard size was specified and
Tray Selection was set to Auto.
Check the print data. In the above case, select Tray 5
Remedy
(Bypass).
11 . P r o b le m S o l vi n g
11-39