There are many possible answers for this problem. The most common and most likely is that you’re running another program which is blocking port 80 or 443. If you’ve installed Skype, then you’ve found your problem! Change apache’s port settings to 81 and apache will work. There’s a good tutorial on that To check this you can open up your command line by clicking the start menu, and typing ‘cmd’, and enter the command
netstat -nab
this wil return a list of programs that will vaguely resemble this pattern
    [someprogram.exe]
    UDP     [fe80::numbers:numbers:numbers:numbers%numbers]:portnumber
You need to find a line (or lines) ending in :80 and terminate them in order to start apache. If there is no line ending in :80, there are more things you can do.
First, navigate to xampp’s directory (default is c:\xampp) and double click apache_start.bat. This will open up a comand line and return more detailed errors about why apache can’t run. Mostly, be looking for syntax errors that you could’ve created by editing your httpd.conf, or httpd-ssl.conf files. This is very easy to do if you’ve edited it and are a new user.
If still this fails, your last hope is to check the apache error log by clicking on the logs tab in apache’s row in the xampp control panel and clicking error log.
If none of this works, don’t give up! You got this!
Edit: If you change the port of apache, you will also have to go into httpd.conf (located in xampp/apache/conf) and near line 184, replace
ServerName localhost:80
with
ServerName localhost:81
It is also possible to specify port 81 in the url of your localhost, i.e.
localhost:81/my_project.php
In a previous article, we’ve explored the issue of Apache being unable to start on macOS devices. In this article, we will be exploring the same thing, but for the Windows version of XAMPP.
What should you do if XAMPP’s Apache service does not run on your Windows machine? Read on to find out.
Update 6 April 2023: Added some new solutions to the article.
- The problem
- Possible causes and fixes
- Changing the default XAMPP Apache port
- Disabling the World Wide Publishing Service (W3PS)
- Re-installing XAMPP
- Troubleshooting using XAMPP logs
- Getting output from
apache_start.bat - Reading Apache logs
- Getting output from
- Conclusion
1. The problem
If Apache is unable to start on your XAMPP Control Panel, you will likely see the following error shown below:
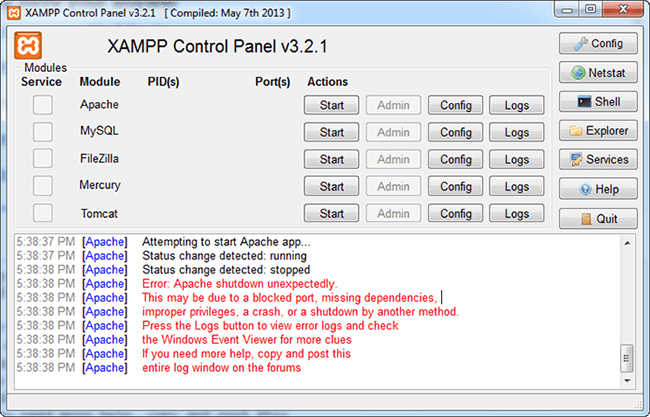
When you try to start Apache Web Server, the XAMPP Control Panel will attempt to do so, but end up failing abruptly, mentioning that “Apache shutdown unexpectedly” (like the red text shown in the photo above).
Below is a transcription of the error, with the shutdown message highlighted.
[Apache] Attempting to start Apache app...
[Apache] Status change detected: running
[Apache] Status change detected: stopped
[Apache] Error: Apache shutdown unexpectedly
[Apache] This may be due to a blocked port, missing dependencies,
[Apache] improper privileges, a crash, or a shutdown by another method.
2. Possible causes and fixes
If XAMPP’s Apache cannot start, it is very likely that your default HTTP port (80), is blocked or being used by another application. To fix that, you can explore the solutions below.
a. Changing the default XAMPP Apache port
To determine if port 80 being blocked is your actual problem, you can change the default port number for Apache and see if it fixes your issue.
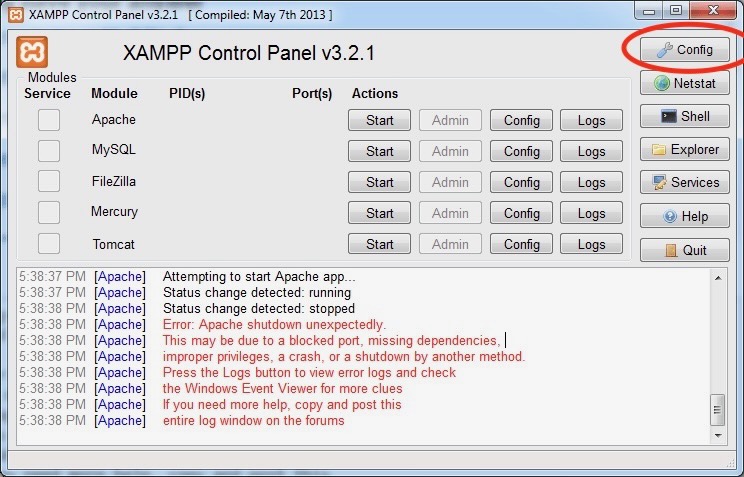
To change XAMPP Apache’s port number, refer to the steps below:
- Click on the Config button next to the Apache Web server (refer to the image below), and select
httpd.conf. - In the file, search for
Listen 80and change it toListen 8080. - Once done, try starting Apache on XAMPP again. If the problem was due to a blocked port, Apache should now start with no problem.
Article continues after the advertisement:
Note that if you are using any other port than 80 or 443, you will have to append the port number at the end of the URL to access the page(s) on XAMPP. For example, if Apache listens to port 8080, the URL you will have to access will be localhost:8080 instead of the default localhost.
Note that for pre-existing virtual hosts on your XAMPP Apache, you will also need to update them to listen to port 8080 instead of 80.
If XAMPP still fails to start after changing your port, that means that the problem is not caused by a blocked port. In this case, you will want to undo the changes made to httpd.conf, so that Apache is back to using Port 80.
b. Disabling the World Wide Web Publishing Service (W3PS)
If you are running a Windows server machine, you may have a process running called the World Wide Web Publishing Service (W3PS). The W3PS is a component of Windows’ Internet Information Services (IIS) — which is responsible for providing HTTP and HTTPS services on Windows machines — may be using port 80, thereby not allowing XAMPP Apache to connect to the same port.
Below, you can read instructions on how to either deactivate or stop the W3PS service, so that port 80 can be freed up for Apache’s use.
To deactivate the W3PS service (so that it doesn’t automatically start on your Windows device):
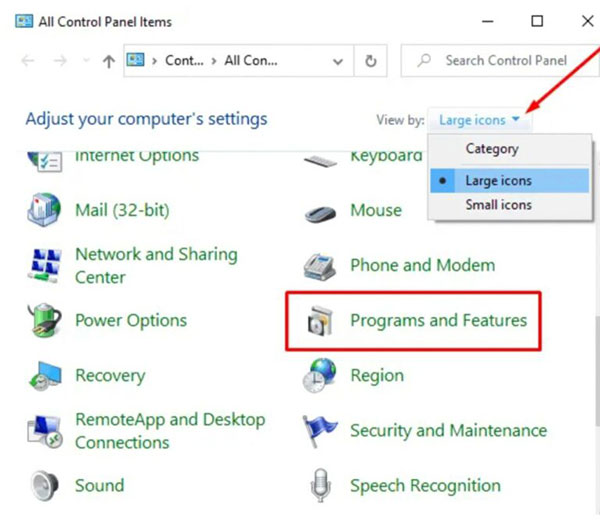
- Open the Control Panel.
- Select View by > Large Icons, so that all the icons in the Control Panel appear. Then, select Programs and Features.
- In the Programs and Features window, click on Turn Windows features on or off.
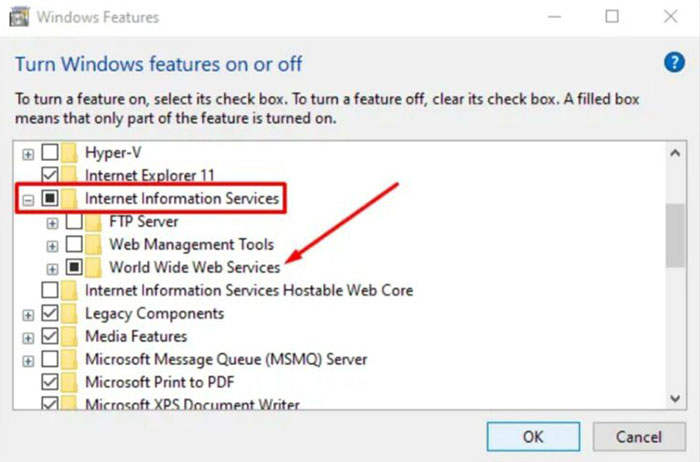
- In the newly-opened window, expand the Internet Information Service field, and uncheck the World Wide Web Services checkbox (see the image below).
- Once done, reboot your device, then try to start XAMPP Apache again. It should be able to run on port 80 now.
To stop the W3PS service (for this current boot) on your Windows device:
- Open the Windows Service Manager by pressing Windows ⊞ + R keys, and in the popped window, type in
services.mscand press Enter. - Search for the World Wide Publishing Service option under the Name column and open its properties by double-clicking on it.

- In the General tab, click Startup Type and switch it to manual. Now, you are able to turn on/off W3PS manually.
- Stop the service and click OK.
- Try to start the XAMPP Apache web server again.
c. Re-installing XAMPP
If neither of the 2 fixes above worked for you, then there is likely a misconfiguration in your XAMPP installation or Apache config files. In such a case, you have 2 options:
- Read the log files to find out what happened, or;
- Re-install XAMPP (here’s the official source)
In most cases, re-installation will be the easier option. If you can uninstall it through the Add or remove programs interface, that would be best. Otherwise, if you can’t find XAMPP on Add or remove programs, you will have to find the folder where XAMPP is and manually remove the folder (it is usually found in C:\xampp). Always uninstall through Add or remove programs (or the Control Panel) if you have the option.
If you can’t find where XAMPP is installed on your computer, you can also do a search for xampp-control.exe on your File Explorer. The folder that contains xampp-control.exe is where XAMPP was installed.
3. Troubleshooting using XAMPP logs
If you still have trouble starting Apache after trying the solutions above, then your issue is very specific to your machine. In such a case, you will have to consult Apache’s or XAMPP’s log files to pinpoint what the error is.
a. Getting output from apache_start.bat
Funnily enough, the XAMPP Control Panel doesn’t actually output the messages that Apache outputs. Hence, if Apache doesn’t start, you can actually try running the apache_start.bat file in your XAMPP install folder (for most of you, it should be in C:\xampp\apache_start.bat). This will try to start XAMPP’s Apache using the Command Prompt, and output messages that you might otherwise not see in the Control Panel.
b. Reading Apache logs
You can also read Apache’s logs (error.log is probably the most useful one) to see if it provides you with any insight. The logs can be accessed from XAMPP Control Panel, using the Log button beside the line for the Apache module.
These logs will not be as helpful as the output from apache_start.bat however, as these logs are usually filled up when Apache is running; but our problem here is that it can’t even start.
4. Conclusion
Having read the article and applied the described solutions, we hope you could manage to fix your problems. Of course, there can be many more problems that cause this, and many with different solutions for these problems. If you are facing one of them that is not described in the article, please leave us a comment so that we can add this to the article (and credit you). Hence, your comment will help us make this article more and more helpful to everyone.
Article continues after the advertisement:
The Save Soil Movement
Poor farming practices and policies across the world have led to the degradation of agricultural soils in the world. This has led to the loss of nutritional value in our food over the years, and it will affect our food production capabilities in the coming decades.
Learn more about Save Soil →
I’m using XAMPP, and I can start Apache, but, MySQL (phpMyAdmin) start!
When I start, I get this error;
10:07:49 [Apache] Error: Apache shutdown unexpectedly.
10:07:49 [Apache] This may be due to a blocked port, missing dependencies,
10:07:49 [Apache] improper privileges, a crash, or a shutdown by another method.
10:07:49 [Apache] Press the Logs button to view error logs and check
10:07:49 [Apache] the Windows Event Viewer for more clues
10:07:49 [Apache] If you need more help, copy and post this
10:07:49 [Apache] entire log window on the forums
I search on it, and, change the port of Apache in Config -> Service and Port setting. I have;
Service name: Apache 2.4
Main port: 122
SSL port: 444
I also uninstall Skype (Windows 8/10/Metro version). Nothing is working. In the httpd.conf file I have;
Listen 122
ServerName localhost:122
I start it via apache_start.bat and get;
(OS 10013)An attempt was made to access a socket in a way forbidden by its access permissions.  : AH00072: make_sock: could not bind to address [::]:445
(OS 10013)An attempt was made to access a socket in a way forbidden by its access permissions.  : AH00072: make_sock: could not bind to address 0.0.0.0:445
AH00451: no listening sockets available, shutting down
AH00015: Unable to open logs
Please note that all the log files don’t exists!
Skype is uninstalled.
XAMPP is a helpful development tool. However, you may run into problems at some point, such as receiving the notification: “Apache shutdown unexpectedly”. This error might seem to come out of nowhere, so identifying the cause – let alone the solution – can be puzzling.
Fortunately, there is a common explanation for Apache’s sudden shutdown. With a few simple modifications, you should be able to fix the problem and get Apache up and running again. All you have to do is update some settings in the configuration files.
In this article, we’ll discuss the common cause of this Apache error in XAMPP and then walk you through four steps to fix it, both on Windows and macOS.
Let’s get started!
An Introduction to the XAMPP “Apache Shutdown Unexpectedly” Error
XAMPP is a free, open source server stack that includes the Apache server and MariaDB database:

It runs PHP and Perl scripts, and is used to develop and test dynamic websites on local machines. This means that if you are building a website, you can install WordPress locally on your computer. You can use XAMPP without having to upload your site’s files to your web hosting service.
If you’re reading this article, we’ll assume you’re already at least somewhat familiar with XAMPP. However, what may be new to you is the “Apache shutdown unexpectedly” error you’re seeing.
This message is most commonly caused by a blocked port. Usually, it means that another application installed on your computer, such as Skype, is using the same port as XAMPP. Additionally, you may notice that the error message indicates the problem may also be attributed to “missing dependencies, improper privileges, a crash, or a shutdown by another method.”
In any event, the easiest fix is to simply modify the XAMPP default settings. However, the method for resolving the error varies slightly between Windows and macOS. Also, the interface may look a bit different depending on the XAMPP version you’re using. We will provide instructions for both operating systems below, starting with Windows.
How to Fix the XAMPP Error “Apache Shutdown Unexpectedly” in Windows
If you’re using a Windows device, you can follow these four steps to update your default port settings in XAMPP.
Step 1: Open the Configuration Settings from the XAMPP Control Panel
The first step is, of course, to launch XAMPP. This will open the XAMPP control panel. From here, you can update the configuration settings for the server stack.
Since this error is related to Apache, we’ll focus on those settings. In the “Apache” row of options, click on the Config button.
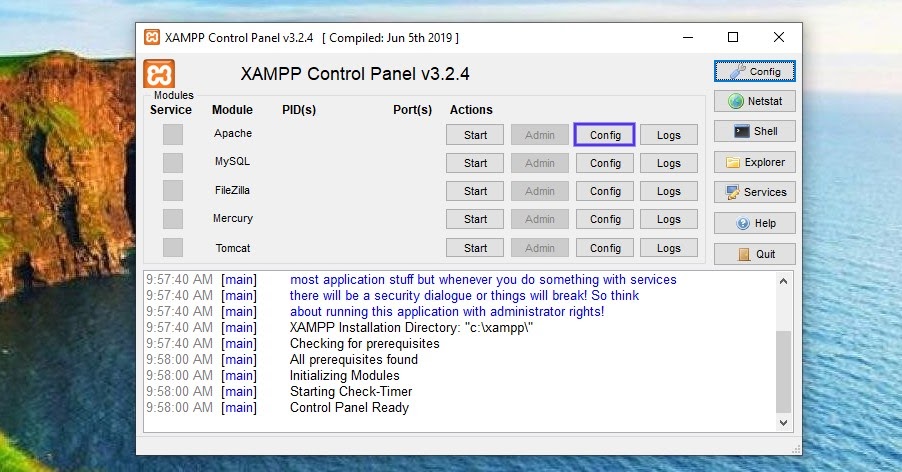
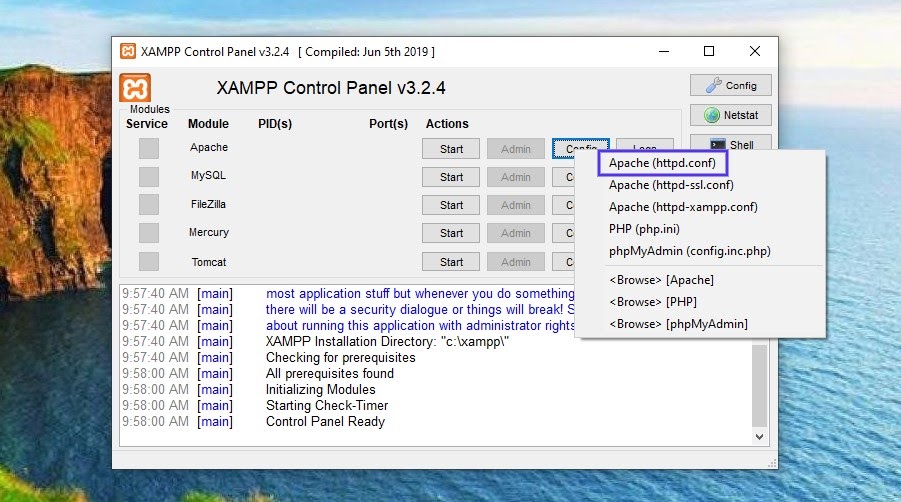
This will open a drop-down menu of files. We’re going to be editing two of these files, starting with httpd.conf.
Step 2: Change the Default Port Settings of the httpd.conf File
From the menu of files, click on Apache (httpd.conf). Once you do, the file will open in your computer’s default text editor:
Within this file, there are three settings you’ll want to update. To get started, press Ctrl + F, then enter “80” in the search field:
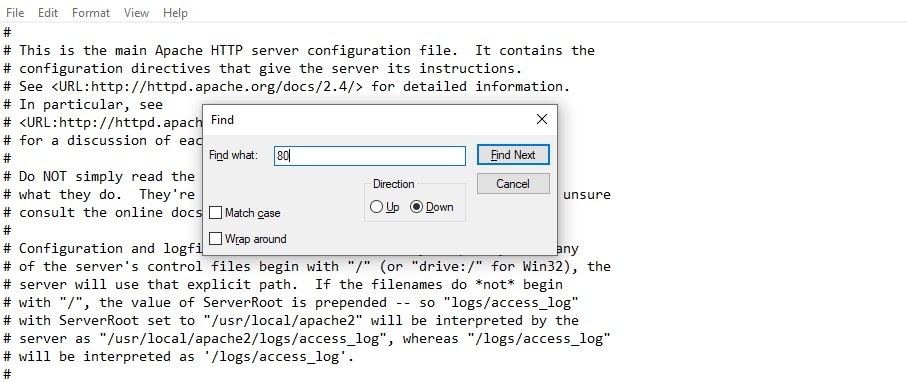
This will display all instances of the number 80 in the file. Locate “Port 80” and change it to “Port 8080”. Once the port setting is updated, search for “Listen 80” and update it to “Listen 8080”.
Finally, search for “servername localhost:80”. Once you find it, modify it to “servername localhost:8080”. When you’re finished, save and close the file.
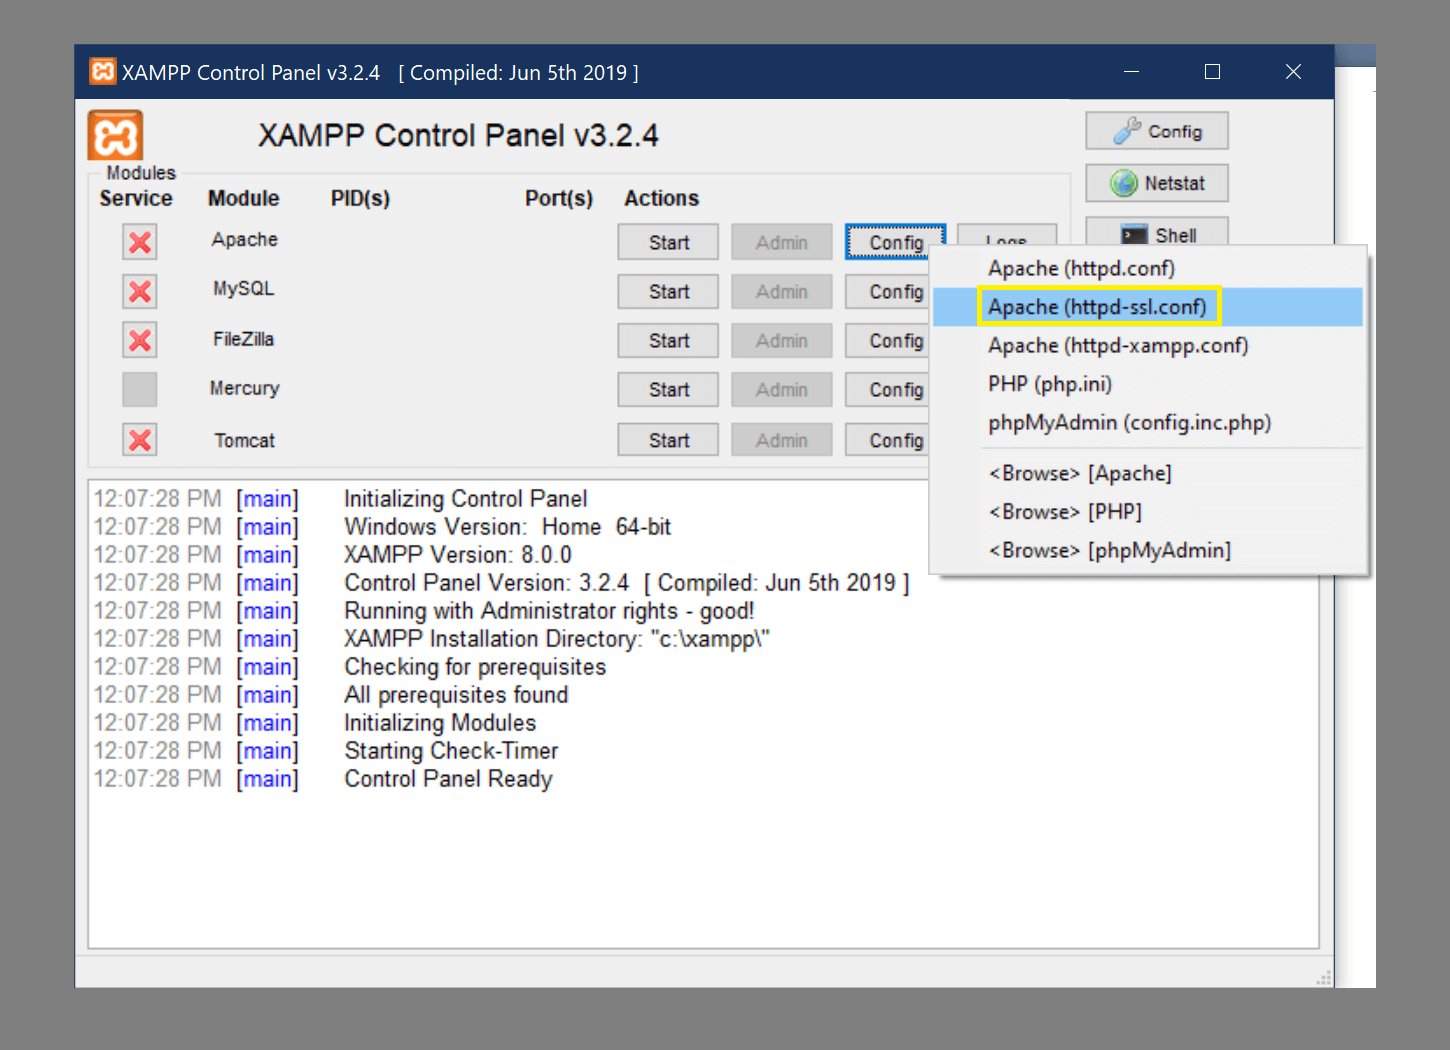
Step 3: Update the Default Port Settings in the http-ssl.conf File
Now it’s time to move on to the second file. To do so, you can return to the XAMPP control panel, then select Config under the Apache settings again. This time, open the Apache (http-ssl.conf) file.
When the file opens in your text editor, press Ctrl + F, and then enter 443 in the search field. Locate “Listen 443” and update this to “Listen 4433”.
Next, search the file for the next instance of “443”. It should be “<VirtualHost _default_:443>”. Once you find it, you can go ahead and change it to “<VirtualHost _default_:4433>”. When you’re finished, remember to save and close the file.
Step 4: Restart Apache
Once you’ve updated the settings in both files, the final step is to stop Apache. You can do this by clicking on the Stop button along the same Apache row. After Apache has been stopped, click the Start button to complete the restart process.
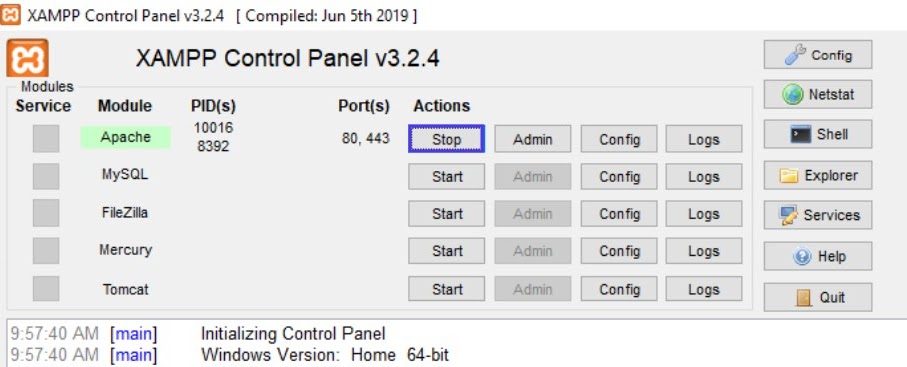
That’s it! Your port numbers will be updated and Apache should now run without error.
How to Fix the XAMPP Error “Apache Shutdown Unexpectedly” in macOS
Depending on what version of macOS you’re running, you may already have Apache installed on your computer. This default application of Apache will use the same default port settings as the Apache server in XAMPP, so this may be the cause of the “Apache shutdown unexpectedly” error.
If you’re using macOS, you can follow these four steps to update the default port settings.
Step 1: Open the XAMPP Apache Configuration
To start, open the XAMPP Application Manager if you haven’t already done so:

Next, select the Manage Servers tab next to the Welcome tab at the top:

On this screen, you’ll find a list of options. You can click on Apache Web Server, followed by the Configure button.
Step 2: Open the Conf File
From the Configure Apache Web Server box, select Open Conf File:

A warning box will appear, stating that the file is for advanced users:

You can click on Yes to continue. This will open the httpd.conf file.
Step 3: Update the Port Settings
Once the file opens in your text editor, the next step is to update the port settings. To do so, you can hit Ctrl + F, and then enter “80” in the search field. This will display instances of the number 80:

Locate the these lines:
#Listen 12.34.56.78:80
Listen 80
Once you do, go ahead and change them to the following:
#Listen 12.34.56.78:8080
Listen 8080
When you’re done, you can save and close the file. In the Configure Apache Web Server box, click on OK.
Step 4: Restart Apache
The final step is to stop and restart Apache, which you can do from the XAMPP Application Manager’s Manage Servers tab. Once Apache is stopped, click on Start to restart:

That’s it! Your port numbers will be updated and Apache should now run without error.
Summary
The XAMPP error “Apache shutdown unexpectedly” is commonly caused by another program, such as Skype, using the default Apache port. While this can be frustrating, it usually has a simple resolution.
As we discussed in this article, the easiest way to fix this problem is to update XAMPP’s Apache configuration settings. You can do this by editing the httpd.conf file and the http-ssl.conf file (for Windows users). Once this is done, you should stop and restart Apache to resume normal operation.
Themeisle content is free. When you purchase through referral links on our site, we earn a commission. Learn More
Technical errors are rarely a welcome sight, especially if they interrupt your workflow. If you’re using XAMPP for local development, you might have run into a particularly confusing message that reads, “XAMPP error Apache Shutdown Unexpectedly”. Finding a way to quickly resolve this vague issue so you can get back to work can be frustrating.
Fortunately, troubleshooting it is often actually quite simple. All you need is a text editor to reconfigure a few simple settings in your XAMPP files. In a few moments, you can eliminate this error and get back to building your latest project.
In this article, we’ll cover what the “XAMPP error Apache shutdown unexpectedly” message means so you can better understand it. Then, we’ll take you through four simple steps to fix the problem with tools that are likely already at your disposal. Let’s dive right in!
XAMPP is a powerful and popular development tool. You can use it to build a site on a local server. This is useful for creating new websites, as well as testing out changes, updates, and new plugins or themes on existing websites.
Unfortunately, this doesn’t mean that XAMPP always works perfectly. Despite being well-designed, there’s always a chance that something will go wrong. In the case of the “XAMPP error Apache shutdown unexpectedly” message, this problem can be particularly frustrating.
This warning appears when you try to boot up XAMPP. Moreover, that’s not always the only error message you’ll see. You could also receive some debugging information, such as text similar to the following:
Error: Apache shutdown unexpectedly. This may be due to a blocked port, missing dependencies, improper privileges, a crash, or a shutdown by another method. Check the "/xampp/apache/logs/error.log" file and the Windows Event Viewer for more clues.That’s a lot of information in one message. As such, it’s easy to become intimidated by all the possible causes of this issue. Furthermore, knowing how to interpret all these details can be even harder if you’re not well-versed in the relevant technology.
Fortunately, the root issue is typically pretty simple. This error message usually means that there’s another program that’s using the same port that XAMPP does by default.
A port is a network connection point used by a variety of programs. Each port only supports one program at a time. Therefore, if another application is blocking the port XAMPP typically connects to, it will prevent the platform from starting up.
Oftentimes, the culprit in this situation is Skype, as it uses the same default port as XAMPP. However, it might be another program. Trying to troubleshoot exactly which application is causing the issue can be a headache. That’s why we’ll be going straight to XAMPP’s files to fix this issue.
How to resolve the “XAMPP Error Apache Shutdown Unexpectedly” message (in 4 steps)
If you’ve never dealt with configuration files before, don’t worry. This process should be fairly simple. Additionally, all you’ll need is your XAMPP installation and a text or code editor.
Step 1: Launch the XAMPP Apache configuration settings
First, go ahead and launch the XAMPP dashboard. The program itself doesn’t have to operate. As long as you can access your dashboard, you should be able to resolve the error.
Additionally, try running XAMPP as an administrator. You can do this by right-clicking on the program and selecting Run as administrator. This isn’t crucial for this walkthrough, but it can prevent occasional unrelated errors.
Once you’ve launched XAMPP, navigate to the row titled Apache under the heading Module. Under Actions, select Config:

Note that when you see the “XAMPP error Apache shutdown unexpectedly” message, that means that the issue is specifically related to Apache. Therefore, you’ll need to click on that specific Config button to properly fix it. None of the other rows in this window will work.
Clicking on the Config button will open a dropdown menu listing a few file names. Each represents a configuration file for the program. Choose the first option, titled Apache (httpd.conf):
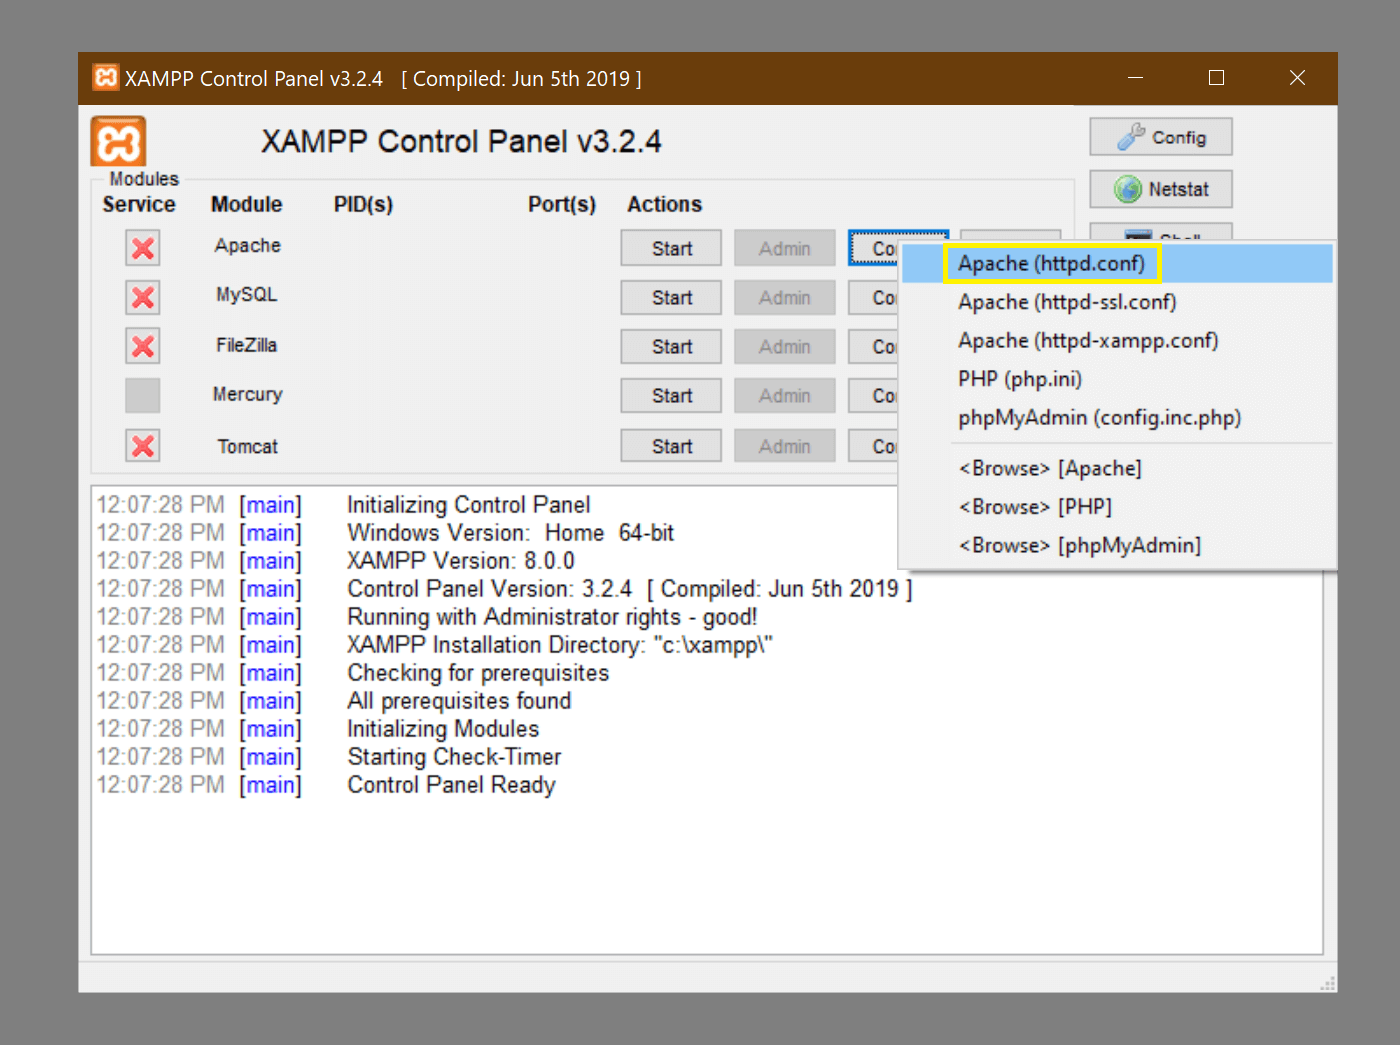
You can either open it with your default text editor, or a specialized code editor. As long as you can make changes to the file and save them, how you do so doesn’t really matter. We’ll be using Notepad.
Once you open the httpd.conf file, you’ll see some text similar to the following:
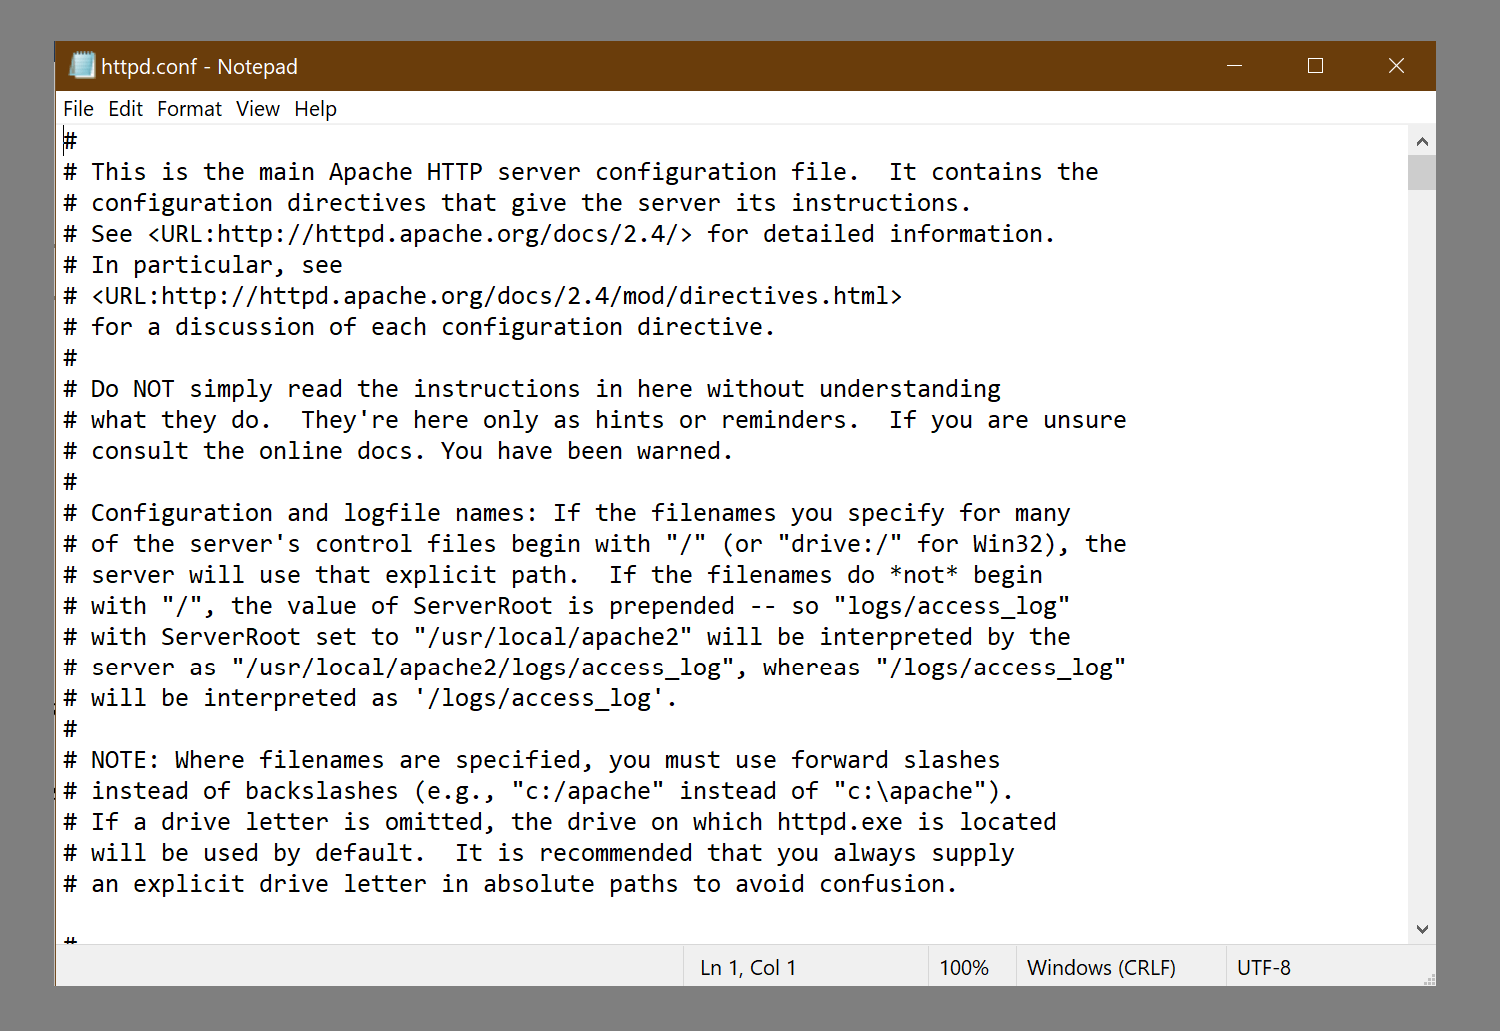
Once again, this can be a bit intimidating if you’re new to editing configuration files. The good news is that you’ll only need to modify a few simple things.
However, we do recommend that you proceed with caution. Configuration files often carry information that is essential for a program’s normal operation. Therefore, try not to edit anything that you don’t understand. You may also want to save a backup of this file before you proceed to the next step.
Step 2: Change your default port settings in httpd.conf
As we already mentioned, when you see the “XAMPP error Apache shutdown unexpectedly” message, it’s almost always a problem with a blocked port. As such, we’ll be changing the ports that the program normally uses to connect to your network.
Unless you’ve changed it before, the default port for Apache is 80. Port 80 is specifically for HTTP programs. However, it’s not just the default for Apache. Many other programs will use port 80 as well, which can lead to conflicts if you try to run multiple programs on this port at once.
To solve this issue, you need to redirect Apache to port 8080. This is an alternate HTTP-specific port. As such, XAMPP will continue to work as normal, but with less likelihood that its port will become blocked again in the future. As such, this is also a preventative measure against future port conflict errors.
Let’s get back to the configuration file. Press Ctrl + F to open a search dialogue. Enter 80 into the field to find every instance of the number in the file:

There will probably be a handful of instances where 80 occurs. However, you only need to change a few of them. Specifically, you’ll need to change three items:
- Change
Port 80toPort 8080 - Change
Listen 80toListen 8080 - Change
servername localhost: 80toservername localhost: 8080
Once again, we encourage you to only change these three items. Not only will modifying unrelated lines not solve this error, but it could also cause another one. If you accidentally edit the wrong element, you can restore your own backup or find the default Apache file on Github.
Save the httpd.conf file and close it when you’re finished making these changes. Then go back to your XAMPP control panel for the last step.
Step 3: Update your default port settings in http-ssl.conf
Lastly, we’ll be editing one final configuration file. To access it, repeat the instructions from Step 1. Go to the Apache row under Module and select Config. However, this time, click on the second option in the dropdown menu, titled Apache (httpd-ssl.conf):
Open up the text file in your preferred editor. However, this time you won’t be searching for 80. Instead, hit Ctrl + F and search for the number 443.
Port 443 is the port that is typically used for secure web transactions. However, Apache also needs it. Therefore, you need to change two instances of 443 to the alternative port – 4433:
- Change
Listen 443toListen 4433 - Change
<VirtualHost_default_:443>to<VirtualHost_default_:4433>
Be sure to save your work in this file as well. Once you’re done, close your text or code editor.
Step 4: Restart Apache
The next thing you want to do is restart Apache. This will reset the processes so that Apache can use the new alternate ports you’ve specified.
How to restart Apache on XAMPP
Restarting Apache is easy to do and somewhat intuitive:
- Click the Stop button on the Apache row.
- After Apache stops, click the Start button to restart it again.
If for some reason that doesn’t work, then you might need to completely shut down XAMPP and relaunch it. In most cases that shouldn’t be necessary though. The stop-start method should do the trick.
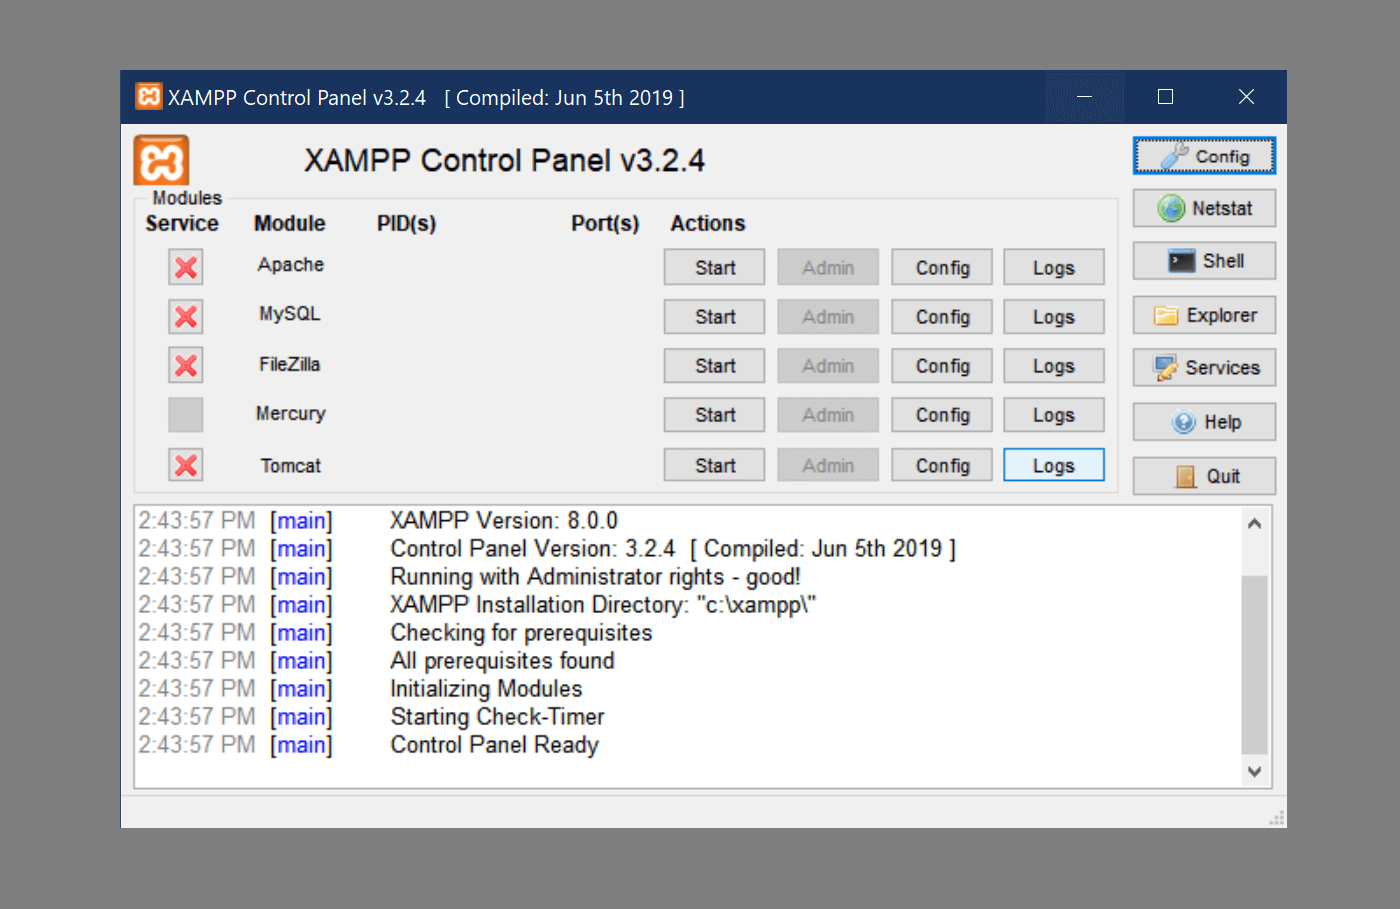
Upon restart, everything should work normally. Your control panel should look something like this:
From here, you should be able to click on Start next to Apache and continue with your work on your local site. Remember to not use ports 8080 or 4433 for any other programs, or you may have to repeat this process.
Once you have resolved this error, you may want to investigate other programs to see which one is taking up Apache’s default ports. If you decide to adjust another program’s settings to disconnect it, you can repeat these steps to reconnect XAMPP to ports 80 and 443.
Conclusion
Having to troubleshoot an error when you’re in the middle of a development project is annoying and eats up valuable time. Apache errors in particular can be aggravating. Fortunately, by altering a few configuration files, you can quickly resolve this frustrating roadblock.
In this article, we covered four easy steps to resolve the “XAMPP error Apache shutdown unexpectedly” message:
- Launch the Apache configuration settings from the XAMPP dashboard.
- Open the httpd.conf file and change the default port from
80to8080. - Open the http-ssl.conf file and change the default port from
443to4433. - Restart Apache.
Finally, if you regularly have problems with XAMPP, there are lots of other local development tools that you can consider, such as DesktopServer, Docker, or Vagrant.
Do you have any questions about resolving the “XAMPP error Apache shutdown unexpectedly” message? Let us know in the comments section below!
Free guide
4 Essential Steps to Speed Up
Your WordPress Website
Follow the simple steps in our 4-part mini series
and reduce your loading times by 50-80%. 🚀
Free Access