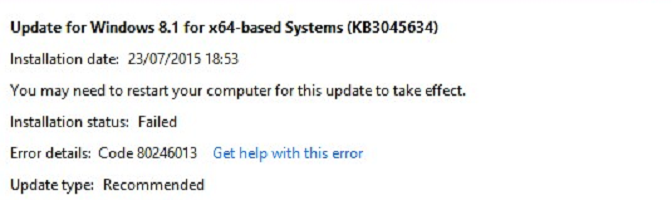
При очередном автоматическом обновлении операционной системы Windows 8/8.1, вы можете наткнуться на ошибку 80246013. Ошибки при обновления ОС — это уже дело достаточно привычное и когда ты устанавливаешь его, то всегда в голове появляется мысль о том, что вот сейчас что-то будет.
Итак, для этой ошибки существует огромное количество причин, по которым та может возникать на вашем компьютере. Однако, наиболее часто она проявляет себя по причине поврежденных файлов или проблем с определенными разрешениями.
Так или иначе давайте сразу же перейдем к возможным способам решения ошибки 80246013. Всего их в этой статье будет два: перезапуск Службы обновления Windows и сброс компонентов Центра обновления Windows.
Способы решения ошибки 80246013
Способ №1 Сброс компонентов Центра обновления Windows
- Нажмите правой кнопкой мыши на Пуск и выберите «Командная строка(администратор)».
- Далее вам понадобиться ввести в командную строку следующие команды для приостановления работы служб BITS и ЦО(Центра обновления) Windows:
- net stop bits
- net stop wuauserv
- net stop appidsvc
- net stop cryptsvc
- Теперь вам нужно удалить файл qmgr*.dat. Введите в командной строке команду Del «%ALLUSERSPROFILE%\Application Data\Microsoft\Network\Downloader\qmgr*.dat» и нажмите Enter.
- Далее нам нужно выполнить переименование папок SoftwareDistribution и catroot2. Просто введите в командную строку две следующие команды: Ren %systemroot%\SoftwareDistribution SoftwareDistribution.bak и Ren %systemroot%\system32\catroot2 catroot2.bak.
- Следующим шагом станет сброс службы BITS и Центра обновления Windows. Впишите в командную строку следующие команды:
- exe sdset bits D:(A;;CCLCSWRPWPDTLOCRRC;;;SY)(A;;CCDCLCSWRPWPDTLOCRSDRCWDWO;;;BA)(A;;CCLCSWLOCRRC;;;AU)(A;;CCLCSWRPWPDTLOCRRC;;;PU)
- exe sdset wuauserv D:(A;;CCLCSWRPWPDTLOCRRC;;;SY)(A;;CCDCLCSWRPWPDTLOCRSDRCWDWO;;;BA)(A;;CCLCSWLOCRRC;;;AU)(A;;CCLCSWRPWPDTLOCRRC;;;PU)
- Затем впишите в командную строку cd /d %windir%\system32 и нажмите Enter.
- Теперь вам нужно провести перерегистрацию компонентов BITS и Центра обновления Windows. Для этого введите команды:
- regsvr32.exe atl.dll
- regsvr32.exe urlmon.dll
- regsvr32.exe mshtml.dll
- regsvr32.exe shdocvw.dll
- regsvr32.exe browseui.dll
- regsvr32.exe jscript.dll
- regsvr32.exe vbscript.dll
- regsvr32.exe scrrun.dll
- regsvr32.exe msxml.dll
- regsvr32.exe msxml3.dll
- regsvr32.exe msxml6.dll
- regsvr32.exe actxprxy.dll
- regsvr32.exe softpub.dll
- regsvr32.exe wintrust.dll
- regsvr32.exe dssenh.dll
- regsvr32.exe rsaenh.dll
- regsvr32.exe gpkcsp.dll
- regsvr32.exe sccbase.dll
- regsvr32.exe slbcsp.dll
- regsvr32.exe cryptdlg.dll
- regsvr32.exe oleaut32.dll
- regsvr32.exe ole32.dll
- regsvr32.exe shell32.dll
- regsvr32.exe initpki.dll
- regsvr32.exe wuapi.dll
- regsvr32.exe wuaueng.dll
- regsvr32.exe wuaueng1.dll
- regsvr32.exe wucltui.dll
- regsvr32.exe wups.dll
- regsvr32.exe wups2.dll
- regsvr32.exe wuweb.dll
- regsvr32.exe qmgr.dll
- regsvr32.exe qmgrprxy.dll
- regsvr32.exe wucltux.dll
- regsvr32.exe muweb.dll
- regsvr32.exe wuwebv.dll
- После выполненной перерегистрации, вам нужно удалить с Реестра Windows поврежденные записи. Для этого сделайте следующее:
- Нажмите Win+R и выполните regedit.
- Пройдите с помощью левой панели в раздел HKEY_LOCAL_MACHINE\COMPONENTS
- Удалите PendingXmlIdentifier, NextQueueEntryIndex и AdvancedInstallersNeedResolving, а затем перезагрузите свой компьютер.
- Переходим к сбросу Winsock. Для этого введите в командную строку netsh winsock reset и нажмите Enter.
- Теперь нужно снова запустить ранее остановленные службы BITS и ЦО Windows. Впишите в командную строку команды:
- net start bits
- net start wuauserv
- net start appidsvc
- net start cryptsvc
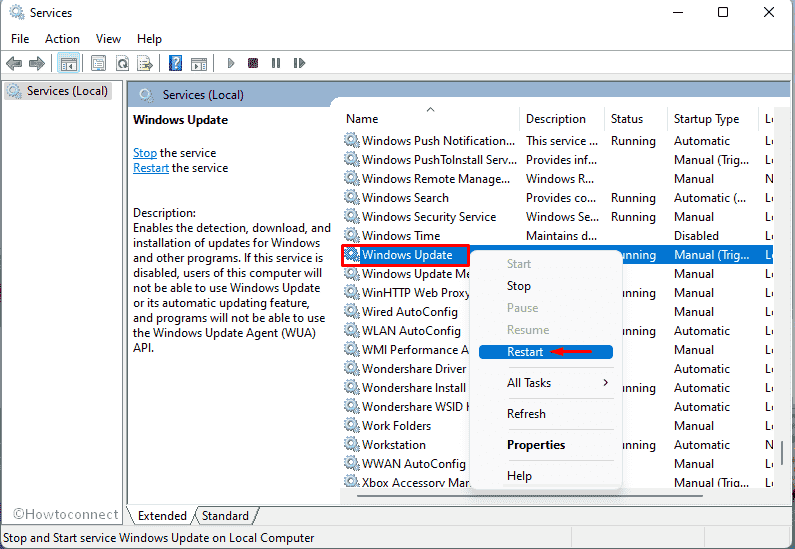
Способ №2 Перезапуск служб Центра обновления Windows
- Нажмите Win+R и выполните services.msc.
- Найдите в списке службу BIST и Центра обновления Windows, и кликните дважды каждой из них.
- Проверьте, запущены ли эти службы. Если нет, то нажмите на кнопку «Запустить», а также выберите настройку «Тип запуска — Автоматически».
Вот и все. Данные способы являются уже широко известными и их можно найти в очень большом количестве различных статей, в которых описывается проблематика похожая на ошибку 80246013. Проще говоря, номера ошибок может и разные, но решения для них практически одинаковы.
Corrupt system files can cause this error code
by Henderson Jayden Harper
Passionate about technology, Crypto, software, Windows, and everything computer-related, he spends most of his time developing new skills and learning more about the tech world. He also enjoys… read more
Updated on
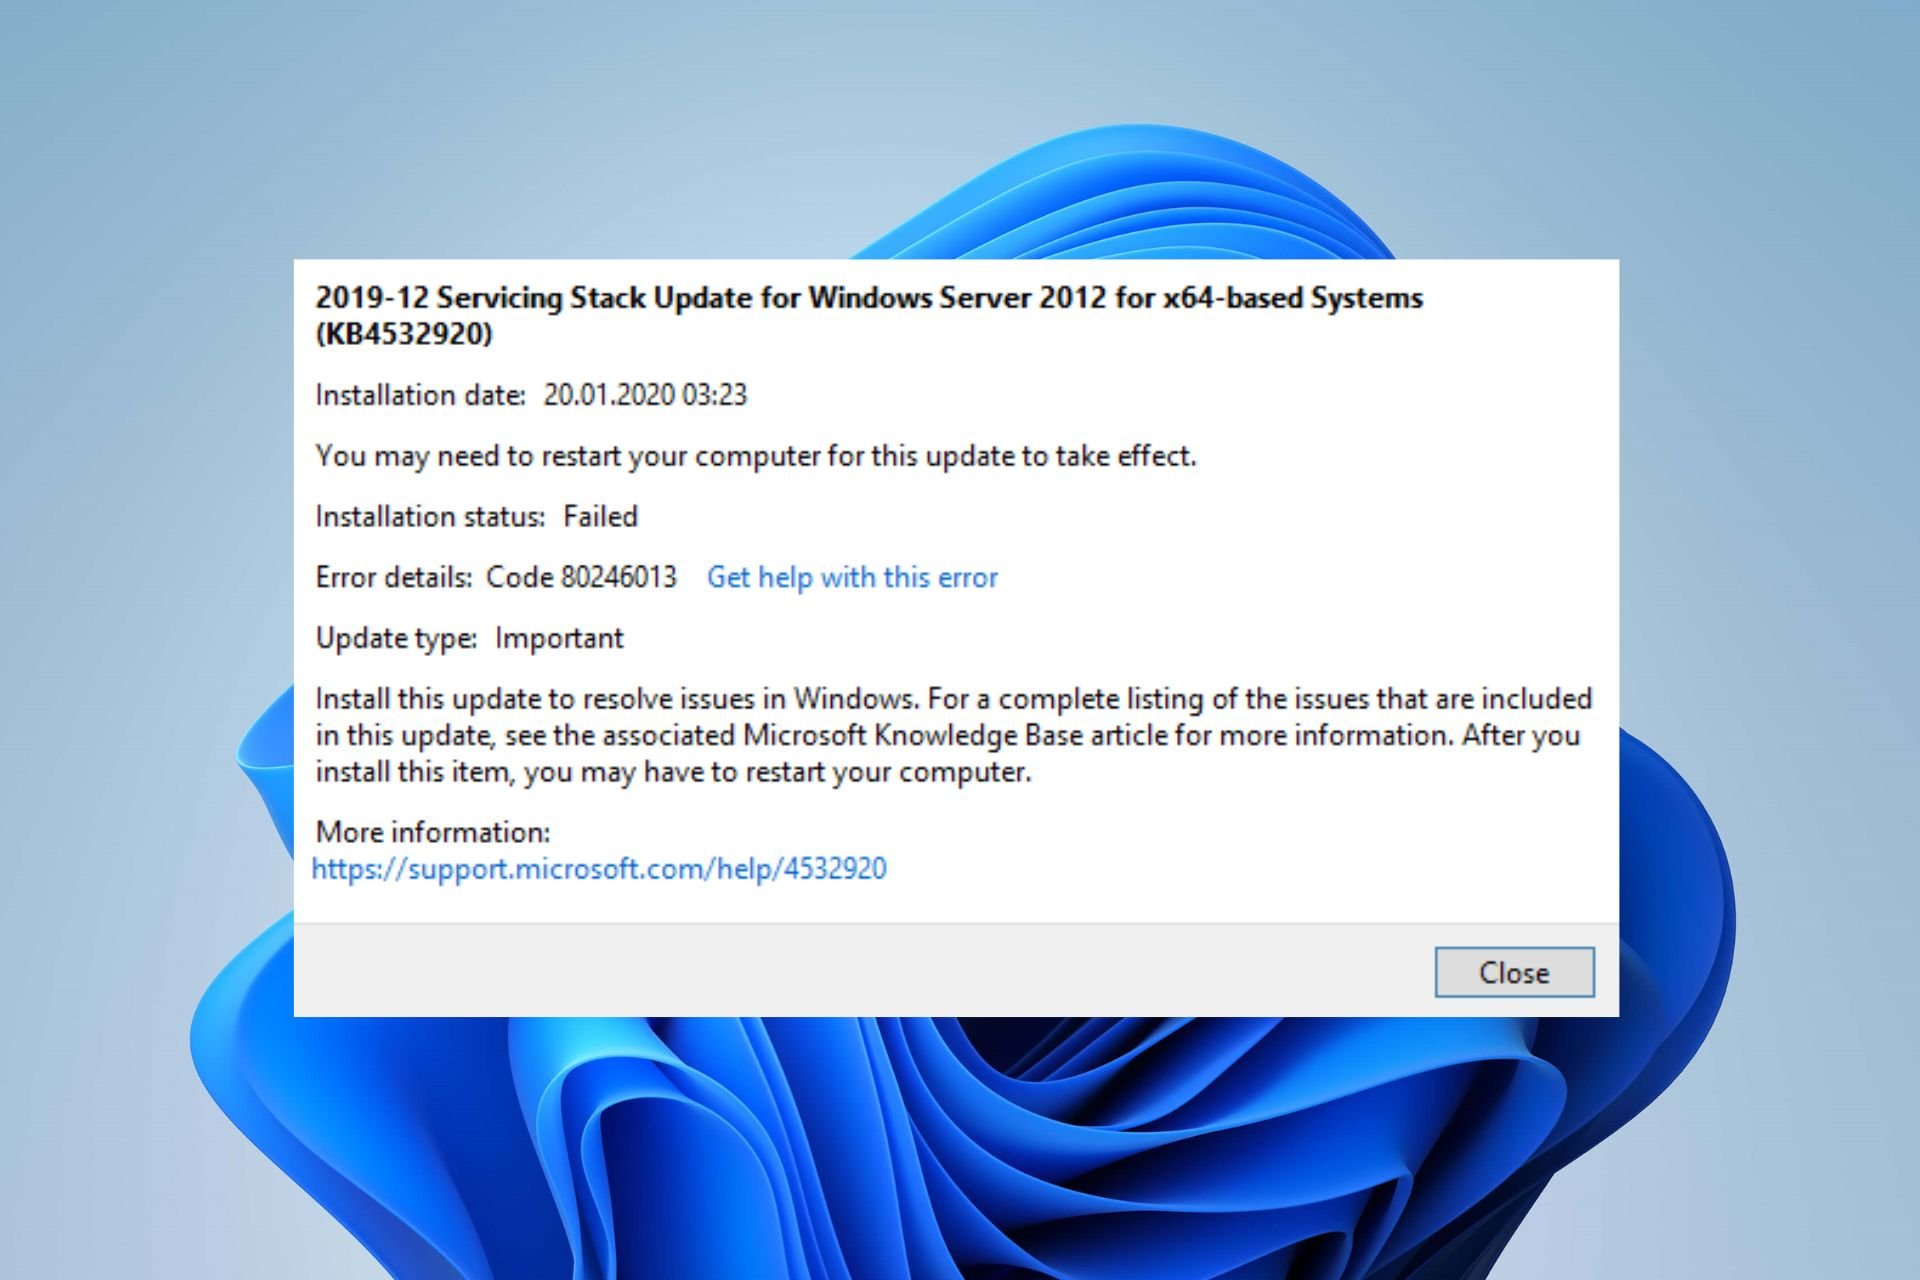
- Windows Update error code 80246013 prevents users from installing new updates.
- The error may occur due to corrupt system files and issues with the Windows Update service on your PC.
- You may run a Windows Update troubleshooter to resolve the error, as described below.
XINSTALL BY CLICKING THE DOWNLOAD FILE
Repair all Windows Updates Errors with Fortect:
SPONSORED
Windows update failures can be annoying! With Fortect, you will get rid of errors caused by missing or corrupted files after an update. The utility maintains a repository of the original Windows system file versions, and it uses a reverse algorithm to swap out the damaged ones for good ones.
- Download Fortect and install it on your PC
- Start the tool’s scanning process to look for corrupt files that are the source of the issues
- Right-click on Start Repair to resolve security and performance issues with your computer
- Fortect has been downloaded by 0 readers this month, rated 4.4 on TrustPilot
Microsoft releases timely updates and patches to improve Windows PC performance and fix bugs affecting the previous version. However, users may run into several issues on their PCs if there is an issue with the update process.
It may result in the Windows update error code 80246013 when installing Windows updates. Also, users can read our guide on the Windows Update Error 0x80073701 and some fixes for the error.
What causes the error code 80246013?
Many factors may cause Windows users to run into the error code 80246013 during a Windows update installation. It indicates issues with Windows Update services running correctly on your device.
Some notable causes are:
- Windows Defender Firewall interference – Some activities on your computer may get picked up as threatening to the system by the Windows Defender Firewall. It causes the Windows update process to run into errors. Likewise, Windows Firewall can impede the connection between the PC and Windows updates services.
- Corrupt system files – System files are essential for maintaining the smooth operation of your system. So, the update error may occur due to corrupt Windows components or damaged system files. Corrupt system files prevent the services dependent on it from performing as expected, resulting in errors. Also, missing system files can cause errors.
- Issues with Windows update components – Windows update uses some components to help run the update process. If these components are not intact, you may encounter the Windows update error code 80246013 on your PC.
These factors may vary in different computers. Hence, we’ll discuss some effective methods to resolve the Windows update error and get your system updated.
How can I fix the Windows update error code 80246013?
Before proceeding with any advanced steps for the error, try the following:
- Turn off background apps running on your PC.
- Fix network congestion issues on your PC.
- Restart Windows in Safe Mode and check if the error persists.
If you can’t fix the error, proceed with the following solutions.
1. Run Windows Update Troubleshooter
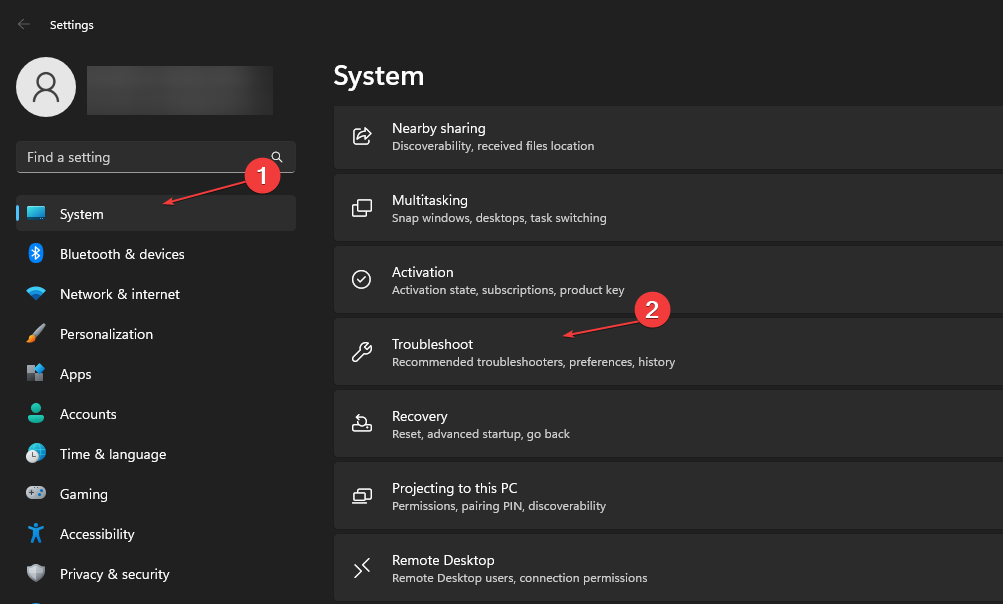
- Press Windows + I key to open the Settings app.
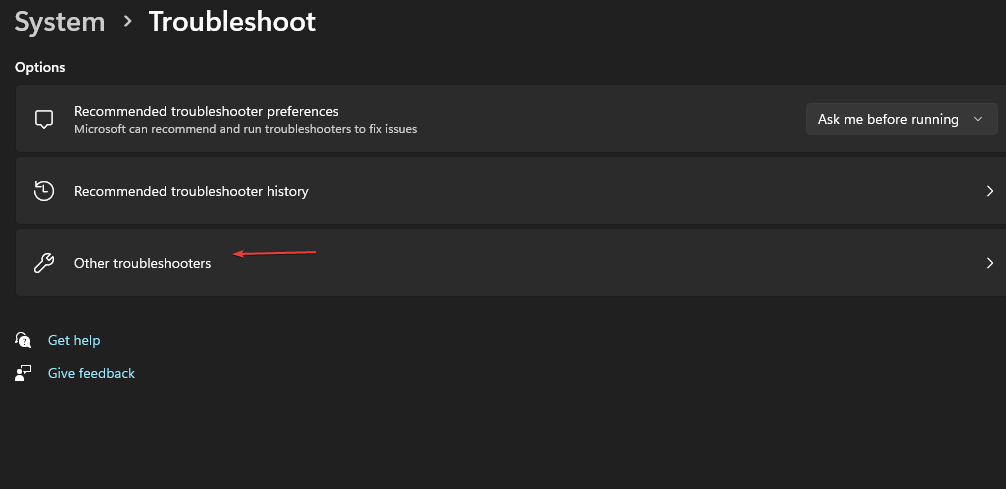
- Click System and select Troubleshoot.

- Then click on Other troubleshooters.

- Click Run beside the Windows Update.

- Follow the on-screen instructions and restart your PC afterward.

Running the Windows Update Troubleshooter will repair issues causing the Windows update not working on your PC.
If you can’t use the steps above, check other ways to run the Windows Update troubleshooter in Windows 11.
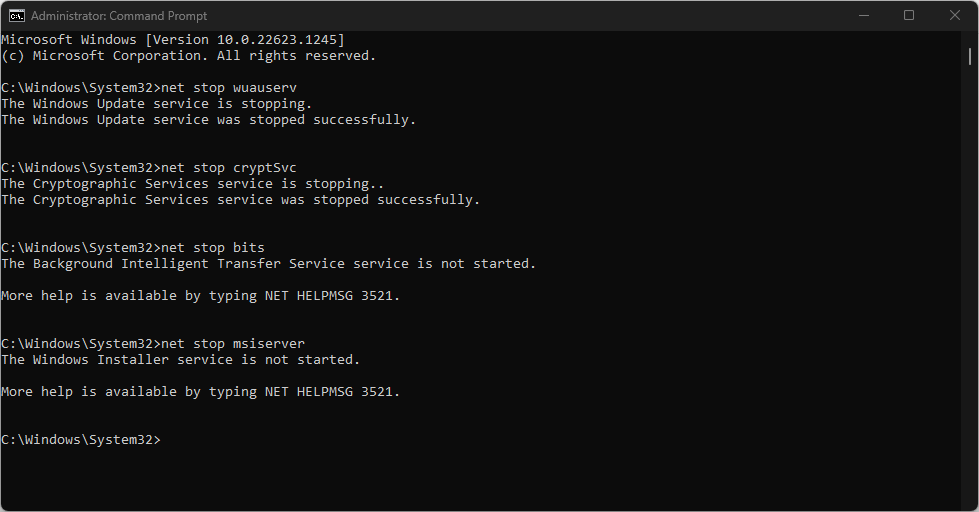
2. Reset the Windows Update process
- Left-click the Start button, type cmd, and select Run as Administrator.
- Input the following commands and press Enter after each one:
net stop wuauservnet stop cryptSvcnet stop bitsnet stop msiserver
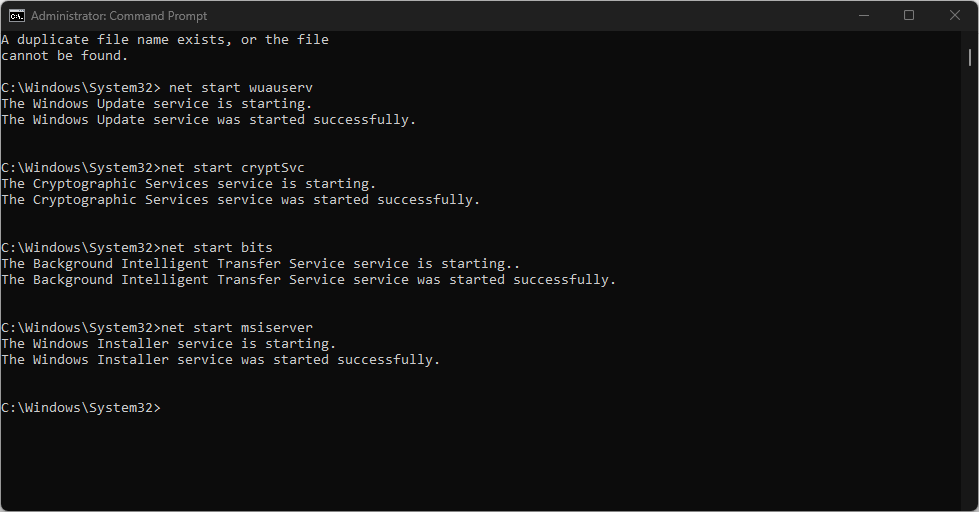
- Run the following command one after the other:
ren C:\Windows\SoftwareDistribution SoftwareDistribution.oldren C:\Windows\System32\catroot2 Catroot2.old - Type the following commands and press Enter after each one:
net start wuauservnet start cryptSvcnet start bitsnet start msiserver - Close the Command Prompt and restart your PC.
The above steps reset the activities involved in the Windows Update process and fix the problems causing the update error. Also, it can clear the update caches on your PC, impeding the process.
- Create stunning images with DALL-E 3 on Bing Chat now
- Meet Microsoft 365 Chat, a new AI assistant ready to help you work faster
- Microsoft announces Copilot Lab, a hub where you learn to work with AI
- Surface Laptop Go 3 offers 1 month of Xbox Game Pass ultimate
- Surface Studio 2 full specifications revealed and it’s a beast
3. Run an SFC scan
- Left-click the Start button, type Command Prompt, and click the Run as administrator option.
- Click Yes on the User Account Control prompt.
- Type the following and press Enter:
sfc /scannow - Restart your PC and check if the Windows update error persists.

An SFC scan will detect corrupt system files that can prevent the user profile from loading. You can check how to fix the run-as-administrator option if it’s not working on your PC.
Another reliable solution for the above process is using a third-party tool like Fortect that offers a thorough report of your PC’s corrupt files and automatically locates healthy components as replacements.
⇒ Get Fortect
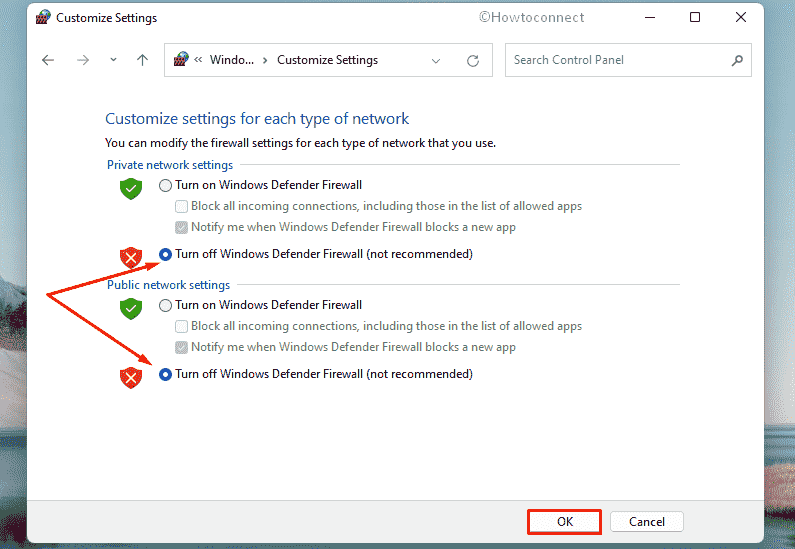
4. Disable Windows Firewall
- Click the Start button, type control panel, then press Enter to open the Control Panel.
- Click on the Windows Defender Firewall option.
- Select the Turn Windows Defender Firewall on or off option from the left side.

- Go to the Private network settings and Public network settings, then click the radio buttons for the Turn off Windows Defender Firewall (not recommended) option.
- Exit the Control Panel and restart your computer.
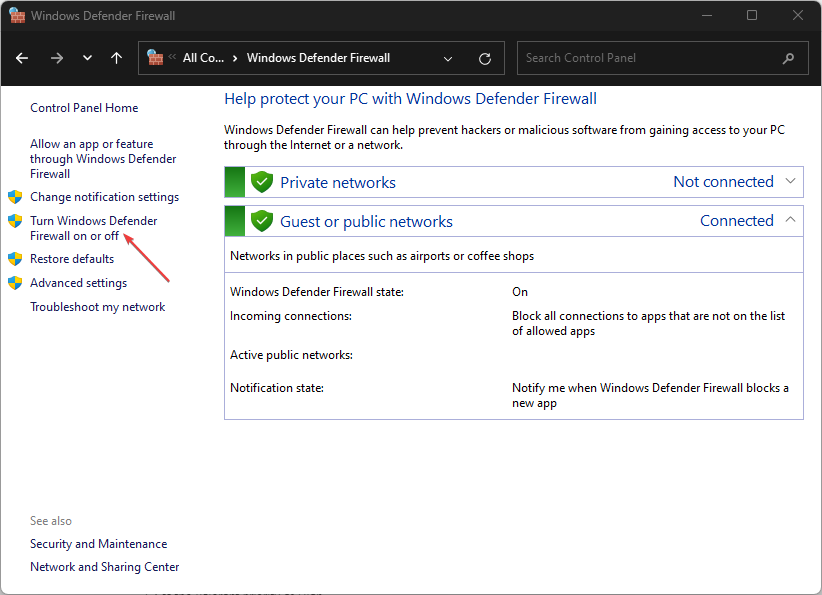
Disabling the Windows Defender Firewall will fix any interference it’s causing in the Windows update process.
Alternatively, our readers can check our guide on fixing slow Windows updates on their PCs. Likewise, we have a detailed guide on Windows Update error 0x8007045b and some fixes to apply.
Let us know which of the above solutions worked for you as well.
![]()
Download Windows Speedup Tool to fix errors and make PC run faster
Error 0x80246013 occurs when we try to download an app from the Microsoft Store or when we run Windows Update. There is no one single cause as to why this error issue occurs, but one of the most relevant causes is that your Windows 10 system has problems connecting to Windows Update or Microsoft Store.
Installation Failure: Windows failed to install the following update with error 0x80246013

Most of the time error 0x80246013 can create a lot of frustration in the user’s mind since they do not understand what is actually causing this issue. Keeping that in mind, we have curated the most probable solutions to fix error 0x80246013 on Windows 10. Therefore, here is how to troubleshoot error code 0x80246013 that shows on our display while installing or updating an application. You can try one of these fixes.
- Use Windows Store Apps Troubleshooter
- Run Windows Update Troubleshooter
- Delete these data files
- Reset Microsoft Store
- Disable Firewall and Antivirus Software.
Let’s look at these fixes in detail.
1] Use Windows Store Apps Troubleshooter
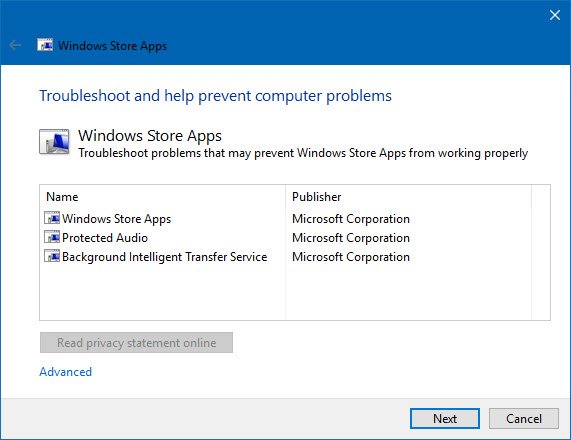
Windows Store Apps Troubleshooter is a built-in software program that identifies the general issues in your operating system and helps to fix them. Follow the below steps to use this tool and fix this error:
- First, right-click the ‘Start’ button and hit ‘Settings’ from the list.
- In the ‘Settings’ window, click on the ‘Update & Security’ option.
- On the subsequent page, select ‘Troubleshoot’ from the left-hand side pane
- From the options look for the ‘Windows Store Apps’ and click on it
- Once expanded, hit ‘Run the Troubleshooter’ option.
Now, wait for a few minutes for the Windows Store troubleshooter to identify the right cause and fix them. Once completed, the system will display the result
2] Run Windows Update Troubleshooter
Following the above procedure, you can similarly run the Windows Update Troubleshooter.
3] Delete these data files
Try this! Navigate to the following path in Explorer:
C:\Windows\System32\config\systemprofile\AppData\Local\Microsoft\InstallAgent\Checkpoints
IF such a location exists on your PC, then here you may find two data files:
- 9ND94HKF4S0Z.dat
- 9NCGJX5QLP9M.dat
If you see them, move them temporarily to your desktop.
Now see if the problem goes away.
If it does, you may delete these 2 files; if it does not, you can move them back to the Checkpoints folder.
4] Reset Microsoft Store

This is one of the most workable solutions to fix any issue related to the Microsoft Store. Follow these steps to reset the Microsoft Store:
- Open the ‘Command Prompt App’ from the ‘Search Bar’ by typing ‘cmd.exe’
- Right-click on the search result and select ‘Run as Administrator’ from the options
- If a ‘UAC’ opens, hit ‘Yes’ to provide your consent
- In the Command Prompt window type WSReset.exe and hit the ‘Enter’ key.
Try reinstalling the application again and check if error 0x80246013 persists.
5] Disable Firewall & Antivirus software
Sometimes, Windows Defender misjudges an application as malicious, which can trigger error 0x80246013 in Windows 10. Hence, disabling the settings temporarily in this security tool can fix this error. Follow these steps:
- Open the ‘Run’ dialogue box by hitting the ‘Window + R’ keys simultaneously.
- Enter ‘Control Panel’ in the text field and tap ‘Enter’
- Now, set the ‘View by’ option to ‘Small Icons’ once you see the complete listings of items related to the control panel
- Locate ‘Windows Defender Firewall’ and click on it.
- Now, navigate to the left-hand side section and on the following page and switch the ‘Turn Windows Defender Firewall on or off’ to ‘Off’ for deactivating its features.
- Hit ‘OK’.
You should also try to disable your antivirus software, similarly.
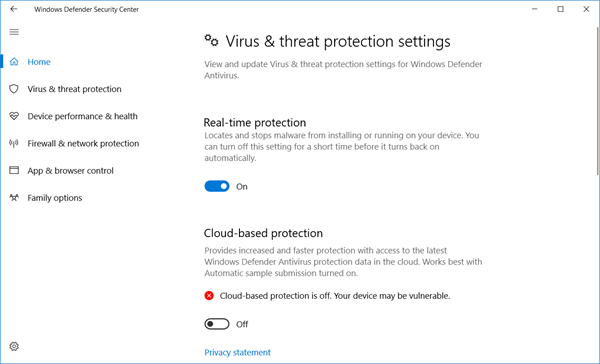
Once, try to download or update the app from Microsoft Store or run Windows Update.
Remember to reactivate them once you have successfully completed your work.
We hope this guide helped you fix the error code 0x80246013.
Ankit Gupta is a writer by profession and has more than 7 years of global writing experience on technology and other areas. He follows technological developments and likes to write about Windows & IT security. He has a deep liking for wild life and has written a book on Top Tiger Parks of India.
Previously, we have covered How to Fix Code: 0x80246013 Microsoft Store in Windows 10 but the same code also appears when a Windows update fails. The errors are nothing new and they keep frustrating quite frequently when you try to download and install a patch. The fatal code usually strikes when the system attempts to install the downloaded update file but this can occur during the downloading process too. What actually brings error 80246013 and obstructs the update is yet to be known, corrupted system files can be one of the probable culprits.
Microsoft didn’t deliver any official fix for error 80246013 in Windows 10 or 11 so far, therefore, you have to go through some workarounds manually. There are some probable causes that generally bring forth such issues on Windows and based on this, we have prepared a method list. The troubleshooting may seem time-consuming at first glance, but worth trying since the issue can be fixed by deploying these.
Here is how to fix Windows Update Error 80246013 –
Way-1: Restart update service
Windows Update is one of the most necessary components in the system as it allows to download the patches, builds, and versions and install them afterward. This is how Windows stays updated with the inclusive features and is also protected by security improvements. It’s unfortunate that Windows Update often gets into trouble only for the service issues because if the service doesn’t work properly, the downloading process won’t get started at all or get stuck.
wuauserv aka Windows Update service comes pre-enabled in the system but the default settings can be overwritten by third-party programs or accidentally by the user. To fix Windows Update Error 80246013, check and restart the service if required –
- Press – Windows + R.
- In Run command, type – services.msc.
- Click – OK.
- From the appearing window, find – Windows Update.
- Right-click the same and choose – Restart.
- Reboot Windows.
Way-2: Repair corrupted system files
Windows runs smoothly and performs assigned tasks flawlessly as some crucial files constantly work for it. These are the system files and are treated as core components. However, these are very much sensitive, become an easy target of malicious invaders, and get corrupted. Some of these may also go missing when a software conflict or sudden power surge occurs.
Missing and corrupted system files can trigger severe restrictions to the Windows Update process and you may face error code 80246013. SFC scan is a built-in utility that can repair these components and also recover missing files. To run the scanning, proceed with the below steps –
- Click – Start button.
- Type in – cmd.exe.
- Press – Ctrl+Shift+Enter.
- For appearing User Account Control, click – Yes.
- Type – Sfc /scannow

- Hit – Enter.
- Wait until the process reaches 100%.
- When the scanning process ends, reboot Windows.
- Retry updating after signing back in.
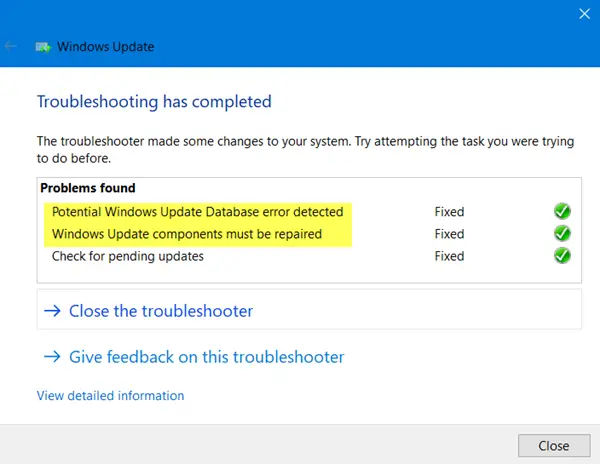
Way-3: Run Windows Update troubleshooter
Windows Update troubleshooter is a built-in Fixit tool to repair any problem coming across when you attempt to update the System. Errors and glitches are pretty connected with updating in Windows 10 or 11 as Microsoft is very keen to regularly distribute installer files. To adapt to the changes and enjoy inclusive privileges, Windows updating is the only way but a lot of people used to be deprived of it. In most cases, the glitches had no clue to resolve, and then Microsoft introduced this utility as a problem solver.
Windows 11
- Press – Windows + I.
- From the right pane of Settings, select – Troubleshoot.
- Click – Other troubleshooters.
- Hit – Run button present by the side of Windows update.
- Now, the utility will start detecting abnormalities.
- If the utility offers a fix, click – Apply this fix. Or else, do what the tool suggests.
- Close troubleshooter and then reboot Windows.
Windows 10
- Open Windows Settings.
- Choose – Update & Security.
- Select – Troubleshoot.
- Shift to the right-hand side.
- Click – Additional troubleshooters.
- After shifting to the next page, select – Windows update.
- From the expanded tray, click – Run the troubleshooter.
- Comply with on-screen guidelines to complete the process.
Way-4: Reset update components
Windows Update is really very crucial in the system to keep it up to date and protected with improved security features. However, the process often runs into trouble and shows error codes when users attempt to carry out updating. Behind this problem, corrupted system components play a great role and the issue will persist until the components are fixed. Luckily, we can always reset Windows Update components and give the process the required momentum.
Once you perform this task, MSI installer, BITS, Cryptographic, and Windows Update services will be reset to default. Simultaneously, the system will rename two very important files namely SoftwareDistribution and Catroot2. At the time of Updating, the files temporarily store the update-related special components in them. To fix Windows Update Error 80246013, follow the underneath instructions and carry out the reset –
- Press – Windows + S.
- Type – cmd.
- Choose – Run as administrator.
- When User Account Control prompts, click – Yes.
- In the elevated Command Prompt, copy-paste the following lines one at a time and hit Enter after each –
net stop bit

net stop wuauserv

net stop appidsvc

net stop cryptsvc

Del "%ALLUSERSPROFILE%\Application Data\Microsoft\Network\Downloader\*.*"

rmdir %systemroot%\SoftwareDistribution /S /Q

rmdir %systemroot%\system32\catroot2 /S /Q

regsvr32.exe /s atl.dll

regsvr32.exe /s urlmon.dll

regsvr32.exe /s mshtml.dll

netsh winsock reset

netsh winsock reset proxy

net start bits

net start wuauserv

net start appidsvc

net start cryptsvc
- Close Command Prompt.
- Restart Windows PC.
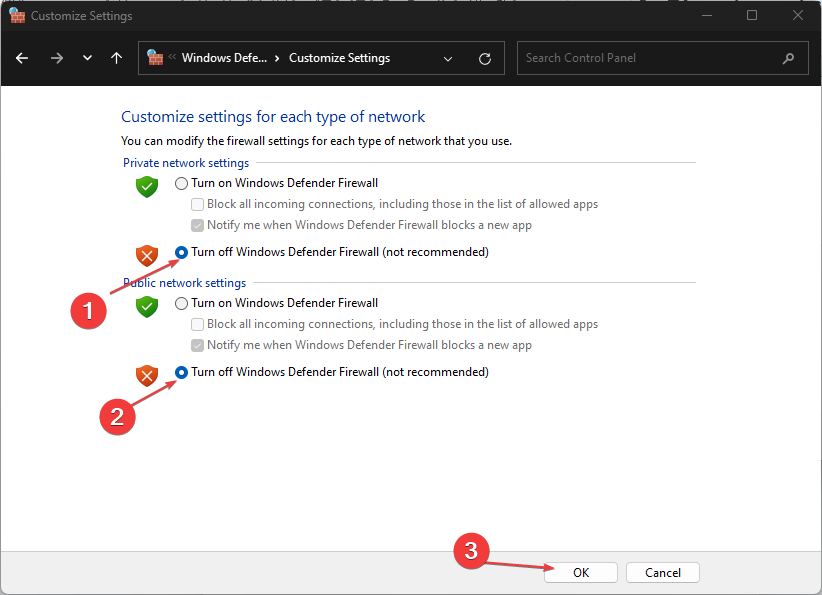
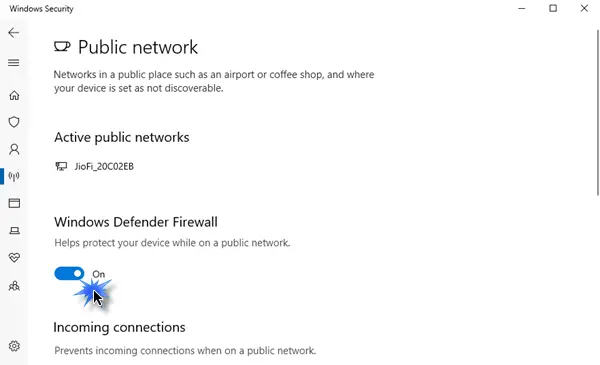
Way-5: Disable Windows Defender Firewall
Windows Defender Firewall is a much-needed Microsoft application that filters the incoming data from the internet and significantly blocks the potentially harmful ones. For ensuring the utmost security of the system, there is no alternative to keeping the application enabled and running.
The program works so perfectly that, it may often treat the Windows installer files as suspicious and filters them too. Hence, the updating process ends in trouble and Windows Update Error 80246013 is generated. To rescue the problem, you can temporarily disable Windows Firewall and re-enable it once the updating is successful. To do this, follow the steps –
- Press – Windows + R.
- In the command box, insert – control firewall.cpl.
- Click – OK.
- Select – Turn Windows Defender Firewall on or off.
- Check the radio button present before Turn off Windows Defender Firewall for both Private and Public network settings.
- Finally, click – OK.
Way-6: Uninstall third-party antivirus
You cannot really think of leaving malware out of consideration nowadays as these bugs are always looking for a chance to fuse the security interface. From the internet, spyware, worms, rootkits and trojans can easily break the security system unless a powerful anti-virus is active 24/7. Windows security is a powerful tool for this purpose which is really the best of all times and it’s a default program.
Sometimes, users intend to install third-party antivirus programs for additional security and that doesn’t really help. Instead, they block installer files misinterpreting them as suspicious and Update Error 80246013 in Windows 10 and 11 occurs. Again, having similar programs in Windows, there is a possibility of dangerous software conflict as well. Hence, uninstall the third-party antivirus suits to resolve unexpected issue.
- Open Run Dialog.
- In the command box, type – appwiz.cpl.
- Click – OK.
- From the appearing window, look for the installed third-party antimalware program.
- Once found, right-click the same and choose – Uninstall.
- To delete the app completely, follow on-screen instructions properly.
- After deletion, reboot Windows to make the changes effective.
Way-7: Tweak registry
Some glitches in the Windows Update Download path can be another reason to have error 80246013 in Windows 10 or 11. To fix this, tweaking Windows Registry is required and you may have to delete some keys. Thus, the path will be cleaned up and no more issues will be coming in when proceeding for an update.
Tweaking Windows Registry is a professional task and any mistake can lead to permanent damage to the system. Therefore, make a proper backup of the necessary things before you proceed with this workaround, it is better to ask for help from professionals. Follow the below instructions properly to delete Registry keys –
- Press – Windows + S.
- In Windows search, type – regedit.
- Hit – Enter.
- For appearing User Account Control, click – Yes.
- When Registry Editor appears, navigate to the following directory –
HKEY_LOCAL_MACHINE\SOFTWARE\Policies\Microsoft\Windows\WindowsUpdate- Right-click WUServer DWORD key and choose – Delete.
- In the same way, delete WIStatusServer key too.
- After doing so, restart Windows.
Methods list:
Way-1: Restart update service
Way-2: Repair corrupted system files
Way-3: Run dedicated troubleshooter
Way-4: Reset update components
Way-5: Disable Windows Defender Firewall
Way-6: Uninstall third-party antivirus
Way-7: Tweak registry
That’s all!!!
Repair any Windows problems such as Blue/Black Screen, DLL, Exe, application, Regisrty error and quickly recover system from issues using Reimage.
Как исправить неудачную ошибку обновления Windows 0x80246013 (09.21.23)
Центр обновления Windows — это фундаментальная часть операционной системы Windows. Утилита обычно работает правильно, но в некоторых случаях в процессе обновления что-то идет не так. Одна проблема, которая существует уже некоторое время и продолжает появляться, — это код ошибки 0x80246013.
Недавно некоторые пользователи Lenovo жаловались, что сообщение об ошибке с кодом ошибки установки 0x80246013 появляется несколько раз в день. По большей части они не знают, что вызывает проблему, что часто приводит к разочарованию.
Что такое код ошибки 0x80246013?
Ошибка обновления Windows 0x80246013 обычно возникает, когда в вашей системе не удается установить предварительную сборку. Проблема может быть вызвана неправильной настройкой системных файлов в вашей ОС. На самом деле существует множество событий, которые могут вызвать ошибки системных файлов — например, агрессивные настройки брандмауэра или сторонняя антивирусная программа могут вызвать проблемы при попытке установить приложение из Microsoft Store. Проблема также может возникнуть, когда приложение загружается, когда Центр обновления Windows уже выполняет обновления в фоновом режиме. Эти события могут вызвать повреждение или удаление системных файлов Windows, что препятствует установке самого обновления.
Помимо ошибок установки, код ошибки 0x80246013 также может привести к снижению производительности ПК, зависанию программы, запуску и проблемы с выключением, а также сбои оборудования.
Совет для профессионалов: просканируйте свой компьютер на наличие проблем с производительностью, ненужных файлов, вредоносных приложений и угроз безопасности
, которые могут вызвать системные проблемы или снижение производительности. >Бесплатное сканирование на наличие проблем с ПК. 3.145.873загрузкиСовместимость с: Windows 10, Windows 7, Windows 8
Специальное предложение. Об Outbyte, инструкции по удалению, лицензионное соглашение, политика конфиденциальности.
Как исправить код ошибки 0x80246013?
На данный момент Microsoft не предоставила официального решения проблемы, поэтому лучше всего устранить ее. К счастью, устранение этой проблемы обычно несложный процесс. В этом руководстве мы предложим различные советы по решению этой проблемы.
Решение 1. Отключите сторонние приложения и Security Suite.
Сторонние приложения, работающие в фоновом режиме, могут быть причиной Код ошибки сбоя установки 0x80246013. В этом случае попробуйте отключить их на время перед установкой обновления. Если вы используете пакет Internet Security или брандмауэр, вы также можете временно отключить их до завершения установки приложения. Если установка прошла гладко, возможно, ваш брандмауэр был настроен неправильно.
Остановка активных приложений
Лучший способ остановить любое запущенное стороннее приложение — это выполнить «чистую» загрузку вашего ПК. Чистая загрузка запустит Windows с минимальным набором автозагрузочных программ и драйверов. Вот как проходит процесс:
- Перейдите в Конфигурация системы , набрав msconfig в поле поиска и нажав Enter . Не используйте утилиту Конфигурация системы , если ваш компьютер подключен к сети.
- В открывшемся окне Конфигурация системы выберите Службы .
- Установите флажок Скрыть все службы Microsoft и нажмите Отключить все .
- Перейти к Запуск и нажмите Открыть задачу M anager .
- Когда откроется окно Диспетчер задач выберите каждый элемент на вкладке «Автозагрузка» и нажмите «Отключить».
- После этого закройте окно Диспетчер задач .
- Теперь вернитесь в диалоговое окно Конфигурация системы и нажмите OK
- Включите компьютер и проверьте, сохраняется ли проблема.
Отключите стороннюю антивирусную программу
Чтобы отключить стороннее антивирусное программное обеспечение, следуйте этим инструкциям:
- Разверните вертикальную стрелку на панели задач.
- Когда появится панель задач, найдите значок антивирусной программы.
- Щелкните значок правой кнопкой мыши и выберите параметр Отключить защиту от вирусов .
Отключение брандмауэра Защитника Windows
Иногда Защитник Windows может классифицировать приложение как вредоносное и, как следствие, вызывать ошибку с кодом ошибки установки 0x80246013. Таким образом, отключение брандмауэра может решить проблему. Выполните следующие действия, чтобы отключить брандмауэр Защитника Windows:
- Запустите Диалоговое окно запуска , нажав Windows + R .
- Введите «панель управления» в поле поиска и нажмите Enter
- Когда в Все элементы панелей управления В появившемся окне найдите Брандмауэр Защитника Windows и щелкните его.
- Выберите параметр Отключить брандмауэр Защитника Windows (не рекомендуется) .
- После этого нажмите ОК , чтобы активировать изменения. Не забудьте включить брандмауэр Защитника Windows по завершении установки.
Решение 2. Исправьте Центр обновления Windows с помощью средства устранения неполадок
В большинстве случаев Центр обновления Windows работает в фоновом режиме, но иногда он застревает. К счастью, Windows поставляется со встроенным средством устранения неполадок, которое поможет вам исправить зависшее обновление. Вот как проходит процесс:
- Перейдите в Пуск и найдите « устранение неполадок» .
- Выберите Параметр Устранение неполадок на панели управления.
- Затем найдите Система и безопасность и нажмите на параметр Устранить проблемы с Центром обновления Windows .
- Когда появится Устранение неполадок Центра обновления Windows откроется окно, нажмите Расширенные .
- Установите флажок «Применить ремонт автоматически» .
- Нажмите Запустите от имени администратора , затем нажмите Далее
- Средство устранения неполадок будет работать в фоновом режиме, чтобы определить и исправить проблему зависшего обновления.
Решение 3. Установите доступные обновления Windows
Устаревшие системные файлы — еще одна причина, по которой может возникать ошибка с кодом 0x80246013. Хотя это не частая причина, но рекомендуется регулярно обновлять систему. Вы можете найти последние обновления в каталоге обновлений Windows. После получения соответствующих обновлений загрузите и установите их вручную. Windows 10 обычно получает обновления автоматически, но вы все равно можете проверить наличие обновлений вручную. Вот как это сделать:
- Используйте ярлык Windows + R для запуска приложения Настройки .
- После этого перейдите в Обновления & amp; Безопасность & gt; Центр обновления Windows .
- Нажмите кнопку Проверить наличие обновлений , чтобы найти последние обновления.
Решение 4. Исправление ошибки обновления Windows. 0x80246013 автоматически
Если проблема связана с вашим компьютером, вам следует просканировать репозитории и восстановить поврежденные и отсутствующие файлы. Это решение часто работает, когда проблема связана с повреждением системы. Мы настоятельно рекомендуем вам скачать Outbyte PC Repair. Этот инструмент автоматически просканирует и диагностирует вашу систему Windows. После этого он восстановит ваш системный реестр, удалив с вашего компьютера все типы мусора.
Вот и все. Мы надеемся, что это руководство о том, как исправить код ошибки 0x80246013, помогло вам решить проблему. Мы ценим ваши отзывы, поэтому поделитесь с нами своим опытом в разделе комментариев ниже.
YouTube видео: Как исправить неудачную ошибку обновления Windows 0x80246013
09, 2023