Are you seeing the ‘413 Request Entity Too Large’ error in WordPress?
This error usually occurs when you are trying to upload a theme or plugin file in WordPress. It means that the file is larger than the allowed maximum file upload limit on your website.
In this article, we will show you how to easily fix the ‘413: Request Entity Too Large’ error in WordPress.

What Causes WordPress 413 Request Entity Too Large Error?
This error usually happens when you are trying to upload a file that exceeds the maximum file upload limit on your WordPress website.
Your web server will fail to upload the file, and you will see the ‘413 Request Entity Too Large’ error message.

Normally, most WordPress hosting companies have their servers configured so that WordPress users can easily upload large images and other media.
However, sometimes this setting is not high enough to upload large theme or plugin files.
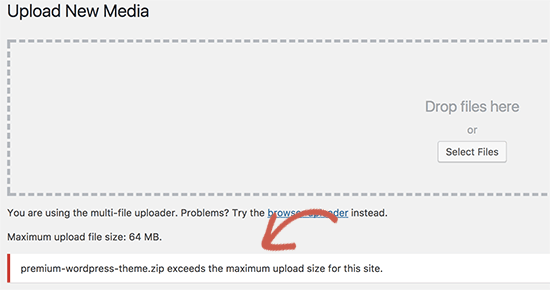
The server configuration can also stop you from uploading large files to the media library. In this case, you will see a different message clearly stating that the file size exceeds the maximum allowed limit.

That being said, let’s take a look at how to fix the WordPress ‘413 Request Entity Too Large’ error.
Fixing 413 Request Entity Too Large Error in WordPress
There are multiple ways to fix the request entity too large error in WordPress. We will cover all these methods, and you can try the one that works best for you.
You can use the quick links below to jump to the method you want to use.
- Method 1: Increase Upload File Size Limit Using WPCode (Recommended)
- Method 2: Increase Upload File Size Limit via .htaccess File
- Method 3: Manually Upload File via FTP
Method 1: Increase Upload File Size Limit Using WPCode (Recommended)
You could directly edit your theme’s functions.php file. However, we recommend against this method because even small mistakes can break your website.
That’s why we recommend using WPCode instead. It is the best WordPress code snippets plugin that allows you to increase the upload file size limit without directly editing the functions.php file.
First, you will need to install and activate the free WPCode plugin. For more details, see our guide on how to install a WordPress plugin.
Next, you need to go to Code Snippets » Add New Snippet in your WordPress admin sidebar. Then, simply click the ‘Add New’ button.

Now you will see a library of different code snippets.
You need to click on ‘Add Your Custom Code (New Snippet)’.

You can enter a title for the code snippet at the top so that you can find it easily.
You now need to enter the following code into the ‘Code Preview’ box.
@ini_set( 'upload_max_size' , '120M' );
@ini_set( 'post_max_size', '120M');
@ini_set( 'max_execution_time', '300' );
Make sure that you also select ‘PHP Snippet’ from the ‘Code Type’ dropdown menu.

You can increase the values in upload_max_size and post_max_size to be more than the file you are trying to upload.
You will also need to increase the max_execution_time to the time you think it would take for the file to upload. If you are unsure, then you can try doubling this value.
Finally, make sure to toggle the code snippet from ‘Inactive’ to ‘Active’ at the top of the page and click on ‘Save Snippet’. This will execute the code snippet on your website.

For more details, please see our guide on how to easily add custom code in WordPress.
Method 2: Increase Upload File Size Limit via .htaccess File
For this method, you will need to access and edit your .htaccess file using an FTP client or the file manager app in your hosting dashboard.
For more details, see our guide on how to use FTP in WordPress.
Then, simply add the following code at the bottom of the .htaccess file:
php_value upload_max_filesize 64M
php_value post_max_size 64M
php_value max_execution_time 300
php_value max_input_time 300
You can change each of the numerical values to be more than the size of the file you are trying to upload. Then, make sure to save and reupload the .htaccess file to your server.
To learn more about increasing the file upload size limit, see our guide on how to increase the maximum file upload size in WordPress.
Method 3: Manually Upload File via FTP
If the 413 error only occurs when you are uploading one specific file, then you may want to consider uploading it manually via FTP.
If you are trying to upload a WordPress theme, then see our guide on how to install a WordPress theme and jump to the ‘Installing a WordPress theme using FTP’ section.
If you are trying to upload a plugin, then see our guide on how to install a WordPress plugin and jump to the ‘Manually install a WordPress plugin using FTP’ section.
For other files, you can see our guide on how to manually upload WordPress files using FTP.
We hope this article helped you learn how to fix the WordPress ‘413 Request Entity Too Large’ error. You may also want to see our list of the most common WordPress errors and how to fix them, along with our expert picks for the must have WordPress plugins to grow your website.
If you liked this article, then please subscribe to our YouTube Channel for WordPress video tutorials. You can also find us on Twitter and Facebook.
Disclosure: Our content is reader-supported. This means if you click on some of our links, then we may earn a commission. See how WPBeginner is funded, why it matters, and how you can support us. Here’s our editorial process.
Editorial Staff at WPBeginner is a team of WordPress experts led by Syed Balkhi with over 16 years of experience in WordPress, Web Hosting, eCommerce, SEO, and Marketing. Started in 2009, WPBeginner is now the largest free WordPress resource site in the industry and is often referred to as the Wikipedia for WordPress.
WordPress has around sixteen years of experience and has empowered numerous people to start their own sites and business online. WordPress which provides users to utilize this content management system (CMS), and where CMS is also an open source platform providing users free access to web development. However, it is a pretty impressive and open-source platform. But, with so many people and websites, things cannot always go so fluently and the users start facing the issues in between.
Indeed, there are a lot of WordPress Common Errors in which “413 request entity too large error” is one of them. Hence, with its huge user base and supportive community, we provide various solutions for the same. For web-development services click here. But first, get a bit overview of error 413 request entity too large.
What is the “413 request entity too large” error?
When your web server sets a particular HTTP request size limit, it shows that the client came across a 413 request entity as a too-large response. It occurs when the request made from the client is too large and can’t be processed by the webserver. An example request, which could cause this error if a client is trying to upload a large file to the server (such as a large media file).
It certainly depends on the type of web server you are currently working on, which determines the instructions you need to configure. Whether you want to prevent users from uploading too large files to your web server or increasing the upload size limit, the following section will explain how.
So what is actually a web server and why there are many types of web servers?
- A web server is a computer that stores web server software and a website’s component files. (for example, HTML documents, images, CSS stylesheets, and JavaScript files) A web server connects to the Internet and supports physical data interchange with other devices connected to the web.
- On the software side, a web server includes several parts that control how web users access hosted files. At a minimum, this is an HTTP server. An HTTP server is software that understands URLs (web addresses) and HTTP (the protocol your browser uses to view webpages). An HTTP server can be accessed through the domain names of the websites it stores, and it delivers the content of these hosted websites to the end user’s device.
Main causes of WordPress 413 request entity too large error
This error normally occurs while you are trying to upload a file that exceeds the maximum file upload limit on your WordPress site. That’s why, a web server will fail to upload the file, and a 413 request entity too large error page will display on the screen.
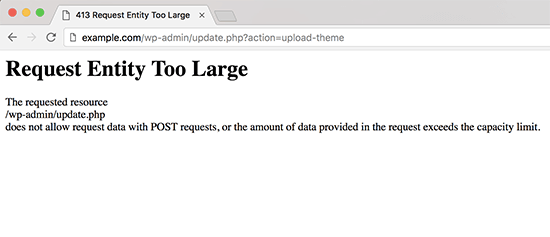
Generally, most WordPress hosting companies have configured their servers but WordPress users can easily upload large images and other media. But, sometimes this setting is not sufficiently high to upload large themes or plugins files. As one can install plugins to improve a site’s performance or help it rank better in search engines like Google. 413 Request entity too large error does not allow request data with POST requests, or the amount of data provided in the request exceeds the capacity limit.
Also, stop uploading large files in the media library through the multi-file uploader. In that condition, you will see a different message, the file size exceeds the maximum granted limit.
Now, let’s have a look at how to fix the WordPress 413 request entity too large error.
Fix “413 request entity too large error” in WordPress
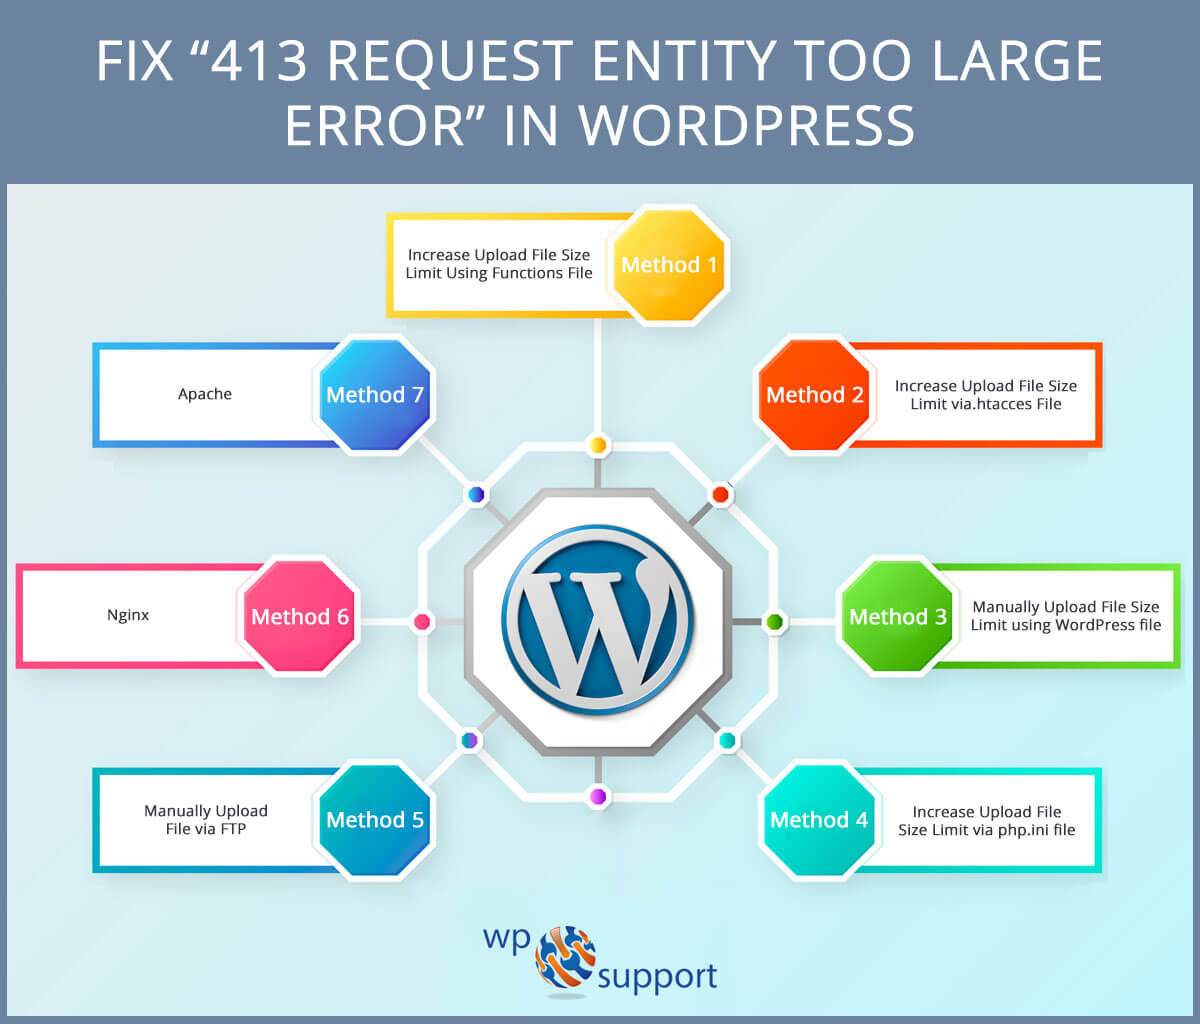
There are various ways to fix the 413 request entity too large error in WordPress, a list of all the methods is shown below. Let’s have a look at them:
- Increase Upload File Size Limit Using Functions File
- Increase Upload File Size Limit via.htacces File
- Manually Upload File Size Limit using WordPress file
- Increase Upload File Size Limit via php.ini file
- Manually Upload File via FTP
- Nginx
- Apache
Method 1: Increase Upload File Size Limit Using Functions File
To do this, you just have to do is to add the following code to your theme’s function.php files where the function.php file defines classes, actions, functions, and filters that are used by templates. Function.php file is automatically loaded in the admin bar and front-end pages of a WordPress site.
@ini_set( ‘upload_max_size’ , ’64M’ );
@ini_set( ‘post_max_size’, ’64M’);
@ini_set( ‘max_execution_time’, ‘300’ );
However, you can exceed the value to be more than the file you are trying to upload in upload_max_size_ and post_max_size.
You will also have to extend the max_execution_time to the time that it seems it would take for the file to upload. Additionally, you can try to double this value if you are unsure. As 413 request entity too large error relies on the extended time.
Method 2. Increase Upload File Size Limit via.htacces File
In case, if the above method is not working properly, then you can easily remove the error via this method.
Further, to fix the 413 Request Entity Too Large Error – All you have to do is to edit the .htaccess file entirely. As the .htaccess file belongs to Apache server. Actually, this is the server configuration file that communicates with the server to respond to your WordPress Website.
Important – Precautions of Editing .htaccess file
When you are editing .htaccess. However, it’s important to exercise maximum caution since errors on the .htaccess file will cause your site to crash. Finding .htaccess can also be difficult; Here are two precautions to guide you while editing the .htaccess file:
- Show Hidden Files -:- While editing .htaccess in cPanel. You will need to check the “Show hidden files” setting to view and edit .htaccess. However, in some web hosting, you may require changing the permission settings to view the same .htaccess file.
- Backup .htaccess -:- Creating a backup copy of the .htaccess file while editing the same file is the most important precaution. However, this backup copy is used to restore back the website to its original status.
Add the following code shown below:
php_value upload_max_filesize 64M
php_value post_max_size 64M
php_value max_execution_time 300
php_value max_input_time 300
Method 3: Manually Upload File Size Limit using WordPress file
For this, WordPress media file uploader allows you to upload multiple files at the same time, you may choose multiple images, audio files, and even video files to upload and WordPress Website will do the rest on its own. You will need to edit the WordPress file. Thereafter add the below code in the wp-config.php or themes function.php file.
@ini_set( ‘upload_max_size’ , ’64MB’ );
@ini_set( ‘post_max_size’,64 MB);
@ini_set( ‘memory_limit’, ’300MB’
Now, you have successfully fixed the error using a WordPress file.
Method 4: Increase the Upload File Size Limit via the php.ini file
For increasing the Upload File Size Limit via php.ini file – All you have to do is to edit the entire PHP.ini file and add the following code that’s shown below:
upload_max_filesize = 64M
post_max_size = 64M
max_execution_time = 300
Method 5. Manually Upload File via FTP
As we have discussed above, the 413 Request Entity Too Large error occurs while you are uploading a single specific file, so you would like to consider uploading the file manually via FTP.
If you have any problem uploading the theme, then read our article on how to install a WordPress theme.
Continuously, if you face any difficulty to upload the plugin, you can also see our article on how to install a plugin in WordPress.
FTP or File Transfer Protocol is a way to transfer or upload files from one local computer to another remote website like a WordPress blog. For example, if you install software like WordPress, there are more chances you will use FTP in order to upload all of the WordPress files from your personal computer to your server. To do this task, you need a thing called an FTP client.
Method 6. Nginx
The client_max_body_size directive which determines the maximum allowable HTTP request size for Nginx error. Nginx pronounced like “engine-ex”, is an open-source web server that, since its initial success as a web server, is now also used as a reverse proxy, HTTP cache, and load balancer. Which is somewhere already defined in your nginx.conf file located at /etc/nginx/nginx.conf. Though in a rare case, if it isn’t present there, you can add that directive either in an HTTP, server, or location block and define it as a value. Nginx is built to offer low memory usage and high concurrency. Rather than creating new processes for each web request, Nginx uses an asynchronous, event-driven approach where requests are handled in a single thread.
# set client body size to 8M #
client_max_body_size 8M;
Though the default value for this directive is 1 megabyte. If you don’t require to have a request size limit you may even set the value to 0.
After the desired value has been set, save the changes and reload Nginx using the command: service nginx reload.
Method 7. Apache
Apache web servers use a similar directive called LimitRequestBody. WordPress Apache is a popular open-source, cross-platform web server that is, right now the most popular web server in existence. It is actively maintained by the Apache Software Foundation. A web server is a software that receives your request to access a web page. It runs only a couple of security checks on your HTTP request and takes you to the web page.
This instruction provides the same functionality as inclient_max_body_size that you are able to restrict the size of the HTTP request. The LimitRequestBody command can be defined in your HTTP.conf file or .htaccess file. The directive LimitRequestBody is used to limit the total size of the HTTP request body sent from the client. You can use this directive to specify the number of bytes from 0 (meaning unlimited) to 2147483647 (2GB) that are allowed in a request body.
The default value for this instruction in Apache is 0, however, you may prefer this value to whatever value you want (values are represented in bytes). 413 request entity too large error uses Apache web servers.
Let’s take an example:
If you want to restrict requests larger than 100MB, use –
LimitRequestBody 104857600Once you have made your changes, save the configuration file and reload Apache using the following command:
service apache2 reload
Conclusion
Here with the error 413 request entity is too large. As it depends on the type of web server you are currently working on, which determines the instructions you need to configure. These methods have been provided to prevent users from uploading too large files to your web server or increasing the upload size limit.
That’s all on our behalf! We hope that you thoroughly went through this article and now must be able to resolve your WordPress 413 request entity too large Error.
If you need any help talk to our WordPress Support Experts as they will resolve all your issues with a quick response. Our experts from WPGlobalSupport are well-trained professionals who will provide solutions to your problems with the best customer experience. So instead of wasting your precious time dial our Toll-Free number +1-855-945-3219.
Read More Useful Blogs:
- How to fix Secure Connection Error in WordPress
- 3 easy steps to fix WordPress Error” Upload: Fail to write the file to disk”
- Quick Fix: “Missing a Temporary Folder” Error in WordPress
Sometimes, a website shows annoying errors confusing users while browsing. If browsing other sites makes you annoyed when it comes to your site, things are very different. Many types of website errors occur, some generic and others specific to WordPress. One such error is 413.
Error 413 belongs to the family of HTTP 4xx status codes, which identify errors connected to the request made by the client. In this article, you will see what the “413 Request Entity Too Large” error is and how you can fix it in your WordPress.
- What Is the “Error 413 Request Entity Too Large” Error?
- Why Does “413 Request Entity Too Large” Error Occur?
- Fixing the “413 Request Entity Too Large” Error in WordPress
HTTP Error 413 indicates that the server cannot manage the request made, and this is because it involves a file or a block of data or, again, a group of files that are too large compared to the maximum limit that the server can manage.
The browser window generally displays the message “413 Request Entity Too Large”. This problem can occur if you try to upload too large files via the browser, exceeding the limits imposed by the webmaster for security reasons or others.
Why Does the “413 Request Entity Too Large” Error Occur?
Error 413 Request Entity Too Large occurs when you try to upload a file that exceeds the maximum upload limit set on your web server. In other words, when you try to upload a file that is too large, the web server returns an error message informing the user that “413 Request Entity Too Large”.
The message shown to the user may vary depending on the web server and the client. The following are the most common messages that indicate the occurrence of this error:
- Error 413
- HTTP Error 413
- HTTP Code: 413
- Request Entity Too Large
- 413. That’s an error.
Fixing the “413 Request Entity Too Large” Error in WordPress
As you know, error 413 usually occurs when you upload a large file to your web server and your hosting provider has set a limitation on file size.
One of the common problems webmasters encounter when managing WordPress is allowing the webserver to allow file uploads via the Media Library. However, if your Nginx-powered website is not configured to allow the uploading of large files, the upload process will mostly fail.
I will show you some of the easiest methods to increase the file upload size and fix the 413 Request Entity Too Large error in WordPress.
- Reset File Permissions
- Manually Upload the File via FTP
- Increase Upload File Size
- Modify Your Functions.php File
- Modify Your .htaccess File
- Modify Your nginx.conf File
- Contact Your Hosting Provider
Fixing Errors is Easier With Cloudways
Get rid of WordPress errors with a cloud host built to deliver a hassle-free experience with incredible speeds.
1. Reset File Permissions
It might be possible that you are encountering this error due to limited access to a file and upload permission. So, it would be great to check the WordPress file/folder permissions and set the recommended permission, then try uploading the file to your site.
You can set the permissions from an FTP Client like FileZilla, and if your hosting provider offers any file permission reset option, then you can fix it from there.
2. Manually Upload the File via FTP
It’s a good idea to consider FTP to upload your large file, but please note that if you are uploading a file via FileZilla, it takes more time.
Here, you will need to access your web server and upload the file by drag and drop. Therefore, first, you need to check whether your hosting provider offers server credentials or SFTP access to your web server.
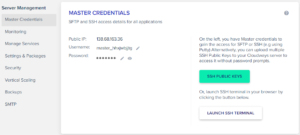
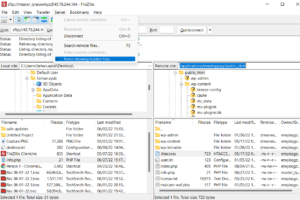
Now, you need the FileZilla FTP Client to access your web files, so download it if you don’t have one. Then, open FileZilla and fill the respective fields; Host, Username, Password, and Port. You can see in the below screenshot that I pasted my server IP, Username, Password, and 22 as a port number.
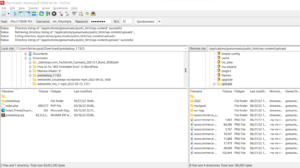
Next, drag the file you want to upload to your website from your local desktop (left-side) and drop it into your web server’s folder. In my case, the webserver folder path is /applications/dbname/public_html/wp-content/uploads. If you want to upload any plugin then the folder path is /applications/dbname/public_html/wp-content/plugins.
3. Increase Upload File Size
Many good WordPress hosting providers offer the file size settings feature on their platform that lets users increase the maximum upload size value, maximum execution time, post max size, and more.
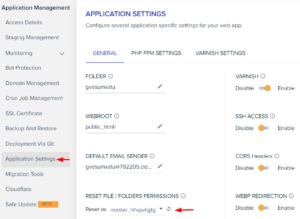
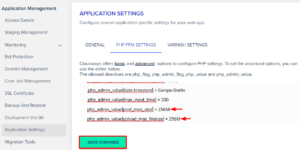
Now, let’s look at how you can increase your upload file size from the hosting dashboard. Cloudways offers application and server settings from which you can increase your file upload settings. From the Application Management panel, I have to remove comment “;” from three values and increase the upload and post max size to 256M & execution time to 300.
php_admin_value[post_max_size] = 256M

php_admin_value[upload_max_filesize] = 256M

php_admin_value[max_execution_time] = 300
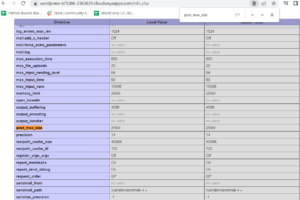
To check whether the file size value is updated or not, you need to create an info.php file on your desktop and upload it to your website folder via FileZilla. Now, open any file editor like Notebook, paste the following code, and save it as info.php.
<?php

phpinfo();

?>
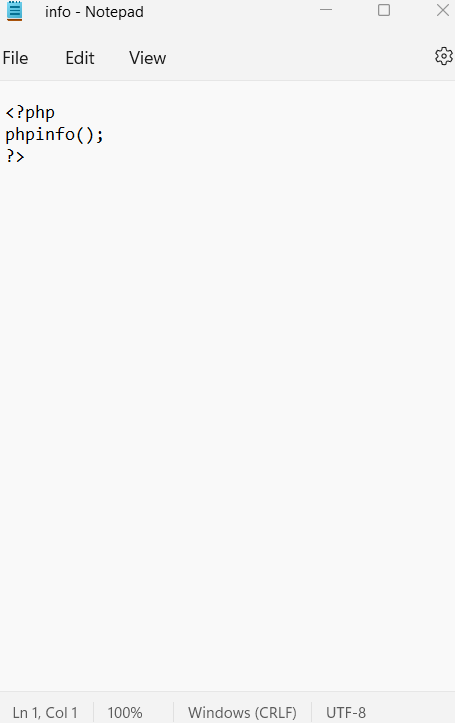
Now, upload it to your site’s public_html folder.
In the next step, open your browser and run this URL “www.yoursite.com/info.php”. In my case, the URL is https://wordpress-675386-2363839.cloudwaysapps.com/info.php. Search for the PHP admin values that you updated; if the values are changed, you have successfully increased the file size. After this, try to upload your file and check whether the issue has been resolved or not.
If your hosting provider doesn’t offer any feature to modify the file upload size, move to the next method.
4. Modify Your Functions.php File
You can edit your theme’s functions.php file and increase the file upload size. But before that, you will need to create a backup of your entire WordPress site for data recovery. Backups help you recover your web files if something goes wrong.
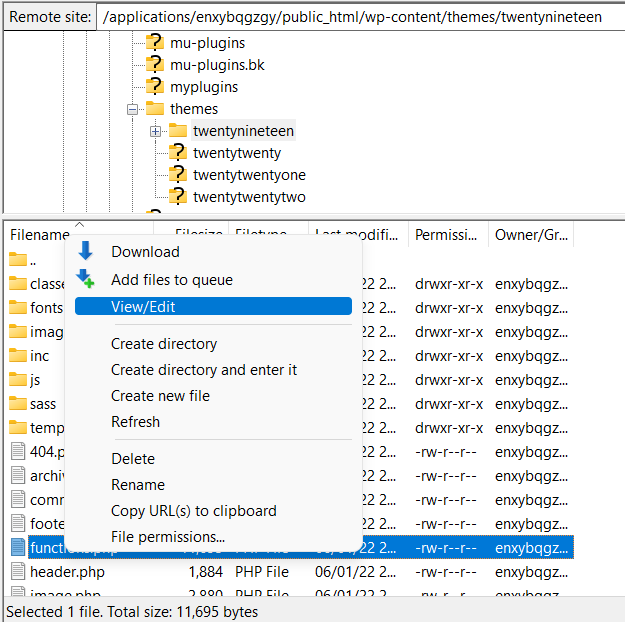
You need an FTP Client like FileZilla to access your site’s file. So, connect your server via FileZilla and go to your active theme folder. You will find the theme files in the wp-content folder and in my case, the source path is “/applications/enxybqgzgy/public_html/wp-content/themes/twentynineteen”. Next, find the functions.php and click View/Edit.
Next, paste the following lines of code into your file and save it. This will define the max upload size in Megabytes. Replace the numbers as per your requirement.
@ini_set( 'upload_max_size' , '256M' );

@ini_set( 'post_max_size', '256M');

@ini_set( 'max_execution_time', '300' );
After this, check open info.php on your browser “www.yoursite.com/info.php” and check whether the values are updated or not, then try uploading your file.
In case this doesn’t work, then move to the next method.
5. Modify Your .htaccess File
If your website is hosted on LAMP Stack (using Apache web server and PHP), you can increase the max upload size from your .htaccess file.
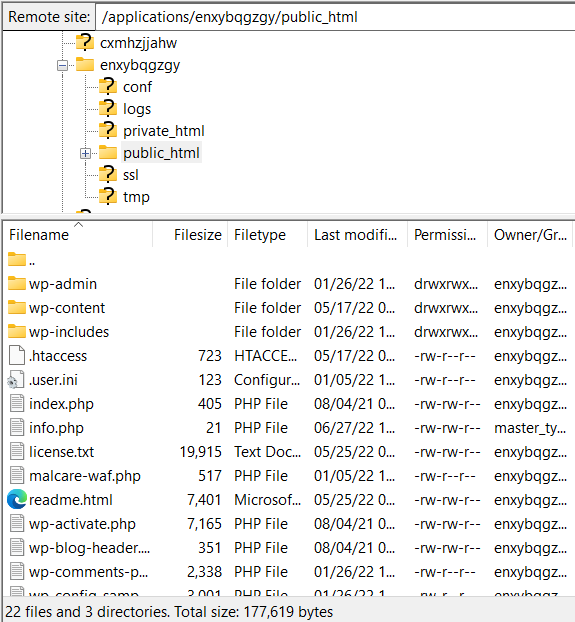
Again, you need to access your .htaccess file from an FTP client like FileZilla and go to the public_html folder. Search for the .htaccess file, and if you do not see the .htaccess file, it’s probably hidden. Hence, navigate to FileZilla menus > Server and click Force Showing Hidden Files.
Now View/Edit the .htaccess file in a code editor or Notepad and add the following lines.
php_value post_max_size 256M

php_value memory_limit 256M

php_value max_execution_time 300
Choose a number and size that is suitable for your site and file. Next, open info.php ““www.yoursite.com/infor.php”” on your browser to check the updated sizes as we did in the previous step.
6. Modify Your nginx.conf File
The above troubleshooting method is for Apache web server, but if you are running your website on LEMP (NGINX as a web server and PHP), you need to edit nginx.conf i.e., located in /etc/nginx/ and add the following line of code to the file.
http {

client_max_body_size 100M;

}
7. Contact Your Hosting Provider
If you tried all the above and are still facing the issues, then it would be good to contact your hosting support and ask them to fix this issue ASAP. Several hosting providers offer 24/7 support chat and ticket assistance to help their customers.
Reliable WordPress Hosting Starting from $11/month
Enjoy hassle-free hosting on a cloud platform with guaranteed performance boosts.
Summary
Error 413 Request Entity Too Large is related to the size of the client request. There are multiple ways to fix this error you have read in this article. The most common way is to reduce the file size or to change the web server settings to increase the upload file size. If you know any other methods that can help fix the HTTP 413 Error, then please comment in the section below.
Frequently Asked Questions
Q. How do I fix Error 413 Request Entity Too Large?
A. The most common way to fix the HTTP 413 Error is to increase the media file maximum upload size. Other ways are: resetting file permissions, uploading files using an FTP client, and modifying your files (fuctions.php/.htaccess/nginx.config).
Q. What does “HTTP Error 413” mean?
A. If a user gets this error it is because he’s uploading a file that is too large. When a webmaster receives this report, what he can do is ask the user to reduce the file size and try to upload it again.
WordPress errors come in all shapes and sizes. In most cases they’re easy to decipher; such is the accessibility of WordPress’ error reporting. Even so, when the “413 Request Entity Too Large” error pops up, it can leave you scratching your head.
Without realizing it, you already have everything you need to understand and diagnose the error within its name. The good news is you won’t need more than a standard Secure File Transfer Protocol (SFTP) client and administrator access to your server.
In this post, we’ll take a look at how to solve the “413 Request Entity Too Large” error. We’ll also give you a quick list of steps to take before you begin to solve the error, to make the process super straightforward.
Check out our video guide to fixing the “413 Request Entity Too Large” Error
What the “413 Request Entity Too Large” Error Is (And Why It Exists)
We noted that there’s a clue in the error name as to what the solution and problem are. Before you go sleuthing yourself, though, we’ll spoil the surprise: it’s in the adjective “large.”
In a nutshell, the “413 Request Entity Too Large” error is a size issue. It happens when a client makes a request that’s too large for the end server to process. Depending on the nature of the error, the server could close the connection altogether to prevent further requests being made.
Let’s break the error down into its parts:
- “413”: This is one of the 4xx error codes, which mean there’s a problem between the server and browser.
- “Request Entity”: The “entity” in this case is the information payload being requested by the client from the server.
- “Too Large”: This is straightforward: the entity is bigger than the server is willing or able to serve.
In fact, this error has changed its name from what it originally was to be more specific and offer more clarity. It’s now known as the “413 Payload Too Large” error, although in practice, you’ll see the older name a lot more.
As for why the error occurs, the simple explanation is that the server is set up to deny explicit uploads that are too large. Think of times when you upload a file where there’s a maximum file size limit:

In most cases, there will be some validation in place to stop the error… if you’re seeing the “413 Request Entity Too Large” error, those validation efforts may not be as watertight as you think.
What You’ll Need to Resolve the “413 Request Entity Too Large” Error
Fixing this error is all about raising the maximum file size for the server in question. Once that’s out of the way, you shouldn’t see the error anymore.
As such, to fix the “413 Request Entity Too Large” error, you’ll need the following:
- Administrator access to your server.
- A suitable SFTP client (we’ve covered many of these in the past).
- The know-how to use SFTP — there’s a good guide to the basics on WordPress.org, and you won’t need more than that.
- A text editor, though there’s no need for anything too complex.
- A clean and current backup in case the worst happens.
As an aside, we mention SFTP throughout this article as opposed to FTP. In short, the former is more secure than the latter (hence the name). That said, while there are other differences you should investigate, the functionality remains the same for the vast majority of uses.
Also, it’s worth noting that the MyKinsta dashboard has plenty of functionality on hand to help you get onto your server. For example, each site displays SFTP connection information that’s easy to understand:

This can help you get into your site without fuss. In some cases, you may be able to import the credentials straight to your chosen SFTP client.
3 “Pre-Steps” You Can Take Before Rectifying the “413 Request Entity Too Large” Error
Before you crack open your toolbox, there are some steps you can take to help resolve the “413 Request Entity Too Large” error. Here are two — and each one may give you a welcome workaround to the error.
1. Try to Upload a Large File to Your Server Through SFTP
Because the issue is related to the file sizes hitting your server, it’s a good idea to circumvent the frontend interface and upload a large file to the server yourself. The best way to do this is through SFTP.
This is because protocols such as SFTP are almost as “close to the bone” as you can get with regards to the way you access your server. Also, you can simultaneously rule out any issues with the frontend that may be causing the error.
To do this, log into your site through SFTP and find the wp-content folder. In here will be the uploads folder.

Next, upload your file to this folder on the server and see what the outcome is. If the upload is successful, we suggest sending an email to the site’s developer, as they may want to investigate the issue further on the frontend.
2. Check for Server Permissions Errors
Of course, permissions errors will stop any server request from running. As such, you should check whether the user has sufficient permissions to upload files of any size. Once this is sorted, the error should disappear.
The first step is to determine whether this is an issue with a single user (in which case they may be restricted for a reason). If the “413 Request Entity Too Large” error is happening for multiple users, you can be more sure of something that needs your input.
We’d suggest two “pre-fixes” here:
- Double-check your WordPress file permissions, just in case there’s an issue.
- Remove and re-create your SFTP user (a general investigation is a great idea).
While they may not solve the error in the first instance, you’ll at least know that your file and user structure is as it should be.
How to Solve the “413 Request Entity Too Large Error” for Your WordPress Website (3 Ways)
Once you’ve gone through the pre-steps, you’re ready to tackle the error head-on.
The following three methods are listed from easiest to toughest, with the understanding that that the path of least resistance is the best one to take.
1. Edit Your WordPress functions.php File
First off, you can work with your functions.php file to help bump up the file upload size for your site. To do this, first log into your site through SFTP using the credentials found within your hosting control panel.
When you’re in, you’ll want to look for the file itself. The functions.php file should be in the root of your server. In many cases, this root is called www or public_html, or it could be the abbreviated name of your site.
Once you’ve found it, you can open it in your text editor of choice. If you don’t see the file, you can create it using your text editor.
Once you have a file open, enter the following:
@ini_set( '_max_size' , '64M' );
@ini_set( 'post_max_size', '64M');
@ini_set( 'max_execution_time', '300' );
In short, this increases the maximum file size of posts and uploads while boosting the time the server will spend trying to process the request. The numbers here could be anything you wish, but they should be large enough to make the error disappear. In practice, 64 MB is enough for all but the most heavy-duty of tasks.

When you’re ready, save your file and upload it to the server again. Then, check whether the “413 Request Entity Too Large” error still exists. If it does, head onto the next method.
2. Modify Your WordPress .htaccess File
Much like your functions.php file, your .htaccess file sits on your server. The difference here is that .htaccess is a configuration file for Apache servers. If you’re a Kinsta customer, you’ll know we run Nginx servers, so you won’t see this file in your setup.
Still, for those with an Apache server, this is the approach you’ll need. Much like with the guidance for functions.php, first log into your server through SFTP, then look in your root folder as before.
The .htaccess file should be within this directory, but if it’s missing, we suggest you get in touch with your host to determine where it is, and whether your server runs on Nginx instead.
Once you’ve found it, open it up again. You’ll see some tags, and the most important here is # END WordPress. You’ll want to paste the following after this line:
php_value upload_max_filesize 64M
php_value post_max_size 64M
php_value max_execution_time 300
php_value max_input_time 300
In short, this does almost the same thing as the code you’d add to the functions.php file, but it’s akin to giving the server direct instructions.

When you’ve finished, save your changes, upload the file, and check your site again. If you’re still having trouble, we’d again suggest contacting your host, as they will need to verify some aspects of your setup that lie beyond the scope of this article.
3. Change Your Nginx Server Configuration
Our final method is specific to Nginx servers — those used at Kinsta. The purpose is the same as when working with the .htaccess file, in that you’re talking to the server, rather than going through WordPress.
We mentioned that for Apache servers you’ll use .htaccess. For Nginx servers, though, you’ll want to find the nginx.conf file. Rather than walk you through every step in the chain, we’ve gone over the full details in our post on changing the WordPress maximum upload size.
Remember that you’ll need to also alter the php.ini file based on the changes you make to nginx.conf. We’ve covered that in the aforementioned blog post too, so take a look there for the exact steps.
Summary
Despite WordPress being a rock-solid platform, you’ll see a lot of different WordPress errors over time. The “413 Request Entity Too Large” error is related to your server, though — not WordPress. As such, there’s a different approach to solving this error than other platform-specific issues.
If you have SFTP skills, there’s no reason you can’t fix this error quickly. It relates to the upload size specified in your server configuration files, so digging into your .htaccess or nginx.config files will be necessary. It’s a breeze to crack open your text editor and make the changes to these files, and if you’re a Kinsta customer, we’re on hand to support you through the process.
WordPress is the most popular content management system (CMS) in the world, and rightfully so. It is powerful and versatile, suitable for people with or without a coding background. However, as any website owner might tell you, the road to site creation and maintenance is rarely without hurdles. WordPress errors are among those hurdles. The more common errors are often paired with numbers and/or error log names. One such error is the 413 Request Entity Too Large error. This is a rather common error for websites that use shared hosting.
The 413 Request Entity Too Large error happens when you try to upload a file or folder that is bigger than the maximum upload limit. It usually happens when uploading a plugin or theme folder using the upload options of your dashboard. Luckily, this error has quite an easy solution, which you can approach using one of the methods listed below:
How to solve 413 Request Entity Too Large error
To solve this error, you simply need to increase the server resources whose limits lead to the error. Those are the file upload size and the maximum time allowed for executing PHP scripts.
We will show you various ways of increasing server resources. You can choose the method best suited to your needs or try them one by one. In case the issue isn’t solved after applying one of the methods, you should consider increasing the values further. However, make sure to do so within the limits of your hosting package! If additional resources that exceed the limits are needed, we suggest negotiating with your hosting provider regarding the increase. Finally, the problem can also be solved by manually uploading the large file or folder via FTP. We discuss this method towards the end of the article.
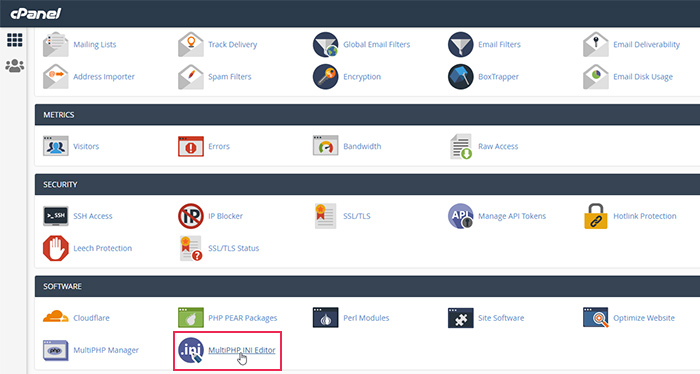
Using PHP INI Editor within cPanel
Hosting providers will offer their clients access to a control panel like cPanel. Thus, the easiest way of solving this error is to change the settings relating to the php.ini file within cPanel. To change your php.ini settings, navigate to MultiPHP INI Editor located within the Software section in cPanel.
You will be able to change the basic php.ini settings in the following window. Make sure you are in the Basic Mode tab, choose your domain, and then adjust the values of the following settings:
max_execution_time = 300
upload_max_filesize = 128M
post_max_size = 256M
Once you’ve done that, press the Apply button below.
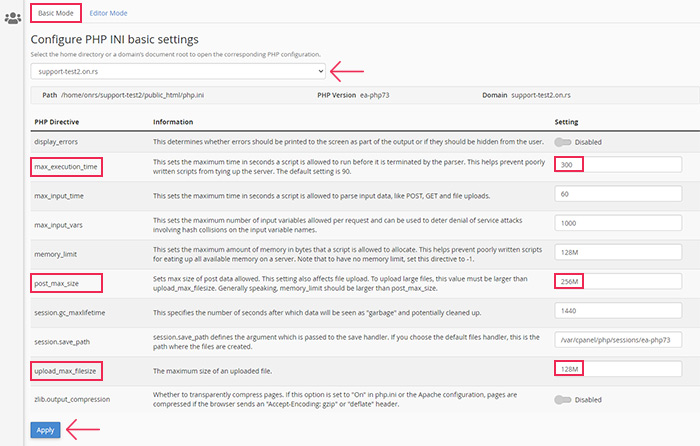
Afterward, you will receive a message stating Successfully applied the settings in the top right corner of the screen.
Editing your functions.php file
Other ways of solving the error require you to edit certain files. This process is only slightly more difficult than the previous one we mentioned. Furthermore, you can edit those files either within the File Manager section of cPanel or via FTP, using an FTP client. We’ve included examples for both types of editing, depending on the file. But, to avoid the article being needlessly long, we left out duplicate instructions for every file mentioned.
With that being said, let us examine how to edit the functions.php file, which is one of the files that can be edited to increase server resources. Within the Files section of cPanel click on the File Manager option.
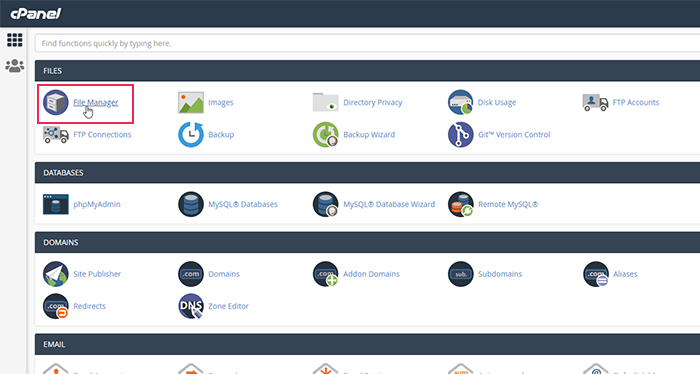
Afterward, locate your domain and position within your root WordPress directory, often called public_html, from the left-side navigation. Then, navigate to /wp-content/themes directory and open the directory of the theme you are currently using. Find the functions.php file within, right-click it, and select the Edit option in the dropdown.

Confirm that you wish to edit the file by pressing the Edit button in the popup that appears.
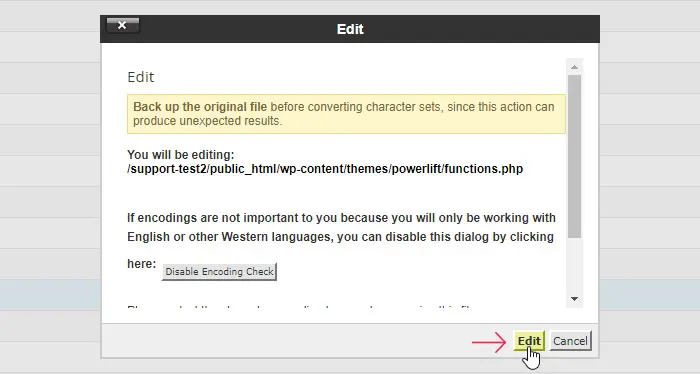
The file will be opened with a text editor native to cPanel. Insert the following code at the bottom of your functions.php file:
@ini_set( ‘upload_max_size’ , ’128M’ );
@ini_set( ‘post_max_size’, ’256M’);
@ini_set( ‘max_execution_time’, ‘300’ );
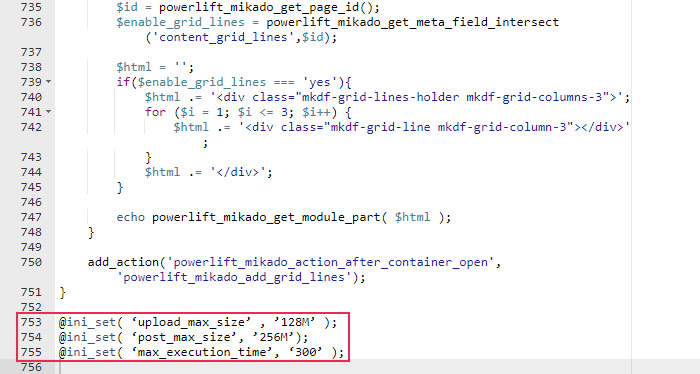
Then press the Save changes button in the upper right corner of the screen.
Editing your .htaccess file
Another file that you could edit to increase your server resources is the .htaccess file. As .htaccess is a server configuration file for Apache servers, it can help enable or disable a multitude of other server functionalities. You can access it using FTP. However, as it is usually hidden, you will have to enable the appropriate options for showing hidden files within the FTP client of your choice to see it.
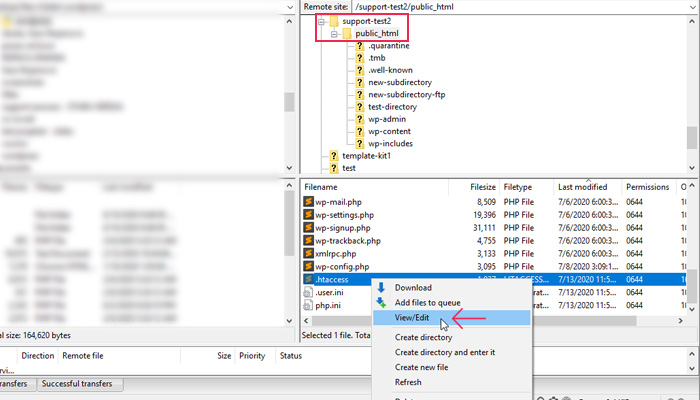
After connecting to your server using your FTP credentials, navigate to the root WordPress directory of your site, called public_html. Locate the .htaccess file within, right-click it and select the View/Edit option.
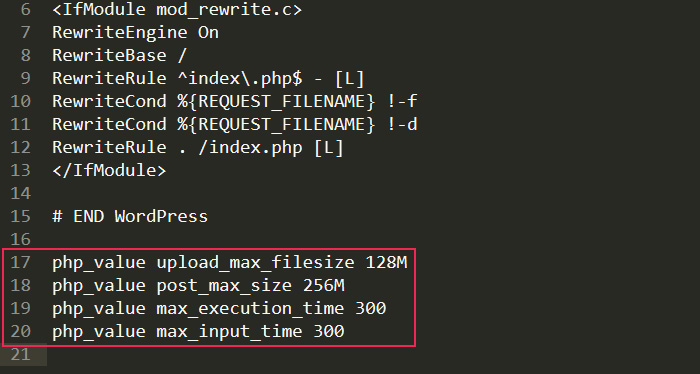
Open the file using a text editor you prefer. Insert the code shown below at the end of the file, after the # END WordPress line of code.
php_value upload_max_filesize 128M
php_value post_max_size 256M
php_value max_execution_time 300
php_value max_input_time 300
Afterward, save the changes and upload the edited file back to your server to override the current one.
Editing your wp-config.php file
The wp-config.php file is yet another file that can be used for increasing server resources. The process is very similar to the one for editing the .htaccess file.
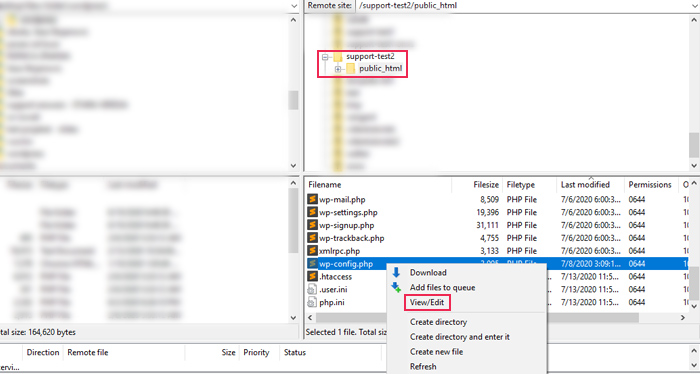
Connect to your server using your FTP credentials and navigate to the root WordPress directory. Find the wp-config.php file within, right-click it, and select the View/Edit option. You can edit the file using any text editor you like.
Insert the code shown below right before the /* That’s all, stop editing! Happy publishing. */ line of code.
@ini_set( ‘upload_max_size’ , ’128MB’ );
@ini_set( ‘post_max_size’, ’256M’ );
@ini_set( ‘memory_limit’, ’300MB’ );
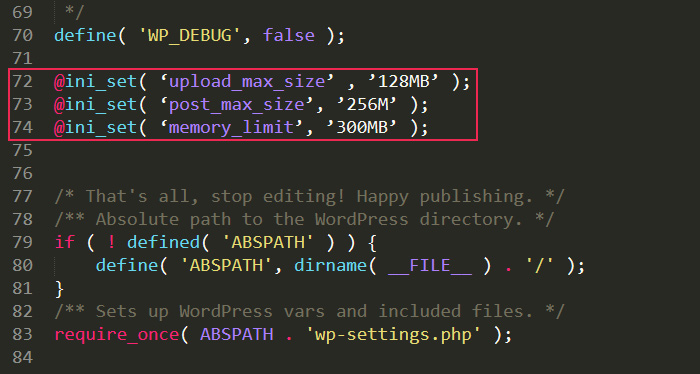
Then, save the changes and upload the file back to your server to overwrite the old wp-config.php on your server.
Manually uploading the file or folder via FTP
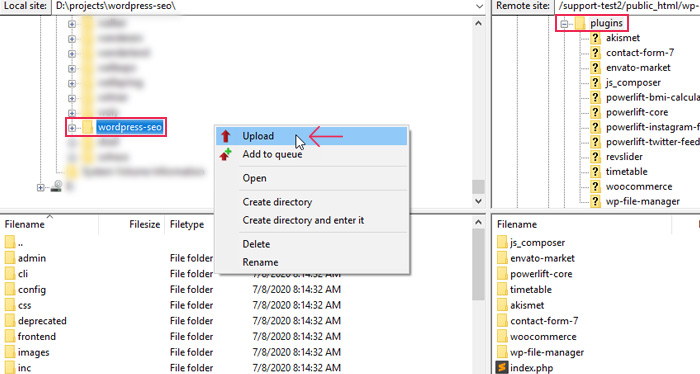
Since the 413 error happens when uploading a very large file or folder within your dashboard, an additional way of solving the issue is by uploading the troublesome file via FTP. We will show you the steps using a plugin folder as an example. You can upload it manually by connecting to your server with your FTP credentials and navigating to your root WordPress directory, called public_html. Afterward, find and enter your /wp-content/plugins directory. Then, in the left section of the FTP client, find the unzipped plugin folder located on your computer. Right-click it and select the Upload option in the dropdown.
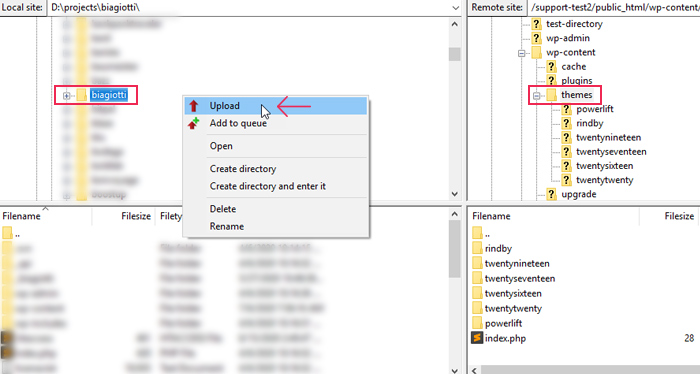
Uploading themes via FTP is very similar. Using the navigation on the right side of the FTP client, start from your root WordPress directory and navigate to the /wp-content/themes directory. Then, in the FTP client navigation on the left side, find the unzipped theme folder. Right-click it and select the Upload option.
In both cases, you might need to have a little bit of patience for the upload to be complete. Depending on the size of the plugin or theme folder, this process could take some time. But, your patience will be rewarded once the folder is uploaded as it will solve the error you were having.
Final Thoughts
WordPress errors can seem puzzling and difficult to solve at times, but most can be solved quite easily. The 413 Request Entity Too Large error is no exception. By carefully following any of the methods we discussed above, we are confident that you will be able to solve the error quite quickly. Furthermore, increasing the server resources could prove beneficial for your site in the long term. It can solve (or prevent) the appearance of other common WordPress errors such as image upload errors. And increased server resources can help your website run smoothly in general.