Themeisle content is free. When you purchase through referral links on our site, we earn a commission. Learn More
Trying to access a website only to be met with a 401 error code? This could be happening on your own WordPress website or it could be happening on someone else’s site that you’re trying to visit.
If your WordPress site is showing the 401 error code to other visitors, it’s important to fix the problem so that your visitors can enjoy your site. And if you’re experiencing the 401 error code when you visit someone else’s site, you’ll want to understand the problem so you know what’s happening. 🐞
In a previous post we presented the most common HTTP error codes and status codes, but this post, we’ll explain what the 401 error is, what causes it, and how to fix the error 401 message.
What does the 401 error code mean? 🤔
A 401 Unauthorized error is an HTTP status code indicating that the server received an unauthenticated request. 401 error code responses are most often generated because of invalid credentials for a particular page or destination on your website. This status is typically sent with a WWW-authenticate header that contains information on how to authorize properly.
In human terms, this basically means that your client (e.g. your web browser) isn’t able to authenticate itself with the server and, as such, cannot view the resource. For example, a specific page might require a valid username and password to view.
The 401 error code, like other error codes in the 400-range, means there’s a problem on the client-side – AKA the problem lies on your web browser’s side (or another client), rather than the website you’re trying to visit.
401 error vs 403 error
People often confuse a 401 error with a 403, but the two are different. A 403 error means access to the page is forbidden, whereas a 401 error just means there’s a problem with authenticating access to the page. That is, a 401 means access is not necessarily forbidden, the server just cannot authenticate the request to grant access.
401 error code variations
The exact message that indicates a 401 error code varies depending on the server, but here are the typical 401 error code variations that you’ll see:
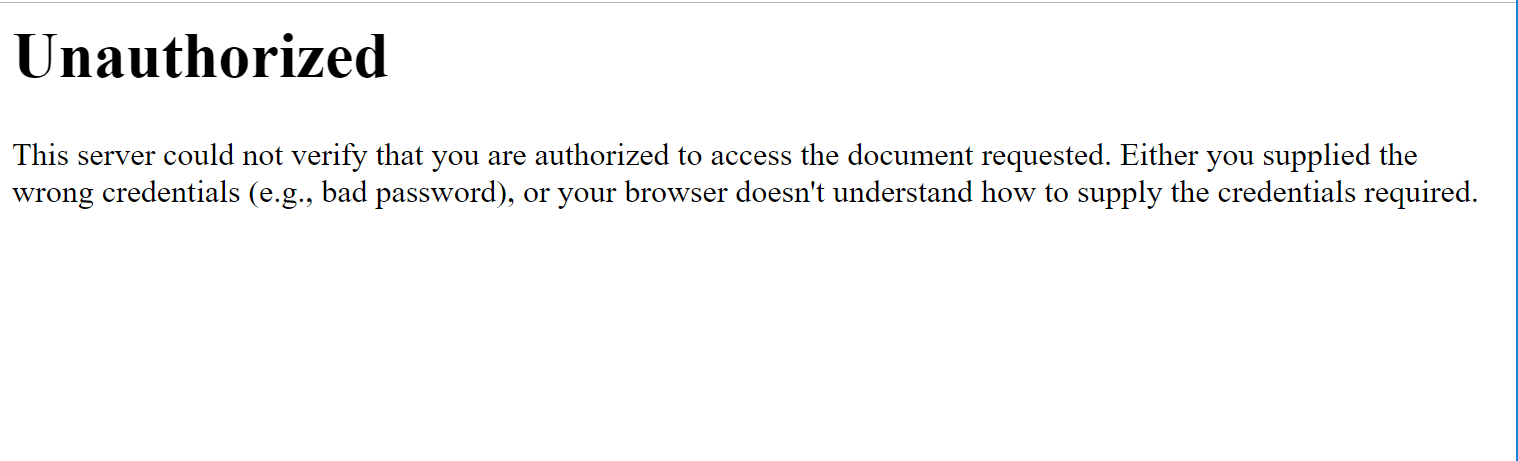
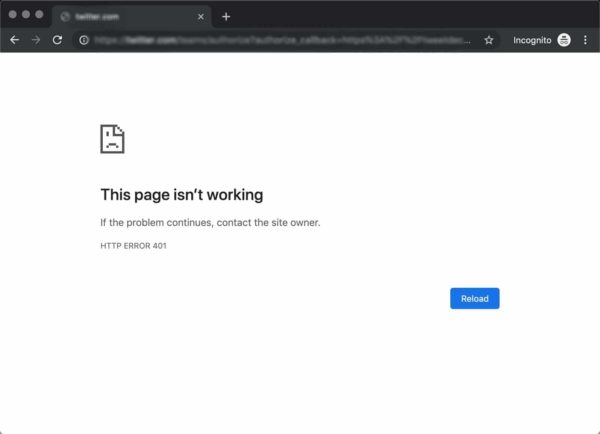
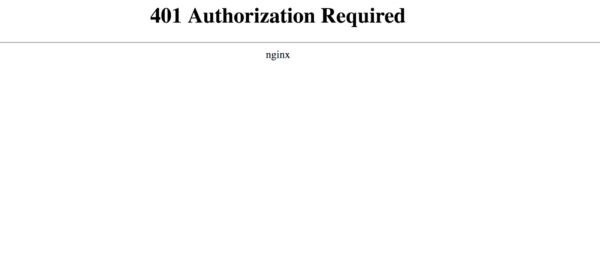
- 401 Unauthorized
- Authorization Required
- Access Denied
- HTTP Error 401 Unauthorized
What causes the 401 error code? ⚠️
Here are some common causes of the 401 error code:
- Incorrect URL – sometimes the 401 error code is because of the wrong URL. Make sure that the URL for the site you want to access has been entered correctly.
- Invalid login credentials – some pages of a website require you to login in order to access the information. If you’re not logged in, you will very likely get a 401-error. Make sure that the login credentials you are entering are accurate.
- False login requirement – this occurs rarely but, in some cases, a website that should not require a login will still show a login page. This indicates an issue on the admin side and will often throw up a 401-error.
- DNS errors – occasionally, domain name system failures may result in a 401 response. DNS malfunctioning is less common.
- Security/firewall issues – some WordPress security plugins or firewalls can cause a 401 error if they detect malicious activity.
- Plugin issues – a WordPress plugin on your site might be triggering the 401 error code.
Often, 401-error codes can be fixed by simply hitting the refresh button. If refreshing your page doesn’t work, try the following fixes:
- Check the URL for errors
- Clear browser cache and cookies
- Deactivate your WordPress plugins
- Remove server-level password protection
- Flush your DNS
- Try waiting
1. Check the URL for errors
It is possible that a 401 error occurs because you have typed the URL incorrectly or the login URL has been changed. Alternatively, you may have clicked on an outdated link in your web browser. In cases where a page no longer exists, the server might show a 401 code. Check the URL for spelling mistakes. You can also use a search engine to find the correct URL of the webpage you are trying to access.
2. Clear browser cache and cookies
Your browser’s cache helps improve your overall surfing experience by decreasing the loading time of websites. To do this, browsers store local copies of the content you visit most frequently. Your browser’s cache can sometimes overlap with the live version of your application, resulting in a 404 error code.
To fix this error, just clear the browser’s cache.
Similar to the cache, there are HTTP cookies which are basically tiny pieces of stored data. Invalid and/or corrupted cookies can cause an authentication error. Clear the cookies and try to open the page again.
3. Deactivate your WordPress plugins
Because WordPress plugins can alter how your site functions, they’re a typical cause of the 401 error code on WordPress.
In the case of WordPress security plugins, sometimes the plugin intends to do this. For example, some plugins will lock down your login page if the plugin thinks you’re under attack, which can trigger the 401 error code when you try to open your login page. Or the firewall in a plugin like Wordfence might cause the issue.
In this case, once you figure out the issue by deactivating the plugin, you can reach out to the plugin’s support to understand the issue.
Other times, it could be an unintended compatibility issue.
To figure out which plugin is causing the 401 error, try deactivating all of the plugins on your site and reactivating them one-by-one. Or, if the error only appeared after you installed a new plugin, try deactivating that plugin first.
4. Remove server-level password protection
If you’re using htaccess/htpasswd to protect parts of your WordPress site with an extra username/password, try deactivating this extra password protection.
Many web hosts also give you a tool to control such passwords from cPanel. Look for a tool named something like:
- Password protect directories
- Directory privacy
5. Flush your DNS
In rare cases, DNS errors can cause the server to show a 401-error code on your browser. To fix this, you need to flush your DNS. Although this is a fairly unusual cause, it is quite simple to repair.
👉 For Windows users:
- Log in to your computer as an administrator
- Open a “search” window
- Type in CMD.exe in the search field to open Command Prompt
- Enter this little code in the CMD interface: “ipconfig/flushdns”
👉 For macOS users:
- Open the Command Terminal
- Enter this code in terminal interface: “sudo killall -HUP mDNSResponder”
6. Try waiting
Like security plugins, some WordPress hosting companies will temporarily block your IP if they think you’re doing something malicious – e.g. entering the wrong password. In this case, you can try waiting to see if that fixes the issue, as sometimes your site is only locked down for a short period of time.
Additionally, many WordPress websites need regular downtime for maintenance. If you’re seeing a 401-error on someone else’s site, there may be maintenance or construction going on at the backend causing temporary login issues. Try giving the admins some time and logging in a few minutes later.
At this point you should have a solid understanding of the general definition of the 401 error code. However, sometimes people ask about it in different contexts or simply want some quick answers to some quick questions. Below you’ll find responses to three of the most commonly asked questions regarding this http error code.
What is 401 status code in REST API?
In the context of REST API, the 401 status code means “Unauthorized.” It’s used when the server requires user authentication for the requested resource. If you receive a 401 response, it indicates that you either haven’t provided valid credentials or haven’t provided any credentials at all. The server may include a “WWW-Authenticate” header in the response to guide you on how to authenticate yourself, such as including an API key or valid username and password.
What is an example of a 401 error?
An example of a 401 error is when you try to access a restricted page on a website without logging in or providing the correct credentials. It’s like attempting to enter a restricted area without the right key or permission. The server will respond with a 401 error, indicating that you need valid login credentials to access the requested content.
What does 401 unauthorized access is denied due to invalid credential mean?
The message “401 Unauthorized: Access is denied due to invalid credentials” indicates that the server received a request that requires authentication, but the credentials provided by the client are either missing or incorrect.
In simpler terms, when you encounter this error, it means that you’re trying to access a resource or perform an action that requires you to provide valid login credentials (such as a username and password), but the ones you provided are not recognized or are missing altogether. As a result, the server denies access to the requested content or functionality.
Conclusion 🧐
A 401 error indicates a client-side problem with authentication. That is, your web browser is having issues authenticating itself with your WordPress site’s server.
Before you start digging into any in-depth troubleshooting, try a few quick fixes first. Make sure that the URL you’re using is correct, and don’t forget to clear your browser’s cache and cookies.
Also consider any security tools you may be using on your site, as well as any server-level passwords you might have added, like a password via htaccess and htpasswd. You can also try deactivating your plugins.
Do you have any questions about the 401 error code? Let us know in the comments!
Free guide
4 Essential Steps to Speed Up
Your WordPress Website
Follow the simple steps in our 4-part mini series
and reduce your loading times by 50-80%. 🚀
Free Access
Страница с ошибкой при обращении к WordPress-сайту всегда вызывает неудобства, вне зависимости от того, ваш это сайт или чужой. Как и в случае со многими другими кодами ответов HTTP, ошибка 401 не содержит детальных данных для диагностики и решения проблемы.
Ошибка 401 может появиться в любом браузере. В большинстве случаев ее легко решить.
В этой статье мы расскажем, что означает 401 ошибка, почему она происходит, и какие методы ее устранения существуют.
Итак, приступим!
Содержание
- Код ошибки 401 – что это?
- Что вызывает ошибку 401
- Как исправить ошибку 401 (5 методов)
Код ошибки 401 – что это?
Коды состояния HTTP 400 возникают в случае проблем с выполнением запросов. В частности, ошибка 401 появляется, когда браузер отказывает вам в доступе к странице, которую вы хотите посетить.
В результате вместо загрузки страниц браузер выведет сообщение об ошибке. Ошибки 401 могут возникать в любом браузере, потому отображаемое сообщение может варьироваться.
К примеру, в Chrome и Edge вы, скорее всего, увидите иконку бумаги с простым сообщением о том, что запрашиваемая страница не отвечает. Вы увидите фразу «HTTP Error 401». Вам будет предложено связаться с владельцем сайта, если ошибка не пропадет:
В иных случаях и в других браузерах вы можете получить менее дружелюбное предупреждение. К примеру, может выводиться пустая страница с сообщением «401 Authorization Required»:
Другие вариации текста:
- HTTP 401 Error – Unauthorized
- 401 Unauthorized
- Access Denied
Эти ошибки часто появляются на сайтах, где требуется вводить данные для входа. В большинстве случаев это означает, что что-то не так с учетными данными. Возможно, браузер перестал считать их действительными.
Эта ошибка похожа на HTTP 403 Forbidden Error, когда доступ к сайту для пользователя запрещен. Однако, в отличие от ошибки 403, сообщение об ошибке 401 указывает, что процесс аутентификации завершился неудачно.
Код ошибки передается через заголовок WWW-Authenticate, который отвечает за определение метода аутентификации, используемого для предоставления доступа к веб-странице или ресурсу.
Что вызывает ошибку 401
Если вы столкнулись с кодом ошибки в кодах 400, вы должны знать, что проблема произошла на стороне клиента (либо на стороне браузера). Случается, что виновником проблемы является браузер, но так бывает не всегда. Об этом мы еще расскажем позже.
Ошибки 401 возникают на ресурсах с ограниченным доступом – к примеру, на страницах, защищенных паролем. Потому можно предположить, что причина проблемы связана с данными аутентификации.
Устаревшие Cookie и кэш браузера
Одной из наиболее распространенных причин возникновения ошибки 401 является то, что кэш и файлы cookie вашего браузера устарели, что не позволяет выполнить авторизацию. Если ваш браузер использует недействительные данные для авторизации (либо вообще их не использует их), сервер отклонит запрос.
Несовместимые плагины
Также бывают ситуации, когда ошибка вызвана несовместимостью плагинов или какими-либо сбоями в них. К примеру, плагин безопасности может ошибочно принять вашу попытку входа за вредоносную активность, а потому будет возвращена ошибка 401 для защиты страницы.
Неверный URL или устаревшая ссылка
Бывает, что источником проблемы является незначительная оплошность. К примеру, был неверно введен URL, ссылка была устаревшей и т.д.
Как исправить ошибку 401 (5 методов)
Теперь, когда мы разобрались с причинами ошибки 401, пришло время обсудить, как ее устранить.
Давайте рассмотрим 5 методов, которые вы можете использовать.
- Проверьте ваш URL.
Начнем с самого простого потенциального решения: убедитесь, что вы использовали верный URL. Это может выглядеть банально, но 401 ошибки нередко появляются, если URL-адрес был введен неправильно.
Еще один вариант: ссылка, которую вы использовали для перехода на запрашиваемую страницу, указывает на неправильный URL. К примеру, ссылка устарела, ведет на страницу, которой больше нет (и редиректов не задано).
Стоит тщательно перепроверить URL-адрес, который вы использовали. Если вы набирали адрес самостоятельно, убедитесь, что все написано безошибочно. Если вы переходили по ссылке, убедитесь в том, что она ведет на страницу, к которой вы хотите получить доступ (либо попробуйте перейти на эту страницу непосредственно через сайт).
- Почистите кэш браузера.
Кэш браузера предназначен для улучшения процесса взаимодействия с сайтами в сети за счет сокращения времени загрузки страниц. К сожалению, иногда это может вести к нежелательным последствиям.
Как мы уже говорили выше, одной из распространенных причин появления ошибки 401 являются устаревшие или неправильные данные кэша или cookies. Потому, если URL введен верно, следующий шаг – чистка кэша браузера.
В итоге вы удалите любую недействительную информацию, которая хранится локально в вашем браузере и может приводить к прерываниям процесса аутентификации. Аналогично, файлы cookie вашего браузера могут содержать аутентификационные данные, которые нужно обновить.
Если вы пользуетесь Chrome, вам нужно щелкнуть по иконке с меню в правом верхнем углу браузера и выбрать пункт Settings. В разделе «Privacy and security» нажмите «Clear browsing data:»
![]()
Далее вводим URL требуемого сайта и очищаем для него данные.
![]()
В других браузерах процесс очистки кэша и cookie может отличаться. К примеру, в Firefox нужно щелкать по иконке с библиотекой и выбирать History > Clear Recent History:
![]()
Информацию по остальным браузерам вы можете найти в поисковиках.
- Очистка DNS.
Еще один метод, который вы можете попробовать для устранения ошибки 401 – это очистка DNS. Эта причина встречается относительно редко, но стоит попробовать и такой подход, особенно если первые два ничего не дали.
Чтобы очистить DNS, перейдите в Windows к меню «Пуск» и там уже введите в строку поиска cmd. Нажмите Enter. Откроется командная строка. Далее вставьте команду ipconfig/flushdns, после чего снова нажмите Enter.

Если вы пользуетесь Mac, вы можете открыть командную строку следующим образом: Finder > Applications > Utilities > Terminal.
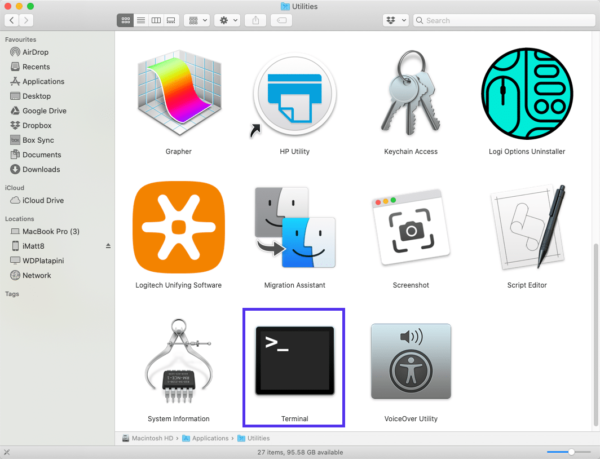
Введите команду sudo killall -HUP mDNSResponder и нажмите Enter. Затем вы можете обновить страницу, чтобы посмотреть, пропала ли ошибка 401 или нет.
- Деактивируйте ваши плагины
Проблема может возникать и по вине плагинов.
Некоторые плагины, особенно связанные с безопасностью, могут выдавать ошибку 401 при подозрении на вредоносную активность. Также у них могут быть проблемы с совместимостью. Потому лучше всего деактивировать все плагины и посмотреть, будет ли страница работать.
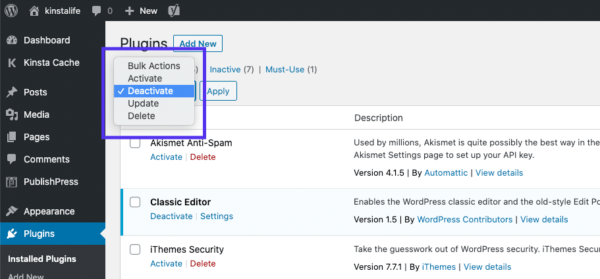
Вы можете деактивировать все плагины разом, перейдя в раздел Plugins > Installed Plugins в консоли WordPress. Выберите все плагины и в меню Bulk Actions задайте Deactivate, после чего щелкните по кнопке Apply:
После этого попробуйте перезагрузить страницу с ошибкой. Если ошибка пропала, вы можете вручную по одному активировать плагины заново, чтобы выявить виновника всех бед.
Далее вы уже можете либо удалить плагин, либо написать его разработчикам, чтобы они предоставили рабочее решение.
- Проверьте заголовок WWW-Authenticate
Если проблема все еще остается, то в таком случае она может быть связана с ошибками на сервере. А значит, исправить ее будет чуть сложнее.
Как мы уже писали ранее, ответ 401 передается через заголовок WWW-Authenticate, который отображается как “WWW-Authenticate: <type> realm=<realm>”. Он включает в себя строки данных, указывающие на то, какой тип аутентификации требуется для предоставления доступа.
Вам нужно посмотреть, был ли отправлен ответ в WWW-Authenticate, а точнее какая схема аутентификации была использована. По крайней мере, это позволит вам приблизиться на один шаг к решению.
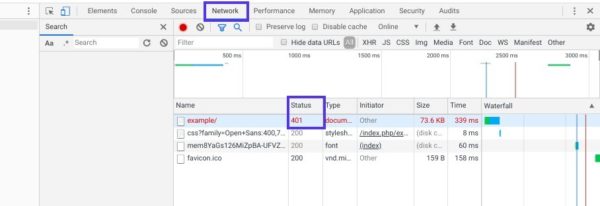
Перейдите на страницу с ошибкой 401 и откройте консоль разработчика в Chrome. Вы можете щелкнуть правой кнопкой мыши на странице и выбрать Inspect (Ctrl+Shift+J).
Далее перейдите на вкладку Network и перезагрузите страницу. Это позволит сгенерировать список ресурсов. Выберите заголовок Status, чтобы отсортировать таблицу, и найдите код 401:
Выберите данную запись, после чего перейдите на вкладку Headers. В Response Headers найдите заголовок WWW-Authenticate:
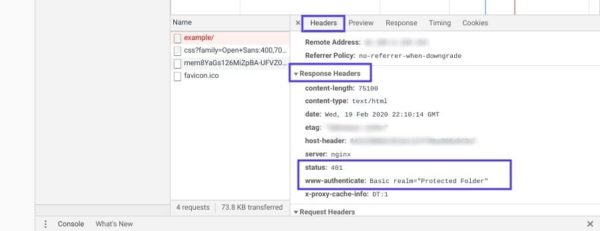
Информация, представленная в заголовке ответа, в частности, в схеме аутентификации, даст вам больше сведений о том, что произошло, и укажет на решение. Это позволит вам понять, какой тип аутентификации требуется серверу.
К примеру, в приведенном выше примере мы видим, что схема аутентификации задана как «Basic». Это означает, что запрос аутентификации требует только ID и password. Для получения более подробной информации и инструкций мы рекомендуем обратиться к HTTP Authentication Scheme Registry.
Источник: kinsta.com
Are you seeing a 401 error on your WordPress site? It is one of the most confusing WordPress errors that can lock you out of your WordPress website.
The 401 error has multiple names, including Error 401 and 401 unauthorized error. These errors are sometimes accompanied by a message ‘Access is denied due to invalid credentials’ or ‘Authorization required’.
In this article, we will show you different solutions to easily fix the 401 error in WordPress. We will also discuss what causes it and how to avoid it in the future.

What Causes the 401 Error in WordPress?
The 401 error in WordPress is caused by improper authentication while communicating with the WordPress hosting server.
For example, if you have password-protected your WordPress admin folder, then not entering a password will show a 401 error page on the WordPress login and admin pages.

However, in some cases, you may see this error even without adding any special password protection to your website.
For example, WordPress security plugins can lock down your admin area during a brute-force attack.
Security measures taken by hosting companies to protect your WordPress website can also cause this error. They can trigger the 401 error when your WordPress login pages are accessed excessively.
Mostly, 401 errors appear on WordPress admin and login pages. However, in some cases, it could also appear on all pages of your website.
You will need to troubleshoot exactly what’s causing the error and then fix it.
That being said, let’s take a look at different solutions to quickly fix the 401 error in WordPress.
- Temporarily Remove Password Protection on WordPress Admin
- Clear Firewall Cache to Solve the 401 Error in WordPress
- Deactivate All WordPress Plugins
- Switch to a Default WordPress Theme
- Reset WordPress Password
- Contact Your WordPress Hosting Provider
1. Temporarily Remove Password Protection on WordPress Admin
If you have password-protected your WordPress admin directory, then this could be the solution you need.
You may have forgotten your admin directory password, or your server configuration might have changed.
To fix this, you need to log in to your WordPress hosting control panel. Then, click the ‘Directory Privacy’ or ‘Password Protected Directories’ icon.
Our screenshot is showing our Bluehost hosting account, but most hosting panels will have this option.

Once you open it, you will see all the files and folders on your hosting account. Browse to your wp-admin directory and select it by clicking on the name.
The control panel will now display its password protection settings. Simply uncheck the box next to the ‘Password protect this directory’ option and click on the ‘Save’ button.

After that, click on the ‘Go Back’ button and scroll down to the bottom of the page. From here, you need to delete the username you use to log in to your password-protected directory.
You have now successfully disabled password protection for your WordPress admin directory. You can now try to log in to your WordPress site.
If everything works normally, then you can go ahead and enable password protection for your WordPress admin area by creating a new user and password.
2. Clear Firewall Cache to Solve the 401 Error in WordPress
If you are using a cloud-based WordPress firewall service like Sucuri or Cloudflare, then the 401 error may be triggered when the firewall fails to communicate with your website.
Purge Cache in Sucuri Firewall
If you are using Sucuri, then you need to log in to your Sucuri dashboard and visit the ‘Firewall (WAF)’ page. From here, you need to switch to the ‘Clear Cache’ tab and then click on the ‘Clear cache’ button.

Purge Cache in Cloudflare
If you are using Cloudflare, then you need to log in to the Cloudflare dashboard and go to the ‘Caching’ section. From here, you must click on the ‘Purge everything’ button to clear the cache.

After clearing your firewall cache, go ahead and clear your browser cache or WordPress cache as well. You can see our complete guide on how to clear your cache in WordPress for more details.
3. Deactivate All WordPress Plugins
A misbehaving or poorly-configured WordPress plugin can also trigger the 401 error. You will need to temporarily deactivate all WordPress plugins to find out if the error is caused by one of them.
You can simply deactivate WordPress plugins from inside the admin area by visiting the Plugins page.
Simply check the box in the top left to select all the plugins, choose ‘Deactivate’ from the ‘Bulk actions’ dropdown menu, and then click ‘Apply’.

However, if you cannot access the WordPress admin area, then you will need to use FTP to deactivate all WordPress plugins.
Simply connect to your WordPress site using an FTP client. Once connected, go to the /wp-content/ folder and rename the plugins folder to ‘plugins.deactivated’.

Renaming the plugins folder will deactivate all WordPress plugins.
You can now visit your WordPress website’s admin area and try to log in. If everything works fine, then this means that one of the plugins was causing the issue.
Now you need to switch back to the FTP client and once again rename the plugin’s folder to just ‘plugins’.
Next, return to the WordPress admin area and go to the Plugins page. You can now activate each plugin one at a time until you start seeing the 401 error again.
This will help you find the plugin causing the issue. Once you have found the plugin, you can contact their support or find an alternative plugin.
4. Switch to a Default WordPress Theme
Sometimes a function inside your WordPress theme may trigger the 401 error on your website. To find out, you need to temporarily switch to a default WordPress theme.
Default themes are made by the WordPress team and are shipped with the default WordPress install. These themes include Twenty Twenty-Two, Twenty Twenty, Twenty Nineteen, and more.
First, go to the Appearance » Themes page. If you have a default WordPress theme installed, then you can go ahead and activate it.

If you don’t have a default theme installed on your site, then you need to install and activate it. See our guide on how to install a WordPress theme for instructions.
After switching the theme, you can test your website. If everything works OK now, then this means your theme was causing the 401 error.
You can report the issue to the theme developer, and they may be able to help you fix it. If that doesn’t work, then you can permanently change your WordPress theme.
5. Reset WordPress Password
WordPress hosting companies can sometimes block access to wp-admin and login pages if someone is repeatedly trying to enter a password.
In that case, your access will be temporarily blocked, and you can try after a few minutes.
However, instead of guessing your password, it is best to recover your forgotten WordPress password.

WordPress will send you an email with a link to change your password. The problem with this method is that sometimes WordPress may fail to send emails.
If you don’t get the email, then don’t worry. You can also reset the WordPress password using phpMyAdmin.
6. Contact Your WordPress Hosting Provider
Many WordPress hosting companies automatically detect suspicious activity on a WordPress website and block access to prevent attacks.
These security precautions sometimes only affect the WordPress admin area, and your login page may become inaccessible for a while.

However, if it does not return to a normal state, or you are seeing a 401 error on all your site pages, then you will need to contact your WordPress hosting provider immediately. Their staff can check the access and error logs to fix the issue for you.
For future prevention, you can follow our complete WordPress security guide to protect your WordPress admin area from unauthorized access.
We hope one of these solutions helped you fix the 401 error in WordPress. You may also want to see our complete WordPress troubleshooting guide and check out our expert picks for the best WordPress plugins to grow your website.
If you liked this article, then please subscribe to our YouTube Channel for WordPress video tutorials. You can also find us on Twitter and Facebook.
Disclosure: Our content is reader-supported. This means if you click on some of our links, then we may earn a commission. See how WPBeginner is funded, why it matters, and how you can support us. Here’s our editorial process.
Editorial Staff at WPBeginner is a team of WordPress experts led by Syed Balkhi with over 16 years of experience in WordPress, Web Hosting, eCommerce, SEO, and Marketing. Started in 2009, WPBeginner is now the largest free WordPress resource site in the industry and is often referred to as the Wikipedia for WordPress.
WordPress has several types of errors and every error has its own solution. One of the most frustrating error is the 401- Unauthorized Error.
A 401 unauthorized error in WordPress means that you are trying to view a particular page or post that you don’t have authentication to access it.
In simple words, WordPress 401 Error means that access is denied due to invalid credentials or proper authorization is required.
So in this article, I will show you different ways and easy solutions that you can use to fix the 401 Error in WordPress. If you are facing any WordPress errors, then check the Complete Guide to WordPress Errors and Solutions.

What is 401 Error in WordPress means?
A 401 unauthorized error is an HTTP code that presents that the server received a request and that request is unauthorized.
This error is mostly generated due to invalid credentials or because the browser didn’t understand how to supply the credentials.
During this error, the browser isn’t able to authorize itself with the server and thus throws an error that it received in the WWW-authenticate header, stating it’s unable to view the resources.
Mostly the 401 error happens in a WordPress admin and login pages and in very rare cases it may appear on your entire website.
Difference between 401 and 403 Error

401 and 403 Error are very similar but both are different. Here is what you should know.
401 Error: You are unauthorized to access it as you have provided the wrong credentials or there’s a problem authenticating the access for you.
403 Error: Means access is forbidden and you cannot access the resource or the page.
What Causes the 401 Error in WordPress
As said earlier, this problem is caused due to unauthorized requests or invalid credentials. The error can be solved in WordPress using the following methods.

- Remove Password Protection
- Check the URL for error
- Clear Caches & Cookies
- Deactivate all Plugins
- Change to Default Theme
- Flush your DNS
- Reset WordPress Password
- Contact WordPress Hosting Provider.
1. Remove Password Protection
If you have password-protected your WordPress folders or files then the 401 error will appear. Now, if you don’t remember which folder or files have your password-protected, then all you need to do is to follow this is a simple fix.
Login to your Hosting Panel and search for Directory privacy or Password Protected directories. This will help you identify the password-protected directories easily. So all you need to do is to remove the password from the directories and the problem is fixed.
If you don’t have this function in your hosting panel then you need to login to your hosting panel and access the Files Manager. Navigate to the root folder of your WordPress. Check the File’s permission for the files and folders.
If you find that a folder or a file is password protected, then simply untick the password-protected checkbox and save it.
You have successfully disabled the password protection for your WordPress admin, now try to login to your WordPress.
Note: 401 errors in WordPress are mostly seen in the WordPress admin or login pages.
2. Check the URL
If you have changed the url of any resource or page and you trying to access the page using the old url. You may encounter with the 401 error.
Since the old URL is no longer available and the resource doesn’t exist through the old URL, the browser might show a 401 error.
So check the url and try accessing the page using the new url. This time the 401 error should be gone.
If you are still facing the problem then go to WP-Admin > Settings > Permalink and click on the save changes button twice. This will rewrite your .htaccess files.
If you can’t access the WordPress admin due to the 401 error then login to your hosting panel and access the Files manager. From the file manager, navigate to the root of the WordPress root folder and edit the .htaccess file.
Delete everything inside the .htaccess file and paste this code and click on the Save Changes.
# BEGIN WordPress

RewriteEngine On
RewriteRule .* - [E=HTTP_AUTHORIZATION:%{HTTP:Authorization}]
RewriteBase /
RewriteRule ^index\.php$ - [L]
RewriteCond %{REQUEST_FILENAME} !-f
RewriteCond %{REQUEST_FILENAME} !-d
RewriteRule . /index.php [L]

# END WordPress
3. Clear Cache & Cookies
Whenever you browse any website, the browser save the files and resources so that you can browse the website without waiting for the files to load.
This feature is called Cache. All browsers utilize this feature and Chrome does the most. Moreover, WordPress also uses caching features that with help of plugins. Sometimes the caches are outdated and overlap the current live version of the website, resulting in an error
By clearing the cache, you manually deleted all the old cache and request the website for the current live version. This fixes the 401 WordPress error in most cases.
Cookies are a piece of data that holds your authorization like your log-in sessions and other credentials. This may turn into invalid or ger corrupted for some reason and cause you a 401 unauthorized error.
Clear the cookies and close the browser and reopen the website.
If you are using Cloudflare or another caching plugin, then hit the purge cache button to empty the current cache and reload the live version.

4. Deactivate WordPress Plugins
WordPress functionality totally changes with the use of the plugin. WordPress has several security plugins that may lock the WordPress admin and login pages if your IP has a spam history or the plugin thinks that you are spamming or a security threat.
Then the plugin may block your access to the admin pages and you may encounter a 401 error. This happens because your plugins think that the site is under attack and locks the user out to protect it.

Sometimes a firewall can also trigger this 401 error in wordpress.
In this case, you need to deactivate the plugin if you know which plugin is causing this error. If you don’t know which plugin is causing this error, then deactivate all the plugins and only activate the necessary ones and after that contact the plugin support to resolve this issue.
To find the plugin that is causing this error, try activating the plugins one by one.
Note: Guide to Deactivate all WordPress Plugins without WP-Admin.
To better protect your WordPress site and its data from hackers and attacks, use the iThemes Security Plugin
5. Switch to Default Theme
Sometimes WordPress themes can also trigger the WordPress 401 unauthorized. Since WordPress Themes uses several php functions and methods and WordPress always uses the most stable and the latest version of PHP.
If your hosting accounts PHP version is outdated or doesn’t stand to the requirements of the WordPress themes, then the functions will not work as it supposed to be and the WordPress may show a 401 error.
The simplest way to fix this 401 error in WordPress, in this case, is to switch to the default WordPress theme.

The default WordPress themes come pre-installed in every WordPress, and in case if you have deleted it. You can download the latest version of the theme from the WordPress Repository. The default theme name is “twenty-Followed by the Year”. E.g: TwenyTwentyOne.
To change the WordPress theme from the WordPress Admin, navigate to wp-admin » Appearance » Themes » add new » upload. Upload the .zip file of the theme and activate it.
In case you can’t get access to the WP-Admin, you need to upload the theme folder to the WordPress Theme directory using FTP. Upload the themes folder “twentytwentyone” to WP-content » themes.
6. Flush your DNS
Sometimes DNS can get messed up too. This happens in rare cases too.
Fixing the DNS errors is very easy and its worth to give it a shot as sometimes as simple as this can cause the WordPress 401 Error.
To flush the DNS, you need to follow the exact steps.
For Windows users
- Open search window.
- Type “CMD” in search field and then right click on it.
- Choose Open as Administrator.
- After the command prompt opens, type the following and hit enter.
- ipconfig/flushdns
For Mac Users
- Open Spotlight and search terminal or Choose the terminal from the Applications » Utility folder.
- Enter the code below and hit enter.
- sudo killall -HUP mDNSResponder
7. Reset WordPress Password
Sometimes WordPress hosting companies blocks the access to the WP-Admin and login pages if someone repeatedly fails to login and tries to enter password.
The companies do this to protect the user’s site from attackers. In this case, you will be temporarily blocked and you can retry after some minutes or from different device with different IP.
But the best thing to do is to reset the password, instead of guessing the password and blocking yourself again and again.

To reset the password. go to your wp-login.php page and select the “lost your password”. Fill in your username or the email and hit the reset button.
WordPress will send you an email with a link to change your password. Type in your new password and get access to your site again.
We have remembering passwords and especially when you have a lot of sites to visit. That’s why we use 1Password to manage our passwords and the best feature is that it automatically generates strong passwords that are non-hackable and auto-fills the password when you visit the website.

8. Contact WordPress Hosting Provider
If you have tried all of the above methods and still can get access to your site and the site is stuck at the 401 Error.
Then it’s better to get in touch with your hosting provider and they can help you get your site back to work.
WordPress hosting companies use security measures to block out the attackers and spammers from their servers as it hurts their reputation and the goodwill of the brand.
For future protection of your WordPress site, you can follow our WordPress security Guide and our WordPress Errors & Solutions Guide to get rid of the 401 Error in WordPress and other errors also.

You can also hire a WordPress Agency to fix your problem. They will monitor your site and fix all the possible errors and bugs. You can contact GloriousThemes.com for WordPress-related services.
Fix 401 Error in WordPress
That’s all.
However, your needs may be different from mine. Which plugin is your favorite, and are you currently using it on your site? Do you have any other recommendations to add? Please voice your thoughts in the comments below!
You can also subscribe to our YouTube and Like and Follow us on Facebook, Twitter, and Instagram.
Are you getting a WordPress 401 error? This isn’t unique to WordPress. 401 errors are thrown at the server level. But, a WordPress plugin or setting can cause a 401 error, too. Fortunately, there’s several ways of getting your WordPress site back up and running.
So What is a 401 Error, Exactly?
The 101 on 401
Simply put, a 401 error is what happens when communication with the WordPress hosting server is attempted without proper authentication.
A 401 can appear in a number of different forms. The most common error messages are “Error 401” and “401 unauthorized error”. These two numerically-based errors are usually accompanied with the message “Access is denied due to invalid credentials” or “Authorization required.”

One of the most frequent causes of a 401 error is simply forgetting to enter a password when you try to access your account. But there can be more to it than that. If there’s an attack on your site, any WordPress security plugins that you use may lock down your admin area. Which will, in turn, cause a 401 error message.
Another possibility is that your hosting company may display the error when your login pages are accessed excessively or brute-forced. Normally, these messages will appear on your admin page and login page. However, the error may appear throughout your site, especially if it’s more serious.
Now that you know the basics about 401 errors and their causes, let’s get to the various fixes. Most of these are simple, but some require more complicated procedures.
Table of Contents
- Disable Password Protection
- Clear Your Firewall Cache
- Deactivate Your WordPress PlugIns
- Switch to a Default WordPress Theme
- Contact Your Web Hosting Provider
5 Ways to Fix WordPress 401 Errors
Solution 1: Disable Password Protection
One of the quickest and easiest fixes for a 401 error is to temporarily remove password protection on your admin page (if you have it enabled).
To do this, you’ll need to log in to your control panel (cPanel, Plesk etc.). Then, look for the icon Directory Privacy or Password Protected Directories.
![]()
When you open one of these icons, you’ll see all the files and folders on your hosting account. Find the wp-admin directory and click the name to select it.

When you do this, your control panel will display the password protection settings. If the box is checked next to “Password protect this directory,” uncheck it and click the Save button.

Once you’ve done that, scroll down and delete the username as well. Try to log in again. If you’re successful, you can create a new username and password for the directory and proceed normally.
Solution 2: Clear Your Firewall Cache
If you’re using a cloud-based WordPress firewall service like Sucuri, the 401 error may be triggered when the firewall fails in its efforts to communicate with your WordPress site.
The basic solution for this is to go to the dashboard of the firewall and find the section pertaining to cache functions.

This will be slightly different for each firewall plugin, but that’s the basic solution, and a simple implementation will often allow you to proceed unimpeded.
Solution 3: Deactivate Your WordPress PlugIns
If a WordPress plugin is configured incorrectly or isn’t working right, this too can cause a 401 error.
To fix it, visit the plugin page Plugins > Installed Plugins and deactivate all of your plugins. This will allow you to reactivate them one by one to determine which plugin is causing the problem.

If you don’t have access to the WordPress dashboard, you’ll need to use a File Transfer Protocol (FTP) like FileZilla to deactivate the plugins.
This can be done by going to the WordPress plugin folder wp-content/plugins and renaming it, designating it to be plugins-deactivated.

Once the plugins are deactivated, you can return to the admin area and try to log in. If you are successful, switch back to FTP access.
Rename the plugin folder so that the plugins are activated again, then go back to the admin area and deactivate them one at a time to see which one is causing the problem.
When you’ve isolated the problematic plugin, you can either try to get support from the plugin creator or find another option.
Solution 4: Switch to a Default WordPress Theme
If you’re using your own WordPress Theme, this can sometimes be the cause of a 401 error. To fix it, you need to temporarily switch to a default WordPress theme.
These themes are supplied by the WordPress, and they’re shipped as part of the default version that’s automatically installed if you don’t designate otherwise.
To do the switch, go to the Appearance > Themes page and try to deactivate your own theme. Then, switch to one of the default ones. (e.g. 2020, 2019, 2018, etc.).

If the error goes away once you’ve activated the default theme, that means your theme was the issue, and you either need to contact the theme developer to fix it or permanently change to a different theme.
Solution 5: Contact Your Web Hosting Provider
In some instances, the 401 error can be generated when your hosting provider detects suspicious activity. Usually, this security precaution only affects the admin area of WordPress and makes your login page inaccessible for a brief but indeterminate period of time.
After waiting, the page should return to normal. If it doesn’t or you start seeing 401 errors on all your site pages, contact your hosting provider immediately. They can help address the issue and fix the problem.
My final thoughts on 401 errors and WordPress
When it comes to WordPress, most errors are easy to understand, and correcting them is generally simple as well. But there are exceptions. The 401 error is definitely one of the more confusing ones and fixing it can be tricky business.
I think the important thing to remember is that 401 errors are caused by improper authentication. If you keep this in mind when you are trying to troubleshoot your website, it will help lead you in the right direction.
If you enjoyed this tutorial, please be sure to follow us on Facebook and Twitter. You can also find us on Freelancer if you need some help with your WordPress website or web development issues.