![]() Written by on
Written by on
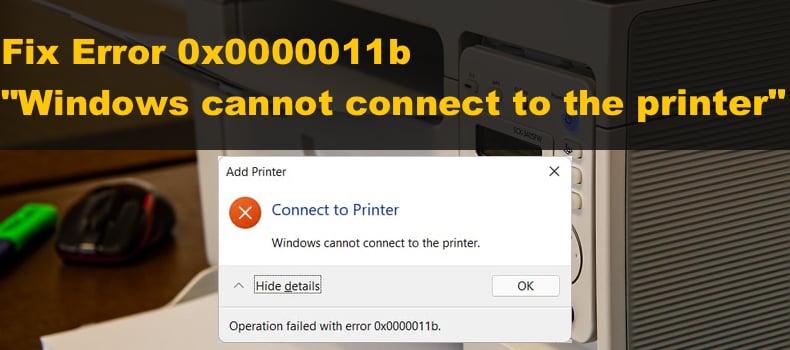
How to Fix Error 0x0000011b “Windows cannot connect to the printer” on Windows 11/10
Printing documents on Windows 11/10 is usually a breeze, but error 0x0000011b may prevent you from connecting to your printer. If you’re getting this error, follow our troubleshooting instructions in this article to fix it.
The entire error message text reads as follows:
Windows cannot connect to the printer.
Operation failed with error 0x0000011b.
What is Error 0x0000011b?
Error 0x0000011b usually occurs when trying to print something using a network-shared printer.
According to user reports, error 0x0000011b started occurring on Windows 10 after installing security updates KB5005568, KB5005566, and KB5005565, which are aimed at protecting from Windows Print Spooler Spoofing. Several users have reported getting this error after installing KB890830.
These updates interfere with the TPC authentication level for network printers and trigger the error. Uninstalling the updates usually solves the issue but will leave your network vulnerable to the PrintNightmare and MSHTML vulnerabilities.
Video on How to Fix Error 0x0000011b «Windows cannot connect to the printer»
Table of Contents:
- Introduction
- Disable Print Spooler RPC Encryption On the Host Computer
- Video on How to Fix Error 0x0000011b «Windows cannot connect to the printer»
Disable Print Spooler RPC Encryption On the Host Computer
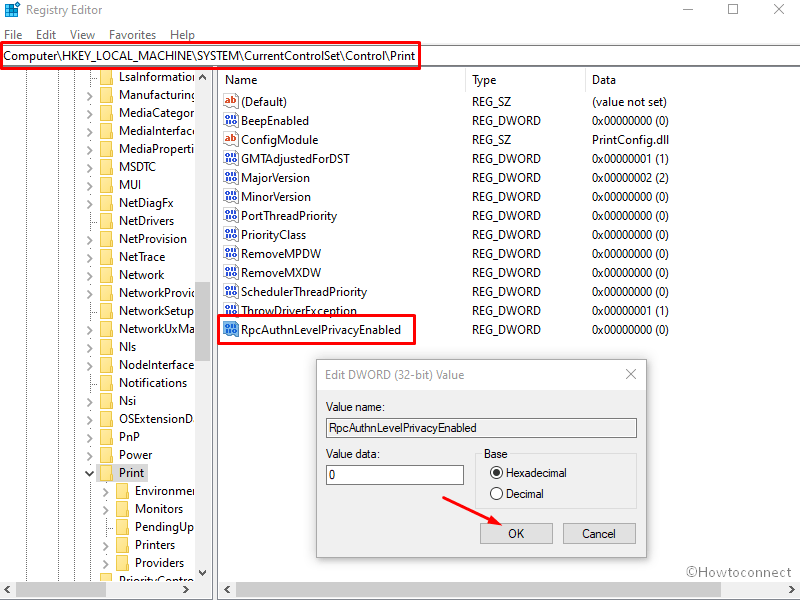
If you can’t print documents on a network-shared server, disable the print spooler privacy settings on the client and print server. Setting the RpcAuthnLevelPrivacyEnabled value to 0 disables the RPC communication encryption with network printers and print servers. This method will work for Windows 11 and Windows 10 computers.
1. On the host computer, hold down Windows+R keys to open Run.
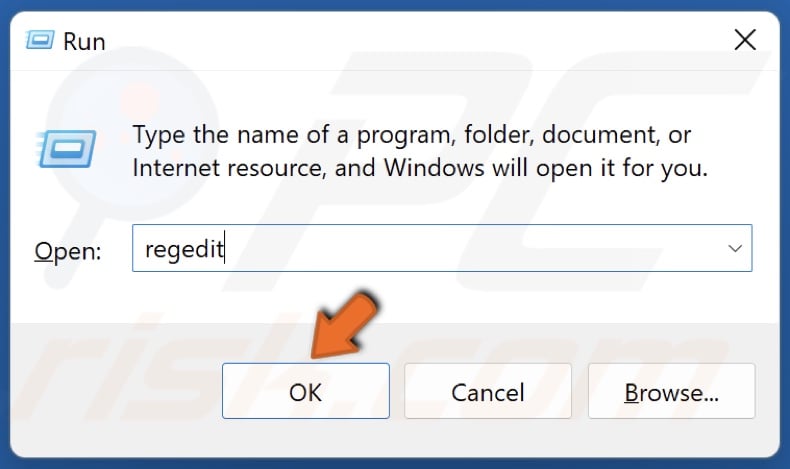
2. In the Run dialog box, type in regedit and click OK.
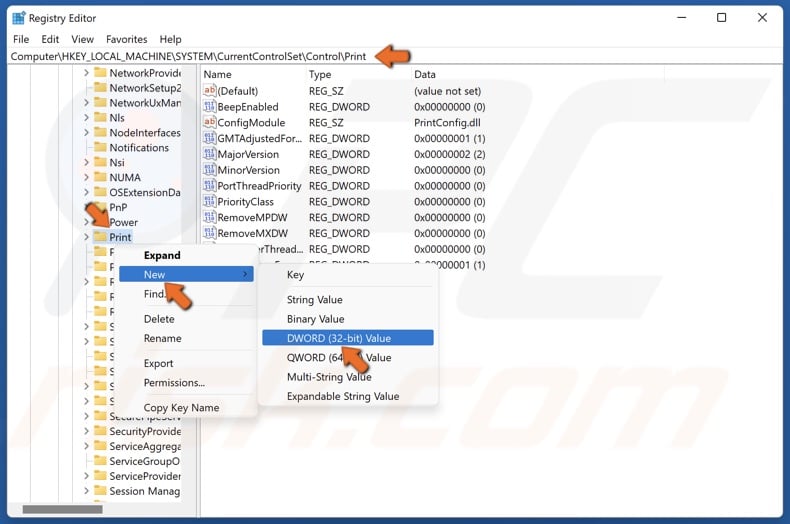
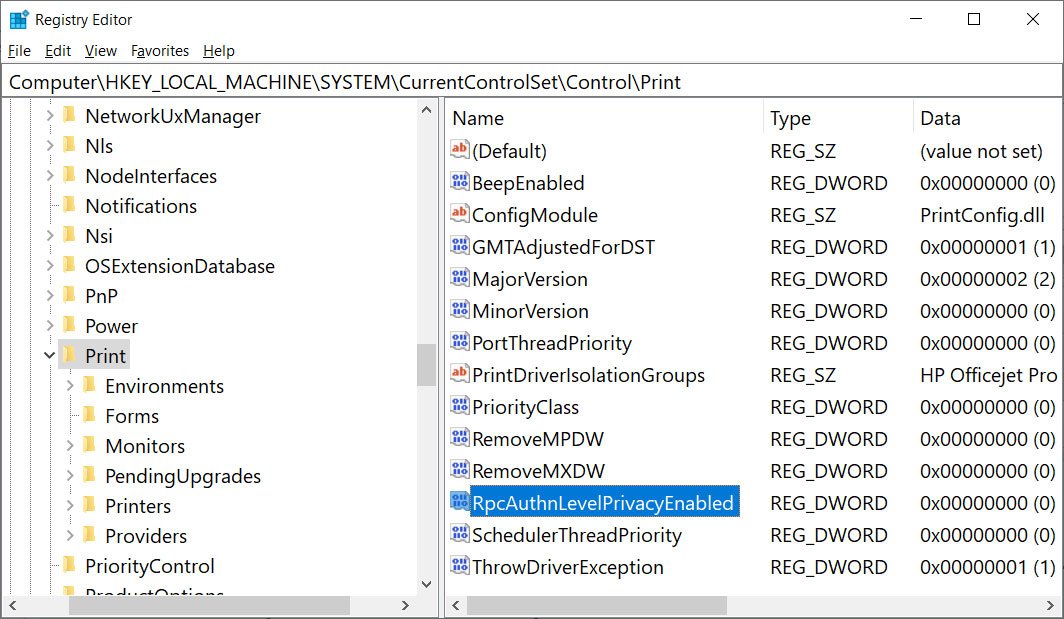
3. In the Windows Registry Editor, navigate to
HKEY_LOCAL_MACHINE\System\CurrentControlSet\Control\Print
4. Right-click the Print registry key, select New, and click DWORD-32 bit Value.
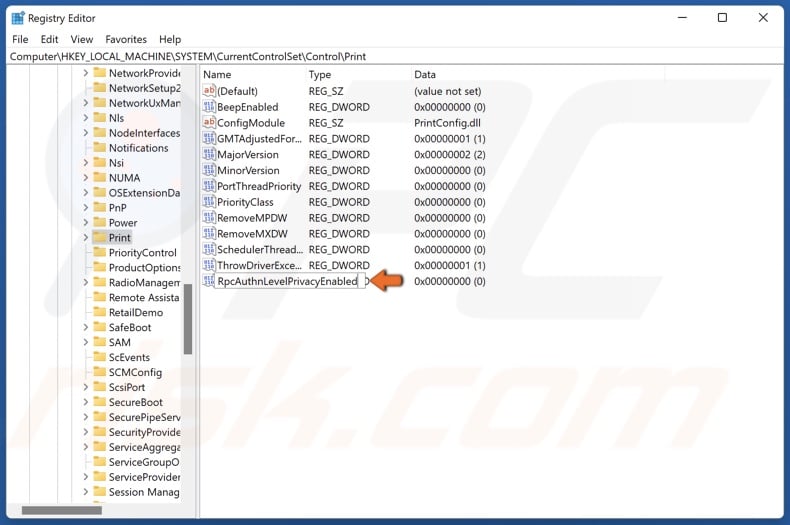
5. Name the new key RpcAuthnLevelPrivacyEnabled
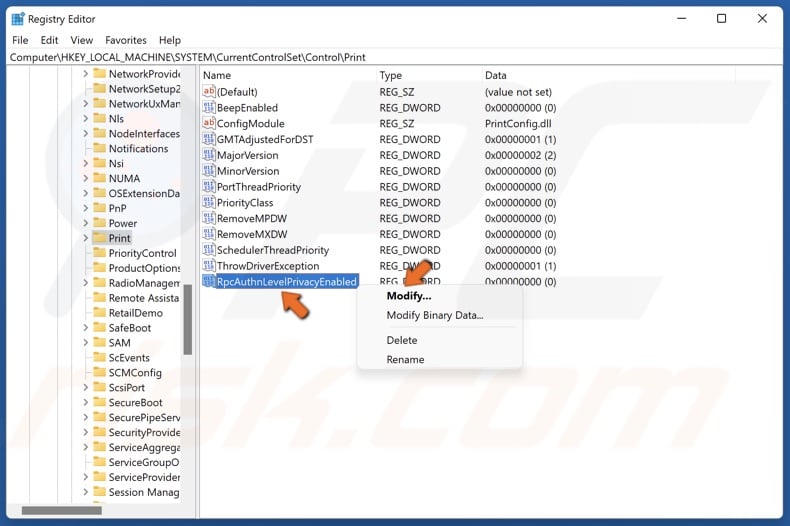
6. Right-click RpcAuthnLevelPrivacyEnabled and click Modify.
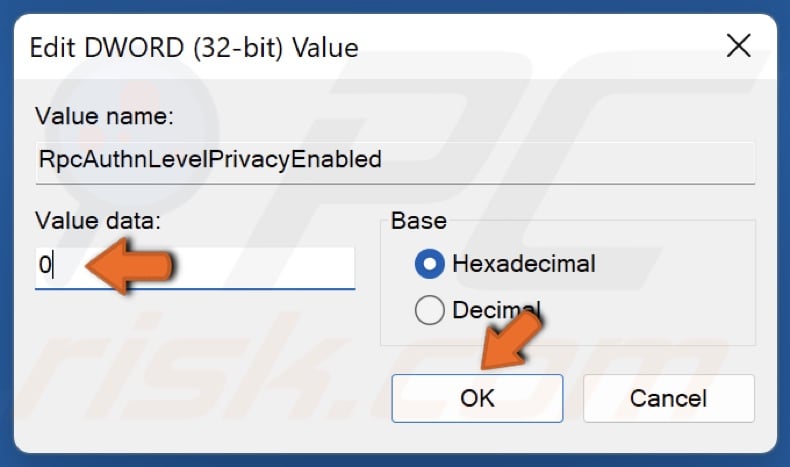
7. Set the Value data to 0 and click OK. Close the Windows Registry Editor.
8. Hold down Windows+R keys to open Run.
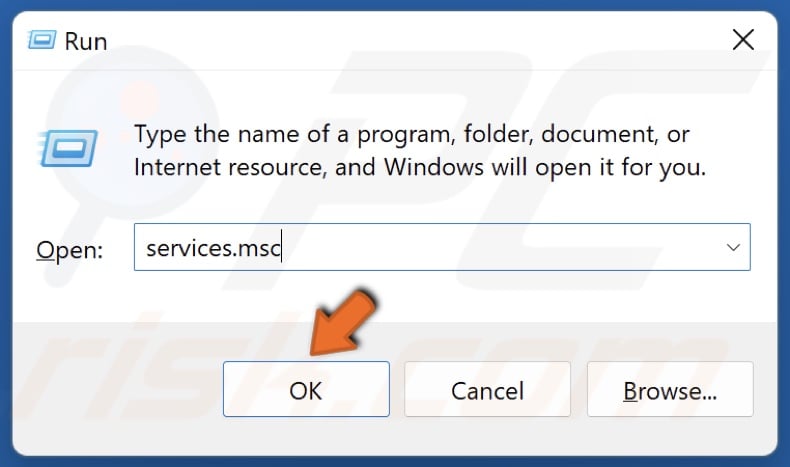
9. In the Run dialog box, type in services.msc and click OK.
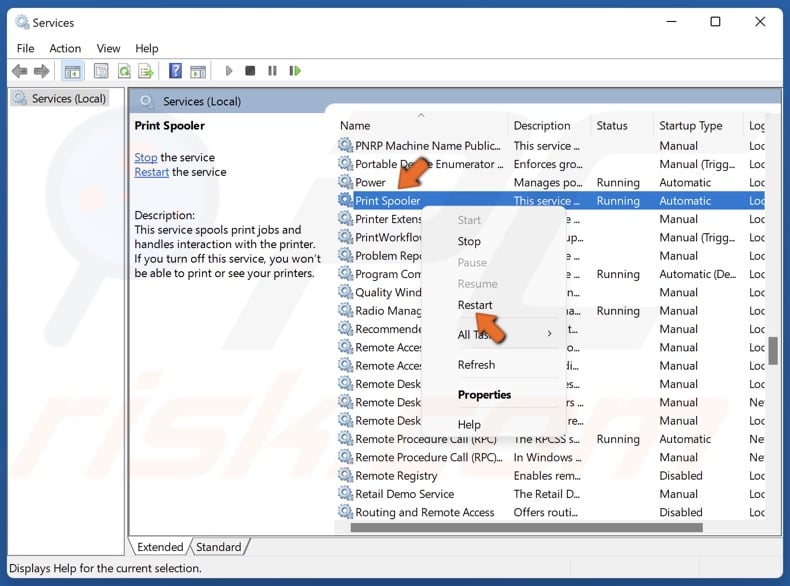
10. Find Print Spooler, right-click it and click Restart. Close the Services window.
11. Try connecting to your printer on the client computer.
Did this article help? Let us know by commenting below.
[Back to Top]
Even though we are living in the digital era, it is impossible to deny the significance of printers. For the same reason, we know how frustrating it is to see a message like the operation failed with error 0x0000011b when trying to print something or add a shared network printer.
Full message that shows up during the issue is, “Windows cannot connect to the printer operation failed with an error 0x0000011b”. If you want to know what is 0x0000011b then this is an error code that appears when you try to add a printer to your computer or run a print job and it fails. The causes of this shared network printer problem are Windows updates such as KB5005627, Printer Spooler service, and Dynamic IP Address. You know the problem appears when you try to connect to a printer over the internet. That means the issue may be associated with either the host (to which the printer is directly attached) or the client (from where you want to access the printer over the web). We will give you nine solutions. Do not rush into one or two to declare the problem is unsolvable. Just go through each one and follow the steps in the given manner.
Shared Network Printer Error 0x0000011b
Here is How to Fix Printer Error 0x0000011b in Windows 11 or 10 –
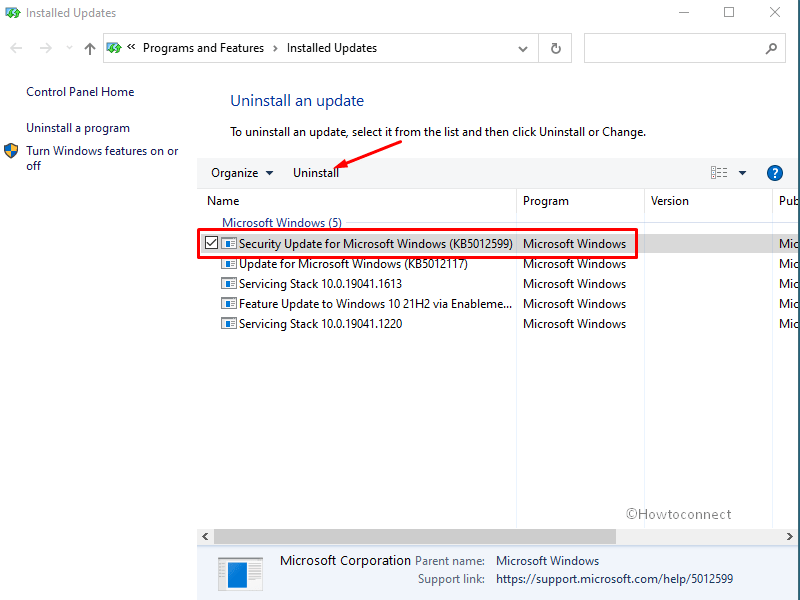
Way-1: Uninstall Recent Updates
You may not care about the updates getting installed in the background because they generally strengthen the security and enhances the features on the computer. However, many people have confirmed that patches like KB5007189, KB5006738, KB5006670, KB5005565, KB5005573, and KB5005568 (vary according to your Windows version) harm network printers. In case, you have installed any of these Windows updates you will undergo the printer error 0x0000011b. Therefore, uninstall them using the below steps –
For Windows 10 –
- Press Windows and I.
- Select – Update & Security.
- On the next Settings page, click on Update history from the right pane.
- Select – Uninstall updates.
- A window opens from Control panel; find and right-click on the Installed update (Showing as KB123456)
- Click on – Uninstall.
- Choose Yes on the confirmation dialog.
For Windows 11 –
- Press – Win+I.
- Select – Windows update.
- Go to the right and click on – Update history.
- Scroll down to the bottom and click – ‘Uninstall updates’.
- Locate the update and select – Uninstall.
- Click on Yes on the confirmation dialog box.
You can uninstall the update using command prompt in both Windows 10 and 11 –
- Click – Search from the taskbar.
- Type – CMD.
- Select – Run as an administrator.
- On the UAC dialog, click on OK.
- On Administrator: Command Prompt, type
wusa /uninstall /KB:123456(Replace 12345 with your update KB number) - Press Enter.
- When you are asked to confirm; click on Yes.
Further, you should pause or block the update for the time being – Windows 10 Update Disable Tool [Download]
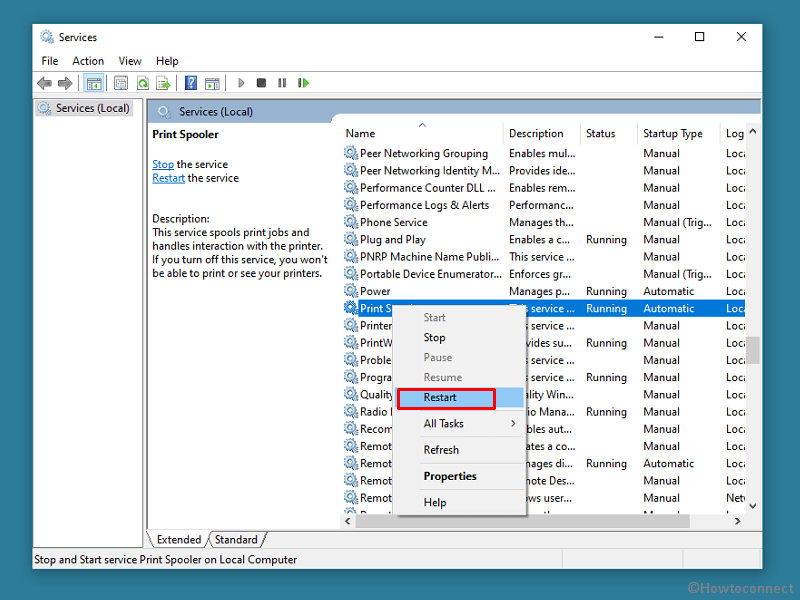
Way-2: Restart Printer Spooler Service
Oops, did the previous fix not work for you? Don’t worry, restarting the spooler service may do the trick to solve Windows cannot connect to the printer 0x0000011b error.
We have already given you a small introduction about the printer spooler (when talking about the causes). If the issue pertains to the same, following the steps mentioned below is the best thing you can do –
- Press Windows key+R to get the run dialog box.
- Enter services.msc into the text field.
- You will get a list of services on the main panel. Just locate Printer Spooler.
- Right-click on it and select Restart.
- Wait for a minute to finish the stopping procedure.
- Restart the computer to be on the safe shore.
Way-3: Add Printer Manually Using its IP Address or hostname
If the 2 solutions didn’t work, you must try adding the printer through the manual method. We hope it will solve the Printer operation failed with error 0x0000011b on Windows 11 or 10. For this method to work, you must know the IP address of the printer. See – How to Find Printer’s IP and MAC Address in Windows 10. Now follow the steps –
For Windows 10 –
- Open Windows Settings (Winkey+I).
- Select – Devices.
- From the left pane on the next page, click on – Printers & Scanners.
- Click on Add a printer or scanner from the right.
- After a while, select – The printer that I want isn’t listed.
- A window named Add Printer will appear.
- Here, you will see half a dozen options, of which the third one (Add a printer using a TCP/IP or hostname) should be your pick. Click on Next.

- Go with the prompts on the screen. You need to enter the IP address on a given field along the way.
- Hit Next and try printing the test page.
For Windows 11 –
- Click on Start and select Settings.
- Select Bluetooth & devices on the Settings window.
- Go to the right pane and click – Printers & Scanners
- Now click the button for – Add device.
- After a while, beside ‘The printer that I want isn’t listed’, select – Add manually.
- Follow from Step 6 to 9 as for Windows 10.
Way-4: Deactivate Print Spooler RPC Encryption
Having print spooler RPC encryption enabled may be a caveat on some computers. So, we are going to disable the same on both the host and the client.
- Click – Start.
- Type – regedit.
- Press – Enter.
- Select Yes on User account control.
- Once Registry Editor opens, navigate to –
HKEY_LOCAL_MACHINE\System\CurrentControlSet\Control\Print
- Right-click on the Print folder and follow New >> DWORD (32-bit) Value.
- Name it RpcAuthnLevelPrivacyEnabled.
- Give the Value data as 0 (zero).
- Click on OK.
- Don’t forget to restart the system for the recent changes to take effect.
Source – Microsoft support.
Way-5: Modify Registry
This method is a Microsoft recommended solution to deal with printnightmare problem and the company suggests adding a new value to Registry. Printnightmare bug has been one of the reasons of 0x0000011b Windows cannot connect to printer error in Windows 11 or 10. However, this method will involve Registry Editor to repair the bug but you can perform the same task using command prompt more easily –
- Press Windows+R.
- Type – cmd.exe.
- Hit – Ctrl + Shift +Enter.
- Click Yes on the verification dialog.
- Copy the following command and paste it into command prompt –
reg add "HKEY_LOCAL_MACHINE\Software\Policies\Microsoft\Windows NT\Printers\PointAndPrint" /v RestrictDriverInstallationToAdministrators /t REG_DWORD /d 1 /f- Now, press Enter.
- Reboot the system and check if 0x0000011b still persists.
Way-6: Update printer driver
Operation failed with error 0x0000011b might also befall because of obsolete printer driver. Once after getting outdated the driver software becomes buggy and incompatible with the current Windows version and instead of assisting the hardware it starts fighting the system files. Result is Windows cannot connect to the printer error in Windows 11 or 10 that can be only fixed by updating the driver. So, follow the steps to do this –
- Right click on ‘Start’ located on the taskbar.
- Select – Device Manager.
- Once the Windows tool loads on the screen, look for Printer in the list.
- If not found click on View from the top menu bar.
- Choose – Show hidden devices.
- Now go to Printer and double click on it.
- Right-click on the problematic device and select Update driver.
- Select – Search automatically for drivers.
- There may be a chance where the printer is not getting updated by this method. In this case, go to the manufacturer’s website.
- Match the model number of your printer there to reach the software download page.
- Download the correct and most recent driver.
- From the download location double click on the Setup.
- Follow the onscreen instructions and complete the installation.
- Restart the PC to solve the Windows cannot connect to the printer error.
Way-7: Uninstall and Reinstall printer driver
Sometimes, mere updating the printer driver is not enough to rescue shared network printer error 0x0000011b in Windows 11 or 10 but you need to uninstall and reinstall it. Despite everything being fine with the driver, system might not support it to be perfectly installed. Reason may be power surges, glitches in system files, buggy updates, etc. Therefore, uninstall and reinstall the printer driver using the below guidelines –
- Press Winkey and R.
- Type devmgmt.msc.
- Hit ‘Enter’.
- On the Device Manager, expand Printer by double-clicking on it.
- Right-click on the culprit driver and select – Uninstall device.
- On the warning pop-up, click on “Uninstall”.
- Reboot the machine and check the status of the error.
See – How to Reinstall Printer Driver in Windows 11 or 10.
Way-8: Reset print spooler
Corrupted or incorrectly configured Print spooler services on of the root causes of error code 0x0000011b. This is the main component to control the printing jobs on WIndows which oftentimes causes issues. Luckily, you have the ability to repair the spooler by resetting it –
- Press – Windows and R.
- Copy the path for the following folder location without quotes – “%WINDIR%\system32\spool\printers”.
- Now paste it into the Run dialog box.
- Hit – Enter.
- Once a folder opens, select all the items there (Ctrl+A).
- Press – “Delete”.
- Reboot and see if the error code no longer occurs.
Read the method in detail – How to Reset the Print Spooler in Windows 11 or 10.
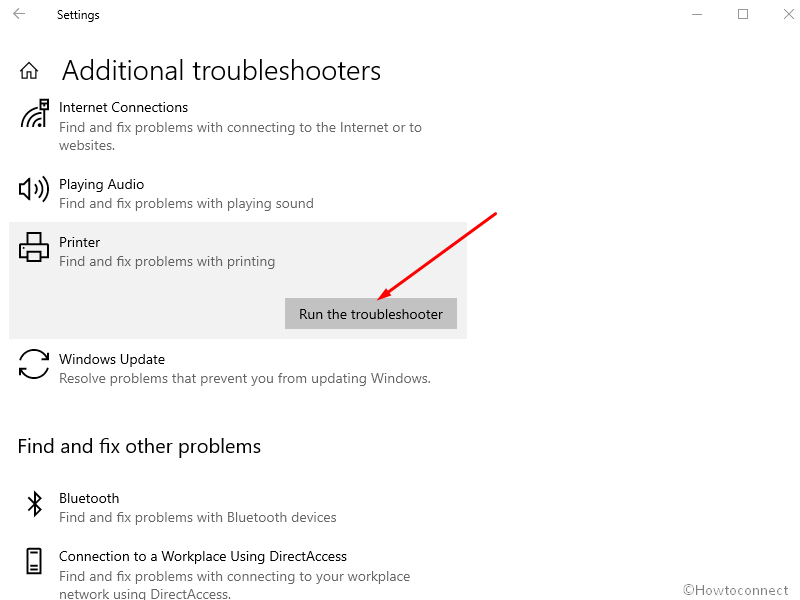
Way-9: Run Printer Troubleshooter
In case, the issue still persists, you must try opening up the printer troubleshooter which automatically finds issues and repairs them in a few clicks. This is a default Fixit tool and you can solve the error using the below steps –
For Windows 10 –
- Press Windows+S.
- Type – troubleshooter.
- Press – Enter.
- On the Settings page that appears, click on – Additional troubleshooters.
- Click on Printer.
- Select – Run the troubleshooter.
For Windows 11 –
- Press Win+I.
- Select Troubleshoot from the right side.
- Click on – Other troubleshooters.
- In the Printer section, click on – Run.
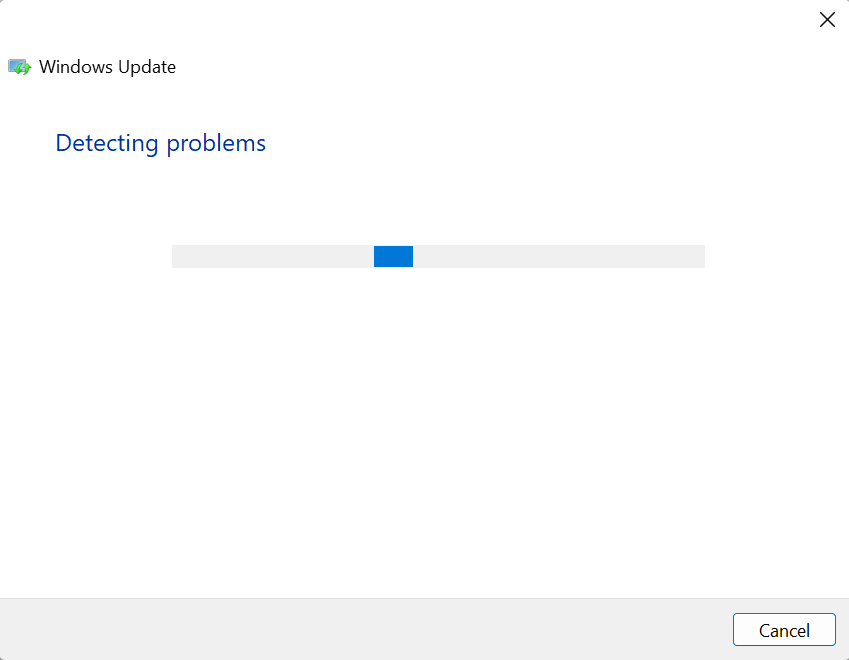
- Finally, the tool will start detecting problems and print spooler then repair them if needed.
See – Download Printing Troubleshooter Windows 10.
Methods list:
Way-1: Uninstall Recent Updates
Way-2: Restart Printer Spooler Service
Way-3: Add Printer Manually Using its IP Address
Way-4: Deactivate Print Spooler RPC Encryption
Way-5: Modify Registry
Way-6: Update printer driver
Way-7: Uninstall and Reinstall printer driver
Way-8: Reset print spooler
Way-9: Run Printer Troubleshooter
That’s all!!
Repair any Windows problems such as Blue/Black Screen, DLL, Exe, application, Regisrty error and quickly recover system from issues using Reimage.
Expert solutions to install the pending updates in a jiffy
by Kazim Ali Alvi
Kazim has always been fond of technology, be it scrolling through the settings on his iPhone, Android device, or Windows. And at times, unscrewing the device to take… read more
Updated on
- The 0x800b0101 update or install error prevents users from updating the OS.
- The error appears when installing an update from the standalone package downloaded from the Update Catalog.
- To fix things, check for corrupt system files, run the dedicated troubleshooter, and set the correct time, amongst other solutions.
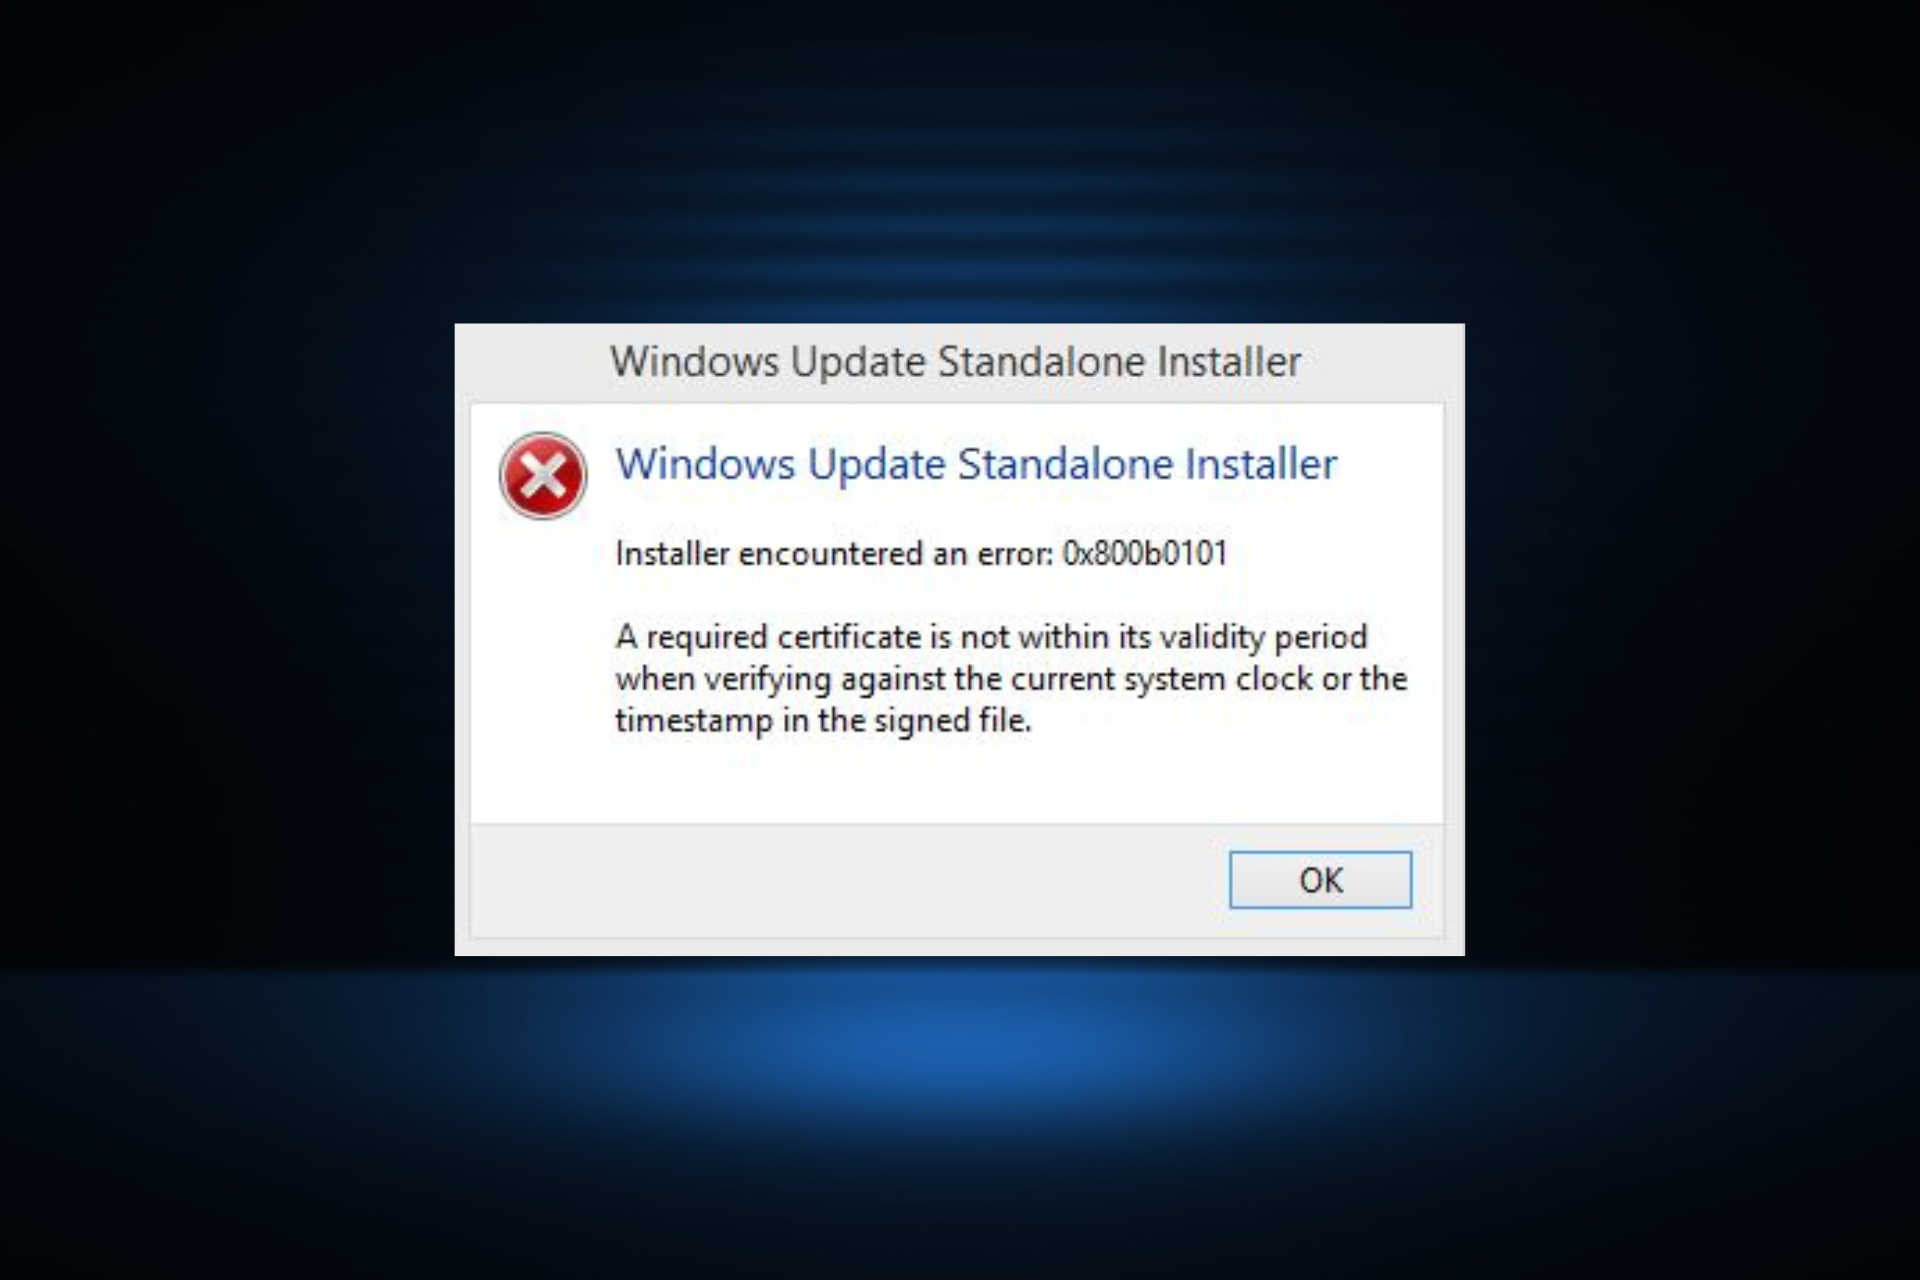
Updates are critical to the effective functioning of the PC, be it for Windows or the installed apps. An up-to-date computer delivers faster performance and is better protected against threats. But many users reported getting the 0x800b0101 update error.
The error code affects the PC’s ability to install Windows updates via Settings, using the MSU standalone installer, and when downloading apps from Microsoft Store. So, let’s find out how you can get things up and running in these cases.
What is failed to install 0x800b0101?
The error is encountered when you try to install a missing update from the standalone installer downloaded from Microsoft Update Catalog. Normally, we head to the catalog when unable to update the OS normally. But, when it starts to throw an error, users are left in a pickle.
Here are a few reasons your might be getting the error:
- Issues with certificates: One of the reasons users get the 0x800b0101 error is when a required certificate is not within its validity period. This is usually due to an incorrect time set on the PC.
- Corrupt update components: When the Windows Update Components are corrupt, users are bound to run into issues updating the OS.
- Corrupt system files: Even corrupt system files can trigger a wide range of issues, including reduced functionality, app crashes, and update errors.
How do I fix Windows Update error 0x800b0101?
Before we move ahead, try these quick tips:
- Restart the computer and check for updates.
- Connect to a different network, preferably a wired one, and verify whether the 0x800b0101 error disappears.
If these don’t work, head to the fixes listed next.
1. Run the Windows Update troubleshooter
- Press Windows + I to open Settings, and then click on Troubleshoot on the right in the System tab.

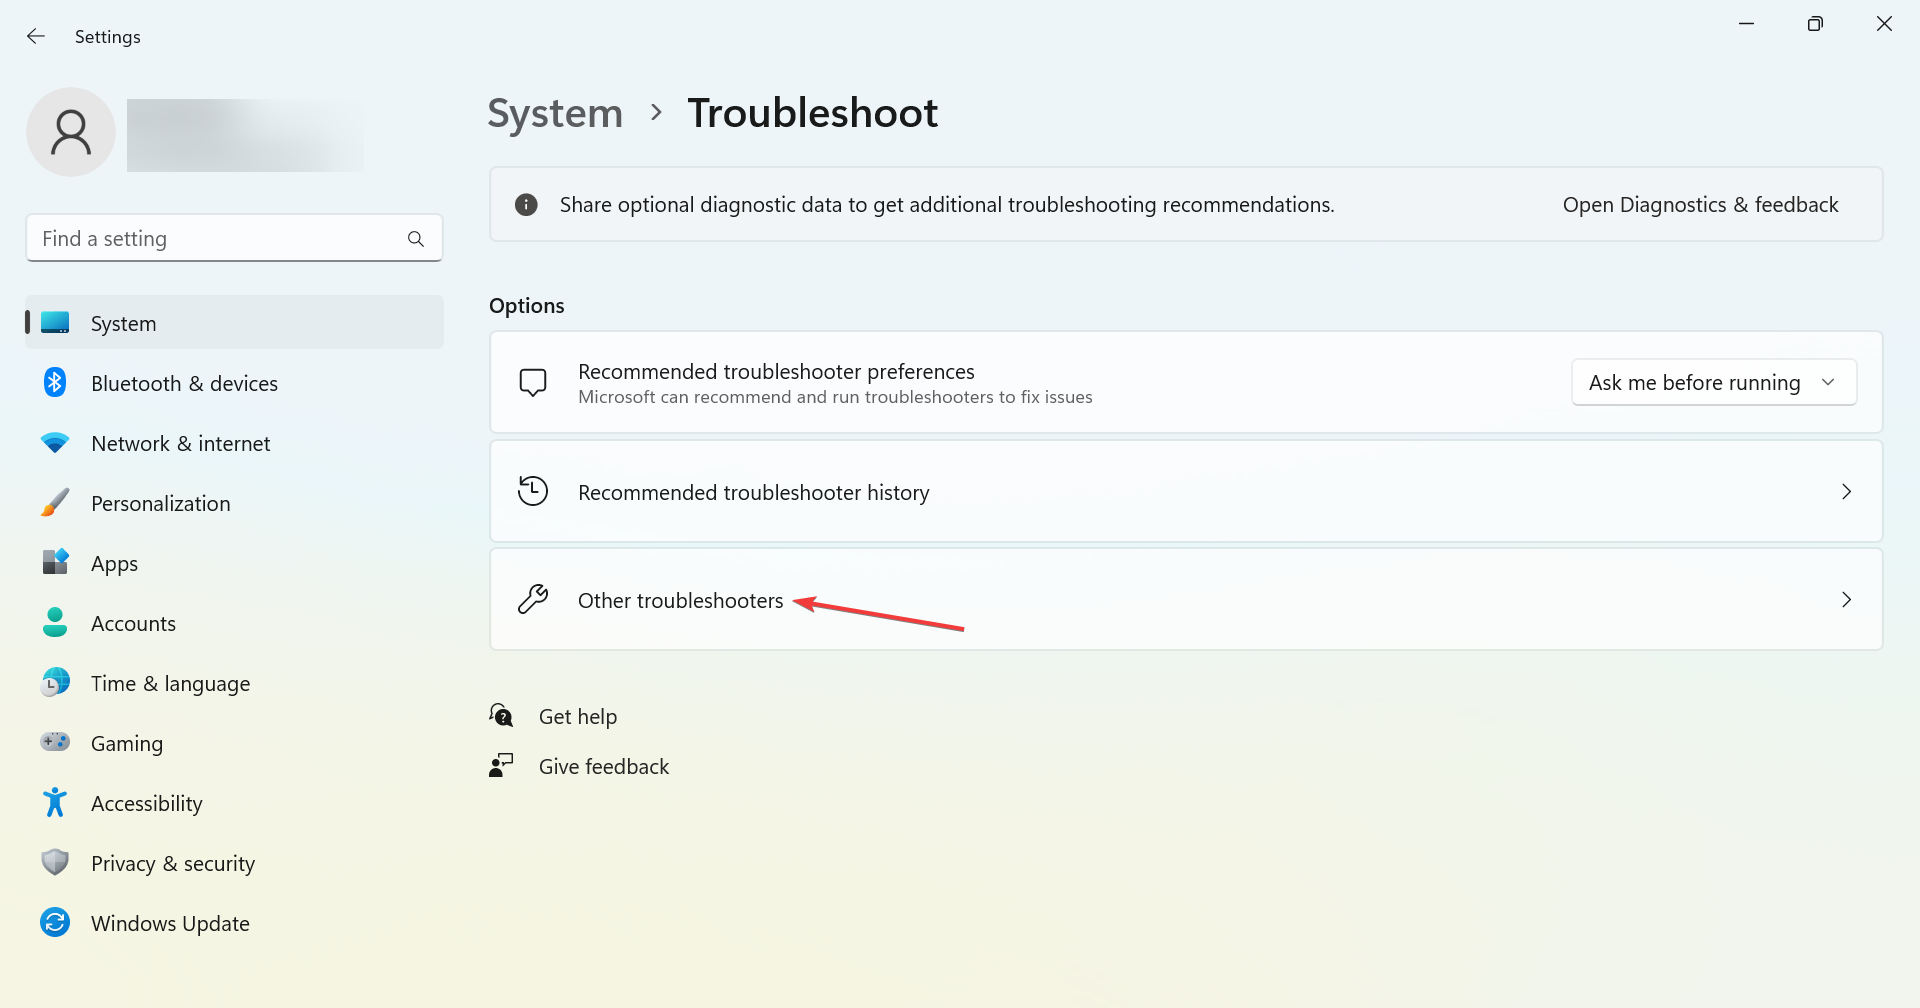
- Click on Other troubleshooters.
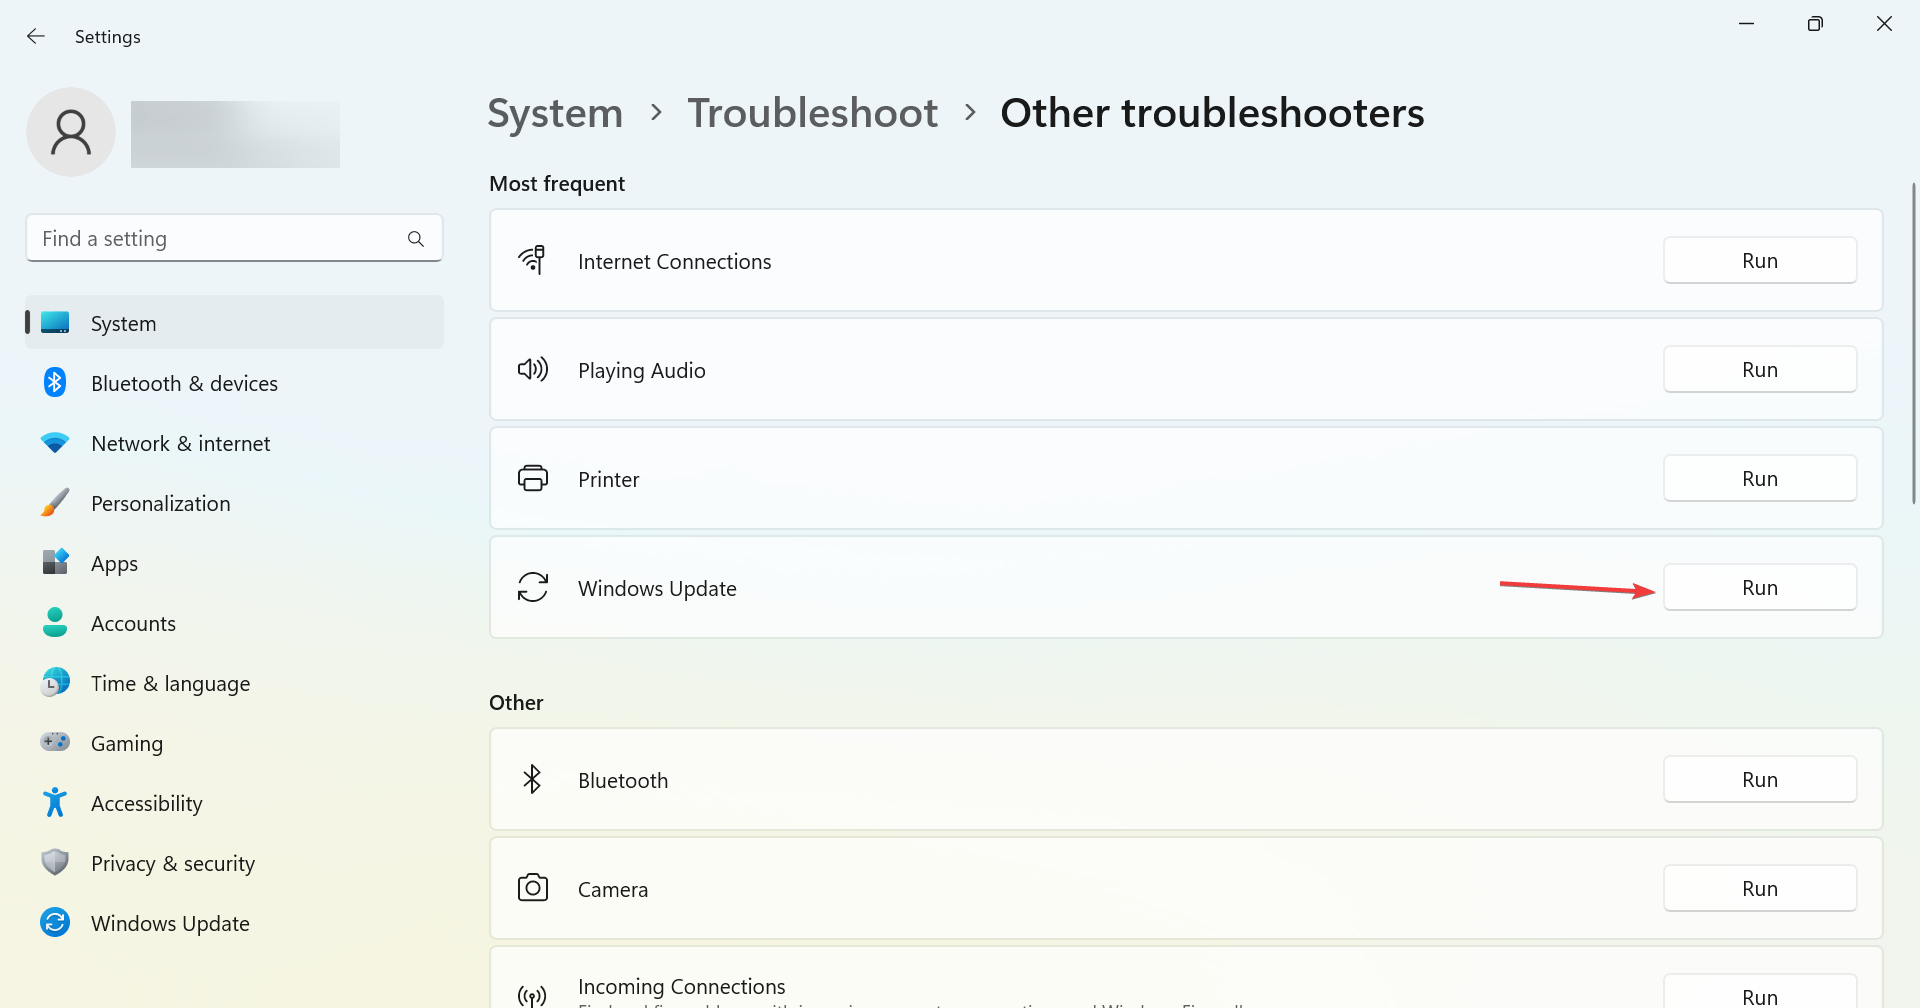
- Locate Windows Update and click the Run button next to it.
- Now, wait for the troubleshooter to identify and eliminate the problem automatically.

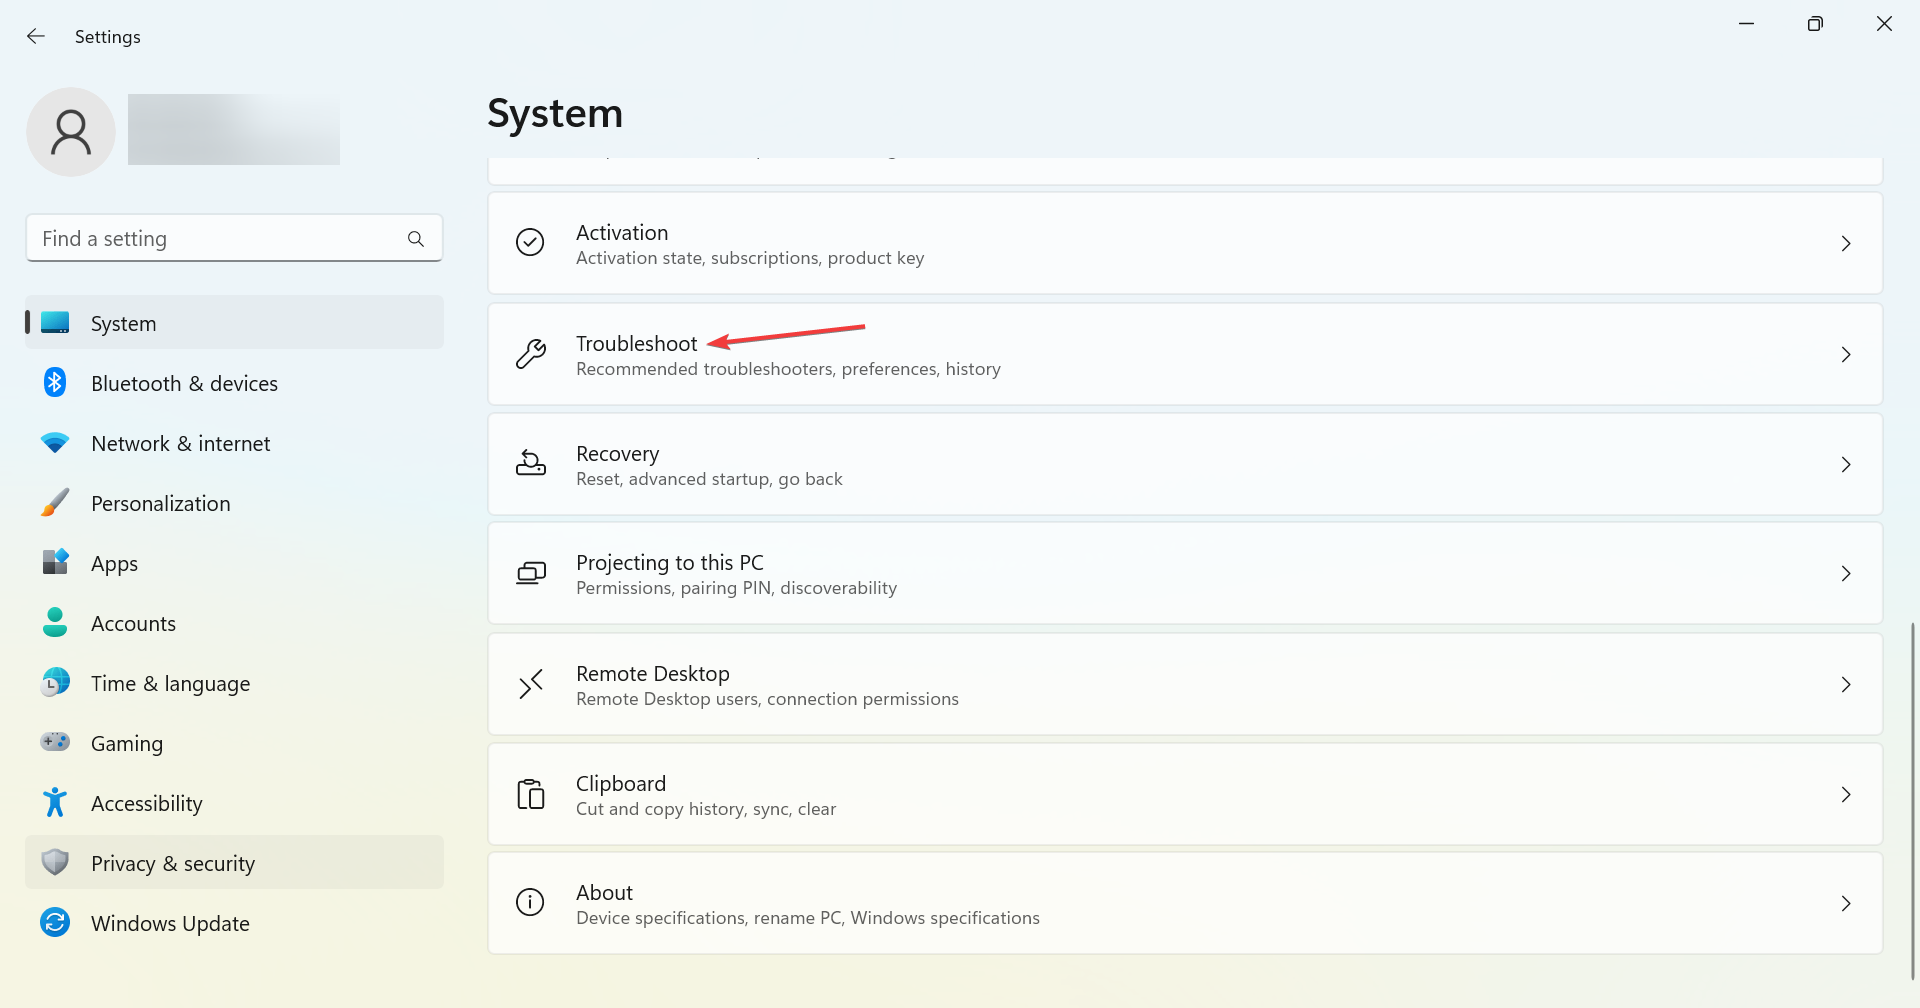
When getting the 0x800b0101 error, your primary approach should be to run the dedicated Windows Update troubleshooter. Once done, try installing the same update via the built-in method, and if it still fails, use the update catalog.
2. Correct the PC time
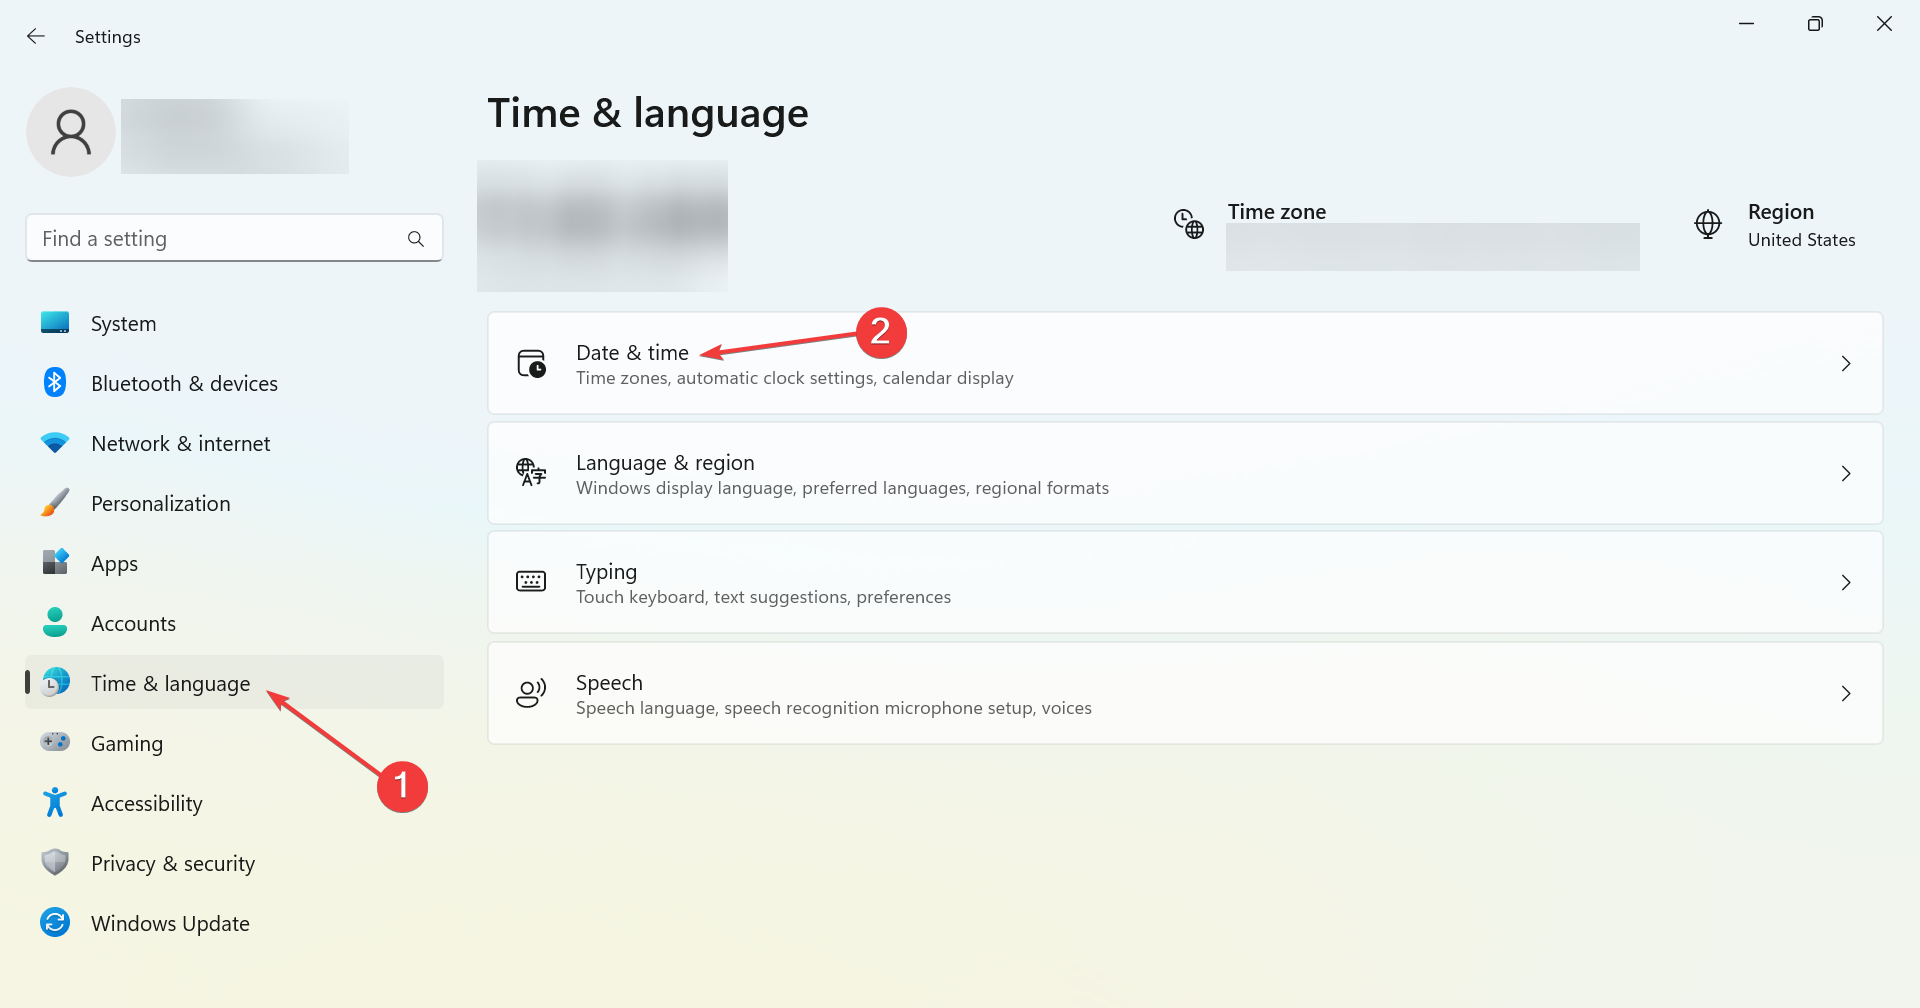
- Press Windows + I to launch Settings, select Time & language from the navigation pane, and click on Date & time on the right.
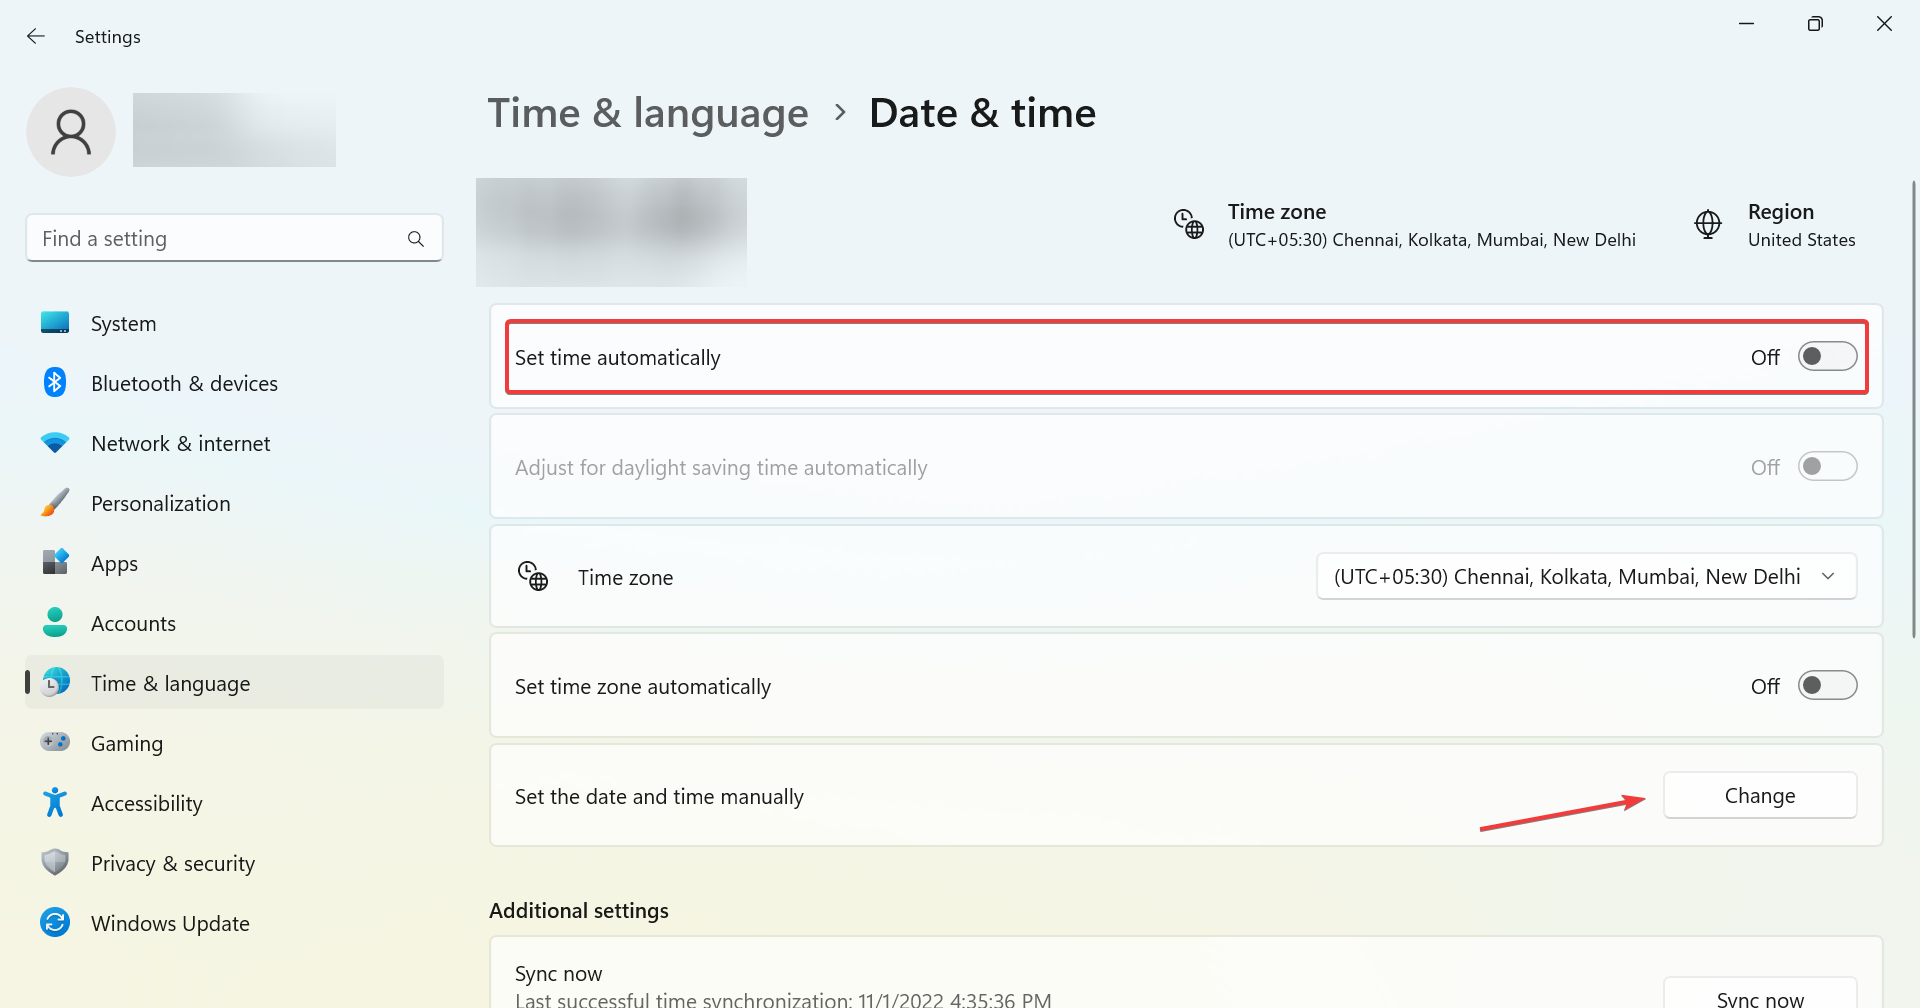
- Now, you can either enable the Set time automatically setting, or click on the Change button to manually configure it.
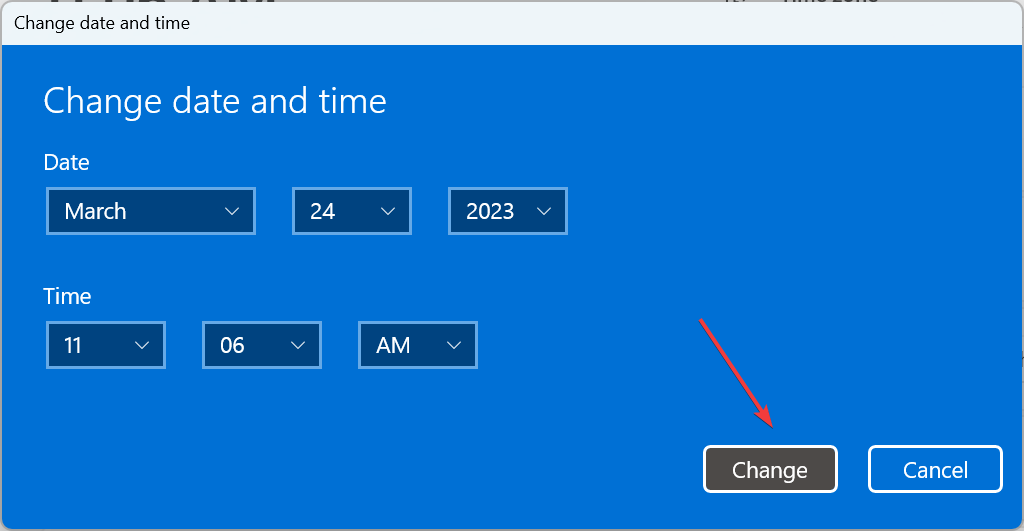
- Choose the present date and time from the various dropdown menus, and click on Change to confirm.

3. Run the DISM and SFC scan
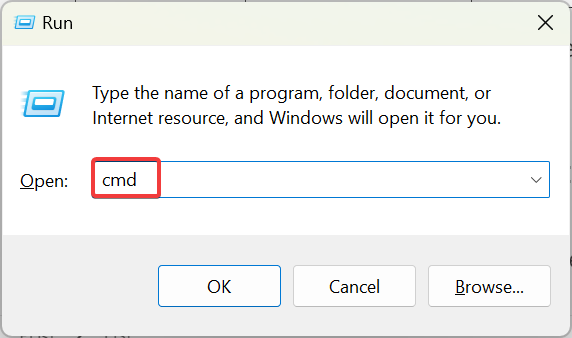
- Press Windows + R to open Run, type cmd, and then hit Ctrl + Shift + Enter.

- Click Yes in the UAC prompt.
- Paste the following three commands one at a time, and press Enter after each:
DISM /Online /Cleanup-Image /CheckHealthDISM /Online /Cleanup-Image /ScanHealthDISM /Online /Cleanup-Image /RestoreHealth - Once done, run this command for the SFC scan:
sfc /scannow
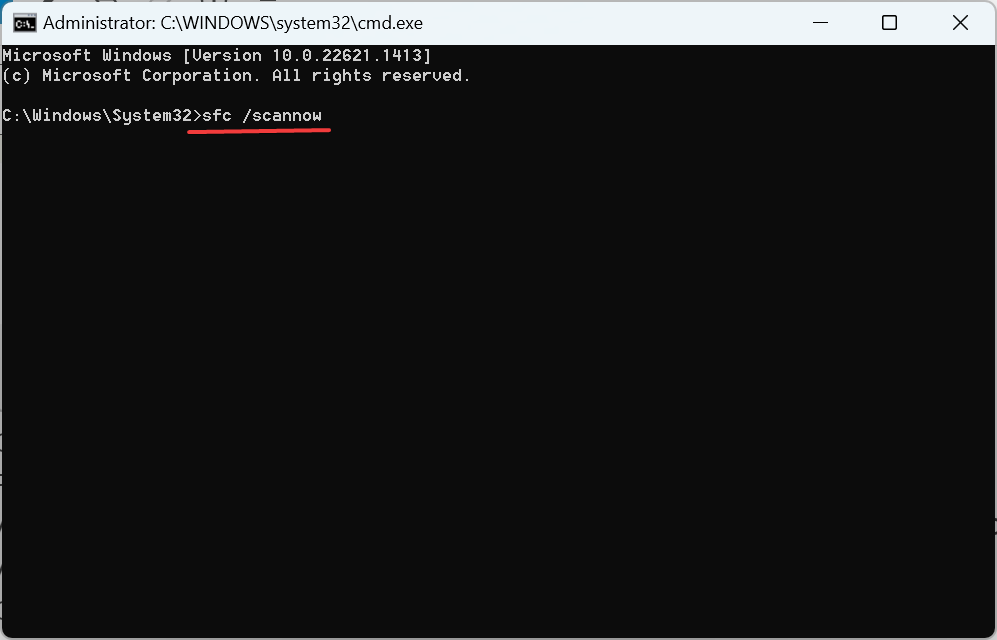
If it’s the corrupt system files to blame for the error, we recommend you run the DISM tool and the SFC (System File Checker) scan to repair/replace any corrupt system files, as well as fix other issues with the Windows image.
Otherwise, you may also opt for a proficient system repair technology that can fully scan your Windows PC to detect malfunctioned files or programs, broken registry, and many more issues.
Fortect is therefore the suitable choice when you’re dealing with these types of errors that prevent your OS from running properly.
- Fix: No Internet, Secured Error on Windows 11
- Fix: Keyboard Shortcuts are Not Working in Photoshop
- Fix: Keyboard Shortcuts Are Not Working in Chrome
- Fix: NAS Drive Not Showing in Windows 11
- Adding layers in Windows 11’s Paint greatly increases RAM usage
4. Perform an in-place upgrade

NOTE
The steps here are to perform an in-place upgrade in Windows 11. If you are facing the error on Windows 10, directly download the Media Creation Tool, and run it to repair the Windows installation.
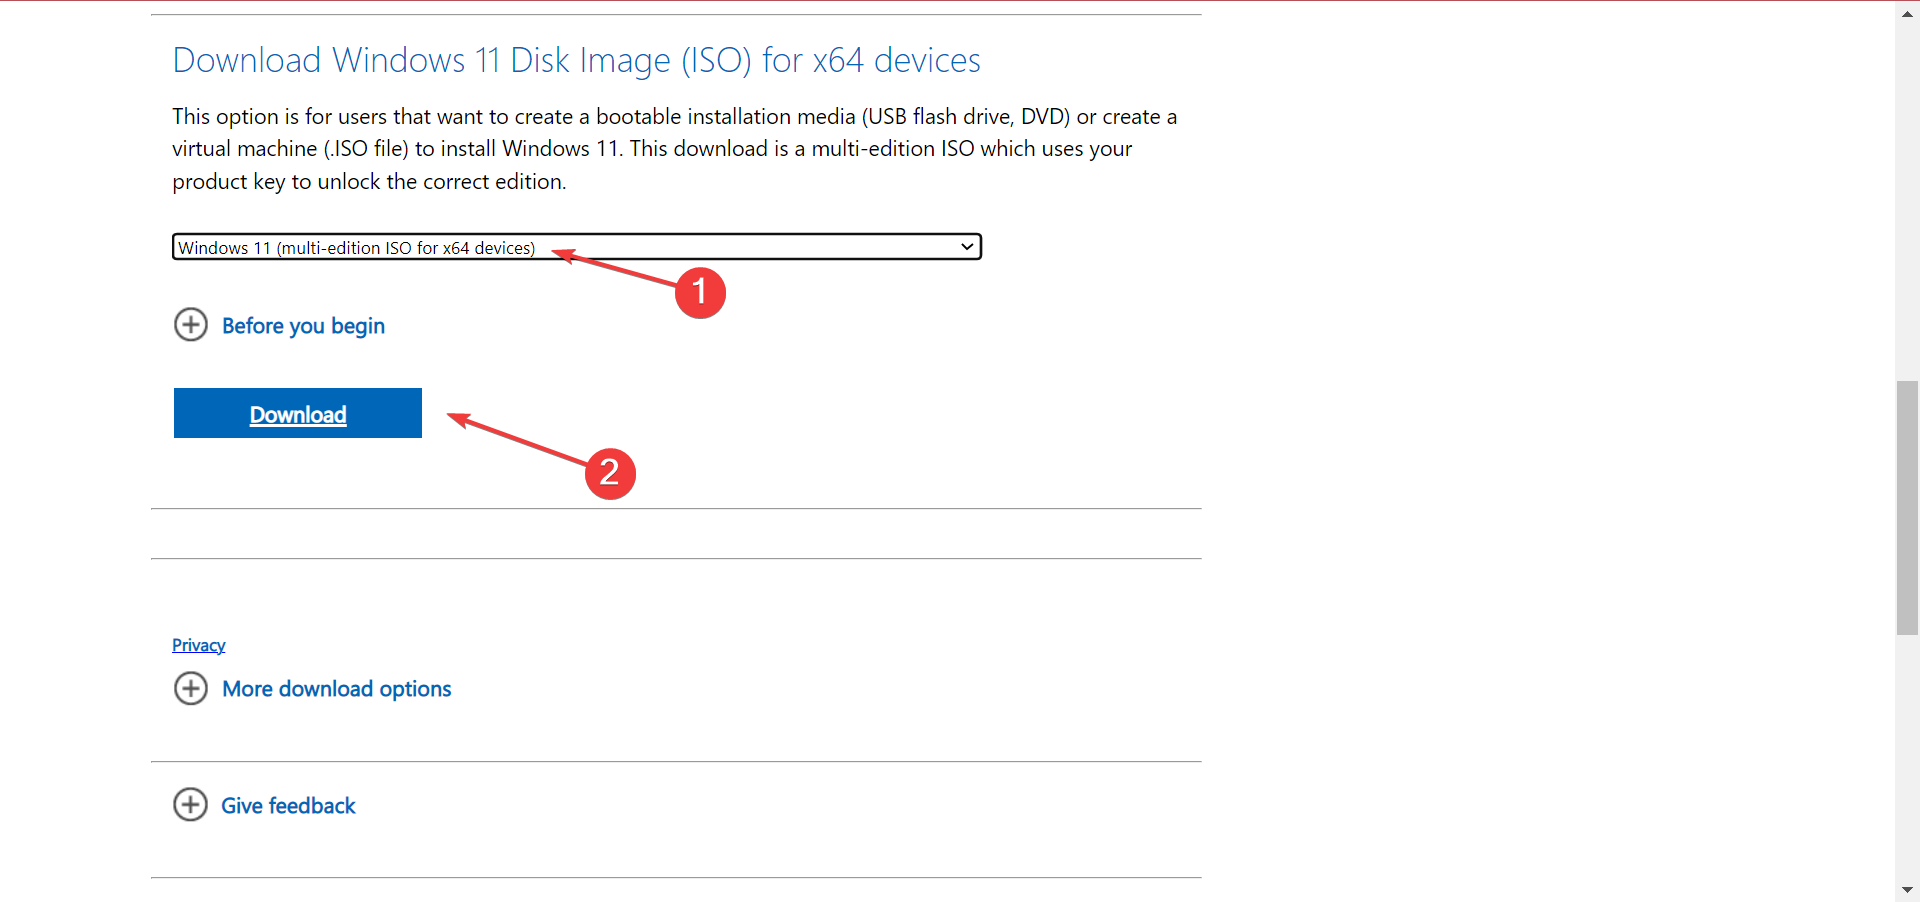
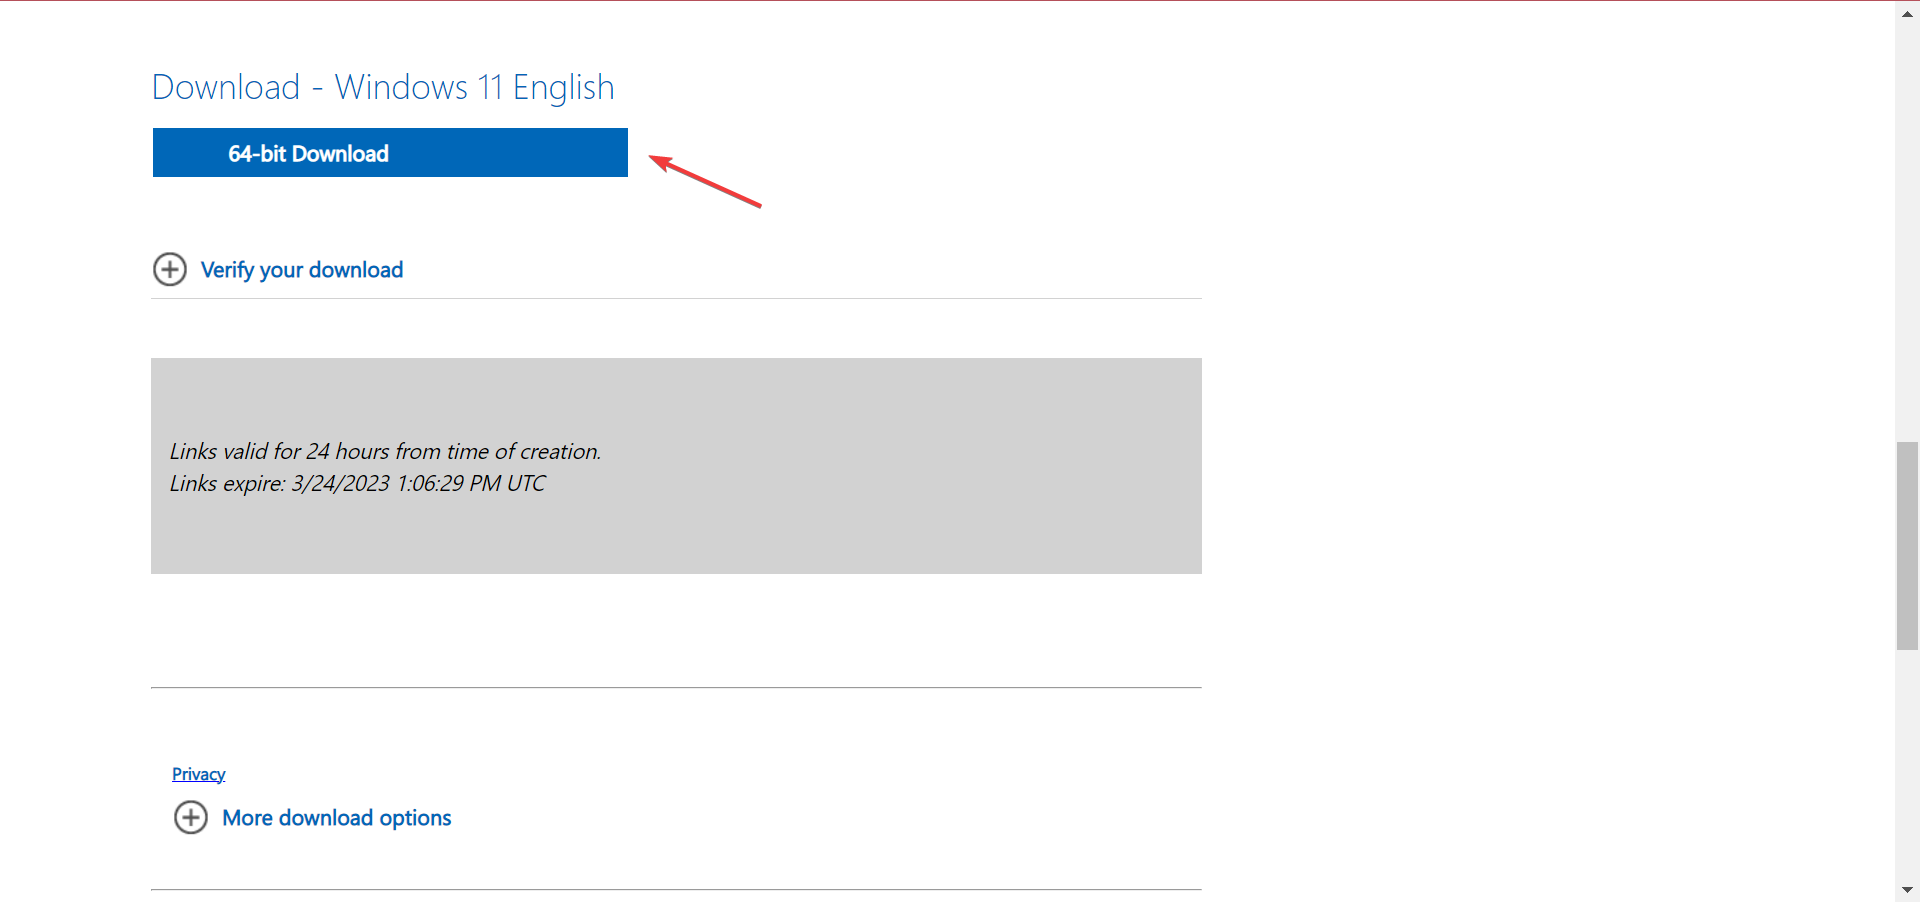
- Go to Microsoft’s dedicated Windows 11 page, select the desired ISO edition, and click Download.

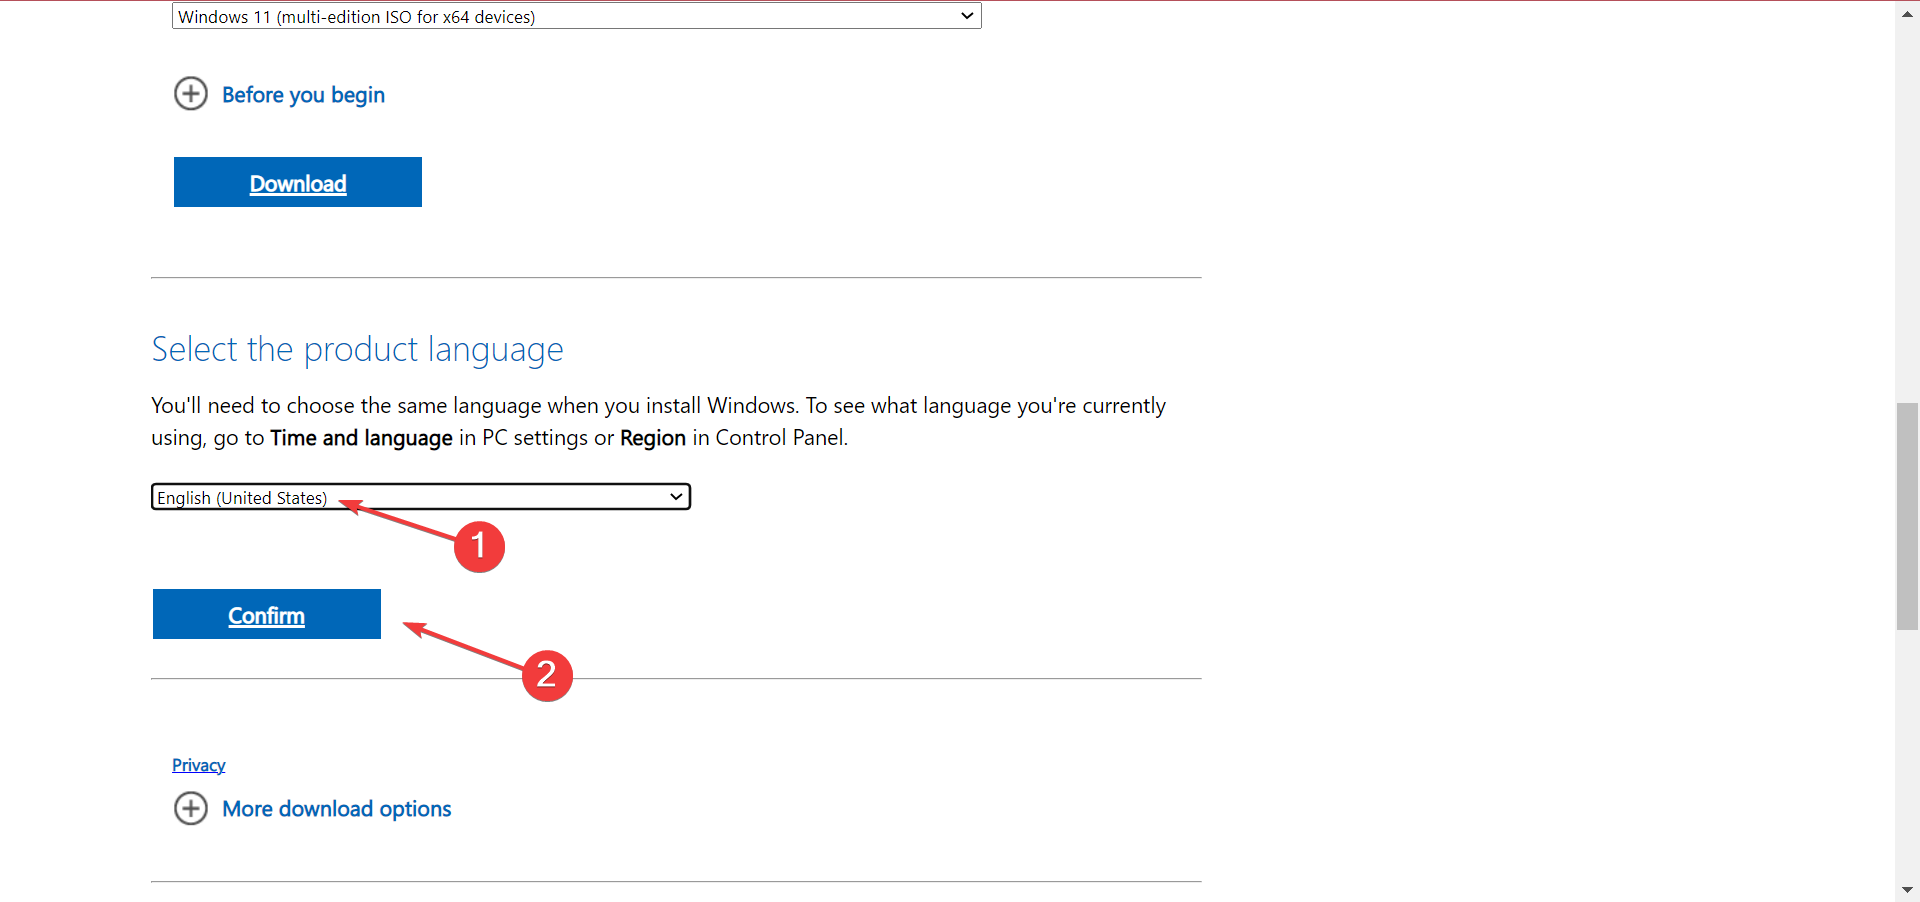
- Choose the OS language and click Confirm.
- Now, click on the provided link to start the download.
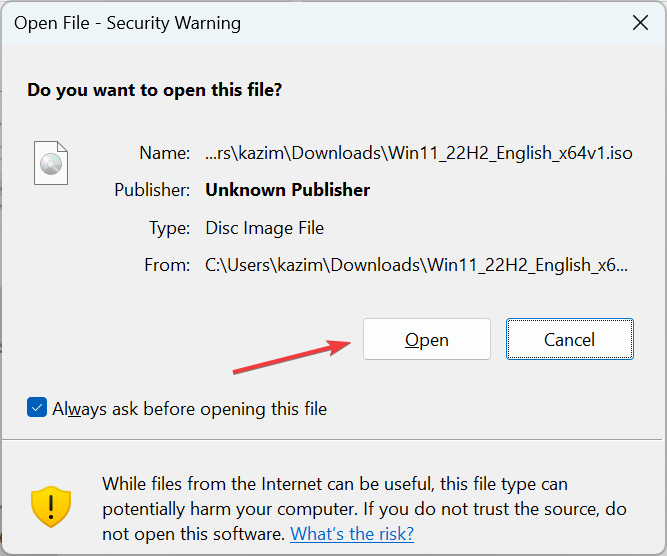
- Double-click on the ISO file to view its contents and click Open in the prompt that appears.

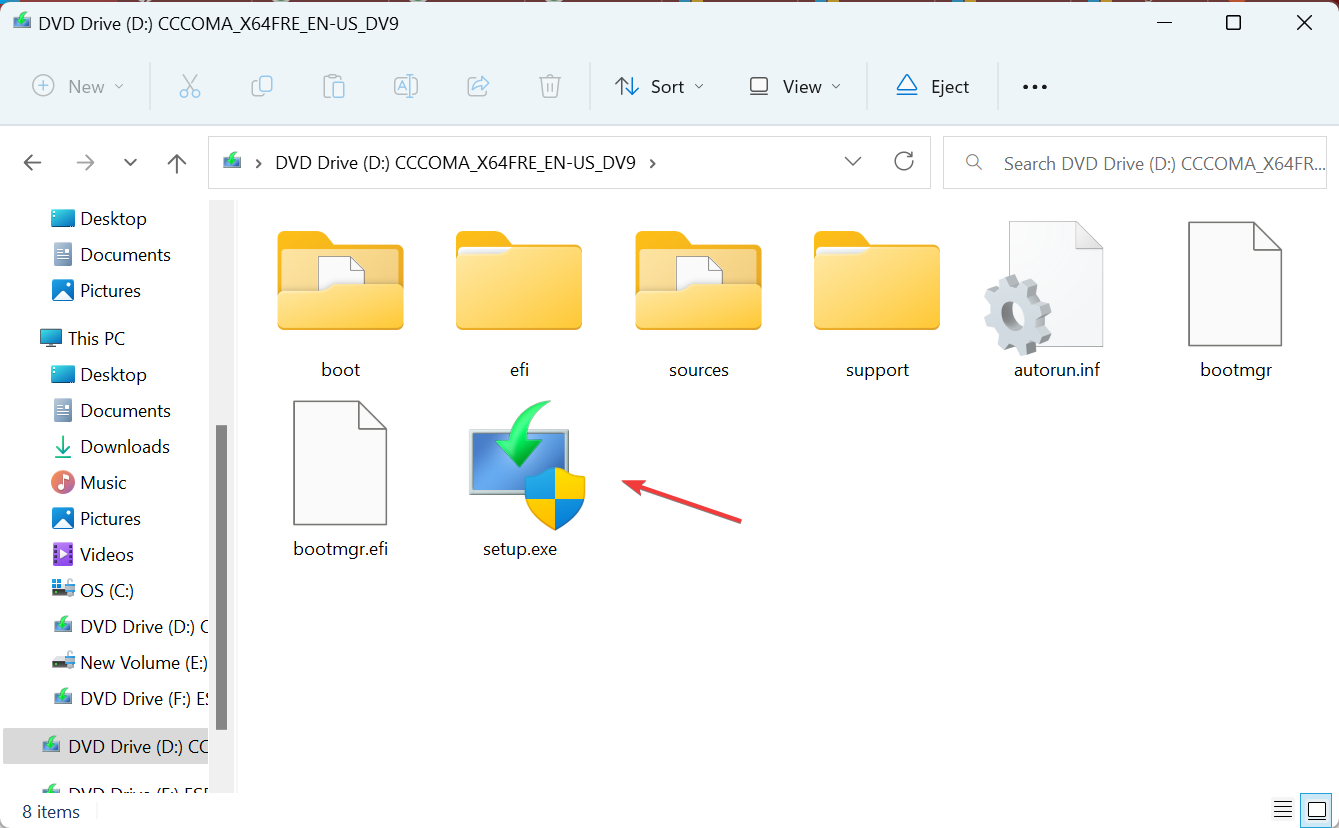
- Run the setup.exe file.

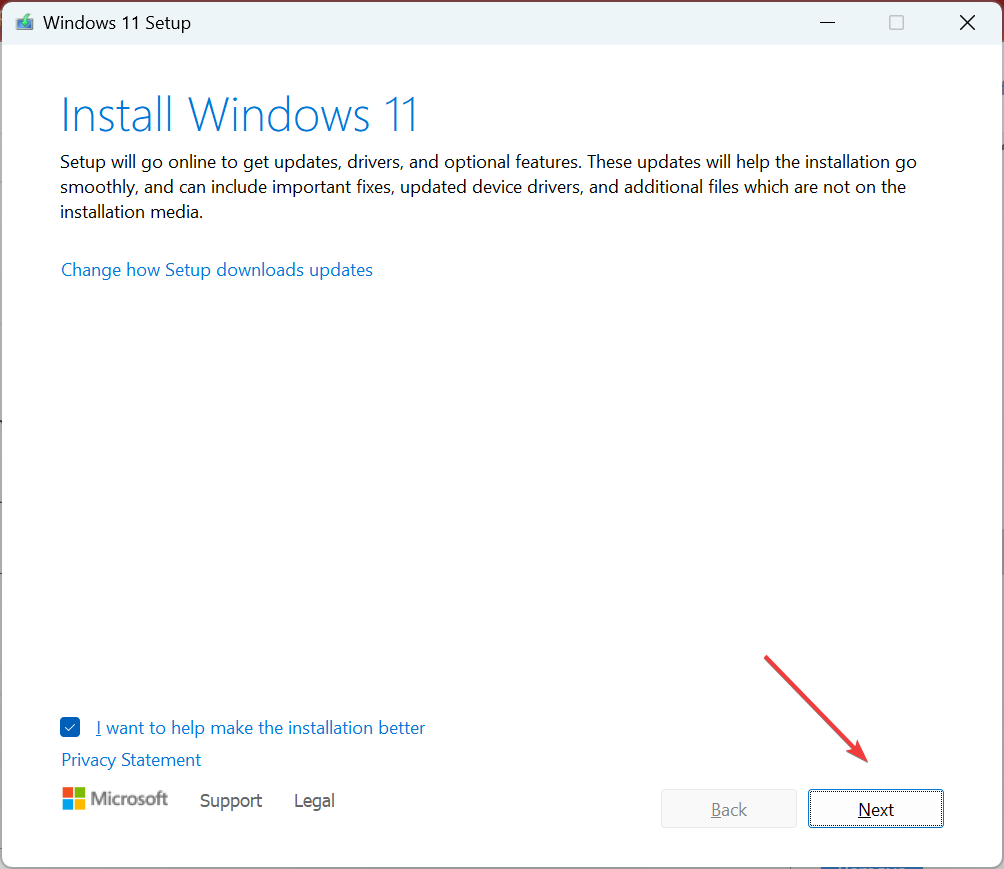
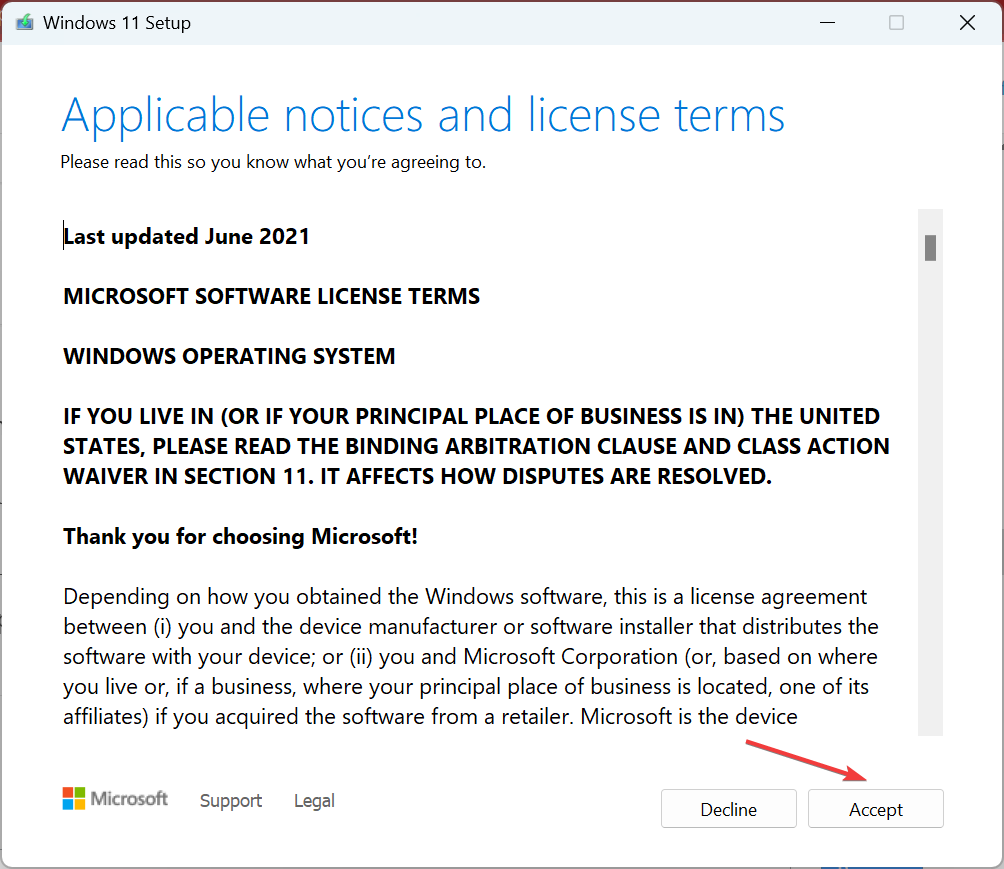
- Click Next to continue.

- Now, click Accept to agree to the license terms.
- Finally, make sure the setup lists, Keep personal files and apps, and click on Install to proceed.

That’s it! Wait for the in-place upgrade to complete (may take a few hours). Once done, things should be up and running like before, and you shouldn’t get the 0x800b0101 error. An in-place upgrade will fix any issues with the OS without affecting the installed apps or stored files.
Also, before you leave, check some quick tips to boost the PC’s performance in no time.
Tell us which fix worked for you in the comments section below.
![]()
Всем привет!!! После недавнего обновления Windows, вышедшего в середине сентября, у многих пользователей стала появляться ошибка 0х0000011b при подключении принтера, расположенного в общем доступе, подключенного по локальной сети или по USB. Также ошибка 0х0000011b может возникать в ходе операции печати. Неисправность, как правило, возникает в моделях производителя принтеров HP и Canon.
Полный текст ошибки:
Подключение к принтеру
Windows не удается подключиться к принтеру.
В ходе операции произошла ошибка 0х0000011b
Причина ошибки:
Причиной возникновения ошибки является вышедшее в сентябре 2021 года обновление для Windows 10 и 11 — KB5005565. Проблема заключается в том, что свежий апдейт не дает возможность подключиться к службам диспетчера печати, без привилегий администратора.
Решение 1. Удаляем обновление
Удаление обновления KB5005565. Для этого открыть от администратора Windows PowerShell и ввести команду
wusa /uninstall /kb:5005565
Решение 2. Редактируем реестр
- Запустить редактор реестра. Для этого можно воспользоваться стандартным поиском Windows или нажать сочетание клавиш Win+R и ввести команду regedit;
- Перейти в ветку: HKEY_LOCAL_MACHINE\System\CurrentControlSet\Control\Print
- Кликнуть правой кнопкой мыши по пустому месту и создать параметр DWORD32, задать ему имя RpcAuthnLevelPrivacyEnabled;
- Перезапустить службу печати
Я лично использовал второй способ. Проверено — работает!
Спасибо: https://urfix.ru/oshibka-0x0000011b-pri-podklyuchenii-printera/
Выпущенные в январе обновления безопасности для Windows теперь приводят к проблемам с сетевыми принтерами: пользователи видят ошибку 0x0000011b. Посмотрим, как можно исправить ситуацию и избавиться от этого бага.
В январе этого года Microsoft выпустила патчи, которые должны были устранить уязвимость в службе печати Windows — CVE-2021-1678. Когда апдейты пришли пользователям, оказалось, что они не патчат дыру автоматически.
Заплатки просто добавляли новый ключ в системном реестре, который администраторы могли использовать, чтобы повысить уровень RPC-аутентификации для сетевой печати. Другими словами, вышедшие обновления совершенно бесполезны, пока вы не поработаете со следующим ключом:
[HKEY_LOCAL_MACHINE\System\CurrentControlSet\Control\Print]
"RpcAuthnLevelPrivacyEnabled"=dword:00000001
Однако с выходом сентябрьского набора патчей разработчики активировали новые настройки по умолчанию, что и привело к появлению проблем с сетевой печатью. Решить вопрос деинсталляцией последних патчей нельзя — пользователь остаётся уязвим к багам PrintNightmare и MSHTML, которые активно эксплуатируются в атаках. Тем не менее есть более разумный способ избавиться от ошибки 0x0000011b.
Если вы столкнулись с багом, стоит открыть редактор реестра Windows и найти ключ HKEY_LOCAL_MACHINE\System\CurrentControlSet\Control\Print key. После этого нужно создать 32-битную запись RpcAuthnLevelPrivacyEnabled и установить её значение на 0.
Ещё проще — вы можете скачать специальный файл, который сделать всё за вас. За инструкцию спасибо изданию BleepingComputer.
![]() Подписывайтесь на канал «Anti-Malware» в Яндекс Дзен, чтобы первыми узнавать о новостях и наших эксклюзивных материалах по информационной безопасности.
Подписывайтесь на канал «Anti-Malware» в Яндекс Дзен, чтобы первыми узнавать о новостях и наших эксклюзивных материалах по информационной безопасности.
Читайте также
/news/2023-09-21-111332/41967

Компания «Газинформсервис» сообщила о внесении программного комплекса EFROS Defence Operations в реестр отечественных программ для электронно-вычислительных машин и баз данных.
Согласно описанию, EFROS Defence Operations предназначен для мониторинга и анализа безопасности ИТ-инфраструктуры заказчика. В конце августа у нас вышел обзор этого продукта, где мы описывали его функциональные возможности и технические нюансы.
Теперь EFROS Defence Operations получил номер 18615 в реестре отечественных программ. Корпоративным заказчикам в России будет ещё удобнее использовать комплекс для анализа безопасности своей инфраструктуры.
Вы сможете проверить аутентификацию и авторизацию конечных точек, провести аудит топологии и сегментацию сети, проанализировать возможные векторы кибератак и проконтролировать целостность и соответствие политкам безопасности.
В «Газинформсервис» подчеркнули, что EFROS Defence Operations — полностью отечественный продукт, но при этом полностью соответствующий мировым промышленным стандартам качества.
EFROS DefOps даёт независимость от иностранных поставщиков и помогает обойти санкционные риски.
![]() Подписывайтесь на канал «Anti-Malware» в Яндекс Дзен, чтобы первыми узнавать о новостях и наших эксклюзивных материалах по информационной безопасности.
Подписывайтесь на канал «Anti-Malware» в Яндекс Дзен, чтобы первыми узнавать о новостях и наших эксклюзивных материалах по информационной безопасности.

Свидетельство о регистрации СМИ ЭЛ № ФС 77 — 68398, выдано федеральной службой по надзору в сфере связи, информационных технологий и массовых коммуникаций (Роскомнадзор) 27.01.2017
Разрешается частичное использование материалов на других сайтах при наличии ссылки на источник. Использование материалов сайта с полной копией оригинала допускается только с письменного разрешения администрации.
© ООО «АМ Медиа», 2005-2023. Все права защищены.
Рекламные коды ОРД: JapBIIgg8, JapBINit6, JapBIR7iO, JapBIM8gm, LdtCKaTR6