WordPress errors don’t happen too often, given the stable codebase. What’s more, when something does pop up to dampen your day, it’s explicit. The 414 Request-URI Too Large error, for one, tells you exactly what the problem is. From there, you can attempt to fix it.
Much like many other WordPress errors, there are some specific steps you can take to resolve it. In short, you’ll need to adjust some configuration settings to allow for longer URLs. Once you’re finished, the error will be too.
In this article, we will walk you through how to fix the 414 Request-URI Too Large error. It will include the tools and skills you’ll need to solve the problem and list some “pre-steps” before getting under the hood.
Check out our video guide to fixing the 414 Request-URI Too Large error:
What the 414 Request-URI Too Large Error Is (And Why It Happens)
The 414 Request-URL Too Large error is a configuration issue. It’s one of the 400 error codes. They’re troublesome because it often means there’s a critical issue somewhere between your browser and a server.
In this case, a 414 error means that the URL is too long for the server to process, so it throws an exception. This could be an issue when using Urchin Tracking Module (UTM) codes to track conversions. These links can get long depending on the parameters you set, and if they reach the maximum limit of your site’s configuration, you’ll see the error.
As with many WordPress errors, there are many more things going on under the hood to cause a 414. In fact, you can group the causes into three distinct areas:
- Converting a POST request to a GET request with query information that is too long. This is a developer-specific issue that happens at the coding level.
- A redirect loop. We’ve talked about the best practices for redirects in a previous post. If you get into a redirect loop, the resulting URLs get too long, and the error will appear.
- The server could be under attack, and a 414 error at this point will be the least of your worries.
Before we move on, it’s worth noting that for all intents and purposes, a URI and a URL are the same things. While there are some distinct differences between the two, we’re going to use “URL” here to keep things straightforward.
Ever seen this error pop up? 😅 Tackle it with no fear thanks to this guide 💪Click to Tweet
What You’ll Need to Fix the 414 Request-URI Too Large Error
If you’ve encountered the 413 Request Entity Too Large error in the past, you’ll find a 414 error to be similar. Of course, the names show their similarities, as they’re next to each other in the official standards and have almost identical descriptions.
Given this, the list of tools and skills you’d use for fixing a 413 will be the same for a 414 too:
- Administrative access to your server
- One of the many Secure File Transfer Protocol (SFTP) clients available
- The right skills to use SFTP and navigate your server
- A clean and current backup on hand in case you need to restore
- A text editor, though this might not be necessary for you
If you’re a Kinsta customer, you’ll find your SFTP credentials within the MyKinsta dashboard, along with some other handy functionality to get into your server:
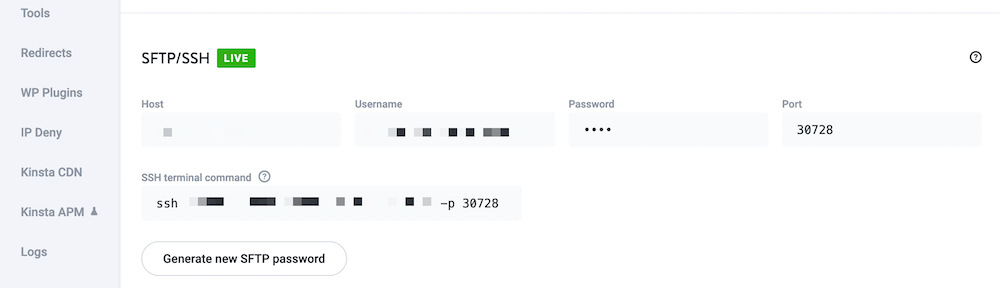
It’s also worth noting that we will connect through SFTP here because it’s more secure (hence the name).
What to Do Before You Begin Resolving the 414 Request-URI Too Large Error
Before you crack open the hood on your server and set it to work, you may want to carry out some “pre-steps” first. It could be that there’s a simple workaround that doesn’t involve you tinkering with your configuration files.
What’s more, these checks should be carried out at some point regardless, so getting them taken care of now will help in the long run.
First, a WordPress plugin might generate long URLs as part of its functionality. Full-featured, all-in-one security plugins can be a prime candidate here, especially if they offer lots of functionality.
It’s hard to know at a glance whether a plugin could be at fault, but it’s worth investigating its specific settings for a dedicated option to restrict the length of URLs. If so, toggling this could solve the 414 error within seconds.
Under normal circumstances, though, there are a few other tasks you can carry out to help you diagnose the error:
- Check your server logs for mentions of the error or any other identifying entries.
- Your browser developer tools may give you some indication of the error’s cause — especially your Console.
- Reach out to the site owner or developer (if it’s not you) and let them know the error exists. It could be that they will have a fix or can advise you further on what to do.
Of course, you may want to contact both the site and plugin developers anyway if you’ve found that a plugin is at fault. Even so, if you’ve exhausted all of your outreach and top-level checks, it’s time to venture on.
How to Fix the 414 Request-URI Too Large Error (In 3 Steps)
Once you have your tools together, you’ll need a plan. The fix for the 414 Request-URI Too Large error is to alter a server configuration file. As such, there are three steps you can take.
Let’s start by getting into your server and figuring out which type of server you have.
1. Log In to Your Server (And Determine Your Server Type)
You have to get into the server before you work on it, and this is where your SFTP skills come into play.
We’ve outlined how to get into your site through SFTP in the past, and once you’re in, you’ll need to figure out what type of server you have. There are two main types: Apache and Nginx.
It could be that you already know which server type you run. If so, you can skip to the next step.
If you’re struggling, here’s a quick tip: look for a .htaccess file. It’s found in the root of your server, and if you can see it, this means you’re running an Apache server. Nginx servers use a different configuration file.
That said, it could be that you’re running an Apache server that doesn’t yet have a .htaccess file. As such, there are two other methods you could use:
- Carry out a domain lookup using the Whois Domain Tools site: This might tell you the type of server you’re using, although it’s not a foolproof method.
- Check with your hosting provider about the server type you use. Of course, your host is going to know what server you run. Kinsta customers will always use Nginx servers, although other providers may use Apache or a mix. It’s best to open a ticket with your host to check before you poke around in your site’s backend.
When you’ve determined which type of server you use, you can head onto the next step and find your configuration file.
2. Find the Server Configuration File and Open It in Your Text Editor
As we noted, Apache servers use a .htaccess file for basic server configuration, and it will be located in your root directory. This isn’t the file you need to fix the 414 Request-URI Too Large error, though.
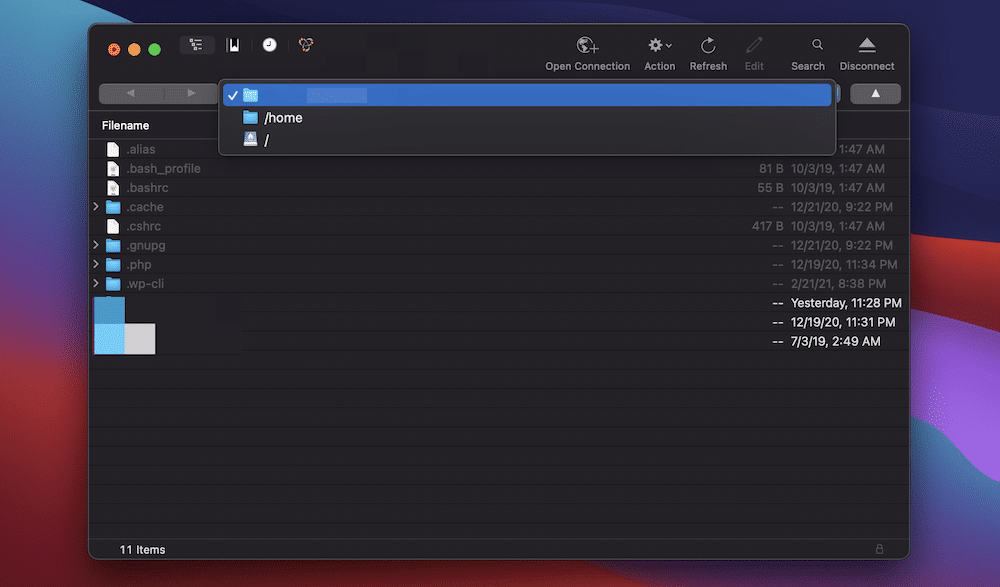
In this case, you’ll need to go deeper into your advanced configuration settings. These are found not at your site’s root folder but the server’s root.
When you log into your site through SFTP, you’ll often come to a directory that contains all of your sites (along with some other files). In many cases, you can go up a couple of levels to a server root directory:
This will give you a few more directories to traverse. Among them will be the etc folder:
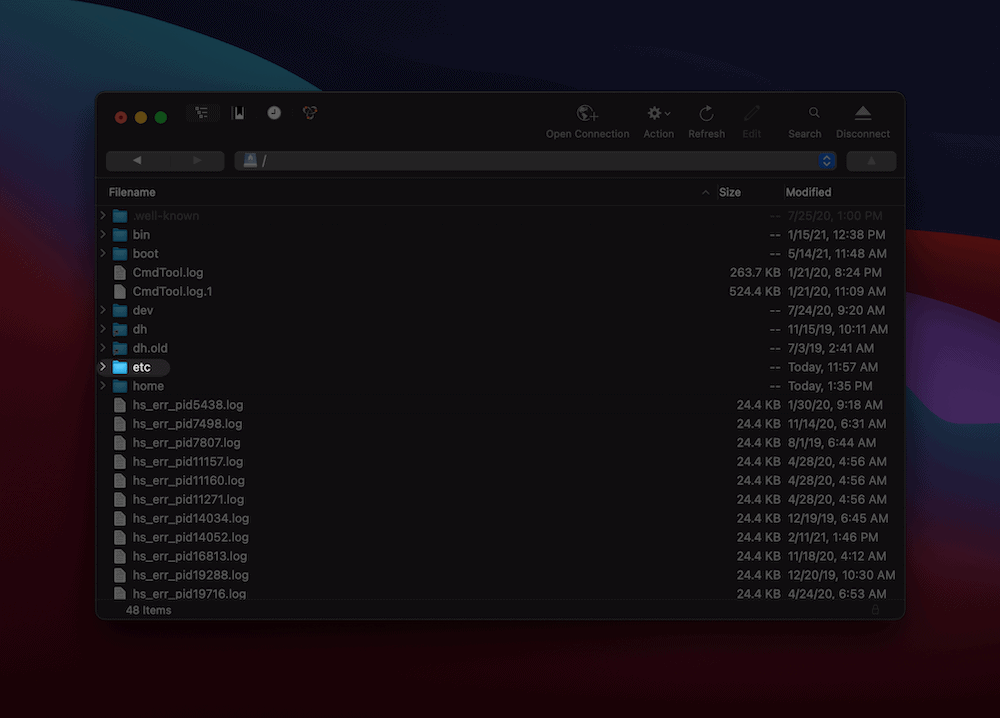
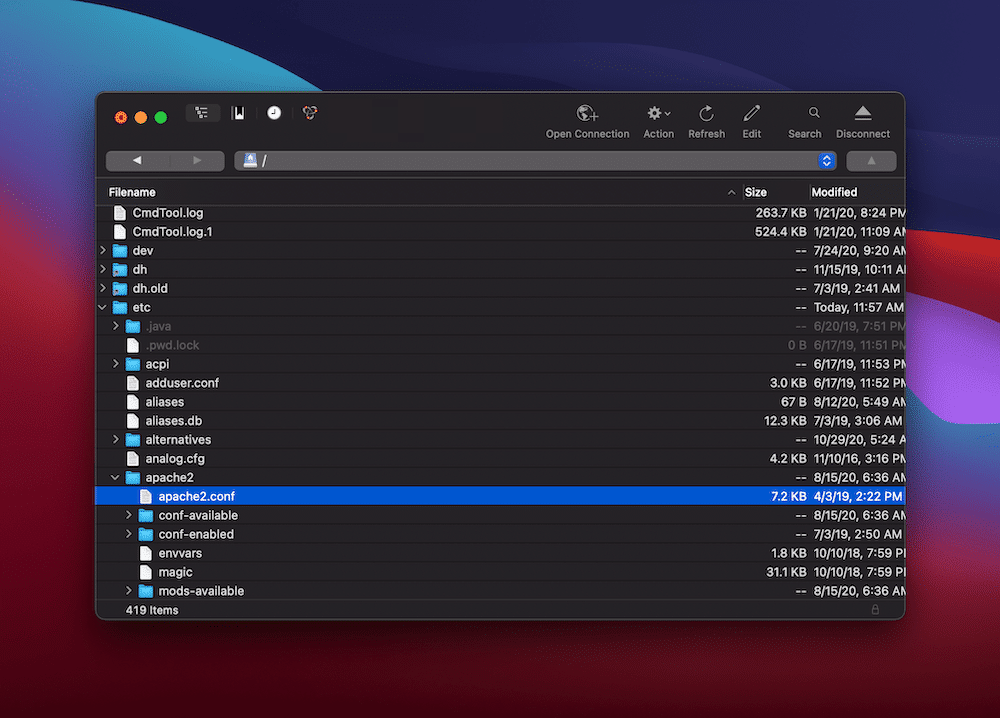
The full path of the configuration file will be /etc/apache2/apache2.conf.
For Nginx servers, the process is similar. It’s one we’ve covered in part within our article on adjusting the maximum upload size in WordPress. The path to the configuration file will be /etc/nginx/nginx.conf.
Once you’ve located your file, open it in your favorite text editor. At this point, you’re ready to adjust it.
3. Adjust the Configuration File To Allow for Longer URLs
Much like how Apache and Nginx servers have different configuration files, they also have different settings to adjust. Regardless of your server type, though, you’ll need to open it in an editor if you haven’t already done so. Our preferred approach is to download the file to your computer, work on it, and upload it back to the server.
For Apache configuration files, look for the LimitRequestLine setting, or add it to the bottom of your file if it’s not there:
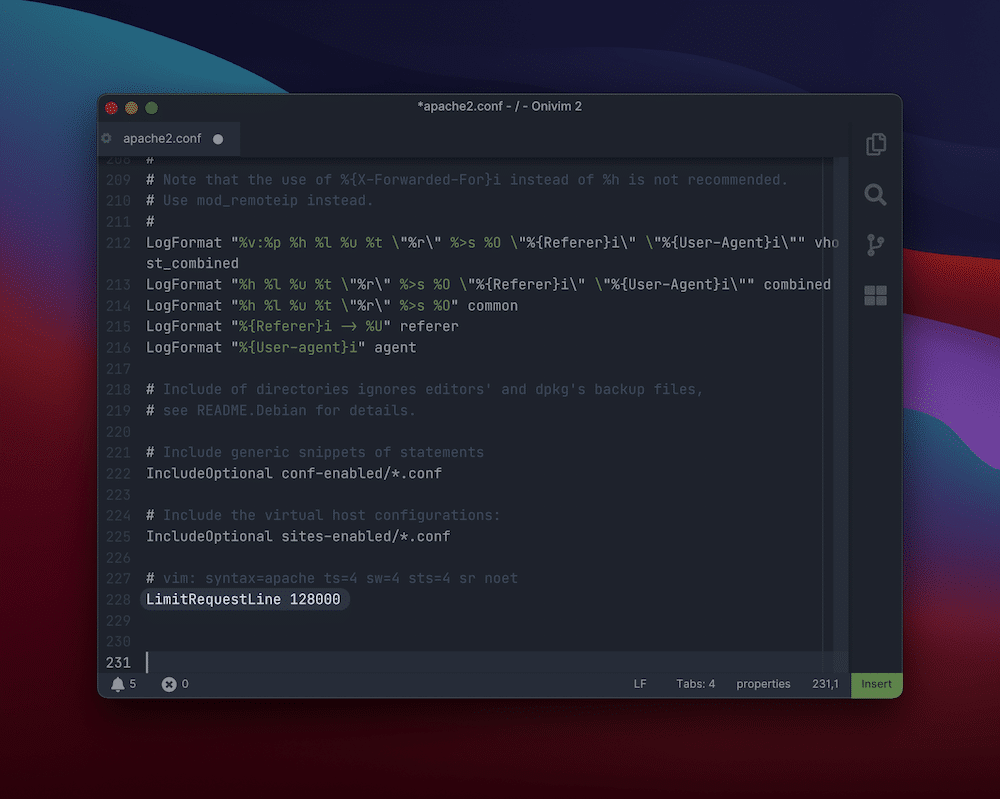
For the value, use at least 128000. If you need to go higher than this, keep to multiples of two (i.e. the next value should be 256000).
For Nginx servers, you’re looking for the large_client_header_buffers setting. Here, you’ll see two values relating to number and size. For example, large_client_header_buffers 4 8K. The only figure you need to alter here is the size — you can go from 8K to around 128K, although you may need to increase this further (again in multiples of two).
Once you’re done, save your changes and upload your configuration file back to your server. At this point, check your site again, and the 414 Request-URI Too Large error should have gone.
The 414 Request-URI Too Large error may be annoying, but luckily, it tells you exactly what the problem is. 🤷♀️ Learn how to fix it here 👇Click to Tweet
Summary
WordPress errors often have a similar approach for resolving them. You’ll often need to diagnose the error first, though. In the case of the 414 Request-URI Too Large error, the problem is clear: the URLs being passed to the server are too big.
To fix it, you’ll need to change your Apache or Nginx server settings. This doesn’t take too long, and once you’re done, you should be back up and running. While we can’t speak for other hosts, Kinsta’s support team is on hand 24/7 to help you get over the 414 Request-URI Too Large error if you’re stuck. In fact, we’re here whenever you need our help and guidance, so you can get back to running your site.
WordPress errors don’t happen too often, given the stable codebase. What’s more, when something does pop up to dampen your day, it’s explicit. The 414 Request-URI Too Large error, for one, tells you exactly what the problem is. From there, you can attempt to fix it.
Much like many other WordPress errors, there are some specific steps you can take to resolve it. In short, you’ll need to adjust some configuration settings to allow for longer URLs. Once you’re finished, the error will be too.
In this article, we will walk you through how to fix the 414 Request-URI Too Large error. It will include the tools and skills you’ll need to solve the problem and list some “pre-steps” before getting under the hood.
Check out our video guide to fixing the 414 Request-URI Too Large error:
What the 414 Request-URI Too Large Error Is (And Why It Happens)
The 414 Request-URL Too Large error is a configuration issue. It’s one of the 400 error codes. They’re troublesome because it often means there’s a critical issue somewhere between your browser and a server.
In this case, a 414 error means that the URL is too long for the server to process, so it throws an exception. This could be an issue when using Urchin Tracking Module (UTM) codes to track conversions. These links can get long depending on the parameters you set, and if they reach the maximum limit of your site’s configuration, you’ll see the error.
As with many WordPress errors, there are many more things going on under the hood to cause a 414. In fact, you can group the causes into three distinct areas:
- Converting a POST request to a GET request with query information that is too long. This is a developer-specific issue that happens at the coding level.
- A redirect loop. We’ve talked about the best practices for redirects in a previous post. If you get into a redirect loop, the resulting URLs get too long, and the error will appear.
- The server could be under attack, and a 414 error at this point will be the least of your worries.
Before we move on, it’s worth noting that for all intents and purposes, a URI and a URL are the same things. While there are some distinct differences between the two, we’re going to use “URL” here to keep things straightforward.
Ever seen this error pop up? 😅 Tackle it with no fear thanks to this guide 💪Click to Tweet
What You’ll Need to Fix the 414 Request-URI Too Large Error
If you’ve encountered the 413 Request Entity Too Large error in the past, you’ll find a 414 error to be similar. Of course, the names show their similarities, as they’re next to each other in the official standards and have almost identical descriptions.
Given this, the list of tools and skills you’d use for fixing a 413 will be the same for a 414 too:
- Administrative access to your server
- One of the many Secure File Transfer Protocol (SFTP) clients available
- The right skills to use SFTP and navigate your server
- A clean and current backup on hand in case you need to restore
- A text editor, though this might not be necessary for you
If you’re a Kinsta customer, you’ll find your SFTP credentials within the MyKinsta dashboard, along with some other handy functionality to get into your server:
It’s also worth noting that we will connect through SFTP here because it’s more secure (hence the name).
What to Do Before You Begin Resolving the 414 Request-URI Too Large Error
Before you crack open the hood on your server and set it to work, you may want to carry out some “pre-steps” first. It could be that there’s a simple workaround that doesn’t involve you tinkering with your configuration files.
What’s more, these checks should be carried out at some point regardless, so getting them taken care of now will help in the long run.
First, a WordPress plugin might generate long URLs as part of its functionality. Full-featured, all-in-one security plugins can be a prime candidate here, especially if they offer lots of functionality.
It’s hard to know at a glance whether a plugin could be at fault, but it’s worth investigating its specific settings for a dedicated option to restrict the length of URLs. If so, toggling this could solve the 414 error within seconds.
Under normal circumstances, though, there are a few other tasks you can carry out to help you diagnose the error:
- Check your server logs for mentions of the error or any other identifying entries.
- Your browser developer tools may give you some indication of the error’s cause — especially your Console.
- Reach out to the site owner or developer (if it’s not you) and let them know the error exists. It could be that they will have a fix or can advise you further on what to do.
Of course, you may want to contact both the site and plugin developers anyway if you’ve found that a plugin is at fault. Even so, if you’ve exhausted all of your outreach and top-level checks, it’s time to venture on.
How to Fix the 414 Request-URI Too Large Error (In 3 Steps)
Once you have your tools together, you’ll need a plan. The fix for the 414 Request-URI Too Large error is to alter a server configuration file. As such, there are three steps you can take.
Let’s start by getting into your server and figuring out which type of server you have.
1. Log In to Your Server (And Determine Your Server Type)
You have to get into the server before you work on it, and this is where your SFTP skills come into play.
We’ve outlined how to get into your site through SFTP in the past, and once you’re in, you’ll need to figure out what type of server you have. There are two main types: Apache and Nginx.
It could be that you already know which server type you run. If so, you can skip to the next step.
If you’re struggling, here’s a quick tip: look for a .htaccess file. It’s found in the root of your server, and if you can see it, this means you’re running an Apache server. Nginx servers use a different configuration file.
That said, it could be that you’re running an Apache server that doesn’t yet have a .htaccess file. As such, there are two other methods you could use:
- Carry out a domain lookup using the Whois Domain Tools site: This might tell you the type of server you’re using, although it’s not a foolproof method.
- Check with your hosting provider about the server type you use. Of course, your host is going to know what server you run. Kinsta customers will always use Nginx servers, although other providers may use Apache or a mix. It’s best to open a ticket with your host to check before you poke around in your site’s backend.
When you’ve determined which type of server you use, you can head onto the next step and find your configuration file.
2. Find the Server Configuration File and Open It in Your Text Editor
As we noted, Apache servers use a .htaccess file for basic server configuration, and it will be located in your root directory. This isn’t the file you need to fix the 414 Request-URI Too Large error, though.
In this case, you’ll need to go deeper into your advanced configuration settings. These are found not at your site’s root folder but the server’s root.
When you log into your site through SFTP, you’ll often come to a directory that contains all of your sites (along with some other files). In many cases, you can go up a couple of levels to a server root directory:
This will give you a few more directories to traverse. Among them will be the etc folder:
The full path of the configuration file will be /etc/apache2/apache2.conf.
For Nginx servers, the process is similar. It’s one we’ve covered in part within our article on adjusting the maximum upload size in WordPress. The path to the configuration file will be /etc/nginx/nginx.conf.
Once you’ve located your file, open it in your favorite text editor. At this point, you’re ready to adjust it.
3. Adjust the Configuration File To Allow for Longer URLs
Much like how Apache and Nginx servers have different configuration files, they also have different settings to adjust. Regardless of your server type, though, you’ll need to open it in an editor if you haven’t already done so. Our preferred approach is to download the file to your computer, work on it, and upload it back to the server.
For Apache configuration files, look for the LimitRequestLine setting, or add it to the bottom of your file if it’s not there:
For the value, use at least 128000. If you need to go higher than this, keep to multiples of two (i.e. the next value should be 256000).
For Nginx servers, you’re looking for the large_client_header_buffers setting. Here, you’ll see two values relating to number and size. For example, large_client_header_buffers 4 8K. The only figure you need to alter here is the size — you can go from 8K to around 128K, although you may need to increase this further (again in multiples of two).
Once you’re done, save your changes and upload your configuration file back to your server. At this point, check your site again, and the 414 Request-URI Too Large error should have gone.
The 414 Request-URI Too Large error may be annoying, but luckily, it tells you exactly what the problem is. 🤷♀️ Learn how to fix it here 👇Click to Tweet
Summary
WordPress errors often have a similar approach for resolving them. You’ll often need to diagnose the error first, though. In the case of the 414 Request-URI Too Large error, the problem is clear: the URLs being passed to the server are too big.
To fix it, you’ll need to change your Apache or Nginx server settings. This doesn’t take too long, and once you’re done, you should be back up and running. While we can’t speak for other hosts, Kinsta’s support team is on hand 24/7 to help you get over the 414 Request-URI Too Large error if you’re stuck. In fact, we’re here whenever you need our help and guidance, so you can get back to running your site.
Содержание
- 3 простых шага по исправлению ошибок 414.EXE
- 1- Очистите мусорные файлы, чтобы исправить 414.exe, которое перестало работать из-за ошибки.
- 2- Очистите реестр, чтобы исправить 414.exe, которое перестало работать из-за ошибки.
- 3- Настройка Windows для исправления критических ошибок 414.exe:
- Как вы поступите с файлом 414.exe?
- Некоторые сообщения об ошибках, которые вы можете получить в связи с 414.exe файлом
- 414.EXE
- процессов:
- Проверенные и рабочие способы восстановить Windows 10 при появлении ошибок, BSOD и сбоев
- реклама
- реклама
- реклама
- реклама
- Бэкап, бекап и еще раз бекап
- Дифференцируем проблемы софта от проблем железа
- Убеждаемся, что ПК не заражен вредоносными программами
- Удаляем лишний и ненужный софт
- Чистим мусор, накопившийся в ОС
- Проверяем системные файлы Windows 10
- Анализируем синие экраны смерти или BSOD
- Тотально переустанавливаем драйвера
- Что делать дальше и что еще может помочь?
- Ошибка 414. Причины ее возникновения и возможные решения
- Почему возникает ошибка 414?
- Как избавиться от ошибки 414?
- Каковы действия должен совершить владелец сайта для того, чтобы исправить ошибку 414?
3 простых шага по исправлению ошибок 414.EXE
Файл 414.exe из unknown company является частью unknown product. 414.exe, расположенный в c:colet?nea de louvorcolet?nea de louvorhasd 414 .exe с размером файла 7985914 байт, версия файла Unknown version, подпись 208bf6d3573fb84b76dd28158a004bcb.
В вашей системе запущено много процессов, которые потребляют ресурсы процессора и памяти. Некоторые из этих процессов, кажется, являются вредоносными файлами, атакующими ваш компьютер.
Чтобы исправить критические ошибки 414.exe,скачайте программу Asmwsoft PC Optimizer и установите ее на своем компьютере
1- Очистите мусорные файлы, чтобы исправить 414.exe, которое перестало работать из-за ошибки.
- Запустите приложение Asmwsoft Pc Optimizer.
- Потом из главного окна выберите пункт «Clean Junk Files».
- Когда появится новое окно, нажмите на кнопку «start» и дождитесь окончания поиска.
- потом нажмите на кнопку «Select All».
- нажмите на кнопку «start cleaning».
2- Очистите реестр, чтобы исправить 414.exe, которое перестало работать из-за ошибки.

3- Настройка Windows для исправления критических ошибок 414.exe:

- Нажмите правой кнопкой мыши на «Мой компьютер» на рабочем столе и выберите пункт «Свойства».
- В меню слева выберите » Advanced system settings».
- В разделе «Быстродействие» нажмите на кнопку «Параметры».
- Нажмите на вкладку «data Execution prevention».
- Выберите опцию » Turn on DEP for all programs and services . » .
- Нажмите на кнопку «add» и выберите файл 414.exe, а затем нажмите на кнопку «open».
- Нажмите на кнопку «ok» и перезагрузите свой компьютер.
Всего голосов ( 21 ), 11 говорят, что не будут удалять, а 10 говорят, что удалят его с компьютера.
Как вы поступите с файлом 414.exe?
Некоторые сообщения об ошибках, которые вы можете получить в связи с 414.exe файлом
(414.exe) столкнулся с проблемой и должен быть закрыт. Просим прощения за неудобство.
(414.exe) перестал работать.
414.exe. Эта программа не отвечает.
(414.exe) — Ошибка приложения: the instruction at 0xXXXXXX referenced memory error, the memory could not be read. Нажмитие OK, чтобы завершить программу.
(414.exe) не является ошибкой действительного windows-приложения.
(414.exe) отсутствует или не обнаружен.
414.EXE

Проверьте процессы, запущенные на вашем ПК, используя базу данных онлайн-безопасности. Можно использовать любой тип сканирования для проверки вашего ПК на вирусы, трояны, шпионские и другие вредоносные программы.
процессов:
Cookies help us deliver our services. By using our services, you agree to our use of cookies.
Проверенные и рабочие способы восстановить Windows 10 при появлении ошибок, BSOD и сбоев
Признаюсь честно, редко когда Windows держалась у меня без переустановки более полугода. Мой компьютер всегда был зоной особого риска — множество установленных игр, скаченных из сомнительных источников, постоянные эксперименты с разнообразными утилитами и попытки ускорить и оптимизировать работу ПК не давали ОС много шансов на выживание. Ведь все это никак не способствует стабильности работы и в один прекрасный момент я обязательно сталкивался с глюками, багами или даже синими экранами смерти.
реклама
Раньше решение было простое — переустановка ОС, которая во времена Windows 10 стала быстрой и простой как никогда, установка программ и игр, и через пару часов быстрая и свежая система была снова готова к работе. Но сейчас ситуация изменилась. Количество игр на моем ПК превысило пару десятков, установлено штук 15 необходимых и настроенных утилит, которые я часто применяю, вдобавок старушка GeForce RTX 1060 круглосуточно трудится, пытаясь окупить себя уже в третий или четвертый раз.
реклама
Да и написание блогов занимает у меня по 3-4 часа почти ежедневно, в результате чего Windows 10 May 2020 Update, установленная у меня в сентябре 2020 года, работает уже восьмой месяц, обновившись до October 2020 Update, и, надеюсь, протянет хотя бы еще полгода, ведь переустанавливать ее совсем нет сил, времени и желания.
Думаю, многие читатели, занятые серьезной работой на ПК, посмеются над моими причинами держаться за Windows из-за игрушек, утилит и любительского майнинга, и я полностью с ними соглашусь.
реклама
Ведь когда на вашем ПК установлены серьезные лицензионные программы, настроена сложная локальная сеть, а в работе находится проект, простои в работе над котором даже в несколько часов чреваты, как минимум, потерей денег, а максимум — работы, переустановка Windows — это катастрофа. Но не меньшая катастрофа, если при этом ваша Windows начала глючить, тормозить и не давать нормально работать. И в этом блоге мы займемся устранением глюков и сбоев Windows 10, но таким образом, чтобы не сломать ее окончательно, и не потерять ваш рабочий инструмент и плоды труда.
реклама
Но если самое важное, что есть сейчас у вас на ПК — это 10 закладок с паролями в браузере и сохранения от Ведьмак 3: Дикая охота, я все равно рекомендую вам прочитать этот блог, ведь переустановка Windows при глюках и проблемах — метод действенный, но ничего не дающий вам в плане роста навыков обращения с компьютерной техникой. Грубо говоря, переустановить Windows 10 сможет каждый ламер, а вот исправить серьезную проблему — только опытный пользователь, да и то не всякий.
Бэкап, бекап и еще раз бекап
Хоть мы и будем использовать проверенные и официальные инструменты для починки Windows 10, обязательно сделайте бэкап важных файлов и всего системного диска встроенными средствами. Это займет не так уж много времени, а лишним не будет никогда.
Дифференцируем проблемы софта от проблем железа
Иногда компьютер глючит так, что совершенно непонятно — Windows 10 это не перенесла очередного обновления или ваш SSD отходит в мир иной. Множество трудно диагностируемых сбоев могут вызвать проблемы с ОЗУ, перегрев, плохой блок питания или банальное окисление контактов на материнской плате.
Поэтому не помешает, как минимум, убедиться в исправности ваших накопителей и отсутствии перегрева компонентов. Хорошую подборку бесплатных программ для мониторинга и настройки «железа» я выкладывал в блоге «20 актуальных утилит для оверклокера в 2021 году — мониторинг, настройка, разгон и стресс-тесты«. Посмотрите хотя бы температуры компонентов и S.M.A.R.T. накопителей.
Убеждаемся, что ПК не заражен вредоносными программами
Несмотря на то, что количество вредоносных программ растет с каждым годом, а по миру идет просто эпидемия вирусов-шифровальщиков, могущих легко оставить вас без важных и невосполнимых данных, секта «отрицателей антивирусов» только множится. Их легко можно было понять лет 10-20 назад, когда ПК были слабы для антивируса, а из ценных данных на них хранились только ваши сохранения игр.
Сегодня ПК — это лакомый объект для воровства разнообразных аккаунтов, денег с электронных кошельков, ресурсов для майнинга и шифрования данных для выкупа. Но несмотря на это, многие пользователи считают, что не кликая по подозрительным ссылкам и ставя игры только из Steam, они обезопасят себя. К счастью для секты «отрицателей антивирусов» большинство из них находится под незаметной защитой «Защитника Windows» и встроенных систем безопасности в браузерах.
Но не помешает проверить ПК дополнительно с помощью таких средств, как Dr.Web CureIt!, RogueKiller Anti-Malware Free и Malwarebytes Free. По своему опыту могу сказать, что даже набор из хорошего антивируса и этих утилит может пропустить хитрый майнер или троян, который еще не успел засветиться в антивирусных базах. В этом случае стоит понаблюдать за поведением ПК в простое с помощью программ аппаратного мониторинга, ища подозрительные продолжительные нагрузки на процессор и видеокарту.
Удаляем лишний и ненужный софт
Сторонний софт может создавать множество проблем и конфликтовать друг с другом и Windows. Поэтому при поиске проблем рекомендуется удалить все лишнее и ненужное, без чего можно обойтись на ПК. Игры которые вы не запускали месяцами, утилиты, которыми почти не пользуетесь, а главное, софт от производителей железа. MSI Dragon Center или AI Suite от ASUS — даже ПК оверклокера прекрасно может обойтись без этих программ.
Заодно стоит проверить автозагрузку на предмет ненужных утилит, которые у многих живут там без дела годами, таких, как например, утилиты от встроенных звуковых карт.
Чистим мусор, накопившийся в ОС
Не помешает очистить мусор, которыми забиваются временные папки Windows, да и свободное место на системном диске редко бывает лишним. Сделать это можно встроенными средствами Windows 10 или утилитой Wise Disk Cleaner. Утилита неплохо показала себя в сравнении со старожилом чистки ПК — CCleaner, что показало сравнение их в блоге «Выбираем удобный и надежный «чистильщик» Windows 10 — сравниваем CCleaner или Wise Disk Cleaner«.
Проверяем системные файлы Windows 10
Все вышеописанное было только приготовлениями к восстановлению Windows 10, которые не помешает делать регулярно даже на стабильно работающем ПК. А теперь мы займемся восстановлением и начнем со стандартной утилиты System File Checker, запустить которую можно в командной строке от имени Администратора.
Команда sfc /scannow проверит и восстановит важные файлы Windows на целостность и восстановит их. System File Checker — не панацея от сбоев, но часто находит и исправляет поврежденные файлы.
Более серьезное средство восстановление файлов Windows 10 — утилита DISM, которую тоже следует запускать из командной строки от имени Администратора. Обе утилиты, и System File Checker и DISM, работают с системой Windows Resource Protection, которая защищает ключи в реестре, директории, а также критические системные файлы. Но отличие DISM в том, что она обращается не к внутреннему кешу хранилища, а через службу Windows Update сверяет системные файлы с оригиналами.
И простая команда Dism /Online /Cleanup-Image /RestoreHealth может исправить довольно серьезные проблемы с системой, даже после вирусного заражения. Но при этом у вас должно работать соединение с интернетом.
Анализируем синие экраны смерти или BSOD
Если ваш ПК выпадает в BSOD, с одной стороны — это плохой признак довольно серьезной проблемы, с другой — по коду в BSOD мы можем определить источник проблемы. Поможет в этом утилита BlueScreenView, про которую я уже писал в цикле блогов «10 небольших полезных и бесплатных утилит, упрощающих использование Windows 10«. Утилита поможет выявить источник BSOD или дать вам направление, в котором нужно искать в поисковиках при данных BSOD.
Тотально переустанавливаем драйвера
Драйвера на видеокарту или материнскую плату — частый источник проблем, которые может помочь решить их переустановка, желательно на новую версию. При переустановке драйверов не помешает воспользоваться утилитой Display Driver Uninstaller, которая удаляет все остатки и «хвосты» от старых драйверов.
Не помешает переустановить драйвера даже на такие устройства как принтеры, веб-камеры, мыши и прочую периферию. Судя по новостям в СМИ, принтеры и веб-камеры — это ахиллесова пята Windows 10 уже года три.
Что делать дальше и что еще может помочь?
На первый взгляд может показаться, что все действия, описанные выше, займут гораздо больше времени, чем простая переустановка Windows 10 с настройкой программ, но их необязательно делать все сразу, тем более, что большинство из них работает в фоне, не мешая вам.
Как правило, эти средства могут вам помочь, но довольно тесно зная Windows 10, я не удивлюсь, что легко можно встретить такой баг, с исправлением которого вам не поможет и техподдержка Microsoft.
В этом случае стоит поспрашивать советов на форумах, посвященных Windows 10, где пользователи часто предлагают очень оригинальные и действенные способы решения проблем. Ну а если решение проблемы так и не находится даже коллективным разумом, надо решаться на переустановку.
Пишите в комментарии, какие самые сложные проблемы подкидывала вам Windows 10, и как вы решали их?
Ошибка 414. Причины ее возникновения и возможные решения

Ошибка 414 или Error 414 Request URI Too Large — почему она возникает и как ее устранить простому пользователю или владельцу собственного сайта. Начнем с того, что это довольно редкая, не распространенная ошибка. В оригинале ее название — Request URI Too Large.
Почему возникает ошибка 414?
Вы можете столкнуться с ошибкой 414 в случае, когда адрес, который Вами запрашивается, слишком длинный. Серверу не удается его растолковать, в результате чего, на своих экранах вы видите данную ошибку.
Стоит заметить, что любой запрос условно делится на две составляющие:
В нормальных условиях в заголовке содержится только общая информация. Это значит, что он по своей природе не может быть слишком длинным. Тело же в свою очередь наоборот содержит всю основную часть запроса. Каким бы длинным и ёмким не было тело, сервер воспринимает это за норму и ошибка 414 не должна возникать. Так что в большинстве случаев причиной данной неполадки является именно заголовок и сбои в нем.
Как избавиться от ошибки 414?
Обычному пользователю никак. Если во время сёрфинга в Интернете вы столкнулись с этой нераспространенной проблемой, вы абсолютно бессильны. Нужно просто ждать, пока администраторы злосчастной страницы исправят ситуацию. Единственное, что доступно обычному пользователю – написание запроса в техническую поддержку.
Каковы действия должен совершить владелец сайта для того, чтобы исправить ошибку 414?
- Попытаться исключить ошибку непосредственно в коде ресурса.
- Сделать больше допустимый размер заголовка. За это отвечает 3 параметра, которые необходимо разместить в http:
- сlіеnt_bоdу_buffеr_sіzе — отвечает за размер тела;
- сlіеnt_hеаdеr_buffеr_sіzе — отвечает за обычные заголовки;
- lаrgе_clіеnt_hеаdеr_buffеrs — отвечает за большие заголовки.
В случае с ошибкой 414 нам необходимо работать с последней строкой. Стандартно размер заголовка = 8kb. Вносим изменения в последнюю строку – дописываем 8 (пробел) 64k. Точно такие же исправления необходимо сделать в каждой строке перед секцией под названием «сервер». Теперь перезагружаем ресурс, ошибка 414 должна уйти. Если нет, то это означает, что вы сделали что-то неправильно.
Напоследок хотелось бы заметить, что если вы совсем не разбираетесь в системе nginx, то не делайте никаких изменений самостоятельно. Так вы не только не решите проблему, но и рискуете встретиться с другими ошибками в дальнейшем. В таком случае лучше обратиться к специалистам, для них справиться с этим не составит особого труда.
| Номер ошибки: | Ошибка HTTP 414 | |
| Название ошибки: | Request URI Too Long | |
| Описание ошибки: | The website address (URI) you entered was too long for the server. | |
| Разработчик: | Microsoft Corporation | |
| Программное обеспечение: | Windows Operating System | |
| Относится к: | Windows XP, Vista, 7, 8, 10, 11 |
Такие проблемы Request URI Too Long обычно вызваны повреждением файла, связанного с Edge, или, в некоторых случаях, его случайным или намеренным удалением. Как правило, самый лучший и простой способ устранения ошибок, связанных с файлами Windows 10, является замена файлов. В качестве последней меры мы рекомендуем использовать очиститель реестра для исправления всех недопустимых Request URI Too Long, расширений файлов Windows 10 и других ссылок на пути к файлам, по причине которых может возникать сообщение об ошибке.
Типичные ошибки Request URI Too Long
Вопросы, связанные с Request URI Too Long и Edge:
- «Ошибка в файле Request URI Too Long.»
- «Request URI Too Long отсутствует или перемещен. «
- «Отсутствует файл: Request URI Too Long»
- «Не удалось загрузить модуль для Request URI Too Long. «
- «Отсутствует модуль: не удалось зарегистрировать Request URI Too Long»
- «Ошибка времени выполнения Request URI Too Long. «
- «Ошибка загрузки: Request URI Too Long. «
Обычно ошибки Request URI Too Long с Edge возникают во время запуска или завершения работы, в то время как приложения, связанные с Request URI Too Long, выполняются, или редко во время последовательности обновления ОС. Отслеживание ошибок Request URI Too Long, связанных с Edge, имеет решающее значение для обнаружения неисправностей и ретрансляции обратно в Microsoft Corporation для параметров восстановления.
Создатели Request URI Too Long Трудности
Проблемы Edge и Request URI Too Long возникают из отсутствующих или поврежденных файлов, недействительных записей реестра Windows и вредоносных инфекций.
В основном, осложнения Request URI Too Long из-за:
- Недопустимый раздел реестра Request URI Too Long (или поврежденный).
- Зазаражение вирусом повреждает файл Request URI Too Long.
- Request URI Too Long злонамеренно удален (или ошибочно) другим изгоем или действительной программой.
- Другая программа находится в конфликте с Edge и его общими файлами ссылок.
- Request URI Too Long поврежден во время загрузки или установки программного обеспечения.
Продукт Solvusoft
Загрузка
WinThruster 2023 — Проверьте свой компьютер на наличие ошибок.
Совместима с Windows 2000, XP, Vista, 7, 8, 10 и 11
Установить необязательные продукты — WinThruster (Solvusoft) | Лицензия | Политика защиты личных сведений | Условия | Удаление
Коды состояний браузера в базе знаний
Идентификатор статьи:
120632
Автор статьи:
Последнее обновление:
Популярность:
star rating here
Загрузка (Исправление ошибки)
Have you ever encountered a 414 request URI too long error on your WordPress website?
The error is usually caused when there is a critical error between your web browser and a server. You’ll see this error when clicking on a link or any action performed by a WordPress plugin.
In this article, we will show you what is the ‘414 request URI too long’ error and how to fix it.

What is 414 Request URI Too Long Error?
A 414 request URI too long error occurs when a URL or an action you’re requesting is too long for the server to handle.
Do note that there is a difference between URI and URL. A URI or Uniform Resource Identifier can be a resource’s name, location, or both. On the other hand, a URL or Uniform Resource Locator can only be the location of a resource.
Both terms are usually used interchangeably because URL is part of URI. However, the 414 error can be triggered by both components, so let’s look at the causes.
What Causes 414 Request URI Too Long Error?
You might see the 414 error when you click on the link, and the server is unable to process it because it’s too long.
One situation where a link might to very long is using UTM (Urchin Tracking Module) parameters. If you’re using UTM codes to track conversions on your WordPress website and there are a lot of parameters in the URL, then it can cause this error.
Another situation that can cause a 414 error is a redirect loop. This is when a misconfiguration or a setting in a WordPress plugin causes a lot of redirect requests.
As a result, you get incredibly long URLs and 414 requests URI too long error.
Similarly, some plugins can also generate lengthy URIs as part of their functionality. You’re most likely to encounter this error if you have all-in-one WordPress security plugins installed on your site.
In a rare event, a developer-side issue can also trigger a 414 error when a POST request converts into a GET request with query information being too long. Lastly, cyber attacks on your website server can also result in 414 URI too long issues.
That said, let’s see how you can fix the 414 error on your WordPress website.
Fixing 414 Request URI Too Long Error
A quick way to fix this issue is by increasing the size of the URI your website server can process.
Before we move forward, we recommend creating a WordPress backup. That’s because fixing the 414 error involves editing the website configuration files. In case anything goes wrong, you’ll have a backup copy of your site ready to restore.
For more details, please see our guide on how to backup a WordPress site.
Determine if Your Website is Using Apache or Nginx
First, you’ll need to find out the type of server your WordPress website is using. There are 2 main types of servers, which includes Apache and Nginx.
A simple way to do that is by opening your site in a browser. After that, you can right-click on the homepage and select the ‘Inspect’ option.

Next, you’ll need to switch to the ‘Network’ tab at the top.
From here, you can select any element under the Name column. After that, you will need to scroll down to the ‘Response Headers’ section and see the ‘Server’ details.

This will show you whether your site is using Nginx or Apache.
If you’re still unsure which server type to use, then you can reach out to your WordPress hosting provider to get more details.
Once you’ve determined the server type, let’s look at how to fix the 414 request URI too long error for Apache and Nginx.
Fixing 414 Request URI Too Long Error in Nginx
First, you’ll need an FTP or file transfer protocol client to access website configuration files.
There are many FTP clients you can use. For this tutorial, we will use Filezilla. If you need help setting up FTP and accessing website files, then please see our guide on how to use FTP to upload files to WordPress.
Once you’re logged in, you’ll need to download the ‘nginx.conf’ file. You can access this by following this path: /etc/nginx/nginx.conf

After locating the file, go ahead and download it on your computer and then open it in a notepad software.
From here, you can search for large_client_header_buffers 4 8K settings. If it’s not there, then simply add it to the end of the file.
You will see 2 sets of values, which relate to a number and size. Simply edit the size from 8K to 128K. This will increase the URI size and allow the site server to process long URLs.

Once you’re done, simply save the text file and reupload it to your website using the FTP client.
For more details, please see our guide on how to use FTP to upload files to WordPress.
Fixing 414 Request URI Too Long Error in Apache
If you’re using the Apache server type, then the process is similar to that of Nginx. First, you’ll need an FTP client to access website files.
Once you’re logged in, you’ll need to locate the ‘apache2.conf’ file. Simply head to the following path using the FTP client: /etc/apache2/apache2.conf

Next, you’ll need to download the file and open it in notepad software.
After that, you can look for LimitRequestLine 128000 settings. If you don’t see one, then simply add it to the end of the file.
Usually, LimitRequestLine is set to 128000. However, you can increase this to 256000 or higher to remove the 414 error. Just make sure that the value you set is a multiple of 2.

Once you’re done, simply upload the file back to the website using the FTP client. This should help resolve the 414 error on your WordPress website.
We hope this article helped you learn about what is 414 request URI too long error and how to fix it. You may also want to see our guide on WordPress security and the most common WordPress errors.
If you liked this article, then please subscribe to our YouTube Channel for WordPress video tutorials. You can also find us on Twitter and Facebook.
Disclosure: Our content is reader-supported. This means if you click on some of our links, then we may earn a commission. See how WPBeginner is funded, why it matters, and how you can support us. Here’s our editorial process.
Editorial Staff at WPBeginner is a team of WordPress experts led by Syed Balkhi with over 16 years of experience in WordPress, Web Hosting, eCommerce, SEO, and Marketing. Started in 2009, WPBeginner is now the largest free WordPress resource site in the industry and is often referred to as the Wikipedia for WordPress.
This error is actually thrown from http.sys, not from IIS. The error gets thrown before the request is passed along to IIS in the request-handling pipeline.
- To verify this, you can check the Server header value in the HTTP response headers, as per https://stackoverflow.com/a/32022511/12484.
To get https.sys to accept longer request URLs without throwing the HTTP 414 error, in the Windows Registry on the server PC, at Computer\HKEY_LOCAL_MACHINE\SYSTEM\CurrentControlSet\Services\HTTP\Parameters, create a DWORD-type value with name MaxFieldLength and value sufficiently large, e.g. 65535.
- Reference: Http.sys registry settings for Windows
If you decide to make this change, then obviously it’ll need to be made in all environments (including all production server(s)) — not just on your local dev PC.
Also, whatever script and/or documentation your team uses to set up new server instances will need to be updated to include this registry setting, so that your team doesn’t forget to apply this setting 18 months from now when setting up a new production server.
Finally, be aware making this change could have adverse security consequences for all applications running on your server, as a large HTTP request submitted by an attacker won’t be rejected early in the pipeline as it would normally.
As an alternative to making this change to bypass the http.sys security, consider changing the request to accept HTTP POST instead of HTTP GET, and put the parameters into the POST request body instead of into a long URL. For more discussion on this, see question Design RESTful GET API with a long list of query parameters.