| Номер ошибки: | Ошибка 110 | |
| Название ошибки: | ERROR_OPEN_FAILED | |
| Описание ошибки: | Системе не удается открыть указанное устройство или файл. | |
| Шестнадцатеричный код: | 0x6E | |
| Разработчик: | Microsoft Corporation | |
| Программное обеспечение: | Windows Operating System | |
| Относится к: | Windows XP, Vista, 7, 8, 10, 11 |
Повреждение, отсутствие или удаление файлов Windows 10 может привести к возникновению ошибок исполняемого файла ERROR_OPEN_FAILED, которые чаще всего наблюдаются на этапе запуска 0x6E. Возникновение подобных проблем является раздражающим фактором, однако их легко устранить, заменив файл ERROR_OPEN_FAILED, из-за которого возникает проблема. Если ошибка Windows 10 возникла в результате его удаления по причине заражения вредоносным ПО, мы рекомендуем запустить сканирование реестра, чтобы очистить все недействительные ссылки на пути к файлам, созданные вредоносной программой.
Типичные ошибки Windows 10
Типичные ошибки Windows 10, возникающие в 0x6E для Windows:
- «Ошибка программы Windows 10. «
- «Недопустимая программа Win32: Windows 10»
- «Windows 10 должен быть закрыт. «
- «Windows 10 не может быть найден. «
- «Отсутствует файл Windows 10.»
- «Ошибка запуска программы: Windows 10.»
- «Не удается запустить Windows 10. «
- «Отказ Windows 10.»
- «Ошибка пути программного обеспечения: Windows 10. «
Обычно ошибки Windows 10 с 0x6E возникают во время запуска или завершения работы, в то время как программы, связанные с Windows 10, выполняются, или редко во время последовательности обновления ОС. Выделение при возникновении ошибок Windows 10 имеет первостепенное значение для поиска причины проблем 0x6E и сообщения о них вMicrosoft Corporation за помощью.
Причины ошибок в файле Windows 10
Заражение вредоносными программами, недопустимые записи реестра 0x6E или отсутствующие или поврежденные файлы Windows 10 могут создать эти ошибки Windows 10.
Особенно ошибки Windows 10 проистекают из:
- Недопустимая (поврежденная) запись реестра Windows 10.
- Вирус или вредоносное ПО, повреждающее Windows 10.
- Windows 10 злонамеренно или ошибочно удален другим программным обеспечением (кроме 0x6E).
- Другое программное обеспечение, конфликтующее с 0x6E, Windows 10 или общими ссылками.
- 0x6E/Windows 10 поврежден от неполной загрузки или установки.
Продукт Solvusoft
Загрузка
WinThruster 2023 — Проверьте свой компьютер на наличие ошибок.
Совместима с Windows 2000, XP, Vista, 7, 8, 10 и 11
Установить необязательные продукты — WinThruster (Solvusoft) | Лицензия | Политика защиты личных сведений | Условия | Удаление
Коды системных ошибок Windows в базе знаний
Идентификатор статьи:
120949
Автор статьи:
Последнее обновление:
Популярность:
star rating here
Загрузка (Исправление ошибки)
What is Error 110?
Error 110 is a kind of Windows System Error Codes error that is found in the Microsoft Windows operating systems. The file can be found for Windows Operating System. ERROR_OPEN_FAILED has a popularity rating of 1 / 10.
Errors
This tutorial contains information on Error 110 or otherwise known as ERROR_OPEN_FAILED. Errors such as ERROR_OPEN_FAILED indicate your machine has faulty hardware or software that should be fixed when possible. Below is information on how to repair Error 110 and get your computer back to normal.
 Signs of Error 110:
 Signs of Error 110:
- When your computer freezes or locks up at random.
- When your computer crashes when you are running Windows Operating System.
- If ERROR_OPEN_FAILED pops up and causes a program to shutdown or your computer to crash.
- Your computer is running slow, taking a long time to boot up, and you suspect Error 110 by Windows Operating System is the cause.
What Causes Windows System Error Codes Errors Like Error 110?
The error can be caused by a variety of reasons. It is usually due to the system failing to properly run a program or application. It can be hardware or related to the installation or maintenance of Windows Operating System. Corrupted files, malfunctioned hardware, corrupted Registry, etc., can be the prime reasons for the occurrence of Windows System Errors.
How to Fix ERROR_OPEN_FAILED
 How to Fix ERROR_OPEN_FAILED
Follow the step by step instructions below to fix the Error 110 problem. We recommend you do each in order. If you wish to skip these steps because they are too time consuming or you are not a computer expert, see our easier solution below.
Step 1 — Uninstall and Reinstall Windows Operating System
If the ERROR_OPEN_FAILED is a result of using Windows Operating System, you may want to try reinstalling it and see if the problem is fixed. Please follow these steps:
Windows XP
- Click “Start Menu”.
- Click “Control Panel”.
- Select the “Add or Remove” program icon.
- Find the Error 110 associated program.
- Click the Change/Remove button on the right side.
- The uninstaller pop up will give you instructions. Click “okay” or “next” or “yes” until it is complete.
- Reinstall the software.
Windows 7 and Windows Vista
- Click “Start Menu”.
- Click “Control Panel”.
- Click “Uninstall a Program” which is under the “Programs” header.
- Find the Error 110 associated program.
- Right click on it and select “Uninstall”.
- The uninstaller pop up will give you instructions. Click “okay” or “next” or “yes” until it is complete.
- Reinstall the software and run the program.
Windows 8, 8.1, and 10
- Click “Start Menu”.
- Click “Programs and Features”.
- Find the software that is linked to **insert file name**.
- Click Uninstall/Change.
- The uninstaller will pop up and give you instructions. Click “okay” and “next” until it is complete.
- Restart your computer.
- Reinstall the software and run the program.
Step 2 — Remove Registry Entry related to Error 110
 WARNING: Do NOT edit the Windows Registry unless you absolutely know what you are doing. You may end up causing more trouble than you start with. Proceed at your OWN RISK.
- Create a backup of registry files.
- Click “Start”.
- Type regedit, select it, and grant permission in order to proceed.
- Click HKEY LOCAL MACHINE>>SOFTWARE>>Microsoft>>Windows>>Current Version>>Uninstall.
- Find the ERROR_OPEN_FAILED software from the list you wish to uninstall.
- Select the software and double click the UninstallString icon on the right side.
- Copy the highlighted text.
- Exit and go to the search field.
- Paste the data.
- Select Okay in order to uninstall the program.
- Reinstall the software.
Step 3 – Ensure Junk Isn’t Causing ERROR_OPEN_FAILED
Any space that isn’t regularly cleaned out tends to accumulate junk. Your personal computer is no exception. Constant web browsing, installation of applications, and even browser thumbnail caches slow down your device and in the absence of adequate memory, can also trigger a ERROR_OPEN_FAILED error.
So how do you get around this problem?
- You can either use the Disk Cleanup Tool that comes baked into your Windows operating system.
- Or you can use a more specialized hard drive clean up solution that does a thorough job and flushes the most stubborn temporary files from your system.
Both solutions may take several minutes to complete the processing of your system data if you haven’t conducted a clean up in a while.
The browser caches are almost a lost cause because they tend to fill up quite rapidly, thanks to our constantly connected and on the go lifestyle.
Here’s how you can run the Window’s Disk Cleanup Tool, without performance issues or surprises.
- For Windows XP and Windows 7, the program can be ran from “Start” and from the “Command Prompt”.
- Click “Start”, go to All Programs > Accessories > System Tools, click Disk Cleanup. Next choose the type of files you wish to remove, click OK, followed by “Delete Files”.
- Open up the Command Prompt, type “c:\windows\cleanmgr.exe /d” for XP and “cleanmgr” for Windows 7. Finish by pressing “Enter”.
- For Windows 8 and Windows 8.1, the Disk Cleanup Tool can be accessed directly from “Settings”. Click “Control Panel” and then “Administrative Tools”. You can select the drive that you want to run the clean up on. Select the files you want to get rid of and then click “OK” and “Delete Files”.
- For Windows 10, the process is simplified further. Type Disk Cleanup directly in the search bar and press “Enter”. Choose the drive and then the files that you wish to wipe. Click “OK”, followed by “Delete Files”.
The progressive ease with which the Cleanup Tool can be used points to the growing importance of regularly deleting temporary files and its place in preventing ERROR_OPEN_FAILED.
![]() PRO TIP:
PRO TIP:
Remember to run the Disk Cleanup as an administrator.
Step 4 – Fix Infections and Eliminate Malware in Your PC
 How do you gauge if your system is infected with a malware and virus?
Well, for one, you may find certain applications misbehaving.
And you may also see the occurrence of Error 110.
Infections and malware are the result of:
- Browsing the Internet using open or unencrypted public Wi-Fi connections
- Downloading applications from unknown and untrustworthy sources
- Intentional planting of viruses in your home and office networks
But thankfully, their impact can be contained.
- Enter “safe mode” by pressing the F8 key repeatedly when your device is restarting. Choose “Safe Mode with Networking” from the Advanced Boot Options menu.
- Back up all the data in your device to a secure location. This is preferably a storage unit that is not connected to your existing network.
- Leave program files as is. They are where the infection generally spreads from and may have been compromised.
- Run a thorough full-system scan or check of an on-demand scanner. If you already have an antivirus or anti-malware program installed, let it do the heavy lifting.
- Restart your computer once the process has run its course.
- Lastly, change all your passwords and update your drivers and operating system.
![]() PRO TIP: Are you annoyed by the frequent updates to your antivirus program? Don’t be! These regular updates add new virus signatures to your software database for exponentially better protection.
PRO TIP: Are you annoyed by the frequent updates to your antivirus program? Don’t be! These regular updates add new virus signatures to your software database for exponentially better protection.
Step 5 – Return to the Past to Eliminate Error 110
The steps outlined up until this point in the tutorial should have fixed ERROR_OPEN_FAILED error. But the process of tracking what has caused an error is a series of educated guesses. So in case the situation persists, move to Step 5.
Windows devices give users the ability to travel back in time and restore system settings to an uncorrupted, error free state.
This can be done through the convenient “System Restore” program. The best part of the process is the fact that using System Restore doesn’t affect your personal data. There is no need to take backups of new songs and pictures in your hard drive.
- Open “Control Panel” and click on “System & Security”.
- Choose the option “System”.
- To the left of the modal, click on “System Protection”.
- The System Properties window should pop-up. You’ll be able to see the option “System Restore”. Click on it.
- Go with “Recommended restore” for the path of least hassles and surprises.
- Choose a system restore point (by date) that will guarantee taking your device back to the time when Error 110 hasn’t been triggered yet.
- Tap “Next” and wrap up by clicking “Finish”.
If you’re using Windows 7 OS, you can reach “System Restore” by following the path Start > All Programs > Accessories > System Tools.
Step 6 — Error 110 Caused by Outdated Drivers
Updating a driver is not as common as updating your operating system or an application used to run front-end interface tasks.
Drivers are software snippets in charge of the different hardware units that keep your device functional.
So when you detect an ERROR_OPEN_FAILED error, updating your drivers may be a good bet. But it is time consuming and shouldn’t be viewed as a quick fix.
Here’s the step-by-step process you can go through to update drivers for Windows 8, Windows 8.1 and Windows 10.
- Check the site of your hardware maker for the latest versions of all the drivers you need. Download and extract them. We strongly advice going with original drivers. In most cases, they are available for free on the vendor website. Installing an incompatible driver causes more problems than it can ever fix.
- Open “Device Manager” from the Control Panel.
- Go through the various hardware component groupings and choose the ones you would like to update.
- On Windows 10 and Windows 8, right-click on the icon of the hardware you would like to update and click “Update Driver”.
- On Windows 7 and Vista, you right-click the hardware icon, choose “Properties”, navigate to the Driver panel, and then click “Update Driver”.
- Next you can let your device automatically search for the most compatible drivers, or you can choose to update the drivers from the versions you have on your hard drive. If you have an installer disk, then the latter should be your preferred course of action. The former may often get the driver selection incorrect.
- You may need to navigate a host of warnings from the Windows OS as you finalize the driver update. These include “Windows can’t verify that the driver is compatible” and “Windows can’t verify the publisher of this driver”. If you know that you have the right one in line, click “Yes”.
- Restart the system and hopefully the ERROR_OPEN_FAILED error should have been fixed.
Step 7 – Call the Windows System File Checker into Action
 By now the ERROR_OPEN_FAILED plaguing your device should have been fixed. But if you haven’t resolved the issue yet, you can explore the Windows File Checker option.
With the Windows File Checker, you can audit all the system files your device needs to operate, locate missing ones, and restore them.
Sound familiar? It is almost like “System Restore”, but not quite. The System Restore essentially takes you back in time to a supposedly perfect set up of system files. The File Checker is more exhaustive.
It identifies what is amiss and fills the gaps.
- First and foremost, open up an elevated command prompt.
- Next, if you are using Windows 8, 8.1 or 10, enter “DISM.exe /Online /Cleanup-image /Restorehealth” into the window and press Enter.
- The process of running the Deployment Image Servicing and Management (DISM) tool may take several minutes.
- Once it completes, type the following command into the prompt “sfc /scannow”.
- Your device will now go through all protected files and if it detects an anomaly, it will replace the compromised version with a cached version that resides at %WinDir%\System32\dllcache.
Step 8 – Is your RAM Corrupted? Find Out.
Is it possible? Can the memory sticks of your device trigger Error 110?
It is unlikely – because the RAM chips have no moving parts and consume little power. But at this stage, if all else has failed, diagnosing your RAM may be a good move.
You can use the Windows Memory Diagnostics Tool to get the job done. Users who are on a Linux or Mac and are experiencing crashes can use memtest86.
- Open up your device and go straight to the “Control Panel”.
- Click on “Administrative Tools”.
- Choose “Windows Memory Diagnostic”.
- What this built-in option does is it burns an ISO image of your RAM and boots the computer from this image.
- The process takes a while to complete. Once it is done, the “Status” field at the bottom of the screen populates with the result of the diagnosis. If there are no issues with your RAM/memory, you’ll see “No problems have been detected”.
One drawback of the Windows Memory Diagnostic tool pertains to the number of passes it runs and the RAM segments it checks.
Memtest86 methodically goes over all the segments of your memory – irrespective of whether it is occupied or not.
But the Windows alternative only checks the occupied memory segments and may be ineffective in gauging the cause of the ERROR_OPEN_FAILED error.
Step 9 – Is your Hard Drive Corrupted? Find Out.
Your RAM or working memory isn’t the only culprit that may precipitate an ERROR_OPEN_FAILED error. The hard drive of your device also warrants close inspection.
The symptoms of hard drive error and corruption span:
- Frequent crashes and the Blue Screen of Death (BSoD).
- Performance issues like excessively slow responses.
- Errors like Error 110.
Hard drives are definitely robust, but they don’t last forever.
There are three things that you can do to diagnose the health of your permanent memory.
- It is possible that your device may have a hard time reading your drive. This can be the cause of an ERROR_OPEN_FAILED error. You should eliminate this possibility by connecting your drive to another device and checking for the recurrence of the issue. If nothing happens, your drive health is okay.
- Collect S.M.A.R.T data by using the WMIC (Windows Management Instrumentation Command-line) in the command prompt. To do this, simply type “wmic” into the command prompt and press Enter. Next follow it up with “diskdrive get status”. The S.M.A.R.T status reading is a reliable indicator of the longevity of your drive.
- Fix what’s corrupt. Let’s assume you do find that all isn’t well with your hard drive. Before you invest in an expensive replacement, using Check Disk or chkdsk is worth a shot.
- Open the command prompt. Make sure you are in Admin mode.
- Type “chkdsk C: /F /X /R” and press “Enter”. “C” here is the drive letter and “R” recovers data, if possible, from the bad sectors.
- Allow the system to restart if the prompt shows up.
- And you should be done.
These steps can lead to the resolution you’re seeking. Otherwise the ERROR_OPEN_FAILED may appear again. If it does, move to Step 10.
Step 10 – Update Windows OS
 Like the software applications you use to render specific tasks on your device, the Operating System also requires periodic updates.
Yes, we’ve all heard the troubling stories.
Devices often develop problems post unfinished updates that do not go through. But these OS updates include important security patches. Not having them applied to your system leaves it vulnerable to viruses and malware.
And may also trigger Error 110.
So here’s how Windows 7, Windows 8, Windows 8.1 and Windows 10 users can check for the latest updates and push them through:
- Click the “Start” button on the lower left-hand corner of your device.
- Type “Updates” in the search bar. There should be a “Windows Update” or “Check for Updates” option, based on the OS version you’re using.
- Click it. The system will let you know if any updates are available.
- You have the convenience of choosing the components of the update you’d like to push through. Always prioritize the security updates.
- Click “OK” followed by “Install Updates”.
Step 11 – Refresh the OS to Eliminate Persistent ERROR_OPEN_FAILED Error
“Windows Refresh” is a lifesaver.
For those of you who are still with us and nothing has worked to eliminate the Error 110, until recently, a fresh install of Windows would have been the only option.
Not anymore.
The Windows Refresh is similar to reinstalling your Windows OS, but without touching your personal data. That’s hours of backup time saved in a jiffy.
Through the Refresh, all your system files become good as new. The only minor annoyance is the fact that any custom apps you’ve installed are gone and the system applications you had uninstalled are back.
Still, it is the best bet as the final step of this process.
- Enter the “Settings” of your PC and click on “Change Settings”.
- Click “Update and recovery” and then choose “Recovery”.
- Select “Keep my files”. This removes apps and settings, but lets your personal files live on.
- You’ll get some warning messages about the apps that will be uninstalled. If you’ve gone through a recent OS upgrade, the Refresh process makes it so that you can’t go back to your previous OS version – if you should ever feel the need to do it.
- Click the “Refresh” button.
Are you using an older version of Windows that doesn’t come with the power to “Refresh”?
Maybe it is time to start from scratch.
- Enter your BIOS set-up.
- This is where you need to change your computer’s boot order. Make it so that the boot happens not from the existing system files, but from the CD/DVD Drive.
- Place the original Windows disk in the CD/DVD drive.
- Turn on or restart the device.
- Choose where you’d like the system files to be installed.
- Your PC will restart several times as the process runs its course.
FAQ’s
How to Fix Windows System Errors Like Error 110?
These errors are complex and require great expertise in the software department for a person to solve errors like ERROR_OPEN_FAILED. Sometimes, the fault can be small such as “Access Denied”. Most of these errors can be fixed by running the program as an administrator. However, for complex errors such as missing .dll files, memory problem, device problem, expertise is required.
How Long Will It Take to Fix Windows System Errors?
Solving the problem is often not as complicated as diagnosing the issue. Since Windows System Errors can be due to a variety of reasons, it can be a bit difficult to find the exact cause. Sometimes the issue is with the hardware and sometimes the software. It can take you a good few hours to find the problem; solving it will take more time. However, with a computer repair software, sometimes the problem can be solved in minutes.
I’m Not a Computer Technician, Can I Still Fix an Error Like ERROR_OPEN_FAILED?
You cannot fix Windows System Errors like Error 110 on your own. But there are computer repair software available which can help fix the problem without having to bring it to the repair shop. The program is designed to scan your computer and diagnose exactly what is going on and recommend fixes. With an easy to use user interface, even a non-computer technician can use it.
![]()
Start Download Now
Author:

Curtis Hansen has been using, fiddling with, and repairing computers ever since he was a little kid. He contributes to this website to help others solve their computer issues without having to buy a new one.
![]()
Prevent Windows Error Code 110 from appearing
The system cannot open the device or file specified (code 110)
This page shows you the easy and correct steps required to repair a Windows 110 error. Check it out and finally get rid of this problem.
The Problem
When you are attempting to install the .NET framework to a PC or server, you get the Windows error code 110 when the temp directory appears to be encrypted. This error stops the installation from taking place and needs to be resolved to complete installation.
Solution
This is an installation error that can prevent you from adding .NET to a computer or server. As the .NET architecture is a requirement for many software applications to install or run successfully, you need to know precisely what caused the error message to occur and how you can quickly resolve the error message to complete the installation of the .NET architecture.
This error message occurs when the temp file is set to encrypted. The encryption prevents the installation of .NET due to the inability to read and write to that directory effectively for the installation process.
Here are the resolution steps for Windows error code 110:
- Right click on the Temp folder located at C:\Documents and Settings\User profile\Local
- Settings\Temp.
- Click on Properties.
- Click on Advanced.
- Click the box next to Encrypt contents to secure data. Make sure that you are unchecking the box.
- Run the .NET installation.
- Repeat steps 1 through 4, only this time check the encrypt box to restore the encryption settings that you cleared the first time.
These steps should resolve the error code 110. If you do not use the encryption on a regular basis, you may want to skip step 6 listed above and keep the temp directory un-encrypted to prevent future problems that might occur during a software installation that uses the temp directory to store files while the installation is taking place.
TipFor more information, please see: How to fix Installation error #110
![]()
![]()
![]()
![]()
Other Installation error messages
- ERROR_SUCCESS_REBOOT_REQUIRED’
- FDI server error
- An internal error has occurred. Contact Microsoft Product Support Services (PSS) for assistance.
- The terminal services could not locate a license server
- No process in the command subtree has a signal handler. (Code 205)
Did you know why you are getting Error 110 Google Play Store Android Smartphone Device + Windows PC Code problem & how to fix this error problem from your PC permanently then check out this post of finding out how we fix and solve this error code problem?
This shows an error code message like;

Unknown error code during application install Error 110
This error problem occurs mainly while updating or installing apps. It also happens due to an incompatibility of the Operating system (O.S.). This Error 110 also occurs due to many reasons. From this error, the system cannot open the file or device. This Error Code 110 is seen in the smartphone running Android custom ROM & rarely it is observed in devices running stock Android.
Causes of Error 110 Google Play Store Android Smartphone Device + Windows Issue:
- Unsupported android apps
- Incompatible Operating system (O.S.)
- Adobe Acrobat error
- Custom ROM
- Connection timed out
- Incompatible Apps
- Android unknown error issue
So, here are the guide and the great methods to quickly fix and resolve this type of Error 110 Google Play Store Android Smartphone Device + Windows PC Code problem from your PC completely.
How to Fix Error 110 Google Play Store Android Smartphone Devices + Windows Issue
For Google Play Store Devices:
1. Reset App Preference –
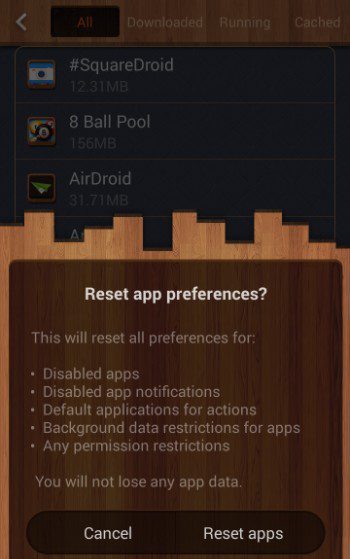
This is also an excellent simple Error 110 Google play method you can try to fix the google play store Error Code. So, for that
- Go to the Settings
- Click on Apps or Installed Apps
- Select the ‘More‘ button in the Apps
- Click on Reset App Preference
- Select Reset Apps
- After completing, close the tab there
- That’s it, done
It will reset all preferences for, Disabled apps, Disabled app notifications, default applications for actions, background data restrictions for apps, and any permission restrictions and fix your Android Error 110 fix google play store code problem.
**NOTE - You will not lose any app data.
2. Download Apps through APK (Android Application Package) File –
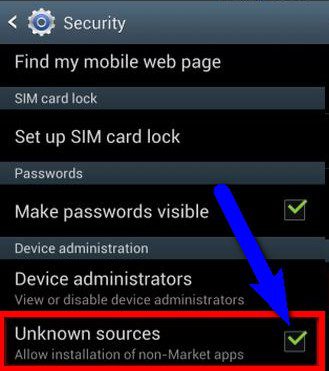
- Go to the settings tab
- Scroll down and go to the Security option there
- If it is Unchecked, Check the “Unknown Source” item checked
(This will allow you to install apps from non-market applications) - Now, directly download the APK file
- After downloading, close the tab
- That’s it, done
By unchecking this option now, you can easily download the apps from the APK file successfully and also get rid of this google play Error 110 during the installation problem.
3. Clear your Google Play Store App. Data & Cache –
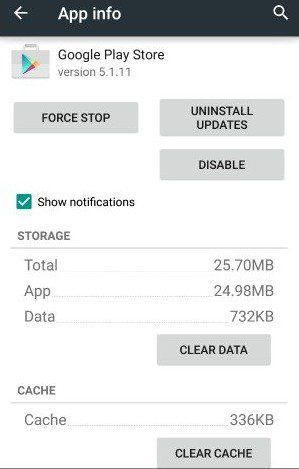
One of the best Error Code 110 Chromecast methods that many tried and succeeded in is this approach; It will help you to fix this Error 110 connection timed out Code Google Play store problem. For that,
- Go to the Settings
- Select Installed Apps or Apps
- Search for Google Play Store & Click on it
- Click on Clear Data & Clear Cache Button
- After clearing, close the tab there
- That’s it, done
It will Clear all your Data and your caches of the Google Play Store. Now you have a new Google Play Store for use.
4. Remove your Google Account & Reconfigure it –
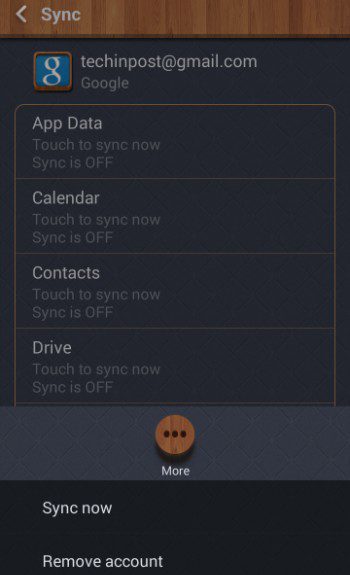
It is also one of the natural way methods to solve this Google Play movies Error 110 Code problem. For doing that first,
- Go to the Settings
- Click on the ‘Accounts‘ Button
- Select your Google Account there
- Click on ‘Remove Account.’
- It will Remove your Google Account
- Reconfigure your Google Account again
- After finishing, close the tab there
- That’s it, Done
Now, after removing your Google Account, Reconfigure it back to start your Google Play Store & check that it solves your, this Error 110 elsword google play store problem.
5. Clear the Google Service Framework App. Cache –
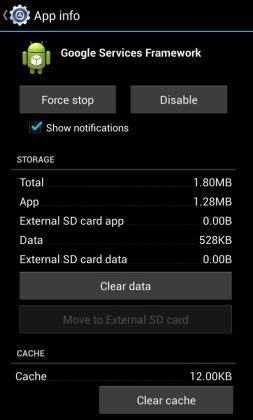
For solving this problem and get rid of this Error 110 Roblox you can clear your Google Service Framework cache. Here are some steps that how to Clear Google Service Framework Cache.
- Go to the Settings
- Click on Installed Apps or Apps
- Search for Google Service Framework & Click on it
- Select the Clear Cache button
- After completing, close the tab there
- That’s it, Done
It will Clear all your Google Service Framework Cache. Hope it will help to fix this Error 110 google play problem.
For Windows PC:
1. Fix by unchecking the Temp Box in Windows –
- Go to the start menu
- Search or directly go to the ‘Temp‘ Folder there
” C:\Documents and Settings\Userprofile\Local settings\Temp “ - Right-click on it &
- Click on the Properties tab option there
- & Click on the Advanced tab
- Click the box next to Encrypt contents to secure data.
(Make sure that you are unchecking the box) - Run the .NET installation
(Repeat the 1-4 steps, only this time check the encrypt box to restore the encryption settings that you cleared the 1st time)
Fixing this method on the Windows PC can also fix this error code 110 play store problems from your Windows PC successfully.
Conclusion:
These are some guidelines and the tricky ways to get rid of this Error 110 Google Play Store Android Smartphone Device + Windows PC problem from you permanently. Hope it will surely help you to get back from this error problem & hope you liked this Error Code 110 article too..!!
If you are facing this Error 110 Google Play Store Android Smartphone Device problem or any problem while fixing it, then comment down the problem below so that we can fix it too by our top best solution methods guide.
Содержание
- MSI error code 2755 #316
- Comments
- Комп не хочет устанавливть проги. файлы типа -.exe не открывает в чем проблема?
- [BUG] Installer error 2755 #776
- Comments
- Server returned unexpected error 110 attempting to install package
- Вопрос
- Все ответы
- Server returned unexpected error 110 attempting to install package
- Asked by:
- Question
- All replies
MSI error code 2755 #316
Application is installed as on the Hyper-V Host with the same Windows Version and the same installer file.


MSI Log from temp folder:
The text was updated successfully, but these errors were encountered:
Hi @lennybacon
thank you for reporting the issue.
Would you mind running the setup from the command line using this command?
It may produce a more detailed information regarding the error.
Thank you.
I used procmon and the retry button causes msiexec to look for a registry key named HKLMSOFTWAREMicrosoftWindows NTCurrentVersionFontSubstitutesSegoe UI which results in NAME NOT FOUND .

The registry key is also not present on the hyper-v host, where the installation was successful. I’ll run MSI with logging options now.
I had another instance of the installer running on the first attempt
MSI (c) (F0:1C) [09:27:45:307]: Note: 1: 2755 2: 110 3: R:PowerToysSetup.msi
MSI (c) (F0:1C) [09:27:45:307]: Note: 1: 2205 2: 3: Error
MSI (c) (F0:1C) [09:27:45:307]: Note: 1: 2228 2: 3: Error 4: SELECT Message FROM Error WHERE Error = 2755
DEBUG: Error 2755: Server returned unexpected error 110 attempting to install package R:PowerToysSetup.msi.
The installer has encountered an unexpected error installing this package. This may indicate a problem with this package. The error code is 2755. The arguments are: 110, R:PowerToysSetup.msi,
MSI (c) (F0:1C) [09:27:46:446]: Note: 1: 2205 2: 3: Error
MSI (c) (F0:1C) [09:27:46:446]: Note: 1: 2228 2: 3: Error 4: SELECT Message FROM Error WHERE Error = 1709
MSI (c) (F0:1C) [09:27:46:446]: Product: PowerToys — The installer has encountered an unexpected error installing this package. This may indicate a problem with this package. The error code is 2755. The arguments are: 110, R:PowerToysSetup.msi,
Hi @lennybacon
thanks a lot for providing all the information, I didn’t have time to look into this yet, but I will.
Thanks,
I had issues with another installer — keybase — which failed with the same error code. When I do not start the installation from my ram drive (r:) temp directory it worked.
Источник
Комп не хочет устанавливть проги. файлы типа -.exe не открывает в чем проблема?
Вариантов несколько, вот может это поможет :
В какой-то момент, устанавливая на компьютер программы, у которых установщик был в формате .msi, я получал сообщение об ошибке «Системе не удается открыть указанное устройство или файл», после чего установка программы (любой) прекращалась с кодом ошибки 2755. Например, при установке безобидного Google Earth получалось так: «Продукт: Google Earth — Ошибка 2755. Server returned unexpected error 110 attempting to install package C:DOCUME
Потратив целый вечер на бесплодные поиски в Интернете решения данной проблемы, лег спать. Наутро проснувшись, пытался вспомнить, что же я такого сделал со своей машиной, что стала появляться такая ошибка. И вспомнил ведь.
На решение проблемы меня натолкнула статья о проблемах установки Office под Windows 2000 SP3. Там говорилось о том, что такая ошибка может возникнуть, когда у установщика недостаточно прав на папку временных файлов, на свою собственную папку, где он хранит данные об установленных программах.
Однако, в моей конфигурации (Windows XP Home) задать отдельные права на папки не представлялось возможным (Windows XP Home просто не позволяет расширенное управление NTFS файлами и папками) .
НО! когда-то, памятую о приватности, я поставил папке своего аккаунта (которая расположена в Documents and Settings/имя пользователя, в моем случае это было C:Documents and Settingsandyceo) атрибут шифрования. Т. е. вся эта папка, включая подпапки в ней и файлы, были зашифрованы. Как оказалось, даже если я захожу под собственным логином (следовательно программы запускаются от моего имени и имеют полный доступ к зашифрованным файлам и папкам) , а системная учетная запись SYSTEM, от имени которой запускаются все системные службы и приложения, в том числе и тот самый пресловутый Windows Installer, не имеет доступа к зашифрованным папкам и файлам. Установщик пытался записать что-то во временную директорию C:Documents and SettingsandyceoLocal SettingsTemp, которая была зашифрована, и не мог получить к ней доступ, генерировал вышеупомянутую ошибку «Системе не удается открыть указанное устройство или файл».
Проблема полностью разрешилась, когда я убрал атрибуты шифрования с папки C:Documents and SettingsandyceoLocal SettingsTemp.
Такая вот история приключилась со мной. Надеюсь что моя статья кому-нибудь поможет, и счастлливчику уже не надо будет тратить свои нервы и целый вечер на поиски решения.
Если не в тему, попробуйте просто для начала переставить Windows Installer 3.1 или выше
или
Администрирование — Службы — Windows Installer перезапустить
Источник
[BUG] Installer error 2755 #776
Describe the bug
I attempted to install the msi but received error 2755.
To Reproduce
Steps to reproduce the behavior:
See attached log
Desktop (please complete the following information):
- OS: Windows 10 1903
- Accessibility Insights for Windows Version: 1.1
The text was updated successfully, but these errors were encountered:
We’re sorry you’re hitting this issue! We haven’t been able to reproduce the problem you’re seeing, and unfortunately the error information in the log file is fairly generic. The most specific information we think is relevant is Error 2755: Server returned unexpected error 110 attempting to install package , which has many potential causes.
Some options to try:
- Download the installer again and double check that it isn’t corrupted (the SHA256 hash for AccessibilityInsights.msi v1.1.1198.01 should be 2CE37A774B36B7B832AD5A08CCE0F593D9CB8DDE361AEA5F0C5F786ED320F96A )
- Try installing to/from the C: drive, rather than D: like the log suggests you’ve tried already
- If you have any RAMDisk software installed (particularly ImDisk), try disabling it temporarily
- Ensure you’re up to date on Windows Updates
Let us know if any of those solve your problem. If not, can you share which version of Windows you’re trying to install on? You can find this by pressing «Windows + R» and typing winver to get a dialog like this:
Источник
Server returned unexpected error 110 attempting to install package
![]()
Вопрос
![]()
![]()
Все ответы
![]()
![]()
Is it the first time you install LiveMeeting 2007 on Windows 7? Did you install the latest version from the link below?
Please paste the detailed error message here for troubleshooting and check the event viewer to see if there is any error regarding the install.
Let me know the result, thanks.
![]()
![]()
Is it the first time you install LiveMeeting 2007 on Windows 7? Did you install the latest version from the link below?
Please paste the detailed error message here for troubleshooting and check the event viewer to see if there is any error regarding the install.
Here is the exact error message I have:
Microsoft Office Live Meeting 2007
Installation Incomplete
The installer was interrupted before Microsoft Office Live Meeting 2007 could be installed. You
need to restart the installer to try again.
Click «Close» to exit.
Cancel
Let me know the result, thanks.
I was not able to download from the link, when I clicked on accept and install nothing happened, but the one I have says its from January 2009. Also, which event log should I look at, there are so many categories not sure where to look and most of them seem to be 0 entries.
Источник
Server returned unexpected error 110 attempting to install package
This forum is closed. Thank you for your contributions.
Asked by:
![]()
Question
![]()
![]()
![]()
![]()
Is it the first time you install LiveMeeting 2007 on Windows 7? Did you install the latest version from the link below?
Please paste the detailed error message here for troubleshooting and check the event viewer to see if there is any error regarding the install.
Let me know the result, thanks.
![]()
![]()
Is it the first time you install LiveMeeting 2007 on Windows 7? Did you install the latest version from the link below?
Please paste the detailed error message here for troubleshooting and check the event viewer to see if there is any error regarding the install.
Here is the exact error message I have:
Microsoft Office Live Meeting 2007
Installation Incomplete
The installer was interrupted before Microsoft Office Live Meeting 2007 could be installed. You
need to restart the installer to try again.
Click «Close» to exit.
Cancel
Let me know the result, thanks.
I was not able to download from the link, when I clicked on accept and install nothing happened, but the one I have says its from January 2009. Also, which event log should I look at, there are so many categories not sure where to look and most of them seem to be 0 entries.
Источник
In this article, we are going to discuss on How to fix Windows Installer error code 2755 in Windows 10/11. You will be guided with easy steps/methods to resolve the issue. Let’s starts the discussion.
‘Windows Installer error code 2755’: It is common Windows Problem usually occurred while installing a new software program/application or game in your Windows 10/11 computer. This issue indicates you are unable to install new software/game in your Windows computer for some reasons. There could be several reasons behind the issue including the corruption in system files or registry, or in system image, missing Windows Installer folder and some relating permissions, and other Windows issues.
This issue can also be occurred due to malware or viruses infections in your computer. You can run system scan for malware or viruses with some powerful antivirus software or PC Repair Tool offers you to find and remove all types of threats and fix Windows PC issues. It is possible to fix the issue with our instructions. Let’s go for the solution.
Some common Windows Installer error code 2755 forms:
- Internal Error 2755
- Windows Installer Package
- Epic Games Launcher Error Code 2755
- Update Windows Installer
- What Does Error 2755
- Error 2755 Server Returned Unexpected Error 110
- Error Code 2755 Fortnite
- Windows Installer For Windows 7
How to fix Windows Installer error code 2755 in Windows 10/11?
Method 1: Fix Windows Installer error code 2755 with ‘PC Repair Tool’
‘PC Repair Tool’ is easy & quick way to find and fix BSOD errors, DLL errors, EXE errors, problems with programs/applications, malware or viruses issues, system files or registry issues, and other system issues with just few clicks.
Method 2: Create Installer Folder
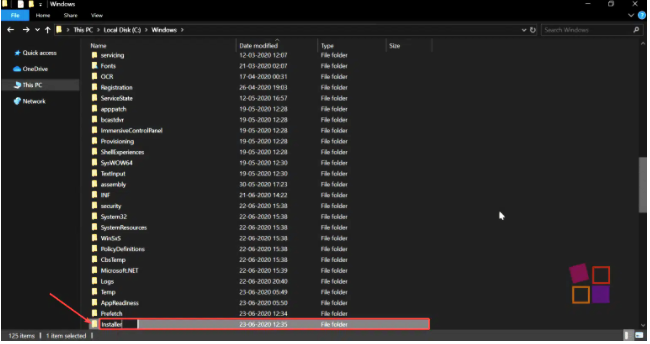
This issue can be occurred due to missing Windows Installer folder. You can create Installer folder in order to fix the issue.
Step 1: Open ‘This PC’ or ‘My Computer’ in Windows PC and go to ‘Windows Folder’ where Windows OS is installed like ‘C: > Windows’ folder
Step 2: Right-click on empty space and select ‘New > Folder’ and name the folder to ‘Installer’ and save it
Step 3: Once done, restart your computer and check if the issue is resolved.
Method 3: Check if Windows Installer service is running
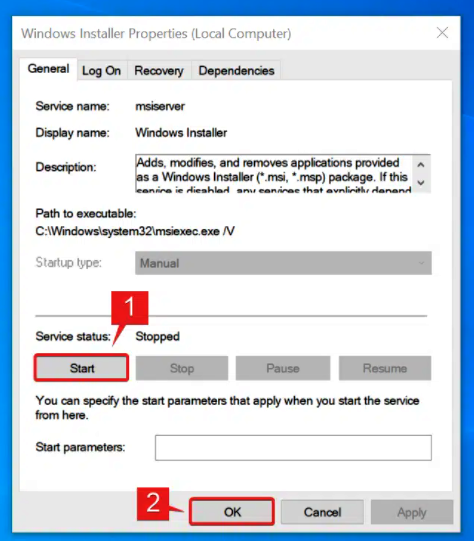
Step 1: Open ‘Services’ app in Windows PC via Windows Search Box
Step 2: Find and double-click on ‘Windows Installer’ service to open its ‘Properties’.
Step 3: Select ‘Automatic’ from ‘Startup Type’ dropdown, and hit ‘Start’ button under ‘Service Status’ section, and then hit ‘Apply > Ok’ button to save the changes. Once done, restart your computer and check if the issue is resolved.
Method 4: Decrypt setup file
This issue can be occurred due to encrypted setup file so you can decrypt it in order to fix.
Step 1: Find and right-click on setup file and select ‘Properties’.
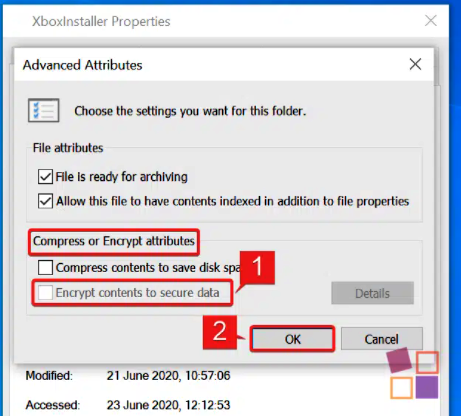
Step 2: Under ‘General’ tab, click ‘Advanced’ button under ‘Attributes’ section
Step 3: Under ‘Encrypt contents to secure data’ under ‘Compress or Encrypt attributes’, click ‘Ok’ button
Step 4: Finally, click ‘Apply > Ok’ in Installer properties window to save the changes.
Method 5: Add User in Setup file
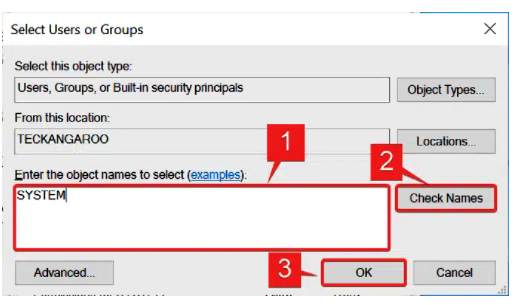
Step 1: Right-click on Setup file and select ‘Properties’
Step 2: Go to ‘Security’ tab, click ‘Edit’ button, click ‘Add’ under ‘Group or usernames’
Step 3: Type SYSTEM’ under ‘Enter the object names to select’ and then click ‘Check Names’ and click ‘Ok’ button
Step 4: Make sure tick ‘Full Control’ once the user is added. Finally, click ‘Ok’ button to save the changes and restart your computer and check if the issue is resolved.
Conclusion
I am sure this post helped you on How to fix Windows Installer error code 2755 in Windows 10 with several easy steps/methods. You can read & follow our instructions to do so. That’s all. For any suggestions or queries, please write on comment box below.
| Номер ошибки: | Ошибка 2755 | |
| Название ошибки: | Windows Installer Error 2755 | |
| Описание ошибки: | Ошибка 2755: Возникла ошибка в приложении Windows Installer. Приложение будет закрыто. Приносим извинения за неудобства. | |
| Разработчик: | Microsoft Corporation | |
| Программное обеспечение: | Windows Installer | |
| Относится к: | Windows XP, Vista, 7, 8, 10, 11 |
Обзор «Windows Installer Error 2755»
Люди часто предпочитают ссылаться на «Windows Installer Error 2755» как на «ошибку времени выполнения», также известную как программная ошибка. Чтобы убедиться, что функциональность и операции работают в пригодном для использования состоянии, разработчики программного обеспечения, такие как Microsoft Corporation, выполняют отладку перед выпусками программного обеспечения. К сожалению, инженеры являются людьми и часто могут делать ошибки во время тестирования, отсутствует ошибка 2755.
Некоторые люди могут столкнуться с сообщением «Windows Installer Error 2755» во время работы программного обеспечения. После того, как об ошибке будет сообщено, Microsoft Corporation отреагирует и быстро исследует ошибки 2755 проблемы. Затем они исправляют дефектные области кода и сделают обновление доступным для загрузки. Если есть уведомление об обновлении Windows Installer, это может быть решением для устранения таких проблем, как ошибка 2755 и обнаруженные дополнительные проблемы.
Сбой во время выполнения Windows Installer, как правило, когда вы столкнетесь с «Windows Installer Error 2755» в качестве ошибки во время выполнения. Причины сбоев обработки можно отличить, классифицируя ошибки 2755 следующим образом:.
Ошибка 2755 Crash — она называется «Ошибка 2755», когда программа неожиданно завершает работу во время работы (во время выполнения). Обычно это происходит, когда Windows Installer не может обрабатывать предоставленный ввод или когда он не знает, что выводить.
Утечка памяти «Windows Installer Error 2755» — ошибка 2755 приводит к постоянной утечке памяти Windows Installer. Потребление памяти напрямую пропорционально загрузке ЦП. Потенциальным фактором ошибки является код Microsoft Corporation, так как ошибка предотвращает завершение программы.
Ошибка 2755 Logic Error — логическая ошибка возникает, когда компьютер производит неправильный вывод, даже если вход правильный. Это происходит, когда исходный код Microsoft Corporation вызывает уязвимость при обработке информации.
Как правило, такие Microsoft Corporation ошибки возникают из-за повреждённых или отсутствующих файлов Windows Installer Error 2755, а иногда — в результате заражения вредоносным ПО в настоящем или прошлом, что оказало влияние на Windows Installer. Основной способ решить эти проблемы вручную — заменить файл Microsoft Corporation новой копией. Помимо прочего, в качестве общей меры по профилактике и очистке мы рекомендуем использовать очиститель реестра для очистки любых недопустимых записей файлов, расширений файлов Microsoft Corporation или разделов реестра, что позволит предотвратить появление связанных с ними сообщений об ошибках.
Типичные ошибки Windows Installer Error 2755
Наиболее распространенные ошибки Windows Installer Error 2755, которые могут возникнуть на компьютере под управлением Windows, перечислены ниже:
- «Ошибка приложения Windows Installer Error 2755.»
- «Windows Installer Error 2755 не является программой Win32. «
- «Возникла ошибка в приложении Windows Installer Error 2755. Приложение будет закрыто. Приносим извинения за неудобства.»
- «Файл Windows Installer Error 2755 не найден.»
- «Windows Installer Error 2755 не найден.»
- «Ошибка запуска программы: Windows Installer Error 2755.»
- «Windows Installer Error 2755 не работает. «
- «Отказ Windows Installer Error 2755.»
- «Ошибка в пути к программному обеспечению: Windows Installer Error 2755. «
Проблемы Windows Installer Error 2755 с участием Windows Installers возникают во время установки, при запуске или завершении работы программного обеспечения, связанного с Windows Installer Error 2755, или во время процесса установки Windows. Выделение при возникновении ошибок Windows Installer Error 2755 имеет первостепенное значение для поиска причины проблем Windows Installer и сообщения о них вMicrosoft Corporation за помощью.
Эпицентры Windows Installer Error 2755 Головные боли
Большинство проблем Windows Installer Error 2755 связаны с отсутствующим или поврежденным Windows Installer Error 2755, вирусной инфекцией или недействительными записями реестра Windows, связанными с Windows Installer.
В первую очередь, проблемы Windows Installer Error 2755 создаются:
- Недопустимые разделы реестра Windows Installer Error 2755/повреждены.
- Загрязненный вирусом и поврежденный Windows Installer Error 2755.
- Другая программа злонамеренно или по ошибке удалила файлы, связанные с Windows Installer Error 2755.
- Другое программное обеспечение, конфликтующее с Windows Installer, Windows Installer Error 2755 или общими ссылками.
- Поврежденная установка или загрузка Windows Installer (Windows Installer Error 2755).
Продукт Solvusoft
Загрузка
WinThruster 2022 — Проверьте свой компьютер на наличие ошибок.
Совместима с Windows 2000, XP, Vista, 7, 8, 10 и 11
Установить необязательные продукты — WinThruster (Solvusoft) | Лицензия | Политика защиты личных сведений | Условия | Удаление