What is Error 1013?
Error 1013 is a kind of Runtime error that is found in the Microsoft Windows operating systems. The file can be found for Microsoft Access. Access Error 1013 has a popularity rating of 1 / 10.
Errors
This tutorial contains information on Error 1013 or otherwise known as Access Error 1013. Errors such as Access Error 1013 indicate your machine has faulty hardware or software that should be fixed when possible. Below is information on how to repair Error 1013 and get your computer back to normal.
 Signs of Error 1013:
 Signs of Error 1013:
- When your computer freezes or locks up at random.
- When your computer crashes when you are running Microsoft Access.
- If Access Error 1013 pops up and causes a program to shutdown or your computer to crash.
- Your computer is running slow, taking a long time to boot up, and you suspect Error 1013 by Microsoft Access is the cause.
What Causes Runtime Errors Like Error 1013?
There are several causes of runtime errors like Access Error 1013, such as viruses, out of date drivers, missing files or folders, incomplete or poor installation, and registry errors. They can also occur due to an issue with the computer’s memory, which may often be due to a hardware problem. In some cases there was an issue installing Microsoft Access and an error occurred.
How to Fix Access Error 1013
 How to Fix
 Follow the step by step instructions below to fix the Error 1013 problem. We recommend you do each in order. If you wish to skip these steps because they are too time consuming or you are not a computer expert, see our easier solution below.
Step 1 — Uninstall and Reinstall Microsoft Access
If the Access Error 1013 is a result of using Microsoft Access, you may want to try reinstalling it and see if the problem is fixed. Please follow these steps:
Windows XP
- Click “Start Menu”.
- Click “Control Panel”.
- Select the “Add or Remove” program icon.
- Find the Error 1013 associated program.
- Click the Change/Remove button on the right side.
- The uninstaller pop up will give you instructions. Click “okay” or “next” or “yes” until it is complete.
- Reinstall the software.
Windows 7 and Windows Vista
- Click “Start Menu”.
- Click “Control Panel”.
- Click “Uninstall a Program” which is under the “Programs” header.
- Find the Error 1013 associated program.
- Right click on it and select “Uninstall”.
- The uninstaller pop up will give you instructions. Click “okay” or “next” or “yes” until it is complete.
- Reinstall the software and run the program.
Windows 8, 8.1, and 10
- Click “Start Menu”.
- Click “Programs and Features”.
- Find the software that is linked to **insert file name**.
- Click Uninstall/Change.
- The uninstaller will pop up and give you instructions. Click “okay” and “next” until it is complete.
- Restart your computer.
- Reinstall the software and run the program.
Step 2 — Remove Registry Entry related to Error 1013
 WARNING: Do NOT edit the Windows Registry unless you absolutely know what you are doing. You may end up causing more trouble than you start with. Proceed at your OWN RISK.
- Create a backup of registry files.
- Click “Start”.
- Type regedit, select it, and grant permission in order to proceed.
- Click HKEY LOCAL MACHINE>>SOFTWARE>>Microsoft>>Windows>>Current Version>>Uninstall.
- Find the Access Error 1013 software from the list you wish to uninstall.
- Select the software and double click the UninstallString icon on the right side.
- Copy the highlighted text.
- Exit and go to the search field.
- Paste the data.
- Select Okay in order to uninstall the program.
- Reinstall the software.
Step 3 – Ensure Junk Isn’t Causing Access Error 1013
Any space that isn’t regularly cleaned out tends to accumulate junk. Your personal computer is no exception. Constant web browsing, installation of applications, and even browser thumbnail caches slow down your device and in the absence of adequate memory, can also trigger a Access Error 1013 error.
So how do you get around this problem?
- You can either use the Disk Cleanup Tool that comes baked into your Windows operating system.
- Or you can use a more specialized hard drive clean up solution that does a thorough job and flushes the most stubborn temporary files from your system.
Both solutions may take several minutes to complete the processing of your system data if you haven’t conducted a clean up in a while.
The browser caches are almost a lost cause because they tend to fill up quite rapidly, thanks to our constantly connected and on the go lifestyle.
Here’s how you can run the Window’s Disk Cleanup Tool, without performance issues or surprises.
- For Windows XP and Windows 7, the program can be ran from “Start” and from the “Command Prompt”.
- Click “Start”, go to All Programs > Accessories > System Tools, click Disk Cleanup. Next choose the type of files you wish to remove, click OK, followed by “Delete Files”.
- Open up the Command Prompt, type “c:\windows\cleanmgr.exe /d” for XP and “cleanmgr” for Windows 7. Finish by pressing “Enter”.
- For Windows 8 and Windows 8.1, the Disk Cleanup Tool can be accessed directly from “Settings”. Click “Control Panel” and then “Administrative Tools”. You can select the drive that you want to run the clean up on. Select the files you want to get rid of and then click “OK” and “Delete Files”.
- For Windows 10, the process is simplified further. Type Disk Cleanup directly in the search bar and press “Enter”. Choose the drive and then the files that you wish to wipe. Click “OK”, followed by “Delete Files”.
The progressive ease with which the Cleanup Tool can be used points to the growing importance of regularly deleting temporary files and its place in preventing Access Error 1013.
![]() PRO TIP:
PRO TIP:
Remember to run the Disk Cleanup as an administrator.
Step 4 – Fix Infections and Eliminate Malware in Your PC
 How do you gauge if your system is infected with a malware and virus?
Well, for one, you may find certain applications misbehaving.
And you may also see the occurrence of Error 1013.
Infections and malware are the result of:
- Browsing the Internet using open or unencrypted public Wi-Fi connections
- Downloading applications from unknown and untrustworthy sources
- Intentional planting of viruses in your home and office networks
But thankfully, their impact can be contained.
- Enter “safe mode” by pressing the F8 key repeatedly when your device is restarting. Choose “Safe Mode with Networking” from the Advanced Boot Options menu.
- Back up all the data in your device to a secure location. This is preferably a storage unit that is not connected to your existing network.
- Leave program files as is. They are where the infection generally spreads from and may have been compromised.
- Run a thorough full-system scan or check of an on-demand scanner. If you already have an antivirus or anti-malware program installed, let it do the heavy lifting.
- Restart your computer once the process has run its course.
- Lastly, change all your passwords and update your drivers and operating system.
![]() PRO TIP: Are you annoyed by the frequent updates to your antivirus program? Don’t be! These regular updates add new virus signatures to your software database for exponentially better protection.
PRO TIP: Are you annoyed by the frequent updates to your antivirus program? Don’t be! These regular updates add new virus signatures to your software database for exponentially better protection.
Step 5 – Return to the Past to Eliminate Error 1013
The steps outlined up until this point in the tutorial should have fixed Access Error 1013 error. But the process of tracking what has caused an error is a series of educated guesses. So in case the situation persists, move to Step 5.
Windows devices give users the ability to travel back in time and restore system settings to an uncorrupted, error free state.
This can be done through the convenient “System Restore” program. The best part of the process is the fact that using System Restore doesn’t affect your personal data. There is no need to take backups of new songs and pictures in your hard drive.
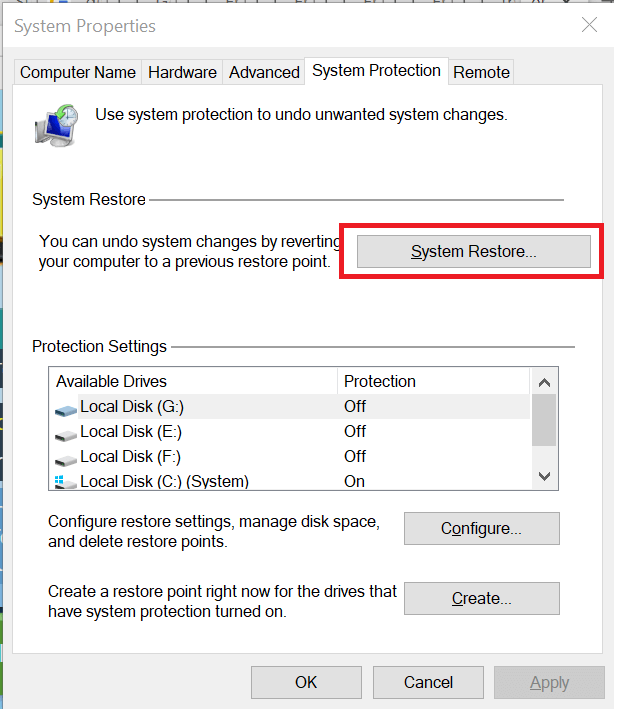
- Open “Control Panel” and click on “System & Security”.
- Choose the option “System”.
- To the left of the modal, click on “System Protection”.
- The System Properties window should pop-up. You’ll be able to see the option “System Restore”. Click on it.
- Go with “Recommended restore” for the path of least hassles and surprises.
- Choose a system restore point (by date) that will guarantee taking your device back to the time when Error 1013 hasn’t been triggered yet.
- Tap “Next” and wrap up by clicking “Finish”.
If you’re using Windows 7 OS, you can reach “System Restore” by following the path Start > All Programs > Accessories > System Tools.
Step 6 — Error 1013 Caused by Outdated Drivers
Updating a driver is not as common as updating your operating system or an application used to run front-end interface tasks.
Drivers are software snippets in charge of the different hardware units that keep your device functional.
So when you detect an Access Error 1013 error, updating your drivers may be a good bet. But it is time consuming and shouldn’t be viewed as a quick fix.
Here’s the step-by-step process you can go through to update drivers for Windows 8, Windows 8.1 and Windows 10.
- Check the site of your hardware maker for the latest versions of all the drivers you need. Download and extract them. We strongly advice going with original drivers. In most cases, they are available for free on the vendor website. Installing an incompatible driver causes more problems than it can ever fix.
- Open “Device Manager” from the Control Panel.
- Go through the various hardware component groupings and choose the ones you would like to update.
- On Windows 10 and Windows 8, right-click on the icon of the hardware you would like to update and click “Update Driver”.
- On Windows 7 and Vista, you right-click the hardware icon, choose “Properties”, navigate to the Driver panel, and then click “Update Driver”.
- Next you can let your device automatically search for the most compatible drivers, or you can choose to update the drivers from the versions you have on your hard drive. If you have an installer disk, then the latter should be your preferred course of action. The former may often get the driver selection incorrect.
- You may need to navigate a host of warnings from the Windows OS as you finalize the driver update. These include “Windows can’t verify that the driver is compatible” and “Windows can’t verify the publisher of this driver”. If you know that you have the right one in line, click “Yes”.
- Restart the system and hopefully the Access Error 1013 error should have been fixed.
Step 7 – Call the Windows System File Checker into Action
 By now the Access Error 1013 plaguing your device should have been fixed. But if you haven’t resolved the issue yet, you can explore the Windows File Checker option.
With the Windows File Checker, you can audit all the system files your device needs to operate, locate missing ones, and restore them.
Sound familiar? It is almost like “System Restore”, but not quite. The System Restore essentially takes you back in time to a supposedly perfect set up of system files. The File Checker is more exhaustive.
It identifies what is amiss and fills the gaps.
- First and foremost, open up an elevated command prompt.
- Next, if you are using Windows 8, 8.1 or 10, enter “DISM.exe /Online /Cleanup-image /Restorehealth” into the window and press Enter.
- The process of running the Deployment Image Servicing and Management (DISM) tool may take several minutes.
- Once it completes, type the following command into the prompt “sfc /scannow”.
- Your device will now go through all protected files and if it detects an anomaly, it will replace the compromised version with a cached version that resides at %WinDir%\System32\dllcache.
Step 8 – Is your RAM Corrupted? Find Out.
Is it possible? Can the memory sticks of your device trigger Error 1013?
It is unlikely – because the RAM chips have no moving parts and consume little power. But at this stage, if all else has failed, diagnosing your RAM may be a good move.
You can use the Windows Memory Diagnostics Tool to get the job done. Users who are on a Linux or Mac and are experiencing crashes can use memtest86.
- Open up your device and go straight to the “Control Panel”.
- Click on “Administrative Tools”.
- Choose “Windows Memory Diagnostic”.
- What this built-in option does is it burns an ISO image of your RAM and boots the computer from this image.
- The process takes a while to complete. Once it is done, the “Status” field at the bottom of the screen populates with the result of the diagnosis. If there are no issues with your RAM/memory, you’ll see “No problems have been detected”.
One drawback of the Windows Memory Diagnostic tool pertains to the number of passes it runs and the RAM segments it checks.
Memtest86 methodically goes over all the segments of your memory – irrespective of whether it is occupied or not.
But the Windows alternative only checks the occupied memory segments and may be ineffective in gauging the cause of the Access Error 1013 error.
Step 9 – Is your Hard Drive Corrupted? Find Out.
Your RAM or working memory isn’t the only culprit that may precipitate an Access Error 1013 error. The hard drive of your device also warrants close inspection.
The symptoms of hard drive error and corruption span:
- Frequent crashes and the Blue Screen of Death (BSoD).
- Performance issues like excessively slow responses.
- Errors like Error 1013.
Hard drives are definitely robust, but they don’t last forever.
There are three things that you can do to diagnose the health of your permanent memory.
- It is possible that your device may have a hard time reading your drive. This can be the cause of an Access Error 1013 error. You should eliminate this possibility by connecting your drive to another device and checking for the recurrence of the issue. If nothing happens, your drive health is okay.
- Collect S.M.A.R.T data by using the WMIC (Windows Management Instrumentation Command-line) in the command prompt. To do this, simply type “wmic” into the command prompt and press Enter. Next follow it up with “diskdrive get status”. The S.M.A.R.T status reading is a reliable indicator of the longevity of your drive.
- Fix what’s corrupt. Let’s assume you do find that all isn’t well with your hard drive. Before you invest in an expensive replacement, using Check Disk or chkdsk is worth a shot.
- Open the command prompt. Make sure you are in Admin mode.
- Type “chkdsk C: /F /X /R” and press “Enter”. “C” here is the drive letter and “R” recovers data, if possible, from the bad sectors.
- Allow the system to restart if the prompt shows up.
- And you should be done.
These steps can lead to the resolution you’re seeking. Otherwise the Access Error 1013 may appear again. If it does, move to Step 10.
Step 10 – Update Windows OS
 Like the software applications you use to render specific tasks on your device, the Operating System also requires periodic updates.
Yes, we’ve all heard the troubling stories.
Devices often develop problems post unfinished updates that do not go through. But these OS updates include important security patches. Not having them applied to your system leaves it vulnerable to viruses and malware.
And may also trigger Error 1013.
So here’s how Windows 7, Windows 8, Windows 8.1 and Windows 10 users can check for the latest updates and push them through:
- Click the “Start” button on the lower left-hand corner of your device.
- Type “Updates” in the search bar. There should be a “Windows Update” or “Check for Updates” option, based on the OS version you’re using.
- Click it. The system will let you know if any updates are available.
- You have the convenience of choosing the components of the update you’d like to push through. Always prioritize the security updates.
- Click “OK” followed by “Install Updates”.
Step 11 – Refresh the OS to Eliminate Persistent Access Error 1013 Error
“Windows Refresh” is a lifesaver.
For those of you who are still with us and nothing has worked to eliminate the Error 1013, until recently, a fresh install of Windows would have been the only option.
Not anymore.
The Windows Refresh is similar to reinstalling your Windows OS, but without touching your personal data. That’s hours of backup time saved in a jiffy.
Through the Refresh, all your system files become good as new. The only minor annoyance is the fact that any custom apps you’ve installed are gone and the system applications you had uninstalled are back.
Still, it is the best bet as the final step of this process.
- Enter the “Settings” of your PC and click on “Change Settings”.
- Click “Update and recovery” and then choose “Recovery”.
- Select “Keep my files”. This removes apps and settings, but lets your personal files live on.
- You’ll get some warning messages about the apps that will be uninstalled. If you’ve gone through a recent OS upgrade, the Refresh process makes it so that you can’t go back to your previous OS version – if you should ever feel the need to do it.
- Click the “Refresh” button.
Are you using an older version of Windows that doesn’t come with the power to “Refresh”?
Maybe it is time to start from scratch.
- Enter your BIOS set-up.
- This is where you need to change your computer’s boot order. Make it so that the boot happens not from the existing system files, but from the CD/DVD Drive.
- Place the original Windows disk in the CD/DVD drive.
- Turn on or restart the device.
- Choose where you’d like the system files to be installed.
- Your PC will restart several times as the process runs its course.
FAQ’s
Why Fix Runtime Errors Like Error 1013?
Runtime errors like Error 1013 can halt your computer, resulting in loss of data which can lead to delays and frustration. It can get annoying to have to constantly deal with these pop up errors while you are working or using a program. Since they can be fixed, we recommend doing so as soon as you can.
Should I Bring My Computer to the Repair Shop if There are Runtime Errors Like Error 1013?
You can bring it to the repair shop but they will charge you a lot more than trying to fix it on your own or by using a specialized repair software. We would recommend trying some of the DIY ideas first such as diagnosing the problem and then working backwards from there. For example, if a specific program is causing it, try reinstalling the program. If that doesn’t work, try using a software to diagnose the errors on your system. As a last recourse, you can bring it to the repair shop.
Will Removing Runtime Errors Like Error 1013 Improve My Start Up Speed?
Runtime errors have no impact on the start up speed since the error occurs while the program is running. It may, however, cause the OS to crash during or after start up. Correcting runtime errors will have no impact on the startup speed of the computer. It may just help you save time by reducing crashes and errors which may cause the computer to keep starting up.
![]()
Start Download Now
Author:

Curtis Hansen has been using, fiddling with, and repairing computers ever since he was a little kid. He contributes to this website to help others solve their computer issues without having to buy a new one.
| Номер ошибки: | Ошибка 1013 | |
| Название ошибки: | Access Error 1013 | |
| Описание ошибки: | Ошибка 1013: Возникла ошибка в приложении Microsoft Access. Приложение будет закрыто. Приносим извинения за неудобства. | |
| Разработчик: | Microsoft Corporation | |
| Программное обеспечение: | Microsoft Access | |
| Относится к: | Windows XP, Vista, 7, 8, 10, 11 |
Определение «Access Error 1013»
Люди часто предпочитают ссылаться на «Access Error 1013» как на «ошибку времени выполнения», также известную как программная ошибка. Чтобы убедиться, что функциональность и операции работают в пригодном для использования состоянии, разработчики программного обеспечения, такие как Microsoft Corporation, выполняют отладку перед выпусками программного обеспечения. Поскольку разработчики программного обеспечения пытаются предотвратить это, некоторые незначительные ошибки, такие как ошибка 1013, возможно, не были найдены на этом этапе.
Ошибка 1013 также отображается как «Access Error 1013». Это распространенная ошибка, которая может возникнуть после установки программного обеспечения. Когда это происходит, конечные пользователи могут сообщить Microsoft Corporation о наличии ошибок «Access Error 1013». Затем программисты могут исправить эти ошибки в коде и включить исправление, которое можно загрузить с их веб-сайта. Таким образом, когда ваш компьютер выполняет обновления, как это, это, как правило, чтобы исправить проблемы ошибки 1013 и другие ошибки внутри Microsoft Access.
В чем причина ошибки 1013?
Проблема с исходным кодом Microsoft Access приведет к этому «Access Error 1013», чаще всего на этапе запуска. Следующие три наиболее значимые причины ошибок выполнения ошибки 1013 включают в себя:
Ошибка 1013 Crash — программа обнаружила ошибку 1013 из-за указанной задачи и завершила работу программы. Если данный ввод недействителен или не соответствует ожидаемому формату, Microsoft Access (или OS) завершается неудачей.
Утечка памяти «Access Error 1013» — ошибка 1013 утечка памяти приводит к тому, что Microsoft Access использует все больше памяти, что делает ваш компьютер запуск медленнее и замедляет вывод системы. Это может быть вызвано неправильной конфигурацией программного обеспечения Microsoft Corporation или когда одна команда запускает цикл, который не может быть завершен.
Ошибка 1013 Logic Error — Логическая ошибка вызывает неправильный вывод, даже если пользователь дал действительные входные данные. Когда точность исходного кода Microsoft Corporation низкая, он обычно становится источником ошибок.
Как правило, ошибки Access Error 1013 вызваны повреждением или отсутствием файла связанного Microsoft Access, а иногда — заражением вредоносным ПО. Для устранения неполадок, связанных с файлом Microsoft Corporation, большинство профессионалов ПК заменят файл на соответствующую версию. Кроме того, регулярная очистка и оптимизация реестра Windows предотвратит создание неправильных ссылок на пути к файлам Microsoft Corporation, поэтому мы настоятельно рекомендуем регулярно выполнять сканирование реестра.
Типичные ошибки Access Error 1013
Частичный список ошибок Access Error 1013 Microsoft Access:
- «Ошибка программы Access Error 1013. «
- «Недопустимая программа Win32: Access Error 1013»
- «Извините за неудобства — Access Error 1013 имеет проблему. «
- «Не удается найти Access Error 1013»
- «Access Error 1013 не может быть найден. «
- «Ошибка запуска программы: Access Error 1013.»
- «Файл Access Error 1013 не запущен.»
- «Ошибка Access Error 1013. «
- «Неверный путь к программе: Access Error 1013. «
Эти сообщения об ошибках Microsoft Corporation могут появляться во время установки программы, в то время как программа, связанная с Access Error 1013 (например, Microsoft Access) работает, во время запуска или завершения работы Windows, или даже во время установки операционной системы Windows. Запись ошибок Access Error 1013 внутри Microsoft Access имеет решающее значение для обнаружения неисправностей электронной Windows и ретрансляции обратно в Microsoft Corporation для параметров ремонта.
Эпицентры Access Error 1013 Головные боли
Большинство проблем Access Error 1013 связаны с отсутствующим или поврежденным Access Error 1013, вирусной инфекцией или недействительными записями реестра Windows, связанными с Microsoft Access.
Точнее, ошибки Access Error 1013, созданные из:
- Недопустимый Access Error 1013 или поврежденный раздел реестра.
- Файл Access Error 1013 поврежден от вирусной инфекции.
- Другая программа (не связанная с Microsoft Access) удалила Access Error 1013 злонамеренно или по ошибке.
- Другое приложение, конфликтующее с Access Error 1013 или другими общими ссылками.
- Microsoft Access (Access Error 1013) поврежден во время загрузки или установки.
Продукт Solvusoft
Загрузка
WinThruster 2023 — Проверьте свой компьютер на наличие ошибок.
Совместима с Windows 2000, XP, Vista, 7, 8, 10 и 11
Установить необязательные продукты — WinThruster (Solvusoft) | Лицензия | Политика защиты личных сведений | Условия | Удаление
How to fix the issue reported by «error code error 1013»
Special Offer
Instructions
The following steps should fix the error 1013 issue:
- Step 1.Download Outbyte PC Repair application See more information about Outbyte uninstall instructions EULA Privacy Policy
- Step 2.Install and launch the application
- Step 3.Click the Scan Now button to detect issues and abnormalities
- Step 4.Click the Repair All button to fix the issues
| Compatibility | Win 11, 10, 8, 7 |
| Download Size | 21.2 MB |
| Requirements | 300 MHz Processor, 256 MB RAM, 50 MB HDD |
Limitations: trial version offers an unlimited number of scans, backups and restores of your Windows system elements for free. Registration for the full version starts from USD 29.95.
Installation: When you install software, it gives our advertisers a chance to speak to you. ALL OFFERS ARE OPTIONAL. There is no obligation to accept. Simply choose to decline the offer if you are not interested. If you are interested and choose to accept, you’ll help us to offer more software in the future. Again, there is no obligation to accept any offers. You have the option to decline all advertisements and still install and use the software for free.
Web Companion is your first line of defence. With hundreds of thousands of new virus strands created every day, Ad-Aware Web Companion is the perfect complement to your antivirus and web browser security.
A malfunction reported by «error code error 1013» may happen due to a number of different factors. Common causes include incorrectly configured system settings or irregular entries in the system elements, to name a few. Such issues may be resolved with special software that repairs system elements and tunes system settings to restore stability.
The article provides details on what the issue means, potential causes, and ways to resolve the issue.
- 1Meaning of the «error code error 1013»
- 2Causes of the «error code error 1013»
- 3Ways to repair the «error code error 1013»
Meaning of the «error code error 1013»
«Error code error 1013» is an issue name that usually contains details of the malfunction, including why it occurred, which system component or application malfunctioned, along with some other information. The numerical code in the issue name usually contains data that can be deciphered by the manufacturer of the component or application that malfunctioned. The issue with using this code may occur in many different locations within the system, so even though it carries some details in its name, it is still difficult for a user to pinpoint and fix the issue cause without specific technical knowledge or appropriate software.
Causes of the «error code error 1013»
If you have received this warning on your PC, it means that there was a malfunction in your system operation. «Error code error 1013» is one of the issues that users get as a result of the incorrect or failed installation or uninstallation of software that may have left invalid entries in your system elements, improper system shutdown due to a power failure or another factor, someone with little technical knowledge accidentally deleting a necessary system file or system element entry, as well as a number of other causes.
Ways to repair the «error code error 1013»
For an immediate fix of such issues, advanced PC users may be able to repair it by manually editing system elements, and others may want to hire a technician to do it for them. However, since any manipulations with Windows system elements carry a risk of rendering the operating system unbootable, whenever a user is in any doubt of their technical skills or knowledge, they should use a special type of software that is meant to repair Windows system elements without requiring any special skills from the user.
The following steps should help fix the issue:
- Download Outbyte PC Repair application Special offer. See more information about Outbyte uninstall instructions EULA Privacy Policy
- Install and launch the application
- Click the Scan Now button to detect potential issue causes
- Click the Repair All button to fix found abnormalities
The same application can be used to run preventative measures to reduce the chance of this or other system issues appearing in the future.
Некоторые пользователи говорят, что когда они запускают ipconfig/обновить или какая-либо другая IP-команда для восстановления сетевого подключения, с которой они столкнулись. Ошибка: 1013. Была предпринята попытка доступа к сокету способом, запрещенным его разрешением на доступ. Проблема обычно возникает, когда порт заблокирован или используется для двух заданий одновременно. Также высока вероятность того, что сторонний антивирус блокирует соединение и не дает разблокировать IP. В этом посте мы поговорим об этой проблеме и посмотрим, что вы можете сделать, чтобы решить эту проблему.
Необработанная ошибка сокета, ошибка: 10013, была предпринята попытка доступа к сокету способом, запрещенным его разрешениями на доступ.
Исправить ошибку 1013. Была предпринята попытка доступа к сокету способом, запрещенным его правами доступа.
Эта ошибка возникает, когда ваша ОС Windows или любое другое стороннее приложение пытается получить доступ к порту, который уже используется. Более того, пользователи также могут столкнуться с ошибкой 1013 при использовании сторонних антивирусных или VPN-программ. Если вы видите это сообщение об ошибке, сначала перезагрузите компьютер, а затем повторите попытку.
Используйте следующие методы, если вы видите ошибку: 10013, была предпринята попытка доступа к сокету способом, запрещенным его разрешениями на доступ.
- Отключить общий доступ к подключению к Интернету
- Разрешить запуск приложений через брандмауэр Windows
- Удалить сторонний антивирус
- Перезапустите информационные службы Интернета (IIS)
- Использовать точку восстановления системы
Давайте устраним указанную ошибку, используя эти методы.
1]Отключите общий доступ к подключению к Интернету.
При включении общего доступа к Интернету по всем этим протоколам HTTP, HTTPS, FTP, SMTP, POP и IMAP на всех компьютерах сети начинается доступ к ресурсам с вашего компьютера. Проблема начинается, когда доступ к сокету недоступен, а порт заблокирован или отключен. Чтобы решить эту проблему, нам нужно отключить службу общего доступа к подключению к Интернету из диспетчера служб.
- Нажмите клавишу Windows + R, чтобы открыть диалоговое окно «Выполнить».
- Напишите services.msc и нажмите Enter
- В службе Windows найдите службу общего доступа к подключению к Интернету (ICS).
- Как только вы узнаете, дважды щелкните по нему, чтобы открыть свойства
- На вкладке «Общие» выберите «Отключено» в параметре «Время запуска».
- Сохраните изменения и перезагрузите компьютер
Надеюсь, ваша ошибка будет устранена после отключения общего доступа к подключению к Интернету.
2]Временно отключить Защитник Windows
Далее нам нужно временно отключить антивирус Защитника Windows, чтобы он не мешал процессу. Перед запуском ipconfig/renew (или любой другой команды) отключите Защитник Windows, после завершения выполнения снова включите антивирус.
3]Удалить сторонний антивирус
Если вы столкнулись с этой проблемой, сначала следует проверить, не мешает ли сторонний антивирус SMTP-соединениям или нет. Было замечено, что антивирусы блокируют определенные порты, используемые локальным хостом. Таким образом, мы можем четко сказать, что за эту ошибку может быть ответственен сверхзащитный брандмауэр. Чтобы решить эту проблему, временно удалите или отключите сторонний антивирус (например, Avast, Norton и т. д.) и проверьте, решена ли проблема.
Примечание. После устранения проблемы антивирус следует установить и снова запустить, поскольку он защитит вашу систему от атак.
4]Перезапустите информационные службы Интернета (IIS)
Другой способ решить эту проблему — перезапустить Информационную службу Интернета. Перезапуск службы IIS удалит все связанные интернет-службы, включая FTP, SMTP и NNTP, а также удалит сохраненные данные и сбои.
Давайте использовать предписанные шаги, чтобы решить вашу проблему
- Нажмите клавишу Windows, чтобы открыть меню «Пуск».
- Напишите cmd и щелкните правой кнопкой мыши командную строку, выберите «Запуск от имени администратора».
- Выберите «Да», чтобы открыть командную строку.
- Введите «iisreset» и нажмите Enter, чтобы перезапустить службы IIS.
- Остановка и перезапуск интернет-сервисов займет несколько секунд.
Теперь вы проверяете и видите, решена ли ваша проблема.
5]Используйте точку восстановления системы
В любой момент в системе могут возникнуть какие-то проблемы, поэтому воспользуйтесь точкой восстановления системы, чтобы откатить конфигурацию системы к предыдущему состоянию. Это применимо только в том случае, если вы уже создали точку восстановления системы. Выполните предписанные шаги, чтобы использовать восстановление системы.
- Нажмите Windows + R, чтобы открыть диалоговое окно запуска.
- Напишите rstrui и нажмите Enter, чтобы открыть Восстановление системы.
- Выберите «Выбрать другую точку восстановления» и нажмите «Далее».
- Выберите Показать больше точек восстановления.
- Выберите точку восстановления, созданную ранее, и нажмите кнопку «Далее».
- Нажмите кнопку «Готово», и Windows автоматически перезапустится, старое состояние будет восстановлено при следующем запуске.
Надеюсь, ваша проблема будет решена после использования этого метода.
Читать . Устранение проблем с сетью и подключением к Интернету в Windows
Итак, как вы можете видеть, ошибка сокета 1013 не является обычной сетевой проблемой, она возникает, когда порт используется более чем одним протоколом или какой-либо другой проблемой порта. Чтобы решить проблему, вам нужно либо исправить ситуацию с портами, проверить протоколы, либо изменить конфигурацию системы.
Чтение: сброс TCP/IP, сброс DNS, сброс Winsock, сброс прокси-сервера с помощью пакетного файла.
by Tashreef Shareef
Tashreef Shareef is a software developer turned tech writer. He discovered his interest in technology after reading a tech magazine accidentally. Now he writes about everything tech from… read more
Updated on

XINSTALL BY CLICKING THE DOWNLOAD FILE
Get rid of malfunctioning drivers on your PC
SPONSORED
Drivers can often become corrupt as they can interfere with malfunctioning system files, thus arriving to be installed but not running correctly. To keep your drivers running smoothly, your Windows OS must run even smoother. Get it in perfect shape by following the steps below:
- Download Fortect and install it on your PC.
- Start the tool’s scanning process to look for corrupt files that are the source of your problem
- Right-click on Start Repair so the tool can start the fixing algorithm
- Fortect has been downloaded by 0 readers this month, rated 4.4 on TrustPilot
Glyph is a popular software distribution and game management platform for the Windows OS. Sometimes, when opening a game or performing Glyph update, you may encounter glyph launcher error 1013.
This is a common error and can occur due to system issues that may not be related to Glyph etc.
If you are also troubled by this error, here are a couple of troubleshooting tips to help you fix Glyph launcher error 1013 in Windows computers.
Steps to fix Glyph launcher error 1013
1. Check for Glyph update
- Check if you have the latest version of Glyph installed. If the issue is widespread, the developer will release an update to fix the problem.
- Launch Glyph and click the Update button to download and install the new version if available.
Manually update Glyph
- If you are unable to update directly from the Glyph client, update the client manually.
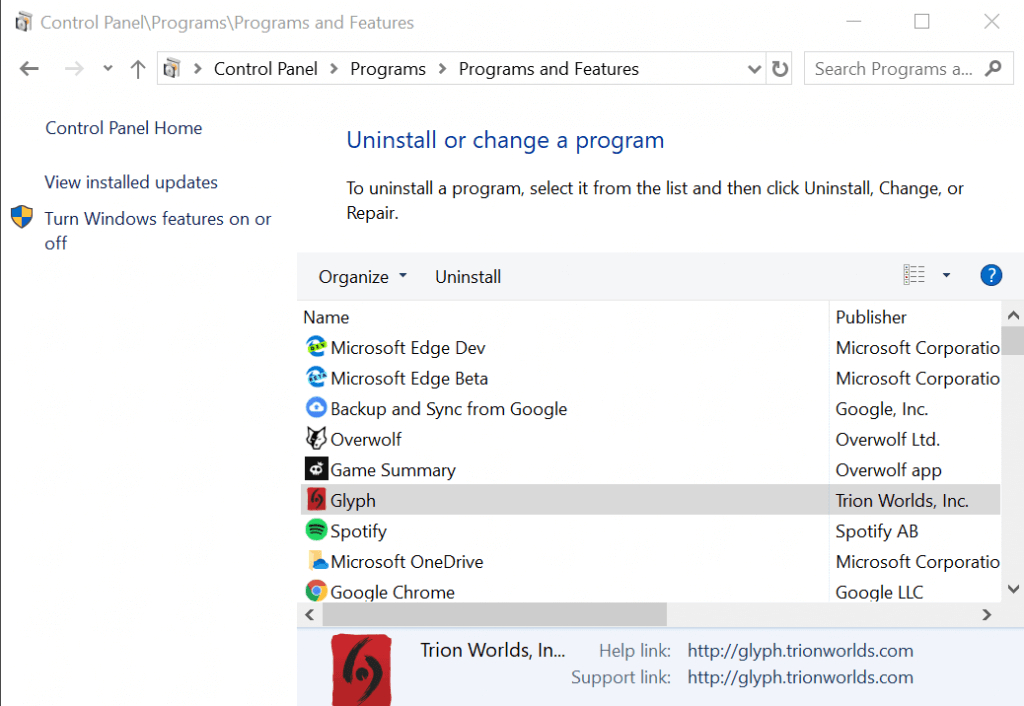
- First, open Control Panel and go to Programs > Programs Features.

- Select Glyph and click on Uninstall.
- Now go to the Glyph page and check if a new update is available.

- Download and install the newer version of the client.
- Even though Glyph update’s automatically, manually doing the same can help you resolve the issue.

Check for service issues
- The aforementioned error also occurs if the Glyph service is down due to regular maintenance.
- Check Glyph’s social media accounts as the developers usually posts about the issues at their end on social media.
Glyph launcher error 1034? Try these solutions
2. Check security software
- The Glyph launch error can occur if your antivirus is blocking connection to the internet. Also, check if Windows Defender Firewall is blocking the connection.
- Click on the System Tray icon to show the hidden icons.
- Right-click on your Antivirus software and select Disable/Quit.
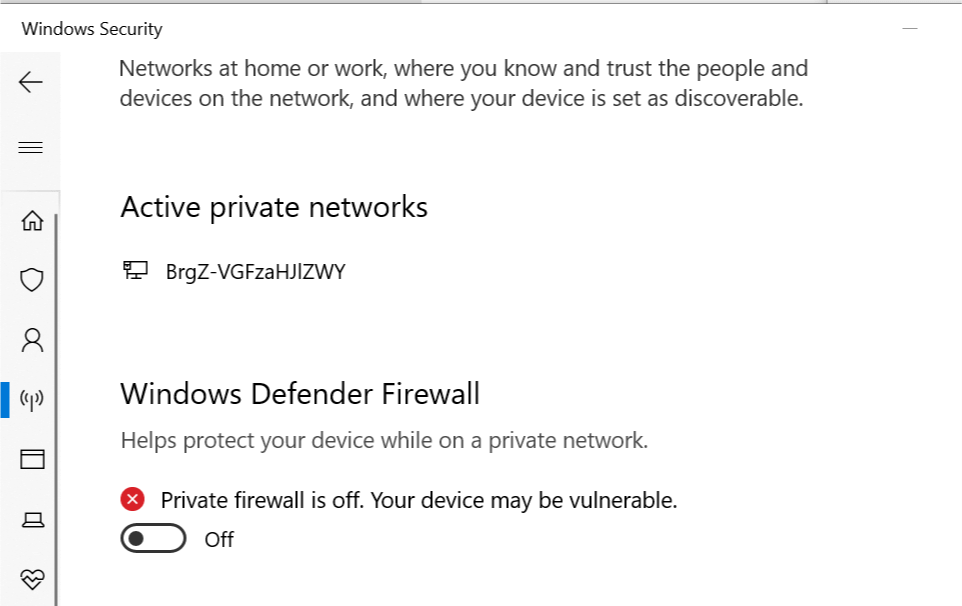
Turn off Windows Defender Firewall
- Click on Start and select Settings.
- Go to Updates and security.
- Click on Windows Security.

- Choose the “Firewall and Network Protection” option.
- Click on your currently active network.

- Click the little switch under the “Windows Defender Firewall” to turn it off.
- Relaunch Glyph and check if the launcher error is resolved.
- Make sure you enable the Antivirus as well the Firewall after diagnosing the issue.

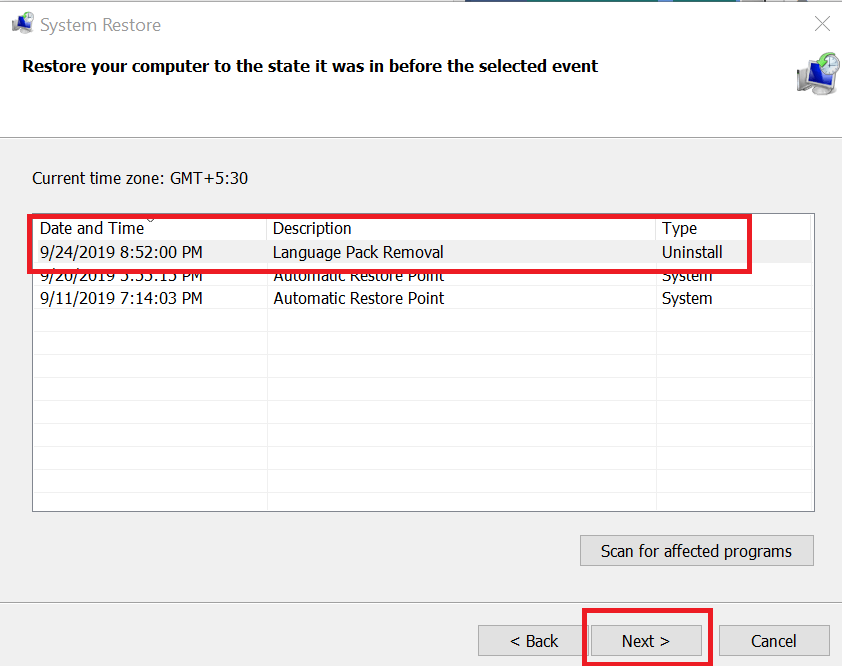
3. Perform System Restore
- Windows OS automatically creates Restore Point when the users install updates and software on the system. You can use these restore points to fix many issues.
- Type restore in the Windows search bar.
- Click on the “Create a Restore Point” option.

- Click on the “System Restore” button and click Next.

- Check the “Show more restore points” box is available.
- Select the most recent restore point and click on Next.
- Read the description and click on Finish.
- Wait till the PC is restored to the selected restore point.
- Once done, try launching Glyph and check if the error is resolved.
Closing words
By following the steps in this article, you can fix the Glyph launcher error 1013 in Windows computers. Do let us know which fix worked for you in the comments.
RELATED STORIES YOU MAY LIKE:
- The best game websites that aren’t blocked by schools
- 7 best game recording software for low-end PCs
- 6 of the cheapest HDMI monitors to buy in 2019
Still experiencing troubles? Fix them with this tool:
SPONSORED
Some driver-related issues can be solved faster by using a tailored driver solution. If you’re still having problems with your drivers, simply install OutByte Driver Updater and get it up and running immediately. Thus, let it update all drivers and fix other PC issues in no time!
![]()