In this article, we are going to discuss on How to fix win32 full.sys bsod error in Windows 10. You are provided with easy steps/methods to resolve the issue. Let’s starts the discussion.
‘win32 full.sys bsod error’:
It is common Windows Problem considered as Blue Screen of Death (BSOD) error. The BSOD error is appeared with messages saying ‘Your PC ran into a problem and needs to restart. We’re just collecting some error info, and then we’ll restart for you’ along with some Windows Stop Codes like SYSTEM_SERVICE_EXCEPTION (win32kbase.sys), APC_INDEX_MIXMATCH, PAGE_FAULT_IN_NONPAGED_AREA, STOP 0x0000001E: KMODE_EXCEPTION_NOT_HANDLED – win32kfull.sys, and STOP 0x0000000A: IRQL_NOT_LESS_EQUAL – win32kfull.sys.
The BSOD error is usually appeared in the middle of your work on computer or when you start/restart your computer. There could be several reasons behind the issue including corrupted/outdated device drivers, faculty RAM or memory, corruption in system files or registry, malware or viruses infections in computer, issue with hardware attached recently or software installed in computer.
You should make sure all device drivers are properly installed and are up-to-date to latest & compatible version in computer. If not, device driver update is necessary in computer if you don’t want to face this type of issue. It is possible to fix the issue with our instructions. Let’s go for the solution.
How to fix win32 full.sys bsod error in Windows 10?
Method 1: Fix ‘win32 full.sys bsod error’ with ‘PC Repair Tool’
‘PC Repair Tool’ is easy & quick way to find and fix BSOD errors, DLL errors, EXE errors, problems with programs/applications, malware or viruses infections in computer, system files or registry issues, and other system issues with just few clicks.
Method 2: Update Device Drivers
Updating all necessary device drivers to latest & compatible version can resolve the issue. You can use Automatic Driver Update Tool for this – offers you to update all Windows drivers including graphics card driver, sound card driver, and other device drivers in computer. You can get this tool through button/link below.
Method 3: Update Windows OS
Updating Windows OS to latest version can resolve the issue.
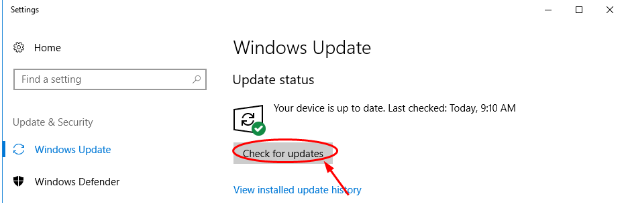
Step 1: Open ‘Settings’ app in Windows PC via Windows Search Box and go to ‘Update and Security > Windows Update’ and click ‘Check for updates’ button
Step 2: Download and install all available updates in computer and once updated, restart your computer and check if the issue is resolved.
Method 4: Run SFC Scan
You can run SFC scan in computer to repair corruption in system files in order to fix the issue.
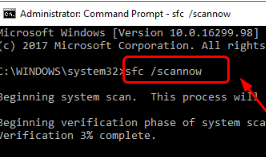
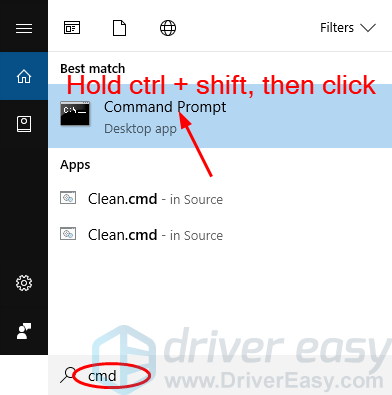
Step 1: Type ‘cmd’ in Windows Search Box and press ‘SHIFT + ENTER’ keys on keyboard to open ‘Command Prompt as Administrator’
Step 2: Type ‘sfc /scannow’ command and hit ‘Enter’ key to execute. Once executed, restart your computer and check if the issue is resolved.
Method 5: Uninstall problematic software
This issue can be occurred due to some problematic software installed in computer or issue with recently installed software. You can uninstall recently installed software or problematic software in order to fix, and then check if the issue is resolved.
Step 1: Open ‘Control Panel’ in Windows PC via Windows Search Box and go to ‘Uninstall a Program > Programs & Features’
Step 2: Find and right-click the problematic software or recently installed application, and select ‘Uninstall’ to uninstall it, and after that, restart your computer and check if the issue is resolved.
Method 6: Run Windows Memory Diagnostic Tool
You can run Windows Memory Diagnostic Tool in computer in order to fix RAM and memory issue.
Step 1: Open ‘Windows Memory Diagnostic’ tool in Windows PC via Windows Search Box
Step 2: Click ‘Restart Now and check for problems’ option and wait to finish scanning and repairing process. Once done, check if the issue is resolved.
Method 7: Run Blue Screen Troubleshooter
Windows built-in Blue Screen trooubleshooter can resolve the issue.
Step 1: Open ‘Settings’ app in Windows PC via Windows Search Box and go to ‘Update & Security > Troubleshoot > Additional Troubleshooters’
Step 2: Find and click ‘Blue Screen’ troubleshooter, and click ‘Run the troubleshooter’ and follow on-screen instructions to finish troubleshooting. Once done, check if the issue is resolved.
Method 8: Perform System Restore
If the issue is still persist, you can perform System Restore in computer in order to restore your computer to valid restore point and fix the issue.
Step 1: Press ‘Windows + R’ keys on keyboard, type ‘rstrui’ in ‘Run’ window and hit ‘Ok’ button to open ‘System Restore’ app
Step 2: Click ‘Next’, select a valid restore point according to date & time when there was no issue at all in computer, and then click ‘Next > Finish’ to start restoring process and once finished, check if the issue is resolved.
Conclusion
I am sure this post helped you on How to fix win32 full.sys bsod error in Windows 10 with easy ways. You can read & follow our instructions to do so. That’s all. For any suggestions or queries, please write on comment box below.
Содержание
Синий экран — одна из распространенных ошибок, с которыми могут столкнуться пользователи Windows. Это довольно неприятно иметь такую ошибку. Здесь мы обсудим ошибку синего экрана, как показано на рисунке ниже. На синем экране вы увидите код win32kfull.sys. Код может отличаться, как указано ниже:
Если вы столкнулись с этой ошибкой на вашем ПК с Windows, вы можете использовать решения, которые мы обсудим, чтобы исправить ошибку типа «синий экран» win32kfull.sys на компьютере под управлением Windows. Таким образом, вам не нужно вызывать техподдержку для этой ошибки.
.системные файлы идут с операционной системой Windows. Большинство файлов .sys представляют собой драйверы устройств реального режима, обеспечивающие успешную связь между оборудованием ПК и системой Windows. Слева находятся важные системные файлы, называемые драйверами режима ядра. Они необходимы для загрузки операционной системы Windows. win32kfull.sys является одним из драйверов устройств режима ядра.
Ниже представлены самые простые решения, чтобы решить ошибку win32kfull.sys:
В этой части мы перечислим 5 простых решений для вас, чтобы попытаться решить проблему с синим экраном win32kfull.sys. Возможно, вам не придется пробовать их все; просто работайте над списком, пока не решите свою проблему.
Вероятно, ошибка win32kfull.sys может быть связана с соответствующим программным обеспечением драйвера. Вероятно, вы успешно решили эту проблему, обновив драйверы устройств.
Обновление драйвера вручную — Вы можете обновить драйверы вручную, перейдя на веб-сайт производителя для своих устройств и выполнив поиск самой последней верной версии драйвера. Обязательно выбирайте только те драйверы, которые совместимы с вашим вариантом версий Windows. Таким образом, вам нужно будет проверить обновление для ваших устройств одно за другим.
1) Скачать и установите Driver Easy.
Или нажмите Обновить все для автоматической загрузки и установки правильной версии всех драйверов, которые отсутствуют или устарели в вашей системе. (Это требует профессионал версия с полной поддержкой и 30-дневной гарантией возврата денег. Вам будет предложено обновить, когда вы нажмете Обновить все.)
4) После обновления драйверов перезагрузите компьютер, чтобы новые драйверы вступили в силу. Проверьте, исчез ли синий экран.
Microsoft время от времени пытается восстановить и улучшить системный файл Windows. Вы можете получить улучшение путем обновления Windows. Установка доступного обновления Windows иногда может помочь решить ошибку nagging win32kfull.sys.
Если вы используете Windows 10:
2) Нажмите Проверьте наличие обновлений. 3) Windows должна проверить наличие обновлений и установить, обнаруживаются ли какие-либо доступные обновления автоматически.
Если вы используете Windows 7:
Решение 3: Запустите проверку системных файлов
Чтобы запустить проверку системных файлов:
3) В открытом черном окне введите SFC / SCANNOW и нажмите Войти. 4) Windows должна начать сканирование и восстановление ваших системных файлов автоматически. Это займет некоторое время, обычно около 15 минут. Подождите, пока проверка не завершится на 100%.
Решение 4. Переустановите только что установленную программу
Чтобы удалить недавно установленную программу:
Чтобы переустановить программу:
Затем перезагрузите компьютер и проверьте, исчезла ли ошибка win32kfull.sys.
RAM (оперативное запоминающее устройство) является формой хранения компьютерных данных. Повреждения в ОЗУ также могут вызвать ошибку синего экрана win32kfull.sys. Вы можете решить это путем проверки вашей оперативной памяти.
Следуйте этим, чтобы проверить вашу оперативную память:
2) Тип Память в поле поиска от Пуск. 3) Нажмите Перезагрузите сейчас и проверьте наличие проблем. 4) После этого ваши окна должны перезагрузиться и проверить оперативную память.
Update: It is also solve the problem on Windows 11.
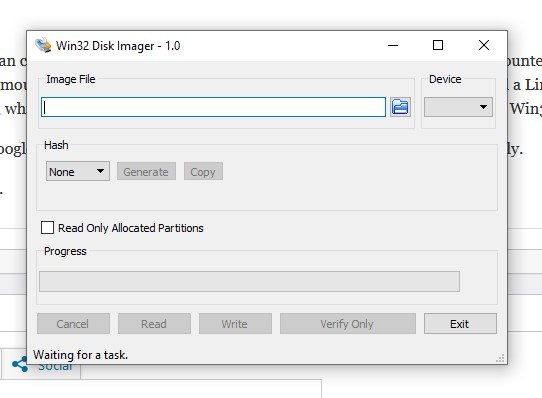
I am trying to burn an ISO file into a USB disk for installation. Most of the time, I am using Win32DiskImager to do the job.
But today, I can not start the Win32diskimager program. I uninstalled it and downloaded a fresh copy from Sourceforge and installed it. Still not working.
I have used it before and it is OK to launch.
So, I did research and found someone who has the same problem as me.
I downloaded Win32DiskImager from SourceForge, as was recommended in some Linux installation instruction (coming from Windows). The installer runs successfully and the program is installed into C:\Program Files (x86) as expected. When launching the program Windows prompts me to accept that this program can make changes, I accept and nothing happens. No service or process launches in Task Manger.
vi kltft
The answer is quite simple.
It turns out that mounted drives can cause issues with Win32DiskImager. In my case Google Drive had mounted itself on the file system. Quitting Google Drive unmounted the drive it had mounted and then Win32DiskImager launched without issue! I also had a Linux ISO mounted (I believe Windows did this automatically after download, which seems odd) and had unmounted that as well before re-launching Win32DiskImager.
So I did the same way, right-click the Google Drive icon at the taskbar, and click quit to stop Google Drive temporarily.
Then, I run Win32DiskImager, it works.
Problem
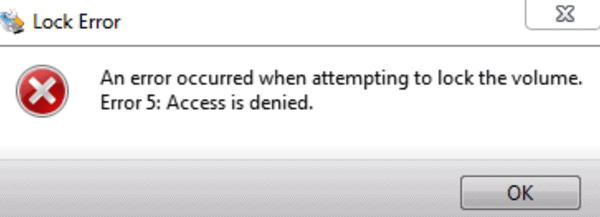
I was building a new Retropie image for my RaspberryPi this week when I hit a hurdle. I attempted to write the RetroPie image (.img) onto the SD Card via Win32 Disk Imager using Microsoft Windows 10 when the following error occurred:
An error occurred when attempting to lock the volume. Error 5: Access is denied.
The SD card looked fine in Windows, I could see it and write to it from within Windows file explorer. I also tried the following which did not work:
- Formatting the SD Card as NTFS
- Formatting the SD card as FAT32
- Using an alternate SD card reader
I come across a couple of solutions and outlined them below, solution number 2 worked for me.
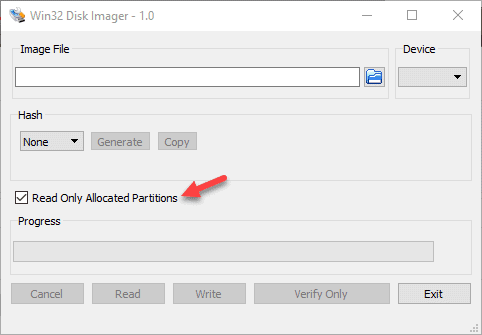
Solution 1
The first solution is a simple one and some people have reported that the problem was fixed for them by selecting the “Read only allocated partitions” checkbox within Win32 Disk Imager:
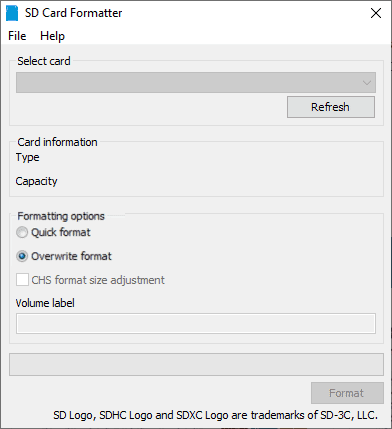
Solution 2
The solution that worked for me was to use a program called SD Memory Card Formatter. Once I formatted the card using this tool, Win32 Disk Imager worked fine and committed the Retropie image to the SD card.
I’ve outlined the steps below:
- Download SD Memory Card Formatter from here.
- Find and Open SD Memory Card Formatter
- It should default to your SD Card – confirm that it’s the correct card if you have multiple readers connected to your machine.
- Update the formatting options to “Overwrite format“
- Set the Volume label to any name you like
- Click Format
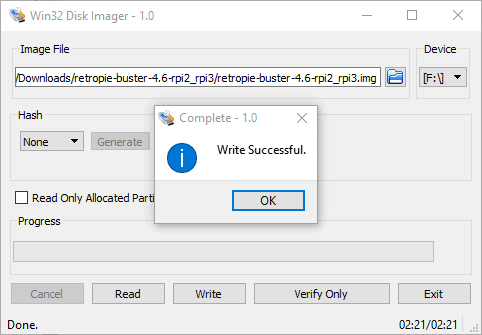
Depending on the size of your SD Card this process may take a while. I had a Class 10 32Gb card and it took just on 15 minutes to complete.
Once the format is complete, re-open Win32 Disk Imager and try copy the image again – it should work this time!
Feel free to post a comment below if you have any issues – Good Luck.
Recent Posts
Just now, your PC suddenly turns into a blue screen. It tells you win32kfull.sys fails with a stop code. The stop code can be different, it could be any one listed below or others:
APC_INDEX_MIXMATCH
SYSTEM_SERVICE_EXCEPTION
PAGE_FAULT_IN_NONPAGED_AREA
This is very frustrating. But don’t panic. Here’s a list of solutions to try.
What is the win32kfull.sys file?
.sys files are coming with Windows operating system. Most .sys files are real-mode device drivers, ensuring the successful communication between your PC hardware and Windows system. The left are critical system files, called kernel-mode device drivers. These are essential for booting your Windows operating system. win32kfull.sys is one of kernel-mode device drivers. Any .sys error can cause serious damage, the most common one, like in your case, blue screen of death error.
How do I solve the win32kfull.sys blue screen error?
In this part, we will list the top 6 easy solutions for you to try to solve the win32kfull.sys blue screen error. You may not have to try them all; just work your way down the list until you solve your problem.
- Update all your available drivers
- Update your Windows system
- Run System File Checker
- Repair corrupted system files with Fortect
- Reinstall your newly installed program
- Check your RAM
Solution 1: Update all your available drivers
win32kfull.sys error could be probably caused by the related driver software. You’re very likely to solve this problem by updating your device drivers.
There are two ways you can update your device drivers: manually or automatically.
Manual driver update – You can update your drivers manually by going to the manufacturer’s website for your devices, and searching for the most recent correct driver. Be sure to choose only drivers that are compatible with your variant of Windows versions. In this way, you will need to check the update for your devices one by one.
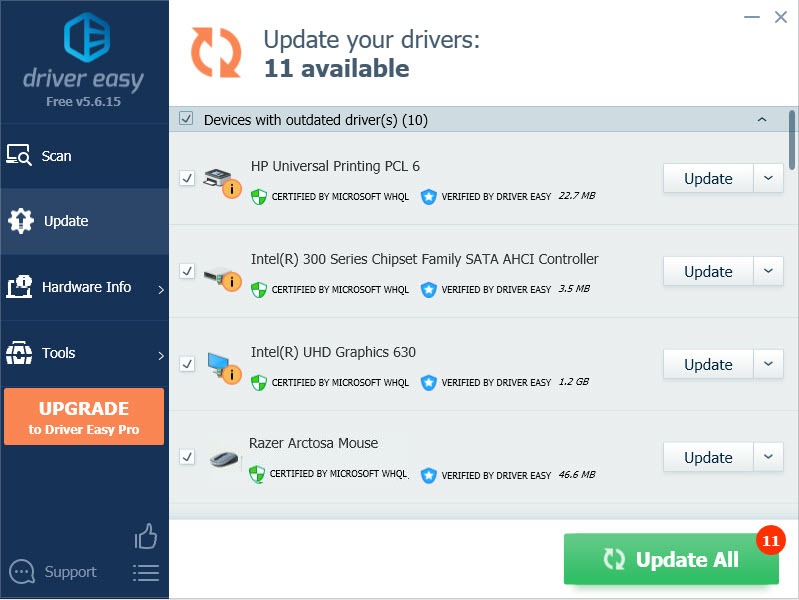
Automatic driver update – If you don’t have the time, patience, or computer skills to update your drivers manually, you can, instead, do it automatically with Driver Easy. Driver Easy will automatically recognize your system and find all the available correct drivers, and it will download and install them correctly:
1) Download and install Driver Easy.
2) Run Driver Easy and click the Scan Now button. Driver Easy will then scan your computer and detect any problem drivers.

3) Click the Update button next to any flagged driver to automatically download and install the correct version of that driver (you can do this with the FREE version).
Or click Update All to automatically download and install the correct version of all the drivers that are missing or out of date on your system. (This requires the Pro version which comes with full support and a 30-day money back guarantee. You’ll be prompted to upgrade when you click Update All.)
4) After updating drivers, please restart your computer to make the new drivers take effect. Check to see if the blue screen is gone.
The Pro version of Driver Easy comes with full technical support.
If you need assistance, please contact Driver Easy’s support team at support@drivereasy.com.
Solution 2: Update your Windows system
Microsoft is trying to repair and improving the Windows system file every now and then. You can get the improvement through updating your Windows. Installing the available Windows update sometimes can help you solve the nagging win32kfull.sys error. Follow the instructions below:
Windows 10 users
Windows 7 users
If you use Windows 10:
1) Type update in the search box from Start. Then click Check for updates from the results.

2) Click Check for updates.
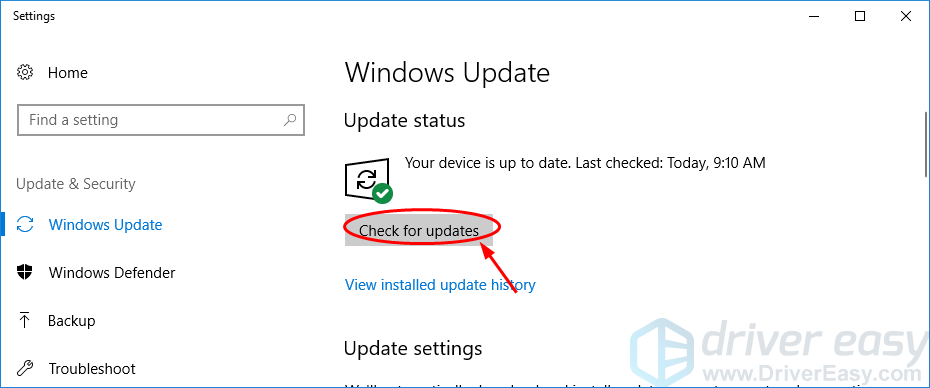
3) Windows should then check for updates and install if any available updates are detected automatically.
4) Reboot your Windows 10 and check to see if the win32kfull.sys error is gone.
If you use Windows 7:
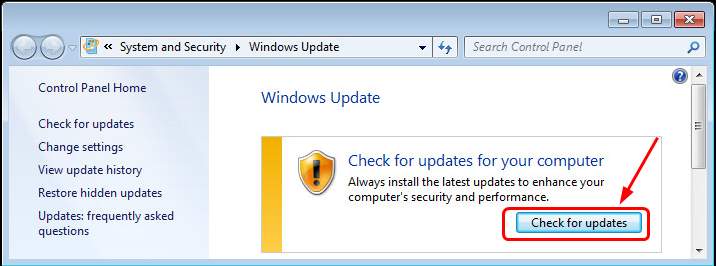
1) Type update in the search box from Start. Then click Check for updates.
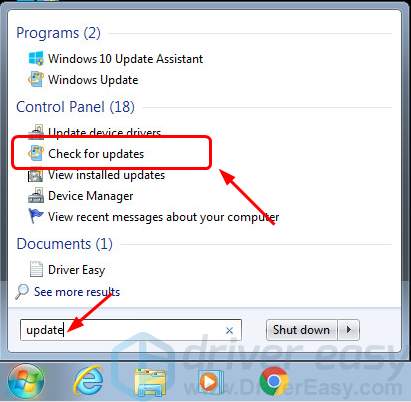
2) Click Check for updates.
3) Windows should then check for updates automatically. If there’s any update available, click Install updates.
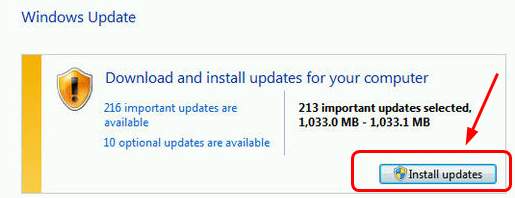
4) Reboot your Windows 7 and check to see if the win32kfull.sys error is gone.
Solution 3: Run System File Checker
System File Checker is a useful tool in the Windows system to help you scan for and repair any corruptions of your system files. Your win32kfull.sys file is no exception.
To run System File Checker:
1) Type cmd in the search box from Start. Then on your keyboard, hold Ctrl + shift (at the same time), meanwhile click Command Prompt (Windows 10) or cmd (Windows 7) from the result.
2) Click Yes when prompted by User Account Control.
3) On the open black window, type sfc /scannow and press Enter.
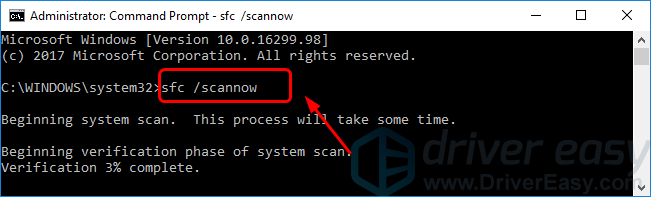
4) Windows should then start to scan for and repair your system files automatically. This will take some time, usually around 15 minutes. Wait till the Verification is 100% complete.
5) When it completes, restart your computer and check to see if the win32kfull.sys error is gone.
Solution 4: Repair corrupted system files with Fortect
Fortect specializes in Windows repair. It scans your system files to see if any are corrupted or missing and replaces system files automatically. It’s like a clean Windows reinstallation in one hour, and you won’t lose any programs, settings, or user data.
Fortect can scan your PC, diagnose any hardware, security, and program issues, and fix them for you. If there are any broken system files, it can replace them without affecting your personal data.
1) Download and install Fortect.
2) Open Fortect and run a free scan of your PC status. This may take a few minutes.
3) You can review a summary of the issues detected after the scan is finished.
If there’s any problem, you can click Start Repair to start the repair process. You’d need to buy the pro version (which comes with a 60-day Money-Back Guarantee) to unlock this feature.

The Pro version of Fortect comes with 24/7 technical support. If you need any assistance, please contact Fortect support:
Email: support@fortect.com
Solution 5: Reinstall your newly installed program
If you confront the win32kfull.sys blue screen error after you install a new program on your Windows, it’s very likely there’s an error to the program and it causes the blue screen error. Follow the guide here to uninstall and re-install your newly installed program.
To uninstall your newly installed program:
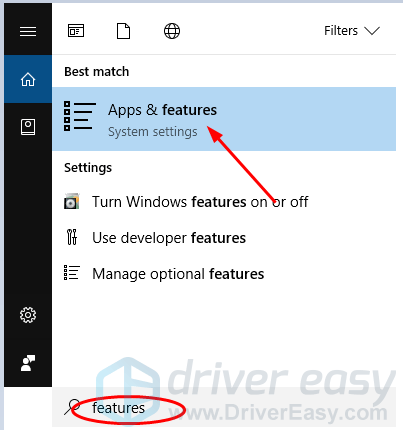
1) Type features in the search box from Start. Then click Apps & features (Windows 10) or Programs and Features (Windows 7).
2) Select your newly installed program, then click Uninstall.

3) Follow the on-screen instructions to complete the uninstall.
To re-install the program:
Please download the installation file of the program from its official website or Microsoft store. Do not download programs from any unsafe website. When downloaded, install the program on your computer.
Then restart your computer and check to see if the win32kfull.sys error is gone.
Solution 6: Check your RAM
RAM (Random-access memory) is a form of computer data storage. Corruptions in RAM may also cause the win32kfull.sys blue screen error. You can solve it by checking your RAM.
Before checking, please remove the memory of the one you have newly installed if you do so. Check if the error disappears after the removal. If the error is gone, please replace a new memory. Instead, go on to check your RAM.
Follow these to check your RAM:
1) Important: Save your work and close programs on your Windows.
2) Type memory in the search box from Start.
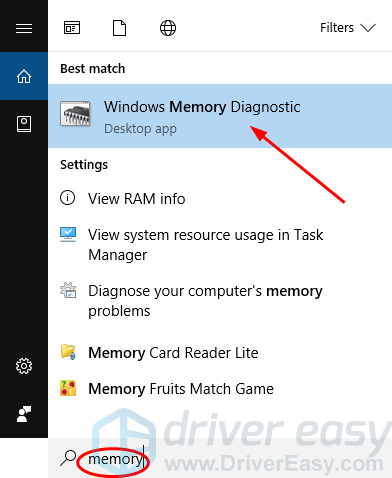
3) Click Restart now and check for problems.

4) Your windows should then restart and check RAM.
5) When it’s done, check to see if the win32kfull.sys error is gone.
So far, you should have solved your problem now. Share with others which solution helps you or, if you have any questions, feel free to tell us via the comment below.