Getting the following Whitelabel Error Page while
I am running Spring Boot MVC app.
Whitelabel Error Page
This application has no explicit mapping for /error, so you are seeing this as a fallback.
Wed Apr 13 15:45:59 IST 2016
There was an unexpected error (type=Internal Server Error, status=500).
Circular view path [home]: would dispatch back to the current handler URL [/rewards/web/home] again. Check your ViewResolver setup! (Hint: This may be the result of an unspecified view, due to default view name generation.)
application.properties
server.contextPath=/rewards/web
rewardsweb-servlet.xml:
<beans xmlns="http://www.springframework.org/schema/beans"
    xmlns:context="http://www.springframework.org/schema/context"
    xmlns:xsi="http://www.w3.org/2001/XMLSchema-instance"
    xmlns:mvc="http://www.springframework.org/schema/mvc"
    xsi:schemaLocation="
        http://www.springframework.org/schema/beans
        http://www.springframework.org/schema/beans/spring-beans-3.2.xsd
        http://www.springframework.org/schema/mvc
        http://www.springframework.org/schema/mvc/spring-mvc-3.2.xsd
        http://www.springframework.org/schema/context
        http://www.springframework.org/schema/context/spring-context-3.2.xsd">

    <context:component-scan base-package="com.rewards.web" />

    <bean
        class="org.springframework.web.servlet.view.InternalResourceViewResolver">
        <property name="prefix">
            <value>/WEB-INF/views/jsp/</value>
        </property>
        <property name="suffix">
            <value>.jsp</value>
        </property>
    </bean>

    <mvc:resources mapping="/resources/**" location="/resources/" />

    <mvc:annotation-driven />

</beans>
web.xml
<web-app xmlns="http://java.sun.com/xml/ns/javaee"
    xmlns:xsi="http://www.w3.org/2001/XMLSchema-instance"
    xsi:schemaLocation="http://java.sun.com/xml/ns/javaee
    http://java.sun.com/xml/ns/javaee/web-app_2_5.xsd"
    version="2.5">

    <display-name>rewards-web</display-name>
    <welcome-file-list>
   <welcome-file>index.jsp</welcome-file>
  </welcome-file-list>
    <servlet>
        <servlet-name>rewardsweb</servlet-name>
        <servlet-class>
                    org.springframework.web.servlet.DispatcherServlet
                </servlet-class>
        <load-on-startup>1</load-on-startup>
    </servlet>

    <servlet-mapping>
        <servlet-name>rewardsweb</servlet-name>
        <url-pattern>/</url-pattern>
    </servlet-mapping>

</web-app>
Spring Boot files
package com.rewards.web;

import org.springframework.boot.SpringApplication;
import org.springframework.boot.autoconfigure.SpringBootApplication;
import org.springframework.boot.context.web.SpringBootServletInitializer;


@SpringBootApplication
public class Application extends SpringBootServletInitializer {

    public static void main(String[] args) {
        SpringApplication.run(Application.class, args);
    }

}

package com.rewards.web;

import io.undertow.Undertow.Builder;

import org.springframework.boot.autoconfigure.EnableAutoConfiguration;
import org.springframework.boot.context.embedded.undertow.UndertowBuilderCustomizer;
import org.springframework.boot.context.embedded.undertow.UndertowEmbeddedServletContainerFactory;
import org.springframework.context.annotation.Bean;
import org.springframework.context.annotation.Configuration;

@Configuration
@EnableAutoConfiguration
public class ApplicationConfiguration {
    @Bean
    public UndertowEmbeddedServletContainerFactory embeddedServletContainerFactory() {
        UndertowEmbeddedServletContainerFactory factory = new UndertowEmbeddedServletContainerFactory();
        factory.addBuilderCustomizers(new UndertowBuilderCustomizer() {

            public void customize(Builder builder) {
                builder.addHttpListener(9090, "0.0.0.0");
            }

        });
        return factory;
    }
}
Controller:
package com.rewards.web.controller;

import org.springframework.stereotype.Controller;
import org.springframework.web.bind.annotation.RequestMapping;
import org.springframework.web.servlet.view.InternalResourceViewResolver;

@Controller
public class HomeController {

    @RequestMapping("/home")
    public String getHome(){
        System.out.println("-------this is home----------");
        return "home";
    }
}
JSP
home.jsp is in this path : /src/main/webapp/WEB-INF/views/jsp/home.jsp
when i hit : http://localhost:9090/rewards/web/home
i am getting Whitelabel Error
And also i have tried following solution, added the following code in controller class. but no help.
package com.rewards.web.controller;

import org.springframework.boot.autoconfigure.web.ErrorController;
import org.springframework.stereotype.Controller;
import org.springframework.web.bind.annotation.RequestMapping;

@Controller
public class HomeController implements ErrorController{

    private static final String PATH = "/error";

    @RequestMapping(value = PATH)
    public String error() {
        return "Error handling";
    }

    public String getErrorPath() {
        return PATH;
    }

    @RequestMapping("/home")
    public String getHome(){
        System.out.println("-------this is home----------");
        return "home";
    }
}
Can you please help me out.
Thanks.
By
Atul Rai |
Last Updated: October 2, 2019
Previous Next
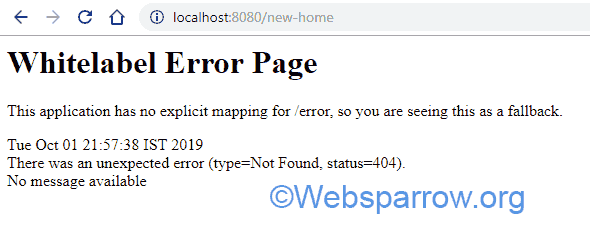
In this article, we will explore how to handle Whitelabel Error Page in Spring Boot application. During the development of Spring application, sometimes we face the Whitelabel Error Page and Spring Framework suggests us ‘This application has no explicit mapping for /error, so you are seeing this as a fallback‘ as shown below:
P.S Tested with Spring Boot and Thymeleaf 2.1.8.RELEASE version.
We can resolve the Whitelabel Error Page error in 3 ways:
1. Custom Error Controller
By implementing the ErrorController interface provided by the Spring Framework itself and overrides its getErrorPath() method to return a custom path to call when an error occurred:
ErrorrHandlerController.java
package org.websparrow.controller;
import org.springframework.boot.web.servlet.error.ErrorController;
import org.springframework.web.bind.annotation.GetMapping;
import org.springframework.web.bind.annotation.RestController;
@RestController
public class ErrorrHandlerController implements ErrorController {
@GetMapping("/error")
public String customError() {
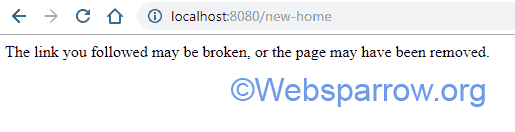
return "The link you followed may be broken, or the page may have been removed.";
}
@Override
public String getErrorPath() {
return "/error";
}
}In the customError() method, we return the custom message. If we trigger a 404, 500, etc error now, our custom message will be displayed.
2. Displaying Custom Error Page
Create a error.html page and put it into the src/main/resources/templates directory. Spring Boot’s BasicErrorController will automatically be picked it up by default.
error.html
<!DOCTYPE html>
<html>
<title>Error</title>
<body>

	<h1>Something went wrong!</h1>
	<p>The link you followed may be broken, or the page may have been removed.</p>

</body>
</html>
Since we’re using Thymeleaf template engine to display the custom error page. Add the Thymeleaf dependency in the pom.xml:
<dependency>
    <groupId>org.springframework.boot</groupId>
    <artifactId>spring-boot-starter-thymeleaf</artifactId>
    <version>2.1.8.RELEASE</version>
</dependency>
3. Disabling the Whitelabel Error Page
By setting the server.error.whitelabel.enabled property to false in the application.properties file, we can disable the white label error page.
application.properties
#Disable Whitelabel Error Page
server.error.whitelabel.enabled = false
Note: Add the right property matched with Spring Boot version:
Spring Boot Version >= 1.3 then use
server.error.whitelabel.enabled= falseSpring Boot Version <= 1.2 then use
error.whitelabel.enabled= false
We can achieve the same result by excluding the ErrorMvcAutoConfiguration class to the main class:
Main.java
@SpringBootApplication(exclude = { ErrorMvcAutoConfiguration.class })
public class Main {

	public static void main(String[] args) {
		SpringApplication.run(WhitelabelErrorPageApplication.class, args);
	}

}
References
- Customize the ‘whitelabel’ Error Page
- Custom Error Pages
The Spring Boot Whitelabel Error Page is a default error page displayed by the application when there is an issue handling a request. The type «Not Found» and status code 404 indicate that the requested resource could not be found. There could be several reasons why this error is being displayed, such as a misconfigured web server, incorrect URL mapping, or missing controller method.
Method 1: Check URL Mapping
To fix the Spring Boot Whitelabel Error page (type=Not Found, status=404) by checking URL mapping, you can follow these steps:
- Create a new controller class with a
@RequestMappingannotation for the root path («/»):
@Controller
@RequestMapping("/")
public class HomeController {
    @GetMapping
    public String index() {
        return "index";
    }
}- Create a new HTML file named «index.html» in the «src/main/resources/templates» directory:
<!DOCTYPE html>
<html>
<head>
    <title>Home Page</title>
</head>
<body>
    <h1>Welcome to the Home Page</h1>
</body>
</html>-
Run the Spring Boot application and navigate to «http://localhost:8080» in your web browser. You should see the «Welcome to the Home Page» message.
-
If you still see the Whitelabel Error page, check the console output for any error messages. You may need to add additional dependencies or configuration to your project.
By following these steps, you can fix the Spring Boot Whitelabel Error page (type=Not Found, status=404) by checking URL mapping.
Method 2: Check for Missing Controller Method
When encountering a Whitelabel Error page in Spring Boot with a 404 status, one possible solution is to check for a missing controller method. This can be done by ensuring that the controller class has a method that maps to the requested URL.
Here is an example of a controller class with a method that maps to the URL «/hello»:
@RestController
public class HelloController {

    @GetMapping("/hello")
    public String hello() {
        return "Hello World!";
    }
}
In this example, the @GetMapping annotation maps the hello() method to the URL «/hello». If a request is made to this URL, the method will be invoked and the string «Hello World!» will be returned.
If a request is made to a URL that does not have a corresponding method in the controller class, a Whitelabel Error page with a 404 status will be returned. To fix this, simply add a method to the controller class that maps to the missing URL.
For example, if a request is made to the URL «/goodbye» and a Whitelabel Error page is returned, the following method can be added to the controller class:
@GetMapping("/goodbye")
public String goodbye() {
    return "Goodbye World!";
}
Now, if a request is made to the URL «/goodbye», the goodbye() method will be invoked and the string «Goodbye World!» will be returned.
By checking for missing controller methods and adding them as necessary, Whitelabel Error pages with a 404 status can be resolved in Spring Boot.
Method 3: Check for Correct Web Server Configuration
If you are facing the Spring Boot Whitelabel Error Page (type=Not Found, status=404) issue, it means that your application is not able to find the requested resource. This error occurs when the web server is not configured correctly to handle the incoming requests. In this tutorial, we will discuss how to fix this issue by checking the correct web server configuration.
Step 1: Check the Application Properties
Firstly, check the application.properties file to ensure that the server port is correctly configured. By default, Spring Boot applications run on port 8080. If you have changed the port, make sure that the port number is correct.
Step 2: Check the Controller Mapping
Next, check the controller mapping to ensure that the requested resource is mapped correctly. The @RequestMapping annotation is used to map the incoming requests to the appropriate controller method.
@RestController
public class UserController {

    @GetMapping("/users")
    public List<User> getUsers() {
        // code to retrieve users
    }
}
In the above example, the getUsers() method is mapped to the /users endpoint. If the requested endpoint is not mapped correctly, the Spring Boot Whitelabel Error Page (type=Not Found, status=404) error will occur.
Step 3: Check the Application Context Path
If your application is deployed on a web server, check the application context path to ensure that the requested resource is located at the correct path. The context path is the prefix of the application URL.
server.servlet.context-path=/myappIn the above example, the context path is set to /myapp. If the requested resource is located at /users, the full URL would be http://localhost:8080/myapp/users.
Step 4: Check the Web Server Configuration
Finally, check the web server configuration to ensure that the incoming requests are handled correctly. If you are using Apache or Nginx as a reverse proxy server, make sure that the proxy configuration is correctly set up.
For example, if you are using Nginx, the configuration file should include the following:
location /myapp {
    proxy_pass http://localhost:8080/myapp;
}
This configuration will forward all requests to the /myapp endpoint to the Spring Boot application running on port 8080.
If you are using a different web server, refer to the web server documentation for instructions on how to configure the reverse proxy.
Method 4: Customize Error Page
To customize the error page for a Spring Boot application, you can create a custom error page and configure Spring Boot to use it. Here are the steps to do this:
-
Create a new HTML file in the
src/main/resources/templatesdirectory. Name iterror.html. This file will be used as the custom error page. -
Add the following code to the
error.htmlfile:
<!DOCTYPE html>
<html>
    <head>
        <title>Error</title>
    </head>
    <body>
        <h1>Error</h1>
        <p>There was an error processing your request.</p>
        <p>Message: [[${error.message}]]</p>
    </body>
</html>
This code will display a simple error message with the error message from the exception that caused the error.
- Create a new class called
CustomErrorControllerin thesrc/main/javadirectory. Add the following code to the class:
import org.springframework.boot.web.servlet.error.ErrorController;
import org.springframework.stereotype.Controller;
import org.springframework.ui.Model;
import org.springframework.web.bind.annotation.RequestMapping;

@Controller
public class CustomErrorController implements ErrorController {

    @RequestMapping("/error")
    public String handleError(Model model) {
        // add error message to model
        model.addAttribute("error", "An error occurred while processing your request.");
        return "error";
    }

    @Override
    public String getErrorPath() {
        return "/error";
    }
}
This code creates a new controller that handles errors and sets the error message in the model. The getErrorPath() method returns the path to the error page.
- Run your Spring Boot application and navigate to a non-existent page to see the custom error page.
That’s it! You have now customized the error page for your Spring Boot application.
Let’s learn about the Whitelabel error page in Spring Boot and how to customize or disable them. White label error pages are default behavior from Spring Boot. Like any other feature, We can customize this feature to great extent.
What are Whitelabel error pages in Spring Boot?
Depending on API client request or browser request, spring boot provides an error JSON response or a full HTML error page. For example, let’s create a simple /hello endpoint that throws an exception always.
@RequestMapping("/hello")
String hello() {
    throw new IntrovertException("Don't bother me please..!");
}Code language: Java (java)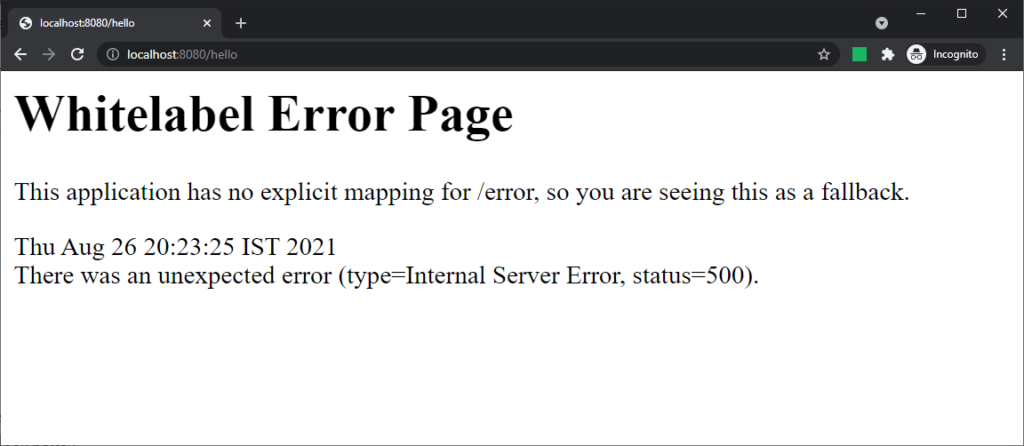
Even though this page looks simple, you can add details to it using the following configuration.
server.error.include-message=always
server.error.include-exception=true
server.error.include-stacktrace=always
server.error.include-binding-errors=alwaysCode language: Properties (properties)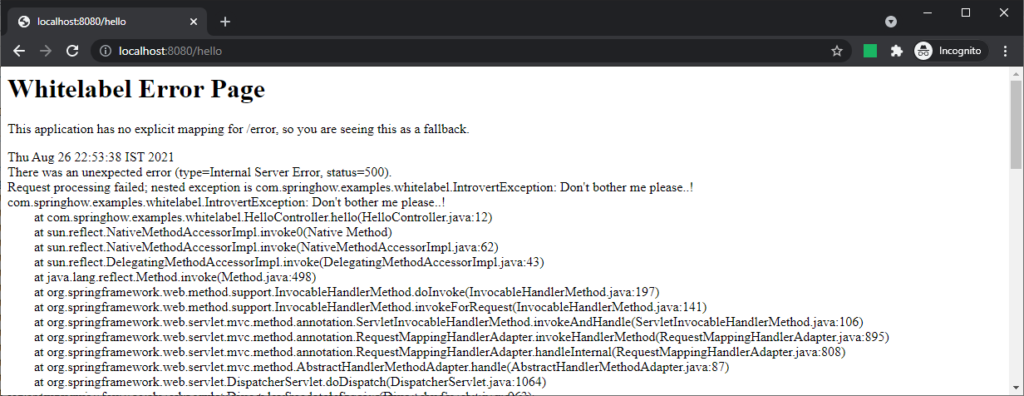
Even though the messages are helpful, this page may not fit well with your other page designs. So if you want to override this page with your own design, you are in luck.
Overriding Whitelabel Error Pages
Spring boot provides a /error mapping at a global servlet container level. This mapping handles requests and sends back JSON or HTML view as a response with error codes/messages. But the view that we saw above looks default. If you notice the first line of the error page, it says “This application has no explicit mapping for /error, so you are seeing this as a fallback.”
Here, the spring boot is trying to hint to you that you need to provide your own template to handle these error requests. So let’s see how to do that.
As we know, The handler mapped for /error expects a view to show the HTML response. If it doesn’t find a view matching “error” it will use the placeholder we have seen above. So we first need to add a template called error.html. But the template alone will not work. You also need to add one of the spring boot supported template engines. In our case, we are adding thymeleaf.
<dependency>
    <groupId>org.springframework.boot</groupId>
    <artifactId>spring-boot-starter-thymeleaf</artifactId>
</dependency>Code language: HTML, XML (xml)
Next, you need to add the error.html template into your src/main/resources/templates directory.
With the above in place, the following MVC attributes will be available for you to access in the templates.
- message – Return value of exception.getMessage()
- exception – A string that contains the canonical exception name.
- trace – The complete stacktrace of the exception that caused this error.
- errors – A list of validation failures that occured during the request.
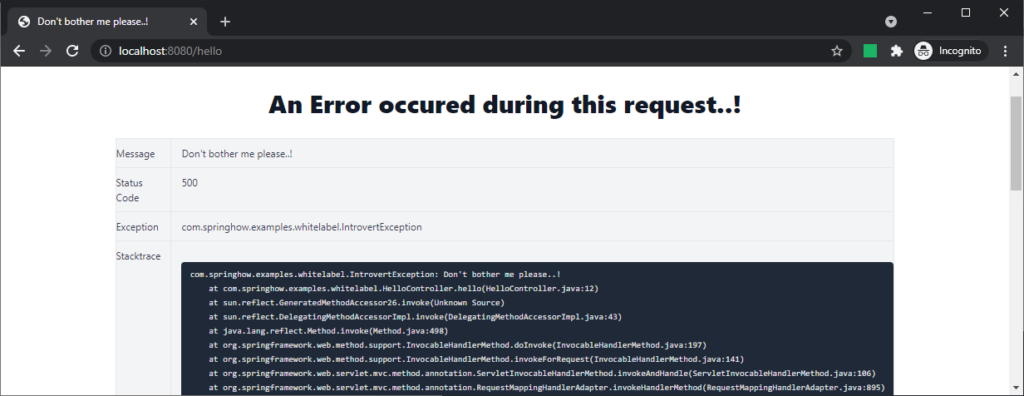
Along with these, there is also a status attribute that gives the HTTP status code for the error response. With that in place, we can rewrite our template file to show all these attributes.
<!doctype html>
<html lang="en">
<head>
    <title th:text="${message}"></title>
</head>
<body>
<table border="1">
    <tr><td>Error Message</td><td th:text="${message}"></td></tr>
    <tr><td>Status Code</td><td th:text="${status}"></td></tr>
    <tr><td>Exception</td><td th:text="${exception}"></td></tr>
    <tr><td>Stacktrace</td><td><pre th:text="${trace}"></pre></td></tr>
    <tr><td>Binding Errors</td><td th:text="${errors}"></td></tr>
</table>
</body>
</html>Code language: HTML, XML (xml)
This simple template will yield the following error page when we access /hello.

With a little bit of CSS, we can get this page to look better and more appealing.
Disabling Whitelabel error page altogether /Tomcat whitelabel
Spring boot also provides a way to disable the Whitelabel error page altogether using server.error.whitelabel.enabled setting. When set to false, the server will show an error page specific to the servlet container(tomcat). For example, the below error page from tomcat will be visible if the Whitelabel is disabled and no error template is available.
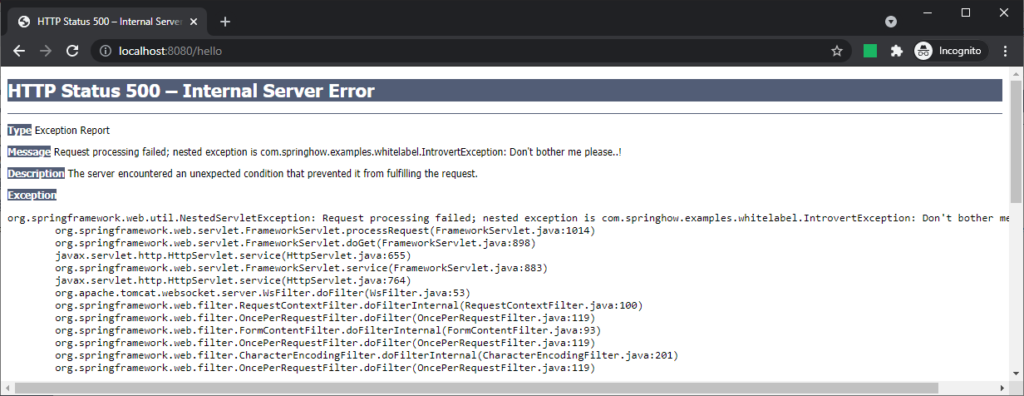
You can swap tomcat with jetty and you will still see an error page like this offered by the jetty runtime. And undertow currently doesn’t provide a view. But it does send response codes.
Important things to note
Always use a custom error.html page for the following reasons.
- Default whitelabel page lets hackers know you are using spring boot. This means they only need to try the exploits for spring boot.
- Never show exceptions in your production servers. Exceptions are great info for hackers.
- A custom error page with proper CSS will blend in to your other pages. You can even provide links and search boxes that can redirect users back to your site.
You can hide specific error attributes based on the configuration we saw earlier. Also, all these configurations are also applicable for the JSON response as well. If your request contains Accept: application/json header, then the response will be in the form of JSON. Even here, you can access all these attributes. For example, take a look at the below request.
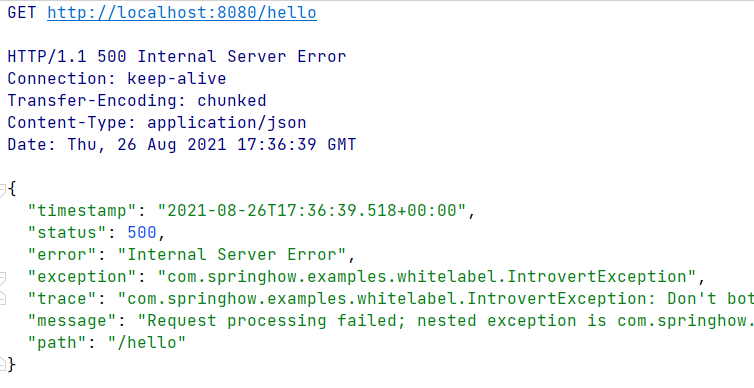
Here you can see the trace, exception, and message attributes being available as JSON.
Summary
To sum it up, we learned about white label error pages and how to customize them. We found out how to override the default Whitelabel with our own error.html. You can check out all these examples at our GitHub Repository.
Related
In this article, we will cover the famous Spring Boot Whitelabel error page. We are covering how to disable the default error page and how we can customize the Whitelabel error page in your Spring Boot application.
Introduction
Spring Boot uses a default Whitelabel error page in case server error. This is not very helpful and we may want to give more relevant information to the customer in a production environment. This article focuses on the Spring Boot whitelabel error page. We will learn how to disable this default behavior and how we can use our own custom error page to align with our UI.
1. Disabling Whitelabel Error Page
There are multiple ways to disable this behavior in your Spring Boot application. Let’s cover common options to do this.
1.1 Using Properties File
Spring Boot provides an application.properties (or YAML) file to easily configure/change your application. We can use the same property file to disable this error page globally. Set server.error.whitelabel.enabled to false to achieve this.
# Whether to enable the default error page displayed in browsers in case of a server error.
server.error.whitelabel.enabled=false
Please know that using the above configuration will restore the default of the servlet container you are using. This means that if you are not using any custom error page, the default servlet container error page shown to the customer (like default tomcat server error page).
Another option is to exclude ErrorMvcAutoConfiguration from your application using application.properties file.
spring.autoconfigure.exclude=org.springframework.boot.autoconfigure.web.servlet.error.ErrorMvcAutoConfigurationFor Spring Boot 1.x application use ErrorMvcAutoConfiguration in exclude the list.
1.2 Exclude using @EnableAutoConfiguration
In case you like to exclude using the code, you have the option to pass exclude configuration list to the @EnableAutoConfiguration annotation.
@SpringBootApplication
@EnableAutoConfiguration(exclude = {
 ErrorMvcAutoConfiguration.class
})
public class SpringBootApplication { //application code
}
2. Custom Error Page
As suggested, one of the first options is to Overriding the error page with your own template. For this post, we are taking Thymeleaf as our underlying templating engine. We create a custom error page with name error.html and save it under resources/templates directory. In case of error, Spring Boot system will automatically pick this custom error page. Let’s see how the page looks like before customizing error page.
Let’s create our custom error.html and place it under the <em>resources/templates</em> directory.
<!DOCTYPE html>
<html lang="en">
   <head>
      <title>We've got some trouble</title>
   </head>
   <body>
      <div class="cover">
         <h1>Our apologies.</h1>
         <p class="lead">This page stepped out for a quick ride.</p>
         <p>Please go back to our homepage to restart your browsing experience.</p>
      </div>
   </body>
</html>
If we run our application, this is how the output shown to the customer.
Once we add the error.html in the templates directory, Spring Boot BasicErrorController automatically pick our custom template.
3. Custom ErrorController
If the above options are not suitable for your need or if we want to have a better control on the error handling mechanism, we have the option to extend Spring’s ErrorController with our own implementation. We need to implement the ErrorController interface and overrides its getErrorPath()to return a custom path.
package com.javadevjournal.controller;

import org.springframework.boot.web.servlet.error.ErrorController;
import org.springframework.stereotype.Controller;
import org.springframework.web.bind.annotation.RequestMapping;

@Controller
public class CustomErrorController implements ErrorController {

 private static final String PATH = "/error";

 @RequestMapping(value = PATH)
 public String error() {
  return "customError";
 }

 @Override
 public String getErrorPath() {
  return PATH;
 }
}
Let’s have a look at the above code.
- Our controller creates a mapping for the path as returned by
getErrorPath()method. - ErrorController interface shows that a
@Controlleris used to render errors. - We have the option to use
getErrorPath()to return different error pages based on the error type.
Let’s create a new error page which we will use in this new controller method.
<!DOCTYPE html>
<html lang="en">
   <head>
      <title>We've got some trouble</title>
   </head>
   <body>
      <div class="cover">
         <h1>Our apologies For Custom Page.</h1>
         <p class="lead">This page stepped out for a quick ride.</p>
         <p>Please go back to our homepage to restart your browsing experience.</p>
      </div>
   </body>
</html>
When we run our application this time, we will have a different error page displayed to the customer.
Summary
In this post, we cover how to disable Spring Boot Whitelabel error page and how we can customize the Whitelabel error page in your Spring Boot application. We learned how to extend the error handling mechanism by implementing ErrorController in the custom error handling controller.