If you are a hardcore gamer, it’s nothing more annoying than when you are amidst an intense final battle, and the application has crashed and will now close. we apologize for the inconvenience
It is a common issue, and the problem is universal for all gamers. Even though the application has crashed and will now close, it is a common issue, and there is nothing to worry about that.
Table of Contents
- 1 7 Rapid Methods to Fix the Application have Crashed and Will now Close. We Apologize for the Inconvenience
- 1.1 Method 1: Update the Graphics Card Driver
- 1.2 Method 2: Verify Fortnite Files
- 1.3 Method 3: Run Anti-cheat Batch Files
- 1.4 Method 4: Clear Vault Cache
- 1.5 Method 5: Add CMD Arguments
- 1.6 Method 6: Override High DPI Scaling Feature
- 1.7 Method 7: Update the Windows
- 2 FAQ’s
- 2.1 Why does my Fortnite crash many times?
- 2.2 How to Fix the Fortnite application that has crashed and will close now?
- 3 Conclusion
7 Rapid Methods to Fix the Application have Crashed and Will now Close. We Apologize for the Inconvenience
Here are 7 quick methods to solve the Fortnite application crash detected
Before going to the methods, let us see one immediate remedy to solve the Fortnite issue.
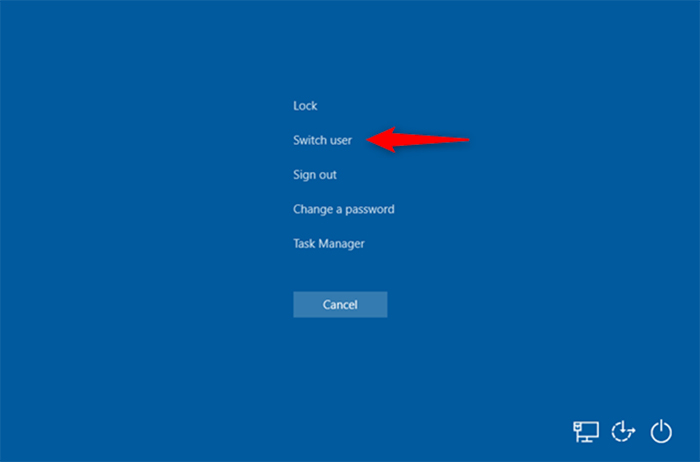
The issue occurs outside the running match, and the best remedy is to end the Fortnite via task manager and reopen it again. This small trick actually works. However, those who face game crashes while in the middle of a match are nifty methods to continue playing without actually exiting the game. Follow the steps below.
- Press CTRL+ALT+DEL simultaneously
- Click the switch user option.

- Click the Sign-in option in the account displayed.
And also, there is another quick Remedy to try.
Close the Fortnite if it’s already open. Disconnect the Network from your PC and connect to the Network again and access Fortnite with your Epic game launcher
Try to disable the third-party antivirus. And try to open Fortnite again.
Let us go to the 7 Quick methods to solve the application has crashed and will now close. we apologize for the inconvenience
Method 1: Update the Graphics Card Driver
If the latest versions of drivers have not updated on your graphics card driver or your drivers are outdated, that may result in you in Fortnite application crash detected. Try the below steps to resolve that.
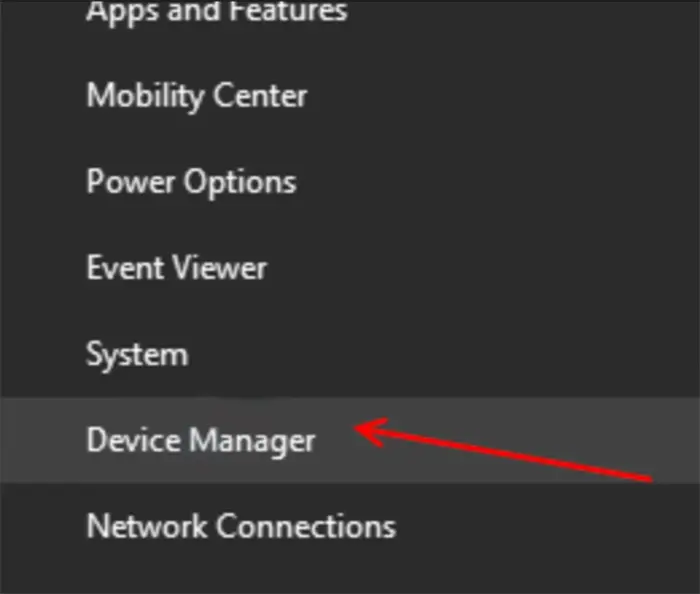
- Press the Win+X key simultaneosly on your keyboard.
- After clicking, open the device manager.

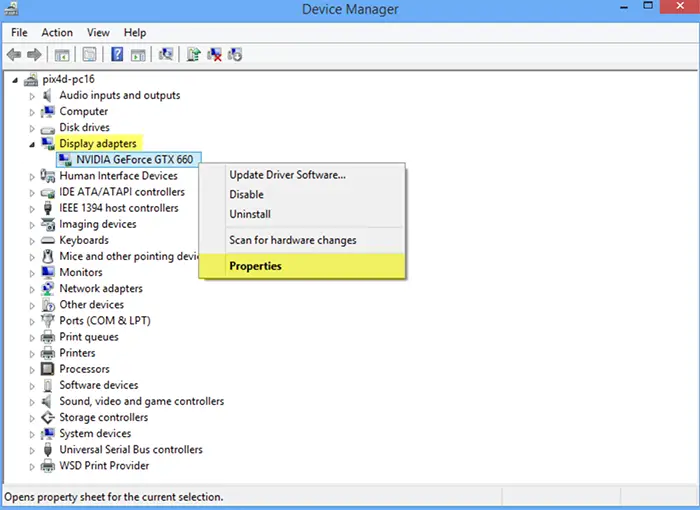
- Now search for the Device Adapters section and expand the device manager section.
- Now, right-click on the respective graphic driver and click on update driver.

To search the driver itself and install it on your computer, click on automatically search for drivers.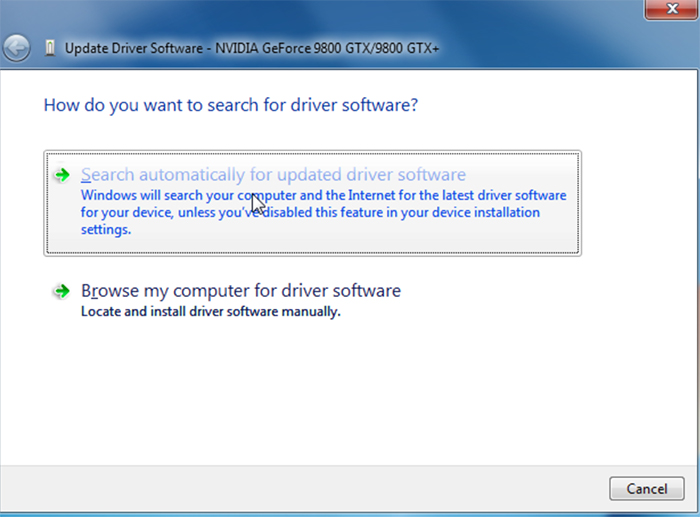
An alternative method for installing drivers,
If the above method doesn’t update the drivers, follow these steps:
- Type “Geforce Experience” in the search bar.
- Click on “GeForce experience.”
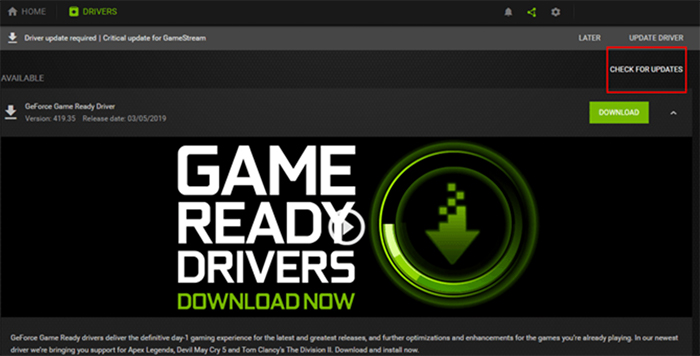
- When the tab appears, click on the driver’s section Tab
- Now, click on check for updates

- To download the latest version of the drivers, click on download.
This will download drivers on your PC and replace your Outdated version of your drivers.
After downloading the drivers, you will see two ways of installing the drivers- Express Installation and custom installation. You have to choose a custom installation.
After clicking this, click on perform a clean install box.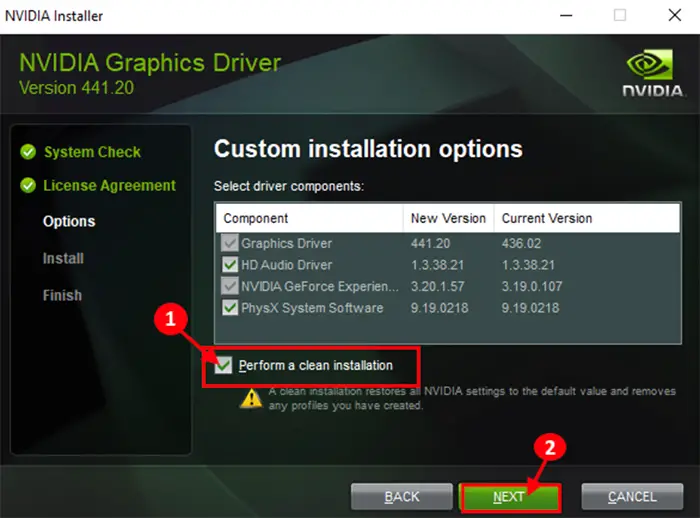
Next, click on next to begin the process of installation.
Finally, Geforce Experience will uninstall the existing graphics driver and replace the outdated ones with the latest drivers. The process may take up to 5-10mins.
After the installation is over, you should restart the computer. This method probably solves application crash detected fortnite and might solve the application has crashed and will now close. we apologize for the inconvenience in fortnite.
Also See: How To Roll Back Nvidia Drivers On Windows 10
4 Ways To Fix GeForce Experience Error 0X0003
Method 2: Verify Fortnite Files
The Fortnite issue can also occur when the Fortnite system files are corrupted. It may act as a barrier to the game opening. To rectify this, you can follow the below steps.
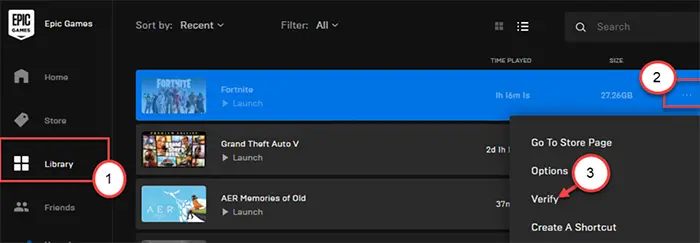
- Click and open the Epic Games launcher on your computer.
- Once it opens, on the left side, click on library.
- Click on the three-bar menu beside Fortnite and click on the verify.

Just wait for minutes to analyze the Fortnite files on your system. After completing, try to access and open the game. This solves application has hung fortnite and also the application has crashed and will now close. we apologize for the inconvenience.
Method 3: Run Anti-cheat Batch Files
Many times, your system blocks the anti-cheat files on your system; this may also act as a problem for opening Fortnite.
- You navigate to the Fortnite installation folder; generally, it will be in C drive on your drive list.
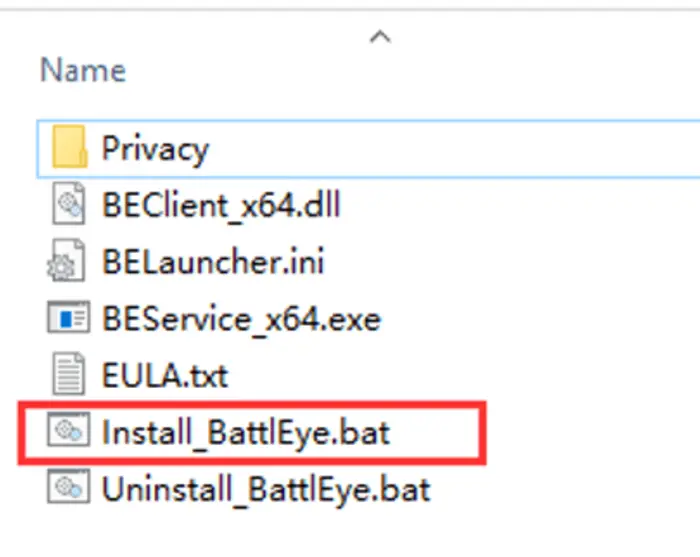
- Now, double-click on the “battleye” folder.
- When you are there, double click on the “uninstall_Battleye.bat” to uninstall it from your system.
- To install it again on your PC, click on Install_Battleye.bat to install it on your PC.

- After installing this, navigate to the Win64 folder as done in Step 1.
- Now, double click on the “anticheat.exe” to access the file.

- Then, click on the repair service.


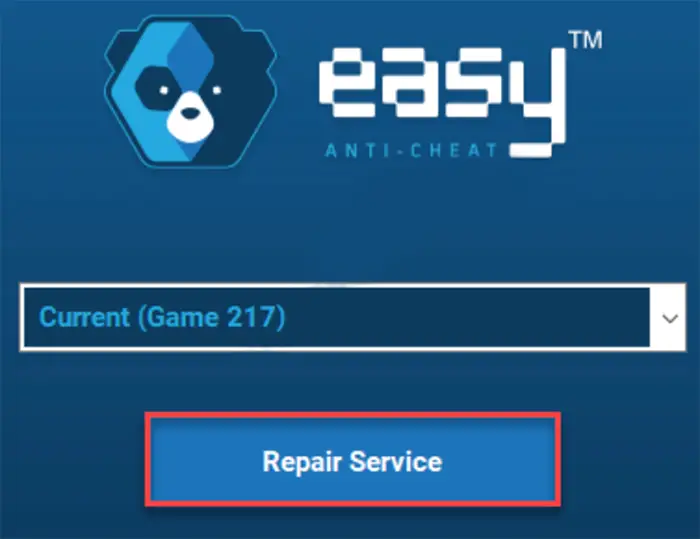
This will repair the anticheat service and try to open Fortnite and play. This certainly solves the application has crashed and will now close. We apologize for the inconvenience.
See Also: How to fix Epic Games Error Code As- 1041
Method 4: Clear Vault Cache
- Open the Epic game Launcher in your System
- After that, click on the settings on the left side.

- Then, click on the “Edit Vault Cache location.”
- After that, click on browse.

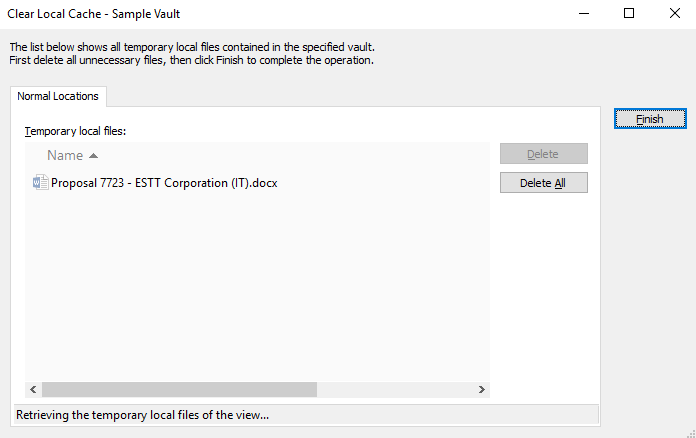
- The vault cache will be opened.
- Ensure that no files are present in that folder; if so, delete the files in the respective folder.
- After that, close the window, open Fortnite, and see the problem the application has crashed and will now close. we apologize for the inconvenience that occurs again. This simple system may also pave the way for the problem.

Find out: 4 Ways To Fix NVIDIA Driver Crashing In Windows 10
Method 5: Add CMD Arguments
- Open Epic game launcher.
- After that, go to the settings.
- Scroll down, and you will notice the list of games installed.
- And then check the Additional Command-line Arguments.

- Paste the link in the box( -USEALLAVAILABLECORES )

After this process, open Fortnite again and see if this issue persists. And adding additional command-line arguments might solve the application has crashed and will now close. we apologize for the inconvenience.
Method 6: Override High DPI Scaling Feature
Sometimes, the high DPI Scaling feature may solve this issue.
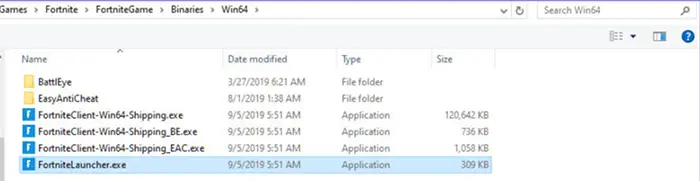
- Go to the Fortnite installation folder. It usually will be in ( Local Disk (C:) Program FilesEpic GamesFortniteFortniteGameBinariesWin64 )
- Right-click on the “FortniteLauncher.exe” file and click on properties.

- Go to “Compatibility” tab there.

- After that, click on the ” High Dpi Settings.”

- And then click on OK.
- Try to relaunch Fortnite.


This method probably solves the application has crashed and will now close. we apologize for the inconvenience.
Method 7: Update the Windows
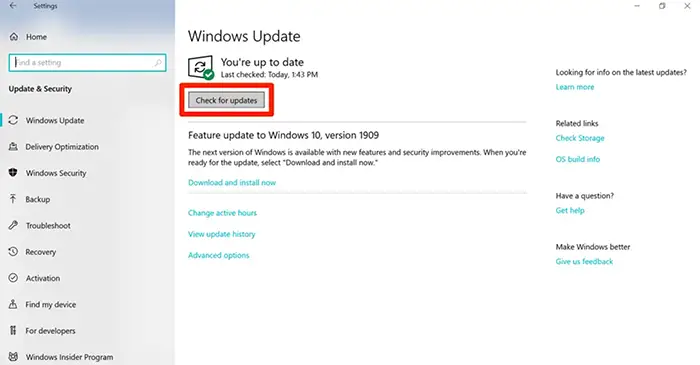
Updating the window is a universal solution for most issues caused; follow the steps below.
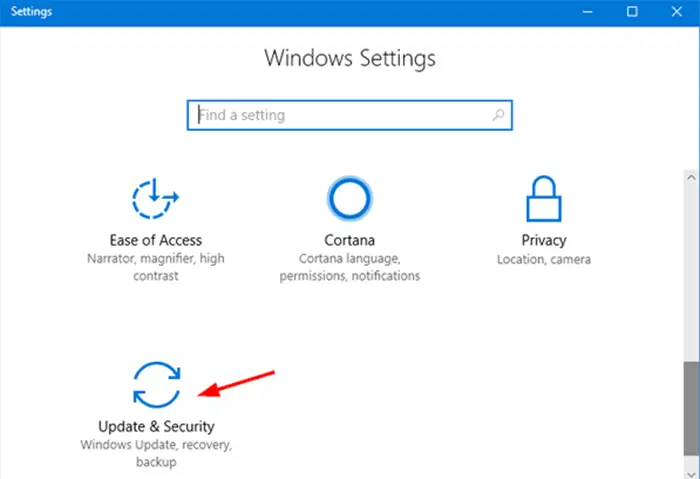
- Press Win+I
- And click on Updates and Security.

- after that, click the “check for updates” box in the window.

- When the necessary updates are shown and downloaded, click on restart your PC to make updates into effect.
This method should probably fix the fortnite an unknown process has crashed and the application has crashed and will now close. we apologize for the inconvenience.
Also See: {Solved} 7 Ways To Fix Windows Update Not Working
FAQ’s
Why does my Fortnite crash many times?
The Fortnite, an unknown process, has crashed may be due to outdated drivers that are present on your PC. Try to update the drivers to the latest version of your PC, CPU overclocking, etc.
How to Fix the Fortnite application that has crashed and will close now?
To resolve this issue, try to update the graphics card driver; this probably solves the problems.
Conclusion
In Conclusion, here are 7 quick methods to solve the application has crashed and will now close. we apologize for the inconvenience. There are different remedies for the issue, and you can try any methods above for your comfort. The possible causes may be outdated driver, direct X issues, or you can Repair the C++ Redistributables or adjust the compatibility mode on your PC.

Mayank Parmar is a journalist covering technology news, but with a strong focus on Microsoft and Windows related stories.
This guide will explain how to fix the Windows error “We apologize for the inconvenience, but Windows did not start successfully. A recent hardware or software change might have caused this.”
Are you getting this error message when you try to start up Windows:
We apologize for the inconvenience, but Windows did not start successfully. A recent hardware or software change might have caused this.
If so, your Windows system files are possibly corrupt, or there is something wrong with your hard drive (bad sectors, etc.) Luckily, it’s usually an error that can be fixed without having to reinstall the Windows operating system.
Here are some steps you can take to try and fix the problem.
Method 1 – Repair Windows via Recovery Console by running CHKDSK
My first suggestion would be to restart your computer into the Recovery Console mode and run CHKDSK with the repair option to make sure there are no errors on your hard disk.
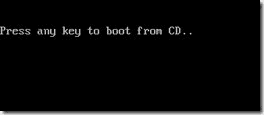
In order to get into the Recovery Console in Windows XP, you need to put in your Windows installation CD and press any key when it says boot from CD.
Now in the XP Professional Setup screen, press R to choose the Repair a Windows XP installation using the Recovery Console option.

click to enlarge
Now you need to choose the installation that you want to run the recovery console too on, usually you can just type 1. Enter the password for the local Administrator account on the computer and press Enter.

click to enlarge
Now go ahead and type in the command CHKDSK /r at the command prompt to run the disk check:

click to enlarge
Method 2 – Do a Repair installation of Windows
In Method 1, we ran CHKDSK through the Recovery Console to try and repair any errors that may have been on the hard disk. In Method 2, we will do a repair installation of Windows, which basically replaces all of your system files without deleting any of your data. The OS is reinstalled, but all data is left intact.
After doing a repair install, you will have to reapply all Windows Updates. For this, you would put in your XP CD like before, boot to it by pressing a key when you see Press any key to boot from CD.
From the menu of options above, press Enter instead of pressing R. This is a little counter-intuitive, but you have to choose the option to setup Windows XP.
Press F8 to accept the license agreement and then press R to choose the Repair the selected Windows XP installation option.

click to enlarge
Note that it will look like Windows is reinstalling the operating system fresh, but it is not! It’s just replacing all of the Windows system files, so your data will not be lost.

click to enlarge
Always make sure that you are using the same XP CD that came with computer originally or the repair may fail in the middle! Allow the install to complete and then restart your computer and see if you can log on. Your desktop settings may be back to their defaults because of the repair.
Method 3 – Use Last Known Good Configuration option
A final thing you can try is to press F8 when the computer is starting to boot up and choose Last Known Good Configuration from the Windows XP Advanced Options menu:

click to enlarge
Those are basically your three options for the “Windows did not start successfully error”. Last resort would be to simply reinstall Windows, but that means you lose your data. Make sure to back it up first because Microsoft will no longer help you with issues related to Windows 95. You can also try to log into safe mode and if you can, that means you can try to do a system restore by going to the command prompt and typing in the following command:
%systemroot%\system32\restore\rstrui.exe
Now follow the instructions on to choose an earlier state to restore your computer back to. Hope that helps someone fix their problems!
If this article helped you, I’d be grateful if you could share it on your preferred social network — it helps me a lot. If you’re feeling particularly generous, you could buy me a coffee and I’d be super grateful 

Error Message
ArcMap or ArcCatalog randomly crashes and Windows returns one of the error messages shown below:
Error:
ArcMap.exe has encountered an error and needs to close. We apologize for the inconvenience.
Error:
The instruction at 0x000xx00 referenced memory at 0x000000. The memory could not be 'read'. Click OK to terminate the program.
The instructions provided in this article address general solutions that may help avoid the above errors.
Cause
This error can be caused by one or more system conflicts.
Note:
If this error occurs when performing a specific operation, check the Related Information section below for an article that addresses the situation. If the instructions in this article do not resolve the problem, and there is not an article related to your issue, please contact Esri Support Services.
Solution or Workaround
The following is a list of the most common solutions to this error. Please note that this is a general Windows error that has many causes and many solutions. Contrary to the error message, there is no log file created.
Rename the normal template for the application that generates the error
- Close any ArcCatalog or ArcMap sessions that are running.
- In File Explorer, browse to:
C:\Users\<user name>\AppData\Roaming\ESRI
Note:
The Application Data or AppData folder is hidden by default. If this folder is not visible, navigate to Tools > Folder Options > View tab, and select the option to show hidden files and folders.
- Open the folder for the component of ArcGIS, ArcCatalog or ArcMap that is generating the error message. Each component of the software has a template that stores settings and customizations for that part of ArcGIS. These are:
- ArcCatalog: normal.gxt
- ArcMap: normal.mxt, stored in the Templates folder
- ArcToolbox: arctoolbox.dat
- Rename the file (for example: OLDNORMAL.GXT). When that component of ArcGIS is started again, a new template is created. This resolves many problems with ArcGIS software.
Change the TEMP environment variable for Windows
- Verify the following user variables are set:
Variable: TMP Value: <drive>:\TEMP
Variable: TEMP Value: <drive>:\TEMP
- Set the environment variable based on the operating system.
Clean out the TEMP directory
Browse to:
C:\Users\<your user name>\AppData\Local\Temp
This directory can become filled with hundreds or thousands of files and folders.
After resetting TEMP and TMP as described in the previous step and rebooting the computer, go to the original TEMP directory at the path above and delete all of the files and folders. Deleting the files in the new TEMP directory on a regular basis is also recommended to maintain good performance.
Verify that a default printer is installed
Check that the default printer is a valid, working printer by doing a test print. If the default printer is on a network, be sure there is access to that printer. If no printers are installed, install a test default printer.
Remove any customizations, add-on scripts, and third-party extensions for ArcGIS and unregister any custom DLLs that may be present
If removing all customizations fixes the problem, then the customizations can be added one at a time to determine which one is causing the problem.
Note:
Methods to remove customizations vary depending on the customization type. Contact the vendor or author of the customization to determine the best method.
Maximize the virtual memory for the operating system
Verify that a minimum of 500 MB of virtual memory is present. The initial and maximum size can be set as high as three times the computer’s RAM, up to 6GB or approximately 6,144 MB.
How to Increase Virtual Memory in Windows 10: A Quick Guide
Verify that the operating system is up-to-date
Go to the Update Windows 10 web page to check for updates.
Run a repair of the ArcGIS Desktop software
- Navigate to Control Panel > Programs > Programs and Features.
- Right-click the ArcGIS Desktop program and select Uninstall/Change. The Program Maintenance text box window will open.
- Select Repair. Click Next, then click Install.
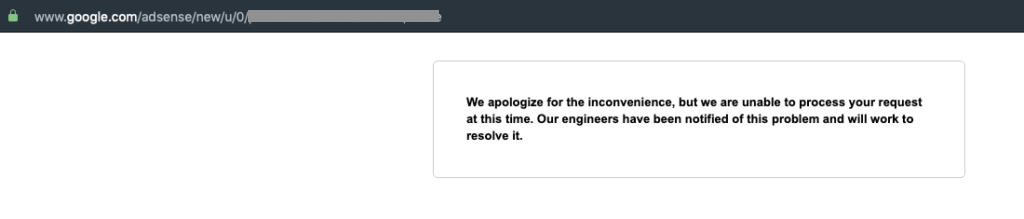
Adsense users who are trying to access the homepage of the Adsense dashboard are getting a peculiar error that says:
We apologize for the inconvenience, but we are unable to process your request at this time. Our engineers have been notified of this problem and will work to resolve it.
Adsense, like any other product of technology in this day and age can give you headaches at times. Common Adsense issues include balance not updated, website approval takes too long, a website is approved but then got rejected again, no ads is appearing on the website and many more.
Adding to this long list of Adsense errors and issues is the error we have mentioned above when trying to access the Adsense dashboard. However, this error only occurs on the homepage. Users have no issue accessing the other part of the dashboard.
What Causes this Adsense Error?
As it turned out, this error is not really an actual error with the Adsense dashboard platform. This is apparently being caused by the adblocker plugin you have installed in your browser. Not, only browser extensions, but built-in adblockers can also cause this error like the ones in Brave or Opera browsers.
How to Fix Adsense Error Blocked by Adblocker?
As you can already guess, the solution is pretty much straightforward. You just have to disable the adblocker on the Adsense URL. You don’t need to completely disable the adblocker in your browser, just do it for the specific Google URL.
After doing this, you can now access the Adsense dashboard homepage without a problem.
Wrapping It Up
We hope that we have helped you in any way with the Google Adsense error caused by adblocker. Let us know in the comments section below.
How to Fix Adsense Error: We apologize for the inconvenience, but we are unable to process your request at this time. Our engineers have been notified of this problem and will work to resolve it.
Adsense users who attempt to access the Adsense dashboard homepage receive the following strange AdSense Error message:

AdSense, like any other technological product on the market today, can occasionally cause headaches. The balance is not updated. The website’s approval takes an excessive amount of time. A website is approved and rejected repeatedly, there is no publicity on the website, and several other issues are all common Adsense errors and Issues.
When attempting to access the Adsense dashboard, the previously mentioned error adds to the lengthy list of Adsense errors and problems. This error, however, only appears on the homepage. The rest of the dashboard is straightforward.
What causes this Adsense Error
To begin, I noticed that the ads on my Google AdSense website were infrequently loading. I used to believe it was just a symptom of AdSense’s general outage, but I was wrong.
This AdSense error is unrelated to the Adsense dashboard platform in any way. This AdSense error appears to be the source of your browser’s adblocker plugin. This error can occur with both browser extensions and built-in adblockers, such as those included with the Brave and Opera browsers.
How to Resolve an AdSense Error Blocking
As you might expect, the solution is reasonably straightforward. All that remains is for you to disable your adblocker for the Adsense URL. You do not need to disable your browser’s adblocker altogether; uncheck it for this Google URL. Following that, you should be able to access the Adsense dashboard homepage with ease.
Conclusion:
We hope this information helped resolve a Google AdSense error caused by an adblocker. Kindly share your thoughts in the comment section below and Post your related queries so that we can also address those AdSense errors.