If the «DirectX unrecoverable» error is ruining your game of COD Warzone, don’t fret. Here are some tricks you can try.
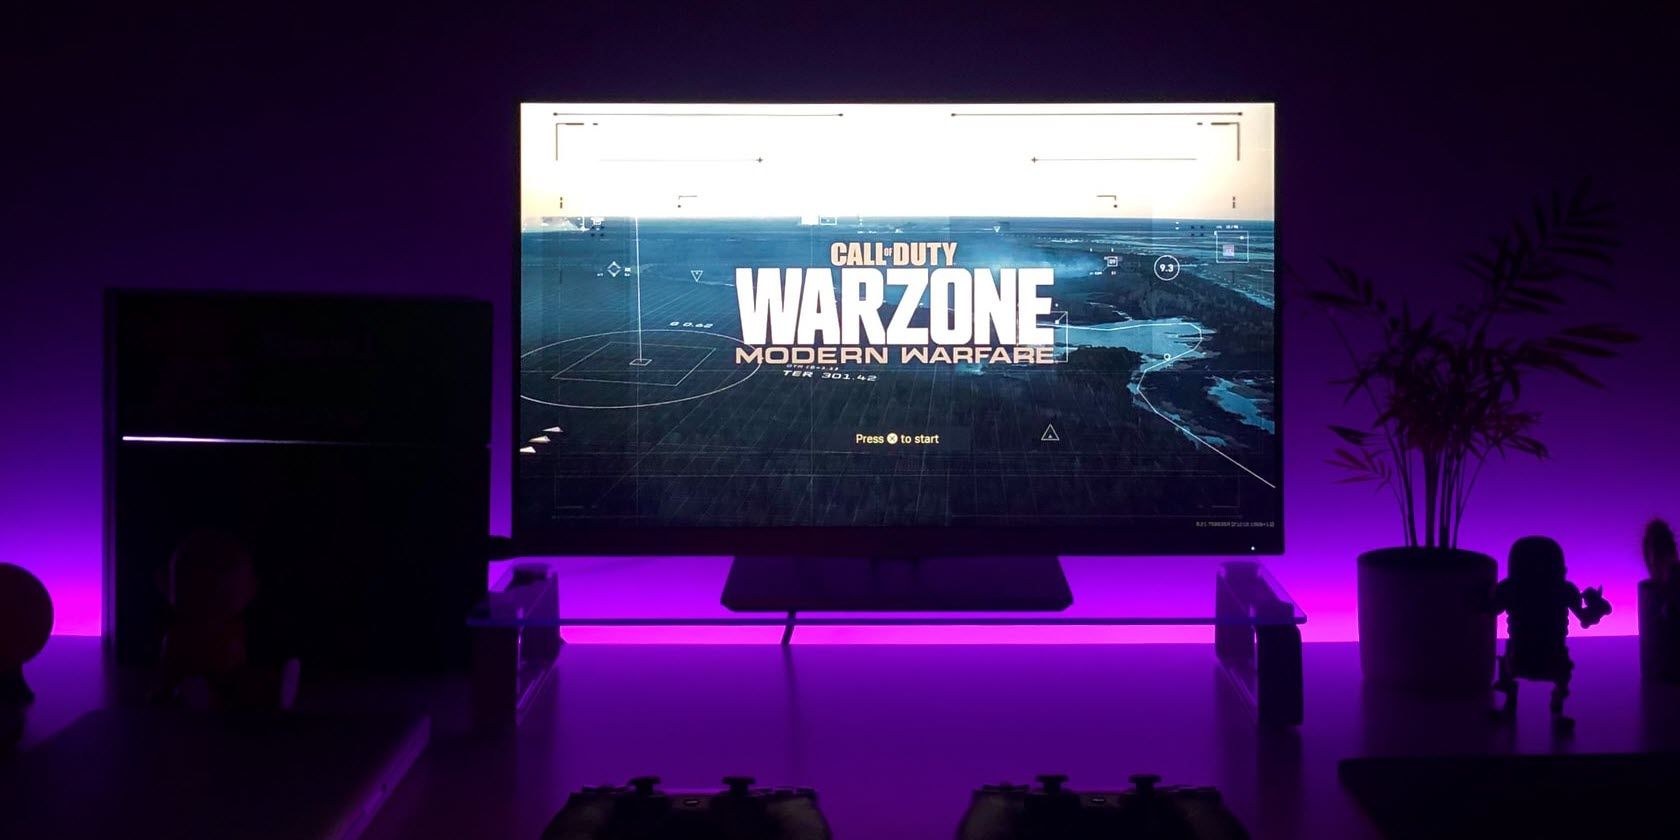
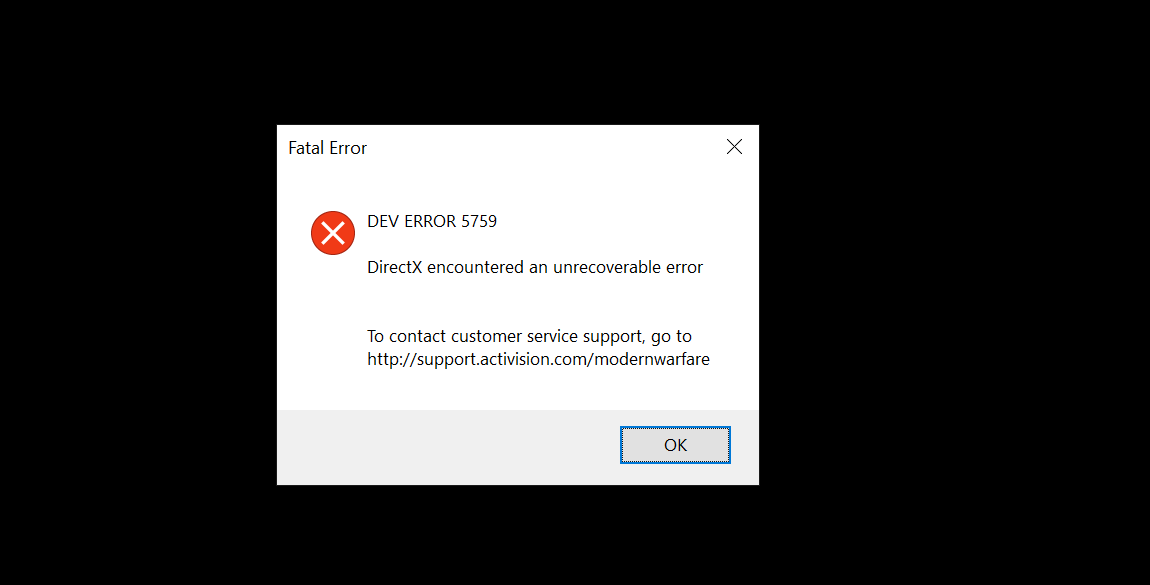
If you are experiencing a «DirectX unrecoverable» error when playing Call of Duty (COD) Warzone, you are not alone. In fact, this is one of the common issues that players are complaining about. It is important to note that the error occurs because of DirectX-related issues and has nothing to do with the game servers.
Let’s explore what causes the «DirectX unrecoverable» error in Call of Duty Warzone and how you can fix it.
Possible Causes for Call of Duty Warzone’s «DirectX Unrecoverable» Error
A few different things can cause this error, so be sure to give each solution a try to see if it does the job.
Random Computer or Game Bug
Coding bugs or game bugs are normal and usually cause many errors encountered when playing or launching games. However, faulty hardware may also trigger some software problems, which can cause the game to crash. You can minimize problems coming from random bugs by keeping your game app up to date.
Outdated Drivers or Software
Games like Call of Duty Warzone heavily rely on your computer’s system and drivers. If they’re not updated, they can cause games like COD to crash. If you encounter the DirectX Unrecoverable Error all of a sudden, it might be an issue with the drivers of your PC or your operating system. Running an outdated OS or drivers can introduce issues to your computer, not only your game. So make sure you regularly update them.
Your Computer Is Incompatible With COD Warzone
If it’s your first time launching COD Warzone and you’ve encountered this issue, your PC may be incompatible with the game. Your computer must meet the minimum specification required to play the game, or else you’ll encounter issues like DirectX Unrecoverable Error.
Conflicts With Other Programs
Unfortunately, other applications may interfere with the Blizzard launcher or the COD Warzone game. For example, if you’ve been running the game for a while and it suddenly crashes after you recently installed a new application, the new program might be causing the Warzone DirectX Unrecoverable error.
Internet Connection Problems
Another possible cause for the DirectX error on COD Warzone is your internet connection. A slow or intermittent connection can affect your gameplay and cause issues in general. Before launching the game, make sure that your internet is properly working. This can minimize your chances of getting an error throughout the game.
How to Fix Call of Duty Warzone DirectX Unrecoverable Error
Now you know the common causes, it’s time to get this error fixed. Here’s how.
Restart the Game and Launcher
This is a crucial step, and you should not skip this. While this may seem like a basic step, it can be an effective solution as rebooting the game and launcher gives the app a fresh start, removing any random errors it may have encountered. Here’s how you can restart the game:
- Quit COD Warzone as you would normally do.
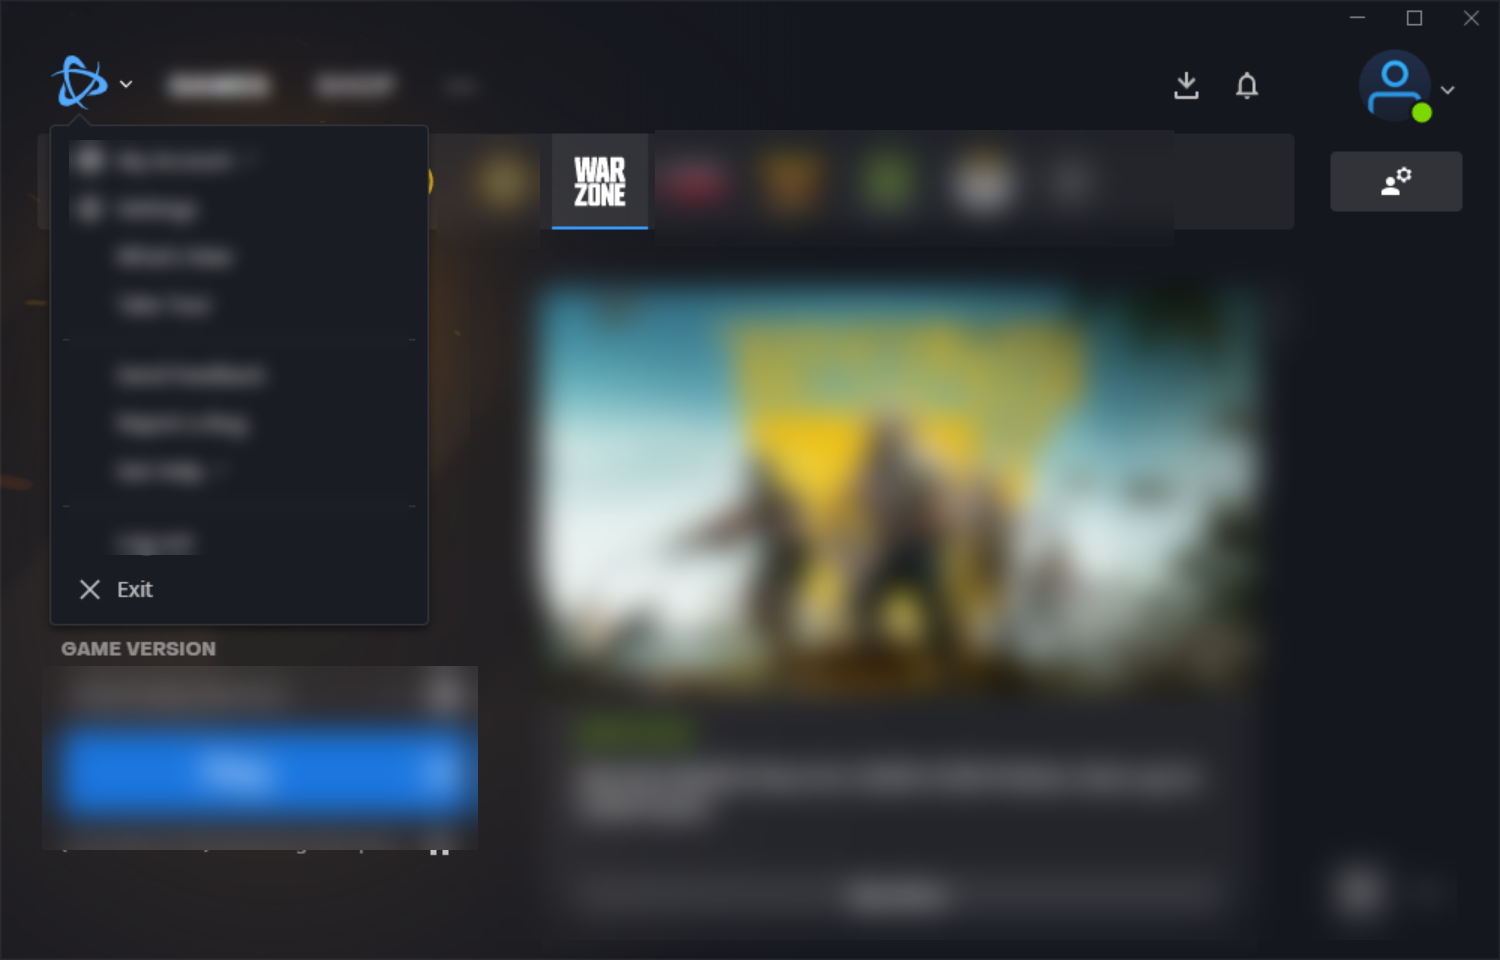
- Then, close the Battle.net launcher completely by clicking the Battle.net logo on the upper-left side and selecting Exit.
-

If necessary, close it through the task manager. Press and hold Ctrl + Shift + Esc, select COD Warzone and Battle.net launcher from the list and click End task.
- Relaunch both programs and check if the error is fixed.
Reboot Your Computer
If you are still experiencing the Warzone DirectX Unrecoverable error after restarting the game and its launcher, the next thing you should do is reboot your computer. Don’t just restart it; shut down your PC completely and wait for at least 30 seconds before turning it back on. After turning on your computer, open the game and see if the issue persists.
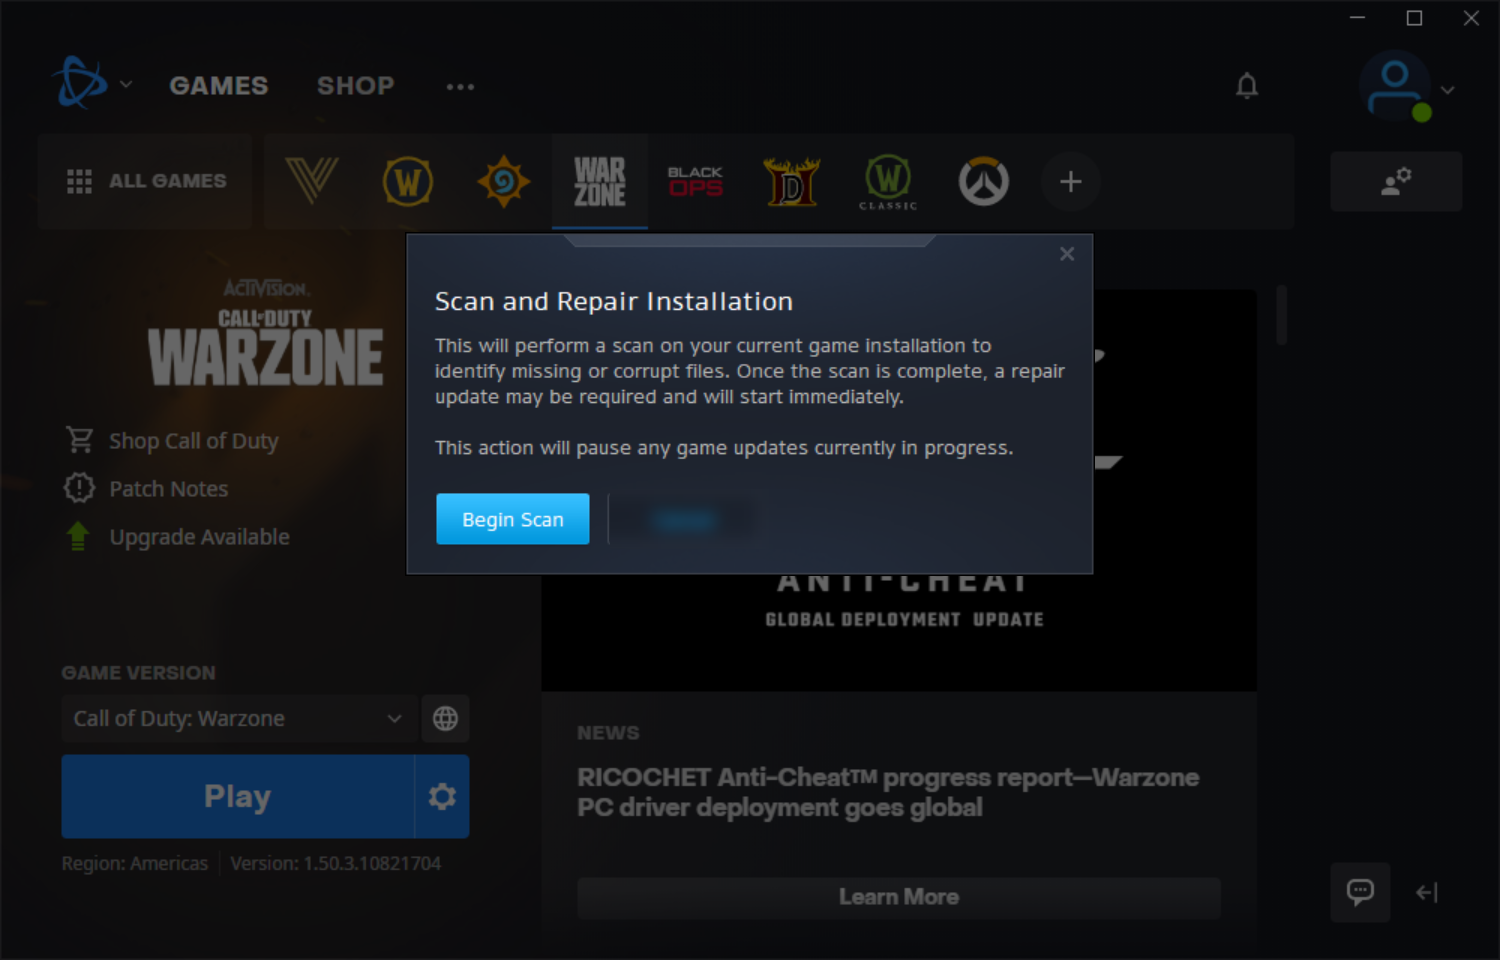
Use the Scan and Repair Option from the Battle.net App
The Blizzard Battle.net app has a built-in troubleshooting tool that helps repair corrupted game files. Many users have reported that this tool was able to help them fix several game issues, such as the DirectX Unrecoverable error. Follow the steps below o use this feature.
- Open the Battle.net launcher from your computer.
- Click the Call of Duty Warzone icon.
-
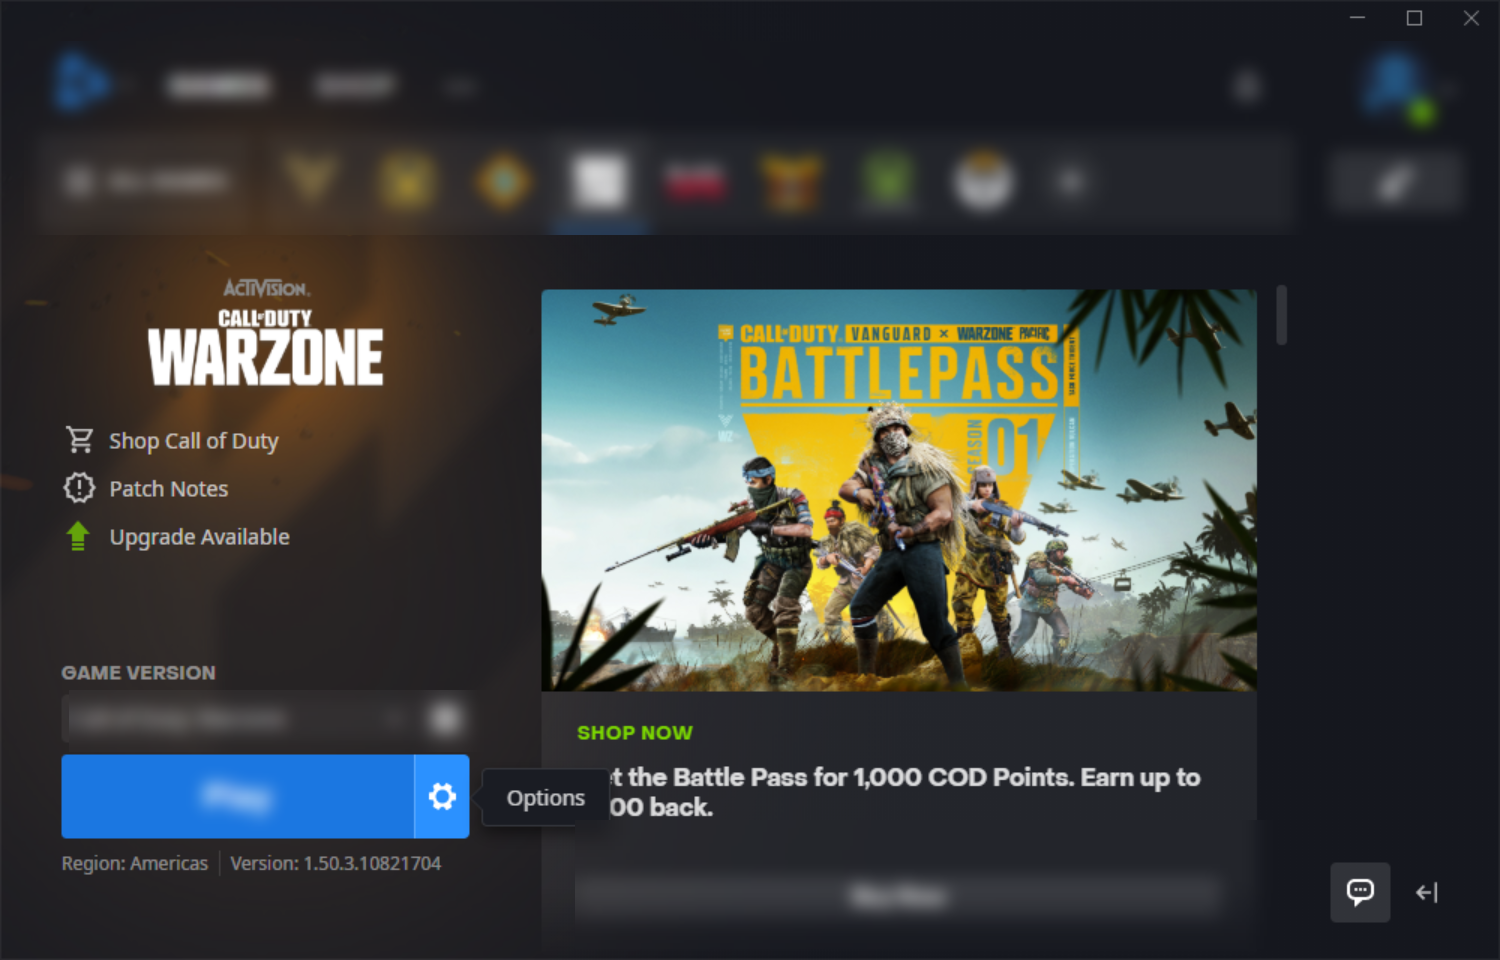
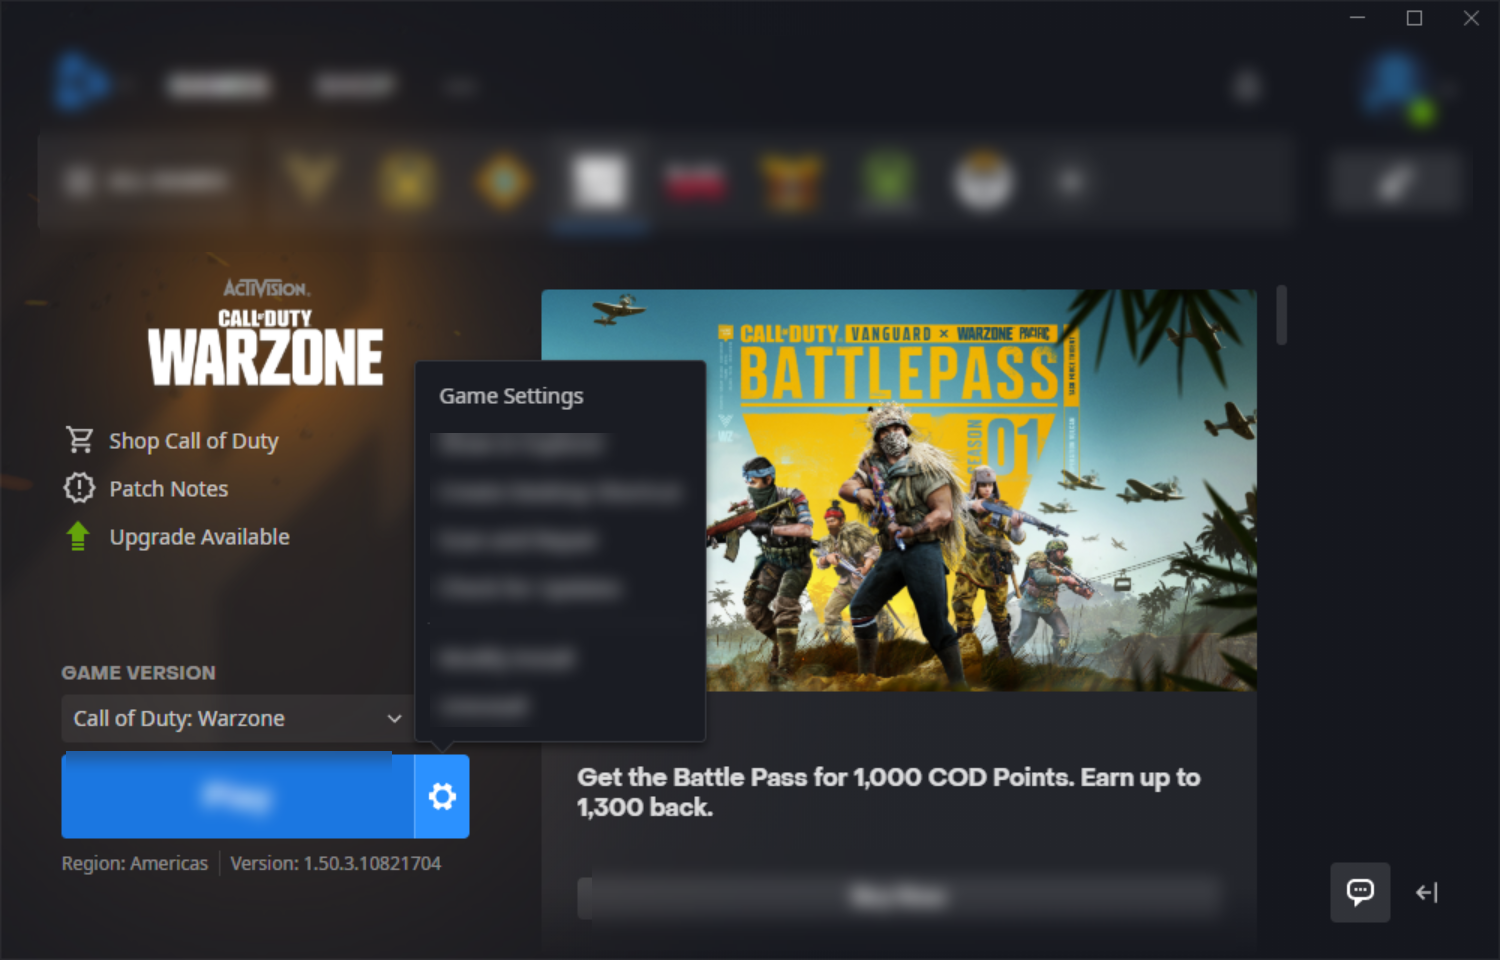
Then, click Options or the gear icon beside the Play game button.
-
Next, select Scan and Repair from the menu.
-
In the popup window, click Begin scan.
-
Wait for the repair to finish and see if this fixes the issue.


Keep Your Software and Drivers Updated
Outdated drivers and software can cause various issues to your system and its apps. To minimize your chances of encountering game bugs, make sure that the following are updated:
- Windows Operating System
- Graphics Card Drivers
- COD Warzone
- Blizzard Battle.net launcher
You also need to check if your system and other apps receive regular updates from Microsoft and developers. If not, it can be detrimental to your PC’s overall health.
Run Call of Duty in DirectX 11 Mode
In some cases, forcing your computer to run on DirectX 11 mode instead of DirectX 12 can fix the unrecoverable error. Here’s how you can run COD Warfare in DirectX 11 mode:
- Open the Battle.net launcher.
- Select the Call of Duty: Warzone from your list of games.
-
Click the gear icon or Options found beside the Play game button.
-
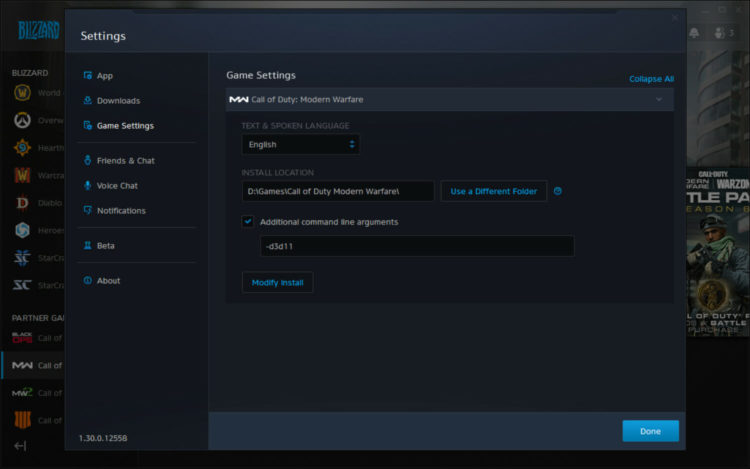
Then, choose Game Settings.
-
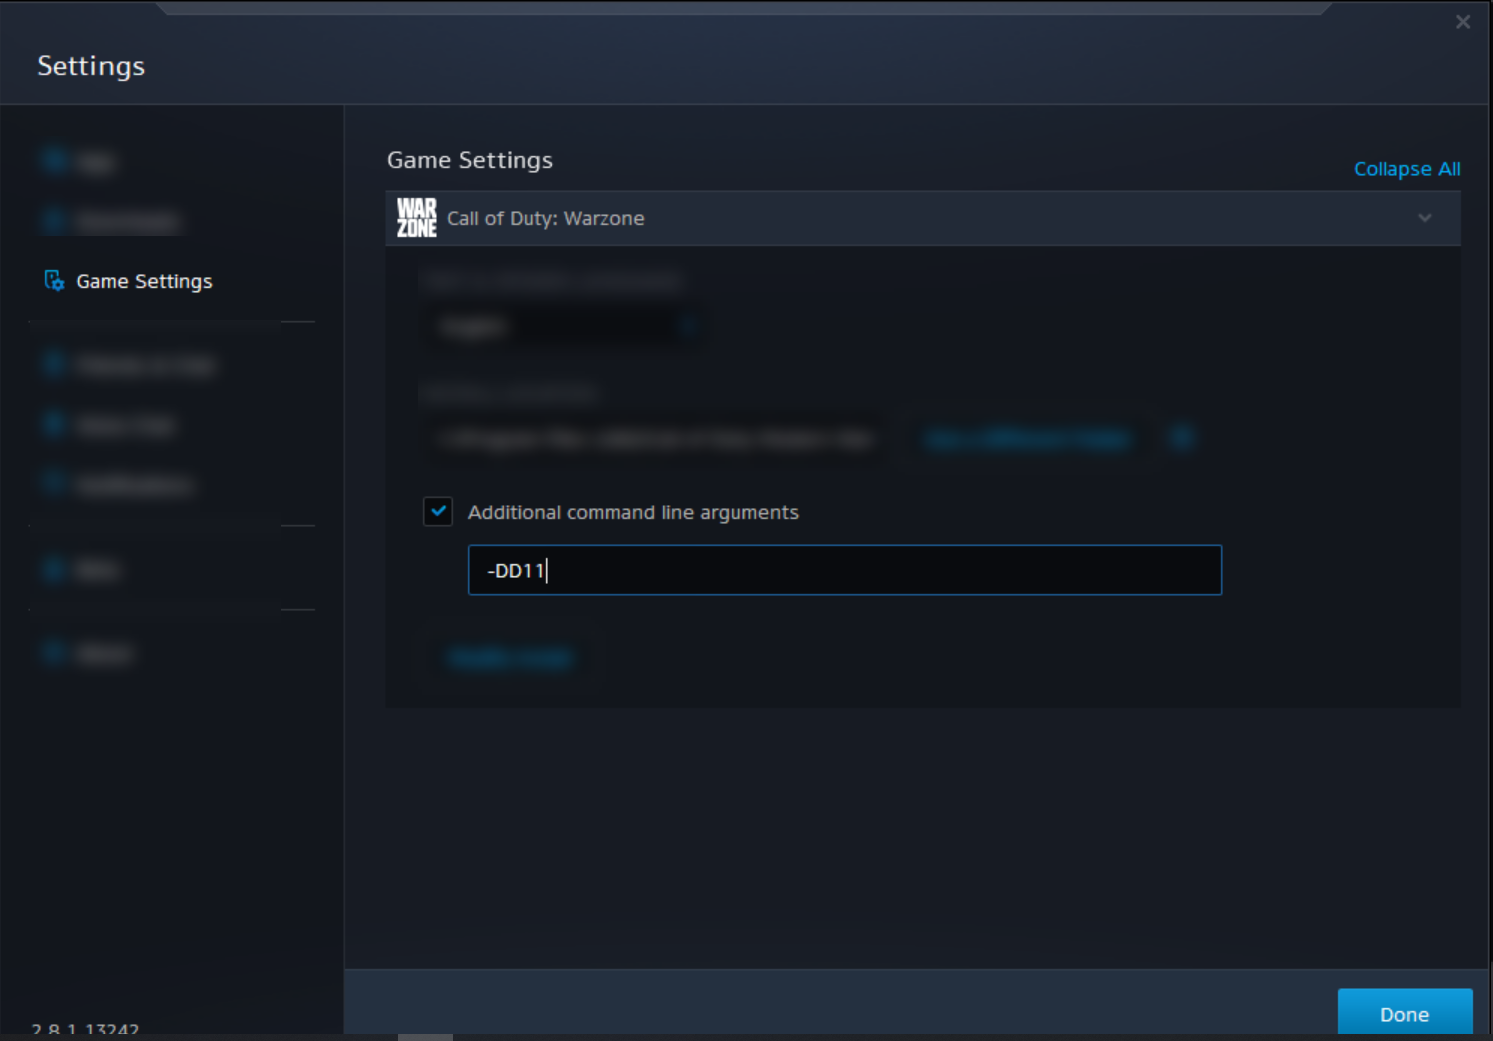
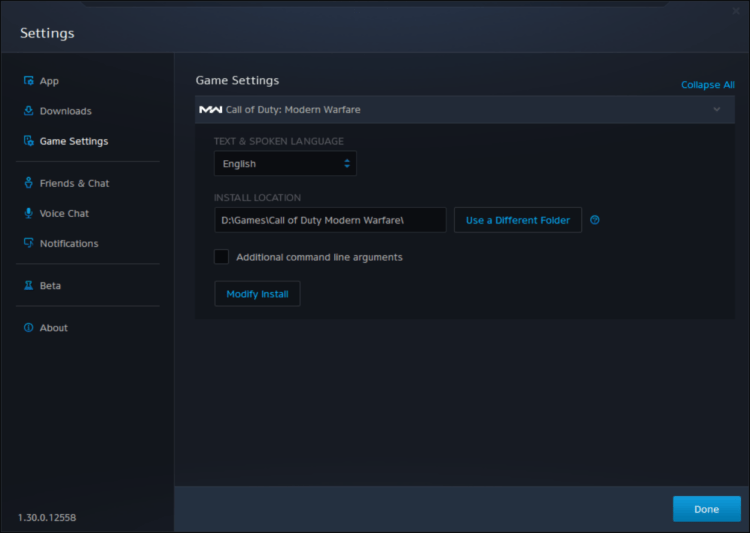
From the Game Settings, check the box beside the Additional Command Line Arguments.
-

In the box, type -DD11. Next, click the Done button at the bottom of the window.
-

Rerun the game and see if the problem returns.

Reinstall Your GPU Drivers
Games like COD Warzone heavily rely on your computer’s GPU. If its drivers fail, you’re likely to experience errors while playing or launching the game. If you’re still getting an error after the fixes above, reinstalling your graphics card driver may be the solution. Here’s how:
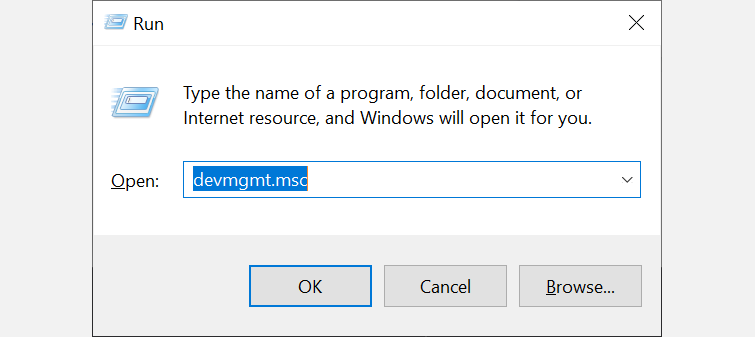
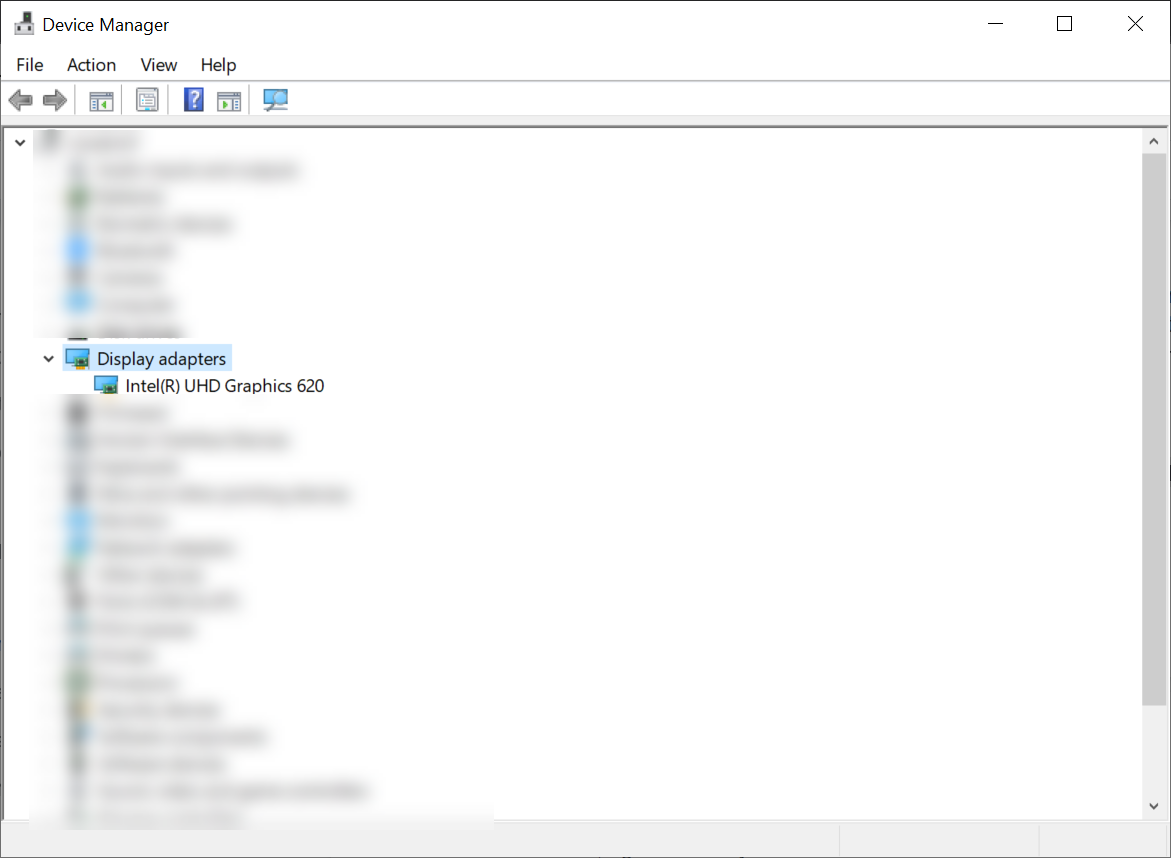
- Press Win + R to open Run. Then, type in devmgmt.msc in the text box. Press OK.
-

On the Device Manager, click the arrow beside the Display adapters to show your graphics card.
-

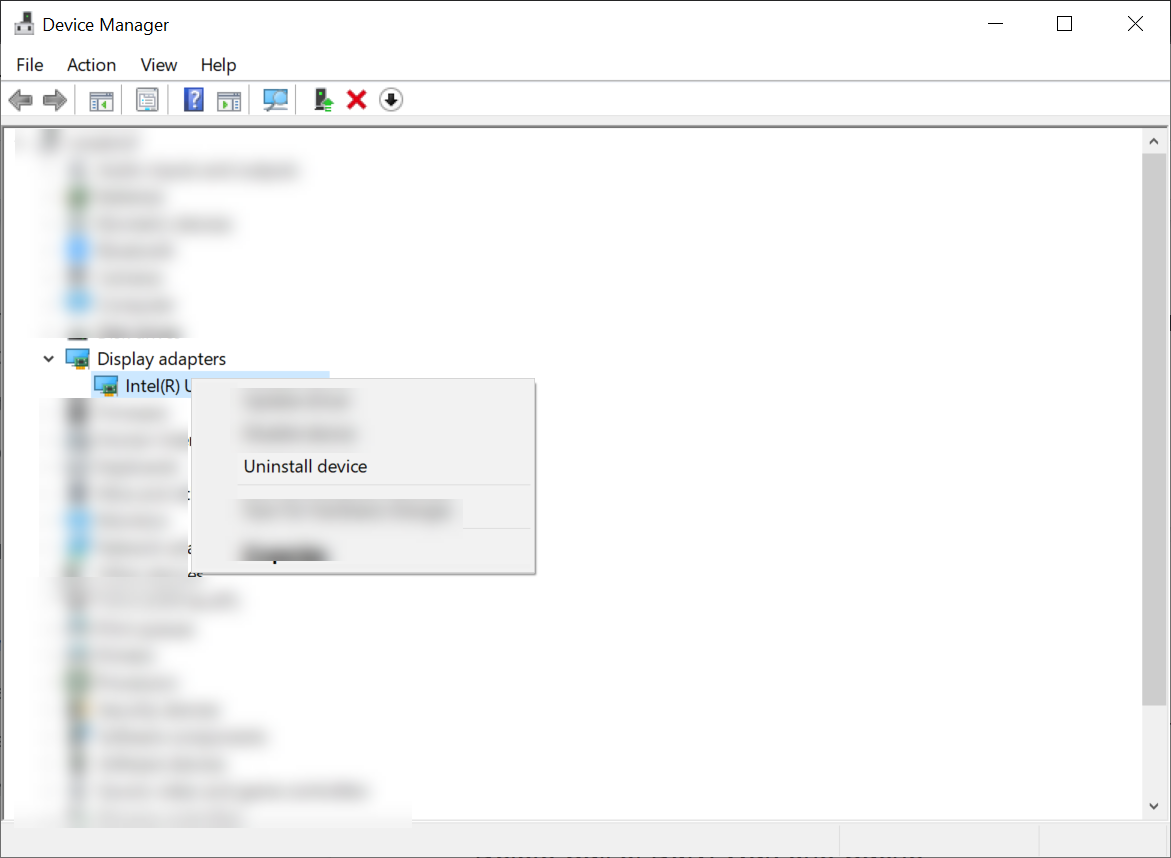
Then, right-click on your GPU and select Uninstall device.
-
Next, restart your computer. Windows 10 will automatically attempt to reinstall the driver during the reboot.
- Open the game and see if it’s working correctly.
Delete Call of Duty Warzone’s Cache
Removing the game’s cache can also fix the unrecoverable error and refresh its settings. Follow the steps below to delete the cache:
- Close COD Warzone and the Battle.net application.
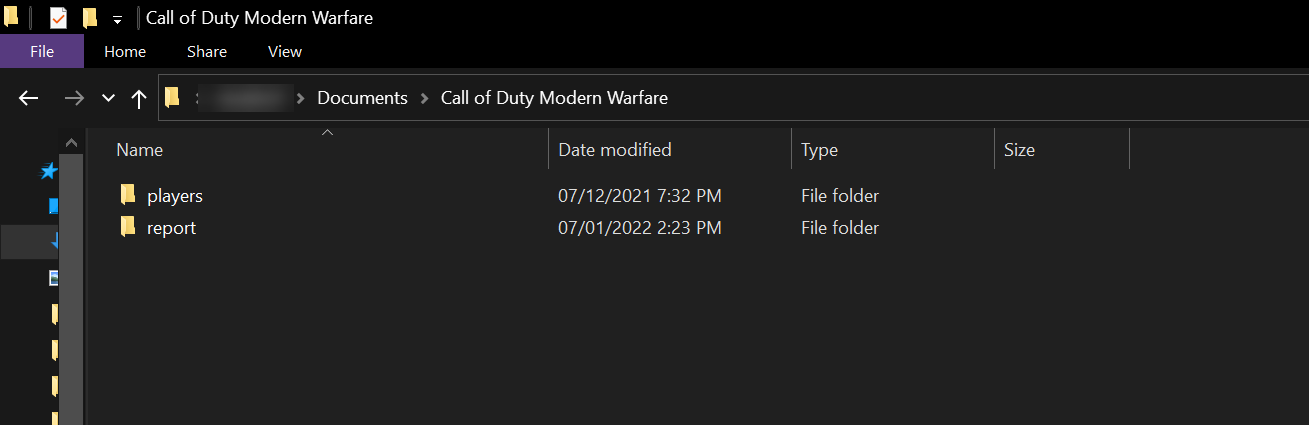
- Open File Explorer and copy and paste the following on the address bar: C:\Users\[your name]\Documents\Call of Duty Modern Warfare\. Make sure to change the [your name] label to your PC’s name.
-

Copy all the folders found in this location and keep them in another folder. This will serve as your backup if you encounter an error with your troubleshooting later or when you want to restore the cache to your game.
- After copying the game cache to another folder, go back to the Call of Duty file explorer window and delete all the folders in it.
- Start the COD Warzone game again and see if this fixed the error.
Close Other Apps When the Game Is Running
As mentioned, other programs can cause the DirectX Unrecoverable error. To ensure that these apps aren’t the cause of the issue, close all other apps before launching the game. If it runs smoothly, run the apps one by one before opening the game to see which is causing the problem. Once you’ve determined which app, uninstall it completely to stop the error from happening again.
Getting a Better Gaming Experience
Experiencing an error when launching or playing Call of Duty Warzone can be frustrating, especially if you don’t know the root cause of the problem. Hopefully, the fixes above resolve the DirectX Unrecoverable error. If it does, it’s also best to look at ways to optimize your Windows 10 performance for a better gaming experience.
Call of Duty: Warzone — один из самых динамичных бластеров в жанре «королевская битва». Однако, как и в любой игре, время от времени в ней все же случаются технические сбои. Некоторые игроки сообщили на форуме Blizzard, что им нужно исправить Call of Duty: Warzone, не запускающуюся в Windows 11/10. Call of Duty: Warzone вообще не запускается или зависает при загрузке для этих игроков.
Есть множество способов, которыми игроки могут решить проблемы с запуском Call of Duty: Warzone. Вы также пытаетесь исправить то, что Call of Duty: Warzone не запускается в Windows 11/10? Если да, вот как вы можете исправить Call of Duty: Warzone, если он не запускается в Windows 11/10.
1 Запустите программу запуска Battle.net от имени администратора.
Запуск программного обеспечения от имени администратора дает ему полный доступ к системе. Поскольку Battle.net является средством запуска Call of Duty: Warzone, рекомендуется настроить это программное обеспечение для запуска от имени администратора. Вы можете настроить Battle.net таким образом, чтобы он всегда работал с повышенными правами.
-
Если у вас есть ярлык Battle.net на рабочем столе, щелкните его правой кнопкой мыши и выберите «Свойства ». Либо откройте папку Battle.net в проводнике, щелкните правой кнопкой мыши файл Battle.net Launcher.exe и выберите «Свойства».
-
Выберите вкладку «Совместимость », показанную на снимке экрана ниже.

-
Щелкните Запустить эту программу от имени администратора, чтобы установить этот флажок.
-
Выберите «Применить », чтобы сохранить новую настройку совместимости, и нажмите «ОК », чтобы выйти.

Помимо панели запуска Battle.net, выберите тот же параметр «Запуск от имени администратора» для игры Call of Duty Warzone. Откройте папку Call of Duty: Modern Warfare в Проводнике. Затем выберите параметр «Запуск от имени администратора» для Modern Warfare.exe и Modern Warfare Launcher.exe, как описано выше.
2 Проверьте Call of Duty: игровые файлы Warzone
Возможно, вам придется восстановить файлы Call of Duty: Warzone, если игра не запускается. Battle.net включает удобную функцию сканирования и восстановления для проверки файлов игры. Вы можете выбрать этот параметр следующим образом.
-
Откройте программу запуска Battle.net.
-
Выберите Warzone на игровой панели в верхней части окна Battle.net.
-
Нажмите значок шестеренки справа от кнопки воспроизведения Call of Duty: Warzone, чтобы открыть меню, показанное непосредственно ниже.
-
Нажмите «Сканировать и восстановить ».

3 Запустите сканирование системных файлов
Call of Duty: Warzone может не запуститься из-за более широких проблем с системными файлами. Инструмент проверки системных файлов, основанный на командах, скорее всего, восстановит любые поврежденные системные файлы, что также может исправить то, что Call of Duty: Warzone не запускается.
Вот как запустить сканирование SFC в Windows 11:
-
Запустите окно поиска с помощью горячей клавиши Win + S, которая откроет его.
-
Чтобы найти командную строку, введите cmd в поле «Введите здесь для поиска».
-
Нажмите «Командная строка» правой кнопкой мыши, чтобы выбрать «Запуск от имени администратора».
-
Перед запуском сканирования SFC введите следующую команду обслуживания образа развертывания:
DISM.exe /Online /Cleanup-image /Restorehealth -
Нажмите клавишу Enter, чтобы выполнить введенную команду.
-
Затем запустите сканирование SFC, введя эту команду и нажав Return :
sfc /scannow -
Сканирование SFC займет некоторое время. Не закрывайте командную строку, пока сканирование не достигнет 100 процентов и не отобразит сообщение о результатах.


4 Изменить Call of Duty: место установки Warzone
Некоторые игроки говорят, что им удалось исправить не запускающуюся Call of Duty: Warzone, изменив место установки игры. Для этого вам нужно скопировать папку Call of Duty Modern Warfare в другой каталог.
Выполните следующие действия, чтобы изменить место установки Call of Duty: Warzone.
-
Нажмите комбинацию клавиш Win + E, чтобы запустить проводник.
-
Перейдите в каталог, содержащий папку Call of Duty Modern Warfare.
-
Щелкните правой кнопкой мыши папку Call of Duty Modern Warfare, чтобы выбрать «Вырезать».
-
Затем откройте другую папку, чтобы переключить место установки Call of Duty: Warzone.
-
Щелкните правой кнопкой мыши область в папке, чтобы выбрать «Вставить », которая скопирует туда каталог Modern Warfare.
-
Запустите программу Battle.net.
-
Теперь вы должны увидеть опцию «Найти игру» чуть ниже синей кнопки «Установить» для Call of Duty: Warzone.
-
Нажмите «Найти игру ».
-
Выберите папку Call of Duty Modern Warfare в новом каталоге, в который вы ее скопировали.
-
Нажмите кнопку «Выбрать папку ».
-
Затем нажмите кнопку «Воспроизвести», чтобы (надеюсь) запустить Call of Duty: Warzone.


5 Разрешите запуск Battle.net через брандмауэр Защитника Windows.
Call of Duty: Warzone — это многопользовательская игра, запуск которой могут блокировать брандмауэры. Итак, убедитесь, что брандмауэр Защитника Windows не блокирует Call of Duty: Warzone или программу запуска Battle.net. Вот как вы можете разрешить Battle.net через брандмауэр Windows.
-
Откройте апплет панели управления брандмауэра Windows.
-
Затем нажмите Разрешить приложение или функцию через брандмауэр Защитника Windows на панели управления.
-
Нажмите «Изменить настройки».
-
Установите флажки Private и Public для приложения Battle.net Launcher.
-
Нажмите кнопку OK для подтверждения.


Если приложения Battle.net Launcher нет в списке, нажмите кнопку Разрешить другое приложение. Нажмите кнопку «Обзор », выберите программу запуска Battle.net и нажмите «Открыть ». Нажмите кнопку «Добавить », а затем установите все флажки для Battle.net.

Кроме того, установите флажки Public и Private для Call of Duty: Modern Warfare. Убедитесь, что вы также установили эти флажки, чтобы разрешить игру через брандмауэр.
6 Обновите драйвер графического адаптера вашего ПК
Call of Duty: Warzone может не запуститься, потому что драйвер вашей видеокарты устарел, несовместим или неисправен. Обновление или переустановка драйвера для видеокарты вашего ПК может стать решением в таком случае. Вы можете вручную обновить драйвер для своего графического процессора, загрузив для него последний пакет драйверов с веб-сайта NVIDIA или AMD.
Если вам нужна помощь в этом, узнайте, как обновить графические драйверы для получения дополнительной информации.
7 Чистая загрузка вашего ПК
Вы можете исключить сторонние программы и службы автозапуска из автозагрузки Windows с помощью чистой загрузки. Чистая загрузка вашего ПК может отфильтровать программу или службу, которые могут конфликтовать с Battle.net или игрой Call of Duty: Warzone. Чтобы выполнить чистую загрузку Windows, измените параметры конфигурации запуска следующим образом.
-
Щелкните значок меню «Пуск» правой кнопкой мыши, чтобы выбрать «Выполнить».
-
Введите msconfig в поле «Открыть» в «Выполнить».
-
Нажмите «ОК », чтобы открыть окно «Конфигурация системы».
-
Снимите флажок Загрузить элементы автозагрузки .
-
Выберите вкладку «Службы» в верхней части окна «Конфигурация системы».
-
Щелкните Скрыть все службы Microsoft, чтобы выбрать этот параметр, исключающий все наиболее важные системные службы.
-
Нажмите кнопку Отключить все, чтобы снять все выбранные флажки для сторонних сервисов.
-
Затем нажмите «Применить» > «ОК », чтобы сохранить параметры и выйти из MSConfig.
-
Откроется диалоговое окно с запросом на перезагрузку. Нажмите «Перезагрузить», чтобы выполнить чистую загрузку компьютера.
-
Попробуйте запустить Call of Duty: Warzone после перезагрузки.


Это исправило игру, которая не запускалась? Если это так, возможно, фоновая программа или служба конфликтуют с Call of Duty: Warzone. Вы можете просто оставить конфигурацию загрузки как есть или попытаться определить, какое программное обеспечение вызывает проблему. Взгляните на вкладку «Автозагрузка» диспетчера задач, чтобы увидеть, какие конкретные программы были отключены от запуска с Windows.
8 Переустановите Call of Duty: Warzone
Переустановка Call of Duty: Warzone заменит ее файлы. Поскольку игра требует большой загрузки, сделайте это последним средством, если ничего не работает.
Вот как переустановить Call of Duty: Warzone:
-
Откройте окно Battle.net.
-
Нажмите «Все игры» и выберите «Call of Duty: Warzone».
-
Затем щелкните значок шестеренки на кнопке «Играть» для Call of Duty: Warzone.
-
Выберите вариант «Удалить ».
-
Перезагрузите компьютер или ноутбук после удаления Call of Duty: Warzone.
-
Снова откройте Battle.net и нажмите «Установить» для Call of Duty: Warzone.

Вы также можете попробовать переустановить Battle.net. Для этого нажмите горячую клавишу Win + R, введите appwiz.cpl в поле «Выполнить» и нажмите «ОК ». Выберите Battle.net в разделе «Программы и компоненты» и нажмите «Удалить/Изменить» для этого программного обеспечения. Затем загрузите последнюю версию программного обеспечения с веб- сайта Battle.net, чтобы переустановить его.

Если ничего не помогает, вы можете обратиться в службу поддержки Activision для Call of Duty: Warzone. Для этого войдите в свою учетную запись на сайте Activision. Затем нажмите «Параметры поддержки», выберите игру Warzone и платформу и отправьте запрос в службу поддержки оттуда.
Получайте удовольствие от Call of Duty: Warzone снова
Эти подтвержденные разрешения, вероятно, запустят Call of Duty: Warzone в Windows 11/10 для большинства игроков. Нельзя обещать, что эти потенциальные решения исправят запуск Warzone не для всех, но они того стоят. В дополнение к этому попробуйте отключить или даже удалить стороннее антивирусное программное обеспечение, которое может мешать игре.
Источник записи: www.makeuseof.com
Ошибка 0xc0000005 портит вам матчи Call of Duty: Warzone? Попробуйте выполнить следующие действия, чтобы исправить эту проблему

Call of Duty: Warzone – это игра в жанре battle royale от Modern Warfare, которая доставляет огромное удовольствие— когда вы можете играть в нее без проблем. Некоторые игроки Warzone (и Modern Warfare) написали на Reddit и форумах Battle.net об ошибке 0xc0000005. Эти игроки видят сообщение Fatal Error с довольно длинным кодом ошибки 0x00000001419101f1 9926301 0xc0000005 при игре в Warzone или одиночной игре Modern Warfare
Эта ошибка 0xc0000005 может привести к краху Warzone, когда она появляется, что портит удовольствие от игры. Происходит ли то же самое, когда вы играете в эту игру? Вот как можно исправить ошибку 0xc0000005 в Warzone в Windows 11 и 10
Одно из решений, которое предлагает сообщение об ошибке 0xc0000005, – запустить сканирование восстановления Warzone (ModernWarfare.exe). В сообщении об ошибке даже есть кнопка Scan and Repair , но некоторые игроки говорят, что при нажатии на нее игра вылетает. Поэтому мы рекомендуем вам выбрать Сканировать и восстановить для Warzone в Battle.net следующим образом:
- Сначала откройте программу Warzone Battle.net launcher.
- Нажмите кнопку Battle.net Все игры и выберите опцию Мои игры.
- Выберите свою игру Warzone.
- Нажмите Options (значок шестеренки) справа от кнопки Play игры Warzone.
- Затем выберите опцию Сканировать и восстановить.
- Нажмите Начать сканирование для подтверждения.


Теперь дождитесь окончания сканирования. Это может занять некоторое время, поскольку Call of Duty: Warzone – большая игра
2. Выберите опцию GeForce Experience ‘Оптимизация для Warzone’
Если ваш компьютер оснащен видеокартой NVIDIA, это разрешение стоит попробовать. Некоторые игроки Warzone сообщили, что смогли исправить ошибку 0xc0000005, выбрав Оптимизировать для Warzone в GeForce Experience. При необходимости вы можете загрузить это ПО со страницы NVIDIA GeForce Experience. Вот как вы можете выбрать опцию Оптимизировать для Warzone в этом ПО:
- Щелкните правой кнопкой мыши на значке NVIDIA в системном трее и выберите GeForce Experience.
- Наведите курсор на Modern Warfare на вкладке Главная.
- Выберите опцию Подробности .
- Нажмите кнопку Оптимизировать.


Если на вкладке Главная вы не видите Modern Warfare (Warzone), нажмите кнопку Настройки . Выберите опцию Games & Apps > Scan Now. После этого вы увидите игру в GeForce Experience
3. Установите для Warzone режим Run With DirectX 11
DirectX 12 – более продвинутая версия DirectX, чем DX11, но она может вызывать ошибки сбоя Warzone. Вы можете настроить Warzone на работу с DirectX 11, введя для этого аргумент командной строки следующим образом:
- Вызовите Warzone в программе Battle.net.
- Нажмите Options на кнопке Play , чтобы выбрать Game Settings.
- Затем нажмите на игру Call of Duty: Warzone на вкладке Game Settings Настройки игры.
- Выберите Дополнительные аргументы командной строки , чтобы активировать текстовое поле.
- Введите -d3d11 в текстовое поле для аргументов командной строки.
- Нажмите кнопку Готово.

4. Обновите графический драйвер для вашего GPU
Call of Duty: Warzone имеет фантастическую графику, что делает установку последних версий графических драйверов NVIDIA или AMD более важной. Такие проблемы Warzone, как ошибка 0xc0000005, чаще всего возникают, если драйвер вашего GPU устарел на много месяцев или даже лет. Вы можете обновить драйверы GPU одним из способов, описанных в нашем руководстве по обновлению графических драйверов в Windows
5. Переименуйте папку Modern Warfare в Warzone
Вы каким-либо образом настраивали внутриигровые графические и звуковые параметры Warzone? Если да, то сброс всех настроек по умолчанию может быть эффективным решением проблемы ошибки 0xc0000005. Вы можете восстановить стандартные настройки игры, переименовав папку Modern Warfare, выполнив следующие действия:
- Сначала запустите File Explorer, для открытия которого есть удобная горячая клавиша Windows + E.
- Выберите Документы на боковой панели навигации Проводника файлов.
- Щелкните правой кнопкой мыши опцию Call of Duty Modern Warfare и выберите Переименовать.
- Введите Call of Duty Modern Warfare backup в качестве названия новой папки. После этого Warzone создаст новую папку при повторном запуске игры.

6. Выключите NVIDIA Highlights
Играете ли вы в Call of Duty: Warzone с оверлеем NVIDIA GeForce Experience? Если да, попробуйте отключить функцию Highlights этого оверлея для автоматического захвата снимков и записей из игр с помощью ShadowPlay. Вот как можно отключить функцию NVIDIA Highlights:
- Вызовите NVIDIA GeForce Experience, щелкнув правой кнопкой мыши на его значке в системном трее и выбрав его оттуда.
- Затем нажмите на кнопку Настройки.
- Нажмите кнопку Настройки для внутриигрового оверлея.
- Выберите опцию Highlights.
- Отключите настройку Захват.


.
Кроме того, вы можете отключить Highlights специально для Warzone. Для этого откройте настройки Highlights из оверлея GeForce Experience во время игры и отключите опцию Call of Duty: Modern Warfare
7. Отключите настройку потоковой графики текстур по требованию
Потоковая передача текстур по требованию – это графическая настройка в Warzone, которая усиливает цвета игры за счет потоковой передачи текстур. Однако эта настройка является потенциальной причиной ошибки 0xc0000005 для игроков с низкой пропускной способностью интернета. Также эта опция не дает особенно заметного улучшения визуального качества игры. Вот шаги по отключению потоковой передачи текстур по требованию в Warzone:
- Запустите игру Call of Duty: Warzone.
- Нажмите кнопку Options в нижней части окна Warzone.
- Выберите вкладку Графика.
- Затем нажмите Disabled для On-demand Texture Streaming.
- Выберите опцию Yes когда появится запрос, чтобы подтвердить, что вы уверены в отключении этой настройки.
- Затем перезапустите Warzone, чтобы применить настройку.

Уменьшение других графических настроек в Warzone также освободит системные ресурсы во время игры. Игра Warzone будет реже выходить из строя на компьютерах с более низкими характеристиками, если играть в нее с более низкими графическими настройками. Поэтому подумайте о снижении или даже отключении других настроек отображения и качества для этой игры
8. Отключите фоновое программное обеспечение ASUS GameFirst VI
ASUS GameFirst VI – это интегрированная сетевая программа, которая, как известно, конфликтует с Call of Duty: Warzone. Некоторые игроки исправили ошибку 0xc0000005, отключив это программное обеспечение. Если вам не нужен GameFirst VI, мы рекомендуем удалить его через Настройки. Однако вы можете отключить это приложение следующим образом:
- Вызовите Диспетчер задач (нажатие Ctrl + Shift + Esc открывает его).
- Выберите вкладку Startup Диспетчера задач.
- Затем выберите GameFirst VI на вкладке Startup и нажмите кнопку Disable.
- Щелкните правой кнопкой мыши процесс GameFirst VI на вкладке Процессы и выберите Завершить задачу.
- Снова поиграйте в Warzone, отключив или удалив GameFirst.
GameFirst VI, вероятно, не единственное фоновое приложение, которое конфликтует с Warzone. Мы также рекомендуем игрокам выполнить чистую загрузку Windows 11/10, чтобы отключить лишние приложения и службы при запуске. Ознакомьтесь с нашим руководством по выполнению чистой загрузки в Windows, чтобы узнать больше
9. Переустановите клиент Battle.net
Некоторые игроки сообщили, что переустановка Battle.net исправила ошибку 0xc0000005 Warzone на их компьютерах. Обратите внимание, что переустановка этого программного обеспечения не удаляет игры Battle.net, поэтому возвращение к игре не займет много времени. Вы можете удалить Battle.net через ‘Программы и функции’, как описано в нашем руководстве по удалению программ для Windows 11/10

Чтобы переустановить игровой клиент Warzone, откройте страницу загрузок Battle.net; там нажмите Battle.net Desktop App для Windows. Затем откройте мастер установки Battle.net из браузера или File Explorer, чтобы переустановить программу
10. Переустановите Call of Duty: Warzone
Warzone – это большая игра, которую нужно скачивать и устанавливать заново, но если ничего не помогает, попробуйте переустановить ее в качестве последнего средства для устранения ошибки 0xc0000005. Переустановка Call of Duty: Warzone – самый надежный способ решить проблемы с установкой игры. Выполните следующие шаги, чтобы переустановить Warzone через Battle.net:
- Откройте страницу Call of Duty: Warzone в приложении Battle.net.
- Нажмите Опции , чтобы просмотреть это меню.
- Выберите в нем опцию Uninstall.
- Нажмите Yes, Uninstall для подтверждения.
- Переустановите Warzone, нажав кнопку Install в Battle.net для этой игры.


Если вы используете ноутбук, убедитесь, что он подключен к сети, пока вы ждете переустановки Warzone. Затем вы можете пойти посмотреть телевизор или почитать книгу, так как загрузка, вероятно, займет не менее нескольких часов
Насладитесь взрывным экшеном Call of Duty: Warzone снова
Применение этих потенциальных исправлений, вероятно, остановит ошибку 0xc0000005, портящую взрывной экшен Warzone, для большинства игроков, которым необходимо решить эту проблему. Гарантированного способа исправить эту ошибку нет, но эти решения сработали для некоторых игроков
Вы также можете попробовать общие решения, такие как очистка заполненного жесткого диска, чтобы освободить место, запуск сканирования SFC для проверки поврежденных файлов и отключение G-Sync для устранения ошибки 0xc0000005
Dev Error 6068 Modern Warfare(COD)? DirectX, Overlock?
Are you getting the above error on the screen?
You don’t need to worry honestly because you are not alone in this
as many users who have been playing COD Warzone experienced Dev Error 6068.
Whenever they try to launch their game or during the game.
So, we have compiled a list of useful solutions for you to solve COD Warzone Dev Error 6068 below.
But if you want to know the cause behind the error then continue reading down below.
Why does Dev error 6068 occur?
Dev error 6068 can occur due to the following reasons:
- Outdated graphics driver.
- Windows 10 not updated
- Corrupted files of DirectX
- Game settings are not fully optimized.
How do I fix Dev error 6068?
You can fix the Dev error 6068 with the help of the following points
but details are given below in the article:
- Adjusting Video Memory Scale option.
- Updating Windows 10.
- Changing game settings to fullscreen
- Run Modern warfare as administrator
Video Guide: How To Fix COD Warzone Dev Error 6068 | PC | SOLVED
Solution 1: Update Your Graphics Driver
As COD Warzone Dev Error 6068 is mostly related to outdated graphics driver
How do I Update my graphics driver for free?
So, here is how you can update the graphic driver for free:
- Press Windows + X keys
- Select Device Manager

- Now click on Display adapters
- Right-click on Update driver

- Click Search automatically for updated driver software

- Now the updated version of the graphic driver will be downloaded and installed


Now after performing this solution now we move on to the next solution.
Solution 2: Run Modern Warefare as Administrator to Fix Dev Error 6068
If the above solution is not working then you should try running COD as Administrator
as sometimes your Modern warfare might not have the proper rights to run on PC.
How do I run Modern warfare as administrator?
Here is how you can run Modern warfare as an administrator:
- Right-click on the Modern Warfare(ModernWarfare.exe) launcher file
- Select properties.
- Now in the pop-up window go to the compatibility tab
- Then click the box next to Run this program as an administrator and click OK
- Launch the game and COD Warzone Dev Error 6068 will be fixed
You can do the same steps for the Battle.net launcher.
If Running Modern Warefare as Administrator didn’t work out, then proceed to the next solution.
Solution 3: Run COD Warzone with DirectX 11
Some users have been able to solve modern warfare DirectX error when they run it through DirectX 11.
How do I fix DirectX errors?
Here’s how you can solve the Direct X errors:
- Launch Battle.net client
- Now select Call of Duty: MW
- Click Options > Game Settings

- Tick the check box saying Additional command-line arguments
- In the text box type -d3d11

- And press Done
- Launch Warfare COD and check if Dev Error 6068 is solved
Solution 4: Adjust COD Modern Warfare Graphics Settings
You can run your game on full screen to overcome COD Modern Warfare Dev Error 6068.
How do I get better graphics on CoD?
Here is how you can get a better graphic on COD:
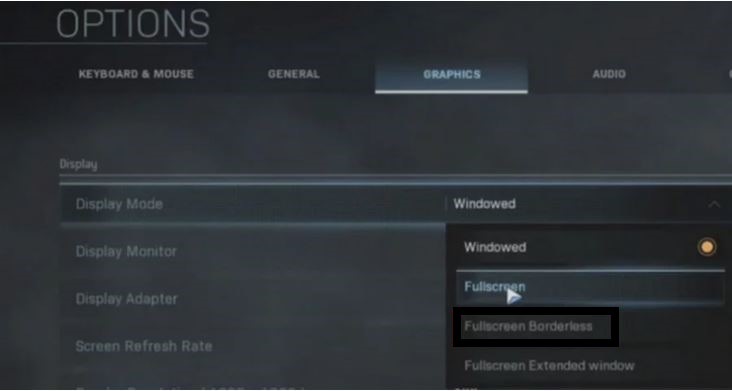
- Launch Call of Duty Modern Warfare
- Go to Settings > Graphics

- Click on Display Mode and select Fullscreen Borderless
If this solution didn’t fix your Dev Error 6068 then try the next solution for Modern Warfare Dev Error 6068
Solution 5: Change Video Memory Scale
A high video memory scale can lead to COD Warzone Dev Error 6068
How do I change the video memory scale?
So, here is how you can change the video memory scale:
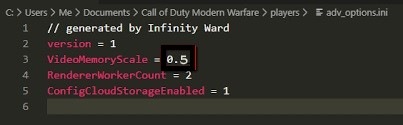
- Make sure you quit COD Warzone
- Now go to Documents\Call of Duty Modern Warfare\players
- Look for adv_options.ini
- Right-click on the folder and open it on Notepad
- Press Ctrl + F and search the VideoMemoryScale
- Change it to 0.5 and save it

- Launch Warzone and check if Warfare Dev Error 6068 is solved
If still the error persists then try to Disable Direct X Raytracing.
Solution 6: Disable DirectX Raytracing and Crossplay
Some specific settings in COD may cause dev error 6068.
So we have to disable the DirectX Raytracing to get rid of Dev Error 6068.
How do I turn off ray tracing?
Here’s how you can disable/turn off DirectX Raytracing:
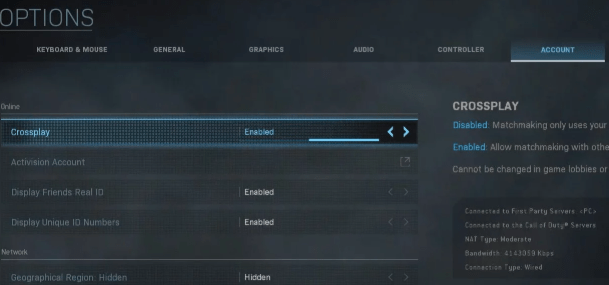
- Launch Call of Duty Modern Warfare
- Go to Settings > Graphics
- Under Shadow & Lighting Disable DirectX Raytracing

- Now click on Account
- Diable Crossplay option

- And Launch the game to check if modern warfare DirectX error is fixed

IF this solution also didn’t help you to eliminate the dev error 6068 then the next solution will definitely help you to eliminate the Dev error 6068.
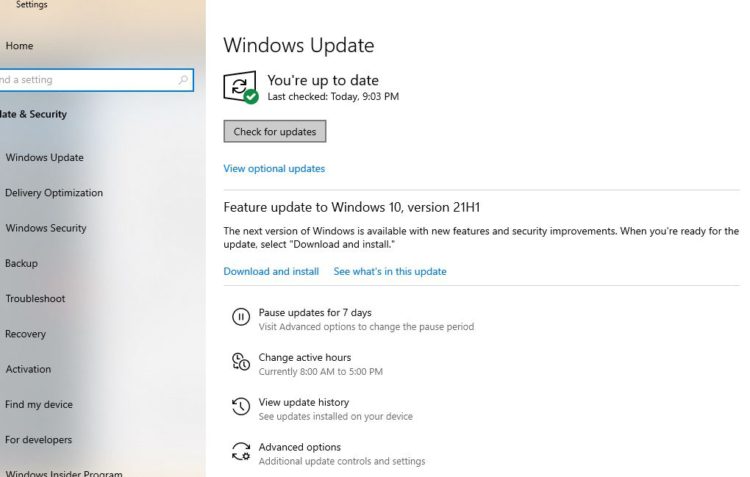
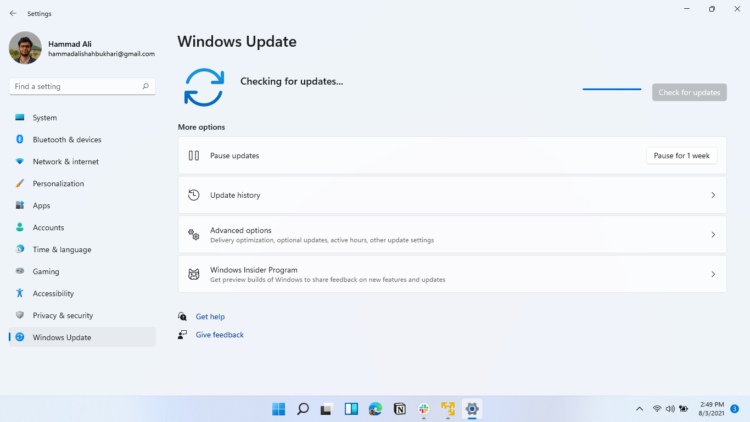
Solution 7: Check For Updates Windows 10
How do I check for Windows updates?
Here is how you can check for Windows updates:
Make sure your Windows 10 is up to date as an outdated version of it may lead to COD Warzone Dev Error 6068
So here’s how you can check for updates:
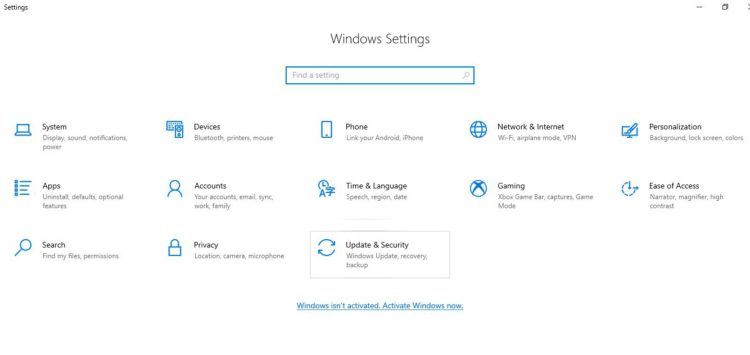
- Press Windows key + I to open settings
- Click on Update & Security

- Now click on Check for updates and wait for Windows to download and install the updates

- After updating restart your PC and launch Warzone
If you are a Windows 11 user then proceed to the next solution to Update Windows 11.
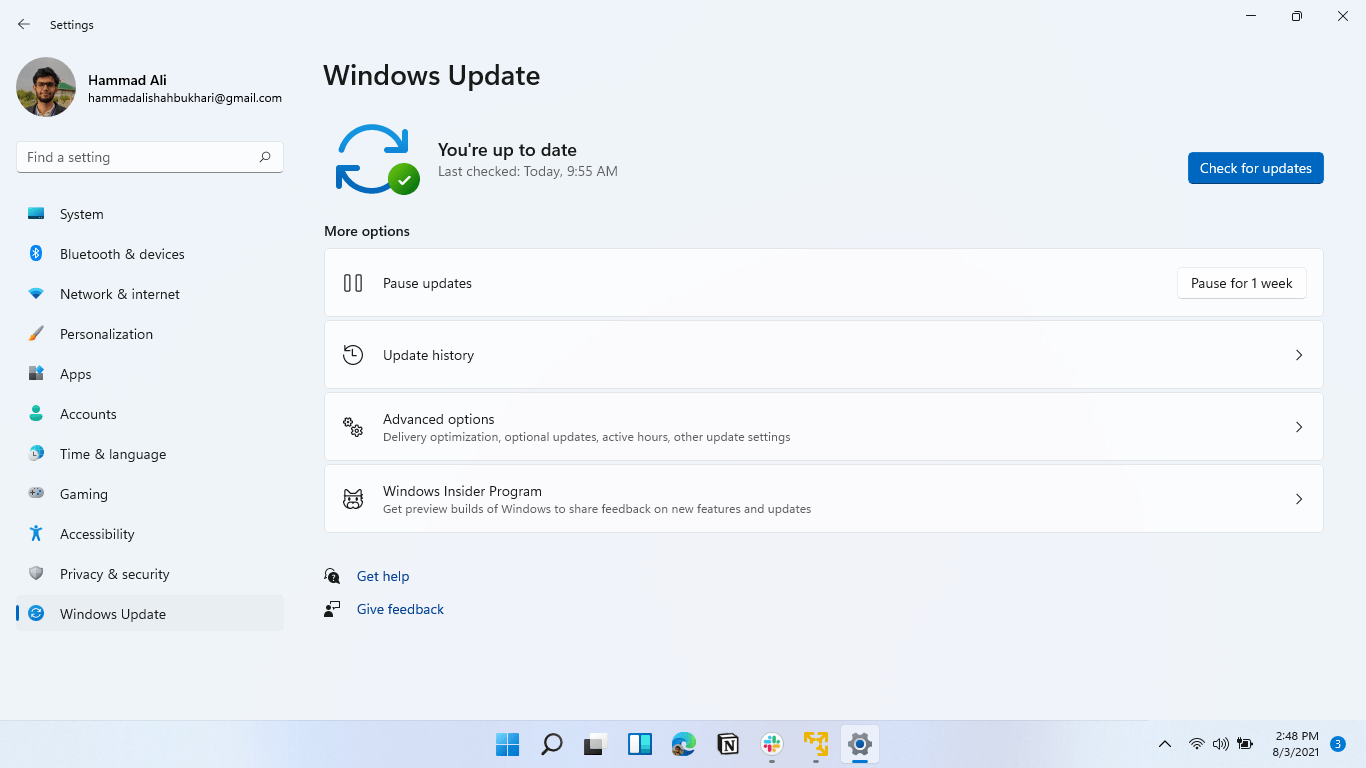
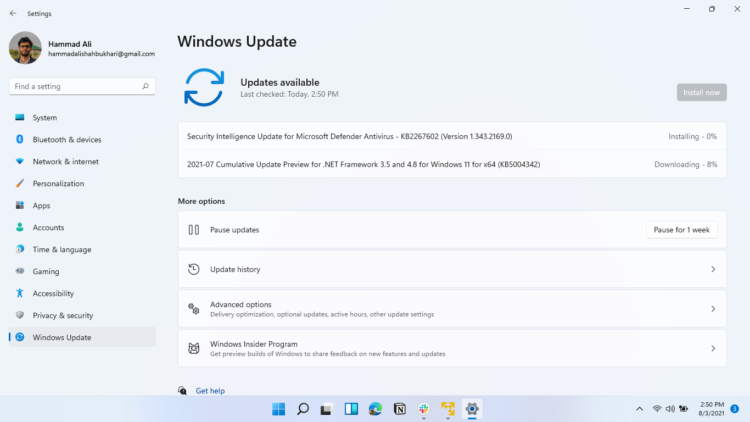
Solution 8: Keep your PC Updated on Windows 11
Sometimes your outdated PC is the main cause of the Outdated Graphics Card Driver on Windows 11. Outdated drivers in your PC or your current Windows version are not able to support the new games and software, as you update your Windows the whole running drivers are updated too.
So, here is how you can do it:
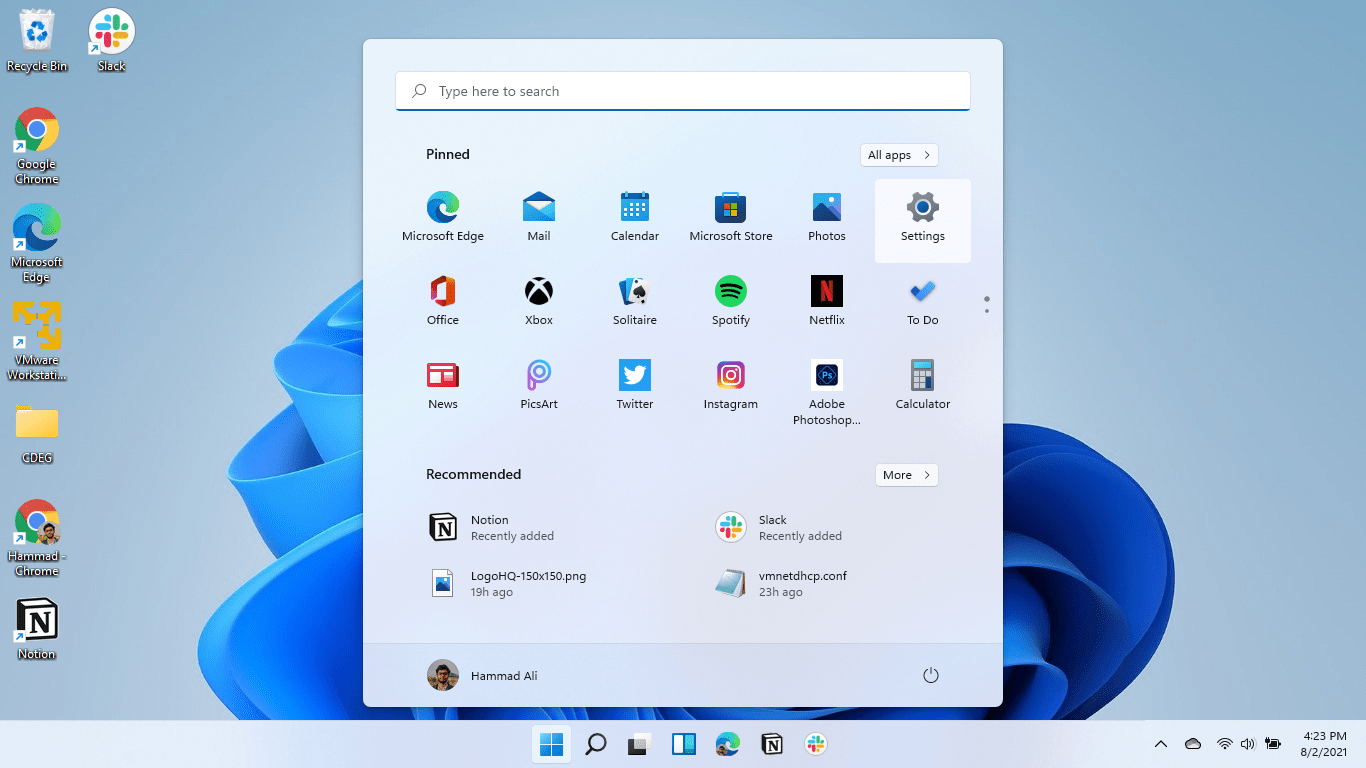
- Click on the Windows icon

- Click on the Settings icon
- A new window will pop up
- Select Windows Update from the left menu
- The new window will pop up
- Then click on Check for updates

- If there is any update it will start updating the PC
I hope the above solutions solved Modern Warefare dev error 6068.
If you got any questions just let us know in the comment section.
How do I fix Dev error 6068 in warzone?
Here is how you can fix dev error 6068 warzones by performing these solutions:
1. Update Your Graphics Driver
2. Run Modern Warefare as Administrator
3. Run COD Warzone with DirectX 11
4. Adjust COD Modern Warfare Graphics Settings
5. Change Video Memory Scale
Why do I keep getting Dev error on modern warfare?

Many Warfare users are experiencing this error whenever they try to launch their game or during the game on PC.
Dev error can be caused due to the following causes:
1. Graphic settings configuration
2. Game not meeting the system requirements
3. G-sync in NVIDIA is enabled.
Can Warzone run on 8GB RAM?
Yes, Warzone can be run 8GB DDR3 but it recommends to run the game on 8GB DDR4.
Gamers complain that after updating Call Of Duty Modern Warfare to COD Warzone they are confronting unexpected crashing of the app. Dev error 6036 Warzone appears on very frequent interval both in Xbox as well as in computer platforms. The error seems pretty stubborn as installing the game and installing shader pack 1 don’t offer much help to the users.
Dev error 6036 Warzone has become the talk of the town as frequent crashing driving the gamers crazy. A few users have tried reinstalling the game and after playing one session, the same problem appeared again. The drawback may be an output of inadequate system requirements, internal server trouble, or some problems associated with graphics card as well. In this write-up today, we will discuss some resolutions aiming to fix the Dev error 6036 Warzone in Windows 10.
Here is how to fix Dev error 6036 Warzone in Windows 10 –
1] Make Sure your device fulfill System requirements
The first thing for which Dev error 6036 Warzone in Windows 10 may occur is insufficient system requirement. Therefore before we move any further, let’s check the minimum and recommended system requirements for Call Of Duty Warzone –
| Category | Minimum Requirements | Recommended Requirements |
| Operating System | 64-bit Windows 7 SP1 and “64-bit Windows 10” | “64-bit Windows 7 SP1”, 64-bit Windows 10 |
| Processor | Intel® Core™ i3-4340; AMD FX-6300 | Intel® Core™ i5-2500K; AMD Ryzen™ R5 1600X |
| System Memory (RAM) | 8 GB | 12 GB |
| Graphics | NVIDIA® GeForce® GTX 670; NVIDIA® GeForce® GTX 1650; AMD Radeon™ HD 7950 | NVIDIA® GeForce® GTX 970; NVIDIA® GeForce® GTX 1660; AMD Radeon™ R9 390; AMD Radeon™ RX 580 |
| DirectX | Version 12 | Version 12 |
| Network | Broadband Internet connection | Broadband Internet connection |
| Storage | 175 GB available space | 175 GB available space |
You can check the requirements following the below instructions –
- Open Windows Settings (Win+I).
- From the upcoming UI, click System.
- Choose About from the left pane.
- Shift yourself the right to check information about Processor, model, RAM size, CPU architecture under Device Specifications.
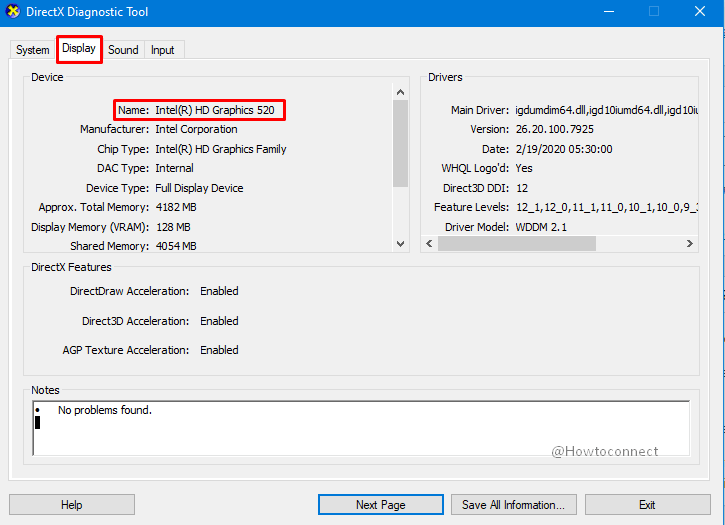
- If you like to check the details about graphics card, open the Taskbar Search pressing Win+Q shortcut keys.
- Type dxdiag in the empty text area and press Enter key.
- In a moment, the DirectX Diagnostic Tool will appear.
- Check the version of DirectX and other information about the PC in System tab.
- Check the details of your Graphics card under the Display tab.
If the system requirements don’t match your specifications, try upgrading the computer in order to play the game. If you face the error even after complying all the system requirements, need t go through below workarounds –
2] Tweak Game settings
Modifying the Game settings is a very prominent resolution in order to fix the Dev error 6036 Warzone in Windows 10. Before doing so, delete the Shaders as well as Shaders cache first from Game folder. Then follow the below steps –
- Start the Game.
- Before Entering into the lobby, set the Priority limit to High.
- Set the FPS level to 60, even you are playing the game in 120 Hz refresh rate.
- Restart the Game.
3] Restore the Game files from UNC path
The Dev error 6036 Warzone leads the app to repeatedly crash COD while playing which resolves restoring the game files from UNC path. For that, follow the below instructions –
- Open the File Explorer pressing Win+E.
- Navigate to the folder of Call of Duty Modern Warfare 2019 folder i.e. c:\program files (x86).
- Select all the single files from this folder pressing Ctrl+A keys together.
- Click Delete on the upper ribbon to remove them.
- Note – if this process doesn’t’ work; restore files directly from Recycle Bin. Make sure no folders are selected with individual files such as Blizzardbrowser, data, etc.
- Try running the game once. The game should start now with an error of corrupted path.
- Now, re-update the game from Interface partially. Alternatively, repair the game files copying them to an external drive in order to save time and data.
4] Disable Cache Spot Shadows and Cache Sun Shadows
Low memory may cause Dev error 6036 Warzone in Windows 10 to occur which can be easily fixed by turning Game Cache Spot Shadows and “Cache Sun Shadows” off. For that, –
- Open the Battle.net Launcher from your device.
- Run the Call Of Duty Warzone.
- Click Options and head over to Graphics.
- Under the Shadow & Lighting section, you will see two cache options.
- Disable the options Cache Spot and Cache Sun Shadows.
- Click on OK button in order to save the changes.
- Restart the game.
5] Close Unnecessary tasks to reduce RAM usage
Oftentimes, a large number of unnecessary programs run in the fore as well as background in the computer causing RAM usage to be at peak. Again, low RAM might also cause Dev error 6036 Warzone in Windows 10. Therefore, You can end the task from Task Manager before starting to play the game or after getting the error. Here are the instructions to complete the task –
- Move the Cursor to Taskbar area and make a right-click on any empty space.
- Select Task Manager to open the program.
- Check which processes are taking the most memory usage.
- Right click the unnecessary ones and choose End Task option.
- Close Task Manager and Start the Game.
6] Reinstall the Blizzard Battle.net launcher
Reinstalling the Blizzard Battle.net launcher is often found very much effective for resolving the Dev error 6036 Warzone in Windows 10. Follow the below steps to reinstall the launcher –
- Open the Run dialog pressing Win+R at once.
- Type appwiz.cpl in the blank text box and click Ok button.
- When the Program and Features window unrolls from Control Panel, reach out to Blizzard launcher.
- Make a right-click on the same and choose Uninstall.
- Keep following on-screen guidelines to finish uninstalling the launcher.
- Restart the Windows 10.
- When the succeeding session begins, make a visit to Blizzard website again to download Blizzard launcher.
- Install the launcher and login to your Blizzard account.
- Get the Warzone game from here and run it.
7] Delete Game Data folder to fix Dev error 6036 Warzone
Sometimes, corrupted items in the Data folder also responsible for the Dev error 6036 Warzone in Windows 10. You can delete this folder temporarily without much thinking that it will cause more hard to the gameplay. Rather you can download the files again and run the game flawlessly. Here is how to delete the data folder –
- Open File Explorer and navigate to the installed file for Call of Duty Modern Warfare. The path should look like -This PC\C:\Program Files (x86)\Blizzard\Call of Duty: Modern Warfare.
- Locate the Data folder here and delete it.
- Open the Battle.net launcher again.
- Click Options for Warzone.
- Choose Scan and Repair.
- When scanning finishes, restart the launcher again and also run the game.
8] Disable the Overlay to solve Dev error 6036 Warzone
Using some programs with overlay features may also be a reason you are encountering the Dev error 6036 Warzone in Windows 10. On the computer, we may have programs like Overwatch, NVIDIA GeForce Experience, Steam, Game Bar enabled in order to enhance the in-game experience. Such a feature helps you to take screenshot, capture in-game video while playing furthermore streaming, chatting, and many more.
Nevertheless bringing super handy features, you may not really compromise with deterioration of the gameplay. Disabling the Overlay feature have been a great solution for game crashing error over the years. In the below part, we will provide you instructions to disable the Overlay in various programs –
In GeForce Experience
Follow the below steps in order to disable overlay feature from NVIDIA GeForce Experience –
- Hover the cursor to the rightmost corner of Taskbar and click Show hidden icon arrow.
- When the System tray opens up, click Nvidia icon followed by selecting GeForce Experience.
- When the program unrolls in a separate window, click the General tab in left side pane.
- Move on to the right side pane and move ahead to IN-GAME OVERLAY.
- Toggle the slider to disable under the option.
- Close the program and restart the Game.
In Discord Chat App
Discord is a renowned program used for voice and text chatting while playing games. Overlay feature in Discord also found to cause the Dev error 6036 Warzone in Windows 10. For fixing the issue, you can entirely disable the overlay for only Call of Duty Modern Warfare game. Here are the steps to follow –
- Click on Start, type discord and then press Enter.
- When the app opens up, click the cog. Sign to navigate to User Settings environment.
- In the succeeding window, click Overlay located at the left pane.
- Jump to right pane and toggle off the slider beside “Enable In-Game Overlay.”
- While disabling the Overlay feature for the specific game like Call of Duty: Modern Warfare individually, enter into the Games tab.
- Head over to CODMW and disable overlay.
- Restart the computer and when a new session begins, run the game again.
In Spotify Streaming app
At present, Spotify is considered as one of the best streaming application in the world. It has got an Overlay feature that lets you draw over your application. This is also another reason to cause Dev error 6036 Warzone in Windows 10. Turning Off the Overlay for Spotify can also fix the error as many of the users have come out with positive feedback. To disable the feature, here are the steps –
- Launch the Spotify application from your computer.
- Click the Edit option from the top.
- Choose Preference from the context menu.
- In the upcoming Preference interface, move out for Display Options.
- Turn Off the switch for “Show desktop overlay when disabled.”
- Restart the game and check whether the error has resolved.
9] Disable Game bar
Microsoft introduced Game bar in Windows 10 to provide gamers little more room and enhanced gameplay experiences. Users can record game footage, capture snapshots, stream and access many more handy tools. Like the Overlay, Game bar is also sometimes responsible for Dev error 6036 Warzone in Windows 10. You can disable this feature using below instructions –
- Invoke the Windows Settings app pressing Win+I hotkeys simultaneously.
- From the UI, click Gaming.
- When the additional settings page opens, choose Game bar located at the left pane.
- Move to the adjacent pane and toggle the slider under “Record game clips, screenshots, and broadcast using Game Bar.” to Off.
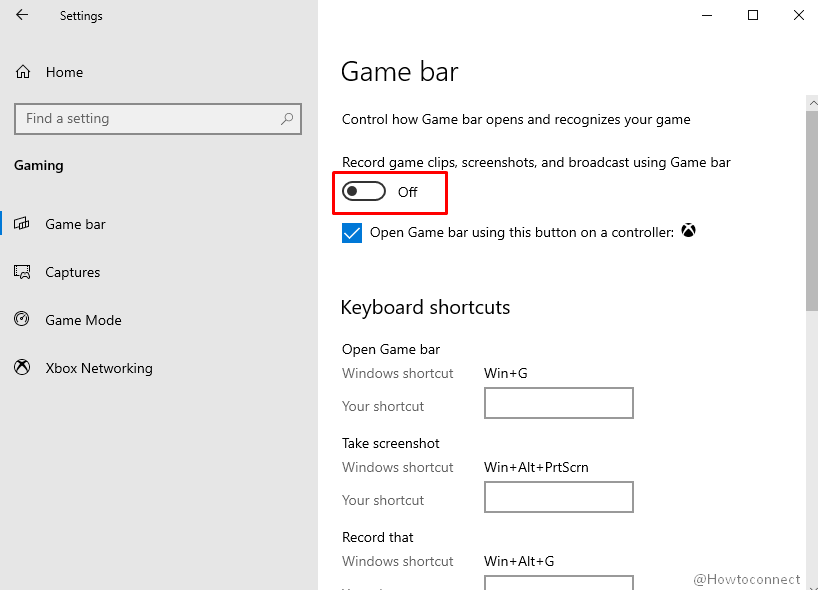
- Move back in the left pane and click Capture.
- Shift to corresponding right and uncheck the box that reads “Record in the background while I’m playing a game.”
- Terminate Settings app and re-launch the game once.
10] Reinstall the Graphics Card Driver
Usually, the Display adapters like Graphics card drivers are quite more responsible for causing issues in Games. Whenever some trouble happens, you can consider them as primary suspect as it determines how the GPU should render a game. If there is trouble in the driver, it will reflect in the gaming, and issues will keep coming up.
Good numbers of users have resolved the Dev error 6036 Warzone just by re-installing the Graphics Card driver. The guidelines to carry out this task are as following –
- Open the Power User menu with the help of pressing Win+X hotkeys.
- Click Device Manager from the evident menu.
- When the app opens in a separate window, move out to Display adapters.
- Split the drivers’ list clicking the same.
- Make a right click on your Graphics Card Driver.
- Choose Uninstall Device option.
- Confirm the task clicking Uninstall when prompt (leave the check box unchecked).
- Follow the guidelines that appear next to complete the process.
- Once it ends, restart the computer.
- When it powers up again, launch the web browser and make visit to maker’s webpage for Graphics Card Driver.
- Download the compatible file from here and install it in the system.
- Try running the game and check if the error persists.
11] Update the drivers using Device Manager
When Re-installing the Graphics driver fails to resolve the Dev error 6036 Warzone in Windows 10, you may have to look into other drivers who are already outdated. Outdated device drivers usually do not cooperate with games and it is well prudent. To identify the outdated drivers, Device Manager is the top notch utility as you can see them in yellow indication. There may have other third party programs for this task but a default utility always serves the best. Here is how to update the drivers in Windows Device Manager –
- Invoke the Run dialog first.
- Type “devmgmt.msc” in empty box provided.
- Click the Ok button located on the wizard.
- When the Device Manager window opens, look for an outdated device with mark of exclamation on it.
- Split the driver list adhered to it by double clicking.
- Make a right click on the outdated driver followed by selecting Update Driver option.
- From the succeeding screen, click Search automatically for updated driver software option.
- Complete the process following on screen guidelines provided.
- At last, Restart the Device and let all the changes to be saved.
12] Carry out Windows Update to fix Dev error 6036 Warzone
Updating Windows is one of the best resolutions for updating the display adapters as the process comes through a verified channel of Microsoft. Again, the drivers updated in this process will be solely compatible with the device as the selection takes place automatically based on specs. Let’s follow the below instructions to update the Windows 10 to fix Dev error 6036 Warzone –
- Open the Start menu pressing Windows key.
- Click the Gear icon to launch Windows Settings app.
- Click on Update & Security from the opened UI.
- From the succeeding page, click on Windows Update located at the left pane.
- Jump to alongside pane and click on Check for updates link.
- Once the files are available, click Download to initiate the process.
- Installation commences automatically after finishing the downloading process.
- To complete the process, you may need to attend a couple of Restarting process.
Methods:
1] Make Sure your device fulfill System requirements
2] Tweak Game settings
3] Restore the Game files from UNC path
4] Disable Cache Spot Shadows and Cache Sun Shadows
5] Close Unnecessary tasks to reduce RAM usage
6] Reinstall the Blizzard Battle.net launcher
7] Delete Game Data folder to fix Dev error 6036 Warzone
8] Disable the Overlay to solve Dev error 6036 Warzone
9] Disable Game bar
10] Reinstall the Graphics Card Driver
11] Update the drivers using Device Manager
12] Carry out Windows Update to fix Dev error 6036 Warzone
That’s all!!
Repair any Windows problems such as Blue/Black Screen, DLL, Exe, application, Regisrty error and quickly recover system from issues using Reimage.