


ErrorLens turbo-charges language diagnostic features by making diagnostics stand out more prominently, highlighting
the entire line wherever a diagnostic is generated by the language and also prints the message inline.

Features
- Highlight lines containing diagnostics
- Append diagnostic as text to the end of the line
- Show icons in gutter
- Show message in status bar
Commands (13)
| Command | Description |
|---|---|
| errorLens.toggle | Error Lens: Toggle (Enable/Disable) Everything (toggle global setting "errorLens.enabled") |
| errorLens.toggleError | Error Lens: Enable/Disable Errors in "errorLens.enabledDiagnosticLevels" setting. |
| errorLens.toggleWarning | Error Lens: Enable/Disable Warnings in "errorLens.enabledDiagnosticLevels" setting. |
| errorLens.toggleInfo | Error Lens: Enable/Disable Info in "errorLens.enabledDiagnosticLevels" setting. |
| errorLens.toggleHint | Error Lens: Enable/Disable Hint in "errorLens.enabledDiagnosticLevels" setting. |
| errorLens.toggleInlineMessage | Error Lens: Toggle global setting "errorLens.messageEnabled". |
| errorLens.searchForProblem | Error Lens: Open problem in default browser (controlled by errorLens.searchForProblemQuery setting). |
| errorLens.selectProblem | Error Lens: Set editor selection to the problem range (controlled by errorLens.selectProblemType setting). |
| errorlens.toggleWorkspace | Error Lens: Exclude/Include current workspace by fs path. |
| errorLens.disableLine | Error Lens: Add a comment to disable line for linter rule. Comment format is controlled by "errorLens.disableLineComments" setting. |
| errorLens.findLinterRuleDefinition | Error Lens: Search in local linter files (like .eslintrc.json) for the rule definition. |
| errorLens.copyProblemMessage | Error Lens: Copy problem message to the clipboard (at the active cursor). |
| errorLens.copyProblemCode | Error Lens: Copy problem code to the clipboard (at the active cursor). |
Settings (60)
Error Lens extension settings start with
errorLens.
| Setting | Default | Description |
|---|---|---|
| enabled | true | Controls all decorations and features (except commands). |
| enabledInMergeConflict | true | Controls if decorations are shown if the editor has git merge conflict indicators <<<<<<< or ======= or >>>>>>>. |
| fontFamily | «» | Font family of inline message. |
| fontWeight | «normal» | Font weight of inline message. "normal" is alias for 400, "bold" is alias for 700). |
| fontStyleItalic | false | When enabled — shows inline message in italic font style. |
| fontSize | «» | Font size of inline message (CSS units). |
| margin | «4ch» | Distance between the last word on the line and the start of inline message (CSS units). |
| padding | «» | Padding of the inline message. Visible when #errorLens.messageBackgroundMode# is set to «message». |
| borderRadius | «3px» | Border radius of the inline message. Visible when #errorLens.messageBackgroundMode# is set to «message». |
| enabledDiagnosticLevels | [«error», «warning», «info»] | Customize which diagnostic levels(severity) to highlight. |
| messageTemplate | «$message» | Template used for all inline messages. Whitespace between items is important. List of variables: — $message — diagnostic message text— $count — Number of diagnostics on the line— $severity — Severity prefix taken from #errorLens.severityText#— $source — Source of diagnostic e.g. «eslint»— $code — Code of the diagnostic |
| messageMaxChars | 500 | Cut off inline message if it’s longer than this value. (Improves performance when the diagnostic message is long). Set to 0 to disable inline message. |
| severityText | [«ERROR», «WARNING», «INFO», «HINT»] | Replaces $severity variable in #errorLens.messageTemplate#. |
| messageEnabled | true | Controls whether inline message is shown or not (Including background highlight). |
| messageBackgroundMode | «line» | Controls how inline message is highlighted in the editor (entire line / only message / none). |
| editorHoverPartsEnabled | {«messageEnabled»:false, «sourceCodeEnabled»:false, «buttonsEnabled»:false} | Controls which parts of the editor hover tooltip to show. |
| statusBarIconsEnabled | false | When enabled — shows highlighted error/warning icons in status bar. |
| statusBarIconsPriority | -9000 | Move status bar icons left or right by adjasting the number priority. |
| statusBarIconsAlignment | «left» | Choose on which side the icons status bar is on: left or right. |
| statusBarIconsUseBackground | true | When enabled — highlights status bar icons with background, when disabled — with foreground. |
| statusBarIconsAtZero | «removeBackground» | What to do when there are 0 errors/warnings — hide the item or strip its background color. |
| statusBarMessageEnabled | false | When enabled — shows message in status bar. |
| statusBarMessagePriority | -10000 | Move status bar message left or right by adjasting the number priority. |
| statusBarMessageAlignment | «left» | Choose on which side the message status bar is on: left or right. |
| statusBarColorsEnabled | false | When enabled — use message decoration foreground as color of Status Bar text. |
| statusBarMessageType | «activeLine» | Pick what to show in Status Bar: closest message or only message for the active line. |
| statusBarCommand | «goToProblem» | Pick command that activates on click for Status Bar. |
| statusBarMessageTemplate | «» | Template for status bar message. Whitespace between items is important. List of variables: — $message — diagnostic message text— $count — Number of diagnostics on the line— $severity — Severity prefix taken from #errorLens.severityText#— $source — Source of diagnostic e.g. «eslint»— $code — Code of the diagnostic |
| replace | [] | Specify message to transform. E.g. if this is configured to [{ matcher: ‘foo (.*)’, message: ‘just $1’ }], the message ‘foo bar’ would be displayed as ‘just bar’. |
| exclude | [] | Specify messages that should not be highlighted (RegExp). Strings passed to the RegExp constructor: new RegExp(EXCLUDE_ITEM, 'i'); |
| excludeBySource | [] | Specify source or source(code) pair that should not be highlighted. Examples: ["eslint"] or ["eslint(padded-blocks)"] |
| excludePatterns | [] | Exclude files by using glob pattern. Example ["**/*.{ts,js}"] |
| excludeWorkspaces | [] | Exclude workspaces by path. |
| disableLineComments | {…} | Used for errorLens.disableLine command that adds a comment disabling linter rule for a line.To force comment on the same line — add SAME_LINE to the message: "eslint": "// eslint-disable-line $code SAME_LINE" |
| lintFilePaths | {…} | Specify where to search for linter rule definitions by diagnostic source (glob for local linter files). node_modules folder is excluded. |
| searchForProblemQuery | «https://duckduckgo.com/?q=$message» | Pick query to open in default browser when searching for problem with errorLens.searchForProblem command. |
| selectProblemType | «closestProblem» | Select which problem to select (closest / active line) when executing errorLens.selectProblem command. |
| light | Specify color of decorations for when the light color theme is active. | |
| delay | 0 | Delay (ms) before showing problem decorations (0 to disable). Minimum delay of 500 is enforced by the extension. #errorLens.delayMode# controls how to handle the delay. |
| delayMode | «old» | Pick which version of the delay to use. |
| onSave | false | When enabled — updates decorations only on document save (manual). |
| onSaveTimeout | 1000 | Time period (ms) that used for showing decorations after the document save. |
| enableOnDiffView | false | Enable decorations when viewing a diff view in the editor (e.g. Git diff). |
| followCursor | «allLines» | Highlight only portion of the problems. |
| followCursorMore | 0 | Augments #errorLens.followCursor#.Adds number of lines to top and bottom when #errorLens.followCursor# is set to activeLine.Adds number of closest problems when #errorLens.followCursor# is closestProblem |
| gutterIconsEnabled | false | When enabled — shows gutter icons (In place of the debug breakpoint icon). |
| gutterIconsFollowCursorOverride | true | When enabled and #errorLens.followCursor# setting is not allLines, then gutter icons would be rendered for all problems. But line decorations (background, message) only for active line. |
| gutterIconSize | «100%» | Change gutter icon size. Examples: auto, contain, cover, 50%, 150% (CSS units). |
| gutterIconSet | «default» | Change gutter icon style. |
| errorGutterIconPath | «» | Absolute path to error gutter icon. |
| warningGutterIconPath | «» | Absolute path to warning gutter icon. |
| infoGutterIconPath | «» | Absolute path to info gutter icon. |
| hintGutterIconPath | «» | Absolute path to hint gutter icon. |
| errorGutterIconColor | «#e45454» | Error color of simple gutter icons (shapes and letters). |
| warningGutterIconColor | «#ff942f» | Warning color of simple gutter icons (shapes and letters). |
| infoGutterIconColor | «#00b7e4» | Info color of simple gutter icons (shapes and letters). |
| hintGutterIconColor | «#2faf64» | Hint color of simple gutter icons (shapes and letters). |
| removeLinebreaks | true | When enabled — replaces line breaks in inline diagnostic message with whitespaces. |
| replaceLinebreaksSymbol | «⏎» | Symbol to replace linebreaks. Requires enabling #errorLens.removeLinebreaks#. |
| scrollbarHackEnabled | false | When enabled — prevents showing horizontal scrollbar in editor (caused by inline decorations). |
Colors (26)
Can be specified in settings.json (workbench.colorCustomizations section)
| Color | Dark | Light | HC | Description |
|---|---|---|---|---|
| errorLens.errorBackground | #e454541b |
#e4545420 |
#e454541b |
Background color of the entire line containing error. |
| errorLens.errorMessageBackground | #e4545419 |
#e4545419 |
#e4545419 |
Background color of the error message. |
| errorLens.errorBackgroundLight | #e4545420 |
#e4545420 |
#e4545420 |
Background color of the entire line containing error (Only in light themes). |
| errorLens.errorForeground | #ff6464 |
#e45454 |
#ff6464 |
Text color used to highlight lines containing errors. |
| errorLens.errorForegroundLight | #e45454 |
#e45454 |
#e45454 |
Text color used to highlight lines containing errors (Only in light themes). |
| errorLens.warningBackground | #ff942f1b |
#ff942f20 |
#ff942f1b |
Background color used to highlight lines containing warnings. |
| errorLens.warningMessageBackground | #ff942f19 |
#ff942f19 |
#ff942f19 |
Background color of the warning message. |
| errorLens.warningBackgroundLight | #ff942f20 |
#ff942f20 |
#ff942f20 |
Background color used to highlight lines containing warnings (Only in light themes). |
| errorLens.warningForeground | #fa973a |
#ff942f |
#fa973a |
Text color used to highlight lines containing warnings. |
| errorLens.warningForegroundLight | #ff942f |
#ff942f |
#ff942f |
Text color used to highlight lines containing warnings (Only in light themes). |
| errorLens.infoBackground | #00b7e420 |
#00b7e420 |
#00b7e420 |
Background color used to highlight lines containing info. |
| errorLens.infoMessageBackground | #00b7e419 |
#00b7e419 |
#00b7e419 |
Background color of the info message. |
| errorLens.infoBackgroundLight | #00b7e420 |
#00b7e420 |
#00b7e420 |
Background color used to highlight lines containing info (Only in light themes). |
| errorLens.infoForeground | #00b7e4 |
#00b7e4 |
#00b7e4 |
Text color used to highlight lines containing info. |
| errorLens.infoForegroundLight | #00b7e4 |
#00b7e4 |
#00b7e4 |
Text color used to highlight lines containing info (Only in light themes). |
| errorLens.hintBackground | #17a2a220 |
#17a2a220 |
#17a2a220 |
Background color used to highlight lines containing hints. |
| errorLens.hintMessageBackground | #17a2a219 |
#17a2a219 |
#17a2a219 |
Background color of the hint message. |
| errorLens.hintBackgroundLight | #17a2a220 |
#17a2a220 |
#17a2a220 |
Background color used to highlight lines containing hints (Only in light themes). |
| errorLens.hintForeground | #2faf64 |
#2faf64 |
#2faf64 |
Text color used to highlight lines containing hints. |
| errorLens.hintForegroundLight | #2faf64 |
#2faf64 |
#2faf64 |
Text color used to highlight lines containing hints (Only in light themes). |
| errorLens.statusBarIconErrorForeground | #ff6464 |
#e45454 |
#ff6464 |
Status bar icon item error color. Foreground is used when the errorLens.statusBarIconsUseBackground setting is disabled. |
| errorLens.statusBarIconWarningForeground | #fa973a |
#ff942f |
#fa973a |
Status bar icon item error color. Foreground is used when the errorLens.statusBarIconsUseBackground setting is disabled. |
| errorLens.statusBarErrorForeground | #ff6464 |
#e45454 |
#ff6464 |
Status bar item error color. |
| errorLens.statusBarWarningForeground | #fa973a |
#ff942f |
#fa973a |
Status bar item warning color. |
| errorLens.statusBarInfoForeground | #00b7e4 |
#00b7e4 |
#00b7e4 |
Status bar item info color. |
| errorLens.statusBarHintForeground | #2faf64 |
#2faf64 |
#2faf64 |
Status bar item hint color. |
Line highlighting depends on the
"errorLens.messageBackgroundMode"setting.
#fff0— Completely transparent color.
Upstream issues
Please upvote the following VS Code issues:
- Api for editor insets
- Access theme’s colors programmatically
- When completing color keys in settings, fill in current value
- Inline text adornments break word wrapping
- OnClick event on Gutter
- Support hover decorations over the line numbers i.e. gutter
Webpack — это инструмент для сборки JavaScript-приложений, который также применяется для обработки статических файлов — изображений, шрифтов и других ресурсов. У Webpack множество функций, которые легко расширяются с помощью добавления плагинов.
Копирование статических файлов в каталог сборки — одна из таких функций. Выполнить эту задачу можно несколькими способами, наиболее простой — использование специального плагина CopyWebpackPlugin. Рассмотрим подробнее, как это делать.
Плагин CopyWebpackPlugin позволяет скопировать файлы из одного каталога в другой, сохраняя их иерархию.
Для начала установите CopyWebpackPlugin в свой проект:
npm install copy-webpack-plugin --save-dev
После установки настройте конфигурацию Webpack, добавив новый экземпляр плагина в секцию plugins конфига. Пример:
const CopyWebpackPlugin = require('copy-webpack-plugin');
const path = require('path');

module.exports = {
  // ваша конфигурация Webpack здесь
  plugins: [
    new CopyWebpackPlugin({
      patterns: [
        {
          from: path.resolve(__dirname, 'src/assets'),
          to: path.resolve(__dirname, 'dist/assets')
        }
      ]
    })
  ]
};
В плагине содержится массив объектов patterns. Каждый объект patterns указывает на исходный файл или каталог назначения, куда копировать файлы. В примере указано, что нужно скопировать все файлы из каталога src/assets в dist/assets во время сборки.
Теперь все статические файлы будут скопированы в каталог сборки при запуске команды npm run build или той, которую вы используете для запуска сборки.
💫 Научитесь работать с webpack и сократите время на разработку, сборку и тестирование проекта.
Копирование нескольких файлов
Для копирования нескольких файлов с помощью плагина CopyWebpackPlugin добавляем каждый каталог или файл в отдельный объект-шаблон в массиве patterns.
Каждый объект-шаблон содержит свойство from, оно указывает путь к файлу или каталогу для копирования. Свойство to — это путь, по которому нужно скопировать файлы или каталоги.
const CopyWebpackPlugin = require('copy-webpack-plugin');

module.exports = {
  //ваша конфигурация Webpack здесь

  plugins: [
    new CopyWebpackPlugin({
      patterns: [
        { from: 'src/images', to: 'dist/images' },
        { from: 'src/index.html', to: 'dist' },
      ],
    }),
  ],
};
В примере первый объект-шаблон копирует каталог images из src в dist/images, а второй — копирует файл index.html из src в dist.
Добавляйте столько объектов-шаблонов, сколько нужно для копирования всех необходимых файлов и каталогов.
Для более детальной настройки копирования файлов существуют другие опции, доступные в CopyWebpackPlugin, их подробное описание можно прочитать в документации.
Другие способы
Кроме CopyWebpackPlugin, существуют и другие плагины и загрузчики, их также часто называют лоадерами, которые позволяют копировать статические файлы в каталог сборки.
Лоадерfile-loader позволяет копировать статические файлы в указанную папку при сборке проекта.
Чтобы использовать file-loader, установите его с помощью npm:
npm install file-loader --save-dev
Затем добавьте его в конфигурационный файл webpack.config.js:
module.exports = {
  // ... ваша конфигурация webpack ...

  module: {
    rules: [
      {
        test: /\.(png|jpe?g|gif)$/i,
        use: [
          {
            loader: 'file-loader',
            options: {
              name: '[name].[ext]',
              outputPath: 'images/',
            },
          },
        ],
      },
    ],
  },
};
В этом примере file-loader используется для копирования файлов изображений в каталог images внутри каталога сборки.
Лоадерurl-loader работает аналогично file-loader, но может преобразовывать маленькие файлы в Data URL, вместо копирования их в каталог сборки. Это может быть полезно для уменьшения количества запросов к серверу.
Для использования url-loader необходимо его установить:
npm install url-loader --save-dev
Затем добавить в конфигурационный файл webpack.config.js:
module.exports = {
  module: {
    rules: [
      {
        test: /\.(png|jpg|gif)$/i,
        use: [
          {
            loader: 'url-loader',
            options: {
              limit: 8192,
            },
          },
        ],
      },
    ],
  },
};
Поместите файлы, которые хотите скопировать, в соответствующий каталог в вашем проекте, например, в папку src/images. Если размер файла меньше 8 кБ, он будет встроен в виде Data URL. При сборке проекта все файлы будут обработаны и скопированы.
Описанные лоадеры ещё используются в разработке, но рекомендуем ознакомиться с новой версией Webpack и её обновлениями.
Visual Studio Code — недавно поставил, осваиваю, вроде пока не тупит как Breackets.
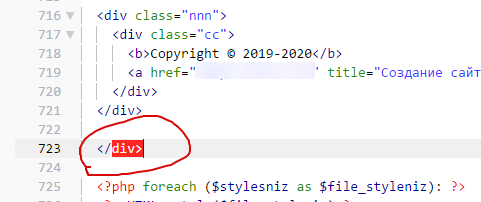
В старой программе у меня ошибки подсвечивались, если допустим лишний див поставлю или не закрою див правильно или в css скобку не поставлю и т.д, у меня подсвечивало и видно было что есть ошибка в коде.
В Visual Studio Code — пока такого не сделал, хотя поставил плагин, HTMLHint, он не подсвечивает.
Я открыл страницу index.php, там у меня hmtl, js, php.
Может по этому HTMLHint не срабатывает, хотя должно по идеи работать.
Хотелось бы чтоб так подсвечивало:
Проверял css, там есть подсветка, волнистая оранжевая линия, как ее можно изменить? а то не очень и приметно что ошибка. Желательно изменить так чтобы красным шрифт выделялся, как реализовать?
Вот так в css подсвечивает.
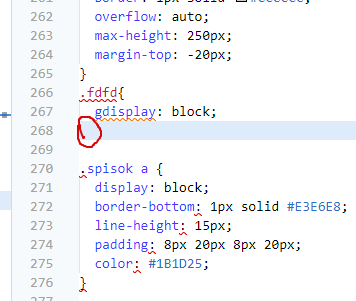
Что заметил, почему teg font подсвечивает, пока не могу понять из-за ошибки что не должно быть такого тега в html, хотя ерунда же.
В шаблоне в стилях для ошибок (если я правильно понял стиль для подсветки ошибок)
{
      "name": "Invalid",
      "scope": "invalid",
      "settings": {
        "fontStyle": " bold underline",
        "foreground": "#ff0000"
      }
    },
    {
      "name": "Invalid deprecated",
      "scope": "invalid.deprecated",
      "settings": {
        "foreground": "#ff0000",
        "fontStyle": " bold underline"
      }
},Is it possible to show warnings (not used variables / typo), errors and an overview about my created variables and functions in an open file?
I have installed the newest Visual Studio Code IDE but if I press Ctrl + P and then !, my VSCode says there are no results. It doesn’t know !-command and other commands I found in the internet.
What extension/addon do I have to install to see this? It would be great if I could see this in a separate window without using Ctrl + P and if the IDE would mark positions with warnings/errors in my open code as Eclipse-IDE can do.
![]()
asked Jun 23, 2017 at 17:06
![]()
Meteor NewbieMeteor Newbie
6462 gold badges10 silver badges23 bronze badges
7
Use Eslint. Install it globally using the following command
npm install -g eslint
It will show all possible warnings based on the rule sets given, while you are coding. Moreover VSCode is not an IDE it’s just Code Editor like Sublime.
As of august 2023, you can then install the Microsoft official ESLint VSCode extension and you will be able to see errors in your code :

![]()
answered Jun 25, 2017 at 11:14
![]()
1
Is it possible to show warnings (not used variables / typo), errors […] in an open file?
The VS Code extension for quick-lint-js can show you syntax errors and misspelled variable names. It requires no configuration. (ESLint requires per-project configuration.)
At this moment, quick-lint-js doesn’t tell you about unused variables.
answered Nov 18, 2021 at 8:11
![]()
The main difference here is the word IDE…Eclipse is an IDE and is the most widely used Java IDE, but, Visual Studio Code is not an IDE, but, a code editor.
If you want to try a Microsoft IDE, you can download
Visual Studio Community, a fully-featured, extensible, free IDE for creating modern applications for Android, iOS, Windows, as well as web applications and cloud services https://www.visualstudio.com/vs/community/
answered Jun 23, 2017 at 17:30
![]()
HackermanHackerman
12.2k2 gold badges34 silver badges45 bronze badges
Настраиваем автоматическое форматирование кода и проверку на ошибки при помощи Prettier и ESLint согласно стайлгайду Airbnb.
Во время работы над последним проектом я опробовал в деле два прекрасных иструмента, ESLint и Prettier. Захотелось написать о том, что это такое, чем полезен линтер и prettier, как их настроить, и как использовать.
-
Что такое Lint?
- ESLint в Create React App и расширение для VS Code
- Настройка ESLint
-
Установка и подключение дополнительных плагинов ESLint
- eslint-plugin-react
- eslint-plugin-react-hooks
- eslint-plugin-jsx-a11y
- eslint-plugin-import
-
Prettier
- Установка Prettier в проект
- Отключаем конфликтующие с Prettier правила ESLint
- Интеграция Prettier в VS Code
- .prettierrc.json и .prettierignore
-
Установка правил Airbnb для ESLint
Что такое Lint?
Lint, или линтер — это инструмент для поиска ошибок в коде. Пример работы линтера в проекте Create React App, ниже:

Клавиатура моего ноутбука иногда срабатывает неправильно, и делает двойное нажатие клавиши, вместо однократного. В 8 и в 25 строке опечатка, вместо logo — logoo а вместо App — Appp
Линтер нашел эти ошибки и сообщил о них в терминал. Прекрасно!
Теперь можно их исправить, и все заработает как надо:

ESLint в Create React App и расширение для VS Code
В Create React App линтер уже установлен, он называется ESLint. Именно его сообщения об ошибках мы видим в терминале.
Существует так же ESLint расширение для VS Code:

Установив это расширение в VS Code, получим сообщения ESLint и подсветку ошибок в редакторе кода:

Настройка ESLint
У ESLint есть конфиг, в котором находятся правила, согласно которым он выполняет проверку кода. Как я говорил ранее, ESLint уже встроен в Create React App, и использует конфиг который называется eslint-config-react-app
В Create React App этот конфиг подключается к ESLint в package.json, 22 строка:

Eslint сейчас настроен так, как решили создатели CRA. Давайте инициализируем ESLint и заново сами все настроим, так, как нам необходимо. Для этого выполним команду:
$ npx eslint --init
Enter fullscreen mode
Exit fullscreen mode
Запустится мастер настройки ESLint.
Пройдем настройку согласно предложенным вариантам:
В конце мастер создаст файл настроек линтера, .eslintrc.json:
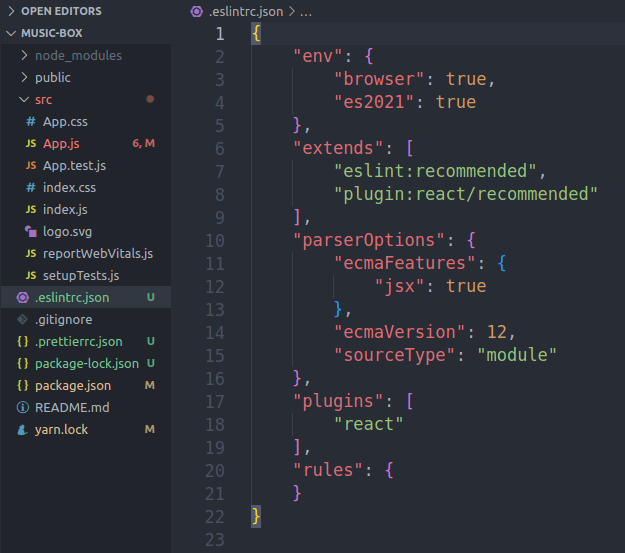
На этом базовая настройка линтера закончена, теперь было бы неплохо расширить его конфигурацию и подключить несколько дополнительных плагинов с правилами.
Установка и подключение дополнительных плагинов ESLint
установим правила ESLint для React:
$ npm install eslint-plugin-react --save-dev
Enter fullscreen mode
Exit fullscreen mode
Если вы используете версию React старше 17, и не импортируете React from ‘react’ можно после установки этого плагина, добавить в конфиг .eslintrc.json строку «plugin:react/jsx-runtime», тогда ESLint не будет ругаться, что ‘React’ must be in scope when using JSX
В этом случае конфиг будет выглядеть так:

Установим правила для поддержки хуков React, eslint-plugin-react-hooks:
$ npm install eslint-plugin-react-hooks --save-dev
Enter fullscreen mode
Exit fullscreen mode
подключим их, добавив строку «plugin:react-hooks/recommended» в .eslintrc.json:

Установим правила доступности для людей с ограниченными возможностями eslint-plugin-jsx-a11y
$ npm install eslint-plugin-jsx-a11y --save-dev
Enter fullscreen mode
Exit fullscreen mode
добавляем «plugin:jsx-a11y/recommended» в .eslintrc.json:

установим правила, которые будут отвечать за синтаксис импортов и экспортов eslint-plugin-import
$ npm install eslint-plugin-import --save-dev
Enter fullscreen mode
Exit fullscreen mode
добавим «plugin:import/recommended» в .eslintrc.json:

С ESLint мы пока что закончили, переходим к Prettier
Prettier
Prettier. Что это такое и зачем вообще нужно?
Prettier — это инструмент для автоматического форматирования кода.
Форматирование кода — это процесс придания коду определенного вида.
Prettier берет код, который вы ему дали, и преобразует этот код к единому стилю.
Вот простой пример:

Здесь у нас стандартный файл App.js из Create React App проекта, у которого я где то убрал, а где то добавил отступы и точки с запятыми в конце строк, в некоторых местах использовал длинные, плохо читаемые строки.
Prettier автоматически исправил мой код при сохранении файла, добавил нужные отступы, точки с запятыми, а длинные линии кода разбил на более короткие и лучше читаемые блоки. Теперь все выглядит лучше и опрятнее.
Установка Prettier в проект
Установка хорошо описана в официальной документации, пройдем ее вместе, по шагам.
Первым делом устанавливаем Prettier в наш Create React App проект, локально:
$ npm install --save-dev --save-exact prettier
Enter fullscreen mode
Exit fullscreen mode
Создаем пустой конфигурационный файл, .prettierrc.json в корне проекта:
$ echo {}> .prettierrc.json
Enter fullscreen mode
Exit fullscreen mode

Отключаем конфликтующие правила ESLint
Теперь нужно сделать так, чтобы Prettier не конфликтовал с линтером. Дело в том, что когда ESLint ищет ошибки в коде, он руководствуется определенными правилами, которые хранятся в его конфиге. Эти правила отвечают как за качество кода, так и за стиль кода. Так вот, у Prettier есть свои собственные правила, которые тоже отвечают за стиль кода. Чтобы у линтера и Prettier не было конфликтов по части оформления кода, нужно отключить кофликтующие правила у линтера, чтобы за стиль кода отвечал только Prettier.
Сделать это можно очень просто, установив eslint-config-prettier
ставим:
$ npm install --save-dev eslint-config-prettier
Enter fullscreen mode
Exit fullscreen mode
Далее открываем конфиг нашего линтера, (файл .eslintrc.json), и добавляем «prettier» в конец массива:

Cтрока «prettier» в конфиге .eslintrc.json отключает конфликтующие с Prettier правила ESLint.
Теперь Prettier и линтер будут корректно работать вместе.
Мы установили Prettier в наш проект. Давайте теперь добавим поддержку Prettier в VS Code.
Интеграция Prettier в VS Code
Установим расширение Prettier для VS Code:

После того как мы установили расширение Prettier в VS Code, можно сделать так, чтобы Prettier автоматически форматировал наш код, когда мы сохраняем файл. Для этого нужно добавить два значения в JSON конфиг VS Code, (файл settings.json).
Чтобы открыть settings.json нужно, находясь в VS Code, нажать Ctrl + Shift + P, ввести в поиск «settings» и выбрать пункт Open Settings (JSON). Откроется файл settings.json.

Добавим в него следующие строки:
"editor.defaultFormatter": "esbenp.prettier-vscode",
"editor.formatOnSave": true
Enter fullscreen mode
Exit fullscreen mode
Первая строка устанавливает Prettier как инструмент форматирования кода по-умолчанию.
Вторая строка включает форматирование кода при сохранении файла.
.prettierrc.json и .prettierignore
Пара слов об этих двух файлах.
Для чего нужен .prettierrc.json?
.prettierrc.json — это файл конфигурации Prettier.
Перечислю базовые настройки, которые в него можно добавить:
{
  "trailingComma": "es5",
  "tabWidth": 4,
  "semi": false,
  "singleQuote": true
}
Enter fullscreen mode
Exit fullscreen mode
«trailingComma» — отвечает за висящие, (или «последние») запятые. Можно разрешить Prettier ставить их там, где это возможно, или отключить эту функцию
«tabWidth» — ширина отступа, в пробелах
«semi» — отвечает за добавление точек с запятыми в конце инструкций. Можно добавлять, можно не добавлять
«singleQuote» — отвечает за использование одинарных или двойные кавычек
Мой конфиг .prettierrc.json сейчас выглядит так:

В нем я запретил использование точек с запятыми в конце строк. Такое вот личное предпочтение, при работе над персональными проектами.
В итоге, когда мы сохраняем файл, Prettier будет удалять точки с запятыми в конце строк, если они были, и менять одинарные кавычки на двойные. (замена кавычек на двойные производится по умолчанию, этим поведением можно управлять при помощи параметра «singleQuote»)
вот как это выглядит:

Сохранили файл — произошло форматирование кода.
.prettierignore
Файл .prettierignore существует для того, чтобы запретить Prettier форматировать определенные файлы. Какие файлы запретить форматировать, решаете вы. Я добавил туда файл .eslintrc.json, потому что не хочу, чтобы Prettier его трогал:

Установка правил Airbnb для ESLint
Теперь, когда мы настроили ESLint и Prettier в нашем проекте, давайте установим популярный конфиг eslint-config-airbnb, который настроен с учетом стайлгайда по JavaScript от Airbnb
для этого выполним команду:
$ npm install --save-dev eslint-config-airbnb
Enter fullscreen mode
Exit fullscreen mode
и добавим «airbnb» в .eslintrc.json.
Финальный конфиг ESLint с учетом правил Airbnb будет выглядеть вот так:

Чтобы ESLint не ругался на то, что у нас JSX присутствует в файлах с расширением ‘.js’, можно добавить правило
"react/jsx-filename-extension": [1, { "extensions": [".js", ".jsx"] }]
Enter fullscreen mode
Exit fullscreen mode
в .eslintrc.json, тогда ошибки JSX not allowed in files with extension ‘.js’ не будет:
![добавили правило "react/jsx-filename-extension": [1, { "extensions": [".js", ".jsx"] }] в .eslintrc.json](https://res.cloudinary.com/practicaldev/image/fetch/s--N3-WFYng--/c_limit%2Cf_auto%2Cfl_progressive%2Cq_auto%2Cw_880/https://dev-to-uploads.s3.amazonaws.com/uploads/articles/pypss46npdep358ssoqw.png)
Установка и настройка ESLint и Prettier закончена!
Что мы сделали:
- разобрались с тем, что такое линтер
- установили и настроили ESLint в Create React App проект
- установили ESLint в VS Code
- узнали, что такое Prettier
- установили и настроили Prettier в нашем проекте
- установили расширение Prettier в VS Code и настроили форматирование кода при сохранении файла
- установили в линтер популярные правила написания JavaScript кода от Airbnb
Увидимся в новых постах!