ERROR #134 (0x85100086) Fatal condition! Невозможно открыть необходимый архив … с ошибкой: 5
Ошибка 5
Эта ошибка может возникнуть, если World of Warcraft не может изменить файлы игры. Причиной могут быть некорректные разрешения, программы безопасности или ошибка в самом файле. Пожалуйста, воспользуйтесь следующими советами.
-
Настройте список исключений в вашей программе безопасности для того, чтобы разрешить запуск приложений Blizzard.
-
Обновите драйверы, чтобы исправить ошибки совместимости.
-
Запустите инструмент восстановления, чтобы восстановить поврежденные файлы игры.
-
Если это не помогло, удалите и переустановите игру.
Ничего не помогло?
Если вы попробовали все шаги, предложенные для вашей операционной системы, но затруднение не было решено, вы можете обсудить решение затруднения на форуме технической поддержки или обратиться к нам.
Загрузка…
This application has encountered a critical error:
ERROR #134 (0x85100086) Fatal Condition
Program: D:\WOW\World of Warcraft Sirus\sirus.exe
Failed to read file DBFilesClient\SpellItemEnchantment.dbc.
Debug Details:
[2] err=0 text=SFileReadFile — DBFilesClient\SpellItemEnchantment.dbc — Data\ruRU\patch-ruRU-4.mpq
[1] err=0 text=LoadSectorTable failed
[0] err=0 text=LoadSectorTable failed
WoWBuild: 12340
Settings:
SET locale «ruRU»
SET hwDetect «0»
SET gxWindow «1»
SET gxResolution «1280×720»
SET gxRefresh «60»
SET gxMultisampleQuality «0.000000»
SET gxFixLag «0»
SET videoOptionsVersion «3»
SET movie «0»
SET Gamma «1.000000»
SET readTOS «1»
SET readEULA «1»
SET showToolsUI «1»
SET Sound_OutputDriverName «System Default»
SET Sound_MusicVolume «0.10000000149012»
SET Sound_AmbienceVolume «0.20000000298023»
SET farclip «617»
SET specular «1»
SET groundEffectDensity «24»
SET projectedTextures «1»
SET realmList «151.80.20.84:9643»
SET gxMaximize «1»
SET mouseSpeed «1»
SET accounttype «LK»
SET Sound_MasterVolume «0.20000000298023»
SET Sound_SFXVolume «0.20000000298023»
SET realmName «Scourge x2 — 3.3.5a+»
SET gameTip «33»
SET timingTestError «0»
SET Sound_EnableMusic «0»
—————————————-
GxInfo
—————————————-
GxApi: D3D9
Adapter Count: 1
Adapter 0 (primary):
Driver: nvd3dum.dll
Version: 10.18.0013.6822
Description: NVIDIA GeForce GT 520M
DeviceName: \\.\DISPLAY1
——————————————————————————
—————————————-
Stack Trace (Manual)
—————————————-
Address Frame Logical addr Module
Showing 7/7 threads…
— Thread ID: 2732 [Current Thread] —
00772AB5 0378FC2C 0001:00371AB5 D:\WOW\World of Warcraft Sirus\sirus.exe
004226EB 0378FD50 0001:000216EB D:\WOW\World of Warcraft Sirus\sirus.exe
00424DFE 0378FE8C 0001:00023DFE D:\WOW\World of Warcraft Sirus\sirus.exe
0064F92F 0378FEBC 0001:0024E92F D:\WOW\World of Warcraft Sirus\sirus.exe
006343A2 0378FF18 0001:002333A2 D:\WOW\World of Warcraft Sirus\sirus.exe
0047DB62 0378FF40 0001:0007CB62 D:\WOW\World of Warcraft Sirus\sirus.exe
0047F29A 0378FF94 0001:0007E29A D:\WOW\World of Warcraft Sirus\sirus.exe
0047F2E1 0378FFAC 0001:0007E2E1 D:\WOW\World of Warcraft Sirus\sirus.exe
0040B7D8 0378FFB4 0001:0000A7D8 D:\WOW\World of Warcraft Sirus\sirus.exe
7695C032 0378FFEC 0001:0002C032 C:\windows\syswow64\kernel32.dll
7695BFEA 0378FFFC 0001:0002BFEA C:\windows\syswow64\kernel32.dll
— Thread ID: 6384 —
752C460C 0026FF14 0001:0001360C C:\windows\syswow64\KERNELBASE.dll
00438935 0026FF34 0001:00037935 D:\WOW\World of Warcraft Sirus\sirus.exe
0044DF1A 0026FF48 0001:0004CF1A D:\WOW\World of Warcraft Sirus\sirus.exe
0088C5DF 0026FF80 0001:0048B5DF D:\WOW\World of Warcraft Sirus\sirus.exe
0088C684 0026FF94 0001:0048B684 D:\WOW\World of Warcraft Sirus\sirus.exe
771798F2 0026FFD4 0001:000298F2 C:\windows\SysWOW64\ntdll.dll
771798C5 0026FFEC 0001:000298C5 C:\windows\SysWOW64\ntdll.dll
— Thread ID: 5776 —
76931194 0109F1FC 0001:00001194 C:\windows\syswow64\kernel32.dll
76931148 0109F210 0001:00001148 C:\windows\syswow64\kernel32.dll
6F1678C9 0109F23C 0001:006568C9 C:\windows\system32\nvd3dum.dll
6F164E6C 0109FF34 0001:00653E6C C:\windows\system32\nvd3dum.dll
6F17EEE7 0109FF44 0001:0066DEE7 C:\windows\system32\nvd3dum.dll
6F3B1FB4 0109FF7C 0001:008A0FB4 C:\windows\system32\nvd3dum.dll
6F3B20FB 0109FF88 0001:008A10FB C:\windows\system32\nvd3dum.dll
7693336A 0109FF94 0001:0000336A C:\windows\syswow64\kernel32.dll
771798F2 0109FFD4 0001:000298F2 C:\windows\SysWOW64\ntdll.dll
771798C5 0109FFEC 0001:000298C5 C:\windows\SysWOW64\ntdll.dll
— Thread ID: 6272 —
76931194 0141FF08 0001:00001194 C:\windows\syswow64\kernel32.dll
76931148 0141FF1C 0001:00001148 C:\windows\syswow64\kernel32.dll
6F19E4FD 0141FF38 0001:0068D4FD C:\windows\system32\nvd3dum.dll
6F19E420 0141FF44 0001:0068D420 C:\windows\system32\nvd3dum.dll
6F3B1FB4 0141FF7C 0001:008A0FB4 C:\windows\system32\nvd3dum.dll
6F3B20FB 0141FF88 0001:008A10FB C:\windows\system32\nvd3dum.dll
7693336A 0141FF94 0001:0000336A C:\windows\syswow64\kernel32.dll
771798F2 0141FFD4 0001:000298F2 C:\windows\SysWOW64\ntdll.dll
771798C5 0141FFEC 0001:000298C5 C:\windows\SysWOW64\ntdll.dll
— Thread ID: 8024 —
76931194 02D7FF08 0001:00001194 C:\windows\syswow64\kernel32.dll
76931148 02D7FF1C 0001:00001148 C:\windows\syswow64\kernel32.dll
6F19E4FD 02D7FF38 0001:0068D4FD C:\windows\system32\nvd3dum.dll
6F19E420 02D7FF44 0001:0068D420 C:\windows\system32\nvd3dum.dll
6F3B1FB4 02D7FF7C 0001:008A0FB4 C:\windows\system32\nvd3dum.dll
6F3B20FB 02D7FF88 0001:008A10FB C:\windows\system32\nvd3dum.dll
7693336A 02D7FF94 0001:0000336A C:\windows\syswow64\kernel32.dll
771798F2 02D7FFD4 0001:000298F2 C:\windows\SysWOW64\ntdll.dll
771798C5 02D7FFEC 0001:000298C5 C:\windows\SysWOW64\ntdll.dll
— Thread ID: 7940 —
752C460C 06E4FB34 0001:0001360C C:\windows\syswow64\KERNELBASE.dll
0086B28D 06E4FB40 0001:0046A28D D:\WOW\World of Warcraft Sirus\sirus.exe
004BA8BD 06E4FF60 0001:000B98BD D:\WOW\World of Warcraft Sirus\sirus.exe
0076FFCB 06E4FF88 0001:0036EFCB D:\WOW\World of Warcraft Sirus\sirus.exe
7693336A 06E4FF94 0001:0000336A C:\windows\syswow64\kernel32.dll
771798F2 06E4FFD4 0001:000298F2 C:\windows\SysWOW64\ntdll.dll
771798C5 06E4FFEC 0001:000298C5 C:\windows\SysWOW64\ntdll.dll
— Thread ID: 1176 —
76931194 0751FF28 0001:00001194 C:\windows\syswow64\kernel32.dll
76931148 0751FF3C 0001:00001148 C:\windows\syswow64\kernel32.dll
007746A0 0751FF4C 0001:003736A0 D:\WOW\World of Warcraft Sirus\sirus.exe
0081C00D 0751FF60 0001:0041B00D D:\WOW\World of Warcraft Sirus\sirus.exe
0076FFCB 0751FF88 0001:0036EFCB D:\WOW\World of Warcraft Sirus\sirus.exe
7693336A 0751FF94 0001:0000336A C:\windows\syswow64\kernel32.dll
771798F2 0751FFD4 0001:000298F2 C:\windows\SysWOW64\ntdll.dll
771798C5 0751FFEC 0001:000298C5 C:\windows\SysWOW64\ntdll.dll
—————————————-
Stack Trace (Using DBGHELP.DLL)
—————————————-
Showing 7/7 threads…
— Thread ID: 2732 [Current Thread] —
— Thread ID: 6384 —
752C460C KERNELBASE.dll Sleep+15 (0x00000064,0x00000000,0x02E1FFF0,0x00398398)
00438935 sirus.exe <unknown symbol>+0 (0x00000000,0x00000000,0x02E1FFF0,0x0026FF80)
0044DF1A sirus.exe <unknown symbol>+0 (0x00398398,0x9BD77564,0x00000000,0x02E1FFF0)
0088C5DF sirus.exe <unknown symbol>+0 (0x00000000,0x7693336A,0x02E1FFF0,0x0026FFD4)
0088C684 sirus.exe <unknown symbol>+0 (0x02E1FFF0,0x79882614,0x00000000,0x00000000)
771798F2 ntdll.dll RtlInitializeExceptionChain+99 (0x0088C605,0x02E1FFF0,0x00000000,0x00000000)
771798C5 ntdll.dll RtlInitializeExceptionChain+54 (0x00000045,0x00000000,0x00000000,0x00000000)
00520055 sirus.exe <unknown symbol>+0 (0x00000000,0x00000000,0x00000000,0x00000000)
— Thread ID: 5776 —
76931194 kernel32.dll WaitForSingleObjectEx+67 (0x00002248,0xFFFFFFFF,0x00000000,0x0109F23C)
76931148 kernel32.dll WaitForSingleObject+18 (0x00002248,0xFFFFFFFF,0x057A6C80,0x00000000)
6F1678C9 nvd3dum.dll <unknown symbol>+0 (0x6F165348,0x05191000,0x057AAD90,0x00000000)
6F164E6C nvd3dum.dll <unknown symbol>+0 (0x00000000,0x057B9E88,0x0109FF7C,0x6F3B1FB4)
6F17EEE7 nvd3dum.dll <unknown symbol>+0 (0x057A64C0,0x9E4F8313,0x00000000,0x057B9E88)
6F3B1FB4 nvd3dum.dll QueryOglResource+1899300 (0x00000000,0x0109FF94,0x7693336A,0x057A8980)
6F3B20FB nvd3dum.dll QueryOglResource+1899627 (0x057A8980,0x0109FFD4,0x771798F2,0x057A8980)
7693336A kernel32.dll BaseThreadInitThunk+18 (0x057A8980,0x78A72614,0x00000000,0x00000000)
771798F2 ntdll.dll RtlInitializeExceptionChain+99 (0x6F3B207F,0x057A8980,0x00000000,0x00000000)
771798C5 ntdll.dll RtlInitializeExceptionChain+54 (0x6F3B207F,0x057A8980,0x00000000,0xACF9CD91)
— Thread ID: 6272 —
76931194 kernel32.dll WaitForSingleObjectEx+67 (0x00002254,0xFFFFFFFF,0x00000000,0x0141FF38)
76931148 kernel32.dll WaitForSingleObject+18 (0x00002254,0xFFFFFFFF,0x00000000,0x057C6538)
6F19E4FD nvd3dum.dll <unknown symbol>+0 (0x00000000,0x0141FF7C,0x6F3B1FB4,0x0519D58C)
6F19E420 nvd3dum.dll <unknown symbol>+0 (0x0519D58C,0x9E078313,0x00000000,0x057C6538)
6F3B1FB4 nvd3dum.dll QueryOglResource+1899300 (0x00000000,0x0141FF94,0x7693336A,0x057C5B98)
6F3B20FB nvd3dum.dll QueryOglResource+1899627 (0x057C5B98,0x0141FFD4,0x771798F2,0x057C5B98)
7693336A kernel32.dll BaseThreadInitThunk+18 (0x057C5B98,0x78EF2614,0x00000000,0x00000000)
771798F2 ntdll.dll RtlInitializeExceptionChain+99 (0x6F3B207F,0x057C5B98,0x00000000,0x00000000)
771798C5 ntdll.dll RtlInitializeExceptionChain+54 (0x6F3B207F,0x057C5B98,0x00000000,0x9DB5FF1E)
— Thread ID: 8024 —
76931194 kernel32.dll WaitForSingleObjectEx+67 (0x00002254,0xFFFFFFFF,0x00000000,0x02D7FF38)
76931148 kernel32.dll WaitForSingleObject+18 (0x00002254,0xFFFFFFFF,0x00000000,0x057C9D30)
6F19E4FD nvd3dum.dll <unknown symbol>+0 (0x00000001,0x02D7FF7C,0x6F3B1FB4,0x0519D594)
6F19E420 nvd3dum.dll <unknown symbol>+0 (0x0519D594,0x9D918313,0x00000000,0x057C9D30)
6F3B1FB4 nvd3dum.dll QueryOglResource+1899300 (0x00000000,0x02D7FF94,0x7693336A,0x057C5F60)
6F3B20FB nvd3dum.dll QueryOglResource+1899627 (0x057C5F60,0x02D7FFD4,0x771798F2,0x057C5F60)
7693336A kernel32.dll BaseThreadInitThunk+18 (0x057C5F60,0x7B792614,0x00000000,0x00000000)
771798F2 ntdll.dll RtlInitializeExceptionChain+99 (0x6F3B207F,0x057C5F60,0x00000000,0x00000000)
771798C5 ntdll.dll RtlInitializeExceptionChain+54 (0x6F3B207F,0x057C5F60,0x00000000,0x00000000)
— Thread ID: 7940 —
752C460C KERNELBASE.dll Sleep+15 (0x00000001,0x06E4FF60,0x004BA8BD,0x00000001)
0086B28D sirus.exe <unknown symbol>+0 (0x00000001,0x0039C4A0,0x00001F04,0x00002268)
004BA8BD sirus.exe <unknown symbol>+0 (0x04374138,0x00000000,0x00000000,0x0039C4A0)
0076FFCB sirus.exe <unknown symbol>+0 (0x00CAC7E0,0x06E4FFD4,0x771798F2,0x0039C4A0)
7693336A kernel32.dll BaseThreadInitThunk+18 (0x0039C4A0,0x7F4A2614,0x00000000,0x00000000)
771798F2 ntdll.dll RtlInitializeExceptionChain+99 (0x0076FF30,0x0039C4A0,0x00000000,0x00000000)
771798C5 ntdll.dll RtlInitializeExceptionChain+54 (0x0076FF30,0x0039C4A0,0x00000000,0x046A0000)
— Thread ID: 1176 —
76931194 kernel32.dll WaitForSingleObjectEx+67 (0x00002140,0xFFFFFFFF,0x00000000,0x0751FF4C)
76931148 kernel32.dll WaitForSingleObject+18 (0x00002140,0xFFFFFFFF,0x0751FF60,0x0081C00D)
007746A0 sirus.exe <unknown symbol>+0 (0xFFFFFFFF,0x00000498,0x04A48E88,0x0751FF88)
0081C00D sirus.exe <unknown symbol>+0 (0x00D3FCF0,0x00000000,0x00000000,0x04A48E88)
0076FFCB sirus.exe <unknown symbol>+0 (0x00CAC800,0x0751FFD4,0x771798F2,0x04A48E88)
7693336A kernel32.dll BaseThreadInitThunk+18 (0x04A48E88,0x7EFF2614,0x00000000,0x00000000)
771798F2 ntdll.dll RtlInitializeExceptionChain+99 (0x0076FF30,0x04A48E88,0x00000000,0x00000000)
771798C5 ntdll.dll RtlInitializeExceptionChain+54 (0x0076FF30,0x04A48E88,0x00000000,0x0C740000)
—————————————-
Loaded Modules
—————————————-
DBG-MODULE<00400000 009FD000 «sirus.exe» «Wow.pdb» 0 {8805d059-f6a3-4565-a646aa69736d4efe} 1 1277448958>
DBG-MODULE<10000000 00069000 «DivxDecoder.dll» «» 0 {00000000-0000-0000-0000000000000000} 0 1076466304>
DBG-MODULE<64AB0000 00115000 «dbghelp.dll» «dbghelp.pdb» 0 {a95a9676-9559-4b16-959820e93cb1abec} 1 1152389492>
DBG-MODULE<65F80000 000E7000 «DDRAW.dll» «ddraw.pdb» 0 {497dbeef-b385-4f24-bc6a468137860ada} 2 1247533496>
DBG-MODULE<66070000 000C8000 «OPENGL32.dll» «opengl32.pdb» 0 {d6a5e50a-cc5c-4af5-9ff7b7b387ca4a2a} 2 1247533787>
DBG-MODULE<69770000 0035F000 «nvapi.dll» «nvapi.pdb» 0 {8dc7b73d-9f1a-4cd6-8686ff5ff66e0091} 1 1463706653>
DBG-MODULE<69BB0000 00151000 «nvspcap.dll» «nvspcap.pdb» 0 {e71b5213-fb2f-4ccd-8bcadaf75e7a7abc} 1 1462161893>
DBG-MODULE<6A460000 00022000 «GLU32.dll» «glu32.pdb» 0 {2c6b6170-dfa8-4c3e-8ce7ef5d4408ce74} 2 1247533535>
DBG-MODULE<6A4F0000 00009000 «HID.DLL» «hid.pdb» 0 {015645ef-10de-49b0-84ee745a3fdc0f8d} 2 1247533548>
DBG-MODULE<6A500000 00030000 «DINPUT8.dll» «dinput8.pdb» 0 {ca86b91a-9619-4907-8e07314413ffe1dd} 2 1247533505>
DBG-MODULE<6A530000 00006000 «DCIMAN32.dll» «dciman32.pdb» 0 {2cade618-2ed5-4e72-952b19cfa74b701b} 2 1507768657>
DBG-MODULE<6EB10000 00D9A000 «nvd3dum.dll» «nvd3dum.pdb» 0 {c867ae59-fef2-4ab3-b7702c6ff1b2198c} 1 1463706759>
DBG-MODULE<6F8C0000 00014000 «MSACM32.dll» «msacm32.pdb» 0 {3d318d5e-38c5-4502-b64578f0710a510f} 2 1247533646>
DBG-MODULE<6FA80000 00013000 «dwmapi.dll» «dwmapi.pdb» 0 {3478583a-5a88-473e-a647096a55e52c2a} 2 1436463421>
DBG-MODULE<6FBC0000 0004C000 «apphelp.dll» «apphelp.pdb» 0 {086332a0-927f-42d1-89abea071ee447a1} 2 1446140464>
DBG-MODULE<6FC30000 00080000 «uxtheme.dll» «wuxtheme.pdb» 0 {20c669c0-018e-4062-95bfa56b7c93850f} 2 1247533884>
DBG-MODULE<717F0000 00012000 «MPR.dll» «mpr.pdb» 0 {1408743d-4222-4025-a49e02a79ce7190a} 2 1247533622>
DBG-MODULE<71B60000 00050000 «webio.dll» «webio.pdb» 0 {71c169d5-c73b-41a4-abd46fe8c7b0989a} 2 1457548816>
DBG-MODULE<71BB0000 00058000 «WINHTTP.dll» «winhttp.pdb» 0 {4a1c7b40-aebd-42d6-8ab3d1e53e7a914f} 2 1462979988>
DBG-MODULE<71C60000 00009000 «VERSION.dll» «version.pdb» 0 {52234e5c-7ec4-4646-b62d56357b2c9487} 2 1247533867>
DBG-MODULE<725F0000 0008D000 «AcLayers.DLL» «AcLayers.pdb» 0 {cb9200e4-8e14-41b6-9c39311062f9edc3} 2 1446140400>
DBG-MODULE<72BD0000 00025000 «powrprof.dll» «powrprof.pdb» 0 {b1f8f66c-cbad-4869-badfd20c1f24ac83} 2 1247533836>
DBG-MODULE<72F70000 00006000 «d3d8thk.dll» «d3d8thk.pdb» 0 {d9c3a335-615f-448e-a0b012d76716e6b7} 2 1247533480>
DBG-MODULE<72F80000 001C3000 «d3d9.dll» «d3d9.pdb» 0 {f55aeb50-462b-473f-9733515dc6532daf} 2 1290254259>
DBG-MODULE<73330000 00051000 «WINSPOOL.DRV» «winspool.pdb» 0 {b165bbe7-cd8c-4f39-be373c0d9dfcd77b} 2 1290254923>
DBG-MODULE<735B0000 00032000 «WINMM.dll» «winmm.pdb» 0 {7afd98fc-aad3-4f6b-8b31a4667c4e2bfc} 2 1290254914>
DBG-MODULE<749D0000 0000C000 «CRYPTBASE.dll» «cryptbase.pdb» 0 {d341dd50-7e02-4b1e-b79c639c360d4a16} 2 1505313973>
DBG-MODULE<749E0000 00060000 «SspiCli.dll» «wsspicli.pdb» 0 {787b6894-55de-44c5-922463562938bff1} 1 1505315350>
DBG-MODULE<74AF0000 0000A000 «LPK.dll» «wlpk.pdb» 0 {c0d18781-a740-4892-826f350086649982} 1 1507768653>
DBG-MODULE<74B00000 00090000 «GDI32.dll» «wgdi32.pdb» 0 {7779fd51-f1c9-4e08-9faed5e01e3c955d} 2 1504883406>
DBG-MODULE<74B90000 00003000 «normaliz.DLL» «normaliz.pdb» 0 {9481804b-b4fd-4703-ae6ae76f8b99b476} 1 1247533780>
DBG-MODULE<74BA0000 00012000 «DEVOBJ.dll» «devobj.pdb» 0 {583f4457-964d-46ca-8c36ed4903be6aa2} 2 1306232957>
DBG-MODULE<74BC0000 0019D000 «SETUPAPI.dll» «setupapi.pdb» 0 {c6b7cc38-0fcd-42c2-9edb1b61757dfd92} 2 1290254809>
DBG-MODULE<74D60000 00004000 «api-ms-win-downlevel-user32-l1-1-0.dll» «api-ms-win-downlevel-user32-l1-1-0.pdb» 0 {02cb0348-17b4-4abb-99da042a6008fe6c} 1 1358111481>
DBG-MODULE<74D70000 000F0000 «RPCRT4.dll» «wrpcrt4.pdb» 0 {e40a69c3-e600-4a29-93ba9b4684586e5c} 2 1505315350>
DBG-MODULE<74E60000 000CD000 «MSCTF.dll» «msctf.pdb» 0 {b377c450-ede1-4d4c-aed26e970740059c} 2 1505315404>
DBG-MODULE<74F30000 00057000 «shlwapi.DLL» «shlwapi.pdb» 0 {e128b1ce-e2eb-438c-8646e6967118f33e} 2 1290254818>
DBG-MODULE<74FC0000 00060000 «IMM32.dll» «wimm32.pdb» 0 {35dd4069-eb2a-43bf-869d6e311fad0945} 2 1290254931>
DBG-MODULE<751C0000 00091000 «OLEAUT32.dll» «oleaut32.pdb» 0 {6851eea1-91f4-4b85-abb56ddda78abd7c} 2 1492441960>
DBG-MODULE<75260000 00003000 «api-ms-win-downlevel-normaliz-l1-1-0.dll» «api-ms-win-downlevel-normaliz-l1-1-0.pdb» 0 {5402f635-52f3-4e26-a727bf0c479713ee} 1 1358111822>
DBG-MODULE<75270000 00027000 «CFGMGR32.dll» «cfgmgr32.pdb» 0 {e4c73e93-b825-413f-99e80ba656c48317} 2 1306232913>
DBG-MODULE<752A0000 00005000 «api-ms-win-downlevel-advapi32-l1-1-0.dll» «api-ms-win-downlevel-advapi32-l1-1-0.pdb» 0 {815d3737-568d-4305-842320735da06f72} 1 1358111802>
DBG-MODULE<752B0000 00047000 «KERNELBASE.dll» «wkernelbase.pdb» 0 {dea6e346-5410-454b-8cf1fb59a95ee0bd} 1 1505315515>
DBG-MODULE<75300000 0009D000 «USP10.dll» «usp10.pdb» 0 {f3dcdb66-ac78-4318-b4dc37c0fbea1ba6} 1 1502896249>
DBG-MODULE<753A0000 000A1000 «ADVAPI32.dll» «advapi32.pdb» 0 {9d2559de-439d-4f27-a336602b9098c936} 2 1505315341>
DBG-MODULE<75450000 00C4C000 «SHELL32.dll» «shell32.pdb» 0 {f57374e9-0888-43fd-bb8288bac1c1bbba} 2 1502809856>
DBG-MODULE<760A0000 00100000 «USER32.dll» «wuser32.pdb» 0 {2989d28d-81d0-4257-9db67ad418c0af68} 2 1478794780>
DBG-MODULE<76360000 00035000 «WS2_32.dll» «ws2_32.pdb» 0 {f2ef0aea-45aa-413a-8f4de1bdd42cc19d} 2 1462979980>
DBG-MODULE<763A0000 00005000 «PSAPI.DLL» «psapi.pdb» 0 {a895a052-f325-481b-9e2da00a29e8d5df} 2 1247533774>
DBG-MODULE<76440000 00004000 «api-ms-win-downlevel-version-l1-1-0.dll» «api-ms-win-downlevel-version-l1-1-0.pdb» 0 {204b81c3-3a4d-4100-a32de3be94935e66} 1 1358111467>
DBG-MODULE<76450000 0000B000 «profapi.dll» «profapi.pdb» 0 {ca045ca9-e5c7-4d89-9b90e776b38a18b3} 2 1247526721>
DBG-MODULE<76460000 0015D000 «ole32.dll» «ole32.pdb» 0 {215568f9-dcc9-44e1-80513e1b14df5928} 2 1502432393>
DBG-MODULE<765C0000 00017000 «USERENV.dll» «userenv.pdb» 0 {fd47f512-75f8-4fca-aa6071cb11cc4ab8} 2 1290254888>
DBG-MODULE<765F0000 002AB000 «WININET.dll» «wininet.pdb» 0 {193230ae-f39d-433a-bd0cb248ba64fd1c} 2 1510085074>
DBG-MODULE<768A0000 00004000 «api-ms-win-downlevel-shlwapi-l1-1-0.dll» «api-ms-win-downlevel-shlwapi-l1-1-0.pdb» 0 {dc8c3e81-3e5b-4491-afcb375f0f7ce050} 1 1358111823>
DBG-MODULE<76920000 00110000 «kernel32.dll» «wkernel32.pdb» 0 {d658cf17-d7b2-4b5c-81ba1b32c4bba0f2} 2 1505315514>
DBG-MODULE<76A30000 000AC000 «msvcrt.dll» «msvcrt.pdb» 0 {f1d253f9-555c-46df-8076400a52b3a929} 2 1324021538>
DBG-MODULE<76AE0000 00019000 «sechost.dll» «sechost.pdb» 0 {2c99b7b1-394e-4c64-b66de258b63c07f5} 1 1432576740>
DBG-MODULE<76B00000 00235000 «iertutil.dll» «iertutil.pdb» 0 {f9465f1f-782d-4d05-946597e5f910e77a} 2 1510087442>
DBG-MODULE<77110000 00006000 «NSI.dll» «nsi.pdb» 0 {d4f9fbf1-4678-4c50-b403eaa659593de5} 2 1502432485>
DBG-MODULE<77140000 00180000 «ntdll.dll» «wntdll.pdb» 0 {2babfaa0-5142-4da8-a3f0f3736f9bb7a1} 2 1505315350>
—————————————-
Memory Dump
—————————————-
Stack: 1024 bytes starting at (ESP = 0378F3A8)
* = addr ** *
0378F3A0: F6 E6 77 00 A8 F3 78 03 78 22 00 00 02 00 00 00 ..w…x.x»……
0378F3B0: F6 E6 77 00 A8 F3 78 03 BC F3 78 03 EC F3 78 03 ..w…x…x…x.
0378F3C0: 65 23 77 00 01 00 6E 00 B0 10 77 00 78 22 00 00 e#w…n…w.x»..
0378F3D0: 03 00 00 00 00 00 00 00 AC 4F 9E 00 00 00 00 00 ………O……
0378F3E0: 00 00 00 00 9A BC 88 00 18 F4 78 03 18 FC 78 03 ……….x…x.
0378F3F0: 6D 2A 77 00 86 00 10 85 00 00 00 00 00 00 00 00 m*w………….
0378F400: 18 F4 78 03 00 00 00 00 01 00 00 00 11 11 11 11 ..x………….
0378F410: E0 91 A0 04 58 45 37 04 46 61 69 6C 65 64 20 74 ….XE7.Failed t
0378F420: 6F 20 72 65 61 64 20 66 69 6C 65 20 44 42 46 69 o read file DBFi
0378F430: 6C 65 73 43 6C 69 65 6E 74 5C 53 70 65 6C 6C 49 lesClient\SpellI
0378F440: 74 65 6D 45 6E 63 68 61 6E 74 6D 65 6E 74 2E 64 temEnchantment.d
0378F450: 62 63 2E 0A 0A 44 65 62 75 67 20 44 65 74 61 69 bc…Debug Detai
0378F460: 6C 73 3A 0A 0A 5B 32 5D 20 65 72 72 3D 30 20 74 ls:..[2] err=0 t
0378F470: 65 78 74 3D 53 46 69 6C 65 52 65 61 64 46 69 6C ext=SFileReadFil
0378F480: 65 20 2D 20 44 42 46 69 6C 65 73 43 6C 69 65 6E e — DBFilesClien
0378F490: 74 5C 53 70 65 6C 6C 49 74 65 6D 45 6E 63 68 61 t\SpellItemEncha
0378F4A0: 6E 74 6D 65 6E 74 2E 64 62 63 20 2D 20 44 61 74 ntment.dbc — Dat
0378F4B0: 61 5C 72 75 52 55 5C 70 61 74 63 68 2D 72 75 52 a\ruRU\patch-ruR
0378F4C0: 55 2D 34 2E 6D 70 71 0A 5B 31 5D 20 65 72 72 3D U-4.mpq.[1] err=
0378F4D0: 30 20 74 65 78 74 3D 4C 6F 61 64 53 65 63 74 6F 0 text=LoadSecto
0378F4E0: 72 54 61 62 6C 65 20 66 61 69 6C 65 64 0A 5B 30 rTable failed.[0
0378F4F0: 5D 20 65 72 72 3D 30 20 74 65 78 74 3D 4C 6F 61 ] err=0 text=Loa
0378F500: 64 53 65 63 74 6F 72 54 61 62 6C 65 20 66 61 69 dSectorTable fai
0378F510: 6C 65 64 0A 00 00 00 00 00 00 00 00 00 00 00 00 led………….
0378F520: 00 00 00 00 00 00 00 00 00 00 00 00 00 00 00 00 …………….
0378F530: 00 00 00 00 00 00 00 00 00 00 00 00 00 00 00 00 …………….
0378F540: 00 00 00 00 00 00 00 00 00 00 00 00 00 00 00 00 …………….
0378F550: 00 00 00 00 00 00 00 00 00 00 00 00 00 00 00 00 …………….
0378F560: 00 00 00 00 00 00 00 00 00 00 00 00 00 00 00 00 …………….
0378F570: 00 00 00 00 00 00 00 00 00 00 00 00 00 00 00 00 …………….
0378F580: 00 00 00 00 00 00 00 00 00 00 00 00 00 00 00 00 …………….
0378F590: 00 00 00 00 00 00 00 00 00 00 00 00 00 00 00 00 …………….
0378F5A0: 00 00 00 00 00 00 00 00 00 00 00 00 00 00 00 00 …………….
0378F5B0: 00 00 00 00 00 00 00 00 72 00 75 00 2D 00 52 00 ……..r.u.-.R.
0378F5C0: 55 00 00 00 00 00 00 00 00 00 00 00 00 00 00 00 U……………
0378F5D0: 00 00 00 00 00 00 00 00 00 00 00 00 00 00 00 00 …………….
0378F5E0: 00 00 00 00 00 00 00 00 00 00 00 00 00 00 00 00 …………….
0378F5F0: 00 00 00 00 00 00 00 00 00 00 00 00 00 00 00 00 …………….
0378F600: 00 00 00 00 00 00 00 00 00 00 00 00 00 00 00 00 …………….
0378F610: 00 00 00 00 00 00 00 00 00 00 00 00 00 00 00 00 …………….
0378F620: 00 00 00 00 00 00 00 00 00 00 00 00 00 00 00 00 …………….
0378F630: 00 00 00 00 00 00 00 00 00 00 00 00 00 00 00 00 …………….
0378F640: 00 00 00 00 00 00 00 00 00 00 00 00 00 00 00 00 …………….
0378F650: 00 00 00 00 00 00 00 00 00 00 00 00 00 00 00 00 …………….
0378F660: 00 00 00 00 43 00 3A 00 5C 00 77 00 69 00 6E 00 ….C.:.\.w.i.n.
0378F670: 64 00 6F 00 77 00 73 00 5C 00 73 00 79 00 73 00 d.o.w.s.\.s.y.s.
0378F680: 77 00 6F 00 77 00 36 00 34 00 5C 00 00 00 00 00 w.o.w.6.4.\…..
0378F690: D7 3E 77 00 ED B5 09 00 20 00 7F 08 ED B5 09 00 .>w….. …….
0378F6A0: 98 45 37 04 98 45 37 04 01 00 00 00 38 97 A0 04 .E7..E7…..8…
0378F6B0: B8 45 37 04 00 00 00 00 04 00 00 00 54 00 00 00 .E7………T…
0378F6C0: 02 00 00 00 80 FE 78 03 3B 5F 9C 00 EC F6 78 03 ……x.;_….x.
0378F6D0: 0B 38 45 00 23 00 00 00 20 00 7F 08 58 45 37 04 .8E.#… …XE7.
0378F6E0: 90 42 45 00 20 00 7F 08 C0 A9 B9 04 24 FC 78 03 .BE. …….$.x.
0378F6F0: A0 A5 45 00 00 00 00 00 1C F7 78 03 04 00 00 00 ..E…….x…..
0378F700: 1C F7 78 03 24 71 9E 00 E0 A9 B9 04 1C FB 78 03 ..x.$q……..x.
0378F710: E0 91 A0 04 00 00 00 00 ED B5 09 00 53 46 69 6C …………SFil
0378F720: 65 52 65 61 64 46 69 6C 65 20 2D 20 44 42 46 69 eReadFile — DBFi
0378F730: 6C 65 73 43 6C 69 65 6E 74 5C 53 70 65 6C 6C 49 lesClient\SpellI
0378F740: 74 65 6D 45 6E 63 68 61 6E 74 6D 65 6E 74 2E 64 temEnchantment.d
0378F750: 62 63 20 2D 20 44 61 74 61 5C 72 75 52 55 5C 70 bc — Data\ruRU\p
0378F760: 61 74 63 68 2D 72 75 52 55 2D 34 2E 6D 70 71 00 atch-ruRU-4.mpq.
0378F770: 00 00 00 00 00 00 00 00 42 3D 45 00 7C AD A5 00 ……..B=E.|…
0378F780: E8 CD 39 00 C0 A9 B9 04 00 00 00 00 00 00 00 00 ..9………….
0378F790: 00 00 00 00 00 00 00 00 B8 F7 78 03 7F F3 40 00 ……….x…@.
0378F7A0: 20 F8 78 03 54 7F 89 98 EC F7 78 03 54 E8 88 00 .x.T…..x.T…
——————————————————————————
by Tashreef Shareef
Tashreef Shareef is a software developer turned tech writer. He discovered his interest in technology after reading a tech magazine accidentally. Now he writes about everything tech from… read more
Updated on
- If you see the error 134 on WoW, you won’t be able to run the game properly.
- To start fixing this annoying issue, run the built-in repair tool, and then run battle.net as an administrator.
- Explore other useful guides and information on our extensive Blizzard Hub.
- For more specific fixes, consider bookmarking our detailed World Of Warcraft webpage.

World of Warcraft is a massively popular multiplayer online role-playing game developed by Blizzard Entertainment. However, at times when launching the game, you may encounter the WoW error 134.
The full error reads:
ERROR #134 (0x85100086) Fatal condition! Failed to open required archive
According to Blizzard, this error may occur when the World of Warcraft is prevented from making changes to a game file. It can be caused by incorrect permissions, antivirus program blocking the connection or corrupt installation.
In this article, we take a look at the best solutions to fix the WoW error 134 on your PC.
How do I fix the WoW error 134 Fatal conditions?
1. Run Battle.net as administrator
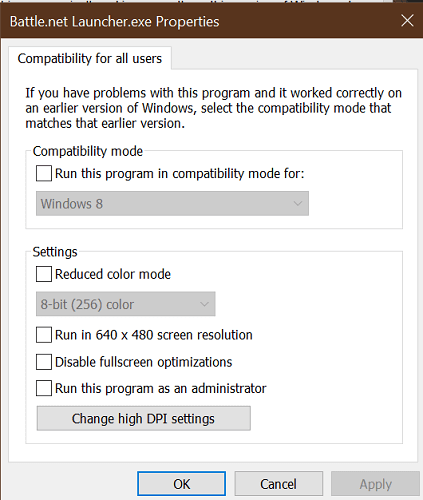
- Right-click on the Battle.net desktop application icon.
- Select Properties.
- Click Change settings for all users.
- Under Settings, check Run this program as administrator.
- Click Apply.
- Click OK to save the changes.
Launch Battle.net and open World of Warcraft to see if the error is resolved.
Running the Battle.net launcher as an administrator can fix issues that may occur due to permission, patching, networking, and start-up issues.
2. Repair World of Warcraft

- Launch the Blizzard Battle.net desktop app.
- Select the World of Warcraft game.
- Click on Options.
- Select Scan and Repair.
- Click Begin Scan.
- The repair tool will scan the game installation files and repair any corrupt files.
- Relaunch the launcher and check if the error is resolved.
3. Check your antivirus for issues
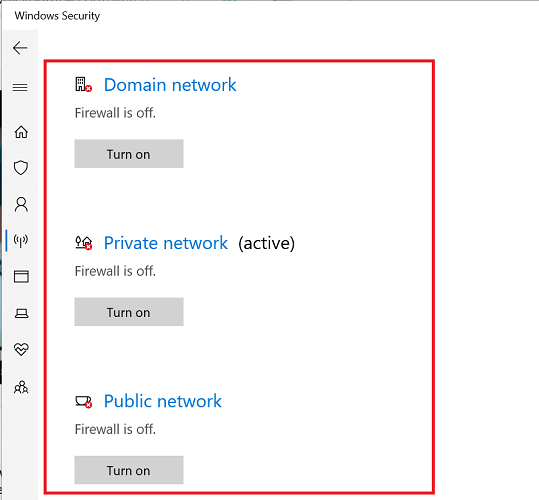
Turn off firewall
- Click Start and select Settings.
- Go to Update and security.
- Click on Windows Security.
- Click on Firewall and network protection.
- Open your currently active network (Home, Public, Private).
- Toggle the switch to turn off Windows Defender Firewall.
If you are using a third-party antivirus solution, you can disable the tool from the taskbar temporarily. Right-click on the antivirus icon in the System Tray and select Disable temporarily.
Once disabled, launch Battle.net launcher and try to open World of Warcraft. If the issue is resolved, make sure to add the game to whitelist.
At times, you may have to uninstall your antivirus to fix the fatal condition error completely. Check the Blizzard battle.net security software page for different antivirus compatibility with the game.
4. Update Windows and hardware drivers
Update display driver
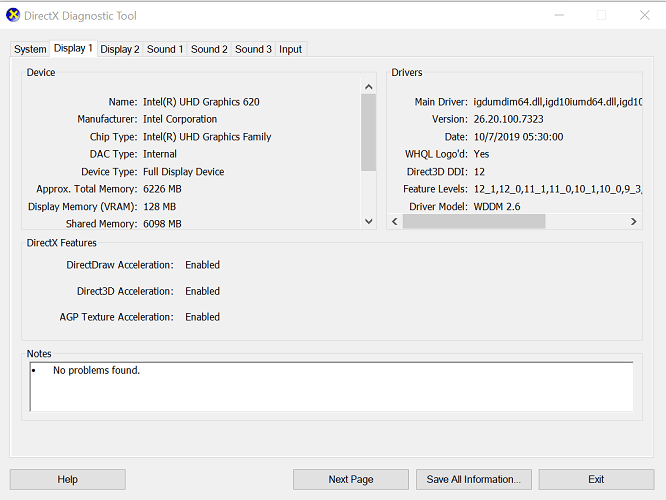
- Press Windows Key + R to open Run.
- Type DxDiag and click OK.
- In the DirectX Diagnostic Tool, open the Display.
- Note down the driver version.
- Open your graphics card manufacturer website.
- Download the latest version of the display driver for your GPU.
- Once installed, relaunch Battle.net and check if the error is resolved.
At times, Windows update may come bundled with necessary drivers update for your device that fixes glitches and bugs found in the previous update. Try updating your Windows OS to see if that helps you fix the error.
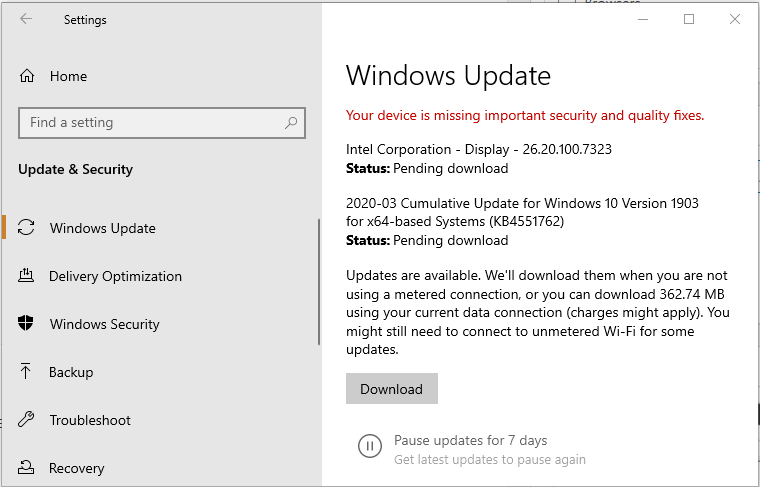
- Press Windows Key + I.
- Go to Update & Security.
- Download and install all the pending Windows updates.
- Make sure you have sufficient internet bandwidth as some Windows updates can be in GBs.
Update network drivers
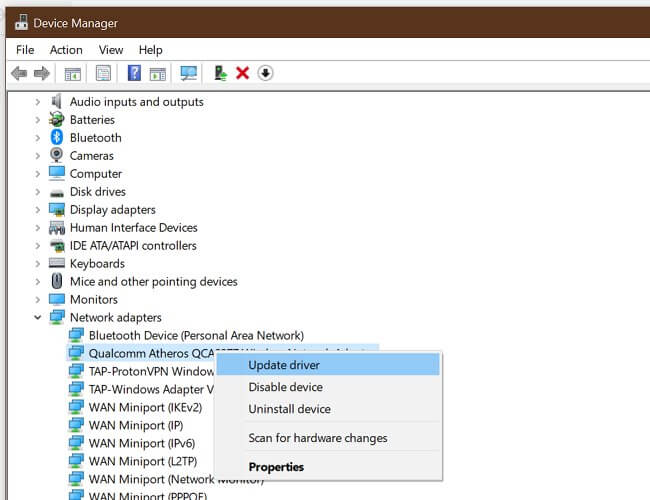
- Press Windows Key + R.
- Type devmgmt.msc and click OK to open Device Manager.
- Expand the Network adapter
- Right-click on your network adapter.
- Select Update Driver.
- Select Search for update driver software automatically.
- Wait for Windows to download and install any pending updates.
- Reboot the computer and check for any improvements.
If Windows fails to find a newer version of the website, you can visit the network adapter manufacturer or your laptop manufacture website to find the new drivers and install them manually.
5. Uninstall and reinstall World of Warcraft

- Press Windows key + R.
- Type appwiz.cpl.
- Select World of Warcraft from the list of installed apps.
- Click on Uninstall.
- Click Yes to confirm.
- Once uninstalled, open the file explorer, navigate to the following location, and delete WoW related files from the folder.
C:\Documents and Settings\Local Settings\Temp
C:\Windows\Temp
C:\Program Files\gametitle
C:\Program Files (x86)\gametitle
C:\Program Files\Common Files\Blizzard Entertainment
C:\Users\Public\Games\gametitle
C:\Users\Public\Public Documents\Blizzard Entertainment\gametitle - Empty the recycle bin.
Once the game is uninstalled, you can reinstall it from the Battle.net launcher. Reinstalling the game can fix any issues that may occur due to corrupt installation or missing files that the built-in troubleshooter couldn’t fix.
The WoW error 134 can be fixed by troubleshooting your system for permission issues, corrupt installation, or driver issues. As a last resort, try reinstalling the game to see if it fixes the error.
![]()
If you are a game lover, you would have definitely come across World of Warcraft. This game is one of the best MMO Role-Playing Games with millions of players in the world. Although this game was released in 2004, it rules the entire gaming empire with huge success, and it is still popular. When Blizzard Entertainment released this game, it was available only for Windows Operating Systems. Later, it was expanded, and now users can enjoy this game on many gaming platforms. Blizard frequently releases updates to fix and prevent any errors during the game. Still, few users are struggling with WOW Error #134 Fatal Condition. This guide will help you learn the WOW Error #134 fix in detail.

Table of Contents
There are so many reasons associated with WOW Error #134 (0x85100086) in your Windows 10 PC. Yet, a few significant reasons are listed below:
- Battle.net lacks admin access
- Corrupt data in-game installation folder
- Editing permissions are missing
- An antivirus program blocks a few features of the game or the game itself
- Windows Defender Firewall is blocking the program
- Outdated Operating System and PC drivers
- Corrupt game data
Now, read and implement the below-discussed methods in your Windows 10 computer for WOW Error #134 fix and to prevent the same.
Method 1: Basic Troubleshooting
Step 1: Restart PC
The general trick to resolve all the temporary glitches associated with World of Warcraft is to restart your computer as depicted below.

Step 2: Ensure Proper Network Connectivity
Unstable internet connection leads to WOW takes forever to launch Error #134 Fatal Condition. You can run a speed test to know the optimum level of network speed required for the proper connection. Then, contact your ISP for better plans.

- Disconnect devices, if too many devices are connected to the same network.
- Do not use old, broken, or damaged cables. Replace the cables if necessary.
- Or else, read our guide How to Troubleshoot Network Connectivity Problems on Windows 10 to troubleshoot the same.
Step 3: Close Background Tasks
Several users have confirmed that WOW Error #134 Fatal Condition can be resolved by closing all the background tasks running on your PC. To do the same, follow our guide on How to End Task in Windows 10 and proceed as instructed.

Also Read: Fix PUBG Stuck on Loading Screen on Windows 10
Method 2: Run Blizzard Battle.net as Administrator
It is one of the most common reasons that cause WOW Error #134 Fatal Condition in your Windows 10 PC. Since certain permissions and features can only be accessed if you have granted admin rights to the World of Warcraft game, you can fix it as follows:
1. Right-click on the World of Warcraft shortcut on the desktop.
Note: You can also navigate to the World of Warcraft installation directory and right-click on it.

2. Now, select the Properties option as shown.
3. Then, switch to the Compatibility tab and check the box titled Run this program as an administrator.

4. Finally, click on Apply > OK to save the changes.
Also Read: Fix WOW High Latency But Internet is Fine in Windows 10
Method 3: Rename Cache, Interface & WTF Folders
There are few gaming files residing in folders like Cache, Interface, and WTF that are responsible to store the basic information on the game, progress, and settings. If they are corrupt, you will face WOW Error #134 (0x85100086). So, you are advised to rename the folders and check if it works.
1. Press Windows + E keys together to open File Explorer.
2. Navigate to C:\Program Files (x86)\World of Warcraft as shown.

3. Now, find Cache folder and right-click on it. Then, select Rename option as shown.

4. Rename the folder as Cacheold.
5. Similarly, rename Interface and WTF folders as Interfaceold, and WTFold, respectively. Refer image below for clarity.

5. Relaunch the game and check if you got WOW Error #134 fix in your Windows 10 PC.
Also Read: Fix Dragon Age Inquisition Crash to Desktop Windows 10
Method 4: Delete WOW Cache Folder
Several users face WOW Error #134 Fatal Condition during the startup, and this issue could be resolved when the cache folder is removed completely from your computer. All the temporary files of the game will be deleted, and the next successive startup will launch the game without any errors. If renaming the folders didn’t work for you, the upcoming instructions might help.
1. Navigate to C:\Program Files (x86)\World of Warcraft > Cache folder as earlier.
2. Right-click on the Cache folder and select the Delete option, as shown.

Also Read: Top 14 Best Graphics Card for Linux
Method 5: Change Read-Only Attribute
The World of Warcraft game will run without any errors when you have granted proper custom attributes settings in UAC or User Account Control. In case, the game, and its components have only read-only components, you cannot modify or update World of Warcraft. It results in WOW Error #134 Fatal Condition in your PC. In this event, change the read-only attribute for the game as instructed below.
1. Launch File Explorer and navigate to C:\Program Files (x86)\World of Warcraft

2. Here, right-click on the Wow.exe setup file and click the Properties option.

3. Switch to the General tab. Uncheck the box marked Read-only next for the Attributes section shown highlighted below.

4. Then, click on Apply > OK to save the changes.
Method 6: Run Blizzard Repair Tool
If you still couldn’t find WOW Error #134 fix, there may be some chances that your PC has some damaged gaming files in it. Damaged files may fill your computer due to an overprotective antivirus suite or due to an update failure. Fortunately, you can resolve all these corrupt gaming files automatically with the help of built-in tool of Blizzard.
1. Navigate to the directory of the Wow.exe setup file and select the Run as administrator option as shown.

2. If you are prompted by the User Account Control window, click on Yes to proceed.
3. Now, switch to the Games tab at the top corner of the window and then select World of Warcraft from the list.
4. Then, click on Options followed by Scan & Repair from the drop-down list.
5. In the next prompt, click on Begin Scan and wait until the process gets completed.

6. Finally, restart the game and check if you can fix WOW Error #134 Fatal Condition.
Also Read: Fix Frosty Mod Manager Not Launching Game in Windows 10
Method 7: Run SFC & DISM Scans
If there are any missing or damaged files on your Windows 10 PC, you will face WOW Error #134 Fatal Condition. Yet, you are repairing these corrupt files by using inbuilt utilities, namely System File Checker and Deployment Image Servicing and Management. Read our guide on How to Repair System Files on Windows 10 and follow the steps as instructed to repair corrupt system files.

Method 8: Delete Temporary Files
Few users have suggested that clearing some disk space on PC has helped them sort out WOW Error #134 (0x85100086). Follow our guide How to Delete Temp Files in Windows 10 which will help you clear all unnecessary files.

Method 9: Update Windows OS
You can also eradicate bugs in your computer and game by updating your Operating System. Implement our guide How to Download and Install Windows 10 Latest Update and connect to your game server without any errors.

Method 10: Update Graphics Drivers
As World of Warcraft is a graphically intensive game, updated & compatible graphics driver is essential for your gaming experience. You can search for the newest releases of drivers from its official website, or you can update them manually via Device Manager. Read 4 Ways to Update Graphics Drivers in Windows 10 to learn more.

Also Read: Fix Unable to Connect to World Minecraft in Windows 10
Method 11: Reinstall Graphics Drivers
If you still face WOW Error #134 (0x85100086) after updating your Graphical drivers, reinstall device drivers to fix any incompatibility issues. Read our guide How to Uninstall and Reinstall Drivers on Windows 10 here.

Method 12: Roll Back GPU Drivers
Sometimes, the current version of GPU drivers may cause any game launching conflicts. And in this case, you have to restore previous versions of installed drivers with the process called rollback of drivers. You can easily roll back your computer drivers to their previous state by following our guide on How to Rollback Drivers on Windows 10.

Also Read: 33 Best Scary Roblox Games to Play with Friends
Method 13: Allow WOW or Add New Rule in Windows Defender Firewall
You will also face WOW Error #134 Fatal Condition due to an over-protective antivirus suite in your Windows 10 computer. It prevents the connection link between the game launcher and the server. Similarly, in-built Windows defender firewall may also cause conflicts. Hence, you can try to resolve it using either of the following options:
Option I: Whitelist World of Warcraft
To allow World of Warcraft in your Windows Defender Firewall, follow our guide on Allow or Block Apps through the Windows Firewall.

Option II: Create New Rule in Firewall
1. Hit the Windows key and type Windows Defender Firewall with Advanced Security. Then, click on Open.

2. From the left pane, click on Inbound Rules as depicted.

3. Then, from the right pane, click on New rule… as shown.

4. Select the Program option under What type of rule would you like to create? menu and click on Next > as shown.

5. Then, click on the Browse… button corresponding to This program path: as shown.

6. Navigate to C:\Program Files (x86)\World of Warcraft path and double-click on the WOW setup file. Then, click on the Open button.
7. Click on Next > in the New Inbound Rule Wizard window.

8. Now, mark the option titled Allow the connection and click on Next > as depicted.

9. Make sure to check the following boxes and click on Next > as shown.
- Domain
- Private
- Public

10. Finally, add a name e.g. WOW to your new rule and click on Finish.

Also Read: Fix Skyrim Won’t Launch in Windows 10
Method 14: Reinstall World of Warcraft
Misconfigured files in World of Warcraft will lead to WOW Error 51900101 or #134. So, in this case, you have no other option than to reinstall the game as follow:
1. Hit the Windows key and type Apps & features. Then, click on Open.

2. Search World of Warcraft in the list and click on it. Then, select the Uninstall option.

3. If you are prompted, again, click on Uninstall.
4. Once the game is completely uninstalled from your computer, press-hold Windows + E keys together to open File Explorer.
5. Now, navigate to the following paths one by one and Delete all folders related to WOW.
- C:\Windows\Temp
- C:\Program Files\gametitle
- C:\Program Files (x86)\gametitle
- C:\Program Files\Common Files\Blizzard Entertainment
- C:\Users\Public\Games\gametitle
- C:\Users\Public\Public Documents\Blizzard Entertainment\gametitle

6. Double-click Recycle Bin from Desktop and permanently Delete all the files/folders from here.

7. Then, visit Blizzard official website to Download World of Warcraft for Windows PC.

8. Navigate to My downloads in File Explorer and double-click on the setup file to run the application.
9. Follow the on-screen instructions to install the game on your Windows 10 PC and continue playing!
Recommended:
- 9 Best Video Doorbell Compatible With Google Home
- How to Fix Unable to Download Patch Files FFXIV
- Fix Minecraft Black Screen in Windows 10
- Fix ARK Keeps Crashing on Windows 10
We hope that this guide was helpful and you could fix WOW Error #134 Fatal Condition in your device. Let us know which method worked for you the best. Drop queries or suggestions in the comments section below.