
570ка мощная… Даа уж. А еще на Voodoo2 не пойдет.
- пожаловаться
- скопировать ссылку
не очем у меня конфиг компа еще на 5 лет актуален , все равно ошибка такая сделал все как в видео
- пожаловаться
- скопировать ссылку
Скачал репак от Хатаба. Игра запустилась Но после загрузки заставки об эпилепсии черный экран и комп завис. Я не понимал в чем дело. Пока через долгие поиски и Мучения и по советам не отключил карту intel hd 620. Пробовал запустить и игра запустилась вроде бы но не тут то было. Вот тут и выскочила эта хрень о которой я читал Could hot write crash dump и все игра сразу свернулась.
- пожаловаться
- скопировать ссылку
Просмотрел видео. Vulkan у меня потдерживает. Doom иедет и хорошо. Кто знает как помочь
- пожаловаться
- скопировать ссылку
Разрабы УРОДЫ
- пожаловаться
- скопировать ссылку
Видеокарта GTX 950M DOOM играю свободно (лицензия) Сначала скачал новый драйвер 388.10 (не помогло) Отключил Intel HD как указано (не помогло) Режим совместимости ставил (не помогло) От имени администратора запускал (не помогло) Помогите пожалуйста P.S. Wolfenstein пиратская. Репаки пробовал от Механиков и Хатаба С обоими репаками проводил данные махинации. Результатов 0 Интереса ради попробовал наоборот отключить GTX 950M и оставить Intel HD В итоге увидел текст ошибки (до этого не видел самого текста на синем фоне)
- пожаловаться
- скопировать ссылку

Я ниже приведенный способ не использовал, так как у меня все в порядке, вроде. Но чувак советовал запуск на OpenGl. Дописать в свойствах ярлыка +r_disablesteamOverlay 0 +devMode_enable 1 +r_renderapi 0 Попробуйте.
- пожаловаться
- скопировать ссылку
Наконец то запустил игру. Таблетка кривая, привязана Steam. Запустил Steam в офлайн и всё заработало, а то намучаемся с тем что игра не запускалась. До обновлений игры, таблетка была полноценной, без привязке к Steam. Зачем таблетку Steam привязали? лёлики!, и главное нигде инфи нет по этому поводу.
- пожаловаться
- скопировать ссылку
![]()
Sirius536 Вы просто гений! Наконец-то удалось запустить игру, включив Steam в автономном режиме.
- пожаловаться
- скопировать ссылку
The error “Wolfenstein 2 could not write crash dump” occurs when the game crashes because of mostly graphics issues and display the error message on the computer. This error usually occurs because of incorrect configuration of graphics on your computer or when your graphics drivers are outdated.
There are several workarounds to fix this error message starting from checking the graphics drivers on your computer to changing in-game settings. We will go through each of them starting with the easiest one first. Make sure that you have an administrator account before proceeding with the solution.
- Wolfenstein 2 could not write crash dump AMD: This situation refers to the scenario where your graphics card is of AMD and the game crashes each time when you launch it.
- Wolfenstein 2 could not write crash dump NVIDIA: Similar to the error message, this condition occurs when the graphics card installed in NVIDIA and the refuses to launch and crashes.
Solution 1: Update the game and client
Before we move on to more tedious and lengthy solutions, you should first make sure that the game and the game client are updated to the latest build. Every now and then, the developers of Wolfenstein release patches to fix bugs or introduce new features in the game.
If you have a Steam client, you should make sure that the game is updated from there or if you are using a standalone game client, navigate to the Wolfenstein’s website and download the latest patch.
Solution 2: Changing compatibility settings
Every computer application has compatibility settings which determine how the application will perform and what are the compatibility settings that will govern the main running of the application. We can try changing some compatibility settings of the game in the Steam folder and see if this fixes the problem. You can always revert the changes if this doesn’t work.
- Navigate to the Steam’s installation directory. From there locate the executable of the game. The file path may differ according to 32 or 64-bit type of the application.
For example, the file path can be:
D:\Steam\steamapps\common\wolfenstein 2\game\bin\win64
- Once in the folder, right-click on the game executable and select Properties.
- Once in properties, navigate to the compatibility tab and click on Change high DPI settings. Check the option Override high DPI scaling behavior. Select Application from the drop-down menu.
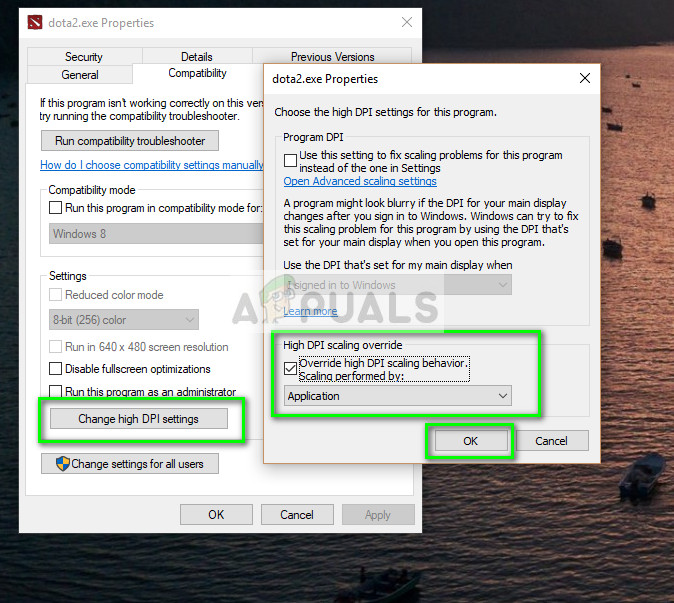
- Press OK to save changes and exit. Restart your computer and try launching the game again.
You can do the same with the Steam client or the standalone version of the game.
Solution 3: Disabling Async Compute
Another thing to try if the above solutions don’t work is disabling the Async compute on the game or on your computer. The Async compute enhances the graphics output of the game on your computer. However, in several cases like this one, it causes problems and forces the game not to launch.
You can disable the feature from your graphics card or if you are able to enter the game, you can disable it from there. Once disabled, restart your computer completely and try launching Wolfenstein 2.
Solution 4: Deleting the ‘config’ file
Each game has a configuration file saved locally on your computer. The settings of the game are stored in this config file so whenever you launch the game, the application fetches the settings from here and then loads its modules.
It is possible that the configuration file is corrupt and hence you are unable to even launch the game. If we delete the configuration file, the game will detect that none is present and then make a new one with default values.
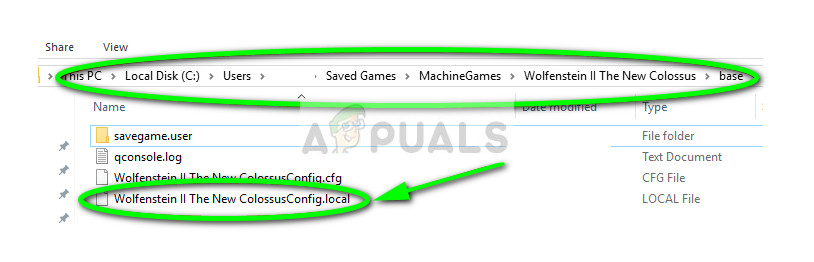
- Navigate to the following directory:
C:\Users\Username\Saved Games\MachineGames\Wolfenstein II The New Colossus\base\Wolfenstein II The New ColossusConfig.local
- Delete or cut paste the config file to another location. Now restart your computer completely and try launching Wolfenstein.
If you have an i7 or i5, you can also try disabling igpu before launching the game.
Solution 5: Checking your graphics drivers
If all the above methods don’t work out, you can try making sure that your graphics drivers are updated to the latest version. This can be the primary reason why your game is crashing because it doesn’t have access to the latest and updated graphics drivers. We will make use of the utility DDU to help to remove the remnants completely from your computer.
- Download and install DDU (Display driver uninstaller) from its official website.
- After installing Display Driver Uninstaller (DDU), launch your computer in safe mode. You can check our article on how to boot your computer into safe mode.
- After launching the DDU, select the first option “Clean and restart”. The application will then automatically uninstall the installed drivers and restart your computer accordingly.

- Now after the uninstallation, boot your computer normally without safe mode. Press Windows + R, type “devmgmt.msc” in the dialogue box and press Enter. Right-click on any empty space and select “Search for hardware changes”. The default drivers will be installed. Try launching the game and check if this solves the problem.
- If the default drivers don’t work you, you can update them to the latest build. There are two ways to go through it; either update the drivers automatically or manually. You can try automatically first and if that doesn’t work, you can move to the manual method.
In the manual method, you have to download the drivers from the manufacturer’s website and install the drivers from there.
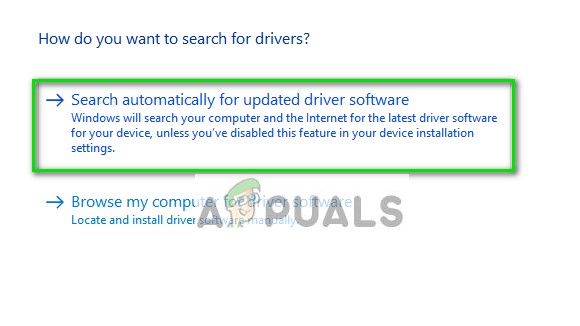
- After you have installed the drivers, restart your computer and check if the problem is solved.

Kevin Arrows
Kevin Arrows is a highly experienced and knowledgeable technology specialist with over a decade of industry experience. He holds a Microsoft Certified Technology Specialist (MCTS) certification and has a deep passion for staying up-to-date on the latest tech developments. Kevin has written extensively on a wide range of tech-related topics, showcasing his expertise and knowledge in areas such as software development, cybersecurity, and cloud computing. His contributions to the tech field have been widely recognized and respected by his peers, and he is highly regarded for his ability to explain complex technical concepts in a clear and concise manner.
Many gamers have recently got an error when they’re playing games like Wolfenstein 2. The game crashes and an error pops up saying: Could not write crash dump. But in fact, there are still some solutions that can help you get rid of the error.
Why does this error occur? For now most of players got this error when playing Wolfenstein 2, and the most common cause is the graphics card issue in your computer. Another possible reason is the improper settings in your game. Sometimes it’s hard to identify the exact cause, but you can still try the solutions to fix the problem.
Try these fixes
Here are some fixes for you to try. You shouldn’t have to try them all. Just try each one in turn until everything’s working again.
- Install the latest game patches
- Update your graphics card driver
- Configure the setting in Steam
- Disable Async Compute
- Temporarily disable your graphics card device
Fix 1. Install the latest game patches
The game developer keeps releasing the updates to fix the bugs and improve the game experience, so you should check whether there’s any update for the game that’s giving the error, and update it to the latest version.
For example, I’m having the “Could not write crash dump” error in Wolfenstein II: The New Colossus, so I check the Wolfenstein II updates in Steam or from the Wolfenstein website, and install the latest game patches to keep the game up to date.
After updating, restart your computer and launch the game to see if it works now.
Note: You should install the official released updates to avoid the potential risks to your computer.
Fix 2. Update your graphics card driver
The missing or outdated graphics card driver can cause “Could not write crash dump” error in Wolfenstein 2, so you should check your graphics card driver in your computer, and update it to the latest version.
You can manually update all the drivers in your computer by looking for the latest drivers from the manufacturer’s website and installing it in your computer. This requires time and computer skills.
If you don’t have time or patience, you can do it automatically with Driver Easy.
Driver Easy will automatically recognize your system and find the correct drivers for it. You don’t need to know exactly what system your computer is running, you don’t need to risk downloading and installing the wrong driver, and you don’t need to worry about making a mistake when installing.
You can update your drivers automatically with either the FREE or the Pro version of Driver Easy. But with the Pro version it takes just 2 clicks (and you get full support and a 30-day money back guarantee):
1) Download and install Drive Easy.
2) Run Driver Easy and click the Scan Now button. Driver Easy will then scan your computer and detect any problem drivers.
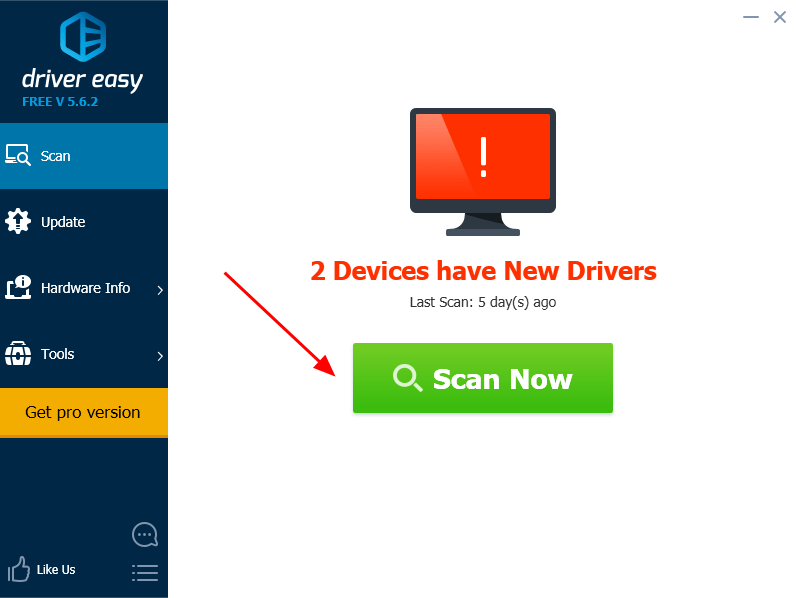
3) Click the Update button next to the flagged graphics driver to automatically download the correct version the this driver (you can do this with the FREE version), then install it in your computer.
Or click Update All the automatically download and install the correct version of all the drivers that are missing or out of date on your system (this requires the Pro version – you’ll be prompted to upgrade when you click Update All).

4) After updating, restart your computer, and open the game to see if it works.
Install the GeForce Hotfix Driver if you’re using NVIDIA graphics card
If you’re using the NVIDIA graphics card in your computer, after updating your dedicated graphics card driver, you should also download the GeForce Hotfix Driver from the NVIDIA download page, and install it in your computer. Make sure to download the one that is matched with your Windows OS system.
This should resolve the game error. If the issue still persists, don’t worry. We have other solutions for you to try.
Fix 3. Configure the settings in Steam
The incorrect settings in your Steam may cause the “Could not write crash dump” error in Wolfenstein 2, so you should check the following setting in your Steam:
Step 1:
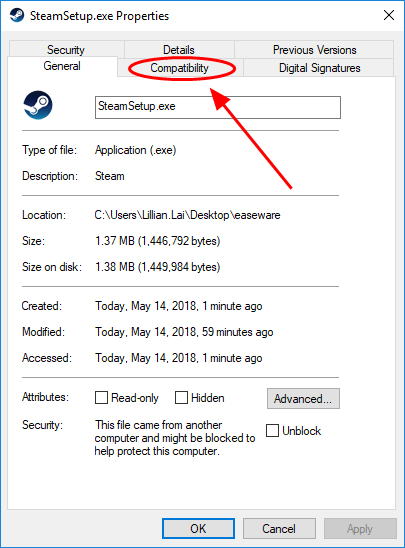
1) Go to the Steam .exe file where you downloaded and saved Steam in your computer.
2) Right click SteamSetup.exe, and select Properties.
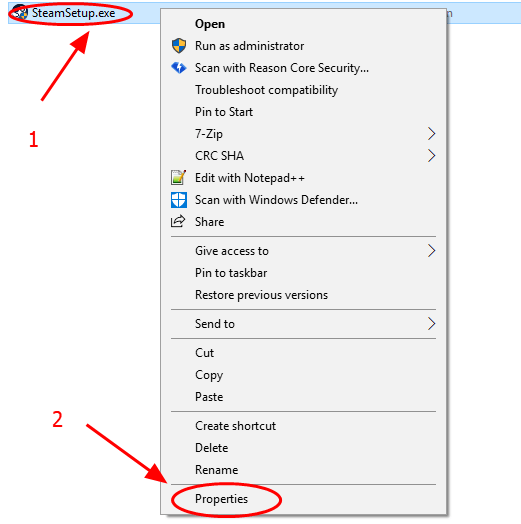
3) Click the Compatibility tab.
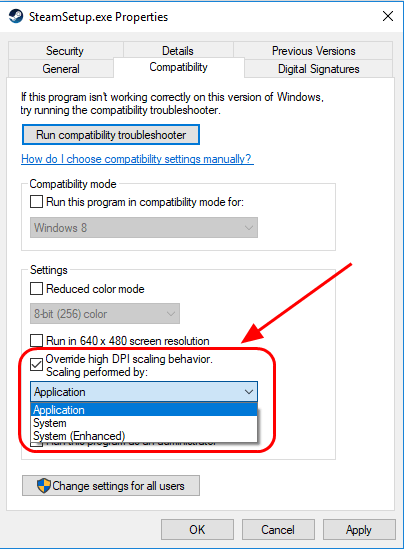
4) Check the box next to Override high DPI scaling behavior. Scaling performed by:, and make sure Application is selected in the list.
5) Click Apply and OK to save the setting.
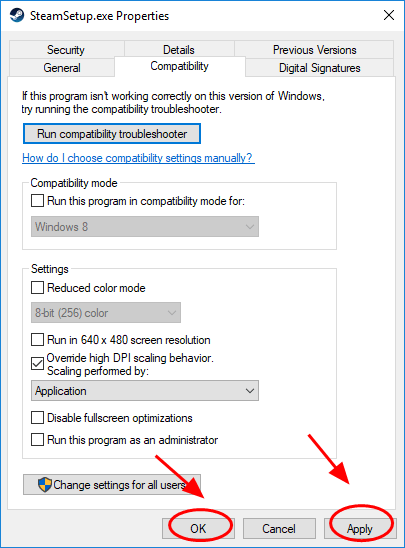
6) Restart your computer, open Steam and launch Wolfenstein 2 to see if the error is removed.
Step 2:
You should also go to Video > Advanced and change Image Streaming to Low.
This should resolve the crash issue in your computer. If the error still appears, don’t worry. We have other solutions for you to try.
Fix 4. Disable Async Compute
This is a solution suggested by Bethesda. If you have the hardware that meets the minimum specs, and your graphics card driver is up to date, you can try to disable async compute to fix the “Could not write crash dump” error in Wolfenstein 2. To do so, follow the instructions below:
1) Run the game in Safe Mode or exit the game.
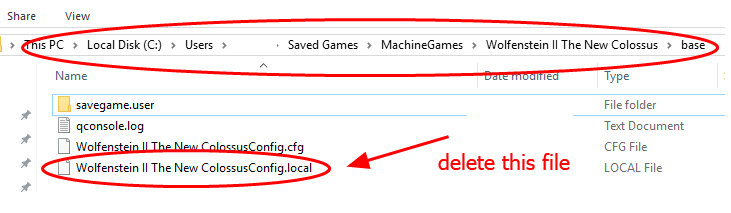
2) Delete the config file from this folder:
C:\Users\Username\Saved Games\MachineGames\Wolfenstein II The New Colossus\base\Wolfenstein II The New ColossusConfig.local
3) Close down all the applications running in the background.
4) If you have a supported i5 or i7 CPU, exit the title, disable igpu before playing.
5) Restart your computer, and re-open your game to play.
Fix 5. Temporarily disable your graphics card device
This is a quick tip introduced by some Steam users who had the same issue. And it works for many Steam users. You can give it a try by following the steps below:
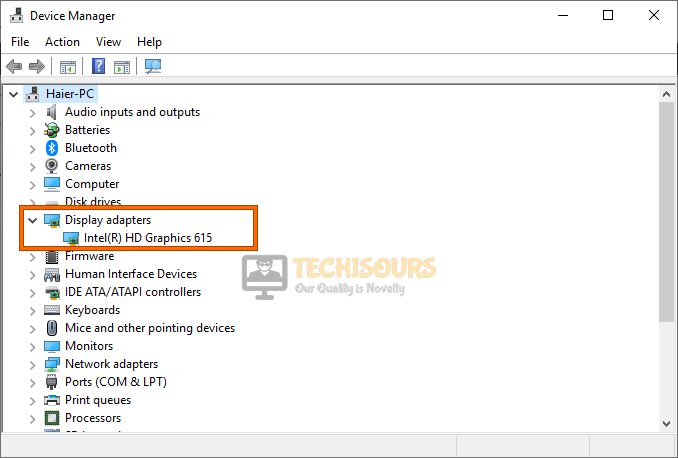
1) Open Device Manager in your computer (run devmgmt.msc in the Run box).
2) Expand Display adapters.

3) Right click on your graphics card, and select Disable device. Then click Yes to confirm.
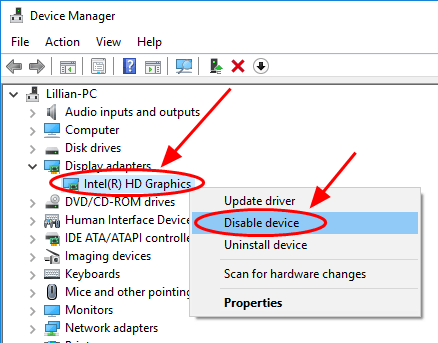
4) Close Device Manager, and open your game again to see if the error disappears.
Note: You can re-enable the graphics card device later in Device Manager.
Hope this fix your Wolfenstein 2 crash dump issue.
That’s it – the fix easy methods to fix the “Could not write crash dump” error in Wolfenstein 2. Hope it helps.
Feel free to add a comment below to share your experience related to the similar issues.
Wolfenstein 2: The New Colossus is a fairly well-rated game and it has been a while since its release. However, Wolfenstein 2 Could not Write Crash Dump Error is certainly as old as the game itself and it hasn’t been fixed by the developers either. Therefore, we intended to take it upon ourselves and compiled a comprehensive guide of fixes, workarounds, and solutions to help you eradicate this error from your computers completely.

Before we start implementing the solutions on your computer, we think it is important that you are aware of the triggers that actually cause this issue in the first place and we have compiled some of the most common ones as follows.
- Compatibility Issues: There are cases where the game and the operating system aren’t completely compatible with each other and this gives rise to Wolfenstein 2 Could not Write Crash Dump Error. A resourceful way to circumvent this is to just try running the game in a compatibility setting which should eliminate this potential trigger.
- Game File Integrity: It is important that all of the game files are present and have been arranged in the specific manner in which the developers intended, If that is not the case then this error will be seen while trying to launch Wolfenstein 2 and the game will simply not launch.
- Config File Corruption: The Wolfenstein 2 config file contains important user data, settings, and other instructions that determine the launch point of the game. If this file has been corrupted, Wolfenstein 2 will not launch properly and you will probably get the ‘Could not Write Crash Dump’ Error on your computer.
- GPU Drivers: The Graphics Card Drivers might also be responsible for this issue if they have been outdated or if they aren’t installed properly on the system. The GPU drivers are primarily responsible for allocating GPU resources to the game and if they fail to do so, it will be unable to launch properly.
- Integrated GPU: Sometimes, this error is also triggered if the game sets to launch and run its GPU models from the integrated graphics installed on the system instead of the dedicated ones and this can end up causing the Wolfenstein 2 could not write crash dump issue on Windows.
- Steam Overlay: Overlays and other add-ons that add more functionality to your game screen can sometimes end up preventing certain game features from running properly which ends up causing this error on your computer. Therefore, it is important that you try toggling these overlays and gadgets to make sure that they aren’t causing this issue.
- Overclocking: Many performance-conscious users tend to try and get the most out of their hardware by overclocking their CPU, GPU, and other parts to a higher setting than the factory clock and as we see it, there isn’t any harm in it but that is not always the case with game developers. Some games tend not to run as smoothly on an overclocked system then they do on a factory configured one so it is best to tune those overclock settings back down to the factory ones and check to see if doing so fixes your issue.
Now that you are aware of most of the reasons that trigger this issue on your computer, we can move on towards implementing fixes to combat this issue.
Before we start:
- If you have just encountered this error on Wolfenstein 2, we recommend you to run a previously saved game and see the error persists.
- If the error is not resolved, press “Win + R” keys simultaneously on the keyboard to open the run box and search for the “%localappdata%” command.

Tying in “%localappdata%” - From here, open the “Temp” folder to delete everything inside that folder and restart the game to see if the error is removed.

Delete Temp files - Lastly, it is also recommended to disable “Async Compute” from your graphic card’s control panel in order to minimize the chance of encountering this error.


Fixing the Wolfenstein Could Not Write Crash Dump Issue:
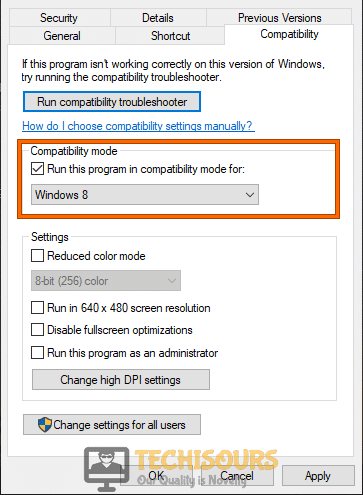
Solution 1: Run the game in compatibility mode
- Navigate to the desktop, right-click on the game’s desktop shortcut, and select “Properties”.
- Now move to the “Compatability” mode and check the box that is associated with “Run this program in compatibility mode for” option.

Running in compatibility mode - Select a version of Windows older than the version you are currently using on your computer and apply the settings.
- Now check the box parallel to “Run this program as an administrator” and click on “OK”.

Running Wolfenstein 2 as an administrator - After making the changes, run the game to see if the Wolfenstein 2 error persists.

Solution 2: Verify the integrity of the game files
- Double-click on the Steam shortcut located at your desktop to open it and navigate to “Library”.
- Now right-click on Wolfenstein 2 and select “Properties” from the pop-up menu.
- Navigate to the “Local files” tab and select “Verify Integrity of the Game Files”.

Verify Integrity of the Game Files - When the verification process is completed, hopefully, the error would be rectified but if the issue still persists proceed to the next potential fix indexed below.

Solution 3: Tweak compatibility settings
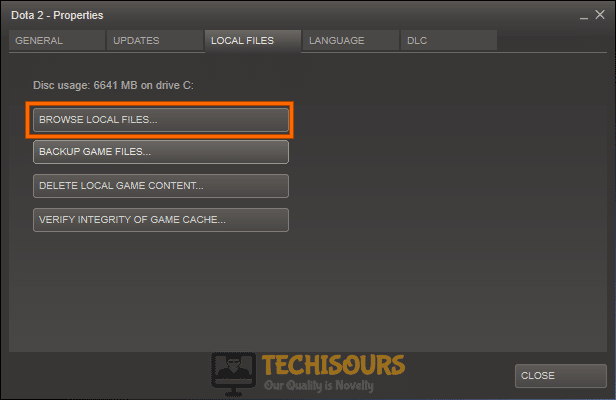
- Double-click on the Steam’s shortcut located at your desktop to open it and navigate to “Library”.
- Now right-click on Wolfenstein 2 and select “Properties” from the pop-up menu.
- Navigate to the “Local files” tab and select “Browse Local Files” to go to its location in the directory.

Click on Browse Local files - Now right-click on the game’s executable file and select “Properties” from the pop-up menu.
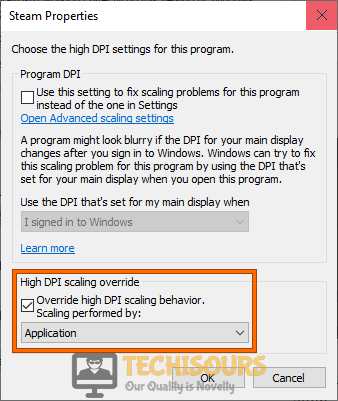
- Navigate to the “Compatability” tab and click on the “Change high DPI settings” button.
Change high DPI settings - Check the box parallel to “Override high DPI scaling behavior” and select “Applications” from the drop-down menu located below the checkbox.

Override high DPI scaling behavior - Apply the settings and see if the game is now able to write the crash dump.

Solution 4: Remove the config file
- Press the “Win + E” keys simultaneously to open the “File Explorer” and navigate to the following location on the drive.
C:\Users\Username\Saved Games\MachineGames\Wolfenstein II The New Colossus\base\Wolfenstein II The New ColossusConfig.local
- Now select the “Wolfenstein II The New ColossusConfig.local” config file and hit the “Delete” key on your keyboard to remove this file from the directory.
Note: You can also cut-paste it to another location if you want to make a backup. - Now launch the game again and see if you encounter the same error again on your PC.
Solution 5: Rollback or Update graphics drivers
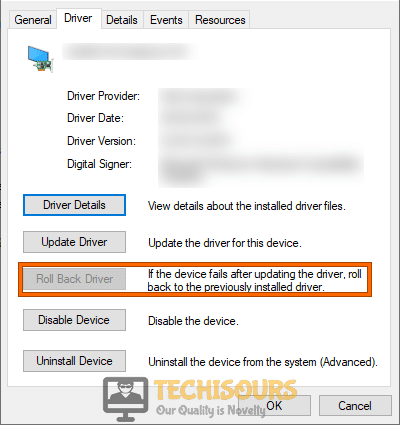
- Hit “Windows + X” keys simultaneously on the keyboard and select “Device Manager”.

Choosing Device Manager - Now click on “Display Adapters” to expand the list and double-click on the graphic card driver.

Selecting Display Adapters - Navigate to the “Drivers” tab and click on “Roll back driver” to revert to the previous version of the driver.

Rollback Driver - If the “Rollback Driver” button is greyed out, click on the “Update device” to install the latest version of the driver on your computer.

Update Driver - After carrying this task out, check if you encounter Wolfenstein 2 could not write crash dump issue again while playing the game.


Solution 6: Disable iGPU
- Press “Windows + X” keys simultaneously on the keyboard and select “Device Manager”.
Choosing Device Manager - Now click on “Display Adapters” to expand the list and double-click on the “INTEL” graphic card driver. Note: If you have any other integrated GPU, select that.
- Go to the “Drivers” tab and click on the “Disable device” to disable this device completely.
Disable device Driver - After disabling the integrated GPU, launch your game again and see if it shows an error while writing the crash dumps.

Solution 7: Install the GeForce Hotfix driver in safe mode
- Launch your favorite browser and download Display Driver Uninstaller.
- Double-click on the downloaded file and follow the on-screen instructions to install it on your computer.
- On your keyboard, press “Windows + I” keys simultaneously to open “Settings” and select “Update and Security”.

Choose Update and Security - From the left pane, click on “Recovery” and then select “Restart Now” under the heading of Advanced Startup.

Clicking Restart now - Click on “Troubleshoot” and then select “Advanced Options”.

Click on Advanced Options - Now select “Startup Settings” and click on “Restart”.
- Now select “Safe mode with networking” before the system restarts and wait while it reboots.
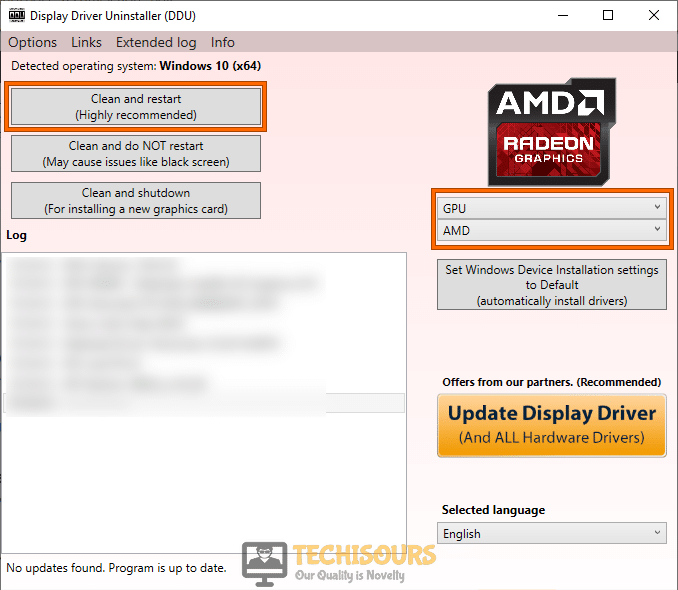
- Now launch DDU and set the “Device Type” and select the “Device” from the drop-down list displayed on the screen.
- Now click on “Clean and Restart” to uninstall the current and previous drivers installed on your computer and install the latest version of the driver automatically.

Click Clean and Restart - When the clean and restart process has been completed, reboot your computer and download the GeForce Hotfix driver on your computer.
- Now install the driver on your computer and reboot it once again.
- Now launch the game and see if the same problem occurs again while writing the crash dump.


Solution 8: Disable Steam Overlay
- Launch “Steam” and navigate to the “Library” tab. Now, from the left pane, locate the game you are having trouble with.
- Right-click on the faulty game and select “Properties” from the pop-up menu.
- Now proceed to the “General” tab and uncheck the box parallel to “Enable the Steam overlay while in-game”.

Disabling Steam Overlay - Now restart the Steam application and check whether the error has been removed.

Solution 9: Disable third-party antivirus software
- Click on the “^” button located at the bottom right of the taskbar and then right-click on the Avast icon.
- Hover over the “Avast Shield Control” and select the “Disable Permanently” option to disable your antivirus software.

Disabling antivirus

Note: If you have any other Anti-virus installed, like AVG or BitDefender disable it by following the same steps as indexed above.
Solution 10: Delete some Vulkan files
- Press “Win + E” keys simultaneously on the keyboard to open the File Explorer and go to the following location on the disk.
C:\Windows\System32
- Here locate and delete the “amd_vulkan64.json” and “amdvlk64.dll” files.
- After deleting these files, launch the game again to see whether wolfenstein 2 could not write crash dump issue is resolved.
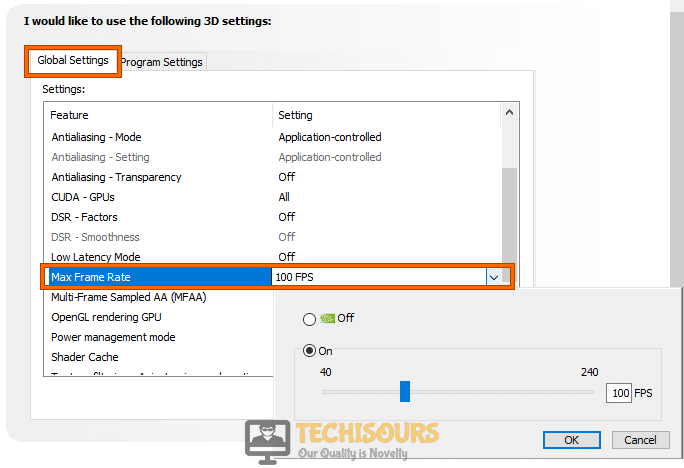
Solution 11: Tweak NVIDIA settings
- Right-click on the desktop and select “NVIDIA control panel” from the menu.

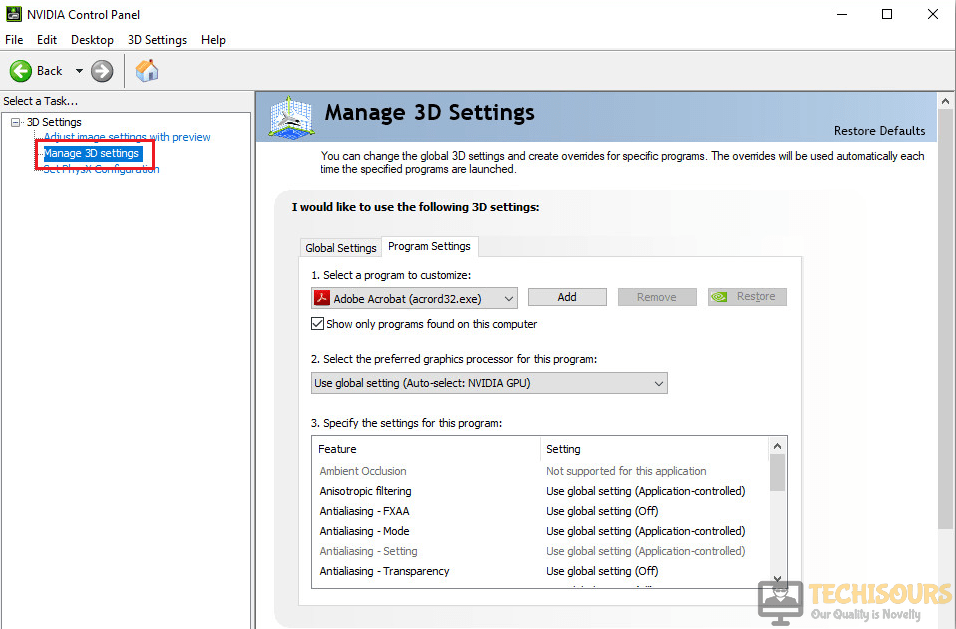
Clicking on the Nvidia Control Panel - From the left pane, click on the “3D Settings” option to expand its list and choose “Manage 3D settings”.

Manage 3D Settings - Have a look at the right side of the screen and from there click on the “Program Settings” tab.
- Now select “Wolfenstein 2” from the list of programs to customize and “Integrated Graphics” as the preferred processor for the program.
- Now navigate to the “Global Settings” tab and set the value of “Maximum Frame Rate” equal to “60 fps”.

Setting FPS - Scroll down and select “OFF” from the drop-down list parallel to “Vertical Sync” to disable V-sync.
- After waiting for a couple of minutes, enable V-sync and launch the game to see if the error has been resolved.

Re-enable Vertical Sync


Solution 12: Re-Install Vulkan API
- Press “Win + R” keys on the keyboard to open the Run box and search for “appwiz.cpl”.
Typing “appwiz.cpl” - Now right-click on ” Vulkan Run Time Libraries” and select “Uninstall” from the pop-up menu.

Uninstall Vulkan Run Time Libraries - Now launch your browser and download the Vulkan Run Time libraries on your computer.
- When the libraries are downloaded, double click on the “VulkanRT-Installer.exe” file and follow the onscreen instructions to install the libraries on your PC.

Solution 13: Tweak In-game settings
- Launch the game and navigate to its “Settings”.
- Now, select “Video” and then navigate to “Advanced”.
- Here, set the “Image Streaming” to “Low” and disable the “Shadowplay” mode.

Tweak In-game settings - We also recommend you to disable “Desktop Capture” and “Async Compute” options and use a single monitor to play the game.
- Save the settings and restart your game client to see if the Wolfenstein 2 error persists.

Solution 14: Disable Overclocking
- On your keyboard, press “Windows + I” keys simultaneously to open “Settings” and select “Update and Security”.
Choose Update and Security - From the left pane, click on “Recovery” and then select “Restart Now” under the heading of Advanced Startup.
Restart now - Click on “Troubleshoot” and then select “Advanced Options”.
Choose Advanced Options - Now select “UEFI Firmware Settings” and click on “Restart”.

Click on UEFI Firmware Settings - Press the BIOS boot key as soon as the machine’s logo appears on the screen.
Note: Different computers/Laptops have different BIOS boot keys like DEL, F2, ESC, etc. - After entering the BIOS, go to the “Advanced” tab and select “Performance”.
- Locate the “Overclocked” option and disable it, hit “F10” on the keyboard to save and exit the settings and restart your PC.

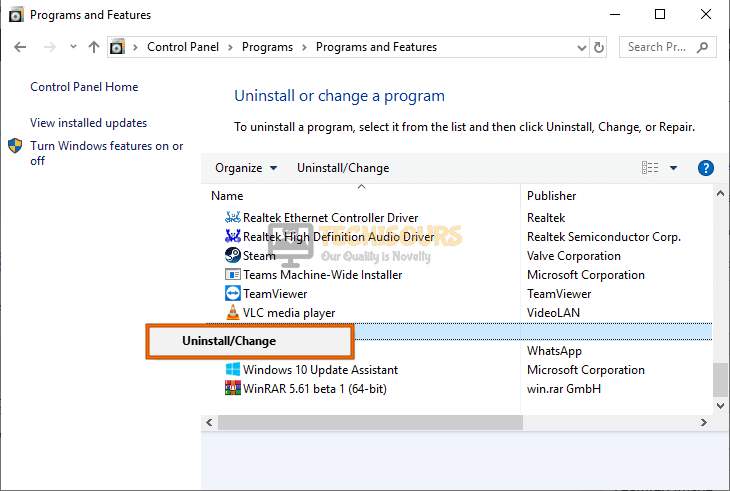
Solution 15: Reinstall the client
- Press “Windows key + I” keys simultaneously on the keyboard to open the run box and search for the “appwiz.cpl” command.
Typing “appwiz.cpl” Command - Now right-click on the “Wolfenstein 2” and select “Uninstall” to uninstall the game completely from your PC.
Uninstall Killing Floor 2 - When the game is uninstalled completely, launch Steam client and proceed to the “Store” to download “Wolfenstein 2” again on your PC.
- When the game is installed, launch the game and check if you still encounter wolfenstein 2 could not write crash dump issue.
Solution 16: Clean install Windows
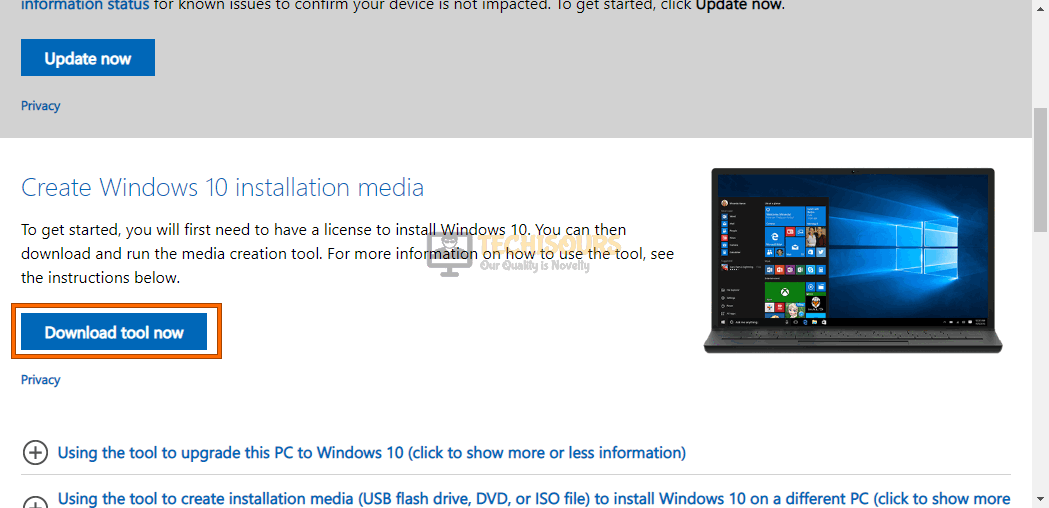
Create installation media:
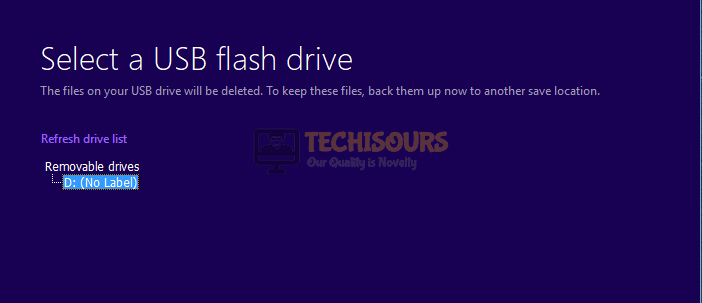
- Launch your favorite browser and download the Windows Media creation tool by Microsoft.

Media creation tool - Insert a formatted USB drive into your PC.
- Now double-click on the downloaded executable to run the Media Creation Tool.
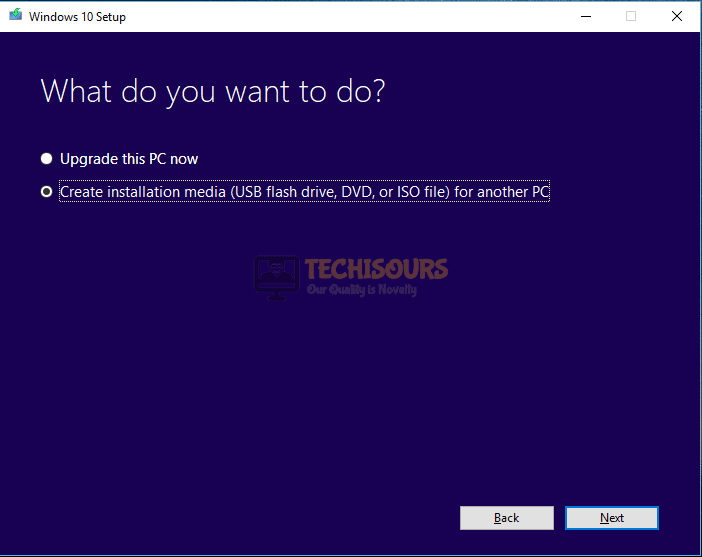
- Click on the “Accept” option located in the user agreement and select “Create installation media (USB flash drive, DVD, or ISO file for another PC”. Now click on “Next”.

Create installation media (USB flash drive, DVD, or ISO file) for another PC - Now un-check the box parallel to “Use the recommended options fort his PC” and set your language, edition, and architecture.

Use the recommended options for this PC - Now check the box parallel to “USB flash drive” and click on “Next”.

USB flash drive - Now select the USB on which you want to burn the installation media and click on “Next”.

Selecting the USB - Wait patiently while the Media creation tool downloads Windows 10 and installs it on the USB drive.

Installation in progress


Clean install Windows:
- Insert the USB in your system and restart it.
- While the computer is restarting, press and hold the ESC button to enter the BIOS settings.
Note: Different computers have different buttons to enter BIOS settings e.g, ESC, F2, F12 or Delete Key. - In the Bios, set the USB key as the first boot priority and restart your system.
- Boot from the installation media to start the installation process.
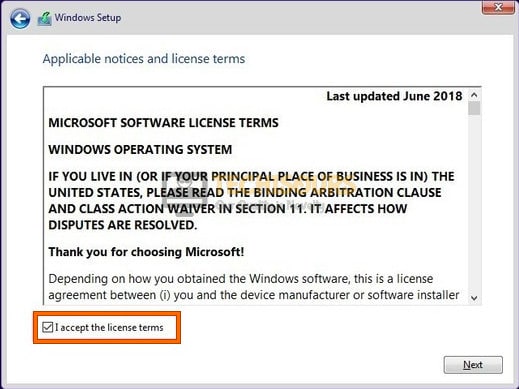
- Now click on “Install now” and type the authorized product key.

Type the authorized product key - Click on “Accept the license term ” checkbox and choose “Next”. Accept the license terms.

Accept the license agreement - Now select the partitions that were previously created and delete them to reallocate the available memory space.

Delete partitions - Now follow the onscreen instructions to clean install Windows 10 on your computer.


If you are still unable to fix this issue, you can contact us for any further assistance.

Alan is a hardcore tech enthusiast that lives and breathes tech. When he is not indulged in playing the latest video games, he helps users with technical problems that they might run into. Alan is a Computer Science Graduate with a Masters in Data Science.

Содержание
- Как исправить: Wolfenstein 2 не может писать аварийный дамп
Ошибка «Wolfenstein 2 не может писать аварийный дамп”Происходит, когда игра вылетает из-за, в основном, проблем с графикой и отображает сообщение об ошибке на компьютере. Эта ошибка обычно возникает из-за неправильной конфигурации графики на вашем компьютере или устаревания графических драйверов.

Есть несколько способов исправить это сообщение об ошибке, начиная с проверки графических драйверов на вашем компьютере и заканчивая изменением настроек в игре. Мы рассмотрим каждый из них, начиная с самого простого. Прежде чем приступить к решению, убедитесь, что у вас есть учетная запись администратора.
- Wolfenstein 2 не может записать аварийный дамп AMD: Эта ситуация относится к сценарию, когда ваша видеокарта AMD и игра вылетает каждый раз, когда вы ее запускаете.
- Wolfenstein 2 не может записать аварийный дамп NVIDIA: Подобно сообщению об ошибке, это состояние возникает, когда графическая карта, установленная в NVIDIA, отказывается запускаться и дает сбой.
Решение 1. Обновите игру и клиент
Прежде чем мы перейдем к более утомительным и длительным решениям, вы должны сначала убедиться, что игра и игровой клиент обновлены до последней сборки. Время от времени разработчики Wolfenstein выпускают патчи для исправления ошибок или введения новых функций в игру.

Если у вас есть клиент Steam, вы должны убедиться, что игра обновляется оттуда, или, если вы используете автономный игровой клиент, перейдите на веб-сайт Wolfenstein и загрузите последний патч.
Решение 2. Изменение настроек совместимости
Каждое компьютерное приложение имеет параметры совместимости, которые определяют, как приложение будет работать, и какие параметры совместимости будут управлять основным запуском приложения. Мы можем попробовать изменить некоторые настройки совместимости игры в папке Steam и посмотреть, решит ли это проблему. Вы всегда можете отменить изменения, если это не сработает.
- Перейдите к Каталог установки Steam. Оттуда найдите исполняемый файл игры. Путь к файлу может отличаться в зависимости от 32- или 64-битного типа приложения.
Например, путь к файлу может быть таким:
D: Steam steamapps common wolfenstein 2 игра bin win64
- Оказавшись в папке, щелкните правой кнопкой мыши исполняемый файл игры и выберите Свойства.
- В свойствах перейдите к вкладка совместимости и нажмите на Измените настройки высокого разрешения. Проверьте опция Переопределить поведение масштабирования с высоким разрешением DPI. Выбрать заявка из раскрывающегося меню.

- Нажмите ОК, чтобы сохранить изменения и выйти. Перезагрузите компьютер и попробуйте снова запустить игру.
Вы можете сделать то же самое с клиентом Steam или с отдельной версией игры.
Решение 3. Отключение асинхронного вычисления
Еще одна вещь, которую можно попробовать, если вышеуказанные решения не работают, — это отключить асинхронные вычисления в игре или на вашем компьютере. В Асинхронные вычисления улучшает вывод графики игры на вашем компьютере. Однако в некоторых случаях, подобных этому, это вызывает проблемы и заставляет игру не запускаться.
Вы можете отключить эту функцию на своей видеокарте или, если вы можете войти в игру, вы можете отключить ее оттуда. После отключения полностью перезагрузите компьютер и попробуйте запустить Wolfenstein 2.
Решение 4. Удаление файла «config»
У каждой игры есть файл конфигурации, сохраненный локально на вашем компьютере. Настройки игры хранятся в этом файле конфигурации, поэтому всякий раз, когда вы запускаете игру, приложение извлекает настройки отсюда, а затем загружает свои модули.
Возможно, файл конфигурации поврежден, и вы даже не можете запустить игру. Если мы удалим файл конфигурации, игра обнаружит, что его нет, а затем создаст новый со значениями по умолчанию.
- Перейдите в следующий каталог:
C: Users Имя пользователя Сохраненные игры MachineGames Wolfenstein II The New Colossus base Wolfenstein II The New ColossusConfig.local
- Удалить или вырезать и вставить файл конфигурации в другое место. Теперь полностью перезагрузите компьютер и попробуйте запустить Wolfenstein.

Если у вас i7 или i5, вы также можете попробовать отключить igpu перед запуском игры.
Решение 5.Проверьте драйверы видеокарты
Если все вышеперечисленные методы не помогли, вы можете попробовать обновить драйверы видеокарты до последней версии. Это может быть основной причиной того, что ваша игра дает сбой, потому что у нее нет доступа к последним и обновленным графическим драйверам. Мы воспользуемся утилитой DDU, чтобы полностью удалить остатки с вашего компьютера.
- Загрузите и установите DDU (программа удаления драйверов дисплея) с официального сайта.
- После установки Программа удаления драйвера дисплея (DDU), запустите свой компьютер в безопасный режим. Вы можете ознакомиться с нашей статьей о том, как загрузить компьютер в безопасном режиме.
- После запуска DDU выберите первую опцию «Очистите и перезапустите». После этого приложение автоматически удалит установленные драйверы и перезагрузит компьютер соответственно.

- Теперь после удаления загрузите компьютер в обычном режиме без безопасного режима. Нажмите Windows + R, введите «devmgmt.msc»В диалоговом окне и нажмите Enter. Щелкните правой кнопкой мыши любое пустое место и выберите «Искать изменения оборудования». Будут установлены драйверы по умолчанию. Попробуйте запустить игру и проверьте, решает ли это проблему.
- Если драйверы по умолчанию вам не подходят, вы можете обновить их до последней сборки. Есть два способа пройти через это; обновите драйверы автоматически или вручную. Вы можете сначала попробовать автоматически, а если это не сработает, вы можете перейти к ручному методу.
При использовании ручного метода вам необходимо загрузить драйверы с веб-сайта производителя и установить драйверы оттуда.

- После установки драйверов перезагрузите компьютер и проверьте, решена ли проблема.