Итак, как видно из названия, рассмотрим проблемы с vCenter Converter при конвертировании физических Windows серверов. Очень часто сталкиваюсь с проблемами виртуализации серверов 2008 и 2008 R2, на 2012 не сталкивался и пока везло и вопросы с виртуализацией 2003-го динозавра тоже не появлялись. Как правило симптомы и их причины достаточно одинаковы от случая к случаю и в комьюнити широко известны, да и блоги не молчат. Итак, вот список часто встречающихся проблем, по крайней мере мне.
При установки vCenter Converter Agent на виртуализируемую Windows машину возникает длительное ожидание процесса установки а в конце победоносно прилетает ошибка — ERROR 1053 “ The service did not respond to the start or control request in a timely fashion ”. Данная проблема известна VMware как ни странно это из-за отсутствия доступа в интернет с машины, на которой устанавливается служба конвертера, это кстати относится как к машине, на которой разворачивается консоль vCenter Converter, так и виртуализируемой машину, на которуя в процессе ставиться vCenter Converter Agent. Смотрим цитату из Release Notes. Собственно, в ней же и решение. Запустив regedit в CMD и создать параметр реестра (DWORD) по пути HKEY_LOCAL_MACHINE\System\CurrentControlSet\Control с именем ServicesPipeTimeout и деситичным (decemical) значением не ниже 300000 (5 minutes), после этого перезагрузить машину для применения изменений. После этих манипуляций проблема решается.
Проблема, появляющаяся так же, как и предыдущая при инсталляции агента конвертации на виртуализируемую Windows машину. «Error 1603: A fatal error occurred during installation» преследует нас по причине слишком долгого ожидания старта службы vCenter Converter Agent после ее установки. Решение то же самое, что и для предыдущей проблемы.
При конфигурировании задачи конвертации (Job), в самом начале, после того как мы заполнили данные логин и пароля source машины и нажали Next, нам вываливается “Permission to perform this operation was denied”, и даже после того как мы запустим конфертер от имени администратора, данная проблема не уходит. Досконально в чем причина сказать не могу, но есть решение, которое мне помогло. Итак, логинимся на конвертируемый Windows сервер, заходим в Local Security Policy (открывая в cmd secpol.msc), идем в Local Policies > Security Options, пункт «User Access Control: Run all Administrators in Admin Approval Mode» переводим в Disable, перезагружаем машину. И после этого у Вас должно все получиться.
Когда мы уже запустили наш Job по конвертации Windows машины и радостные пошли пить кофе, на 1% прогресса появляется «A file I/O error occurred while accesssing» и задача останавливается. Странная проблема, в комьюнити грешат на некорректную насройку DNS на конвертируемой машине, в следствии чего машина по имени не могла достучаться до ESXi, но в моем случае с DNS было все в порядке. Мне помог запуск Job через включение галочки PROXY при настройке подключения в vCenter, этот же метод помог и нескольким другим людям.
На всякий случай приложу список необходимых портов для работы vCenter Converter:
Windows P2V
| Communication Paths | Communication Ports | Notes |
| Converter Standalone server to powered on source machine | TCP — 445, 139, 9089 UDP — 137, 138 | If the source computer uses NetBIOS, port 445 is not required. If NetBIOS is not being used, ports 137, 138, and 139 are not required. When in doubt, make sure that none of the ports are blocked. Note: Unless you have installed Converter Standalone server or agent on the source computer, the account used for authentication to the source computer must have a password, the source computer must have network file sharing enabled, and it cannot be using Simple File Sharing. |
| Converter Standalone server to vCenter Server | TCP — 443 | Required only if the conversion destination is vCenter Server. |
| Converter Standalone client to vCenter Server | TCP — 443 | Required only if the Converter Standalone server and client components are on different machines. |
| Converter Standalone server to the destination ESXi | TCP — 902 | Converter server always requires access to ESXi at port 902. |
| Powered on source machine to ESXi | TCP — 443, 902 | If the conversion destination is vCenter Server, only port 902 is required. If the proxy mode feature is on, port 902 is not required. |
Linux P2V
| Communication Paths | TCP Ports | Notes |
| Converter Standalone server to powered on source machine | 22 | Used to establish an SSH connection between the Converter Standalone server and the source machine. |
| Converter Standalone client to Converter Standalone server | 443 | Required only if the Converter Standalone server and client components are on different machines. |
| Converter Standalone server to vCenter Server | 443 | Required only if the conversion destination is a vCenter Server. |
| Converter Standalone server to ESXi | 443, 902 | If the conversion destination is a vCenter Server, only port 902 is required. |
| Converter Standalone server to helper virtual machine | 443 | |
| Helper virtual machine to powered on source machine | 22 | Used to establish an SSH connection between the helper virtual machine and the source machine. By default, the IP address of the helper virtual machine is assigned by DHCP. If no DHCP server is available on the destination network, you must manually assign the helper virtual machine an IP address. |
If you are using VMware vCenter converter standalone tool version 6.2.x for P2V / V2V to migrate the obsolete windows Server 2000 to 2008 SP1 / SP2, 2008 R2 or later then may face very common errors : Unable to complete converter agent installation error code 1603 or similar errors as shown below:
vCenter Converter Standalone Tool common error list and solution is here.
vCenter Tool – Common Issues
1. The VMware vCenter Converter Standalone Agent service failed to start due to the following error: The service did not respond to the start or control request in a timely fashion. Unable to complete converter agent installation error code 1603.
2. Error 1053: “The service did not respond in a timely fashion” when attempting to start, stop or pause a service
3. A timeout was reached (30000 milliseconds) while waiting for the VMware vCenter Converter Standalone Agent service to connect.
4. A service does not start, and events 7000 and 7011 are logged in the Windows event log.
5. Event ID 7009 can be get in Windows event viewer with content “A timeout was reached (30000 milliseconds) while waiting for the VMware vCenter Converter Standalone Worker service to connect”.
6. Error 7000: The failed to start due to the following error: The service did not respond to the start or control request in a timely fashion.
7. This issue occurs because Service Control Manager generates an event if a service does not respond within the defined timeout period (the default timeout period is 30000 milliseconds).
8. A VMware product fails to install with the error 1603 (1009167)
9. vCenter Converter 6.2 failed to install on Windows Server 2008 R2 or later (64993)
10. VMware vcenter converter standalone server service not starting 1053
11. Error 1603: A fatal error occurred during installation
12. When install vCenter Converter standalone 6.x, the installation finished with pop window “Could not start service“.
13. vCenter Converter Agent, vCenter Converter Server or vCenter Converter Worker service cannot turn to “Running” in Windows Service Manager.
14. VMware vcenter converter standalone agent service failed to start
15. The VMware vCenter Converter Standalone Agent service failed to start due to the following error.
I know you have frustrated from above VMware vCenter converter tool 6.2.x errors but don’t worry i have the Best Solution here for all above vCenter converter tool errors list.
Best Solution of Above Error List
The Service Control Manager will generate an event if a service does not respond within the defined timeout period (the default timeout period is 30000 milliseconds). To resolve the error: Unable to complete converter agent installation error code 1603, just use the Registry Editor to change the default timeout value for all services to follow the following steps:
Increase the service timeout period
To perform this procedure, you must have membership in Administrators, or user must be member of Administrator group.
Warning: Incorrectly editing the registry may severely damage your system. Before making changes to the registry, you should back up any valued data.
To change the service timeout period:
Step 1: Click the Start button, then click Run, type regedit, and click OK.
Step 2: In the Registry Editor, click the registry subkey HKEY_LOCAL_MACHINE\SYSTEM\CurrentControlSet\Control
Step 3: Select Control Folder, look at right-hand the ServicesPipeTimeout entry, right-click that entry and then select Modify.
Note: If the ServicesPipeTimeout entry does not exist, you must create it by selecting New on the Edit menu, followed by the DWORD Value 32 bit, then typing ServicesPipeTimeout, and clicking Enter.
Step 4: Modify the ServicePipeTimeout value,
Click Decimal, enter the new timeout value = 180000 OR 300000 ( In Milliseconds ) and then click OK.
Note : If 180,000 milliseconds is not sufficient then you can increase it as per your requirement.
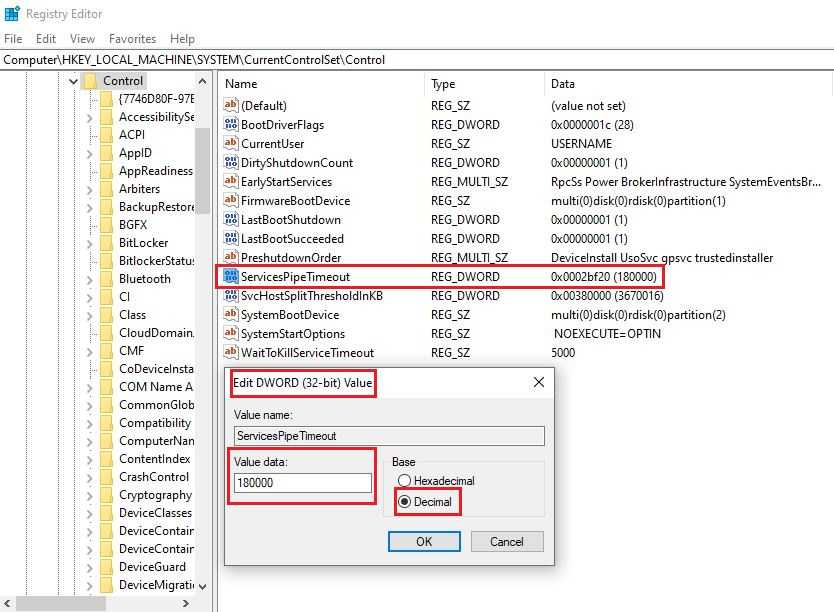
Step 5: Restart the computer to save the registry changes.
This above method 100% works in most of the cases but if doesn’t work then follow the below Alternative solutions.
Read Also: Cross Hypervisor Migration To-from Nutanix AHV
Alternative Solutions
If above BEST SOLUTION doesn’t work for you then you need to cross-check following things:
Check Compatibility Matrix
VMware Converter Standalone 6.2.x supported Guest OS Compatibility list:
- Windows Vista SP2 (32-bit and 64-bit)
- Windows Server 2008 SP2 (32-bit and 64-bit)
- Windows 7 (32-bit and 64-bit)
- Windows Server 2008 R2 (64-bit)
- Windows 8 (32-bit and 64-bit)
- Windows Server 2012 (64-bit)
- Windows 8.1 (32-bit and 64-bit)
- Windows Server 2012 R2 (64-bit)
- Windows 10 (32-bit and 64-bit)
- Windows Server 2016 (64-bit)
- CentOS 6.x (32-bit and 64-bit)
- CentOS 7.0, 7.1, 7.2, 7.3, 7.4, 7.5 (64-bit)
- Red Hat Enterprise Linux 4.x (32-bit and 64-bit)
- Red Hat Enterprise Linux 5.x (32-bit and 64-bit)
- Red Hat Enterprise Linux 6.x (32-bit and 64-bit)
- Red Hat Enterprise Linux 7.0, 7.1, 7.2, 7.3, 7.4, 7.5 (64-bit)
- SUSE Linux Enterprise Server 10.x (32-bit and 64-bit)
- SUSE Linux Enterprise Server 11.x (32-bit and 64-bit)
- Ubuntu 12.04 LTS (32-bit and 64-bit)
- Ubuntu 14.04 LTS (32-bit and 64-bit)
- Ubuntu 16.04 LTS (32-bit and 64-bit)
Read also: Change VMware ESXi Hypervisor Hostname in Nutanix Hyper HCI Cluster
Check VMware vCenter Tool Platform
you can install VMware Converter Standalone tool version 6.2.x on the following Windows OS platforms:
- Windows Vista SP2 (32-bit and 64-bit)
- Windows Server 2008 SP2 (32-bit and 64-bit)
- Windows 7 (32-bit and 64-bit)
- Windows Server 2008 R2 (64-bit)
- Windows 8 (32-bit and 64-bit)
- Windows Server 2012 (64-bit)
- Windows 8.1 (32-bit and 64-bit)
- Windows Server 2012 R2 (64-bit)
- Windows 10 (32-bit and 64-bit)
- Windows Server 2016 (64-bit)
Read also: Nutanix In-Place Hypervisor Conversion | ESXi – AHV
Check vCenter Tool Firewall Port List
Required network ports must be open on external firewall between source machine and vCenter Converter standalone tool during the conversion of powered on source machines running Windows / Linux.
Network Ports required during Windows P2V
| Communication Paths | Communication Ports | Notes |
|---|---|---|
| Converter Standalone server to powered on source machine | TCP – 445, 139, 9089UDP – 137, 138 | If the source computer uses NetBIOS, port 445 is not required. If NetBIOS is not being used, ports 137, 138, and 139 are not required. When in doubt, make sure that none of the ports are blocked.Note:Unless you have installed Converter Standalone server or agent on the source computer, the account used for authentication to the source computer must have a password, the source computer must have network file sharing enabled, and it cannot be using Simple File Sharing. |
| Converter Standalone server to vCenter Server | TCP – 443 | Required only if the conversion destination is vCenter Server. |
| Converter Standalone client to vCenter Server | TCP – 443 | Required only if the Converter Standalone server and client components are on different machines. |
| Converter Standalone server to the destination ESXi | TCP – 902 | Converter server always requires access to ESXi at port 902. |
| Powered on source machine to ESXi | TCP – 443, 902 | If the conversion destination is vCenter Server, only port 902 is required.If the proxy mode feature is on, port 902 is not required. |
Read also: Nutanix Infra Default Credentials
Network Ports Required During Linux P2V
| Communication Paths | TCP Ports | Notes |
|---|---|---|
| Converter Standalone server to powered on source machine | 22 | Used to establish an SSH connection between the Converter Standalone server and the source machine. |
| Converter Standalone client to Converter Standalone server | 443 | Required only if the Converter Standalone server and client components are on different machines. |
| Converter Standalone server to vCenter Server | 443 | Required only if the conversion destination is a vCenter Server. |
| Converter Standalone server to ESXi | 443, 902 | If the conversion destination is a vCenter Server, only port 902 is required. |
| Converter Standalone server to helper virtual machine | 443 | |
| Helper virtual machine to powered on source machine | 22 | Used to establish an SSH connection between the helper virtual machine and the source machine. By default, the IP address of the helper virtual machine is assigned by DHCP. If no DHCP server is available on the destination network, you must manually assign the helper virtual machine an IP address. |
Read also: Nutanix Move Migration Guide ?
Network Ports Required During V2V
| Communication Paths | Communication Ports | Notes |
|---|---|---|
| Converter Standalone server to Fileshare path | TCP – 445, 139UPD – 137, 138 | Required only for standalone virtual machine sources or destinations. If the computer hosting the source or destination path uses NetBIOS, port 445 is not required. If NetBIOS is not being used, ports 137, 138, and 139 are not required. When in doubt, make sure that none of the ports are blocked. |
| Converter Standalone client to Converter Standalone server | TCP – 443 | Required only if the Converter Standalone server and client components are on different machines. |
| Converter Standalone server to vCenter Server | TCP – 443 | Required only if the conversion destination is a vCenter Server. |
| Converter Standalone server to ESXi | TCP – 443, 902 | If the conversion destination is a vCenter Server, only port 902 is required. |
Read also: VMware Esxi 6.5 U1 High CPU Consumption issue
VMware Prerequisites for Converting a Powered On Windows Machine
VMware Prerequisites for P2V / V2V migration for Windows OS, Before you continue with the conversion, you must prepare the source Windows machine.
1. Make sure that the Converter Standalone server machine has network access to the Windows source machine.
2. Turn off firewall applications and Defender Antivirus running on the source machine.
3. Disable simple file sharing on the source Windows
machine.
4. Stop or disable anti-virus software running on the source
machine.
5. Turn off User Account Control (UAC) or use local administrator account on the source machine.
6. If you are logged in as a member of the local Administrators group, you must disable the User Account Control: You must reboot for the changes to take effect.
7. Remove any Pen drive or removal disk from Physical machine.
8. You must have the Windows / Linux – local administrator / root account credential.
9. Check Windows update should not pending to install in Windows OS
10 ( Optional ). Check HDD / SSD Disk bad sector before migration if you have any doubt on disk performance or data corruption event.
Note: The Security
Options folder is located in Computer Configuration/Windows
Settings/Security Settings/Local Policies.
Ensure that Windows Firewall Does Not Block File and
Printer Sharing
If Converter Standalone fails to connect to a remote Windows machine and issues a bad username/ password error message, ensure that file and printer sharing is not blocked by Windows Firewall.
Procedure
1 Select Start > Settings > Control Panel > Administrative Tools > Local Security Policy.
2 In the Security Settings list on the left, select Local Policies > Security Options.
3 In the policies list on the right, select Network access: Sharing and Security model for local accounts.
4 Verify that Classic – local users authenticate as themselves is selected.
More info visit VMware vCenter converter tool 6.2.x document.
Conclusion
Hopefully you have got the solution of Unable to complete converter agent installation error code 1603, Error 1053: “The service did not respond in a timely fashion” when attempting to start, stop or pause a service, The service did not respond to the start or control request in a timely fashion, installation finished with pop window “Could not start service”, vmware vcenter converter standalone agent service failed to start, vmware vcenter converter standalone server service not starting 1053 etc. issues.
Thanks to being with HyperHCI Tech Blog to stay tuned with latest and trending technology.!
This tutorial describes How to fix VMware vCenter Converter Standalone errors An error occurred while opening a virtual disk. Verify that the converter server and the running source machines have a network access to the source destination ESX/Esxi hosts and converter.fault.FileIOFault.

Our company brought a brand new VM servers and we have so many physical servers running in Linux & Windows and the virtualization task is assigned to me.
My server details:-
Physical Server:-
System Manufacturer: IBM
System Model: IBM eServer x3400
BIOS: Phoenix ServerBIOS 3 Release 6.1.U
Processor: Intel(R) Xeon(R) CPU E5405 @ 2.00GHz (8 CPUs), ~2.0GHz
Memory: 16382MB RAM
RAID: 10
OS: Windows server (Windows Server® 2008 R2)
Virtual Server:-
Dell R630, RAID 10
Let me move onto my scenario. I had installed VMware VCenter Converter standalone into my IBM Windows server. I open up the converter software and start up converting the job. I have passed all the stage except the last stage. I got an error «An error occurred while opening a virtual disk. Verify that the converter server and the running source machines have a network access to the source destination ESX/Esxi hosts» I do a ping and telnet to ensure the connectivity between source machine and Destination Vcenter machine. There is no issue between source and destination ends but my ESXi hostname is not resolved. So, I’ve added VM Servers host entry on the windows server.
Error:-
An error occurred while opening a virtual disk. Verify that the converter server and the running source machines have a network access to the source destination ESX/Esxi hosts
Resolution:-
You must point the VCenter and ESXi IP address and hostname on the windows machine and converter server.
How to add the host entry in Windows
Click start > All Programs > Accessories> Notepad.
Click File > Open. In the filename field type this path :- «C:\Windows\System32\drivers\etc\hosts»
Click Open.
Point your ESXi and Vcenter hostname with IP address
Example
192.168.2.200 Vcenter.domain
192.168.2.201 ESX-01.domain
Make the necessary changes to the file.
Click File > Save to save your changes.
I have successfully fix the error:- An error occurred while opening a virtual disk. Verify that the converter server and the running source machines have a network access to the source destination ESX/Esxi hosts. Again i start up the P2V conversion process i got an second error while converting the physical box. This time error is Failed: An error occurred during the conversion:’converter.fault.FileIOFault’. I tried 2-3 attempts but still the conversion process is failed and i realized there is something wrong. Finally i got a fix for this error «An error occurred while opening a virtual disk. Verify that the converter server and the running source machines have a network access to the source destination ESX/Esxi hosts»
Error:- converter.fault.FileIOFault

Resolution:-
Go habit always take a backup copy before editing anything.
Take a backup of the converter-worker.xml file. By default, this file is located at:
To disable SSL encryption:
Windows 7/Server 2008 and Later – C:\ProgramData\VMware\VMware vCenter Converter Standalone
Window Vista, XP and 2003, 2008 Server — %ALLUSERSPROFILE%\VMware\VMware vCenter Converter Standalone
In older Windows versions – %ALLUSERSPROFILE%\Application Data\VMware\VMware vCenter Converter Standalone
Open the converter-worker.xml file using a text editor(Notepad).
Locate the tag pair <useSsl></useSsl>. It is located inside the <nfc> tag and has a value of true.
Change the value to false.
Save and close the file.
Before (converter-worker.xml):-
<nfc>
<readTimeoutMs>120000</readTimeoutMs>
<useSsl>true</useSsl>
<useOptimizeLazyZero>true</useOptimizeLazyZero>
<!— Delay is specified in milliseconds, -1 denotes the default.
<acceptTimeoutMs>-1</acceptTimeoutMs>
<requestTimeoutMs>-1</requestTimeoutMs>
<readTimeoutMs>-1</readTimeoutMs>
<writeTimeoutMs>-1</writeTimeoutMs>
<fssrvrReqTimeoutMs>-1</fssrvrReqTimeoutMs>
<fssrvrWriteTimeoutMs>-1</fssrvrWriteTimeoutMs>
<maxRecvRetries>-1</maxRecvRetries>
—>
</nfc>
Before (converter-worker.xml):-
<nfc>
<readTimeoutMs>120000</readTimeoutMs>
<useSsl>false</useSsl>
<useOptimizeLazyZero>true</useOptimizeLazyZero>
<!— Delay is specified in milliseconds, -1 denotes the default.
<acceptTimeoutMs>-1</acceptTimeoutMs>
<requestTimeoutMs>-1</requestTimeoutMs>
<readTimeoutMs>-1</readTimeoutMs>
<writeTimeoutMs>-1</writeTimeoutMs>
<fssrvrReqTimeoutMs>-1</fssrvrReqTimeoutMs>
<fssrvrWriteTimeoutMs>-1</fssrvrWriteTimeoutMs>
<maxRecvRetries>-1</maxRecvRetries>
—>
</nfc>
Restart the VMware vCenter Converter Standalone Worker service on the machine.
Lots of failure conversion. I have been successfully converted my Windows server (Windows Server® 2008 R2)

I hope this information is useful for you. Please forgive any typos or incomplete sentences.
Share:
If you are using VMware vCenter converter standalone tool version 6.2.x for P2V / V2V to migrate the obsolete windows Server 2000 to 2008 SP1 / SP2, 2008 R2 or later then may face very common errors : Unable to complete converter agent installation error code 1603 or similar errors as shown below:
vCenter Converter Standalone Tool common error list and solution is here.
vCenter Tool – Common Issues
1. The VMware vCenter Converter Standalone Agent service failed to start due to the following error: The service did not respond to the start or control request in a timely fashion. Unable to complete converter agent installation error code 1603.
2. Error 1053: “The service did not respond in a timely fashion” when attempting to start, stop or pause a service
3. A timeout was reached (30000 milliseconds) while waiting for the VMware vCenter Converter Standalone Agent service to connect.
4. A service does not start, and events 7000 and 7011 are logged in the Windows event log.
5. Event ID 7009 can be get in Windows event viewer with content “A timeout was reached (30000 milliseconds) while waiting for the VMware vCenter Converter Standalone Worker service to connect”.
6. Error 7000: The failed to start due to the following error: The service did not respond to the start or control request in a timely fashion.
7. This issue occurs because Service Control Manager generates an event if a service does not respond within the defined timeout period (the default timeout period is 30000 milliseconds).
8. A VMware product fails to install with the error 1603 (1009167)
9. vCenter Converter 6.2 failed to install on Windows Server 2008 R2 or later (64993)
10. VMware vcenter converter standalone server service not starting 1053
11. Error 1603: A fatal error occurred during installation
12. When install vCenter Converter standalone 6.x, the installation finished with pop window “Could not start service“.
13. vCenter Converter Agent, vCenter Converter Server or vCenter Converter Worker service cannot turn to “Running” in Windows Service Manager.
14. VMware vcenter converter standalone agent service failed to start
15. The VMware vCenter Converter Standalone Agent service failed to start due to the following error.
I know you have frustrated from above VMware vCenter converter tool 6.2.x errors but don’t worry i have the Best Solution here for all above vCenter converter tool errors list.
Best Solution of Above Error List
The Service Control Manager will generate an event if a service does not respond within the defined timeout period (the default timeout period is 30000 milliseconds). To resolve the error: Unable to complete converter agent installation error code 1603, just use the Registry Editor to change the default timeout value for all services to follow the following steps:
Increase the service timeout period
To perform this procedure, you must have membership in Administrators, or user must be member of Administrator group.
Warning: Incorrectly editing the registry may severely damage your system. Before making changes to the registry, you should back up any valued data.
To change the service timeout period:
Step 1: Click the Start button, then click Run, type regedit, and click OK.
Step 2: In the Registry Editor, click the registry subkey HKEY_LOCAL_MACHINESYSTEMCurrentControlSetControl
Step 3: Select Control Folder, look at right-hand the ServicesPipeTimeout entry, right-click that entry and then select Modify.
Note: If the ServicesPipeTimeout entry does not exist, you must create it by selecting New on the Edit menu, followed by the DWORD Value 32 bit, then typing ServicesPipeTimeout, and clicking Enter.
Step 4: Modify the ServicePipeTimeout value,
Click Decimal, enter the new timeout value = 180000 OR 300000 ( In Milliseconds ) and then click OK.
Note : If 180,000 milliseconds is not sufficient then you can increase it as per your requirement.

Step 5: Restart the computer to save the registry changes.
This above method 100% works in most of the cases but if doesn’t work then follow the below Alternative solutions.
Read Also: Cross Hypervisor Migration To-from Nutanix AHV
Alternative Solutions
If above BEST SOLUTION doesn’t work for you then you need to cross-check following things:
Check Compatibility Matrix
VMware Converter Standalone 6.2.x supported Guest OS Compatibility list:
- Windows Vista SP2 (32-bit and 64-bit)
- Windows Server 2008 SP2 (32-bit and 64-bit)
- Windows 7 (32-bit and 64-bit)
- Windows Server 2008 R2 (64-bit)
- Windows 8 (32-bit and 64-bit)
- Windows Server 2012 (64-bit)
- Windows 8.1 (32-bit and 64-bit)
- Windows Server 2012 R2 (64-bit)
- Windows 10 (32-bit and 64-bit)
- Windows Server 2016 (64-bit)
- CentOS 6.x (32-bit and 64-bit)
- CentOS 7.0, 7.1, 7.2, 7.3, 7.4, 7.5 (64-bit)
- Red Hat Enterprise Linux 4.x (32-bit and 64-bit)
- Red Hat Enterprise Linux 5.x (32-bit and 64-bit)
- Red Hat Enterprise Linux 6.x (32-bit and 64-bit)
- Red Hat Enterprise Linux 7.0, 7.1, 7.2, 7.3, 7.4, 7.5 (64-bit)
- SUSE Linux Enterprise Server 10.x (32-bit and 64-bit)
- SUSE Linux Enterprise Server 11.x (32-bit and 64-bit)
- Ubuntu 12.04 LTS (32-bit and 64-bit)
- Ubuntu 14.04 LTS (32-bit and 64-bit)
- Ubuntu 16.04 LTS (32-bit and 64-bit)
Read also: Change VMware ESXi Hypervisor Hostname in Nutanix Hyper HCI Cluster
Check VMware vCenter Tool Platform
you can install VMware Converter Standalone tool version 6.2.x on the following Windows OS platforms:
- Windows Vista SP2 (32-bit and 64-bit)
- Windows Server 2008 SP2 (32-bit and 64-bit)
- Windows 7 (32-bit and 64-bit)
- Windows Server 2008 R2 (64-bit)
- Windows 8 (32-bit and 64-bit)
- Windows Server 2012 (64-bit)
- Windows 8.1 (32-bit and 64-bit)
- Windows Server 2012 R2 (64-bit)
- Windows 10 (32-bit and 64-bit)
- Windows Server 2016 (64-bit)
Read also: Nutanix In-Place Hypervisor Conversion | ESXi – AHV
Check vCenter Tool Firewall Port List
Required network ports must be open on external firewall between source machine and vCenter Converter standalone tool during the conversion of powered on source machines running Windows / Linux.
Network Ports required during Windows P2V
| Communication Paths | Communication Ports | Notes |
|---|---|---|
| Converter Standalone server to powered on source machine | TCP – 445, 139, 9089UDP – 137, 138 | If the source computer uses NetBIOS, port 445 is not required. If NetBIOS is not being used, ports 137, 138, and 139 are not required. When in doubt, make sure that none of the ports are blocked.Note:Unless you have installed Converter Standalone server or agent on the source computer, the account used for authentication to the source computer must have a password, the source computer must have network file sharing enabled, and it cannot be using Simple File Sharing. |
| Converter Standalone server to vCenter Server | TCP – 443 | Required only if the conversion destination is vCenter Server. |
| Converter Standalone client to vCenter Server | TCP – 443 | Required only if the Converter Standalone server and client components are on different machines. |
| Converter Standalone server to the destination ESXi | TCP – 902 | Converter server always requires access to ESXi at port 902. |
| Powered on source machine to ESXi | TCP – 443, 902 | If the conversion destination is vCenter Server, only port 902 is required.If the proxy mode feature is on, port 902 is not required. |
Read also: Nutanix Infra Default Credentials
Network Ports Required During Linux P2V
| Communication Paths | TCP Ports | Notes |
|---|---|---|
| Converter Standalone server to powered on source machine | 22 | Used to establish an SSH connection between the Converter Standalone server and the source machine. |
| Converter Standalone client to Converter Standalone server | 443 | Required only if the Converter Standalone server and client components are on different machines. |
| Converter Standalone server to vCenter Server | 443 | Required only if the conversion destination is a vCenter Server. |
| Converter Standalone server to ESXi | 443, 902 | If the conversion destination is a vCenter Server, only port 902 is required. |
| Converter Standalone server to helper virtual machine | 443 | |
| Helper virtual machine to powered on source machine | 22 | Used to establish an SSH connection between the helper virtual machine and the source machine. By default, the IP address of the helper virtual machine is assigned by DHCP. If no DHCP server is available on the destination network, you must manually assign the helper virtual machine an IP address. |
Read also: Nutanix Move Migration Guide ?
Network Ports Required During V2V
| Communication Paths | Communication Ports | Notes |
|---|---|---|
| Converter Standalone server to Fileshare path | TCP – 445, 139UPD – 137, 138 | Required only for standalone virtual machine sources or destinations. If the computer hosting the source or destination path uses NetBIOS, port 445 is not required. If NetBIOS is not being used, ports 137, 138, and 139 are not required. When in doubt, make sure that none of the ports are blocked. |
| Converter Standalone client to Converter Standalone server | TCP – 443 | Required only if the Converter Standalone server and client components are on different machines. |
| Converter Standalone server to vCenter Server | TCP – 443 | Required only if the conversion destination is a vCenter Server. |
| Converter Standalone server to ESXi | TCP – 443, 902 | If the conversion destination is a vCenter Server, only port 902 is required. |
Read also: VMware Esxi 6.5 U1 High CPU Consumption issue
VMware Prerequisites for Converting a Powered On Windows Machine
VMware Prerequisites for P2V / V2V migration for Windows OS, Before you continue with the conversion, you must prepare the source Windows machine.
1. Make sure that the Converter Standalone server machine has network access to the Windows source machine.
2. Turn off firewall applications and Defender Antivirus running on the source machine.
3. Disable simple file sharing on the source Windows
machine.
4. Stop or disable anti-virus software running on the source
machine.
5. Turn off User Account Control (UAC) or use local administrator account on the source machine.
6. If you are logged in as a member of the local Administrators group, you must disable the User Account Control: You must reboot for the changes to take effect.
7. Remove any Pen drive or removal disk from Physical machine.
8. You must have the Windows / Linux – local administrator / root account credential.
9. Check Windows update should not pending to install in Windows OS
10 ( Optional ). Check HDD / SSD Disk bad sector before migration if you have any doubt on disk performance or data corruption event.
Note: The Security
Options folder is located in Computer Configuration/Windows
Settings/Security Settings/Local Policies.
Ensure that Windows Firewall Does Not Block File and
Printer Sharing
If Converter Standalone fails to connect to a remote Windows machine and issues a bad username/ password error message, ensure that file and printer sharing is not blocked by Windows Firewall.
Procedure
1 Select Start > Settings > Control Panel > Administrative Tools > Local Security Policy.
2 In the Security Settings list on the left, select Local Policies > Security Options.
3 In the policies list on the right, select Network access: Sharing and Security model for local accounts.
4 Verify that Classic – local users authenticate as themselves is selected.
More info visit VMware vCenter converter tool 6.2.x document.
Conclusion
Hopefully you have got the solution of Unable to complete converter agent installation error code 1603, Error 1053: “The service did not respond in a timely fashion” when attempting to start, stop or pause a service, The service did not respond to the start or control request in a timely fashion, installation finished with pop window “Could not start service”, vmware vcenter converter standalone agent service failed to start, vmware vcenter converter standalone server service not starting 1053 etc. issues.
Thanks to being with HyperHCI Tech Blog to stay tuned with latest and trending technology.!
When doing a p2v I always use the standalone version of the Converter software. It proved to be more stable than the vCenter Converter plugin.
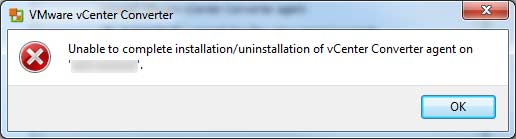
While trying to p2v a server onto our vSphere platform I was presented with the following error by the VMware vCenter Converter Standalone client: “Unable to complete vCenter Converter agent installation on <SERVERNAME>. Error code: 1603.”

While checking the event log of the server in question, I noticed a perfect error description (Error 1714). There was an older version of the converter agent installed on the server and it refused to be uninstalled:

I checked the uninstall string and tried a manual uninstall, but of course that failed too.


The installation MSI wasn’t available on the server anymore.

This is a problem many of us will have faced. Quite annoying. In this case, however, the software is still available for download on the VMware website (Thank you VMware for keeping some of the older versions available).
So I downloaded VMware vCenter Converter 3.0.3 Enterprise Edition. I didn’t want to install the software, so I extracted the VMware Agent.msi from the installer by executing VMware-converter-3.0.3-89816.exe. This will extract the MSI installer to a subdir of %TEMP%. From there I used UniExtract to extract the files from the MSI.

In the subdir ‘VMware Converterprogram filesVMwareVMware Converter’ that will be created by UniExtract, I found the file I needed; VMware Agent.msi. I copied it to another folder and stopped the installation of VMware vCenter Converter 3.0.3 Enterprise Edition. I had to manually delete the extraction folder.
I copied the VMware Agent.msi to the server I wanted to P2V, pointed the VMware Agent uninstaller on the server to the MSI I just copied and was able to complete the uninstall of the ‘old’ Converter agent.
From here, the installation of the ‘new’ vCenter Converter Standalone agent went smoothly. The P2V ran without any problems. So I was able to put another old hardware server out of commission. Hurray for virtualization!

Approved: ASR Pro
Speed up your computer’s performance now with this simple download.
Over the past few weeks, some of our readers have encountered an error message during installation stating that the vcenter Converter Agent installation failed to install. This problem occurs for several reasons. Now we will deal with them.
If you choose VMware vCenter Standalone Converter Tool Copy 6.2.x for P2V / V2V to migrate or further configure one of our older versions of Windows Server 2000 to 2008 SP1 / SP2, 2008 R2, very common issues can occur: complete agent conversion code, evaluate error 1603 or similar errors as below:
Approved: ASR Pro
ASR Pro is the world’s most popular and effective PC repair tool. It is trusted by millions of people to keep their systems running fast, smooth, and error-free. With its simple user interface and powerful scanning engine, ASR Pro quickly finds and fixes a broad range of Windows problems — from system instability and security issues to memory management and performance bottlenecks.

Common errors in the standalone vCenter Converter tool. See the full cost and solution here.
VCenter Tool – Common Issues
1. The VMware vCenter Converter Standalone Agent service failed to start due to the following error: the service did not respond to the start or management request in a timely manner. Installing broker-converter error with code 1603 could not be completed.
2. Error 1053: “The service did not respond in time” when trying to start, stop, or suspend the service
3. Timed out (30,000 milliseconds) while waiting for the VMware vCenter Converter standalone agent service to connect.
4. The service will not start, let alone events 7000 and 7011, which are logged in the Windows event log.
5. Event ID 7009 may appear in Windows Event Watcher with the message “ “There is a 30,000 millisecond timeout window while waiting for VMware vCenter Converter Standalone Worker to help you connect.” “
6. Error 7000: Startup failed due to the following error: The service did not respond to the startup or monthly check request.
7. This issue occurs on the service because Control Manager generates an event when a huge service does not respond within a well-defined timeout (the default timeout is of course 30,000 milliseconds).
8. VMware product won’t help you install error 1603 (1009167)
9. vCenter Converter 6.2 cannot be installed directly on Windows Server R2 2008 or later (64993)
12. When installing vCenter Converter Standalone 6.x, the project exited with the “Process service failed to start” pop-up window.
13. Converter vCenter Agent, Converter vCenter Server, or Converter vCenter Worker cannot be set to Running in Windows Service Manager.

15. Failed to start VMware vCenter Converter Standalone Agent service immediately afterwards due to an error.
I know you are frustrated with the aforementioned VMware Converter vCenter Tool 6.2.x errors. Don’t worry, on this website yI have a better solution for all of the above vCenter Converter Gizmo error lists.
Best Solution For The Above List Of Error Services
Control Manager will initiate a conference call if the service does not respond within the specified time (crawl timeout is 30,000 milliseconds). To resolve the error: Unable to install Agent Extraction Tools with error code 1603.
Renew The Service
To practice this practice, you must have permanent administrators or the user must be a member of the Administrators group.
Warning: Incorrectly registering edits can severely damage your system. Before undoubtedly making any changes to the registry, you should make a backup of all well data.
Step 3. Select the watched folder, look to the right of the “ServicesPipeTimeout” entry, right-click it and also select “Modify.”
Note. If the ServicesPipeTimeout entry does not exist, the owners must create it from the Edit menu by choosing New when found from a 32-bit valueSelecting a DWORD, then typing ServicesPipeTimeout and pressing Enter.
Step 4. Change the value of the ServicePipeTimeout entry,
click Decimal, the new timeout value is 180000 OR 300000 (in milliseconds) combined with, then click OK.
Note. If 180,000 milliseconds isn’t enough now, you can expand your home however you want.
Register Windows ServicePipeTimeout
“
Windows ServicePipeTimeout Entry
“- ServicePipeTimeout”% 2C470 & ssl = 1 “% 2C470 & is-pending-load = 1 # 038; ssl = 1″% 2C220 & ssl = 1 “% 2C612 & ssl = 1″% 2C470 & ssl = 1 “srcset = “data: image / gif; base64, R0lGODlhAQABAIAAAAAAAP /// yH5BAEAAAAALAAAAAABAAEAAAIBRAA7 “>
This method described above works 100% in most cases, but if it doesn’t, follow the alternate solutions below. Solutions
If
An alternative to a BETTER BEST SOLUTION doesn’t work for you, so you need to check the relevant things:
Check compatibility matrix
- Windows Vista SP2 (32-bit, then 64-bit)
- Windows Server 2008 SP2 (32-bit and 64-bit)
- Windows some (32 -bit -Bit and 64-bit)
- Windows Server 2008 R2 (64-bit)
- Windows 8 (32-bit and 64-bit)
- Windows Server next year (64-bit)
- Windows 8.1 (32-bit and 64-bit)
- Windows Server 2012 R2 (64-bit)
- Windows 10 ( 32 & 64 bit)
- Windows Server 64 bit
- CentOS 2016 6.x (32-bit and 64-bit)
- CentOS 7.0, 7.1, 7.2, 7.3, 7.4, 7.5 (64-bit)
- Linux Red Hat Enterprise 4. (32-bit and 64-bit)
- Red Hat Enterprise Linux 5.x (32-bit and 64-bit)
- Red Hat Linux Enterprise 6.x (32-bit and 64-bit)
- red Enterprise Linux 7.0, 7.1, 7.2, 7.3, 7.4, 7.5 (64-bit)
- SUSE Linux Enterprise Server 10.x (32-bit 64-bit)
- SUSE and Linux Enterprise Server 11.x (32-bit with 64-bit)
- ubuntu.04 LTS (32-bit and 64-bit above)
- Ubuntu 16.04 LTS (32- bit and 64 bit)
< li> Ubuntu 12.04 LTS (32-bit and 14 64-bit)
Also read: Change esxi hostname of VMware hypervisor in Nutanix Hyper HCI cluster
Check VMware VCenter Tool Platform
VMware Converter Standalone version 6.2.x is installed on the following Windows operating system platforms:
- Windows Vista SP2 (32-bitcurrent and 64-bit)
- Windows Server 2008 SP2 (32-bit and 64-bit)
- Windows 7 (32-bit) then 64-bit)
- Windows Server 2008 (64 bit)
- Windows r2 8 (32 bit plus 64 bit)
- Windows Server 2012 (64 bit)
- Windows 8.1 (32-bit as well as 64-bit)
- Windows Server 2012 R2 10 (64-bit)
- Windows (32-bit or 64-bit)
- Windows Server 2016 (64-bit)
Check The VCenter Tool Firewall Port List
The required network ports usually need to be opened on an external firewall between the source hardware and the standalone vCenter Converter, while the conversion is often done from powered on source computers connected to Windows / Linux.
| Communication paths | Communication ports | Notes |
|---|---|---|
| Convert standalone server to source computer with power on | TCP – 445, 139, 9089, UDP – 137, 138 | If the generator computer is using NetBIOS, port 445 literally not required. If NetBIOS is not used, ports 137, 138, and Are 139 are not required. If in doubt, make sure none of the ports are blocked. Note. If on the original koYour computer does not have a standalone server or Converter agent installed, the account used to authorize the original computer must be completely new. Pick a password. The source computer must have a network circular file enabled, share must be enabled, and simple file sharing cannot always be used. |
| Convert Standalone Server to vCenter Server | TCP – 443 | Only required if the desired conversion target is vCenter. |
| Standalone client converter to vCenter Server | TCP – 443 | Only required if the standalone converter and client server are running on different computers. |
| Standalone Converter Server available for ESXi target | TCP on – 902 | Conversion still requires ESXi discovery on port 902. |
| On source vehicle for ESXi | TCP – 443, 902 | If converting to vCenter site server, only port is required 902. If the proxy port mode feature is enabled, 902 is simply not required. |
| Communication paths | TCP ports | Notes |
|---|---|---|
| Standalone converter server to source computer on | 22 | Used to start an SSH connection between the standalone Converter server and the machine
Speed up your computer’s performance now with this simple download.
Related Posts:
|


When doing a p2v I always use the standalone version of the Converter software. It proved to be more stable than the vCenter Converter plugin.
While trying to p2v a server onto our vSphere platform I was presented with the following error by the VMware vCenter Converter Standalone client: “Unable to complete vCenter Converter agent installation on <SERVERNAME>. Error code: 1603.”
While checking the event log of the server in question, I noticed a perfect error description (Error 1714). There was an older version of the converter agent installed on the server and it refused to be uninstalled:
I checked the uninstall string and tried a manual uninstall, but of course that failed too.
The installation MSI wasn’t available on the server anymore.
This is a problem many of us will have faced. Quite annoying. In this case, however, the software is still available for download on the VMware website (Thank you VMware for keeping some of the older versions available).
So I downloaded VMware vCenter Converter 3.0.3 Enterprise Edition. I didn’t want to install the software, so I extracted the VMware Agent.msi from the installer by executing VMware-converter-3.0.3-89816.exe. This will extract the MSI installer to a subdir of %TEMP%. From there I used UniExtract to extract the files from the MSI.
In the subdir ‘VMware Converter\program files\VMware\VMware Converter’ that will be created by UniExtract, I found the file I needed; VMware Agent.msi. I copied it to another folder and stopped the installation of VMware vCenter Converter 3.0.3 Enterprise Edition. I had to manually delete the extraction folder.
I copied the VMware Agent.msi to the server I wanted to P2V, pointed the VMware Agent uninstaller on the server to the MSI I just copied and was able to complete the uninstall of the ‘old’ Converter agent.
From here, the installation of the ‘new’ vCenter Converter Standalone agent went smoothly. The P2V ran without any problems. So I was able to put another old hardware server out of commission. Hurray for virtualization!