Claiming the file ownership often does the trick
by Sagar Naresh
Sagar is a web developer and technology journalist. Currently associated with WindowsReport and SamMobile. When not writing, he is either at the gym sweating it out or playing… read more
Updated on
- VLC Media Player is arguably the most versatile media player used by millions across the globe.
- You may come around with some hiccups while using this popular media player.
- In this guide, we will show you some easy solutions that will help you fix the VLC is unable to open the MRL error.
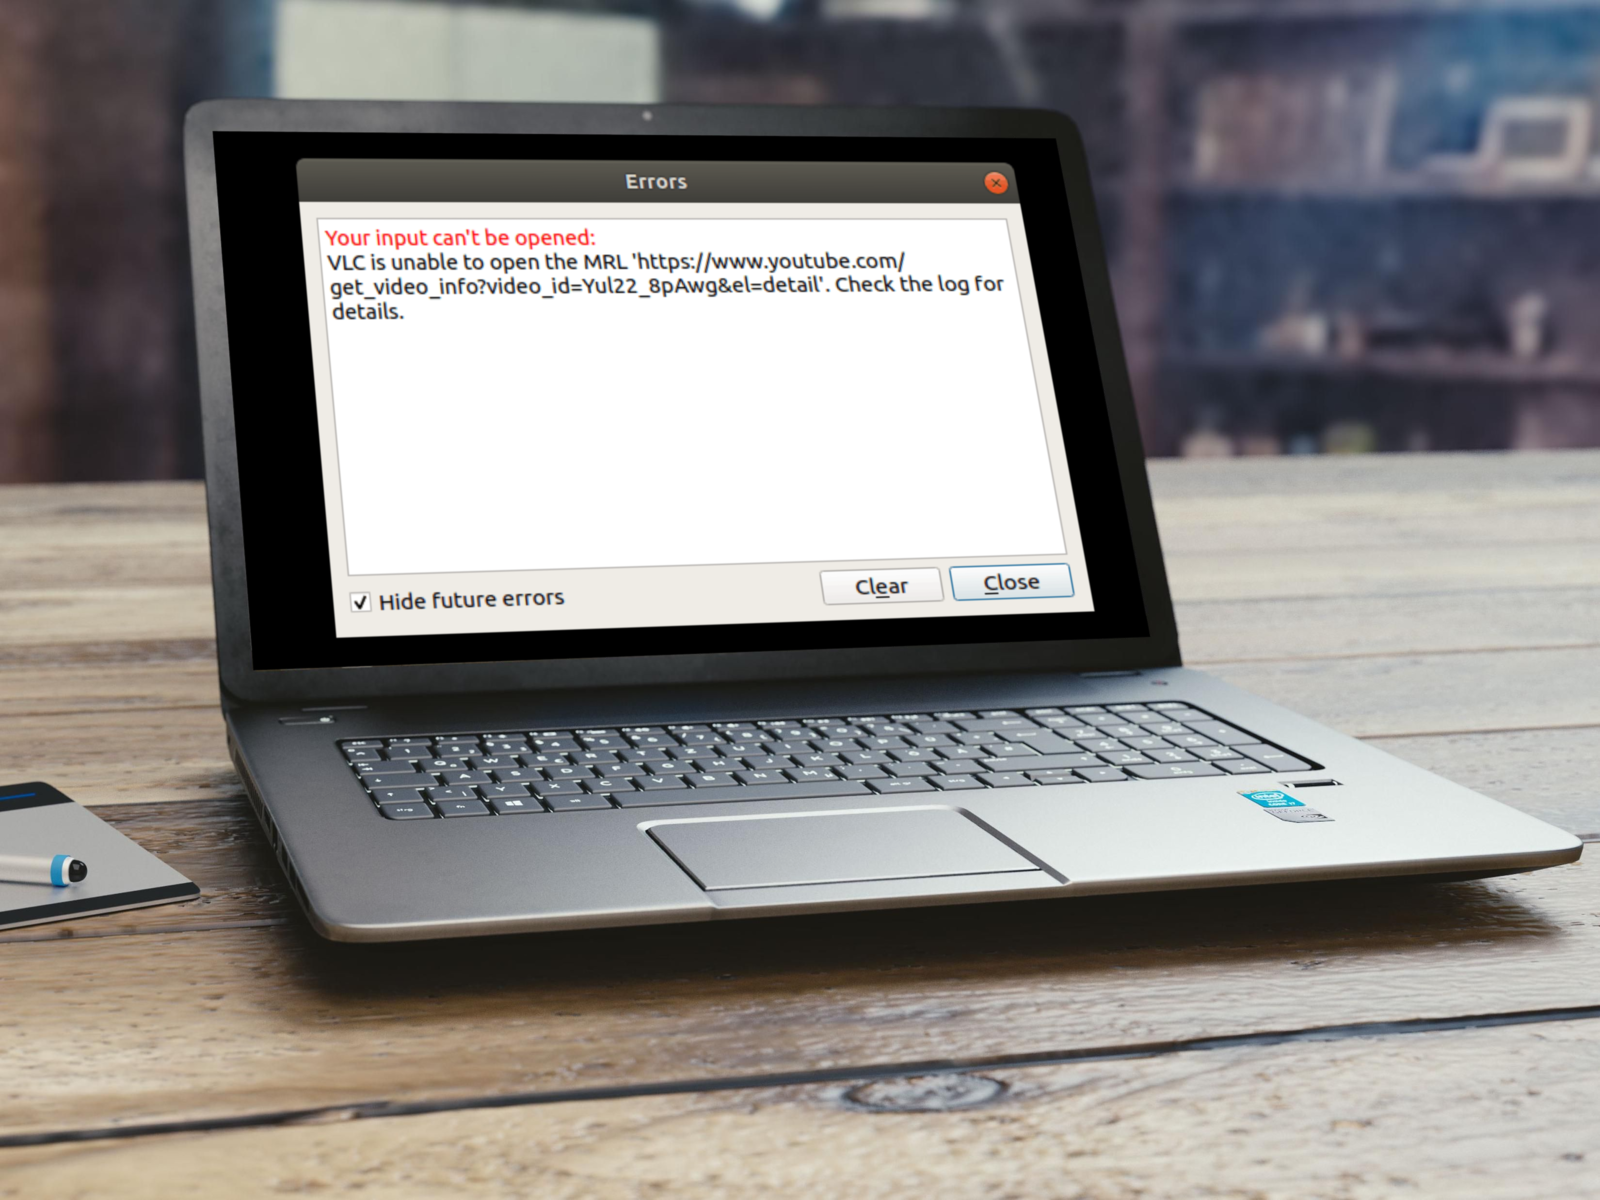
Are you seeing VLC is unable to open the MRL error wherever you are trying to play a video on the VLC Player?
If so, then you are not alone. It is one of the common errors of the VLC media player that pops up when you want to stream videos on VLC from a different source.
Notably, this error is triggered when you try to play videos from YouTube or other online sources and the VLC player is not able to find the target file.
This means you will come across the VLC is unable to open the MRL error when you try to open a file or stream a video that is not physically located on the local computer.
Thankfully, in this guide, we will give you three effective solutions that have been tested and tried to fix the VLC is unable to open the MRL error and help you get back to content watching. Let us get right into it.
What is VLC MRL?
MRL stands for Media Source Locator. It helps the VLC media player locate the multimedia resource. MRL is used by Xine media players as well as the Java Media Framework, in addition to VLC.
A media resource locator (MRL) is known as a string of characters used to identify a multimedia resource or part of a multimedia resource. An MRL is often used to identify inputs or outputs to the VLC media player.
You will come across the VLC is unable to open the MRL error when you try to open a media file that is located on external storage, online, or on another server. If VLC is unable to locate the file, then you will be shown this error.
Quick Tip:
If VLC is unable to open a certain video file format, you can try another media player. CyberLink Power DVD is a software decoder that allows you to watch high-quality MPEG-1 and MPEG-2 videos.
PowerDVD requires only a DVD drive on your PC to play DVDs, VCDs, SVCDs, and mini DVDs, as well as other video and audio files.

CyberLink Power DVD
Try to play your movie in this app and see if you get the same error.
How do you find MRL?
Notably, the MRL syntax is:
[[access][/demux]://]URL[#[title][:chapter][-[title][:chapter]]] [:option=value …]
How do you fix VLC Cannot open MRL file?
1. Claim the file ownership
- Right-click on the file on which you are getting the error.
- Select Properties from the drop-down list.
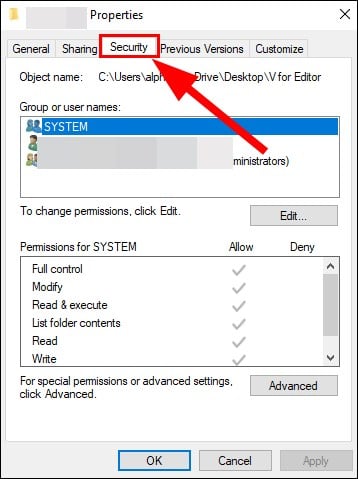
- Switch to the Security tab.

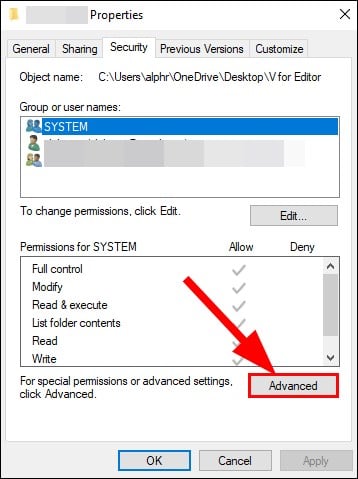
- Click on Advanced.
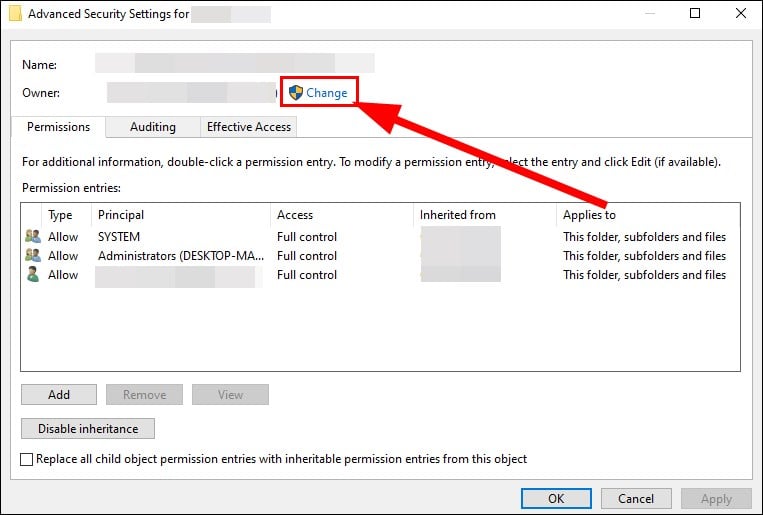
- Click on the Change button for the Owner.

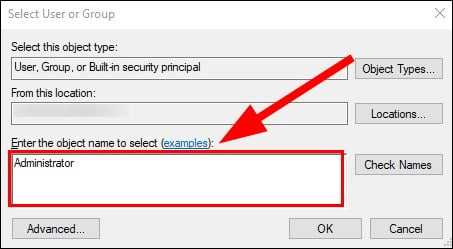
- In the new window that opens, type the below in the Enter the Object Name to select box.
Administrator
- Click OK.
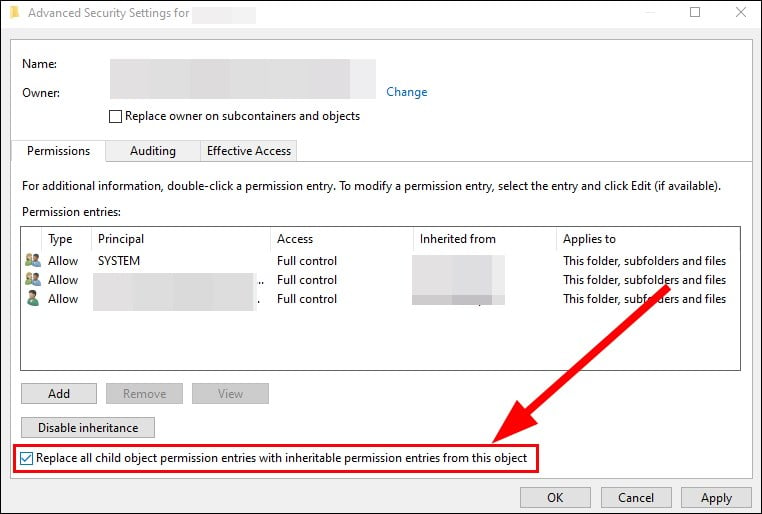
- Check the Replace All Child Object Permission Entries With Inheritable Permission Entries From This Object box.

- Click on Apply and check if this fixes the issue or not.
This issue, as already mentioned, happens when you try to run a video from an external drive. In such a case, you should ensure that you have proper rights to run the video.
Following the above steps, you can claim ownership of the file and try running it on the VLC media player to check if this fixes the issue or not.
If you are facing other issues, like VLC could not open the MP4a audio encoder issue, we recommend you check out this informative guide to find solutions.
2. Update or reinstall VLC
Update VLC
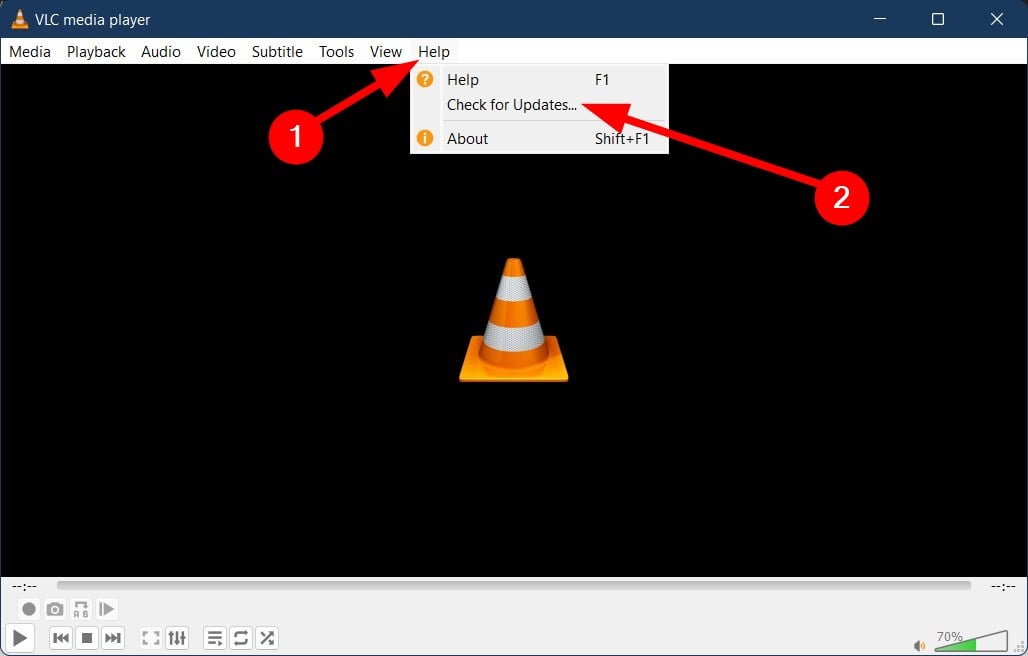
- Open VLC media player.
- Click on Help.
- Select Check for Updates.

- VLC will check if a new update is available, and if it detects one, it will prompt you to install the update.
Reinstall VLC
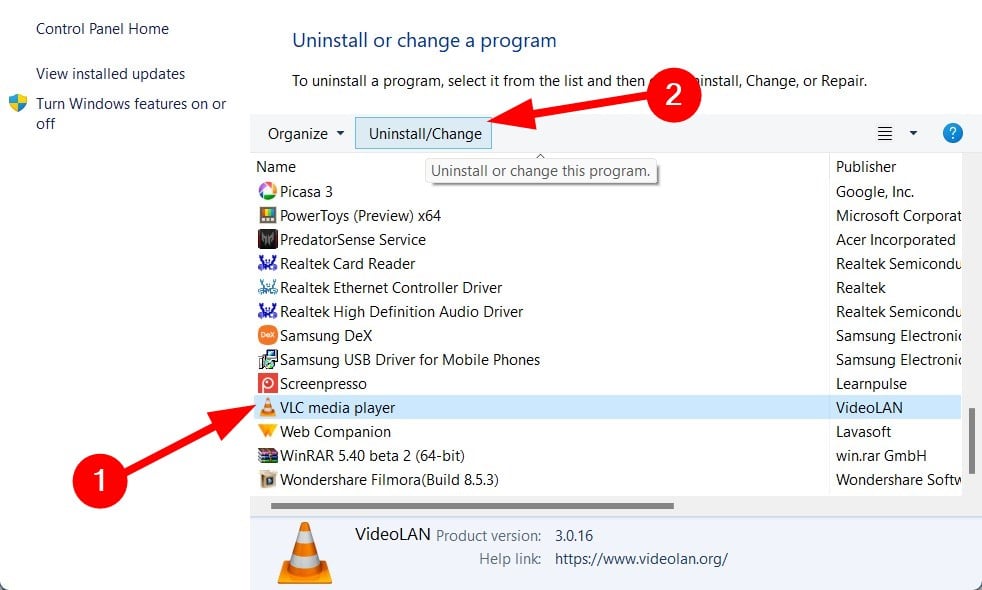
- Open the Start menu.
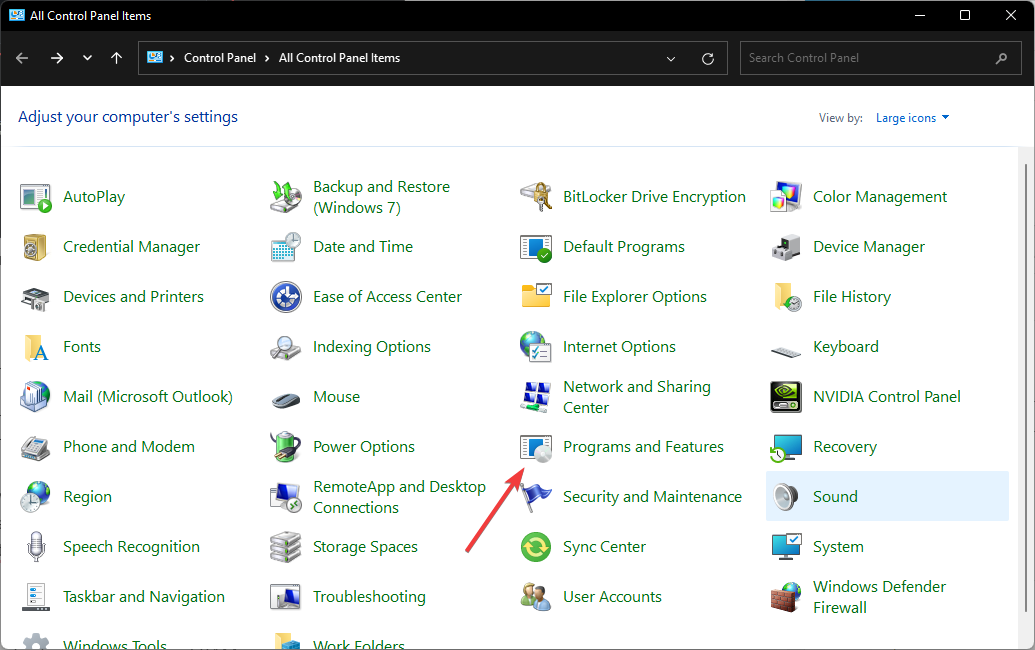
- Search Control Panel and open it.
- Click on Programs and Features.

- Select VLC.
- Click on the Uninstall button at the top.

- Head over to the official website.
- Download the VLC media player software.
- Follow the on-screen instructions to install VLC on your PC and check if this fixes the issue or not.
- How to Find & View Saved Passwords on Windows 11
- How to Permanently Disable Left Swipe on Windows 11
- Fix: Secure Boot is Greyed Out on Windows 11
3. Check the source video
There are chances that the video you are trying to stream on VLC itself has a problem, which is why you are coming across the VLC unable to open the MRL issue.
In such a case, we would suggest you copy the URL and try running it on another player. You can also take the help of some of the online streaming players.
If the video is not working on another player, then the problem isn’t with the VLC player, but with the source of the video instead.
How do I allow VLC through the Firewall?
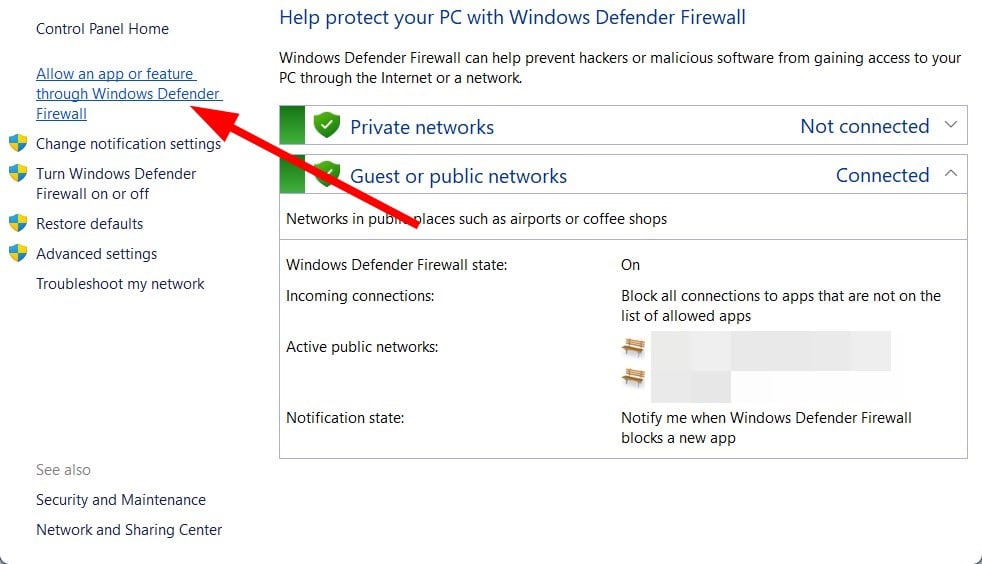
- Open the Start menu.
- Search for Windows Defender Firewall and open it.
- Click on the Allow an app or feature through Windows Defender Firewall on or off.

- Click on Change settings.
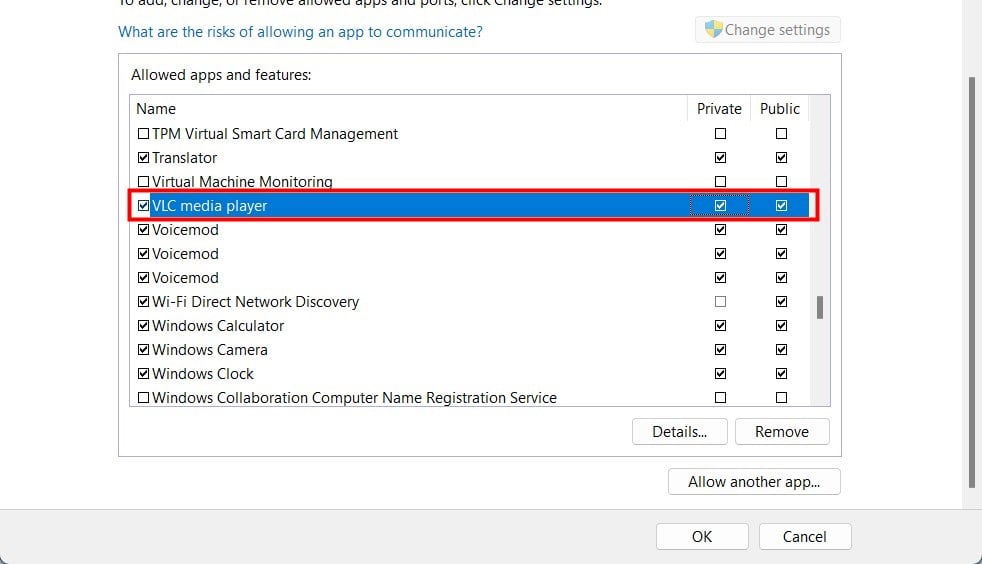
- Scroll down and locate VLC Media Player. If it is not there, then click Add at the bottom and add VLC from its installation directory.
- Tick the box next to VLC Media Player.
- Select both the Public and Private network boxes for it.
- Click OK to confirm your settings.

Chances are that the Windows Defender Firewall isn’t allowing the VLC player to stream video from a website for security reasons, which could be a false alarm.
In such a case, simply allow the VLC media player software through your Windows Defender Firewall and check if this fixes the issue or not.
VLC is unable to open the MRL on YouTube?
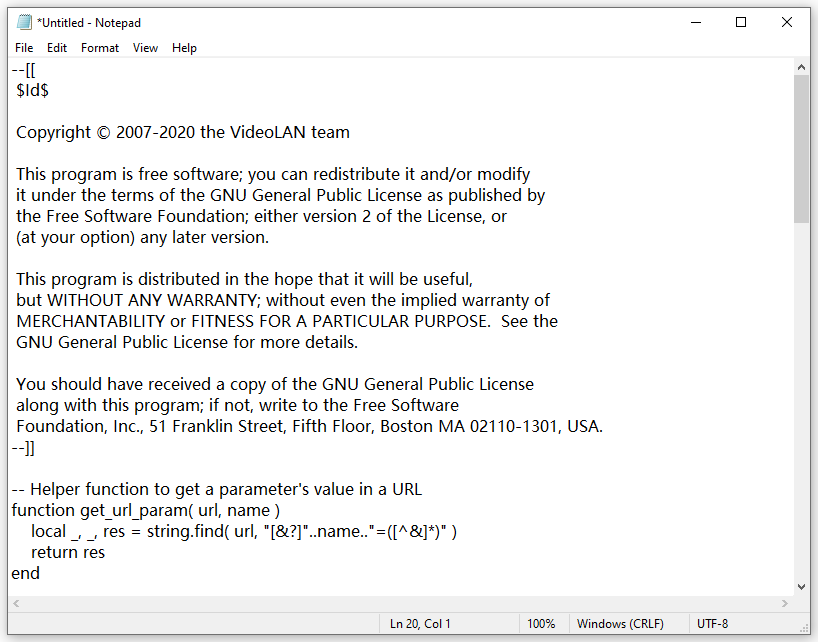
- Head to this website.
- Copy the codes in the .Iua file on a notepad.

- Rename the file to youtube.luac.
- Copy the file to the Iua folder where you have installed the VLC Media Player, which should be the below:
C:\Program Files (x86)\VideoLAN\VLC\lua\playlist - Within the Iua folder, open the playlist folder.
- Paste the youtube.Iuac file inside the playlist folder.
- Open the VLC player and check if the player is streaming the YouTube video or not.
In case the above doesn’t help, you can check out our guide on the best universal video players that you can install on your Windows OS PC and enjoy video watching.
That is it from us in this guide. Let us know in the comments below if this guide helped you fix the VLC is unable to open the MRL error or not. You can also share any other method that helped you resolve the problem.
![]()
Медиаплеер VLC — одно из наиболее широко используемых приложений медиаплеера в Windows и других операционных системах. Это бесплатный мультимедийный проигрыватель с открытым исходным кодом, разработанный VideoLAN. Он поставляется с различными стандартными и расширенными функциями, которые расширяют возможности просмотра видео и воспроизведения музыки на компьютере. При этом VLC не лишен проблем, как и любое другое приложение. У него есть своя доля ошибок и проблем, с которыми продолжают сталкиваться его пользователи. В этом посте мы рассмотрим некоторые распространенные ошибки и проблемы, о которых сообщили пользователи VLC. Кроме того, мы также перечислим исправления, которые помогут вам избавиться от указанных проблем.

Вот распространенные проблемы и ошибки, с которыми вы можете столкнуться при использовании медиаплеера VLC на компьютере с Windows 11/10:
1]Медиаплеер VLC продолжает зависать или зависать
Некоторые пользователи VLC сообщают, что приложение продолжает зависать или зависать на их ПК. Приложение внезапно останавливается и аварийно завершает работу во время воспроизведения видео или зависает в середине и становится непригодным для использования. Теперь, если вы столкнулись с той же проблемой, вот исправления, которые вы можете использовать:
- Убедитесь, что VLC обновлен.
- Отключите аппаратное ускорение в VLC.
- Запустите VLC в режиме совместимости.
- Сбросить настройки.
- Переустановите медиаплеер VLC.
A]Убедитесь, что VLC обновлен.
Возможно, вы сталкиваетесь со сбоями VLC и другими проблемами производительности из-за использования более старой версии приложения. Следовательно, убедитесь, что вы установили все доступные обновления для VLC и используете его последнюю версию. Для этого откройте VLC и перейдите в меню «Справка». Теперь выберите параметр «Проверить наличие обновлений», и он начнет проверку наличия доступных обновлений. Вы можете загрузить ожидающие обновления, нажав кнопку Да. После этого перезапустите VLC, чтобы успешно установить обновления и проверить, решена ли проблема.
B]Отключить аппаратное ускорение в VLC
Следующее, что вы можете сделать, чтобы решить эту проблему, — отключить аппаратное ускорение в приложении VLC. Использование аппаратного ускорения на слабом компьютере или неподдерживаемой системе может сделать приложение нестабильным и привести к его сбою. Итак, выключите его, а затем проверьте, решена ли проблема. Вот как это сделать:
- Сначала откройте медиаплеер VLC и перейдите в меню «Инструменты».
- Теперь выберите параметр «Настройки».
- Далее переходим на вкладку Ввод/Кодеки.
- После этого нажмите кнопку раскрывающегося списка, связанную с параметром декодирования с аппаратным ускорением, а затем выберите параметр «Отключить».
- После этого попробуйте воспроизвести свои видео в VLC и проверьте, не прекратились ли сбои или зависания.
C]Запустите VLC в режиме совместимости
Если вы используете VLC в более старой версии Windows, проблема может быть вызвана несовместимостью. Следовательно, если сценарий применим, запустите VLC в режиме совместимости и проверьте, решена ли проблема или нет. Для этого щелкните правой кнопкой мыши ярлык VLC на рабочем столе и выберите пункт «Свойства» в появившемся контекстном меню. После этого перейдите на вкладку «Совместимость» и установите флажок «Запустить эту программу в режиме совместимости», а затем выберите предыдущую версию для запуска приложения. После этого нажмите кнопку «Применить»> «ОК», а затем запустите VLC, чтобы проверить, устранена ли проблема.
Г]Сбросить настройки
Если проблема не устранена, вы можете попробовать сбросить настройки и посмотреть, поможет ли это. Поврежденные настройки приложения могут быть одной из причин сбоев и других проблем с производительностью. Итак, чтобы решить проблему, сбросьте настройки, выполнив следующие действия:
- Сначала запустите медиаплеер VLC и выберите в меню «Инструменты» > «Настройки».
- Теперь нажмите кнопку «Сбросить настройки», а затем нажмите «ОК» в запросе подтверждения.
- Затем закройте приложение VLC и откройте окно команды «Выполнить» с помощью Win + R.
- После этого введите %APPDATA% в «Выполнить», а затем откройте папку vlc в открывшемся месте.
- Затем найдите файл «vlcrc» и удалите его.
- После этого перезапустите VLC и проверьте, решена ли проблема.
E]Переустановите медиаплеер VLC.
Если ничего не помогает, в крайнем случае переустановите приложение VLC. Вы столкнетесь со сбоями, зависаниями и другими проблемами, если установка приложения повреждена. Итак, полностью удалите VLC со своего компьютера, а затем переустановите его свежую и чистую копию.
Читать . Медиаплеер VLC продолжает отставать / заикаться / пропускать в Windows.
2]Зашифрованное воспроизведение видео в VLC
Если у вас возникла проблема с воспроизведением зашифрованного видео в медиаплеере VLC, вы можете использовать следующие исправления для ее решения:
Вы можете отключить функцию аппаратного ускорения в VLC. Мы поделились шагами, чтобы сделать это ранее в этом посте.
Еще одна вещь, которую вы можете сделать, это увеличить значение сетевого кэширования. Для этого откройте VLC и перейдите в меню «Инструменты» > «Настройки». Затем в разделе «Показать настройки» выберите «Все» и перейдите в категорию «Ввод/кодеки». После этого найдите параметр «Сетевое кэширование (мс)» в разделе «Дополнительно», увеличьте его значение и нажмите кнопку «Сохранить».
Если вы пытаетесь воспроизвести видео с внешнего диска, сетевого диска или CD/DVD, попробуйте воспроизвести его с локального диска. Скопируйте видео и вставьте его на рабочий стол. Откройте видео в VLC и проверьте, решена ли проблема воспроизведения зашифрованного видео.
Читайте: исправьте код ошибки 0xc00d36c4 при воспроизведении медиафайлов в Windows.
3]Ваш ввод не может быть открыт, ошибка в VLC
Несколько пользователей VLC сообщили об ошибке «Ваш ввод не может быть открыт» при попытке открыть медиафайл. Чтобы исправить это, вы можете попробовать изменить путь к файлу или переименовать файл. Если вы пытаетесь ввести URL-адрес видео, убедитесь, что он работает. Кроме того, вы можете обновить VLC, сбросить настройки VLC, временно отключить антивирус или стать владельцем файла. Если это не поможет, переустановите приложение VLC, чтобы исправить ошибку.
4]VLC не показывает видео
Еще одна распространенная проблема, с которой сталкиваются пользователи VLC, заключается в том, что медиаплеер не воспроизводит или не показывает видео. Кроме того, по мнению некоторых пользователей, звук продолжает воспроизводиться, а видео не отображается.
Если VLC не может правильно воспроизвести видео, причиной проблемы может быть ряд факторов. Это может быть вызвано тем, что вы включили аппаратное ускорение в настройках приложения. Другой потенциальной причиной может быть низкий размер кэширования файлов или сетевого кэширования. Кроме того, проблемой может быть режим вывода видео по умолчанию. Неисправный файл настроек VLC и поврежденная установка приложения — еще несколько причин этой проблемы.
Если вы столкнулись с той же проблемой, вы можете использовать следующие решения:
- Начните со стандартных методов устранения неполадок.
- Отключить аппаратное ускорение.
- Измените значения файлового кэширования и сетевого кэширования.
- Выберите режим видеовыхода DirectX (DirectDraw) в VLC.
- Сбросьте настройки VLC.
- Переустановите ВЛК.
A]Начните со стандартных методов устранения неполадок
Вы можете начать с общих методов устранения неполадок, чтобы решить проблему. Просто перезагрузите компьютер, а затем проверьте, показывает ли VLC ваши видео или нет. Кроме того, вам также необходимо проверить формат вашего видео и посмотреть, поддерживается ли оно VLC. Хотя вероятность того, что VLC не поддерживает формат вашего видео, меньше, поскольку он поддерживает большое количество распространенных и необычных видеоформатов. Вот еще несколько советов, которым вы можете следовать:
B]Отключить аппаратное ускорение
Отключите функцию аппаратного ускорения в VLC, чтобы решить проблему с отображением видео в медиаплеере. Вы можете обратиться к предыдущей части поста, чтобы узнать, как это сделать.
C]Измените значения кэширования файлов и кэширования сети.
Если вы воспроизводите онлайн-видео в VLC, проблема может быть вызвана низким размером сетевого кеша. Точно так же низкий размер файлового кеша может быть причиной проблемы с локально воспроизводимыми видео. Следовательно, вы можете попробовать увеличить значения кэширования файлов и кэширования сети, чтобы решить проблему. Вот шаги, чтобы сделать это:
- Сначала откройте приложение VLC и коснитесь меню «Инструменты» > «Настройки» или просто нажмите горячую клавишу trl + P.
- Затем нажмите на опцию «Все» ниже «Показать настройки».
- Теперь перейдите в категорию «Ввод / Кодеки».
- Затем найдите параметр «Кэширование файлов (мс)», доступный в разделе «Дополнительно», и увеличьте значение. Вы можете установить значение 2000.
- После этого увеличьте значение параметра Сетевое кэширование (мс); установите значение, например, 1500.
- Наконец, нажмите кнопку «Сохранить» и проверьте, можете ли вы воспроизводить свои видео или нет.
D]Выберите режим видеовыхода DirectX (DirectDraw) в VLC
Вы можете попробовать изменить режим вывода видео на DirectX в настройках VLC и посмотреть, решена ли проблема. Вот шаги, чтобы сделать это:
- Сначала откройте VLC и нажмите «Инструменты» > «Настройки» или нажмите Ctrl+P.
- Теперь перейдите на вкладку Видео.
- После этого нажмите кнопку раскрывающегося списка рядом с параметром «Вывод» и выберите параметр вывода видео DirectX (DirectDraw).
- Наконец, нажмите кнопку «Сохранить», а затем проверьте, можете ли вы воспроизводить свои видео без каких-либо проблем.
Если проблема не устранена, используйте следующее исправление.
E]Сбросить настройки VLC
Эта проблема может быть вызвана поврежденными настройками VLC. Следовательно, если сценарий применим, вы можете сбросить его настройки до настроек по умолчанию, чтобы решить проблему. Вы можете обратиться к проблеме (1), чтобы узнать точные шаги для этого.
F]Переустановите VLC
Вы можете переустановить приложение VLC, если оно по-прежнему не может правильно воспроизводить видео. Проблема может заключаться в установке приложения. Итак, удалите текущую копию и установите чистую копию VLC на свой компьютер.
Читать: Нет звука или звука в VLC в Windows.
5]VLC не смог определить аудио- или видеокодек
Некоторые пользователи VLC сообщают об ошибке «VLC не удалось определить аудио- или видеокодек» при воспроизведении MKV или некоторых других видео. Чтобы исправить это, загрузите и установите недостающие кодеки из онлайн-источников, а затем попробуйте воспроизвести свое видео.
Почему VLC не работает должным образом?
Может быть несколько причин, по которым VLC может не работать должным образом на вашем ПК. Если вы не загрузили VLC с его официального сайта, установщик приложения может содержать вирусы и не будет работать должным образом. Кроме того, проблема может быть вызвана функцией аппаратного ускорения. Другими причинами этой проблемы могут быть поврежденные настройки кэша, использование устаревшей версии и неправильная установка VLC.
Теперь прочитайте: Как воспроизвести RTSP Stream в медиаплеере VLC?
The VLC media player is an open-source multimedia platform which is available in Operating systems as well as in mobile such as iOS, Windows 10, Android, Linux and more. It was developed by the VideoLAN project in February (2001).
Though it’s an old app it still gives the best movie quality but now Windows users reported some issues such as the VLC media player not working, VLC media player crashing, lagging, scrambled video, and more.
Well, these are pretty common issues that users are reporting in the forum thread.
If you are among those users troubled with VLC not working problem then read our article and follow the working solutions mentioned below on How to Fix VLC Media Player Problems.
Along with solutions also get to know why VLC player not working and what can be done to make it work.
To repair corrupted Windows system files, we recommend Advanced System Repair:
This software is your one stop solution to fix Windows errors, protect you from malware, clean junks and optimize your PC for maximum performance in 3 easy steps:
- Download Advanaced System Repair rated Excellent on Trustpilot.
- Click Install & Scan Now to install & scan issues causing the PC problems.
- Next, click on Click Here to Fix All Issues Now to fix, clean, protect and optimize your PC effectively.
There are numerous problems with the VLC media player that interrupts you from watching videos. Some of the common problems are stated below along with their solutions. Go ahead find which problem you are facing and solve it.
- VLC Media Player Is Lagging/Stuttering/Skipping
- Scrambled Video Playback In VLC Player
- VLC Media Player Keeps Crashing
- VLC Not Working
How to Fix VLC Media Player Problems?
Several ways are there to make your VLC work properly. Go through the solutions one by one to fix VLC not working properly in Windows 10/11.
1: VLC Media Player Is Lagging/Stuttering/ Skipping
If your VLC lagging then you can fix this issue by following the solutions given below:
Solution 1: Change the caching value
- Open the VLC player and press Ctrl + P to open Preference
- At the bottom of the page, you will see Show settings with two options, select All.
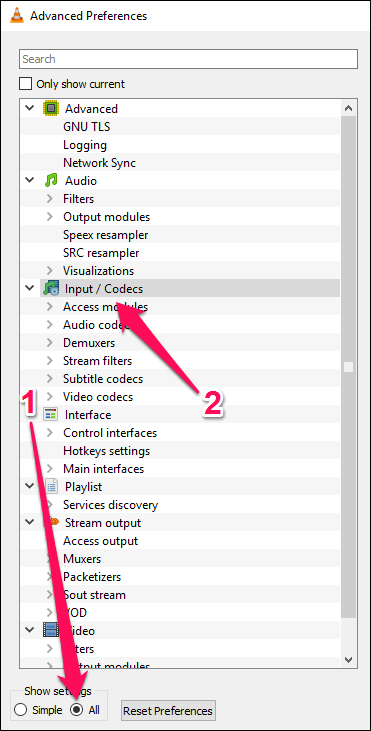
- Now, go to the Input/Codes section and search for the File caching option.
- Change the value from 300 to 1000 and click on Save.

Check if the VLC media player lagging video problem is fixed or else head to the next solution.
Solution 2: Try Disabling Hardware Decoding
Some users have found saying that after disabling Hardware decoding their VLC player stuttering issue is solved. Follow the steps to disable hardware decoding:
- Open VLC player and press CTRL + P>show settings, select All
- Go to the Input/Codes section
- Navigate Hardware-accelerated decoding and Disable it

After performing the above steps VLC player stuttering issue will be solved.
Solution 3: Change the Video Output Module
If you are facing a Video lagging issue in the VLC media player then simply change the output module by following the steps:
- Open the VLC player and press CTRL + P>show settings, select All
- Go to the Video Output module
- Select the output module one after the other till you find the one that will work for you.

It is estimated now the VLC player lagging, stuttering, buffering problem is fixed.
2: Scrambled Video Playback In VLC Player
To fix scrambled video playback in VLC problem try the below-given solutions one by one:
Solution 1: Turn Off Accelerated Video Output
Many users confirmed that scrambled video playback in VLC media player problem is fixed by turning off the accelerated video output option.
So here it is suggested to follow the steps given to disable it:
- Open VLC player
- Press CRTL + P to open Preferences.
- Select ‘Video’
- Under ‘Display’ settings, turn off ‘Accelerated video output’
- Click on ‘Save’
Now, try playing the video file to see if the scrambling is gone.
Solution 2: Increase the Network Caching Rate
If the above-given solution won’t work for you then increasing the network caching rule worked for many. it is worth to given it a try.
Follow the steps to do so:
- Open VLC player
- Press CTRL +P
- Select ‘All’ under the ‘Show Settings’ at the bottom.
- Select the ‘Input/Codecs’
- Look for the ‘Advanced’ section and ‘Network Caching (ms)’.

- Increase the value of this caching and then try playing the video again.
This will take a minute trial but increasing the network caching rate will fix the scrambled video playback in VLC.
Also Read: VLC Media Player Cannot Play YouTube Videos [SOLVED]
Solution 3: Play the Media from different Local Drive
If you are playing a video file from a network drive or an external network drive or Windows 10 DVD, then try copying it to your desktop and then play it.
This will work if the file that is played without any difficulties suddenly starts stuttering while playback. Sometimes, drives go into a sleep state and VLC stops working properly. So, it will be beneficial for you if move your media to local storage.
This way scrambled video playback in VLC issue will be solved and moreover, the issue won’t occur anymore.
3: VLC Media Player Keeps Crashing
VLC media keeps crashing because of several reasons like unrecognized data including the problem with the pre-loading of MKV files.
If you are facing a VLC player keeps crashing then follow the below-given solutions to fix VLC media player crash problem.
Solution 1: Fix Corrupt Files
- Exit VLC
- Double-click on This PC/My Computer
- Click on the View tab and check for Hidden files
- Open the directory:
C:\User\User_Name\AppData\Roaming\VLC
- Right-click on the file named VLCC and Rename it
Solution 2: Compatibility Settings
Compatibility settings in Windows will allow you to run the programs in the current version of Windows. Run VLC in compatibility mode to fix VLC keeps crashing Windows 10/11.
Follow the steps:
- Open File Explorer
- Navigate the Directory:
Windows 64 bit: C:\Program Files (x86)\VideoLAN\VLC
Windows 32-bit: C:\Program Files\VideoLAN\VLC
- Right-click on exe and select properties
- Click on the compatibility tab
- Check on the Run this program in compatibility mode for and select Window’s previous version
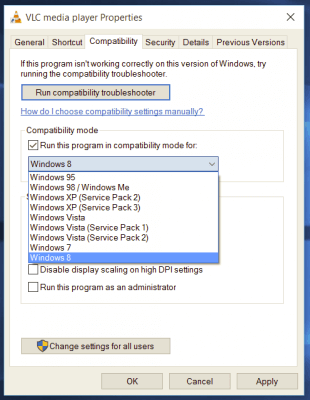
- Click on OK
Solution 3: Try Disabling Pre-loading MKV Files
Some Windows users have fixed their VLC media player crashing issue by disabling the pre-loading MKV files. Follow the steps to do so:
- Open VLC media player
- Press CTRL + P to open preferences
- At the bottom of the page select All>show settings
- Expand the nodes given below:
Input/ Codecs
Demuxers
Matroska
- Un-tick the Pre-load MKV files
- Click Save.
Solution 4: Reinstall the VLC player
If your VLC media player crashes issue is not solved by any of the above-given solutions then try reinstalling the VLC player to fix this issue.
Follow the steps to uninstall and reinstall VLC:
- Press Windows + X key
- Select Apps and Features
- Select VLC media player and uninstall it
- Reboot your computer
- Re-install the VLC setup from the official website
- Double-click on the installer and follow the instructions on the screen
Or you can try Revo Uninstaller which will help you to uninstall the program completely without leaving traces, junk files and others on the computer.
Get Revo Uninstaller to Uninstall Programs Completely
Hope now your question about how to fix the VLC media player crash is solved and you are able to use the VLC media player with ease.
4: VLC Not Working
Many users are asking the same question why is my VLC player not working? Well, the problem commonly occurs due to a common VLC glitch, or due to a video card.
Sometimes the preference setting or playing a codec that is not installed can also cause the VLC not working issue.
To solve this issue, very first quit the program and then restart VLC, if this won’t work for you to fix the VLC media player not working Windows 10 problem, then go through the solutions provided below.
Solution 1: Alter Power Settings
To reduce power consumption if your PC is in Battery Saver mode, your usage of hardware is reduced. For the smooth playing of HD, video hardware demands more power.
High performances power consumes access to power which drains battery life. So, to keep the power supply at medium and also to have an HD video player you need to change power settings in order to extend battery life in Windows 10.
Follow the steps to do so:
- Go to the Control Panel and click on Power Options.
- Click on the radio button with High performance

Now adjust it according to your PC.
Solution 2: Alter FFmpeg audio/video decoder
If you facing a lagging issue in the VLC media player with MKV file, then change the number of FFmpeg threads that are used for transcoding multimedia files to the value 2.
Follow the steps to change the settings:
- Open the VLC media player and click on Tools.
- From the Tools drop-down menu, go to the Preference from the tools drop-down menu or press CTRL + P to open
- At the bottom of the page select All under show settings
- Click on the Input/ Codecs section
- Go to the Video codecs
- Expand the Video codecs and click on the FFmpeg.
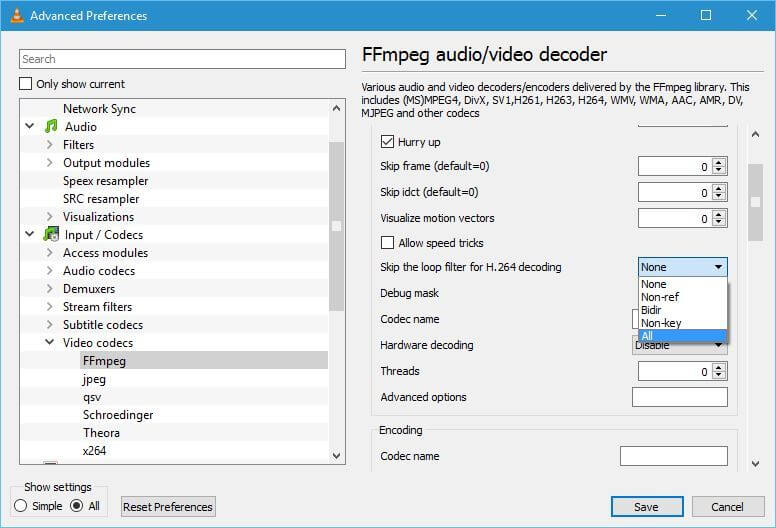
- Search for the Threads option and change its value to 2.
- Click on Save to apply the changes.
Recommended Solution to Fix Various PC Problems
If your system is not responding well, gets freezes or crashes in between any task then it is advised you to scan your PC/Laptop with the PC Repair Tool.
This tool is skilled in fixing various PC-related issues, recovering damaged/corrupt files, scanning for viruses and others. It is easy to use and improves Windows performance.
Get PC Repair Tool to Fix Errors and Enhance PC Performances
Conclusion
Well, that’s all about VLC media player problems. The above-provided solutions will help you to fix all VLC-related issues.
Make sure to follow the solutions given one by one and fix VLC media player not working problems in Windows 10 & 11.
Hope this article helped you in solving your VLC-related issues such as crashing, lagging, scrambled video, stuttering and more.
However, if you have any suggestions or questions regarding this article then feel free to share them on our Facebook Page.
Good Luck..!

Hardeep has always been a Windows lover ever since she got her hands on her first Windows XP PC. She has always been enthusiastic about technological stuff, especially Artificial Intelligence (AI) computing. Before joining PC Error Fix, she worked as a freelancer and worked on numerous technical projects.
Решение проблем
VLC media player
Если вы столкнулись с проблемой, при которой звук отстает от картинки или воспроизводится с запозданием, то это можно легко исправить. Для того, чтобы произвести синхронизацию, вам нужно:
- В меню найти пункт «Инструменты» и в выпадающем списке кликнуть на «Эффекты и фильтры».
- В появившемся окне настроек активировать вкладку «Синхронизация».
- Стрелками вверх или вниз настроить синхронизацию дорожки звука (с шагом в 0,1с).
- Если требуется более точная настройка, то можно ввести необходимое значение вручную.
В этом же разделе меню можно синхронизировать не только звук, но и субтитры к видео. В этом случае стрелками изменяйте пункт «Синхронизация дорожки субтитров».
В случае, если при просмотре видео вы столкнулись со слишком темной картинкой, то причина может быть в некачественном видеофайле или проблемами с видеокартой.
- Если проблема только с одним видеофайлом, то можно легко настроить яркость картинки при помощи настроек проигрывателя. Для этого нам нужно:
- В меню кликнуть на пункт «Инструменты».
- В открывшемся списке выбрать пункт «Эффекты и фильтры».
- Перейти на вкладку «Видеоэффекты».
- Активировать чекбокс «Настройка изображения» и переместить ползунок яркости в оптимальное положение.
- Если эта проблема прослеживается во всех воспроизводимых видеозаписях, то дело может быть в видеокарте. Попробуйте в настройках видеокарты отключить аппаратное наложение видео. В случае, если проблема была в этом, то может помочь удаление и переустановка видеодрайвера.
VLC Media Player поддерживает множество форматов аудио и видеофайлов. Но если вы столкнулись с тем, что какой-либо файл не открывается, то для начала стоит проверить, действительно ли расширение файла соответствует поддерживаемому этим медиапроигрывателем. Проверить это можно на странице «Особенности». Если формат файла отсутствует в представленном списке, то попробуйте загрузить и установить кодеки.
Если при воспроизведении аудио вы сталкиваетесь с тем, что звук очередного файла значительно громче или тише предыдущего, то это можно исправить. Откройте:
Инструменты → Настройки → Аудио
Там в разделе «Эффекты» поставьте галочку напротив «Нормализовать громкость до» и настройте необходимое значение. Чем оно ниже, тем меньше будут перепады звука.
Для того, чтобы плеер VLC автоматически исправлял ошибки при воспроизведении поврежденного видеофайла вам нужно открыть:
Инструменты → Настройки → Ввод/кодеки
Найдите пункт под названием «При открытии поврежденного avi» и из выпадающего списка выберите «Всегда исправлять»
файлы
vlc media player
диски
vlc media player
веб-камеры
vlc media player
устройства
vlc media player
потоки
vlc media player
Универсальный
iOS
Windows
Android
linux
MacOS
media player
VLC
универсальный кросс-платформенный медиаплеер, который способен воспроизвести практически любой аудио или видео файл
-
Home
-
MovieMaker
- [9 Ways] How to Fix the VLC Error “Your Input Can’t be Opened”
By Zoe |
Last Updated
You get an error message “Your input can’t be opened: VLC is unable to open MRL” when trying to stream a video from the Internet or play a YouTube video. How to fix the error? Here are 9 solutions for you.
VLC is a multimedia player that can play local media files as well as stream videos from websites like YouTube. When you try to stream a YouTube video, you may get the following message:
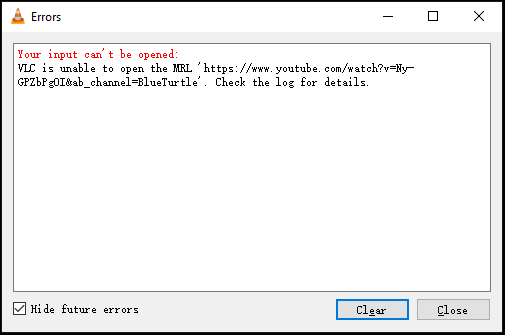
How to fix the Your input can’t be opened VLC error? Continue to read this post!
9 Solutions to Fix VLC “Your input can’t be opened”
- Reset VLC preferences
- Save the YouTube.lau file in the VLC playlist folder
- Turn off Windows Defender Firewall
- Disable third-party antivirus software
- Check for VLC Updates
- Reinstall VLC
- Change the file ownership
- Use another video player – MiniTool MovieMaker
- Download videos from YouTube
Fix 1. Reset VLC Preferences
To resolve this problem, you can reset your VLC preferences. Here’s how:
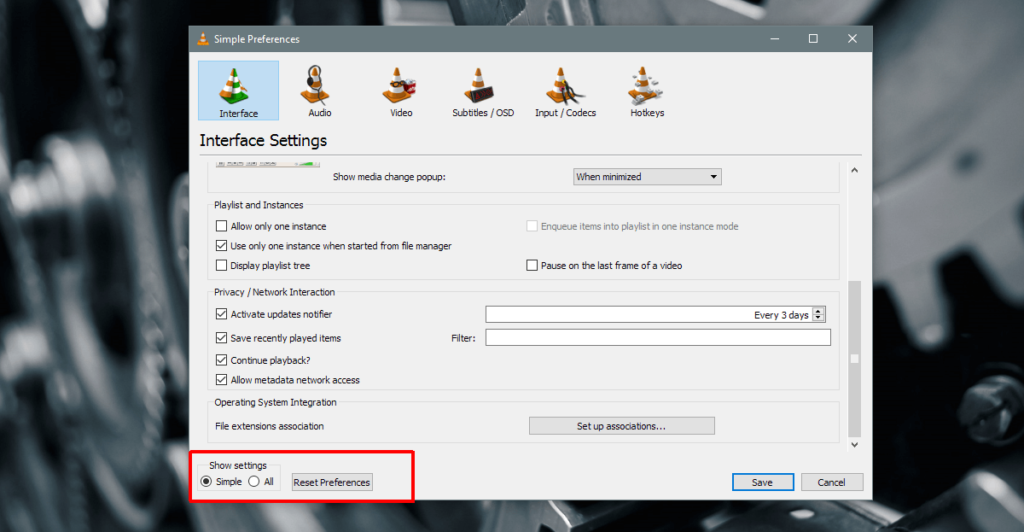
- Open the VLC app and head to Tools > Preferences.
- On the Simple Preferences window, click the Reset Preferences button and click OK to reset your VLC preferences.
- Then check if your video is streamable in VLC.
Fix 2. Save the youtube.lau File in the VLC Playlist Folder
Another solution for fix Your input can’t be opened is to put the YouTube.lau file in the VLC playlist folder. Here’s how:
- Click this link and copy the code.
- Create a new text file and paste the code. Then rename it “youtube.luac” and copy the file.
- Go to: C:ProgramFiles(x86)/VideoLAN/VLC/lau/playlist. If you can’t find the folder, right-click the VLC media player icon on the desktop and choose the Open file location.
- Replace the youtube.luac file with the file you just created.
Fix 3. Turn off Windows Defender Firewall
YouTube URLs would be blocked by Windows Firewall. To fix “VLC is unable to open the MRL”, you can disable Windows Defender Firewall. Here’s how:
- Click the search icon on the taskbar, enter “Windows Defender Firewall” and open it.
- In the left pane, click Turn Windows Defender Firewall on or off. Under the Private network settings and the Public network settings, check the Turn off Windows Defender Firewall box.
- Click OK.
Fix 4. Disable Antivirus Software
Antivirus software can also cause the “Your input can’t be opened” error. You can fix it by turning off antivirus software. Here’s how:
- Go to Settings > Update & Security.
- Click on Windows Security and select the Virus & threat protection option.
- Under the Virus & threat protection settings, click Manage settings and turn off Real-time protection.
Also read: Can VLC Play 4K Videos? How to Fix VLC 4K Choppy Playback Issue?
Fix 5. Check for VLC Updates
Update your VLC to the latest version might fix the error. To check for updates, open VLC and go to Help > Check for updates in VLC.
Fix 6. Reinstall VLC
If the “Your Input can’t be opened: VLC is unable to open the MRL” error still exists, reinstall the VLC media player.
Fix 7. Change the File Ownership
Sometimes, this error occurs when you try to play local videos on your PC. To fix it, you can take ownership of the video. Here’s how:
- Find the video and right-click on it.
- Select the Properties option from the popup menu. Go to the Security tab and click the Advanced button.
- Tap on Change and enter “Administrator” in the box. Click OK to continue.
- Then check the Replace all child object permission entries with inheritable permission entries from this object box and click Apply > OK.
Fix 8. Use Another Video Player
VLC not working? VLC can’t play videos? You can use a video player – MiniTool MovieMaker (or other media players). It’s a free video player, video editor, and video converter.
MiniTool MovieMakerClick to Download100%Clean & Safe
Fix 9. Download Videos from YouTube
If you can’t stream videos from YouTube with VLC, download them to your computer. Here recommend MiniTool Video Converter to you. It can download YouTube videos/playlists in MP4 and MP3 format for free.
Conclusion
Now, try the above methods and check if it fixed the “Your input can’t be opened: VLC is unable to open the MRL” error.
About The Author
Position: Columnist
Zoe works as editor at MiniTool for many years, writing articles about video editing skills. She has published hundreds of articles about video editing, video conversion, video downloading, audio editing and photo editing. She also writes some articles about YouTube, Facebook, Instagram and Twitter. During her spare time, Zoe loves reading, traveling, skating, watching movies, musicals and plays. Her favorite musicals include The Phantom of the Opera, Hamilton and Le Rouge et le Noir.