
Содержание
- Что вызывает «ошибку инициализации» Dead by Daylight?
Dead by Daylight в последнее время набирает большую популярность, но некоторые пользователи не в восторге от этого. Одна повторяющаяся проблема с этой игрой — «Ошибка инициализации. Эта перекрестная проблема возникает во время запуска игры — после того, как игра попросит вас нажать ‘А‘ продолжать. После короткой ведущей последовательности «Ошибка инициализации» появляется и мешает пользователю играть в игру. Эта конкретная проблема не является эксклюзивной для определенной платформы, поскольку она встречается на Xbox One, Playstation 4 и ПК.

Мы исследовали эту конкретную проблему, изучив различные отчеты пользователей и протестировав различные стратегии восстановления, которые успешно использовались другими затронутыми пользователями. Как оказалось, несколько разных сценариев могут привести к появлению этой проблемы. Вот краткий список виновников, которые могут нести ответственность за эту проблему:
- Проблема с сервером — Как оказалось, этой конкретной проблеме также может способствовать проблема с сервером, которая находится вне вашего контроля. Есть отчеты пользователей об этой проблеме, возникающей с Xbox One, Playstation 4 и ПК. В подобных ситуациях единственное, что вы можете сделать, это подтвердить, что проблема связана с сервером (а не локально), и подождать, пока квалифицированные инженеры / разработчики разрешат проблему.
- NAT закрыт — Согласно различным отчетам пользователей, эта ошибка может возникать из-за того, что перевод сетевого адреса не открывается в сети, к которой вы подключаетесь. Если этот сценарий применим, вы можете решить проблему, зайдя в настройки вашего маршрутизатора и включив функцию UPnP, чтобы игра могла открывать свои порты, необходимые для соединения с игровым сервером.
- Поврежденное постоянное хранилище — Если вы играете в Dead by Daylight на Xbox One с физической копии, скорее всего, вы столкнулись с проблемой из-за сбоя, вызванного постоянным хранилищем. В этом случае вы можете решить проблему, открыв настройки консоли Xbox One и очистив постоянное хранилище.
- Проблема, связанная с прошивкой — Как оказалось, в определенных ситуациях эта конкретная проблема может возникать из-за того, что некоторые временные файлы, активно используемые прошивкой вашей консоли, были повреждены. В этом случае вы сможете решить проблему, выполнив процедуру выключения и выключения питания на консоли (работает для Xbox One и Ps4).
- Поврежденная папка с игрой Steam — Если вы столкнулись с этой проблемой при попытке играть в игру на ПК и установили ее через Steam, возможно, это связано с проблемой синхронизации. Если этот сценарий применим, вы можете решить проблему, удалив папку с игрой и активировав облачную функцию Steam, чтобы платформа установила последнюю версию.
Если вы в настоящее время пытаетесь устранить это сообщение об ошибке, эта статья предоставит вам несколько различных шагов по устранению неполадок. Ниже вы найдете список возможных стратегий восстановления, которые другие пользователи успешно использовали для решения проблемы Dead by Daylight. «Ошибка инициализации».
Имейте в виду, что некоторые из представленных ниже методов неприменимы, поскольку проблема заключается в мультиплатформенности. Для достижения наилучших результатов начните следовать приведенным ниже инструкциям по порядку и игнорируйте возможные исправления, предназначенные для другой платформы. В конце концов, вы должны найти метод, который решит проблему (или, по крайней мере, определит проблему) на вашей игровой платформе, независимо от виновника, вызвавшего проблему.
Давай начнем!
Метод 1: поиск проблем с сервером
Прежде чем применять какие-либо другие стратегии ремонта, вы должны начать поиски неисправностей, убедившись, что проблема не выходит за рамки вашего контроля. Несколько затронутых пользователей подтвердили, что в их случае проблема была вызвана проблемой сервера, из-за которой игра не могла получить доступ к сетевым функциям. Сетевые службы могут быть отключены из-за планового обслуживания или из-за периода отключения, который не был запланирован.
Это может произойти как на PS4 из-за проблем с сетью Playstation, так и на ПК или Xbox One из-за онлайн-службы Xbox Live.
Если вы окажетесь в подобной ситуации, единственная стратегия устранения неполадок, которая у вас есть, — это подтвердить проблему и дождаться, пока проблема с сервером будет исправлена Microsoft или Sony.
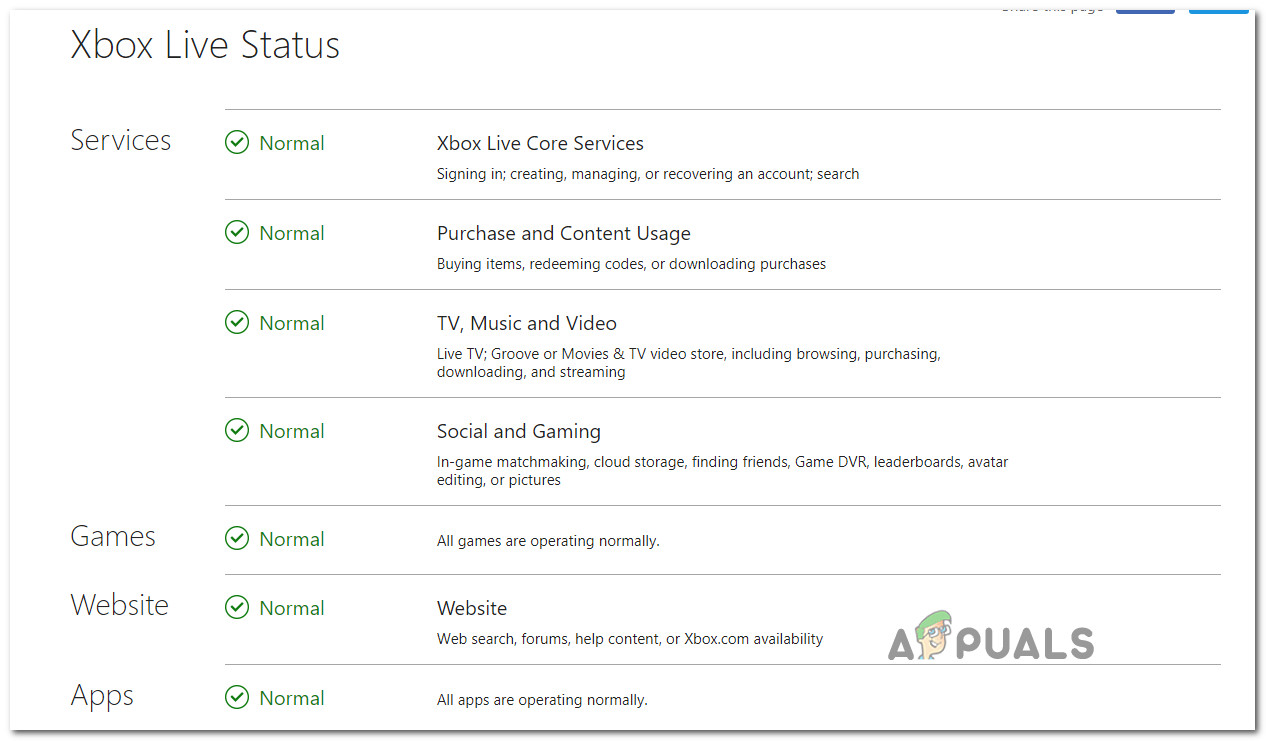
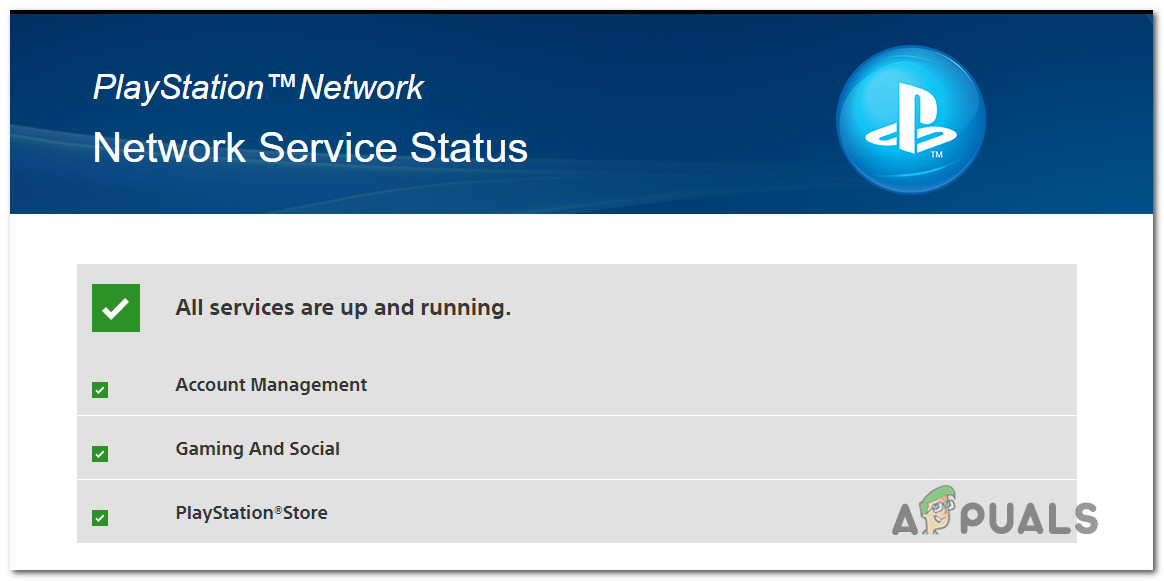
Чтобы проверить, есть ли проблема с серверами Microsoft, перейдите по этой ссылке (Вот) и проверьте, не возникают ли проблемы с какими-либо службами.

Если вы столкнулись с проблемой на консоли PS4, перейдите по этой ссылке (Вот) и посмотрите, не предшествует ли какой-либо услуге красный восклицательный или вопросительный знак.

Если ваше расследование показало, что проблема является широко распространенной и возникает из-за проблемы с сервером, вы можете сделать вывод, что проблема не ограничивается вашей консолью. В этом случае не рекомендуется следовать любой из других стратегий ремонта, представленных ниже, поскольку они не решат проблему. Если вы оказались в такой ситуации, все, что вам нужно сделать, это подождать, пока проблема не будет решена инженерами Sony или Microsoft.
Однако, если расследование не выявило каких-либо проблем со службами Xbox Live или Playstation Network, начните использовать следующие методы ниже, чтобы применить некоторые стратегии восстановления, которые другие затронутые пользователи успешно реализовали для решения «Ошибка инициализации».
Метод 2: Убедитесь, что NAT открыт
Как оказалось, это конкретное сообщение об ошибке в Dead by Daylight часто связано с тем фактом, что преобразование сетевых адресов (NAT) не открывается в сети, к которой подключено устройство gamin (консоль или ПК). Несколько затронутых пользователей сообщили, что им удалось решить проблему и нормально играть в игру после того, как они открыли статус NAT.
Таким образом вы, по сути, гарантируете, что любые проблемы с подключением, вызванные несогласованностью NAT, не возникнут. Это универсальное исправление, которое будет работать независимо от платформы, на которой вы столкнулись с проблемой.
Следуйте приведенным ниже инструкциям, чтобы включить UPnP (Universal Plug and Play) на маршрутизаторе, чтобы маршрутизатор автоматически перенаправлял необходимые порты и избегал таких проблем, как «Ошибка инициализации». Вот что вам нужно сделать:
Примечание: Если вы уверены, что ваш маршрутизатор не поддерживает UPnP, пропустите этот метод и перейдите сразу к Способ 3.
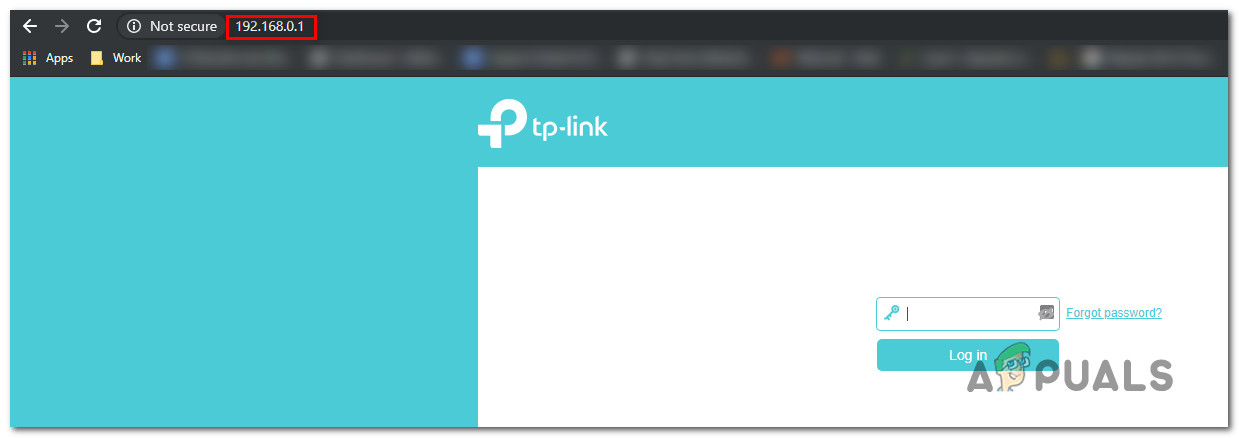
- Убедитесь, что ваша консоль или компьютер подключен к маршрутизатору, который поддерживает подключение к Интернету. Убедившись в этом, введите 192.168.0.1 или 192.168.1.1 и нажмите Войти открыть Настройки страницу вашего роутера.

Примечание: Если эти адреса по умолчанию не работают, поищите в Интернете конкретные действия по доступу к настройкам маршрутизатора.
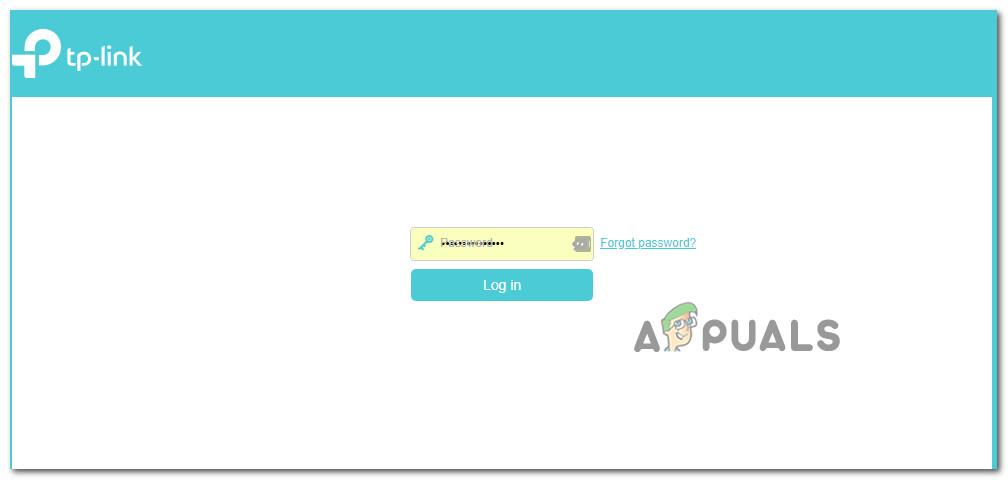
- Как только вы окажетесь на начальной странице входа, введите учетные данные своего маршрутизатора (не сетевые учетные данные). Если вы не меняли логин по умолчанию, имя пользователя и пароль по умолчанию должны быть либо «Админ» или ‘1234’.
Примечание: Если учетные данные по умолчанию не подходят для вас, поищите в Интернете конкретные действия по сбросу вашего маршрутизатора до учетных данных по умолчанию.
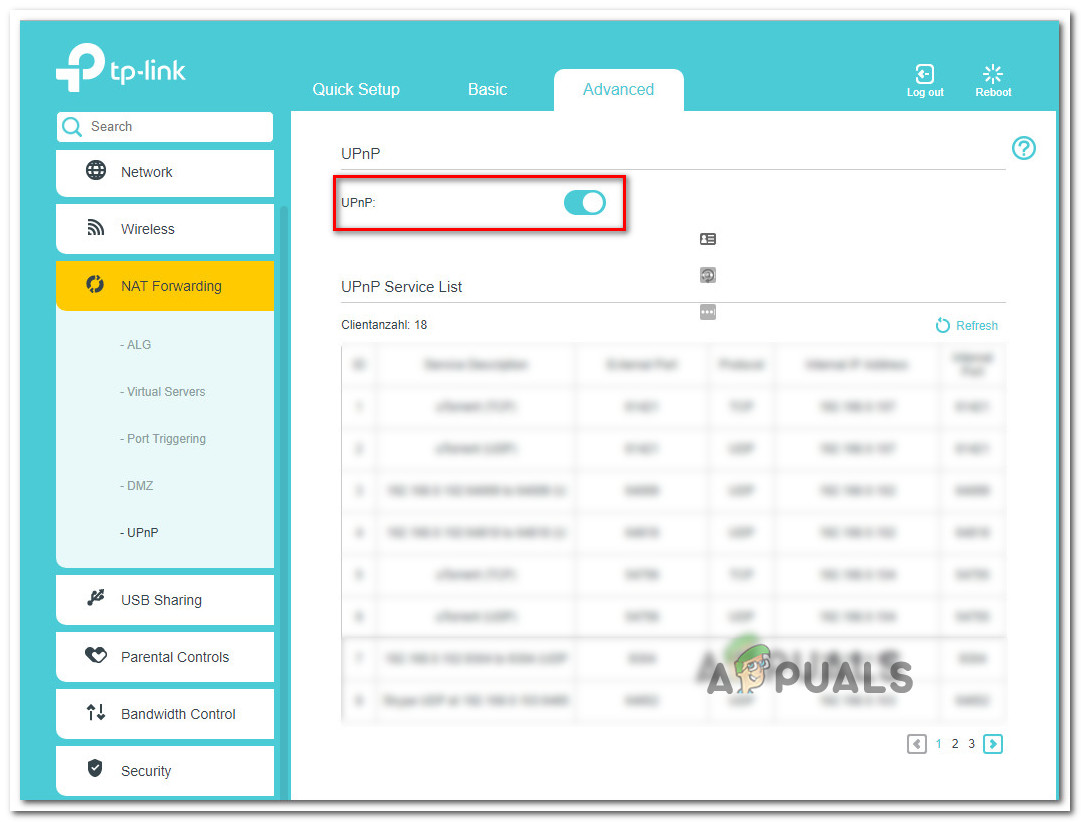
- После того, как вам удастся войти в настройки маршрутизатора, найдите Продвинутый меню. Как только вы его увидите, перейдите к Переадресация NAT и найдите подменю UPnP.
Заметка: Помните, что в зависимости от производителя вашего маршрутизатора меню может выглядеть иначе, чем в приведенных выше инструкциях. Но если вы не используете сильно устаревший маршрутизатор, вы должны найти вариант, который позволит вам включить UPnP. Подавляющее большинство современных роутеров его поддерживают.
- После UPnP перезапустите маршрутизатор и консоль, чтобы открылись необходимые порты.
- Затем, после завершения следующего запуска, снова запустите игру и посмотрите, решена ли проблема.


Если вы все еще сталкиваетесь с «Ошибка инициализации» или этот метод неприменим, перейдите к следующему способу ниже.
Метод 3. Очистка постоянного хранилища (только Xbox One)
Несколько пользователей Xbox One, которые также сталкивались с «Ошибка инициализации» при попытке играть в Dead by Daylight сообщили, что проблема была решена после того, как они получили доступ к настройкам своей консоли и очистили постоянное хранилище.
Это постоянное хранилище — это пространство, которое Xbox One автоматически создает для хранения контента, который напрямую связан с дисками Blu-Ray, которые вы вставляете в консоль. Но имейте в виду, что это исправление будет эффективным только в тех случаях, когда у вас есть физическая копия Dead by Daylight.
Примечание: Этот метод применим только для пользователей, которые сталкиваются с проблемой на Xbox One. Если вы столкнулись с «Ошибка инициализации» на другой игровой платформе этот метод не применим. В этом случае перейдите к следующему способу ниже.
Вот краткое руководство по очистке постоянного хранилища на консоли Xbox One, чтобы устранить Dead by Daylight «Ошибка инициализации»:
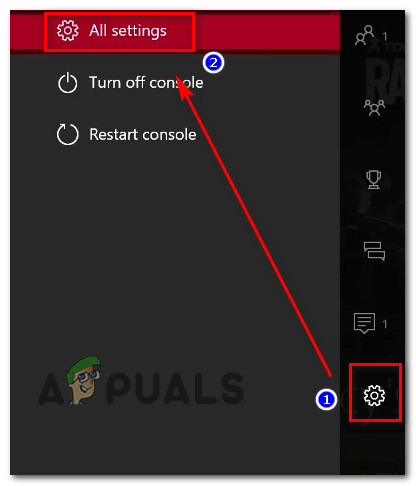
- Превратите свою консоль Xbox one в одну. Как только вы окажетесь в главном меню панели управления консоли Xbox One, откройте Настройки меню.
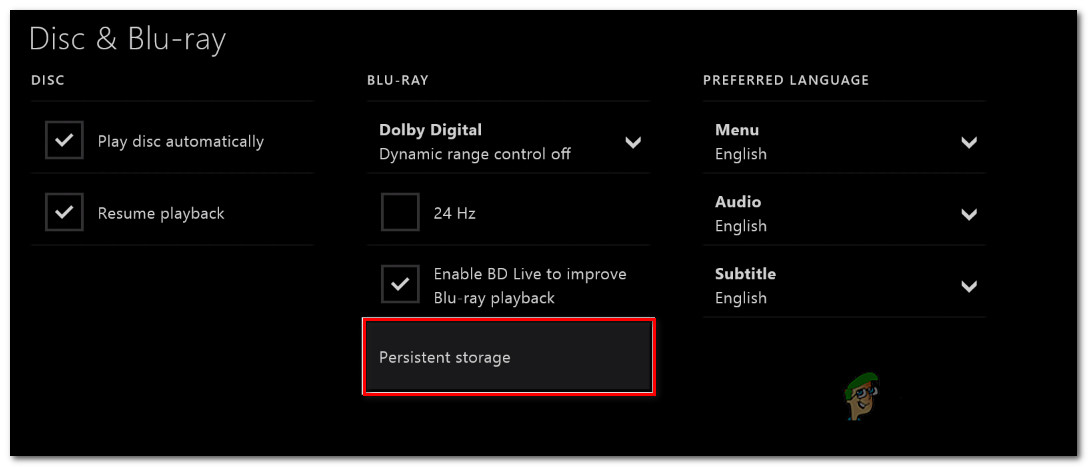
- Как только вам удастся попасть на экран настроек, откройте Приставка настройки, затем выберите Диск и Blu-Ray (подопция расположена на правой панели).
- После того, как вам удастся попасть в меню дисков и Blu-Ray, войдите в Постоянное хранение меню (под Blu-Ray)
- Как только вы окажетесь в правильном меню, выберите Очистить постоянный вариант хранения и дождитесь завершения процесса.
- Перезагрузите консоль и посмотрите, решится ли проблема при следующем запуске консоли.


Если вы все еще сталкиваетесь с «Ошибка инициализации» если вы пытаетесь запустить Day by Daylight или этот метод не подходит, перейдите к следующему способу ниже.
Метод 4: выключите и снова включите консоль (только консоль)
Если ни один из перечисленных ниже методов не помог вам решить проблему, скорее всего, вы имеете дело с ошибкой прошивки, которая в конечном итоге мешает соединению между игровым сервером и Dead by Daylight. В подобных ситуациях единственное жизнеспособное решение — обучить силовые конденсаторы удалять временные данные, вызывающие проблему. Это устранит большинство проблем, связанных с прошивкой, которые могут вызвать это сообщение об ошибке.
Затронутые пользователи подтвердили, что этот метод эффективен как на Xbox One, так и на PS4. Мы создали два отдельных руководства для консольных игроков обеих категорий. Следуйте тому руководству, которое применимо к вашей ситуации.
Переключение питания на Xbox One
- Убедитесь, что консоль полностью включена, затем нажмите и удерживайте кнопку питания Xbox One (на передней панели консоли. Удерживайте эту кнопку нажатой в течение 10 секунд или около того — или пока не увидите, что передний светодиодный индикатор периодически мигает.
- Подождите около минуты, прежде чем обычным способом повернуть консоль обратно. Если вы хотите убедиться, что процесс прошел успешно, физически подключите шнур питания к розетке и подождите пару секунд, прежде чем снова подключить его.
- Снова запустите консоль и просмотрите последовательность анимаций при следующем запуске. Если вы видите логотип с анимацией Xbox, значит, вы успешно подтвердили, что процедура выключения и выключения питания прошла успешно.
- После завершения последовательности загрузки снова запустите игру и посмотрите, решена ли проблема.

Переключение питания на Ps4
- Когда консоль PS4 полностью включена (не в спящем режиме), нажмите и удерживайте кнопку питания (на передней панели консоли, пока консоль полностью не выключится. Вы можете отпустить кнопку, как только увидите, что индикатор на передней панели перестает мигать. .
- После выключения консоли физически выньте шнур питания из розетки и дайте ему постоять пару секунд, прежде чем снова подключить.
- По истечении этого периода снова запустите консоль обычным способом и посмотрите, решена ли проблема.

Если этот метод был неприменим или вы следовали ему безрезультатно, воспользуйтесь следующим способом.
Метод 5: удаление папки с игрой и активация Steam Cloud (только для ПК)
Нескольким пользователям Windows, столкнувшимся с этой проблемой на ПК, удалось исправить ее, удалив основную папку с игрой, а затем включив функцию Steam Cloud. Согласно сообщениям пользователей, эта процедура приводит к тому, что клиент Steam повторно синхронизирует все файлы и доводит игру до последней доступной версии.
Это исправление применимо только к пользователям ПК. Если вы столкнулись с проблемой на консоли, вы не сможете следовать приведенным ниже инструкциям.
Вот краткое руководство по удалению папки Steam из Dead by Daylight и активации Steam Cloud для решения проблемы «Ошибка инициализации» на ПК:
- Откройте проводник и перейдите в следующее место:
C: Program Files (x86) Steam userdata * ВАШ ID *
Примечание: * Ваш ID * — это просто заполнитель. Замените его своим идентификатором Steam, чтобы перейти в нужное место.
- Как только вы окажетесь в правильном месте, найдите имя папки 381210. Увидев его, щелкните его правой кнопкой мыши и выберите «Удалить» в появившемся контекстном меню.
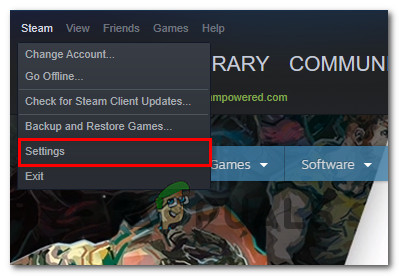
- Закройте проводник и откройте Steam. Внутри Платформа Steam, нажмите на Пар (верхний левый угол) и выберите Настройки из недавно появившегося меню.
- Как только вы окажетесь внутри Настройки экрана, выберите Облако в вертикальном меню слева, затем перейдите на правую панель и установите флажок, связанный с Включите синхронизацию Steam Cloud для приложений, которые ее поддерживают.
- Перезапустите клиент Steam и дождитесь, пока программа повторно загрузит данные, необходимые для запуска Dead by Daylight. После завершения процесса снова запустите приложение и посмотрите, решена ли проблема.


Turning on the NAT Forwarding UPnP option might help
by Loredana Harsana
Loredana is a passionate writer with a keen interest in PC software and technology. She started off writing about mobile phones back when Samsung Galaxy S II was… read more
Updated on
- Dead By Daylight is a horror survival game very popular and raging these days.
- Many gamers are finding the initialization error after launching this game.
- Server issues, NAT Forwarding, and Steam Cloud synchronization are some of the common tricks to fix this error.
The Dead By Daylight game is a multiplayer horror online game. It can be played on computers, Xbox, PlayStation, Nintendo Switch, and Android devices.
This game was released in the year 2016 by Behaviour Interactive. It started attracting more and more gamers and became very popular soon. This is not just a regular game but a strategic survival type of game that involves a lot of blood.
In this 5-players game, one player is a killer and tries to kill the other four players who are the survivors to win the game. Those four survivors need to escape by finding the exit gates without being caught by the killer. Isn’t this very interesting to play?
Many gamers recently got an initialization error on the Dead By Daylight game while trying to open and log in to the game. Some other users also got an error code 8018 while playing this game.
What does initialization error mean on Dead By Daylight?
If any player wants to play the Dead By Daylight game on their systems like Windows, Xbox, or PlayStation, they need to start the system and open the game.
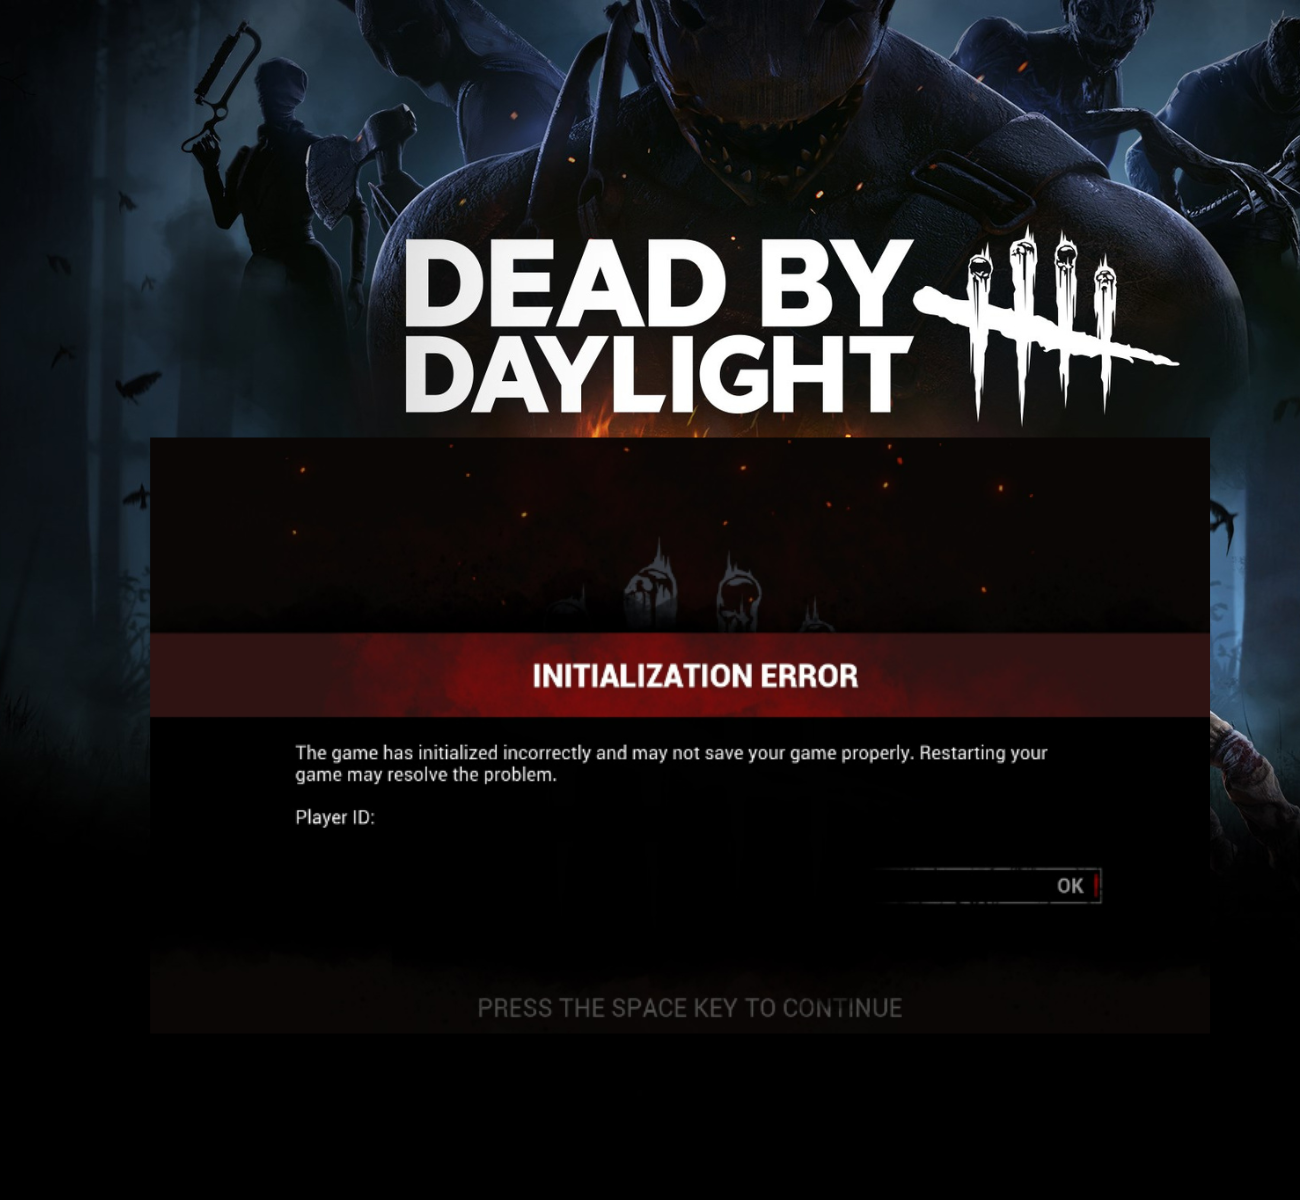
After opening the game app, they need to log in using their account credentials. But after signing in, it tries to initialize the game where the players get an error which says Initialization Error – The game has initialized incorrectly and may not save game properly. Restarting your game may resolve this problem.
This also shows the PlayerID and the error message on the game screen and closes the app after the player presses any key.
Don’t fret if you also get the same initialization error on the Dead By Daylight game. We have explained three quick and easy ways to fix this error in the article below.
How do I fix the initialization error in Dead By Daylight?
1. Check whether the game server is down or not
If the Dead By Daylight game server is down for maintenance or due to request overload to the server, the initialization error tends to occur while initializing the game. So you can check whether the game server is down or not using the Downdetector webpage.
If you are using the Xbox device to play this game and get this error, the Xbox server may be down, which can be known by checking Xbox live status.
Similarly, one can check the PlayStation server status to see if it is down or not. If any servers have issues, please wait an hour or so and then try launching the game.
Quick Tip:
If you hate when their servers are down for whatever reason, keep in mind that some of them might still be up. If you want to be able to connect to them we recommend using a third-party software.
PIA is a VPN that allows you to access any servers worldwide. While this is not limited to Dead by Daylight, you can do this in any game. If you worry about privacy, its “MACE” feature will block any ads, trackers, and malicious sites for you.
Private Internet Access
100% open source with no logs saved and unlimited bandwidth.
2. Delete the Game folder and Enable Steam Cloud Synchronization
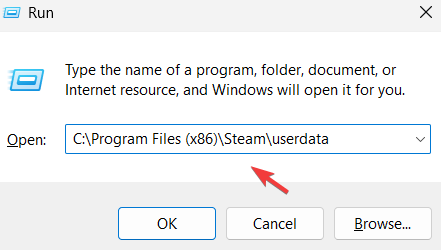
- Firstly, open the run command box by pressing the Windows and R keys together.
- Type C:\Program Files (x86)\Steam\userdata in the run box and press the Enter key.

- This opens a user data folder inside your system’s Steam app folder.
- Locate the folder with your ID as the folder name and open it by double-clicking on it.
- Inside this folder, you will find a folder named 381210, which is for the Dead By Daylight game.
- Delete this folder by right-clicking on it and clicking the Delete icon on top of the context menu.

- After deleting the game folder, open the Steam client app on your system.
- Sign in to the Steam app and click Steam on the top menu bar.
- Select the Settings option from the list.

- In the Settings window, click Cloud on the left side panel.
- On the right-hand side, you need to select the checkbox called Enable Steam Cloud synchronization for applications that support it by clicking on it.
- After selecting it, click OK in the settings window.

- Then restart the system once and try to run the game without any errors.


3. Turn on the NAT Forwarding UPnP option
- Open your web browser app on your system.
- In a new tab, type 192.168.0.1 or 192.168.1.1, the default IP address for the router, and press the Enter key.
- Once the sign-in page appears, please sign in with your router credentials.
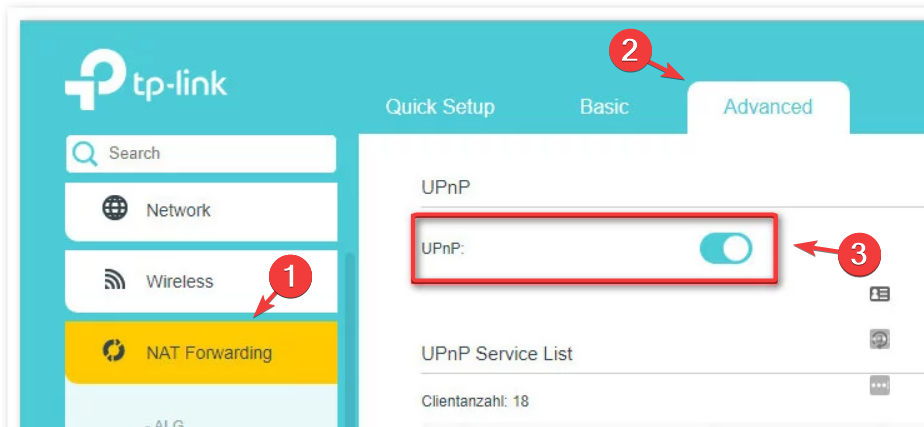
- Next, click the NAT Forwarding option on the left-hand side.
- Then, under the Advanced tab, toggle the UPnP option to turn it on.

- After enabling it, close the web browser and restart the router once.
- Now restart the system as well and try launching the game.
How do I contact Dead By Daylight support?
We sometimes need support to discuss some problems playing or have difficulty with the game levels. But, of course, you can always go to the support page of the Dead By Daylight game and explore them.
There is a dedicated forum if you want to talk to some other good players to have a game conversation.
Still, if you cannot resolve your issues by referring to all the possible FAQs given on the support page, you can always submit your request regarding the matter.
Try these 3 VPNs for Dead by Daylight to reduce ping and lag, and we hope you have already resolved the initialization error. Please let us know by commenting below!
![]()
Dead by Daylight has been gaining a lot of popularity recently, but some users are not thrilled about it. One recurring issue with this game is the ‘Initialization error. This cross-issue problem is encountered during the startup sequence of the game – After the game asks you to press ‘A‘ to continue. After a short leading sequence, the ‘Initialization Error’ appears and is preventing the user from playing the game. This particular issue is not exclusive to a certain platform as it’s encountered on Xbox One, Playstation 4 and PC.

What’s causing the Dead by Daylight ‘Initialization Error’?
We investigated this particular issue by looking into various user reports and by testing out the different repair strategies that were successfully used by other affected users. As it turns out, several different scenarios might lead to the apparition of this issue. Here’s a shortlist of culprits that might be responsible for this problem:
- Server issue – As it turns out, this particular issue can also be facilitated by a server issue that is beyond your control. There are user reports of this problem occurring with Xbox One, Playstation 4 and PC. In situations like this one, the only thing you can do is confirm that the issue is server-side (not occurring locally) and wait for the qualified engineers/developers to resolve the issue.
- NAT is closed – According to various user reports, this error can occur because the Network Adress Translation is not opened on the network you’re connecting to. If this scenario is applicable, you can resolve the problem by accessing your router settings and enabling the UPnP feature so that the game can open its ports that are needed for the connection with the game server.
- Corrupted persistent storage – If you’re playing Dead by Daylight on Xbox One from a physical copy, chances are you’re encountering the issue due to a glitch caused by your persistent storage. In this case, you can resolve the issue by accessing your Xbox One console settings and clearing the persistent storage.
- Firmware-related issue – As it turns out, in certain situations, this particular issue can occur due to some temporary files actively being used by your console firmware that have become corrupted. In this case, you should be able to resolve the issue by performing a power-cycling procedure on your console (works for Xbox One and Ps4.)
- Corrupted Steam game folder – If you’re encountering this issue while trying to play the game on a PC and you installed it via Steam, it’s probably because of a sync problem. If this scenario is applicable, you can resolve the issue by deleting the game folder and activating the Steam cloud feature to force the platform to install the latest version.
If you’re currently to resolve this error message, this article will provide you with several different troubleshooting steps. Down below, you’ll find a selection potential repair strategies that other users have successfully used to resolve the Dead by Daylight ‘Initialization Error’.
Keep in mind that some of the methods presented below will not be applicable since the issue is multi-platform. For the best results, start following the instructions below in order and disregard the potential fixes that are geared towards a different platform. Eventually, you should find a method that will resolve the issue (or at least identify the problem) on your gaming platform regardless of the culprit that’s causing the issue.
Let’s begin!
Method 1: Investigating for a server issue
Before you pursue any other repair strategies, you should start your troubleshooting quest by ensuring that the issue is not beyond your control. Several affected users have confirmed that in their case, the issue was facilitated by a server problem the prevented the game from accessing the network features. The network services may be down due to scheduled maintenance or due to an outage period that was not planned.
This can happen on both PS4 due to Playstation Network issues and on PC or Xbox one due to an online Xbox Live service.
If you find yourself in a situation like this one, the only troubleshooting strategy you have is to confirm the issue and wait for the server issue to be fixed by Microsoft or Sony.
To verify if there’s a problem with Microsoft servers, visit this link (here) and check to see if any services are affected by problems.
If you’re encountering the issue on a PS4 console, access this link (here) and see if any services are preceded by a red exclamation point or a question mark.
If your investigation revealed that the issue is wide-spread and it’s occurring due to a server issue, you can conclude that the issue is not limited to your console. In this case, following any of the other repair strategies presented below is not advisable since they will not resolve the issue. if you find yourself in this scenario, all you need to do is wait until the issue is resolved by Sony’s or Microsoft’s engineers.
However, in case the investigations didn’t reveal any issue with the Xbox Live or Playstation Network services, start following the next methods below to apply some repair strategies that other affected users have successfully implemented to resolve the ‘Initialization Error’.
Method 2: Ensuring that the NAT is Open
As it turns out, this particular error message in Dead by Daylight is often linked to the fact that the Network Adress Translation (NAT) is not opened on the network that the gamin device (console or PC) is connected to. Several affected users have reported that they managed to fix the issue and play the game normally after they opened the status of NAT.
By doing this, you’re essentially ensuring that any type of connectivity issues caused by NAT inconsistency is prevented from occurring. This is a universal fix that will work regardless of the platform that you’re encountering the issue on.
Follow the instructions below to enable UPnP (Universal Plug and Play) on your router to allow your router to forward the required ports automatically and avoid issues such as the ‘Initialization Error’. Here’s what you need to do:
Note: If you’re certain that your router doesn’t support UPnP, skip this method and move directly to Method 3.
- Make sure that your console or computer is connected to the router that’s maintaining the Internet connection. After you’ve made sure of this, type 192.168.0.1 or 192.168.1.1 and press Enter to open up the Settings page of your router.

Accessing the Settings page of your router Note: If these default addresses don’t work, search online for specific steps on accessing your router settings.
- Once you’re at the initial login page, insert the credentials of your router (not the network credentials). If you haven’t changed the default login, the default username and password should be either ‘admin’ or ‘1234’.

Accessing your router settings Note: If the default credentials don’t work for you, search online for specific steps on resetting your router to the default credentials.
- After you manage to get inside your router settings, look for the Advanced menu. Once you see it, go to the NAT forwarding tab and look for the UPnP sub-menu.

Enabling UPnP from your Router settings Note: Keep in mind that depending on your router manufacturer, the menu might look way different than the instructions above. But unless you’re using an extremely outdated router, you should find an option that will allow you to enable UPnP. The vast majority of modern routers will support it.
- After UPnP, restart both your router and your console so that the necessary ports are opened.
- Then, once the next startup is complete, launch the game again and see if the issue is now resolved.
If you’re still encountering the ‘Initialization Error’ or this method wasn’t applicable, move down to the next method below.
Method 3: Clearing Persistent Storage (Xbox One Only)
Several Xbox One users who were also encountering the ‘Initialization Error’ when trying to play Dead by Daylight have reported that the issue was resolved after they accessed their console settings and cleared the persistent storage.
This persistent storage is a space that Xbox One automatically creates to store the content that’s directly related to the Blu-Ray disks that you insert in your console. But keep in mind that this fix will only be effective in situations where you own a physical copy of Dead by Daylight.
Note: This method is only applicable for users that are encountering the issue on Xbox One. If you’re encountering the ‘Initialization Error’ on a different gaming platform, this method will not be applicable. In this case, move over to the next method below.
Here’s a quick guide on clearing the persistent storage on an Xbox one console to resolve the Dead by Daylight ‘Initialization Error’:
- Turn your Xbox one console one. Once you’re inside the main Dashboard menu of your Xbox One console, access the Settings menu.

Accessing the Settings menu on Xbox One - Once you manage to get inside the settings screen, access the Console settings, then select Disc & Blu-Ray (the sub-option located on the right pane).
- After you manage to get inside the Disc & Blu-Ray menu, access the Persistent storage menu (under Blu-Ray)

Accessing the Persistent Storage menu - Once you’re inside the correct menu, select the Clear Persistent storage option and wait for the process to complete.
- Restart your console and see if the issue is resolved at the next console startup.
If you’re still encountering the ‘Initialization Error’ when you try to launch Day by Daylight or this method wasn’t applicable, move down to the next method below.
Method 4: Power-cycling your console (console only)
If none of the methods below have allowed you to resolve the issue, you’re likely dealing with a firmware glitch that is ultimately interfering with the connection between the game server and Dead by Daylight. In situations like this one, the only viable fix is to train the power capacitors to remove the temporary data that’s causing the issue. This will fix most firmware-related issues that might trigger this error message.
Affected users have confirmed this method for being effective on both Xbox One and PS4. We’ve created two separate guides to accommodate both categories of console players. Follow whichever guide applies to your situation.
Power-cycling on Xbox One
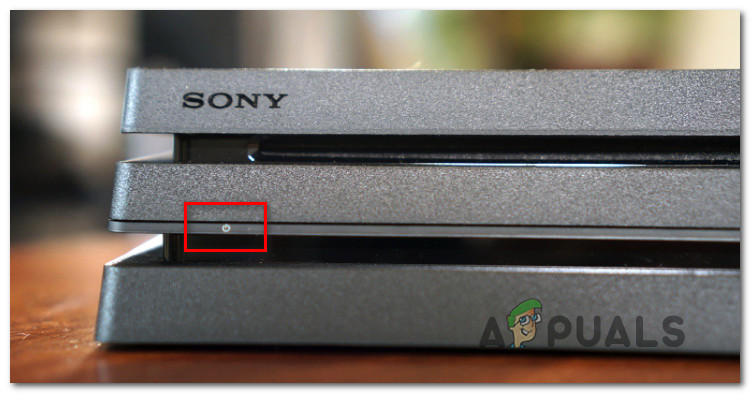
- Ensure that the console is fully-powered on, then press and hold on the Xbox One power button (on the front of your console. Keep that button pressed for 10 seconds or so – or until you see that the front LED flashing intermittently.

Perform a hard reset on Xbox One - Wait for about a minute or so before turning the console back conventionally. If you want to ensure that the process is successful, physically plug the power cord from the power outlet and wait for a couple of seconds before plugging it back in.
- Start your console once again and look for the animation sequence during the next startup. If you see the Xbox animation logo, you safely confirmed that the power-cycling procedure was successful.
- Once the boot sequence is complete, launch the game again and see if the issue is now resolved.
Power-cycling on Ps4
- With your PS4 console fully turned on (not in hibernation), press and hold on the power button (on the front of the console until the console shuts off completely. You can let go of the button once you see that the front LED stops flashing.

- Once the console is turned off, physically plug out the power cord from the outlet and let it sit for a couple of seconds before plugging it back in.
- After that period has passed, start your console again conventionally and see if the issue has been resolved.
If this method wasn’t applicable or you followed it to no avail, follow the next method below.
Method 5: Deleting Game folder and activating Steam Cloud (PC Only)
Several Windows users that encountered this issue on a PC have managed to fix it by deleting the main game folder and then enabling the Steam Cloud feature. According to user reports, this procedure ends up forcing the Steam client to re-sync all files and bring the game to the latest version available.
This fix is only applicable to PC users. If you’re encountering the issue on a console, you will not be able to follow the instructions below.
Here’s a quick guide on deleting the Steam folder of Dead by Daylight and activating Steam Cloud to resolve the ‘Initialization Error’ on a PC:
- Open File Explorer and navigate to the following location:
C:\Program Files (x86)\Steam\userdata\*YOUR ID*
Note: *Your ID* is simply a placeholder. Replace it with your Steam id to navigate to the correct location.
- Once you arrive at the correct location, look for the folder name 381210. Once you see it, right-click on it and choose Delete from the newly appeared context menu.

Deleting the Dead by Daylight Steam folder - Close file Explorer and open Steam. Inside the Steam Platform, click on Steam (top-left corner) and choose Settings from the newly appeared menu.

Accessing the Settings screen of Steam - Once you’re inside the Settings screen, select Cloud from the vertical menu on the left-hand side, then move over to the right pane and check the box associated with Enable Steam Cloud synchronization for applications that support it.

Enabling Cloud Synchronization inside Steam - Restart your Steam client and wait until the program re-download the data needed to run Dead by Daylight. Once the process is complete, launch the application again and see if the issue is now resolved.


Are you getting the DBD Initialization error while playing Dead By Daylight? If YES then you are not alone.
There are plenty of players who are facing the Dead By Daylight Initialization error preventing them play the game smoothly.
For the unversed, Dead By Daylight is an asymmetric multiplayer survival horror game developed by Behaviour Interactive.
The asymmetrical part refers to the fact that it’s four players against one player. Generally in these scenarios, one player is supercharged and strong and the other four are weak and that’s how it balances itself out.
There is no denying that DBS is an amazing game to keep yourself entertained but sometimes, you have to encounter errors and issues.
The error that DBD players are currently having is an initialization error. Notably, this error is happening on both the PC and the Console.
If you are getting a DBD initialization error and are here to fix it now then don’t worry, we have got you covered.
In this article, we will teach you some easy methods to resolve the Dead By Daylight Initialization error.
Without any further ado, let’s get started:
What Causes The DBD Initialization Error?
Many reasons could cause Initialization errors in Dead By Daylight. To make your work easier, we have mentioned some possible reasons here.
- You may be getting this error because of a server outage.
- You might be facing this error because your NAT is closed. In that case, you can fix this problem by enabling the UPnP option from your router’s Settings.
- If you are an Xbox user and are facing this problem then the main cause of this error is inconsistent persistent storage data on their consoles. You can try fixing this error by cleaning persistent storage from your console.
Based on the above-mentioned causes, we have come up with a bunch of methods that can be used to fix the Dead By Daylight Initialization error.
Before you start fixing this error by using the below-mentioned methods, you must try restarting the game.
Sometimes, you get the DBD initialization error due to minor glitches, and restarting the game often fixes it.
If you have not restarted your game yet, I advise you to try restarting your game before you apply any of the below-mentioned methods to resolve the issue.
Method 1: Check the Server status of Dead By Daylight
If restarting the game does not fix your problem then you should try this method. In this method, you have to check the server status, sometimes you are getting errors due to server outage.
To confirm the exact reason for getting the Initialization error in Dead By Daylight, you have to check the current status of the server.
You can check the server status of DBD by using third-party websites like Downdetector and others.
If the servers of DBD are down right now, you will have to wait until the servers are back online.
If there is no issue in servers then you have to try other methods to resolve the Dead By Daylight Initialization Error.
Method 2: Enable NAT
The second main reason for getting the Dead By Daylight Initializing error is having NAT disabled or closed.
To fix this error, you have to enable the NAT in your router. To enable NAT, you need to follow the steps written below:
- First, open your Browser and then open your router Settings. You can do this by entering your router’s IP address in the address bar.
- Now, you have to enter your login details to get access to your router settings.
- Under the main Settings menu, you have to locate and select the Port Forwarding / NAT Forwarding tab on the left-hand side panel.
- Next, go to the Advanced / Expert tab and search for the UPnP option.
- Now, you have to click on the toggle button to enable it.
- That’s it.
Once the NAT is enabled, you have to reboot your router, reconnect your device, and launch the Dead By Daylight game again.
Method 3: Clear Persistent Storage on Xbox
If you are an Xbox user and are facing the Dead By Daylight Initialization error then this method is for you.
You may be getting this error because of inconsistent persistent storage data on your console.
In that case, you can fix this error by clearing the Persistent Storage from your console.
To do that, you need to follow the below-given steps:
- Open your Xbox main Settings Menu.
- Under the Settings options, you have to navigate to the Console settings section.
- There, you have to select Disc & Blu-Ray from the right-hand side panel.
- Now, under the Blu-Ray on the Disc & Blu-Ray page, you have to select the Persistent storage option.
- Click on the Clear Persistent Storage option to clear the persistent storage from your Xbox.
- Once the clearing process is finished, you have to reboot your console and check if the error is resolved or not.
That’s all. We hope this article helped you fix the Initialization Error in the Dead By Daylight game.
Ошибка при инициализации и запуске приложения
На чтение 3 мин Просмотров 620 Опубликовано
Иногда при попытке запуска только что установленной программы операционная система Windows выдает сообщение об ошибке при инициализации приложения. Например, довольно часто встречаются такие ошибки, как 0xc0000022 и 0xc000007b. Что же следует делать в случае возникновения таких и других им подобных ошибок? Некоторые пользователи пытаются решить данную проблему переустановкой приложения, но это практически никогда не срабатывает, ведь источник ошибки зачастую кроется не в самой программе, а в операционной системе, установленной на компьютере пользователя. Ниже описаны способы решения проблем с инициализацией и запуском приложений.
- Самый простой вариант – это попробовать запустить программу от имени администратора. Для этого необходимо нажать на ярлычке приложения правой кнопкой мышки и выбрать из контекстного меню пункт Запуск от имени администратора. Вообще данный метод помогает довольно редко, но попробовать стоит.
- Просканируйте систему на наличие ошибок. Сделать это можно при помощи встроенной в Windows стандартной утилиты для исправления ошибок. Откройте меню Пуск, перейдите в раздел Все программы, затем в папку Стандартные. Щелкните правой мышкой на пункте Командная строка и выберите из контекстного меню Запуск от имени администратора. В открывшемся окне командной строки впишите команду sfc /scannnow и нажмите Enter. Утилита автоматически выполнит сканирование системы на ошибки и попробует сама все исправить.
- Если у вас отключена функция автоматического обновления Windows, включите ее и выполните обновление системы. Делается это при помощи Центра обновлений Windows, который можно найти, зайдя в Панель управления. Зайдите в Центр обновлений Windows и нажмите кнопку Проверка обновлений. После установки обновления системы перезагрузите компьютер и попробуйте снова запустить приложение.
- Установите последние обновления для драйверов. Можно сделать это вручную, с сайта производителя вашего оборудования (правда для этого вам обязательно нужно знать точное название и модель комплектующих, установленных на вашем ПК) также обновить драйвера можно при помощи специальной программы, которая автоматически определит тип оборудования и выполнит установку всех нужных обновлений (одной из лучших среди таких программ является программа DriverPack Solution).
- Обновите DirectX до последней версии. Для этого необходимо зайти на сайт Microsoft.com, перейти в раздел Download center и во вкладке Продукты выбрать пункт DirectX. После загрузки и установки исполняемых библиотек DirectX выполните перезагрузку компьютера.
- Если вы прежде делали точки восстановления Windows или создавали образ системы при помощи программы для резервного копирования, можно попробовать выполнить восстановление системы. Как создавать и применять точки восстановления Windows вы можете узнать отсюда, а ознакомиться с лучшей программой для создания резервных копий системы – из этой статьи.
- Ну и последний способ, который помогает всегда – это переустановка операционной системы Windows. Разумеется, при полной переустановке системы теряются все пользовательские настройки, а также файлы, которые находились на системном диске, поэтому данный метод лучше приберечь на самый крайний случай. Но если вам все-таки пришлось выполнить переустановку Windows, то после выполнения всех нужных настроек сразу же создайте точку восстановления системы – это поможет избежать подобных проблем в будущем.

Воспользуйтесь услугой нашей компании сервисное обслуживание компьютеров.