![]()
Veracrypt fails to mount a ext4/AES/sha256 volume with read-only ticked
it should be noted that this MAY not be veracrypts fault
this started happening after the latest update of my operating system (2023-05-07)
i have 2 existing volumes which i always mount as read-only, they do not exhibit this error message
only the volume that i sometimes mount with RW, and newly created volumes
if i check «do not mount» and then manually mount using: sudo mount -o ro /dev/mapper/veracrypt1 ./mountpoint
the command prints:
mount: /mnt/endercrypt: can't read superblock on /dev/mapper/veracrypt1.
       dmesg(1) may have more information after failed mount system call.
and exits with a status code 32 «mount failure»
mounting the volume with RW, results in no error message, only when mounting it as RO
Expected behavior
mounting as read only should succeed whitout any issue
Observed behavior
error message both in veracrypt (produced most likely by the mount command) and kernel log
Steps to reproduce
- be on LATEST version of Manjaro linux
- have veracrypt 1.25.9
- create a standard voulme, ext4, aes, sha512
- mount with read-only option ticked
Screenshots
Veracrypt error:

Kernel log message (DMESG):

My Environment
VeraCrypt: 1.25.9
Manjaro: 2023-05-07
KDE: 5.27.4
Kernel: 6.3.0-1
Coreutils: 9.3-1
System type: 64-bit
![]()
found a workaround:
adding the mount option noload
is a temporary workaround, allowing you to successfully mount as read only, i feel like maybe this should be default for mounting ext4 as read only?
![]()
Thank you for sharing this.
I don’t have an explanation for your issue but it looks like something is wrong with the journal of the affected volumes.
As for the noload option, I don’t like the idea of making it the default since journal handling should left to the underlaying filesystem even in read-only mode. That being said, VeraCrypt should probably retry mounting with noload if read-only mounting fails with similar error but the user should be informed that their volume has a journal problem.
![]()
I can confirm the same issue with VeraCrypt 1.25.9 on openSUSE Tumbleweed. The workaround is also valid for me too. I can also rule-out filesystem issues as the volume in question has had the same md5sum for months, but the problem started just recently.
![]()
I have the same issue on Arch while try to open an encrypted file from a DVD. If I copy the file from the DVD to the (writable) harddisk then it is possible to open & mount it. So I think nothing is wrong with the encrypted volume itself.
If I try to open the file with cryptsetup I can create the device but got the same issue on mount. If I use the mountoption -o ro,noload it works, but if I try to use -m ro,noload as a veracrypt mountoption I got a Error: Unknown option: noload message in result.
Since it also failed with cryptsetup I suppose it is a problem in the underlying system and not veracrypt itself. Workaround for me is currently the Do not mount-option checked to create the device, and then a mount /dev/mapper/veracrypt1 /mnt/dvd/ -o ro,noload on the commandline.
However, can any body guide me how to properly set the noload mountoption using verycrypt, or better, how to get the whole stuff inside the gui?
![]()
@martin-ms im not sure what the -m part in -m ro,noload is suppose mean here, according to the manual for mount it creates a directory to mount in which seems to be different from the RO options
you can also type «noload» directly into the mount options in veracrypt, its just under «mount this volume as read-only» under where you type your password, saving you some time hopefully
![]()
you can also type «noload» directly into the mount options in veracrypt, its just under «mount this volume as read-only» under where you type your password, saving you some time hopefully
Thank you, found it and works for me, too.
![]()
Issue has resolved itself for me, maybe one of the recent updates to my system included a fix
here is a list of versions that changed since i opened this issue
Manjaro: 2023-08-18
KDE: 5.27.6
Kernel: 6.4.6-1
no changes in version occured to veracrypt or coreutils
im not sure if i should close the issue, on one hand its resolved, but on the other, people might still have this issue
so i’ll leave it open, but feel free to close it if you think thats more appropriate
![]()
Thank you @EnderCrypt for taking the time to update this issue about. This feedback is helpful and I agree on keeping it open so that others affected by this may find it easily.
-
Summary
-
Files
-
Reviews
-
Support
-
Source Code
-
Forums
-
Tickets
-
Documentation
-
FAQ
-
Donate
-
Faire un don
-
Mailing Lists
Menu
▾
▴
VeraCrypt upgraded and now unable to mount encrypted external drive. «Auto-mount failed due to one or more of the following»
Created:
2020-04-30
Updated:
2020-05-18
-

Hello Veracrypt Community,
Six years of school & work documents are in this encrypted hard drive.
Any guidance is greatly appreciated.
Summary:
Upgraded Veracrypt (v1.21 > 1.24-Update6). Attempting to Auto-Mount external hard drive presents the following error:
Auto-mount failed due to one or more of the following:
— Incorrect password.
— Incorrect Volume PIM number.
— Incorrect PRF (hash).
— No valid volume found.»Details:
MacBook Air
MacOS version: macOS Sierra 10.12.6 [note updated on 5/3/2020]
Bootcamp vesion: 6.0
Windows 10 Education (1909)
VeraCrypt version 1.21
External Drive Size: 4 TB (Entire partition encrypted)
External Drive was encrypted with VeraCrypt veracrypt 1.21 (I did not specify or use PIM. I only enter my password which has not changed)Here are the exact steps that I took to perform the upgrade:
- Verify the external drive mounts under VeraCrypt v1.21. Log into Windows as standard account (.\standard)
- Launch Veracrypt > Auto-Mount > H & I volumes mount successfully after approximately 3 minutes. Joy!
- Sign Out
- Log into Windows as admin account (.\administator)
- Launch VeraCrypt v1.21 > Click Home Page button (avoid scam websites serving modified installers)
- Download «VeraCrypt Setup 1.24-Update6.exe» installer
- Run «VeraCrypt Setup 1.24-Update6.exe»
- Select «Upgrade» from the wizard
- «Upgrade successful» and proceeded with required «Reboot»
- Reboot
- Log into admin account (.\administrator)
- Launch VeraCrypt > Click Auto-Mount > enter password. The following error is presented:
Auto-mount failed due to one or more of the following:
— Incorrect password.
— Incorrect Volume PIM number.
— Incorrect PRF (hash).
— No valid volume found.»- Auto-Mount > enter password again (typing slowly). The same error is presented.
- Anxiety levels spike
- Sign Out
- .Log into standard account (.\standard)
- Launch Veracrypt > Auto-Mount > enter password again (typing slowly). The same error is presented.
- Volume Tools > Enable «Read Only» > Auto-Mount > The same error is presented.
- Help!
- Dismount All
I was not performing a TrueCrypt to VeraCrypt conversion and did not Backup the Header Volume (Tools > Backup Volume Header).
Potential Fix Actions:
Other posts advise trying > Mount Options > «Use backup header embedded in volume if available» — I have not attempted this.
Other posts advise trying using «Mount» (as opposed to Auto-Mount) — I have not attempted this.My fear is that the header of a VeraCrypt volume is damaged. Please advise on next steps.
Again, your input is greatly appreciated.
Last edit: madvillan 2020-05-04
-
I’m no expert, just a long time user.
I’m not familiar with auto-mount. Maybe just try manually mounting (Select the drive letter > Select File > Mount > Enter Password > See what shakes out).
Then, maybe try uninstalling VeraCrypt 1.24-Update6, re-installing VeraCrypt 1.21, and see if you can mount the external drive’s volume?
-
Other posts advise trying > Mount Options > «Use backup header embedded in volume if available» — I have not attempted this.
You need to perform this option.
Based on your detailed steps for upgrading, it appears you failed to dismount the volumes before upgrading and then reboot. Likely the reboot caused the damage to the primary header.
-
Hi Enigma,
It is possible that I forgot to click «Dismount All» before signing out of my .\standard account and logging into the .\administrator account for the upgrade. As a habit, I consistentently dismount volumes from Veracyrpt and only then click » Safely Remove Hardware» from the Windows system tray. I may have just forgoten to document that step in this post.
Moving ahead, here are the steps I took:
- Log into Windows as standard account (.\standard)
- Launch VeraCrypt
- Select Device > Device\Harddisk2\Partition1 > OK > Mount > enter password > Successful mount of H: volume
- Select Device > Device\Harddisk2\Partition2 > OK > Mount > enter password > Successful mount of I: volume
- Explorer.exe > browse into H: > success (no data here as it is the OEM/Windows recovery partition)
- Explorer.exe > browse into I: > error message is presented:
Incorrect Function
See attached images for details on the volumes.
Some questions before I proceed.
First, do I only get one attempt with «Use backup header embedded in volume if available» ? Is it possible to overwrite/erase the backup header during my testing?
Second, do you recommend the «Auto-Mount» or manual «Select Device» method?
Third, as per Jim’s suggestion, which of these routes give me a better chance of success?a.) Use VeraCrypt version 1.24-Update6 and proceed with the «Use backup header embedded in volume if available» option.
b.) Uninstall VeraCrypt version 1.24-Update6. Then install VeraCrypt v1.21 and proceed with the «Use backup header embedded in volume if available» option.Thank you again.
Last edit: madvillan 2020-05-01
-
If I understand correctly, the H volume, OEM/Windows recovery partition mounts correctly.
The issue is the I volume does not mount.
Use the manual «Select Device» method to use the option of «Use backup header embedded in volume if available».
You can attempt to use the embedded backup header to mount the I volume. This does not alter the primary header or the backup header for mounting.
For now, I would continue to use the 1.24-Update6 version.
EDIT: From your screenshots, it appears you are able to mount the volumes manually. I believe your filesystem is damaged. Which filesystem format did you use when you created the volumes?
Using the Administrator account, mount the volumes and in the VeraCrypt main screen, right click on each mounted volume and select Check Filesystem. This will not alter any data. If it reports errors, you can then right click and select Repair Filesystem. This may cause data loss for the repair.
If you have another HDD, clone the dismounted volumes to the other HDD to attempt the repair. This method will allow you to clone again from the source HDD to try other recovery/repair methods.
You could run data recovery software on the mounted volumes like EaseUS Data Recovery or R-Studio. There may be limits on the free version.
Last edit: Enigma2Illusion 2020-05-01
-
Enigma,
Thank you very much for the assistance. This is difficult to type, but here are the results of today’s actions:
- Log into Windows as standard account (.\standard)
- Launch VeraCrypt
- Attach external drive.
- Explorer.exe > D: volume mounts
- Select Device > Device\Harddisk2\Partition1 > OK > Mount > enter password > Successful mount of H: volume
- Select Device > Device\Harddisk2\Partition2 > already shows as D: [veracrypt_05032020_1.jpg]
- Dismount-All [Note: D: volume persists in Explorer.exe)
- Exit VeraCrypt
- Screenshot disk partition and computer management snap in [veracrypt_05032020_1.jpg, veracrypt_05032020_2.jpg]
- Launch VeraCrypt
- Select Device > Device\Harddisk2\Partition1 > OK > Mount > enter password > Successful mount of H: volume
10.Select Device > Device\Harddisk2\Partition2 > Mount Options > «Use backup header embedded in volume if available» > enter password > I: volume > browse > Incorrect Function [veracrypt_05032020_3.jpg] - Dismount-All
- Exit VeraCrypt
- Log into Windows as admin account (.\administator)
- Explorer.exe > D: appears
- Select Device > Device\Harddisk2\Partition1 > OK > Mount > enter password > Successful mount of H: volume
- Select Device > Device\Harddisk2\Partition2 > OK > Mount > enter password > I: volume > error:
Auto-mount failed due to one or more of the following:
— Incorrect password.
— Incorrect Volume PIM number.
— Incorrect PRF (hash).
— No valid volume found.Source:MountVolume:8370
[veracrypt_05032020_5.jpg]
- Click OK
- Returns to VeraCrypt Mount > Enter Password prompt
- Select Device > Device\Harddisk2\Partition2 > OK > Mount > enter password > I: volume > Right click «Check File System» > No problems found
- Select Device > Device\Harddisk2\Partition1 > OK > Mount > enter password > Successful mount of H: volume > Right click «Check File System» > No problems found [veracrypt_05032020_6.jpg]
- Dismount-All
- Auto-Mount > Successful mount of H: volume. However, I: volume > Right click «Check File System» > No problems found
- Dismount-All
- «Safely Remove Hardware»
The «Source:MountVolume:8370» error is specific. Thoughts?
A quick search for the above error in the Technical Topics forums finds users reporting problems after Windows Updates. Others are reporting the inability to mount drives after upgrading VeraCrypt to the latest version.
Additional Context:
Before I upgraded VeraCrypt, earlier in the day Windows installed a culmulative update. See Event Viewer entry [veracrypt_05032020_7.jpg]
At approximately 1:16 AM I upgraded VeraCrypt, the wizard stated it completed successfully and it created a restore point [veracrypt_05032020_8.jpg]Potential Fix Actions:
- Restore Point a potential course of remediation?
- Uninstall VeraCrypt 1.24-Update6. Then install VeraCrypt v1.21 and proceed with the «Use backup header embedded in volume if available» option and «Check File System»?
- I have another PC laptop (Windows 7) with VeraCrypt v1.21 installed. Any value in introducing this into troubleshooting?
Please advise.
Thank you.
Last edit: madvillan 2020-05-04
-
Do not use Microsoft System Restore aka Restore Point as this will make matters worse.
Personally, I see no value in connecting to another machine.
Windows has assign the drive letter D to the VeraCrypt unmounted volume.
You need to remove the Windows assignment by using Disk Management in the Control Panel (Google search how to remove the drive letter using Disk Management in Windows 10).
Click on the VeraCrypt unmount D drive in the Disk Management application > Change drive letter and paths > Remove.
This will get rid of the empty D drive Windows assignment.
With your VeraCrypt volumes unmounted, you can uninstall VeraCrypt, reboot and install the older version to eliminate that the VeraCrypt upgrade as being the cause of the issue.
If the older version of VeraCrypt does not resolve the issue, you will have to try data recovery tools on the mounted VeraCrypt volume to see if the tools can recover any data. Again, I recommend cloning the unmounted volume to another HDD to attempt the recovery for the same reasons I posted earlier in the thread.
-
Hi Enigma,
I have great news to report — the volume mounted successfully! My data is saved! Endless gratitude for taking the time and effort to provide input. I honestly thought the volume was hosed.
I ordered a new external hard drive so I can make another backup of my data. The new hard drive arrives tomorrow.
What immediate steps should I now take to ensure mirroring the data to the new volume goes smoothly? Is there a specific order of operations? Should I first backup the header volume (Tools > Backup Volume Header)? What about «Check File System» ? Or should I avoid messing with either of those steps and head straight into copying my data to the new drive?
Please advise.
THANK YOU!
Also, thank you Jim Nelson!For documentation purposes, see below.
Fix Actions:
-
- Log into Windows as standard account (.\standard)
- Computer Management.msc > Disk Management
- Attach external drive
- Disk 2 > Volume D: > Right click > Change Drive Letter and Paths > Remove
- Launch VeraCrypt
- Highlight H: > Auto-Mount > enter password > I: volume > Right click «Check File System» > No problems found
- Dismount-All > Exit VeraCrypt
- «Safely Remove Hardware»
- Physically unplug external drive
- Sign out
- Log into Windows as administator account (.\administator)
- Uninstall VeraCrypt 1.24-Update6 > VeraCrypt has been successfully uinstalled.
- Install VeraCrypt v1.21
- Get-FileHash C:\Users\administrator\veracrypt.exe verified
- Launch VeraCrypt v1.21
- Attach external drive
- Select Device > Device\Harddisk2\Partition1 > OK > Mount > enter password > Successful mount of H: volume
- Select Device > Device\Harddisk2\Partition2 > OK > Mount > enter password > Successful mount of I: volume JOY!!!
-
-
My recommendations would be to perform the following:
- Encrypt the partition on the new HDD. I will call this the backup VeraCrypt volume.
- Mount both original and backup VeraCrypt volumes.
- Use Micosoft’s Robocopy to copy data from original mounted drive letter to the new mounted backup volume’s drive letter.
- In the future, you can use a program called FreeFileSync to update the backup volume with files that where changed/deleted from the source volume.
- On both the original and backup VeraCrypt, create external backup of the headers and store in locations other than the source HDD which the external header backup file represents.
.
I am curious why the upgrade from VeraCrypt v1.21 to VeraCrypt 1.24-Update6 caused this issue.Last edit: Enigma2Illusion 2020-05-18
Log in to post a comment.
Аккаунт удален
Комментарий недоступен
Ответить
Развернуть ветку
Аккаунт удален
Комментарий недоступен
Ответить
Развернуть ветку
Аккаунт удален
Комментарий недоступен
Ответить
Развернуть ветку
Аккаунт удален
Комментарий недоступен
Ответить
Развернуть ветку
Аккаунт удален
Комментарий недоступен
Ответить
Развернуть ветку
Принцесса Xbox
Автор
Ну у меня сейчас тоже минуты полторы, боль, скучаю по bitlocker
Ответить
Развернуть ветку
Аккаунт удален
Комментарий недоступен
Ответить
Развернуть ветку
Аккаунт удален
Комментарий недоступен
Ответить
Развернуть ветку
4 комментария
Раскрывать всегда
Troubleshooting
This section presents possible solutions to common problems that you may run into when using VeraCrypt.
Note: If your problem is not listed here, it might be listed in one of the following sections:
- Incompatibilities
- Known Issues & Limitations
- Frequently Asked Questions
Make sure you use the latest stable version of VeraCrypt. If the problem is caused by a bug in an old version of VeraCrypt, it may have already been fixed. Note: Select
Help >
About to find out which version you use.
Problem:
Writing/reading to/from volume is very slow even though, according to the benchmark, the speed of the cipher that I’m using is higher than the speed of the hard drive.
Probable Cause:
This is probably caused by an interfering application.
Possible Solution:
First, make sure that your VeraCrypt container does not have a file extension that is reserved for executable files (for example, .exe, .sys, or .dll). If it does, Windows and antivirus software may interfere with the container and adversely affect the performance
of the volume.
Second, disable or uninstall any application that might be interfering, which usually is antivirus software or automatic disk defragmentation tool, etc. In case of antivirus software, it often helps to turn off real-time (on-access) scanning in the preferences
of the antivirus software. If it does not help, try temporarily disabling the virus protection software. If this does not help either, try uninstalling it completely and restarting your computer subsequently.
Problem:
VeraCrypt volume cannot be mounted; VeraCrypt reports «Incorrect password or not a VeraCrypt volume«.
Possible Cause:
The volume header may have been damaged by a third-party application or malfunctioning hardware component.
Possible Solutions:
-
You can try to restore the volume header from the backup embedded in the volume by following these steps:
- Run VeraCrypt.
-
Click Select Device or
Select File to select your volume. - Select Tools > Restore Volume Header.
Problem:
After successfully mounting a volume, Windows reports «This device does not contain a valid file system» or a similar error.
Probable Cause:
The file system on the VeraCrypt volume may be corrupted (or the volume is unformatted).
Possible Solution:
You can use filesystem repair tools supplied with your operating system to attempt to repair the filesystem on the VeraCrypt volume. In Windows, it is the ‘chkdsk‘ tool. VeraCrypt provides an easy way to use this tool on a VeraCrypt
volume: First, make a backup copy of the VeraCrypt volume (because the ‘chkdsk‘ tool might damage the filesystem even more) and then mount it. Right-click the mounted volume in the main VeraCrypt window (in the drive list)
and from the context menu select ‘Repair Filesystem‘.
Problem:
When trying to create a hidden volume, its maximum possible size is unexpectedly small (there is much more free space than this on the outer volume).
Probable Causes:
- The outer volume has been formatted as NTFS
- Fragmentation
- Too small cluster size + too many files/folders in the root directory of the outer volume.
Possible Solutions:
Solution Related to Cause 1:
Unlike the FAT filesystem, the NTFS filesystem always stores internal data exactly in the middle of the volume. Therefore, the hidden volume can reside only in the second half of the outer volume. If this constraint is unacceptable, do one of the following:
- Reformat the outer volume as FAT and then create a hidden volume within it.
- If the outer volume is too large to be formatted as FAT, split the volume to several 2-terabyte volumes (or 16-terabyte volumes if the device uses 4-kilobyte sectors) and format each of them as FAT.
Solution Related to Cause 2:
Create a new outer volume (defragmentation is not a solution, because it would adversely affect plausible deniability – see section
Defragmenting).
Solution Related to Cause 3:
Note: The following solution applies only to hidden volumes created within FAT volumes.
Defragment the outer volume (mount it, right-click its drive letter in the ‘Computer‘ or ‘My Computer‘ window, click
Properties, select the
Tools tab, and click ‘Defragment Now‘). After the volume is defragmented, exit
Disk Defragmenter and try to create the hidden volume again.If this does not help, delete all files and folders on the outer volume by pressing Shift+Delete, not by formatting, (do not forget to disable the Recycle Bin and System Restore for this drive beforehand) and try creating the
hidden volume on this completely empty outer volume again (for testing purposes only). If the maximum possible size of the hidden volume does not change even now, the cause of the problem is very likely an extended root directory.
If you did not use the ‘Default‘ cluster size (the last step in the Wizard), reformat the outer volume and this time leave the cluster size at ‘Default‘.If it does not help, reformat the outer volume again and copy less files/folders to its root folder than you did last time. If it does not help, keep reformatting and decreasing the number of files/folders in the root folder. If this is unacceptable or if it
does not help, reformat the outer volume and select a larger cluster size. If it does not help, keep reformatting and increasing the cluster size, until the problem is solved. Alternatively, try creating a hidden volume within an NTFS volume.
Problem:
One of the following problems occurs:
- A VeraCrypt volume cannot be mounted.
- NTFS VeraCrypt volumes cannot be created.
In addition, the following error may be reported: «The process cannot access the file because it is being used by another process.«
Probable Cause:
This is probably caused by an interfering application. Note that this is not a bug in VeraCrypt. The operating system reports to VeraCrypt that the device is locked for an exclusive access by an application (so VeraCrypt is not allowed to access it).
Possible Solution:
It usually helps to disable or uninstall the interfering application, which is usually an anti-virus utility, a disk management application, etc.
Problem:
In the VeraCrypt Boot Loader screen, I’m trying to type my password and/or pressing other keys but the VeraCrypt boot loader is not responding.
Probable Cause:
You have a USB keyboard (not a PS/2 keyboard) and pre-boot support for USB keyboards is disabled in your BIOS settings.
Possible Solution:
You need to enable pre-boot support for USB keyboards in your BIOS settings. To do so, follow the below steps:
Restart your computer, press F2 or Delete (as soon as you see a BIOS start-up screen), and wait until a BIOS configuration screen appears. If no BIOS configuration screen appears, restart (reset) the computer again and start pressing F2 or Delete repeatedly
as soon as you restart (reset) the computer. When a BIOS configuration screen appears, enable pre-boot support for USB keyboards. This can typically be done by selecting:
Advanced > ‘USB Configuration‘ > ‘Legacy USB Support‘ (or ‘USB Legacy‘) >
Enabled. (Note that the word ‘legacy’ is in fact misleading, because pre-boot components of modern versions of MS Windows require this option to be enabled to allow user interaction/control.) Then save the BIOS settings (typically
by pressing F10) and restart your computer. For more information, please refer to the documentation for your BIOS/motherboard or contact your computer vendor’s technical support team for assistance.
Problem:
After the system partition/drive is encrypted, the computer cannot boot after it is restarted (it is also impossible to enter the BIOS configuration screen).
Probable Cause:
A bug in the BIOS of your computer.
Possible Solutions:
Follow these steps:
- Disconnect the encrypted drive.
- Connect an unencrypted drive with an installed operating system (or install it on the drive).
- Upgrade the BIOS.
- If it does not help, please report this bug to the manufacturer or vendor of the computer.
OR
-
If the BIOS/motherboard/computer manufacturer/vendor does not provide any updates that resolve the issue and you use Windows 7 or later and there is an extra boot partition (whose size is less than 1 GB) on the drive, you can try reinstalling Windows without
this extra boot partition (to work around a bug in the BIOS).
Problem:
One of the following problems occurs:
- After the pre-boot authentication password is entered during the system encryption pretest, the computer hangs (after the message ‘Booting…‘ is displayed).
-
When the system partition/drive is encrypted (partially or fully) and the system is restarted for the first time since the process of encryption of the system partition/drive started, the computer hangs after you enter the pre-boot
authentication password (after the message ‘Booting…‘ is displayed). - After the hidden operating system is cloned and the password for it entered, the computer hangs (after the message ‘Booting…’ is displayed).
Probable Cause:
A bug in the BIOS of your computer or an issue with Windows bootloader.
Possible Solution:
- Upgrade your BIOS (for information on how to do so, please refer to the documentation for your BIOS/motherboard or contact your computer vendor’s technical support team for assistance).
- Use a different motherboard model/brand.
-
If the BIOS/motherboard/computer manufacturer/vendor does not provide any updates that resolve the issue and you use Windows 7 or later and there is an extra boot partition (whose size is less than 1 GB) on the drive, you can try reinstalling Windows without
this extra boot partition (to work around a bug in the BIOS). -
There two other known workarounds for this issue that require having a Windows Installation disk:
-
Boot your machine using a Windows Installation disk and select to repair your computer. Choose «Command Prompt» option and when it opens, type the commands below and then restart your system:
- BootRec /fixmbr
- BootRec /FixBoot
-
Delete the 100 MB System Reserved partition located at the beginning of your drive, set the system partition next to it as the active partition (both can be done using diskpart utility available in Windows Installation disk repair option). After that, run Startup
Repair after rebooting on Windows Installation disk. The following link contains detailed instructions:https://www.sevenforums.com/tutorials/71363-system-reserved-partition-delete.html
-
Boot your machine using a Windows Installation disk and select to repair your computer. Choose «Command Prompt» option and when it opens, type the commands below and then restart your system:
Problem:
When trying to encrypt the system partition/drive, during the pretest, the VeraCrypt Boot Loader always reports that the pre-boot authentication password I entered is incorrect (even though I’m sure it is correct).
Possible Causes:
-
Different state of the Num Lock and/or
Caps Lock key - Data corruption
Possible Solution:
-
When you set a pre-boot authentication password, remember whether the
Num Lock and Caps Lock keys are on or off (depending on the manufacturer, the keys may have different labels, such as
Num LK). Note: You can change the state of each of the keys as desired before you set the password, but you need to remember the states. - When you enter the password in the VeraCrypt Boot Loader screen, make sure the state of each of the keys is the same as when you set the password.
Note: For other possible solutions to this problem, see the other sections of this chapter.
Problem:
When the system partition/drive is encrypted, the operating system ‘freezes’ for approx. 10-60 seconds every 5-60 minutes (100% CPU usage may co-occur).
Probable Cause:
A CPU and/or motherboard issue.
Possible Solutions:
- Try disabling all power-saving-related features (including any special CPU enhanced halt functions) in the BIOS settings and in the ‘Power Options’ Windows control panel.
- Replace the processor with a different one (different type and/or brand).
- Replace the motherboard with a different one (different type and/or brand).
Problem:
When mounting or dismounting a VeraCrypt volume, the system crashes (a ‘blue screen’ error screen appears or the
computer abruptly restarts).
OR
Since I installed VeraCrypt, the operating system has been crashing frequently.
Possible Causes:
- A bug in a third-party application (e.g. antivirus, system «tweaker», driver, etc.)
- A bug in VeraCrypt
- A bug in Windows or a malfunctioning hardware component
Possible Solutions:
-
Try disabling any antivirus tools, system «tweakers», and any other similar applications. If it does not help, try uninstalling them and restarting Windows.
If the problem persists, run VeraCrypt and select Help > ‘Analyze a System Crash‘ shortly after the system crashes or restarts. VeraCrypt will then analyze crash dump files that Windows automatically
created when it crashed (if any). If VeraCrypt determines that a bug in a third party driver is likely to have caused the crash, it will show the name and provider of the driver (note that updating or uninstalling the driver might resolve the issue). Whatever
the results, you will be able to choose to send us essential information about the system crash to help us determine whether it was caused by a bug in VeraCrypt.
Problem:
On Windows 7/Vista (and possibly later versions), the Microsoft Windows Backup tool cannot be used to backup data to a non-system VeraCrypt Volume.
Cause:
A bug in the Windows Backup tool.
Possible Solution:
- Mount the VeraCrypt volume to which you want to back up data.
- Right-click a folder located on the volume (or right-click its drive letter in the ‘Computer‘ list) and select an item from the ‘Share with‘ submenu (on Windows Vista, select ‘Share‘).
- Follow the instructions to share the folder with your user account.
- In the Windows Backup tool, select the shared folder (the network location/path) as the destination.
- Start the backup process.
Note: The above solution does not apply to the Starter and
Home editions of Windows 7 (and possibly later versions).
Problem:
The label of a filesystem in a VeraCrypt volume cannot be changed from within the ‘Computer’ window under Windows Vista or a later version of Windows.
Cause:
A Windows issue causes the label to be written only to the Windows registry file, instead of being written to the filesystem.
Possible Solutions:
-
Right-click the mounted volume in the ‘Computer‘ window, select
Properties, and enter a new label for the volume.
Problem:
I cannot encrypt a partition/device because VeraCrypt Volume Creation Wizard says it is in use.
Possible Solution:
Close, disable, or uninstall all programs that might be using the partition/device in any way (for example an anti-virus utility). If it does not help, right-click the ‘Computer‘ (or ‘My Computer‘)
icon on your desktop and select Manage -> Storage
-> Disk Management. Then right-click the partition that you want to encrypt, and click
Change Drive Letter and Paths. Then click
Remove and OK. Restart the operating system.
Problem:
When creating a hidden volume, the Wizard reports that the outer volume cannot be locked.
Probable Cause:
The outer volume contains files being used by one or more applications.
Possible Solution:
Close all applications that are using files on the outer volume. If it does not help, try disabling or uninstalling any anti-virus utility you use and restarting the system subsequently.
Problem:
When accessing a file-hosted container shared over a network, you receive one or both of the following error messages:
«Not enough server storage is available to process this command.» and/or,
«Not enough memory to complete transaction.«
Probable Cause:
IRPStackSize in the Windows registry may have been set to a too small value.
Possible Solution:
Locate the IRPStackSize key in the Windows registry and set it to a higher value. Then restart the system. If the key does not exist in the Windows registry, create it at
HKEY_LOCAL_MACHINE\SYSTEM\CurrentControlSet\Services\LanmanServer\Parameters and set its value to 16 or higher. Then restart the system. For more information, see:
https://support.microsoft.com/kb/285089/ and
https://support.microsoft.com/kb/177078/

Как зашифровать флешку? В этой статье будет рассказано и показано шифрование флешки в VeraCrypt. Имея на руках работающую флешку и установленную программу VeraCrypt, вы можете создать полностью зашифрованную флешку. При условии, если вы создадите надёжный пароль для доступа, никто не сможет рассекретить ваши конфиденциальные данные на этой флешке. Следуя нашим инструкциям, вы сможете самостоятельно зашифровать флешку VeraCrypt.
Содержание
- 1 Подготовка к шифрованию флешки
- 2 Установка пароля шифрования
- 3 Форматирование флешки
- 4 Использование зашифрованной флешки
- 5 Если вы ввели неверный пароль
Подготовка к шифрованию флешки
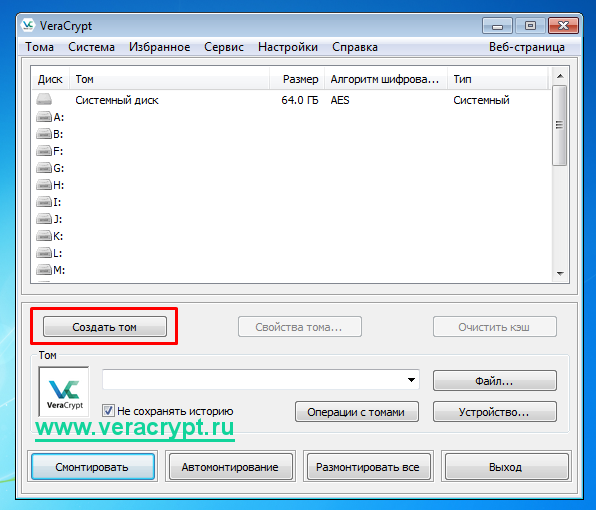
Первым делом запустите VeraCrypt. Если у вас ещё не установлена программа VeraCrypt, здесь вы можете узнать, как скачать и установить VeraCrypt.

После того, как вы запустили VeraCrypt, в главном окне программы нажмите кнопку «Создать том».
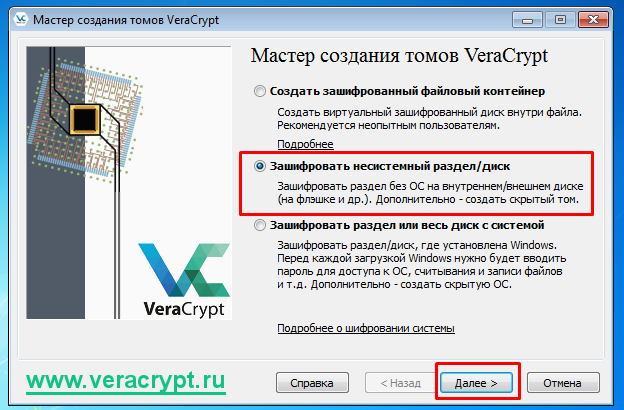
Откроется окно мастера по созданию томов VeraCrypt. Мы создадим зашифрованный том на флешке, которую вам нужно зашифровать. Выберите опцию «Зашифровать несистемный раздел/диск» и нажмите кнопку «Далее».
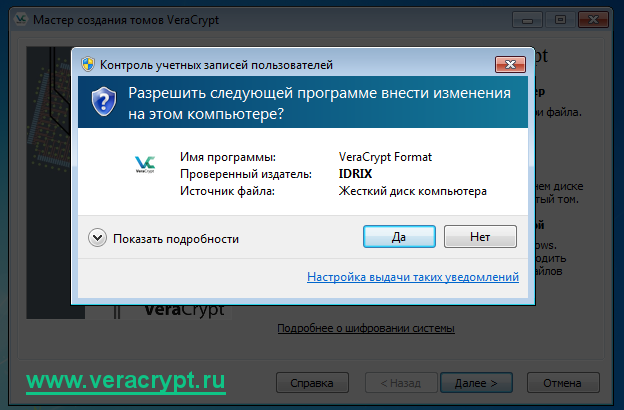
В случае, если у вас включен UAC в Windows, вы увидите окно, в котором вам потребуется разрешить программе изменять данные на жёстком диске и сменных носителях.
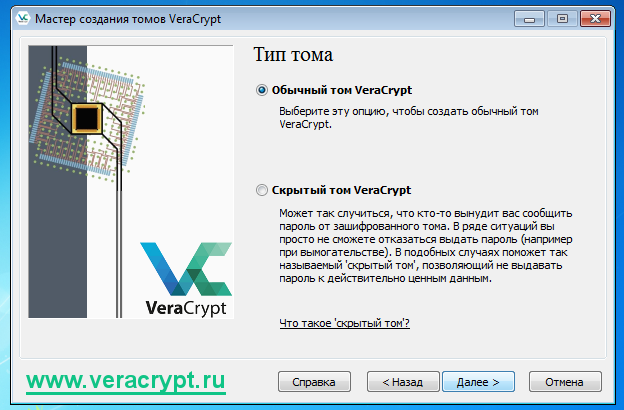
На следующем шаге выберите опцию «Обычный том VeraCrypt» и перейдите к следующему шагу.
Затем нажмите кнопку «Устройство…» для выбора сменного носителя.
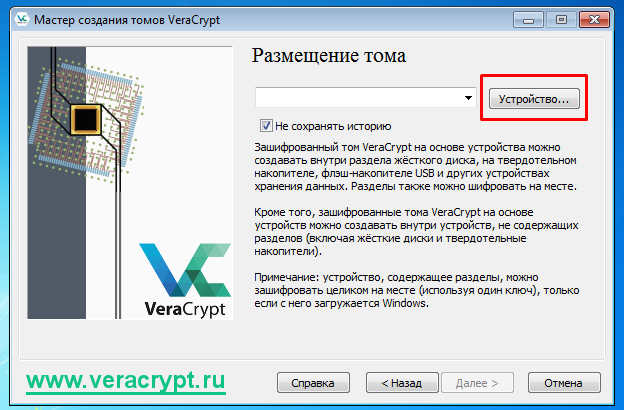
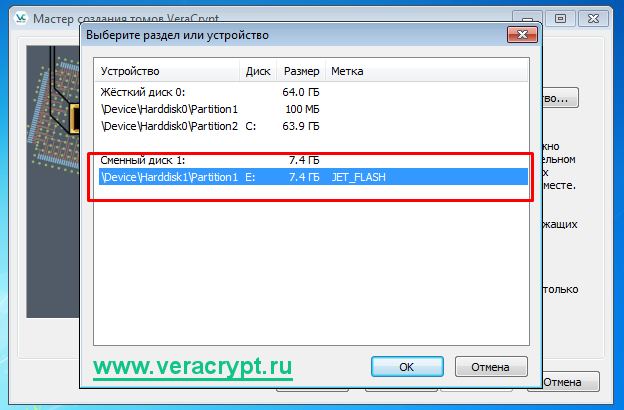
Выберите нужную флешку и подтвердите ваш выбор нажатием на кнопку «ОК».
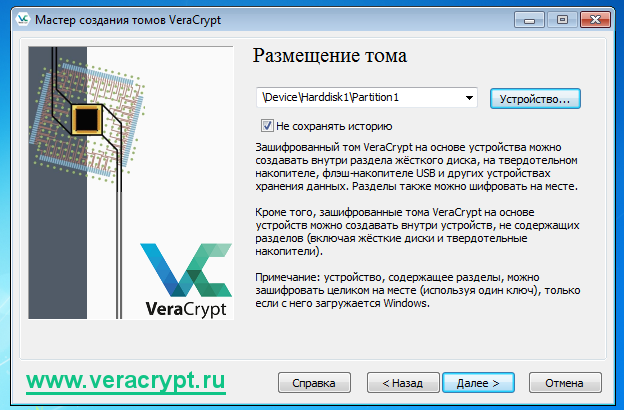
После того, как вы выбрали флеш-накопитель, нажмите «Далее».
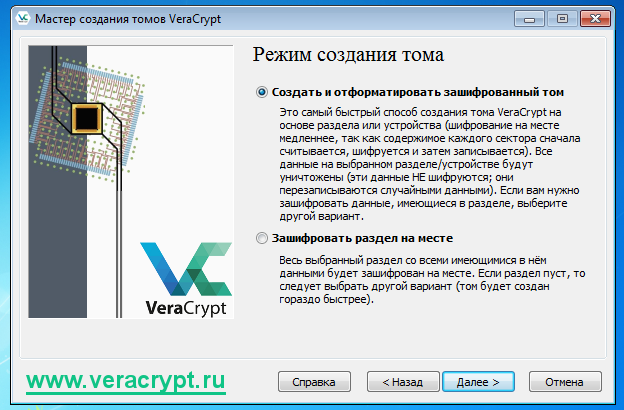
На следующем шаге вам будет предложено выбрать режим создания тома. Есть два варианта:
- Форматирование всех данных на флешке и создание зашифрованного тома. Если флешка новая или не содержит важных данных, выберите этот способ. Внимание: все данные будут удалены и флешка будет полностью отформатирована.
- Шифрование раздела на диске. Выберите этот вариант, если вам необходимо сохранить данные на флешке.
Установка пароля шифрования
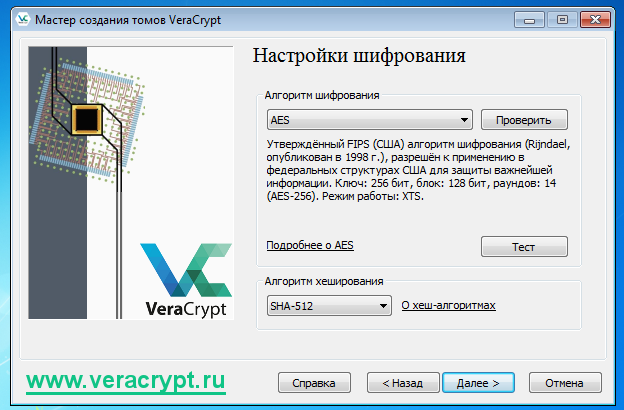
Далее вы сможете выбрать желаемый алгоритм шифрования и алгоритм хеширования. Рекомендуем оставить все значения по умолчанию.
Далее вам нужно будет проверить размер создаваемого тома. В случае, если вы выбрали форматирование всех данных и создание тома, то будет создан зашифрованный том размером чуть менее доступного объёма флешки.

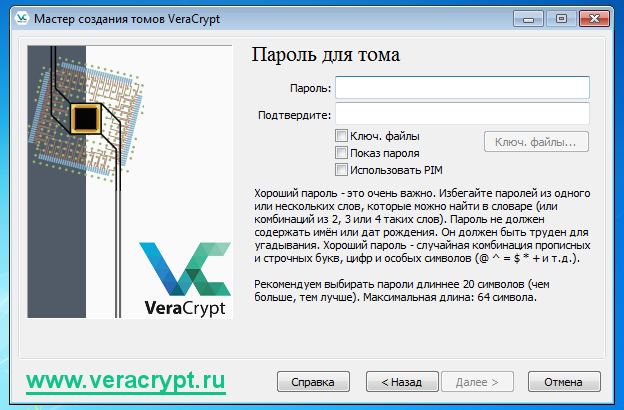
На следующем шаге установите пароль создаваемого тома на флешке. VeraCrypt рекомендует создавать пароли из случайной комбинации прописных и строчных букв, цифр и особых символов. Также рекомендованная длина пароля составляет более 20 символов. Максимальная же длина пароля составляет 64 символа.
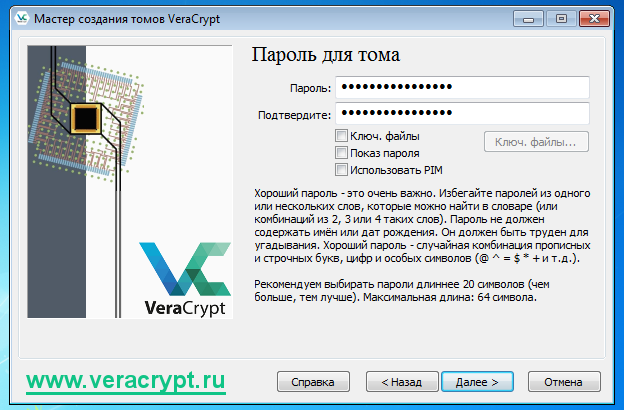
После того, как вы указали пароль, нажмите кнопку «Далее».
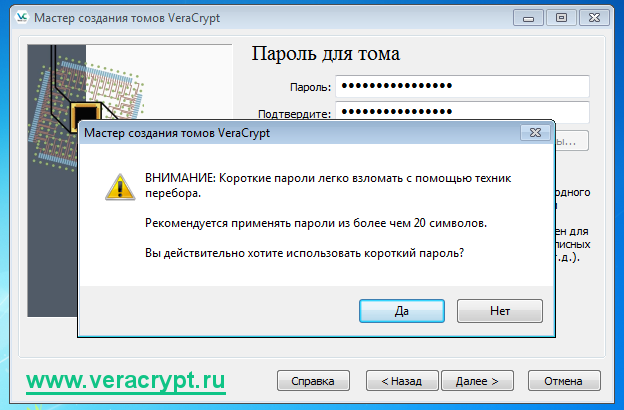
В случае, если вы указали пароль длиной менее 20 символов, VeraCrypt предупредит вас об использовании короткого пароля и предложит установить более длинный пароль:
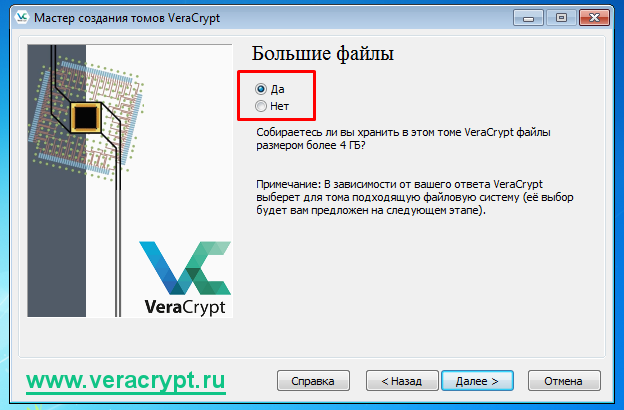
Далее у вас спросят, собираетесь ли вы хранить на флешке файлы размером более 4 ГБ. Желательно указать опцию «Да».
На следующем шаге вас попросят перемещать мышь. Это нужно для сбора случайных данных из этих перемещений.
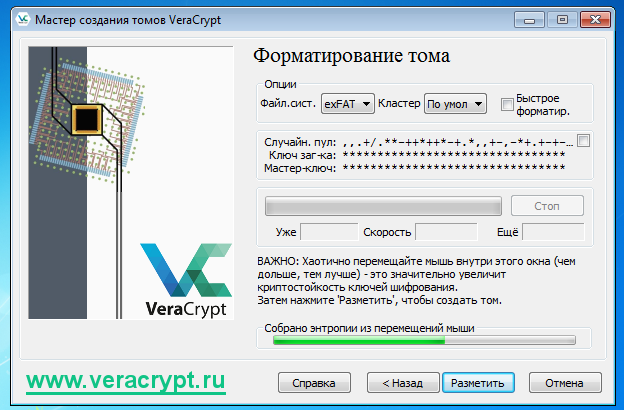
После того, как шкала полностью заполнилась, нажмите кнопку «Разметить».
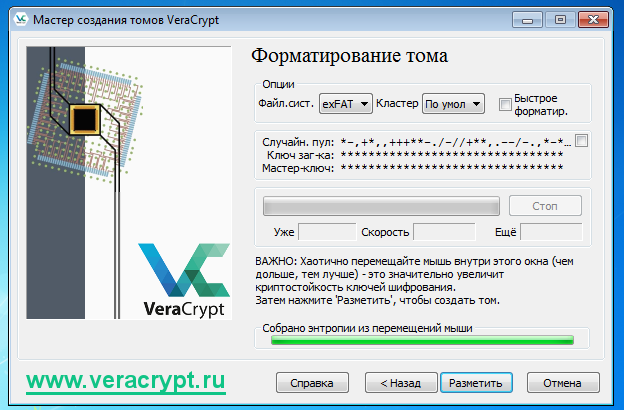
Форматирование флешки
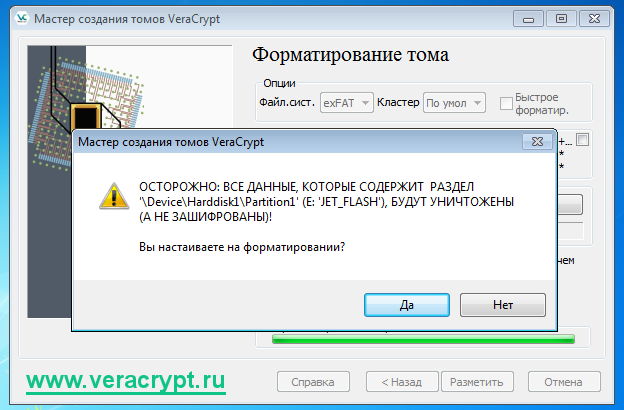
Всё готово для форматирования флешки и создания зашифрованного тома на ней. Подтвердите форматирования флешки.
VeraCrypt также может предложить быстрое форматирование. Это ускоренное форматирование, которое не перезаписывает все ваши данные, что потенциально может привести к тому, что злоумышленник может восстановить какую-что часть данных на накопителе, которая не была перезаписана новыми данными.

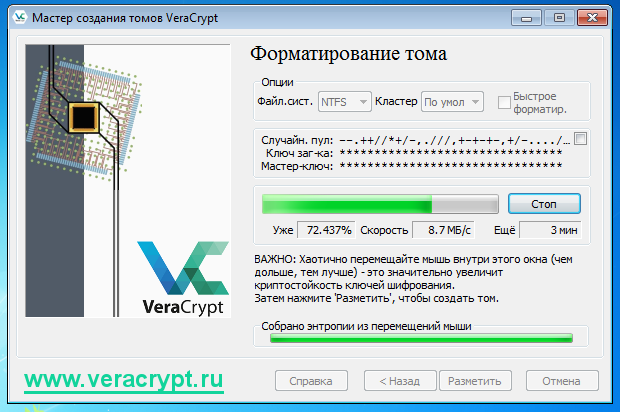
Форматирование флешки началось. Теперь нужно дождаться окончания этого процесса.
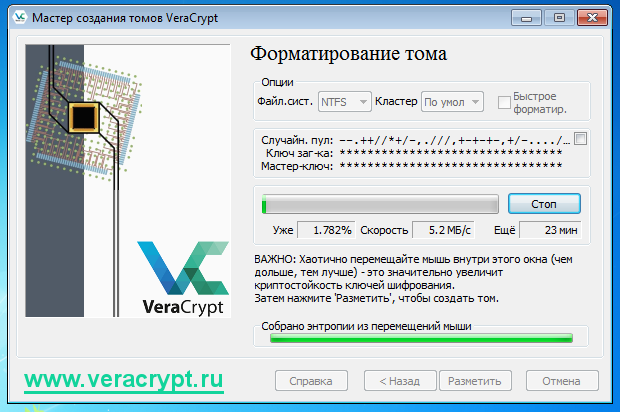
В зависимости от выбранного режима форматирования и от показателей флеш-накопителя, этот процесс может занять от нескольких минут до нескольких десятков минут.
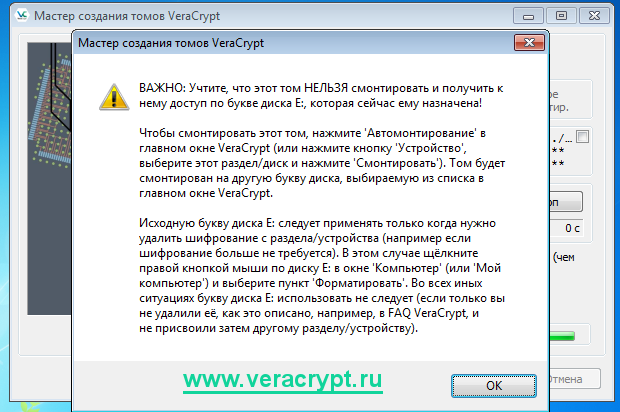
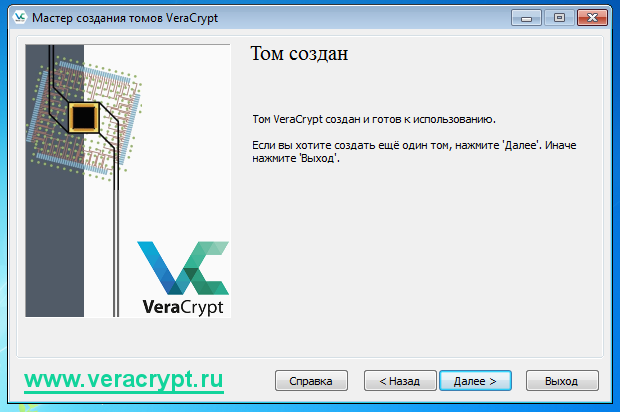
После того, как VeraCrypt отформатирует флешку, программа предупредит вас о том, что чтобы пользоваться своими зашифрованными файлами на этой флешке, вам сперва требуется смонтировать зашифрованный том на свободную букву локального диска.
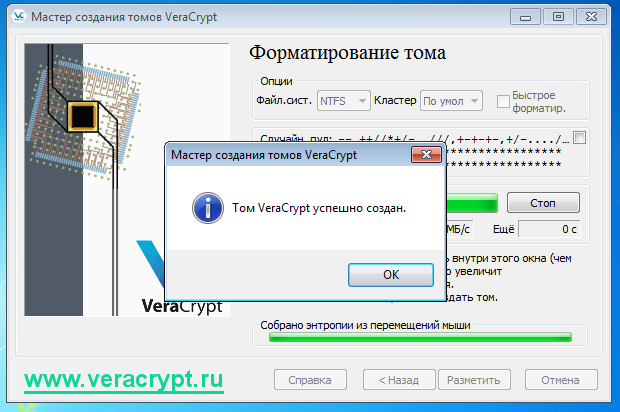
Поздравляем, том VeraCrypt успешно создан! Теперь вы можете закрыть мастер создания тома и пользоваться зашифрованной флешкой.
Использование зашифрованной флешки
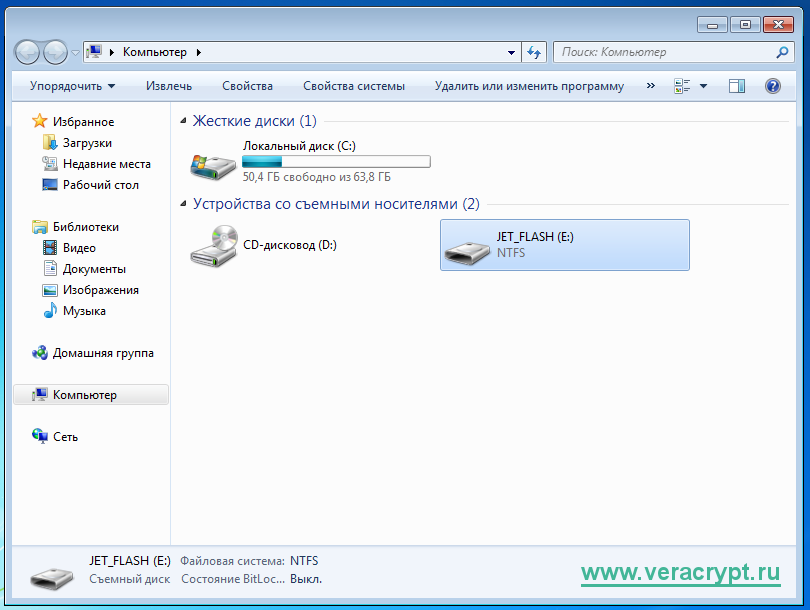
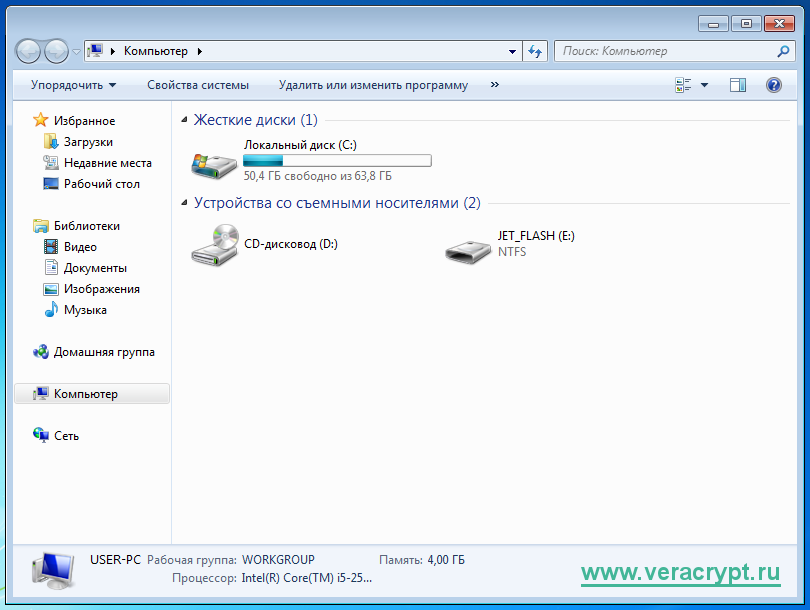
Если после шифрования флешки вы зайдёте в «Мой компьютер» и посмотрите на эту флешку, вы увидите, что она разспознаётся как неотформатированная флешка.
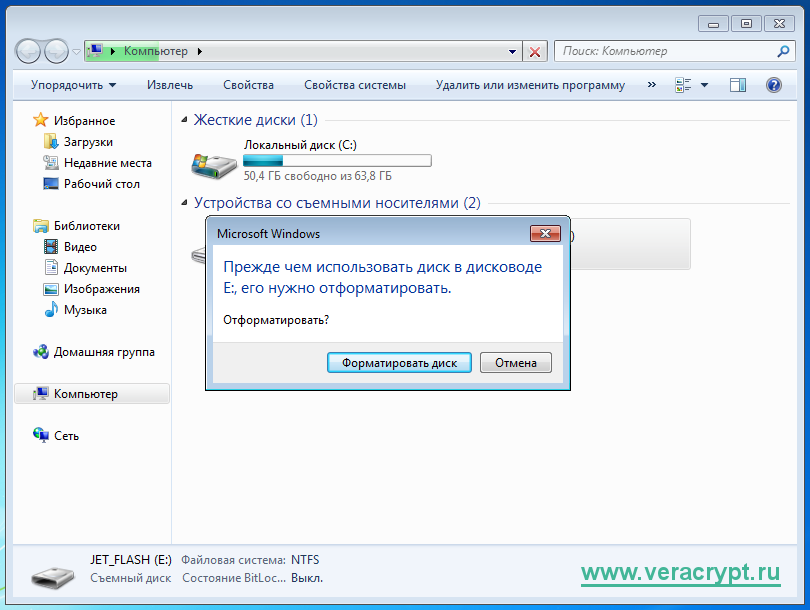
Если вы попытаетесь просмотреть содержимое зашифрованной флешки, Проводник предложит вам отформатировать её.
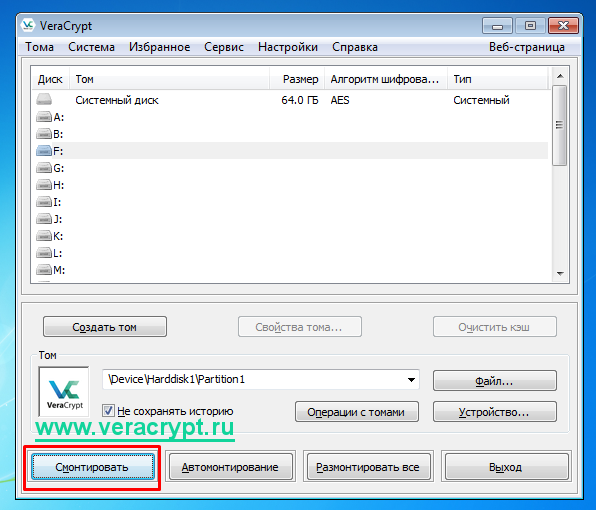
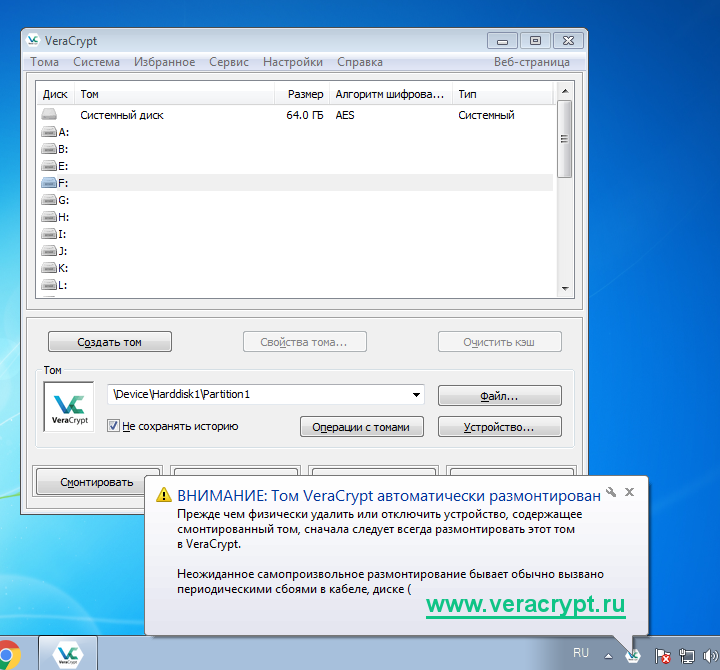
Для того, чтобы пользоваться зашифрованной флешкой, перейдите в главное окно программы VeraCrypt. Затем выберите свободную букву для монтирования флешки и нажмите кнопку «Устройство…»
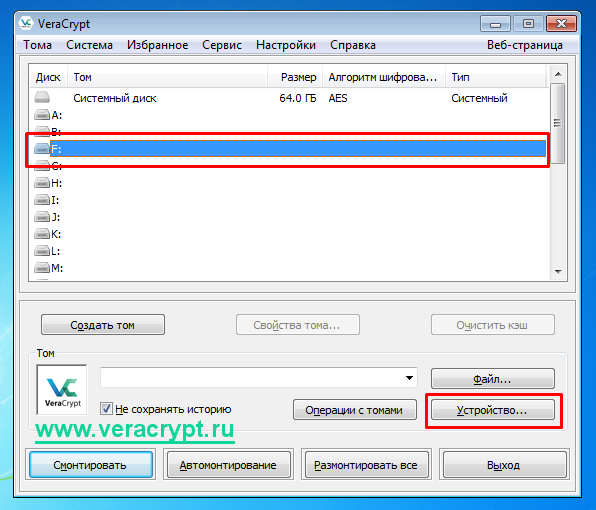
Откроется меню со списком доступных накопителей. Выберите зашифрованную флешку и нажмите «ОК».

Вы возвратитесь снова в главное меню программы. Нажмите кнопку «Смонтировать»
Теперь введите пароль для расшифрования данных на флешке.
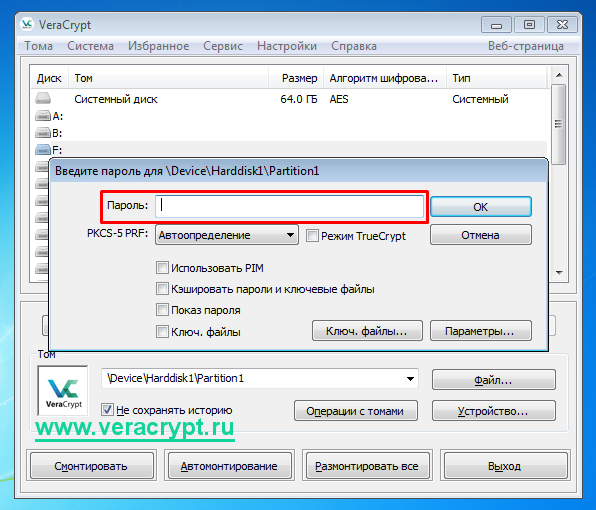
После того, как вы ввели пароль, подтвердите свой ввод нажатием на кнопку «ОК».

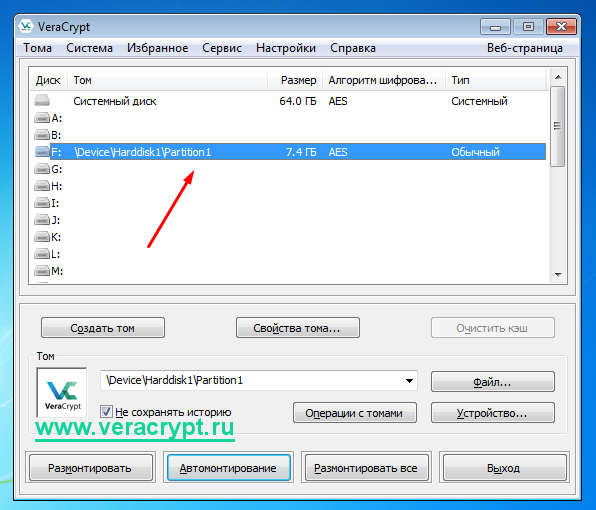
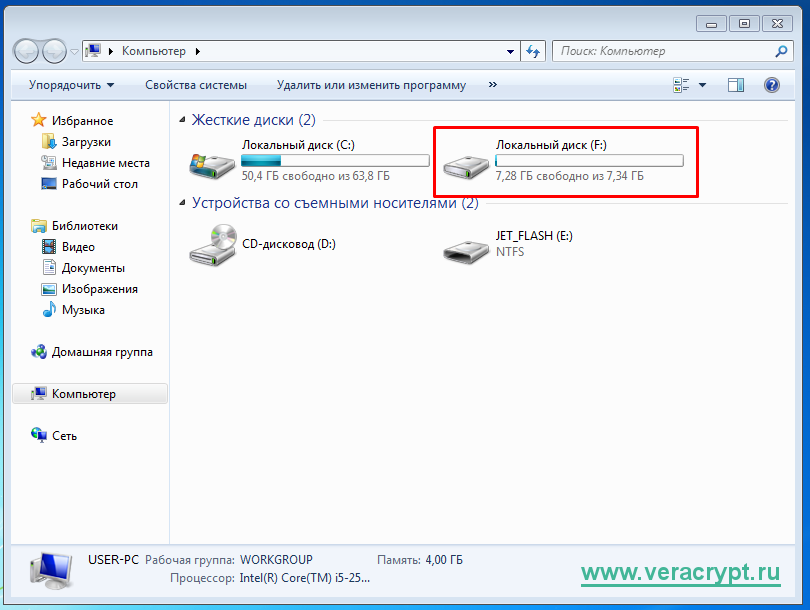
После того, как вы ввели правильный пароль, вы увидите появившийся локальный диск. На этом диске будут находиться все ваши данные, к которым вы будете иметь доступ до тех пор, пока флешка остаётся смонтированной.
После окончания работы с зашифрованными данными на флешке, выберите флешку в списке устройств и нажмите кнопку «Размонтировать». После этого никто не прочитает ваши данные, не зная пароля.

После того, как вы размонтировали флешку, пропадёт локальный диск и никто не сможет прочитать ваши зашифрованные данные.
Обратите внимание: всегда размонтируйте том VeraCrypt, прежде чем физически извлечь флеш-накопитель из компьютера. Иначе зашифрованные данные на флешке могут повредиться и весь том будет непригодным для расшифрования.
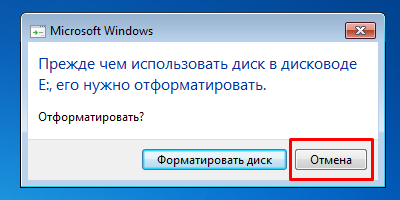
В случае, если вы вставили зашифрованную флешку в компьютер, Windows может предложить вам отформатировать флеш-накопитель. Не нужно этого делать, так как в этом случае вы потеряете свои зашифрованные данные!
Если вы ввели неверный пароль

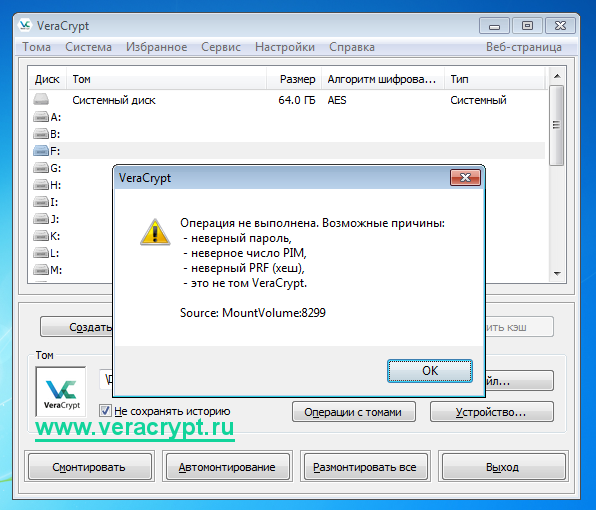
В случае, если вы ввели неправильный пароль при монтировании флешки, VeraCrypt выдаст вам ошибку:
В этой статье мы рассказали вам, как зашифровать флешку в VeraCrypt в системе Windows 7. Теперь вы научились создавать зашифрованную флешку VeraCrypt, монтировать и размонтировать зашифрованный том на флешке. Остались вопросы? Напишите комментарий!