")
Если у вас есть ошибка VAN 9003, то вам необходимо включить TPM 2.0. Данный процессор поддерживает стандарт или отсутствует? Старые модели имеют TPM 1.0, 2.1 или другие устаревшие варианты. Благодаря этой технологии происходит шифрование данных в игре перед отправкой на серверы, поэтому компьютер должен быть включен. ТПМ 2.0 нужен для того чтобы ваш ПК поддерживал TPM 2.0. Для того чтобы узнать о поддержке, следует изучить технические характеристики процессора.
Как убрать ошибку VAN 9003 в Valorant?
Большая часть пользователей, которые столкнулись с этой проблемой и сталкивались с ней ранее смогли исправить ее, изменив некоторые настройки BIOS. По данным производителя, чаще всего сбой происходит на компьютерах ASUS из-за каких-то особенностей предустановленного BIOS (UEFI).
Инструкция:
- Перезагружаем компьютер и в момент, когда появится подсказка внизу экрана, нажимаем F2, Del или другую клавишу (должна быть указана в строке снизу). Нам нужно попасть в BIOS.
- Идем в раздел «Advanced» и выбираем вкладку «PCH-FW Configuration».
- Кликаем по строке «TPM Device Selection» и устанавливаем значение «Enable Firmware TPM»
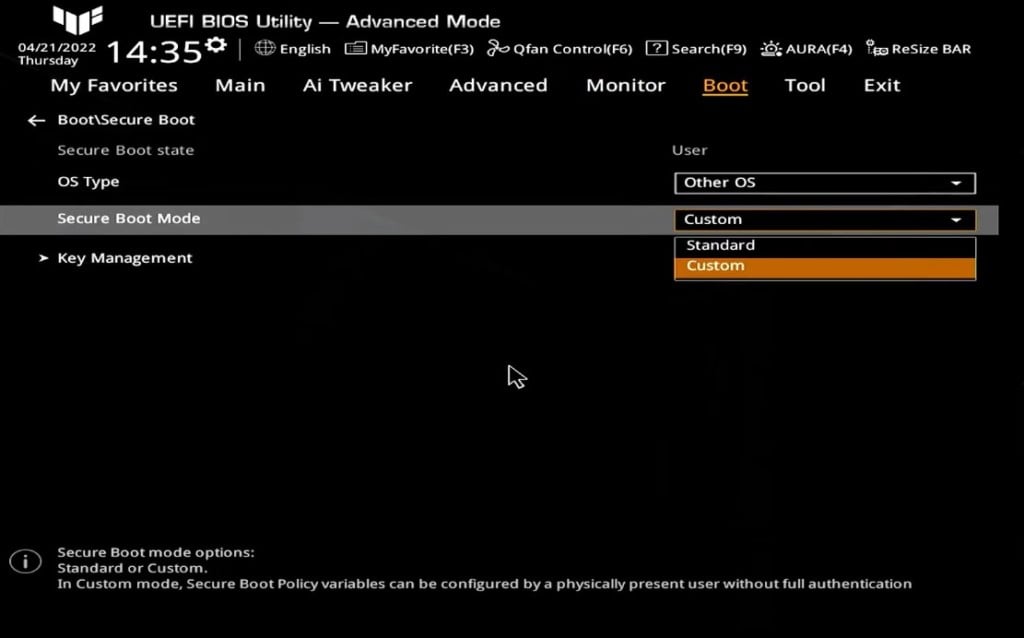
- На вкладке «Boot» открываем «Secure Boot» – «Secure Boot Mode» и выбираем «Standart».
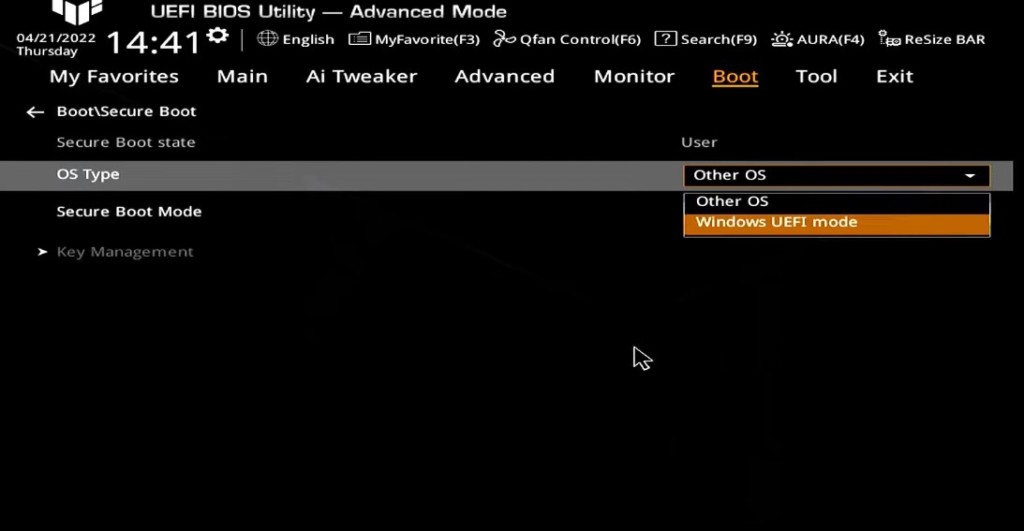
- Для параметра «OS Type» устанавливаем вариант «Windows UEFI Mode».
- Перезагружаем компьютер через вкладку «Exit» и проверяем, работает ли Valorant.
Как оказалось, многие из тех кто прошел данную операцию не подтвердили, что она была проведена. Возможно, это указывает либо на проблему совместимости,либо же на отсутствие TPM 2.1. Пока что нет никакой другой причины появления ошибки, но это может быть связано с тем, что кто-то из сотрудников допустил ошибку в тексте или же просто забыл о ней. Эта инструкция — ваш лучший шанс исправить ошибку VAN 9003.
Видео
Fix VAN9003 Valorant Windows 11 || Fix This Build of Vanguard is Out of Compliance Valorant Error
If you are getting the Van9003 Valorant error on Windows 11, then watch this video till the end to know to fix this build of Vanguard is out of compliance Valorant error.
If you have any sort of query, let us know in the comment section given below, and we will be helping you with your queries.
If you like the video please don’t forget to subscribe and hit the bell icon!
Timestamps:
00:00 Intro
01:04 Fix 1
01:40 Fix 2
02:18 Fix 3
Эта статья предназначена только для пользователей Windows 11.
О БЕЗОПАСНОЙ ЗАГРУЗКЕ И TPM 2.0
Доверенный платформенный модуль (TPM) и безопасная загрузка – это защитные технологии, которые позволяют Windows 11 запускать программы на более высоком уровне доверия и безопасности. Поэтому Vanguard требует запуска этих двух функций, чтобы определить доверенный статус системы.
Если безопасная загрузка или TPM 2.0 отключены в Windows 11, VALORANT не сможет корректно запуститься, и игроки увидят ошибку VAN9001 или VAN9003:

Как проверить, что безопасная загрузка поддерживается и включена
- Нажмите клавишу Windows.
- Введите «msinfo32» и нажмите Enter. Откроется меню «Сведения о системе».
- Щелкните по пункту «Сведения о системе» на панели слева.
- Прокрутите вниз панель справа и найдите эти значения:
- У параметра «Режим BIOS» должно быть значение «UEFI»
- У параметра «Состояние безопасной загрузки» должно быть значение «Вкл.».
- Если у этого параметра отображается значение «Выкл.», значит, он отключен. Его можно включить в любое время. (Ниже указаны способы решения проблем.)
- Если у этого параметра отображается значение «Не поддерживается», значит, ваше оборудование не поддерживает эту функцию. Чтобы узнать возможности своего оборудования, свяжитесь с его производителем.
Как проверить, что TPM 2.0 поддерживается и включен
- Нажмите клавишу Windows.
- Введите «tpm.msc» и нажмите Enter.
- Если TPM не поддерживается или не включен, вы увидите примерно следующее:
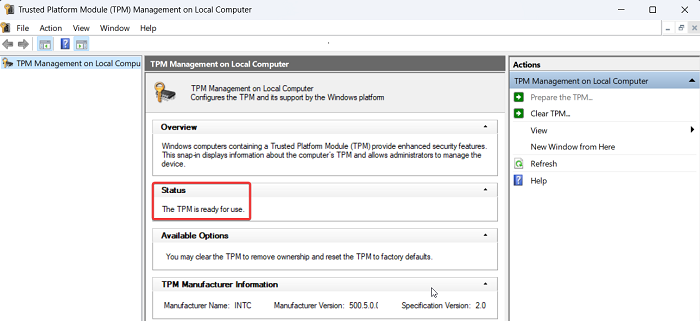
Если TPM поддерживается, вы увидите примерно следующее:
- Статус: TPM готов к использованию.
- Версия спецификации: 2.0
КАК ПРОВЕРИТЬ, ПОДДЕРЖИВАЕТ ЛИ ВАША СИСТЕМА БЕЗОПАСНУЮ ЗАГРУЗКУ И TPM 2.0
Для начала давайте убедимся, что ваша система поддерживает эти технологии.
ВАЖНО: РЕДАКТИРОВАНИЕ ВАШИХ НАСТРОЕК BIOS
Если вы не очень хорошо знакомы с навигацией в своей версии BIOS, пожалуйста, обратитесь за помощью к специалисту. Неправильные настройки BIOS могут вызвать проблемы с вашим компьютером, вплоть до того, что он не сможет запуститься.
Кроме того, BIOS может сильно отличаться в зависимости от типа и производителя вашего компьютера или материнской платы. Поэтому мы настоятельно рекомендуем вам обратиться к справочным ресурсам производителя вашего компьютера или материнской платы, чтобы сделать все правильно.
РЕШЕНИЕ ПРОБЛЕМ С БЕЗОПАСНОЙ ЗАГРУЗКОЙ
Внимание: ресурсы, указанные в этом руководстве, не принадлежат и не контролируются Riot Games, поэтому используйте их на свой страх и риск!
Вот несколько справочных ресурсов, где рассказывается, как включить безопасную загрузку и UEFI:
| Dell | https://www.dell.com/support/kbdoc/en-us/000190116/How-to-Enable-Secure-Boot-on-Your-Dell-Device |
| HP | https://support.hp.com/us-en/document/ish_4300937-4295746-16 |
| Lenovo | https://support.lenovo.com/ru/ru//solutions/ht509044 |
| MSI | https://www.msi.com/blog/Windows-11-guidance |
У Microsoft также есть страница с общей информацией о включении безопасной загрузки: https://support.microsoft.com/ru-ru/windows/windows-11-%D0%B8-%D0%B1%D0%B5%D0%B7%D0%BE%D0%BF%D0%B0%D1%81%D0%BD%D0%B0%D1%8F-%D0%B7%D0%B0%D0%B3%D1%80%D1%83%D0%B7%D0%BA%D0%B0-a8ff1202-c0d9-42f5-940f-843abef64fad
РЕШЕНИЕ ПРОБЛЕМ С TPM 2.0
Внимание: ресурсы, указанные в этом руководстве, не принадлежат и не контролируются Riot Games, поэтому используйте их на свой страх и риск!
Вот несколько справочных ресурсов, где рассказывается, как включить TPM 2.0:
| ASUS | https://www.asus.com/support/FAQ/1046215/ |
| Dell | https://www.dell.com/support/kbdoc/en-us/000189676/windows-10-how-to-enable-the-tpm-trusted-platform-module |
| HP | https://support.hp.com/us-en/document/ish_4300937-4295746-16 |
| Lenovo | https://support.lenovo.com/ru/ru/solutions/ht512598 |
| MSI | https://www.msi.com/blog/How-to-Enable-TPM-on-MSI-Motherboards-Featuring-TPM-2-0 |
У Microsoft также есть страница с общей информацией о включении TPM 2.0: https://support.microsoft.com/ru-ru/windows/%D0%B2%D0%BA%D0%BB%D1%8E%D1%87%D0%B5%D0%BD%D0%B8%D0%B5-tpm-2-0-%D0%BD%D0%B0-%D0%BA%D0%BE%D0%BC%D0%BF%D1%8C%D1%8E%D1%82%D0%B5%D1%80%D0%B5-1fd5a332-360d-4f46-a1e7-ae6b0c90645c
Все рабочие решения для исправления ошибки van9003 в Valorant
Вы можете реализовать одно из следующих решений, чтобы исправить ошибку van9003 в Valorant.
Связанный: Valorant «Очередь отключена» — как исправить
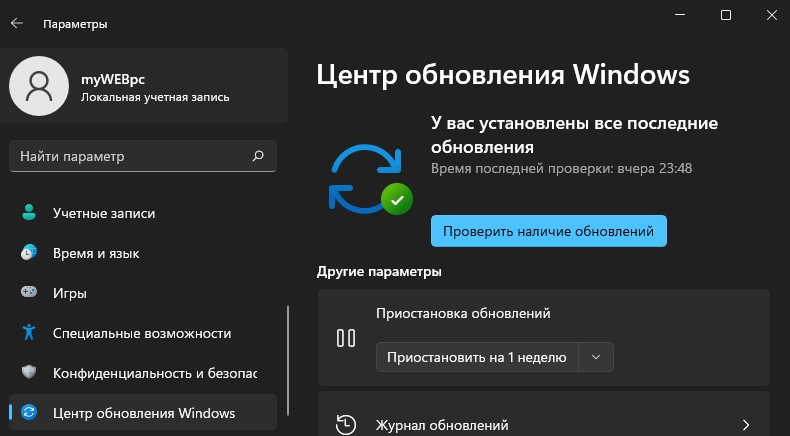
- Обновление Windows 11: наиболее распространенным исправлением данной ошибки является обновление Windows 11. Найдите Настройки из панели поиска Windows в нижней части экрана и щелкните значок, когда он появится. В настройках выберите «Обновление и безопасность» и нажмите кнопку «Центр обновления Windows». Проверьте наличие последних обновлений и установите последний патч. Перезагрузите компьютер и перезапустите игру.
- Включение безопасной загрузки: Другое популярное исправление для игры — включить безопасную загрузку для вашего ПК. Сначала проверьте, включена ли безопасная загрузка, выполнив поиск Системная информация в строке поиска Windows. Щелкните значок «Информация о системе» и в новом окне проверьте Сводка системы чтобы узнать, включена ли безопасная загрузка. Если он не включен, откройте BIOS, нажав F2(стандартная кнопка для большинства материнских плат) при запуске устройства. Перейдите к UEFI настройки и включите безопасную загрузку.
- Превращение TPM 2.0: отключение TPM 2.0 также приведет к той же ошибке. Вы можете включить его, открыв BIOS и посетив Настройки доверенного платформенного модуля. Внутри этого включите Доверенный платформенный модуль вариант и сохранить все. Перезагрузите систему и попробуйте запустить Valorant.
Помните, что это некоторые из наиболее распространенных решений для исправления ошибки van9003, доступных в Интернете. Если ничего из этого не работает, мы настоятельно рекомендуем обратиться в службу поддержки Riot Games для получения дополнительных запросов и предложений.
This build of Vanguard is out of compliance — VAN 9003 Valorant
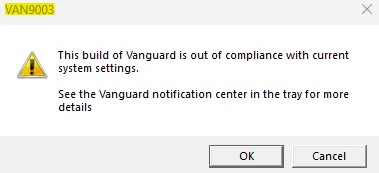
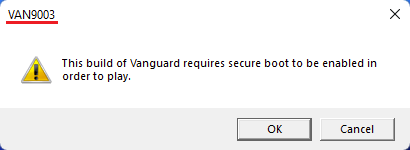
При запуске игры Valorant в Windows 11 может возникнуть ошибка VAN 9003 This build of Vanguard is out of compliance with current system settings, что сборка Vanguard не соответствует текущим системным настройкам.
Виновником ошибки This build of Vanguard is out of compliance с кодом VAN 9003 является анти-чит Vanguard, который устарел или несовместим с текущей версии игры. Кроме того, это может быть неправильные настройками Secure Boot и TPM 2.0 в BIOS.
Как исправить VAN 9003 This build of Vanguard is out of compliance
В данной инструкции разберем, как исправить ошибку This build of Vanguard is out of compliance with current system settings с кодом VAN 9003 при запуске игры Voliorant в Windows 11.
1. Обновите Windows 11
Обновите Windows 11 до последней версии, так как с обновлениями идут нужные компоненты для правильной работы игр.
- Перейдите в Центр обновления Windows
- Нажмите Проверить наличие обновлений
2. Переустановить Vanguard
Чтобы исправить ошибку VAN 9003 при запуске игры Valorant в Windows 11 нужно удалить Vanguard и установить его заново.
- Нажмите Win+R и введите appwiz.cpl
- Найдите и удалите Riot Vanguard
- Перезагрузите ПК
- Далее зайдите на официальный сайт игры и скачайте последнюю версию
- Vanguard установится автоматически после запуска Riot Games
- Перезагрузите ПК

3. Включить Secure Boot, TPM и UEFI
Для анти-чита Vanguard в Windows 11 нужна безопасная загрузка и наличие TPM 2.0 чипа для корректной работы игр от Rio Games, которые включаются в BIOS.
Чтобы зайти в BIOS, при включении ноутбука или ПК нажимайте непрерывно кнопку Delete. Кроме того, вы можете набрать в поиске Google «Как зайти в биос …» и указать модель ноутбука или материнской платы ПК. Это касается и включения ниже параметров, которые тоже придется искать самостоятельно в поиске по картинкам, так как у всех BIOS разный, но я прикреплю картинки для некоторых BIOS/UEFI.
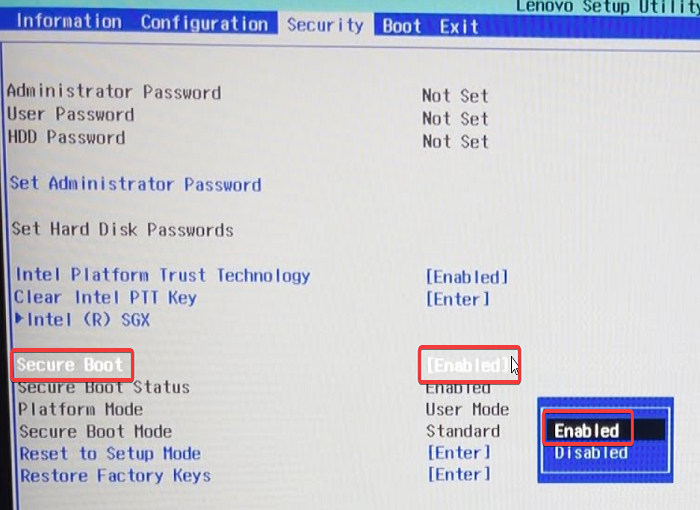
Включите ниже UEFI, Secure Boot и TPM:
- Измените режим загрузки CSM или Legacy на UEFI
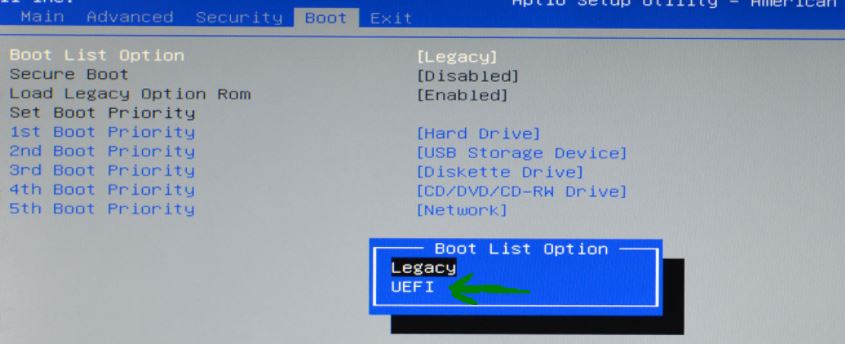

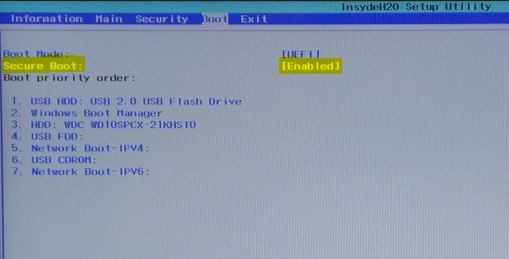
- Включите Secure Boot (Enabled)
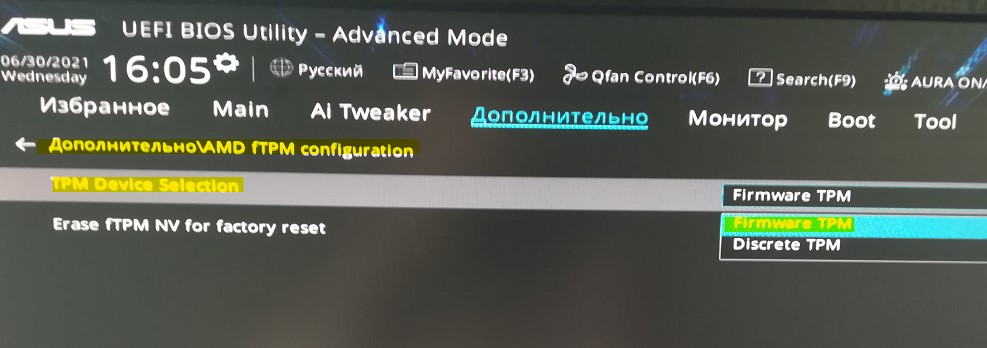
- Включите TPM 2.0. Имеется подробное руководство по включению TPM 2.0 для разных BIOS
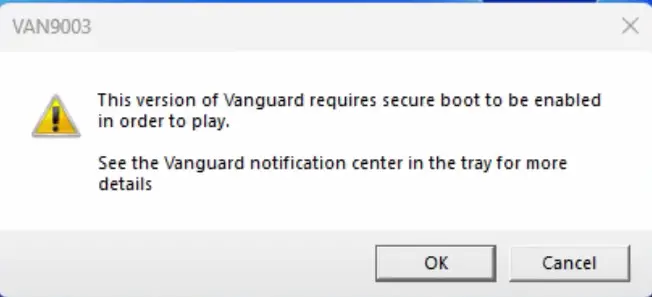
Valorant is one of the most popular free first-person shooter games. While the game has been designed to be as error-free as possible, a few errors exist. One such error is VAN9003, This build of Vanguard requires secure boot to be enabled in order to play. This error doesn’t allow the launch of the Valorant game. The VAN 9003 error is followed by the following statement:
This build of Vanguard requires secure boot to be enabled in order to play.

What causes VAN 9003 error on Valorant?
The VAN9003 error on Valorant is typically caused when Secure Boot is not enabled on your computer. Other than this, it can also be caused when TPM 2.0 is disabled on your system.
If you encounter this error, then please try the following solutions sequentially:
- Enable Secure Boot on your computer
- Check if TPM is enabled
- Update drivers and Windows
- Run Valorant in Compatibility mode
1] Enable Secure Boot on your computer
Secure Boot is necessary for applications to trust your computer. Secure Boot is enabled on all computers by default, but if not, then you can enable it manually through the BiOS. The procedure is as follows:
Restart your computer and on as soon as it restarts, press the following key/s to open the BiOS:
- For Asus computers: F2
- For Dell computers: F2 or F12
- For HP computers: F10
- For Lenovo desktops: F1
- For Lenovo laptops: F2
Once you are in the BiOS, go to the System Configuration tab.
Now, change the option for Secure Boot to Enabled.
Read: Windows computer won’t boot after enabling Secure Boot
2] Check if TPM is enabled
If Trusted Platform Module (TPM) is disabled, you may encounter the VAN 9003 error on your system. In this case, we suggest you verify the same. The procedure is as follows:
Press Win+R to open the Run window.
In the Run window, type the command TPM.MSC and hit Enter to open the TPM window.
If the TPM module does not exist on your system, you will encounter the error Compatible TPM cannot be found.
If the TPM module exists and is enabled, the TPM settings window will open on your system and the Status would read “The TPM is ready for use.”
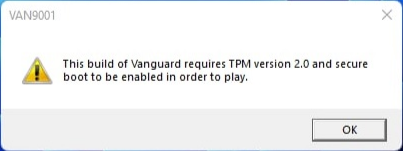
Read: Error VAN9001, This build of Vanguard requires TPM version 2.0 and secure boot to be enabled in order to play.
3] Update drivers and Windows
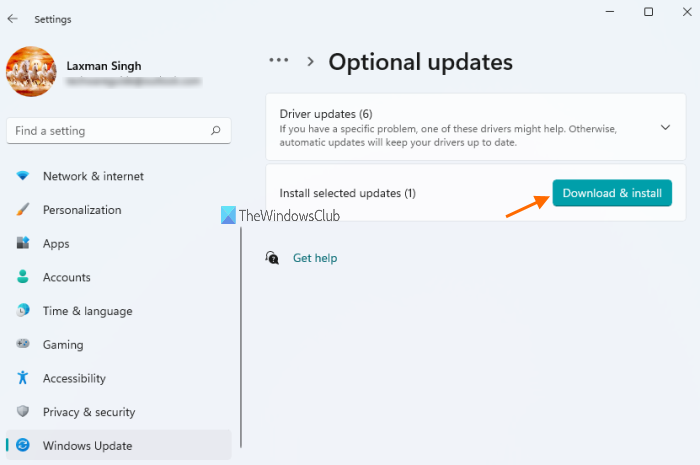
At times, obsolete drivers may also cause the VAN 9003 error while trying to access Valorant. In this case, you can update the drivers by installing Driver & Optional updates on your Windows 11 computer. The procedure is as follows:
- Right-click on the Start button and select Settings from the menu.
- In the Settings menu, go to the Windows Update tab on the left pane.
- In the right pane, click on Advanced Options.
- Select Optional Updates.
- If any update is available, please check the box for the same and click on Install.
4] Run Valorant in Compatibility mode
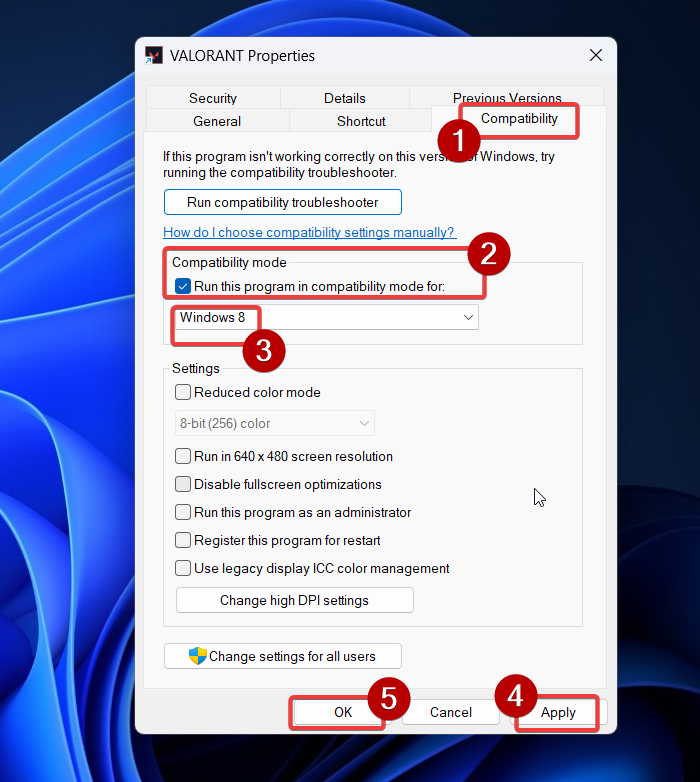
If the above-mentioned solutions fail, then you can run your game in Compatibility mode and see if it helps.
- Right-click on the icon for the game (Valorant in our case).
- Select Show more options from the menu.
- Select Properties from the list.
- Go to the Compatibility tab.
- In the Compatibility mode section, check the box for Run the program in compatibility mode for.
- From the drop-down menu, select the previous version of Windows from the list.
- Click on Apply and then on OK to save the Settings.
I hope this was helpful. Please let us know in the comment section.
Related: This build of Vanguard is out of compliance error VAN9005 or VAN9003
Is Valorant down right now?
Valorant uses the server of its parent company Riot Games. It is rare for the server supporting Valorant to be down. Nonetheless, you can check the server status at status.riotgames.com. Click on Valorant amongst the list of games. Then, change the region to your region. The server status will be displayed on the main page.
Read: Fix VAN 1067 error code in Valorant
Does Riot Vanguard not work on Windows 11?
Interestingly, the basic security requirements for both Vanguard and Windows 11 are the same – TPM 2.0 and Secure Boot. However, Vanguard needs additional resources like a sufficiently powerful CPU and GPU. Once these conditions are fulfilled, Valorant will work well on your Windows 11 system. However, a lot of users install Windows 11 on older computers by evading the requirements. That is the reason they encounter errors like VAN 9003.
Riot Games разработала тактическую игру Valorant 5 на 5, которая представляет собой игру FPS. С более чем 13 раундами для защиты или нападения с помощью оружия и способностей, вы получаете одну жизнь за каждый раунд. Но после недавнего обновления 5.12 многие геймеры сообщили об ошибке Valorant VAN9003, за которой последовали другой ошибкой, которая гласит: «Эта сборка Vanguard не соответствует текущей системе настройки».
Далее следует инструкция «Дополнительную информацию см. в Центре уведомлений Vanguard в трее».
Кроме того, различные пользователи сообщали об аналогичной ошибке, отображающей VAN9003 «Ошибка начальной аттестации. Требование безопасной загрузки не выполнено». Однако, если у вас также есть аналогичная проблема с Valorant, это руководство по устранению неполадок для вас.
Прочитайте следующие простые, но эффективные шаги, чтобы исправить ошибку Valorant VAN9003 на ваших устройствах Windows. Но прежде чем мы перейдем к решению, важно понять проблему, которая может привести к отображению ошибки VAN9003.
Оглавлениескрывать
Что означает ошибка Valorant VAN9003?
Шаги, чтобы быстро исправить ошибку Valorant VAN9003
Исправление 1: включить безопасную загрузку
Исправление 2: включить доверенный платформенный модуль
Исправление 3: обновить Windows
Закрытие линий:
Что означает ошибка Valorant VAN9003?
Ошибка может возникнуть, если на вашем устройстве не включена безопасная загрузка. Надежные функции Windows, такие как безопасная загрузка, доверенный платформенный модуль и т. д., помогают вашей системе безопасно загружать приложения или программы. И, следовательно, Vanguard также требует этих двух программ, то есть Trusted Platform Module и Secure boot, чтобы гарантировать, что система находится в безопасном состоянии.
Теперь проверьте, установлен ли для режима BIOS режим UEFI. Кроме того, состояние безопасной загрузки включено. Если эти параметры не совпадают, выполните следующие действия, чтобы включить состояние безопасной загрузки на вашем ПК.
Шаги, чтобы быстро исправить ошибку Valorant VAN9003
Примените следующие исправления, чтобы устранить ошибку VAN9003 на вашем устройстве.
Исправление 1: включить безопасную загрузку
Примените указанные ниже шаги, чтобы исправить ошибку VAN9003 на вашем устройстве, включив безопасную загрузку на вашем ПК.
Шаг 1: Перезагрузите компьютер и нажмите клавишу F2, чтобы войти в режим BIOS.
Шаг 2: Если вы используете
После того, как эти настройки будут применены и сохранены, подождите, пока ваш компьютер перезагрузится. Если ошибка Valorant VAN9003 не устранена, перейдите к следующему исправлению, чтобы решить проблему.
Читайте также: Valorant не запускается на ПК Ошибка
Исправление 2: включить доверенный платформенный модуль
Чтобы исправить ошибку Valorant, вы должны проверить, включен ли TPM. Вот как это проверить.
Нажмите клавиши Windows и R вместе, чтобы открыть диалоговое окно «Выполнить». Входить tpm.msc и нажмите «ОК». Если версия TPM ниже 2.0, ваша система запросит обновление. Для этого вам необходимо включить TPM из вашего BIOS, выполнив перечисленные ниже шаги.
Шаг 1: Перезагрузите устройство с Windows 11 и откройте BIOS с помощью клавиши F10, F11, F12 или Delete (в зависимости от производителя вашей материнской платы).
Шаг 2: В расширенном режиме BIOS перейдите к состоянию TPM или PTT, fTPM с помощью клавиш со стрелками.
Шаг 3: Нажмите на опцию «Включить» и нажмите клавишу «Ввод» на клавиатуре.
Шаг 4: Сохраните изменения, а затем выйдите из режима BIOS. Перезагрузите компьютер, чтобы проверить, исправлена ли ошибка игры.
Запустите игру Valorant, чтобы проверить, устранена ли ошибка VAN9003.
Читайте также: Как исправить ошибку Valorant «Сбой графического драйвера»
Исправление 3: обновить Windows
Другой возможной причиной ошибки VAN9003 Volarant является устаревшая версия Windows. Многие существующие программные или аппаратные устройства могут иметь проблемы совместимости с версией Windows. И для решения этой проблемы Microsoft выпускает регулярные обновления для Windows. Обновления Windows не только исправляют ошибки, но и повышают общую производительность вашего ПК.
Поэтому, чтобы устранить ошибку Van9003 Valorant Windows 11, вот как вы можете загрузить последнее обновление Windows.
Шаг 1: В строке поиска введите Настройки. Нажмите на значок приложения «Настройки» и «Открыть».
Шаг 2: Теперь выберите Центр обновления Windows вкладку и нажмите кнопку Проверить наличие обновлений кнопка.
Дождитесь завершения загрузки и перезагрузите компьютер, чтобы применить обновления.
Теперь проверьте, исправлена ли ошибка VaAN9003 Valorant в Windows 11 с помощью обновления Windows.
Закрытие линий:
Мы надеемся, что в приведенной выше статье вы исправили ошибку Valorant VAN9003. В большинстве случаев проблема решается включением режима безопасной загрузки. Однако, если у вас все еще есть какие-либо проблемы, оставьте их в разделе комментариев ниже. Мы постараемся сделать все возможное, чтобы решить проблему с соответствующим решением.
Кроме того, если вы нашли это руководство полезным, не забудьте подписаться на наш блог, чтобы получать более информативные руководства по устранению неполадок и технические обновления.
Are you trying to open Valorant on your Windows 11 device and getting a VAN9003 error? Does this error state, “This version of Vanguard requires secure boot to be enabled in order to play”? Or are you finding a different error with the VAN9003 error code? If yes, then this error means that the Secure Boot or UEFI is disabled from the BIOS of your device.
Why does the VAN9003 Error occur on your Windows 11 device?
The error occurs due to Secure Boot and UEFI. It shows that “This Build of Vanguard is Out of Compliance” when the required components are disabled from the firmware interface.
The secure boot and trusted platform module (TPM) are security features that allow safety for Windows to boot programs. Thus, Vanguard requires both Trusted Platform Module and Secure Boot to ensure the safety of the system.
Before finding the solution to fix this error, you must first focus on understanding the cause of the VAN9003 error. For this, check if Secure Boot State is ON and BIOS Mode is set to UEFI on your device.
How to check whether the Secure Boot or UEFI is enabled or not?
1. Go to Windows Search and look for the System Information app.
2. Click on the System Summary from the left side and find BIOS mode and Secure Boot State from the right.
3. Now, check the value of these items. The value for BIOS mode should be UEFI; if it is CSM or Legacy, then you must change it to UEFI. Similarly, the Value for Secure Boot State must be ON; if it is Off, then you must turn it On from BIOS.
You can easily fix Valorant VAN9003 Error on your Windows 11 PC by following the steps mentioned below. These must be followed one after the other if the previous one does not work for you.
1. Enable Secure Boot
Valorant requires Secure Boot to be enabled. You can do it by opening UEFI/BIOS on your PC. For this, you must know the BIOS key for your PC.
Here are the BIOS Keys for major brands:
| Manufacturers | BIOS Key |
| Acer | Del or F2 |
| AOpen | Del |
| Asus | F2 for Laptops/PC, F2 or Del for motherboards |
| Asrock | Del or F2 |
| Biostar | F12 |
| Dell | F2 or F12 |
| Gigabyte | Del or F2 |
| HP | F10 or Esc |
| Lenovo | F2 or Fn+F2 F1 for desktop Enter+F1 for Thinkpads |
| MSI | Del |
| Origin | F2 |
| Samsung | F2 |
| Sony | F1, F2 or F3 |
Once you have found the BIOS key for your PC, then proceed with the below-mentioned steps:
1. Close everything and Restart your PC.
2. While restarting, when you see the manufacturer logo, you have to press the suitable BIOS key on your keyboard; this will load the BIOS settings.
3. Open the BIOS in advanced mode. Click on Advanced Mode or press F7 from your keyboard to open the advanced BIOS mode. (For MSI motherboard, see pictures)
You might have different motherboards; just look for the Settings option, or you can search for it.
4. Click on Settings.
5. Go to the Advanced option and then click on Windows OS configuration.
6. Now, switch BIOS mode from legacy or CSM to UEFI.
7. Click on Secure Boot and Enable it. Then, set the Secure Boot Mode to Standard.
2. Enabling TPM 2.0
8. Go back to the main menu, then click on the Security option. Click on Trusted Computing and Enable Security Device Support. (Some motherboards have different names for “Security device support”)
9. Now, you can select the available TPM Switch; it can be AMD FTPM, ITPM, or Intel PTT. Or select the available TPM switch as your processor support.
10. Now, save all the changes by simply clicking on the Red X button from the top right, followed by clicking on the yes option to save all the changes you made. OR Press F10.
11. Then Restart your PC.
12. Lastly, log in to your device and check if you can open Valorant.
3. Reset Factory Default Keys if you can’t Enable Secure Boot
If you are unable to play the Valorant even after following the method mentioned above, then Secure Boot might not be enabled.
Or you might get another error “System is in setup mode; secure boot can be enabled in user mode.”
Verify the Secure Boot state by opening the “System Information.” If it is still OFF, then follow the below steps.
1. Open the BIOS menu again (follow steps 1 and 2 mentioned in method 1).
2. Go to Advanced Mode or press F7.
3. Click on Settings.
4. Go to the Advanced option and then click on Windows OS configuration.
5. Click on Secure Boot. Then, disable the Secure Boot and select the Custom option for Secure Boot Mode.
6. Now again, click on Secure Boot Mode and select the Standard option. This will ask you to install the factory default keys, so press Yes. Then it will ask to “Reset without saving” here; click on the No option.
7. Now, Enable the Secure Boot.
8. Save all the changes by pressing F10. Or simply click on the Red “X” button from the top right, followed by clicking on the Yes option to save all the changes you made.
9. Now, your device will restart.
10. Login back into your Windows 11 and open the System Information again. Now, the BIOS mode will be UEFI, and the Secure Boot Mode status will be ON.
11. Lastly, open and play Valorant on your Windows 11 Device. If you are still unable to do so, then follow the next method.
4. Compatibility Mode to fix Valorant VAN9003 Error
1. Locate the Valorant’s Shortcut. If it is not on your desktop, then search for Valorant and right-click on it to open the file location.

2. Now, copy its shortcut and paste it on your desktop.
3. Right-click on the Valorant shortcut from your desktop and click on Properties.
4. Click on the Compatibility tab from the top right.
5. Under the compatibility mode, select the option Run this program in compatibility mode, and select Windows 8 from the drop-down menu.
6. Click on Apply, followed by clicking on OK.
7. Lastly, open and play Valorant.
Take Away!
The primary reason for the Valorant VAN9003 error is the disabled Secure boot or TMP 2.0. This will not allow Valorant to launch. The above methods will definitely fix the problem.
After that, Valorant will work without the error “This Build of Vanguard is Out of Compliance.” Or any other Secure Boot and TPM 2.0-related errors.
This will help you easily open and play Valorant on your Windows 11 device.
FAQs About VAN9003 Error
What if Valorant won’t launch if TPM is disabled?
If TPM is disabled on your device, then it will show a VAN9003 error. To fix this, you can start by checking if the BIOS mode is UEFI and Secure Boot State is enabled.
What is Van9003 error in Valorant?
The Van9003 error in Valorant often pops up when the TPM 2.0 (Trusted Platform Module 2.0) is not enabled on your Windows 11 device. It is a security feature that allows safety for Windows to boot programs. To fix this, you can follow the steps mentioned in this article.
Are Secure Boot and TPM 2.0 necessary to run Valorant?
Yes, you need to enable both secure boot and TPM 2.0 to run the Valorant on your Windows 11. If these features are turned off, then Valorant will not open.
Why am I getting the “System is in Setup Mode” error while enabling Secure Boot?
When there are already Platform Keys enrolled, then you need to change them to Default Keys before enabling Secure Boot.
Fix other Valorant Errors:-
- Valorant Fix: DX11 Feature Level 10.0 Is Required To Run The Engine on Windows 11/10/8.1
- Valorant Fix: This Build Of Vanguard Requires TPM Version 2.0 and Secure Boot to be Enabled
- How To Fix “Graphics Driver Crashed! Make Sure Your Graphics Drivers Are Up To Date” On Valorant
Introduction
Valorant has taken the gaming world by storm, offering a unique blend of fast-paced first-person shooter gameplay and tactical strategies. However, like any other game, it’s not immune to occasional hiccups and errors. One such issue that has left players scratching their heads is the VAN9003 error, which displays the message «This Build of Vanguard is Out of Compliance.» This error can leave you unable to enjoy your favorite game, but don’t worry — we’ve got you covered! In this comprehensive guide, we’ll provide a step-by-step solution to tackle the VAN9003 Valorant error and get you back into the action in no time. With the right information, fixes, and insights, you’ll soon forget this issue ever existed. So, let’s dive right in and resolve the Vanguard compliance issue once and for all!
Terminate All Riot Games and Valorant Processes
Initially, ensure that you close all active Riot Games and Valorant processes on your computer. Launch your Task Manager and navigate to the Processes tab. Locate any Riot Games, Vanguard, or Valorant processes, right-click on them, and select «End Task.» This will help eliminate any lingering processes that might be causing the VAN9003 error in your Valorant game.
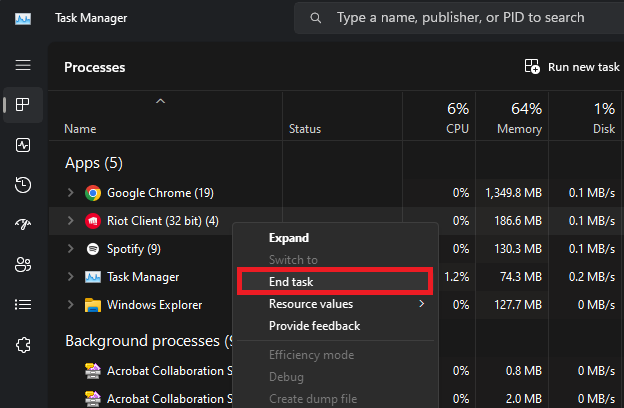
Task Manager > Riot Client (32 bit) > End Task
Modify Valorant Compatibility Settings
After completing the previous step, it’s time to tweak your Valorant compatibility settings. Locate Valorant by using your Start menu search and click on «Open File Location.»
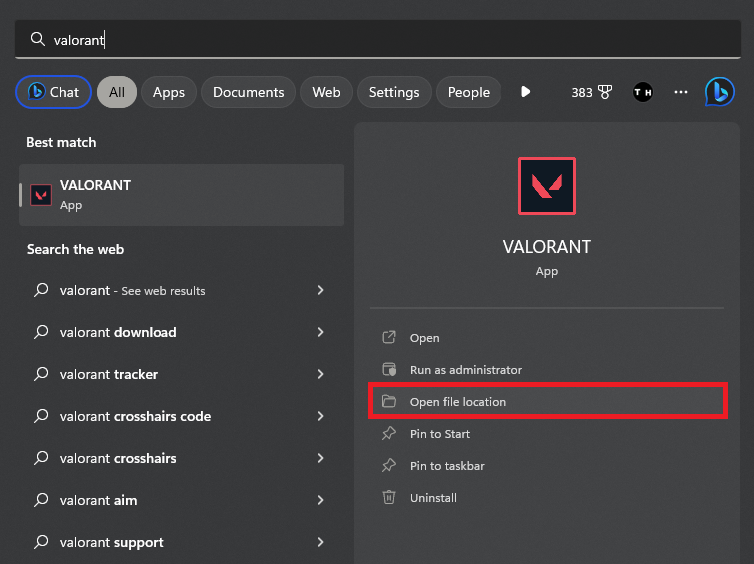
Windows Start Menu > Valorant > Open File Location
The file explorer will appear, presenting the Valorant shortcut. Right-click it to access its properties. Head to the Compatibility tab and choose to run the program in compatibility mode for Windows 7. Be sure to apply the changes you’ve made.
Performing this adjustment may already resolve the Vanguard out of compliance error you encounter while attempting to launch Valorant.
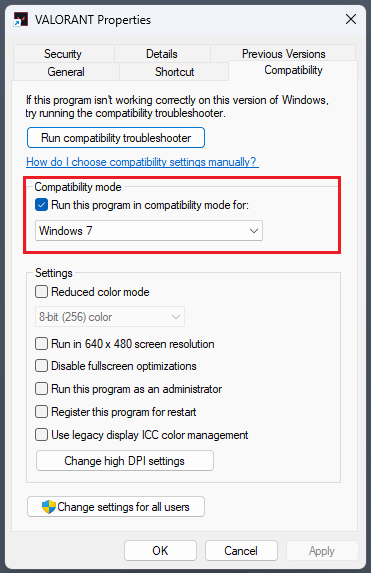
Valorant Properties > Compatibility > Compatiblity Mode: Windows 7
Upgrade and Reboot Windows OS
Should the issue continue, it is crucial to ensure that your Windows operating system is current, as this will also install the most recent drivers required for running Valorant smoothly.
Access your Windows settings, and head to the Windows Update area. Click on «Check for Updates» and proceed to download any available updates. After successfully downloading the update, reboot your PC to apply the changes.

Windows Settings > Windows Update
Enable Secure Boot on your Windows PC
Finally, verify that secure boot is activated on your computer. Launch the System Information application on your PC. Within the System Summary, you can review your BIOS Mode and the Secure Boot State. If it is set to OFF, you’ll need to enable it in your BIOS settings during your PC’s restart.
To enable Secure Boot State in your BIOS, follow these steps:
-
Restart your PC and, as it boots up, press the appropriate key (usually F2, F10, F12, or Delete) to enter the BIOS/UEFI settings.
-
Navigate through the BIOS settings using the arrow keys to find the «Boot» or «Security» tab.
-
Locate the «Secure Boot» option within the selected tab.
-
Change the «Secure Boot» setting from «Disabled» or «Off» to «Enabled» or «On.»
-
Save the changes by pressing the designated key (typically F10) or by navigating to the «Exit» tab and selecting «Save and Exit.»
-
Your PC will restart and apply the changes.
Enabling the Secure Boot State ensures that your computer is protected against unauthorized changes, which could help resolve the Vanguard compliance error while trying to launch Valorant.
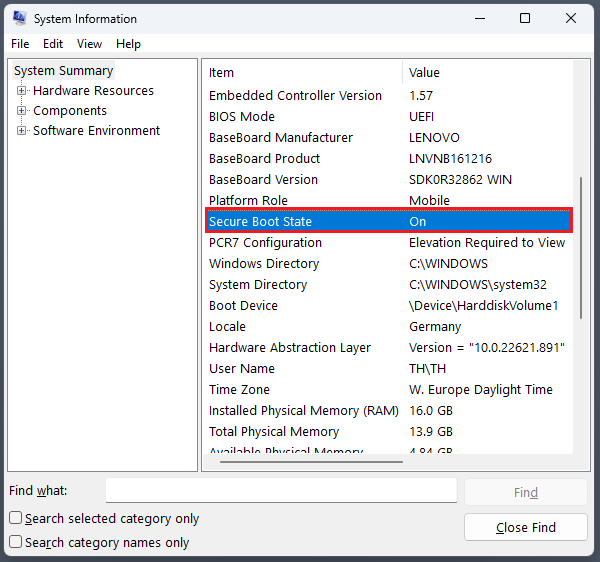
System Information > System Summary > Secure Boot State (ON)
-
The VAN9003 Valorant error message, «This Build of Vanguard is Out of Compliance,» indicates that your Vanguard anti-cheat system is outdated or not functioning properly, preventing you from playing Valorant.
-
To fix the VAN9003 error, close all Riot Games and Valorant processes by opening the Task Manager, locating Riot Games, Vanguard, and Valorant processes in the Processes section, right-clicking each process, and selecting “End Task.”
-
To adjust the compatibility settings, search for Valorant in your start menu search, select «Open File Location,» right-click the Valorant shortcut, access its properties, navigate to the Compatibility section, and select to run the program in compatibility mode for Windows 7. Apply your changes, and this might fix the Vanguard out of compliance error.
-
Updating your Windows operating system ensures that you have the latest drivers and system files necessary for running Valorant smoothly. To update your Windows, navigate to the Windows Update section in your settings, click «Check for Updates,» download any available updates, and restart your PC.
-
Secure Boot is a security feature that prevents unauthorized changes to your computer, ensuring that only trusted software runs during the boot process. Enabling Secure Boot in your BIOS settings can help resolve the Vanguard compliance error in Valorant by enhancing your system’s security. To enable Secure Boot, enter your BIOS settings during the PC’s restart, locate the «Secure Boot» option within the «Boot» or «Security» tab, and change the setting to «Enabled» or «On.» Save the changes and restart your PC.