Are you getting the “Riot Vanguard Crashed” error on Valorant? Here are the fixes that you can try to get rid of the error. Several users have complained of encountering an error that says “Riot Vanguard Crashed” while playing the Valorant game. Now, the error might be triggered due to various reasons. In any case, you can follow this guide to fix the error without any hassle.

What causes Riot Vanguard Crashed error on Valorant?
Here are the potential causes of the Riot Vanguard Crashed error on Valorant:
- It can be caused if there is some glitch with the Vanguard service. You can try restarting the service to fix the error.
- Some Windows features like the Hyper-V feature can also cause the error at hand.
- It can also be triggered due to corrupted cache files that belong to the Valorant game. Hence, clear the cache files and see if the error is fixed or not.
- An unverified graphics driver can also cause the same error. So, verify the graphics driver and then reinstall it to fix the error.
- Your antivirus or Windows Defender might be blocking the game and causing the error at hand. If the scenario is applicable, add Valorant to the Exclusion list to fix the error.
How do I fix Valorant Vanguard crash?
If you experience a Vanguard crash error while playing Valorant, you can fix it up by running the game with admin privilege or restarting the Vanguard service. If that doesn’t help, you can try some advanced solutions like disabling the Hyper-V feature, turning on Data Execution Prevention, disabling Windows Testing Mode, or verifying your graphics driver. There are many more fixes that we have mentioned below; so checkout.
How do I fix driver crashed Valorant?
If you receive the Graphics Driver Crashed error on Valorant, try updating your graphics driver. Besides that, you can also roll back the graphics driver, update DirectX, reset the graphics card, stop overclocking, disable VSync, etc.
Fix Riot Vanguard Crashed Error on Valorant in Windows 11/10
Here are the fixes that you can try to fix the Riot Vanguard Crashed or Encountered an error on Valorant:
- Reboot your PC.
- Run Valorant as an administrator.
- Restart the Vanguard service.
- Turn off the Hyper-V feature on Windows.
- Enable Data Execution Prevention.
- Disable Windows Testing Mode.
- Delete the cache files and temporary files.
- Verify and Reinstall your graphics drivers.
- Add Valorant to Exclusion.
- Reinstall Valorant and Riot Vanguard.
1] Reboot your PC
The first thing you should do when encountering this error is to reboot your PC. Most of the time, the error is caused due to some temporary glitch in your system. Or, there might be some temporary bug or error in Valorant causing the error at hand. Hence, a simple restart should help you fix the error. So, reboot your computer and then check if the “Riot Vanguard Crashed” error on Valorant is fixed or not.
In case the error still persists, go ahead and try the next potential fix to resolve the error.
Read: Valorant Download or Update Stuck at 0.1 kb/s or at 0%, 95%, 100%
2] Run Valorant as an administrator
The error might be caused due to lack of administrator privilege to run the game. Hence, try running the Valorant game with admin rights. Just go to the Valorant application file and right-click on it. Then, from the appeared context menu, select the Run as administrator option to launch the game with admin privilege. If the error doesn’t appear again, you can try making the game run as an administrator always in order to fix the error permanently.
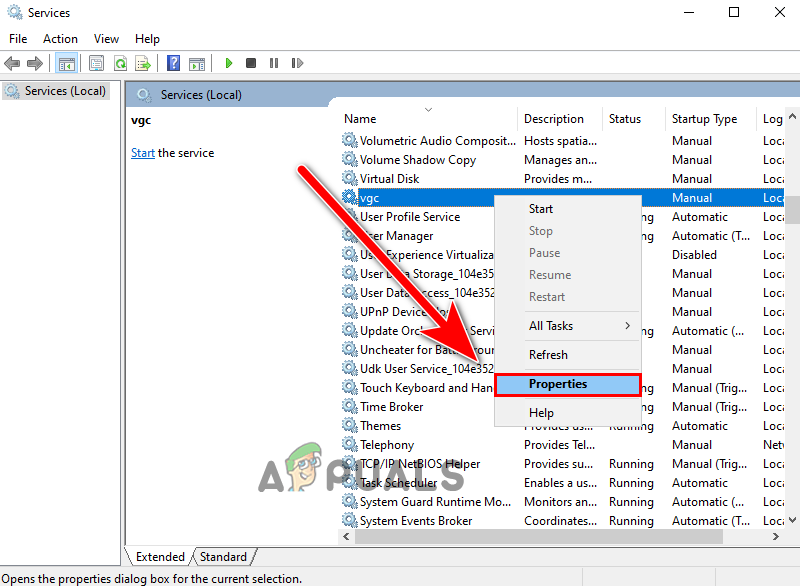
3] Restart the Vanguard service
You are likely to experience this error if the Vanguard service is stuck in a limbo state. In that case, restarting the Vanguard service will be effective in resolving the error at hand. You can restart the Vanguard service using the below steps:
- Firstly, hit the Windows+R key to open the Run dialog box and enter services.msc in it to open the Services window.
- Now, scroll down and locate the “vgc” service. Select the service and if it is already running, click on the Stop button to stop it.
- After that, press the Start button to enable it again.
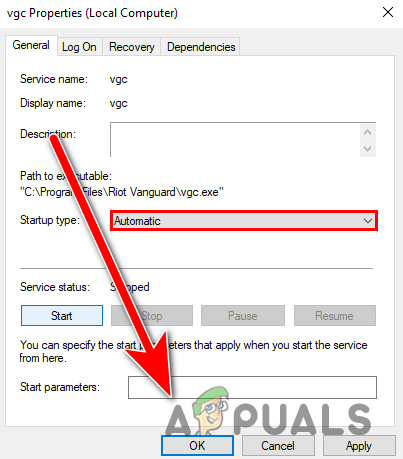
- Next, right-click on the vgc service and select the Properties option.
- Then, set the Startup type to Automatic and press Apply > OK button to save changes.
- Finally, relaunch the game and see if the error is fixed now.
If you still get the same error, move on to the next potential fix to resolve it.
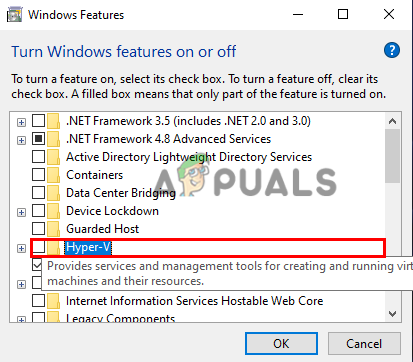
4] Turn off the Hyper-V feature on Windows
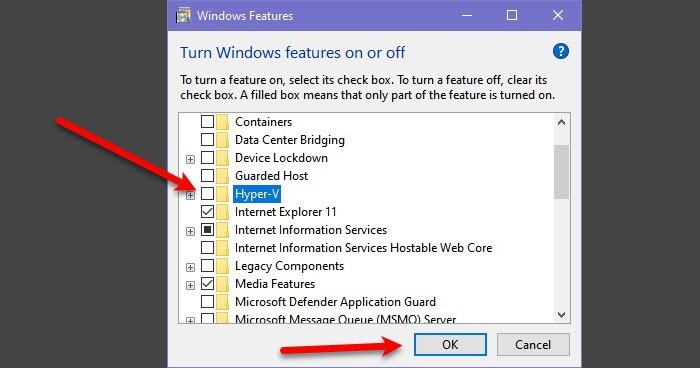
Hyper-V is a popular feature that enables the virtualization of a hardware server into several virtual servers. But, as per user reports, this feature might hamper gaming performance and you end up receiving the error at hand. So, if you have enabled Hyper-V, turn it off and see if the error is resolved or not.
To disable Hyper-V Feature on Windows, use the below steps:
- Firstly, open the taskbar search and type Turn Windows feature on or off in it; simply open the first result.
- Now, uncheck the Hyper-V feature and then click on the OK button to apply changes.
- Finally, reboot your PC and check if the error is fixed or not.
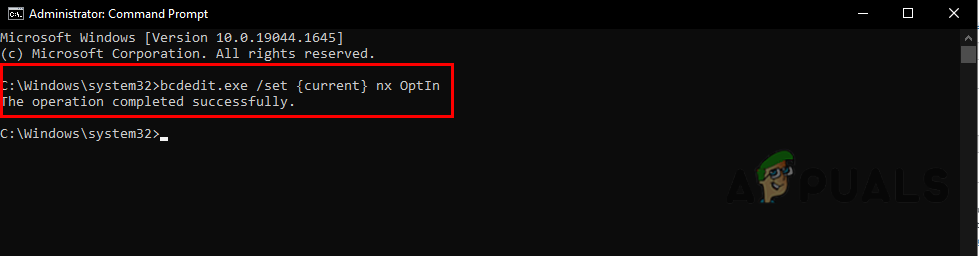
5] Enable Data Execution Prevention
DEP aka Data Execution Prevention service is used by most anti-cheats in order to stop hackers/cheaters from injecting malicious DLLs into the games. You might experience the error at hand in case DEP is disabled. So, if the scenario is applicable, try enabling Data Execution Prevention to resolve the error. Here is how you can do that:
Firstly, start Command Prompt as an administrator.
Now, enter the below command:
bcdedit.exe /set {current} nx OptIn
Once the command is executed successfully, check if the error is fixed or not.
6] Disable Windows Testing Mode
To run unverified drivers on Windows PC, Test Signing mode is used. It might conflict with Vanguard causing the error at hand. Hence, to fix the error, you will need to turn off Windows Testing mode. Here is how you can do that:
First of all, open Command Prompt with admin rights.
Now, enter the below commands one by one:
bcdedit -set TESTSIGNING OFF
bcdedit -set NOINTEGRITYCHECKS OFF
Once done, reboot your PC and launch Valoarant to see if the error is fixed or not.
If the error still persists, try the next solution.
Read: Valorant Download or Update Stuck at 0.1 kb/s or at 0%, 95%, 100%
7] Delete the cache files and temporary files
This error might occur if you are dealing with corrupted cache files associated with the Valorant game. So, clearing the cache files might help you fix the error. Here are the steps to do so:
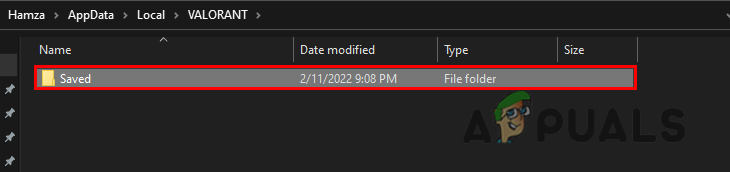
- Firstly, evoke the Run dialog box using Win+R hotkey and enter AppData in it.
- Now, open the Local > VALORANT > Saved folder.
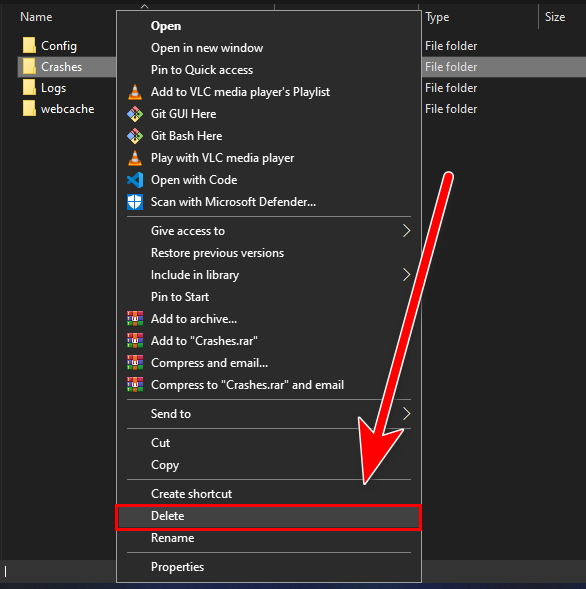
- Next, select the Crashes folder and press the Delete button to clear it.
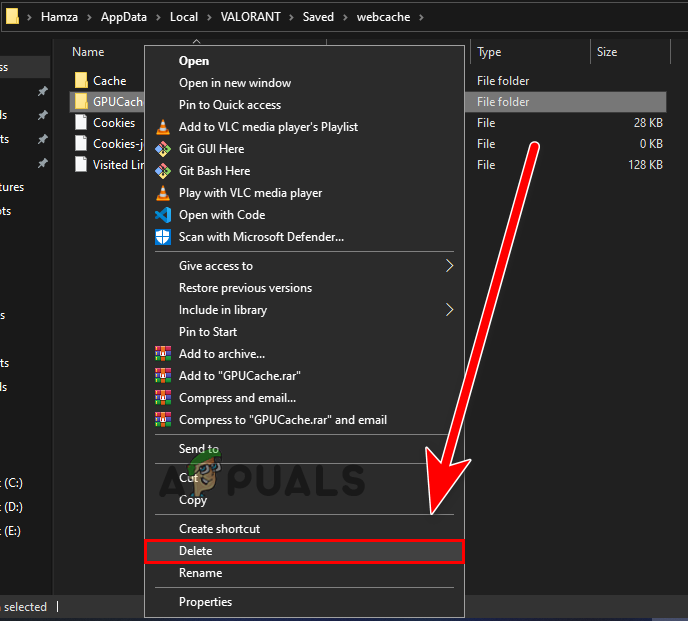
- After that, open the webcache folder, and delete the GPUCache folder.
- Then, delete the Cache folder.
- Finally, relaunch Valorant and see if the error is gone now.
In addition, you can try running disk cleanup to delete temporary files, and then check if the error is fixed or not.
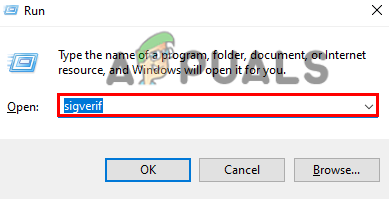
8] Verify and Reinstall your graphics drivers
This error might be triggered due to unverified drivers as Valorant does not support unverified graphics drivers. So, verify your graphics drivers and if you have unverified graphics drivers, reinstall them. To verify graphics drivers, follow the below steps:
- First, open the Run dialog box using Win+R hotkey and then enter sigverif in it to open the File Signature Verification window.
- Now, press the Start button to initiate the signature verification process.
- In case an unverified driver is detected, it will show you the filename. Simply search on the web if the filename belongs to your graphics driver or not.
If the filename belongs to your graphics driver, you can reinstall the graphics driver to fix the error.
9] Add Valorant to Exclusion
There are also chances that the error is caused due to Valorant being blocked by Windows Defender. Hence, if the scenario is applicable, you can try adding Valorant to the Exclusion list so that Windows Defender doesn’t detect it to be malicious or a threat. Follow the below steps to do so:
- Firstly, open the Settings app using Windows + I hotkey and navigate to Privacy & security > Windows Security > Virus and threat protection.
- Now, press the Manage settings option which is present below the Virus & threat protection settings section.
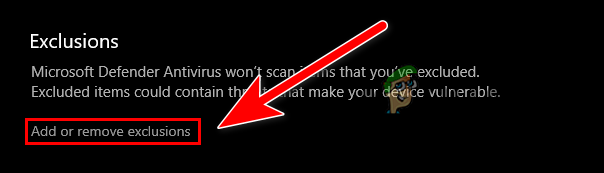
- Next, locate the Exclusions section and click on the Add or remove the exclusion > Add an exclusion button.
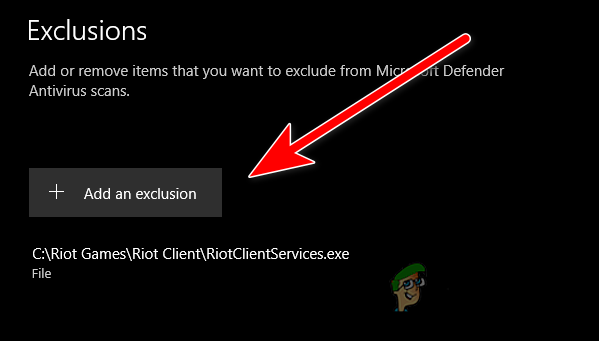
- After that, browse and select the Valorant executable file and RiotClientServices.exe file to the exclusion list one by one.
- Finally, reopen the game and see if the error is fixed or not.
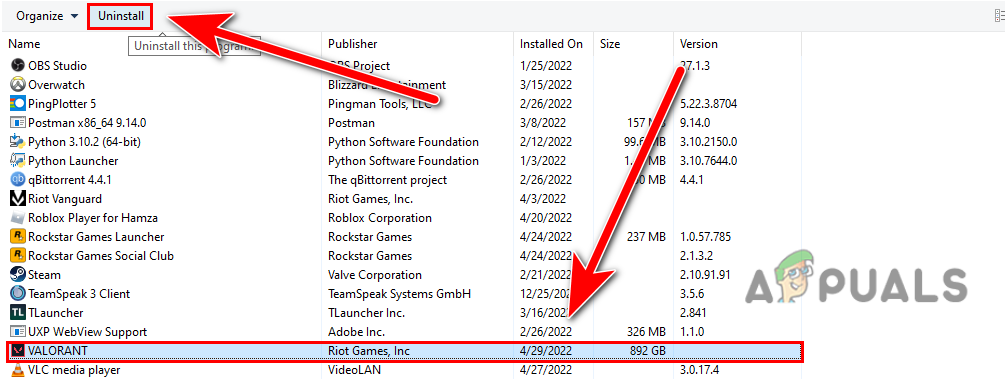
10] Reinstall Valorant and Riot Vanguard
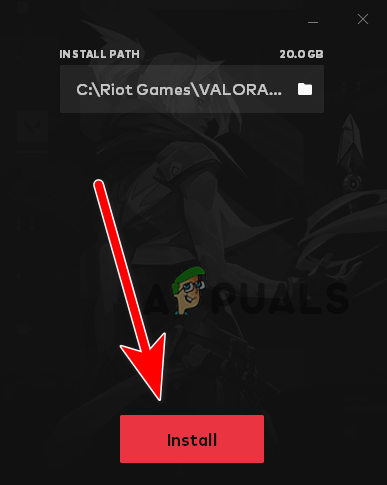
If the error still pops up even after trying the above solutions, the last resort is to reinstall Valorant and Riot Vanguard. Simply uninstall Valorant and Riot Vanguard from your PC by going to Settings > Apps > Apps & features. After that, you can download Valorant from its official website and install it on your PC. Riot Vanguard will be installed with the game.
Hopefully, this guide helps you fix the error for you.
Now read: Fix VALORANT Vanguard error codes 128 and 57 on Windows PC.
Several users have reported in forums that they are getting crashed while playing Valorant and also they got an error that says “Riot Vanguard Crashed”. The error appears when Vanguard gets crashed from your system while playing Valorant.
We had a look into this and discovered some important causes that might be interrupting you to play Valorant.
- Windows-specific feature- There is a chance that some specific Windows feature might be preventing you to play Valorant, to fix this you have to disable it.
- Corrupted vanguard Files- Corrupted Riot vanguard Valorant files can cause a crashing error just like Riot Vanguard Crashed because it is an anti-cheat program of valorant.
- Valorant background services- At some point, background services can cause a crashing error because they run 24/7 in the background, restarting the services can fix the Riot Vanguard Crashed error.
- Corrupted Cache files- Cache files are the temporary files but if they get corrupt then they can create problems for our application.
- Antivirus or Windows defender- There is a possibility that your antivirus or Windows defender might be blocking the Valorant to fix this you can disable it temporarily to check if that works.
Now we have some knowledge of the Riot Vanguard Crashed error, so let’s straight jump into solutions that helped users to fix this annoying error.
Restart Your Computer
Before we get into it, we suggest you to restart your computer because restarting the Windows operating system fixes the temporary bugs and errors, it also restarts the services that may stop you to play Valorant for that reason restart your computer then make some changes in your system for fixing the Riot Vanguard Crashed error.
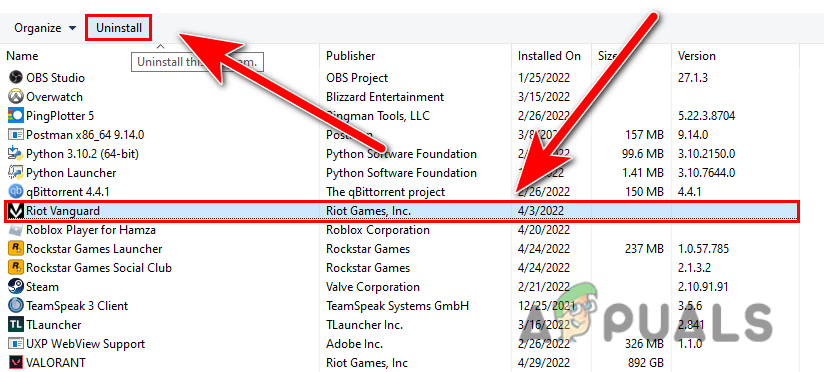
Reinstall Riot Vanguard
Sometimes the vanguard files get corrupted due to several reasons such as high CPU/Memory usage, for that reason, we will have to reinstall Riot Vanguard by following the below steps:-
- Press the Windows + R keys to open the Run Window.
- Type appwiz.cpl and press Enter.
- Here find and select the Riot Vanguard, now click on Uninstall button.

Uninstall Riot Vanguard - After that launch the Valorant and it should automatically start installing Vanguard.
- Once done, check if the error persists.
Disable Hyper-V Feature on Windows
The Hyper-v is a Microsoft feature that allows the virtualization of a hardware server into multiple virtual servers. it also helps in running a virtual machine software, remote software, and also the emulators however this feature can hurt gaming performance and it can also cause Riot Vanguard Crashed error.
Several users have reported in forums that disabling the Hyper-V feature fixed the Riot Vanguard crashed error.
Follow the steps to disable Hyper-V Feature on Windows:-
- Press the Windows key and search the Turn Windows feature on or off, and open it.
- Now uncheck the Hyper-V and press ok to save the changes.

Uncheck Hyper-V and press ok to save the changes - Restart your computer and check if the error persists.
Enable Data Execution Prevention
DEP or Data Execution Prevention is a Windows inbuilt security feature that helps to protect the computer systems from attacks and malicious data through your memory. By default, Data Execution Prevention is enabled for inbuild Windows programs and services for that reason the feature does not monitor the vanguard vgc service and it can cause Riot Vanguard Crashed error.
Follow the steps to enable the Data Execution Prevention feature:-
- Press the Windows key, and type the command prompt in the search box.
- Open command prompt as administrator by pressing ctrl + shift + Enter keys together.
- Insert the below command to enable Data Execution Prevention if it is disabled.
bcdedit.exe /set {current} nx OptIn
Insert the command in the command prompt to enable Data Execution Prevention - Once done check if the issue still persists.
Disabling Windows Testing Mode
Windows Testing Mode is for the developer to create a new driver without a signature, it is similar to save mode but only used in development. However, it allows you to run the unsigned drivers on Windows operating system for that reason it can cause the Riot vanguard crashed error. There might be chances that the testing mode is enabled in your operating system by the program which you installed recently and it is in the test phase.
Follow the steps to disable Windows testing Mode:-
- Press the Windows key and type the command prompt in the search bar.
- Press the Ctrl + shift + Enter keys together to open a command prompt as administrator privilege.
- Now insert the below commands one by one to disable Windows testing Mode.
bcdedit -set TESTSIGNING OFF
bcdedit -set NOINTEGRITYCHECKS OFF

Insert commands to disable Windows testing mode - Restart your computer and open the Valorant then check if the issue is resolved.

Verify and Reinstall Graphics Drivers with DDU
Reinstalling the graphics driver might work in this case because if your graphics driver is unverified, Valorant does not allow having an unverified graphics driver, in the response, it can crash, freeze, and might not launch so to fix this you have to completely uninstall your drivers and to make sure that the drivers are completely uninstalled from the system we use DDU or display driver uninstaller that allows users to uninstall drivers completely from the operating system.
It is recommended to uninstall drivers in safe mode for the absolute result.
Verify Your Graphics Drivers
If you are not sure that the error is occurring due to unverified drivers then simply you can verify your Graphics driver.
There is a utility in Windows operating system then can check Graphics drivers, and tells you which driver is unverified then simply you can fix this by reinstalling the Graphics Driver.
Follow the steps to verify your graphics drivers:-
- Press the Windows + R keys together to open the Run Window.
- Type sigverif in the search box and press enter.

Type sigverif in the Run Window - Now Click on the Start button to run the signature verification process.

Click on the Start button to start the file signature verification - Wait for the verification process to finish.
- If it detected the unsigned driver, then it will show up on the screen, then you will have to search the filename on google to see where it belongs, if it belongs to Nvidia or AMD drivers then simply reinstalling the graphics driver will fix the issue.
- In my case, it did not detect any unsigned or unverified Graphics driver because I have a signed graphics driver which belongs to the official Nvidia website.

No unsigned driver found


Uninstall Graphics Driver
- Download the Display driver uninstaller from the official website.
- Now you have to restart your computer, click on the Start button then click on the Power button.
- Hold the shift key and select the Restart option to open the Windows in safe mode.
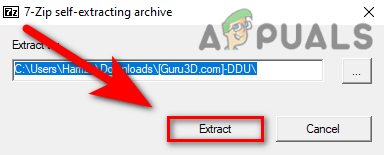
- The Display driver uninstaller comes in the Zip folder, which you have to extract.
- Go to the download folder, right-click on the DDU folder and select Extract to extract the folder.

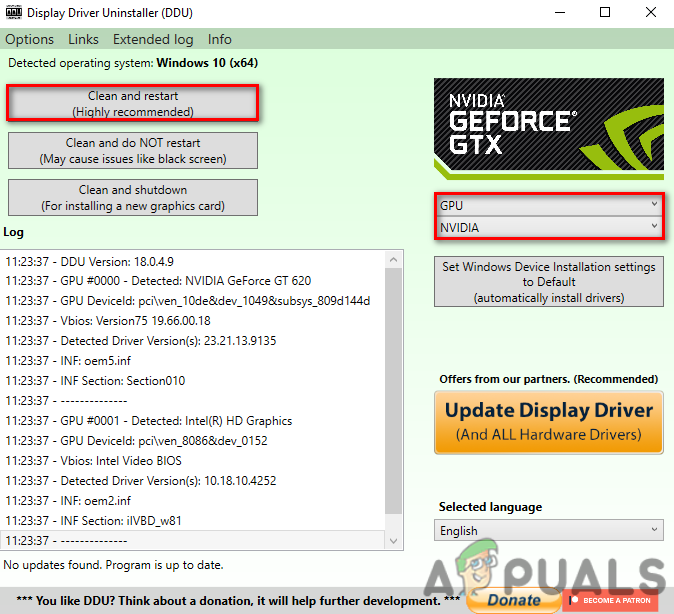
Extract DDU-1 - After that, navigate to the folder and double-click on the DDU v18.0.4.9 application.
- In the next popup Windows, click on Extract and navigate to the extracted DDU v18.0.4.9 folder.

Select the Extract button for the DDU application - Run the Display driver uninstaller application.
- Select your device type from the top-right then select your Graphics card manufacturer.

Choose the device type and your graphics card manufacturer from the top - Click on Clean and Restart, it will completely uninstall the previous graphics driver and reset your computer.

Install Graphics Driver
Now you have to install verified Graphics drivers from the official website because if you download your graphics driver through the third-party website then again it can cause the Riot Vanguard Crashed error.
AMD Radeon
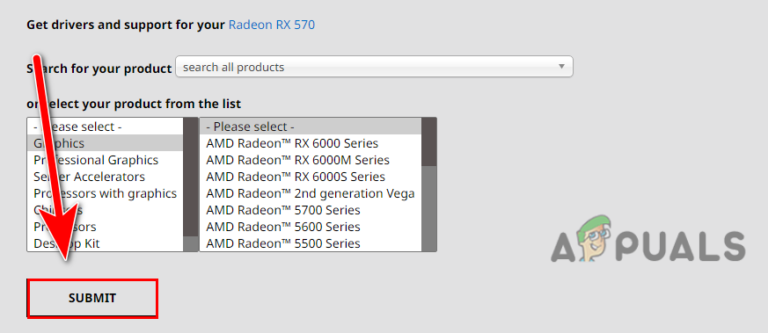
- For AMD users, go to the official website of AMD Radeon.
- Here select your Graphics card Model, then click on Submit button to get the latest Graphics driver.

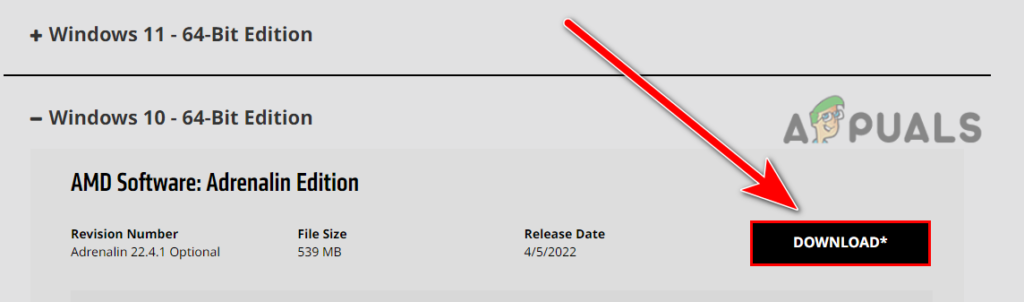
Select Your Graphics Card-then click on Submit button - In the next window, choose your Windows operating system, and click on the Download button to download the latest drivers.

Select the Operating System then-click-on-Download-button-to-download-the Graphics Drivers - Once the downloading Is started, wait until it’s done, then double-click on the Driver installer and follow the further instruction to install the Graphics card driver.
- Once done reboot your computer and check if the error is resolved.
Nvidia Drivers
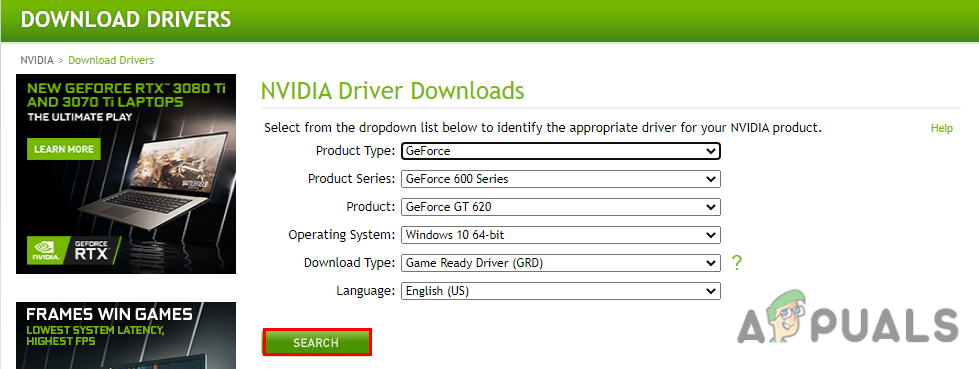
- For Nvidia users, open the Nvidia official website on your favorite browser.
- Carefully select your Graphics card Model then click on the Search button.

Click on the Download button - It will automatically search for the latest driver.
- Once done click on the Download button to download the Graphics card driver.

Select the Download button to download the drivers - Double click on the installer, and follow the instruction to install verified drivers.

Delete Cache Files and Crashes Reports
Cache files stores temporary data about the game and the GPU cache contains the reports that are created by your graphics driver, generally deleting the cache files fixes many errors in games so you can use this method to check if that works.
- Press the Windows key and type AppData in the search box then press enter
- Navigate to Local>VALORANT>Saved.

Navigate to the Saved folder - Right-click on the Crashes folder and select delete.

Right-click on the Crashes folder and select delete - Now navigate to webcache, and again right-click on the GPUCache select delete.

Delete GPUCache folder - Repeat the same process for the Cache folder to delete it.
- Once done, launch the valorant and check if the error persists.
Run Disk cleanup
Disk Clean-up is a computer maintenance utility included in Windows operating system to scan and delete all the temporary data that are no longer required by you such as rejected programs and files which end up in recycle bin or temporary Windows files and also corrupted files.
If the error is occurring because of some corrupted valorant temporary files then you can delete those files by using Disk cleanup.
Follow the steps to delete temporary files:-
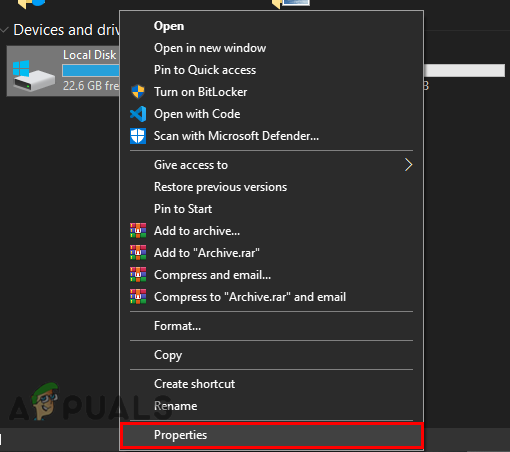
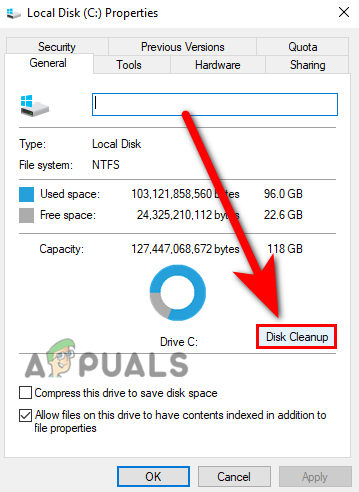
- Open file explorer, and Right-click on the disk where the Valorant is installed.
- Select the Properties option to select the Disk cleanup option.

Select the Properties option, where the Valorant is installed. - Click on Disk Cleanup to clean up the disk.

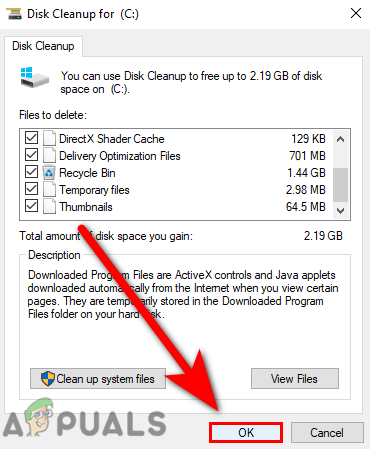
Click on disk cleanup - Here tickmark all the files and don’t worry these files are no longer important, just checkmark all of them.

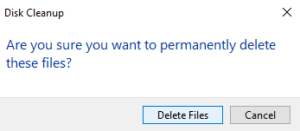
Checkmark all the files - Then click on Ok, in the next Window click on Delete Files.

Click on delete files - Once done check if the error is solved.
Add Valorant in Exclusion
There is a chance that the Windows defender might be blocking Vanguard or it might be interfering in Vgc (vanguard service).
Add Valorant in exclusion means let’s suppose you are trusting on the application that was continuously detected by WIndows defender as malware then you can stop it by just adding the application in Exclusion.
Follow the steps to add Valorant in Exclusion Mode:-
- Press the Windows + I keys together to open the settings.
- Navigate to Update & Security and select Windows Security to view the security option.
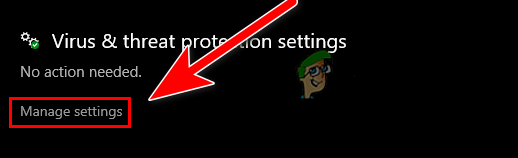
- Click on Open Windows Security, then Virus and threat protection.
- After that, click on Manage settings under the Virus & threat protection settings.

Click on Manage settings to view the other security option - Scroll down to Exclusions, and click on Add or remove the exclusion.

Click on Add or remove exclusions - Click on Add an exclusion button, then click on File in the extended menu.

Click on Add an exclusion to select the Valorant.exe file - Now navigate to the location where the Valorant is installed, and click on the Riot Client folder and select RiotClientServices.exe.
Run Valorant as Administrator
Running any program as an administrator means you are giving special permission to access the restricted parts in Windows operating system, for that reason, it can help to fix the problems such as freezing, and crashing just because you are giving the full authority and read privilege to the application.
Here is how you can do this:-
- Right-click on the Valorant launcher and select Run as administrator.
- Launch the game and check if that works, if it is then follow the one more step to permanently open the Valorant as administrator privilege.
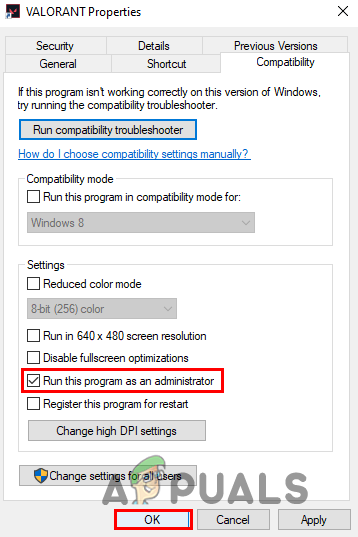
- Right-click on the Valorant launcher and select properties.
- Go to the Compatibility tab from the top, and checkmark the option Run this program as an administrator.

Checkmark the Run this program as an administrator
Restart Vanguard Service
Vgc comes with the installation of Valorant. It is a Riot vanguard service that runs 24/7 in the background to operate multiple tasks such as preventing cheats and detecting suspicious activity and is also used for hardware ban. Restarting the Valorant services might fix the Riot Vanguard Crashed error.
Follow the steps to restart Valorant services:-
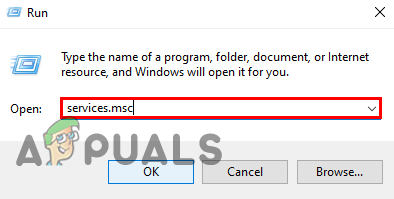
- Press the Windows key and type services.msc then press enter.

Type service.msc in the Run program - Scroll down to vgc service, you can type VGC on the keyboard and it will automatically take you to the VGC service.
- Right-click on the service, and select Properties.

Right-click on vgc service to select properties - Change the Startup type to Automatic for this click on the dropdown icon and select Automatic.

Change startup type to Automatic then press ok - Now click on the Start button then hit Apply and press ok to save the changes.
- Once done restart your computer, launch the valorant, and check if the error persists.
Repair or Reinstall Valorant
If none of the methods worked then the error might be related to your game files or your files might get corrupted, you can use this method as the last option, to fix this you have to Reinstall the valorant from your system.
Here is how you can reinstall valorant:-
- Press the Windows key and search control pane then open it.
- Click on Uninstall a program under the Programs category.
- Here find and select the Valorant then click on Uninstall button on the top.

Uninstall Valorant - Download the Valorant launcher/setup from the official website.
- Once the setup is downloaded, run the setup.
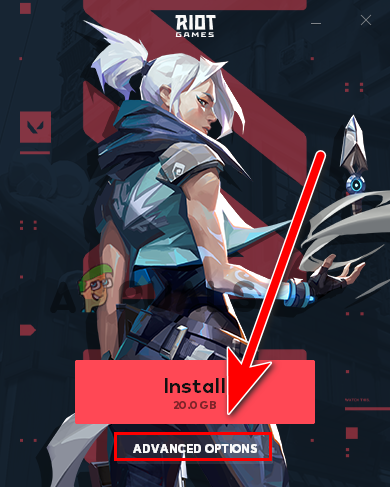
- Click on the Advanced option and select the directory where the Valorant has been installed.

Click on Advanced options - Once done click on the Install button to repair and verify the Game files.

Click on the Install button - It should start the Verification process.
- Once done restart your computer and check if the error persists.
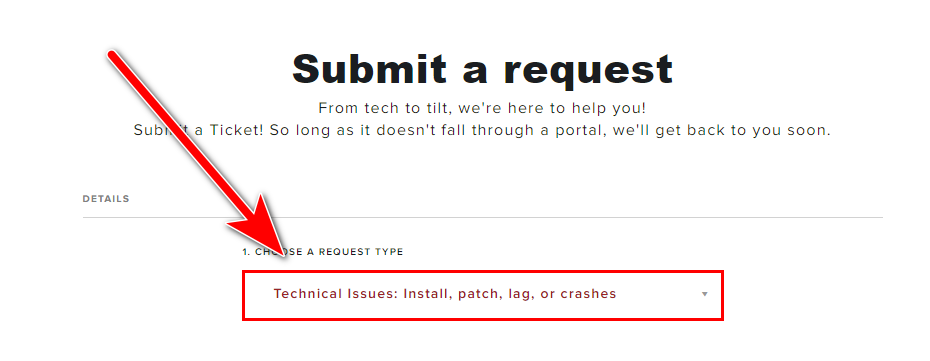
Submit a Ticket
If All the solutions given solution did not work for you then you have to submit a ticket because your problem is kind of unique and serious, to fix this you need a Riot expert who will help you to resolve this in under 48 hours.
Submit your ticket to Riot by following the below steps:-
- Go to the Official Valorant website and sign in to your existing account.
- Now hover your mouse on the Support menu and select the Support option in the expanded menu.

Hover your mouse on the Support menu and select on Support option - Scroll down to the bottom and click on SUBMIT A TICKET option.

Click on SUBMIT A TICKET - In the next Window choose the Technical Issues: Install, patch, lag, or crashes.

Choose Technical Issues Install patch, lag, or crashes - Here describe your issue then click on SUBMIT button.


Hopefully, you have solved the Riot Vanguard Crashed error, if there is a problem while applying methods then you can mention it in the comments section, we would like to appreciate it.
- Запуск Valorant Vanguard
- Ошибки с Riot Vanguard
- Ошибка 44
- Ошибка 45
- Valorant программа Vanguard не запущена
- Не удалось установить необходимые зависимости
- Обновите все драйвера
- Как удалить Riot Vanguard
Если вы играете в Valorant, то наверняка сталкивались с проблемами анти-чита от Riot — Vanguard. У него есть спектр ошибок, о которых нужно знать. Ещё мы расскажем, как справиться с ошибкой, чтобы быстрее зайти в игру.
Запуск Valorant Vanguard
Первая проблема, которая может возникнуть у пользователя — это запуск Riot Vanguard. По умолчанию он включается сразу после запуска компьютера, если вы не меняли этого пункта у него в настройках.

Если вы просто испытываете проблемы с запуском Riot Vanguard, то обратитесь к диспетчеру задач (CTRL + Alt + Delete). Найдите в списке процессов Vanguard, а после этого отключите все его действующие процессы. После этого в любом случае придется перезагружать компьютер. Когда ПК снова включится, то Riot Vanguard должен запуститься без проблем. Если же этого не происходит, то придется решать проблему другими способами.
Ошибки с Riot Vanguard
Сразу стоит сказать, что ничего серьезного в плане ошибок нет. Крайний способ решения любой проблемы — это переустановка игры. А вот самый серьезный способ решения проблемы с самой игрой (если она даже после переустановки не работает, как и Riot Vanguard) — это техническая поддержка пользователей.
Ошибка 44
Она просто сообщает вам, что программа анти-чита не была запущена. Для решения этой проблемы потребуется перезагрузить компьютер, предварительно выключив анти-чит полностью.

Справа, внизу, около часов на экране, кликаем на стрелочку, у вас открывается бар запущенных приложений. Находим Vanguard, кликаем на него правой кнопкой мыши и закрываем. Либо можно сделать то же самое через Диспетчер Задач. Если это не помогло, то:
- Зайдите в: «Пуск — Установка и удаление программ».
- Найдите Riot Vanguard.
- Удалите его.
- Запустите игру снова.
После этого игра скачает анти-чит, а ошибка должна пропасть.
Ошибка 45
Аналогично такая же ошибка, но она в прямом смысле решается простым перезапуском игры. Если после этого ошибкка осталась, то придется переустановить Vanguard.
Valorant программа Vanguard не запущена
Та же самая 44 ошибка, но игроки отмечали, что эта надпись появляется в тот же момент, когда игра только-только запускается, а сигналов об ошибке нет.
Не удалось установить необходимые зависимости
С этой ошибкой придется немного повозиться. Она не решается простой переустановкой игры или перезагрузкой компьютера.
- Сперва нам нужно выключить Riot Vanguard. Около часов в Windows кликаем на стрелочку, находим Riot Vanguard. Кликаем по нему правой кнопкой мыши и нажимаем на «Exit Vanguard».
- Теперь идем в Пуск — Установка и удаление программ — находим Riot Vanguard — удаляем его.
- Открываем Пуск, в поиске вводим «cmd», либо с помощью сочетания клавиш Win + R.
- Вводим туда фразу «sc delete vgc». Нажимаем Enter.
- Теперь запускаем Valorant. Ждем, пока он немного обновиться и скачает анти-чит заново.
Готово! Теперь ошибки с отсутствием зависимостей точно не будет. С другой стороны, новоиспеченный анти-чит может познакомить вас с новыми проблемами, но ответы для их решения вы точно найдете на нашем сайте
Также предлагаем вам ознакомиться со статьей про коды ошибок в Valorant. Всегда полезно знать, почему у вас появилась та или иная ошибка:
Обновите все драйвера
Иногда Riot Vanguard не запускается из-за того, что у вас на компьютере есть устаревшие драйвера. Причем это может быть старый драйвер для аудиокарты, для поддержки вентиляторов на корпусе и так далее. Порой уточнить это невозможно.
Мы рекомендуем вам узнать модель своей материнской планы (легче всего через бесплатную версию AIDA64), а после этого найти её в интернете и скачать все последние драйвера.
Важно! По хорошему, лучше переустанавливать все драйвера хотя бы раз в полгода. Производитель материнской платы заботится о том, что у пользователей постоянно был прирост к производительности
Другой вопрос — драйвера видеокарты. Игра запустится даже без них, но потенциал видеокарты не будет раскрыт. Как следствие, вы будете играть с 15-30 FPS. Поэтому, если у вас видеокарта от NVIDIA, скачайте себе GeForce Experience. Если у вас карточка от AMD, то качайте AMD Catalyst. Желательно не ставить у них автозапуск, поскольку обе программы потребляют оперативную память из-за достаточно громоздкого оверлея.
Как удалить Riot Vanguard
Уже описали это выше, но повторим.
- С помощью «Установка и удаление программ». Находим в списке Riot Vanguard и удаляем. Игра автоматически скачает программу сама после следующего запуска.
- С помощью cmd (командной строки). Открываем её на Win + R. Вписываем туда «sc delete vgc». Дополнительно, перед этим, придется кликнуть по значку вангуарда внизу экрана и нажать «More» — «Uninstall Vanguard».
Готово! Не бойтесь удалять эту программу, потому что без неё Valorant не запустится. Следовательно, лаунчер сам скачает её.
Перейти к контенту

Все чаще пользователи игры Valorant сталкиваются с проблемой запуска игры из-за отказа работы Riot Vanguard, который является частью самой игры и выступает в качестве системы безопасности, которая предотвращает попытки читеров участвовать в матчах с обычными игроками. Если Вангуард не запустился, это не означает, что нужно забыть о самой игре. Просто нужно использовать альтернативные методы запуска античита.
Первый способ запуска Vanguard
Прежде, чем приступить к первому способу запуска Вангуарда, необходимо перезагрузить компьютер и перезапустить клиент античита. Если ошибка запуска Вангуарда не исчезла – нужно удалить античит через панель управления программ, после чего перезапустить игру, она автоматически установит античит заново. Также можно попробовать отключить брандмауэр Виндовс.
Итак, для запуска античита игры необходимо:
- Выйти в «Безопасный режим» операционной системы и удалить все папки и файлы, связанные с Valorant, в том числе и инсталлятор игры (если он сохранен на компе).
- Обновить драйвера системы. Для удобства можно использовать программы Driver Booster или DriverHub.
- Скачать с официального сайта инсталлер игры и установить Valorant. Riot Vanguard установится в процессе инсталляции игры. Важно не заходить в учетную запись Валорант.
- Перезапустить ПК.
- Запустить игру.
Второй способ запуска Riot Vanguard
Если первый способ не сработал, стоит попробовать другой метод решения проблемы.
- Отключить антивирус и перезагрузить компьютер.
- Открыть параметр «Конфигурация системы».
- Перейти на вкладку «Сервисы» и нажать на пункт «Не показывать службы Microsoft» после чего нажать на пункт «Отключить все». Если в списке есть служба «vgc», то ее необходимо включить.
- Перейти на вкладку «Автозагрузка» и клацнуть на пункт «Открыть диспетчер задач».
- В диспетчере отключить все действующие приложения кроме античита Riot Vanguard.
- Вернуться в «Конфигурации системы» Виндовс и нажать на кнопку «ОК».
- Перезагрузить компьютер и запустить игру.
Если это не помогло, то, как всегда, техподдержка Valorant пользователям в помощь.
A lot of players are running into the Riot Vanguard error when trying to launch Valorant. This error occurs when the game fails to initialize the anti-cheat and usually a quick restart fixes the issue. Sometimes the issue can also occur if you do not have Trusted Platform Module (TPM) enabled. Here are all possible fixes for the Riot Vanguard error in Valorant.
Riot Vanguard Error: How to Fix
Here are all the solutions available for fixing the Riot Vanguard error in Valorant.
Solution 1: Restart all Riot processes
You can try closing all Riot Games processes including Riot Vanguard to check if the Riot Vanguard error persists.
-
Right-click on your Taskbar
-
Click on Task Manager
-
Find all processes with the Riot Games or Valorant logo.
-
Right-click on each of the programs and click on End Task.
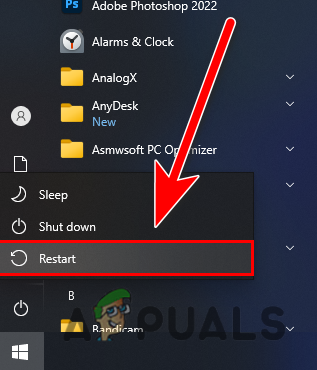
Solution 2: Restart Your Computer
Riot’s Vanguard anti-cheat process can be shut down by Windows, especially if you have less RAM on your computer. Restarting your computer should resolve the issue.
-
Press the Windows key on your keyboard
-
Click on the Power icon
-
Click on Restart
Solution 3: Reinstall the Riot Client and Valorant
The Riot Client is not available as a standalone download and is tied to your game. But you can uninstall it and it will automatically reinstall itself the next time you attempt to launch Valorant.
-
Search for Riot Client in the Windows search bar
-
Find Riot Client and click on Uninstall in the contextual menu
-
Launch Valorant
-
Riot Client should be reinstalled automatically
Solution 4: Enable TPM 2.0
It is recommended to look up the BIOS settings menu for your motherboard before proceeding with the next steps. You need to navigate the menu on your own and enable TPM 2.0 and Secure Boot.
1. Restart your computer
2. See the screen splash to identify the key you must press to enter the firmware (if applicable).
Press the required key repeatedly until you enter the setup mode. Here are the most common BIOS menu buttons. If you have a different button you need to look it up in your motherboard’s manual or search for it online.
-
Dell: F2 or F12.
-
HP: ESC or F10.
-
Acer: F2 or Delete.
-
ASUS: F2 or Delete.
-
Lenovo: F1 or F2.
-
MSI: Delete.
-
Toshiba: F2.
-
Samsung: F2.
-
Surface: Press and hold volume up button.
3. Once in your BIOS menu, you need to navigate to the Secure BOOT and TPM 2.0 settings and enable them.
These menus are different depending on the manufacturer and model of your motherboard and you should look up the settings for your motherboard before making any changes. Once you are done enabling TPM 2.0, you should no longer get the Riot Vanguard error in Valorant.