Справочник ошибок и ответов API
При выполнении некорректного запроса к системе наше API может вернуть код ошибки, в случае же верного запроса, API вернёт ответ. Вы, конечно, уже обрабатывали ответ сервера в ходе отладки своих виджетов или написании скриптов, взаимодействующих с нашей системой. Для Вашего удобства, мы решили систематизировать все возможные ответы и ошибки, отдаваемые нашей системой и разместить их на отдельной странице. Надеемся это облегчит и ускорит интеграцию Ваших проектов с amoCRM.
Ошибки при валидации данных
Если переданные данные не совпадают с теми, что доступны для сущности, запрос вернет HTTP-код 400 Bad Request и массив с параметрами, которые не подошли под условия.
Пример ошибки валидации данных
{
    "validation-errors": [
        {
            "request_id": "0",
            "errors": [
                {
                    "code": "NotSupportedChoice",
                    "path": "custom_fields_values.0.field_id",
                    "detail": "The value you selected is not a valid choice."
                }
            ]
        }
    ],
    "title": "Bad Request",
    "type": "https://httpstatus.es/400",
    "status": 400,
    "detail": "Request validation failed"
}
Ответы при авторизации
Подробнее об авторизации читайте здесь
| Код | HTTP код | Описание |
|---|---|---|
| 110 | 401 Unauthorized | Общая ошибка авторизации. Неправильный логин или пароль. |
| 111 | 401 Unauthorized | Возникает после нескольких неудачных попыток авторизации. В этом случае нужно авторизоваться в аккаунте через браузер, введя код капчи. |
| 112 | 401 Unauthorized | Возникает, когда пользователь выключен в настройках аккаунта “Пользователи и права” или не состоит в аккаунте. |
| 113 | 403 Forbidden | Доступ к данному аккаунту запрещён с Вашего IP адреса. Возникает, когда в настройках безопасности аккаунта включена фильтрация доступа к API по “белому списку IP адресов”. |
| 101 | 401 Unauthorized | Возникает в случае запроса к несуществующему аккаунту (субдомену). |
Ответы при работе с контактами
Подробнее о работе с контактами читайте здесь
| Код | Описание |
|---|---|
| 202 | Добавление контактов: нет прав |
| 203 | Добавление контактов: системная ошибка при работе с дополнительными полями |
| 205 | Добавление контактов: контакт не создан |
| 212 | Обновление контактов: контакт не обновлён |
| 219 | Список контактов: ошибка поиска, повторите запрос позднее |
| 330 | Добавление/Обновление контактов: количество привязанных сделок слишком большое |
Ответы при работе со сделками
Подробнее о работе со сделками читайте здесь
| Код | Описание |
|---|---|
| 330 | Добавление/Обновление сделок: количество привязанных контактов слишком большое |
Ответы при работе с событиями
Подробнее о работе с событиями читайте здесь
| Код | Описание |
|---|---|
| 244 | Добавление событий: недостаточно прав для добавления события |
| 225 | Обновление событий: события не найдены |
Ответы при работе с задачами
Подробнее о работе с задачами читайте здесь
| Код | Описание |
|---|---|
| 231 | Обновление задач: задачи не найдены |
| 233 | Добавление событий: по данному ID элемента не найдены некоторые контакты |
| 234 | Добавление событий: по данному ID элемента не найдены некоторые сделки |
| 235 | Добавление задач: не указан тип элемента |
| 236 | Добавление задач: по данному ID элемента не найдены некоторые контакты |
| 237 | Добавление задач: по данному ID элемента не найдены некоторые сделки |
| 244 | Добавление сделок: нет прав. |
Ответы при работе со списками
Подробнее о работе со списками читайте здесь
| Код | Описание |
|---|---|
| 244 | Добавление/Обновление/Удаление каталогов: нет прав. |
| 281 | Каталог не удален: внутренняя ошибка |
| 282 | Каталог не найден в аккаунте. |
Ответы при работе с элементами каталога
Подробнее о работе с элементами каталога читайте здесь
| Код | Описание |
|---|---|
| 203 | Добавление/Обновление элементов каталога: системная ошибка при работе с дополнительными полями |
| 204 | Добавление/Обновление элементов каталога: дополнительное поле не найдено |
| 244 | Добавление/Обновление/Удаление элементов каталога: нет прав. |
| 280 | Добавление элементов каталога: элемент создан. |
| 282 | Элемент не найден в аккаунте. |
Ответы при работе с покупателями
Подробнее о работе с покупателями читайте здесь
| Код | Описание |
|---|---|
| 288 | Недостаточно прав. Доступ запрещен. |
| 402 | Необходимо оплатить функционал |
| 425 | Функционал недоступен |
| 426 | Функционал выключен |
Другие ответы
Ошибки и ответы, не относящиеся к какому-либо конкретному разделу
| Код | Описание | Примечание |
|---|---|---|
| 400 | Неверная структура массива передаваемых данных, либо не верные идентификаторы кастомных полей | |
| 422 | Входящие данные не мог быть обработаны. | |
| 405 | Запрашиваемый HTTP-метод не поддерживается | |
| 402 | Подписка закончилась | Вместе с этим ответом отдаётся HTTP код №402 “Payment Required” |
| 403 | Аккаунт заблокирован, за неоднократное превышение количества запросов в секунду | Вместе с этим ответом отдаётся HTTP код №403 |
| 429 | Превышено допустимое количество запросов в секунду | Вместе с этим ответом отдаётся HTTP код №429 |
| 2002 | По вашему запросу ничего не найдено | Вместе с этим ответом отдаётся HTTP код №204 “No Content” |
200
Ugh… (309, 400, 403, 409, 415, 422)… a lot of answers trying to guess, argue and standardize what is the best return code for a successful HTTP request but a failed REST call.
It is wrong to mix HTTP status codes and REST status codes.
However, I saw many implementations mixing them, and many developers may not agree with me.
HTTP return codes are related to the HTTP Request itself. A REST call is done using a Hypertext Transfer Protocol request and it works at a lower level than invoked REST method itself. REST is a concept/approach, and its output is a business/logical result, while HTTP result code is a transport one.
For example, returning «404 Not found» when you call /users/ is confuse, because it may mean:
- URI is wrong (HTTP)
- No users are found (REST)
«403 Forbidden/Access Denied» may mean:
- Special permission needed. Browsers can handle it by asking the user/password. (HTTP)
- Wrong access permissions configured on the server. (HTTP)
- You need to be authenticated (REST)
And the list may continue with ‘500 Server error» (an Apache/Nginx HTTP thrown error or a business constraint error in REST) or other HTTP errors etc…
From the code, it’s hard to understand what was the failure reason, a HTTP (transport) failure or a REST (logical) failure.
If the HTTP request physically was performed successfully it should always return 200 code, regardless is the record(s) found or not. Because URI resource is found and was handled by the HTTP server. Yes, it may return an empty set. Is it possible to receive an empty web-page with 200 as HTTP result, right?
Instead of this you may return 200 HTTP code with some options:
- «error» object in JSON result if something goes wrong
- Empty JSON array/object if no record found
- A bool result/success flag in combination with previous options for a better handling.
Also, some internet providers may intercept your requests and return you a 404 HTTP code. This does not means that your data are not found, but it’s something wrong at transport level.
From Wiki:
In July 2004, the UK telecom provider BT Group deployed the Cleanfeed
content blocking system, which returns a 404 error to any request for
content identified as potentially illegal by the Internet Watch
Foundation. Other ISPs return a HTTP 403 «forbidden» error in the same
circumstances. The practice of employing fake 404 errors as a means to
conceal censorship has also been reported in Thailand and Tunisia. In
Tunisia, where censorship was severe before the 2011 revolution,
people became aware of the nature of the fake 404 errors and created
an imaginary character named «Ammar 404» who represents «the invisible
censor».
Why not simply answer with something like this?
{
  "result": false,
  "error": {"code": 102, "message": "Validation failed: Wrong NAME."}
}
Google always returns 200 as status code in their Geocoding API, even if the request logically fails: https://developers.google.com/maps/documentation/geocoding/intro#StatusCodes
Facebook always return 200 for successful HTTP requests, even if REST request fails: https://developers.facebook.com/docs/graph-api/using-graph-api/error-handling
It’s simple, HTTP status codes are for HTTP requests. REST API is Your, define Your status codes.
The default error response format looks like this
{
  "type": "validation_error",
  "errors": [
    {
      "code": "required",
      "detail": "This field is required.",
      "attr": "name"
    }
  ]
}
-
type: can bevalidation_error,client_errororserver_error -
code: short string describing the error. Can be used by API consumers to customize their behavior. -
detail: User-friendly text describing the error. -
attr: set only when the error type is avalidation_errorand maps to the serializer field name orsettings.NON_FIELD_ERRORS_KEY.
Error Types
Validation Errors
These are ones caused by raising a rest_framework.exceptions.ValidationError. They are the only error type
that can have more than 1 error. The list of corresponding error codes depends on the serializer and its fields.
Client Errors
Covers all 4xx errors other than validation errors. Here’s a reference to all possible error codes and corresponding exceptions:
|
Error Code |
Status Code |
DRF Exception |
|---|---|---|
|
parse_error |
400 |
ParseError |
|
authentication_failed |
401 |
AuthenticationFailed |
|
not_authenticated |
401 |
NotAuthenticated |
|
permission_denied |
403 |
PermissionDenied |
|
not_found |
404 |
NotFound |
|
method_not_allowed |
405 |
MethodNotAllowed |
|
not_acceptable |
406 |
NotAcceptable |
|
unsupported_media_type |
415 |
UnsupportedMediaType |
|
throttled |
429 |
Throttled |
Server Errors
These are ones caused by raising a rest_framework.exceptions.APIException or by unhandled exceptions.
The corresponding error code is error and the status code is 500.
Multiple Errors Support
Out of the box, only validation errors would result in an error response with multiple errors. The errors
can be for the same field or for different fields. So, a sample DRF error dict like this:
{
    "phone": [
        ErrorDetail("The phone number entered is not valid.", code="invalid_phone_number")
    ],
    "password": [
        ErrorDetail("This password is too short.", code="password_too_short"),
        ErrorDetail("The password is too similar to the username.", code="password_too_similar"),
    ],
}
would be converted to:
{
    "type": "validation_error",
    "errors": [
        {
            "code": "invalid_phone_number",
            "detail": "The phone number entered is not valid.",
            "attr": "phone"
        },
        {
            "code": "password_too_short",
            "detail": "This password is too short.",
            "attr": "password"
        },
        {
            "code": "password_too_similar",
            "detail": "The password is too similar to the username.",
            "attr": "password"
        }
    ]
}
Nested Serializers Support
Taking this example
{
    "shipping_address": {
        "non_field_errors": [ErrorDetail("We do not support shipping to the provided address.", code="unsupported")]
    }
}
It will be converted to:
{
    "code": "unsupported",
    "detail": "We do not support shipping to the provided address.",
    "attr": "shipping_address.non_field_errors"
}
Note how the attr is the combined value of parent serializer field name and nested one. They are separated by
a . by default, but that can be changed through the setting NESTED_FIELD_SEPARATOR.
List Serializers Support
This example
{
    "recipients": [
        {"name": [ErrorDetail("This field is required.", code="required")]},
        {"email": [ErrorDetail("Enter a valid email address.", code="invalid")]},
    ]
}
would be converted to
{
    "type": "validation_error",
    "errors": [
        {
            "code": "required",
            "detail": "This field is required.",
            "attr": "recipients.0.name"
        },
        {
            "code": "invalid",
            "detail": "Enter a valid email address.",
            "attr": "recipients.1.email"
        }
    ]
}
Note that distinguishing between errors in different objects in the nested list serializer is done using
0-based indexing.
Validation
- Introduction
-
Validation Quickstart
- Defining The Routes
- Creating The Controller
- Writing The Validation Logic
- Displaying The Validation Errors
- Repopulating Forms
- A Note On Optional Fields
- Validation Error Response Format
-
Form Request Validation
- Creating Form Requests
- Authorizing Form Requests
- Customizing The Error Messages
- Preparing Input For Validation
-
Manually Creating Validators
- Automatic Redirection
- Named Error Bags
- Customizing The Error Messages
- After Validation Hook
- Working With Validated Input
-
Working With Error Messages
- Specifying Custom Messages In Language Files
- Specifying Attributes In Language Files
- Specifying Values In Language Files
- Available Validation Rules
- Conditionally Adding Rules
-
Validating Arrays
- Validating Nested Array Input
- Error Message Indexes & Positions
- Validating Files
- Validating Passwords
-
Custom Validation Rules
- Using Rule Objects
- Using Closures
- Implicit Rules
Introduction
Laravel provides several different approaches to validate your application’s incoming data. It is most common to use the validate method available on all incoming HTTP requests. However, we will discuss other approaches to validation as well.
Laravel includes a wide variety of convenient validation rules that you may apply to data, even providing the ability to validate if values are unique in a given database table. We’ll cover each of these validation rules in detail so that you are familiar with all of Laravel’s validation features.
Validation Quickstart
To learn about Laravel’s powerful validation features, let’s look at a complete example of validating a form and displaying the error messages back to the user. By reading this high-level overview, you’ll be able to gain a good general understanding of how to validate incoming request data using Laravel:
Defining The Routes
First, let’s assume we have the following routes defined in our routes/web.php file:
use AppHttpControllersPostController;
Route::get('/post/create', [PostController::class, 'create']);
Route::post('/post', [PostController::class, 'store']);
The GET route will display a form for the user to create a new blog post, while the POST route will store the new blog post in the database.
Creating The Controller
Next, let’s take a look at a simple controller that handles incoming requests to these routes. We’ll leave the store method empty for now:
<?php
namespace AppHttpControllers;
use AppHttpControllersController;
use IlluminateHttpRedirectResponse;
use IlluminateHttpRequest;
use IlluminateViewView;
class PostController extends Controller
{
/**
* Show the form to create a new blog post.
*/
public function create(): View
{
return view('post.create');
}
/**
* Store a new blog post.
*/
public function store(Request $request): RedirectResponse
{
// Validate and store the blog post...
$post = /** ... */
return to_route('post.show', ['post' => $post->id]);
}
}
Writing The Validation Logic
Now we are ready to fill in our store method with the logic to validate the new blog post. To do this, we will use the validate method provided by the IlluminateHttpRequest object. If the validation rules pass, your code will keep executing normally; however, if validation fails, an IlluminateValidationValidationException exception will be thrown and the proper error response will automatically be sent back to the user.
If validation fails during a traditional HTTP request, a redirect response to the previous URL will be generated. If the incoming request is an XHR request, a JSON response containing the validation error messages will be returned.
To get a better understanding of the validate method, let’s jump back into the store method:
/**
* Store a new blog post.
*/
public function store(Request $request): RedirectResponse
{
$validated = $request->validate([
'title' => 'required|unique:posts|max:255',
'body' => 'required',
]);
// The blog post is valid...
return redirect('/posts');
}
As you can see, the validation rules are passed into the validate method. Don’t worry — all available validation rules are documented. Again, if the validation fails, the proper response will automatically be generated. If the validation passes, our controller will continue executing normally.
Alternatively, validation rules may be specified as arrays of rules instead of a single | delimited string:
$validatedData = $request->validate([
'title' => ['required', 'unique:posts', 'max:255'],
'body' => ['required'],
]);
In addition, you may use the validateWithBag method to validate a request and store any error messages within a named error bag:
$validatedData = $request->validateWithBag('post', [
'title' => ['required', 'unique:posts', 'max:255'],
'body' => ['required'],
]);
Stopping On First Validation Failure
Sometimes you may wish to stop running validation rules on an attribute after the first validation failure. To do so, assign the bail rule to the attribute:
$request->validate([
'title' => 'bail|required|unique:posts|max:255',
'body' => 'required',
]);
In this example, if the unique rule on the title attribute fails, the max rule will not be checked. Rules will be validated in the order they are assigned.
A Note On Nested Attributes
If the incoming HTTP request contains «nested» field data, you may specify these fields in your validation rules using «dot» syntax:
$request->validate([
'title' => 'required|unique:posts|max:255',
'author.name' => 'required',
'author.description' => 'required',
]);
On the other hand, if your field name contains a literal period, you can explicitly prevent this from being interpreted as «dot» syntax by escaping the period with a backslash:
$request->validate([
'title' => 'required|unique:posts|max:255',
'v1.0' => 'required',
]);
Displaying The Validation Errors
So, what if the incoming request fields do not pass the given validation rules? As mentioned previously, Laravel will automatically redirect the user back to their previous location. In addition, all of the validation errors and request input will automatically be flashed to the session.
An $errors variable is shared with all of your application’s views by the IlluminateViewMiddlewareShareErrorsFromSession middleware, which is provided by the web middleware group. When this middleware is applied an $errors variable will always be available in your views, allowing you to conveniently assume the $errors variable is always defined and can be safely used. The $errors variable will be an instance of IlluminateSupportMessageBag. For more information on working with this object, check out its documentation.
So, in our example, the user will be redirected to our controller’s create method when validation fails, allowing us to display the error messages in the view:
<!-- /resources/views/post/create.blade.php -->
<h1>Create Post</h1>
@if ($errors->any())
<div class="alert alert-danger">
<ul>
@foreach ($errors->all() as $error)
<li>{{ $error }}</li>
@endforeach
</ul>
</div>
@endif
<!-- Create Post Form -->
Customizing The Error Messages
Laravel’s built-in validation rules each have an error message that is located in your application’s lang/en/validation.php file. Within this file, you will find a translation entry for each validation rule. You are free to change or modify these messages based on the needs of your application.
In addition, you may copy this file to another language directory to translate the messages for your application’s language. To learn more about Laravel localization, check out the complete localization documentation.
Warning
By default, the Laravel application skeleton does not include thelangdirectory. If you would like to customize Laravel’s language files, you may publish them via thelang:publishArtisan command.
XHR Requests & Validation
In this example, we used a traditional form to send data to the application. However, many applications receive XHR requests from a JavaScript powered frontend. When using the validate method during an XHR request, Laravel will not generate a redirect response. Instead, Laravel generates a JSON response containing all of the validation errors. This JSON response will be sent with a 422 HTTP status code.
The @error Directive
You may use the @error Blade directive to quickly determine if validation error messages exist for a given attribute. Within an @error directive, you may echo the $message variable to display the error message:
<!-- /resources/views/post/create.blade.php -->
<label for="title">Post Title</label>
<input id="title"
type="text"
name="title"
class="@error('title') is-invalid @enderror">
@error('title')
<div class="alert alert-danger">{{ $message }}</div>
@enderror
If you are using named error bags, you may pass the name of the error bag as the second argument to the @error directive:
<input ... class="@error('title', 'post') is-invalid @enderror">
Repopulating Forms
When Laravel generates a redirect response due to a validation error, the framework will automatically flash all of the request’s input to the session. This is done so that you may conveniently access the input during the next request and repopulate the form that the user attempted to submit.
To retrieve flashed input from the previous request, invoke the old method on an instance of IlluminateHttpRequest. The old method will pull the previously flashed input data from the session:
$title = $request->old('title');
Laravel also provides a global old helper. If you are displaying old input within a Blade template, it is more convenient to use the old helper to repopulate the form. If no old input exists for the given field, null will be returned:
<input type="text" name="title" value="{{ old('title') }}">
A Note On Optional Fields
By default, Laravel includes the TrimStrings and ConvertEmptyStringsToNull middleware in your application’s global middleware stack. These middleware are listed in the stack by the AppHttpKernel class. Because of this, you will often need to mark your «optional» request fields as nullable if you do not want the validator to consider null values as invalid. For example:
$request->validate([
'title' => 'required|unique:posts|max:255',
'body' => 'required',
'publish_at' => 'nullable|date',
]);
In this example, we are specifying that the publish_at field may be either null or a valid date representation. If the nullable modifier is not added to the rule definition, the validator would consider null an invalid date.
Validation Error Response Format
When your application throws a IlluminateValidationValidationException exception and the incoming HTTP request is expecting a JSON response, Laravel will automatically format the error messages for you and return a 422 Unprocessable Entity HTTP response.
Below, you can review an example of the JSON response format for validation errors. Note that nested error keys are flattened into «dot» notation format:
{
"message": "The team name must be a string. (and 4 more errors)",
"errors": {
"team_name": [
"The team name must be a string.",
"The team name must be at least 1 characters."
],
"authorization.role": [
"The selected authorization.role is invalid."
],
"users.0.email": [
"The users.0.email field is required."
],
"users.2.email": [
"The users.2.email must be a valid email address."
]
}
}
Form Request Validation
Creating Form Requests
For more complex validation scenarios, you may wish to create a «form request». Form requests are custom request classes that encapsulate their own validation and authorization logic. To create a form request class, you may use the make:request Artisan CLI command:
php artisan make:request StorePostRequest
The generated form request class will be placed in the app/Http/Requests directory. If this directory does not exist, it will be created when you run the make:request command. Each form request generated by Laravel has two methods: authorize and rules.
As you might have guessed, the authorize method is responsible for determining if the currently authenticated user can perform the action represented by the request, while the rules method returns the validation rules that should apply to the request’s data:
/**
* Get the validation rules that apply to the request.
*
* @return array<string, IlluminateContractsValidationRule|array|string>
*/
public function rules(): array
{
return [
'title' => 'required|unique:posts|max:255',
'body' => 'required',
];
}
Note
You may type-hint any dependencies you require within therulesmethod’s signature. They will automatically be resolved via the Laravel service container.
So, how are the validation rules evaluated? All you need to do is type-hint the request on your controller method. The incoming form request is validated before the controller method is called, meaning you do not need to clutter your controller with any validation logic:
/**
* Store a new blog post.
*/
public function store(StorePostRequest $request): RedirectResponse
{
// The incoming request is valid...
// Retrieve the validated input data...
$validated = $request->validated();
// Retrieve a portion of the validated input data...
$validated = $request->safe()->only(['name', 'email']);
$validated = $request->safe()->except(['name', 'email']);
// Store the blog post...
return redirect('/posts');
}
If validation fails, a redirect response will be generated to send the user back to their previous location. The errors will also be flashed to the session so they are available for display. If the request was an XHR request, an HTTP response with a 422 status code will be returned to the user including a JSON representation of the validation errors.
Adding After Hooks To Form Requests
If you would like to add an «after» validation hook to a form request, you may use the withValidator method. This method receives the fully constructed validator, allowing you to call any of its methods before the validation rules are actually evaluated:
use IlluminateValidationValidator;
/**
* Configure the validator instance.
*/
public function withValidator(Validator $validator): void
{
$validator->after(function (Validator $validator) {
if ($this->somethingElseIsInvalid()) {
$validator->errors()->add('field', 'Something is wrong with this field!');
}
});
}
Stopping On First Validation Failure Attribute
By adding a stopOnFirstFailure property to your request class, you may inform the validator that it should stop validating all attributes once a single validation failure has occurred:
/**
* Indicates if the validator should stop on the first rule failure.
*
* @var bool
*/
protected $stopOnFirstFailure = true;
Customizing The Redirect Location
As previously discussed, a redirect response will be generated to send the user back to their previous location when form request validation fails. However, you are free to customize this behavior. To do so, define a $redirect property on your form request:
/**
* The URI that users should be redirected to if validation fails.
*
* @var string
*/
protected $redirect = '/dashboard';
Or, if you would like to redirect users to a named route, you may define a $redirectRoute property instead:
/**
* The route that users should be redirected to if validation fails.
*
* @var string
*/
protected $redirectRoute = 'dashboard';
Authorizing Form Requests
The form request class also contains an authorize method. Within this method, you may determine if the authenticated user actually has the authority to update a given resource. For example, you may determine if a user actually owns a blog comment they are attempting to update. Most likely, you will interact with your authorization gates and policies within this method:
use AppModelsComment;
/**
* Determine if the user is authorized to make this request.
*/
public function authorize(): bool
{
$comment = Comment::find($this->route('comment'));
return $comment && $this->user()->can('update', $comment);
}
Since all form requests extend the base Laravel request class, we may use the user method to access the currently authenticated user. Also, note the call to the route method in the example above. This method grants you access to the URI parameters defined on the route being called, such as the {comment} parameter in the example below:
Route::post('/comment/{comment}');
Therefore, if your application is taking advantage of route model binding, your code may be made even more succinct by accessing the resolved model as a property of the request:
return $this->user()->can('update', $this->comment);
If the authorize method returns false, an HTTP response with a 403 status code will automatically be returned and your controller method will not execute.
If you plan to handle authorization logic for the request in another part of your application, you may simply return true from the authorize method:
/**
* Determine if the user is authorized to make this request.
*/
public function authorize(): bool
{
return true;
}
Note
You may type-hint any dependencies you need within theauthorizemethod’s signature. They will automatically be resolved via the Laravel service container.
Customizing The Error Messages
You may customize the error messages used by the form request by overriding the messages method. This method should return an array of attribute / rule pairs and their corresponding error messages:
/**
* Get the error messages for the defined validation rules.
*
* @return array<string, string>
*/
public function messages(): array
{
return [
'title.required' => 'A title is required',
'body.required' => 'A message is required',
];
}
Customizing The Validation Attributes
Many of Laravel’s built-in validation rule error messages contain an :attribute placeholder. If you would like the :attribute placeholder of your validation message to be replaced with a custom attribute name, you may specify the custom names by overriding the attributes method. This method should return an array of attribute / name pairs:
/**
* Get custom attributes for validator errors.
*
* @return array<string, string>
*/
public function attributes(): array
{
return [
'email' => 'email address',
];
}
Preparing Input For Validation
If you need to prepare or sanitize any data from the request before you apply your validation rules, you may use the prepareForValidation method:
use IlluminateSupportStr;
/**
* Prepare the data for validation.
*/
protected function prepareForValidation(): void
{
$this->merge([
'slug' => Str::slug($this->slug),
]);
}
Likewise, if you need to normalize any request data after validation is complete, you may use the passedValidation method:
use IlluminateSupportStr;
/**
* Handle a passed validation attempt.
*/
protected function passedValidation(): void
{
$this->replace(['name' => 'Taylor']);
}
Manually Creating Validators
If you do not want to use the validate method on the request, you may create a validator instance manually using the Validator facade. The make method on the facade generates a new validator instance:
<?php
namespace AppHttpControllers;
use AppHttpControllersController;
use IlluminateHttpRedirectResponse;
use IlluminateHttpRequest;
use IlluminateSupportFacadesValidator;
class PostController extends Controller
{
/**
* Store a new blog post.
*/
public function store(Request $request): RedirectResponse
{
$validator = Validator::make($request->all(), [
'title' => 'required|unique:posts|max:255',
'body' => 'required',
]);
if ($validator->fails()) {
return redirect('post/create')
->withErrors($validator)
->withInput();
}
// Retrieve the validated input...
$validated = $validator->validated();
// Retrieve a portion of the validated input...
$validated = $validator->safe()->only(['name', 'email']);
$validated = $validator->safe()->except(['name', 'email']);
// Store the blog post...
return redirect('/posts');
}
}
The first argument passed to the make method is the data under validation. The second argument is an array of the validation rules that should be applied to the data.
After determining whether the request validation failed, you may use the withErrors method to flash the error messages to the session. When using this method, the $errors variable will automatically be shared with your views after redirection, allowing you to easily display them back to the user. The withErrors method accepts a validator, a MessageBag, or a PHP array.
Stopping On First Validation Failure
The stopOnFirstFailure method will inform the validator that it should stop validating all attributes once a single validation failure has occurred:
if ($validator->stopOnFirstFailure()->fails()) {
// ...
}
Automatic Redirection
If you would like to create a validator instance manually but still take advantage of the automatic redirection offered by the HTTP request’s validate method, you may call the validate method on an existing validator instance. If validation fails, the user will automatically be redirected or, in the case of an XHR request, a JSON response will be returned:
Validator::make($request->all(), [
'title' => 'required|unique:posts|max:255',
'body' => 'required',
])->validate();
You may use the validateWithBag method to store the error messages in a named error bag if validation fails:
Validator::make($request->all(), [
'title' => 'required|unique:posts|max:255',
'body' => 'required',
])->validateWithBag('post');
Named Error Bags
If you have multiple forms on a single page, you may wish to name the MessageBag containing the validation errors, allowing you to retrieve the error messages for a specific form. To achieve this, pass a name as the second argument to withErrors:
return redirect('register')->withErrors($validator, 'login');
You may then access the named MessageBag instance from the $errors variable:
{{ $errors->login->first('email') }}
Customizing The Error Messages
If needed, you may provide custom error messages that a validator instance should use instead of the default error messages provided by Laravel. There are several ways to specify custom messages. First, you may pass the custom messages as the third argument to the Validator::make method:
$validator = Validator::make($input, $rules, $messages = [
'required' => 'The :attribute field is required.',
]);
In this example, the :attribute placeholder will be replaced by the actual name of the field under validation. You may also utilize other placeholders in validation messages. For example:
$messages = [
'same' => 'The :attribute and :other must match.',
'size' => 'The :attribute must be exactly :size.',
'between' => 'The :attribute value :input is not between :min - :max.',
'in' => 'The :attribute must be one of the following types: :values',
];
Specifying A Custom Message For A Given Attribute
Sometimes you may wish to specify a custom error message only for a specific attribute. You may do so using «dot» notation. Specify the attribute’s name first, followed by the rule:
$messages = [
'email.required' => 'We need to know your email address!',
];
Specifying Custom Attribute Values
Many of Laravel’s built-in error messages include an :attribute placeholder that is replaced with the name of the field or attribute under validation. To customize the values used to replace these placeholders for specific fields, you may pass an array of custom attributes as the fourth argument to the Validator::make method:
$validator = Validator::make($input, $rules, $messages, [
'email' => 'email address',
]);
After Validation Hook
You may also attach callbacks to be run after validation is completed. This allows you to easily perform further validation and even add more error messages to the message collection. To get started, call the after method on a validator instance:
use IlluminateSupportFacades;
use IlluminateValidationValidator;
$validator = FacadesValidator::make(/* ... */);
$validator->after(function (Validator $validator) {
if ($this->somethingElseIsInvalid()) {
$validator->errors()->add(
'field', 'Something is wrong with this field!'
);
}
});
if ($validator->fails()) {
// ...
}
Working With Validated Input
After validating incoming request data using a form request or a manually created validator instance, you may wish to retrieve the incoming request data that actually underwent validation. This can be accomplished in several ways. First, you may call the validated method on a form request or validator instance. This method returns an array of the data that was validated:
$validated = $request->validated();
$validated = $validator->validated();
Alternatively, you may call the safe method on a form request or validator instance. This method returns an instance of IlluminateSupportValidatedInput. This object exposes only, except, and all methods to retrieve a subset of the validated data or the entire array of validated data:
$validated = $request->safe()->only(['name', 'email']);
$validated = $request->safe()->except(['name', 'email']);
$validated = $request->safe()->all();
In addition, the IlluminateSupportValidatedInput instance may be iterated over and accessed like an array:
// Validated data may be iterated...
foreach ($request->safe() as $key => $value) {
// ...
}
// Validated data may be accessed as an array...
$validated = $request->safe();
$email = $validated['email'];
If you would like to add additional fields to the validated data, you may call the merge method:
$validated = $request->safe()->merge(['name' => 'Taylor Otwell']);
If you would like to retrieve the validated data as a collection instance, you may call the collect method:
$collection = $request->safe()->collect();
Working With Error Messages
After calling the errors method on a Validator instance, you will receive an IlluminateSupportMessageBag instance, which has a variety of convenient methods for working with error messages. The $errors variable that is automatically made available to all views is also an instance of the MessageBag class.
Retrieving The First Error Message For A Field
To retrieve the first error message for a given field, use the first method:
$errors = $validator->errors();
echo $errors->first('email');
Retrieving All Error Messages For A Field
If you need to retrieve an array of all the messages for a given field, use the get method:
foreach ($errors->get('email') as $message) {
// ...
}
If you are validating an array form field, you may retrieve all of the messages for each of the array elements using the * character:
foreach ($errors->get('attachments.*') as $message) {
// ...
}
Retrieving All Error Messages For All Fields
To retrieve an array of all messages for all fields, use the all method:
foreach ($errors->all() as $message) {
// ...
}
Determining If Messages Exist For A Field
The has method may be used to determine if any error messages exist for a given field:
if ($errors->has('email')) {
// ...
}
Specifying Custom Messages In Language Files
Laravel’s built-in validation rules each have an error message that is located in your application’s lang/en/validation.php file. Within this file, you will find a translation entry for each validation rule. You are free to change or modify these messages based on the needs of your application.
In addition, you may copy this file to another language directory to translate the messages for your application’s language. To learn more about Laravel localization, check out the complete localization documentation.
Warning
By default, the Laravel application skeleton does not include thelangdirectory. If you would like to customize Laravel’s language files, you may publish them via thelang:publishArtisan command.
Custom Messages For Specific Attributes
You may customize the error messages used for specified attribute and rule combinations within your application’s validation language files. To do so, add your message customizations to the custom array of your application’s lang/xx/validation.php language file:
'custom' => [
'email' => [
'required' => 'We need to know your email address!',
'max' => 'Your email address is too long!'
],
],
Specifying Attributes In Language Files
Many of Laravel’s built-in error messages include an :attribute placeholder that is replaced with the name of the field or attribute under validation. If you would like the :attribute portion of your validation message to be replaced with a custom value, you may specify the custom attribute name in the attributes array of your lang/xx/validation.php language file:
'attributes' => [
'email' => 'email address',
],
Warning
By default, the Laravel application skeleton does not include thelangdirectory. If you would like to customize Laravel’s language files, you may publish them via thelang:publishArtisan command.
Specifying Values In Language Files
Some of Laravel’s built-in validation rule error messages contain a :value placeholder that is replaced with the current value of the request attribute. However, you may occasionally need the :value portion of your validation message to be replaced with a custom representation of the value. For example, consider the following rule that specifies that a credit card number is required if the payment_type has a value of cc:
Validator::make($request->all(), [
'credit_card_number' => 'required_if:payment_type,cc'
]);
If this validation rule fails, it will produce the following error message:
The credit card number field is required when payment type is cc.
Instead of displaying cc as the payment type value, you may specify a more user-friendly value representation in your lang/xx/validation.php language file by defining a values array:
'values' => [
'payment_type' => [
'cc' => 'credit card'
],
],
Warning
By default, the Laravel application skeleton does not include thelangdirectory. If you would like to customize Laravel’s language files, you may publish them via thelang:publishArtisan command.
After defining this value, the validation rule will produce the following error message:
The credit card number field is required when payment type is credit card.
Available Validation Rules
Below is a list of all available validation rules and their function:
accepted
The field under validation must be "yes", "on", 1, or true. This is useful for validating «Terms of Service» acceptance or similar fields.
accepted_if:anotherfield,value,…
The field under validation must be "yes", "on", 1, or true if another field under validation is equal to a specified value. This is useful for validating «Terms of Service» acceptance or similar fields.
active_url
The field under validation must have a valid A or AAAA record according to the dns_get_record PHP function. The hostname of the provided URL is extracted using the parse_url PHP function before being passed to dns_get_record.
after:date
The field under validation must be a value after a given date. The dates will be passed into the strtotime PHP function in order to be converted to a valid DateTime instance:
'start_date' => 'required|date|after:tomorrow'
Instead of passing a date string to be evaluated by strtotime, you may specify another field to compare against the date:
'finish_date' => 'required|date|after:start_date'
after_or_equal:date
The field under validation must be a value after or equal to the given date. For more information, see the after rule.
alpha
The field under validation must be entirely Unicode alphabetic characters contained in p{L} and p{M}.
To restrict this validation rule to characters in the ASCII range (a-z and A-Z), you may provide the ascii option to the validation rule:
'username' => 'alpha:ascii',
alpha_dash
The field under validation must be entirely Unicode alpha-numeric characters contained in p{L}, p{M}, p{N}, as well as ASCII dashes (-) and ASCII underscores (_).
To restrict this validation rule to characters in the ASCII range (a-z and A-Z), you may provide the ascii option to the validation rule:
'username' => 'alpha_dash:ascii',
alpha_num
The field under validation must be entirely Unicode alpha-numeric characters contained in p{L}, p{M}, and p{N}.
To restrict this validation rule to characters in the ASCII range (a-z and A-Z), you may provide the ascii option to the validation rule:
'username' => 'alpha_num:ascii',
array
The field under validation must be a PHP array.
When additional values are provided to the array rule, each key in the input array must be present within the list of values provided to the rule. In the following example, the admin key in the input array is invalid since it is not contained in the list of values provided to the array rule:
use IlluminateSupportFacadesValidator;
$input = [
'user' => [
'name' => 'Taylor Otwell',
'username' => 'taylorotwell',
'admin' => true,
],
];
Validator::make($input, [
'user' => 'array:name,username',
]);
In general, you should always specify the array keys that are allowed to be present within your array.
ascii
The field under validation must be entirely 7-bit ASCII characters.
bail
Stop running validation rules for the field after the first validation failure.
While the bail rule will only stop validating a specific field when it encounters a validation failure, the stopOnFirstFailure method will inform the validator that it should stop validating all attributes once a single validation failure has occurred:
if ($validator->stopOnFirstFailure()->fails()) {
// ...
}
before:date
The field under validation must be a value preceding the given date. The dates will be passed into the PHP strtotime function in order to be converted into a valid DateTime instance. In addition, like the after rule, the name of another field under validation may be supplied as the value of date.
before_or_equal:date
The field under validation must be a value preceding or equal to the given date. The dates will be passed into the PHP strtotime function in order to be converted into a valid DateTime instance. In addition, like the after rule, the name of another field under validation may be supplied as the value of date.
between:min,max
The field under validation must have a size between the given min and max (inclusive). Strings, numerics, arrays, and files are evaluated in the same fashion as the size rule.
boolean
The field under validation must be able to be cast as a boolean. Accepted input are true, false, 1, 0, "1", and "0".
confirmed
The field under validation must have a matching field of {field}_confirmation. For example, if the field under validation is password, a matching password_confirmation field must be present in the input.
current_password
The field under validation must match the authenticated user’s password. You may specify an authentication guard using the rule’s first parameter:
'password' => 'current_password:api'
date
The field under validation must be a valid, non-relative date according to the strtotime PHP function.
date_equals:date
The field under validation must be equal to the given date. The dates will be passed into the PHP strtotime function in order to be converted into a valid DateTime instance.
date_format:format,…
The field under validation must match one of the given formats. You should use either date or date_format when validating a field, not both. This validation rule supports all formats supported by PHP’s DateTime class.
decimal:min,max
The field under validation must be numeric and must contain the specified number of decimal places:
// Must have exactly two decimal places (9.99)...
'price' => 'decimal:2'
// Must have between 2 and 4 decimal places...
'price' => 'decimal:2,4'
declined
The field under validation must be "no", "off", 0, or false.
declined_if:anotherfield,value,…
The field under validation must be "no", "off", 0, or false if another field under validation is equal to a specified value.
different:field
The field under validation must have a different value than field.
digits:value
The integer under validation must have an exact length of value.
digits_between:min,max
The integer validation must have a length between the given min and max.
dimensions
The file under validation must be an image meeting the dimension constraints as specified by the rule’s parameters:
'avatar' => 'dimensions:min_width=100,min_height=200'
Available constraints are: min_width, max_width, min_height, max_height, width, height, ratio.
A ratio constraint should be represented as width divided by height. This can be specified either by a fraction like 3/2 or a float like 1.5:
'avatar' => 'dimensions:ratio=3/2'
Since this rule requires several arguments, you may use the Rule::dimensions method to fluently construct the rule:
use IlluminateSupportFacadesValidator;
use IlluminateValidationRule;
Validator::make($data, [
'avatar' => [
'required',
Rule::dimensions()->maxWidth(1000)->maxHeight(500)->ratio(3 / 2),
],
]);
distinct
When validating arrays, the field under validation must not have any duplicate values:
'foo.*.id' => 'distinct'
Distinct uses loose variable comparisons by default. To use strict comparisons, you may add the strict parameter to your validation rule definition:
'foo.*.id' => 'distinct:strict'
You may add ignore_case to the validation rule’s arguments to make the rule ignore capitalization differences:
'foo.*.id' => 'distinct:ignore_case'
doesnt_start_with:foo,bar,…
The field under validation must not start with one of the given values.
doesnt_end_with:foo,bar,…
The field under validation must not end with one of the given values.
The field under validation must be formatted as an email address. This validation rule utilizes the egulias/email-validator package for validating the email address. By default, the RFCValidation validator is applied, but you can apply other validation styles as well:
'email' => 'email:rfc,dns'
The example above will apply the RFCValidation and DNSCheckValidation validations. Here’s a full list of validation styles you can apply:
-
rfc:RFCValidation -
strict:NoRFCWarningsValidation -
dns:DNSCheckValidation -
spoof:SpoofCheckValidation -
filter:FilterEmailValidation -
filter_unicode:FilterEmailValidation::unicode()
The filter validator, which uses PHP’s filter_var function, ships with Laravel and was Laravel’s default email validation behavior prior to Laravel version 5.8.
Warning
Thednsandspoofvalidators require the PHPintlextension.
ends_with:foo,bar,…
The field under validation must end with one of the given values.
enum
The Enum rule is a class based rule that validates whether the field under validation contains a valid enum value. The Enum rule accepts the name of the enum as its only constructor argument:
use AppEnumsServerStatus;
use IlluminateValidationRulesEnum;
$request->validate([
'status' => [new Enum(ServerStatus::class)],
]);
exclude
The field under validation will be excluded from the request data returned by the validate and validated methods.
exclude_if:anotherfield,value
The field under validation will be excluded from the request data returned by the validate and validated methods if the anotherfield field is equal to value.
If complex conditional exclusion logic is required, you may utilize the Rule::excludeIf method. This method accepts a boolean or a closure. When given a closure, the closure should return true or false to indicate if the field under validation should be excluded:
use IlluminateSupportFacadesValidator;
use IlluminateValidationRule;
Validator::make($request->all(), [
'role_id' => Rule::excludeIf($request->user()->is_admin),
]);
Validator::make($request->all(), [
'role_id' => Rule::excludeIf(fn () => $request->user()->is_admin),
]);
exclude_unless:anotherfield,value
The field under validation will be excluded from the request data returned by the validate and validated methods unless anotherfield‘s field is equal to value. If value is null (exclude_unless:name,null), the field under validation will be excluded unless the comparison field is null or the comparison field is missing from the request data.
exclude_with:anotherfield
The field under validation will be excluded from the request data returned by the validate and validated methods if the anotherfield field is present.
exclude_without:anotherfield
The field under validation will be excluded from the request data returned by the validate and validated methods if the anotherfield field is not present.
exists:table,column
The field under validation must exist in a given database table.
Basic Usage Of Exists Rule
'state' => 'exists:states'
If the column option is not specified, the field name will be used. So, in this case, the rule will validate that the states database table contains a record with a state column value matching the request’s state attribute value.
Specifying A Custom Column Name
You may explicitly specify the database column name that should be used by the validation rule by placing it after the database table name:
'state' => 'exists:states,abbreviation'
Occasionally, you may need to specify a specific database connection to be used for the exists query. You can accomplish this by prepending the connection name to the table name:
'email' => 'exists:connection.staff,email'
Instead of specifying the table name directly, you may specify the Eloquent model which should be used to determine the table name:
'user_id' => 'exists:AppModelsUser,id'
If you would like to customize the query executed by the validation rule, you may use the Rule class to fluently define the rule. In this example, we’ll also specify the validation rules as an array instead of using the | character to delimit them:
use IlluminateDatabaseQueryBuilder;
use IlluminateSupportFacadesValidator;
use IlluminateValidationRule;
Validator::make($data, [
'email' => [
'required',
Rule::exists('staff')->where(function (Builder $query) {
return $query->where('account_id', 1);
}),
],
]);
You may explicitly specify the database column name that should be used by the exists rule generated by the Rule::exists method by providing the column name as the second argument to the exists method:
'state' => Rule::exists('states', 'abbreviation'),
file
The field under validation must be a successfully uploaded file.
filled
The field under validation must not be empty when it is present.
gt:field
The field under validation must be greater than the given field. The two fields must be of the same type. Strings, numerics, arrays, and files are evaluated using the same conventions as the size rule.
gte:field
The field under validation must be greater than or equal to the given field. The two fields must be of the same type. Strings, numerics, arrays, and files are evaluated using the same conventions as the size rule.
image
The file under validation must be an image (jpg, jpeg, png, bmp, gif, svg, or webp).
in:foo,bar,…
The field under validation must be included in the given list of values. Since this rule often requires you to implode an array, the Rule::in method may be used to fluently construct the rule:
use IlluminateSupportFacadesValidator;
use IlluminateValidationRule;
Validator::make($data, [
'zones' => [
'required',
Rule::in(['first-zone', 'second-zone']),
],
]);
When the in rule is combined with the array rule, each value in the input array must be present within the list of values provided to the in rule. In the following example, the LAS airport code in the input array is invalid since it is not contained in the list of airports provided to the in rule:
use IlluminateSupportFacadesValidator;
use IlluminateValidationRule;
$input = [
'airports' => ['NYC', 'LAS'],
];
Validator::make($input, [
'airports' => [
'required',
'array',
],
'airports.*' => Rule::in(['NYC', 'LIT']),
]);
in_array:anotherfield.*
The field under validation must exist in anotherfield‘s values.
integer
The field under validation must be an integer.
Warning
This validation rule does not verify that the input is of the «integer» variable type, only that the input is of a type accepted by PHP’sFILTER_VALIDATE_INTrule. If you need to validate the input as being a number please use this rule in combination with thenumericvalidation rule.
ip
The field under validation must be an IP address.
ipv4
The field under validation must be an IPv4 address.
ipv6
The field under validation must be an IPv6 address.
json
The field under validation must be a valid JSON string.
lt:field
The field under validation must be less than the given field. The two fields must be of the same type. Strings, numerics, arrays, and files are evaluated using the same conventions as the size rule.
lte:field
The field under validation must be less than or equal to the given field. The two fields must be of the same type. Strings, numerics, arrays, and files are evaluated using the same conventions as the size rule.
lowercase
The field under validation must be lowercase.
mac_address
The field under validation must be a MAC address.
max:value
The field under validation must be less than or equal to a maximum value. Strings, numerics, arrays, and files are evaluated in the same fashion as the size rule.
max_digits:value
The integer under validation must have a maximum length of value.
mimetypes:text/plain,…
The file under validation must match one of the given MIME types:
'video' => 'mimetypes:video/avi,video/mpeg,video/quicktime'
To determine the MIME type of the uploaded file, the file’s contents will be read and the framework will attempt to guess the MIME type, which may be different from the client’s provided MIME type.
mimes:foo,bar,…
The file under validation must have a MIME type corresponding to one of the listed extensions.
Basic Usage Of MIME Rule
'photo' => 'mimes:jpg,bmp,png'
Even though you only need to specify the extensions, this rule actually validates the MIME type of the file by reading the file’s contents and guessing its MIME type. A full listing of MIME types and their corresponding extensions may be found at the following location:
https://svn.apache.org/repos/asf/httpd/httpd/trunk/docs/conf/mime.types
min:value
The field under validation must have a minimum value. Strings, numerics, arrays, and files are evaluated in the same fashion as the size rule.
min_digits:value
The integer under validation must have a minimum length of value.
multiple_of:value
The field under validation must be a multiple of value.
missing
The field under validation must not be present in the input data.
missing_if:anotherfield,value,…
The field under validation must not be present if the anotherfield field is equal to any value.
missing_unless:anotherfield,value
The field under validation must not be present unless the anotherfield field is equal to any value.
missing_with:foo,bar,…
The field under validation must not be present only if any of the other specified fields are present.
missing_with_all:foo,bar,…
The field under validation must not be present only if all of the other specified fields are present.
not_in:foo,bar,…
The field under validation must not be included in the given list of values. The Rule::notIn method may be used to fluently construct the rule:
use IlluminateValidationRule;
Validator::make($data, [
'toppings' => [
'required',
Rule::notIn(['sprinkles', 'cherries']),
],
]);
not_regex:pattern
The field under validation must not match the given regular expression.
Internally, this rule uses the PHP preg_match function. The pattern specified should obey the same formatting required by preg_match and thus also include valid delimiters. For example: 'email' => 'not_regex:/^.+$/i'.
Warning
When using theregex/not_regexpatterns, it may be necessary to specify your validation rules using an array instead of using|delimiters, especially if the regular expression contains a|character.
nullable
The field under validation may be null.
numeric
The field under validation must be numeric.
password
The field under validation must match the authenticated user’s password.
Warning
This rule was renamed tocurrent_passwordwith the intention of removing it in Laravel 9. Please use the Current Password rule instead.
present
The field under validation must exist in the input data.
prohibited
The field under validation must be missing or empty. A field is «empty» if it meets one of the following criteria:
- The value is
null. - The value is an empty string.
- The value is an empty array or empty
Countableobject. - The value is an uploaded file with an empty path.
prohibited_if:anotherfield,value,…
The field under validation must be missing or empty if the anotherfield field is equal to any value. A field is «empty» if it meets one of the following criteria:
- The value is
null. - The value is an empty string.
- The value is an empty array or empty
Countableobject. - The value is an uploaded file with an empty path.
If complex conditional prohibition logic is required, you may utilize the Rule::prohibitedIf method. This method accepts a boolean or a closure. When given a closure, the closure should return true or false to indicate if the field under validation should be prohibited:
use IlluminateSupportFacadesValidator;
use IlluminateValidationRule;
Validator::make($request->all(), [
'role_id' => Rule::prohibitedIf($request->user()->is_admin),
]);
Validator::make($request->all(), [
'role_id' => Rule::prohibitedIf(fn () => $request->user()->is_admin),
]);
prohibited_unless:anotherfield,value,…
The field under validation must be missing or empty unless the anotherfield field is equal to any value. A field is «empty» if it meets one of the following criteria:
- The value is
null. - The value is an empty string.
- The value is an empty array or empty
Countableobject. - The value is an uploaded file with an empty path.
prohibits:anotherfield,…
If the field under validation is not missing or empty, all fields in anotherfield must be missing or empty. A field is «empty» if it meets one of the following criteria:
- The value is
null. - The value is an empty string.
- The value is an empty array or empty
Countableobject. - The value is an uploaded file with an empty path.
regex:pattern
The field under validation must match the given regular expression.
Internally, this rule uses the PHP preg_match function. The pattern specified should obey the same formatting required by preg_match and thus also include valid delimiters. For example: 'email' => 'regex:/^[email protected]+$/i'.
Warning
When using theregex/not_regexpatterns, it may be necessary to specify rules in an array instead of using|delimiters, especially if the regular expression contains a|character.
required
The field under validation must be present in the input data and not empty. A field is «empty» if it meets one of the following criteria:
- The value is
null. - The value is an empty string.
- The value is an empty array or empty
Countableobject. - The value is an uploaded file with no path.
required_if:anotherfield,value,…
The field under validation must be present and not empty if the anotherfield field is equal to any value.
If you would like to construct a more complex condition for the required_if rule, you may use the Rule::requiredIf method. This method accepts a boolean or a closure. When passed a closure, the closure should return true or false to indicate if the field under validation is required:
use IlluminateSupportFacadesValidator;
use IlluminateValidationRule;
Validator::make($request->all(), [
'role_id' => Rule::requiredIf($request->user()->is_admin),
]);
Validator::make($request->all(), [
'role_id' => Rule::requiredIf(fn () => $request->user()->is_admin),
]);
required_unless:anotherfield,value,…
The field under validation must be present and not empty unless the anotherfield field is equal to any value. This also means anotherfield must be present in the request data unless value is null. If value is null (required_unless:name,null), the field under validation will be required unless the comparison field is null or the comparison field is missing from the request data.
required_with:foo,bar,…
The field under validation must be present and not empty only if any of the other specified fields are present and not empty.
required_with_all:foo,bar,…
The field under validation must be present and not empty only if all of the other specified fields are present and not empty.
required_without:foo,bar,…
The field under validation must be present and not empty only when any of the other specified fields are empty or not present.
required_without_all:foo,bar,…
The field under validation must be present and not empty only when all of the other specified fields are empty or not present.
required_array_keys:foo,bar,…
The field under validation must be an array and must contain at least the specified keys.
same:field
The given field must match the field under validation.
size:value
The field under validation must have a size matching the given value. For string data, value corresponds to the number of characters. For numeric data, value corresponds to a given integer value (the attribute must also have the numeric or integer rule). For an array, size corresponds to the count of the array. For files, size corresponds to the file size in kilobytes. Let’s look at some examples:
// Validate that a string is exactly 12 characters long...
'title' => 'size:12';
// Validate that a provided integer equals 10...
'seats' => 'integer|size:10';
// Validate that an array has exactly 5 elements...
'tags' => 'array|size:5';
// Validate that an uploaded file is exactly 512 kilobytes...
'image' => 'file|size:512';
starts_with:foo,bar,…
The field under validation must start with one of the given values.
string
The field under validation must be a string. If you would like to allow the field to also be null, you should assign the nullable rule to the field.
timezone
The field under validation must be a valid timezone identifier according to the timezone_identifiers_list PHP function.
unique:table,column
The field under validation must not exist within the given database table.
Specifying A Custom Table / Column Name:
Instead of specifying the table name directly, you may specify the Eloquent model which should be used to determine the table name:
'email' => 'unique:AppModelsUser,email_address'
The column option may be used to specify the field’s corresponding database column. If the column option is not specified, the name of the field under validation will be used.
'email' => 'unique:users,email_address'
Specifying A Custom Database Connection
Occasionally, you may need to set a custom connection for database queries made by the Validator. To accomplish this, you may prepend the connection name to the table name:
'email' => 'unique:connection.users,email_address'
Forcing A Unique Rule To Ignore A Given ID:
Sometimes, you may wish to ignore a given ID during unique validation. For example, consider an «update profile» screen that includes the user’s name, email address, and location. You will probably want to verify that the email address is unique. However, if the user only changes the name field and not the email field, you do not want a validation error to be thrown because the user is already the owner of the email address in question.
To instruct the validator to ignore the user’s ID, we’ll use the Rule class to fluently define the rule. In this example, we’ll also specify the validation rules as an array instead of using the | character to delimit the rules:
use IlluminateDatabaseEloquentBuilder;
use IlluminateSupportFacadesValidator;
use IlluminateValidationRule;
Validator::make($data, [
'email' => [
'required',
Rule::unique('users')->ignore($user->id),
],
]);
Warning
You should never pass any user controlled request input into theignoremethod. Instead, you should only pass a system generated unique ID such as an auto-incrementing ID or UUID from an Eloquent model instance. Otherwise, your application will be vulnerable to an SQL injection attack.
Instead of passing the model key’s value to the ignore method, you may also pass the entire model instance. Laravel will automatically extract the key from the model:
Rule::unique('users')->ignore($user)
If your table uses a primary key column name other than id, you may specify the name of the column when calling the ignore method:
Rule::unique('users')->ignore($user->id, 'user_id')
By default, the unique rule will check the uniqueness of the column matching the name of the attribute being validated. However, you may pass a different column name as the second argument to the unique method:
Rule::unique('users', 'email_address')->ignore($user->id)
Adding Additional Where Clauses:
You may specify additional query conditions by customizing the query using the where method. For example, let’s add a query condition that scopes the query to only search records that have an account_id column value of 1:
'email' => Rule::unique('users')->where(fn (Builder $query) => $query->where('account_id', 1))
uppercase
The field under validation must be uppercase.
url
The field under validation must be a valid URL.
ulid
The field under validation must be a valid Universally Unique Lexicographically Sortable Identifier (ULID).
uuid
The field under validation must be a valid RFC 4122 (version 1, 3, 4, or 5) universally unique identifier (UUID).
Conditionally Adding Rules
Skipping Validation When Fields Have Certain Values
You may occasionally wish to not validate a given field if another field has a given value. You may accomplish this using the exclude_if validation rule. In this example, the appointment_date and doctor_name fields will not be validated if the has_appointment field has a value of false:
use IlluminateSupportFacadesValidator;
$validator = Validator::make($data, [
'has_appointment' => 'required|boolean',
'appointment_date' => 'exclude_if:has_appointment,false|required|date',
'doctor_name' => 'exclude_if:has_appointment,false|required|string',
]);
Alternatively, you may use the exclude_unless rule to not validate a given field unless another field has a given value:
$validator = Validator::make($data, [
'has_appointment' => 'required|boolean',
'appointment_date' => 'exclude_unless:has_appointment,true|required|date',
'doctor_name' => 'exclude_unless:has_appointment,true|required|string',
]);
Validating When Present
In some situations, you may wish to run validation checks against a field only if that field is present in the data being validated. To quickly accomplish this, add the sometimes rule to your rule list:
$v = Validator::make($data, [
'email' => 'sometimes|required|email',
]);
In the example above, the email field will only be validated if it is present in the $data array.
Note
If you are attempting to validate a field that should always be present but may be empty, check out this note on optional fields.
Complex Conditional Validation
Sometimes you may wish to add validation rules based on more complex conditional logic. For example, you may wish to require a given field only if another field has a greater value than 100. Or, you may need two fields to have a given value only when another field is present. Adding these validation rules doesn’t have to be a pain. First, create a Validator instance with your static rules that never change:
use IlluminateSupportFacadesValidator;
$validator = Validator::make($request->all(), [
'email' => 'required|email',
'games' => 'required|numeric',
]);
Let’s assume our web application is for game collectors. If a game collector registers with our application and they own more than 100 games, we want them to explain why they own so many games. For example, perhaps they run a game resale shop, or maybe they just enjoy collecting games. To conditionally add this requirement, we can use the sometimes method on the Validator instance.
use IlluminateSupportFluent;
$validator->sometimes('reason', 'required|max:500', function (Fluent $input) {
return $input->games >= 100;
});
The first argument passed to the sometimes method is the name of the field we are conditionally validating. The second argument is a list of the rules we want to add. If the closure passed as the third argument returns true, the rules will be added. This method makes it a breeze to build complex conditional validations. You may even add conditional validations for several fields at once:
$validator->sometimes(['reason', 'cost'], 'required', function (Fluent $input) {
return $input->games >= 100;
});
Note
The$inputparameter passed to your closure will be an instance ofIlluminateSupportFluentand may be used to access your input and files under validation.
Complex Conditional Array Validation
Sometimes you may want to validate a field based on another field in the same nested array whose index you do not know. In these situations, you may allow your closure to receive a second argument which will be the current individual item in the array being validated:
$input = [
'channels' => [
[
'type' => 'email',
'address' => '[email protected]',
],
[
'type' => 'url',
'address' => 'https://example.com',
],
],
];
$validator->sometimes('channels.*.address', 'email', function (Fluent $input, Fluent $item) {
return $item->type === 'email';
});
$validator->sometimes('channels.*.address', 'url', function (Fluent $input, Fluent $item) {
return $item->type !== 'email';
});
Like the $input parameter passed to the closure, the $item parameter is an instance of IlluminateSupportFluent when the attribute data is an array; otherwise, it is a string.
Validating Arrays
As discussed in the array validation rule documentation, the array rule accepts a list of allowed array keys. If any additional keys are present within the array, validation will fail:
use IlluminateSupportFacadesValidator;
$input = [
'user' => [
'name' => 'Taylor Otwell',
'username' => 'taylorotwell',
'admin' => true,
],
];
Validator::make($input, [
'user' => 'array:username,locale',
]);
In general, you should always specify the array keys that are allowed to be present within your array. Otherwise, the validator’s validate and validated methods will return all of the validated data, including the array and all of its keys, even if those keys were not validated by other nested array validation rules.
Validating Nested Array Input
Validating nested array based form input fields doesn’t have to be a pain. You may use «dot notation» to validate attributes within an array. For example, if the incoming HTTP request contains a photos[profile] field, you may validate it like so:
use IlluminateSupportFacadesValidator;
$validator = Validator::make($request->all(), [
'photos.profile' => 'required|image',
]);
You may also validate each element of an array. For example, to validate that each email in a given array input field is unique, you may do the following:
$validator = Validator::make($request->all(), [
'person.*.email' => 'email|unique:users',
'person.*.first_name' => 'required_with:person.*.last_name',
]);
Likewise, you may use the * character when specifying custom validation messages in your language files, making it a breeze to use a single validation message for array based fields:
'custom' => [
'person.*.email' => [
'unique' => 'Each person must have a unique email address',
]
],
Accessing Nested Array Data
Sometimes you may need to access the value for a given nested array element when assigning validation rules to the attribute. You may accomplish this using the Rule::forEach method. The forEach method accepts a closure that will be invoked for each iteration of the array attribute under validation and will receive the attribute’s value and explicit, fully-expanded attribute name. The closure should return an array of rules to assign to the array element:
use AppRulesHasPermission;
use IlluminateSupportFacadesValidator;
use IlluminateValidationRule;
$validator = Validator::make($request->all(), [
'companies.*.id' => Rule::forEach(function (string|null $value, string $attribute) {
return [
Rule::exists(Company::class, 'id'),
new HasPermission('manage-company', $value),
];
}),
]);
Error Message Indexes & Positions
When validating arrays, you may want to reference the index or position of a particular item that failed validation within the error message displayed by your application. To accomplish this, you may include the :index (starts from 0) and :position (starts from 1) placeholders within your custom validation message:
use IlluminateSupportFacadesValidator;
$input = [
'photos' => [
[
'name' => 'BeachVacation.jpg',
'description' => 'A photo of my beach vacation!',
],
[
'name' => 'GrandCanyon.jpg',
'description' => '',
],
],
];
Validator::validate($input, [
'photos.*.description' => 'required',
], [
'photos.*.description.required' => 'Please describe photo #:position.',
]);
Given the example above, validation will fail and the user will be presented with the following error of «Please describe photo #2.»
Validating Files
Laravel provides a variety of validation rules that may be used to validate uploaded files, such as mimes, image, min, and max. While you are free to specify these rules individually when validating files, Laravel also offers a fluent file validation rule builder that you may find convenient:
use IlluminateSupportFacadesValidator;
use IlluminateValidationRulesFile;
Validator::validate($input, [
'attachment' => [
'required',
File::types(['mp3', 'wav'])
->min(1024)
->max(12 * 1024),
],
]);
If your application accepts images uploaded by your users, you may use the File rule’s image constructor method to indicate that the uploaded file should be an image. In addition, the dimensions rule may be used to limit the dimensions of the image:
use IlluminateSupportFacadesValidator;
use IlluminateValidationRulesFile;
Validator::validate($input, [
'photo' => [
'required',
File::image()
->min(1024)
->max(12 * 1024)
->dimensions(Rule::dimensions()->maxWidth(1000)->maxHeight(500)),
],
]);
Note
More information regarding validating image dimensions may be found in the dimension rule documentation.
File Types
Even though you only need to specify the extensions when invoking the types method, this method actually validates the MIME type of the file by reading the file’s contents and guessing its MIME type. A full listing of MIME types and their corresponding extensions may be found at the following location:
https://svn.apache.org/repos/asf/httpd/httpd/trunk/docs/conf/mime.types
Validating Passwords
To ensure that passwords have an adequate level of complexity, you may use Laravel’s Password rule object:
use IlluminateSupportFacadesValidator;
use IlluminateValidationRulesPassword;
$validator = Validator::make($request->all(), [
'password' => ['required', 'confirmed', Password::min(8)],
]);
The Password rule object allows you to easily customize the password complexity requirements for your application, such as specifying that passwords require at least one letter, number, symbol, or characters with mixed casing:
// Require at least 8 characters...
Password::min(8)
// Require at least one letter...
Password::min(8)->letters()
// Require at least one uppercase and one lowercase letter...
Password::min(8)->mixedCase()
// Require at least one number...
Password::min(8)->numbers()
// Require at least one symbol...
Password::min(8)->symbols()
In addition, you may ensure that a password has not been compromised in a public password data breach leak using the uncompromised method:
Password::min(8)->uncompromised()
Internally, the Password rule object uses the k-Anonymity model to determine if a password has been leaked via the haveibeenpwned.com service without sacrificing the user’s privacy or security.
By default, if a password appears at least once in a data leak, it will be considered compromised. You can customize this threshold using the first argument of the uncompromised method:
// Ensure the password appears less than 3 times in the same data leak...
Password::min(8)->uncompromised(3);
Of course, you may chain all the methods in the examples above:
Password::min(8)
->letters()
->mixedCase()
->numbers()
->symbols()
->uncompromised()
Defining Default Password Rules
You may find it convenient to specify the default validation rules for passwords in a single location of your application. You can easily accomplish this using the Password::defaults method, which accepts a closure. The closure given to the defaults method should return the default configuration of the Password rule. Typically, the defaults rule should be called within the boot method of one of your application’s service providers:
use IlluminateValidationRulesPassword;
/**
* Bootstrap any application services.
*/
public function boot(): void
{
Password::defaults(function () {
$rule = Password::min(8);
return $this->app->isProduction()
? $rule->mixedCase()->uncompromised()
: $rule;
});
}
Then, when you would like to apply the default rules to a particular password undergoing validation, you may invoke the defaults method with no arguments:
'password' => ['required', Password::defaults()],
Occasionally, you may want to attach additional validation rules to your default password validation rules. You may use the rules method to accomplish this:
use AppRulesZxcvbnRule;
Password::defaults(function () {
$rule = Password::min(8)->rules([new ZxcvbnRule]);
// ...
});
Custom Validation Rules
Using Rule Objects
Laravel provides a variety of helpful validation rules; however, you may wish to specify some of your own. One method of registering custom validation rules is using rule objects. To generate a new rule object, you may use the make:rule Artisan command. Let’s use this command to generate a rule that verifies a string is uppercase. Laravel will place the new rule in the app/Rules directory. If this directory does not exist, Laravel will create it when you execute the Artisan command to create your rule:
php artisan make:rule Uppercase
Once the rule has been created, we are ready to define its behavior. A rule object contains a single method: validate. This method receives the attribute name, its value, and a callback that should be invoked on failure with the validation error message:
<?php
namespace AppRules;
use Closure;
use IlluminateContractsValidationValidationRule;
class Uppercase implements ValidationRule
{
/**
* Run the validation rule.
*/
public function validate(string $attribute, mixed $value, Closure $fail): void
{
if (strtoupper($value) !== $value) {
$fail('The :attribute must be uppercase.');
}
}
}
Once the rule has been defined, you may attach it to a validator by passing an instance of the rule object with your other validation rules:
use AppRulesUppercase;
$request->validate([
'name' => ['required', 'string', new Uppercase],
]);
Translating Validation Messages
Instead of providing a literal error message to the $fail closure, you may also provide a translation string key and instruct Laravel to translate the error message:
if (strtoupper($value) !== $value) {
$fail('validation.uppercase')->translate();
}
If necessary, you may provide placeholder replacements and the preferred language as the first and second arguments to the translate method:
$fail('validation.location')->translate([
'value' => $this->value,
], 'fr')
Accessing Additional Data
If your custom validation rule class needs to access all of the other data undergoing validation, your rule class may implement the IlluminateContractsValidationDataAwareRule interface. This interface requires your class to define a setData method. This method will automatically be invoked by Laravel (before validation proceeds) with all of the data under validation:
<?php
namespace AppRules;
use IlluminateContractsValidationDataAwareRule;
use IlluminateContractsValidationValidationRule;
class Uppercase implements DataAwareRule, ValidationRule
{
/**
* All of the data under validation.
*
* @var array<string, mixed>
*/
protected $data = [];
// ...
/**
* Set the data under validation.
*
* @param array<string, mixed> $data
*/
public function setData(array $data): static
{
$this->data = $data;
return $this;
}
}
Or, if your validation rule requires access to the validator instance performing the validation, you may implement the ValidatorAwareRule interface:
<?php
namespace AppRules;
use IlluminateContractsValidationValidationRule;
use IlluminateContractsValidationValidatorAwareRule;
use IlluminateValidationValidator;
class Uppercase implements ValidationRule, ValidatorAwareRule
{
/**
* The validator instance.
*
* @var IlluminateValidationValidator
*/
protected $validator;
// ...
/**
* Set the current validator.
*/
public function setValidator(Validator $validator): static
{
$this->validator = $validator;
return $this;
}
}
Using Closures
If you only need the functionality of a custom rule once throughout your application, you may use a closure instead of a rule object. The closure receives the attribute’s name, the attribute’s value, and a $fail callback that should be called if validation fails:
use IlluminateSupportFacadesValidator;
use Closure;
$validator = Validator::make($request->all(), [
'title' => [
'required',
'max:255',
function (string $attribute, mixed $value, Closure $fail) {
if ($value === 'foo') {
$fail("The {$attribute} is invalid.");
}
},
],
]);
Implicit Rules
By default, when an attribute being validated is not present or contains an empty string, normal validation rules, including custom rules, are not run. For example, the unique rule will not be run against an empty string:
use IlluminateSupportFacadesValidator;
$rules = ['name' => 'unique:users,name'];
$input = ['name' => ''];
Validator::make($input, $rules)->passes(); // true
For a custom rule to run even when an attribute is empty, the rule must imply that the attribute is required. To quickly generate a new implicit rule object, you may use the make:rule Artisan command with the --implicit option:
php artisan make:rule Uppercase --implicit
Warning
An «implicit» rule only implies that the attribute is required. Whether it actually invalidates a missing or empty attribute is up to you.
Просмотров 14.4к. Опубликовано
Обновлено
Каждый сайт, который создает компания, должен отвечать принятым стандартам. В первую очередь затем, чтобы он попадал в поисковую выдачу и был удобен для пользователей. Если код страниц содержит ошибки, неточности, он становится “невалидным”, то есть не соответствующим требованиям. В результате интернет-ресурс не увидят пользователи или информация на нем будет отображаться некорректно.
В этой статье рассмотрим, что такое валидность, какие могут быть ошибки в HTML-разметке и как их устранить.
Содержание
- Что такое HTML-ошибка валидации и зачем она нужна
- Чем опасны ошибки в разметке
- Как проверить ошибки валидации
- Предупреждения
- Ошибки
- Пример прохождения валидации для страницы сайта
- Как исправить ошибку валидации
- Плагины для браузеров, которые помогут найти ошибки в коде
- Коротко о главном
Что такое HTML-ошибка валидации и зачем она нужна
Под понятием “валидация” подразумевается процесс онлайн-проверки HTML-кода страницы на соответствие стандартам w3c. Эти стандарты были разработаны Организацией всемирной паутины и стандартов качества разметки. Сама организация продвигает идею унификации сайтов по HTML-коду — чтобы каждому пользователю, вне зависимости от браузера или устройства, было удобно использовать ресурс.
Если код отвечает стандартам, то его называют валидным. Браузеры могут его прочитать, загрузить страницы, а поисковые системы легко находят страницу по соответствующему запросу.
Чем опасны ошибки в разметке
Ошибки валидации могут разными — видимыми для глаза простого пользователя или такими, которые можно засечь только с помощью специальных программ. В первом случае кроме технических проблем, ошибки в разметке приводят к негативному пользовательскому опыту.
К наиболее распространённым последствиям ошибок в коде HTML-разметки также относят сбои в нормальной работе сайта и помехи в продвижении ресурса в поисковых системах.
Рассмотрим несколько примеров, как ошибки могут проявляться при работе:
- Медленно подгружается страница
Согласно исследованию Unbounce, более четверти пользователей покидают страницу, если её загрузка занимает более 3 секунд, ещё треть уходит после 6 секунд;
- Не видна часть текстовых, фото и видео-блоков
Эта проблема делает контент для пользователей неинформативным, поэтому они в большинстве случаев уходят со страницы, не досмотрев её до конца;
- Страница может остаться не проиндексированной
Если поисковый робот распознает недочёт в разметке, он может пропустить страницу и прервать её размещение в поисковых системах;
- Разное отображение страниц на разных устройствах
Например, на компьютере или ноутбуке страница будет выглядеть хорошо, а на мобильных гаджетах половина кнопок и изображений будет попросту не видна.
Из-за этих ошибок пользователь не сможет нормально работать с ресурсом. Единственное решение для него — закрыть вкладку и найти нужную информацию на другом сайте. Так количество посетителей сайта постепенно уменьшается, он перестает попадать в поисковую выдачу — в результате ресурс становится бесполезным и пропадает в пучине Интернета.
Как проверить ошибки валидации
Владельцы ресурсов используют 2 способа онлайн-проверки сайтов на наличие ошибок — технический аудит или использование валидаторов.
Первый случай подходит для серьёзных проблем и масштабных сайтов. Валидаторами же пользуются ежедневно. Наиболее популярный — сервис The W3C Markup Validation Service. Он сканирует сайт и сравнивает код на соответствие стандартам W3C. Валидатор выдаёт 2 типа несоответствий разметки стандартам W3C: предупреждения и ошибки.
Давайте рассмотрим каждый из типов чуть подробнее.
Предупреждения
Предупреждения отмечают незначительные проблемы, которые не влияют на работу ресурса. Они появляются из-за расхождений написания разметки со стандартами W3C.
Тем не менее, предупреждения всё равно нужно устранять, так как из-за них сайт может работать медленнее — например, по сравнению с конкурентами с такими же сайтами.
Примером предупреждения может быть указание на отсутствие тега alt у изображения.
Ошибки
Ошибки — это те проблемы, которые требуют обязательного устранения.
Они представляют угрозу для корректной работы сайта: например, из-за них могут скрываться разные блоки — текстовые, фото, видео. А в некоторых более запущенных случаях содержимое страницы может вовсе не отображаться, и сам ресурс не будет загружаться. Поэтому после проверки уделять внимание ошибкам с красными отметками нужно в первую очередь.
Распространённым примером ошибки может быть отсутствие тега <!DOCTYPE html> в начале страницы, который помогает информации преобразоваться в разметку.
Пример прохождения валидации для страницы сайта
Рассмотрим процесс валидации на примере сайта avavax.ru, который создали на WordPress.
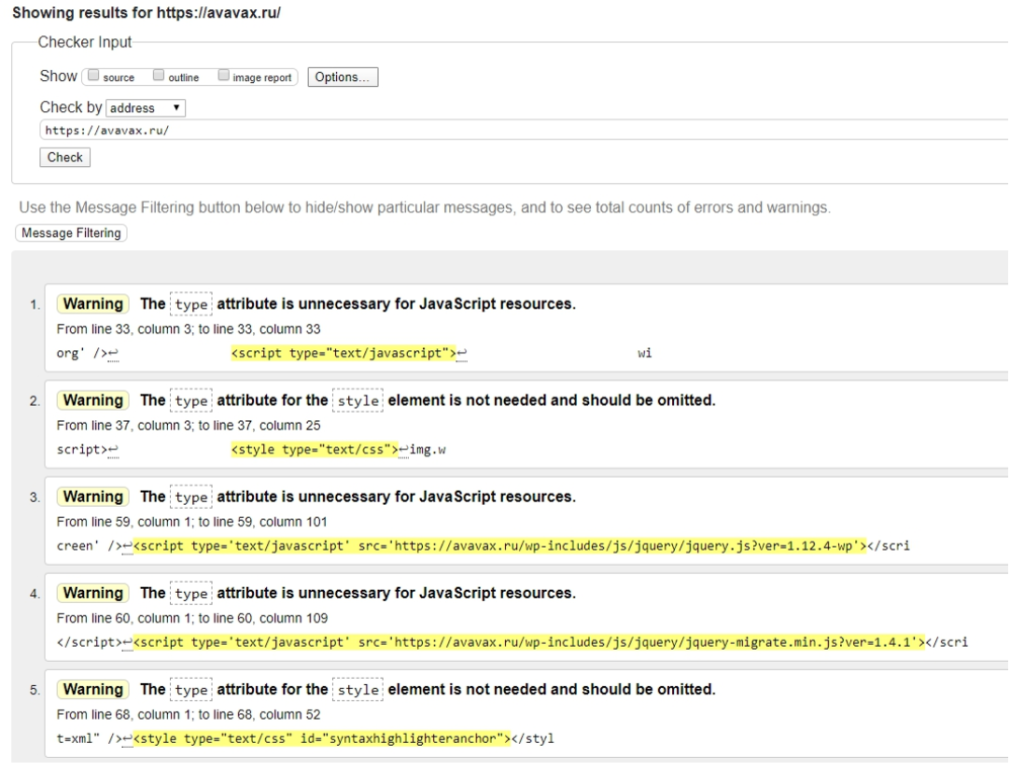
В результате проверки валидатор выдал 17 замечаний. После анализа отчета их можно свести к 3 основным:
- атрибут ‘text/javascript’ не требуется при подключении скрипта;
- атрибут ‘text/css’ не требуется при подключении стиля;
- у одного из элементов section нет внутри заголовка h1-h6.
Первое и второе замечания генерирует сам движок WordPress, поэтому разработчикам не нужно их убирать. Третье же замечание предполагает, что каждый блок текста должен иметь заголовок, даже если это не всегда необходимо или видно для читателя.
Решить проблемы с предупреждениями для стилей и скриптов можно через добавление кода в файл темы function.php.
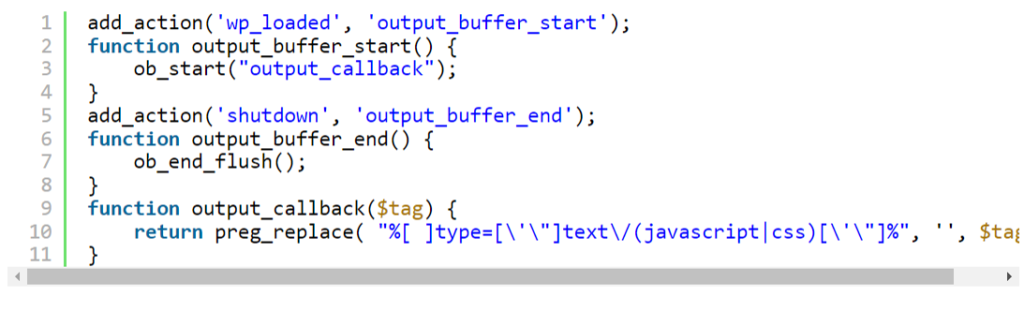
Для этого на хук wp_loaded нужно повесить функцию output_buffer_start(), которая загрузит весь генерируемый код html в буфер. При выводе в буфер вызывается функция output_callback($tag), которая просматривает все теги, находит нежелательные атрибуты с помощью регулярных выражений и заменяет их пробелами. Затем на хук ‘shutdown вешается функция output_buffer_end(), которая возвращает обработанное содержимое буфера.
Для исправления семантики на сайте нужно использовать заголовки. Валидатор выдаёт предупреждение на секцию about, которая содержит фото и краткий текст. Валидатор требует, чтобы в каждой секции был заголовок. Для исправления предупреждения нужно добавить заголовок, но сделать это так, чтобы его не было видно пользователям:
- Добавить заголовок в код: <h3>Обо мне</h3>
Отключить отображение заголовка:
1 #about h3 {
2 display: none;
3 }
После этой части заголовок будет в коде, но валидатор его увидит, а посетитель — нет.
За 3 действия удалось убрать все предупреждения, чтобы качество кода устроило валидатор. Это подтверждается зелёной строкой с надписью: “Document checking completed. No errors or warnings to show”.
Как исправить ошибку валидации
Всё зависит от того, какими техническими знаниями обладает владелец ресурса. Он может сделать это сам, вручную. Делать это нужно постепенно, разбирая ошибку за ошибкой. Но нужно понимать, что если при проверке валидатором было выявлено 100 проблем — все 100 нужно обязательно решить.
Поэтому если навыков и знаний не хватает, лучше привлечь сторонних специалистов для улучшения качества разметки. Это могут быть как фрилансеры, так и профессиональные веб-агентства. При выборе хорошего специалиста, результат будет гарантироваться в любом случае, но лучше, чтобы в договоре оказания услуг будут чётко прописаны цели проведения аудита и гарантии решения проблем с сайтом.
Если объём работ большой, выгоднее заказать профессиональный аудит сайта. С его помощью можно обнаружить разные виды ошибок, улучшить внешний вид и привлекательность интернет-ресурса для поисковых ботов, обычных пользователей, а также повысить скорость загрузки страниц, сделать качественную верстку и избавиться от переспама.
Плагины для браузеров, которые помогут найти ошибки в коде
Для поиска ошибок валидации можно использовать и встроенные в браузеры плагины. Они помогут быстро находить неточности еще на этапе создания кода.
Для каждого браузера есть свой адаптивный плагин:
- HTML Validator для браузера Firefox;
- HTML Validator for Chrome;
- HTML5 Editor для Opera.
С помощью этих инструментов можно не допускать проблем, которые помешают нормальному запуску сайта. Плагины помогут оценить качество внешней и внутренней оптимизации, контента и другие характеристики.
Коротко о главном
Валидация — процесс выявления проблем с HTML-разметкой сайта и ее соответствия стандартам W3C. Это унифицированные правила, с помощью которых сайт может нормально работать и отображаться и для поисковых роботов, и для пользователей.
Проверку ресурса можно проводить тремя путями: валидаторами, специалистам полномасштабного аудита и плагинами в браузере. В большинстве случаев валидатор — самое удобное и быстрое решение для поиска проблем. С его помощью можно выявить 2 типа проблем с разметкой — предупреждения и ошибки.
Работать необходимо сразу с двумя типами ошибок. Даже если предупреждение не приведет к неисправности сайта, оставлять без внимания проблемные блоки нельзя, так как это снизит привлекательность ресурса в глазах пользователя. Ошибки же могут привести к невозможности отображения блоков на сайте, понижению сайта в поисковой выдаче или полному игнорированию ресурса со стороны поискового бота.
Даже у крупных сайтов с миллионной аудиторией, например, Яндекс.Дзен или ВКонтакте, есть проблемы с кодом. Но комплексный подход к решению проблем помогает устранять серьёзные моменты своевременно. Нужно развивать сайт всесторонне, чтобы получить результат от его существования и поддержки. Если самостоятельно разобраться с проблемами не получается, не стоит “доламывать” — лучше обратиться за помощью к профессионалам, например, агентствам по веб-аудиту.