Содержание
- Проблемы с прошивкой тв приставок на компьютерах с Windows 10
- SlimBOX TV
- Инструкция по установке прошивки через USB Burning Tool
- USB Burning Tool 3.1.0 для прошивки Android через ПК
- Описание и возможности
- Как пользоваться
- Загрузка и установка
- Инструкция по работе
- Достоинства и недостатки
- Похожие приложения
- Системные требования
- Скачать
- Видеообзор
- Вопросы и ответы
- Категории Блога
- Руководство по обновлению прошивки для Amlogic устройств
Проблемы с прошивкой тв приставок на компьютерах с Windows 10
![]() Возможно, многие столкнулись с проблемой перепрошивки андроид тв приставки на компьютере Windows 10 с последним обновлением. Сложности возникают из-за того, что компьютер не видит тв приставку, точнее для данного устройства нет драйвера. В некоторых случаях с тв боксами на Amlogic проблему можно решить переустановкой программы USB Burning Tool на более новую версию, которая обновит драйвер. Но есть варианты когда драйвера необходимо устанавливать вручную. Кстати, данный вопрос также касается прошивки мобильных телефонов и планшетов.
Возможно, многие столкнулись с проблемой перепрошивки андроид тв приставки на компьютере Windows 10 с последним обновлением. Сложности возникают из-за того, что компьютер не видит тв приставку, точнее для данного устройства нет драйвера. В некоторых случаях с тв боксами на Amlogic проблему можно решить переустановкой программы USB Burning Tool на более новую версию, которая обновит драйвер. Но есть варианты когда драйвера необходимо устанавливать вручную. Кстати, данный вопрос также касается прошивки мобильных телефонов и планшетов.
В некоторых случаях установка драйверов может привести к нестабильной работе USB портов или же они вовсе перестанут работать. С такими случаями сталкивались мы и наши клиенты. При этом проблемы с USB портами после перепрошивки на компьютере андроид тв приставки может проявится не сразу, а через некоторое время. Чтобы избежать проблемы лучше менять прошивку на ПК с Windows 7 или 8.1.
Что делать если USB порты перестали работать?
Может быть такая ситуация когда после перезагрузки компьютера мышка и прочая периферия, подключенная к компьютеру через USB перестала работать и вы ничего не можете сделать. В данном случае можно быстро решить проблему, не обращаясь в сервисный центр. В первую очередь проверьте есть ли на вашем компьютере порт PS/2. Если есть, то нужно отключить компьютер от сети и подключить мышь с разъемом PS/2, возможно, у вас такой манипулятор сохранился от старого ПК. Далее вам необходимо сделать восстановление системы с последней контрольной точки. После восстановления USB порты будут работать без ошибок.
![]()
![]()
![]()
![]()
![]() (2 оценок, среднее: 4,50 из 5)
(2 оценок, среднее: 4,50 из 5)
SlimBOX TV
Прошивки, программы для ТВ боксов и стиков

1. Вам необходимо скачать архив с прошивкой. Необходимо удостовериться, что скачанная прошивка подходит для вашего устройства, иначе обновление прошивки может привести к опасным последствиям.
2. Распакуйте 7z-архив. В полученной директории вы можете найти файл прошивки “img” .
3. Установите USB_Burning_Tool. Во время установки, вы должны позволить установить дополнительные драйвера для Amlogic устройств.
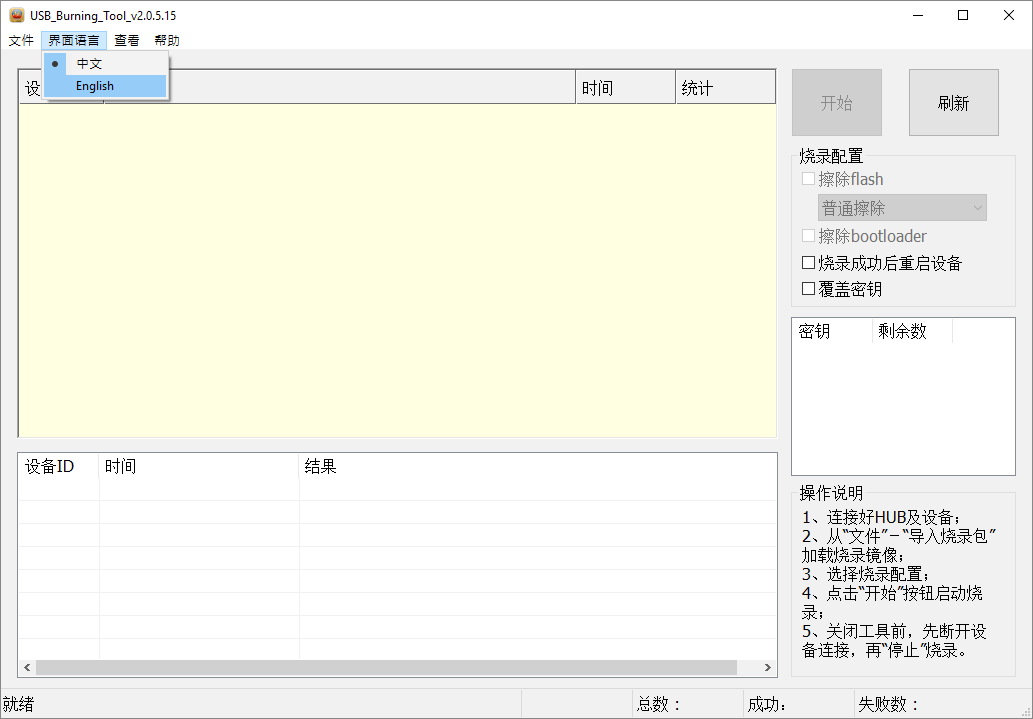
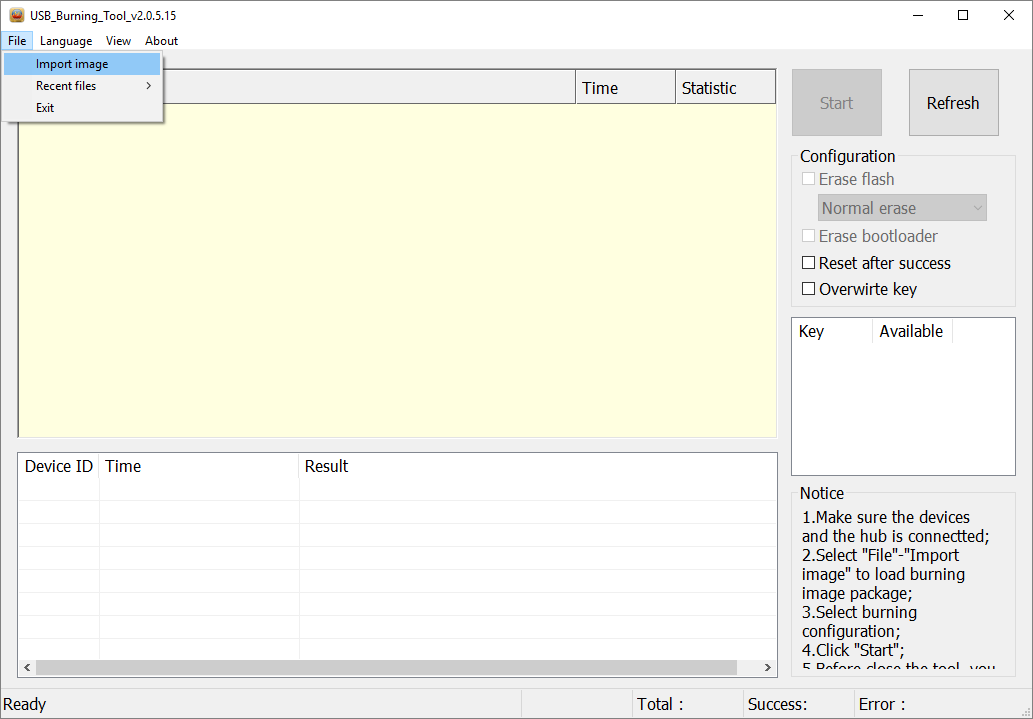
4. Запустите программу и измените в меню язык на Английский

5. Откройте файл прошивки (File-Import Image) и нажмите «start».

5.1. Дополнительно для шифрованных приставок добавляем password.bin

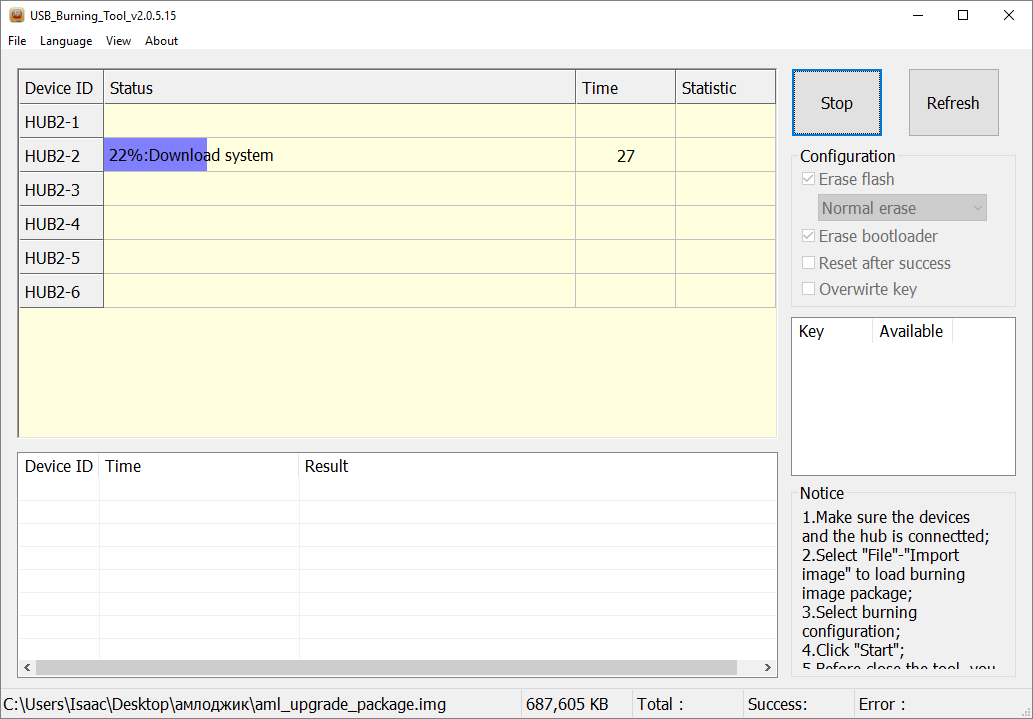
6. Подключите устройство к компьютеру через OTG USB кабель. Устройство включится автоматически.
7. Когда компьютер обнаружит устройство, перепрошивка начнется автоматически. Если этого не произошло, проверьте установлены ли драйвера amlogic в диспетчере устройств и повторите их установку.

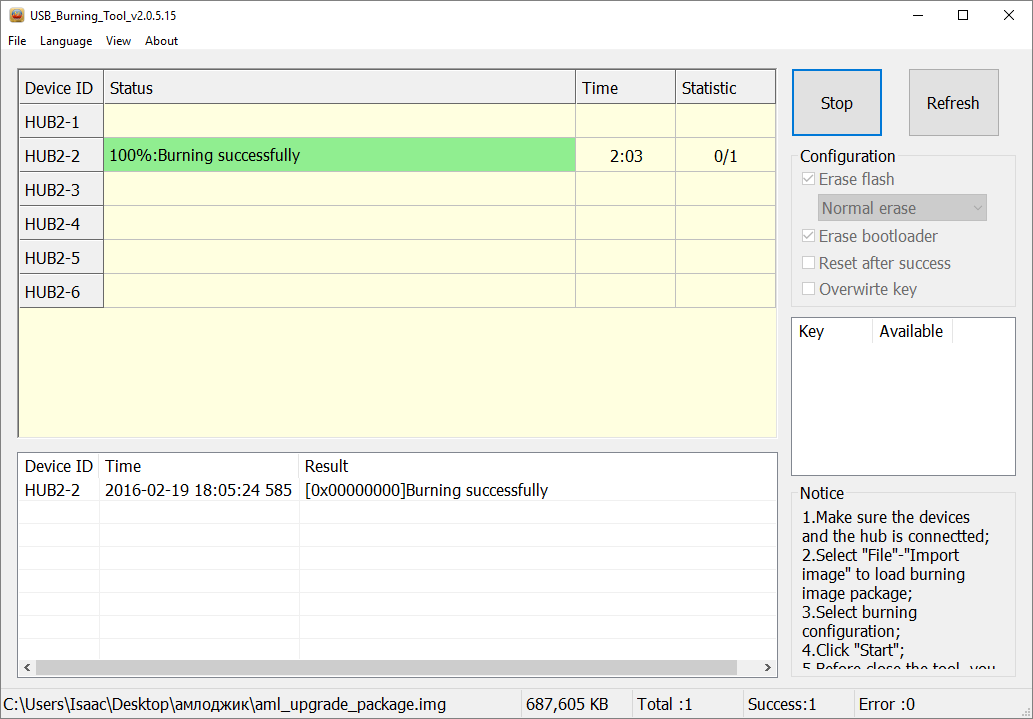
8. После перепрошивки устройства вы увидите сообщение “result: burning successful”, после чего нажмите «stop».

Американская технологическая компания Amlogic Inc славится своими Смарт и ТВ приставками на системе Android. Если вы хотите прошить такое устройство, поможет в этом специальное программное обеспечение. На нашем портале можно бесплатно скачать последнюю версию программы USB Burning Tool 3.1.0 для Windows 7, 8 или 10 с разрядностью 32/64 Bit. Утилита предназначена для прошивки Андроид через ПК, впрочем, давайте обо всем по порядку.
Описание и возможности
Софт, о котором пойдет речь в данном обзоре, широко применяется для прошивки устройств, работающих на базе процессора Amlogic. Главное условие для того, чтобы прошить приставку, наличие USB-порта. Сразу отметим, что не все ТВ-боксы обладают последним. Если с этим проблем нет, можно пробовать. Прошивку для той или иной модели можно найти в интернете на соответствующих ресурсах или на официальном сайте разработчика. К ключевым особенностям программы можно отнести:
- Работает с прошивками, записанными в виде файла IMG.
- Поддерживает устройства, работающие на базе процессоров Amlogic.
- Для прошивки необходим USB-кабель.
- Обновление утилиты производится в автоматическом режиме.
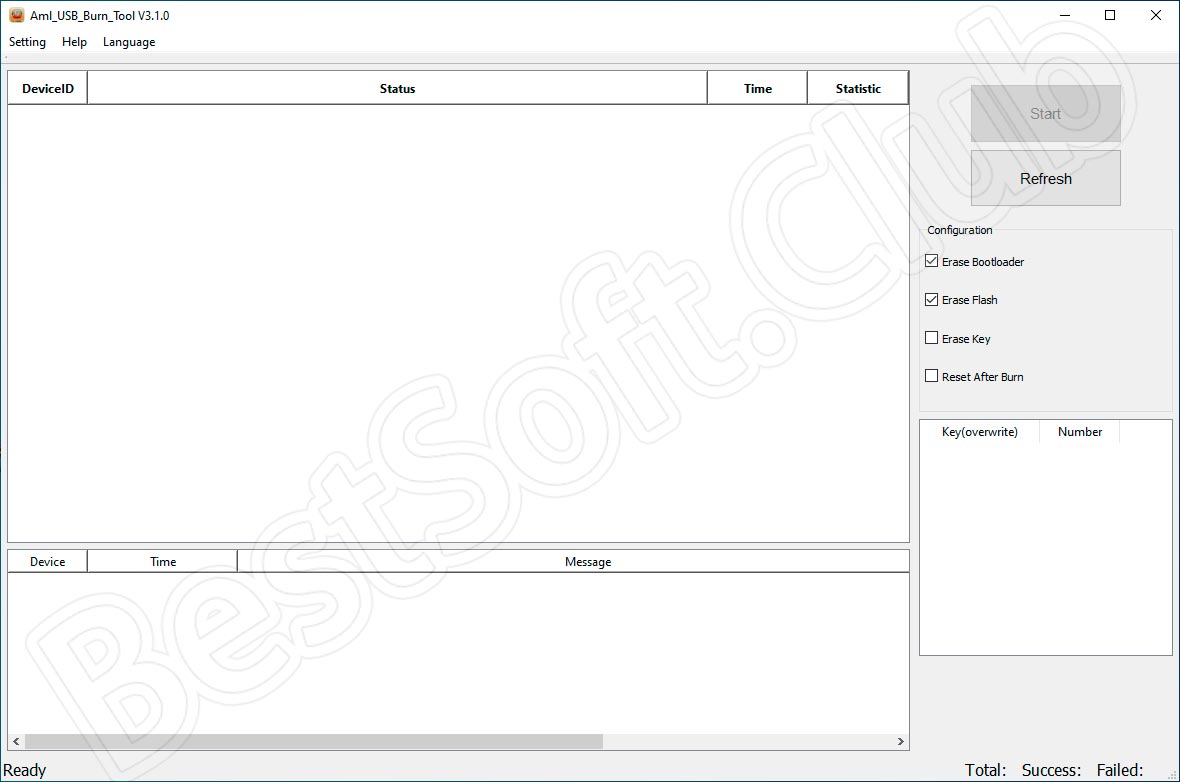
По отзывам пользователей, работает программа очень нестабильно и часто не видит подключенное к ней устройство.
Как пользоваться
С предназначением приложения мы немного разобрались, поэтому самое время перейти к следующему вопросу и узнать, как загрузить его на ПК или ноутбук. Подробная инструкция на эту тему находится немного ниже.
Загрузка и установка
Для получения программы с официального сайта необходимо выполнить несколько максимально простых шагов. Переходим к делу:
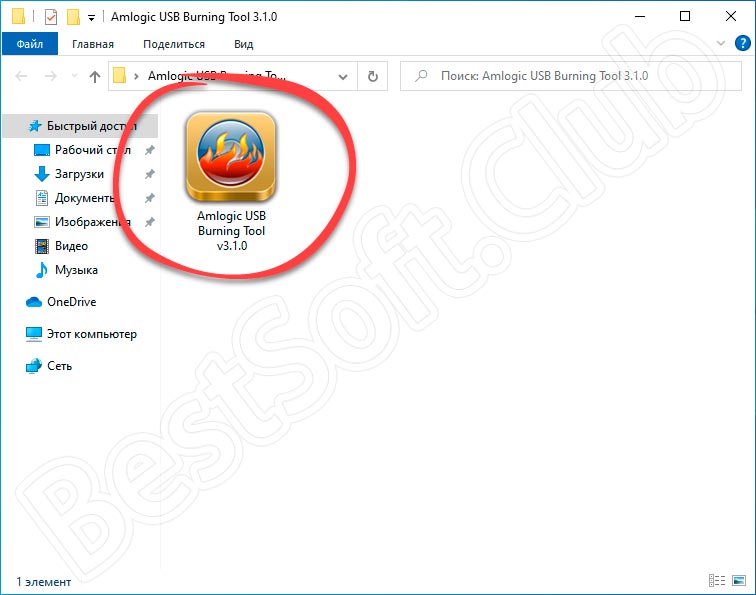
- Для начала загрузим установочный дистрибутив по ссылке, расположенной в разделе скачивания. После распаковки полученного архива запускаем инсталляцию при помощи файла, обозначенного на скриншоте ниже.
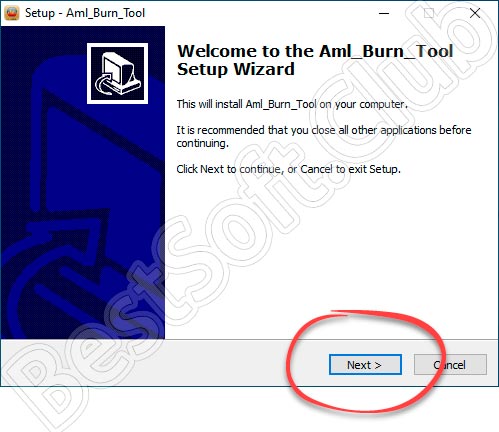
- В следующем окошке просто переходим далее, кликнув по кнопке «Next».
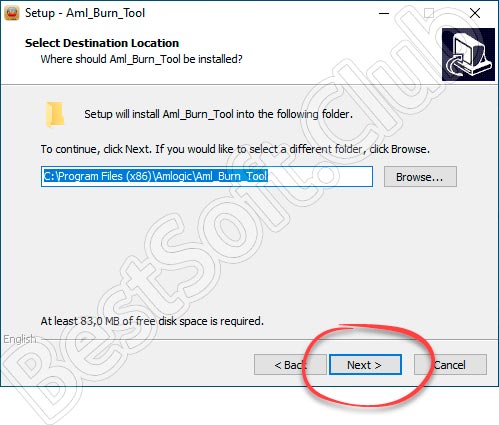
- Меняем путь установки приложения. Если все устраивает, просто кликаем по обозначенной на скриншоте кнопке.
- Если нужно, создаем ярлык на рабочем столе, отметив галочкой соответствующую строку.
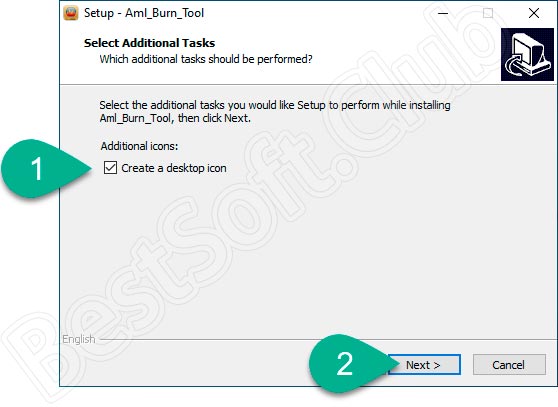
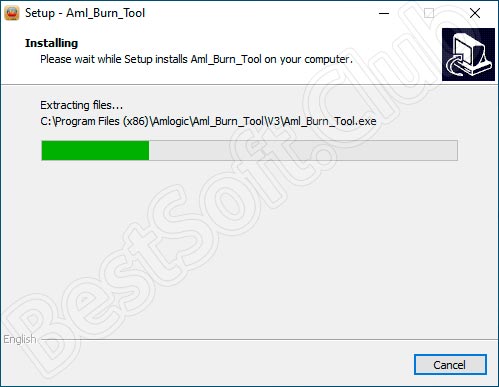
- Ждем несколько секунд, пока процесс инсталляции будет завершен.
- Кликаем по «Finish», чтобы закончить установку утилиты.
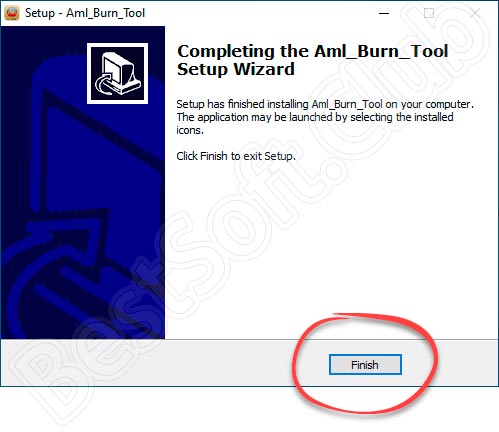
Программа готова к работе. Немного ниже мы рассмотрим, как пользоваться инструментом для прошивки ТВ-приставок.
Инструкция по работе
На русском языке USB Burning Tool пока нет. Несмотря на это, разобраться с использованием инструмента будет несложно. Ниже приведен краткий алгоритм работы:
- Запускаем нашу программу на ПК.
- Переходим в опции и кликаем по «File», а потом по «Import image».
- В открывшемся окошке выбираем прошивку, загруженную ранее. После этого произойдет ее импорт.

Для предупреждения неприятностей во время работы рекомендуем найти в сети инструкцию по прошивке от официального производителя именно вашего устройства.
Достоинства и недостатки
Движемся далее и переходим к рассмотрению плюсов и минусов описываемого программного обеспечения.
- Быстрая и простая инсталляция.
- Невысокие требования к компьютеру.
- Официальная поддержка программы от разработчиков.
- Простота в применении.
- Совместимость со всеми версиями Windows.
- Быстрая работа.
- Бесплатное распространение.
- Довольно сложно выставить опции приложения.
- Англоязычный интерфейс.
- Часто выдает ошибку «Key file configurate wrong USB Burning Tool».
Похожие приложения
К аналогичным инструментам можно отнести, например, приложение RockChip Batch Tool. Будьте внимательны при использовании подобных решений. При неаккуратном обращении с устройством можно навсегда вывести его из строя.
Системные требования
Софт вполне комфортно будет работать при наличии таких системных характеристик:
- Центральный процессор: от 1 ГГц и выше.
- Оперативная память: от 512 МБ.
- Пространство на жестком диске: начиная от 50 Мб и выше.
- Платформа: Microsoft Windows 32/64 Bit.
Скачать
Читаем дополнительную информацию об утилите в табличке, а сразу после этого приступаем к ее загрузке и установке.
| Версия: | 3.1.0 |
| Разработчик: | Amlogic |
| Информация обновлена и актуальна на: | 2021 год |
| Название: | USB Burning Tool |
| Платформа: | Microsoft Windows XP, 7, 8 или 10 |
| Язык: | Английский |
| Лицензия: | Бесплатно |
| Пароль к архиву: | bestsoft.club |
Видеообзор
Советуем просмотреть этот ролик, который поможет лучше разобраться с данной темой.
Вопросы и ответы
Надеемся, наша инструкция была полезной для вас. Пишите комментарии и задавайте вопросы, если в этом появится необходимость.
Категории Блога
Руководство по обновлению прошивки для Amlogic устройств
Руководство по обновлению прошивки поможет вам перепрошить устройство на базе сокета S905 S805
ПРЕЖДЕ ЧЕМ НАЧАТЬ
Что вам понадобится:
- Файл образа
- Компьютер
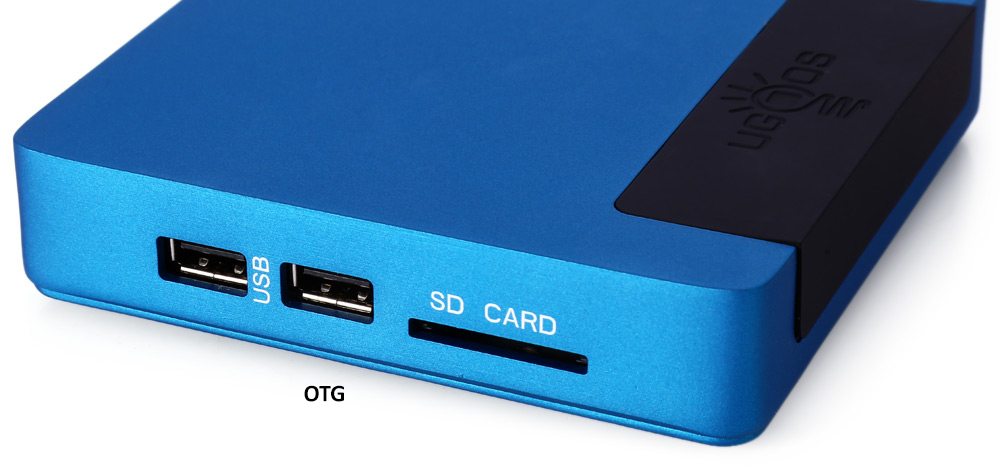
- USB OTG кабель
- Windows XP (32/64bit)
- Windows 7 (32/64bit)
- Windows 8 (32/64bit)
- Windows 10 (32/64bit)
Если вы скачали zip-архив с OTA прошивкой, есть два способа как обновить ваше устройство: через Android (ниже показано как это сделать) или через меню восстановления.
Если вы скачали полную прошивку (zip-архив включающий в себя img файл, это руководство и программу USB Burning Tool) пожалуйста прочитайте следующие инструкции.
USB Burning Tool – это общая программа для обновления прошивки всех Amlogic устройств
1. Вам необходимо скачать архив с прошивкой. Необходимо удостовериться, что скачанная прошивка подходит для вашего устройства, иначе обновление прошивки может привести к опасным последствиям.
2. Распакуйте zip-архив. В полученной директории вы можете найти файл прошивки “img” и USB_Burning_Tool _v2.0.5.15.
3. Установите USB_Burning_Tool _v2.0.5.15. Во время установки, вы должны позволить установить дополнительные драйвера для Amlogic устройств.
4. Запустите программу и измените в меню язык на Английский
5. Откройте файл прошивки (File-Import Image) и нажмите «start».
6. Подключите устройство к компьютеру через OTG USB кабель. Устройство включится автоматически.
7. Когда компьютер обнаружит устройство, перепрошивка начнется автоматически. Если этого не произошло, проверьте установлены ли драйвера amlogic в диспетчере устройств и повторите их установку.
8. После перепрошивки устройства вы увидите сообщение “result: burning successful”, после чего нажмите «stop».
9. Отключите устройство от компьютера.
OTA ОБНОВЛЕНИЕ ПРОШИВКИ (может отличаться на НЕ Ugoos устройствах)
Установка прошивки из Android:
1. Скачайте архив с прошивкой в формате zip. Расположите скачанный файл на флеш карте или USB носителе. Подключите sd/usb карту в устройство.
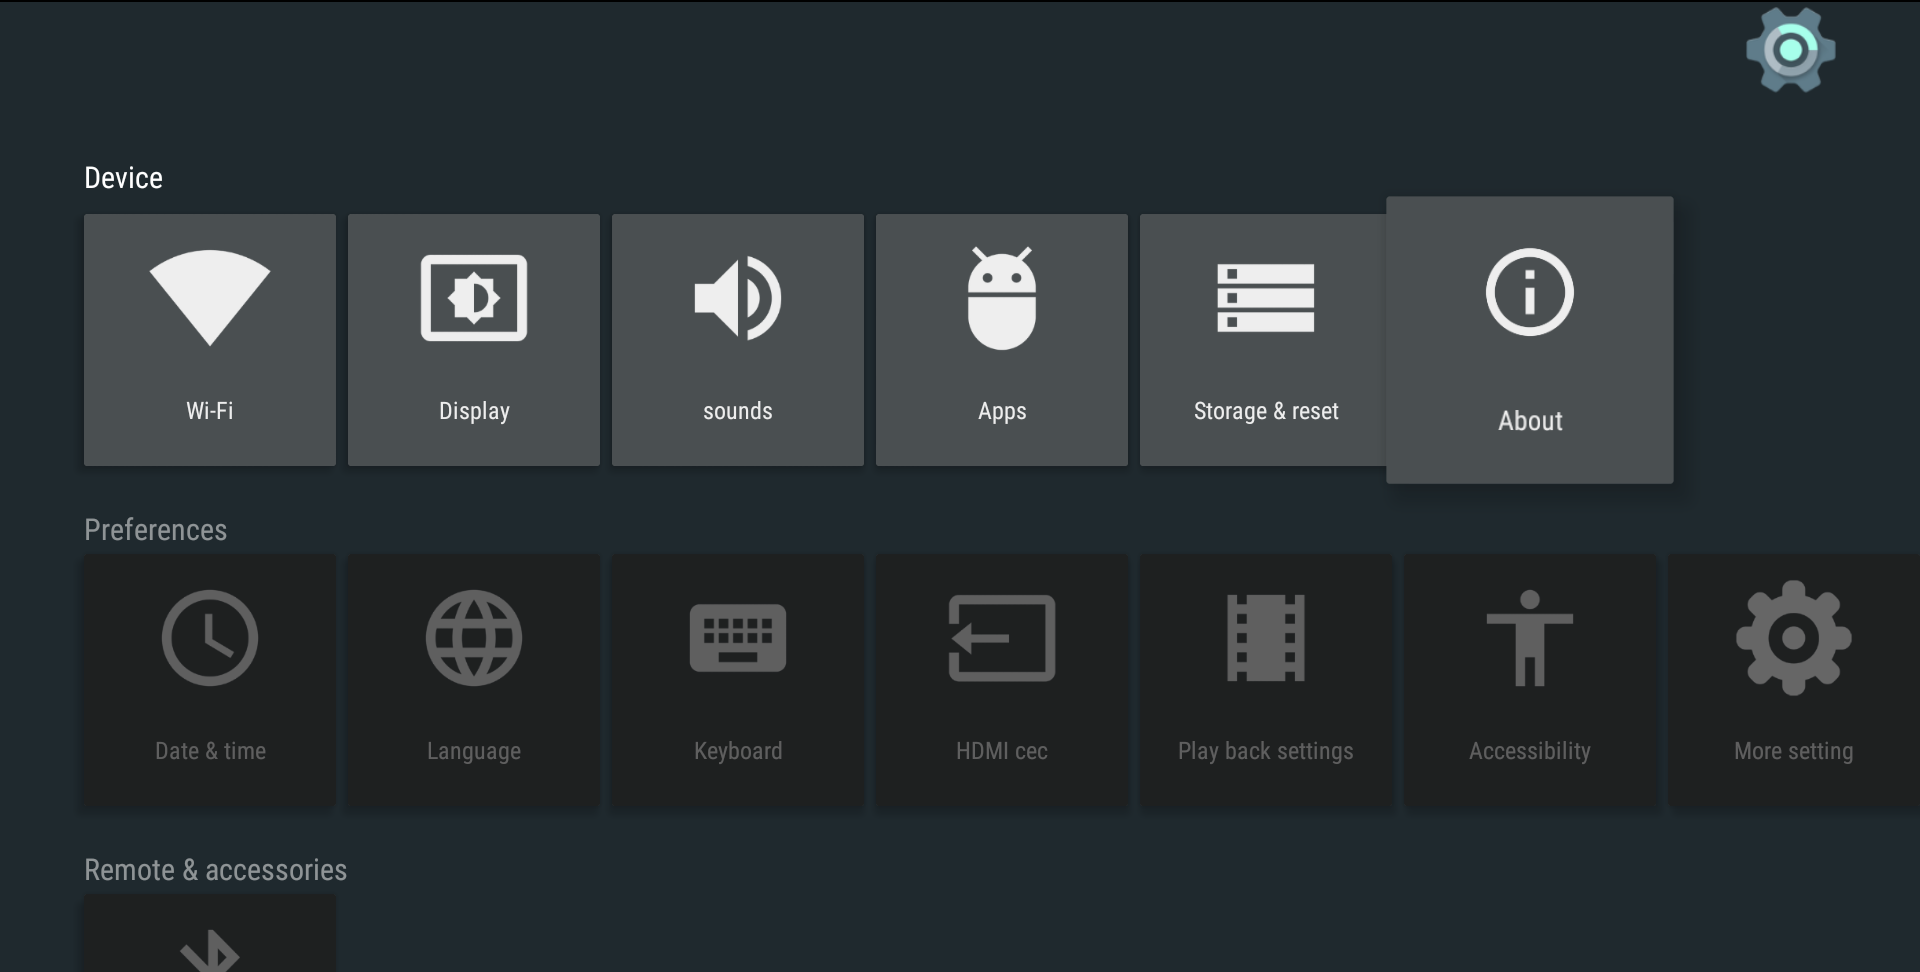
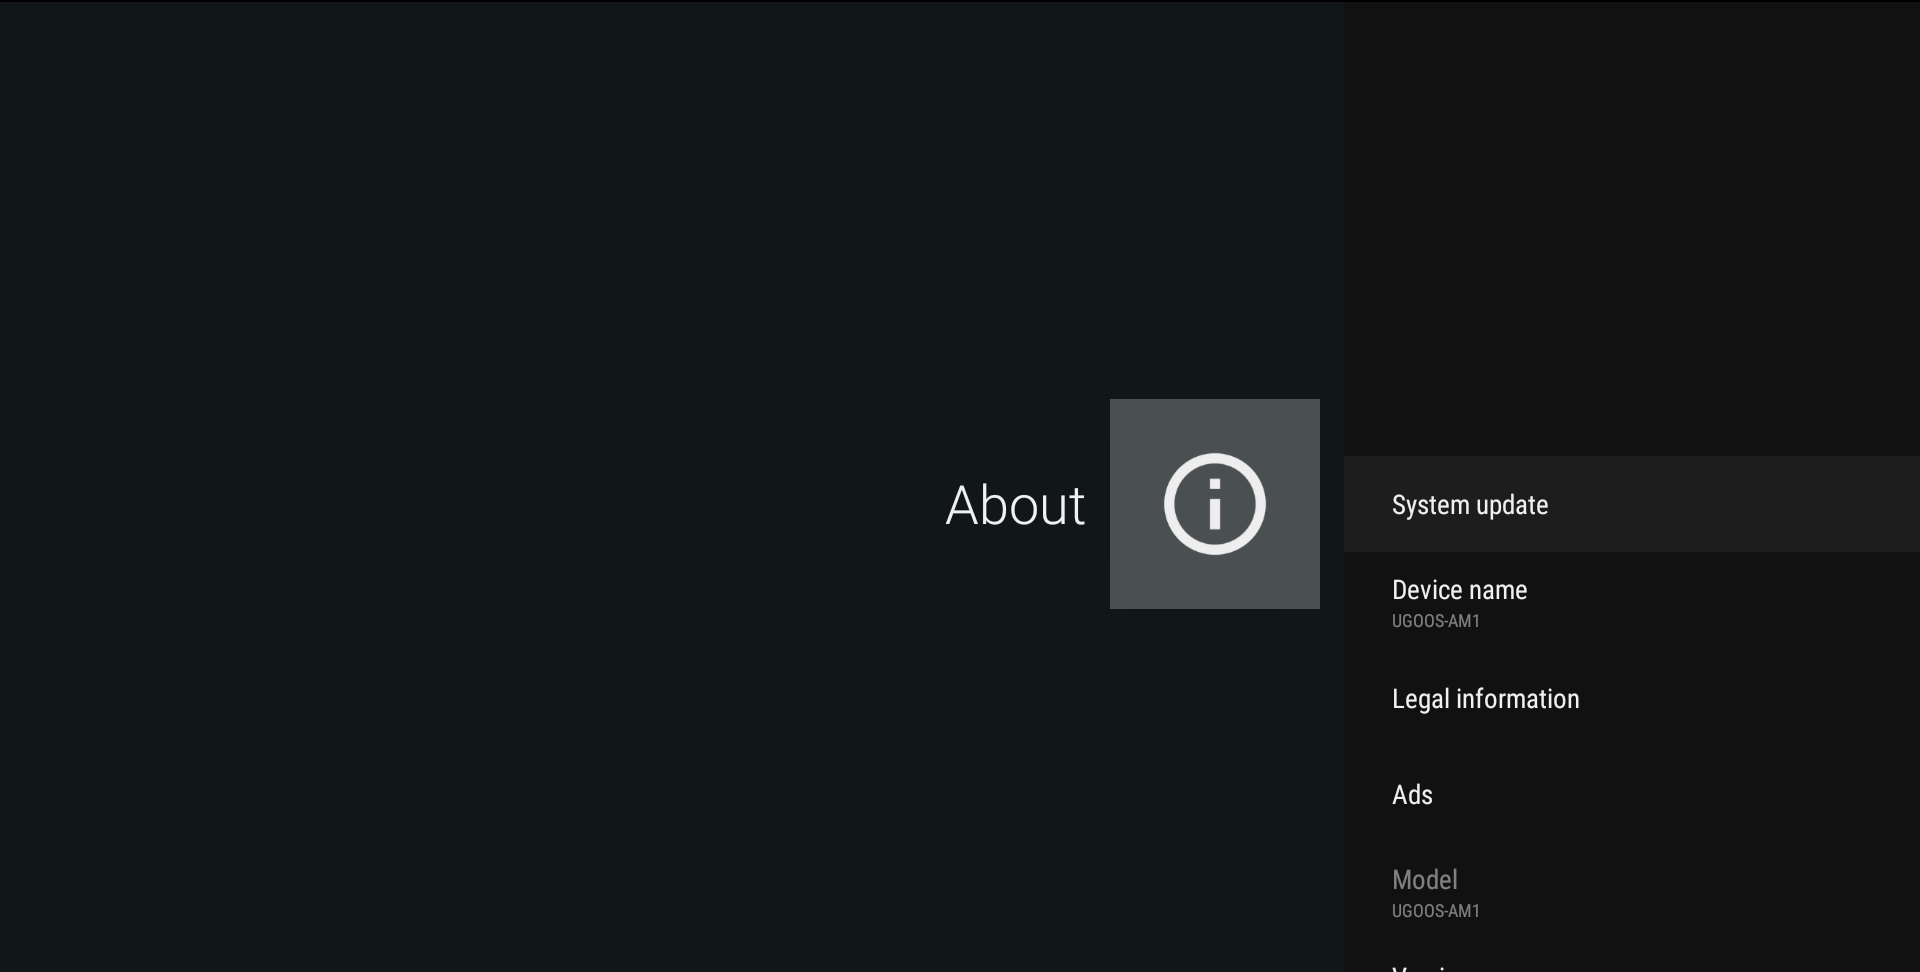
2. Запустите устройство, запустите меню настроек, затем выберите меню «Об устройстве»:
3. Запустите обновление системы:
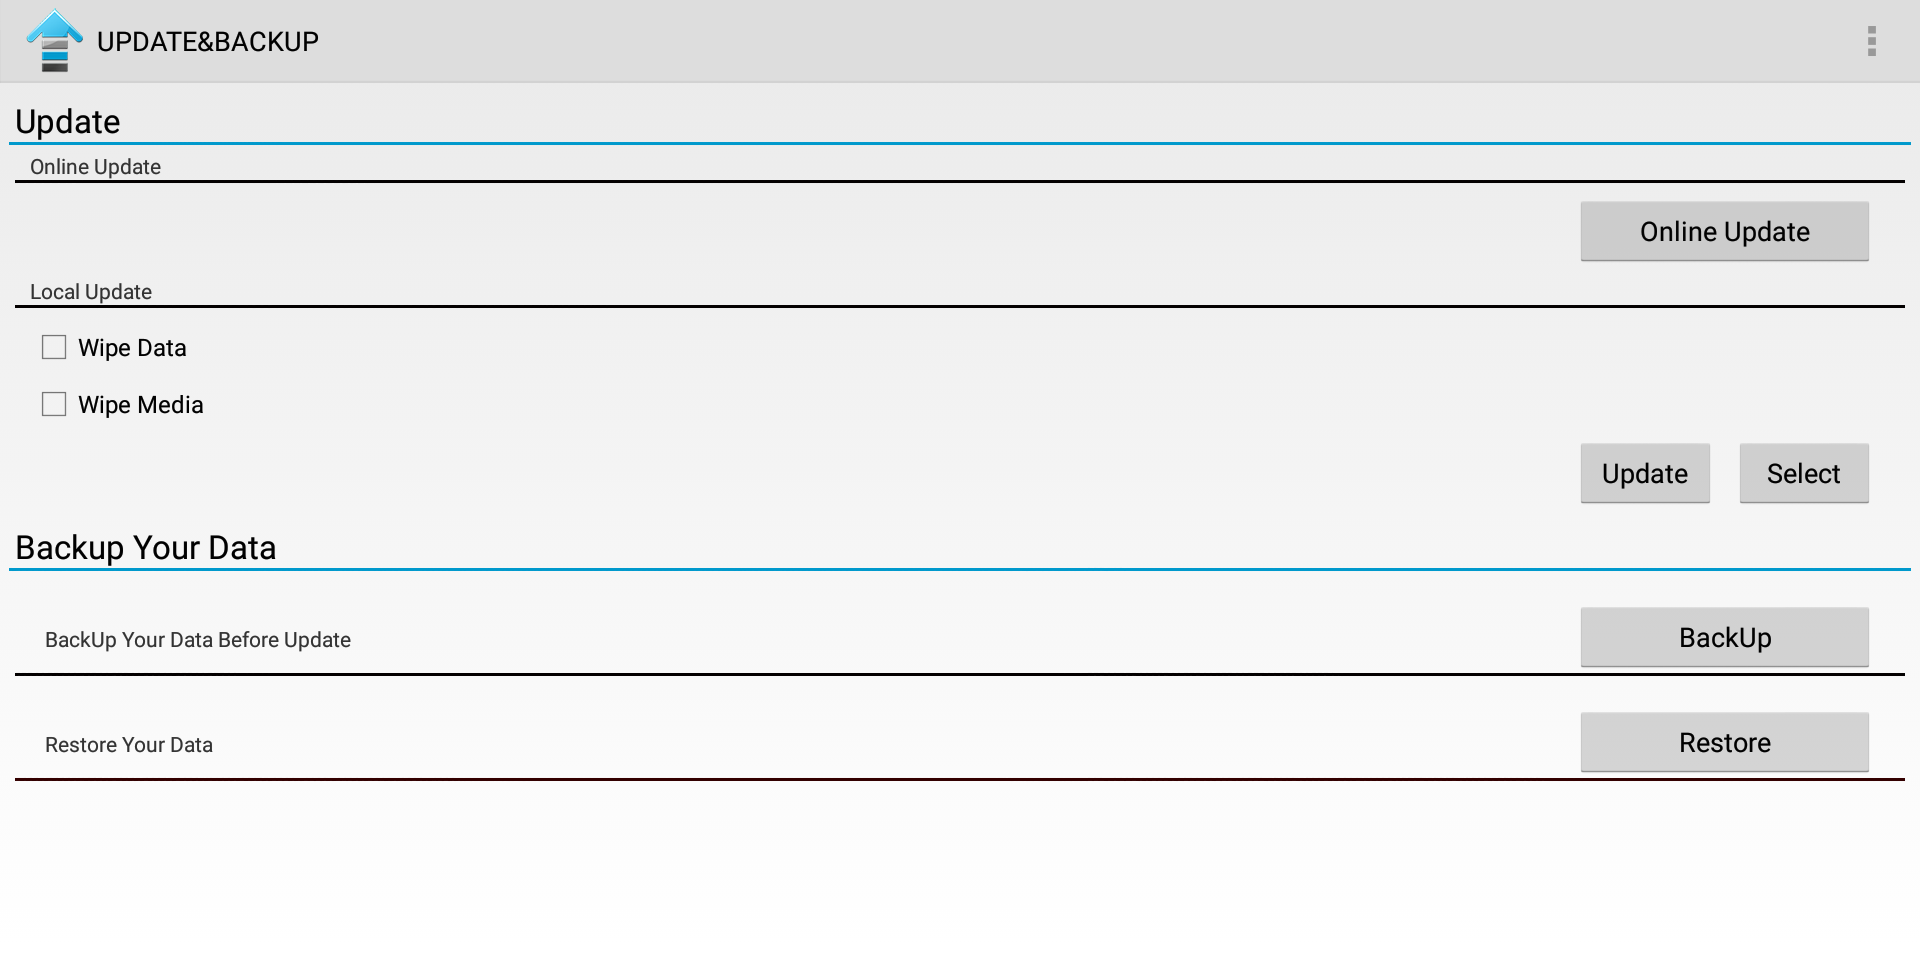
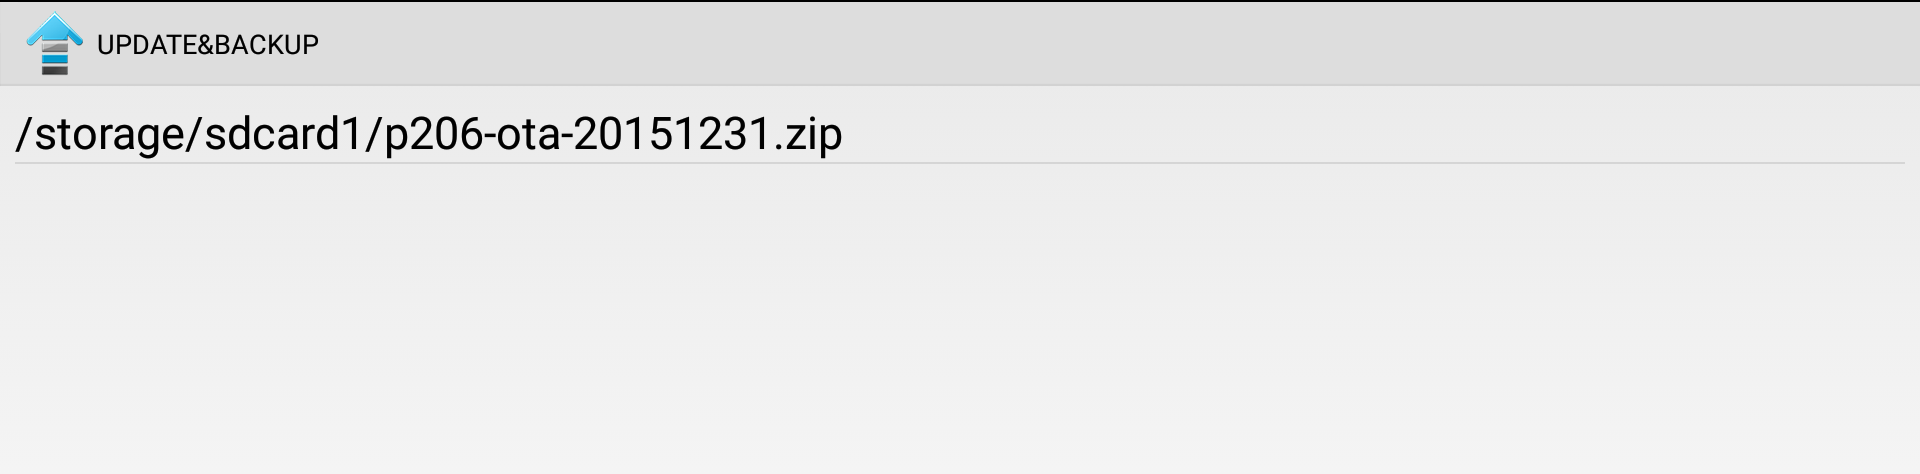
4. В меню “Local update” нажмите кнопку “select” и выберите zip файл обновления:
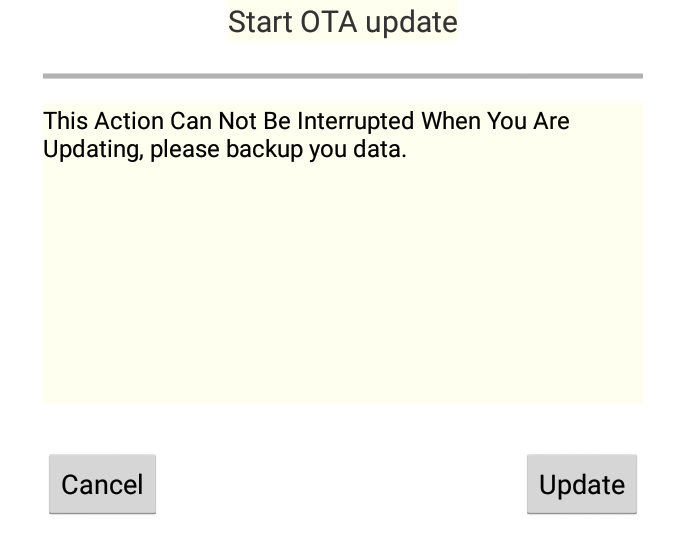
5. Затем нажмите кнопку update: устройство перезагрузится и начнется установка прошивки. Не выключайте питание устройства пока идет процесс установки.
Перепрошивка из меню восстановления:
1. Вставьте usb носитель с OTA обновлением в бокс
2. Зажмите кнопку recovery и включите устройство
3. В меню восстановления выберите пункт “update from ext”
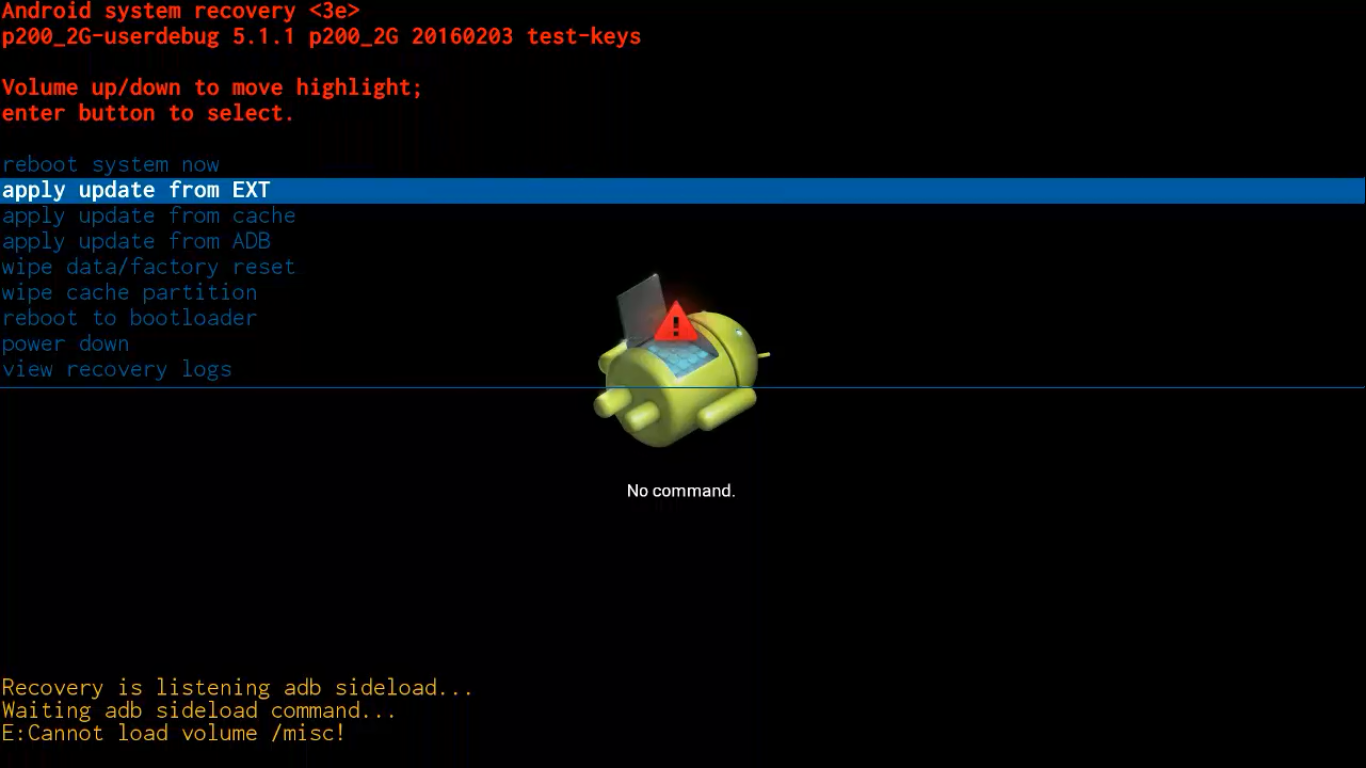
4. Система предложит вам выбрать sd карту или usb носитель. Вы должны выбрать udisk.
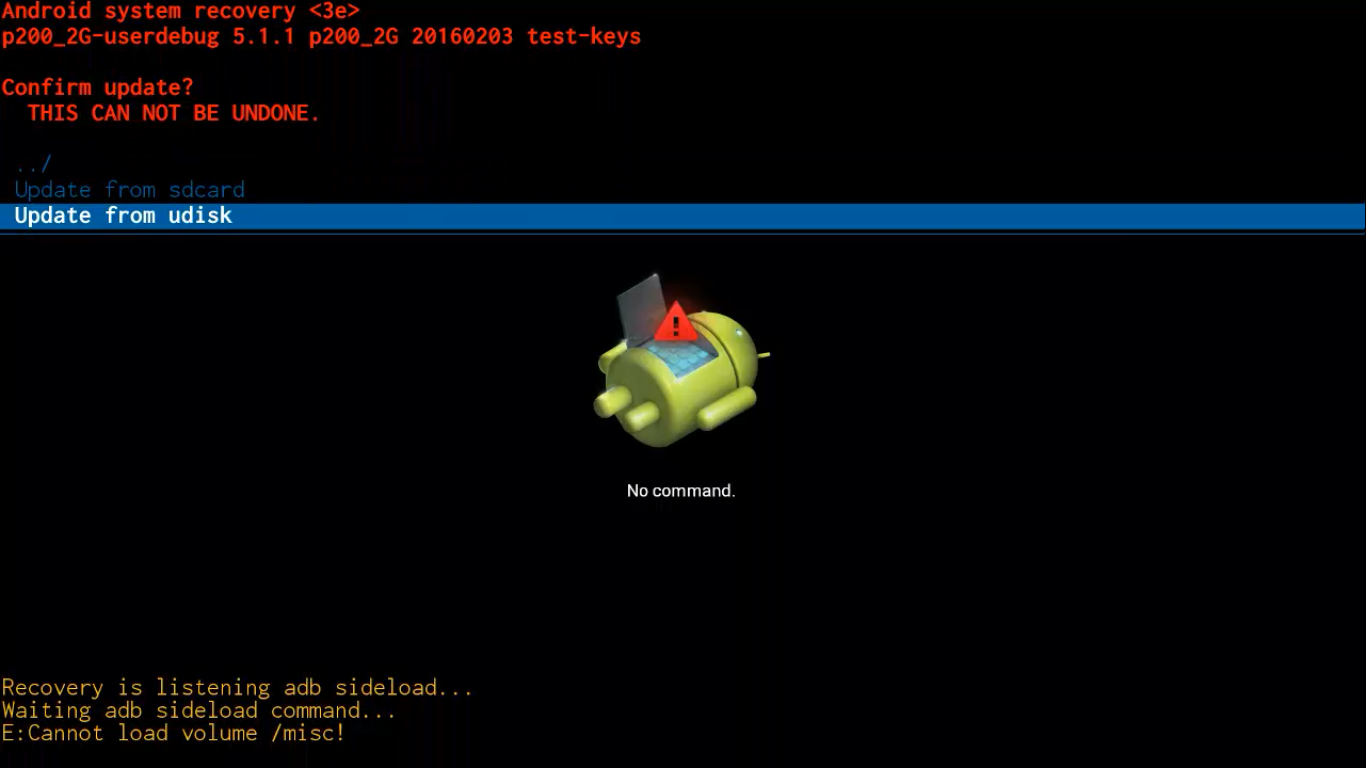
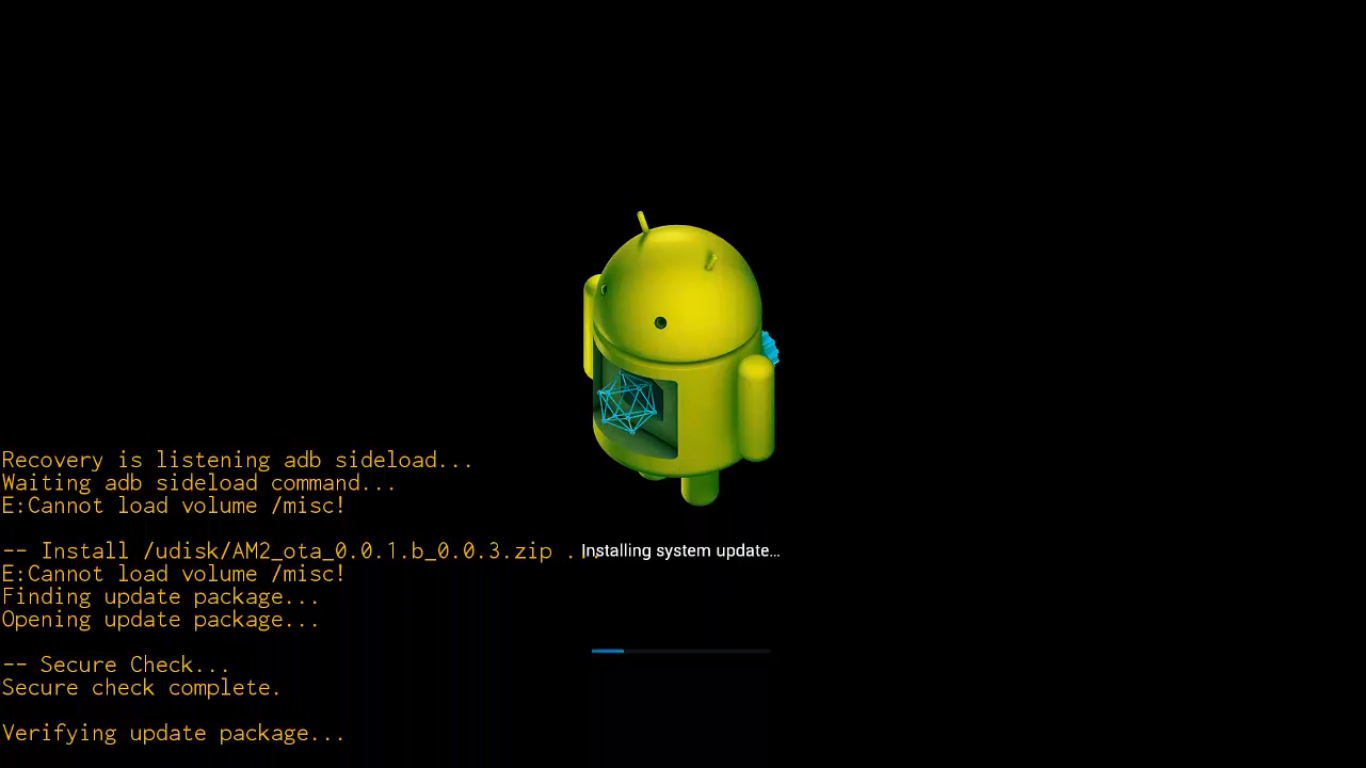
5. Затем выберите zip файл обновления предварительно записанный на usb носитель и система начнет процесс загрузки, проверит и установит прошивку.
OTG usb порты на Amlogic устройствах Ugoos:
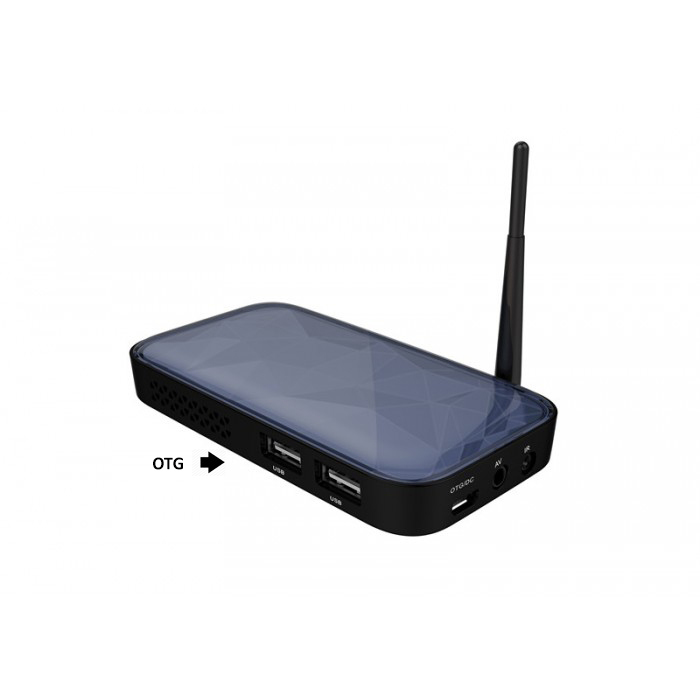
Если ваше устройство превратилось в «кирпич» (легкий кирпич):
Самый простой способ решить эту проблему, без необходимости перемыкать контакты чипа NAND, это использовать программу Amlogic Bootcard Maker для создания загрузочной micro SD карты со стоковой прошивкой вашего устройства.
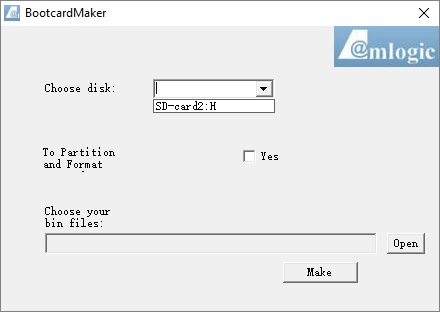
Всего лишь загрузите образ прошивки на (Micro) SD карту и вставьте ее в ваше устройство.
При загрузке вы попадете в меню восстановления и прошивка начнет устанавливаться автоматически. Когда ТВ бокс перезагрузится, извлеките micro SD карту, этот шаг очень важен, подождите 4-5 минут и обновление завершится.
Содержание
- atvXperience : The Forum
- [HELP] h96 pro+ How to solve Romcode/Initialize DDR/Read initialize status.
- atvXperience : The Forum
- [INSTALL] Common USB Burning Tool Errors and Fixes
- Announcement
- USB Burning Tool errors
- USB Burning Tool errors
- Comment
- Comment
- Comment
- Comment
- Comment
- Comment
- Comment
- Comment
- Comment
- Romcode Initialize/USB Control Setup Error
- Attachments
- Villa
- Announcement
- USB Burning Tool problem
- USB Burning Tool problem
- Comment
- Comment
atvXperience : The Forum
One of the Biggest Android TV Box Forums on the internet!
[HELP] h96 pro+ How to solve Romcode/Initialize DDR/Read initialize status.
I’m trying to recover my tv box, but whenever I try, the same error appears.
[Romcode / Initialize DDR / Read initialize status / USB Control setup error]
I tried some roms from atvxperience but they all return the same problem, at 2% for and return the mentioned error. 
My Tv Box (h96 pro + (s32-v6 lpddr3)), can someone help me?


Try one of these versions for LPDDR3:

Put your device in MASK Rom mode by shortening the pins on NAND chip and flash good working stock ROM or atvX LPDDR3 image from post above.
em3ka wrote: ↑ Mon May 25, 2020 11:19 am Put your device in MASK Rom mode by shortening the pins on NAND chip and flash good working stock ROM or atvX LPDDR3 image from post above.
em3ka wrote: ↑ Mon May 25, 2020 11:19 am Put your device in MASK Rom mode by shortening the pins on NAND chip and flash good working stock ROM or atvX LPDDR3 image from post above.
I’m having the same problem..
do I have to pinch those 2 pins and keep pinching them while I’m connecting the USB cable to my box and then press the Start button on the program ( USB burning tool ) or I have to keep pinching the pins even after I click the start button .
also please give me the URL link for the correct firmware for my box ..because when I download the ones in the google drive that you added, the USB burning tool is giving me this message (( Parse burning image fail )) .
it’s like the USB burning tool is not accepting that image file.
Источник
atvXperience : The Forum
One of the Biggest Android TV Box Forums on the internet!
So, having problems with usb burning tool?
Well, here’s how you do it. Don’t forget to reply to this topic if you want to add anything.
1. Don’t forget to plug in power cable if you get lowper error.
2. If your device isn’t getting detected, even after pushing the reset button, try shorting nand pins. You can find a video tutorial on mxq project YouTube channel.
3. DDR Error? Tried using different ddr version atvX? DDR3, DDR4, LPDDR to name a few.
4. Flashed but not working? Try flashing again, or a different image. Still getting a black screen?
a) If you see the bootlogo but not the UI after booting, try atvx on a 1080p tv.
b) If you don’t see anything at all, the device is incompatible, Sorry
5. 7% Uboot error? Try another image or version. Chances are, your box uses a modded uboot which doesn’t accept other original uboot partitions. Fix? Point 6.
6. 2GB/3GB RAM but after flashing it’s 1GB/2GB? You’ve got a fake box. Your uboot was modified to read wrong dtb header to show more RAM than the actual physical one(maybe). The only way to fix(fake your ram) this is unpacking atvx and your stock rom to level 1 with Ricky’s customization tool and replacing your stock’s system, boot, recovery and bootloader partitions with atvx’s and re-packing.
Источник
Announcement
![]()
I have been using USB burning tool v2.0.6.2 to update my OTT MXQ Pro 4K box a couple of times but recently I have been getting these errors below and have not been able to flash the firmware:
— Romcode/Initialize DDR/Initialize PLL/USB Control setup error
— Erase bootloader/Lowper/Identify/ Error result
I have tried using a few other PCs with USB 2 ports but were getting the same errors and I only managed to erase the bootloader once.
Can any one help?
![]()
I had the same problem, but ended up getting it to work by doing the following. Frustrated, I tried different versions of USB Burning tool with no success. The 2.0.5.15 works just fine. You click the middle (2nd) Chinese writing on the upper left corner and select «English.» Remember to open, load, start, then, connect.
1. Open the USB Burning Tool as an Administrator
2. Load the Firmware image file
3. Press «Start»
4. Connect your box via USB
How.did you load the license in the flastool i cant get i right
Sent from my SM-N9300 using Tapatalk
- Join Date: Jun 2014
- Posts: 6441
And were can i find the license it doent come with the rar compressed file
Sent from my SM-N9300 using Tapatalk
- Join Date: Jun 2014
- Posts: 6441
We have a bricked T95u Pro 3/32. USB burning tool now sees the box after a pin short. It goes to 7 percent and then errors out. Any help to get it running again would be greatly appreciated
this is the error we see
[10:12:07 517][Global][Inf]—DevPath:\?pci#ven_8086&dev_293c&subsys_02be1028& rev_03#3&11583659&0&d7#<3abf6f2d-71c4-462a-8a92-1e6861e6af27>
[10:12:07 517][Global][Inf]—->Roothub:USB#ROOT_HUB20#4&13e35410&0#
[10:12:07 589][Global][Inf]———>[Port0]NoDeviceConnected
[10:12:07 589][Global][Inf]———>[Port1]NoDeviceConnected
[10:12:07 589][Global][Inf]———>[Port2]NoDeviceConnected
[10:12:07 589][Global][Inf]———>[Port3]NoDeviceConnected
[10:12:07 589][Global][Inf]———>[Port4]NoDeviceConnected
[10:12:07 590][Global][Inf]———>[Port5]Other device
[10:12:07 590][Global][Inf]—Scan USB host controller complete
[10:12:07 591][Global][Inf]—Update data center with HubMap
[10:12:13 935][Global][Inf]—User click open button
[10:12:58 786][Global][Inf]—Image path C:UsersajcdnDownloadsT95UT95U_S912_03092017_A ndroidTVBox.euT95U_S912_03092017_AndroidTVBox.eu aml_upgrade_package.img
[10:13:22 934][Global][Inf]—Parsing burning package
[10:13:22 934][Global][Inf]—Load configuration file C:Program Files (x86)AmlogicUSB_Burning_Tooltemp
[10:13:22 935][Global][Inf]—Parse burning configuration file C:Program Files (x86)AmlogicUSB_Burning_Tooltempburn_config.xm l
[10:13:22 938][Global][Inf]—Get burning key
can you advise us please?
![]()
I had the same problem, but ended up getting it to work by doing the following. Frustrated, I tried different versions of USB Burning tool with no success. The 2.0.5.15 works just fine. You click the middle (2nd) Chinese writing on the upper left corner and select «English.» Remember to open, load, start, then, connect.
1. Open the USB Burning Tool as an Administrator
2. Load the Firmware image file
3. Press «Start»
4. Connect your box via USB
I have a Mecool M8s PRO L and i got this 2% error when i try to connect only with USB male to male to the pc:
«Romcode/Initialize DDR/Read initialize status/USB Control setup error»
Even if i try to short the reset pins out. Blue LED on the box stays allways on.
If i plug the power cable when we tries to pass the 2% error, we reaches 7% and the following error:
UBOOT/Disk initialize/Send command/Error result’
Источник
Romcode Initialize/USB Control Setup Error
Member
Hi Guys
I have this problem while flashing my U9H:
[12:11:25 210][HUB1-6][Inf]—2-2-0-0
[12:11:25 210][HUB1-6][Inf]—Control write pll reg1 0xd9000000:0x000000b1
[12:11:25 713][HUB1-6][Inf]—Control write pll reg1 0xd9000000:0x00005183
[12:11:26 217][HUB1-6][Inf]—Control write pll reg1 0xd9000000:0x000000b1
[12:11:26 719][HUB1-6][Inf]—Control write pll reg1 0xd9000000:0x00005183
[12:11:27 223][HUB1-6][Inf]—Write initial succeed
[12:11:27 223][HUB1-6][Inf]—Upload encrypt at 0xc8100228
[12:11:27 225][HUB1-6][Inf]—ulValue = 0xadfd718c
[12:11:27 225][HUB1-6][Inf]—Read encrypt value succeed
[12:11:27 225][HUB1-6][Inf]—Download DDR.USB,size: 49152!
[12:11:27 238][HUB1-6][Inf]—Transfer complete 49152
[12:11:27 240][HUB1-6][Inf]—Run at address 0xd9000000
[12:11:27 246][HUB1-6][Inf]—RunInRam success
[12:11:27 271][HUB1-6][Inf]—2-2-0-0-0-1-0-0
[12:11:27 271][HUB1-6][Inf]—CheckFileRunState succeed
[12:11:42 275][HUB1-6][Err]—usbReadFile failed ret = -116
[12:11:42 275][HUB1-6][Err]—ReadPara failed
[12:11:42 282][HUB1-6][Err]—[0x10105002]Romcode/Initialize DDR/Read initialize status/USB Control setup error
[12:11:42 283][HUB1-6][Inf]—Close device handle 0x00000b44
Is there somebody else, with the same problem? Actually tried to flash the Latest Official Firmware because (after a long pause while it was offline) my box didnt want to boot (splash screen appear with Android logo and then nothing happened). For additional info there is a screenshot attached.
Attachments

Villa
Hi Guys
I have this problem while flashing my U9H:
[12:11:25 210][HUB1-6][Inf]—2-2-0-0
[12:11:25 210][HUB1-6][Inf]—Control write pll reg1 0xd9000000:0x000000b1
[12:11:25 713][HUB1-6][Inf]—Control write pll reg1 0xd9000000:0x00005183
[12:11:26 217][HUB1-6][Inf]—Control write pll reg1 0xd9000000:0x000000b1
[12:11:26 719][HUB1-6][Inf]—Control write pll reg1 0xd9000000:0x00005183
[12:11:27 223][HUB1-6][Inf]—Write initial succeed
[12:11:27 223][HUB1-6][Inf]—Upload encrypt at 0xc8100228
[12:11:27 225][HUB1-6][Inf]—ulValue = 0xadfd718c
[12:11:27 225][HUB1-6][Inf]—Read encrypt value succeed
[12:11:27 225][HUB1-6][Inf]—Download DDR.USB,size: 49152!
[12:11:27 238][HUB1-6][Inf]—Transfer complete 49152
[12:11:27 240][HUB1-6][Inf]—Run at address 0xd9000000
[12:11:27 246][HUB1-6][Inf]—RunInRam success
[12:11:27 271][HUB1-6][Inf]—2-2-0-0-0-1-0-0
[12:11:27 271][HUB1-6][Inf]—CheckFileRunState succeed
[12:11:42 275][HUB1-6][Err]—usbReadFile failed ret = -116
[12:11:42 275][HUB1-6][Err]—ReadPara failed
[12:11:42 282][HUB1-6][Err]—[0x10105002]Romcode/Initialize DDR/Read initialize status/USB Control setup error
[12:11:42 283][HUB1-6][Inf]—Close device handle 0x00000b44
Is there somebody else, with the same problem? Actually tried to flash the Latest Official Firmware because (after a long pause while it was offline) my box didnt want to boot (splash screen appear with Android logo and then nothing happened). For additional info there is a screenshot attached.
Why do you have «Erase flash» set to «Erase all»? «Normal erase» should be sufficient!
Also you shouldn’t have «Reset after success» and «Whether overwrite key» Enabled.
Источник
Announcement
![]()
I have H96 pro tv box, I’m trying to install a new firmware but I have a problem with the usb connection.
Whenever I try to connect the box to usb ,it recognized for 1-2 seconds and then disconnecting.
I tried it with 4 different computers (including desktop), I installed the driver, I tried 2 different usb cables — all with the same results.
I tried to press the reset button and then to start the box — it doesn’t recognized at all.
I tried to connect it to the power adapter ,then to start the box and then to connect it to usb- it doesn’t recognized at all.
I tried to connect the hdmi cable so I can see what happens when it starts ,I see that when i press the reset button it goes into the recovery menu — but it seems that when it in this menu it doesn’t recognized by usb.
this is the error that I get:
[2018-11-23 13:50:21 662][HUB2-2][0x10102002]Romcode/Initialize DDR/Initialize PLL/USB Control setup error
[2018-11-23 13:51:36 983][HUB2-2][0x10105002]Romcode/Initialize DDR/Read initialize status/USB Control setup error
![]()
- Join Date: May 2014
- Posts: 1316
Which version of USB Burn Tool?
Which version of Windows?
(Which China Box revision. update to which firmware? (Not immediately important to your question.)
Do you have a firewall running?
Do you have Anti-Virus running?
I suggest that you you give more info.
(All 4 computers only recognize connection (1-2 sec.)?
![]()
USB burn tool v.2.0.7.2, I also use the usbview.exe to see if the box recognized.
I tried on win7 and win10
box version you can see attached, trying to install h96pro.H96PRO+_2G(16)_HS2734A_1000M_7.1.2018.04.10 .20.38
I don’t have a firewall
I have Symantec Endpoint Protection
I attached the log files
![]()
- Join Date: May 2014
- Posts: 1316
Amlogic Worldcup Drivers..no longer installed properly??
«Romcode/Initialize DDR/Initialize PLL/USB Control setup error
Romcode/Initialize DDR/Read initialize status/USB Control setup error.»
2018-11-23. «attempting to erase bootloader». Did USB Burn Tool succeed in seeing and flashing your China Box?
Источник
Amlogic USB burning tool v2.0.8, v2.0.9, v2.1.2- Fatal Error when importing any image. Windows 10
I was able to flash my Nexbox A95X (s905x) 2Gb Ram 8gb storage once yesterday. The next day I tried to flash my second box which is a 2gb Ram 16gb storage same model. But before I plug in the box by USB transfer cable, I have to import the .img firmware file into the USB burning tool program. When I import any .img file into the USB Tool program, it closes with a pop up that basically says Fatal error, please check crash.dmp.
Here is my crash.dmp file which can be downloaded here:
http://s000.tinyupload.com/index.php?file_id=05475691369172656462
I always install the USB burning tool as administrator and run it as administrator. I tried installing a newer version of the USB burning tool program on top of the current installation. I uninstalled the USB burning tool and the libusb driver it installed. Then I used ccleaner to clear the cache and fix the registries. I even tried uninstalling the USB burning tool with Revo uninstaller in advanced mode and it deleted all related files and registries using revo uninstaller. I tried deleting the log file. Nothing I have done has fixed it.
Can any of you please tell me what else I can try?
![]()
weew
3633 silver badges12 bronze badges
asked Jan 24, 2018 at 0:52
![]()
Never mind. I fixed it by doing this:
- uninstall usb burning tool
- delete Amlogic folder in
c:/Program Files (x86)/ - delete Amlogic Inc. in
regedit HKEY_CURRENT_USER/Software
![]()
shizhen
12.3k9 gold badges52 silver badges88 bronze badges
answered Jan 25, 2018 at 3:58
![]()
Nobody1Nobody1
11 silver badge2 bronze badges
-
Nayam
- Administrator & Developer
- Posts: 1263
- Joined: Mon Jun 11, 2018 11:58 pm
- Has thanked: 192 times
- Been thanked: 432 times
- Contact:
So, having problems with usb burning tool?
Well, here’s how you do it. Don’t forget to reply to this topic if you want to add anything.
1. Don’t forget to plug in power cable if you get lowper error.
2. If your device isn’t getting detected, even after pushing the reset button, try shorting nand pins. You can find a video tutorial on mxq project YouTube channel.
3. DDR Error? Tried using different ddr version atvX? DDR3, DDR4, LPDDR to name a few.
4. Flashed but not working? Try flashing again, or a different image. Still getting a black screen?
a) If you see the bootlogo but not the UI after booting, try atvx on a 1080p tv.
b) If you don’t see anything at all, the device is incompatible, Sorry5. 7% Uboot error? Try another image or version. Chances are, your box uses a modded uboot which doesn’t accept other original uboot partitions. Fix? Point 6.
6. 2GB/3GB RAM but after flashing it’s 1GB/2GB? You’ve got a fake box. Your uboot was modified to read wrong dtb header to show more RAM than the actual physical one(maybe). The only way to fix(fake your ram) this is unpacking atvx and your stock rom to level 1 with Ricky’s customization tool and replacing your stock’s system, boot, recovery and bootloader partitions with atvx’s and re-packing.
Contribute more points by commenting below ![]()
BE NICE, BE RESPECTFUL
RESPECT THE MODERATORS
PM ONLY WHEN IMPORTANT
ENJOY!
My Devices:
X96 Mini, A95X Pro, H96 Pro Stick, A95X Max
-
hugodias
- Posts: 1
- Joined: Sun Mar 03, 2019 8:49 am
#2
is there a way of burning to usb flash drive? I can get box in recovery mode but pc doesn’t recognise it even after trying all options. if I can get the firmware update in a usb flash drive in the right format I can update directly
-

ricklar
- Moderator
- Posts: 889
- Joined: Fri Nov 30, 2018 10:30 pm
- Has thanked: 139 times
- Been thanked: 249 times

#3
Update
If having problems with Amlogic USB Burning Tool try using the latest version 2.1.7 — This is the most recent version I have come across and it will be needed for the new Amlogic SoC S905x2 TV boxes.
Link:
https://mega.nz/#!5ZExnYKD!6Y-fz1MARAF8 … xh4-k69vb8
BE KIND, BE NICE, BE RESPECTFUL TO OTHERS, RESPECT THE MODERATORS,
*IMPORTANT NOTE* ONLY PM MODERATORS OR DEVELOPERS AS A LAST RESORT!!!
 My test device: H96 Pro+ 3gb/32gb DDR4 Plus own Tanix, Beelink, Alfawise, X96S, Odroid-N2, Khadas VIM3L, X3, ADT-3, X96-Air
GEARBEST.com
PLEASE ENJOY ATVX!
-
WebofThrones
- Verified Member
- Posts: 18
- Joined: Mon Jul 09, 2018 8:06 am
- Been thanked: 1 time
#4
Hi there how do you unpack the firmware you mentioned in point 6 : The only way to fix(fake your ram) this is unpacking atvx and your stock rom to level 1 with Ricky’s customization tool and replacing your stock’s system, boot, recovery and bootloader partitions with atvx’s and re-packing.
As im stuck with error 5, UBOOT
-
ricklar
- Moderator
- Posts: 889
- Joined: Fri Nov 30, 2018 10:30 pm
- Has thanked: 139 times
- Been thanked: 249 times
#5
WebofThrones wrote: ↑Wed Jun 05, 2019 8:44 am
Hi there how do you unpack the firmware you mentioned in point 6 : The only way to fix(fake your ram) this is unpacking atvx and your stock rom to level 1 with Ricky’s customization tool and replacing your stock’s system, boot, recovery and bootloader partitions with atvx’s and re-packing.As im stuck with error 5, UBOOT
Read some of the other tutorials as well. Check this one for more info on Bootloader/UBOOT =
viewtopic.php?f=16&t=799
BE KIND, BE NICE, BE RESPECTFUL TO OTHERS, RESPECT THE MODERATORS,
*IMPORTANT NOTE* ONLY PM MODERATORS OR DEVELOPERS AS A LAST RESORT!!!
My test device: H96 Pro+ 3gb/32gb DDR4 Plus own Tanix, Beelink, Alfawise, X96S, Odroid-N2, Khadas VIM3L, X3, ADT-3, X96-Air
GEARBEST.com
PLEASE ENJOY ATVX!
-
OpJbud
- Posts: 1
- Joined: Mon Apr 22, 2019 4:33 am
#6
Hey fellas I hope its ok to ask questions or to seek help here. I relatively new to the scene at least posting anything i been following along for a little over a year tho. So thank you for all the tools and firmware and knowledge you give I have learned a great deal from you. I have an issue with this usb burning tool i have been searching for the answer but cant find or i just don’t understand. I keep getting error [22:32:06 879][HUB2-2][Err]—[0x10102002]Romcode/Initialize DDR/Initialize PLL/USB Control setup error. The box im on is beelink GT1 mini witch i just got and i was trying to install twrp is was successful took a backup before i was going to install ATVX’s rom but the dang thing wouldn’t reboot cant even force it into recovery just gets stuck on boot nothing but the beelink emblem. So i figured just flash the new rom well i continue to get that error i’ve tried different ddr different ports uninstalling and reinstalling usb burn tool i’ve always had to fidget with the tool but eventual it would work but i cant figure this dang thing out. If you have any ideas please i welcome all of them. So frustrated after waiting forever to receive my new box i cant even use it. And i’m sorry if im in the wrong place for what i’m asking if so just point me in the right direction and my apologies. And thanks again for all that you guys do it it is greatly appreciated.
-
Praveen99
- Posts: 1
- Joined: Wed Dec 04, 2019 4:58 am
- Been thanked: 1 time
#9
Hello, I’m having a Tanix Tx3 max and I’ve tried to install atv. But the flash process stucked at 7%. But after few tries the process was done. But there’s nothing showing up on the tv , just black screen. I tried to flash the stock firmware but the process again stucked at 7% diskinitial error. I’ve tried several roms for tx3 max. But still couldn’t get passed. I even tried all the versions for usb burning tool. Am I missing something?
In order to upgrade the firmware of a particular Android TV box, Amlogic USB Burning Tool is the main tool you’re going to need.
Addressing the issues of “Parse Burning Image Fail”, “Get Key Failed”, and many more are the benefits that you can get with the Amlogic USB Burning Tool.
Moreover, you can also have a solution to any update-related problem alongside the .img format that your Android box might be going to face.
For your comfortableness, this article will provide a guide on how to use the Amlogic USB Burning Tool to update Firmware in 2022.
Make sure that you have a device that’s based on Amlogic before doing an action because each chipset manufacturer has its own way of doing things.
This process is specifically for Amlogic devices like Cosycost Android Tv Box. The next thing to keep in mind is while upgrading the firmware do not ever disconnect the power to your TV box.
Lastly, always use the “Normal erase” configuration option except if you are an expert on what you are doing.
Make sure the file you will be downloading will at least work in Windows 7,8,8.1 and 10 to use the Amlogic USB Burning Tool.
However, it will need be needing Administrator permissions for it to run. You will change a system using another device, therefore Windows ensure you know what you’re doing.
Extract it into a temporary directory once you’ve downloaded the file for USB Burning Tool. After that, you will encounter a Setup.exe file that holds the version number.
Now, connect your Android TV box to your computer. And a friendly reminder, before you start installing the USB Burning Tool, make sure that your PC is on and the Android TV box is connected.
It is necessary before installing the USB burning tool.
Installing the Amlogic USB Burning Tool is somewhat easy using Windows PC.
The only minor issue you will encounter is a message from Windows like “Windows protected your PC” during the start of installation.
However, this is not going to happen to anyone because everyone has different settings set up. Just check to box saying “I understand the risk and want to run the app” to proceed.
After that, a frame of USB Burning Tool that welcomes you will show up and you just have to press next.
Next, you will be asked where to put the file that you want to be installed and also if you want to create a Start Menu folder.
After selecting one of those options, you’re given the final chance to decide to proceed to install. Just click the install for the process to start.
Previously, the Android TV box is already connected to your PC and turned on.
When the installation process is about to end, you’ll likely see “Device Driver Installation Wizard” on the window frame that pops up.
This means the process will scan your system to ensure if you have installed the proper drivers.
Once the driver is being installed, you’ll get one more window frame pop-up that tells what driver is being installed.
Click on the “Finish” on the window frame that’s being titled with “Completing the USB_Burning_Tool Setup Wizard”.
Finally, turn off your TV Box in order for you to reboot it into Recovery Mode in the following steps.
First and foremost, open the Amlogic USB Burning Tool Application. Previously, the reason why the TV box was powered up is for the correct drivers to be installed, however, it needs to be in Recovery Mode for the following steps.
The first method is Toothpick Method, on the back of the device you can see a small port named “Recovery”.
With a turned-off TV box, you should ready a long thin object, but not metal because it is a good conductor.
Insert the object you prepared into the port until you can sense that you already pushed or pressed a button.
Turn the TV box on while the button is being depressed. If you’ve done it successfully, you will be seeing the device appear at the bottom of the “Device” heading.
Now in importing an image, always make sure to use an image that suits your device because using inappropriate firmware can brick your TV box.
Now, in the upper left-hand corner, click on the File menu and choose Import image. Then you’ll need to traverse to the location where you saved the .img file and choose it.
To start, on the right-hand side, you’ll be going to see a big “Start” button with a list of options at the bottom.
Carefully choose and select “Normal Erase” and click the start button for the process to start. When the status bar turns green and saying 100%, the process is complete.
Conclusion
Hopefully, this article gives you clarity on why “Parse Burning Image Fail” exists. Now, you already have knowledge of how to update firmware using a new image file or how to use the Amlogic USB Burning Tool to update Firmware with the help of the Amlogic USB Burning Tool.
However, sometimes, it’s hard for the PC to recognize the TV box and install the proper drivers but don’t worry you’ll get into it.
See more articles in the category: Windows
We know how frustrated it is when you’re trying to install an image file on your android box, whether it’s Probox EX, MXQ PRO, Minix Neo X8-H, or M8s, and found things do not go smooth as expected. It’s Monday night past your working hours. You’ve searched for any possible cause why you cannot get past the error message.
Don’t fret. We’re here to revisit the steps to make it work.
First, check if your firmware is correct and the latest, verify with MD5 hash if you have it. Some errors could come from ROM image files that get corrupted.
To get the latest firmware, go to the official device maker.
Secondly, check out and install the latest Amlogic USB Burning Tool version here or from here. It is a USB burning tool specifically to flash stock firmware based on an Amlogic chipset. Many reported that the file works wonders. Amlogic USB Burning Tool helps you flash the stock firmware on the Mobile phone operating on the Amlogic Chipset.
After the installation process and setting up the Amlogic Burning Tool, you need to load the firmware by clicking on the File > Import Image (img). Then after connecting your Mobile phone to the computer system, click on the start button to begin the flashing procedure.
For Windows 8 and 8.1, you will need to disable driver signature enforcement to install the burning tool successfully.
Here’s how to do it:
Run command from an Administrator Command Prompt to do this. To release one, right-click the Start button or press Windows+X and select “Command Prompt (Admin)

Paste the following command into the Command Prompt window and press Enter.”
bcdedit /set testsigning on
If you see a message stating the value is “protected by Secure Boot policy,” that means Secure Boot is made possible for your computer’s UEFI firmware. You’ll need to disable Secure Boot in your computer’s UEFI firmware (likewise called its BIOS) to enable test finalizing mode.

Restart your computer system to enter test mode. You’ll see the “Test Mode” watermark appear at the bottom ideal corner of your desktop, and you’ll be totally free to install whatever unsigned motorists you desire.
source
You may need to switch between Amlogic Burning Tool versions for the latest compatibility.
This is the key to make the installation work and get rid of the fail message

After that, extract all the files in the zip to a freshly formatted SD Card. By this stage, you already passed the error message.
You need to put the TV box in flash mode. It is also called recovery mode. Make sure the power IS NOT connected, and Insert the SD Card into your device. If you are uncertain, consult your TV box manual guide.
In the back of the device, Locate the A/V port and insert a toothpick, pin, or something not conductive into the hole. You should feel a button being pressed. If you bricked it with no reset hole, there is a socket for a reset button on the PCB inside, near the power button. It depends on the type.

Press and hold the Button in the A/V hole while plugging in power. Keep holding the button for 10 seconds.
You need to see a green Android robotic with a progress bar listed below if you did the actions properly. DO NOT TURN OFF THE POWER OR TOUCH THE BOX!

When the upgrade is finished, your box will immediately reboot on its own. The very first boot will take a while so that you can make yourself some coffee or tea.
If all still failed, you may need to go deep into troubleshooting the box
- Try with the latest firmware and the latest Amlogic USB Burning Tool version first.
- If it’s still failed at some steps, the screen turns blue. Try to downgrade the firmware version and keeping the latest Burning Tool Version.
- Check if already unpack the .img file
- Many users reported success with the Amlogic USB Burning Tool version 2.0.8, or 2.0.5.15, and the image from here.
- Some manufacturers require a specific .img file for their motherboard. Make sure you have this.
- You may need to change the device temperature settings. Some users reported this works.
- If you are stuck in the image load process, you may need to check your USB connection, change the USB cable or port.
Also, if your device is completely bricked after your attempts, you may need to un-brick it. You can follow this tutorial.
Conclusion
Firmware upgrade for your smart TV box can be done at home by yourself, whether you’re not tech-savvy. In the worst case, you will need to unbrick the device. As long as the hardware is running properly, this is not a problem. Watch for any USB burning tool error.
The component in this tutorial is mainly for the motherboard version compatibility with your firmware and Burning Tool and to make sure the device configuration and connection support the upgrade (temperature settings, USB cable, and ports).
We hope this tutorial is useful for you when you upgrade your box firmware and get through the error message.