As a big side note for future, I recommend to use RAM directly without affecting ROM if you don’t want to recover your corrupted bootloader from device for each trying of course.
write bl2_file 0xd9000000        // bl2
write uboot_tpl_file 0x200c000   // tpl to ddr
write usbbl2runpara_file 0xd900c000  // for booting tpl from 0x200c000
0xd9000000  <<< ddr run
0xd900c000  << +c000
0x200c000   <<  0x2000000 (u-boot map) + c000
Actual addresses may be different for your platform, therefore you need to check it from manifest from any firmware image to your device after unpacking it, for example, via AmlImagePack tool:
AmlImagePack -d flashable.img ./dir
Also note, BL2 may prevent corruption of bootloader when you’re trying via official flasher. Because flasher (usb burning tool or how it was named, I don’t remember) starts like ~ bootloader -> then with BL2 will try to execute directly from RAM and it will abort anything if they have any problem, or it will finally commit changes to ROM.
Seems this is what I’m talking about:
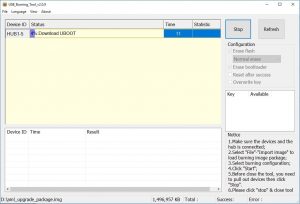
with USB_Burning_Tool , the process stops at 1% with error :
[0x10103005]Romcode/initialize DDR/download data/reading image failed
To the question:
Is there any way to retrieve the above parameters/packages from the original bootloader ( dumped with dd command ) ?
Yes, of course, https://github.com/3F/aml_s905_uboot#arm-trusted-firmware
before sequence [010064AA] ~ u-boot.bin.usb.bl2 (BL2)
  Second part, starting with `010064AA` is UBOOT.USB ~ u-boot.bin.usb.tpl
But looks like your attached bootloader is encrypted. I’m not sure (I don’t see @AMLрї sign) and you’re talking about s905d that I did not inspect as I already said (s905, s905x, s905d, are not the same).
Anyway, there are something different with your case before my 010064AA:
0018A690  07 0B 08 0D 12 12 2A 08 01 00 00 00 00 00 24 24  ......*.......$$
0018A6A0  00 00 00 00 00 44 A4 00 00 80 [ 01 00 64 AA ] 00 00  .....D¤..Ђ..dЄ..
.........................................^ at 0x18A6AA
So you can’t separate it manually as in my readme.
More probably, you need to decrypt this before. Try to ask on XDA for your s905d platform to be sure.
Rehashing the header can also help for your case. Here I mentioned about this.
try this:
aml_encrypt_gxb --bootsig --input bootloader.img --output u-boot_new.bin
btw, this should also prepare/extract separated bl2/tpl
u-boot_new.bin -- updated full image
u-boot_new.bin.usb.bl2 -- DDR.USB
u-boot_new.bin.usb.tpl  -- UBOOT.USB
just try
However,
just to restore your device
If you only need to restore your device, I recommend Access mode for your emmc,
When u-boot/ddr is corrupted, we can try to switch memory controller into access mode
then just rewrite an working bootloader from any related firmware.
Loading
-
realit
- Posts: 2
- Joined: Sun Jan 24, 2021 1:49 pm
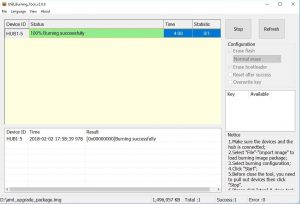
19:51:33 097][HUB2-2][Inf]—Start burning…
[19:51:33 147][HUB2-2][Inf]—————ERASE BOOTLOADER————
[19:51:33 248][HUB2-2][Inf]—start SendIdentifyCmd
[19:51:33 248][HUB2-2][Inf]—2-4-0-0
[19:51:33 248][HUB2-2][Inf]————-Download DDR.USB————
[19:51:33 249][HUB2-2][Inf]—2-4-0-0
[19:51:33 249][HUB2-2][Inf]—Control write pll reg1 0xd9000000:0x000000b1
[19:51:33 750][HUB2-2][Inf]—Control write pll reg1 0xd9000000:0x00005183
[19:51:34 251][HUB2-2][Inf]—Control write pll reg1 0xd9000000:0x000000b1
[19:51:34 751][HUB2-2][Inf]—Control write pll reg1 0xd9000000:0x00005183
[19:51:35 252][HUB2-2][Inf]—Write initial succeed
[19:51:35 252][HUB2-2][Inf]—Upload encrypt at 0xc8100228
[19:51:35 252][HUB2-2][Inf]—ulValue = 0xbdfc31bc
[19:51:35 252][HUB2-2][Inf]—File change to DDR_ENC.USB
[19:51:35 252][HUB2-2][Inf]—Read encrypt value succeed
[19:51:35 252][HUB2-2][Inf]—Download DDR_ENC.USB,size: 0!
[19:51:35 252][Global][Err]—DDR_ENC.USB
[19:51:35 252][Global][Err]—DDR_ENC.USB
[19:51:35 252][HUB2-2][Err]—Read item data error, code -1
[19:51:35 252][Global][Err]—DDR_ENC.USB
[19:51:35 257][HUB2-2][Err]—[0x10103005]Romcode/Initialize DDR/Download buffer/Read item data failed
[19:51:35 257][HUB2-2][Inf]—Close device handle 0x00000b54
-

didux
- Expert Member
- Posts: 122
- Joined: Sun Jun 02, 2019 10:52 am
- Has thanked: 15 times
- Been thanked: 54 times

#2
Your board (bootloader) is encrypted. You can only install original firmware!
Last edited by didux on Sun Jan 24, 2021 2:36 pm, edited 1 time in total.
I’ve sold my box and will never buy this crap again! ![]()
TV Box X96 Mini — Android 7.1.2 Firmware
ZxZ_ZxZ @ 03/14/19, 14:37
What firmware is suitable for games?
on au2,2 I play aswalt 8, clash of clans, well, and saga of survival it goes high, the var robot is playable, the joystick, keyboard, mouse through the usb hub are connected
Post has been edited3629 — 14.03.19, 19:26
immortal_777 , immortal_777 Hi, can you tell me why Assistive zoom doesn’t work?
Post has been editedZxZ_ZxZ — 14.03.19, 20:41
I have x96W. There are a few questions:
- Are x96mini firmware suitable for x96W? I think so, but decided to clarify.
- Does x96W owners threaten brickwork due to Samsung modules? Need to check the board?
- Advise the firmware (preferably ATV), with a working modern AFR and, preferably, a working voice search. Will modern AFR work in Kodi 18 and Vimu?
- Will the stock remote control and Wi-fi work in this firmware? It is highly desirable that they work
Who has a brick and does not sew anything, try to roll this IMG
on board Q6X V2.2 17355
The USB Burning Tool writes: [0x10103005] Romcode / Initialize DDR / Download buffer / Read item data failed.
Good afternoon, I have such a problem. I can’t flash the prefix. I do everything according to the instructions in the header. I have been asking for a long time through a USB flash drive, I worked for six months, one fine moment after the reboot, a screensaver goes on and the prefix does not boot into the recovery, it does not enter. When flashing at the stage, formatting produces an error. Add a photo.
Attached images

serg42s54 maybe you have an insidious board?
Try this way:
Post has been editedCakestwix — 15.03.19, 10:31
serg42s54 , do not hurry.
Try to do standard things first.
1 exclude Russian words on the way to the firmware.
2 uncheck the erase bootloader
3 Pull the string several times. Without pressing the stop button.
4 change yusb to dr yusb on your computer.
5 make a forced firmware
6 change the program to another version
X96MINI OFFICIAL FIRMWARE 01/03/2019
Wow. Is it known that has changed / healed? OTA should fly?
serg42s54, — decision
Briefly, we press «Start» in advance (the program goes into standby mode of the device), we do not release the button that is pressed before plugging in the cable until it runs through 7% (sometimes it may not go the first time, then click «Stop», pull it out cable, and repeat. When all is well, he jumps these 7% almost immediately)
Perhaps it depends on some kind of revisions. fees, because most of this doesn’t have a problem, I have it on any of the firmware via PC (and yes, lanyards, a power supply, etc. that are usually advised on this topic, of course I tried before I found a way)
Post has been editedastarkin — 15.03.19, 13:03
immortal_777 ,
Vayfay speed can finally fixed a driver in the kernel
immortal_777 ,
Spidtestom necessary to look if there are no changes will be clearly seen that the returns greater acceptance
astarkin @ 15.03.2019, 11:55
serg42s54, — decision
Briefly, we press «Start» in advance (the program goes into standby mode of the device), we do not release the button that is pressed before plugging in the cable until it runs through 7% (sometimes it may not go the first time, then click «Stop», pull it out cable, and repeat. When all is well, he jumps these 7% almost immediately)
Perhaps it depends on some kind of revisions. fees, because most of this doesn’t have a problem, I have it on any of the firmware via PC (and yes, lanyards, a power supply, etc. that are usually advised on this topic, of course I tried before I found a way)
After all the highlights programs and drivers that’s the driver that I can not find on the internet. It may be the reason for it?
Attached images

serg42s54, probably.
I have one error in one the same (and on different computers, and different firmware versions), but the driver picks up yourself when installing software for the firmware, and the order of the devices. Also as with the prefix (i.e., no bricks and butlupov), it is in the normal state outputs. So apparently this is not your case.
astarkin @ 15.03.2019, 14:37
serg42s54, probably.
I have one error in one the same (and on different computers, and different firmware versions), but the driver picks up yourself when installing software for the firmware, and the order of the devices. Also as with the prefix (i.e., no bricks and butlupov), it is in the normal state outputs. So apparently this is not your case.
Driver set. Did not help. I try the last version of the firmware and the firmware program
Good evening.
A few days ago I came to console memory on February 16, as I understand it is safely possible to sew. I want to install this firmware ALONE ULTIMATE 7 V2.8 TX3 MINI L 30.08.2018. Photo how to install it? Specific instructions not found a whole bunch at once in one you will not understand.
Attached images

M8S PRO W CUSTOM ROM (MEECOOL 4.01.2019) temperature of 90 C, for up to 70 C. Zavadzkaya Yes good performance but with a temperature of 90 C by cooling with cooling on an original 62 C. Youtube original buggy from 720r. and higher
Post has been editeddruidexe1985 — 15.03.19, 17:15
druidexe1985 I have this same firmware, additional oholozhdeniya It has never, rarely above 70 rises, as well as in the area of 62-67
But why Zavadzkaya far below me, and this because the temperature plays
Posted on 15/03/2019, 17:20:
Firmware is very good but because of the performance lost in temperature
Hello everyone! Guys help! Need firmware running on the console h96w percent S905W. Poor showing channels on Lazy aypitv all buggy, constant hovering of picture and sound. Desirably Russified and suitable active device. Help teapot: sveta:: sveta: Thank you in advance: yes2:
So I bought a media player again. It’s Vontar X96 mini with 1GB RAM and 8GB eMMC and according to rule “Don’t turn it on, take it apart!” it’s exactly what I did:
After assembling and turning it on, Android 7 popped up but this was not my target OS. I wanted to use LibreELEC so I followed installation howto: downloaded and burned latest image to SD card, replaced dtb file with gxl_p212_1g.dtb, and run reboot update from Android terminal.
Box rebooted into working LibreELEC, nice! Now I wanted to burn it into internal eMMC so I run installtointernal despite a big red warning on howto page and warning in the script itself, rebooted and… I got sad. The LED was blinking red-blue and the box stopped booting. I tried all voodoo recovery instructions (holding reset button, powering from both usb and adapter, with HDMI, without it…) to boot into upload mode where the box would be detected by a PC and I would use USB Burning Tool but nothing helped. I also wrote to the seller to get help, they’ve sent me USB Burning Tool, factory image and Upgrade instruction which was nice but it didn’t work either.
So I hooked up serial interface to see what’s going on inside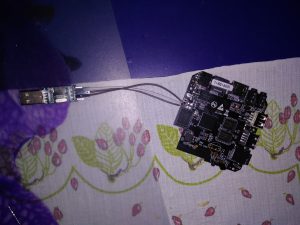 and the result was following:
GXL:BL1:9ac50e:a1974b;FEAT:ADFC318C;POC:3;RCY:0;EMMC:0;READ:0;0.0;CHK:0;
TE: 100781

BL2 Built : 20:32:17, Sep 8 2017.
gxl g6296b83 - xiaobo.gu@droid12

set vcck to 1120 mv
set vddee to 1070 mv
Board ID = 2
CPU clk: 1200MHz
DQS-corr enabled
DDR scramble enabled
DDR3 chl: Rank0 16bit @ 792MHz
Rank0: 1024MB(auto)-2T-11
DataBus test pass!
AddrBus test pass!
-s
Load fip header from eMMC, src: 0x0000c200, des: 0x01400000, size: 0x00004000
New fip structure!
Load bl30 from eMMC, src: 0x00010200, des: 0x01100000, size: 0x0000d600
Load bl31 from eMMC, src: 0x00020200, des: 0x05100000, size: 0x0002c600
Load bl33 from eMMC, src: 0x00050200, des: 0x01000000, size: 0x00065e00
NOTICE: BL3-1: v1.0(release):a625749
NOTICE: BL3-1: Built : 11:25:15, Aug 25 2017
[BL31]: GXL CPU setup!
NOTICE: BL31: BL33 decompress pass
mpu_config_enable:ok
[Image: gxl_v1.1.3243-377db0f 2017-09-07 11:28:58 qiufang.dai@droid07]
OPS=0xa2
0 a4 b0 46 ef c9 98 14 5e dc ac 58 [0.326773 Inits done]
secure task start!
high task start!
low task start!
ERROR: Error initializing runtime service opteed_fast


U-Boot 2015.01-g2d1a155-dirty (Oct 08 2017 - 12:02:50)

DRAM: 1 GiB
Relocation Offset is: 36eb3000
register usb cfg[0][1] = 0000000037f5a960
[CANVAS]canvas init
boot_device_flag : 1
Nand PHY Ver:1.01.001.0006 (c) 2013 Amlogic Inc.
init bus_cycle=6, bus_timing=7, system=5.0ns
reset failed
get_chip_type and ret:fffffffe
get_chip_type and ret:fffffffe
chip detect failed and ret:fffffffe
nandphy_init failed and ret=0xfffffff1
MMC: aml_priv->desc_buf = 0x0000000033eb36b0
aml_priv->desc_buf = 0x0000000033eb59d0
SDIO Port B: 0, SDIO Port C: 1
emmc/sd response timeout, cmd8, status=0x1ff2800
emmc/sd response timeout, cmd55, status=0x1ff2800
init_part() 293: PART_TYPE_AML
[mmc_init] mmc init success
dtb magic edfe0dd0
 Amlogic multi-dtb tool
 Single dtb detected
start dts,buffer=0000000033eb8200,dt_addr=0000000033eb8200
 Amlogic multi-dtb tool
 Single dtb detected
parts: 11
00: logo 0000000002000000 1
01: recovery 0000000002000000 1
02: rsv 0000000000800000 1
03: tee 0000000000800000 1
04: crypt 0000000002000000 1
05: misc 0000000002000000 1
06: boot 0000000002000000 1
07: system 0000000080000000 1
08: cache 0000000020000000 2
09: data ffffffffffffffff 4
"Synchronous Abort" handler, esr 0x96000210
ELR: 37ec0b44
LR: 37ec0afc
x0 : 0000000033f38210 x1 : 000000000000000c
x2 : 0000000037f443f9 x3 : 0000000000000004
x4 : 0000000000000000 x5 : 0000000033f383a0
x6 : 0000000033ec13b0 x7 : 0000000000000020
x8 : 0000000000000034 x9 : 0000000000000000
x10: 000000000000000f x11: 0000000037f38d00
x12: 0000000000000000 x13: 0000000000000000
x14: 0000000000000000 x15: 0000000000000000
x16: 0000000000000000 x17: 0000000000000000
x18: 0000000033ea2e28 x19: 000000000000000a
x20: 0000000000000000 x21: 0000000033eb8200
x22: 0000000000000000 x23: 0000000033ebe6bc
x24: 0000000037f72000 x25: 0000000000000000
x26: 0000000000006468 x27: 0000000000000000
x28: 000000000000000a x29: 0000000033e92b70

Resetting CPU ...

resetting ...
GXL:BL1:9ac50e:a1974b;FEAT:ADFC318C;POC:3;RCY:0;EMMC:0;READ:0;0.0;CHK:0;
TE: 100780

BL2 Built : 20:32:17, Sep 8 2017.
gxl g6296b83 - xiaobo.gu@droid12

set vcck to 1120 mv
set vddee to 1070 mv
Board ID = 2
CPU clk: 1200MHz
DQS-corr enabled
DDR scramble enabled
DDR3 chl: Rank0 16bit @ 792MHz
Rank0: 1024MB(auto)-2T-11
DataBus test pass!
AddrBus test pass!
-s
Load fip header from eMMC, src: 0x0000c200, des: 0x01400000, size: 0x00004000
New fip structure!
Load bl30 from eMMC, src: 0x00010200, des: 0x01100000, size: 0x0000d600
Load bl31 from eMMC, src: 0x00020200, des: 0x05100000, size: 0x0002c600
Load bl33 from eMMC, src: 0x00050200, des: 0x01000000, size: 0x00065e00
NOTICE: BL3-1: v1.0(release):a625749
NOTICE: BL3-1: Built : 11:25:15, Aug 25 2017
[BL31]: GXL CPU setup!
NOTICE: BL31: BL33 decompress pass
mpu_config_enable:ok
[Image: gxl_v1.1.3243-377db0f 2017-09-07 11:28:58 qiufang.dai@droid07]
OPS=0xa2
0 a4 b0 46 ef c9 98 14 5e dc ac 58 [0.326738 Inits done]
secure task start!
high task start!
low task start!
ERROR: Error initializing runtime service opteed_fast


U-Boot 2015.01-g2d1a155-dirty (Oct 08 2017 - 12:02:50)

DRAM: 1 GiB
Relocation Offset is: 36eb3000
register usb cfg[0][1] = 0000000037f5a960
[CANVAS]canvas init
boot_device_flag : 1
Nand PHY Ver:1.01.001.0006 (c) 2013 Amlogic Inc.
init bus_cycle=6, bus_timing=7, system=5.0ns
reset failed
get_chip_type and ret:fffffffe
get_chip_type and ret:fffffffe
chip detect failed and ret:fffffffe
nandphy_init failed and ret=0xfffffff1
MMC: aml_priv->desc_buf = 0x0000000033eb36b0
aml_priv->desc_buf = 0x0000000033eb59d0
SDIO Port B: 0, SDIO Port C: 1
emmc/sd response timeout, cmd8, status=0x1ff2800
emmc/sd response timeout, cmd55, status=0x1ff2800
init_part() 293: PART_TYPE_AML
[mmc_init] mmc init success
dtb magic edfe0dd0
 Amlogic multi-dtb tool
 Single dtb detected
start dts,buffer=0000000033eb8200,dt_addr=0000000033eb8200
 Amlogic multi-dtb tool
 Single dtb detected
parts: 11
00: logo 0000000002000000 1
01: recovery 0000000002000000 1
02: rsv 0000000000800000 1
03: tee 0000000000800000 1
04: crypt 0000000002000000 1
05: misc 0000000002000000 1
06: boot 0000000002000000 1
07: system 0000000080000000 1
08: cache 0000000020000000 2
09: data ffffffffffffffff 4
"Synchronous Abort" handler, esr 0x96000210
ELR: 37ec0b44
LR: 37ec0afc
x0 : 0000000033f38210 x1 : 000000000000000c
x2 : 0000000037f443f9 x3 : 0000000000000004
x4 : 0000000000000000 x5 : 0000000033f383a0
x6 : 0000000033ec13b0 x7 : 0000000000000020
x8 : 0000000000000034 x9 : 0000000000000000
x10: 000000000000000f x11: 0000000037f38d00
x12: 0000000000000000 x13: 0000000000000000
x14: 0000000000000000 x15: 0000000000000000
x16: 0000000000000000 x17: 0000000000000000
x18: 0000000033ea2e28 x19: 000000000000000a
x20: 0000000000000000 x21: 0000000033eb8200
x22: 0000000000000000 x23: 0000000033ebe6bc
x24: 0000000037f72000 x25: 0000000000000000
x26: 0000000000006468 x27: 0000000000000000
x28: 000000000000000a x29: 0000000033e92b70

Resetting CPU ...

resetting ...
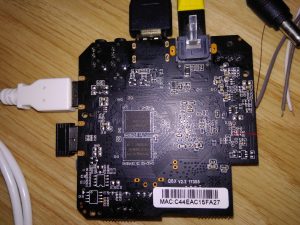
The box was in a boot loop without accepting any input or keystrokes. Some guides suggest to short out some pins on flash chip but my eMMC has BGA package so this was not possible. I randomly shorted out some resistors and capacitors nearby the eMMC but without luck. I was afraid I’ll need to use JTAG which seemed quite hard to solder and there were no howtos for using this method. Then I took some time to rethink this.
The point of shorting out pins is to avoid detecting the eMMC and to force the main chip boot into upload mode. So to avoid detecting it, it should be enough to break the communication by grounding some of the DATA, CLK or CMD lanes. So again I took ampermeter (to see if I’m not grounding power lane), attached one probe to GND and with the other one I was probing pins around the eMMC chip. After few tries, the status LED stayed blue and the board got detected, bingo!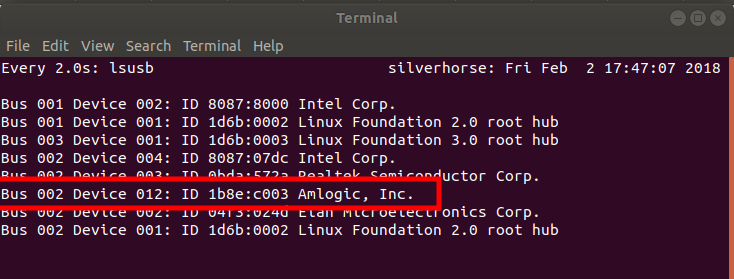
For those with the same board, it was this pin:
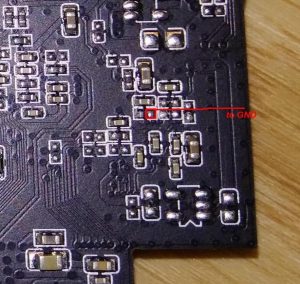
You can find GND on all connector shields (HDMI, USB).
Now it was just a piece of cake, I connected it to Windows machine, grounded pin again and used the upload utility:
 Of course I tried to run and install LibreELEC to eMMC again but this time it worked and I wasn’t able to simulate the boot loop again, even with uploading garbage to /dev/dtb.
Hope this guide will help someone, if you have some questions or ideas please leave a comment.
Bye!