Fixing UNnetbootin is not working on Windows 10 is easy if you follow our instructions
by Tashreef Shareef
Tashreef Shareef is a software developer turned tech writer. He discovered his interest in technology after reading a tech magazine accidentally. Now he writes about everything tech from… read more
Updated on
Reviewed by
Alex Serban

After moving away from the corporate work-style, Alex has found rewards in a lifestyle of constant analysis, team coordination and pestering his colleagues. Holding an MCSA Windows Server… read more
- If the UNetbootin is not working with Windows the issue might be caused by your corrupted ISO file or bad flash drive.
- Modifying your BIOS boot settings can sometimes help you fix this error on your computer.
- Using a different flash drive creator utility to create your live USB can help you with this issue.
- If the UNetbootin failed to start on Windows, you can fix it with Windows installation media.
XINSTALL BY CLICKING THE DOWNLOAD FILE
To fix various Windows 10 errors, we recommend Fortect:
SPONSORED
This software will repair common computer errors, protect you from file loss, malware damage, hardware failure and optimize your PC for maximum performance. Fix PC issues and remove virus damage now in 3 easy steps:
- Download and Install Fortect on your PC
- Launch the tool and Start scanning to find broken files that are causing the problems
- Right-click on Start Repair to fix issues affecting your computer’s security and performance
- Fortect has been downloaded by 0 readers this month, rated 4.4 on TrustPilot
UNetbootin is a popular Windows utility to create bootable USB flash drives for Ubuntu and other Linux distributions.
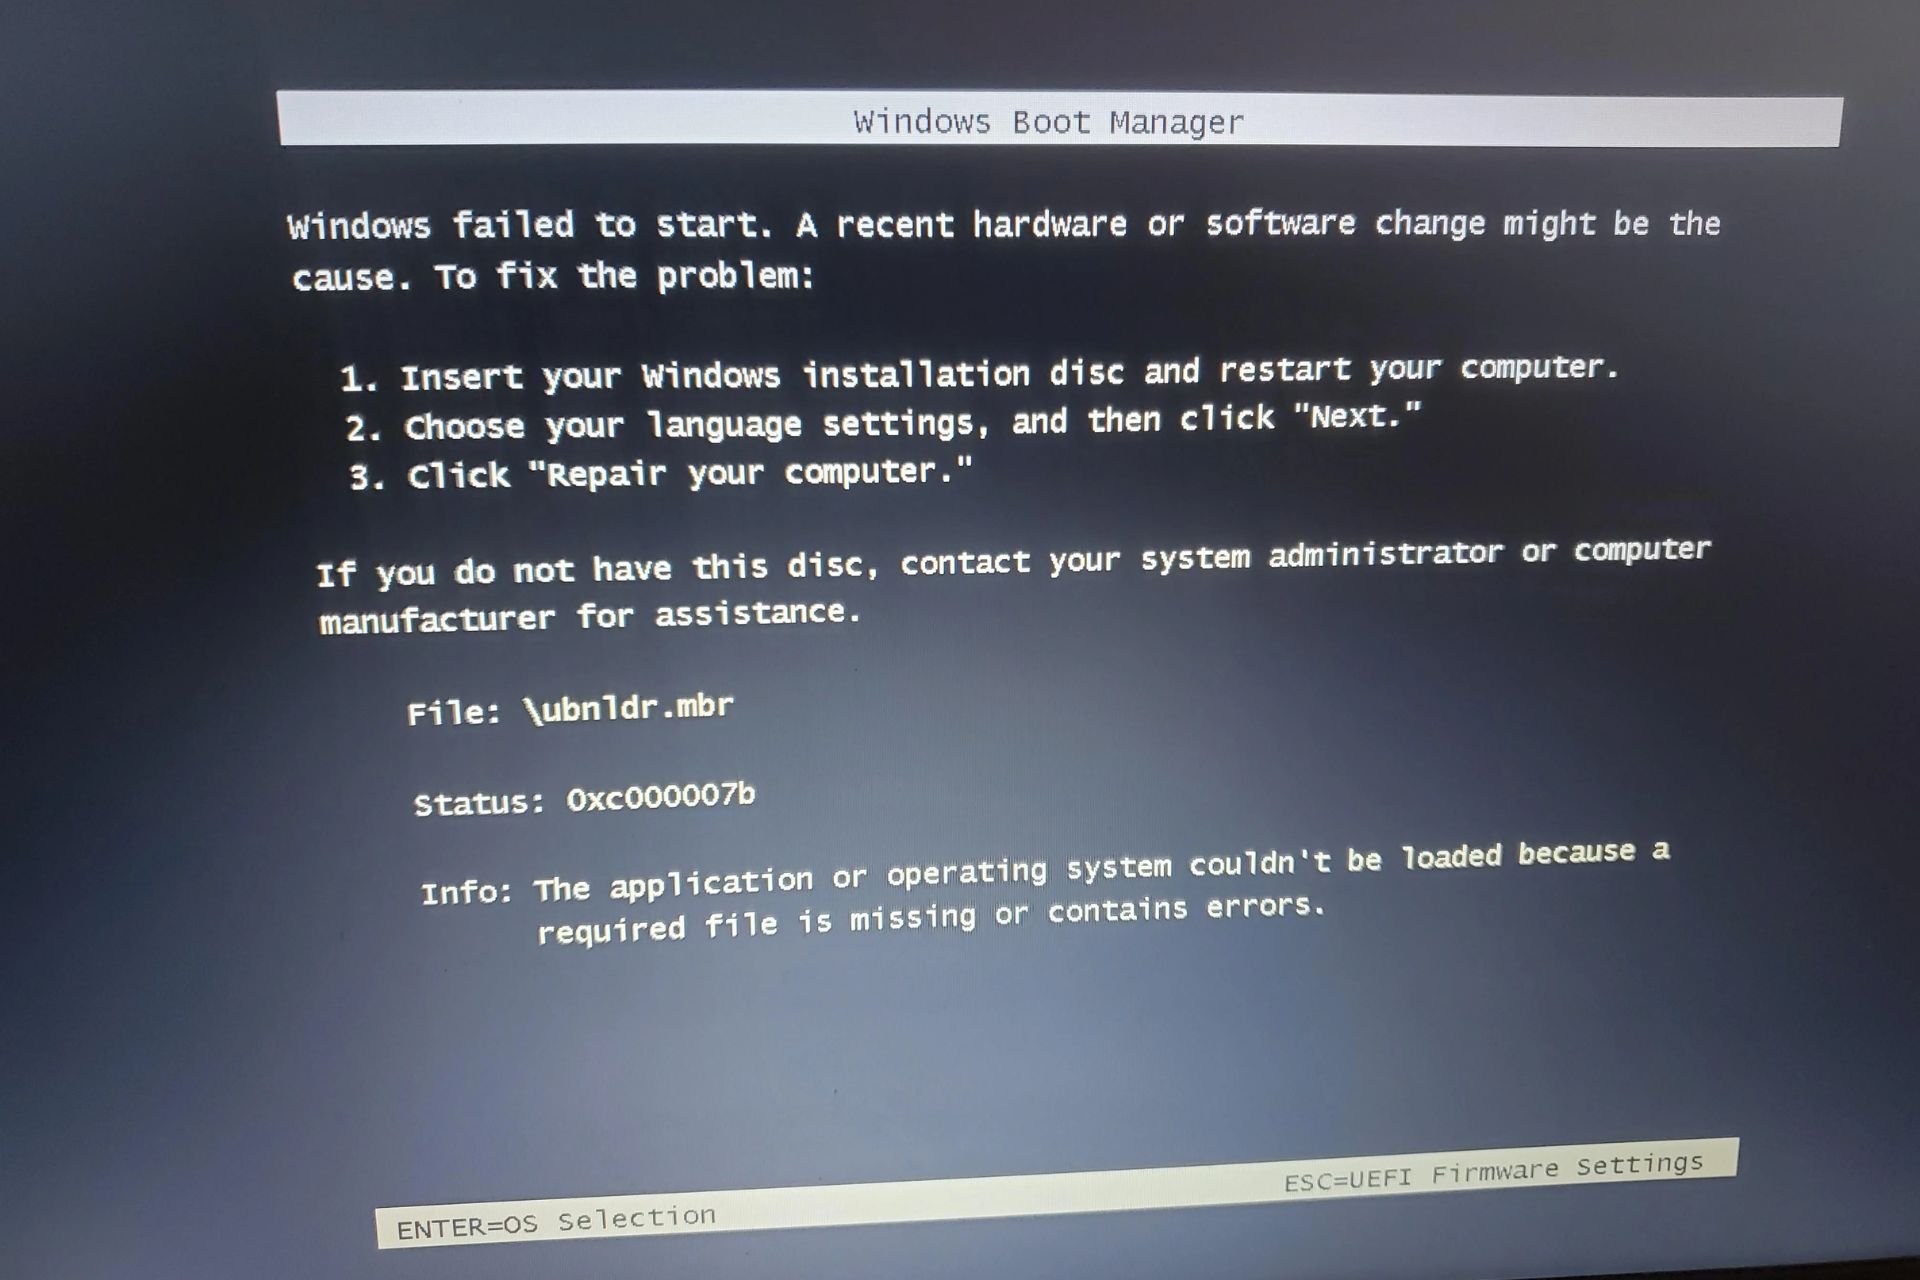
At times UNnetbootin is not working on Windows 10, and this is usually followed by Failed to start error.
The full error reads Windows failed to start A recent hardware or software change might be the cause. Unfortunately, the error message does not give much to work with.
This error is usually triggered if the Live USB was not created properly, and in this guide, we’ll show you how to fix this issue.
How do I fix UNetbootin error?
- How do I fix UNetbootin error?
- 1. Change BIOS Setup
- 2. Disable Secure Boot
- 3. Disable Fast Startup
- 4. Create a new Live USB
- 5. Check ISO files for error
- 6. Create bootable drive with Rufus
- 7. Fix Windows bootloader using Windows 10 USB
1. Change BIOS Setup
The reliable workaround for the UNetbootin Windows failed to start error is to modify your BIOS setup as shown below.
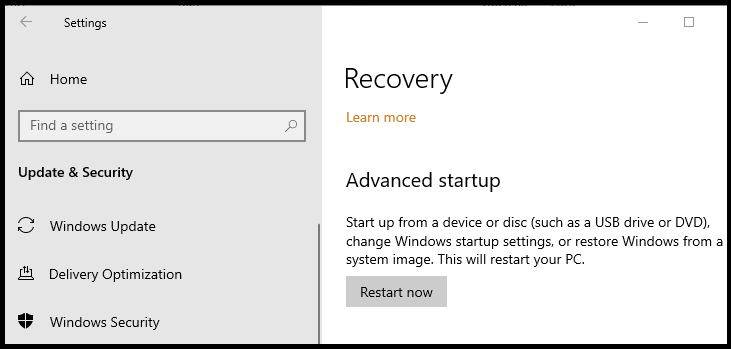
1. Press the Windows key + I to open Settings.
2. Go to Update & Security.
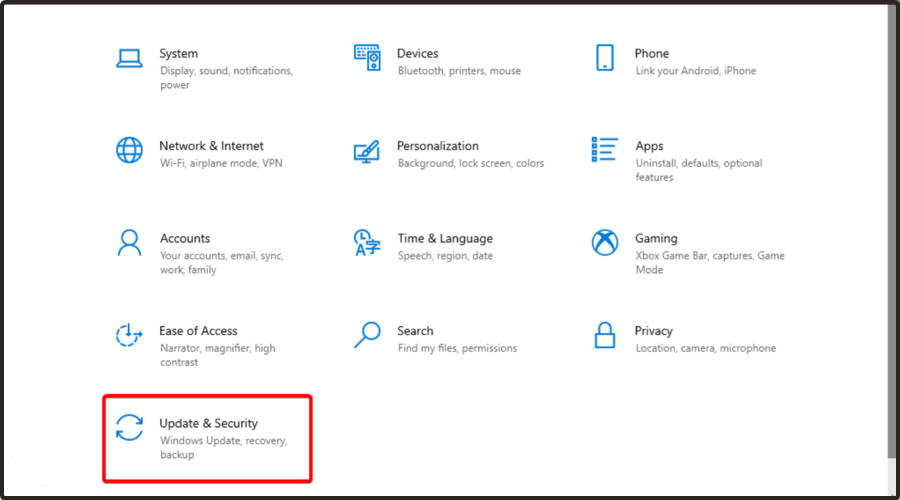
3. Open the Recovery tab from the left pane.

4. Scroll down to Advanced startup and click the Restart Now button.
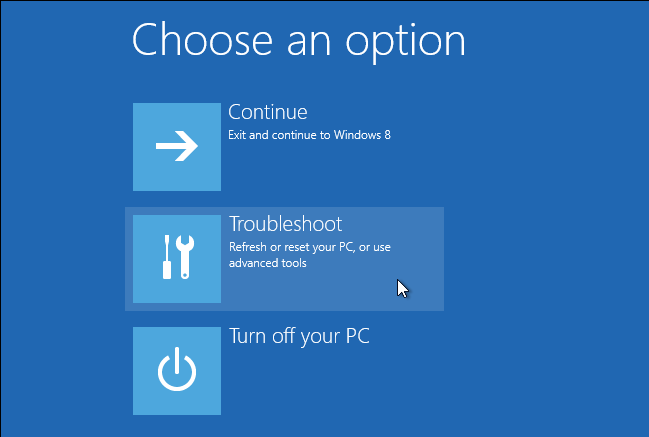
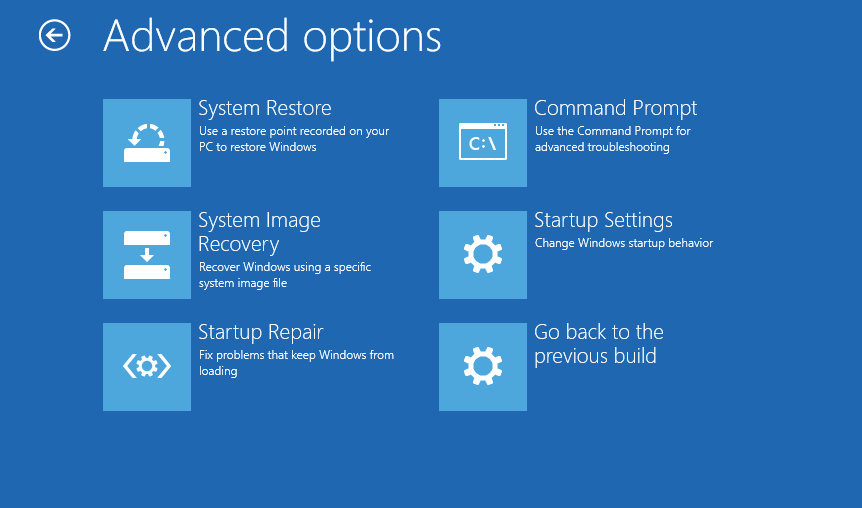
5. After the Restart, select the Troubleshoot option.
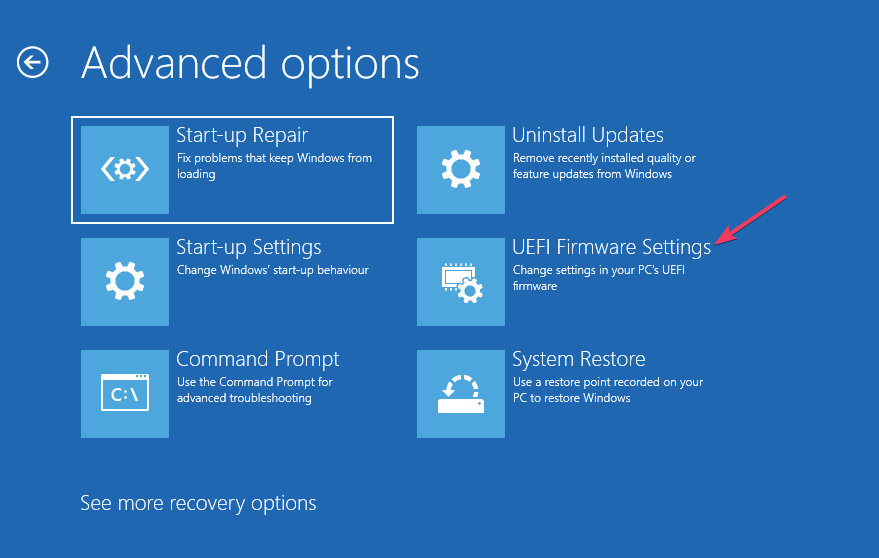
7. Under Advanced options, choose UEFI firmware settings.
8. Confirm the restart. This will allow you to enter BIOS on your Windows 10 PC.
9. After entering the BIOS, open the Boot tab.
10. Set UEFI/BIOS Boot Mode to Legacy.
11. Save the changes and exit BIOS.
Restart your PC and try to boot with the live USB. Check if the UNetbootin not working in Windows 10 error is resolved.
2. Disable Secure Boot
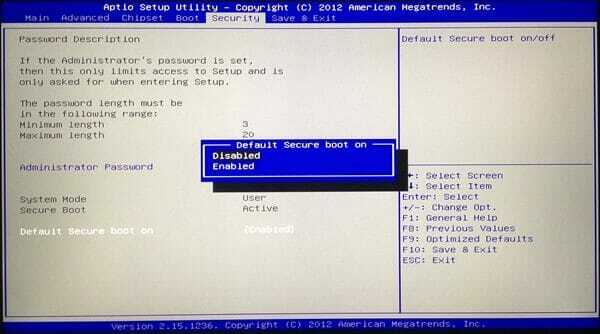
- Power off your PC. Restart and then start pressing F2 to access the BIOS.
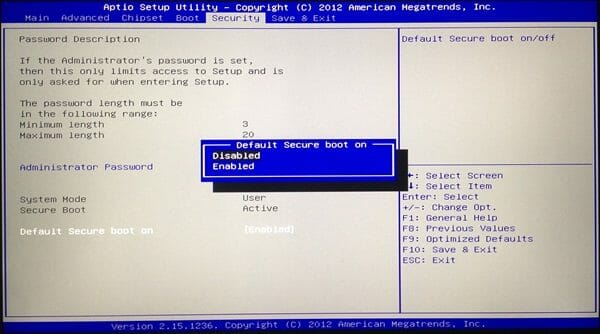
- In the BIOS, open the Security tab.

- Highlight and choose Default Secure boot on and set it as Disabled.
- Save the changes and exit BIOS.
- Reboot the computer with live USB connected and check if the failed to start UNetbootin error is resolved.
If the error persists, disable Fast startup in Windows 10. Fast Startup is a feature designed to reduce boot time. However, it prevents the computer from completely shutting down, which can lead to compatibility issues.
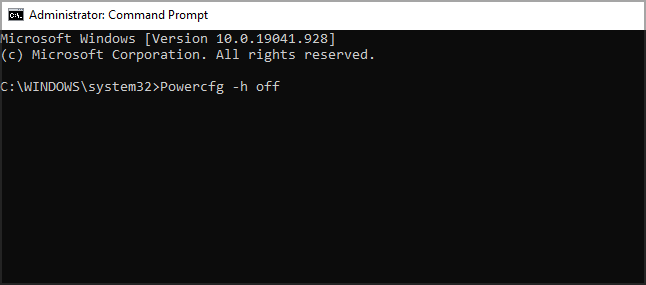
3. Disable Fast Startup
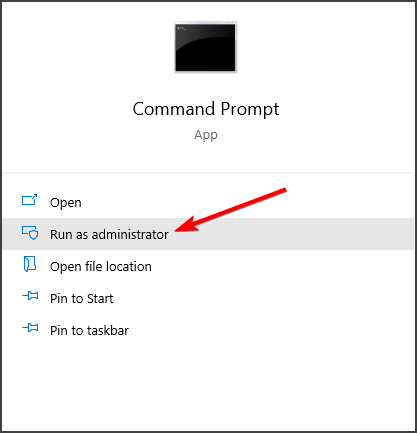
- Press the Windows key and type cmd.
- Now select Run as administrator.

- In the Command Prompt window, type the following command and hit Enter:
Powercfg -h off
- This will turn off Fast Startup. Reboot the computer and check for any improvements.

4. Create a new Live USB
One of the common reasons for Windows failing to start – A recent hardware or software change might be the cause is a corrupted Live USB drive created using UNetbootin.
To make sure the Live USB was created properly, create a new bootable drive using the existing ISO file. This would eliminate any chances of error that may have triggered due to missing or corrupt files in the drive.
5. Check ISO files for error
If the UNetbootin is still not working after creating a new live USB, check your ISO image for errors. Incomplete download or corrupted files may cause the installation to file.
Download the latest version of the ISO image available from the official source. Then create a new bootable drive and check for any improvements.
Alternatively, try using boot repair software. If you are experiencing an error on an existing installation, boot repair tools can fix computer booting issues and repair corrupted files.
6. Create bootable drive with Rufus
- Download Rufus from the official website.
- Make sure you have the latest ISO installed, and the USB is connected to your PC.
- Launch the Rufus application.

- Select your flash drive under the device.
- Next, choose your ISO, partition scheme, and target system as BIOS or UEFI.
- Choose the Format option and leave the other options as default.
- Click Start to create a bootable drive.
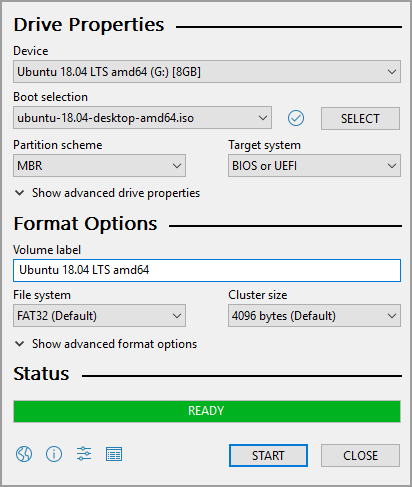
Rufus is a popular utility to create bootable USB flash drives. If UNetbootin is not working, Rufus is an excellent alternative with a uncomplicated interface.
7. Fix Windows bootloader using Windows 10 USB
- Make sure you have the Windows 10 installation media-ready. If not, create a Windows 10 bootable flash drive and then proceed.
- Boot from the media.
- Choose Repair Your Computer.
- Choose the Troubleshoot option.

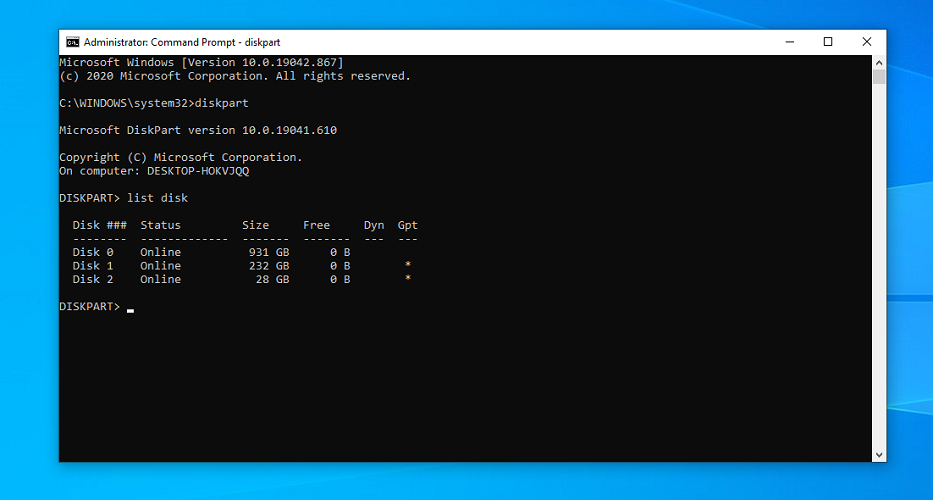
- Next, select Advanced Option and choose Command Prompt.

- In the Command Prompt, type the following command one by one and hit enter:
diskpart
sel disk 0
list vol - Make sure the EFI System Partition is using the FAT32 file system.
- Run the following command to assign a drive letter to the partition that is not in use.
sel vol <number of volume>
assign letter <drive letter>:
Exit - To repair the boot record, run the following command:
Cd /d <drive letter>: \EFI\Microsoft\Boot\
Bootrec /fixBoot - Wait for the command to find and fix issues with the bootloader. Restart the PC once the repair is complete.

The UNetbootin not working in Windows 10 Failed to start error is triggered due to faulty bootable drive or corrupted ISO image. Try changing the BIOS setup to fix the error. If not, use an alternative flash drive creator utility like Rufus.
Did you find a solution to this problem on your own? Don’t be shy and share it with us in the comments section.
![]()
- Если UNetbootin не работает с Windows, проблема может быть вызвана повреждением файла ISO или плохой флешкой.
- Изменение настроек загрузки BIOS иногда может помочь исправить эту ошибку на вашем компьютере.
- Использование другой утилиты для создания флеш-накопителя для создания живого USB-накопителя может помочь вам в решении этой проблемы.
- Если UNetbootin не запустился в Windows, вы можете исправить это с помощью установочного носителя Windows.

Для решения различных проблем с ПК мы рекомендуем Restoro PC Repair Tool:Это программное обеспечение исправит распространенные компьютерные ошибки, защитит вас от потери файлов, вредоносных программ, сбоев оборудования и оптимизирует ваш компьютер для достижения максимальной производительности. Исправьте проблемы с ПК и удалите вирусы прямо сейчас, выполнив 3 простых шага:
- Скачать Restoro PC Repair Tool который поставляется с запатентованными технологиями (патент доступен здесь).
- Нажмите Начать сканирование чтобы найти проблемы с Windows, которые могут вызывать проблемы с ПК.
- Нажмите Починить все для устранения проблем, влияющих на безопасность и производительность вашего компьютера
- Restoro был загружен 0 читатели в этом месяце.
UNetbootin — популярная утилита Windows для создания загрузочных USB-накопителей для Ubuntu и других дистрибутивов Linux.
Однако иногда UNnetbootin не работает в Windows 10, и обычно за этим следует Не смог начать ошибка.
Полная ошибка гласит Windows не запускается. Причиной может быть недавнее изменение оборудования или программного обеспечения.. К сожалению, сообщение об ошибке не дает многого поработать.
Эта ошибка обычно возникает, если Live USB не был создан должным образом, и в этом руководстве мы покажем вам, как решить эту проблему.
Как исправить UNetbootin, если он не работает в Windows 10?
1. Изменить настройки BIOS
- нажмите Клавиша Windows + I открыть Настройки.
- Перейти к Обновление и безопасность.
- Открой Восстановление вкладка на левой панели.

- Прокрутите вниз до Расширенный запуск и щелкните Перезагрузить сейчас кнопка.
- Щелкните значок Перезагрузить сейчас кнопка.
- После перезагрузки выберите Устранение неполадок вариант.
- В разделе «Дополнительные параметры» выберите Настройки прошивки UEFI.
- Подтвердите перезагрузку. Это позволит вам войти в BIOS на вашем ПК с Windows 10.
- После входа в BIOS откройте Ботинок таб.
- Набор Режим загрузки UEFI / BIOS к Наследие.
- Сохраните изменения и выйдите из BIOS.

Перезагрузите компьютер и попробуйте загрузиться с живого USB. Проверьте, устранена ли ошибка UNetbootin, не работающая в Windows 10.
2. Отключить безопасную загрузку
- Выключите компьютер. Перезагрузите, а затем нажмите F2 к доступ к BIOS.
- В BIOS откройте Безопасность таб.
- Выделите и выберите Безопасность по умолчанию загрузитесь и установите его как Отключено.
- Сохраните изменения и выйдите из BIOS.
- Перезагрузите компьютер с подключенным живым USB-портом и проверьте, устранена ли ошибка запуска UNetbootin.
Если ошибка повторится, отключите быстрый запуск в Windows 10. Быстрый запуск — это функция, предназначенная для сокращения времени загрузки. Однако это предотвращает полное выключение компьютера, что может привести к проблемам совместимости.
3. Отключить быстрый запуск
- нажмите Клавиша Windows и введите cmd.
- Теперь выберите Запустить от имени администратора.
- В окне командной строки введите следующую команду и нажмите Enter:
Powercfg -h выкл
- Это отключит быстрый запуск. Перезагрузите компьютер и проверьте, есть ли улучшения.

4. Создайте новый Live USB
Одна из распространенных причин того, что Windows не запускается — недавнее изменение оборудования или программного обеспечения может быть причиной повреждения USB-накопителя Live, созданного с помощью UNetbootin.
Запустите сканирование системы, чтобы обнаружить потенциальные ошибки

Скачать Restoro
Инструмент для ремонта ПК

Нажмите Начать сканирование чтобы найти проблемы с Windows.

Нажмите Починить все для устранения проблем с запатентованными технологиями.
Запустите сканирование ПК с помощью Restoro Repair Tool, чтобы найти ошибки, вызывающие проблемы с безопасностью и замедление. После завершения сканирования в процессе восстановления поврежденные файлы заменяются новыми файлами и компонентами Windows.
Чтобы убедиться, что Live USB был создан правильно, создайте новый загрузочный диск, используя существующий файл ISO. Это устранит любые шансы на ошибку, которая могла возникнуть из-за отсутствия или повреждения файлов на диске.
5. Проверьте файлы ISO на наличие ошибок
Если UNetbootin по-прежнему не работает после создания нового живого USB-накопителя, проверьте образ ISO на наличие ошибок. Неполная загрузка или поврежденные файлы могут привести к загрузке файла установки.
Загрузите последнюю версию ISO-образа, доступную из официального источника. Затем создайте новый загрузочный диск и проверьте наличие улучшений.
В качестве альтернативы попробуйте использовать программное обеспечение для восстановления загрузки. Если вы столкнулись с ошибкой в существующей установке, инструменты для ремонта загрузки может исправить проблемы с загрузкой компьютера и восстановить поврежденные файлы.
6. Создайте загрузочный диск с помощью Rufus
- Скачать Руфус с официального сайта.
- Убедитесь, что у вас установлена последняя версия ISO и USB подключен к вашему компьютеру.
- Запустите приложение Rufus.
- Выбираем флешку под устройством.
- Затем выберите свой ISO, схему разделов и целевую систему как BIOS или UEFI.
- Выберите параметр «Формат» и оставьте остальные параметры по умолчанию.
- Нажмите Начинать для создания загрузочного диска.

Rufus — популярная утилита для создания загрузочных USB-флешек. Если UNetbootin не работает, Rufus — отличная альтернатива с несложным интерфейсом.
7. Исправить загрузчик Windows с помощью Windows 10 USB
- Убедитесь, что у вас есть установочный носитель Windows 10. Если не, создать загрузочную флешку Windows 10 а затем продолжайте.
- Загрузитесь с носителя.
- Выбирать Почини свой компьютер.
- Выбрать Устранение неполадок вариант.
- Далее выберите Расширенный вариант и выберите Командная строка.
- В командной строке введите одну за другой следующую команду и нажмите Enter:
diskpart
сам диск 0
список том - Убедитесь, что системный раздел EFI использует файловую систему FAT32.
- Выполните следующую команду, чтобы назначить букву диска неиспользуемому разделу.
sel vol
назначить письмо :
Выход - Чтобы восстановить загрузочную запись, выполните следующую команду:
Кд / д : \ EFI \ Microsoft \ Boot \
Bootrec / fixBoot - Подождите, пока команда найдет и исправит проблемы с загрузчиком. После завершения ремонта перезагрузите компьютер.

UNetbootin не работает в Windows 10 Ошибка запуска возникает из-за неисправного загрузочного диска или поврежденного образа ISO. Попробуйте изменить настройки BIOS, чтобы исправить ошибку. Если нет, воспользуйтесь альтернативной утилитой для создания флеш-накопителей, например Rufus.
Вы сами нашли решение этой проблемы? Не стесняйтесь и поделитесь этим с нами в комментариях.
 По-прежнему возникают проблемы?Исправьте их с помощью этого инструмента:
- Загрузите этот инструмент для ремонта ПК получил рейтинг «Отлично» на TrustPilot.com (загрузка начинается на этой странице).
- Нажмите Начать сканирование чтобы найти проблемы с Windows, которые могут вызывать проблемы с ПК.
- Нажмите Починить все исправить проблемы с запатентованными технологиями (Эксклюзивная скидка для наших читателей).
Restoro был загружен 0 читатели в этом месяце.
Fixing UNnetbootin is not working on Windows 10 is easy if you follow our instructions
by Tashreef Shareef
Tashreef Shareef is a software developer turned tech writer. He discovered his interest in technology after reading a tech magazine accidentally. Now he writes about everything tech from… read more
Updated on December 14, 2022
Reviewed by
Alex Serban
After moving away from the corporate work-style, Alex has found rewards in a lifestyle of constant analysis, team coordination and pestering his colleagues. Holding an MCSA Windows Server… read more
- If the UNetbootin is not working with Windows the issue might be caused by your corrupted ISO file or bad flash drive.
- Modifying your BIOS boot settings can sometimes help you fix this error on your computer.
- Using a different flash drive creator utility to create your live USB can help you with this issue.
- If the UNetbootin failed to start on Windows, you can fix it with Windows installation media.
XINSTALL BY CLICKING THE DOWNLOAD FILE
This software will repair common computer errors, protect you from file loss, malware damage, hardware failure and optimize your PC for maximum performance. Fix PC issues and remove virus damage now in 3 easy steps:
- Download and Install Fortect on your PC
- Launch the tool and Start scanning to find broken files that are causing the problems
- Right-click on Start Repair to fix issues affecting your computer’s security and performance
- Fortect has been downloaded by 0 readers this month.
UNetbootin is a popular Windows utility to create bootable USB flash drives for Ubuntu and other Linux distributions.
At times UNnetbootin is not working on Windows 10, and this is usually followed by Failed to start error.
The full error reads Windows failed to start A recent hardware or software change might be the cause. Unfortunately, the error message does not give much to work with.
This error is usually triggered if the Live USB was not created properly, and in this guide, we’ll show you how to fix this issue.
How do I fix UNetbootin error?
- How do I fix UNetbootin error?
- 1. Change BIOS Setup
- 2. Disable Secure Boot
- 3. Disable Fast Startup
- 4. Create a new Live USB
- 5. Check ISO files for error
- 6. Create bootable drive with Rufus
- 7. Fix Windows bootloader using Windows 10 USB
1. Change BIOS Setup
The reliable workaround for the UNetbootin Windows failed to start error is to modify your BIOS setup as shown below.
1. Press the Windows key + I to open Settings.
2. Go to Update & Security.
3. Open the Recovery tab from the left pane.
4. Scroll down to Advanced startup and click the Restart Now button.
5. After the Restart, select the Troubleshoot option.
7. Under Advanced options, choose UEFI firmware settings.
Some PC issues are hard to tackle, especially when it comes to missing or corrupted system files and repositories of your Windows.
Be sure to use a dedicated tool, such as Fortect, which will scan and replace your broken files with their fresh versions from its repository.
8. Confirm the restart. This will allow you to enter BIOS on your Windows 10 PC.
9. After entering the BIOS, open the Boot tab.
10. Set UEFI/BIOS Boot Mode to Legacy.
11. Save the changes and exit BIOS.
Restart your PC and try to boot with the live USB. Check if the UNetbootin not working in Windows 10 error is resolved.
2. Disable Secure Boot
- Power off your PC. Restart and then start pressing F2 to access the BIOS.
- In the BIOS, open the Security tab.
- Highlight and choose Default Secure boot on and set it as Disabled.
- Save the changes and exit BIOS.
- Reboot the computer with live USB connected and check if the failed to start UNetbootin error is resolved.
If the error persists, disable Fast startup in Windows 10. Fast Startup is a feature designed to reduce boot time. However, it prevents the computer from completely shutting down, which can lead to compatibility issues.
3. Disable Fast Startup
- Press the Windows key and type cmd.
- Now select Run as administrator.
- In the Command Prompt window, type the following command and hit Enter:
Powercfg -h off - This will turn off Fast Startup. Reboot the computer and check for any improvements.
4. Create a new Live USB
One of the common reasons for Windows failing to start – A recent hardware or software change might be the cause is a corrupted Live USB drive created using UNetbootin.
To make sure the Live USB was created properly, create a new bootable drive using the existing ISO file. This would eliminate any chances of error that may have triggered due to missing or corrupt files in the drive.
5. Check ISO files for error
If the UNetbootin is still not working after creating a new live USB, check your ISO image for errors. Incomplete download or corrupted files may cause the installation to file.
Download the latest version of the ISO image available from the official source. Then create a new bootable drive and check for any improvements.
Alternatively, try using boot repair software. If you are experiencing an error on an existing installation, boot repair tools can fix computer booting issues and repair corrupted files.
6. Create bootable drive with Rufus
- Download Rufus from the official website.
- Make sure you have the latest ISO installed, and the USB is connected to your PC.
- Launch the Rufus application.
- Select your flash drive under the device.
- Next, choose your ISO, partition scheme, and target system as BIOS or UEFI.
- Choose the Format option and leave the other options as default.
- Click Start to create a bootable drive.
Rufus is a popular utility to create bootable USB flash drives. If UNetbootin is not working, Rufus is an excellent alternative with a uncomplicated interface.
7. Fix Windows bootloader using Windows 10 USB
- Make sure you have the Windows 10 installation media-ready. If not, create a Windows 10 bootable flash drive and then proceed.
- Boot from the media.
- Choose Repair Your Computer.
- Choose the Troubleshoot option.
- Next, select Advanced Option and choose Command Prompt.
- In the Command Prompt, type the following command one by one and hit enter:
diskpart
sel disk 0
list vol - Make sure the EFI System Partition is using the FAT32 file system.
- Run the following command to assign a drive letter to the partition that is not in use.
sel vol <number of volume>
assign letter <drive letter>:
Exit - To repair the boot record, run the following command:
Cd /d <drive letter>: EFIMicrosoftBoot
Bootrec /fixBoot - Wait for the command to find and fix issues with the bootloader. Restart the PC once the repair is complete.
The UNetbootin not working in Windows 10 Failed to start error is triggered due to faulty bootable drive or corrupted ISO image. Try changing the BIOS setup to fix the error. If not, use an alternative flash drive creator utility like Rufus.
Did you find a solution to this problem on your own? Don’t be shy and share it with us in the comments section.
![]()

Для создания загрузочных флешк использую замечательную программу UNetbootin.
Но вдруг вновь созданные флшки перестали корректно грузится — по текстовому экрану бегут одинаковые строки о том, что не найден файл. Причём сам файл на флешке есть.
Решение нашёл на сайте Arch-а.
Нужно в файле syslinux.cfg исправить параметры загрузки ядра.
Добавить параметр pmedia=usb или изменить его значение, если там что-то отличное от usb.
Например:
label unetbootindefault
menu label Default
kernel /ubnkern
append initrd=/ubninit pmedia=usb
Да, при добавлении/изменении внимательно смотрим на то, что написано в строчке label. Если там загрузка с жёсткого диска, то менять параметры не нужно.
Если вы только что установили UNetbootin в систему Linux Mint и открыли его в первый раз, то можете столкнуться с сообщением об ошибке.

Данная ошибка выводит сообщение о том, что для режима установки USB-накопителя (флешки) недостаёт пакета extlinux, который требуется установить.
Если вы столкнулись с подобной ошибкой установите пакет extlinux следующей командой в терминале:
sudo apt-get install extlinux
После установки пакета extlinux откройте UNetbootin, сообщение об ошибке не должно больше появляться.
Удачи.
Guys,
I can’t install Linux Mint, because when I tried to boot into UNetbootin, Windows Boot Manager giving a error with ubnldr.mbr.
I don’t know, why it is happening, but I show my PC config:
CPU: AMD FX-8150
Motherboard: Asus M5A99X Evo R2.0
GPU: nVIDIA GeForce GTX 1060 3GB
RAM: 24 Gb (DIMM 1 and 2 is Kllisre KRE-D3U1600M/4G, DIMM 3 and 4 is Patriot Memory PSD38G16002)
BIOS: AMI BIOS (v.2501, OrochiPIV1.5.0.2, UEFI Boot is enabled, Secure Boot is disabled)
As the title says when I select UNetbootin as my OS I get an error saying that Windows failed to start. It advises me to repair using my Windows disc. Then I get this on the screen:
Windows Boot Manager

Windows failed to start. A recent hardware or software change might be the cause.
To fix the problem:

  1. Insert your Windows installation disc and restart your computer.
  2. Choose your language settings, and then click "Next."
  3. Click "repair your computer."

If you don't have this disc, contact your system administrator or computer
manufacturer for assistance.

  File: ubnldr.mbr

  Status: 0xc0000007b

  Info: The application or operating system couldn't be loaded because a required
        file is missing or contains errors.
I am using Windows 8 and Ubuntu 13.04.
So I was already booting In legacy. On a lark I decided to try UEFI and that has made it so I cannot even boot windows after switching back to legacy. I get:
error no such partition
grub rescue >
From the boot menu I can enter either P2: TSSTcorp DVDWBD SN-406AB or P1: WDC WD7500BPKT-75PK4T0 or Bigfoot Boot Agent.
This is quickly going from bad to catastrophic. Please assist. I am in way over my head now. I removed the Ubuntu DVD and still no luck getting back into Windows.
Any advice on getting around this or understanding what the problem is would be appreciated.
Для создания загрузочных флешк использую замечательную программу UNetbootin.
Но вдруг вновь созданные флшки перестали корректно грузится — по текстовому экрану бегут одинаковые строки о том, что не найден файл. Причём сам файл на флешке есть. 
Решение нашёл на сайте Arch-а.
Нужно в файле syslinux.cfg исправить параметры загрузки ядра.
Добавить параметр pmedia=usb или изменить его значение, если там что-то отличное от usb.
Например:
label unetbootindefault
menu label Default
kernel /ubnkern
append initrd=/ubninit pmedia=usb
Да, при добавлении/изменении внимательно смотрим на то, что написано в строчке label. Если там загрузка с жёсткого диска, то менять параметры не нужно. 

Here we can see, “How to: Fix Unetbootin Not Working in Windows 10”
- If UNetbootin isn’t working with Windows, the problem may be due to a corrupted ISO file or a defective flash drive.
- Changing your BIOS boot settings can occasionally help you fix your computer’s issue.
- Creating your live USB with a different flash drive creation tool can assist you in solving this problem.
- If UNetbootin fails to run on Windows, you can use the Windows installation DVD to fix the problem.
UNetbootin is a popular Windows tool for creating Ubuntu and other Linux distribution bootable USB flash drives.
However, on sometimes, UNnetbootin fails to start on Windows 10, resulting in the Failed to start error.
The entire error message is as follows: Windows was unable to start. It’s possible that a recent hardware or software upgrade is to blame. Unfortunately, there isn’t much to work on within the error message.
This mistake is frequently caused by the Live USB not being adequately produced, and we’ll teach you how to solve it in this article.
If UNetbootin isn’t working in Windows 10, how can I get it to work again?
1. Modify the BIOS settings
- To launch Settings, use the Windows key + I.
- Select Update & Security from the drop-down menu.
- From the left pane, select the Recovery tab.
- Click the Restart Now button after scrolling down to Advanced startup.
- Restart the computer by using the Restart Now button.
- Select the Troubleshoot option after the restart.
- Select UEFI firmware settings from the Advanced menu.
- Confirm that you want to restart. This will allow you to access the BIOS settings on your Windows 10 computer.
- Open the Boot tab after entering the BIOS.
- UEFI/BIOS Boot Mode should be set to Legacy.
- Exit BIOS after saving the modifications.
Restart your computer and try booting from the Live USB. Check to see if the UNetbootin problem in Windows 10 has been addressed.
2. Disable Secure Boot
- Power off your PC. Restart and
- Open the Security tab in the BIOS.
- Set Default Secure Boot On to Disabled by selecting it and selecting it.
- Exit BIOS after saving the modifications.
- Check if the failure to start the UNetbootin error has been fixed by rebooting the machine with a live USB inserted.
Fast Startup is a function that reduces the amount of time it takes for your computer to start up. It does, however, prevent the computer from shutting down entirely, which can cause compatibility issues. Disable Fast startup in Windows 10 if the error persists.
3. Turn off the Fast Startup feature
- Type cmd while holding down the Windows key.
- Select Run as administrator from the drop-down menu.
- Type the following command in the Command Prompt window and press Enter:
Powercfg -h off
- Fast Startup will be disabled as a result of this. Restart the machine and see if anything has changed.
4. Make a fresh Live USB drive
A corrupted Live USB drive made using UNetbootin is one of the most prevalent causes of Windows failing to start – A recent hardware or software change could be the culprit.
Create a fresh bootable drive using the existing ISO file to ensure the Live USB was adequately produced. This will eliminate any errors that may have occurred due to missing or corrupt files on the hard drive.
5. Make sure there are no errors in the ISO files
Check your ISO image for issues if UNetbootin is still not operating after making a new live USB. The installation may fail due to an incomplete download or corrupted files.
Get the most recent version of the ISO image from the official source. Then make a new bootable drive and see if anything has changed.
Alternatively, boot repair software may be used. Boot repair software can fix computer booting issues and repair corrupted files if you’re having problems with an existing installation.
6. Using Rufus, create a bootable drive
- Rufus can be downloaded from the official website.
- Ensure that you have the most recent ISO installed and that the USB is connected to your computer.
- Rufus should now be launched.
- Select your flash drive from the device drop-down menu.
- Next, select your ISO, partition scheme, and target system (BIOS or UEFI) from the drop-down menus.
- Select the Format option and leave the rest of the settings alone.
- To make a bootable drive, click Start.
Rufus is a well-known tool for creating bootable USB flash drives. Rufus is an excellent alternative to UNetbootin if UNetbootin isn’t working. It has a simple interface.
7. Using a Windows 10 USB drive, repair the Windows bootloader
-
- Make sure the Windows 10 installation media is ready to go. Make one first if you don’t have a Windows 10 bootable flash drive.
- Remove yourself from the media.
- Make the decision to repair your computer.
- Select Troubleshoot from the drop-down menu.
- After that, go to Advanced Options and select Command Prompt.
- Type the following commands one by one in the Command Prompt and press Enter:
- diskpart
sel disk 0
list vol
- diskpart
- Ascertain that the EFI System Partition is formatted with the FAT32 file system.
- Run the command below to assign a drive letter to the partition that isn’t in use.
- sel vol <number of volume>
assign letter <drive letter>:
Exit
- sel vol <number of volume>
- Run the following command to rebuild the boot record:
- Cd /d <drive letter>: \EFI\Microsoft\Boot\
Bootrec /fixBoot
- Cd /d <drive letter>: \EFI\Microsoft\Boot\
- Wait for the command to discover and correct bootloader faults. Once the fix is finished, restart the computer.
Conclusion
I hope you found this information helpful. Please fill out the form below if you have any questions or comments.
User Questions
1. How do I get UNetbootin to work on Windows 10?
Make A Windows 10 TP USB Bootable
Install UNetbootin from the Ubuntu Software Center, open it, select the Windows 10 TP ISO file as Diskimage, USB Drive as Type, and target Drive as Destination, and click OK. Install Windows 10 using the bootable USB, which should be simple.
2. Is it possible to build a Windows 10 bootable USB with UNetbootin?
While UNetbootin’s primary function is to create a bootable USB drive, it may also be used with any type of USB storage device, including external hard drives. Because UNetbootin does not have the capacity to format USB flash drives or external hard disc devices, it does not wipe any files.
3. Why isn’t my USB bootable working?
Bootable Windows 10 The issue with USB not working could be due to a misconfigured boot mode or file system. Most older computer models support Legacy BIOS, but contemporary computers, such as Windows 8/10, use UEFI boot mode. And, in most cases, BIOS boot mode requires the NTFS file system, whereas UEFI (with CSM deactivated) requires the FAT32 file system.
4. Unetbootin issues on Windows 10, error or bad practice?
Unetbootin issues on Windows 10, error or bad practice? from linux4noobs
5. Problems booting Windows 10 USB installer : r/Ubuntu – Reddit
Problems booting Windows 10 USB installer from Ubuntu