In the case where tried to install a file:
sudo apt-get install libstdc++.so.6
instead of a package. You get the error message:
E: Unable to locate package libstdc++.so.6
E: Couldn't find any package by regex 'libstdc++.so.6'
because you tried to install a file libstdc++.so.6 that you can’t install, because it is located in a debian package.
You can use apt-file to search for the package that contains that file. To install it, type:
sudo apt-get install apt-file
Then you have to update the index.
sudo apt-file update
After that, you can search for the package which contains the file libstdc++.so.6:
sudo apt-file find libstdc++.so.6
Then you find a lot packages that contains the searched file. For this example I paste only one search result:
libstdc++6: /usr/lib/x86_64-linux-gnu/libstdc++.so.6
Then you can install the needed package libstdc++6:
sudo apt-get install libstdc++6
Один из многих способов установки программного обеспечения в Ubuntu – команда apt-get или apt. Установка пакетов с помощью пакетного менеджера намного удобнее и безопаснее, чем поиск и загрузка программ в интернете. Открыв терминал, вы должны вызвать утилиту apt с параметром install написать название программы, чтобы установить ее.
При использовании этой команды иногда возникает ошибка E: Unable to locate package. Ошибка не нуждается в пояснении. Linux-система не может найти пакет, который вы пытаетесь установить. Но почему так? Почему она не видит пакет? Рассмотрим несколько способов решения данной проблемы. В этой статье мы рассмотрим как исправить ошибку Unable to locate package error в Ubuntu.

Дальше пошагово рассмотрим процесс устранения ошибки.
1. Проверьте имя пакета
Это первое, что вы должны сделать. Может, в названии пакета опечатка? Если вы пытаетесь установить vlc и написали vcl, то непременно ничего не получится. Опечатки – распространенная проблема, так что убедитесь в том, что вы не допустили ошибок во время ввода имени пакета.
2. Обновите кэш репозиториев
Если вы в первый раз запустили систему после установки, следует написать команду update:
sudo apt update
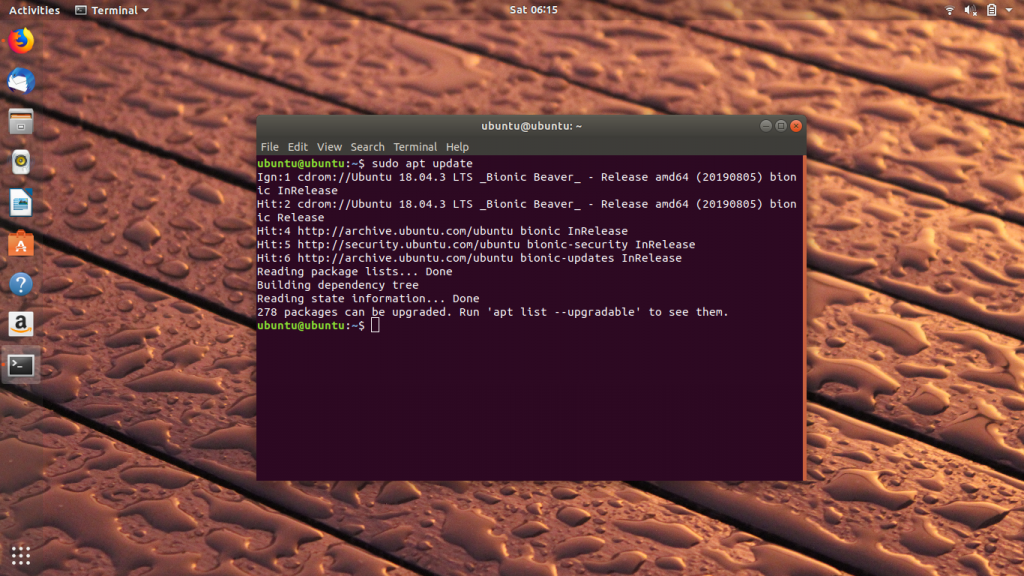
Данная команда не обновит Ubuntu полностью. На деле, команда apt update составляет локальный список доступных для установки пакетов.
При использовании команды install, менеджер пакетов apt просматривает кэш, чтобы получить информацию о пакете и его версии, а затем скачать его из репозиториев в сети. Если пакета в кэше нет, система не сможет его установить.
Кэш в только что установленной системе изначально пуст. Именно поэтому вам стоит запустить команду apt update сразу после установки Ubuntu или других дистрибутивов, основанных на Ubuntu (например, Linux Mint).
Даже если система не новая, кэш apt вполне может оказаться устаревшим. В любой момент не лишним будет его обновить.
3. Убедитесь, что пакет доступен в вашей версии Ubuntu
Отлично! Вы проверили название пакета, и оно верно. Вы запустили команду update, чтобы обновить состояние кэша, но все ошибка unable to locate package все еще присутствует. Вполне возможно, что пакет попросту недоступен. Но вы следуете инструкции с какого-то сайта, и у всех получается установить его указанным образом. В чем может заключаться проблема?
Есть два варианта. Либо пакет доступен в репозитории Universe, который в вашей системе не включен, либо пакета вовсе не существует для вашей версии Ubuntu.
Первый шаг – проверьте, какая версия Ubuntu у вас запущена. Откройте терминал и введите следующую команду:
lsb_release -a
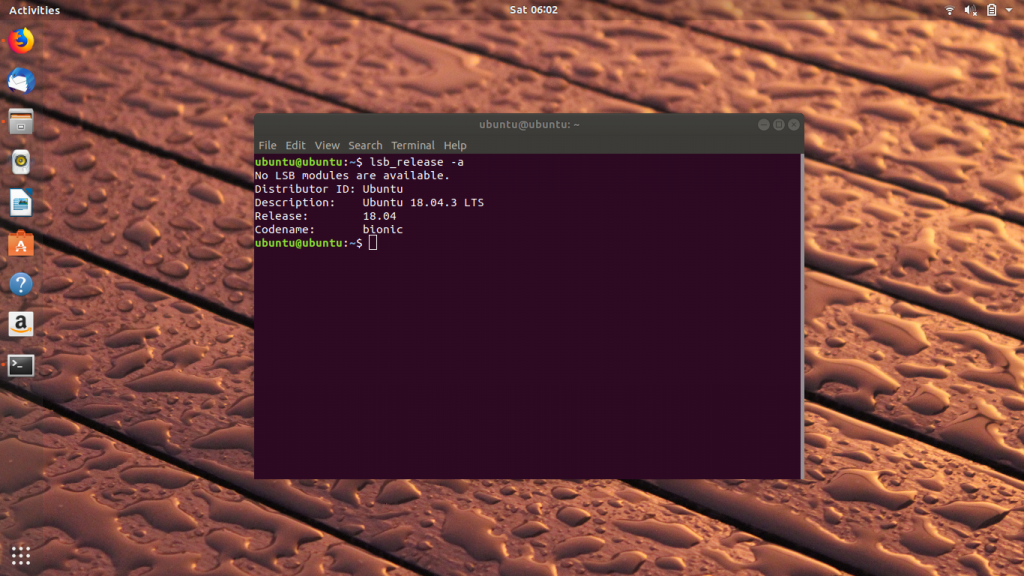
В результате вы увидите версию Ubuntu и ее кодовое название. Именно кодовое название нам важно больше всего. Как видите, мы используем Ubuntu 18.04 с кодовым именем bionic. У вас может быть иначе, но суть должна быть понятна. Как только вы получили сведения о версии и названии, откройте сайт Ubuntu Packages.
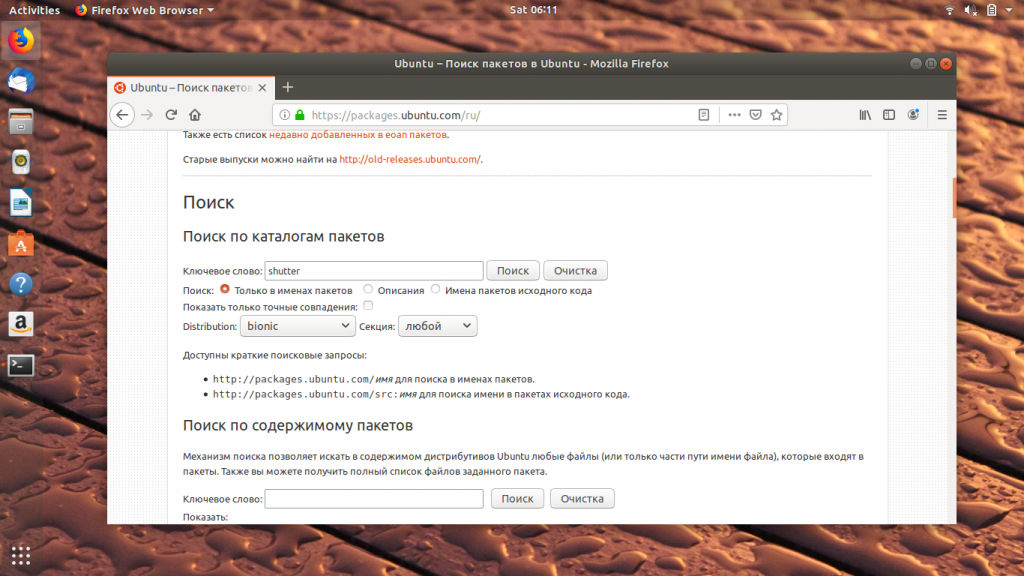
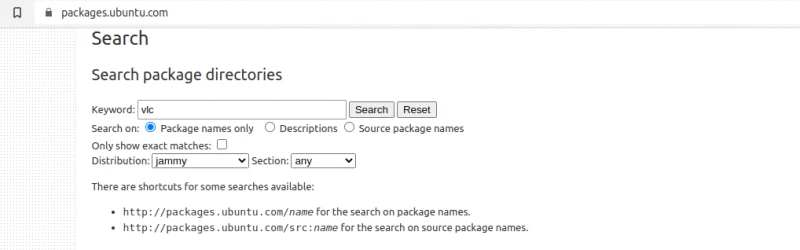
Пролистайте пониже и остановитесь на заголовке Поиск. Вы увидите поле с ключевым словом. Введите название пакета, который ваша система не может найти, и выберите соответствующее кодовое имя. Секцию поставьте любую. После проделанных действий, нажмите на кнопку поиска.
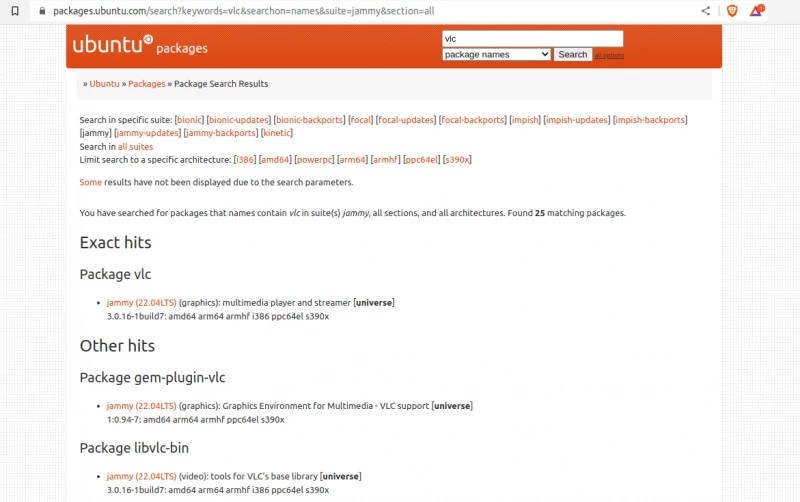
Вам будет показано, доступен ли пакет для вашей версии Ubuntu, и если это так, то вместе с этим отобразится репозиторий, в котором он находится. Мы искали средство создания скриншотов Shutter и вот, что вышло для Ubuntu 18.04 Bionic:
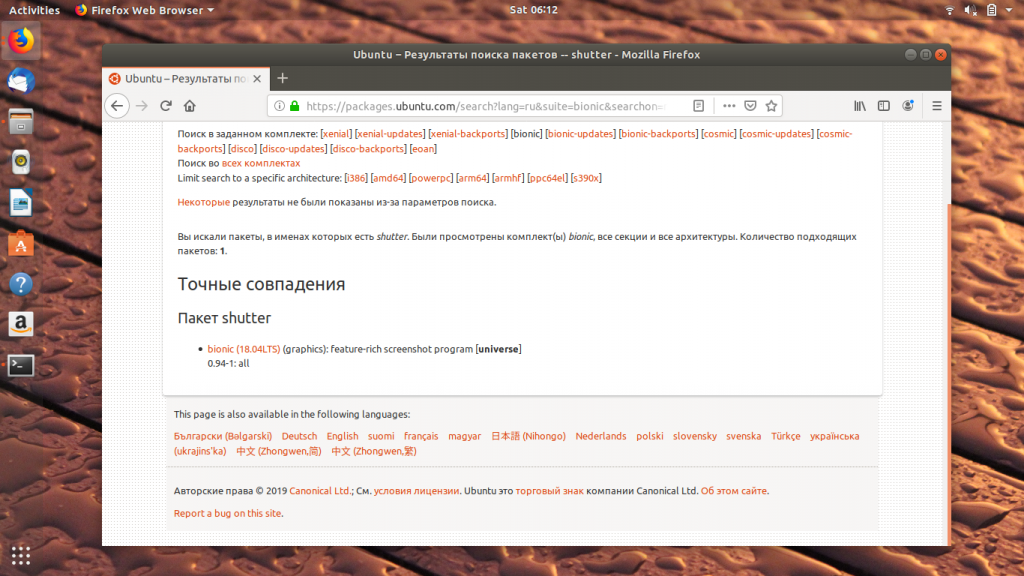
В нашем случае, название пакета точно совпало. Это значит, что пакет shutter существует для Ubuntu 18.04 Bionic, но в репозитории Universe.
Если необходимый пакет доступен для вашей версии Ubuntu, но в Universe или Multiverse, эти репозитории необходимо включить:
sudo add-apt-repository universe multiverse
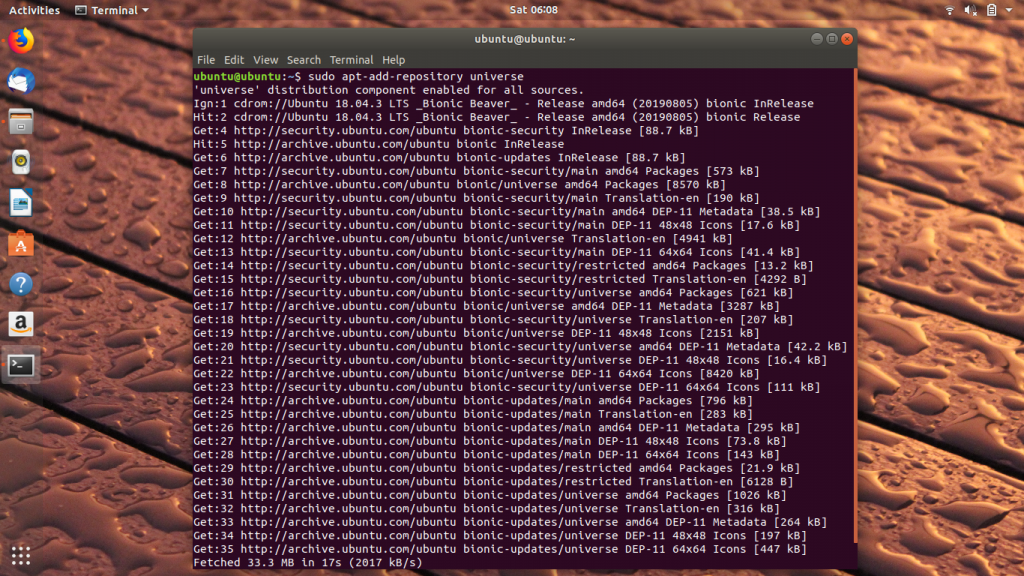
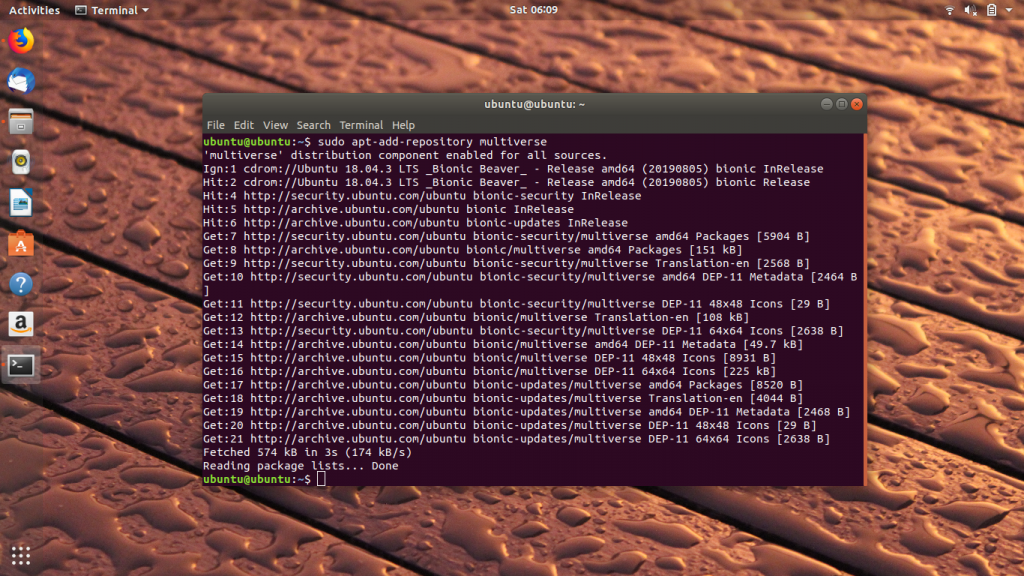
Также нужно обновить кэш для того, чтобы система узнала о новых пакетах, находящихся в подключенных репозиториях:
sudo apt update
Теперь установка пакета должна пройти гладко.
Ничего не работает, что делать?
Если сайте Ubuntu Packages показывает, что пакета для вашей версии системы нет, то придется найти обходные пути его установки.
Возьмем в качестве примера Shutter. Это отличное средство создания скриншотов для Linux, но его несколько лет не обновляли, поэтому в Ubuntu 18.10 и более новых версиях оно не поддерживается. Как же его установить? К счастью, один сторонний разработчик создал собственный репозиторий (PPA) и установить программу можно с помощью него. Искать пакеты и PPA, в которых они находятся, можно на сайте Launchpad для Ubuntu.
Учтите, что не стоит подключать неофициальные PPA к списку репозиториев. Лучше пользоваться теми, которые есть в вашем дистрибутиве.
Если нет даже PPA, зайдите на официальный сайт программы и проверьте, нет ли там описания альтернативных способов установки. У некоторых проектов есть .deb или AppImage файлы. Другие перешли на Snap пакеты.
Иными словами, проверьте на официальном сайте, не изменился ли метод установки приложения.
Если ничего не помогло, есть вероятность, что проект уже не поддерживают, и в таком случае придется поискать программе замену.
В заключение…
Теперь вы знаете как исправить ошибку unable to locate package Ubuntu. Если вы начали пользоваться Linux недавно, все может казаться очень непонятным. По этой причине мы освещаем подобные темы, чтобы вы могли лучше разобраться в том, как работают те или иные аспекты вашей системы.
Надеемся, что это руководство помогло решить проблему с пакетами в Ubuntu. Если у вас есть вопросы или предложения, можно оставить их в комментариях.
Обнаружили ошибку в тексте? Сообщите мне об этом. Выделите текст с ошибкой и нажмите Ctrl+Enter.
Туториал для новичков: как избавиться от ошибки «E: Unable to locate package» на Linux Ubuntu.
Команда apt или apt-get — один из способов установки ПО на Ubuntu. В терминале после команды прописывается название программы, которую нужно установить.
sudo apt install package_nameИногда в процессе установки происходит сбой. Уведомление выглядит следующим образом:
sudo apt-get install package_name
Reading package lists... Done
Building dependency tree
Reading state information... Done
E: Unable to locate package package_name
Текст ошибки говорит сам за себя. Система не может найти пакеты, которые вы пытаетесь установить. Почему это происходит?
Устранение ошибки «Unable to locate package» на Ubuntu

Шаг за шагом рассмотрим, что могло пойти не так.
1. Имя пакета
Это нужно проверить в первую очередь. Возможно, в название закралась опечатка. Если нужно установить «vlc», а в команде прописано «vcl», то, вполне естественно, процесс прервётся.
2. Обновление кэша репозитория
Во время первого старта системы необходимо запустить обновление при помощи следующей команды:
Эта команда не будет сразу же обновлять Ubuntu. Она предназначена для обновления информации о пакетах, содержащихся в репозиториях.
Когда запускается команда установки, apt-менеджер находит в кэше информацию о пакете и его версии, после чего загружает файлы через репозиторий. Соответственно, если пакета нет в кэше, появится уведомление об ошибке.
Сразу после установки новой системы, её кэш еще пуст. Именно поэтому в таких случаях необходимо прописать команду обновления как для Ubuntu, так и для любого другого дистрибутива на её основе (например, Linux Mint) во время первого запуска.
Но даже при работе с давно установленной системой есть шанс, что нужный пакет не был подгружен. Чтобы исключить такую вероятность, стоит перестраховаться и обновить кэш.
3. Доступен ли пакет для используемой версии Ubuntu
Итак, название написано правильно, кэш обновлён, но ошибка всё равно появляется.
Вероятно, пакет доступен через репозиторий Universe, а ваша система или не поддерживает его, или версия Ubuntu не поддерживается данной программой.
Шаг первый – проверить актуальную версию Ubuntu через терминал.
lsb_release -aНа выходе отображается номер версии и кодовое имя.
abhishek@itsfoss:~$ lsb_release -a
No LSB modules are available.
Distributor ID:	Ubuntu
Description:	Ubuntu 18.04.3 LTS
Release:	18.04
Codename:	bionic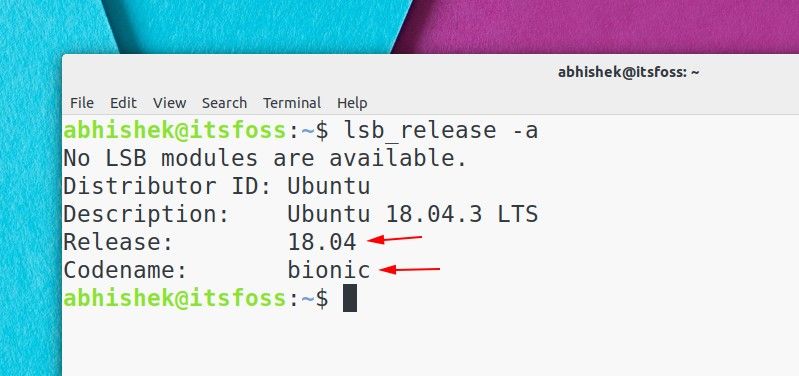
Например, версия Ubuntu 18.04 c кодовым именем “bionic”.
Шаг второй – расширенный поиск на сайте пакетов Ubuntu.
На сайте доступна опция поиска по ключевому слову. Вводим название пакета и выставляем кодовое имя дистрибутива. В графе ”секция” нужно выставить значение ”any”. Запускаем поиск.

Так можно узнать, доступен ли пакет для конкретной версии Ubuntu и, если доступен, то к какому репозиторию он относится. Разберём на примере Shutter, программы для создания скриншотов, которую не обновляли в течение последних лет. Для версии Ubuntu18.04 Bionic будут выведены следующие данные.
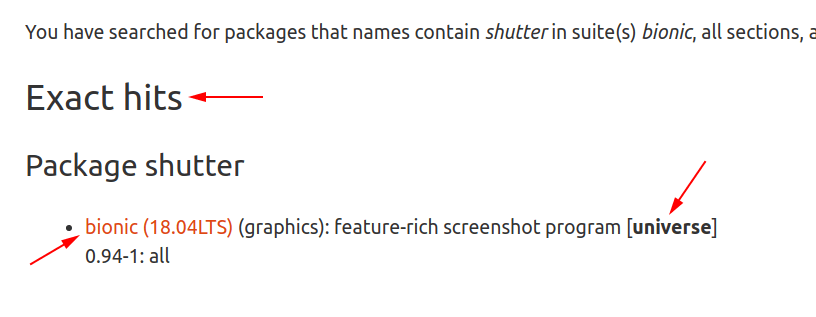
В этом случае есть точное совпадение с названием пакета. Он доступен для версии Ubuntu 18.04 Bionic и относится к репозиторию Universe.
Если искомый пакет доступен для вашей версии системы, но относится к Universe или Multiverse, необходимо установить дополнительные репозитории.
sudo add-apt-repository universe multiverseПосле этого обновите кэш, чтобы убедиться, что пакеты доступны через репозитории.
sudo apt updateНичего не помогло, что делать?
Если пакет недоступен и на сайте Ubuntu, то нужно искать другой способ установки. Усилиями сторонних разработчиков были созданы персональные архивы пакетов (PPA). Здесь стоит быть осторожными с неофициальными архивами и не добавлять сомнительные версии в систему.
Если этот способ не сработал, можно посетить официальный сайт проекта и уточнить, есть ли альтернативные способы установки их программ. На некоторых ресурсах доступны .DEB или AppImage файлы. Какие-то проекты могли перейти на пакеты Snap.
Всегда есть вероятность, что проект был закрыт и более не поддерживается. В таком случае выход один: искать альтернативу самой программе.
Ubuntu’s support for different packages is one of its most valuable features because it allows you to install and run different packages based on your needs. But in contrast to this valuable feature of Ubuntu, when installing packages, you sometimes encounter the “E: Unable to Locate Package” error, which is nothing to worry about.
“E: Unable to Locate Package” is a common error when installing various software and packages in Ubuntu using theapt-getoraptcommand. There are various reasons for receiving this error. Choosing the wrong package installation format or not supporting the relevant information to install the desired package can be common reasons for receiving the “E: Unable to Locate Package” error.
But we have to remind you once again that Linux does not fail in front of any problem and has solutions for every problem. Due to its unique features, Ubuntu has become the most popular operating system for servers among Linux users. It is not without reason that Ubuntu Linux VPS has become the priority of users when buying Linux VPS because, with Ubuntu, any problem can be solved, and it does not allow any problem to remain unsolved. You just need to be familiar with Linux commands and use various commands and the Ubuntu Package Manager (APT) to solve problems related to installing packages in Ubuntu.
This guide will walk you through the steps of fixing this error on Ubuntu by explaining the causes and solutions. After reading this guide, you can rest assured that you will be able to successfully install the software of your choice in Ubuntu.
Reasons for getting the “E: Unable to Locate Package” error in Ubuntu
Ubuntu uses the comprehensive and advanced APT package management tool to install, remove, and upgrade packages in the default Ubuntu repository. As a Linux administrator, you are probably already familiar with the APT package manager and how to use it.
Sometimes, when you install a new package in Ubuntu using the apt command line tool, you will get the following error:
sudo apt-get install package_nameOutput:
Reading package lists... Done
Building dependency tree
Reading state information... Done
E: Unable to locate package package_name
The “E: Unable to Locate Package” error means that you have not succeeded in finding the package you are looking for. The first step in fixing this issue is figuring out why you’re getting this error, and then doing what needs to be done to fix it. You might be asking what the issue is or why we are getting this error.
There are several reasons for receiving this error, including:
- The Ubuntu repository cache does not support new packages
- Non-availability of the main repositories to install the desired package
- A misspelling in the package name
- Unavailability of the package for the version of Ubuntu you are using
- Expiration of the version of Ubuntu and end of the support period for the desired version
- The problem with the resource list
After identifying the problem using the apt package manager and the solutions we will provide, your problem will be solved.
How can we fix Ubuntu’s “E: Unable to Locate Package” error?
Without wasting time, we will go directly to solving the problem of installing various packages in Ubuntu. First, you must identify the causes of this problem and then use appropriate solutions to solve it.
1. Updating packages and repository cache
When installing the desired software package, the apt package manager tool first checks the cache to find the package and version information, and then downloads and installs the desired package through the network and its repositories. If the cache does not support the package you want, Ubuntu will have problems installing the software and the package.
The first suggestion we have for this problem is to update and upgrade the package list of the default Ubuntu repositories to support new and updated packages and software. Run the following commands to ensure that the packages in the Ubuntu repository are up-to-date:
sudo apt update && sudo apt upgrade -yWith the update of Ubuntu repositories, apt cache is no longer out-of-date and supports new and updated packages.
After updating, install the desired package. If you get the “E: Unable to Locate Package” error again, try other solutions.
Note: We recommend that you download and install the packages you need from.deb files. You can also remove the lines from the/etc/apt/sources.list after installing the desired package.
2. Adding main repositories to install packages
One of the common problems in old versions of Ubuntu is not pre-installing the main repositories for installing various software and packages. Fortunately, this problem does not happen in the new version because new versions of Ubuntu (such as LTS 22.04) are provided to users along with the main repositories. Anyway, if you are using an old version of Ubuntu, don’t forget to add the main repositories to the Ubuntu operating system to avoid possible errors when installing various programs. Add the main repositories for installing packages to Ubuntu by running the following commands:
sudo add-apt-repository main
sudo add-apt-repository universe
sudo add-apt-repository restricted
sudo add-apt-repository multiverse
After adding the main repositories to Ubuntu OS, if you have problems installing apps, try other solutions.
3. Checking the package name
Since Ubuntu is case-sensitive, you must pay attention to uppercase and lowercase letters when running commands. Because misspelling the actual package name can cause problems. Therefore, when running commands in Ubuntu, check the spelling of the package name several times and ensure that the package name is typed correctly.
Also, note that the package’s name may differ from the name of the software you want; for example, the installable package zlib in Ubuntu is zlib1g. When installing, you should pay attention to upper and lower case letters and the actual name of the package.
If you are sure the package is spelled correctly when running the installation command, then the reason for receiving the “E: Unable to Locate Package” error is not a mistake in typing the package name.
4. Checking the availability of the package for the Ubuntu version
If you have tried the previous solutions and your problem is not resolved, it may be that the package you are looking for is not really available for the version of Ubuntu you are using. How can we find out if the package is available in the Ubuntu version we are using?
It’s not complicated, first, get complete information about the version of Ubuntu you are using:
lsb_release -aOutput:
No LSB modules are available.
Distributor ID: Ubuntu
Description: Ubuntu 22.04.1 LTS
Release: 22.04
Codename: jammy
As the command output shows, the version of Ubuntu we are using is 22.04.1 LTS with a jammy codename. Your version of Ubuntu may be different from ours, however, you should now look for packages for your Ubuntu version by visiting the official Ubuntu Packages website.
On the official Ubuntu website, scroll down to find the search section. Type the name of the package you want to download in Ubuntu in the keyword field. Then enter the code name for the Distribution field and set the section to any. Finally, click on the search button.
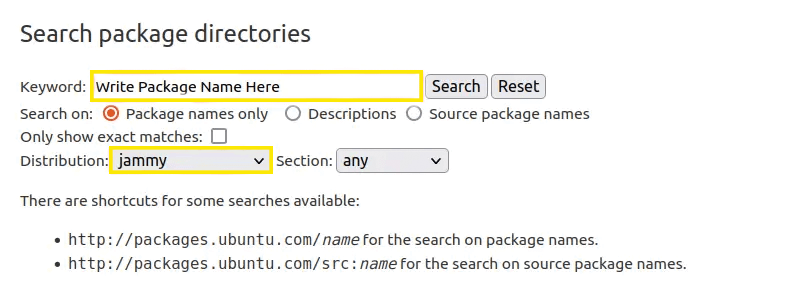
In the output, you will find out whether the package you want to install is available for the version of Ubuntu you are using or not.
If the desired package is available for your version of Ubuntu, check the repository it belongs to.
If the package is available in the universe or multiverse repository, but these repositories are not available in the Ubuntu system, you will see the error “E: Unable to Locate Package” again when installing the package. Therefore, as in Solution 2, you need to add the relevant repositories to Ubuntu:
sudo add-apt-repository universe multiverseAnd to notify these repositories of new packages, you need to update the repositories cache with the following command:
sudo apt updateBy doing these steps, your problem should be solved when installing the new software, if not, we hope that other solutions will fix Ubuntu’s “E: Unable to Locate Package” error.
The question that arises for most users is what to do if the package you want to install is not available for the Ubuntu version.
Sometimes some software is not updated, and new versions of Ubuntu do not support the packages of some software. You can use third-party repositories like PPA to install such software. We have already introduced you to what PPA is, so you are well familiar with its use. If there is no official PPA for the desired package, by checking the official Ubuntu website, you can somehow install your desired package with alternative methods such as using DEB files or snap packages for some projects.
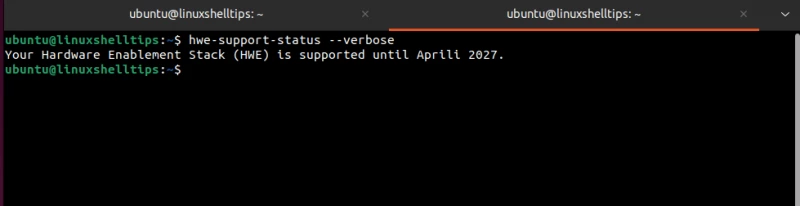
5. Checking the activation of the Ubuntu version
Most likely, you are familiar with the regular and LTS versions of Ubuntu, so you know that the regular versions of Ubuntu are supported for up to 9 months; after 9 months, you will have to update the version of Ubuntu. While the long-term version of Ubuntu receives support for up to 5 years.
If you use the regular version, you must update the Ubuntu version every 9 months. If the Ubuntu version is not supported and has expired, you will receive the error “E: Unable to Locate Package” when installing new packages.
To check the status of the Ubuntu version and ensure that it is supported, use the following command:
hwe-support-status --verboseOutput:
You are not running a system with a Hardware Enablement Stack. Your system is supported until April 2025.In the output you receive, you can ensure that your system is actively supported until what date. If it has not expired, then the reason for receiving the “E: Unable to Locate Package” error is not the expiration and lack of support for the Ubuntu version.
6. Fixing the repository
Ubuntu’s source.list file contains all repository-related data. The source lists are in charge of tracking down the requested package from the repository for installation. When you fail to install a package using the apt command, you can check the apt source list to locate the packages. apt looks for available packages using the source list in the /etc/apt/sources.list file. Therefore, open the desired file with super privileges and the desired editor and find the following lines:
# deb http://deb.debian.org/debian bullseye main
# deb-src http://deb.debian.org/debian bullseye main
After ensuring that the distro’s official source repositories are added, you can safely get a list from the official mirror’s on the distro’s site.
Both of our lines have been commented out, as we can see. This means that apt cannot find packages because there are no source repositories available. So if apt doesn’t use the source repository to search for packages, we comment/remove out the above lines in the /etc/apt/sources.list file. To see how it would look without the comments, we uncomment both lines:
deb http://deb.debian.org/debian bullseye main
deb-src http://deb.debian.org/debian bullseye main
FAQ
main: is a provider of open-source software with official support.
restricted: contains a collection of closed-source software with official support.
universe: is a provider of open-source software that is supported by the community.
multiverse: provides closed-source and patent-encumbered software that is not supported.
If you need software that is not supported by the official and default Ubuntu repository, installing PPA repositories is one of the solutions to install rare software. The Ubuntu Launchpad website is useful for searching for packages and their PPAs.
If you don’t find the PPA of the package you want on the site, check the official Ubuntu website so that you can use alternative methods to install the software you want.
If you are using a new version of Ubuntu, you should check whether the commands provided in the new versions have the same functionality as the old versions. Because the new versions of Ubuntu have received many updates, the way of executing commands may have changed for different purposes.
sources. list file contains information about repositories in Ubuntu, so to solve the problem, we will restore the default repositories by entirely removing the sources. list files from the /etc/apt directory and generate new sources.
This error indicates that the required net-tools package, which includes the netstat executable, is not installed on the system. You may need to manually install the net-tools package if it is not already on your system.
Conclusion
Getting the “Unable to locate package” error is one of the most common errors when installing some packages in Ubuntu. In this article, we tried to improve your skills in managing packages so that you don’t get such an error again. To solve this problem, you must first identify the cause of the problem and then apply the correct solution. In this article, we have provided 6 solutions to fix the “Unable to locate package” error. You can update the resource list and repository cache, check the correct typing of the package names, ensure the official source repositories of the distribution are added, check the activation of the Ubuntu version, and try other solutions to prevent you from receiving the “Unable to locate package” error when installing software in Ubuntu.
We hope this article was able to fix the “Unable to locate package” error. If you know another solution to this problem, share it with us and other users in the comments section.
Почему взникает ошибка «E: Unable to locate Package»
Среда командной строки Linux имеет множество функций. Одна из ее основных функций – установка и управление пакетами программного обеспечения Linux. Существует несколько подходов к установке пакетов в Ubuntu Linux.
Один из методов – через менеджер пакетов apt, который используется для установки пакета Linux. По различным необъяснимым причинам, при неудачной установке пакета через apt может появиться сообщение об ошибке E: Unable to locate the package.
Использование apt для установки пакета используется синтаксис:
Интересно: Как узнать дату и время создания файла в Linux?
sudo apt install имя_пакета
Рассмотрим использование apt для установки пакета Linux под названием tree.
sudo apt install tree
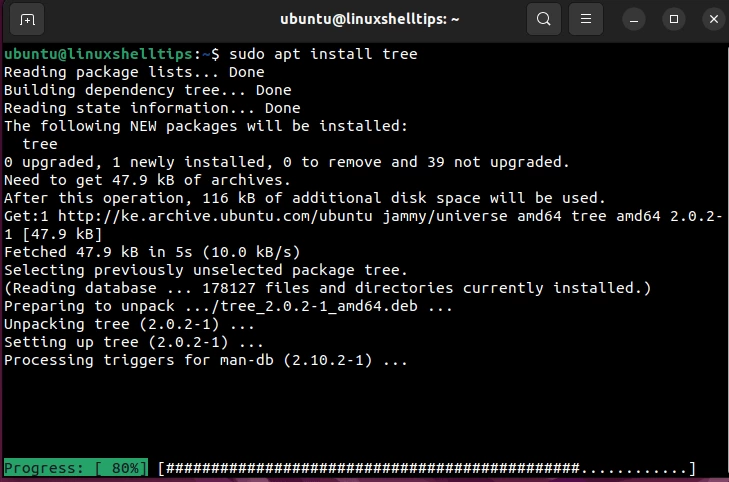
Приведенный выше скрин подтверждает, что установка этого пакета прошла успешно.
sudo apt install tree
Скрин подтверждает, что установка этого пакета прошла успешно.
Рассмотрите возможность использования пакетного менеджера apt для установки пакета с именем vcl.
sudo apt install vcl
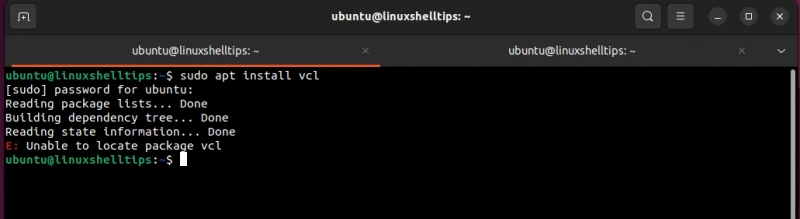
Возможные решения ошибки E: Unable to locate package можно разбить на следующие разделы:
Проверьте имя пакета Ubuntu Linux
Убедитесь, что в названии устанавливаемого пакета нет опечаток. Например, такие пакеты Linux как vlc или tree могут быть ошибочно приняты за vcl или trie при попытке установки пакета.
sudo apt install vcl
sudo apt install trie

Также стоит упомянуть, что команды Linux приписываются с учетом регистра. Например, Vim и vim – это совершенно разные пакеты.
sudo apt install Vim
sudo apt install vim
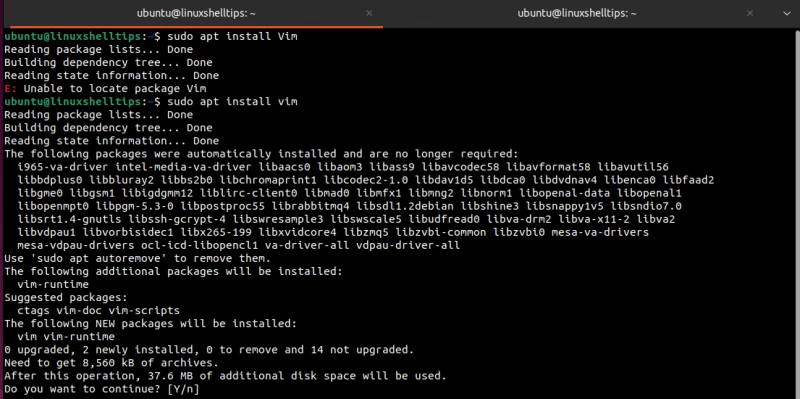
Перед выполнением команды установки apt проверьте чувствительность имени пакета к регистру.
В качестве альтернативы подтвердите существование имени пакета в базе данных apt, используя следующий синтаксис.
apt search package_name
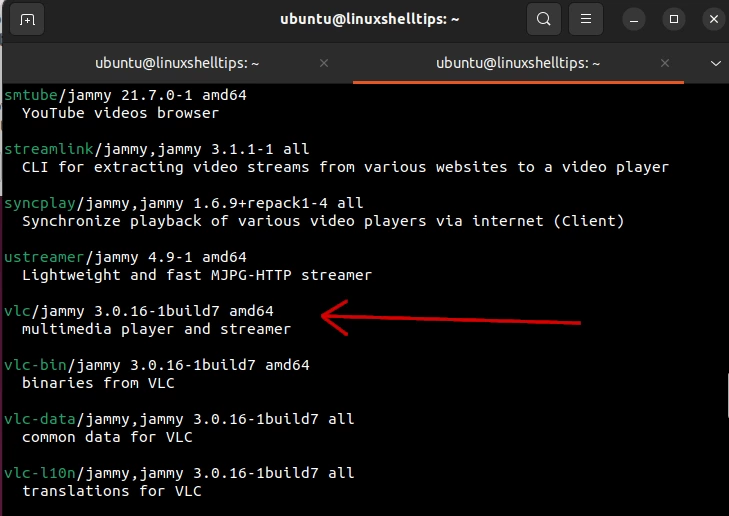
Например, мы можем поискать существование пакета типа vlc с помощью следующей команды:
apt search vlc
Если имя пакета не существует в базе данных apt, мы получим результат, подобный следующему.
apt search notepad
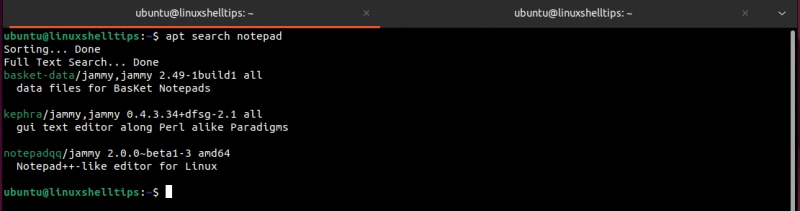
В результате вышеприведенного поиска не найден пакет notepad, который мы пытаемся установить.
Имеем не актуальный кэш репозитория
Этот шаг рекомендуется для новых пользователей со свежеустановленным Ubuntu Linux. Однако он применим ко всем пользователям Ubuntu. Этим пользователям необходимо выполнить команды обновления:
sudo apt update && sudo apt upgrade -y
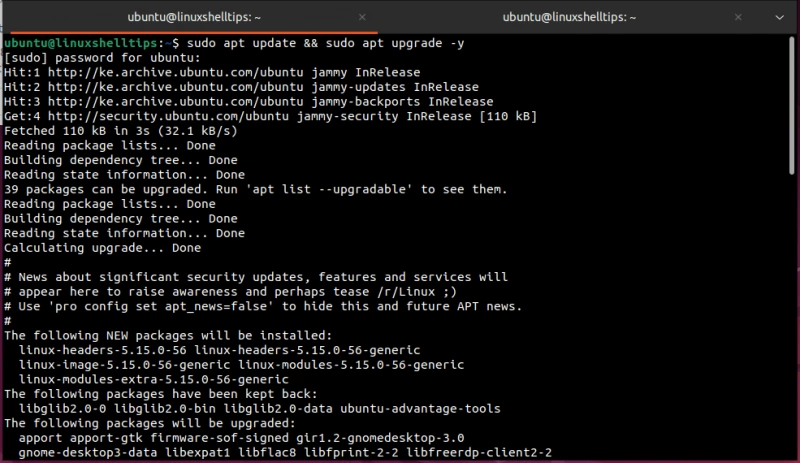
Выполнение вышеуказанной команды создает локальный кэш, в котором размещаются пакеты Ubuntu (существующие и новые), пригодные для установки. Поэтому, если кэш репозитория устарел, новые пакеты и информация об их версии загружаются apt и включаются в кэш репозитория. Другими словами, устанавливаемые apt пакеты должны находиться в кэше репозитория.
После обновления кэша репозитория попробуйте повторно установить нужный пакет.
Проверка совместимости пакетов с Ubuntu
Если вы уверены в существовании пакета Linux, но все еще не можете его установить, скорее всего решение это. Первое предположение заключается в том, что пакет Linux доступен в репозитории, но не включенном в вашей версии ОС.
В репозитории хранятся пакеты, официально не поддерживаемые кэшем репозитория по умолчанию. Такие пакеты не получают обновлений безопасности, и включение этого репозитория дает доступ к этим пакетам.
Второе предположение заключается в том, что используемая вами версия Ubuntu не имеет пакета. Чтобы решить эту проблему, сначала проверьте используемую версию Ubuntu:
lsb_release -a
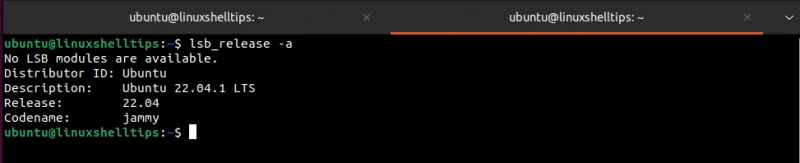
Обратите внимание на записи Release и/или Codename. В приведенном выше случае это 22.04 и jammy соответственно.
Зайдите на сайт пакетов Ubuntu: https://packages.ubuntu.com/
Перейдите к следующему разделу сайта и заполните соответствующие данные о пакете.
Вышеприведенный поиск подтверждает, что пакет vlc доступен в Ubuntu jammy 22.04 в репозитории Universe.
Поэтому его можно установить из среды командной строки Linux. Чтобы включить репозиторий universe в системе Ubuntu, выполните:
sudo add-apt-repository universe multiverse
Эта команда добавляет репозитории universe и multiverse в нашу систему.
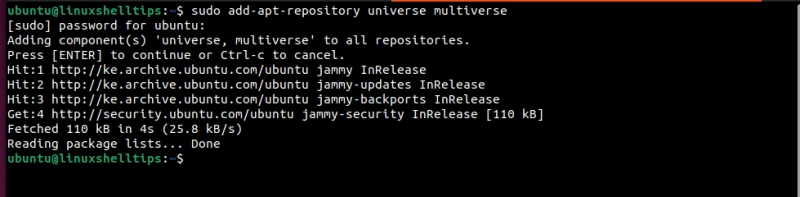
Кэш репозиториев должен знать о новом добавленном репозитории, поэтому выполняем команду:
sudo apt update
Теперь попробуйте установить пакет vlc снова, чтобы исправить ошибку установки.
sudo apt install vlc
Проверьте статус релиза вашей системы Ubuntu
Релизы Ubuntu бывают обычными (9 месяцев поддержки) или LTS (Long Term Support) с периодом в 5 лет. Ошибка Unable to locate package error на Ubuntu иногда возникает, когда система находится в конце срока службы. В этом случае установка новых пакетов становится невозможной.
Чтобы проверить дату окончания срока службы вашей системы Ubuntu, выполните:
hwe-support-status --verbose
Если срок службы системы подходит к концу, возможно, вам стоит подумать об обновлении до последней версии Ubuntu с помощью следующей последовательности команд:
sudo apt autoremove
sudo apt update && sudo apt upgrade -y
sudo apt dist-upgrade
В качестве альтернативы можно использовать следующую последовательность команд:
sudo apt install update-manager-core
sudo do-release-upgrade
После этого вы сможете, установить требуемый пакет.
Чтобы избежать проблем несовместимости с вашей системы, всегда придерживайтесь версии пакетов, поддерживаемых вашей версией Ubuntu, а не случайных репозиториев пакетов (PPA), которые могут устанавливать старые версии или более новые. Кроме того, не все пакеты доступны для установки через менеджер пакетов apt.

Зарубин Иван
Эксперт по Linux и Windows
Парашютист со стажем. Много читаю и слушаю подкасты. Люблю посиделки у костра, песни под гитару и приближающиеся дедлайны. Люблю путешествовать.
Похожие статьи