-
#1
Добрый день. Похожая проблема на форуме поднималась еще в 2013 году, но решение ее не описана. Суть проблемы.
После обновления Bullet M2 titanium прошивки с версии 5.5 на 5.5.8 доступ к WEB интерфейсу начал осуществляться по HTTPS вместо HTTP. При попытке подсоединении IE выдает «Ошибка в сертификате безопасности этого веб-узла». Не беда жмем «Продолжить открытие этого веб-узла (не рекомендуется). » И на этом все, ожидание ответа. Иногда в адресной строке доходит до https://192.168.1.20/login.cgi?uri=/ и все. Пробовал и устанавливать сертификат и добовлять в надежные узлы, без результата. Попытка подключиться через Opera и FireFox также без результата.
Почему на странице оборудования прошивка указана версия 5.5.8 а на вкладке «загрузки» до доступна 5.5.10?
Благодарен всем за помощь.
Последнее редактирование:
-
#2
Поробуйте сбросить и перенастроить
-
Автор темы
-
#3
Поробуйте сбросить и перенастроить
Личка у Вас переполнена. Сброс через rezet выполняли, результат налогичен. А что вы хотите чтобы я перенастроил, и каким способом?
-
#4
Да, такая ошибка обсуждалась. Вывод был в том, что после обновления какой-то версии Явы в настройках ИЕ слетали параметры безопасности. Лечилось апгрейдом Явы, апгрейдом ИЕ, использованием Фокса, Хрома, Яши, Сафари, запуском апдейта ВыньДуся, откатом на предыдущую или самую последню прошивку.
Предлагаю сначала попробовать поработать с этим устройством с дргого ПК, ноута, планшета. Дело было в локальных настройках.
-
Автор темы
-
#5
Да, такая ошибка обсуждалась. Вывод был в том, что после обновления какой-то версии Явы в настройках ИЕ слетали параметры безопасности. Лечилось апгрейдом Явы, апгрейдом ИЕ, использованием Фокса, Хрома, Яши, Сафари, запуском апдейта ВыньДуся, откатом на предыдущую или самую последню прошивку.
Предлагаю сначала попробовать поработать с этим устройством с дргого ПК, ноута, планшета. Дело было в локальных настройках.
Добрый день ubnt.su. Ваш ответ можно считать официальным ответом службы технической поддержки? И его можно приложить к результатам проверки транспортной безопасности?
Вывод о том, «что после обновления какой-то версии ЯВЫ в настройках IE слетали параметры безопасности» для меня не очивидны, так как я обновил не Яву, а Вашу точку доступа. Если вы рекомендуете обновлять весь перечень указаный Вами выши, укажите системные требования для оборудования.
Последнее редактирование:
-
#6
Добрый день, Добрый.
Ответственность за настройки вашего оборудования и ваших компьюетеров несут те люди, которые их делали. Серьёзные компании приглашают интеграторов как раз в целях минимизации рисков получить неработающую систему. Если вы тот администратор, который взял на себя ответственность за настройки, то это ваша задача разобраться в проблеме и найти решение. Вы за это зарплату получаете.
Любые сообщения в форумах являются выражением личного мнения лица, их написавшего. Официальные ответы организации дают на бланке в ответ на официальные запросы.
-
Автор темы
-
#7
Вопрос закрыт. Через TFTP залил новую прошивку версия 5.5.10. взятую с официального сайта ubnt.com после этого доступ к web интерфейсу по https восстановился.
С ТАКИМ ПОДХОДОМ К КЛИЕНТАМ ЭТО ПЕРВЫЙ И ПОСЛЕДНИЙ РАЗ КОГДА Я СВЯЗЫВАЮСЬ С ЭТИМ ОБОРУДОВАНИЕМ!!!!!!! ВСЕМУ КОЛЛЕКТИВУ http://www.ubnt.su ВЫРАЖАЮ СВОЕ ЧРЕЗМЕРНОЕ НЕДОВОЛЬСТВИЕ….. ЭТО НАЗЫВАЕТСЯ НАВЯЗЫВАНИЕМ УСЛУГ. В ПОМОЩИ БЫЛО ОТКАЗНО И ПО ТЕЛЕФОНУ И ПО ПОЧТЕ, А НА ФОРУМЕ ПИШУТ ВИДНО ОТ СКУКИ.
-
#8
Добрый, в будущем постарайтесь оправдывать ваш ник. Не надо угрожать людям, которые вам ничем не обязаны.
Вы не оплачивали техподдержку. то есть вам никто ничего не должен. Или на автобусе вы тоже «зайцем» ездите?
Если вам не нравятся наши ответы, значит вы можете задать их кому-нибудь ещё. Это ваше право, но никак не наша обязанность.
-
Автор темы
-
#9
Добрый день Ubnt.su. Давайте пообщаемся, может подчеркнем, каждый для себя какую-нибудь полезную информацию.
Для начала я не интегратор, а конечный пользователь. Которому по своим должностным обязанностями приходится сталкиваться как с весьма распространенными, так и с узко специализированными продуктами. И на своей практике, я часто обращаюсь именно к производителям оборудования или их официальным представителям. Так как интегратор может уже не существовать, или быть из другого региона за много тысяч километров, или просто может не владеть столь специфическими знаниями, которые нужны для решения проблемы. А даже если и есть возможность работать через интегратора, то это получается испорченный телефон.
Если бы Вы сказали, что ни какого отношения не имеете к данной фирмы, то и разговора этого не было бы.
К примеру могу привести компанию Beward. Интегратор нам установил их оборудование. В итоге, в процессе использования их оборудования мы не смогли достичь желаемого результата изображения с камер. Просто не смогли отстроить баланс белого. Так нам региональный представитель, напрямую, минуя интегратора, меняет объективы. В период пост гарантийного обслуживания. Хотя они нам тоже не обязаны ни чем, но они гордо несут имя компании, и делают все, что бы конечный пользователь был доволен их оборудованием.
В Вашем случае, как минимум вопрос, почему на вкладке оборудования доступна версия 5.5.8, а на вкладке загрузке имеется версия 5.5.10. напрямую связан с Вами, и я ожидал ответа от Вас по этому вопросу.
При попытке посетить страницу контроллера появляется ошибка сертификата.
Ошибки, подобные этой могут появляться при отсутствии правильного сертификата SSL при посещении сайтов по HTTPS.


Возможные причины и рекомендуемые действия
Отсутствует правильный сертификат SSL.
Для повышения безопасности UniFi использует протокол HTTPS. Это означает, что браузер будет проверять правильность сертификатов при установлении безопасного соединения с web-сервером. Хотя появление тревожного сообщения раздражает, для соединения пользователя оно не создает никакого риска. Во избежание ошибок:
- Приобретите подписанный сертификат SSL у любого поставщика услуг web-хостинга.
- Затем внесите в контроллер следующие изменения:
sudo su – # cd <unifi_base> # on Windows, «%USERPROFILE%/Ubiquiti Unifi» cd /usr/lib/unifi # create new certificate (with csr) java -jar lib/ace.jar new_cert <hostname> <company> <city> <state> <country> # your CSR can be found at /var/lib/unifi # — unifi_certificate.csr.der # — unifi_certificate.csr.pem # have this CSR signed by a CA, you’ll get a few certificates back… # copy the signed certificate(s) to <unifi_base> # import the signed certificate and other intermediate certificates java -jar lib/ace.jar import_cert <signed_cert> [<other_intermediate_root_certs>…]
Примечание: После того, как у Вас будет созданный CSR, его можно будет найти в папке %USERPROFILE%\Ubiquiti UniFi\data. На Мас его можно найти в папке: /Users/username/Library/Application\ Support/UniFi/data
-
#1
Добрый день. Похожая проблема на форуме поднималась еще в 2013 году, но решение ее не описана. Суть проблемы.
После обновления Bullet M2 titanium прошивки с версии 5.5 на 5.5.8 доступ к WEB интерфейсу начал осуществляться по HTTPS вместо HTTP. При попытке подсоединении IE выдает «Ошибка в сертификате безопасности этого веб-узла». Не беда жмем «Продолжить открытие этого веб-узла (не рекомендуется). » И на этом все, ожидание ответа. Иногда в адресной строке доходит до https://192.168.1.20/login.cgi?uri=/ и все. Пробовал и устанавливать сертификат и добовлять в надежные узлы, без результата. Попытка подключиться через Opera и FireFox также без результата.
Почему на странице оборудования прошивка указана версия 5.5.8 а на вкладке «загрузки» до доступна 5.5.10?
Благодарен всем за помощь.
Последнее редактирование: 20 Май 2015
-
#2
Поробуйте сбросить и перенастроить
-
Автор темы
-
#3
Поробуйте сбросить и перенастроить
Личка у Вас переполнена. Сброс через rezet выполняли, результат налогичен. А что вы хотите чтобы я перенастроил, и каким способом?
-
#4
Да, такая ошибка обсуждалась. Вывод был в том, что после обновления какой-то версии Явы в настройках ИЕ слетали параметры безопасности. Лечилось апгрейдом Явы, апгрейдом ИЕ, использованием Фокса, Хрома, Яши, Сафари, запуском апдейта ВыньДуся, откатом на предыдущую или самую последню прошивку.
Предлагаю сначала попробовать поработать с этим устройством с дргого ПК, ноута, планшета. Дело было в локальных настройках.
-
Автор темы
-
#5
Да, такая ошибка обсуждалась. Вывод был в том, что после обновления какой-то версии Явы в настройках ИЕ слетали параметры безопасности. Лечилось апгрейдом Явы, апгрейдом ИЕ, использованием Фокса, Хрома, Яши, Сафари, запуском апдейта ВыньДуся, откатом на предыдущую или самую последню прошивку.
Предлагаю сначала попробовать поработать с этим устройством с дргого ПК, ноута, планшета. Дело было в локальных настройках.
Добрый день ubnt.su. Ваш ответ можно считать официальным ответом службы технической поддержки? И его можно приложить к результатам проверки транспортной безопасности?
Вывод о том, «что после обновления какой-то версии ЯВЫ в настройках IE слетали параметры безопасности» для меня не очивидны, так как я обновил не Яву, а Вашу точку доступа. Если вы рекомендуете обновлять весь перечень указаный Вами выши, укажите системные требования для оборудования.
Последнее редактирование: 21 Май 2015
-
#6
Добрый день, Добрый.
Ответственность за настройки вашего оборудования и ваших компьюетеров несут те люди, которые их делали. Серьёзные компании приглашают интеграторов как раз в целях минимизации рисков получить неработающую систему. Если вы тот администратор, который взял на себя ответственность за настройки, то это ваша задача разобраться в проблеме и найти решение. Вы за это зарплату получаете.
Любые сообщения в форумах являются выражением личного мнения лица, их написавшего. Официальные ответы организации дают на бланке в ответ на официальные запросы.
-
Автор темы
-
#7
Вопрос закрыт. Через TFTP залил новую прошивку версия 5.5.10. взятую с официального сайта ubnt.com после этого доступ к web интерфейсу по https восстановился.
С ТАКИМ ПОДХОДОМ К КЛИЕНТАМ ЭТО ПЕРВЫЙ И ПОСЛЕДНИЙ РАЗ КОГДА Я СВЯЗЫВАЮСЬ С ЭТИМ ОБОРУДОВАНИЕМ!!!!!!! ВСЕМУ КОЛЛЕКТИВУ http://www.ubnt.su ВЫРАЖАЮ СВОЕ ЧРЕЗМЕРНОЕ НЕДОВОЛЬСТВИЕ….. ЭТО НАЗЫВАЕТСЯ НАВЯЗЫВАНИЕМ УСЛУГ. В ПОМОЩИ БЫЛО ОТКАЗНО И ПО ТЕЛЕФОНУ И ПО ПОЧТЕ, А НА ФОРУМЕ ПИШУТ ВИДНО ОТ СКУКИ.
-
#8
Добрый, в будущем постарайтесь оправдывать ваш ник. Не надо угрожать людям, которые вам ничем не обязаны.
Вы не оплачивали техподдержку. то есть вам никто ничего не должен. Или на автобусе вы тоже «зайцем» ездите?
Если вам не нравятся наши ответы, значит вы можете задать их кому-нибудь ещё. Это ваше право, но никак не наша обязанность.
-
Автор темы
-
#9
Добрый день Ubnt.su. Давайте пообщаемся, может подчеркнем, каждый для себя какую-нибудь полезную информацию.
Для начала я не интегратор, а конечный пользователь. Которому по своим должностным обязанностями приходится сталкиваться как с весьма распространенными, так и с узко специализированными продуктами. И на своей практике, я часто обращаюсь именно к производителям оборудования или их официальным представителям. Так как интегратор может уже не существовать, или быть из другого региона за много тысяч километров, или просто может не владеть столь специфическими знаниями, которые нужны для решения проблемы. А даже если и есть возможность работать через интегратора, то это получается испорченный телефон.
Если бы Вы сказали, что ни какого отношения не имеете к данной фирмы, то и разговора этого не было бы.
К примеру могу привести компанию Beward. Интегратор нам установил их оборудование. В итоге, в процессе использования их оборудования мы не смогли достичь желаемого результата изображения с камер. Просто не смогли отстроить баланс белого. Так нам региональный представитель, напрямую, минуя интегратора, меняет объективы. В период пост гарантийного обслуживания. Хотя они нам тоже не обязаны ни чем, но они гордо несут имя компании, и делают все, что бы конечный пользователь был доволен их оборудованием.
В Вашем случае, как минимум вопрос, почему на вкладке оборудования доступна версия 5.5.8, а на вкладке загрузке имеется версия 5.5.10. напрямую связан с Вами, и я ожидал ответа от Вас по этому вопросу.
При попытке посетить страницу контроллера появляется ошибка сертификата.
Ошибки, подобные этой могут появляться при отсутствии правильного сертификата SSL при посещении сайтов по HTTPS.
Возможные причины и рекомендуемые действия
Отсутствует правильный сертификат SSL.
Для повышения безопасности UniFi использует протокол HTTPS. Это означает, что браузер будет проверять правильность сертификатов при установлении безопасного соединения с web-сервером. Хотя появление тревожного сообщения раздражает, для соединения пользователя оно не создает никакого риска. Во избежание ошибок:
- Приобретите подписанный сертификат SSL у любого поставщика услуг web-хостинга.
- Затем внесите в контроллер следующие изменения:
sudo su – # cd <unifi_base> # on Windows, «%USERPROFILE%/Ubiquiti Unifi» cd /usr/lib/unifi # create new certificate (with csr) java -jar lib/ace.jar new_cert <hostname> <company> <city> <state> <country> # your CSR can be found at /var/lib/unifi # — unifi_certificate.csr.der # — unifi_certificate.csr.pem # have this CSR signed by a CA, you’ll get a few certificates back… # copy the signed certificate(s) to <unifi_base> # import the signed certificate and other intermediate certificates java -jar lib/ace.jar import_cert <signed_cert> [<other_intermediate_root_certs>…]
Примечание: После того, как у Вас будет созданный CSR, его можно будет найти в папке %USERPROFILE%Ubiquiti UniFidata. На Мас его можно найти в папке: /Users/username/Library/Application Support/UniFi/data
Пользователи могут увидеть страницу с сообщением: «Ваше соединение не защищено» с ошибкой: ERR_CERT_AUTHORITY_INVALID. Это связано с тем, что airOS по умолчанию поставляется с включенным HTTPS (а не HTTP), поэтому пользователи увидят предупреждение системы безопасности при доступе к веб-интерфейсу устройства. Однако, это никоим образом не ставит под угрозу безопасность устройства, вы можете безопасно нажать на «Дополнительно» и перейти к IP-адресу.
Если вы не хотите получать это предупреждение, вы можете отключить HTTPS на вкладке Services. Однако, отключение HTTPS приведет к тому, что весь трафик, направленный на веб-интерфейс устройства airMAX, не будет зашифрован, что позволит скомпрометировать учетные данные пользователя с помощью перехвата пакетов. Ubiquiti не рекомендует отключать HTTPS.
Существует альтернативный вариант: если у вас 10 (десять) или более устройств, совместимых с UNMS, вы можете подключить их к бесплатному облачному UNMS для мониторинга и управления, не получая при этом предупреждения о нарушении защиты SSL.
- Вся активность
Сертификат SSL для устройств Ubiquiti Networks Inc.
Join the conversation
You can post now and register later.
If you have an account, sign in now to post with your account.
Having been bothered by Ubiquiti’s HTTPS certificate issue for years, today I finally find some time to resolve this. There are multiple ways to resolve this, but I’m not able to find a perfect solution on the internet, so I write down my solution here.
I’m not going to use a public domain name, neither will I issue a certificate through a public issuer, for example, letencrypt, which I’ve been vasively used for my public websites. The reason is for me, I don’t want my router to be exposed to the public internet, and the less exposion, the better. Setting up a letsencrypt certificate, most probably I need verify I own this domain name and the server, which means I will reveal my public IP address for my router, and that is not my intension.
With that, I’m going to generate a self signed certificate with a generated CA on a domain name I generated dedicated for my router (router.local). Then I will import my CA to my devices that need to access the router. Finally I’ll redirect my router’s local IP address to a local domain name (router.local).
Now I’m gonig to show you how to archive all the above step by step.
Genaret CA and certifacte for the router
Here is the script. Copy and paste it into a file and run it on a Mac/Linux environment.
#!/bin/ksh

function CreateCertificateAuthority {

if [ -f ./ubntCA.key ]; then rm ./ubntCA.key; fi
if [ -f ./ubntCA.pem ]; then rm ./ubntCA.pem; fi

#
# Create the Root Key
#
openssl genrsa -out ubntCA.key 4096

#
# Now self-sign this certificate using the root key.
#
# CN: CommonName
# OU: OrganizationalUnit
# O: Organization
# L: Locality
# S: StateOrProvinceName
# C: CountryName
#
openssl req -x509
            -new
            -nodes
            -key ubntCA.key
            -sha256
            -days 36500
            -subj "/C=US/ST=IS/L=TOTALLY/O=CONFUSED/OU=HERE/CN=LIANGSUN.ORG"
            -out ubntCA.pem

print ""
print "Now install this cert (ubntCA.pem) in your workstations Trusted Root Authority."
print ""

}

function CreateServerCertificate {

if [ -f ./server.key ]; then rm ./server.key; fi
if [ -f ./server.csr ]; then rm ./server.csr; fi
if [ -f ./server.crt ]; then rm ./server.crt; fi

#
# Create A Certificate
#
openssl genrsa -out server.key 4096

#
# Now generate the certificate signing request.
#
openssl req -new
            -key server.key
            -subj "/C=US/ST=IS/L=ALSOTOTALLY/O=CONFUSED/OU=HERE/CN=ROUTER.LOCAL"
            -out server.csr

#
# Now generate the final certificate from the signing request.
#
openssl x509 -req
             -in server.csr
             -CA ubntCA.pem
             -CAkey ubntCA.key
             -CAcreateserial
             -extfile <(printf "subjectAltName=DNS:ROUTER.LOCAL,IP:172.10.0.1,IP:172.20.0.1,IP:172.30.0.1,IP:192.168.0.1,IP:192.168.1.1")
             -out server.crt -days 36500 -sha256

}

function CreateServerPem {

cat server.crt  > server.pem
cat server.key >> server.pem

}

   CreateCertificateAuthority
   CreateServerCertificate
   CreateServerPem
This script will generate several files, and among them, there are 2 files are import to us, ubntCA.pem and server.pem. The file ubntCA.pem is the one we need to import into our devices that need to access the router.
As an exapmle, to import the CA to a Windows system, run this command on a Command line with Administrator access.
certutil -addstore -enterprise -f "Root" ubntCA.pem
Install the generated certificate on the router
From the last step, we have generated a file called server.pem. This is the file we need to install onto the router.
We can use scp command to copy this file to the router, like this:
scp server.pem USER@172.10.0.1:~/
Here, USER is the username, and 172.10.0.1 is the IP address of the router.
Open a ssh connection to the router, and copy the the file to the lighttpd server configuration folder.
cd /etc/lighttpd
sudo mv server.pem server.pem.bk
sudo cp /home/USER/server.pem ./
Then restart the lighttpd server:
sudo  killall lighttpd
sudo /usr/sbin/lighttpd -f /etc/lighttpd/lighttpd.conf
Bind the domain name to the router’s IP
Of course we can modify each client’s hosts file to redirect the domain router.local into the IP of the router, in this case, it’s 172.10.0.1, but I want to do this in a smarter way, so that each client doesn’t need to manually modify the hosts file. I’m going to modify the router itself.
Again ssh into the router and run configure command to goin the configuration shell.
Then run the following command:
set system static-host-mapping host-name router.local inet 172.10.0.1
commit
save
Probably there is a way to configure this on the Web UI also, but since CLI can handle this faster, I don’t want to find a way on the UI.
Now we can access the router on a client side without the certificate error. Just open https://router.local on a client that has imported the CA.
Last question is, what if a user open https://172.10.0.1 which is the IP address of the router? They will still get a SSL certificate error.
To resolve the last problem and make this solution perfect, follow the next step.
Redirect router IP to its domain name
Again ssh into the router and go to the folder /etc/lighttpd/conf-enabled and create a new file called 11-redirect.conf with the following content.
$HTTP["scheme"] == "https" {
    $HTTP["host"] =~ "^d+.d+.d+.d+$" {
        url.redirect = (
            "^(.*)$" => "https://router.local$1"
        )
    }
}
Then edit the file /etc/lighttpd/lighttpd.conf to include the above config file.
include "conf-enabled/10-ssl.conf"
include "conf-enabled/11-redirect"
include "conf-enabled/15-fastcgi-python.conf"
Add the second line, the same way as the existing 10-ssl.conf and 15-fastcgi-python.conf files.
Now restart the lighttpd server again.
sudo  killall lighttpd
sudo /usr/sbin/lighttpd -f /etc/lighttpd/lighttpd.conf
Now, https://172.10.0.1 will be redirectd to https://router.local without a certificate warning.
Permanently save the cert file configuration for lighttpd
So far, everything works. But one day you reboot your router and find the server certificate is regenerated.
To resolve this issue, we need to save the configuration in a permanent way.
Login to the router by ssh and copy the server.pem file into folder /config/auth/ and run the following command
configure
set service gui cert-file /config/auth/server.pem
commit
save
Run this command to show everything is good:
It will show the following:
 cert-file /config/auth/server.pem
 http-port 80
 https-port 443
 listen-address 172.20.0.1
 older-ciphers disable
By the way, you should always set the listen-address to a local IP address for both services gui and ssh. This will prevent the router from accessing from the public internet, which I see no point Ubiquiti not setting it as a default.
Finally
Conguratulations, you find a perfect solution!
При попытке посетить страницу контроллера появляется ошибка сертификата.
Ошибки, подобные этой могут появляться при отсутствии правильного сертификата SSL при посещении сайтов по HTTPS.
Возможные причины и рекомендуемые действия
Отсутствует правильный сертификат SSL.
Для повышения безопасности UniFi использует протокол HTTPS. Это означает, что браузер будет проверять правильность сертификатов при установлении безопасного соединения с web-сервером. Хотя появление тревожного сообщения раздражает, для соединения пользователя оно не создает никакого риска. Во избежание ошибок:
- Приобретите подписанный сертификат SSL у любого поставщика услуг web-хостинга.
- Затем внесите в контроллер следующие изменения:
sudo su – # cd <unifi_base> # on Windows, «%USERPROFILE%/Ubiquiti Unifi» cd /usr/lib/unifi # create new certificate (with csr) java -jar lib/ace.jar new_cert <hostname> <company> <city> <state> <country> # your CSR can be found at /var/lib/unifi # — unifi_certificate.csr.der # — unifi_certificate.csr.pem # have this CSR signed by a CA, you’ll get a few certificates back… # copy the signed certificate(s) to <unifi_base> # import the signed certificate and other intermediate certificates java -jar lib/ace.jar import_cert <signed_cert> [<other_intermediate_root_certs>…]
Примечание: После того, как у Вас будет созданный CSR, его можно будет найти в папке %USERPROFILE%Ubiquiti UniFidata. На Мас его можно найти в папке: /Users/username/Library/Application Support/UniFi/data
Views: 652
Scenario
Make: Ubiquiti
Model: Ubiquiti Unifi Controller
Mode: CLI (Command Line Interface)
Version: 6.0.43
Description: This article contains a detailed stepwise method to generate CSR for installing an SSL certificate on the Unifi Controller URL to solve the issue of Certificate Error. If you already got the SSL certificate then refer the article to know how to install SSL certificate on the Unifi controller.
Problem
When we install and configure Unifi Controller and try to access the controller via GUI we get a certificate error as shown below in the image. This error occurs due to the unavailability of an SSL certificate. You could still access the controller by clicking the “Connect to unifi.edledge.com (unsafe)“.

Solution
To resolve the issue we need to install the SSL certificate. To get the SSL certificate from a Certificate Authority you would need to share the CSR. Without CSR you can not get the certificate for the Unifi URL e.g “unifi.edledge.com“.
Please follow the steps described below to generate the CSR on Debian OS.
Step1: SSH onto the Server
SSH onto the server and login as super admin.

Step2: Super Admin
Go to the super admin mode to access the library.
login as: localuser
localuser@edledge-unifi's password:
Linux edledge-unifi 4.19.0-12-amd64 #1 SMP Debian 4.19.152-1 (2020-10-18) x86_64The programs included with the Debian GNU/Linux system are free software;
the exact distribution terms for each program are described in the
individual files in /usr/share/doc/*/copyright.Debian GNU/Linux comes with ABSOLUTELY NO WARRANTY, to the extent
permitted by applicable law.
Last login: Sat May 22 20:07:17 2021 from 10.1.1.2
localuser@edledge-unifi:~$
localuser@edledge-unifi:~$ su
Password: edledge.com
root@edledge-unifi:/home/localuser#
Step3: Generate CSR
Generate CSR using the command shown below.
java -jar lib/ace.jar new_cert <hostname> <company> <city> <state> <country>
root@edledge-unifi:/usr/lib/unifi# java -jar lib/ace.jar new_cert unifi.edledge.com edledge Mumbai Mumbai India
Certificate for unifi.edledge.com generated
Step4: Export CSR
Export CSR as that would be needed to share with the certificate authority to get a certificate issued for unifi.edledge.com.
root@edledge-unifi:/usr/lib/unifi# cd /var/lib/unifi
root@edledge-unifi:/var/lib/unifi# ls
backup firmware keystore sites system.properties.bk unifi_certificate.csr.pem
db firmware.json model_lifecycles.json system.properties unifi_certificate.csr.der
root@edledge-unifi:/var/lib/unifi#
root@edledge-unifi:/var/lib/unifi# cat unifi_certificate.csr.pem
-----BEGIN CERTIFICATE REQUEST-----
MIIC2zCCAcMCAQAwgZUxDjAMBgNVBAYTBUphcGFuMQ4wDAYDVQQIDAVUb2t5bz
MIIC2zCCAcMCAQAwgZUxDjAMBgNVBAYTBUphcGFuMQ4wDAYDVQQgNVBAsMHXVu
MIIC2zCCAcMCAQAwgZUxDjAMBgNVBAYTBUphcGFuMQ4wDAYDVQQQQDDB11bmlm
MIIC2zCCAcMCAQAwgZUxDjAMBgNVBAYTBUphcGFuMQ4wDAYDVQQcNAQEBBQADg
MIIC2zCCAcMCAQAwgZUxDjAMBgNVBAYTBUphcGFuMQ4wDAYDVQQ6J2RfRZSrQE
MIIC2zCCAcMCAQAwgZUxDjAMBgNVBAYTBUphcGFuMQ4wDAYDVQQ8EjZoH07sPa
MIIC2zCCAcMCAQAwgZUxDjAMBgNVBAYTBUphcGFuMQ4wDAYDVQQLXD6LAnSc3I
MIIC2zCCAcMCAQAwgZUxDjAMBgNVBAYTBUphcGFuMQ4wDAYDVQQ1txigRT4uLD
MIIC2zCCAcMCAQAwgZUxDjAMBgNVBAYTBUphcGFuMQ4wDAYDVQQd2DUIiqQgQi
MIIC2zCCAcMCAQAwgZUxDjAMBgNVBAYTBUphcGFuMQ4wDAYDVQQAA4IBAQCXTR
MIIC2zCCAcMCAQAwgZUxDjAMBgNVBAYTBUphcGFuMQ4wDAYDVQQFgzZNn+TlyA
MIIC2zCCAcMCAQAwgZUxDjAMBgNVBAYTBUphcGFuMQ4wDAYDVQQRDSYBOanwyU
MIIC2zCCAcMCAQAwgZUxDjAMBgNVBAYTBUphcGFuMQ4wDAYDVQQzOqRxSkNKGGY
MIIC2zCCAcMCAQAwgZUxDjAMBgNVBAYTBUphcGFuMQ4wDAYDVQQfVdNlpcIg6o9
MIIC2zCCAcMCAQAwgZUxDjAMBgNVBAYTBUphcGFuMQ4wDAYDVQQABV5zS3XjqhI
MIIC2zCCAcMCAQAwgZUxDjAMBgNVBAYTBUphcGFuMQ4wDAYDVQQBV5zS3XjqqhI
-----END CERTIFICATE REQUEST-----
Step5: Copy CSR
Copy CSR including “BEGIN CERTIFICATE REQUEST” and “END CERTIFICATE REQUEST” and save it in a notepad to share it with CA.
Once this CSR is shared with the certificate authority they will share the SSL certificate which can be imported to the Unifi controller and the error will go away.
Refer to the attached article if you are looking to upgrade the firmware of the Unifi Controller. Ubiquiti has some nice Wireless solutions as well. Do not forget to check articles on Unifi or Ubiquiti devices on this website.
Source: Knowledge Base, Lab, Ubiquiti
EA00070
I recently upgraded the unfi management software to latest verison, and soon after I found out an AP at a remote site was not working correctly. any devices that associated with it were not on the network.
AP does not show up in the controller, adoption fails with status of «server reject».
I have read that you can have issues like this, and they recommend upgrading the firmware to match the controller.
so I connect to the AP using putty, and try to manually upgrade the firmware, and i get a certificate error that indicates I should use ‘—no-check-certificate», but I cannot seem to get the wording right, I tried added —no-check-certificate to the end of the command I pasted below, but it still errors out.
suggestions?
here is the command I type in putty, and the resulting error:
upgrade http://x.x.x.x:8080 Opens a new window /dl /firmware/bz2/3.751.6230/firmware.bin
ERROR: cannot verify x.x.x.x’s certificate, issued by `/C=US/ST=CA/L=San Jose/O=ubnt.com/OU=UniFi/CN=UniFi’:
Self-signed certificate encountered.
ERROR: certificate common name `UniFi’ doesn’t match requested host name `x.x.x.x’.
To connect to x.x.x.x insecurely, use `—no-check-certificate’.
Unable to establish SSL connection.
As a lot of users, I got tired of the SSL certificate error page every time I visit the controller’s page.
Unfortunately, Ubiquiti doesn’t provide an “easy” upload functionality through the web interface.
But they do provide some documentation, which seems easy and quick enough. Or so I thought.
Ubiquiti documentation
You can find the relevant documentation on the Ubiquiti online documentation page.
To import an SSL certificate, you simply need to use the java ace.jar located under the /usr/lib/unifi directory.
java -jar lib/ace.jar import_cert <signed_cert> [<other_intermediate_root_certs>...]
But this does not work for me. After running the above command, I got an error that the certificate could not be imported into the keystore.
Using the keytool
During my search for a solution, I came across a Git repository of Steve Jenkins. This repository includes a shell script for installing SSL certificates on the Unifi controller.
Being cautious using scripts from the internet, I searched for the commands that actually import the certificate.
I noticed the script uses the keytool utility to handle the SSL certificate import.
Before messing around with it, I first tried out and see what the keytool actually does.
In short, keytool is a key and certificate management utility. It allows users to administer their own public/private key pairs and associate certificates for self-authentication.
It also allows users to cache the public keys (in the form of certificates) of their communicating peers.
First, lets check and see what is stored inside the keystore.
You can do this by using the following command:
sudo keytool -list -keystore /var/lib/unifi/keystore
The keytool asks you to enter a password. The default keystore password is aircontrolenterprise .
Once you enter the password, you see a list of all the certificates currently present in the keystore.
Digging deeper into the script, you’ll see that you first need tot delete the cerficiate with the “unifi” alias before you import the new one. You can delete it using the following command:
sudo keytool -delete -alias unifi -keystore /var/lib/unifi/keystore
After that you can run the keytool utility again to confirm that the certificate is no longer present.
Import your SSL certificate
The next step is to import the new SSL certificate. You can do this by running the following commands:
openssl pkcs12 -export -in <certificate.crt> -inkey <certificate_key.key> -out <tempfile> -passout pass:aircontrolenterprise -name unifi
keytool -importkeystore -srckeystore <tempfile> -srcstoretype pkcs12 -srcstorepass aircontrolenterprise -destkeystore /var/lib/unifi/keystore -deststorepass aircontrolenterprise -deststoretype pkcs12 -alias unifi -trustcacerts
However, this did not do the tick for me. When importing the SSL certificate, I got the following error:
Keytool error: java.io.IOException: DerInputStream.getLength(): lengthTag=109, too big.
If you also get a similar error, you can try running the commands as follow:
openssl pkcs12 -export -nodes -out <tempfile> -inkey <certificate_key.key> -in <certificate.crt> -certfile <bundle.ca-bundle> -passout pass:aircontrolenterprise -name unifi
keytool -importkeystore -srckeystore <tempfile> -srcstorepass aircontrolenterprise -destkeystore /var/lib/unifi/keystore -deststorepass aircontrolenterprise -alias unifi -trustcacerts
This creates a new keystore in JKS format. Unifi does not have a problem with it, but when you list the certificates, you’ll see a warning like this:
Warning:
The JKS keystore uses a proprietary format. It is recommended to migrate to PKCS12 which is an industry standard format using "keytool -importkeystore -srckeystore /var/lib/unifi/keystore -destkeystore /var/lib/unifi/keystore -deststoretype pkcs12".
In addition, if you want to convert the keystore to the PKCS12 format, you can back it up and run the displayed command:
keytool -importkeystore -srckeystore /var/lib/unifi/keystore -destkeystore /var/lib/unifi/keystore -deststoretype pkcs12
The only thing left to do is to restart the Unifi controller and you are good to go!
systemctl restart unifi

I’m the founder of Netronix, a software company that specializes in Ruby / Ruby on Rails development.
I have been developing and deploying a wide variety of online business and content applications. Hands-on experience in Ruby & PHP, although my focus lies mostly on the cutting edge of Ruby / Rails programming.
View all posts by Michaël Rigart
-
#1
Добрый день. Знающие подскажите как привязать ssl сертифика к порталу авторизации. Так как обновленный chrome и тд. не перенаправляют на страничку авторизации без проверки безопасности ssl. Кто нибуть сталкивался с данной проблемой?? И как ее решить????
Портал авторизации имеет внутрений ip 172.16.22.2 без доступа из вне!
Возможно ли получить ssl для внутреннего ip???
-
Автор темы
-
#4
-
#5
сертификат получается не для IP, а для домена. то есть Вы можете получить сертификат для домен.ком, который существует ( или у Вас есть сертификат для этого домена), а потом «испортить» локальный DNS, чтобы домен.ком показывал на 172.16.22.2.
Сертификат кладется по след инструкции https://community.ubnt.com/t5/UniFi-Wireless/Installing-an-SSL-Certificate/td-p/1873036
Спасибо за помощь добрый человек.
друзья, можете объяснить эту инструкцию?
как корректно положить сертификат домена на контроллер под Debian?
-
#6
сертификат получается не для IP, а для домена. то есть Вы можете получить сертификат для домен.ком, который существует ( или у Вас есть сертификат для этого домена), а потом «испортить» локальный DNS, чтобы домен.ком показывал на 172.16.22.2.
Сертификат кладется по след инструкции https://community.ubnt.com/t5/UniFi-Wireless/Installing-an-SSL-Certificate/td-p/1873036
У вас получилось? либо я чего-то не понимаю, либо делаю не так, но у меня https адекватно не устанавливается Прошу помочь
Installing an SSL certificate on Ubiquiti Unifi
- Installing SSL on UDM-base
- Standard method with ace.jar
- Installation with keytool
- Importing PKCS7
- Importing PEM
- PFX file import via command line
- Installing SSL on UDM-pro
- SSL installation for UniFI services not based on UDM
- Installation with keytool (for Windows)
- PFX file import using Keystore Explorer
- PFX file import (Windows) via command line
- Unify SSL security features
Unifi Dream Machine (UDM)
is the latest version of network management hardware created by UniFi. It usually comes with UniFi OS (a version of a Debian-based Linux Operating System). It has two variations: UDM-base, which is technically a modification of older UniFi controllers, and UDM-Pro, which has its own graphical interface for added ease of use.
Installing SSL on UDM-base
Official documentation for the UniFi controller includes one method of installing an SSL. This method is relatively simple; however, there is a common issue involving an error message that doesn’t indicate the actual root.
This guide outlines various alternative installation methods, shows how to fix common errors, and provides useful security enhancement tips.
Important note: Sometimes, a default certificate on the server might be used instead of the one you install, which may cause security warnings in browsers. To avoid this issue, regardless of what installation method you use, please complete the below steps first:
- Connect to UniFi.
- Stop UniFi Controller by running:
unifi-os stop
- Remove the symbolic link to the default certificate file and copy the actual certificate file via:
rm /usr/lib/unifi/data/keystore && cp /etc/ssl/private/unifi.keystore.jks /usr/lib/unifi/data/keystore - Comment out or remove the following line in /etc/default/unifi
UNIFI_SSL_KEYSTORE=/etc/ssl/private/unifi.keystore.jks - Restart UniFI Controller using this command:
unifi-os restart
- Proceed with SSL setup using one of the below methods
Please note, that the part /etc/ssl/private/unifi.keystore.jks should be replaced with the path to your new Keystore where the new certificate files are located.
Standard method with ace.jar
This method is generally recommended, although it has some peculiarities, so it isn’t always the most reliable.
The certificate should be installed in the folder where the CSR code was generated. Follow the steps below to complete the SSL installation using ace.jar:
- Connect to your server through the command prompt.
- On Linux-based or Windows-based servers, you can use Putty or a similar application.
- On MacOS, run the Terminal application.
- On the Windows server, run cmd or PowerShell (connected via remote desktop if needed).
Important: Make sure to start the application with administrator rights on Windows. To do this, right-click on the program icon and choose the Run as administrator option or do it this way:
Properties >> Compatibility >> mark the Run this program as an administrator >> OK.On Linux/MacOS, you should have root or sudo user access. For this, run the following command:
sudo su —
-
To start the installation, open the UniFi shell to access the UDM files:
unifi-os shell
- Go to the UDM-base main folder by running:
cd
/usr/lib/unifi/
- Upload the following files from your received SSL archive in the UniFi base folder:
- Security certificate file in PEM format (the .crt file received from the Certificate Authority);
- Root certificate;
- Intermediate certificates.
Use the following command:
java -jar lib/ace.jar import_cert *your certificate*.crt SectigoRSADomainValidationSecureServerCA.crt USERTrustRSAAddTrustCA.crt addtrustexternalcaroot.crt
Where *your certificate* is replaced with your actual file name.
If you received the intermediate and root certificates in one bundled file (.ca-bundle), you can download them separately here.
Note: that the example command above contains intermediate certificates for the standard Domain Validation type SSL.
- After you run the command, UniFi will ask you to enter the keystore password. Use «aircontrolenterprise» (unless you changed it manually in your UniFi settings) and confirm the certificate’s import.
Keep in mind that some server versions may require the whole CA Bundle to be uploaded as a single file. In such a case, you can download the corresponding bundle following the instructions in this article and use the following command:
java -jar lib/ace.jar import_cert *your certificate*.crt bundle.crt
- Restart UDM-base to apply the changes:
unifi-os restart
You can check the installation here.
Important: There is a known bug on some common modern UniFi versions: after importing the files to the server, the error, «Unable to import the certificate into keystore» appears.
This is because on some UniFi versions, ace.jar is unable to parse the new string (n) symbol.
On Linux and MacOS, this issue can be resolved by removing these symbols with a simple command:
tr -d ‘nr’ < *file name* > *temporary file name* && mv *temporary file name* *file name*
Solution: Replace the *file name* with the actual name of the required file. Apply the command to your certificate, to each of the intermediate certificates, and the root certificate.
The *temporary file name* value is required as a temporary file because the command does not allow it to save the modified content in the same file directly. Therefore it’s necessary to save it in a temporary place and then replace the old one with it.
Alternatively, you can use this command:
tr -d ‘nr’ < *file name* | echo $(cat -) > *file name*
On Windows, the certificate files can be fixed by using Notepad++:
- Open the file with a text editor.
- Click ctrl+F and go to the tab Replace .
- Mark the option Extended to replace the service symbols.

- Type n in the form and click Replace All.
- Repeat it with the parameter r .
- Save the file.

Installation with keytool
Importing PKCS7
Inside the keystore, import the file in the PKCS#7 format (with a .p7b or .cer extension).
Follow Steps 1-3 in the Standard ace.jar method.
Save the certificate’s Private key to the /data/keystore file in the default UniFi keystore after you generate the CSR code.
- Upload the security certificate file the SSL archive you received from the CA in the PKCS#7 format (.cer or .p7b) to the UniFi base folder.
- To import the uploaded file into the keystore, run:
keytool -import -trustcacerts -alias unifi -file *your certificate*.p7b -keystore /data/keystore
Enter the keystore password «aircontrolenterprise» (unless it was changed in your UniFi settings) and press Enter to complete the import.
- Restart the UDM-base to apply the changes:
unifi-os restart
And now you’re done! You can check the installation here.
Warning: You may receive the error «Input not an X.509 certificate» while importing the SSL in the PKCS#7 format. It may be related to the extra empty strings in the file or other formatting issues. If editing the file in a text editor does not help, importing the SSL as PEM files is best.
On Windows, you can also use this solution:
- Change the certificate file extension to .cer.
- Right-click on the file and choose Install certificate. Keep clicking through the options until you locate the Finish button.
TIP: Within the Internet Explorer browser, click on Tools >> Internet Options to install it.
- Open the Content tab and click on Certificates.
- Choose your certificate out of the Other tab and click Export.
- Click Next.
- Select «Cryptographic Message Syntax Standard — PKCS#7 Certificates (.P7B)» and check the «Include all certificates in the certification path if possible» box.
- Click Next >> Browse . Enter the file name and path for the new combined file to be saved.
TIP: You can save the file with a .cer extension.
- Click Next and then Finish.
- Use this newly-created file during installation in the keystore.
Importing PEM
Alternatively, you can import the SSL file in PEM format (.crt).
The example below uses files for a Domain Validation certificate. The process is similar for other SSL types. Find the corresponding files here.
- Import the root certificate:
keytool -import -trustcacerts -alias root -file addtrustexternalcaroot.crt -keystore /data/keystore
- Import intermediate certificates one by one using separate aliases:
keytool -import -trustcacerts -alias intermediate2 -file USERTrustRSAAddTrustCA.crt -keystore /data/keystore
keytool -import -trustcacerts -alias intermediate1 -file SectigoRSADomainValidationSecureServerCA.crt -keystore /data/keystore
- Import the actual certificate with the alias unifi:
keytool -import -trustcacerts -alias unifi -file *your certificate*.crt -keystore /data/keystore
PLEASE NOTE
: You must enter the keystore password for each import and press Enter to complete the process.
TIP
: To avoid this, add the argument -storepass *password* at the end of the command. Replace the *password* with your actual password for the UniFi keystore.
- Restart UDM-base to apply the changes:
unifi-os restart
The files are the same as for the Standard installation method with ace.jar.
PFX file import via command line
You can use this option if the CSR was generated elsewhere or the OpenSSL method was used instead of the default UniFi tool during the process.
In this case, a private key (.key) is created separately. You need to import the key file into the keystore along with the certificate (.crt) and chain (.ca-bundle ) files.
Steps 1-3 are the same as in the Standard method with ace.jar.
If you prefer carrying out the process through command line, follow these steps:
- Upload the PEM security certificate file (.crt), and chain file (.ca-bundle) you received in an archive from the Certificate Authority to the UniFi base folder. Move or upload the previously generated private key file to the same folder for your convenience.
Technically, you can put them in different folders; if you do, add the full paths to the files in the commands in the following steps where these files are used.
- Generate the PKCS#12 (PFX) file using the OpenSSL command:
openssl pkcs12 -export -out *your certificate*.pfx -inkey *your certificate*.key -in *your certificate*.crt -certfile *your certificate*.ca-bundle -name «unifi»
- Import the created PFX file into the keystore:
keytool -importkeystore -srckeystore *your certificate*.pfx -srcstoretype PKCS12 -destkeystore /data/keystore -deststoretype jks -deststorepass *password*
Replace the *password* value with your actual password for the UniFi keystore.
- Restart UDM-base to apply the changes:
unifi-os restart
If you prefer generating the PFX elsewhere (e.g. our converter), do the following:
- Generate the PKCS#12 (PFX) file using any convenient tool.
- Upload the PFX file to the server where the UniFi controller is installed (in the UniFi base folder).
- Import the created PFX file into the keystore:
keytool -importkeystore -srckeystore *your certificate*.pfx -srcstoretype pkcs12 -srcalias 1 -destkeystore /data/keystore -deststoretype jks -destalias unifi -deststorepass *password*
PLEASE NOTE: For the PFX file without an alias assigned, 1 is used as the default alias. Also, ensure you include -srcalias and -destalias in the command to avoid the error, «Alias unifi does not exist». The *password* value should be replaced with your actual password for the UniFi keystore.
- Restart UDM-base to apply the changes:
unifi-os restart
There is a small chance that the default alias is different. If you encounter an error, you can check the alias with any of the following commands:
openssl pkcs12 -in *your certificate*.pfx -info
keytool -list -storetype pkcs12 -keystore *your certificate*.pfx -v
Installing SSL on UDM-pro
For UDM-pro you only need to replace the default private key and self-signed certificate and restart UDM.
- Make sure to enable the Secure Shell (SSH) for UDM-pro:
Settings >> Network Settings >> Device Authentication >> Turn it on and set up the username and password (or generate an access key, which is an alternative option that you will be offered at the last step).
- Connect via SSH and go to the configuration folder for UDM-pro:
cd /mnt/data/unifi-os/unifi-core/config/
- Prepare the installation files:
There are two files inside the folder:unifi-core.crt and unifi-core.key. These are a self-signed certificate and a Private key, respectively.
To install the valid SSL they should be replaced with an actual certificate received from the CA and a corresponding Private key
- unifi-core.crt should contain your certificate (the .crt file from CA) combined with the intermediate and root certificates (the .ca-bundle file from CA) in a single file;
- unifi-core.key should contain the Private key file.
You can combine the .crt and .ca-bundle files you received from the CA in multiple ways:
- Upload both files to /mnt/data/unifi-os/unifi-core/config/ and run this command:
cat example.crt >> unifi-core.crt ; echo >> unifi-core.crt ; cat example.ca-bundle >> unifi-core.crt
- Or open both files with any plain text editor (Notepad, Notepad++, TextEdit, Text), and create a combined unifi-core.crt (certificate first, CA-bundle below it) file on your PC and upload it to the UDM.
- Or copy and paste both files’; content to unifi-core.crt (in the same order as above: certificate first, CA-bundle below it).
To open it in the command line, use any provided Linux editor like nano or vi (for example, run nano unifi-core.crt ).
- Once both files are replaced, restart your UDM-pro:
unifi-os restart
SSL installation for UniFI services not based on UDM
All installation methods described for UDM-base work similarly on older UniFi controller versions. However, a few methods cannot be used for UDM even though they were valid in the past. They are described below.
Installation with keytool (for Windows)
The process is generally the same as on Linux: you upload the files to the server and run the keytool commands to install them in the keystore. However, there is one difference. Unlike Linux-based servers, Windows requires a full path to be specified when you are running an application. Because keytool.exe, certificate files, and the keystore may be located in different folders, make sure to use the full path unless the file is in the folder where you run the command.
To import the files in the PKCS#7 format by running this command:
«*Java base folder*binkeytool.exe» -import -trustcacerts -alias unifi -file *your certificate*.p7b -keystore «C:Users*account username*Ubiquiti UniFidatakeystore
*Java base folder* is specified during the Java installation on the server. By default, it is something like «C:Program FilesJava*Java version*».
Alternatively, run the command below to switch to the Java base folder:
cd *Java base folder*
and then import the file by running:
keytool -import -trustcacerts -alias unifi -file «C:Users*account username*Ubiquiti UniFi*your certificate*.p7b» -keystore «C:Users*account username*Ubiquiti UniFidatakeystore»
Close the UniFi application and start it again using the application icon.
If UniFi is configured as a Windows service, run these commands:
net stop «UniFi Controller»
net start «UniFi Controller»
The certificate should now be installed.
Importing PEM certificates can be performed as described in the Importing PEM section, specifying the full path to the files in all commands.
PFX file import using Keystore Explorer
The easiest way to import the PFX on UniFi on Windows is with the help of «Keystore Explorer». (It can also be used for Linux/Mac OS, though it is best suited for Windows).
- Open the current keystore file in Keystore Explorer using the default password «aircontrolenterprise» or the one used by the controller.
TIP: You can open the system.properties file and add your custom password to it:
app.keystore.pass=*password*
The file is located in the in the data subfolder of UniFi base folder. - This option requires generating the PFX (PKCS#12) format file using any method described in the certificate installation in PFX format section or any online tool (e.g. our converter).
Choose your own password for this. It can be different from the password used in the UniFi controller.
- Once the PFX file is created, switch back to Keystore Explorer and delete the unifi entry.
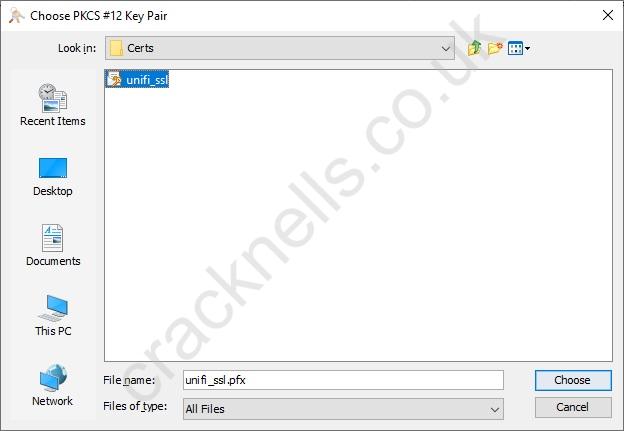
- Click-through: Tools >> Import Key Pair >> PKCS12.
There, locate your PFX file and use the password you set during its creation.
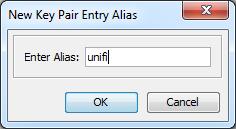
- The Key Pair Entry Alias should be set as unifi.
- Provide the password. It should be the keystore password («aircontrolenterprise» unless it was changed in your UniFi settings).
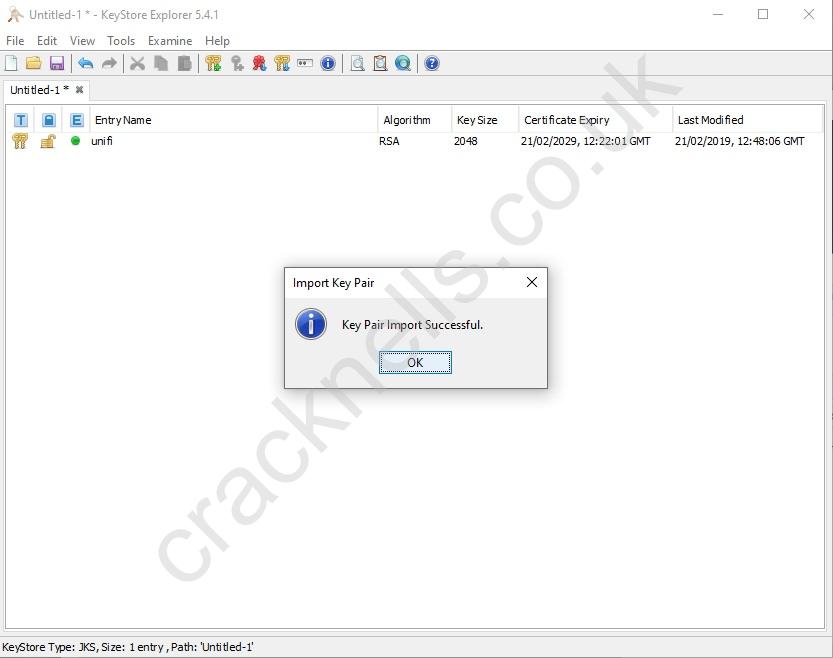
- Save the keystore file using File >> Save (or simply click on the related icon).
-
Restart the controller to apply the changes.
On Linux:
service unifi restartOn Windows, close the UniFi application and start it again using the application icon or, if UniFi is configured as a Windows service, use the commands:
net stop «UniFi Controller»
net start «UniFi Controller»WARNING: Sometimes, the keystore may get corrupted because of multiple imports. If the process does not work properly, delete the initial keystore file and restart UniFi to create a new one, and only proceed with the PFX import when this is done.


PFX file import (Windows) via command line
This process is similar to installation on Linux. The PFX file can be generated by doing the following:
- Save both the certificate and the private key files in one folder using the same file names and corresponding extensions: example.p7b, example.key. Run this command in cmd or PowerShell:
certutil -mergepfx *your certificate*.p7b *your certificate*.pfx
Alternatively, you can put the certificate, private key and CA-bundle in one folder and generate it with OpenSSL:
*OpenSSL path* pkcs12 -export -out *your certificate*.pfx -inkey *your certificate*.key -in *your certificate*.crt -certfile *your certificate*.ca-bundle -name «unifi»
Default OpenSSL path on Windows (if you have it installed) is «C:*OpenSSL version*binOpenSSL.exe».
- Import the created PFX file into the keystore:
«*Java base folder*binkeytool.exe» -importkeystore -srckeystore *your certificate*.pfx -srcstoretype pkcs12 -srcalias 1 -destkeystore «C:Users*account username*Ubiquiti UniFidatakeystore» -deststoretype jks -destalias unifi -deststorepass *password*
*Java base folder* is specified during the Java installation on server. By default, it is something like «C:Program FilesJava*Java version*».
- Close the UniFi application and start it again using the application icon or, if UniFi is configured as a Windows service, with the commands:
net stop «UniFi Controller»
net start «UniFi Controller»
The SSL should now be installed.
Unify SSL security features
The following list includes features not directly related to SSL setup but related to site security and different ways to configure it.
- The ECC certificates won’t work even though these files can be successfully imported to the server.
- Server Name Indication (SNI) is not supported.
- HTTPS redirect is enabled on newer versions of UniFi by default. Access the UniFi admin panel using the http:// link (by default, *hostname*:8080 in system.properties). Then, if the SSL is already installed on UniFi, you’ll be forwarded to the https:// link (by default, https://*hostname*:8443).
This option works on all UniFi versions starting from 4.x. - HSTS can be enabled on UniFi in the system.properties file by modifying these parameters:
unifi.https.hsts=false— set to true to enable HSTSunifi.https.hsts.max_age=*value*— you can specify the duration for how long HSTS is cached (in seconds)unifi.https.hsts.preload=false -set to true only if you do not plan to remove the HSTS, as it will add your UniFi hostname to the preload list, deletion from which should be requested specificallyunifi.https.hsts.subdomain=false— set to true if you would like to apply an HSTS policy for the subdomains of your domain name, as well as for the main domain nameUncomment the corresponding (above-mentioned) strings, save the file, and restart UniFi to complete the process.
-
Permitted cipher suites and SSL/TLS versions can be enabled on UniFi in the system.properties file using the following parameters:
unifi.https.ciphers=cipher1, cipher2, etc.— replace the values with the actual cipher names you want to enableunifi.https.sslEnabledProtocols=protocol1, protocol2, etc. - replace the values with the actual protocol names you want to enableUncomment the corresponding (above-mentioned) strings, save the file, and restart UniFi to complete the process.
Check the optimal configurations for UniFi here.
Associated articles
Over the
last year we have been implementing more and more Ubiquiti hardware, mostly
their UniFi range. As for the price you get a lot of bang for your $! (Or £ in
this case)
One of the
big selling points for me is their software controller that is used to adopt
and configure devices. It is also completely free unlike a lot of other
providers who charge extra for monitoring/management software for their devices.
It can also be setup to allow remote access via a web portal to allow management
of your network from anywhere.
This
software is available for most platforms and is also available as a standalone
piece of hardware called a Cloud Key which runs a local instance of the
controller. This eliminates the need to install and run the controller on a
server or workstation.
Anyway back
to the main topic, once you have installed and setup the controller it is
accessible via a secure webpage allowing you to adopt, configure and monitor
UniFi hardware connected or making up your network.
The problem
is that the UniFi controller will by default use its own self-signed
certificate to secure the connection which causes web browsers to flash up an
insure connection:

To prevent this we need to add our own custom certificate to the controller. This should be achievable using this help article:
https://help.ubnt.com/hc/en-us/articles/212500127-UniFi-SSL-Certificate-Error
However for
the life of me I could not get this to work using the instructions provided!
This wasn’t helped by the fact I was trying to sign the new certificate using
our internal Windows certification authority.
No matter what I tried I just got this error repeatedly, slowly driving me insane:

I gave up
with this article and managed to work it out myself using some help from this
post:
It turns out
it is much easier to just replace the certificate store which holds the
self-signed certificate that the UniFi controller uses with a new one. In this
new file we will store the certificate we want the controller to use.
First off as
I stated before I am using a Windows Certification Authority and already have
some templates setup to create custom certificates for various internal web
accessible network hardware.
The
certificate template I used allows me to submit custom information on each
request. Meaning I don’t have to create a request at the device in questions,
then submit it to the CA and then submit the response back. I just fill out the
subject and any subject alternative names and generate the certificate on my machine.
I then export it with the private key and import it to the device if possible.
To create
this new keystore with our custom certificate we first need to load up the
Certificates snap-in:
Run > certlm.msc
> OK
Or
MMC.exe go
to ‘File > Add/Remove Snap-in’
select ‘Certificates’ select ‘Computer account’ ‘Local computer’ and then ‘Finish’
In ‘Personal > Certificates’ right click and select ‘Request New Certificate’ and click ‘Next’ on the screen that pops up.
Select the certificate template you would like to use, for me it was a custom template I had setup. And click the link next to the yellow triangle to supply the information required to generate the certificate:

Under the ‘Subject’ tab complete the ‘Subject name:’ and ‘Alternative name:’ as required:

Subject
CN = <FQDN> e.g. unifi.mydomain.com
OU = <organisation>
O = <organisation>
L = <town>
S = <county>
C = <country>
Alternative names:
DNS = <FQDN> e.g. unifi.mydomain.com
DNS = <ipaddress> e.g. 192.168.0.10
IP address (v4) = <ipaddress> e.g. 192.168.0.10
Adding the
alternative names in allows the certificate to be valid for more than one
address. So adding the IP address in means the certificate will still be valid
if accessing the controller via its IP address rather than a host name.
The reason I
add the IP in both ‘DNS’ and ‘IP address (v4)’ is because some browsers won’t
see the certificate as valid if the IP address is stored under the ‘IP address
(v4)’ heading.
Click ‘OK’ and click ‘Enroll’:

You will now
have your custom signed certificate with its private key stored on your
machine. Right click the certificate ‘All
Tasks > Export’:

Click ‘Next’ and select ‘Yes, export the private key’:

Untick all
and only tick ‘Include all certificates
in the cortication path if possible’, click ‘Next’:

Tick ‘Password’ and create a password

Give the
certificate a name and save it somewhere relevant:

Click ‘Finish’

Next we need
to download a piece of software that we can use to create our new certificate
store.
KeyStore Explorer
Download, install
and run KeyStore Explorer and click ‘Create
a new KeyStore’:

Select ‘JKS’ and click ‘OK’:

Open the ‘Tools’ tab and click ‘Import Key Pair’:

Select ‘PKCS #12’ and click ‘OK’:

Click ‘Browse’:

Navigate to
where you saved your certificate earlier:
Enter the
password you created when exporting your certificate and click ‘Import’:

Enter the
alias as ‘unifi’ and click ‘OK’:

When asked
to create a new password enter ‘aircontrolenterprise’:
This is important
as this is the password used to access the keystore and certificate by the
UniFi Controller. If the password is different the controller will just overwrite
the new keystore.

Click ‘OK’, you
will now see that your new key has been imported:
Open the ‘File’ tab and click ‘Save As’

Enter the
same password as before ‘aircontrolenterprise’
and click ‘OK’

Name the file as ‘keystore’ and save it somewhere relevant:
Again the name is important.

Navigate to your UniFi Controller installation. On a Windows
machine this will be located in the user profile of the user who installed it
unless it was moved afterwards.
The default installation directory is:
C:Users%USERNAME%Ubiquiti
UniFi
Now navigate to the ‘data’
folder you will find the current ‘keystore’ file:

It is worth taking a backup of this keystore file. However
the controller will just recreate it if there is an issue.
Copy the new keystore file we just created into this
directory and overwrite the old one.
Now restart the Unifi controller. If you have it installed as
a service, open ‘services.msc’ find
the service, right click and ‘Restart’

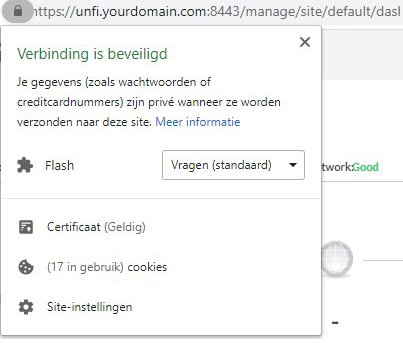
Now open a browser and navigate to your controller. This will
be the host name or IP address depending how you set it up
https://unifi.mydomain.com:8443
You will now see that it will no longer flash up as insecure
and will be valid:

Even if you access the controller via its IP address:

And if you view the certificate you can confirm it is the
correct one:

All done! This shouldn’t need changing until your certificate expires. It is a good idea to keep a copy of your new keystore file backed up somewhere just in case you ever need to reinstall or recover your controller.
One of the most asked questions about the Unifi Controller is how to get rid of the certificate error when you open the controller. And I totally understand, it’s annoying to bypass the error/warning every time you log in to your controller.
So in this article, we are going to install a Letsencrypt SSL Certificate for our Unifi Controller. I am using a Rasberry Pi to run the controller, so this article is mostly written for a Pi.
Letsencrypt certificates are free to use but need to be renewed every 90 days. The renewing can be automated, as I will show you in this article, but it requires that your controller is accessible from the internet.
To do this you will need a custom domain name that you can use to point a subdomain to your local controller. Also, we need to open and forward a specific port in the router.
Before we continue there is one thing you should know, we can’t create a certificate for a local IP Address. You are probably running your controller locally, so if you want to open your Unifi Controller, you go to 192.168.0.201 for example.
Even if we make the controller accessible from the internet, with unifi.yourdomain.com, then, by default, you still can’t access it locally with a certificate. You can’t open unifi.yourdomain.com, because that will require you to make a U-turn on the internet, which won’t work. Opening the controller from the local IP Address will still give a warning because the cert is issued to unifi.yourdomain.com.
Local DNS Entries
But we have a solution for this, we can create a local DNS entry. You can do this locally on your computer, by changing your host file or on your router, by creating a static DNS entry. I prefer the router because this is device independent and will work in your whole network, but you will have to check if it’s possible with your router.
Static DNS entry EdgeRouter
If you have an EdgeRouter, you can create a static DNS route by opening your router through SSH. Simply use Putty or Windows Terminal for this:
# Open the SSH connection to your EdgeRouter
ssh [email protected]

# Open configure mode
configure

# Add the DNS route. Use the domain name we create later
# Change 192.168.0.201 to the IP Address of your Unifi Controller
set system static-host-mapping host-name <unifi.yourdomain.com> inet 192.168.0.201

commit
save
Change your host file
On Windows, you can easily add local DNS routes by adding them to your host file. You will need to open the host file with admin rights to save the changes:
- Open %windir%System32driversetc
- Open the file hosts
- At the end of the file, add: 192.168.0.201 unifi.yourdomain.com
- Save and close the file
Change 192.168.0.201 to the IP Address of your Unifi Controller.
Setup the Port Forwarding and Domain
So to get a certificate we need a domain name. You can get a domain name for less than $10 a year, for example here at NameCheap Now we don’t want to point the whole domain to our unifi controller, so I suggest you create a subdomain unifi.yourdomain.com and point that to your local network.
Look up your public IP Address, here at myip.com, and create an A record with the name unifi and your IP Address.
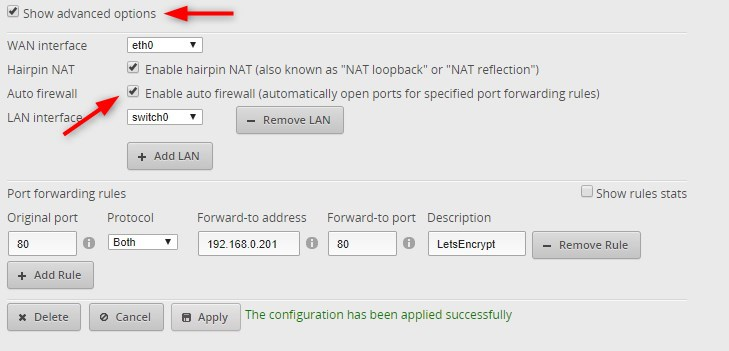
Now you need to forward and open the following ports in your router. Port 80 is needed for LetsEncrypt to authenticate the SSL Certificate.
- Original port: 80
- Protocol: TCP/UDP
- Forward-to address: IP Address of your Unifi Controller
- Forward-to port: 80
If you also want to access your Unifi Controller from the internet, you could also forward the following port number. But keep in mind that your controller is only protected with a username and password. Another, saver, option to access your Unifi Controller is to use unifi.ui.com.
- Original port: 8443
- Protocol: TCP/UDP
- Forward-to address: IP Address of your Unifi Controller
- Forward-to port: 8443
If you have an EdgeRouter you can enable Auto firewall, the EdgeRouter will open the specific port in the firewall for you then:
Install SSL Certificate on Unifi Controller
With everything set, we can start with installing the certificate for our Unifi Controller.
- Install Certbot
sudo apt-get install certbot - Generate a SSL certificate
sudo certbot certonly --standalone -d unifi.yourdomain.com
You will need to enter an email address so you can receive a notification when you need to renew (when the auto-renew fails), Accept the Terms, and Accept or Decline the last request. - Download import script
We need to import the Letsencrypt cert into the Unifi Controller. Steve Jenkins has created an import script that makes this a lot easier to do, so we are going to use this script.
Download the script with the following cmd:
sudo wget https://raw.githubusercontent.com/stevejenkins/unifi-linux-utils/master/unifi_ssl_import.sh -O /usr/local/bin/unifi_ssl_import.shWe place it in /usr/local/bin as recommend by Steve.
- Make the script executable
By default, you can’t execute the script. Give it the correct permissions with the following cmd:
sudo chmod +x /usr/local/bin/unifi_ssl_import.sh - Edit the variables in the script
Next, we need to edit some of the configuration variables in the script. Open the script with
sudo nano -w /usr/local/bin/unifi_ssl_import.shAdd your domain
UNIFI_HOSTNAME=unifi.yourdomain.comComment the three lines for Fedora/RedHat/Centos by placing a # for it:
# Uncomment following three lines for Fedora/RedHat/CentOS
#UNIFI_DIR=/opt/UniFi
#JAVA_DIR=${UNIFI_DIR}
#KEYSTORE=${UNIFI_DIR}/data/keystore
Uncomment the three lines for Debian/Ubuntu
# Uncomment following three lines for Debian/Ubuntu
UNIFI_DIR=/var/lib/unifi
JAVA_DIR=/usr/lib/unifi
KEYSTORE=${UNIFI_DIR}/keystore
Set the Let’s Encrypt mode to true:
If you only enable the line, by removing the #, you will get a loop ==Yes when running the script. So set it to true. Will still get some warning about missing [[:, but the doesn’t matter.LE_MODE=true
Save and close the file
Ctrl + X
Y
Enter - Run the import script
We can now import our new SSL cert into the Unifi Controller. Run the following cmd:
sudo /usr/local/bin/unifi_ssl_import.shIf you get a loop with
== yes, pressctrl + cand change LE_MODE to true (see step 5) - Check the new Certificate
The script will restart the Unifi Controller. Give it a couple of minutes to start.
If you open your controller you should now have a certificate and no errors or warnings anymore.
- Creating the update script
Cerbot will renew the certificate every 3 months. So we will have to import the certificate as well every 3 months.
Create a new file
sudo nano -w /etc/cron.daily/unifi_ssl_import
And add the following content into it#!/bin/bash
/usr/local/bin/unifi_ssl_import.shPress Ctrl +X followed by Y and Enter to save and close the file.
Give the file the correct permissions so it can be executed:
sudo chown root:root /etc/cron.daily/unifi_ssl_import
sudo chmod +x /etc/cron.daily/unifi_ssl_import
That’s all, you should now be set with a nice SSL certificate for you Unifi Controller and the annoying warning should be gone. If you have any questions, just drop a comment below.
You probably also want to take care of your Unifi Controller backup. By default it’s stored on the controller self, but you can simply upload a copy of the backup to Dropbox for example. You can read all about it in this article.
sources used:
https://www.stevejenkins.com/blog/2016/06/use-existing-ssl-certificate-linux-unifi-controller/
https://crosstalksolutions.com/definitive-guide-to-hosted-unifi/
- Вся активность
Сертификат SSL для устройств Ubiquiti Networks Inc.
Join the conversation
You can post now and register later.
If you have an account, sign in now to post with your account.