Customer Problem
The problem the customer encountered is that the printer prints blank sheets from the pc and via scan copy. Also an error of #U2-1112 Turn off then on.
Diagnosis
After trying the printer and getting the error myself I thought it could be either the Laser Unit or the toner cartridge. I search for the Service Manual and found the error which expanded on it specifically being either the Laser Unit, the cable connected between the LSU and Mainboard or the MainBoard it self.

As you can see from above the four things to check are the ribbon cable going to the main board, the ribbon cables connecting to the LSU, the LSU and finally the main board. In this blog post I will show directions to reach each one of these areas.
Work Done
So now that I know where to check, I have to begin with taking off the right cover.


After removing the cover the first attempt at resolving the issue is by reseating the following cable shown circled below.

Next you need to remove the Scanner Unit.


Now to remove the Front Cover.


Middle Cover Removal.


Next is getting to the Laser Scanner Unit.


At this point you will attempt to reseat the LSU harness ribbon cable and put it back up the printer partially and see if the problem persists. But in my case I had a similar printer to this and I actually swapped the LSU it self and got the same problem. So I had to do the most difficult solution out of them all which is removing the LSU harness ribbon cable and replacing it with the one from the other printer.
Removing the LSU Harness Cable


In replacing the cable I will be honest with you and say that i took the short cut way and forced it back between the frame of the printer and the High Voltage Power supply Board. It is a very tight fit and regretfully i dont have any images of behind the board and placement of the cable.
Results
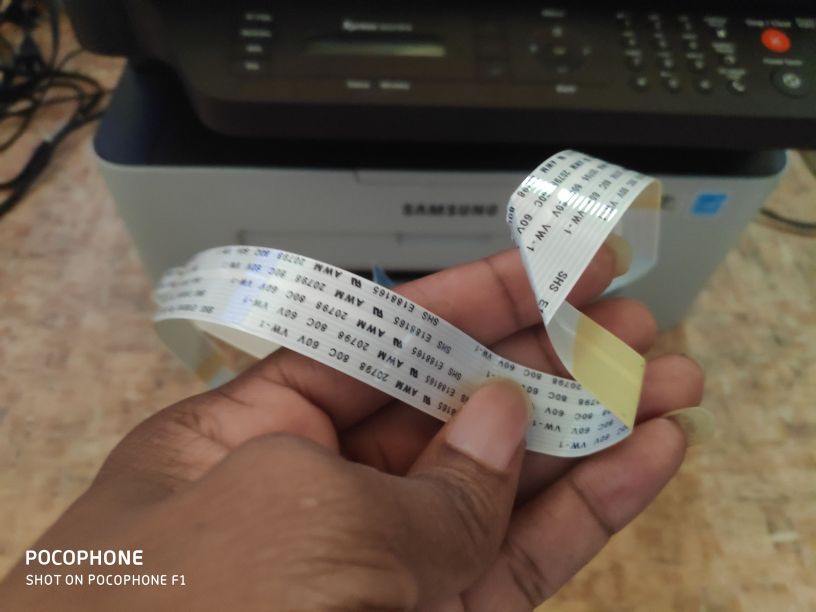
Above I showcased the various areas to check in the case of this error, in my case I had to replace the cable. In the two instances I came across this problem though it was always the cable that was faulty. But because Samsung’s service manual suggests taking all these things into consideration, you can never be too sure. The cable in question is SHS E188165 AWM 20798 80C 60V VW-1 and can be found on ebay but I have never tested using one before.
Содержание
- Error code 11 1113 samsung принтер
- Error #U2-1112, 1113 Samsung m2070FW
- Error code 11 1113 samsung принтер
- Re: Printer setup
- Re: Printer setup
- Re: Printer setup
- Re: Printer setup
- Re: Printer setup
- Re: Printer setup
- Re: Printer setup
- Re: Printer setup
- Re: Printer setup
- Re: Printer setup
- Re: Printer setup
Error code 11 1113 samsung принтер
КОНФЕРЕНЦИЯ СТАРТКОПИ
Принтеры, копировальные аппараты, МФУ, факсы и другая офисная техника:
вопросы ремонта, обслуживания, заправки, выбора
Доброго времени суток уважаемые форумчане.
Возникла проблема после долгого простоя с CLX-3185, сначала несколько листов сделал идеально, потом был выключен и на следующий день выбил ошибку #A1-1113 и отказывается входить в готовность, шлейф к мотору проверен и подкинут новый мотор, никаких изменений не произошло, драйвер не смог подкинуть из за его отсутствия. При нажатии сканирования или копии сканер проходит и на дисплее написано «Печать» но ничего не происходит. Картриджи и фотик на клин проверил. Помогите советом где копнуть.
По мануалам касательно ошибки в одних пишут что проблема с мотором, в других что с памятью.
На радостях напихали столько заданий, что тот поперхнулся)
Сделайте сброс из техменю, должно попустить.
всё же память?вот проблема пробовал сделать сброс, но так и не отпустило. потом пробовал мотор подкинуть и проверил шлейфы и питание, но тоже увы не прошло. после этого решил написать как раз. Попробую ещё раз. Спасибо. Отпишусь как сделаю.
да, читал это, спасибо, а по сбросу сделал и общий сброс всех счётчиков и по отдельности из тех меню и из юзер меню, без изменений.
аппарат прошивался необновляемой прошивкой при покупке (около 5 или более лет назад), версия прошивки так же осталась 11 года, не может ли быть косяк в прошивке?
Не может, но никто не запрещает обновить ее.
увы запрещает, прошивка была необновляемая, дебагом теперь только, в обычном режиме не шьётся.
(7) то есть всё же искать драйвер и подкидывать, учитывая что мотор исправен? Сброс памяти не помог.
(8) Каким дебагом? Принудзагрузки вам мало?
(9) Еще вопрос, о котором моторе и, соответственно, о котором драйвере идет речь. Судя по «Ask the sender to try again»(4) — вряд ли это майн-мотор.
(10) С принудиловки пробовал, не хочет, ошибка загрузки.
Всё же думал что виноват майнмотор или клин картриджа.
Может прошивка битая, уже давно лежит 44я версия, но она никак не хочет литься. Залита 25я на текущий момент. Сейчас скачал 46ю, попробую ещё раз. Отпишусь чуть позже.
Я бы не советовал 46ю — лучше 35ю или 43ю.
KryoiK (11): или клин картриджа
Выньте картриджи да проверьте.
уже картриджи все проверены, картриджи и драм в норме, ещё до разборки аппарата проверил, думал они чудят. Спасибо за информацию по версии, залью 35ю на пробу.
(12)прошил 35й версией, ошибка та же, изменений никаких. Что ещё посоветуете?Куда смотреть?
Проверить майн-мотор из EDC Mode. Если успешно — снять с него подозрения.
KryoiK (5): сделал и общий сброс всех счётчиков и по отдельности из тех меню и из юзер меню
Clear All Mem из Tech Mode — делали? Остальное было не нужно.
(15) Да, делал. Про EDC что то я и забыл, не запускается мейн мотор (индикатор загорается зеленым и потом снова загорается красным и ошибка сменилась на U1-1211 (печка я так понимаю, или опять ошибаюсь?), а после перезапуска вернулась та же 1113.
KryoiK (16): U1-1211
Да, недогрев.
KryoiK (16): не запускается мейн мотор
Вот и руководство к действиям.
(17) нашёл убитый 3185 на авито, скинул мейнмотор, проблема ушла, спасибо за подсказки, долго он у меня валялся без дела, странно что от CLP-365 мотор по пинам и визуально точно такой же и был исправен, но не заработал, потому и начались танцы с остальными узлами, а тут от аналогичного подкинул мотор и загудел сразу. Спасибо!
KryoiK (18): визуально точно такой же и был исправен, но не заработал
И маркировка (по модели движка) та же? И сопротивления обмоток те же?
(19) уже не помню, когда не пошло отдал его обратно владельцу после проверки, но видать не пошли по сопротивлениям.
Да сами сопротивления ему как-то фиолетовы, лишь бы не разными были.
(21) ну по распиновке одинаковы (на разъёме которые), маркировку сверял тоже, но уже не помню точно сошлась или нет,но факт что мотор не пошёл отложился хорошо.
Источник
Error #U2-1112, 1113 Samsung m2070FW

Customer Problem
The problem the customer encountered is that the printer prints blank sheets from the pc and via scan copy. Also an error of #U2-1112 Turn off then on.
Diagnosis
After trying the printer and getting the error myself I thought it could be either the Laser Unit or the toner cartridge. I search for the Service Manual and found the error which expanded on it specifically being either the Laser Unit, the cable connected between the LSU and Mainboard or the MainBoard it self.
Error U2-1112, U2-1113
» data-medium-file=»https://mypcjobs.files.wordpress.com/2020/01/e2qbsau.png?w=273″ data-large-file=»https://mypcjobs.files.wordpress.com/2020/01/e2qbsau.png?w=616″ src=»https://mypcjobs.files.wordpress.com/2020/01/e2qbsau.png?w=616″ alt=»e2qbsau» srcset=»https://mypcjobs.files.wordpress.com/2020/01/e2qbsau.png?w=616 616w, https://mypcjobs.files.wordpress.com/2020/01/e2qbsau.png?w=136 136w, https://mypcjobs.files.wordpress.com/2020/01/e2qbsau.png?w=273 273w, https://mypcjobs.files.wordpress.com/2020/01/e2qbsau.png?w=768 768w, https://mypcjobs.files.wordpress.com/2020/01/e2qbsau.png 796w» sizes=»(max-width: 616px) 100vw, 616px»/> Error U2-1112, U2-1113
As you can see from above the four things to check are the ribbon cable going to the main board, the ribbon cables connecting to the LSU, the LSU and finally the main board. In this blog post I will show directions to reach each one of these areas.
Work Done
So now that I know where to check, I have to begin with taking off the right cover.
 Removing right cover
 Remove right cover screw.
Those two are clips that you need to unhinge before trying to pull it off.
» data-medium-file=»https://mypcjobs.files.wordpress.com/2020/01/ljp9lot.jpg?w=300″ data-large-file=»https://mypcjobs.files.wordpress.com/2020/01/ljp9lot.jpg?w=616″ src=»https://mypcjobs.files.wordpress.com/2020/01/ljp9lot.jpg?w=616″ alt=»ljp9lot» srcset=»https://mypcjobs.files.wordpress.com/2020/01/ljp9lot.jpg?w=616 616w, https://mypcjobs.files.wordpress.com/2020/01/ljp9lot.jpg?w=1232 1232w, https://mypcjobs.files.wordpress.com/2020/01/ljp9lot.jpg?w=150 150w, https://mypcjobs.files.wordpress.com/2020/01/ljp9lot.jpg?w=300 300w, https://mypcjobs.files.wordpress.com/2020/01/ljp9lot.jpg?w=768 768w, https://mypcjobs.files.wordpress.com/2020/01/ljp9lot.jpg?w=1024 1024w» sizes=»(max-width: 616px) 100vw, 616px»/> Those two are clips that you need to unhinge before trying to pull it off.
 Pry the top and bottom.
After removing the cover the first attempt at resolving the issue is by reseating the following cable shown circled below.
 LSU harness ribbon cable
Next you need to remove the Scanner Unit.
 Removing from the Scanner Unit.
 Remove the three cables to the Right.
 Move the top half which is the Scanner/ADF forward and the Platen back.
 Example with my Hand.
 Hold on to the top Scanning cover lean it gently back and ensure when you lift that the cables come out smoothly.
Now to remove the Front Cover.
 Front Cover Removal.
 Using a Flat head Screwdriver to pry the corner of Paper Tray.
Middle Cover Removal.

 Careful when removing the middle cover you unhook these cables.
Next is getting to the Laser Scanner Unit.

 Unplug the Motor Connector.
 Remove these three screws.
 Unplug this Cable.
 Unplug the cable on the left and then remove the cable by peeling it off slowly from the Laser Unit.
At this point you will attempt to reseat the LSU harness ribbon cable and put it back up the printer partially and see if the problem persists. But in my case I had a similar printer to this and I actually swapped the LSU it self and got the same problem. So I had to do the most difficult solution out of them all which is removing the LSU harness ribbon cable and replacing it with the one from the other printer.
Removing the LSU Harness Cable
 There is adhesive on the cable behind the High Voltage Powersupply Board. I used a flat head screw driver and slowly raised it off the glue.
 After releasing the cable from the adhesive slowly pull it in the direction shown and ensure that the cable is not damaged.
In replacing the cable I will be honest with you and say that i took the short cut way and forced it back between the frame of the printer and the High Voltage Power supply Board. It is a very tight fit and regretfully i dont have any images of behind the board and placement of the cable.
Above I showcased the various areas to check in the case of this error, in my case I had to replace the cable. In the two instances I came across this problem though it was always the cable that was faulty. But because Samsung’s service manual suggests taking all these things into consideration, you can never be too sure. The cable in question is SHS E188165 AWM 20798 80C 60V VW-1 and can be found on ebay but I have never tested using one before.
Источник
Error code 11 1113 samsung принтер
I am installing and setting up a Samsung Xpress M2020W printer. I have installed Samsung’s Linux software and SANE and its required supporting files using Synaptic. As far as I can tell, to this point, installation was successful. (I know nearly zero about anything Linux. I did read Terminal’s comments, though.)
Samsung’s final instructions are: . launch printing utility (system>administrator>printing) or execute «system-config-printer» in Terminal.
Problem: I can’t locate System>administrator>printing. And when I open Terminal, it doesn’t recognize the system-config-printer command.
Re: Printer setup
Is the Samsung software compatable with the Pi’s ARMHF architecture ? Can you post a download link ?
Printers are usually configured thru CUPS

Re: Printer setup
In an LXTerminal :-
sudo apt-get install system-config-printer
You will get a menu entry in Preferences/Printing.
I’m not sure, you may need to install ‘cups’ and some of its related programs.
I don’t know if there is a Pi driver for this printer.
Re: Printer setup
mad-hatter wrote: Hello,
In an LXTerminal :-
sudo apt-get install system-config-printer
You will get a menu entry in Preferences/Printing.
I’m not sure, you may need to install ‘cups’ and some of its related programs.
I don’t know if there is a Pi driver for this printer.
Re: Printer setup
Minutes after my first post, I found out about CUPS and installed. It appears to support every Samsung printer in existence except for any SLs. Mine, of course, is an SL-M2020.
I just did «sudo apt-get install system-config-printer.» No support there, so I tried the available search function. Search function never comes up with any result.
I manually installed the driver, but that has zero effect.
Re: Printer setup
Is this your printer is it wireless enabled model ?
If it is wireless and it supports Samsung Mobile Print then use Google Cloud Print, it must be on same home network as Pi
I have a HP ePrinter which is WiFi and just print to PDF then upload PDF to the the Google Cloud Print Web Page for printing
Re: Printer setup
Problem partially solved:
Originally I installed the Samsung driver before I installed CUPS and did system-config-printer. So, I installed the driver again, and now my printer is detected.
Won’t print, related to «/user/lib/cups/filter/rastertospl» not available: No such file or directory.» It’s one thing after another. Brand new printer incompatible with Raspberry.
Thank you for your posts.
Re: Printer setup
As stupid as I feel now, I have to admit that I have also bought this printer (sort of, I have the M2022W) and now experience the same problem.
I can´t get it to print other then the test print through the cups printers tab.
On the test print it says the following:
SPL ERROR — Please use the proper driver
POSITION : 0X0 (0)
VERSION : SPL 5.73.04 06-10-2014
ERROR CODE : 11-1113
My question is, has anyone fixed the problem yet or should I start looking for the receipt?
I hope that someone can help me with this problem cause this is a really good printer for the purpose that I have in mind for it.
Re: Printer setup
pi_nander wrote: Hi guys,
As stupid as I feel now, I have to admit that I have also bought this printer (sort of, I have the M2022W) and now experience the same problem.
I can´t get it to print other then the test print through the cups printers tab.
On the test print it says the following:
SPL ERROR — Please use the proper driver
POSITION : 0X0 (0)
VERSION : SPL 5.73.04 06-10-2014
ERROR CODE : 11-1113
My question is, has anyone fixed the problem yet or should I start looking for the receipt?
I hope that someone can help me with this problem cause this is a really good printer for the purpose that I have in mind for it.
As this is a Wireless Cloud Printer
It can be used standalone ie Wireless to your Broadband Wireless Router, the Printer can be set up without connecting to a PC
Therefore you can use Google Cloud Print which takes the pain away from trying to find drivers
You may have to install IceWeasel (Firefox) Web Browser in Raspbian to access the Goole Cloud Print web site

Re: Printer setup
Re: Printer setup
Ok first of all, thanks alot for the quick reply´s. I was already looking for another printer but now I have hope for using this one.
After having looked through the Noach/shared/PPD map I have found the exact driver needed for my printer (M2020 series).
So I deleted my former printer setting (instead of modifying it) and reinstalled it using the right PPD file.
As happy as I was about finally being able to install the right driver, I found myself disappointed when the test page wouldnt even print. It just says state: stopped and nothing else.
I do think that it is now a simple matter of configuring instead of the entire trouble of finding the right driver.
Any ideas what the problem could be?
I´ll have to add though, I am still an incredible noob with the raspberry pi, linux and coding of any form BUT eager to learn.
ps.- I tried adding a screenshot but couldnt get the size of the screenshot below 64kib without making it unreadable.
Re: Printer setup
pi_nander wrote: Ok first of all, thanks alot for the quick reply´s. I was already looking for another printer but now I have hope for using this one.
After having looked through the Noach/shared/PPD map I have found the exact driver needed for my printer (M2020 series).
So I deleted my former printer setting (instead of modifying it) and reinstalled it using the right PPD file.
As happy as I was about finally being able to install the right driver, I found myself disappointed when the test page wouldnt even print. It just says state: stopped and nothing else.
I do think that it is now a simple matter of configuring instead of the entire trouble of finding the right driver.
Any ideas what the problem could be?
I´ll have to add though, I am still an incredible noob with the raspberry pi, linux and coding of any form BUT eager to learn.
ps.- I tried adding a screenshot but couldnt get the size of the screenshot below 64kib without making it unreadable.
The issue is that Samsung write/compile/test etc on Linux x86 systems, do they even care about ARM drivers ? likely not a high priority as most ARM Devices are Phones/Tablets which can use Air Print/Google Cloud Print.
I personally gave up and use Google Clous Print
Источник
@Miguel2804
Welcome to the HP support community.
I understand that you are getting U2-1113 on your new printer.
This seems to be a hardware issue,
I request you to talk to HP support.
They might have multiple options to help you with this.
- Click on this link — https://support.hp.com/us-en/contact-hp?openCLC=true
- Select the country.
- Enter the serial of your device.
- Select the country from the drop-down.
- Click on «Show Options».
- Fill the web-form. A case number and phone number will now populate for you.
Let me know how it goes.
To thank me for my efforts to help you, please mark my post as an accepted solution so that it benefits several others.
Cheers.
Sandytechy20
I am an HP Employee
Аналогичные аппараты: Samsung SCX-4833 / Samsung SCX-5637
U2-1111 и U2-1113 — ошибки блока лазера
Выполните проверку лазера в EDC Mode.
Для входа в сервисный режим, нажмите последовательность кнопок:
[Menu] [#] [1] [9] [3] [4]
Machine Test → EDC Mode
110-0000 — проверка двигателя блока лазера
110-0060 — вкл/выкл двигатель блока лазера
Проверьте работу двигателя. Если нет звука, то проверьте подключение шлейфа на основной плате и на блоке лазера.
Прозвоните шлейф, при необходимости замените. Если замена шлейфа не помогла, тогда замените блок лазера.
Снимите все крышки
Извлеките лоток для бумаги.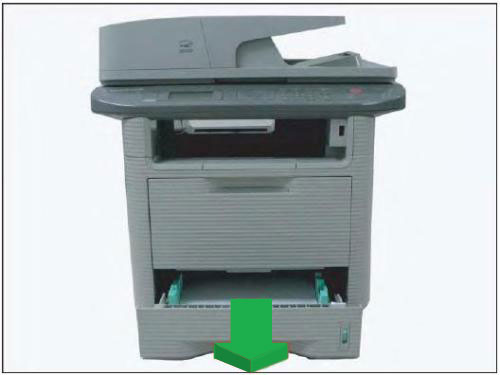
Ослабьте 2 защелки и снимите переднюю крышку.
Снимите дуплекс.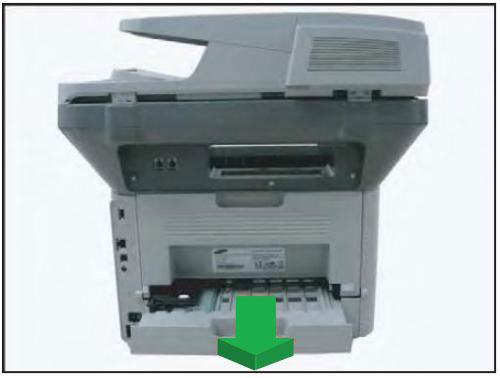
Откройте заднюю крышку и освободите 2 защелки.
Снимите левую крышку.
Снимите правую крышку.
Снимите сканер
Выкрутите 5 винтов:
— 1 справа
— 3 сзади
— 1 спереди
Отключите 3 разъема.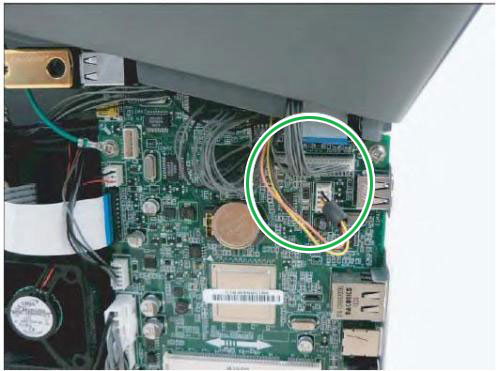
Снимите сканер.
Снимите среднюю крышку
Отсоедините кабель USB от основной платы.
Отсоедините 6 разъемов.
Выкрутите 2 винта.
Выкрутите еще 4 винта.
Ослабьте 2 защелки сзади.
Снимите среднюю крышку.
Снимите лазер
Отсоедините 2 кабеля от блока лазера.
Выкрутите 3 винта.
Снимите лазер.
Парт номер: JC97-03857A (LSU)