Random Windows errors have been appearing since the first Windows operating system was invented. In order to deal with these issues, one often needs to perform a lot of research because there is not in the error message that would suggest a possible solution.
PCs are complex machines with a lot of components and it’s understandable that certain issues need to occur. That is why we come up with articles which should help you with these issues with multiple solutions carefully selected in order to get rid of problems permanently and efficiently.
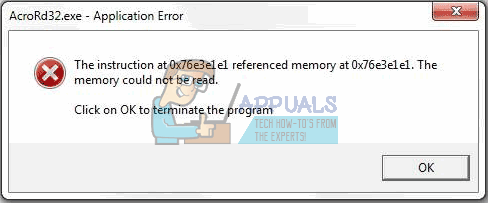
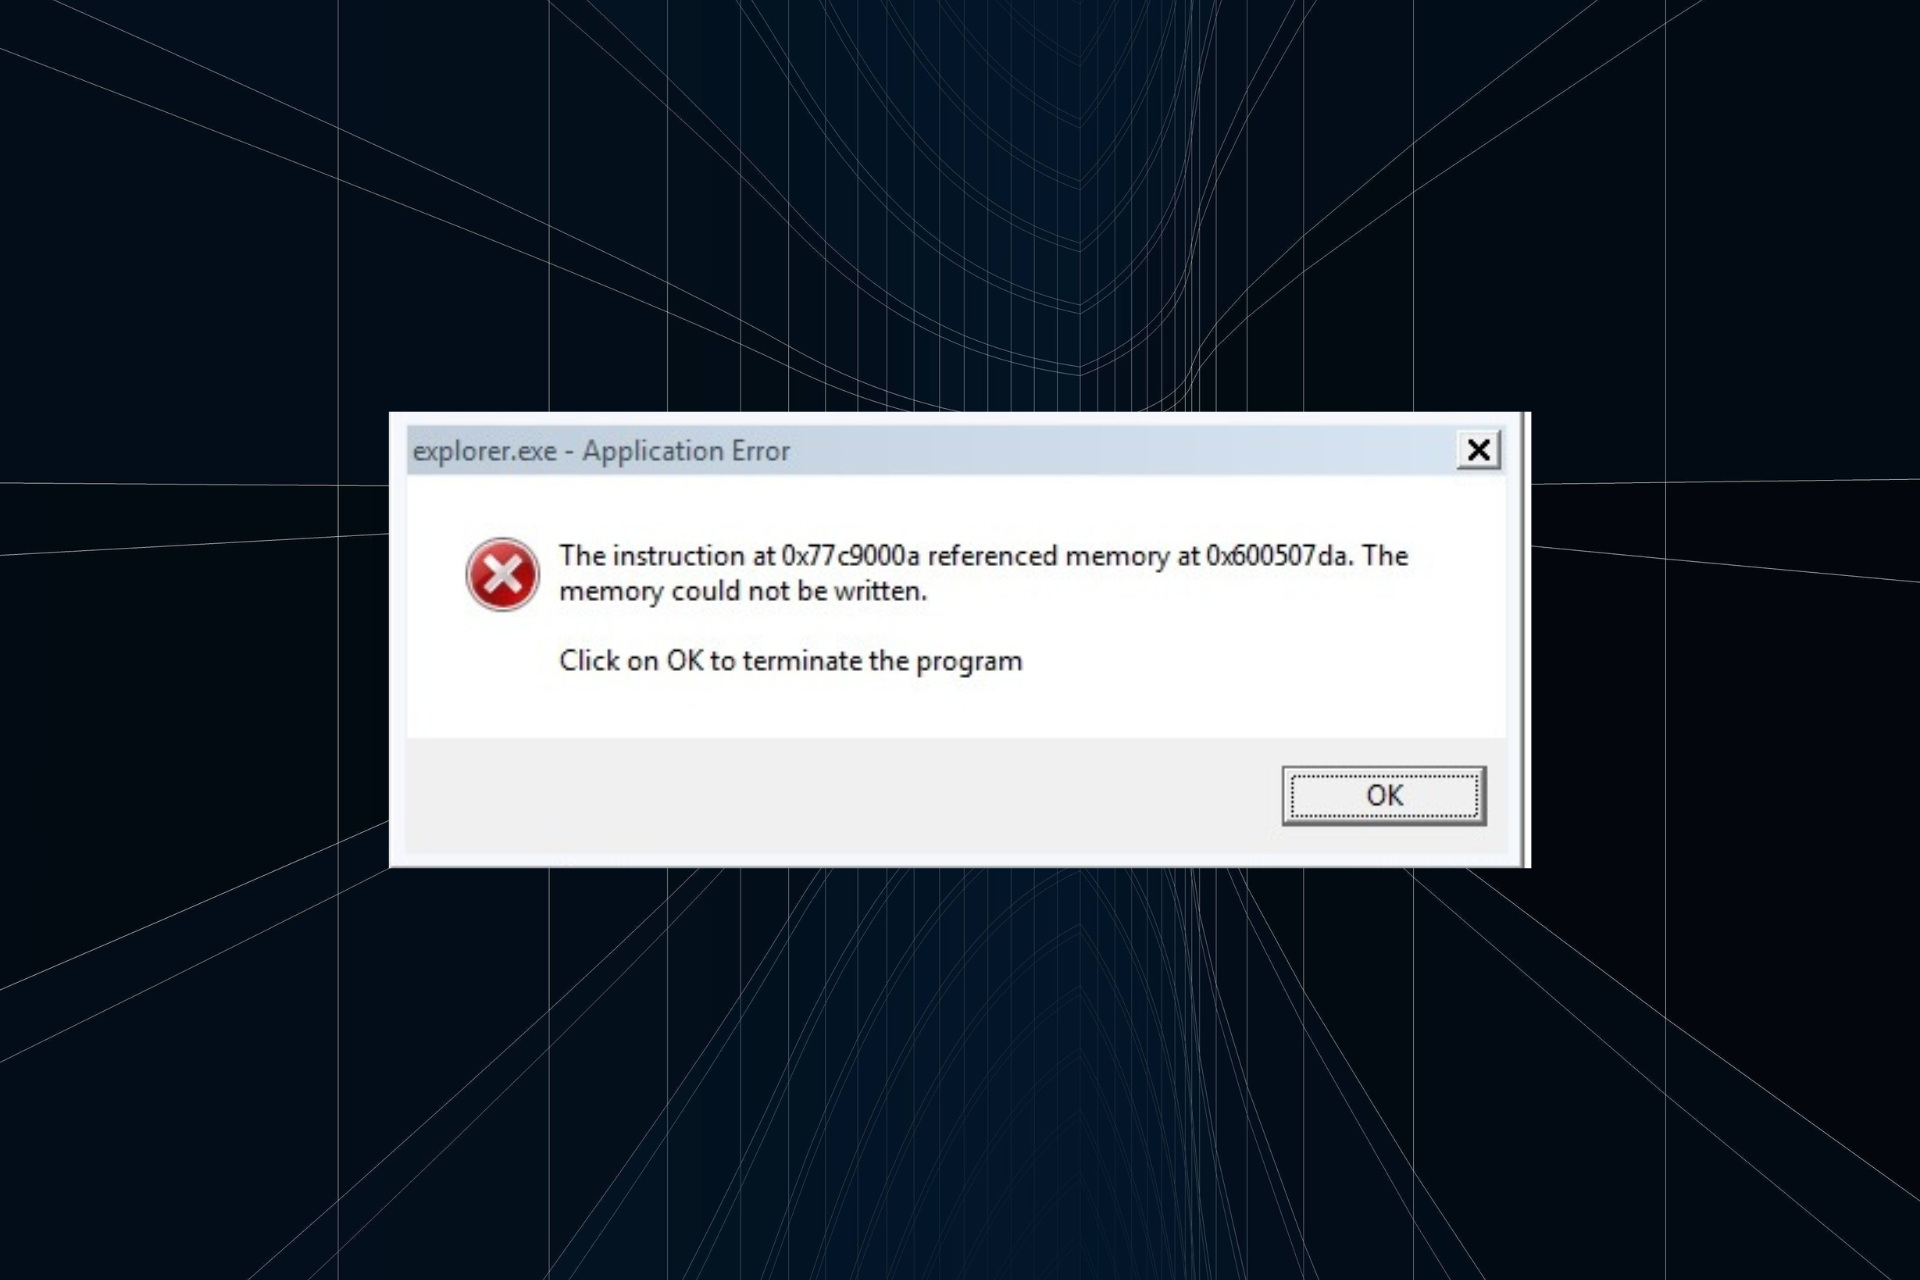
“The Instruction at 0x00### referenced memory at 0x00###. The memory could not be written” – How to Solve?
This particular error message can occur with any application and it related to different parts of your memory. The hashes usually represent a string of numbers which refer to the location of the memory (RAM) fragment which is causing the issue.
Different problems occur with different apps but there are several solutions which might work for everything when you consider the fact that the real problem is sometimes in your computer’s components. Follow the solutions above and try out everything before giving up.
Solution 1: Graphics Card Issues
This particular solution usually depends on what type of application is causing this error message and you might need to use settings in order to avoid your graphics card from accessing the program at all. You can choose which graphics card can operate which program using your graphics card Control Panel.
This particular fix is related to Nvidia graphics cards. If you own an AMD cards, you can easily find how to operate its control panel.
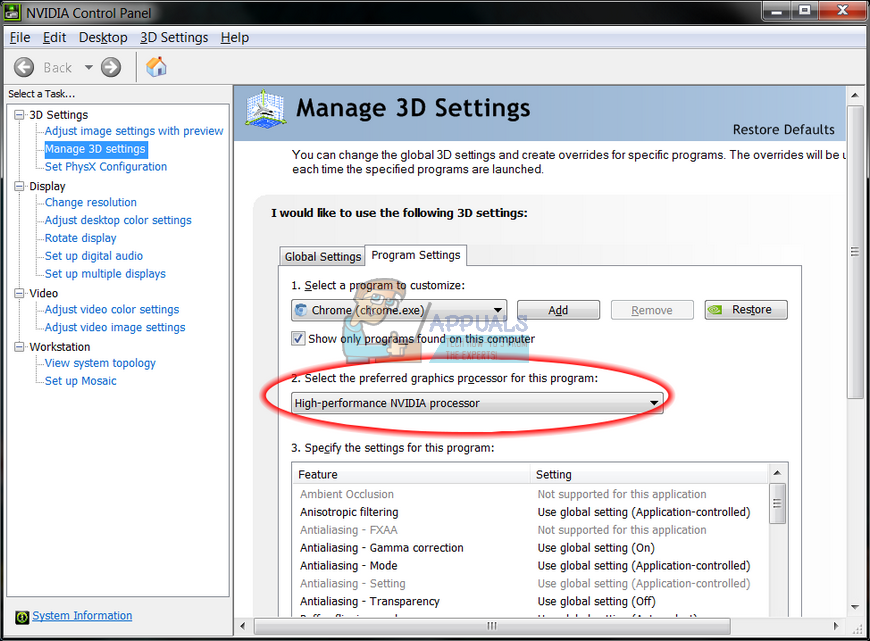
- Right-click on your desktop and select Nvidia Control Panel. If you are unable to locate it in the context menu, just search for it by clicking on the Start menu button.
- When the tool opens, check under 3D Settings and select Manage 3D Settings.
- Switch to the Program Settings tab and choose the program that it causing your issues. You might need to locate it manually but you should look primarily in the Program Files folder.
- Under the “Select the preferred graphics processor for this program:” option, choose your Integrated Graphics Card and apply these changes.
Note: If a video game is causing these issues, you might not be able to play it properly using your integrated graphics card. If that is the case, you can easily revert these changes and research online about that particular game or simply try other solutions in this article.
Solution 2: Updating your Microsoft .NET Framework
Microsoft experts have pointed out that using an application which was designed using Microsoft .NET Framework 1.1 and applying heavy memory load to it may cause the message “The instruction at “0x79259769′ referenced memory at ‘0x00000008’. The memory could not be read.”
This can be fixed by downloading and installing the latest version of .NET Framework to your PC.
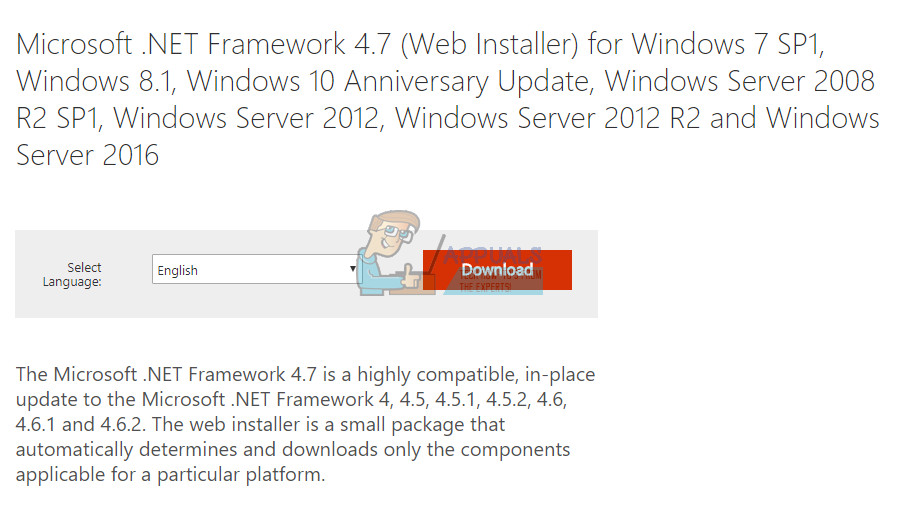
- Visit Microsoft’s official download website for .NET Framework.
- Scroll down to the Download .NET Framework section of the page and choose the latest version of it available for your operating system. The .NET Framework 4.7 is the latest version available for operating systems such as Windows 7 SP1, Windows 8.1, Windows 10 for both x86 and x64 versions (32 bit or 64 bit).
- Download the installer by clicking on the red download button and install it by following the instructions on screen.
- Restart your computer and check if the issue persists.
Solution 3: Disable Third-Party Audio Codecs
Plenty of users have been able to get rid of this issue simply by disabling third-party audio codecs and drivers (such as K-Lite and Realted audio tools). You don’t have to uninstall them completely but you can try this solution and check whether the issue persists. If you really need those codecs, you can try searching for an alternative.
- Click on the Start button located at the bottom left part of your screen and type “Task Manager”. Alternatively, you can use the Ctrl + Shift + Esc key combination.
- When Task Manager opens, navigate to the Startup tab.
- Locate some of your codec packs you might have installed such as K-Lite Codec Pack or Realtek HD Audio and disable them from Startup.
- Restart your computer and check to see if the issue persists.
Solution 4: Turn of Auto-Hide Taskbar
If the app which is causing these issues is explorer.exe itself, things may get more complicated because this app is pretty much responsible for the entire user interface. Explorer.exe usually presents these issues while restarting or shutting down your computer so it can get pretty annoying after a while. Luckily, there is a simple fix…
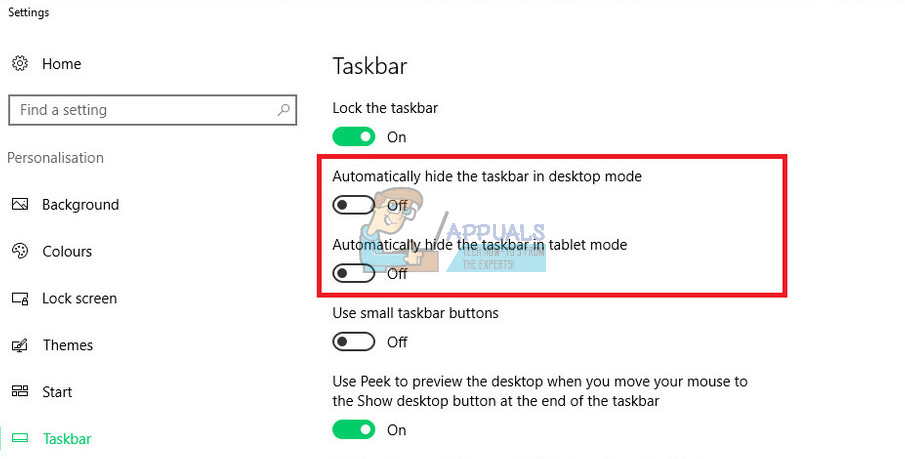
- Right-click anywhere on your taskbar (the horizontal menu at the bottom of your desktop and open Taskbar settings.
- Switch the slider on the “Lock the taskbar” option on in order to keep the taskbar fixed.
- Turn off the following options if they are not already off.
Automatically hide the taskbar in desktop mode
Automatically hide the taskbar in tablet mode
- Try restarting or shutting down your PC now.
Solution 5: Virtual Memory Issues
Virtual memory is a helpful tool which can improve your computer’s performance by providing a paging file on your hard disk which Windows can use as RAM when it runs out of real, physical RAM memory. Note that this virtual memory is nowhere near as fast as your RAM and increasing it won’t drastically improve your PC as if you were installing more RAM but it can help.
- Right-click on This PC shortcut on your desktop or in File Explorer and click on Properties.
- Information about your system should open so click on Advanced System Settings at the right part of the window.
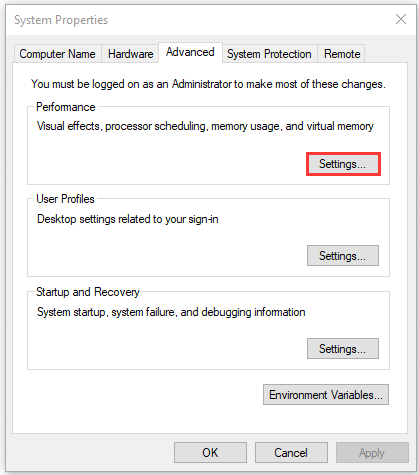
- Navigate to the Advanced tab and click on Settings under the Performance section. Make sure you have administrator privileges if you wish to make changes to these settings.
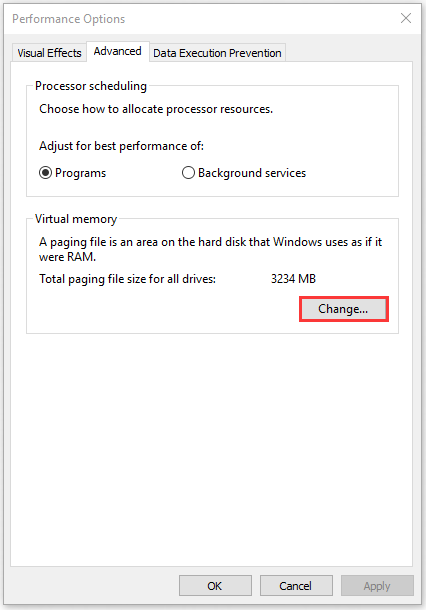
- After Performance Options windows opens, navigate to the Advanced tab and click on the Change… button under the Virtual Memory section.
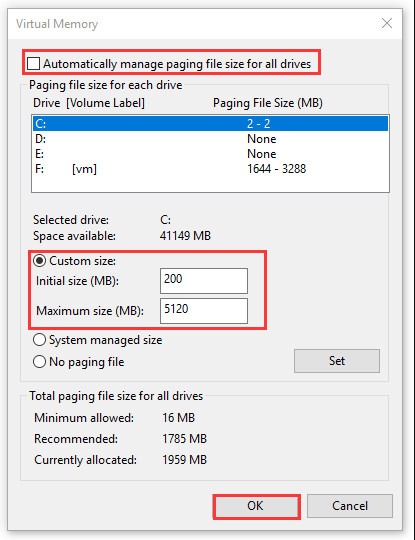
- Uncheck the box next to the “Automatically manage paging file size for all drives” and click on the radio button next to the Custom size option.
- If you have only one partition running, set both the initial size and the Maximum size of the paging file to around 1.5 times the amount of RAM in MB. For example, if you have 2 GB or RAM, that equals to 2048 MB so you can set the size of the paging file to 3072 MB.
- If you have two or more partitions, select the boot partition (where your Windows is installed) and set both the initial and maximum value to 250 MB in order to make space for the mini dump file. Select one of your other partitions and set 1.5 times the amount of RAM you have.
- If you have large quantities of RAM such as 8 or 16 GB, you probably won’t need large paging files so you can ignore the amounts of above and settle to around 2 GB or paging file or 2048 MB.

Note: The reason you choose the initial and maximum size of the paging file to be the same is because you don’t want Windows to grow or shrink the size of the paging file which can cause fragmentation and your computer to slow down. Defragmenting your computer regularly will also help improve the performance of your paging file.
Solution 6: Disabling Fast Startup
Several users finding themselves in a similar situation have managed to get the issue resolved after disabling the Fast Startup feature on Windows 10.
While in most cases fast startup is a pretty harmless tool capable of boosting the startup speed considerably, it also means that your PC will never truly shut down. Because of this, you might experience Wake-on-LAN issues, dual boot and virtualization complications, and random error codes during the startup procedure.
Keep in mind that it’s all guessing work by know – Fast Startup could have nothing to do with the error that you’re seeing.But in order to make sure of that, follow the instructions down below to disable Fast Startup:
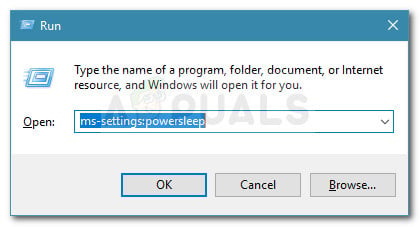
- Press Windows key + R to open up a Run box. Then, type “ms-settings:powersleep” and press Enter to open the Power & Sleep tab of the Settings app.

Run dialog: ms-settings:powersleep - Inside the Power & sleep tab, scroll down to Related settings and click on Additional power settings.
- Next, select Choose what the power buttons do from the right pane and then click on Change settings that are currently unavailable.
- Now scroll down to Shutdown settings and disable the checkbox next to Turn on fast startup (recommended).
- Save the changes and reboot your computer to see if they were successful. If you’re still seeing the 0x00000008 error at the next startup (or during a driver installation) or this method wasn’t applicable, continue down with the next method below.
Solution 7: Restart using the Last Known Good Configuration
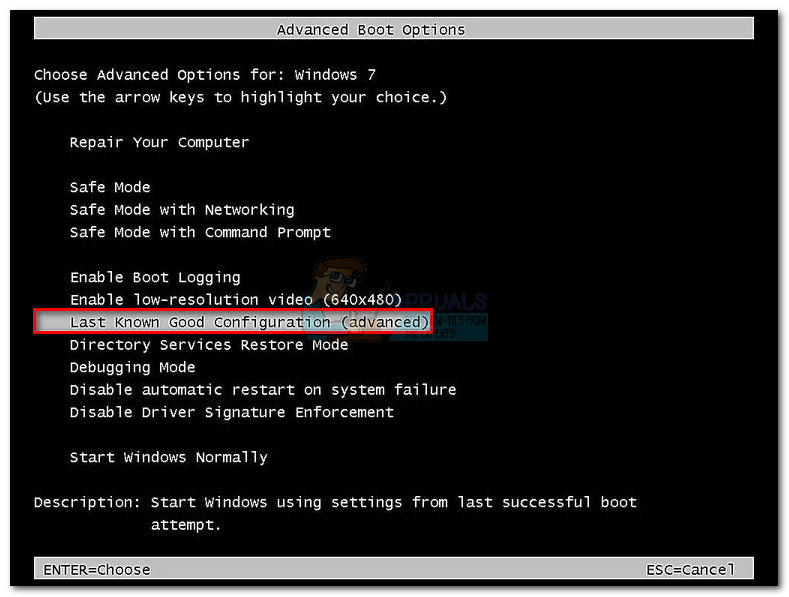
If the error occurs at every startup, you were probably unable to follow most of the methods above because you experience a BSOD crash long before you reach that screen. However, several users have managed to circumvent the issue by booting using the Last Known Good Configuration using the Advanced Menu.
To do this, restart your computer and press the F8 key continuously until you arrive at the Advanced Boot menu. Once you get there, select Last Known Good Configuration and press Enter.
If all goes well, your computer should boot up normally without the referenced memory error. If the method was not successful, continue down with the next method below.
Solution 8: System Restore
Several users have reported that doing a System Restore back to the point before these errors started happening usually does the trick and that is why we recommend you try this if the previous methods have failed. System Restore will keep your personal files but it may uninstall or delete apps you installed or settings you changed.
- Open Control Panel by searching for it.
- Switch the View as option to Large Icons and open Security & Maintenance.
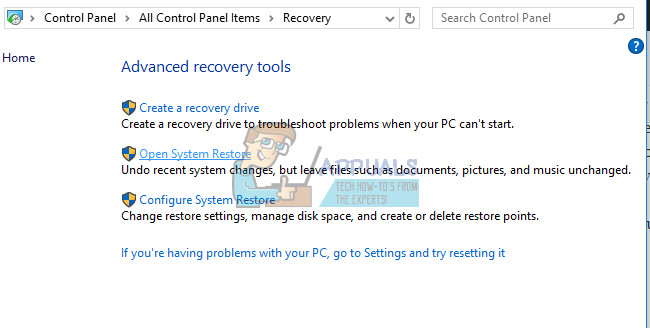
- Navigate to the Recovery menu and select the “Open System Restore” option. Note that you will need to have administrator privileges in order to open this. Be ready to lose everything you installed before the restore point of your choice.
- Follow the instructions on screen and choose a restore point back when you didn’t receive the memory issue.
- Be patient until the process finishes and reboot your computer.
- Check to see is the issue still persists.
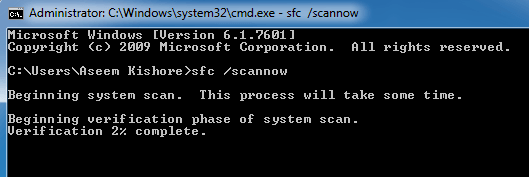
Solution 9: Running the System File Checker (SFC)
System File Checker is a useful tool implemented in all versions of Windows which can search for missing or corrupted system files and it can either fix or replace them. This is quite useful when dealing with memory leaks and problems and several users have reported that simply running this tool has helped them solve the problem.
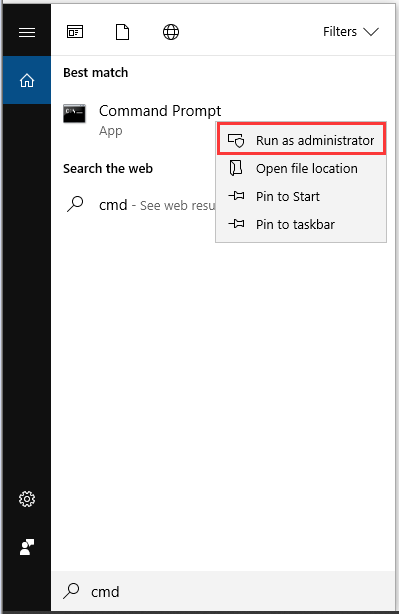
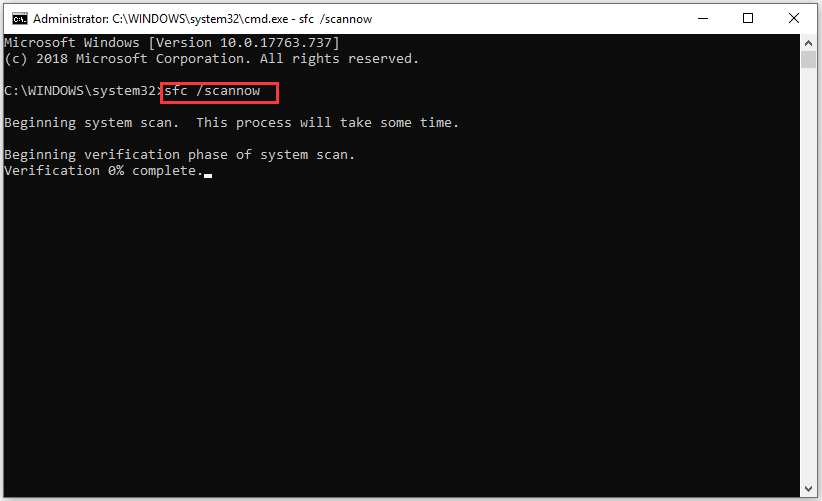
- Open your search bar and search for “Command Prompt”. Right-click on the first result and select the “Run as administrator” option.
- Copy and paste the following command in Command Prompt and wait for the process to finish.
sfc /scannow
- Restart your computer and check for any changes.
Solution 10: Suspicious Browser Add-ons and Extensions
If you received this error message with one of your browsers in the title, you may have installed a suspicious add-on. Disabling or deleting them can differ from browser to browser but the process is generally quite easy.
Microsoft Edge:
- Open the browser and click on the three horizontal dots at the top right part of the browser.
- Click on Extensions and remove anything you find suspicious, especially if they were added recently.
Google Chrome:
- Open Google Chrome and paste the following link in the address bar:
chrome://extensions/
- Locate anything suspicious and either uncheck the box next to Enables or click on the trash icon to the right.
Solution 11: Steam Game Problems
If one of the games in your Steam library is causing these issues, you should firstly research this game’s forum and maybe even start a thread yourself. However, one of the fixes which usually works for Steam games is verifying the game’s cache.
- Open your Steam client and navigate to the Library tab.
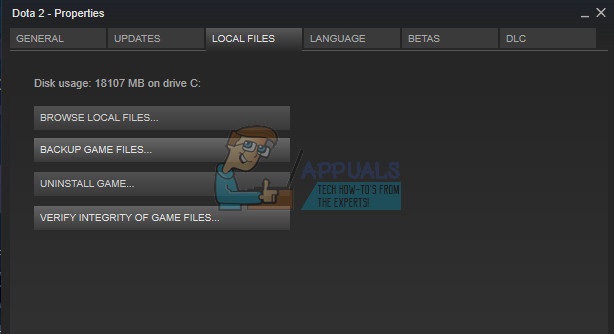
- Right-click on the game which is causing these issues and select Properties.
- Navigate to the Local Files tab and click on Verify Integrity of Game Files…
- Try running the game and check if the issue persists.
Solution 12: Scan Your System for Malicious Software
Viruses and other malicious applications are well-known for causing these errors and it won’t be long before everything gets worse. One of viruses’ well-known traits is its ability to reduplicate itself and spread itself throughout your system. There are a lot of great free antivirus scanners available online such as Microsoft Security Essentials and Malwarebytes: Anti-Malware.
- Download Malwarebytes: Anti-Malware from their official site.
- Run the installer and choose where you want to install the scanner. Follow the instructions on screen.
- Open Malwarebytes and run your scan by clicking on the Scan button. Malwarebytes will firstly update its database and scan your computer thoroughly.
- Wait for the process to finish and eliminate all threats the scanner finds.
- Reboot your computer and check to see if the error message still appears.
Method 13: Resolving a Xeon specific processor error
There is one common 0x00000008 error scenario with one or more Intel Xeon processors, but the error message is a little bit different: STOP 0x00000008 UNEXPECTED_KERNEL_MODE_TRAP.
There are three distinct scenarios that will trigger this particular error:
- The Xeon processor requires a BIOS update
- The processor is damaged or defective.
- The processor is overclocked and is operating outside the save ranges of temperature and power
If you have an Intel Xeon processor, start by navigating to your computer manufacturer’s website and see whether there’s a more recent microcode update than the one you currently have installed. Microcode updates are packaged in BIOS updates, so installing the latest BIOS update for your specific motherboard should resolve the issue automatically.
If you already have the latest BIOS update, verify whether the issue is occurring due to your own doing. If you previously overclocked the frequencies of your CPU, revert back to the stock frequencies and see whether the 0x00000008 error is still occurring. If the error is no longer occurring while the overclock is removed, tone down the frequencies until you reach a stable state.
In the event that your CPU is not overclocked and you have the latest BIOS updates, it’s very likely that your processor is defective or damaged. In this case, it’s recommended that you take it to a hardware technician to verify whether the voltage is fluctuating and it’s causing it to behave erratically.
-
Home
-
Clone Disk
- How to Fix the Instruction at Referenced Memory Error Windows 10
By Ariel | Follow |
Last Updated
When shutting down or restarting Windows 10 PC, an error message pops up “the instruction at referenced memory 0x0000”. What causes the instruction at 0x0000 error? How to fix it? This post of MiniTool will explore these questions together with you.
The instruction at referenced memory is a RAM-related error that often occurs when running Windows 10 PC. This error often indicates that an application couldn’t be read by the assigned physical memory. According to an investigation, it’s concluded that the corrupted system files, malware, and conflicting third-party software can trigger the instruction at 0x0000 error.
Solution 1. Optimize the Virtual Memory on Windows 10
The most common way to fix the memory could not be read error is to optimize the virtual memory. Virtual memory is also known as the pagefile.sys file where Windows keeps track of how your computer juggles a lot of demands for memory. By allocating virtual memory, it can help fix the error.
Here’s how to do that:
Step 1. Press Win + E keys to open the File Explorer, and then right-click This PC entry and select Properties.
Step 2. Click on the Advanced system settings on the left side of the window.
Step 3. Go to the Advanced tab and click on the Settings button under the Performance section.
Step 4. Go to the Advanced tab and click on the Change button in the Virtual memory box.
Step 5. Now, select the target drive and click on the Custom size. Then enter your current available physical RAM in MB values.
Note: Untick the checkbox next to Automatically manage paging file size for all drives.
Step 6. Click OK to save the changes.
Now, you can reboot your computer and see if the instruction at referenced memory error still persists.
Solution 2. Repair Corrupted System Files
As pointed out in the above, the corrupted system files in the C drive are responsible for the instruction at 0x0000 Windows 10. At this time, an SFC and DISM scan are often used to repair the corrupted system files.
Step 1. Type cmd in the search box on the taskbar. And then right-click the Command Prompt app and select Run as administrator.
Step 2. Type sfc /scannow command in the command prompt. This process may take you much time to scan, please wait patiently.
Step 3. If the SFC tool fails to work, you can try using the DISM tool. Type dism /Online /Cleanup-Image /RestoreHealth in the elevated command prompt and hit Enter.

Now, you can restart the computer and see if the referenced memory error is resolved or not.
Solution 3. Scan for Malware
Some users reported that the instruction at referenced memory error could be caused by any malware infections on your PC. To exclude this reason, you can try performing a scan for any malware by using an antivirus program or Windows Defender.
Solution 4. Perform a Clean Boot and Reinstall .Net Framework
The third-party conflicting software might the reason for the instruction at referenced memory error. For that, you can perform a clean boot to determine the conflicting app and uninstall it. Then you need to reinstall a correct .Net framework version. Here’s a quick guide for you:
Step 1. Press Win + R keys to open the Run dialog box, and then type appwiz.cpl in the box and hit Enter.
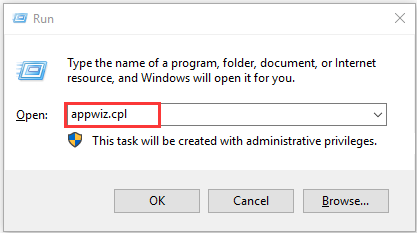
Step 2. Scroll down the list of installed programs to the Net.framwork, and then right-click it and select Uninstall.
Step 3. Once the uninstallation completes, restart your computer, and then click here to download the correct NET Framework version and install it on your computer.
Solution 5. Reset This PC
If all the above methods fail to work, you may have to reset this PC. This operation will remove your apps and settings on the system disk. So, we recommend you make a backup of your system disk beforehand. Then follow the steps below to reset the system.
Step 1. Press Win + I keys to open the Settings app and click on the Update & Security icon.
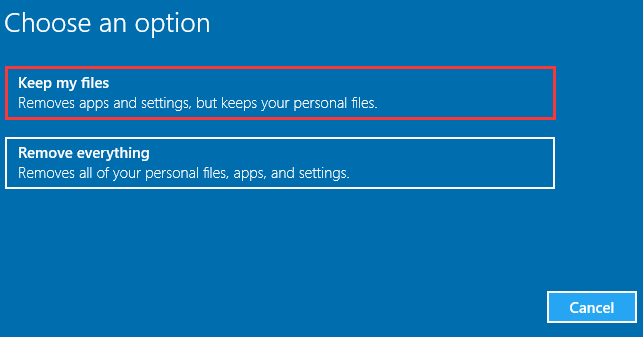
Step 2. Go to the Recovery tab on the left side, and then click on Get started under the Reset this PC section on the right side.

Step 3. Choose an option to reset this PC. Here select the Keep my files option, which will remove apps and settings, but keep your personal files. Then follow the on-screen prompts to complete this reset.
Now, the memory could not be read error Windows 10 should be fixed.
About The Author

Position: Columnist
Ariel has been working as a highly professional computer-relevant technology editor at MiniTool for many years. She has a strong passion for researching all knowledge related to the computer’s disk, partition, and Windows OS. Up till now, she has finished thousands of articles covering a broad range of topics and helped lots of users fix various problems. She focuses on the fields of disk management, OS backup, and PDF editing and provides her readers with insightful and informative content.
Run Windows scans to fix yet another hindering memory issue
by Ivan Jenic
Passionate about all elements related to Windows and combined with his innate curiosity, Ivan has delved deep into understanding this operating system, with a specialization in drivers and… read more
Updated on
- The instruction at 0x00007ff is a RAM-related error associated with system or third-party applications.
- This memory error can often be fixed with dedicated tools to repair the corrupted files.
- Another great idea is to scan your computer for malware in search of possible threats, as described below.
XINSTALL BY CLICKING THE DOWNLOAD FILE
To fix Windows PC system issues, you will need a dedicated tool
SPONSORED
Fortect is a tool that does not simply clean up your PC, but has a repository with several millions of Windows System files stored in their initial version. When your PC encounters a problem, Fortect will fix it for you, by replacing bad files with fresh versions. To fix your current PC issue, here are the steps you need to take:
- Download Fortect and install it on your PC.
- Start the tool’s scanning process to look for corrupt files that are the source of your problem
- Right-click on Start Repair so the tool could start the fixing algorythm
- Fortect has been downloaded by 0 readers this month, rated 4.4 on TrustPilot
Windows users have to deal with quite a few errors, and the instruction at 0x00007ff is one of them. The error can be encountered with several programs, both built-in and third-party ones.
It usually means that an application couldn’t read the assigned physical memory. This article also tackles the instruction at 0x00007ff referenced memory error.
Why am I getting The instruction at 0x00007ff referenced memory error?
This error often implies that the allotted physical memory was unable to read the contents of a program. It has been determined that malicious software, corrupted system files, and incompatible third-party programs are all potential causes of the 0x00007ff referenced memory error.
Here are a few error variations you may come across:
- The instruction at 0x00007ff referenced memory at 0x00000. The memory could not be written – This issue can be caused by a corrupt or damaged system registry file.
- The instruction at 0x00000000 referenced memory at 0x00000000. The memory could not be read – Occurring mostly because of a corrupt driver or the inability of the system to access the HDD.
- The instruction at referenced memory could not be read – Even though it can be solved by following the same suggestions, it is most likely caused by an issue with your HDD.
- The instruction at referenced memory could not be written – This problem occurs when your system identifies the fact that the HDD can not be accessed, either caused by access restriction or if the drive is not correctly inserted into the motherboard.
- The instruction at 0x00007ff referenced memory could not be written – In this case the issue can be caused either by a corrupted drive, or third-party software that’s blocking access.
- The instruction at 0x00000 referenced memory on shutdown – Appears when the Explorer.exe process accesses memory that has already been freed during the shutdown process.
- The memory could not be read – With the error, you should look closely at the hard drive, which may be damaged or faulty.
- The instruction at 0x00007ff referenced memory could not be read – Damaged, or corrupted registry files also trigger this error.
How can I test my RAM?
There are several ways to test the installed RAM on the computer, but the simplest would be to run Windows Memory Diagnostic, a tool that comes bundled with the OS.
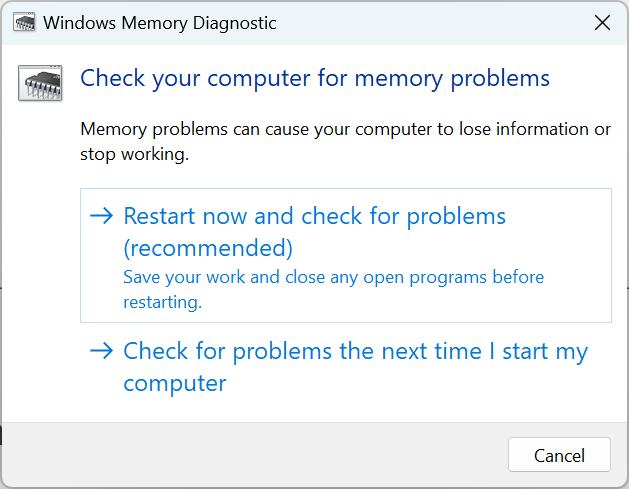
Also, there are several third-party tools that perform extensive tests on the RAM, MemTest86 being one of them.
How do I fix The Instruction at 0x00007ff referenced memory error?
- Why am I getting The instruction at 0x00007ff referenced memory error?
- How do I fix The Instruction at 0x00007ff referenced memory error?
- 1. Run SFC & DISM scan
- 2. Disable the Automatically hide the taskbar feature
- 3. Perform a clean boot and install the .NET framework
- 4. Allocate more virtual memory
- 5. Scan for malware
- 6. Reset the system
Before you proceed to the solutions aimed at eliminating the underlying cause, here are a few simple ones that should get things running:
- Click OK on the error message and try running the program again. In some cases, you shouldn’t encounter the error anymore.
- Restart the computer.
- Check the connections to the Hard Disk and Motherboard, and verify that the RAM has been properly seated (in case you use a laptop still within the warranty period, we won’t recommend opening it).
- Check for any available Windows updates and install them.
If none of these worked, let’s get started with the other solutions.
1. Run SFC & DISM scan
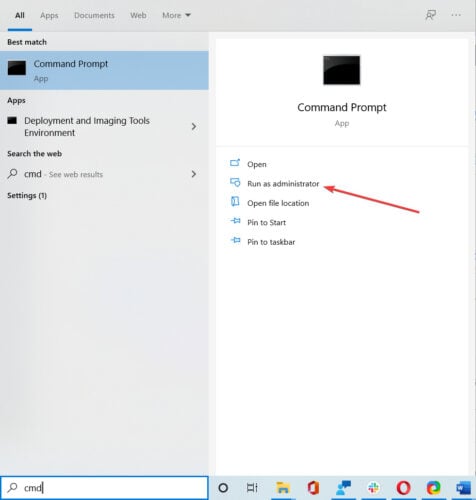
- Go to Start, type cmd, and then click on Run as administrator to start Command Prompt.

- Now, paste the following command and then hit Enter:
sfc /scannow
- Wait for the process to be completed.
- Next, execute the following command:
DISM /Online /Cleanup-Image /RestoreHealth - Once done with both SFC and DISM, run the Check Disk utility with the following command:
Chkdsk /r

Once done, verify if The instruction at 0x00000 referenced memory error with Elden Ring or other games is fixed.
Alternatively, you can use proactive tools such as Fortect or other PC cleaning tools to repair corrupt system files in the Windows registry.

Fortect
Repair PC issues and prevent any possible damage with Fortect’s wide range of features.
2. Disable the Automatically hide the taskbar feature
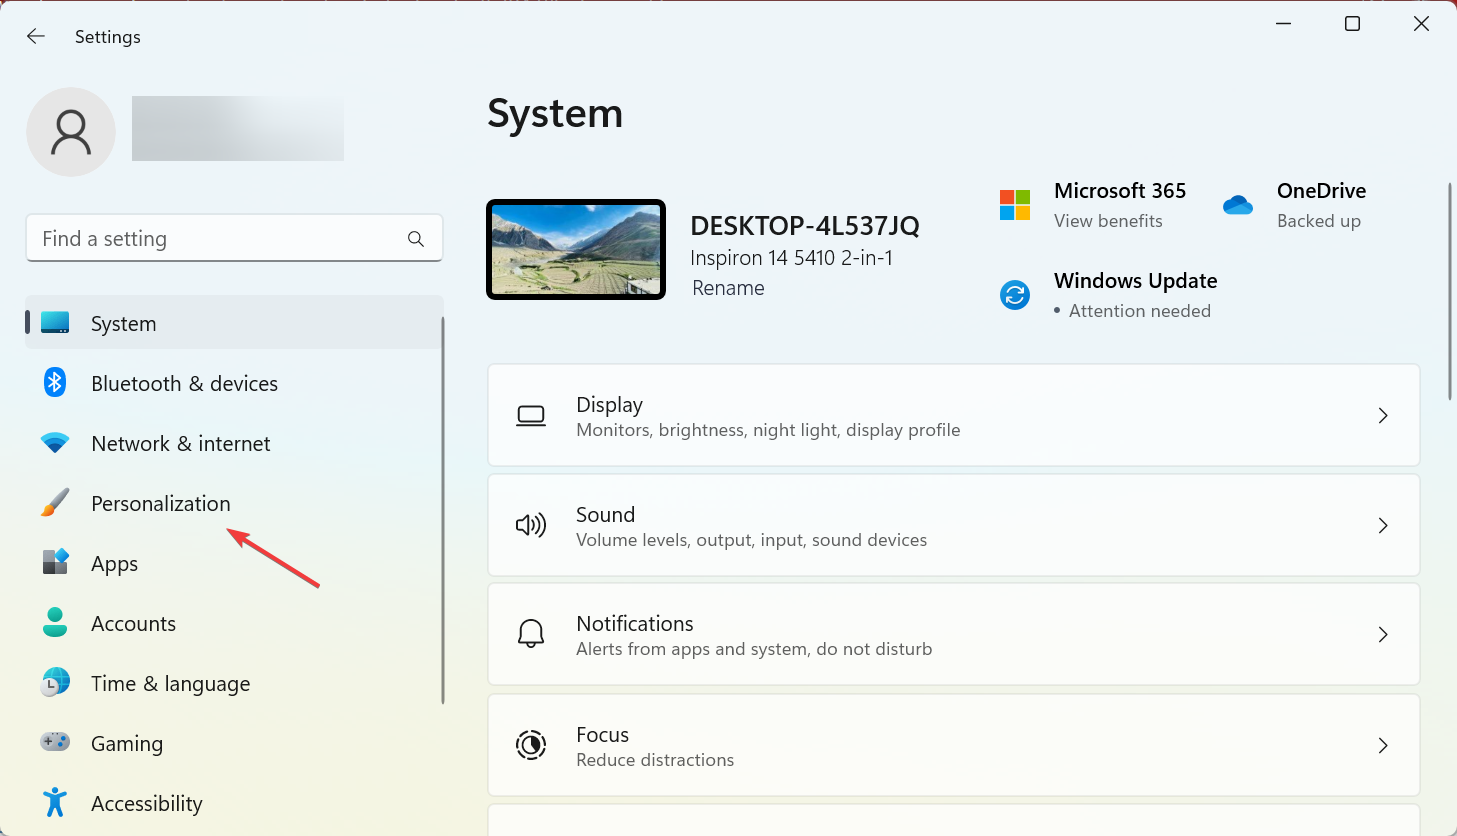
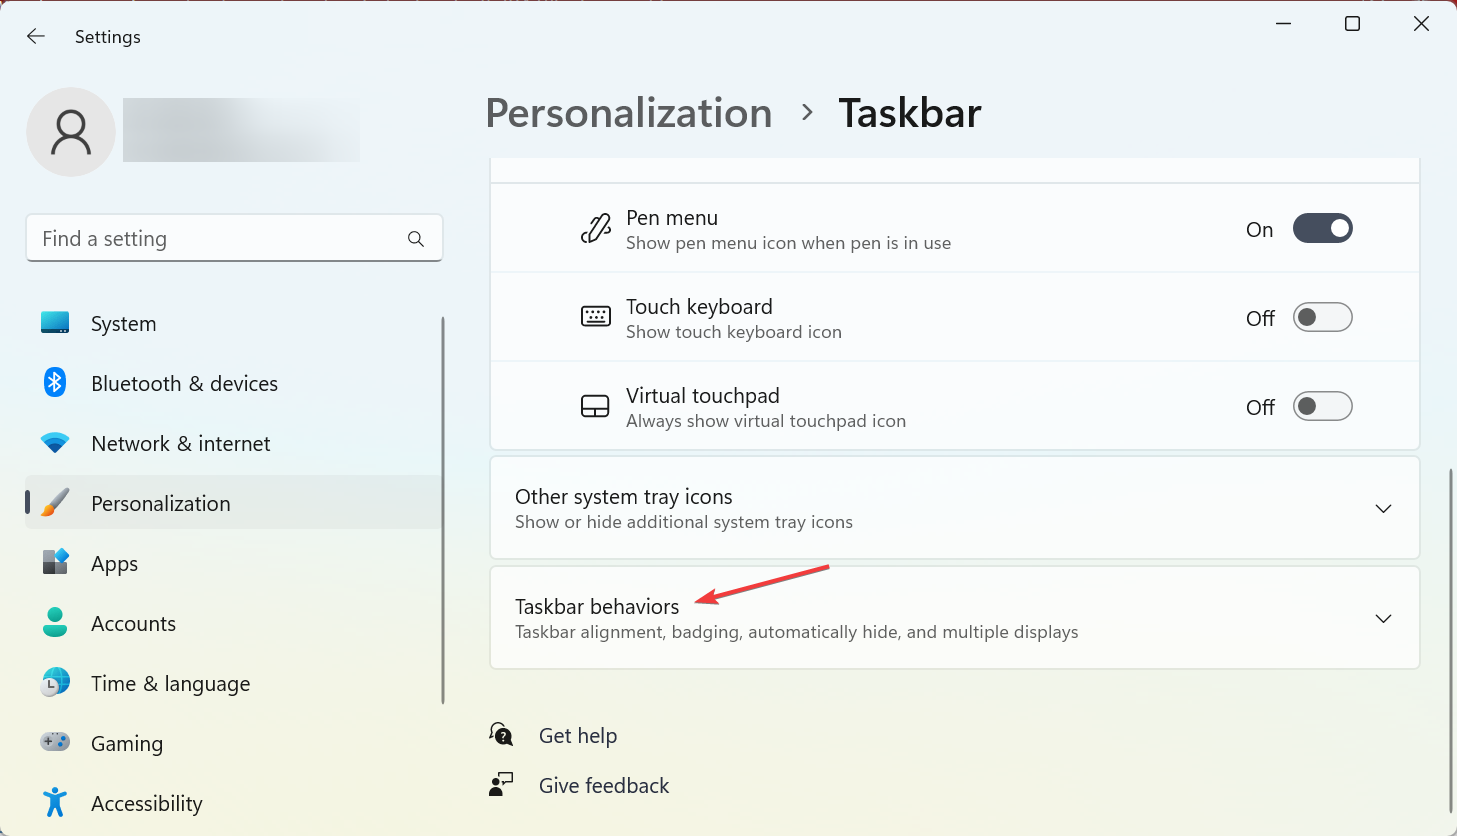
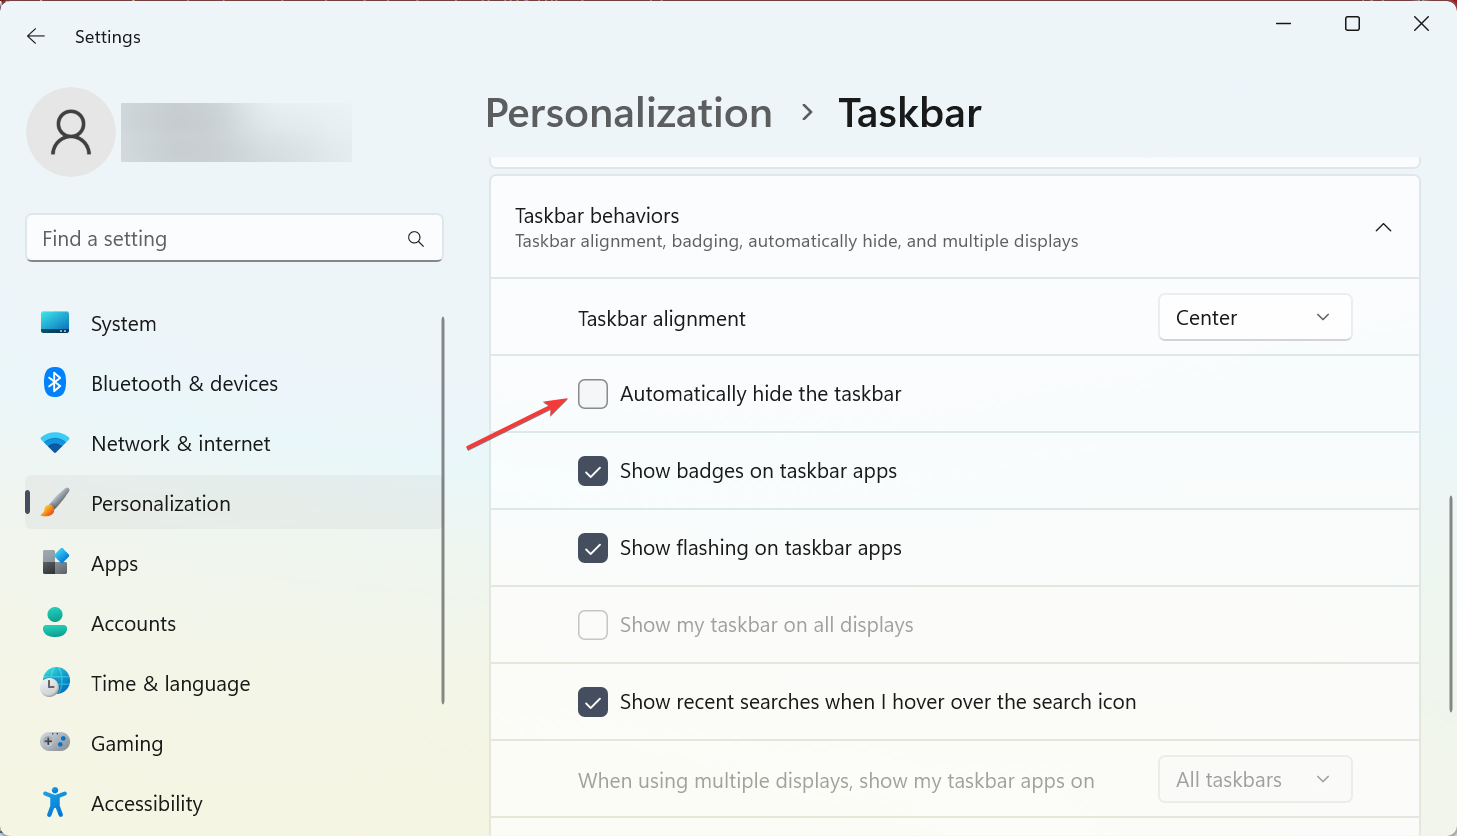
- Press Windows + I to open Settings, and then select Personalization.

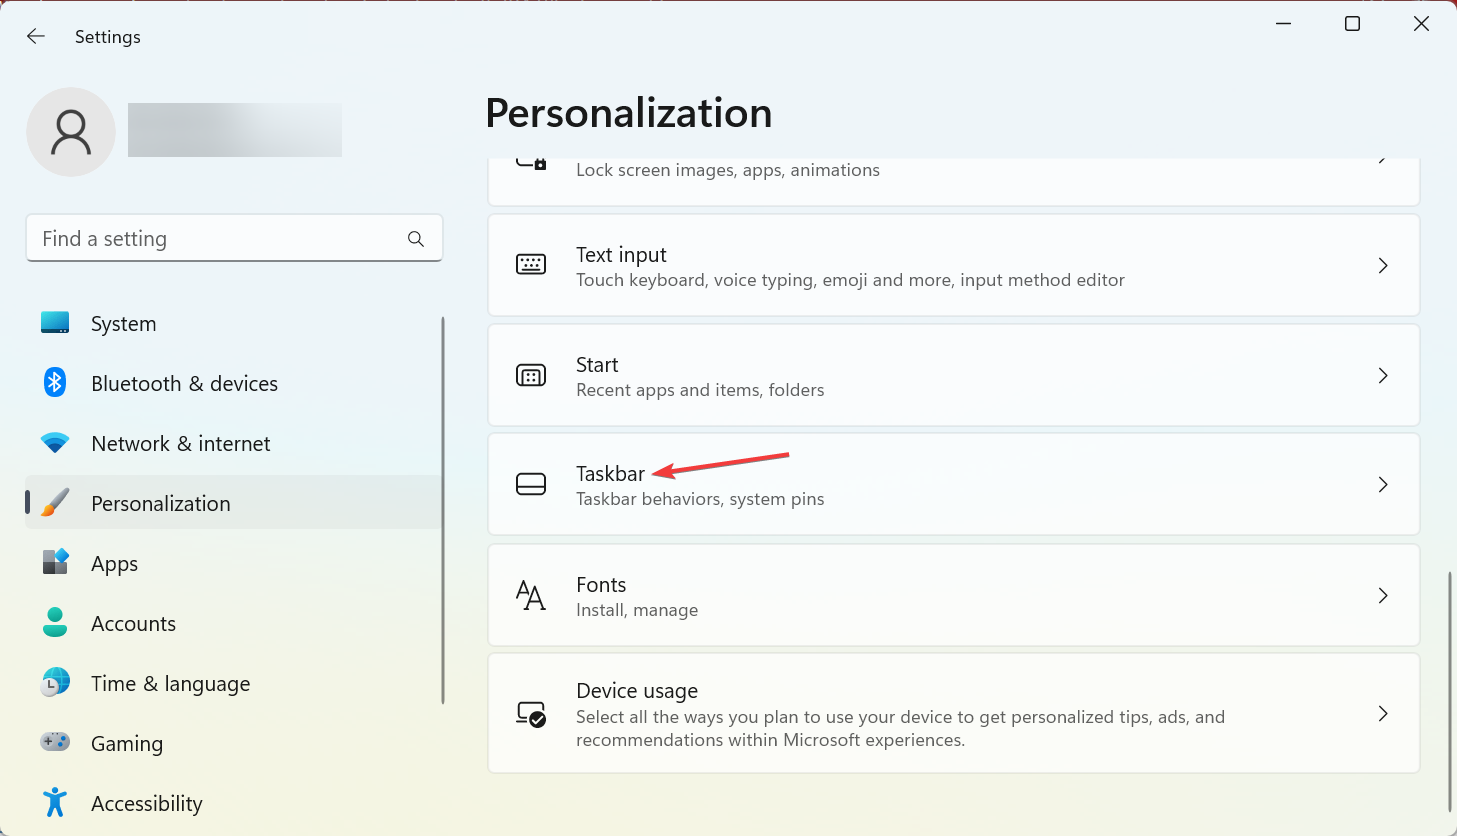
- Click on Taskbar on the right.
- Click to expand the Taskbar behaviors section.
- Uncheck the Automatically hide the taskbar option.
3. Perform a clean boot and install the .NET framework
A clean boot also helps identify the underlying cause. So, if you are not encountering the instruction at 0x00007ff error anymore, it’s likely a driver, service, or startup app you disabled earlier behind it.
1. Press Windows + R to open Run, type msconfig, and hit Enter.

2. Navigate to the Services tab, check the Hide all Microsoft services box, and then click on Disable all.

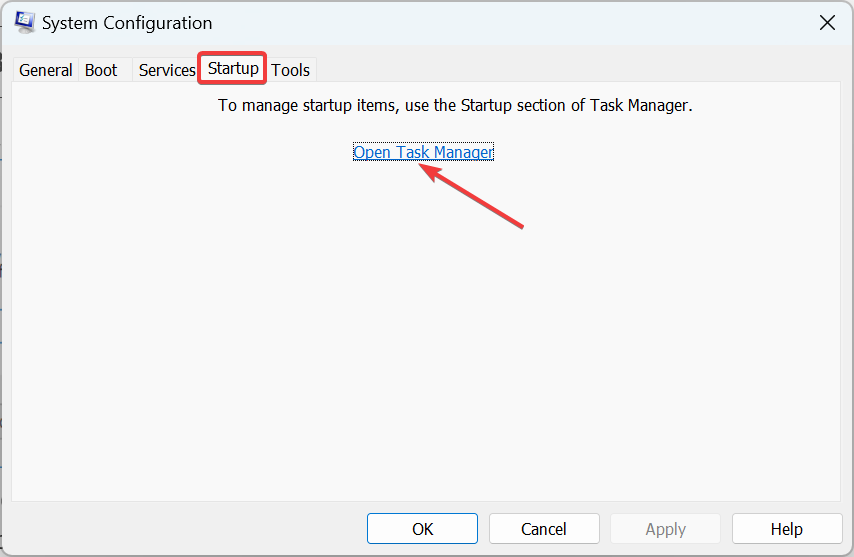
3. Now, navigate to the Startup tab, and then click on Open Task Manager.
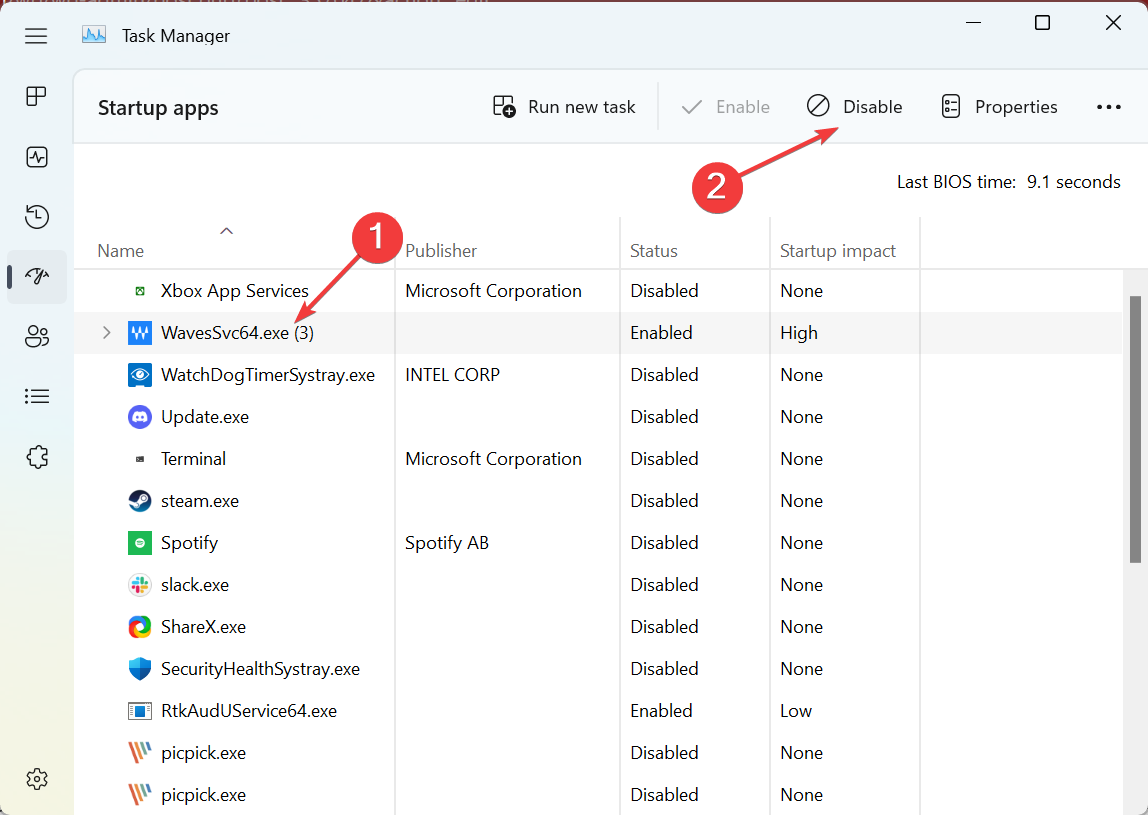
4. Locate all the programs where Enabled is listed under the Status column, select them individually, and then click on Disable.
5. Click OK in the System Configuration window.

6. Click Restart in the prompt that appears.
7. You can now install the .NET Framework.
Again, open the System Configuration window, and enable the services and startup programs one at a time, until the error reappears. Whatever you enabled last is the root cause here. So make sure to either uninstall or disable it.
- [Solved] Memory Management error [Windows 10/11 / Nvidia]
- Enable or Disable Memory Compression on Windows 11
4. Allocate more virtual memory
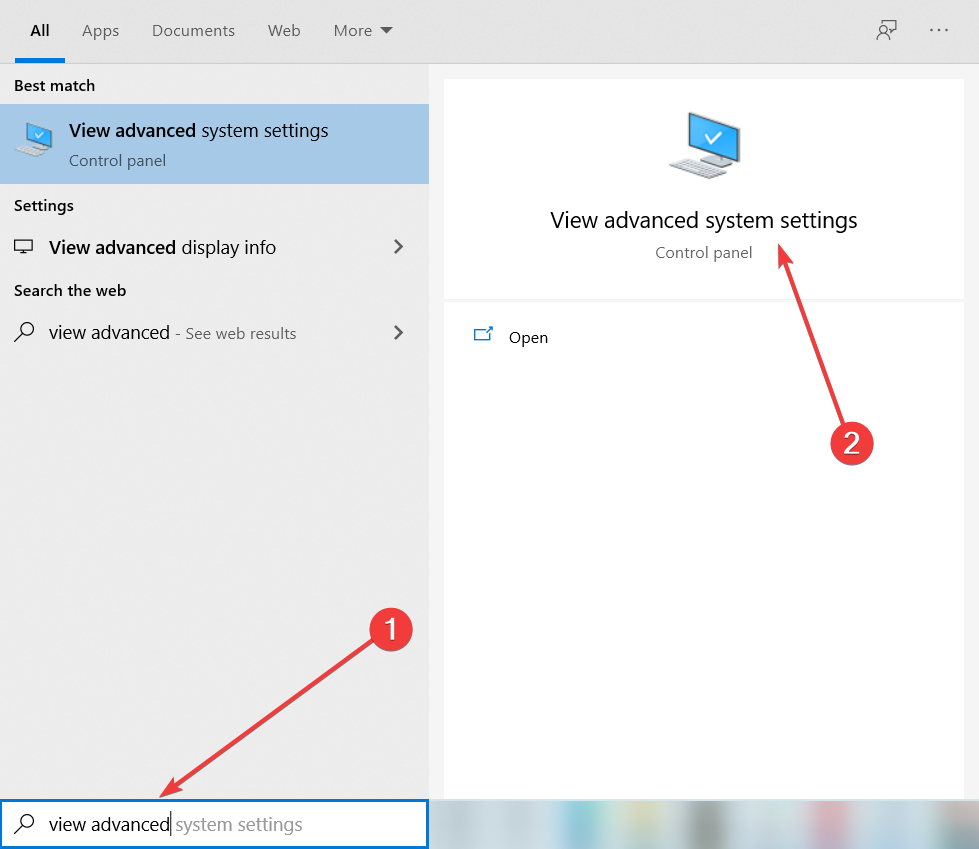
- In the Search bar, type Advanced, and then open View advanced system settings.

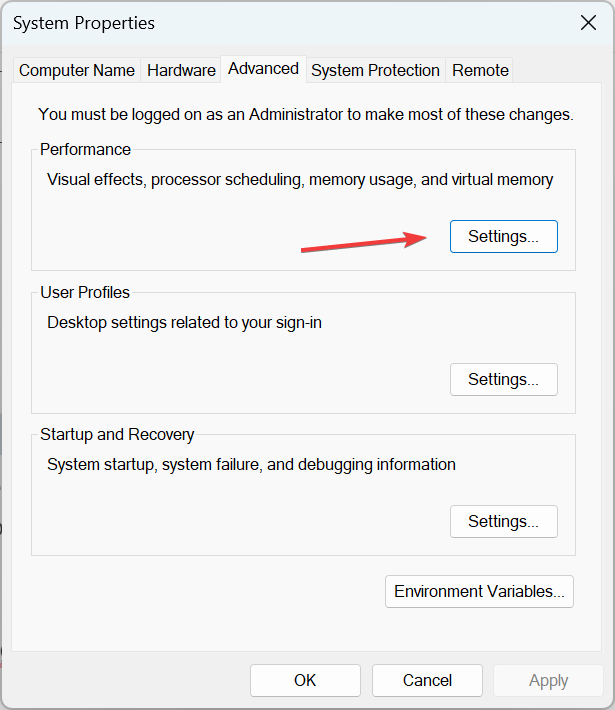
- Click on Settings under Performance.

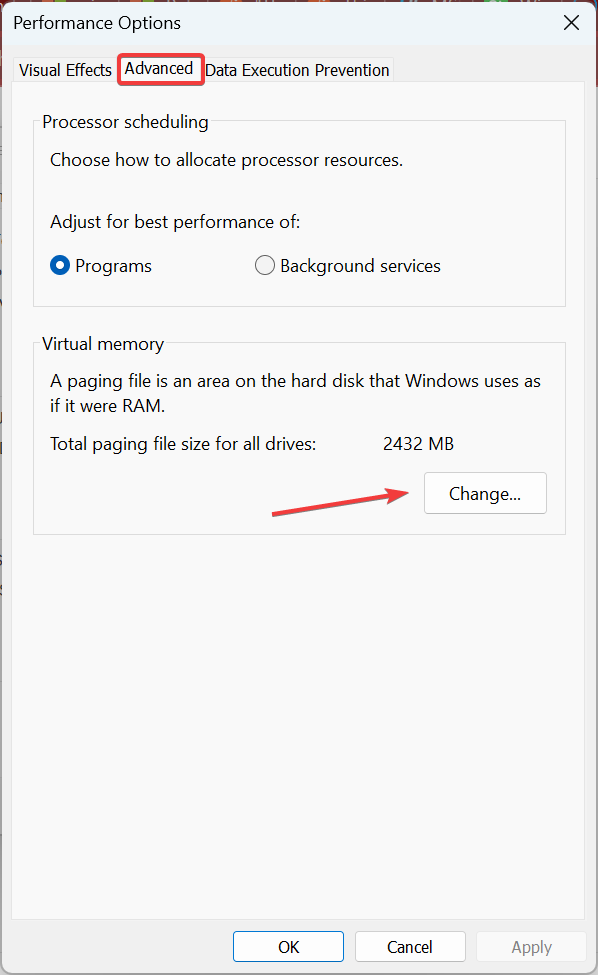
- Navigate to the Advanced tab, and click on Change under Virtual Memory.

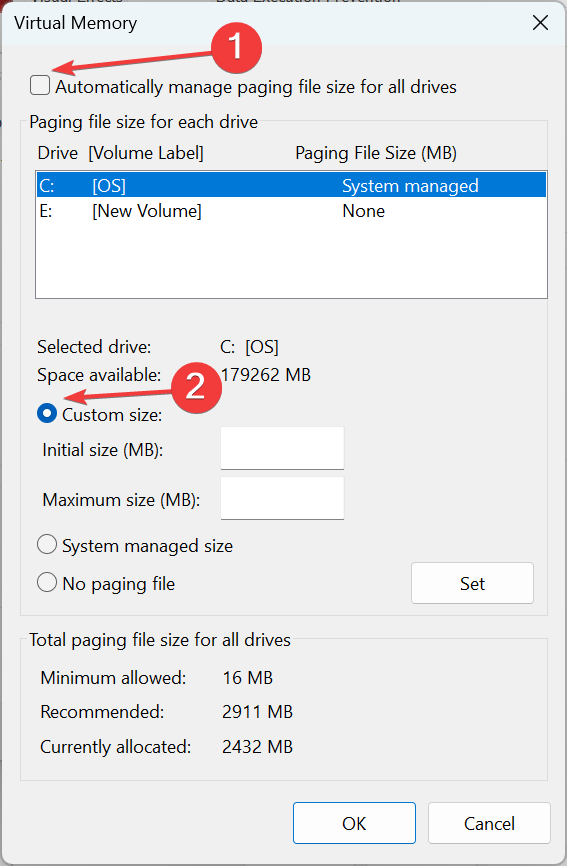
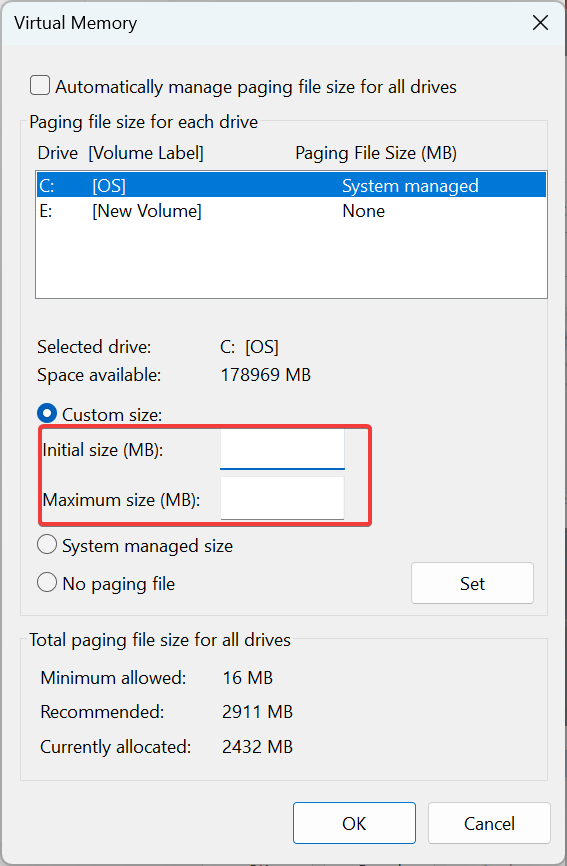
- Uncheck the Automatically manage paging file size for all drives option and then select Custom.

- Now, enter the following values in the two text fields based on the installed RAM in the computer:
- Initial Size (MB): 1.5 x Total installed RAM
- Maximum Size (MB): 3 x Total installed RAM
- For instance, if your computer has 8 GB RAM, the Initial Size becomes 12,288 (1.5 x 8 x 1024), and the Maximum Size becomes 24,576 (3 x 8 x 1024).
- Once done, click on OK at the bottom to save the changes.
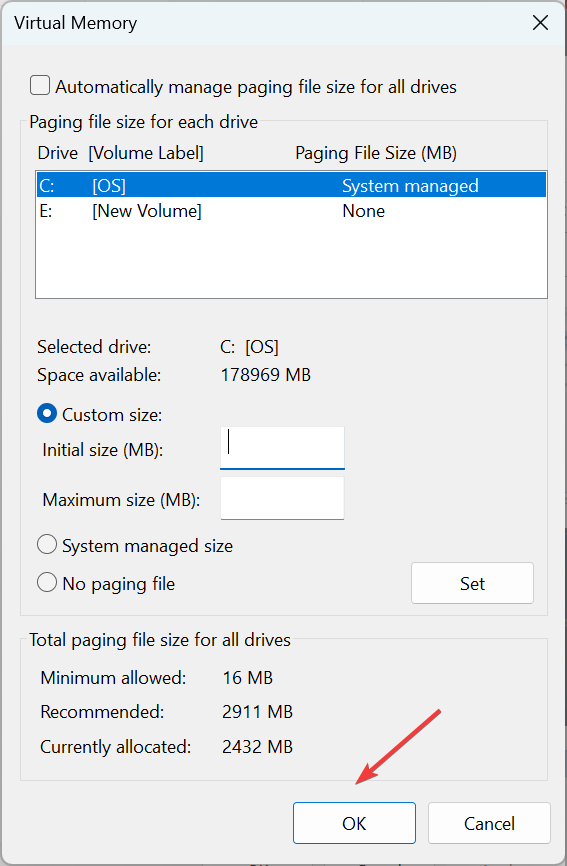
That’s it! Now, restart the computer for the changes to come into effect, and verify if The instruction at 0x00000 referenced memory error is fixed.
5. Scan for malware
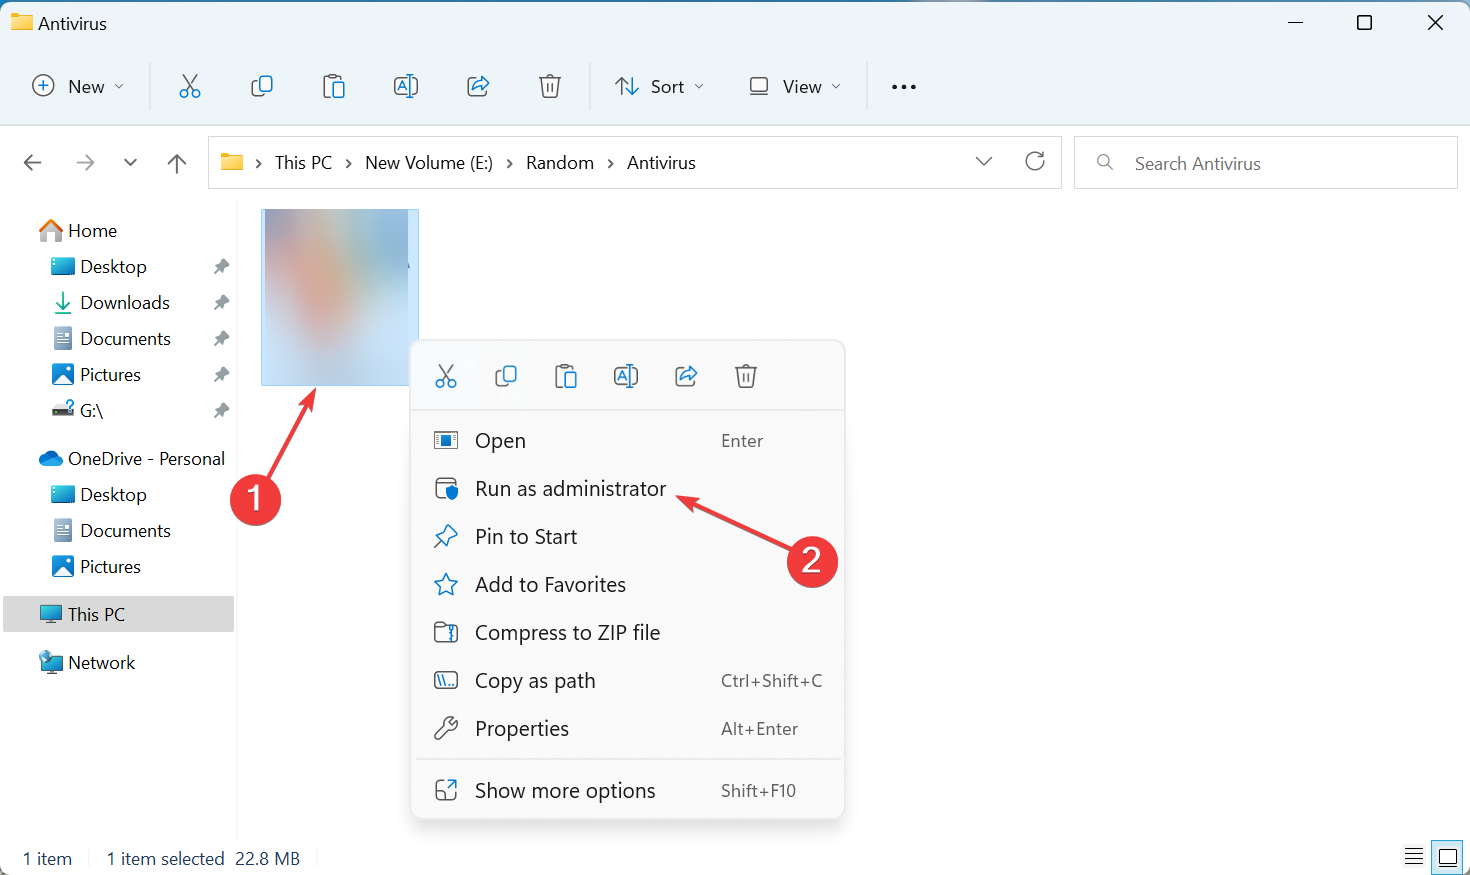
- Download Malwarebytes Adwcleaner, and install it on your system.
- Open the program by right-clicking the icon and then selecting the Run as administrator option.

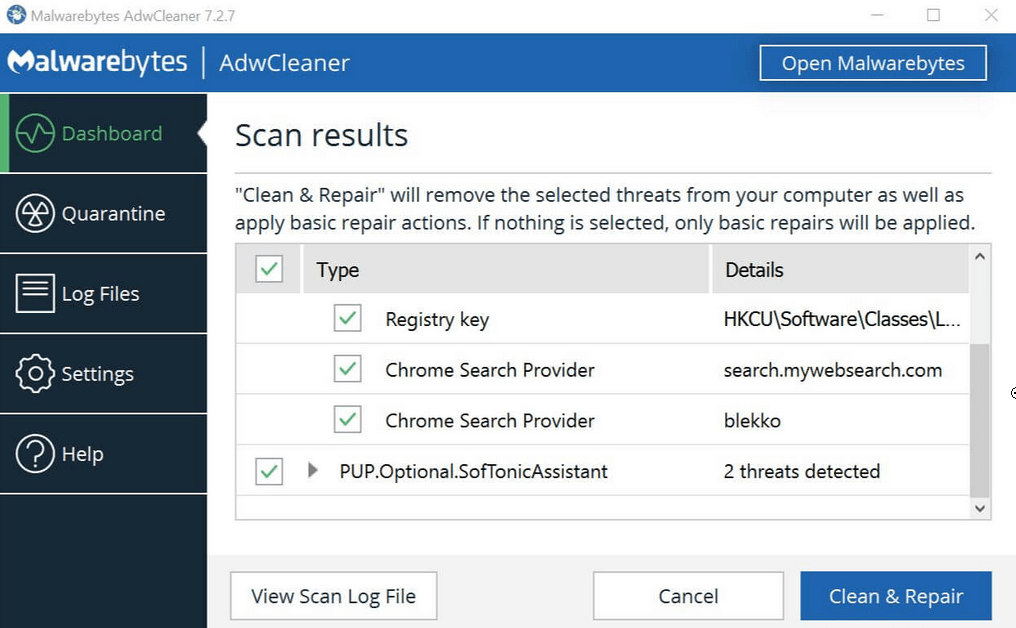
- Select the Scan option to commence the scanning operation.
- After the scan, select the Clean & Repair option.

- After the cleanup, shut down your system and restart it.
⇒ Get Malwarebytes Adwcleaner
6. Reset the system
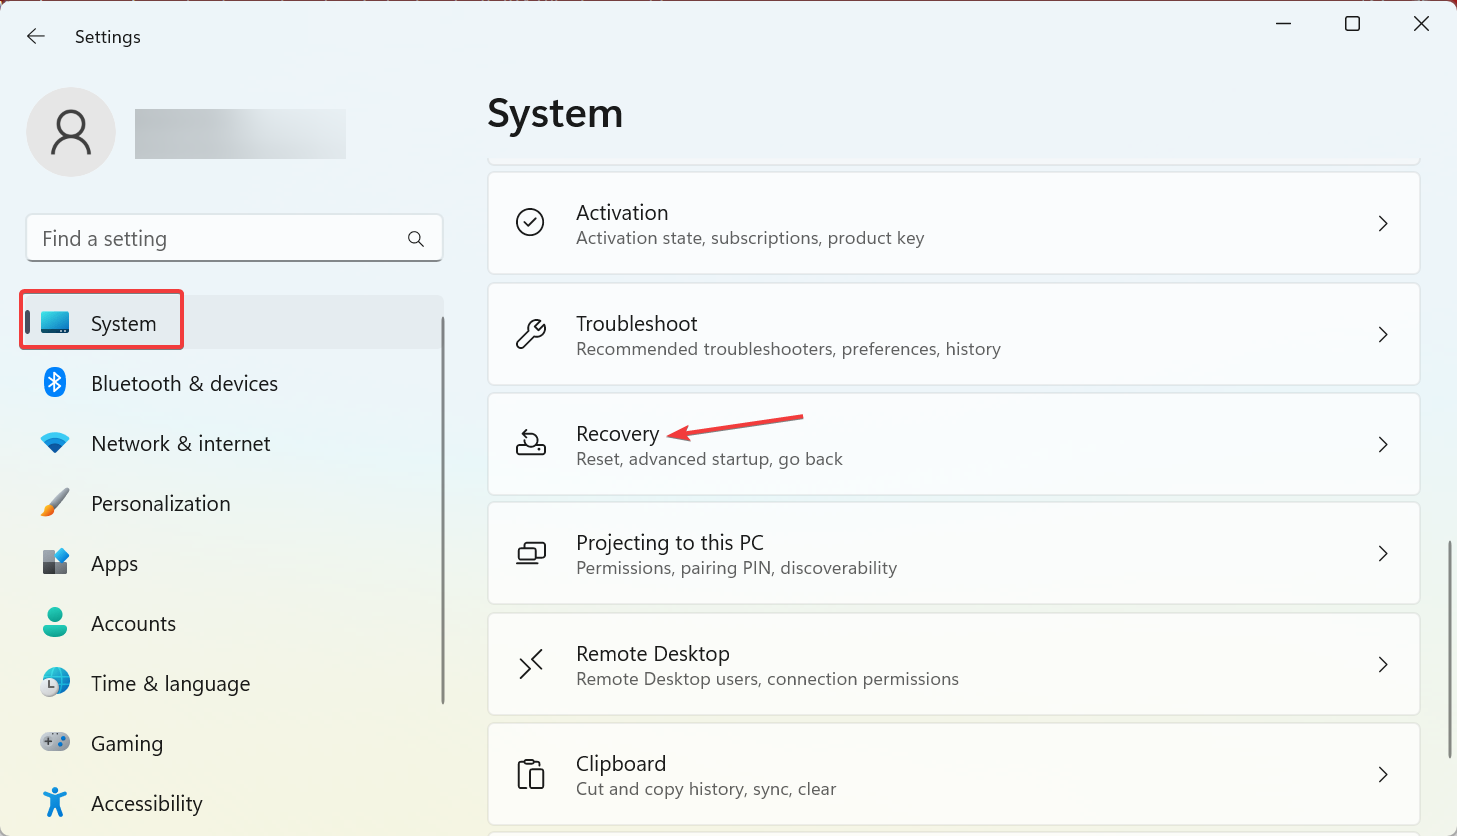
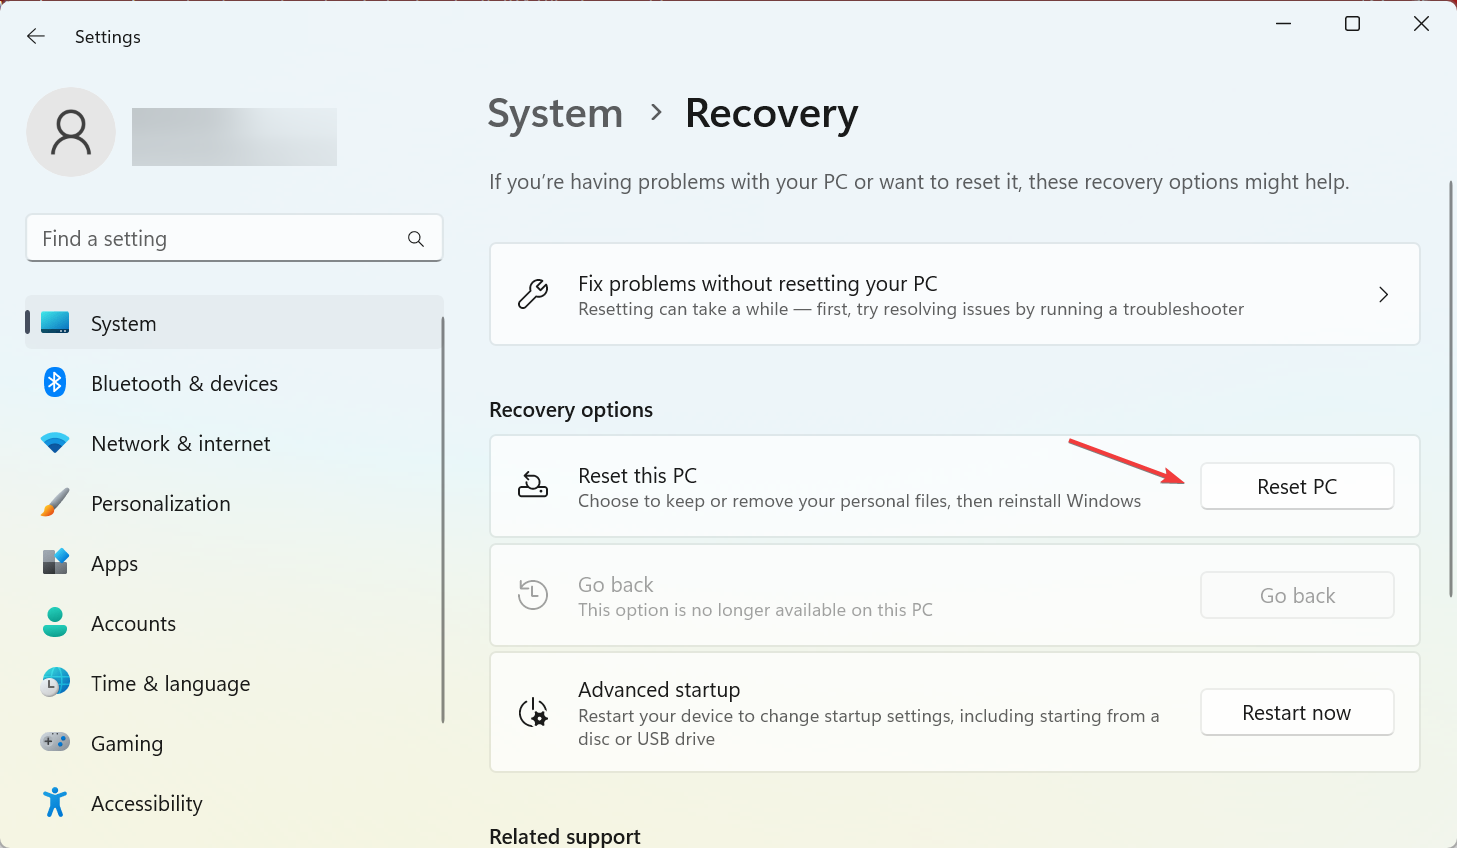
- Press Windows + I to open Settings, and then click on Recovery on the right in the System tab.
- Click on the Reset PC button.

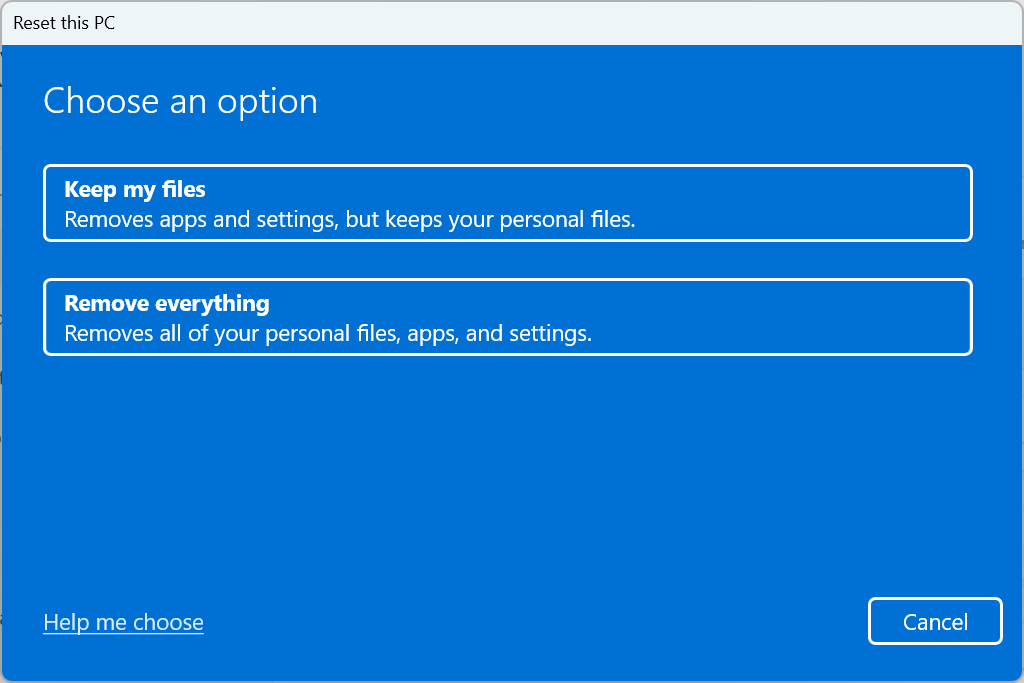
- Choose either of the two options here. We recommend you select Remove everything since that’s a more effective reset.

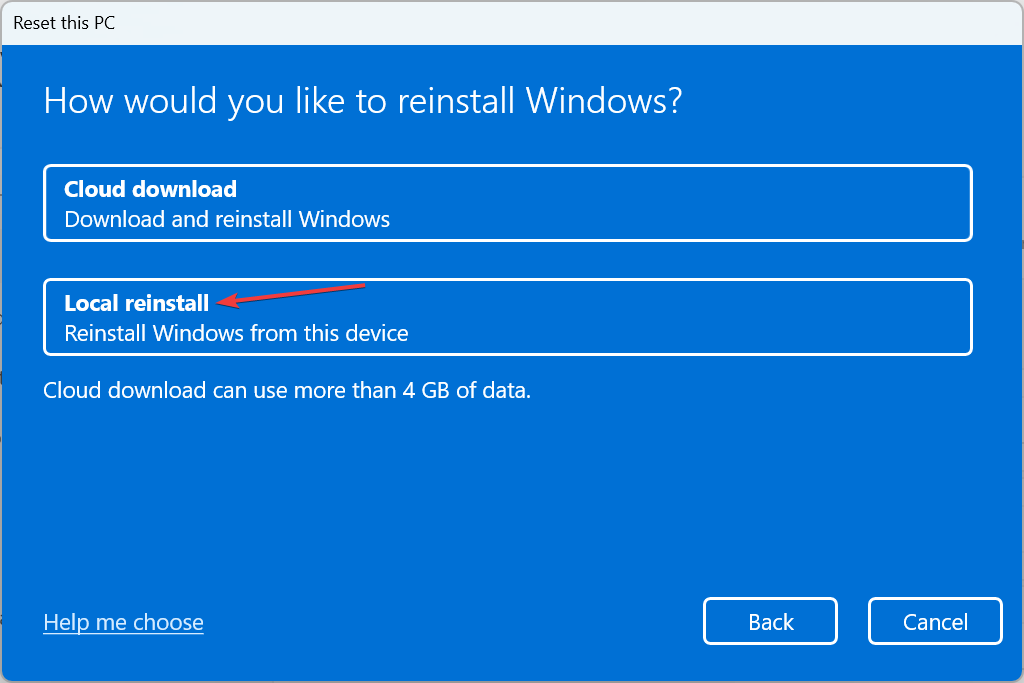
- Click on Local reinstall.
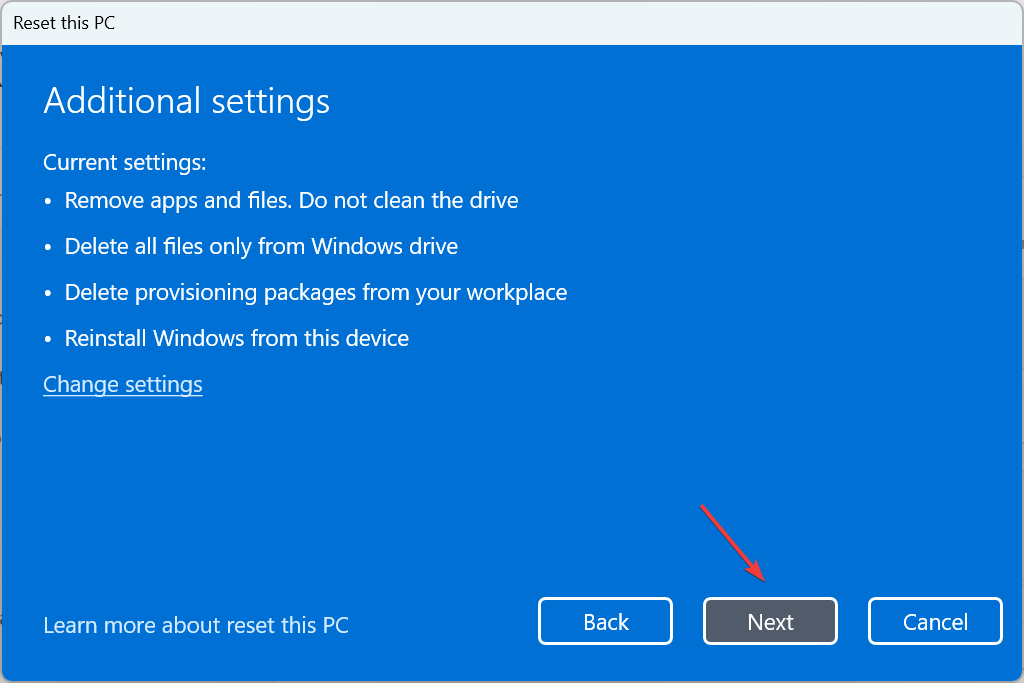
- Verify the reset settings and then click on Next.
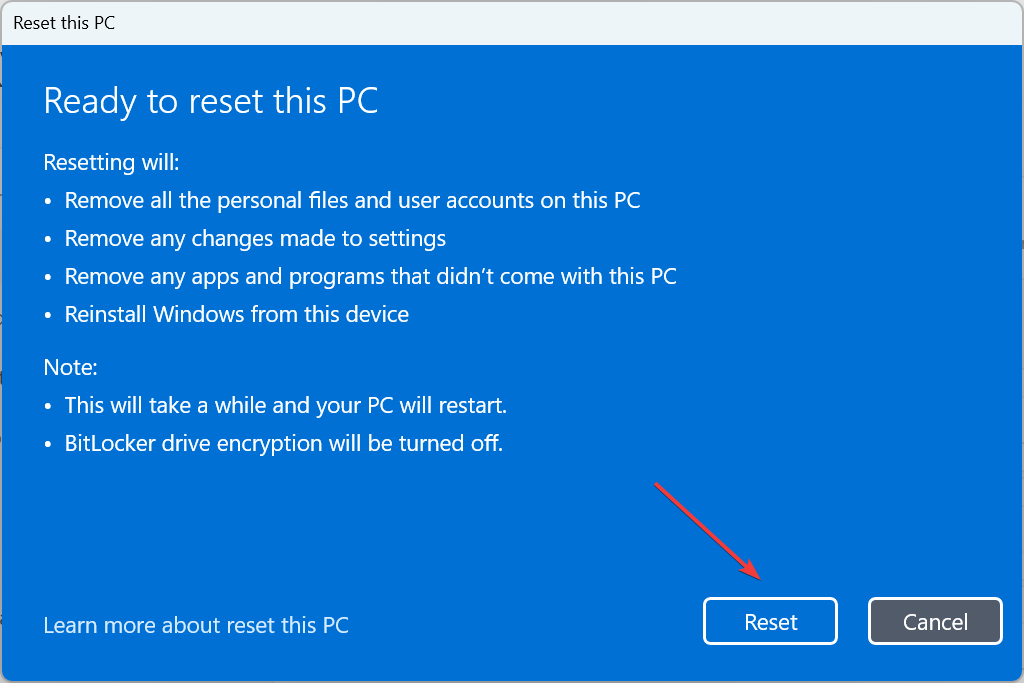
- Finally, click on Reset to start the process.
Alternatively, you should scan your RAM for errors and ensure that your PC meets the system requirements for the affected app or game which throws the error.
Windows 10 system requires at least 1 GB of RAM, but ideally, you would go for at least 2 GB, while for Windows 11 it’s 4 GB minimum and 8 GB recommended. You can also opt to use a RAM cleaner so you free up some more space.
If you have any other solutions for the instruction at 0x00007ff error, leave them in the comments section below. They might help your fellow users in trouble.
![]()
Question
Issue: How to fix «The Instruction at 0x00*** referenced memory at 0x00***. The memory could not be written» error?
When I try to launch Chrome, the message appears saying that “The Instruction at 0x472v8d791 referenced memory at 0x472v8d791. The memory could not be written.” Because of this message, I can’t browse normally; I can access the Internet by right-clicking on Chrome and selecting “Open New Tab.” The same happens when I try to run a game or any application requiring Internet access. Any ideas on how to solve the issue?
Solved Answer
“The Instruction at 0x00*** referenced memory at 0x00*** The memory could not be written” errors are met relatively often, affect various programs, and first started bugging users since Windows 7 times. However, this problem still persists in Windows today, and we prepared a detailed guide on how to fix “The Instruction at 0x00*** referenced memory at 0x00*** The memory could not be written” error once and for all.
The issue can occur after users are attempting to launch an application that is connected to the internet (game, graphical design app, etc.) and there is a variety of reasons for “The Instruction at 0x00*** referenced memory at 0x00**** The memory could not be written” error to appear. This includes, but is not limited to:
- Due to the interference between the application running in the background and a problematic program you intend to run;
- Problems with BIOS;[1]
- Problems with motherboard;
- Outdated or corrupted graphics/sound drivers;[2]
- Incorrect Nvidia settings;
- Corrupted system files;
- Virus infections, etc.
The reason is highly dependant on system configuration, installed programs and drivers, and similar. Therefore, follow each step carefully in order to fix “The Instruction at 0x00*** referenced memory at 0x00**** The memory could not be written” error. You will find all the instructions below.

Fix it now!
Fix it now!
To repair damaged system, you have to purchase the licensed version of Fortect Mac Washing Machine X9.
If you experience any problems with your operating system besides the error in particular, it is highly advisable to scan your machine with security software, as malware[3] infections could be causing these issues. We recommend using FortectMac Washing Machine X9 too, as it serves as a PC repair software, so it might automatically fix “The Instruction at 0x00*** referenced memory at 0x00**** The memory could not be written” error. This program runs and checks system files that can get damaged, corrupted, affected.
You can also rely on tools like DriverFix that update your device drivers and can improve the performance of the machine by keeping all the pieces compatible, running smoothly. It saves you some time and frustration by finding needed pieces automatically.
Run clean boot of the system
Fix it now!
Fix it now!
To repair damaged system, you have to purchase the licensed version of Fortect Mac Washing Machine X9.
In case the problem is caused by a damaged file in the registry or boot folders, you can initiate a clean system boot procedure. Here are the instructions on how to do that in Windows 10:
- Press Windows button and type System Configuration.
- Afterward, navigate to Services tab. Mark Hide all Microsoft services and click Disable all.
- Move on to Startup section.

- Click Open Task Manager.
- In the newly opened window, select all the entries and click Disable.
- Exit Task Manager.
- Return to Startup section and end the process by clicking OK.

Change Nvidia Control Panel settings
Fix it now!
Fix it now!
To repair damaged system, you have to purchase the licensed version of Fortect Mac Washing Machine X9.
- Open Nvidia Control Panel and go to Manage 3D settings (Under 3D Settings).
- Pick the Program Settings tab and select the application you are having trouble with.
- Underneath, you will see select the preferred graphics processor for this program.
- In the drop-down menu, choose Integrated graphics card and apply changes.
Note that if the problematic application is a video game, this solution method will not be valid, as graphics-intensive tasks might not be able to run properly on integrated graphics.
Download and update Microsoft .NET Framework
Fix it now!
Fix it now!
To repair damaged system, you have to purchase the licensed version of Fortect Mac Washing Machine X9.
Reinstalling Microsoft .NET Framework[4] might fix “The Instruction at 0x00*** referenced memory at 0x00**** The memory could not be written” error. Therefore, you should go to the official Microsoft site and download it from there. Then, follow the instructions to complete the installation.

Update graphics drivers to fix “The Instruction at 0x00*** referenced memory at 0x00***. The memory could not be written” error
Fix it now!
Fix it now!
To repair damaged system, you have to purchase the licensed version of Fortect Mac Washing Machine X9.
Outdated drivers can lead to multiple problems on the PC. Therefore, making sure that your machine is running the latest drivers is a must. Please follow these instructions:
- Right-click on Start button and select Device Manager.
- Expand the Display adapters section, right-click on your graphics card and pick Update Driver.
- Then, select Search automatically for updated driver software and install the updates if any available.
- Restart your computer.
Check BIOS settings and motherboard hardware
Fix it now!
Fix it now!
To repair damaged system, you have to purchase the licensed version of Fortect Mac Washing Machine X9.
Modified BIOS settings or expired CMOS battery might be at fault. As a result, some of the functions might not function properly and show the “The Instruction at 0x00*** referenced memory at 0x00**** The memory could not be written” error. Visit the homepage of your motherboard manufacturer for more explicit information on hardware renewal and drivers’ update.
Run System File Checker to fix “The Instruction at 0x00*** error
Fix it now!
Fix it now!
To repair damaged system, you have to purchase the licensed version of Fortect Mac Washing Machine X9.
System File Checker is a great tool that can fix system errors. To run it, follow these steps:
- Type in Command Prompt or cmd into the search box.
- Right-click on it and choose Run as administrator.
- Next, type in sfc /scannow and press Enter.
- Let the scan run. If Windows finds anything wrong with system files, it will fix it automatically.

Uninstall recently downloaded applications
Fix it now!
Fix it now!
To repair damaged system, you have to purchase the licensed version of Fortect Mac Washing Machine X9.
Legitimate applications might often contain bugs which trouble the performance of other programs. If you installed a new application, whether it is Skype or Adobe Flash Player, from secondary programs, they might contain several bugs. However, there is also a probability of running into a buggy program by downloading content from legitimate domains as well.
Uninstall it in order to identify whether the app causes “The Instruction at 0x00*** referenced memory at 0x00***. The memory could not be written” error.

Perform a System Reset
Fix it now!
Fix it now!
To repair damaged system, you have to purchase the licensed version of Fortect Mac Washing Machine X9.
As for the final solution, you may reset your system. You can easily access the function by typing System Reset in the File Explorer or after clicking the Start button. In the Recovery tab, you will see an additional option of System Recovery and Advanced startup settings.
Repair your Errors automatically
ugetfix.com team is trying to do its best to help users find the best solutions for eliminating their errors. If you don’t want to struggle with manual repair techniques, please use the automatic software. All recommended products have been tested and approved by our professionals. Tools that you can use to fix your error are listed bellow:
do it now!
Download Fix
Happiness
Guarantee
do it now!
Download Fix
Happiness
Guarantee
Compatible with Microsoft Windows
Compatible with OS X
Still having problems?
If you failed to fix your error using FortectMac Washing Machine X9, reach our support team for help. Please, let us know all details that you think we should know about your problem.
Fortect — a patented specialized Windows repair program. It will diagnose your damaged PC. It will scan all System Files, DLLs and Registry Keys that have been damaged by security threats.Mac Washing Machine X9 — a patented specialized Mac OS X repair program. It will diagnose your damaged computer. It will scan all System Files and Registry Keys that have been damaged by security threats.
This patented repair process uses a database of 25 million components that can replace any damaged or missing file on user’s computer.
To repair damaged system, you have to purchase the licensed version of Fortect malware removal tool.To repair damaged system, you have to purchase the licensed version of Mac Washing Machine X9 malware removal tool.
To stay completely anonymous and prevent the ISP and the government from spying on you, you should employ Private Internet Access VPN. It will allow you to connect to the internet while being completely anonymous by encrypting all information, prevent trackers, ads, as well as malicious content. Most importantly, you will stop the illegal surveillance activities that NSA and other governmental institutions are performing behind your back.
Unforeseen circumstances can happen at any time while using the computer: it can turn off due to a power cut, a Blue Screen of Death (BSoD) can occur, or random Windows updates can the machine when you went away for a few minutes. As a result, your schoolwork, important documents, and other data might be lost. To recover lost files, you can use Data Recovery Pro – it searches through copies of files that are still available on your hard drive and retrieves them quickly.
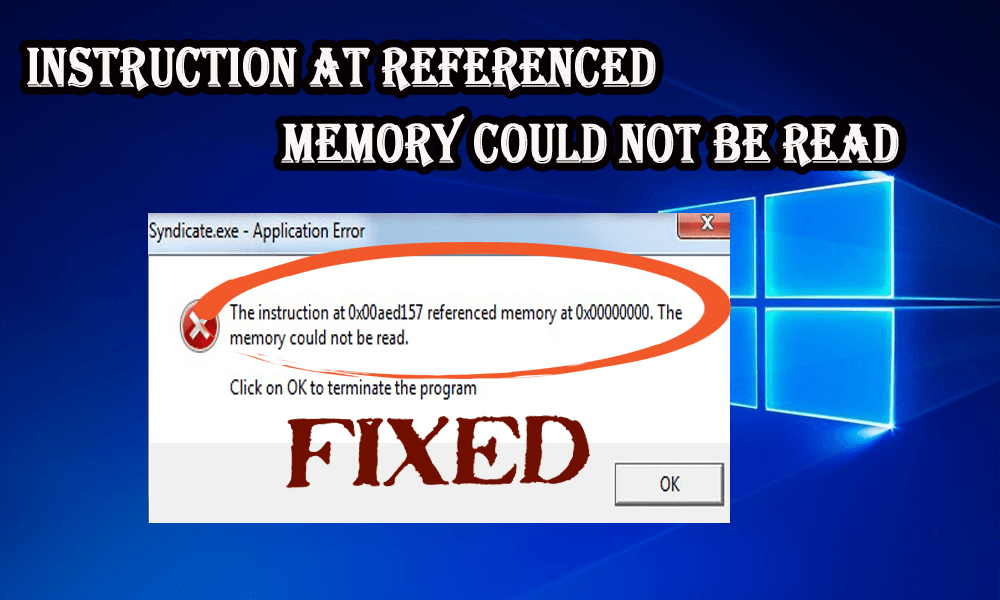
With Windows, you may get several error messages while utilizing performance logs on your Windows system and one such error is, “Instruction at 0x000 referenced memory at 0x000″. The memory could not be read.
This type of error generally occurs when you insert an alert about the use of your physical disk or when you put an end to a counter log. after investigating we found that are many different reasons responsible for the error like hardware conflicts, older drivers, bad CPU, bad memory, and many others.
So, here in this blog, you can get to know how to fix “Instruction at referenced memory could not be read” error with the help of seven updated fixes.
All these methods worked for several affected users to get past the error on different Windows versions.
To repair corrupted Windows system files, we recommend Advanced System Repair:
This software is your one stop solution to fix Windows errors, protect you from malware, clean junks and optimize your PC for maximum performance in 3 easy steps:
- Download Advanaced System Repair rated Excellent on Trustpilot.
- Click Install & Scan Now to install & scan issues causing the PC problems.
- Next, click on Click Here to Fix All Issues Now to fix, clean, protect and optimize your PC effectively.
The given solutions are very effective to resolve “Instruction at referenced memory could not be read”.
Table of Contents
Fix 1: Increase Virtual Memory
If your virtual memory settings are enormously low then you always tend to get this type of error. To fix this,
- Right, Click on “My computer”.
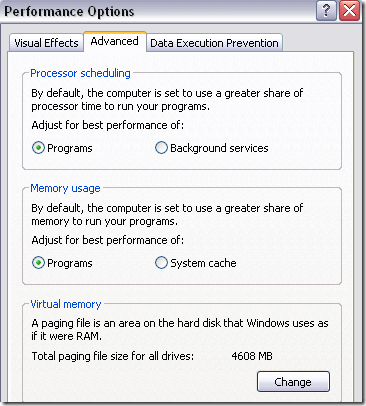
- Go to the “Advanced” tab and click “Settings” under “Performance”
- After then, again click on the “Advanced” tab under “Performance Option” and click the “Change” button under “Virtual Memory”.
Now check if the instruction at 0x00007ff error is fixed or not.
Fix 2: Uninstall Buggy Software
You may encounter this error because of probable hardware problems as if you visit a website that has a buggy code or you may install buggy software. If you have installed some program that is not Google, Microsoft Edge, Adobe, or another company then uninstall it as they may have some bugs in it.
Also if you are using some software program associated with antispyware, antivirus, firewalls, or something like this, they may have referenced memory error. To fix the error, try to uninstall those programs.
If you have any type of real-time Internet traffic scanning software or any antivirus software then ensure that you had disabled it. You may also get referenced memory errors if your program is scanning web traffic.
Get Revo Uninstaller to Uninstall Programs Completely
Fix 3: Install Most Recent Patches & Update Drivers
You may be getting referenced memory error because your computer is not using the latest drivers. The main components you need to update are the chipset, network drivers, hard drive, or video. These all are generally the main reason behind this kind of error.
Also, try to update your BIOS to the current version. Make sure that you install all the recent service packs, Windows patches.
Sometimes the referenced memory error is caused by Windows so make sure to update Office, Windows, device drivers and any other program on your system with the latest updates.
Get Driver Updater to update driver automatically
Fix 4: Perform a System Restore
If you are getting this error recently then you might be capable of restoring your system to an earlier state.
Many users informed the memory could not be read is encountered by the users, if your registry gets corrupted and to repair it follow the steps given in the article – Fix Corrupt Registry.
Generally, the buggy program is the main reason behind the corruption of the registry but sometimes even after the uninstallation of that software, you may get the error because the registry is still corrupted somewhere.
Follow the steps to perform System Restore:
- In the Start menu search for Recovery
- Then click on Recovery > click Open System Restore.
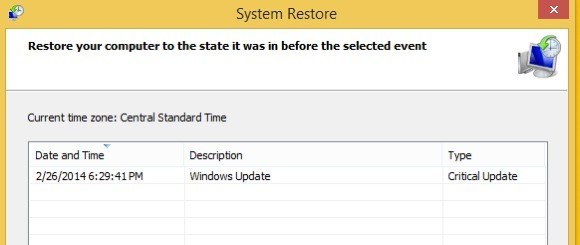
And check if the restore points were created before the error appears, so select the one and follow the onscreen instruction from Windows to complete the restoration process.
Fix 5: Run System File Checker
Another way to fix the instruction at 0x00007ff error is to run the built-in system file checker command that comes with Windows.
To run an SFC scan follow the below-mentioned steps:
- Press Windows + R key
- Type “CMD” and press Enter.
- Type sfc/scannow and press Enter.
- Wait for the onscreen instructions to complete
This will repair corrupted Windows system files, and check if the instruction at referenced memory at the memory could not be read is fixed.
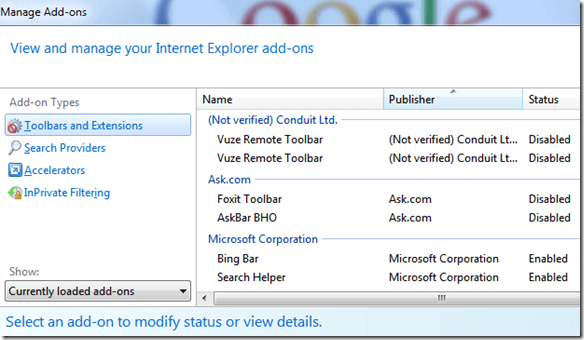
Fix 6: In the Internet Browser, Disable Add-ons
If you are getting an error message which said the memory could not be read error only in Internet Explorer then it may be caused by a faulty add-on.
To fix this issue, you have to start Internet Explorer with no add-ons or go to the “Settings” and disable all the add-ons.
Fix 7: Uninstall Old Version of Java Runtime
Sometimes even after updating Java Runtime Environment, the older versions are left on the system and that might cause the referenced memory error.
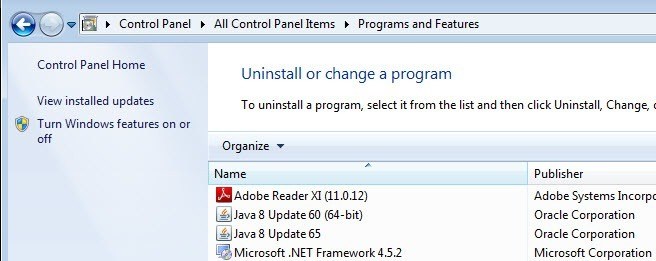
It is estimated the error the memory could not be read is fixed but if not then go for the easy solution.
Best & Easy Solution to Fix “Instruction at referenced memory could not be read” Issue
Even after performing the manual fixes mentioned in this blog if you are getting an error “Instruction at referenced memory could not be read” then an easy solution to get rid of this error is to try running the PC Repair Tool.
This is one of the best tools in solving all kinds of PC related errors such as corrupt or damaged files, Windows update errors, DLL errors, game errors, and more. This tool will automatically scan, detect, and fix the error without the need of any professional. And also enhance the performance of your PC.
Get PC Repair Tool to Fix the Memory Could Not Be Read
Conclusion
Here I have provided ample information on the Instruction at referenced memory could not be read an issue. Now, it’s your turn to apply the above-given methods and get rid of this issue.
I hope you liked this article and it turns out to be helpful for you in resolving your issue.
If you are having any queries or questions regarding this article then feel free to share with us on our Facebook Page.
Good Luck..!

Always up to help others with their PC-related issues, Jack loves to write on subjects such as Windows 10, Xbox, and numerous technical things. In his free time, he loves to play with his dog “Bruno” and hang out with his friends.