The MINTEMP error (written sometimes as min temp) occurs when the temperature readout from the heatbed thermistor or hotend thermistor drops below a certain amount within a certain time frame. It is a safety feature that prevents the printer from overheating in case of a faulty thermistor because, by default, the printer is set to balance out any heat loss by pumping more power into the heat bed or hotend heater cartridge.
WARNING: The temperature limits triggering the MINTEMP were set after rigorous testing. Adjusting them is NOT RECOMMENDED and might lead to damage to the printer and a possible fire hazard!
MK2/S & MK2.5/S
Due to the hardware design of the MiniRAMBo and accounting for manufacturing tolerances, there is a temperature below which the thermistors are unable to read reliable values:
- Hotend thermistor — temperatures below 22 °C (71.6 °F)
- Heatbed thermistor — temperatures below 15 °C (59 °F)
For safety reasons, the MINTEMP error is triggered in case the measured temperatures are below these limits. This is for the firmware to accurately detect a damaged or disconnected thermistor. For a technical explanation of this limitation, please see this Github issue.
MK3 & MK3S & MK3S+
The EinsyRambo board of the MK3/S/+ was allowed by its improved thermistor circuitry design to have a wider range of scale when it comes to temperature (thermistor) readings. It also has an onboard thermistor for ambient temperature. This has allowed the firmware to allow for a lower temperature threshold than on the previous generation (MiniRAMBo).
- Hotend thermistor — temperatures below 10 °C (50 °F)
- Heatbed thermistor — temperatures below 10 °C (50 °F)
Also, printing in very cold environments, outside of the recommended operational temperature, can have negative effects due to other factors than the printer’s electronics, like material properties.
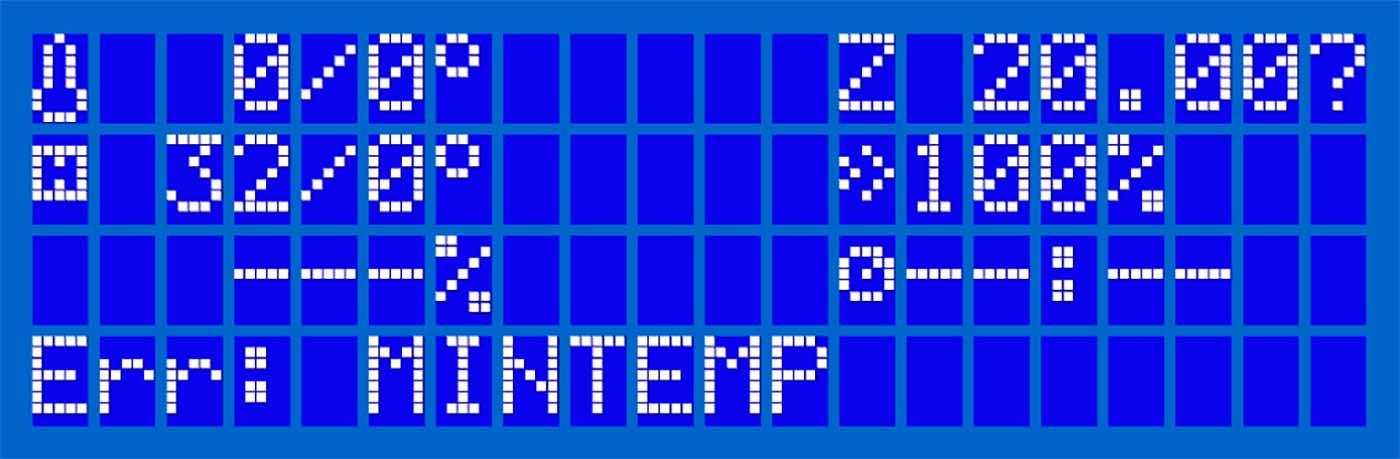
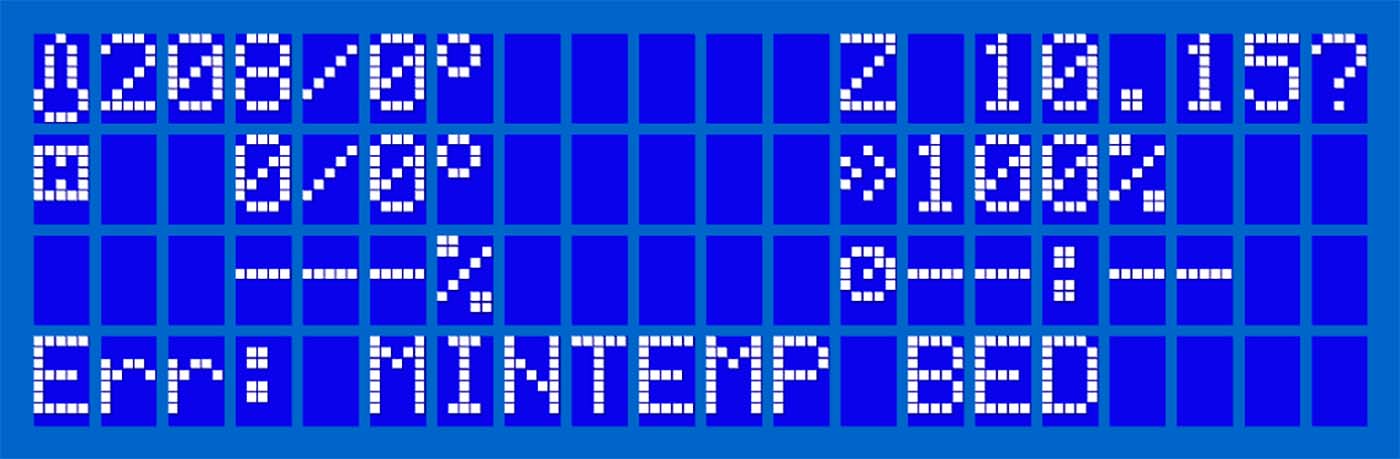
A completely disconnected heatbed/hotend thermistor will give the reading 0°C on the MK3/S/+
What does it look like?
When one of the thermistor cables is broken, it can be observed when the temperature on the LCD screen starts randomly jumping up and down during the Y-axis or X-axis movement.
It is important to distinguish between the MINTEMP error and the MINTEMP BED error.
 |
 |
|
MINTEMP — problem with the hotend temperature readout. |
MINTEMP BED — problem with the heatbed temperature readout. |
This error can be caused by a simple glitch or a gust of breeze. The LCD displays «MINTEMP fixed» and you just need to restart the printer by pressing the X button, under the knob. However, if reoccurring, it indicates an intermittent break in the thermistor wire.
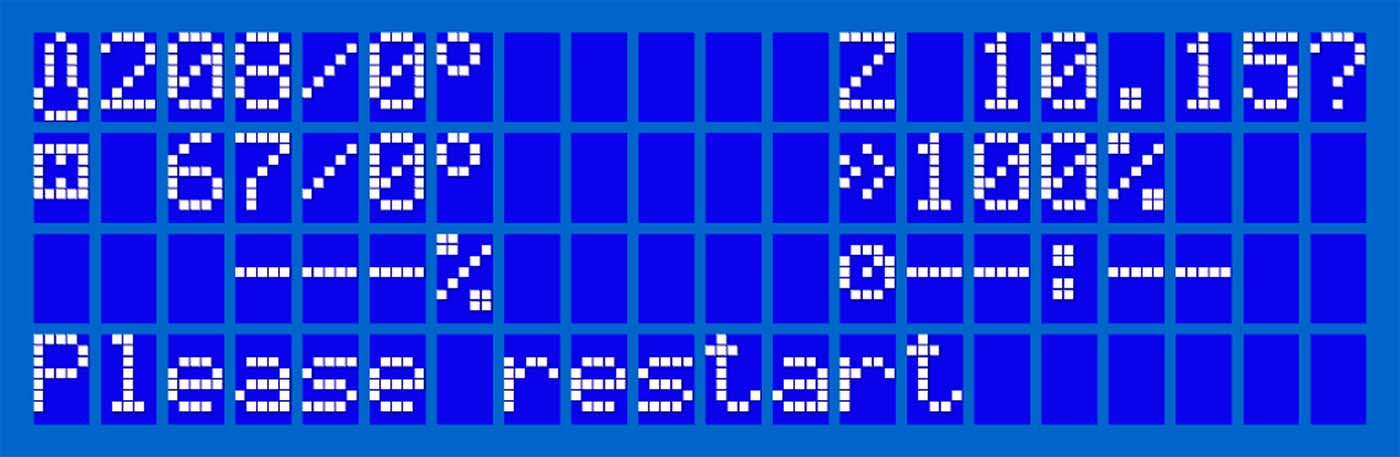
MINTEMP HOTEND/BED fixed
If the cable regains a proper connection and a correct reading from the thermistor, the printer will update the error to «MINTEMP fixed» or «MINTEMP fixed», followed by «Please restart». This does not mean the issue is permanently resolved. You should continue the troubleshooting described in this article.
Testing the thermistor
You can also test it with a multimeter (our article Multimeter usage can guide you). If it fails to read the resistance on the metal inserts in the jumper connectors, then the wire is broken. At room temperature, it should have a resistance you can expect resistance of 80 kΩ — 125 kΩ.
RAMBo board connector
That the RAMBo is the cause is highly unlikely, as the board would not pass the final testing that we do in our factory. However, try switching the Hotend and Heatbed thermistors on the board (both have 3 pins), if the MINTEMP does not turn into MINTEMP BED or if the MINTEMP BED does not turn into MINTEMP, the electronics board connector is broken and a new board is needed. You should also notice the temperature reading on the LCD change.
To find the thermistor see Mini RAMBo electronics wiring (MK2S, MK2.5, MK2.5S) or Einsy RAMBo electronics wiring (MK3/MK3S/MK3S+), depending on your printer.
Wiggle it!
If you do not have a multimeter, a good way to test the cable of the thermistor is to simply wiggle it. Pre-heat to PLA (215/60) and move the extruder or bed by hand, all the way to the end of each side. See if there is any great change in temperature-reading on the LCD (tens of degrees or zeroing out).
Grab the textile sleeve and manipulate and wiggle it, again checking if there is any change in temperature. If there is, it indicates a microfracture of the cable when the connection changes depending on orientation. You then need to replace the thermistor.
How to fix it
For pre-assembled printer owners: If you happen to receive the printer during winter and you want to start using it out of the box, wait until it reaches room temperature.
Temperature
Make sure the temperature of the room where you operate the printer is not below 20 ° C (happens easily if you keep the printer in a basement during winter). Also make sure the printer is not placed next to an opened window, air conditioning, or in a way of a breeze that might cause a sudden temperature fluctuation.
If the issue is only caused by the ambient temperature of the room, you can use a hairdryer on the bed / hotend until it reaches a temperature above 18C to initiate a print. However, some materials, like ASA / ABS, may misbehave if printed in a cold ambient temperature without an enclosure.
Glitch
As mentioned above, the error might have been triggered by a simple glitch. Try to reset your printer by pressing the X button under the knob and see if it will print afterward.
Thermistor connection
Check if the thermistor is properly connected to the RAMBo board: there is a latch on the connector that needs to snap in place. To find the thermistor see Mini RAMBo electronics wiring (MK2S, MK2.5, MK2.5S) or Einsy RAMBo electronics wiring (MK3/MK3S/MK3S+), depending on your printer. Also, make sure the textile sleeve protection of the extruder cable bundle did not snap and that it is still protecting the cables, especially around the spot where they enter the electronics casing.
Hotend thermistor
At the other end of the hotend thermistor cable, inspect the wire where it goes into the heater block. This point is fragile and can get damaged.
Heat bed thermistor
As for the heat bed thermistor cable, make sure it is firmly attached to the underside of the heated bed with the golden Kapton tape. If not, try to press it back on. Make sure that the thermistor cable has some slack, as shown in the right picture below. It is also important that it is not being pinched by the printed cable cover when put together. This is so it won’t be worn down by the movement of the bed.
Replacement
In case there is visible damage on the cable, or if it behaves erratically, the thermistor must be replaced. You can follow our guides How to replace a heatbed thermistor (MK3S+/MK3S/MK2.5S/MK2S) or How to replace a hotend thermistor (MK2S).
Всем привет, купил китайский 3д принтер, собрал, начал настраивать появляется ошибка Err: MINTEMP, как это устранить. Фото материнки и видео запуска для понимания.

Ответы на вопросы
Популярные вопросы
Что за дефект?
Diver17

Загрузка
30.08.2023
7320
Всем привет!
Предыстория: Медведь 5, давно переделан на директ, печатаю не много, в основном техничку. Режу в Прюше, подобрал с…
Сопли, неровности и прыщи при печати FlyingBear Ghost 6, помогите
Здравствуйте, я новичок. Купил себе недавно этот прекрасный принтер. Вроде нормально откалибровал, настроил z offset, но при печати кораблика увидел с…
Шестерня vs зубчатое колесо
mlizart
Загрузка
26.05.2018
45361
Часто участникам портала приходится изготавливать зубчатые колеса и шестерни. Но мало кто задается вопросом, в чем их отличие?
Недавн…
Читайте в блогах
-
TMeeks
- Posts: 37
- Joined: Thu Jan 24, 2019 12:04 am
- Location: Chantilly, VA
- Contact:
err: MINTEMP BED
After printing very successfully for days an error popped up.
Err: MINTEMP BED
PRINTER HALTED
Please Reset
Until the error appears the D9 LED is on. Then it starts to blink and finally the D9 LED goes off and the error appears.
Another sign of the error is that the LCD reports -14 as the bed temperature.
…
…

- MinTemp Error.JPG (188.54 KiB) Viewed 7955 times
…
…
Any help will be appreciated. Fortunately, I have another A10 that is waiting to be built during our teacher training, so we’re not dead in the water. But, we need to know everything we can find to keep these printers up and running like we know they can perform when healthy.
Tom
UPDATE #1: After restarting several times. The after leaving it on for a bit, the -14 went away and it started showing the expected bed temperature. My first guess is that this either indicates a wiring issue or a bad thermistor.
UPDATE #2: With the LCD reporting Bed temperature as expected, a print was started. D9 glowed solidly as the bed reached 60C of 60C. The, as the nozzle started heating D9 blinked furiously until the nozzle temperature reached 210C of 260C. At the moment the bed started to move D9 went dark and the MINTEMP error popped up. From this it makes it all the more likely that the problem is at the bed end of the circuit and possible a cold solder joint.
-
TMeeks
- Posts: 37
- Joined: Thu Jan 24, 2019 12:04 am
- Location: Chantilly, VA
- Contact:
Re: err: MINTEMP BED
Post
by TMeeks » Tue Jan 29, 2019 3:33 am
I think I have narrowed down one path to follow in debugging the issue I’m having.
I am going out to buy some polyimide tape and clips to replace the ones I had tried previously, which I think are shorting through the existing tape.
I had tried some slightly smaller clips than those supplied with the printer and they were (1) a bit smaller and (2) uncoated. I will replace the existing tape holding the heater to the bed with new polyimide tape and try clips that are the same size and type as those that came with the printer.
To come to this conclusion, I had removed the bed and checked the solder joints and continuity through the wiring. I also tested the thermistor. I did not have a multimeter; but, did have a voltage/continuity meter. Continuity was fine.
But, I did notice some chafing of the tape from the clips. I’ll know in an hour or so when I put everything back together again.
Sometimes we are our own worst enemies when it comes to 3D printers. ![]()
![]()
But, this also points out the wisdom of putting together a «first aid» kit for our new printers that would include extra thermistors (bed & hot-end), polyimide tape and other accessories to help us get back up and running quickly should we need to do some quick repair. The beauty of the architecture of the A10 and A20 series is that every possible replacement part is available and access to parts is relatively easy. No matter what the final answer turns out to be the cause of this issue, it is clear that nothing we run into is permanent nor catastrophic in the long term. And, that makes these printers a very good investment from a price/performance point of view. And, that is our primary criteria for these printers in our system.
A lot of people may feel that a very low cost printer is going to be more trouble than the most expensive printers. In addition to needing a number of low cost printers, we are also considering a MarkForged Onyx Pro and possible Fusion3 F410 and Fuse1 to meet our educational goals for the at-risk students we serve. Based on all of our experience with every price level of 3D printers, I do not expect them to be any more free of issues than the A10s and A20s. ALL 3D printers have issues.
-
TMeeks
- Posts: 37
- Joined: Thu Jan 24, 2019 12:04 am
- Location: Chantilly, VA
- Contact:
UPDATE: Polyimide change did not help
Post
by TMeeks » Tue Jan 29, 2019 8:18 am
What I did:
Working on the theory that the bed clips may be shorting the heater board, I replaced the Polyimide tape with new tape and doubled the layers on the underside where the clips might touch. I also went back to the original clips.
Outcome:
Sadly, while it initially seemed to work, the error showed up again. At least this rules out the clips shorting something as a cause.
At this point, it appear that it could be one of three things:
- Bed Heater
GT2560 V3.0 board
Cable harness
Unfortunately, this happened in the middle of the Chinese New Year, so it may be difficult to get replacement parts quickly.
Fortunately, however, we have another unboxed A10. So we will raid that one for parts. We’ll first swap out the bed heater and if that does not work we will swap out the GT2560 V3.0 and, finally, the harness so that we can try to pin down the culprit.
The other good news is that we have 3 more A10 printers on the way; but, probably not until after the Chinese New Year. This will allow us to see how things go over several printers.
-

_kaktus_
- Site Admin
- Posts: 1260
- Joined: Fri Dec 15, 2017 10:06 pm
- Location: PL
- Contact:
Re: err: MINTEMP BED
Post
by _kaktus_ » Wed Jan 30, 2019 12:12 am
Hello.
Very good deduction. ![]()
Do one test.
Disconnect the thermistor and check the temperature indication on the display.
Perhaps, as you wrote in your deliberations, the culprit is a poor quality connection, in a measuring electrical circuit.
On the forum I help to use the rod, I don’t give fish.
Geeetech Prusa I3 M201 Dual extruder Mixcolor 3D printer, bought 2017-12-19, already built, in the cognitive and improvement phase
Geeetech filament, ABS only
Geeetech 3D WiFi Module for 3D Printer, bought 2018-04-15, He got a new life, and still lies in a drawer.
Positively frenzied customer of Getech Technology.
-
TMeeks
- Posts: 37
- Joined: Thu Jan 24, 2019 12:04 am
- Location: Chantilly, VA
- Contact:
Re: err: MINTEMP BED
Post
by TMeeks » Wed Jan 30, 2019 11:08 am
Hi _Kaktus_,
I have really appreciated reading your posts not only to myself; but, everyone. You are very valuable around here.
Once I found that I could still function by disconnecting the heated bed altogether I decided against raiding the other printer. And, can simply wait for the end of the Chinese New Year and order some extra parts.
In the meantime, I want to try to work on getting the smoothest print out of the printer. I have what appears to be a slight Z-Axis wobble that I believe was NOT there earlier. I think I failed to tighten some of the rollers when I adjusted them. I am actually happy when these things come up because it helps me to help our teachers later when I am able to identify and solve issues.
Our A20M is suppose to arrive tomorrow. And, we have the A10 that has yet to be built. This is a good start for our teachers when they arrive for training next week. Even the fact that my heated bed is not working will allow them to see how to keep printing should the same thing happen to them.
As soon as the Geeetech staff is back from holiday, I will order the backup parts and follow your advice. Thanks!
-
soularb
- Posts: 1
- Joined: Mon Aug 12, 2019 7:12 am
Re: err: MINTEMP BED
Post
by soularb » Mon Aug 12, 2019 9:00 am
Hi how are you? I have exactly the same problem, what did you do to fix it
-

William
- Site Admin
- Posts: 6340
- Joined: Tue Jun 07, 2016 9:38 am

Re: err: MINTEMP BED
Post
by William » Mon Aug 12, 2019 9:40 am
soularb wrote: ↑
Mon Aug 12, 2019 9:00 am
Hi how are you? I have exactly the same problem, what did you do to fix it
Hi, When you turn on the printer and the temperature is as shown above,
You can check if your hot bed line is fully connected to the motherboard.
The resistance of the hot bed is then measured and the hot bed may need to be replaced.
I hope this can help you.
-Keep your mind and try to test it. ![]()
-Everything will be fun!-Support all Getech printer.
-You can ask me the questions and I will kindly reply.
-Respect others is the best way you can get help!
Всем привет, купил китайский 3д принтер, собрал, начал настраивать появляется ошибка Err: MINTEMP, как это устранить. Фото материнки и видео запуска для понимания.
Ответы на вопросы
Популярные вопросы
Что актуальней на данный момент
vit.ru
Загрузка
27.05.2023
441
Добрый день. Решил подумать заменой своего ендер 6 (реально не оправдал надежды, а допиливать не в моем случае) смотрю в сторону ендер 3 с1 плюс или Н…
Дефект в начале нового слоя
Liukk
Загрузка
14.05.2023
467
Проблема возникает в начале печати наружного слоя, а также в начале новой области на том же слое. Внутренний слой печатается нормально (дефект к…
Программа для 3D проектирования
Alex-S
Загрузка
22.02.2018
21058
Понимаю, что тема 100500 раз обсуждалась, но не удалось нигде найти обобщающей информации, в основном все в одной куче советуется.
Пр…
Читайте в блогах
The MINTEMP error (written sometimes as min temp) occurs when the temperature readout from the heatbed thermistor or hotend thermistor drops below a certain amount within a certain time frame. It is a safety feature that prevents the printer from overheating in case of a faulty thermistor because, by default, the printer is set to balance out any heat loss by pumping more power into the heat bed or hotend heater cartridge.
WARNING: The temperature limits triggering the MINTEMP were set after rigorous testing. Adjusting them is NOT RECOMMENDED and might lead to damage to the printer and a possible fire hazard!
MK2/S & MK2.5/S
Due to the hardware design of the MiniRAMBo and accounting for manufacturing tolerances, there is a temperature below which the thermistors are unable to read reliable values:
- Hotend thermistor — temperatures below 22 °C (71.6 °F)
- Heatbed thermistor — temperatures below 15 °C (59 °F)
For safety reasons, the MINTEMP error is triggered in case the measured temperatures are below these limits. This is for the firmware to accurately detect a damaged or disconnected thermistor. For a technical explanation of this limitation, please see this Github issue.
MK3 & MK3S & MK3S+
The EinsyRambo board of the MK3/S/+ was allowed by its improved thermistor circuitry design to have a wider range of scale when it comes to temperature (thermistor) readings. It also has an onboard thermistor for ambient temperature. This has allowed the firmware to allow for a lower temperature threshold than on the previous generation (MiniRAMBo).
- Hotend thermistor — temperatures below 10 °C (50 °F)
- Heatbed thermistor — temperatures below 10 °C (50 °F)
Also, printing in very cold environments, outside of the recommended operational temperature, can have negative effects due to other factors than the printer’s electronics, like material properties.
A completely disconnected heatbed/hotend thermistor will give the reading 0°C on the MK3/S/+
What does it look like?
When one of the thermistor cables is broken, it can be observed when the temperature on the LCD screen starts randomly jumping up and down during the Y-axis or X-axis movement.
It is important to distinguish between the MINTEMP error and the MINTEMP BED error.
|
|
|
MINTEMP — problem with the hotend temperature readout. |
MINTEMP BED — problem with the heatbed temperature readout. |
This error can be caused by a simple glitch or a gust of breeze. The LCD displays «MINTEMP fixed» and you just need to restart the printer by pressing the X button, under the knob. However, if reoccurring, it indicates an intermittent break in the thermistor wire.
MINTEMP HOTEND/BED fixed
If the cable regains a proper connection and a correct reading from the thermistor, the printer will update the error to «MINTEMP fixed» or «MINTEMP fixed», followed by «Please restart». This does not mean the issue is permanently resolved. You should continue the troubleshooting described in this article.
Testing the thermistor
You can also test it with a multimeter (our article Multimeter usage can guide you). If it fails to read the resistance on the metal inserts in the jumper connectors, then the wire is broken. At room temperature, it should have a resistance you can expect resistance of 80 kΩ — 125 kΩ.
RAMBo board connector
That the RAMBo is the cause is highly unlikely, as the board would not pass the final testing that we do in our factory. However, try switching the Hotend and Heatbed thermistors on the board (both have 3 pins), if the MINTEMP does not turn into MINTEMP BED or if the MINTEMP BED does not turn into MINTEMP, the electronics board connector is broken and a new board is needed. You should also notice the temperature reading on the LCD change.
To find the thermistor see Mini RAMBo electronics wiring (MK2S, MK2.5, MK2.5S) or Einsy RAMBo electronics wiring (MK3/MK3S/MK3S+), depending on your printer.
Wiggle it!
If you do not have a multimeter, a good way to test the cable of the thermistor is to simply wiggle it. Pre-heat to PLA (215/60) and move the extruder or bed by hand, all the way to the end of each side. See if there is any great change in temperature-reading on the LCD (tens of degrees or zeroing out).
Grab the textile sleeve and manipulate and wiggle it, again checking if there is any change in temperature. If there is, it indicates a microfracture of the cable when the connection changes depending on orientation. You then need to replace the thermistor.
How to fix it
For pre-assembled printer owners: If you happen to receive the printer during winter and you want to start using it out of the box, wait until it reaches room temperature.
Temperature
Make sure the temperature of the room where you operate the printer is not below 20 ° C (happens easily if you keep the printer in a basement during winter). Also make sure the printer is not placed next to an opened window, air conditioning, or in a way of a breeze that might cause a sudden temperature fluctuation.
If the issue is only caused by the ambient temperature of the room, you can use a hairdryer on the bed / hotend until it reaches a temperature above 18C to initiate a print. However, some materials, like ASA / ABS, may misbehave if printed in a cold ambient temperature without an enclosure.
Glitch
As mentioned above, the error might have been triggered by a simple glitch. Try to reset your printer by pressing the X button under the knob and see if it will print afterward.
Thermistor connection
Check if the thermistor is properly connected to the RAMBo board: there is a latch on the connector that needs to snap in place. To find the thermistor see Mini RAMBo electronics wiring (MK2S, MK2.5, MK2.5S) or Einsy RAMBo electronics wiring (MK3/MK3S/MK3S+), depending on your printer. Also, make sure the textile sleeve protection of the extruder cable bundle did not snap and that it is still protecting the cables, especially around the spot where they enter the electronics casing.
Hotend thermistor
At the other end of the hotend thermistor cable, inspect the wire where it goes into the heater block. This point is fragile and can get damaged.
Heat bed thermistor
As for the heat bed thermistor cable, make sure it is firmly attached to the underside of the heated bed with the golden Kapton tape. If not, try to press it back on. Make sure that the thermistor cable has some slack, as shown in the right picture below. It is also important that it is not being pinched by the printed cable cover when put together. This is so it won’t be worn down by the movement of the bed.
Replacement
In case there is visible damage on the cable, or if it behaves erratically, the thermistor must be replaced. You can follow our guides How to replace a heatbed thermistor (MK3S+/MK3S/MK2.5S/MK2S) or How to replace a hotend thermistor (MK2S).
-
TMeeks
- Posts: 37
- Joined: Thu Jan 24, 2019 12:04 am
- Location: Chantilly, VA
- Contact:
err: MINTEMP BED
After printing very successfully for days an error popped up.
Err: MINTEMP BED
PRINTER HALTED
Please Reset
Until the error appears the D9 LED is on. Then it starts to blink and finally the D9 LED goes off and the error appears.
Another sign of the error is that the LCD reports -14 as the bed temperature.
…
…
- MinTemp Error.JPG (188.54 KiB) Viewed 7707 times
…
…
Any help will be appreciated. Fortunately, I have another A10 that is waiting to be built during our teacher training, so we’re not dead in the water. But, we need to know everything we can find to keep these printers up and running like we know they can perform when healthy.
Tom
UPDATE #1: After restarting several times. The after leaving it on for a bit, the -14 went away and it started showing the expected bed temperature. My first guess is that this either indicates a wiring issue or a bad thermistor.
UPDATE #2: With the LCD reporting Bed temperature as expected, a print was started. D9 glowed solidly as the bed reached 60C of 60C. The, as the nozzle started heating D9 blinked furiously until the nozzle temperature reached 210C of 260C. At the moment the bed started to move D9 went dark and the MINTEMP error popped up. From this it makes it all the more likely that the problem is at the bed end of the circuit and possible a cold solder joint.
-
TMeeks
- Posts: 37
- Joined: Thu Jan 24, 2019 12:04 am
- Location: Chantilly, VA
- Contact:
Re: err: MINTEMP BED
Post
by TMeeks » Tue Jan 29, 2019 3:33 am
I think I have narrowed down one path to follow in debugging the issue I’m having.
I am going out to buy some polyimide tape and clips to replace the ones I had tried previously, which I think are shorting through the existing tape.
I had tried some slightly smaller clips than those supplied with the printer and they were (1) a bit smaller and (2) uncoated. I will replace the existing tape holding the heater to the bed with new polyimide tape and try clips that are the same size and type as those that came with the printer.
To come to this conclusion, I had removed the bed and checked the solder joints and continuity through the wiring. I also tested the thermistor. I did not have a multimeter; but, did have a voltage/continuity meter. Continuity was fine.
But, I did notice some chafing of the tape from the clips. I’ll know in an hour or so when I put everything back together again.
Sometimes we are our own worst enemies when it comes to 3D printers. ![]()
![]()
But, this also points out the wisdom of putting together a «first aid» kit for our new printers that would include extra thermistors (bed & hot-end), polyimide tape and other accessories to help us get back up and running quickly should we need to do some quick repair. The beauty of the architecture of the A10 and A20 series is that every possible replacement part is available and access to parts is relatively easy. No matter what the final answer turns out to be the cause of this issue, it is clear that nothing we run into is permanent nor catastrophic in the long term. And, that makes these printers a very good investment from a price/performance point of view. And, that is our primary criteria for these printers in our system.
A lot of people may feel that a very low cost printer is going to be more trouble than the most expensive printers. In addition to needing a number of low cost printers, we are also considering a MarkForged Onyx Pro and possible Fusion3 F410 and Fuse1 to meet our educational goals for the at-risk students we serve. Based on all of our experience with every price level of 3D printers, I do not expect them to be any more free of issues than the A10s and A20s. ALL 3D printers have issues.
-
TMeeks
- Posts: 37
- Joined: Thu Jan 24, 2019 12:04 am
- Location: Chantilly, VA
- Contact:
UPDATE: Polyimide change did not help
Post
by TMeeks » Tue Jan 29, 2019 8:18 am
What I did:
Working on the theory that the bed clips may be shorting the heater board, I replaced the Polyimide tape with new tape and doubled the layers on the underside where the clips might touch. I also went back to the original clips.
Outcome:
Sadly, while it initially seemed to work, the error showed up again. At least this rules out the clips shorting something as a cause.
At this point, it appear that it could be one of three things:
- Bed Heater
GT2560 V3.0 board
Cable harness
Unfortunately, this happened in the middle of the Chinese New Year, so it may be difficult to get replacement parts quickly.
Fortunately, however, we have another unboxed A10. So we will raid that one for parts. We’ll first swap out the bed heater and if that does not work we will swap out the GT2560 V3.0 and, finally, the harness so that we can try to pin down the culprit.
The other good news is that we have 3 more A10 printers on the way; but, probably not until after the Chinese New Year. This will allow us to see how things go over several printers.
-
_kaktus_
- Site Admin
- Posts: 1260
- Joined: Fri Dec 15, 2017 10:06 pm
- Location: PL
- Contact:
Re: err: MINTEMP BED
Post
by _kaktus_ » Wed Jan 30, 2019 12:12 am
Hello.
Very good deduction. ![]()
Do one test.
Disconnect the thermistor and check the temperature indication on the display.
Perhaps, as you wrote in your deliberations, the culprit is a poor quality connection, in a measuring electrical circuit.
On the forum I help to use the rod, I don’t give fish.
Geeetech Prusa I3 M201 Dual extruder Mixcolor 3D printer, bought 2017-12-19, already built, in the cognitive and improvement phase
Geeetech filament, ABS only
Geeetech 3D WiFi Module for 3D Printer, bought 2018-04-15, He got a new life, and still lies in a drawer.
Positively frenzied customer of Getech Technology.
-
TMeeks
- Posts: 37
- Joined: Thu Jan 24, 2019 12:04 am
- Location: Chantilly, VA
- Contact:
Re: err: MINTEMP BED
Post
by TMeeks » Wed Jan 30, 2019 11:08 am
Hi _Kaktus_,
I have really appreciated reading your posts not only to myself; but, everyone. You are very valuable around here.
Once I found that I could still function by disconnecting the heated bed altogether I decided against raiding the other printer. And, can simply wait for the end of the Chinese New Year and order some extra parts.
In the meantime, I want to try to work on getting the smoothest print out of the printer. I have what appears to be a slight Z-Axis wobble that I believe was NOT there earlier. I think I failed to tighten some of the rollers when I adjusted them. I am actually happy when these things come up because it helps me to help our teachers later when I am able to identify and solve issues.
Our A20M is suppose to arrive tomorrow. And, we have the A10 that has yet to be built. This is a good start for our teachers when they arrive for training next week. Even the fact that my heated bed is not working will allow them to see how to keep printing should the same thing happen to them.
As soon as the Geeetech staff is back from holiday, I will order the backup parts and follow your advice. Thanks!
-
soularb
- Posts: 1
- Joined: Mon Aug 12, 2019 7:12 am
Re: err: MINTEMP BED
Post
by soularb » Mon Aug 12, 2019 9:00 am
Hi how are you? I have exactly the same problem, what did you do to fix it
-
William
- Site Admin
- Posts: 6340
- Joined: Tue Jun 07, 2016 9:38 am
Re: err: MINTEMP BED
Post
by William » Mon Aug 12, 2019 9:40 am
soularb wrote: ↑
Mon Aug 12, 2019 9:00 am
Hi how are you? I have exactly the same problem, what did you do to fix it
Hi, When you turn on the printer and the temperature is as shown above,
You can check if your hot bed line is fully connected to the motherboard.
The resistance of the hot bed is then measured and the hot bed may need to be replaced.
I hope this can help you.
-Keep your mind and try to test it. ![]()
-Everything will be fun!-Support all Getech printer.
-You can ask me the questions and I will kindly reply.
-Respect others is the best way you can get help!
Tevo Tarantula mintemp error
Heya guys,
I’ll keep it short and simple. Up until a while ago I had no issue with my printer, sadly it prompted the ‘MINTEMP ERROR’ all of a sudden.
Google tells me to check my cables (done that, no issues) and if that doesn’t work, use a fan to start the heat up (because apparently the MINTEMP means it’s too cold to boot up, which is kind of weird because my house is a solid consistent 21°C).
Does anyone know of a longer lasting fix?
The MINTEMP error (written sometimes as min temp) occurs when the temperature readout from the heatbed thermistor or hotend thermistor drops below a certain amount within a certain time frame. It is a safety feature that prevents the printer from overheating in case of a faulty thermistor because, by default, the printer is set to balance out any heat loss by pumping more power into the heat bed or hotend heater cartridge.
WARNING: The temperature limits triggering the MINTEMP were set after rigorous testing. Adjusting them is NOT RECOMMENDED and might lead to damage to the printer and a possible fire hazard!
MK2/S & MK2.5/S
Due to the hardware design of the MiniRAMBo and accounting for manufacturing tolerances, there is a temperature below which the thermistors are unable to read reliable values:
- Hotend thermistor — temperatures below 22 °C (71.6 °F)
- Heatbed thermistor — temperatures below 15 °C (59 °F)
For safety reasons, the MINTEMP error is triggered in case the measured temperatures are below these limits. This is for the firmware to accurately detect a damaged or disconnected thermistor. For a technical explanation of this limitation, please see this Github issue.
MK3 & MK3S & MK3S+
The EinsyRambo board of the MK3/S/+ was allowed by its improved thermistor circuitry design to have a wider range of scale when it comes to temperature (thermistor) readings. It also has an onboard thermistor for ambient temperature. This has allowed the firmware to allow for a lower temperature threshold than on the previous generation (MiniRAMBo).
- Hotend thermistor — temperatures below 10 °C (50 °F)
- Heatbed thermistor — temperatures below 10 °C (50 °F)
Also, printing in very cold environments, outside of the recommended operational temperature, can have negative effects due to other factors than the printer’s electronics, like material properties.
A completely disconnected heatbed/hotend thermistor will give the reading 0°C on the MK3/S/+
What does it look like?
When one of the thermistor cables is broken, it can be observed when the temperature on the LCD screen starts randomly jumping up and down during the Y-axis or X-axis movement.
It is important to distinguish between the MINTEMP error and the MINTEMP BED error.
 |
 |
|
MINTEMP — problem with the hotend temperature readout. |
MINTEMP BED — problem with the heatbed temperature readout. |
This error can be caused by a simple glitch or a gust of breeze. The LCD displays «MINTEMP fixed» and you just need to restart the printer by pressing the X button, under the knob. However, if reoccurring, it indicates an intermittent break in the thermistor wire.
MINTEMP HOTEND/BED fixed
If the cable regains a proper connection and a correct reading from the thermistor, the printer will update the error to «MINTEMP fixed» or «MINTEMP fixed», followed by «Please restart». This does not mean the issue is permanently resolved. You should continue the troubleshooting described in this article.

Testing the thermistor
You can also test it with a multimeter (our article Multimeter usage can guide you). If it fails to read the resistance on the metal inserts in the jumper connectors, then the wire is broken. At room temperature, it should have a resistance you can expect resistance of 80 kΩ — 125 kΩ.
RAMBo board connector
That the RAMBo is the cause is highly unlikely, as the board would not pass the final testing that we do in our factory. However, try switching the Hotend and Heatbed thermistors on the board (both have 3 pins), if the MINTEMP does not turn into MINTEMP BED or if the MINTEMP BED does not turn into MINTEMP, the electronics board connector is broken and a new board is needed. You should also notice the temperature reading on the LCD change.
To find the thermistor see Mini RAMBo electronics wiring (MK2S, MK2.5, MK2.5S) or Einsy RAMBo electronics wiring (MK3/MK3S/MK3S+), depending on your printer.
Wiggle it!
If you do not have a multimeter, a good way to test the cable of the thermistor is to simply wiggle it. Pre-heat to PLA (215/60) and move the extruder or bed by hand, all the way to the end of each side. See if there is any great change in temperature-reading on the LCD (tens of degrees or zeroing out).
Grab the textile sleeve and manipulate and wiggle it, again checking if there is any change in temperature. If there is, it indicates a microfracture of the cable when the connection changes depending on orientation. You then need to replace the thermistor.
How to fix it
For pre-assembled printer owners: If you happen to receive the printer during winter and you want to start using it out of the box, wait until it reaches room temperature.
Temperature
Make sure the temperature of the room where you operate the printer is not below 20 ° C (happens easily if you keep the printer in a basement during winter). Also make sure the printer is not placed next to an opened window, air conditioning, or in a way of a breeze that might cause a sudden temperature fluctuation.
If the issue is only caused by the ambient temperature of the room, you can use a hairdryer on the bed / hotend until it reaches a temperature above 18C to initiate a print. However, some materials, like ASA / ABS, may misbehave if printed in a cold ambient temperature without an enclosure.
Glitch
As mentioned above, the error might have been triggered by a simple glitch. Try to reset your printer by pressing the X button under the knob and see if it will print afterward.
Thermistor connection
Check if the thermistor is properly connected to the RAMBo board: there is a latch on the connector that needs to snap in place. To find the thermistor see Mini RAMBo electronics wiring (MK2S, MK2.5, MK2.5S) or Einsy RAMBo electronics wiring (MK3/MK3S/MK3S+), depending on your printer. Also, make sure the textile sleeve protection of the extruder cable bundle did not snap and that it is still protecting the cables, especially around the spot where they enter the electronics casing.
Hotend thermistor
At the other end of the hotend thermistor cable, inspect the wire where it goes into the heater block. This point is fragile and can get damaged.
Heat bed thermistor
As for the heat bed thermistor cable, make sure it is firmly attached to the underside of the heated bed with the golden Kapton tape. If not, try to press it back on. Make sure that the thermistor cable has some slack, as shown in the right picture below. It is also important that it is not being pinched by the printed cable cover when put together. This is so it won’t be worn down by the movement of the bed.
Replacement
In case there is visible damage on the cable, or if it behaves erratically, the thermistor must be replaced. You can follow our guides How to replace a heatbed thermistor (MK3S+/MK3S/MK2.5S/MK2S) or How to replace a hotend thermistor (MK2S).
Я использую «Pretty PETG» вместе с последовательным режимом печати PrusaSlicer.
Что я замечаю, так это то, что после завершения первой печати принтер попадает в столMINTEMP . Я не уверен, что это произойдет немедленно, потому что я позволил отпечаткам работать всю ночь, но предполагаю, что стол остынет, а затем произойдет ошибка.
Я только начинаю изучать G-код, и моя первоначальная мысль была о том, что есть ошибочная инструкция по температуре стола, но единственные инструкции M140 S0, которые я вижу, находятся в end_gcode и в нижней части файла. Может быть, в G-коде есть goto, который может работать после M140 S0, что затем вызывает проблему СТОЛА MINTEMP? Может быть, происходит что-то еще?
, 👍1
Обсуждение
2 ответа
Лучший ответ:
Минимальная температура рабочего стола определяется в файле конфигурации, например:
#define BED_MINTEMP 5
Если отображается ошибка, это означает, что измеряемая температура падает ниже этого уровня.
То, что я замечаю, это то, что по окончании первой печати
Это может намекнуть на неисправный разъем теплового стола, где соединение теряется, потому что стол перемещается в конечные положения (трудно сказать, не видя конечного G-кода).
В принципе, у вас может быть соединение с настольным термистором, который периодически выходит из строя, или плохой настольный термистор. Если соединение потеряно, температура по умолчанию равна 0 °C или ниже.
16 сен 20,
@0scar
Скорее всего, это аппаратная проблема, а именно кабель термистора теплового стола.
Чтобы подтвердить это как первопричину, вот что вы можете попробовать
- Перезагрузите принтер
- Переместите ось y вокруг, чтобы убедиться, что есть свобода движения на обоих концах
- Раскачайте кабель термистора в нескольких направлениях в нескольких точках кабеля
Если вы нажмете BED MINTEMP или BED_MINTEMP fixed, то вы нашли угол/положение кабеля, который вызывает проблему. Возможно, вам придется заменить кабель.
Проблема также может возникнуть при соединении с Einsey. Если обернутый кабель, идущий в Einsey, перемещен, соединение может быть неисправным.
- Заземли себя
- Откройте Einsy
- Заземли себя
- Перезагрузите принтер
- Джиггер связь с Эйнзи
Если вы нажмете BED MINTEMP или BED_MINTEMP fixed, то соединение будет плохим. Попробуйте отсоединить и снова подсоединить кабель. Посмотрите на разъемы с обеих сторон, чтобы попытаться определить, является ли источник кабелем или Einsey. Возможно, вам придется заменить кабель или отремонтировать разъем Einsey.
18 сен 20,
@wonton
There are errors that you can experience with your 3D printer that you’ll want to learn how to fix. I decided to write an article that shows users how they can finally fix some 3D printing errors.
Keep on reading through this article for the details behind fixing these 3D printing error issues.
The Mintemp error in 3D printers is a design feature within your firmware for safety in regard to temperature. When below a set temperature, the heater will be switched off due to possibly having a broken thermistor wire.
This happens because when the temperature from the thermistor is cold, it assumes that your thermocouple has disconnected, so the print should begin.
If you are using Marlin as your firmware, it’s even possible to create a custom MINTEMP value.
Here are some ways to fix the MINTEMP error in a 3D printer:
- Go to a warmer environment or heat up manually
- Ensure wires are connected properly
- Replace your thermistor
Go to a Warmer Environment or Heat Up Manually
One common reason behind getting the MINTEMP error is from being in a cold environment, especially in winter months. Your 3D printer is designed to have a minimum temperature that it can operate in as a safety feature.
One user was working in his garage where the temperature was really cold, to the point where it was under the minimum temperature set in the firmware for the 3D printer. This led to the MINTEMP error, so he ended up fixing it by putting a heat lamp over the bed.
This also could be fixed by going to warmer environment.
Many users have discovered that it was the weather that was causing the issue rather than other things. Some people thought they had to take their 3D printer apart, but it was this simple reason.
He suggested to use a hairdryer or a hot water bottle. He mentioned that the magic number for this was around 5°C, with the bed and the hotend. You can hover the nozzle above the heat source as well to bring it up to temperature.
After that, you’ll be able to properly pre-heat your 3D printer the usual way. You may have to turn your 3D printer off and on if you leave it on to heat up a little from the power source.
The video below shows that process to fix the error using this method.
Ensure Wires Are Connected & Screws Tightened
Another way to fix this error is to make sure your thermistor wires are properly seated and connected in your hotend. Sometimes you can get wires that tangle and don’t plug in properly.
One user who was getting the MINTEMP noticed a bit of silver at the plane where the thermistor wires plug into the fitting. He pushed the wire back in and solved the issue.
Another user who was printing with his Ender 3 started getting the error every so often. It would pause the print, then restarting the printer would fix the issue temporarily.
He found that as the hotend was traveling, it would move to a certain point where the connection of the sensor would fail to make contact. He fixed this issue by tightening up a screw that was slightly loose, leading to a better attachment.
You can see the connection in the image below.
Replace Your Thermistor
If none of the above fixes work, your thermistor is probably broken.
Here’s how to test a broken thermistor:
- Put a multimeter on it and have a reading of 100ohms at room temperature (if it’s a 100ohm thermistor)
- Apply heat to the thermistor with a heater, blow-dryer or other heating device
- The resistance should decline steadily in seconds if it works. If not, replace it.
You can also switch your hotend thermistor with your heated bed’s thermistor to see if that stops the error.
One user found out that his thermistor had the wires fail due to getting bent back and forth each time it moved in the X direction. He had to replace the thermistor and give proper strain relief to the wires, resulting in the issue being fixed.
You can go with something like the Creality 3D Printer NTC Thermistor Temp Sensor from Amazon. You can use it for both the bed and hotend, and it has an accuracy of ±1%.
Many users who bought this have had success with it, saying it’s easy to fit and works just as good as the original. It’s always good to have spare thermistors on hand since they are quite thin wires that can break easily.

![]()
Check out the video below to learn how to install a thermistor.
CHEP made a video on fixing this error that you can check out.
How to Fix 3D Printer MAXTEMP Error
The most common reason of MAXTEMP Error is that the thermistor is not functioning properly or it has been completely damaged.
Here are some methods to fix the MAXTEMP error:
- Loosening the bolt on the hotend
- Getting a new thermistor
- Ensuring neat wire connections
- Replacing the motherboard
Loosening the Bolt on the Hotend
There is a bolt in the hotend. If it is too tight, you will see MAXTEMP Error. To solve this issue, loosen that bolt. Be careful while loosening the bolt because wires around it are very thin and sensitive.
The screw doesn’t have to be very tight, only until it gets some resistance while tightening it up, so basically finger tight.
Get a New Thermistor
A lot of people who got the MAXTEMP error fixed their issue by simply replacing their thermistor, since their previous one was failing. They can break easily as previously mentioned, so try replacing it if you’ve tried other fixes but still get an error.
Again, you can go with the Creality 3D Printer NTC Thermistor Temp Sensor from Amazon. You can use it for both the bed and hotend, and it has an accuracy of ±1%.
![]()
Replace the Motherboard
Another reason for the MAXTEMP Error can be short-circuiting of the motherboard. If there is a problem with your motherboard, you might need to get a new one. A recommended motherboard for 3D Printer is SKR Mini. It is cheap and a suitable alternative.
One user who was getting the MAXTEMP : E1 error had an Ender 3 with the stock firmware on a 4.2.2 board but it was faulty. They ended up replacing the board but the next was also faulty. It required buying a new 4.2.7 board from a different vendor to fix this error.
He then flashes the Ender 3 firmware since it came preloaded with Ender 3 Pro firmware it started working perfectly.
Here’s a video on how to swap out a motherboard.
Another user also fixed this issue by replacing the motherboard. They think it happened due to the thermistor wires melting together and shorting each other out, leading to damage to the motherboard.
How to Fix 3D Printer Err: Too far!
Here are some methods to fix the Too Far Error:
- Keep offsets inside the distance limit
- Power cycling
Keep Offsets Inside the Distance Limit
The firmware has a maximum distance set for the offsets (20mm for the Ender 3). If you try to save the offsets outside this limit, you will get the Err: Too far! message.
So, make sure to save offsets inside the distance limit.
You can adjust your offset either in your 3D printer’s firmware through the control screen, or through your slicer software. One user said the method that worked for him was to do it through the 3D printer’s control screen.
To do this, go to Controls, select bed leveling and then probe Z-ffset. This method solved the problem for the user.
Keep in mind that your Z-offset should be saved. Also make sure that SD card is inserted because EEPROM is saved in that card.
Power Cycling
It has been seen that some users who got Too Far Error while printing, tried power cycling and it worked for them. This can be simply turning the power off and on.
You may also want to turn it off at the switch and disconnect the power supply cable, then re-insert the cable and power on the plug, then turn the 3D printer back on.
I just got my HICTOP Prusa i3 Aluminium frame printer and finished putting it together. After setting it to preheat, I realized the bed was not level — I adjusted it and accidentally caused the head to crash into the bed.
It sounded like something popped, and the printer restarted. It is now showing a MINTEMP error message, and both bed and hotend temperatures read 0°C.
The only visible damage is that a thin layer came off the printbed — After testing with a multimeter, I realized that the metal under this layer is connected to power. As both the bed and hotend were heating, I believe I may have caused a short.
Replacing the thermistor on the hotend with a spare did not solve the issue. I tested the thermistor on the printbed with a multimeter, and it seems to be working correctly (resistance value around ~200 kΩ at room temperature).
Which leads me to believe that I may have damaged the control board. What do I do?
Note: This is not a firmware problem as the printer was getting correct temperature readings before that. Also, I have a second extruder thermistor port that is unused. If I did damage my board, could I edit pins.h and configuration.h to use this port instead, and completely disconnect the heated printbed?
if your using the stock fan duct, then it sucks,
there are much better ones here. many people live the mistral 2.0, but me i just use the circular one (because the mistral wont fit the genuine e3d block)
now for PLA the heated bed is not required, it helps, but it is not required. For PETG it is pretty much required. and absolutely required for ABS
with that out of the way
there’s a 1 main thing that results in a mintemp: your temp drops by a set amount (as specified during compilation.)
nowto solve this first make sure the thermistor and heater cartridge are fully seated and the screw (or screws) have not come loose.
if thats good make sure the fan is not blowing directly on the nozzle, it should blow just below the nozzle.
if its blowing on the nozzle, disable the fan and print a duct (the one that came with the a8 sucks).
preferably out of a high temp filament (that means don’t use PLA)
ABS would be best as ABS requires no cooling, and cooling can make it fail, but yours will be disabled because its too high (so its dosent matter).
PETG likes fans, but may have sagging and stringing issues if you don’t use one
for ABS if you don’t have a enclosure use a sheet (plastic or fabric will work) i use a old shower curtain and 2 binder clips for mine (see attached)
-
Gérard P.
- Posts: 4
- Joined: Tue Apr 11, 2017 9:11 pm
Err : MINTEMP — Prusa i3 X — Help needed
Good morning!
I finally endend building my first 3D printer, a Geeetech Prusa i3 X, and when I’m turning on, the LCD shows «Err : MINTEMP» with «0/0°» for the extruder, and room temp is OK.
Repetier-Host shows :
11:25:47.975 : Error:0
11:25:47.975 : : Extruder switched off. MINTEMP triggered !
11:25:47.976 : Error:Printer stopped due to errors. Fix the error and use M999 to restart. (Temperature is reset. Set it after restarting)
I understood that means something is wrong with the extruder’s thermistor or with the Control Board GT2560, and checked the wiring as explained in this forum : viewtopic.php?f=23&t=17030 . But nothing happened…
I used the MK8 extruder and control board in the box product. So it should be operational items!
I didn’t print anything yet. As the Geeetech Technincal Support doesn’t answer, I’m losing hope… I’m a newbie, but if you explain in detail, I will do my best!
Thanks for any answer!
Gérard P.
-
siam
- Posts: 16
- Joined: Mon Mar 06, 2017 11:37 pm
Re: Err : MINTEMP — Prusa i3 X — Help needed
Post
by siam » Mon Apr 17, 2017 10:57 pm
Hello,
maybee the screw from the sensor on the extruder is Too tight, and the line is interrupted ?
regards
andy
-
William
- Site Admin
- Posts: 6340
- Joined: Tue Jun 07, 2016 9:38 am
Re: Err : MINTEMP — Prusa i3 X — Help needed
Post
by William » Fri Apr 21, 2017 11:20 am
Gérard P. wrote:Good morning!
I finally endend building my first 3D printer, a Geeetech Prusa i3 X, and when I’m turning on, the LCD shows «Err : MINTEMP» with «0/0°» for the extruder, and room temp is OK.
Repetier-Host shows :
11:25:47.975 : Error:0
11:25:47.975 : : Extruder switched off. MINTEMP triggered !
11:25:47.976 : Error:Printer stopped due to errors. Fix the error and use M999 to restart. (Temperature is reset. Set it after restarting)I understood that means something is wrong with the extruder’s thermistor or with the Control Board GT2560, and checked the wiring as explained in this forum : http://www.geeetech.com/forum/viewtopic … 23&t=17030 . But nothing happened…
I used the MK8 extruder and control board in the box product. So it should be operational items!
I didn’t print anything yet. As the Geeetech Technincal Support doesn’t answer, I’m losing hope… I’m a newbie, but if you explain in detail, I will do my best!Thanks for any answer!
Gérard P.
Hi,there have some problems in the extruder’s thermistor,replacing with a new thermistor may help.
-Keep your mind and try to test it. ![]()
-Everything will be fun!-Support all Getech printer.
-You can ask me the questions and I will kindly reply.
-Respect others is the best way you can get help!
-
Gérard P.
- Posts: 4
- Joined: Tue Apr 11, 2017 9:11 pm
Re: Err : MINTEMP — Prusa i3 X — Help needed
Post
by Gérard P. » Mon Apr 24, 2017 12:17 am
Thank you so much, it works!
Well, I didn’t find the thermistor’s screw, only one which I couldn’t change anything
I unwraped the thermistor’s cables, and I figured out that, even if it was holded by a metal ring, the both sides of the thermistor weren’t reaching its cables. It wasn’t easy to see… So, now, it is reaching the cables, and my printer shows «PI3 Pro X ready». Yay! ![]()
One last question : I unwraped the cables by using a box cutter, so the cables aren’t protected anymore from heat. I used strong glue, but it was obvious that it would melt… What could I use to protect it?
Thanks, again, for the previous answers!
Gérard P.
-
William
- Site Admin
- Posts: 6340
- Joined: Tue Jun 07, 2016 9:38 am
Re: Err : MINTEMP — Prusa i3 X — Help needed
Post
by William » Tue Apr 25, 2017 6:23 pm
Gérard P. wrote:Thank you so much, it works!
Well, I didn’t find the thermistor’s screw, only one which I couldn’t change anything
I unwraped the thermistor’s cables, and I figured out that, even if it was holded by a metal ring, the both sides of the thermistor weren’t reaching its cables. It wasn’t easy to see… So, now, it is reaching the cables, and my printer shows «PI3 Pro X ready». Yay!One last question : I unwraped the cables by using a box cutter, so the cables aren’t protected anymore from heat. I used strong glue, but it was obvious that it would melt… What could I use to protect it?
Thanks, again, for the previous answers!
Gérard P.
Hi,you can use Electrical tape to protect the cables.
-Keep your mind and try to test it. ![]()
-Everything will be fun!-Support all Getech printer.
-You can ask me the questions and I will kindly reply.
-Respect others is the best way you can get help!
-
nibir
- Posts: 1
- Joined: Thu May 27, 2021 3:08 pm
Re: Err : MINTEMP — Prusa i3 X — Help needed
Post
by nibir » Thu May 27, 2021 3:09 pm
It is happening because of the sensors on the machine. Check out all the sensors on the machine because something is still covering on top essay writing services can provide you assistance if you will not be able to resolve near your area.
The MINTEMP error (written sometimes as min temp) occurs when the temperature readout from the heatbed thermistor or hotend thermistor drops below a certain amount within a certain time frame. It is a safety feature that prevents the printer from overheating in case of a faulty thermistor because, by default, the printer is set to balance out any heat loss by pumping more power into the heat bed or hotend heater cartridge.
WARNING: The temperature limits triggering the MINTEMP were set after rigorous testing. Adjusting them is NOT RECOMMENDED and might lead to damage to the printer and a possible fire hazard!
MK2/S & MK2.5/S
Due to the hardware design of the MiniRAMBo and accounting for manufacturing tolerances, there is a temperature below which the thermistors are unable to read reliable values:
- Hotend thermistor — temperatures below 22 °C (71.6 °F)
- Heatbed thermistor — temperatures below 15 °C (59 °F)
For safety reasons, the MINTEMP error is triggered in case the measured temperatures are below these limits. This is for the firmware to accurately detect a damaged or disconnected thermistor. For a technical explanation of this limitation, please see this Github issue.
MK3 & MK3S & MK3S+
The EinsyRambo board of the MK3/S/+ was allowed by its improved thermistor circuitry design to have a wider range of scale when it comes to temperature (thermistor) readings. It also has an onboard thermistor for ambient temperature. This has allowed the firmware to allow for a lower temperature threshold than on the previous generation (MiniRAMBo).
- Hotend thermistor — temperatures below 10 °C (50 °F)
- Heatbed thermistor — temperatures below 10 °C (50 °F)
Also, printing in very cold environments, outside of the recommended operational temperature, can have negative effects due to other factors than the printer’s electronics, like material properties.
A completely disconnected heatbed/hotend thermistor will give the reading 0°C on the MK3/S/+
What does it look like?
When one of the thermistor cables is broken, it can be observed when the temperature on the LCD screen starts randomly jumping up and down during the Y-axis or X-axis movement.
It is important to distinguish between the MINTEMP error and the MINTEMP BED error.
|
|
|
MINTEMP — problem with the hotend temperature readout. |
MINTEMP BED — problem with the heatbed temperature readout. |
This error can be caused by a simple glitch or a gust of breeze. The LCD displays «MINTEMP fixed» and you just need to restart the printer by pressing the X button, under the knob. However, if reoccurring, it indicates an intermittent break in the thermistor wire.
MINTEMP HOTEND/BED fixed
If the cable regains a proper connection and a correct reading from the thermistor, the printer will update the error to «MINTEMP fixed» or «MINTEMP fixed», followed by «Please restart». This does not mean the issue is permanently resolved. You should continue the troubleshooting described in this article.
Testing the thermistor
You can also test it with a multimeter (our article Multimeter usage can guide you). If it fails to read the resistance on the metal inserts in the jumper connectors, then the wire is broken. At room temperature, it should have a resistance you can expect resistance of 80 kΩ — 125 kΩ.
RAMBo board connector
That the RAMBo is the cause is highly unlikely, as the board would not pass the final testing that we do in our factory. However, try switching the Hotend and Heatbed thermistors on the board (both have 3 pins), if the MINTEMP does not turn into MINTEMP BED or if the MINTEMP BED does not turn into MINTEMP, the electronics board connector is broken and a new board is needed. You should also notice the temperature reading on the LCD change.
To find the thermistor see Mini RAMBo electronics wiring (MK2S, MK2.5, MK2.5S) or Einsy RAMBo electronics wiring (MK3/MK3S/MK3S+), depending on your printer.
Wiggle it!
If you do not have a multimeter, a good way to test the cable of the thermistor is to simply wiggle it. Pre-heat to PLA (215/60) and move the extruder or bed by hand, all the way to the end of each side. See if there is any great change in temperature-reading on the LCD (tens of degrees or zeroing out).
Grab the textile sleeve and manipulate and wiggle it, again checking if there is any change in temperature. If there is, it indicates a microfracture of the cable when the connection changes depending on orientation. You then need to replace the thermistor.
How to fix it
For pre-assembled printer owners: If you happen to receive the printer during winter and you want to start using it out of the box, wait until it reaches room temperature.
Temperature
Make sure the temperature of the room where you operate the printer is not below 20 ° C (happens easily if you keep the printer in a basement during winter). Also make sure the printer is not placed next to an opened window, air conditioning, or in a way of a breeze that might cause a sudden temperature fluctuation.
If the issue is only caused by the ambient temperature of the room, you can use a hairdryer on the bed / hotend until it reaches a temperature above 18C to initiate a print. However, some materials, like ASA / ABS, may misbehave if printed in a cold ambient temperature without an enclosure.
Glitch
As mentioned above, the error might have been triggered by a simple glitch. Try to reset your printer by pressing the X button under the knob and see if it will print afterward.
Thermistor connection
Check if the thermistor is properly connected to the RAMBo board: there is a latch on the connector that needs to snap in place. To find the thermistor see Mini RAMBo electronics wiring (MK2S, MK2.5, MK2.5S) or Einsy RAMBo electronics wiring (MK3/MK3S/MK3S+), depending on your printer. Also, make sure the textile sleeve protection of the extruder cable bundle did not snap and that it is still protecting the cables, especially around the spot where they enter the electronics casing.
Hotend thermistor
At the other end of the hotend thermistor cable, inspect the wire where it goes into the heater block. This point is fragile and can get damaged.
Heat bed thermistor
As for the heat bed thermistor cable, make sure it is firmly attached to the underside of the heated bed with the golden Kapton tape. If not, try to press it back on. Make sure that the thermistor cable has some slack, as shown in the right picture below. It is also important that it is not being pinched by the printed cable cover when put together. This is so it won’t be worn down by the movement of the bed.
Replacement
In case there is visible damage on the cable, or if it behaves erratically, the thermistor must be replaced. You can follow our guides How to replace a heatbed thermistor (MK3S+/MK3S/MK2.5S/MK2S) or How to replace a hotend thermistor (MK2S).
-
TMeeks
- Posts: 37
- Joined: Thu Jan 24, 2019 12:04 am
- Location: Chantilly, VA
- Contact:
err: MINTEMP BED
After printing very successfully for days an error popped up.
Err: MINTEMP BED
PRINTER HALTED
Please Reset
Until the error appears the D9 LED is on. Then it starts to blink and finally the D9 LED goes off and the error appears.
Another sign of the error is that the LCD reports -14 as the bed temperature.
…
…
- MinTemp Error.JPG (188.54 KiB) Viewed 7713 times
…
…
Any help will be appreciated. Fortunately, I have another A10 that is waiting to be built during our teacher training, so we’re not dead in the water. But, we need to know everything we can find to keep these printers up and running like we know they can perform when healthy.
Tom
UPDATE #1: After restarting several times. The after leaving it on for a bit, the -14 went away and it started showing the expected bed temperature. My first guess is that this either indicates a wiring issue or a bad thermistor.
UPDATE #2: With the LCD reporting Bed temperature as expected, a print was started. D9 glowed solidly as the bed reached 60C of 60C. The, as the nozzle started heating D9 blinked furiously until the nozzle temperature reached 210C of 260C. At the moment the bed started to move D9 went dark and the MINTEMP error popped up. From this it makes it all the more likely that the problem is at the bed end of the circuit and possible a cold solder joint.
-
TMeeks
- Posts: 37
- Joined: Thu Jan 24, 2019 12:04 am
- Location: Chantilly, VA
- Contact:
Re: err: MINTEMP BED
Post
by TMeeks » Tue Jan 29, 2019 3:33 am
I think I have narrowed down one path to follow in debugging the issue I’m having.
I am going out to buy some polyimide tape and clips to replace the ones I had tried previously, which I think are shorting through the existing tape.
I had tried some slightly smaller clips than those supplied with the printer and they were (1) a bit smaller and (2) uncoated. I will replace the existing tape holding the heater to the bed with new polyimide tape and try clips that are the same size and type as those that came with the printer.
To come to this conclusion, I had removed the bed and checked the solder joints and continuity through the wiring. I also tested the thermistor. I did not have a multimeter; but, did have a voltage/continuity meter. Continuity was fine.
But, I did notice some chafing of the tape from the clips. I’ll know in an hour or so when I put everything back together again.
Sometimes we are our own worst enemies when it comes to 3D printers. ![]()
![]()
But, this also points out the wisdom of putting together a «first aid» kit for our new printers that would include extra thermistors (bed & hot-end), polyimide tape and other accessories to help us get back up and running quickly should we need to do some quick repair. The beauty of the architecture of the A10 and A20 series is that every possible replacement part is available and access to parts is relatively easy. No matter what the final answer turns out to be the cause of this issue, it is clear that nothing we run into is permanent nor catastrophic in the long term. And, that makes these printers a very good investment from a price/performance point of view. And, that is our primary criteria for these printers in our system.
A lot of people may feel that a very low cost printer is going to be more trouble than the most expensive printers. In addition to needing a number of low cost printers, we are also considering a MarkForged Onyx Pro and possible Fusion3 F410 and Fuse1 to meet our educational goals for the at-risk students we serve. Based on all of our experience with every price level of 3D printers, I do not expect them to be any more free of issues than the A10s and A20s. ALL 3D printers have issues.
-
TMeeks
- Posts: 37
- Joined: Thu Jan 24, 2019 12:04 am
- Location: Chantilly, VA
- Contact:
UPDATE: Polyimide change did not help
Post
by TMeeks » Tue Jan 29, 2019 8:18 am
What I did:
Working on the theory that the bed clips may be shorting the heater board, I replaced the Polyimide tape with new tape and doubled the layers on the underside where the clips might touch. I also went back to the original clips.
Outcome:
Sadly, while it initially seemed to work, the error showed up again. At least this rules out the clips shorting something as a cause.
At this point, it appear that it could be one of three things:
- Bed Heater
GT2560 V3.0 board
Cable harness
Unfortunately, this happened in the middle of the Chinese New Year, so it may be difficult to get replacement parts quickly.
Fortunately, however, we have another unboxed A10. So we will raid that one for parts. We’ll first swap out the bed heater and if that does not work we will swap out the GT2560 V3.0 and, finally, the harness so that we can try to pin down the culprit.
The other good news is that we have 3 more A10 printers on the way; but, probably not until after the Chinese New Year. This will allow us to see how things go over several printers.
-
_kaktus_
- Site Admin
- Posts: 1260
- Joined: Fri Dec 15, 2017 10:06 pm
- Location: PL
- Contact:
Re: err: MINTEMP BED
Post
by _kaktus_ » Wed Jan 30, 2019 12:12 am
Hello.
Very good deduction. ![]()
Do one test.
Disconnect the thermistor and check the temperature indication on the display.
Perhaps, as you wrote in your deliberations, the culprit is a poor quality connection, in a measuring electrical circuit.
On the forum I help to use the rod, I don’t give fish.
Geeetech Prusa I3 M201 Dual extruder Mixcolor 3D printer, bought 2017-12-19, already built, in the cognitive and improvement phase
Geeetech filament, ABS only
Geeetech 3D WiFi Module for 3D Printer, bought 2018-04-15, He got a new life, and still lies in a drawer.
Positively frenzied customer of Getech Technology.
-
TMeeks
- Posts: 37
- Joined: Thu Jan 24, 2019 12:04 am
- Location: Chantilly, VA
- Contact:
Re: err: MINTEMP BED
Post
by TMeeks » Wed Jan 30, 2019 11:08 am
Hi _Kaktus_,
I have really appreciated reading your posts not only to myself; but, everyone. You are very valuable around here.
Once I found that I could still function by disconnecting the heated bed altogether I decided against raiding the other printer. And, can simply wait for the end of the Chinese New Year and order some extra parts.
In the meantime, I want to try to work on getting the smoothest print out of the printer. I have what appears to be a slight Z-Axis wobble that I believe was NOT there earlier. I think I failed to tighten some of the rollers when I adjusted them. I am actually happy when these things come up because it helps me to help our teachers later when I am able to identify and solve issues.
Our A20M is suppose to arrive tomorrow. And, we have the A10 that has yet to be built. This is a good start for our teachers when they arrive for training next week. Even the fact that my heated bed is not working will allow them to see how to keep printing should the same thing happen to them.
As soon as the Geeetech staff is back from holiday, I will order the backup parts and follow your advice. Thanks!
-
soularb
- Posts: 1
- Joined: Mon Aug 12, 2019 7:12 am
Re: err: MINTEMP BED
Post
by soularb » Mon Aug 12, 2019 9:00 am
Hi how are you? I have exactly the same problem, what did you do to fix it
-
William
- Site Admin
- Posts: 6340
- Joined: Tue Jun 07, 2016 9:38 am
Re: err: MINTEMP BED
Post
by William » Mon Aug 12, 2019 9:40 am
soularb wrote: ↑
Mon Aug 12, 2019 9:00 am
Hi how are you? I have exactly the same problem, what did you do to fix it
Hi, When you turn on the printer and the temperature is as shown above,
You can check if your hot bed line is fully connected to the motherboard.
The resistance of the hot bed is then measured and the hot bed may need to be replaced.
I hope this can help you.
-Keep your mind and try to test it. ![]()
-Everything will be fun!-Support all Getech printer.
-You can ask me the questions and I will kindly reply.
-Respect others is the best way you can get help!
The MINTEMP error (written sometimes as min temp) occurs when the temperature readout from the heatbed thermistor or hotend thermistor drops below a certain amount within a certain time frame. It is a safety feature that prevents the printer from overheating in case of a faulty thermistor because, by default, the printer is set to balance out any heat loss by pumping more power into the heat bed or hotend heater cartridge.
WARNING: The temperature limits triggering the MINTEMP were set after rigorous testing. Adjusting them is NOT RECOMMENDED and might lead to damage to the printer and a possible fire hazard!
MK2/S & MK2.5/S
Due to the hardware design of the MiniRAMBo and accounting for manufacturing tolerances, there is a temperature below which the thermistors are unable to read reliable values:
- Hotend thermistor — temperatures below 22 °C (71.6 °F)
- Heatbed thermistor — temperatures below 15 °C (59 °F)
For safety reasons, the MINTEMP error is triggered in case the measured temperatures are below these limits. This is for the firmware to accurately detect a damaged or disconnected thermistor. For a technical explanation of this limitation, please see this Github issue.
MK3 & MK3S & MK3S+
The EinsyRambo board of the MK3/S/+ was allowed by its improved thermistor circuitry design to have a wider range of scale when it comes to temperature (thermistor) readings. It also has an onboard thermistor for ambient temperature. This has allowed the firmware to allow for a lower temperature threshold than on the previous generation (MiniRAMBo).
- Hotend thermistor — temperatures below 10 °C (50 °F)
- Heatbed thermistor — temperatures below 10 °C (50 °F)
Also, printing in very cold environments, outside of the recommended operational temperature, can have negative effects due to other factors than the printer’s electronics, like material properties.
A completely disconnected heatbed/hotend thermistor will give the reading 0°C on the MK3/S/+
What does it look like?
When one of the thermistor cables is broken, it can be observed when the temperature on the LCD screen starts randomly jumping up and down during the Y-axis or X-axis movement.
It is important to distinguish between the MINTEMP error and the MINTEMP BED error.
|
|
|
MINTEMP — problem with the hotend temperature readout. |
MINTEMP BED — problem with the heatbed temperature readout. |
This error can be caused by a simple glitch or a gust of breeze. The LCD displays «MINTEMP fixed» and you just need to restart the printer by pressing the X button, under the knob. However, if reoccurring, it indicates an intermittent break in the thermistor wire.
MINTEMP HOTEND/BED fixed
If the cable regains a proper connection and a correct reading from the thermistor, the printer will update the error to «MINTEMP fixed» or «MINTEMP fixed», followed by «Please restart». This does not mean the issue is permanently resolved. You should continue the troubleshooting described in this article.
Testing the thermistor
You can also test it with a multimeter (our article Multimeter usage can guide you). If it fails to read the resistance on the metal inserts in the jumper connectors, then the wire is broken. At room temperature, it should have a resistance you can expect resistance of 80 kΩ — 125 kΩ.
RAMBo board connector
That the RAMBo is the cause is highly unlikely, as the board would not pass the final testing that we do in our factory. However, try switching the Hotend and Heatbed thermistors on the board (both have 3 pins), if the MINTEMP does not turn into MINTEMP BED or if the MINTEMP BED does not turn into MINTEMP, the electronics board connector is broken and a new board is needed. You should also notice the temperature reading on the LCD change.
To find the thermistor see Mini RAMBo electronics wiring (MK2S, MK2.5, MK2.5S) or Einsy RAMBo electronics wiring (MK3/MK3S/MK3S+), depending on your printer.
Wiggle it!
If you do not have a multimeter, a good way to test the cable of the thermistor is to simply wiggle it. Pre-heat to PLA (215/60) and move the extruder or bed by hand, all the way to the end of each side. See if there is any great change in temperature-reading on the LCD (tens of degrees or zeroing out).
Grab the textile sleeve and manipulate and wiggle it, again checking if there is any change in temperature. If there is, it indicates a microfracture of the cable when the connection changes depending on orientation. You then need to replace the thermistor.
How to fix it
For pre-assembled printer owners: If you happen to receive the printer during winter and you want to start using it out of the box, wait until it reaches room temperature.
Temperature
Make sure the temperature of the room where you operate the printer is not below 20 ° C (happens easily if you keep the printer in a basement during winter). Also make sure the printer is not placed next to an opened window, air conditioning, or in a way of a breeze that might cause a sudden temperature fluctuation.
If the issue is only caused by the ambient temperature of the room, you can use a hairdryer on the bed / hotend until it reaches a temperature above 18C to initiate a print. However, some materials, like ASA / ABS, may misbehave if printed in a cold ambient temperature without an enclosure.
Glitch
As mentioned above, the error might have been triggered by a simple glitch. Try to reset your printer by pressing the X button under the knob and see if it will print afterward.
Thermistor connection
Check if the thermistor is properly connected to the RAMBo board: there is a latch on the connector that needs to snap in place. To find the thermistor see Mini RAMBo electronics wiring (MK2S, MK2.5, MK2.5S) or Einsy RAMBo electronics wiring (MK3/MK3S/MK3S+), depending on your printer. Also, make sure the textile sleeve protection of the extruder cable bundle did not snap and that it is still protecting the cables, especially around the spot where they enter the electronics casing.
Hotend thermistor
At the other end of the hotend thermistor cable, inspect the wire where it goes into the heater block. This point is fragile and can get damaged.
Heat bed thermistor
As for the heat bed thermistor cable, make sure it is firmly attached to the underside of the heated bed with the golden Kapton tape. If not, try to press it back on. Make sure that the thermistor cable has some slack, as shown in the right picture below. It is also important that it is not being pinched by the printed cable cover when put together. This is so it won’t be worn down by the movement of the bed.
Replacement
In case there is visible damage on the cable, or if it behaves erratically, the thermistor must be replaced. You can follow our guides How to replace a heatbed thermistor (MK3S+/MK3S/MK2.5S/MK2S) or How to replace a hotend thermistor (MK2S).
Я использую «Pretty PETG» вместе с последовательным режимом печати PrusaSlicer.
Что я замечаю, так это то, что после завершения первой печати принтер попадает в столMINTEMP . Я не уверен, что это произойдет немедленно, потому что я позволил отпечаткам работать всю ночь, но предполагаю, что стол остынет, а затем произойдет ошибка.
Я только начинаю изучать G-код, и моя первоначальная мысль была о том, что есть ошибочная инструкция по температуре стола, но единственные инструкции M140 S0, которые я вижу, находятся в end_gcode и в нижней части файла. Может быть, в G-коде есть goto, который может работать после M140 S0, что затем вызывает проблему СТОЛА MINTEMP? Может быть, происходит что-то еще?
, 👍1
Обсуждение
2 ответа
Лучший ответ:
Минимальная температура рабочего стола определяется в файле конфигурации, например:
#define BED_MINTEMP 5
Если отображается ошибка, это означает, что измеряемая температура падает ниже этого уровня.
То, что я замечаю, это то, что по окончании первой печати
Это может намекнуть на неисправный разъем теплового стола, где соединение теряется, потому что стол перемещается в конечные положения (трудно сказать, не видя конечного G-кода).
В принципе, у вас может быть соединение с настольным термистором, который периодически выходит из строя, или плохой настольный термистор. Если соединение потеряно, температура по умолчанию равна 0 °C или ниже.
16 сен 20,
@0scar
Скорее всего, это аппаратная проблема, а именно кабель термистора теплового стола.
Чтобы подтвердить это как первопричину, вот что вы можете попробовать
- Перезагрузите принтер
- Переместите ось y вокруг, чтобы убедиться, что есть свобода движения на обоих концах
- Раскачайте кабель термистора в нескольких направлениях в нескольких точках кабеля
Если вы нажмете BED MINTEMP или BED_MINTEMP fixed, то вы нашли угол/положение кабеля, который вызывает проблему. Возможно, вам придется заменить кабель.
Проблема также может возникнуть при соединении с Einsey. Если обернутый кабель, идущий в Einsey, перемещен, соединение может быть неисправным.
- Заземли себя
- Откройте Einsy
- Заземли себя
- Перезагрузите принтер
- Джиггер связь с Эйнзи
Если вы нажмете BED MINTEMP или BED_MINTEMP fixed, то соединение будет плохим. Попробуйте отсоединить и снова подсоединить кабель. Посмотрите на разъемы с обеих сторон, чтобы попытаться определить, является ли источник кабелем или Einsey. Возможно, вам придется заменить кабель или отремонтировать разъем Einsey.
18 сен 20,
@wonton
There are errors that you can experience with your 3D printer that you’ll want to learn how to fix. I decided to write an article that shows users how they can finally fix some 3D printing errors.
Keep on reading through this article for the details behind fixing these 3D printing error issues.
The Mintemp error in 3D printers is a design feature within your firmware for safety in regard to temperature. When below a set temperature, the heater will be switched off due to possibly having a broken thermistor wire.
This happens because when the temperature from the thermistor is cold, it assumes that your thermocouple has disconnected, so the print should begin.
If you are using Marlin as your firmware, it’s even possible to create a custom MINTEMP value.
Here are some ways to fix the MINTEMP error in a 3D printer:
- Go to a warmer environment or heat up manually
- Ensure wires are connected properly
- Replace your thermistor
Go to a Warmer Environment or Heat Up Manually
One common reason behind getting the MINTEMP error is from being in a cold environment, especially in winter months. Your 3D printer is designed to have a minimum temperature that it can operate in as a safety feature.
One user was working in his garage where the temperature was really cold, to the point where it was under the minimum temperature set in the firmware for the 3D printer. This led to the MINTEMP error, so he ended up fixing it by putting a heat lamp over the bed.
This also could be fixed by going to warmer environment.
Many users have discovered that it was the weather that was causing the issue rather than other things. Some people thought they had to take their 3D printer apart, but it was this simple reason.
He suggested to use a hairdryer or a hot water bottle. He mentioned that the magic number for this was around 5°C, with the bed and the hotend. You can hover the nozzle above the heat source as well to bring it up to temperature.
After that, you’ll be able to properly pre-heat your 3D printer the usual way. You may have to turn your 3D printer off and on if you leave it on to heat up a little from the power source.
The video below shows that process to fix the error using this method.
Ensure Wires Are Connected & Screws Tightened
Another way to fix this error is to make sure your thermistor wires are properly seated and connected in your hotend. Sometimes you can get wires that tangle and don’t plug in properly.
One user who was getting the MINTEMP noticed a bit of silver at the plane where the thermistor wires plug into the fitting. He pushed the wire back in and solved the issue.
Another user who was printing with his Ender 3 started getting the error every so often. It would pause the print, then restarting the printer would fix the issue temporarily.
He found that as the hotend was traveling, it would move to a certain point where the connection of the sensor would fail to make contact. He fixed this issue by tightening up a screw that was slightly loose, leading to a better attachment.
You can see the connection in the image below.
Replace Your Thermistor
If none of the above fixes work, your thermistor is probably broken.
Here’s how to test a broken thermistor:
- Put a multimeter on it and have a reading of 100ohms at room temperature (if it’s a 100ohm thermistor)
- Apply heat to the thermistor with a heater, blow-dryer or other heating device
- The resistance should decline steadily in seconds if it works. If not, replace it.
You can also switch your hotend thermistor with your heated bed’s thermistor to see if that stops the error.
One user found out that his thermistor had the wires fail due to getting bent back and forth each time it moved in the X direction. He had to replace the thermistor and give proper strain relief to the wires, resulting in the issue being fixed.
You can go with something like the Creality 3D Printer NTC Thermistor Temp Sensor from Amazon. You can use it for both the bed and hotend, and it has an accuracy of ±1%.
Many users who bought this have had success with it, saying it’s easy to fit and works just as good as the original. It’s always good to have spare thermistors on hand since they are quite thin wires that can break easily.
![]()
Check out the video below to learn how to install a thermistor.
CHEP made a video on fixing this error that you can check out.
How to Fix 3D Printer MAXTEMP Error
The most common reason of MAXTEMP Error is that the thermistor is not functioning properly or it has been completely damaged.
Here are some methods to fix the MAXTEMP error:
- Loosening the bolt on the hotend
- Getting a new thermistor
- Ensuring neat wire connections
- Replacing the motherboard
Loosening the Bolt on the Hotend
There is a bolt in the hotend. If it is too tight, you will see MAXTEMP Error. To solve this issue, loosen that bolt. Be careful while loosening the bolt because wires around it are very thin and sensitive.
The screw doesn’t have to be very tight, only until it gets some resistance while tightening it up, so basically finger tight.
Get a New Thermistor
A lot of people who got the MAXTEMP error fixed their issue by simply replacing their thermistor, since their previous one was failing. They can break easily as previously mentioned, so try replacing it if you’ve tried other fixes but still get an error.
Again, you can go with the Creality 3D Printer NTC Thermistor Temp Sensor from Amazon. You can use it for both the bed and hotend, and it has an accuracy of ±1%.
![]()
Replace the Motherboard
Another reason for the MAXTEMP Error can be short-circuiting of the motherboard. If there is a problem with your motherboard, you might need to get a new one. A recommended motherboard for 3D Printer is SKR Mini. It is cheap and a suitable alternative.
One user who was getting the MAXTEMP : E1 error had an Ender 3 with the stock firmware on a 4.2.2 board but it was faulty. They ended up replacing the board but the next was also faulty. It required buying a new 4.2.7 board from a different vendor to fix this error.
He then flashes the Ender 3 firmware since it came preloaded with Ender 3 Pro firmware it started working perfectly.
Here’s a video on how to swap out a motherboard.
Another user also fixed this issue by replacing the motherboard. They think it happened due to the thermistor wires melting together and shorting each other out, leading to damage to the motherboard.
How to Fix 3D Printer Err: Too far!
Here are some methods to fix the Too Far Error:
- Keep offsets inside the distance limit
- Power cycling
Keep Offsets Inside the Distance Limit
The firmware has a maximum distance set for the offsets (20mm for the Ender 3). If you try to save the offsets outside this limit, you will get the Err: Too far! message.
So, make sure to save offsets inside the distance limit.
You can adjust your offset either in your 3D printer’s firmware through the control screen, or through your slicer software. One user said the method that worked for him was to do it through the 3D printer’s control screen.
To do this, go to Controls, select bed leveling and then probe Z-ffset. This method solved the problem for the user.
Keep in mind that your Z-offset should be saved. Also make sure that SD card is inserted because EEPROM is saved in that card.
Power Cycling
It has been seen that some users who got Too Far Error while printing, tried power cycling and it worked for them. This can be simply turning the power off and on.
You may also want to turn it off at the switch and disconnect the power supply cable, then re-insert the cable and power on the plug, then turn the 3D printer back on.
I just got my HICTOP Prusa i3 Aluminium frame printer and finished putting it together. After setting it to preheat, I realized the bed was not level — I adjusted it and accidentally caused the head to crash into the bed.
It sounded like something popped, and the printer restarted. It is now showing a MINTEMP error message, and both bed and hotend temperatures read 0°C.
The only visible damage is that a thin layer came off the printbed — After testing with a multimeter, I realized that the metal under this layer is connected to power. As both the bed and hotend were heating, I believe I may have caused a short.
Replacing the thermistor on the hotend with a spare did not solve the issue. I tested the thermistor on the printbed with a multimeter, and it seems to be working correctly (resistance value around ~200 kΩ at room temperature).
Which leads me to believe that I may have damaged the control board. What do I do?
Note: This is not a firmware problem as the printer was getting correct temperature readings before that. Also, I have a second extruder thermistor port that is unused. If I did damage my board, could I edit pins.h and configuration.h to use this port instead, and completely disconnect the heated printbed?
I just got my HICTOP Prusa i3 Aluminium frame printer and finished putting it together. After setting it to preheat, I realized the bed was not level — I adjusted it and accidentally caused the head to crash into the bed.
It sounded like something popped, and the printer restarted. It is now showing a MINTEMP error message, and both bed and hotend temperatures read 0°C.
The only visible damage is that a thin layer came off the printbed — After testing with a multimeter, I realized that the metal under this layer is connected to power. As both the bed and hotend were heating, I believe I may have caused a short.
Replacing the thermistor on the hotend with a spare did not solve the issue. I tested the thermistor on the printbed with a multimeter, and it seems to be working correctly (resistance value around ~200 kΩ at room temperature).
Which leads me to believe that I may have damaged the control board. What do I do?
Note: This is not a firmware problem as the printer was getting correct temperature readings before that. Also, I have a second extruder thermistor port that is unused. If I did damage my board, could I edit pins.h and configuration.h to use this port instead, and completely disconnect the heated printbed?
if your using the stock fan duct, then it sucks,
there are much better ones here. many people live the mistral 2.0, but me i just use the circular one (because the mistral wont fit the genuine e3d block)
now for PLA the heated bed is not required, it helps, but it is not required. For PETG it is pretty much required. and absolutely required for ABS
with that out of the way
there’s a 1 main thing that results in a mintemp: your temp drops by a set amount (as specified during compilation.)
nowto solve this first make sure the thermistor and heater cartridge are fully seated and the screw (or screws) have not come loose.
if thats good make sure the fan is not blowing directly on the nozzle, it should blow just below the nozzle.
if its blowing on the nozzle, disable the fan and print a duct (the one that came with the a8 sucks).
preferably out of a high temp filament (that means don’t use PLA)
ABS would be best as ABS requires no cooling, and cooling can make it fail, but yours will be disabled because its too high (so its dosent matter).
PETG likes fans, but may have sagging and stringing issues if you don’t use one
for ABS if you don’t have a enclosure use a sheet (plastic or fabric will work) i use a old shower curtain and 2 binder clips for mine (see attached)
-
Gérard P.
- Posts: 4
- Joined: Tue Apr 11, 2017 9:11 pm
Err : MINTEMP — Prusa i3 X — Help needed
Good morning!
I finally endend building my first 3D printer, a Geeetech Prusa i3 X, and when I’m turning on, the LCD shows «Err : MINTEMP» with «0/0°» for the extruder, and room temp is OK.
Repetier-Host shows :
11:25:47.975 : Error:0
11:25:47.975 : : Extruder switched off. MINTEMP triggered !
11:25:47.976 : Error:Printer stopped due to errors. Fix the error and use M999 to restart. (Temperature is reset. Set it after restarting)
I understood that means something is wrong with the extruder’s thermistor or with the Control Board GT2560, and checked the wiring as explained in this forum : viewtopic.php?f=23&t=17030 . But nothing happened…
I used the MK8 extruder and control board in the box product. So it should be operational items!
I didn’t print anything yet. As the Geeetech Technincal Support doesn’t answer, I’m losing hope… I’m a newbie, but if you explain in detail, I will do my best!
Thanks for any answer!
Gérard P.
-
siam
- Posts: 16
- Joined: Mon Mar 06, 2017 11:37 pm
Re: Err : MINTEMP — Prusa i3 X — Help needed
Post
by siam » Mon Apr 17, 2017 10:57 pm
Hello,
maybee the screw from the sensor on the extruder is Too tight, and the line is interrupted ?
regards
andy
-
William
- Site Admin
- Posts: 6340
- Joined: Tue Jun 07, 2016 9:38 am
Re: Err : MINTEMP — Prusa i3 X — Help needed
Post
by William » Fri Apr 21, 2017 11:20 am
Gérard P. wrote:Good morning!
I finally endend building my first 3D printer, a Geeetech Prusa i3 X, and when I’m turning on, the LCD shows «Err : MINTEMP» with «0/0°» for the extruder, and room temp is OK.
Repetier-Host shows :
11:25:47.975 : Error:0
11:25:47.975 : : Extruder switched off. MINTEMP triggered !
11:25:47.976 : Error:Printer stopped due to errors. Fix the error and use M999 to restart. (Temperature is reset. Set it after restarting)I understood that means something is wrong with the extruder’s thermistor or with the Control Board GT2560, and checked the wiring as explained in this forum : http://www.geeetech.com/forum/viewtopic … 23&t=17030 . But nothing happened…
I used the MK8 extruder and control board in the box product. So it should be operational items!
I didn’t print anything yet. As the Geeetech Technincal Support doesn’t answer, I’m losing hope… I’m a newbie, but if you explain in detail, I will do my best!Thanks for any answer!
Gérard P.
Hi,there have some problems in the extruder’s thermistor,replacing with a new thermistor may help.
-Keep your mind and try to test it. ![]()
-Everything will be fun!-Support all Getech printer.
-You can ask me the questions and I will kindly reply.
-Respect others is the best way you can get help!
-
Gérard P.
- Posts: 4
- Joined: Tue Apr 11, 2017 9:11 pm
Re: Err : MINTEMP — Prusa i3 X — Help needed
Post
by Gérard P. » Mon Apr 24, 2017 12:17 am
Thank you so much, it works!
Well, I didn’t find the thermistor’s screw, only one which I couldn’t change anything
I unwraped the thermistor’s cables, and I figured out that, even if it was holded by a metal ring, the both sides of the thermistor weren’t reaching its cables. It wasn’t easy to see… So, now, it is reaching the cables, and my printer shows «PI3 Pro X ready». Yay! ![]()
One last question : I unwraped the cables by using a box cutter, so the cables aren’t protected anymore from heat. I used strong glue, but it was obvious that it would melt… What could I use to protect it?
Thanks, again, for the previous answers!
Gérard P.
-
William
- Site Admin
- Posts: 6340
- Joined: Tue Jun 07, 2016 9:38 am
Re: Err : MINTEMP — Prusa i3 X — Help needed
Post
by William » Tue Apr 25, 2017 6:23 pm
Gérard P. wrote:Thank you so much, it works!
Well, I didn’t find the thermistor’s screw, only one which I couldn’t change anything
I unwraped the thermistor’s cables, and I figured out that, even if it was holded by a metal ring, the both sides of the thermistor weren’t reaching its cables. It wasn’t easy to see… So, now, it is reaching the cables, and my printer shows «PI3 Pro X ready». Yay!One last question : I unwraped the cables by using a box cutter, so the cables aren’t protected anymore from heat. I used strong glue, but it was obvious that it would melt… What could I use to protect it?
Thanks, again, for the previous answers!
Gérard P.
Hi,you can use Electrical tape to protect the cables.
-Keep your mind and try to test it. ![]()
-Everything will be fun!-Support all Getech printer.
-You can ask me the questions and I will kindly reply.
-Respect others is the best way you can get help!
-
nibir
- Posts: 1
- Joined: Thu May 27, 2021 3:08 pm
Re: Err : MINTEMP — Prusa i3 X — Help needed
Post
by nibir » Thu May 27, 2021 3:09 pm
It is happening because of the sensors on the machine. Check out all the sensors on the machine because something is still covering on top essay writing services can provide you assistance if you will not be able to resolve near your area.
Tevo Tarantula mintemp error
Heya guys,
I’ll keep it short and simple. Up until a while ago I had no issue with my printer, sadly it prompted the ‘MINTEMP ERROR’ all of a sudden.
Google tells me to check my cables (done that, no issues) and if that doesn’t work, use a fan to start the heat up (because apparently the MINTEMP means it’s too cold to boot up, which is kind of weird because my house is a solid consistent 21°C).
Does anyone know of a longer lasting fix?
There are errors that you can experience with your 3D printer that you’ll want to learn how to fix. I decided to write an article that shows users how they can finally fix some 3D printing errors.
Keep on reading through this article for the details behind fixing these 3D printing error issues.
The Mintemp error in 3D printers is a design feature within your firmware for safety in regard to temperature. When below a set temperature, the heater will be switched off due to possibly having a broken thermistor wire.
This happens because when the temperature from the thermistor is cold, it assumes that your thermocouple has disconnected, so the print should begin.
If you are using Marlin as your firmware, it’s even possible to create a custom MINTEMP value.
Here are some ways to fix the MINTEMP error in a 3D printer:
- Go to a warmer environment or heat up manually
- Ensure wires are connected properly
- Replace your thermistor
Go to a Warmer Environment or Heat Up Manually
One common reason behind getting the MINTEMP error is from being in a cold environment, especially in winter months. Your 3D printer is designed to have a minimum temperature that it can operate in as a safety feature.
One user was working in his garage where the temperature was really cold, to the point where it was under the minimum temperature set in the firmware for the 3D printer. This led to the MINTEMP error, so he ended up fixing it by putting a heat lamp over the bed.
This also could be fixed by going to warmer environment.
Many users have discovered that it was the weather that was causing the issue rather than other things. Some people thought they had to take their 3D printer apart, but it was this simple reason.
He suggested to use a hairdryer or a hot water bottle. He mentioned that the magic number for this was around 5°C, with the bed and the hotend. You can hover the nozzle above the heat source as well to bring it up to temperature.
After that, you’ll be able to properly pre-heat your 3D printer the usual way. You may have to turn your 3D printer off and on if you leave it on to heat up a little from the power source.
The video below shows that process to fix the error using this method.
Ensure Wires Are Connected & Screws Tightened
Another way to fix this error is to make sure your thermistor wires are properly seated and connected in your hotend. Sometimes you can get wires that tangle and don’t plug in properly.
One user who was getting the MINTEMP noticed a bit of silver at the plane where the thermistor wires plug into the fitting. He pushed the wire back in and solved the issue.
Another user who was printing with his Ender 3 started getting the error every so often. It would pause the print, then restarting the printer would fix the issue temporarily.
He found that as the hotend was traveling, it would move to a certain point where the connection of the sensor would fail to make contact. He fixed this issue by tightening up a screw that was slightly loose, leading to a better attachment.
You can see the connection in the image below.
Replace Your Thermistor
If none of the above fixes work, your thermistor is probably broken.
Here’s how to test a broken thermistor:
- Put a multimeter on it and have a reading of 100ohms at room temperature (if it’s a 100ohm thermistor)
- Apply heat to the thermistor with a heater, blow-dryer or other heating device
- The resistance should decline steadily in seconds if it works. If not, replace it.
You can also switch your hotend thermistor with your heated bed’s thermistor to see if that stops the error.
One user found out that his thermistor had the wires fail due to getting bent back and forth each time it moved in the X direction. He had to replace the thermistor and give proper strain relief to the wires, resulting in the issue being fixed.
You can go with something like the Creality 3D Printer NTC Thermistor Temp Sensor from Amazon. You can use it for both the bed and hotend, and it has an accuracy of ±1%.
Many users who bought this have had success with it, saying it’s easy to fit and works just as good as the original. It’s always good to have spare thermistors on hand since they are quite thin wires that can break easily.
![]()
Check out the video below to learn how to install a thermistor.
CHEP made a video on fixing this error that you can check out.
How to Fix 3D Printer MAXTEMP Error
The most common reason of MAXTEMP Error is that the thermistor is not functioning properly or it has been completely damaged.
Here are some methods to fix the MAXTEMP error:
- Loosening the bolt on the hotend
- Getting a new thermistor
- Ensuring neat wire connections
- Replacing the motherboard
Loosening the Bolt on the Hotend
There is a bolt in the hotend. If it is too tight, you will see MAXTEMP Error. To solve this issue, loosen that bolt. Be careful while loosening the bolt because wires around it are very thin and sensitive.
The screw doesn’t have to be very tight, only until it gets some resistance while tightening it up, so basically finger tight.
Get a New Thermistor
A lot of people who got the MAXTEMP error fixed their issue by simply replacing their thermistor, since their previous one was failing. They can break easily as previously mentioned, so try replacing it if you’ve tried other fixes but still get an error.
Again, you can go with the Creality 3D Printer NTC Thermistor Temp Sensor from Amazon. You can use it for both the bed and hotend, and it has an accuracy of ±1%.
![]()
Replace the Motherboard
Another reason for the MAXTEMP Error can be short-circuiting of the motherboard. If there is a problem with your motherboard, you might need to get a new one. A recommended motherboard for 3D Printer is SKR Mini. It is cheap and a suitable alternative.
One user who was getting the MAXTEMP : E1 error had an Ender 3 with the stock firmware on a 4.2.2 board but it was faulty. They ended up replacing the board but the next was also faulty. It required buying a new 4.2.7 board from a different vendor to fix this error.
He then flashes the Ender 3 firmware since it came preloaded with Ender 3 Pro firmware it started working perfectly.
Here’s a video on how to swap out a motherboard.
Another user also fixed this issue by replacing the motherboard. They think it happened due to the thermistor wires melting together and shorting each other out, leading to damage to the motherboard.
How to Fix 3D Printer Err: Too far!
Here are some methods to fix the Too Far Error:
- Keep offsets inside the distance limit
- Power cycling
Keep Offsets Inside the Distance Limit
The firmware has a maximum distance set for the offsets (20mm for the Ender 3). If you try to save the offsets outside this limit, you will get the Err: Too far! message.
So, make sure to save offsets inside the distance limit.
You can adjust your offset either in your 3D printer’s firmware through the control screen, or through your slicer software. One user said the method that worked for him was to do it through the 3D printer’s control screen.
To do this, go to Controls, select bed leveling and then probe Z-ffset. This method solved the problem for the user.
Keep in mind that your Z-offset should be saved. Also make sure that SD card is inserted because EEPROM is saved in that card.
Power Cycling
It has been seen that some users who got Too Far Error while printing, tried power cycling and it worked for them. This can be simply turning the power off and on.
You may also want to turn it off at the switch and disconnect the power supply cable, then re-insert the cable and power on the plug, then turn the 3D printer back on.