- SteamVR ошибка 306 может возникнуть из-за определенных обновлений SteamVR, устаревших или неправильно установленных драйверов графического процессора или определенного конфликтующего программного обеспечения.
- Программное обеспечение для обновления драйверов иногда может исправить Гарнитура VR и проблемы с программным обеспечением, такие как ошибка запуск SteamVR 306.
- Удаление определенного конфликтующего программного обеспечения может решить, что SteamVR не удалось инициализировать по неизвестным причинам 306 ошибка.
- Некоторым пользователям может потребоваться проверить, как их VR-устройства подключены к ПК, чтобы исправить сбой подключения совместно используемого композитора IPC 306 ошибка.
Настоящие геймеры используют лучший игровой браузер: Opera GX — Получите ранний доступOpera GX — это специальная версия знаменитого браузера Opera, созданная специально для удовлетворения потребностей геймеров. Opera GX обладает уникальными функциями и поможет вам получить максимум удовольствия от игр и просмотра веб-страниц каждый день:
- Ограничитель ЦП, ОЗУ и сети с убийцей горячих вкладок
- Прямая интеграция с Twitch, Discord, Instagram, Twitter и мессенджерами
- Встроенные элементы управления звуком и настраиваемая музыка
- Пользовательские цветовые темы от Razer Chroma и принудительное создание темных страниц
- Бесплатный VPN и блокировщик рекламы
- Скачать Opera GX
SteamVR — это виртуальная реальность платформа, совместимая с гарнитурами Vive, Windows Mixed Reality и Oculus Rift.
Тем не мение, ошибка 306 может возникнуть у некоторых пользователей при попытке запустить SteamVR. Полное сообщение об ошибке 306 говорит следующее:
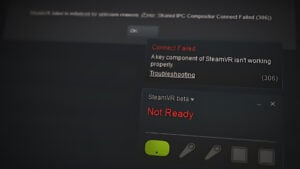
Ошибка запуска SteamVR — SteamVR не удалось инициализировать по неизвестным причинам (Ошибка: сбой подключения к общему IPC Compositor (306))
SteamVR не запускается, когда возникает эта проблема. Если вам нужно исправить ошибку SteamVR 306, ознакомьтесь с этими потенциальными решениями для этой проблемы.
Как исправить ошибку SteamVR с кодом 306?
1. Обновите ваши драйверы
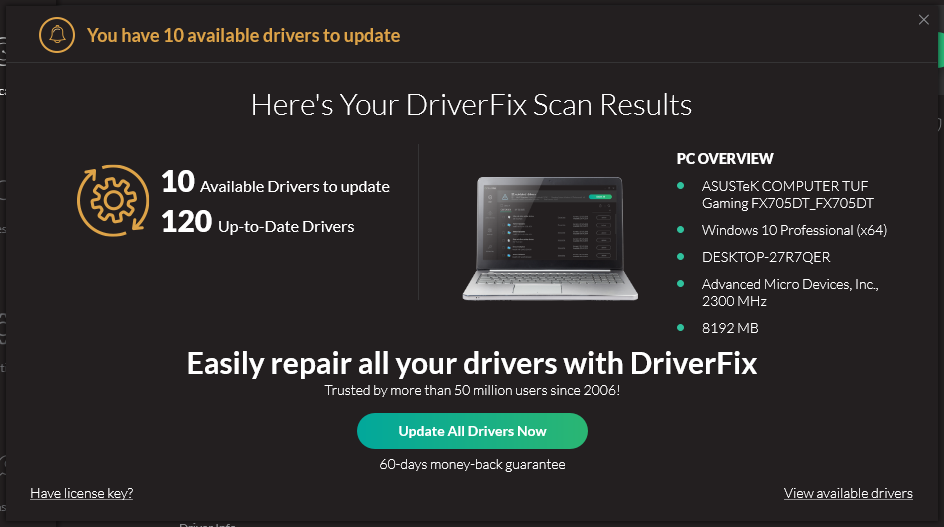
Есть несколько способов обновить драйвер видеокарты, но самый простой — использовать программу обновления драйверов.
При быстром сканировании DriverFix будет отображен подробный отчет, в котором указаны версии драйверов для устройств вашего ПК и требуются новые драйверы.
После этого вы можете выбрать обновление драйвера видеокарты, если это необходимо. DriverFix загрузит для вас последнюю версию драйвера вашего графического процессора.
Если вы используете DriverFix Pro, вы можете выбрать Установить автоматически возможность быстрой установки драйвера без необходимости извлекать и открывать мастер установки.
 Некоторые из наиболее распространенных ошибок и ошибок Windows являются результатом использования старых или несовместимых драйверов. Отсутствие современной системы может привести к задержкам, системным ошибкам или даже ошибкам.Чтобы избежать подобных проблем, вы можете использовать автоматический инструмент, который найдет, загрузит и установит нужную версию драйвера на ваш ПК с Windows всего за пару кликов, и мы настоятельно рекомендуем DriverFix.Выполните следующие простые шаги, чтобы безопасно обновить драйверы:
- Скачайте и установите DriverFix.
- Запустите приложение.
- Подождите, пока программа обнаружит все неисправные драйверы.
- Теперь вам будет представлен список всех драйверов, у которых есть проблемы, и вам просто нужно выбрать те, которые вы хотели исправить.
- Подождите, пока DriverFix загрузит и установит новейшие драйверы.
- Запустить снова ваш компьютер, чтобы изменения вступили в силу.

DriverFix
Защитите свою Windows от любых ошибок, вызванных поврежденными драйверами, установив и используя DriverFix сегодня!
Бесплатная пробная версия
Посетить вебсайт
Заявление об отказе от ответственности: эту программу необходимо обновить с бесплатной версии для выполнения некоторых конкретных действий.
2. Подключите кабель VR к основному порту видеокарты.

- Сначала отсоедините кабель HDMI монитора от основного порта видеокарты настольного компьютера.
- Затем подключите кабель VR (от коробки VR) к основному / основному порту видеокарты.
- Снова подключите монитор через дополнительный порт видеокарты.
- Если ваше приложение SteamVR запущено, закройте и перезапустите его, чтобы проверить, сохраняется ли проблема с ошибкой 306.
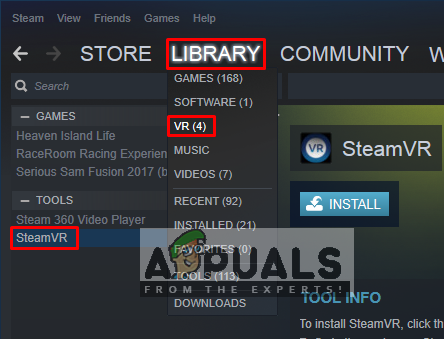
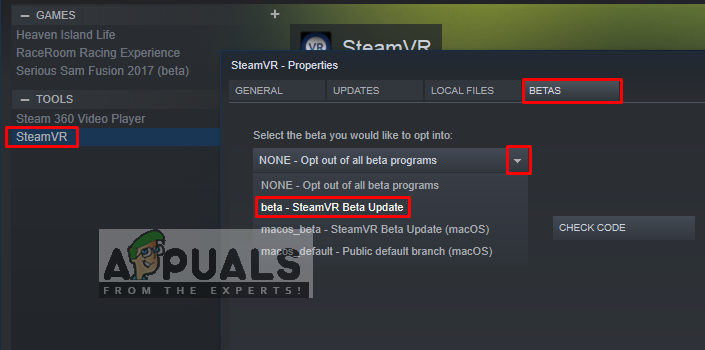
3. Принять участие в бета-обновлении SteamVR
- Откройте свой Клиентское программное обеспечение Steam.
- Выберите Библиотека вкладка в Steam.
- Щелкните правой кнопкой мыши SteamVR слева от Библиотека вкладку, чтобы выбрать окно его свойств.
- Выберите Бета вкладка, показанная непосредственно ниже.

- Затем выберите бета — Обновление бета-версии SteamVR в раскрывающемся меню.
- нажмите Закрывать кнопка.

5. Чистая загрузка Windows
- Откройте окно «Выполнить».
- Введите эту команду запуска в поле Открыть:
msconfig - Щелкните значок Выборочный запуск переключатель.
- Отмените выбор Загрузить автозагрузку настройка элементов.
- Убедитесь, что вы выбрали Загрузить системные службы а также Использовать исходную конфигурацию загрузки флажки.
- Снимите флажок для Скрыть все службы Microsoft показано прямо ниже.
- Нажмите Отключить все чтобы отключить оставшиеся сторонние сервисы.
- Выберите Применять возможность сохранить новые настройки.
- Выберите ОК возможность закрыть Утилита MSConfig.
- Выберите Запустить снова в открывшемся диалоговом окне.
- Затем попробуйте запустить SteamVR после чистой загрузки Windows.


Примечание: Steam подтверждает, что Razer Synapse, Avast Antivirus и Asus AI Suite конфликтуют со SteamVR и его драйверами. Таким образом, удаление этих конфликтующих программ также может помочь устранить ошибку SteamVR 306.
6. Удалить Natural Locomotion
- Чтобы запустить «Выполнить», одновременно нажмите клавиши Windows и R.
- Введите эту команду, чтобы открыть программу удаления Windows в текстовом поле Открыть:
appwiz.cpl - Выберите программное обеспечение Natural Locomotion в апплете «Программы и компоненты».
- Щелкните значок Удалить вариант для Natural Locomotion, чтобы удалить это программное обеспечение.
- Нажмите горячую клавишу Windows + E, чтобы запустить проводник.
- Откройте папку config в проводнике по этому пути:
D: \ Program Files (x86) \ Steam \ config - Щелкните правой кнопкой мыши подпапку передвижения и выберите Удалить.

Это некоторые из наиболее вероятных исправлений для устранения ошибки SteamVR 306, которые стоит попробовать.
Вы также можете связаться со Steam через Страница поддержки Steam если требуются дополнительные возможные решения для ошибки 306.
by Matthew Adams
Matthew is a freelancer who has produced a variety of articles on various topics related to technology. His main focus is the Windows OS and all the things… read more
Updated on
- SteamVR error 306 can arise due to certain SteamVR updates, outdated or incorrectly installed GPU drivers, or certain conflicting software.
- Driver updater software can sometimes fix VR headset and software issues like error starting SteamVR 306.
- Uninstalling certain conflicting software might resolve the SteamVR failed to initialize for unknown reasons 306 error.
- Some users might need to check how their VR devices are connected with PCs to fix the shared IPC compositor connect failed 306 error.

SteamVR is a virtual reality platform that’s compatible with Vive, Windows Mixed Reality, and Oculus Rift headsets.
However, error 306 can arise for some users when they try to launch SteamVR. The full error 306 message says this:
Error Starting SteamVR – SteamVR failed to initialized for unknown reasons (Error: Shared IPC Compositor Connect Failed (306))
SteamVR doesn’t start when that issue arises. Speaking of problems, users also reported other possible variations. Check them out below!
Where does this error occur and what can I expect?
- SteamVR failed initialization with error code vriniterror_init_hmdnotfound (VR init error HMD not found is one of the most frequent error codes, but there can be others as well)
- SteamVR error 436, 435, 301, 475, 309, 119, 307, 303, 0 or SteamVR fail -203
- Frequently associated with Oculus Quest 2: SteamVR Compositor had an error on present (108)
- SteamVR error during OpenVR (Also found under this form: OpenVR runtime is not installed)
If you need to fix the SteamVR 306 error, check out these potential resolutions for that issue.
How can I fix SteamVR error code 306?
1. Update your drivers
There are a few ways you can update your graphics card’s driver, but the most straightforward method is to utilize driver updater software.
A quick Outbyte Driver Updater scan will display a detailed report that shows driver versions for your PC’s devices and which ones need new drivers.
Thereafter, you can select to update your graphics card’s driver if required. It will then download your GPU’s latest driver for you.
If you’re utilizing Outbyte Driver Updater Pro, you can then select the Apply All option to quickly install the driver without needing to extract and open its setup wizard.
Sometimes, malfunctioning drivers can cause multiple system errors. If this happens to your PC, you may need to update or reinstall certain drivers entirely. As the process is not quite straightforward, we recommend using a reliable driver updater for the job.
Here’s how to do it:
- Download and install Outbyte Driver Updater.
- Launch the software.
- Wait for the app to detect all faulty drivers.
- Now, it will show you all the malfunctioning drivers listed to select the ones to Update or Ignore.
- Click on Update & Apply Selected to download and install the newest versions.
- Restart your PC to ensure the applied changes.


Outbyte Driver Updater
Secure your Windows PC with Outbyte from various errors caused by problematic drivers.
Disclaimer: this program needs to be upgraded from the free version in order to perform some specific actions.
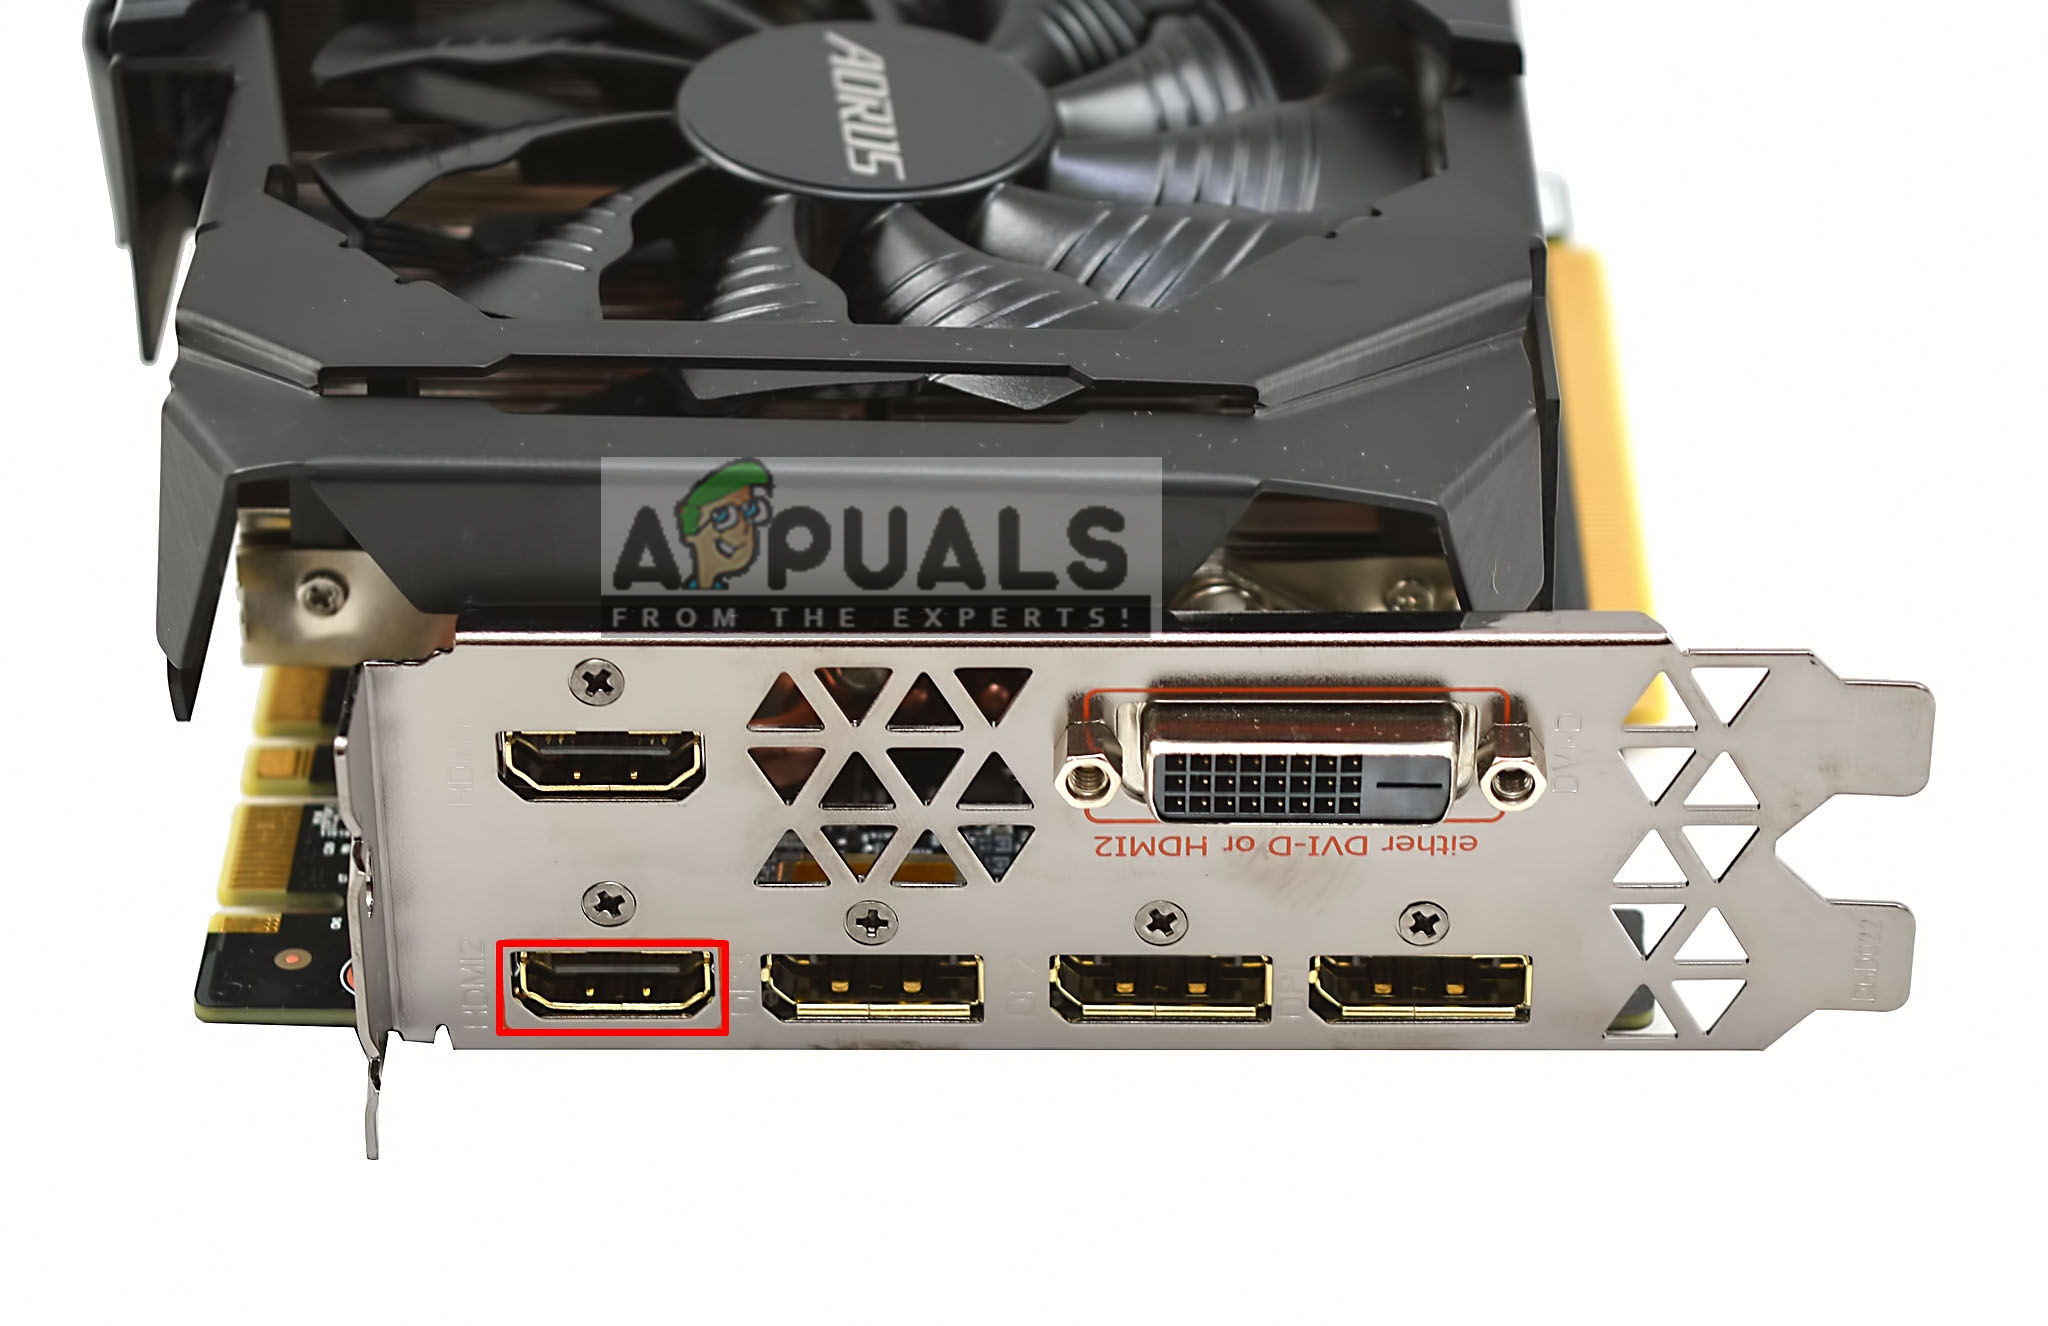
2. Connect your VR cable with your graphics card’s primary port
- First, disconnect the HDMI cable for your monitor from the main port on your desktop graphics card.
- Then plug the VR cable (from the VR box) into the graphics card’s Main Port/Primary Port.
- Reconnect your monitor via your graphics card’s secondary port.
- If your SteamVR app is running, close and restart it to see if the error 306 issue persists.
3. Opt into SteamVR Beta Update
- Open your Steam client software.
- Select the Library tab in Steam.
- Right-click SteamVR on the left of the Library tab to select its properties window.
- Select the Betas tab shown directly below.

- Then choose the beta – SteamVR Beta Update option on the drop-down menu.
- Press the Close button.

- Fix: HTC Vive error 208 on Windows 10/11
- How to fix the SteamVR Home has stopped working error
- SteamVR settings not working
- Perform a SteamVR upgrade of the graphics driver in 3 steps
- Steam Overlay is not working in Windows 10 [Expert Guide]
4. Clean boot Windows
- Open the Run window.
- Input this run command in the Open box:
msconfig - Click the Selective Startup radio button.

- Deselect the Load startup items setting.
- Make sure you’ve selected the Load system services and Use original boot configuration checkboxes.
- Deselect the checkbox for Hide all Microsoft services shown directly below.
- Click Disable all to disable remaining third-party services.
- Select the Apply option to save the new settings.
- Select the OK option to close the MSConfig utility.
- Select the Restart option on the dialog box that opens.
- Then try launching SteamVR after clean-booting Windows.


Note: Steam confirms Razer Synapse, Avast Antivirus, and the Asus AI Suite conflict with SteamVR and its drivers. So, uninstalling those conflicting programs might also help resolve SteamVR error 306.
5. Uninstall Natural Locomotion
- To launch Run, press the Windows and R keys at the same time.
- Input this command for opening the Windows uninstaller in the Open text box:
appwiz.cpl - Select the Natural Locomotion software within the Programs and Features applet.

- Click the Uninstall option for Natural Locomotion to remove that software.
- Press the Windows + E hotkey to launch File Explorer.
- Open the config folder in File Explorer at this path:
D:\Program Files (x86)\Steam\config - Right-click the locomotion subfolder and select Delete.

Those are some of the more probable fixes for resolving SteamVR error 306 that are worth a shot.
You can also contact Steam via the Steam support page if further potential resolutions for error 306 are required.
![]()
SteamVR is a Virtual Reality Platform developed by Valve as an extension of Steam. SteamVR offers 360 degrees, full room VR experience. It was officially announced on March 1, 2015, during the Mobile World Congress. As a platform, SteamVR not only supports its own HMDs such as the Vive but also other HMDs like the Rift.
However, users are experiencing the error message “Error Starting SteamVR” when they try opening the SteamVR application. The full error message is “Error: Shared IPC Compositor Connect Failed (306)”. In this article, we will discuss the numerous reasons due to which this error can be triggered.
What Causes SteamVR Error 306?
Since SteamVR makes use of a lot of components on your computer as compared to the normal Steam, there are various reasons which can trigger this particular error message. Here are some of the reasons why this might happen:
- HDMI Cable: The most basic and common reason will be your HDMI cable that connects the box with your system. When your HDMI cable is not in primary slot of Graphics card HDMI port, it will show this error and won’t be able to start the SteamVR.
- SteamVR Updates: In some case, the updates of the SteamVR can be responsible for this particular error. Several users finding themselves in a similar situation have reported that they managed to resolve the issue after changing SteamVR to beta.
- Graphics Drivers: Another potential case in which this error occurs is when you’re using updated or outdated Graphics drivers. This can make the SteamVR not compatible with your specification.
Now that you have a basic understanding of the nature of the problem, we will move on towards the methods. Down below, you’ll discover a collection of methods that other users in a similar situation have successfully used to resolve the issue.
Method 1: Using Primary HDMI Port
Sometimes this error can be related to your HDMI cable, it means that your HDMI cable of VR might not be in the primary HDMI port of your system. We need to use a primary port always for the VR to work correctly. Also sometimes the adapter or the in-between device; connecting the box HDMI cable to your Graphics card HDMI port, should be not used. So, connected the VR HDMI cable coming from the box directly to your HDMI port on your Graphics card will be better.
- Take out the Monitor HDMI cable from your Graphics card main port
- Now, put the VR cable in “Main Port/Primary Port”, which is coming from the VR box

Use Primary port for the VR HDMI cable - The monitor cable can be in the secondary port because it will still work while the VR won’t
- Now quit the SteamVR window, and restart it again.
For those who have single port only, you can only use your main HDMI port for the VR, or you can get an adapter if it works with your system.
Method 2: Trying the SteamVR Beta
Several users fixed error 306 by changing the SteamVR properties settings. In the properties settings, you have BETAS tab, and there you can select the beta for VR to opt into. By default, it will be selected to none, but you can change it to beta and wait for the SteamVR to update it. To change the SteamVR to beta follow the steps below:
- On your computer, open the Steam App
- Under Library, you will find the “SteamVR”

SteamVR in Steam Library - Now, right-click SteamVR, and then click Properties
- After that select the “BETAS” tab
- Here in “Select the beta you would like to opt into” drop-down, you need to select “beta – SteamVR Beta Update”

Selecting SteamVR beta update - Close the window, and wait for SteamVR to finish updating.
- If you want to turn it off in the future, you can select “None – Opt out of all beta programs” back again.
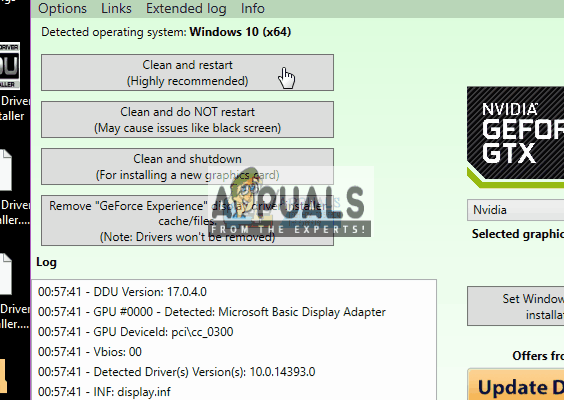
Method 3: Installing Graphics Drivers Manually
As it turns out, one reason that might trigger Error 306 is the outdated Graphics driver. Several affected users have reported that the issue has not longer occurring after they update the Nvidia Graphics drivers to the latest ones or by uninstalling and then reinstalling it. Also, the Nvidia Vulkan can mess up things for the drivers by having the wrong library path in their files.
In this method, we will be uninstalling the Graphics Drivers and then manually installing them from the manufacturer’s website. Make sure you download Display Driver Uninstaller from here and save it on desktop or external drive before you boot into safe mode.
- Follow the instruction in our article on how to boot your computer into safe mode
- Once you start in safe mode, you can copy DDU file to desktop if you saved it onto USB and extract it on desktop
- Now open the Display Driver Uninstaller by clicking on the DDU icon
Note: It might show “Windows 8.1” for system detection, even you are using Windows 10, that is normal - You can choose the option for Card Type that you are using
- Then selection first option “Clean and Restart”, it will take some time to process the clean uninstall and then the system will Reboot
- After the system reboots in normal mode, you can go to the manufacturer’s site of your Graphics Card and Install the latest drivers

Uninstalling the Graphics driver using DDU
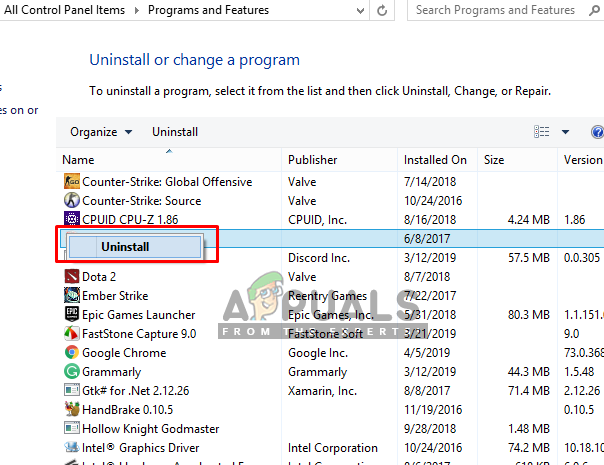
Method 4: Uninstalling Natural Locomotion
Natural Locomotion or NaLo is a paid app that translates arm swing into trackpad input for locomotion. It is very helpful for playing on VR, also helps with sickness a bit. But this can be causing the error 306 because the driver they use is not compatible yet with SteamVR beta. You need to uninstall this and try running the SteamVR with Motion Smoothing. Follow the steps below to uninstall it:
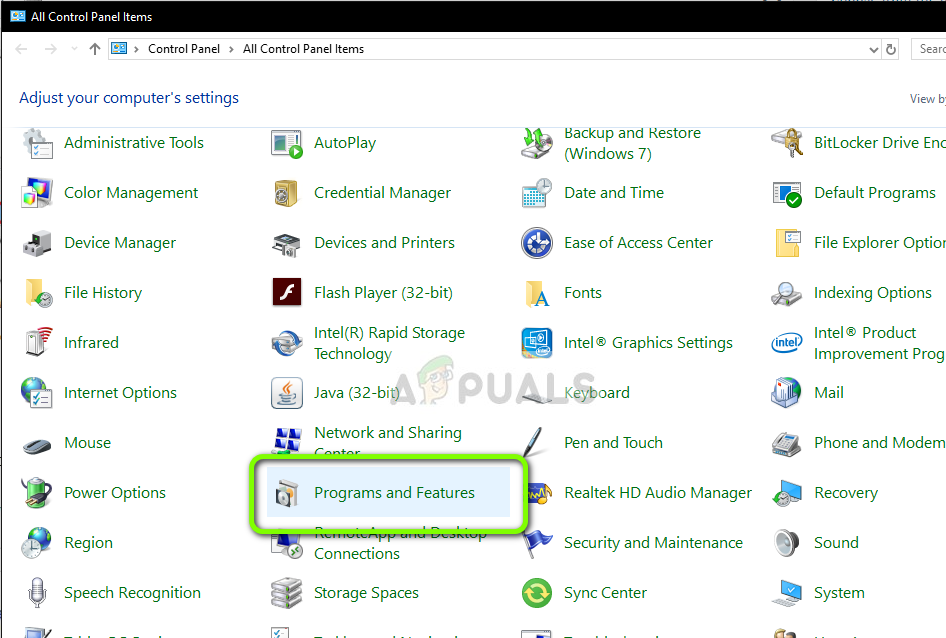
- Go to Control Panel from the start menu or by searching
- Now, open Program and Features

Going into program and features in control panel - Find the Natural Locomotion, and Uninstall it

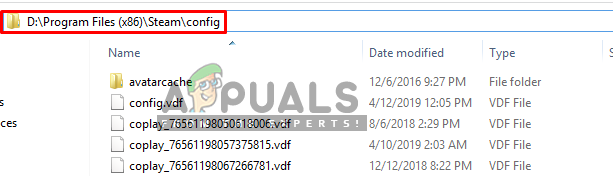
Uninstalling Natural locomotion - Also, go to your steam directory and open config folder:
D:\Program Files (x86)\Steam\config

Steam config folder - Then remove the two folders of locomotion from the config
- Now open the SteamVR and test it in Motion Smoothing

Kevin Arrows
Kevin Arrows is a highly experienced and knowledgeable technology specialist with over a decade of industry experience. He holds a Microsoft Certified Technology Specialist (MCTS) certification and has a deep passion for staying up-to-date on the latest tech developments. Kevin has written extensively on a wide range of tech-related topics, showcasing his expertise and knowledge in areas such as software development, cybersecurity, and cloud computing. His contributions to the tech field have been widely recognized and respected by his peers, and he is highly regarded for his ability to explain complex technical concepts in a clear and concise manner.
Steam is one of the most popular online gaming platforms and it has a large and dedicated userbase that consumes every last bit of the products and features that they put out. However, recently, we have been getting some reports of the SteamVR Error 306 which sometimes states “Error Starting SteamVR” and the full message states “SteamVR failed to initialized for unknown reasons (Error: Shared IPC Compositor Connect Failed (306))“.

This error obviously prevents the user from being able to use SteamVR and is therefore a big annoyance. Therefore, in this article, we have set out to completely fix it using the methods and workarounds that we have listed below. Make sure to follow this guide carefully and accurately in order to avoid any mistakes. Also, make sure to sift through the most probable causes that we have listed below in order to make sure that you fully wrap your head around as to why this issue occurs in the first place.
What Causes the SteamVR Error 306: Shared IPC Compositor Connect Failed (306) Issue?
After going through some basic troubleshooting practices, we concluded that the following were some of the most major reasons due to which the SteamVR error 306 occurs.
- Port Issues/Connector Issues: If you have connected the VR Headset into a secondary port on your computer, the Steam VR Error 306 or Steam VR Error 400 might pop up while you try to use it. This is because the VR headset needs to be on the primary HDMI port in order to work correctly. The same goes for if you are using any connectors on the HDMI/ Display Port slots.
- Outdated Software: Some users might receive the Error Starting SteamVR message if they have installed outdated software for their VR headsets or if they are using outdated drivers. It is very important that you update all the associated software before you move on towards using VR.
- Incorrect Installation of GPU Drivers: If the GPU drivers on your computer haven’t been installed properly or if you have installed a version that isn’t completely compatible with SteamVR, the Steam VR Error 306 will be triggered and you will see the Shared IP Compositor Connect Failed (306) message on your screen.
- Steam Beta: Another probable cause behind the SteamVR Error 306 is the enabling or disabling of the Steam Beta option. For some users, having beta enabled was able to fix the issue while for some, having it disabling was the setting that fixes the issue. Therefore, you need to experiment with this setting and check if changing it helps you in fixing the issue.
- Natural Locomotion: Natural Locomotion is a software that allows users to have better functionality within SteamVR but it can sometimes cause recognition issues due to which SteamVR cannot be started. Therefore, it is recommended that you try and uninstall this software and check if that makes the difference.
Now that you have been made familiar with the reasons due to which this issue is triggered. We can finally move on towards implementing the solutions.
Before you Start:
- Make sure that you try to restart both your Steam and your computer to ensure that you rule out some basic troubleshooting.
- If you are using a DPI adapter or any other sort of adapter, make sure to completely remove those and connect the VR’s HDMI cable into the primary port of the GPU.
- Make sure that if you haven’t attached a camera to your computer, it isn’t enabled in the SteamVR because that can sometimes trigger this error as well.
- If you have the RiftCat and ALVR Driver installed on your system, make sure to uninstall them as they can sometimes cause conflicts.
Fixing the SteamVR Error 306: Error Starting SteamVR
Solution 1: Using the Correct Port
All Graphics Cards have a couple of different ports at their back which you can use to connect multiple displays to your computer. However, what you might not know is that each port has a number assigned to it in terms of hierarchy. For example, one port might be the secondary port to which you would typically connect the secondary display and the other might be the primary one to which you should have the primary display connected.
Your VR Headset requires you to connect to the Primary HDMI port in order for the SteamVR software and the headset to work correctly. Therefore, Remove the Monitor’s Display cable from the primary HDMI slot and connect the VR headset to it instead. Determining the Primary HDMI slot might be a chore for some Graphics cards but it is usually the first one from the top of the GPU.
If this doesn’t work, make sure to remove all the displays connected to the GPU and only connect the HDMI cable of the VR Headset itself. After doing this, make sure to connect only one Monitor in the secondary slots and check if the computer works in this configuration. If it does, it means that you might have to disconnect other forms of the display except for your VR headset and the monitor.
Solution 2: Reinstalling SteamVR Driver and Toggling Direct Mode
- Disconnect the HDMI cable for the VR headset from your computer.
- Launch up SteamVR and click on the Menu option.
- From the menu, click on the “Settings” option to launch the SteamVR settings.
- Inside the settings, click on the “Developer” option on the left side of the window.
- Under the “Reset” option on the right-hand side, click on the “Remove all SteamVR USB Devices”

Selecting the Remove all SteamVR USB Devices - Now in the developer options, make sure to toggle the “Enable Direct Mode Only” setting if it is disabled and if it is already enabled, make sure to click on the “Disable Direct Mode Only” setting.
- After completing these steps, connect the HDMI cord of the VR Headset back into the GPU and also connect all the other cables.
- Launch the program associated with your VR Headset such as PiMax’s PiPlay.
- It will install all the missing drivers on your computer and run SteamVR as you would normally.
- Enable the compositor and check to see if the Steam VR Error 306 has been fixed.

In some cases, you might need to reinstall the VR Drivers manually. In order to do so, you can follow the guide below.
- Disconnect the VR headset from your computer.
- Press “Windows” + “R” to open the Run prompt.
- Inside the Run prompt, type in “devmgmt.msc” and press ‘Enter” to launch the device manager.

Typing devmgmt.msc in the Run prompt - Inside the device manager, find the VR headset driver and right-click on it.
- Select the “Uninstall” button to remove the driver completely from your computer.
- After doing this, make sure to reinstall all the drivers again and see if the SteamVR error 306 has been fixed.

Solution 3: Uninstalling USB Drivers
In some cases, Uninstalling the USB drivers on your computer can help in fixing the Steam VR Error 306 and Steam VR Error 400 as well. To do that:
- Disconnect the VR headset from the back of your computer.
- Press “Windows” + “R” simultaneously to open the Run prompt.
- Type in “devmgmt.msc” and press ‘Enter” to launch the device manager.
Typing devmgmt.msc in the Run prompt - Inside the device manager, click on the “Human Interface Devices” dropdown and right-click on the “USB Input Device”.
- Select the “Uninstall” button to remove the driver completely from your computer.
- After doing this, make sure to connect the VR Headset back into the computer and check to see if the driver is automatically installed.
- If it isn’t, you can go back to the Device Manager and scan for hardware changes to install the driver back.
- Check to see if doing so has fixed the SteamVR Error 306 Compositor Connect Failed issue on your computer.
Solution 4: Opting into SteamVR Beta
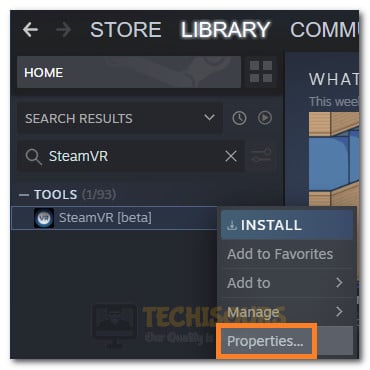
- Launch Steam and login with your credentials.
- After logging in, click on the “Library” option on the top and then click on the search bar to search your library.
- Type in “SteamVR” and the SteamVR tool will appear.
- Right-click on the tool and then select the “Properties” option.

Opening SteamVR Properties - Once in the properties, click on the “Betas” option from the top.
- Click on the “beta – SteamVR Beta Update” and close out of this window.
- Now try to run the game and check to see if you still get the SteamVR Error 306 Compositor Connect Failed.

Solution 5: Remove Natural Locomotion Software
- Press “Windows’ + “R” to open the Run prompt.
- Type in “Appwiz.cpl” and then press “Enter” to launch into the application wizard.

Typing “appwiz.cpl” - Inside this window, scroll down and look for the “Natural Locomotion” application.
- Right-click on this app and select the “Uninstall” button.

Uninstall Natural Locomotion - Follow the on-screen instructions to completely remove this file from your computer.
- After that, open your Steam installation directory and go into the “Config” folder.
- Remove the Locomotion Folders from this location as well if you find any.
- Run SteamVR and check to see if you are now able to fix SteamVR Error 306.


Solution 6: Reinstalling GPU Drivers
- As a last resort, you can try and perform a fresh install of your GPU drivers and check if you are able to fix the SteamVR Error 306 and SteamVR Error 400 by doing so.
- For that, download the DDU software from this website.
- After downloading the software, follow the onscreen instructions to uninstall your respective GPU Drivers.
- After uninstalling, you will automatically be shifted to the Microsoft Basic Visual Adapter.
- Navigate to the AMD or Nvidia website and download the drivers for your respective GPUs.
- Install these drivers and check to see if doing so fixes the SteamVR 306 and the SteamVR 400 error on your computer.
Hopefully, the error might have gone by now but if you need further assistance, contact here.

Alan is a hardcore tech enthusiast that lives and breathes tech. When he is not indulged in playing the latest video games, he helps users with technical problems that they might run into. Alan is a Computer Science Graduate with a Masters in Data Science.
Get rid of the most common SteamVR errors in no time
by Hasibul Kabir
Hasibul Kabir is a Tech-Enthusiast Blogger, Web Developer & Hobbyist Game Developer. Writing about Technology, mainly Windows, Mac, iOS, etc., is his main focus, besides doing some computer… read more
Updated on
- SteamVR has been very popular due to the massive developments of VR technology.
- For some specific reasons, users may encounter various issues while using VR headsets on Steam.
- Though a simple restart may help to fix any SteamVR errors, you should go through this article to get specific solutions for specific errors.
If you use the SteamVR app and having several problems with it, this article is a great place for your relief. Here, you will find the solutions for the most common SteamVR errors. If you are interested, see the best VR browser games to play on Oculus Quest.
Why does my SteamVR keeps failing?
SteamVR works very smoothly with most compatible devices. However, the actual problems appear when you cannot use this app properly because of several errors. It can completely ruin your VR experience.
The SteamVR may fail or doesn’t work properly or entirely due to some common and critical reasons. It is hard to find out the root causes of some problems. But, in most cases, you will find these reasons:
- Graphics card issue – An incompatible graphics card may cause a lot of problems when running SteamVR.
- Driver problem – If the graphics card drivers are corrupted or not updated, you can expect to have trouble.
- VR headset’s internal problem – There are not many issues that can cause a VR headset to malfunction but dropping it repeatedly from the head level may cause serious damage.
- Outdated components – VR headsets are very demanding in terms of system requirements so maybe it’s time for an upgrade.
- Improper connection – A proper cable connection makes all the difference.
- Lack of permission for some specific tasks – Make sure you grant permissions to the apps you’re using, or they may not function properly.
- Misconfigurations – Sometimes, it’s just all about setting up your VR headset right.
What are the most common SteamVR errors?
- SteamVR Error 108 – Headset Not Detected – Rebooting your headset and your PC might get this problem fixed.
- SteamVR Error 113 – Path Registry Not Writable – This error occurs if the system doesn’t have permission to edit some folders in SteamVR.
- SteamVR Error 208 – HMD Display Not Found – This problem is often caused by problematic drivers.
- SteamVR Error 200 – Driver Failed – Still a driver mismatch or corruption problem. A driver update is recommended.
- SteamVR Error Code 203: SteamVR unexpected problem – If you’re using a game booster app, try to deactivate it because this may be the issue.
- SteamVR Error 206 – Driver Not Calibrated – Obviously, another driver-related problem but you will be able to fix it with one of our solutions below.
- SteamVR Error 207 – Driver Calibration Invalid – It’s a variant of error 206 and it has the same solution.
- SteamVR Error 300 – SteamVR failed to initialize for unknown reasons – This is a light error and most of the time, restarting your PC will fix it.
- SteamVR Error 301 – Connect Failed – In this case, it’s recommended to check if the VR service is running.
- SteamVR Error 302 – Init Failed – As for any initialization error, restarting your PC and headset might fix the problem quickly.
- SteamVR Error 306 – SteamVR failed to initialize for unknown reasons – It is similar to Error 300 and here we have a dedicated guide to help you.
- SteamVR Error 436 – We have a dedicated guide on how to fix Error 436 in SteamVR so head over to fix this quickly.
- SteamVR Error 1101-1112 – USB Error – As the name of the error suggests, you should check the USB connection.
- SteamVR Home has stopped working error – This is a SteamVR Home error but our dedicated guide will help you fix it.
Whatever the error you’re facing, this article has the solutions for the most common SteamVR issues. To know about them, follow the next part of this post.
How do I fix SteamVR problems?
Before getting into any complex troubleshooting, make sure you get to this checklist of prerequisite measures:
- Close SteamVR, power off your VR headset (if possible), power it up again, and restart SteamVR.
- Make sure that all the cables are connected properly and replace the ones which look damaged.
- Verify if your PC configuration, including the GPU, is on par with the VR requirements.
- Reboot your PC. Sometimes, a simple solution like this can be the magic touch to fix everything.
- Check your network connection, and that includes restarting your router.
Now that we’ve got over the simple things you can do, if the issues still persist, let’s go through our solutions below.
1. Update or reinstall your drivers
1.1 Update the graphics card driver
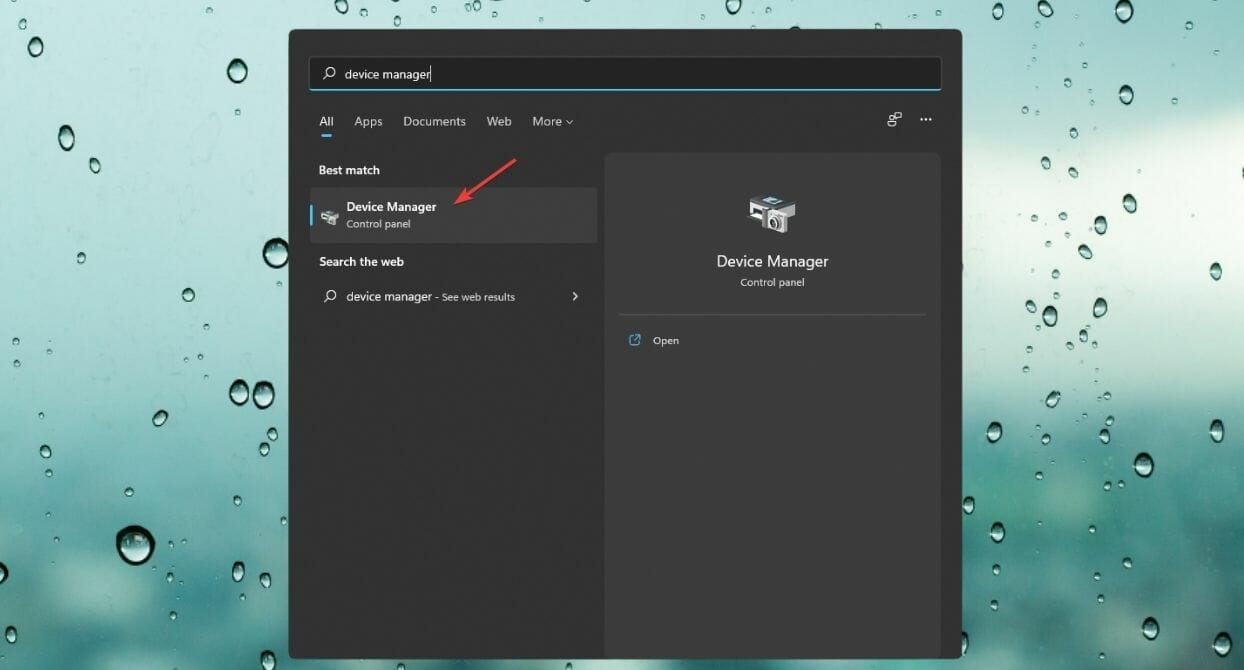
- Open the Start Menu on your PC, type device manager, and hit Enter.

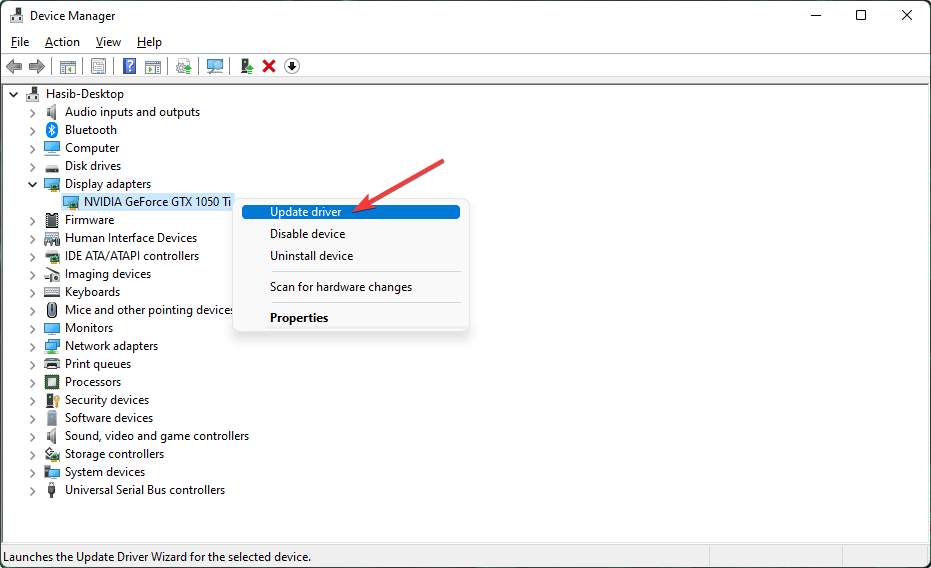
- Find and right-click on the graphics card and choose Update driver.

- Then, follow your preferred method to update.
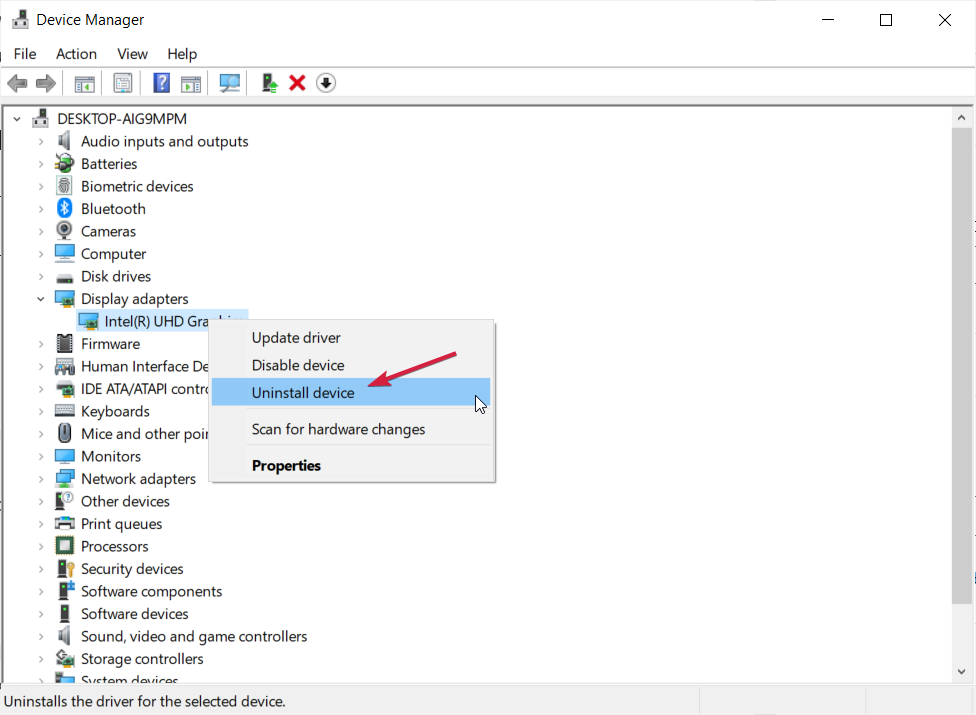
1.2 Re-install the graphics card driver
- Open the Windows Device Manager as shown before.
- Right-click on the graphics driver and choose Uninstall.

- Make sure to check the Attempt to remove the driver for this device.
- Restart your PC.
We should mention that updating the drivers manually sometimes won’t work and you need to visit the manufacturer’s website to get the latest driver.
As you can see, this can be a bit of work, but there are also dedicated driver update software tools that do all the work for you automatically.
Often, your computer system might not be able to update the generic drivers for your hardware and peripherals correctly. There are vital differences between a generic driver and a manufacturer’s driver. Finding the correct driver versions for every hardware component can become tiresome.That’s why a dependable updater can help you find and update your drivers automatically. We strongly suggest the Outbyte Driver Updater, and here’s how to do it:
- Download and install the Outbyte Driver Updater app.
- Launch the software and wait for the app to detect all incompatible drivers.
- Now, it will show you a list of all outdated drivers to select the ones to Update or Ignore.
- Click on Update & Apply Selected to download and install the latest versions.
- Restart your PC to ensure the applied changes.
Outbyte Driver Updater
Maintain your device healthy by letting OutByte Driver Updater find the latest driver options.
Disclaimer: You may need to upgrade the app from the free version to perform specific actions.
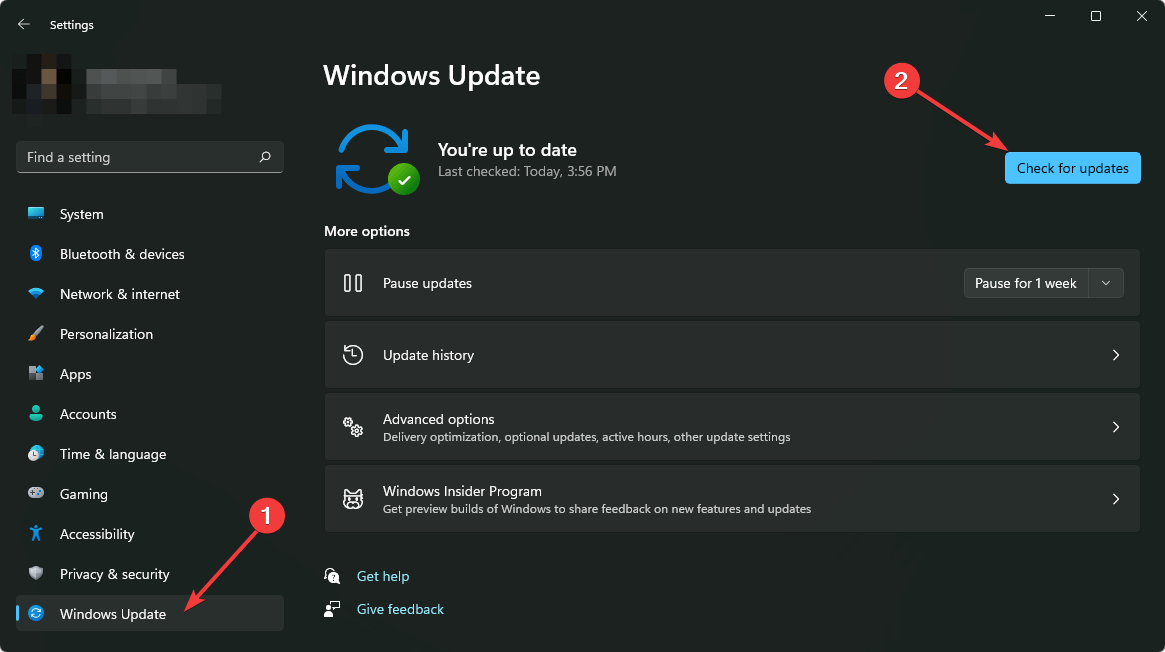
2. Get the latest Windows updates
- Press Win + I on the keyboard to open Windows Settings.
- Go to Windows Update and click on Check for updates.

After updating, restart your PC and see if it has solved the SteamVR error or not.
3. Run SteamVR as administrator
- Locate the Steam shortcut or the launcher file. It should be on the installation location, or you can use the desktop shortcut.
- Right-click and choose Run as administrator.

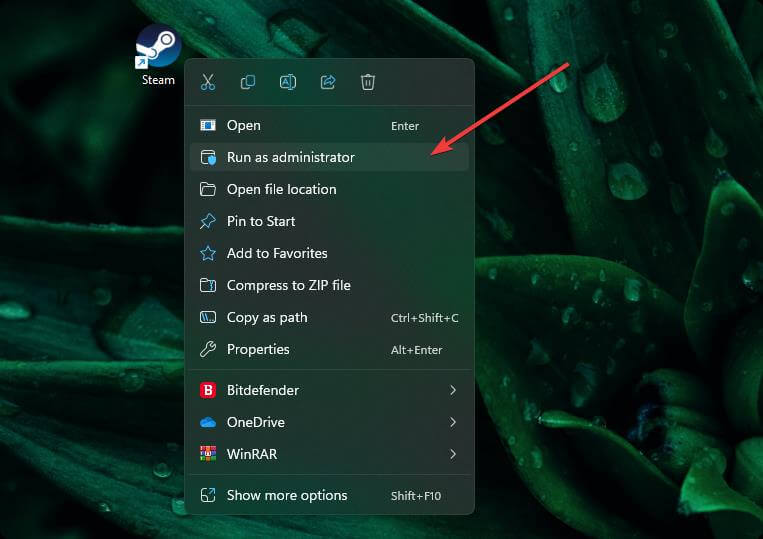
Sometimes, the lack of permissions can cause SteamVR errors and this solution will eliminate this problem from the get-go.
4. Chech the folder rights for SteamVR
- Press the Windows key + E to start File Explorer.
- Navigate to the SteamVR folder. You can usually find it at the following path:
C:\Program Files (x86)\Steam\steamapps\common\SteamVR - Right-click on an empty space and go to its Properties.
- Untick Read-only if it is ticked.

- Save the settings and exit.
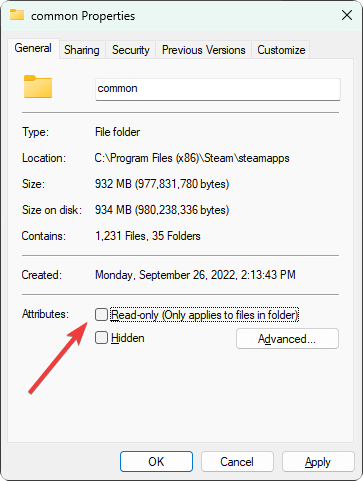
Also, change the folder permission if necessary. Then, see if it has fixed the problem or not.
5. Reconnect your headset
- Unplug your headset.
- Remove all other extra USB devices.
- Open SteamVR.
- Go to Settings.

- Click on Reset.
- Then, click on Remove all SteamVR USB devices.
- Connect your headset, and it will automatically install the drivers.

6. Run steam in Compatibility mode
- Right-click on the Steam shortcut and go to its Properties.
- Under compatibility mode, check Run this program in compatibility mode and choose an earlier OS.

- Click on Apply and OK.
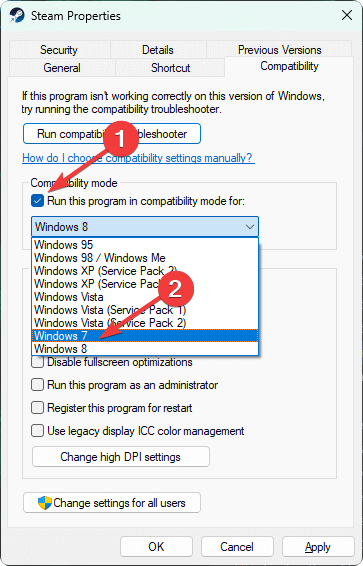
Now, see if it has fixed the SteamVR failed to initialize for unknown reasons or not.
7. Restart the VR service
- Press CTRL + ALT + Del on the keyboard and open Task Manager.
- Find the process called vrserver.exe and select it.
- Click on End Task to quit this process.

- Run SteamVR again.
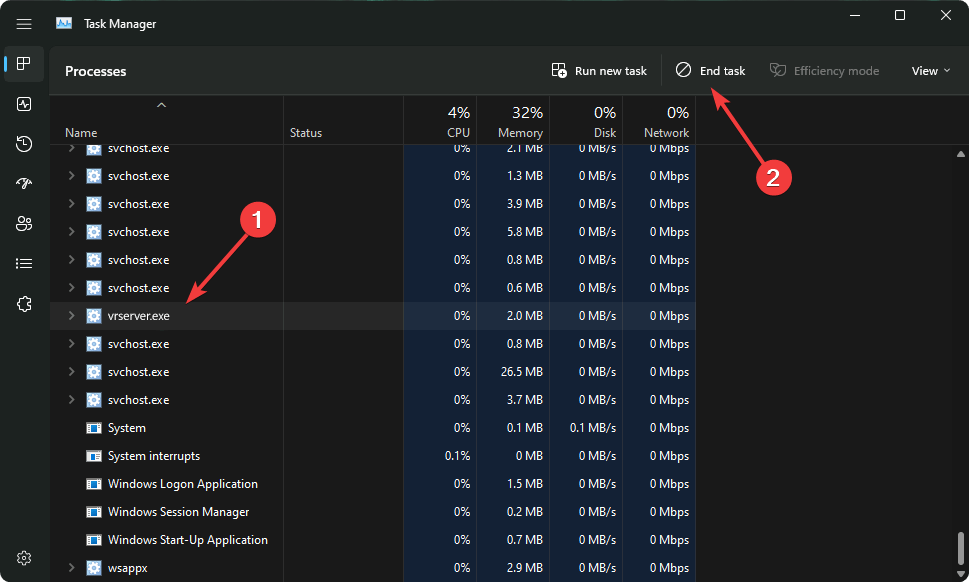
This procedure will restart the VR service and hopefully, the problem will be fixed.
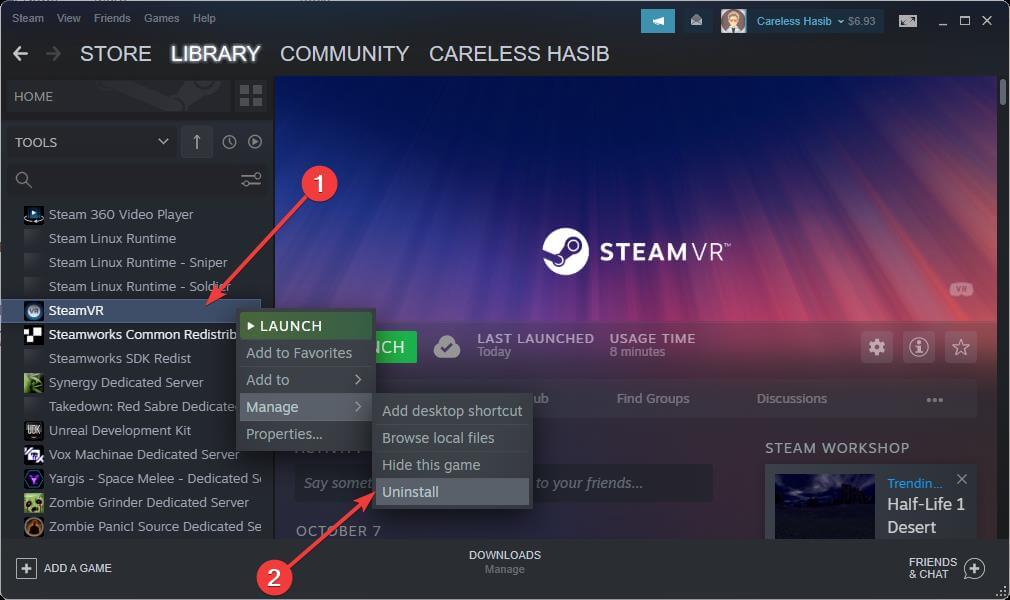
8. Re-install SteamVR
- Open Steam.
- Right-click on SteamVR, hover your mouse over Manage, and choose Uninstall.

- Install it again.
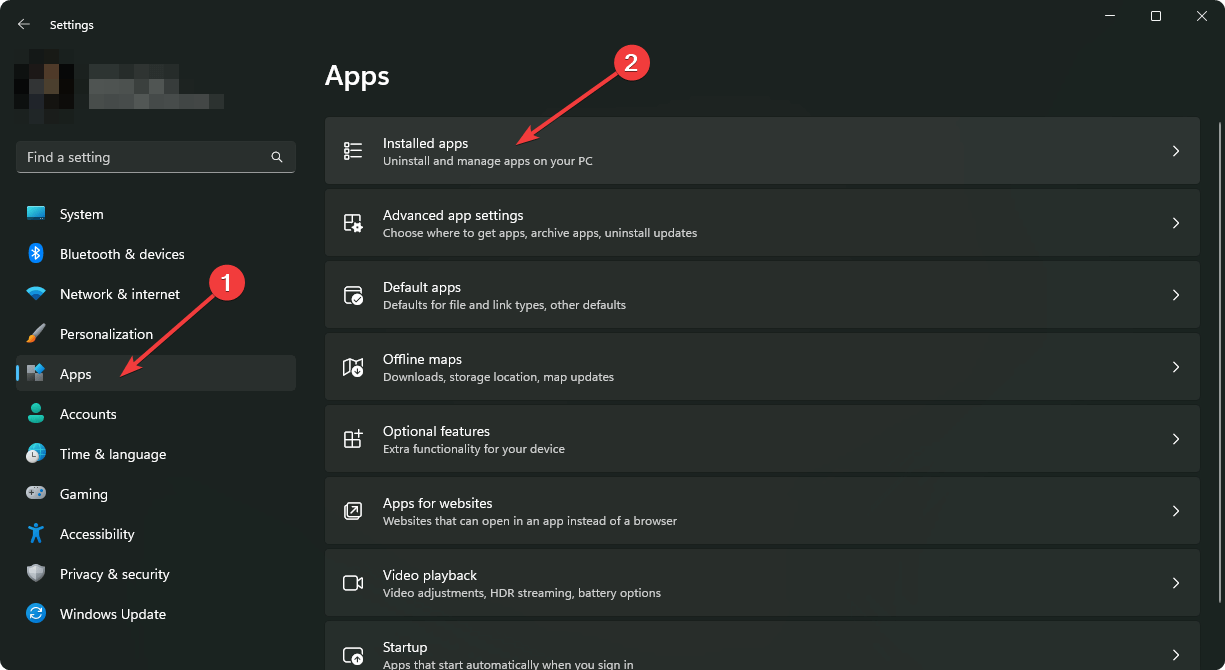
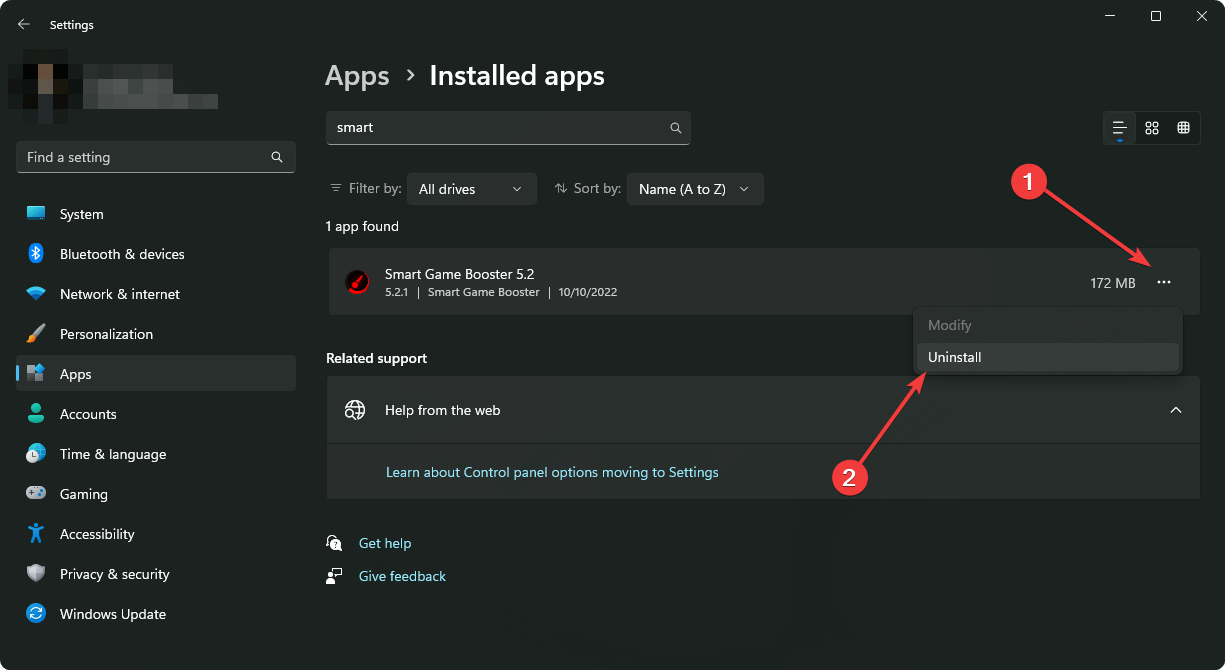
9. Uninstall game booster
- Click the Start button and select Settings.
- Go to Apps and click on Installed apps.

- Search for the game booster software.
- Click on the three vertical dots next to it and then choose Uninstall.
Game booster software is great because they improve the FPS and reduce lag. It also allocates resources to your particular game but, sometimes, it gets in conflict with some apps.
If the situation doesn’t improve by uninstalling the app, feel free to install it again.
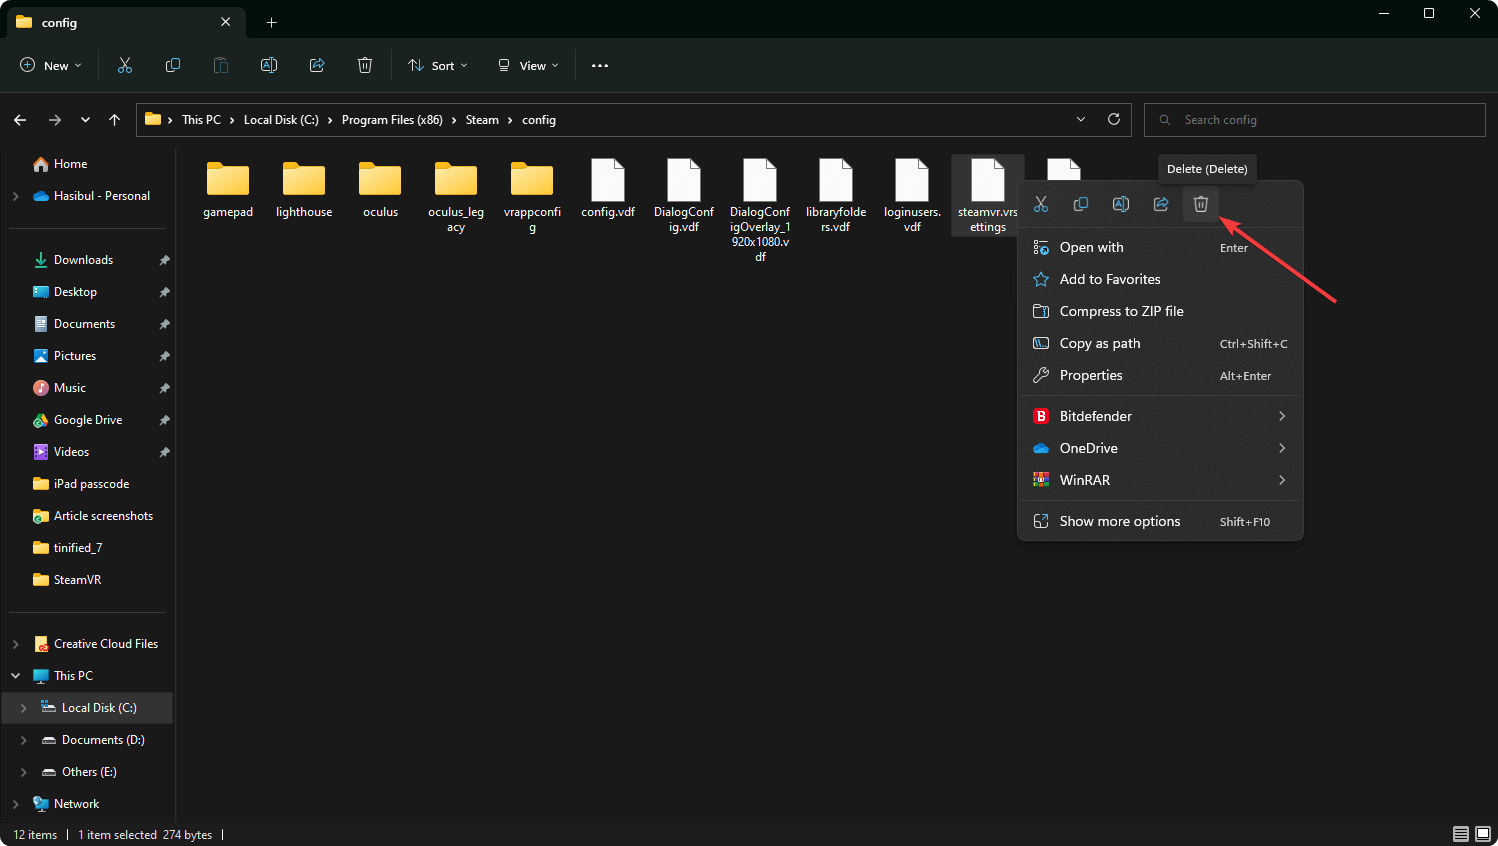
10. Delete the SteamVR settings file
- Press the Windows key + E to open File Explorer.
- Navigate to the following location:
C:\Program Files (x86)\Steam\config - Find the steamvr.vrsettings file and delete it.

Many of our readers asked: Is SteamVR compatible with Oculus Quest 2? The short answer is yes.
Now, users can easily enjoy SteamVR content on Oculus Quest 2. For this, users will have to simply connect the headset to the PC. Then, they can access the entire Steam library.
But if you encounter any issues, we have a great guide on how to fix SteamVR if it’s not working with Oculus Quest.
However, users also need the Quest app for PC for this. Also, there are some specific steps to follow to enjoy the Steam content on this VR headset.
You might also be interested in our list including the best SteamVR web browsers to enjoy VR content.
This article has shown you the solutions for the most common SteamVR errors. If you have any suggestions or opinions, feel free to write them down in the comments box.
![]()