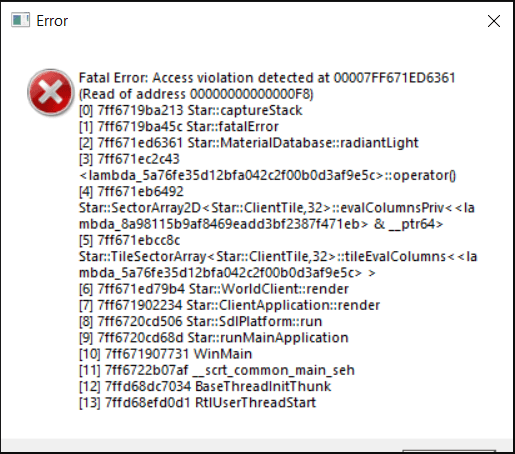
A lot of players encounter the Starbound fatal error when launching the game or joining multiplayer. Don’t worry. This post of MiniTool explores several effective ways to fix the Starbound fatal error access violation detected.
Starbound is an action-adventure video game developed by Chucklefish. It is available on many platforms, including Microsoft Windows, Linux, PlayStation 4, and Xbox One. Since its release, this game has attracted a large number of players around the world.
Sometimes, however, many Windows users complain that Starbound crashes on startup and throws the “fatal error access via lotion detected” message. In addition, the Starbound fatal error is often accompanied by error codes like 00007FF7AB290173 and 0000000000000188. Here’s a true example from the Reddit forum:
Is there a fix for the fatal error [Error] Fatal Error: Access violation detected at 00007FF7AB290173 (Read of address 0000000000000188) it only happens when I try to join multiplayer with an already-existing character.
https://www.reddit.com/r/starbound/comments/ojcrfy/fatal_error_fix/
What causes the “Starbound fatal error access violation detected” error? After analyzing extensive user reports from different forums and communities, we found the error is often related to the following factors:
- Lack of administrative privileges
- Inappropriate compatibility settings
- Outdated or corrupted graphics card driver
- Corrupted or missing game files
- Enabled VSync
How to fix the “fatal exception caught Starbound” error? Here we summarize 6 proven ways to fix the error. Let’s start trying.
# 1. Run the Game in Compatibility Mode with Admin Rights
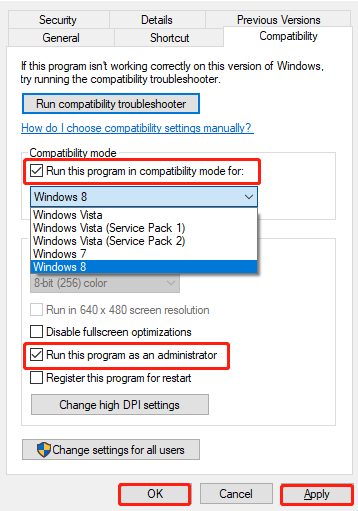
Many users from the Steam community reported that the Starbound fatal error access violation can be solved by running the game as an administrator in combability mode. Follow the steps below to have a try.’
Step 1. Press the Win + E keys to open the File Explorer and locate the game installation folder. If you have installed the game via Steam, the folder is usually located in the following path:
C:Programs Files (x86)SteamSteamSteamappscommonStarbound
Step 2. Right-click the starbound.exe file and select Properties.
Step 3. Navigate to the Compatibility mode and tick the checkbox next to Run this program as an administrator.
Step 4. Tick the checkbox next to Run this program in compatibility mode for and select Windows 8 or older version from the drop-down menu.
Step 5. Click on Apply and OK to save the changes.
Step 6. Revert to the game installation folder and repeat the same procedure for the starbound_opengl.exe and launcher/launcher.exe files. Once done, restart the game and check if the “Starbound fatal error access violation Windows 10” issue gets fixed.
# 2. Clear the Forced Compatibility Settings of Steam
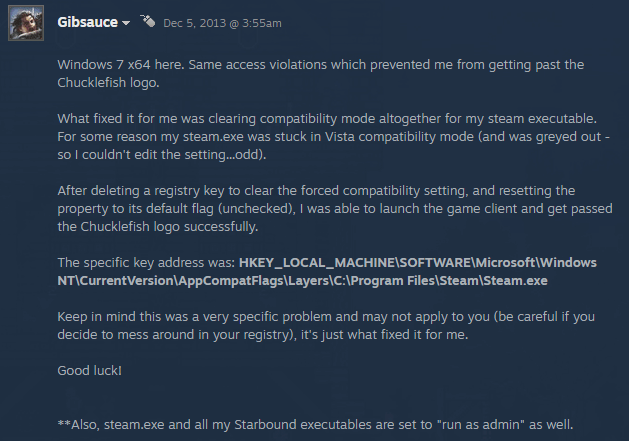
Some users from the Steam community reported that the fatal error access violation Starbound also occurs if the Steam client is stuck in Vista compatibility mode. In this case, you can try clearing the forced compatibility settings in Registry Editor and resetting the properties to its default settings.
Note:
The Registry Editor is a powerful Windows built-in tool, and improper operation could lead to your system being unstable or even inoperable. So, we highly recommend you back up the Registry in case anything goes wrong.
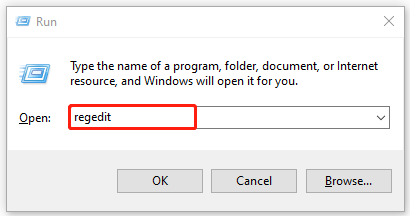
Step 1. Press the Win + R keys to open the Run dialog box, and then type regedit in it and hit Enter. Then click on Yes when a User Account Control window pops up.
Step 2. In the Registry Editor window, locate the following entry key from the left navigation bar.
HKEY_LOCAL_MACHINESOFTWAREMicrosoftWindows NTCurrentVersionAppCompatFlagsLayersC:Program FilesSteamSteam.exe
Step 3. Delete the forced compatibility registry key from the right panel.
Step 4. Open the Properties window of Steam.exe and Starbound.exe files as we explained above, untick the checkbox for Run this program in compatibility mode for, and click on OK to save the change.
Step 5. After you reset the properties to the default settings, you can relaunch the game and see if the “Starbound fatal exception caught starexception” error disappears.
# 3. Disable VSync in Starbound
VSync is a kind of graphics technology that can synchronize the frame rate of the game and the refresh rate of the game monitor. If the VSync is enabled on a low-end computer where the GPU is not powerful enough to sustain the feature, you may encounter the fatal exception caught Starbound error.
In this case, you can follow the steps below to disable VSync in Starbound.
Step 1. Launch your Steam client and sign in to your account and navigate to the Library tab.
Step 2. Right-click Starbound from the left pane and select Properties.
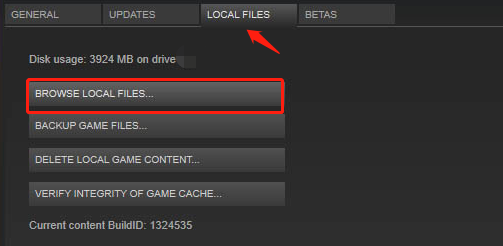
Step 3. Inside the Properties window, navigate to the Local Files section and click on Browse Local Files.
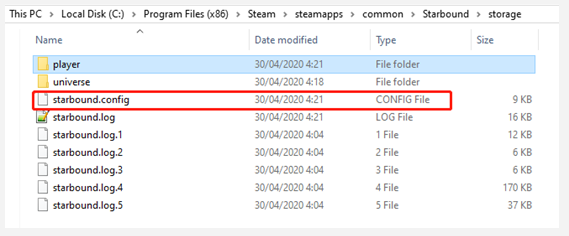
Step 4. Now, you should locate the local installation of Starbound, open the Storage folder, right-click the starbound.config file and select Open with Notepad.
Step 5. In the Notepad window, find a code line named vsync: true and change its value to false. Then press Ctrl + S keys to save the change.
Now, you can relaunch the game and check if the “Starbound fatal error access violation Windows 10” error is fixed.
# 4. Update Your Graphics Card Driver
Sometimes an outdated or corrupted graphics card driver can trigger the fatal error access violation Starbound as well. In this case, you can try updating the GPU driver to the latest version.
Step 1. Press the Win + R keys to open the Run dialog box, and then type devmgmt.msc in the box and hit Enter to open this program.
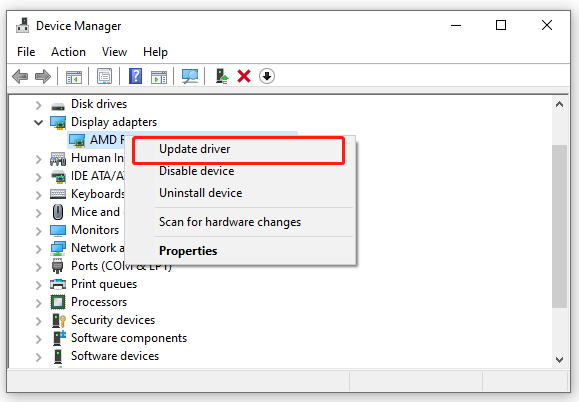
Step 2. Expand the Display adapters category, and then right-click the graphics card driver and select Update Driver.
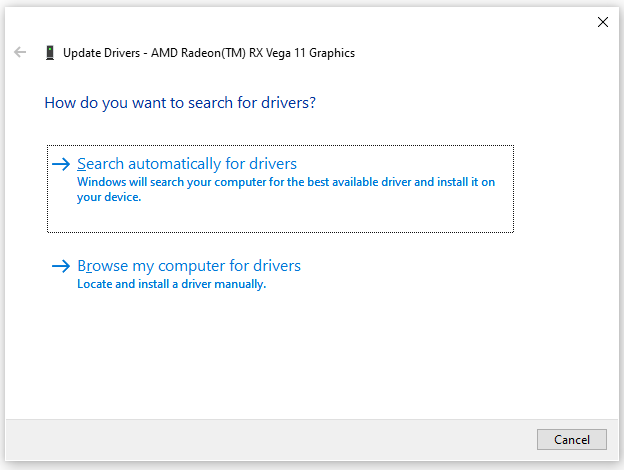
Step 3. Then you can select Search automatically for drivers option and follow the on-screen prompts to complete the update. Alternatively, you can download the latest graphics card driver from the manufacturer’s website and install it on your computer.
# 5. Verify the Integrity of the Game Files
If the game installation files become corrupted or missing, you may encounter various issues like Starbound fatal error access violation detected. To rule out this situation, you can use Steam to verify the integrity of the game files.
Step 1. Run the Steam client as an administrator, and then navigate to the Library tab.
Step 2. Right-click Starbound from the left pane and select Properties.
Step 3. Inside the Properties window, navigate to the Local Files section and click on the Verify Integrity of Game Files option. Then wait for the repair to complete and relaunch the game and see if it works properly.
# 6. Reinstall the Game
If none of the above methods fix the “fatal exception caught Starbound” error, you may consider reinstalling this game. It is very simple to operate. To do so, follow the steps below:
Step 1. Open the Run box again, type appwiz.cpl in it, and hit Enter.
Tips:
Alternatively, you can open Steam, navigate to the Library tab, right-click Starbound and select Uninstall from the drop-down menu. Then click on Delete to confirm the operation. Once uninstalled, you can redownload from Steam.
Step 2. Right-click Starbound from the list of installed programs and select Uninstall. After the uninstallation completes, download the game from its official website and install it on your computer.
Further reading: If you enter some issues like file system corruption or low disk space when reinstalling the game, don’t worry. MiniTool Partition Wizard can help you fix them easily by checking file system errors, extending/resizing partitions, analyzing disk space, upgrading to a larger hard disk, etc.
Сообщается, что некоторые пользователи Starbound видят ошибку NetworkException (соединение не выполнено) при попытке подключиться к многопользовательскому серверу. Сообщается, что эта проблема возникает в Windows 7, Windows 8.1 и Windows 10.
Ошибка исключения сети StarBound
После тщательного изучения этой проблемы выясняется, что существует несколько различных распространенных сценариев, которые могут привести к такому поведению игрового клиента при попытке подключения к существующему многопользовательскому серверу. Вот список виновников, которые могут вызвать ошибку NetworkException ‘(Join Failed) с Starbound:
- UPnP отключен – если вы используете более новую модель маршрутизатора, вы можете ожидать появления этой ошибки, если ранее вы отключили Universal Plug and Play (UPnP). Эта функция важна для подключения к разным серверам Starnbound, поскольку она автоматически перенаправляет порты, используемые игрой.
- Порты Starbound не перенаправляются – если вы используете более старую модель маршрутизатора (та, которая не поддерживает UPnP), вам нужно будет решить проблему перенаправления требуемых портов вручную из настроек вашего маршрутизатора в соответствии с платформой, на которой вы работаете. пытается продолжить игру.
- Повреждение файла игры. По словам некоторых затронутых пользователей, запускающих игру через Steam, вы также можете ожидать появления этой ошибки в тех случаях, когда файл игры или связанная с ним зависимость отсутствует или поврежден. В этом случае вы можете решить проблему, запустив проверку целостности из меню Steam.
- Соединение Starbound заблокировано брандмауэром – ложное срабатывание может убедить ваш пакет безопасности заблокировать входящие и исходящие соединения с сервером Starbound. В этом случае вы можете решить проблему, добавив в белый список Starbound, а также программу запуска, которую вы используете для запуска игры.
- Основное сетевое ограничение. В некоторых случаях сетевое ограничение (связанное с IPv4-соединением), наложенное на уровне интернет-провайдера, препятствует соединению с сервером Starbound. Подобные ситуации обычно можно решить с помощью приложения VPN-туннелирования, такого как Hamachi, при подключении к игровому серверу.
Теперь, когда вы знаете всех потенциальных виновников, которые могут нести ответственность за эту проблему, вот список методов, которые другие игры Starbound использовали для решения этой конкретной проблемы:
1. Включение UPnP (если применимо)
Одна из наиболее распространенных проблем, о которых сообщается, которая вызывает эту ошибку Starbound, – это случай, когда порты, используемые игрой, не перенаправляются, поэтому соединение с игровым сервером не может быть установлено вашим компьютером.
В настоящее время подавляющее большинство маршрутизаторов могут автоматически перенаправлять порты, используемые играми, в которые мы играем, с помощью функции UPnP (Universal Plug and Play).
Поэтому, если ваш маршрутизатор поддерживает Universal Plug and Play, решение очень простое – просто войдите в настройки маршрутизатора и включите UPnP, чтобы ваш маршрутизатор автоматически переадресовал порты, используемые вашей игрой.
Несмотря на то, что инструкции о том, как это сделать, отличаются от маршрутизатора к маршрутизатору, вам необходимо выполнить ряд общих инструкций, чтобы включить UPnP на вашем маршрутизаторе.
Включение UPnP
Убедившись, что UPnP включен, перезагрузите маршрутизатор и компьютер, на котором вы играете, и посмотрите, устранена ли проблема.
Если ваш маршрутизатор не поддерживает Universal Plug and Play, перейдите к следующему потенциальному исправлению ниже.
Если вы используете более старую модель маршрутизатора, которая не поддерживает UPnP, вам необходимо предпринять некоторые дополнительные шаги для перенаправления портов, используемых игрой, вручную (в зависимости от платформы, на которой вы играете в Starbound).
Несколько затронутых пользователей, с которыми мы сталкиваемся с той же проблемой, сообщили, что проблема была окончательно устранена после того, как они получили доступ к настройкам своего маршрутизатора вручную и перенаправили порты, используемые Starbound.
Примечание. Каждая ситуация будет немного отличаться в зависимости от производителя вашего маршрутизатора, но мы создали серию общих шагов, которые помогут вам пройти весь процесс.
Следуйте инструкциям ниже, чтобы перенаправить необходимые порты StarBound вручную из настроек вашего маршрутизатора:
- На ПК, который подключается к той же сети, которую вы используете при игре в Starbound, откройте браузер по умолчанию, введите один из следующих адресов и нажмите Enter, чтобы открыть настройки маршрутизатора: 192.168.0.1 192.168.1.1
- После того, как вы окажетесь на начальном экране входа в систему, введите учетные данные для входа в настройки маршрутизатора.
Доступ к настройкам маршрутизатора
Примечание. В большинстве моделей маршрутизаторов вы сможете войти в систему с учетными данными по умолчанию – admin в качестве имени пользователя и 1234 в качестве пароля. Если эти общие учетные данные не работают, посмотрите на заднюю часть маршрутизатора или найдите в Интернете учетные данные для входа по умолчанию в соответствии с моделью вашего маршрутизатора.
- После того, как вы успешно вошли в настройки вашего маршрутизатора, разверните меню Advanced / Expert и найдите параметр с именем Port Forwarding / NAT Forwarding.
Перенаправление необходимых портов
- Затем откройте указанные ниже порты вручную, чтобы убедиться, что ваша сеть будет принимать входящие соединения от Starbound в соответствии с платформой, на которой вы играете: Starbound – PC TCP: 21025 UDP: Starbound – Playstation 4 TCP: 1935,3478 -3480 UDP: 3074,3478-3479 Starbound – Xbox One TCP: 3074 UDP: 88,500,3074,3544,4500 Starbound – Steam TCP: 21025,27015-27030,27036-27037 UDP: 4380,27000-27031,27036
- После того, как каждый порт будет успешно перенаправлен, перезагрузите компьютер, снова запустите игру и посмотрите, устранена ли проблема.
Если такая же проблема все еще возникает даже после того, как вы перенаправили необходимые порты вручную, перейдите к следующему потенциальному исправлению ниже.
3.Проверка целостности игрового файла (только Steam)
По словам некоторых затронутых пользователей, эта проблема также может быть связана с некоторым типом повреждения системных файлов, влияющим на локальную установку Starbound.
Если вы столкнулись с этой проблемой при запуске игры через Steam, вам следует найти время, чтобы выполнить проверку целостности файла и восстановить установку Starbound в Steam. Эта операция проверит каждый файл игры индивидуально и заменит каждый поврежденный элемент исправным эквивалентом – в случае отсутствия элемента эта операция также заменит его.
Следуйте инструкциям ниже, чтобы проверить файл Starbound в Steam с проверкой целостности файла:
- Начните с запуска клиента Steam, а затем войдите в систему, используя учетные данные своей учетной записи Steam.
- После того, как вы успешно вошли в свою учетную запись Steam, щелкните правой кнопкой мыши список, связанный со Starbound, на вкладке «Библиотека», затем нажмите «Свойства» во вновь появившемся контекстном меню.
Доступ к экрану свойств Starbound
- На экране свойств затронутых игр нажмите «Локальные файлы», затем нажмите «Проверить целостность кэша игры».
Запуск проверки целостности
- Наконец, подтвердите проверку целостности, затем дождитесь завершения операции, прежде чем перезапустить компьютер и снова запустить игру, чтобы проверить, устранена ли проблема.
Если вы по-прежнему видите ту же ошибку NetworkException при попытке подключиться к серверу Starbound, перейдите к следующему исправлению ниже.
4. Внесите в белый список Starbound внутри брандмауэра Windows
Если ни один из вышеперечисленных методов не помог вам, и вы используете пакет безопасности Windows (Защитник Windows + брандмауэр Windows), вероятно, эта проблема возникает из-за того, что соединение с игровым сервером рассматривается как потенциальное нарушение безопасности, и оно активно блокируется.
Если это подходящий сценарий, исправление простое – вам нужно внести в белый список как основной исполняемый файл, так и средство запуска Steam (если вы запускаете через Steam) в настройках AV / Firewall.
Примечание. Если вы используете сторонний пакет безопасности, инструкции, которые вам нужно будет выполнить для создания правила белого списка, будут отличаться от приложения к приложению. Найдите в Интернете инструкции по вашему конкретному приложению безопасности.
Но если вы используете Защитник Windows + брандмауэр Windows, следуйте пошаговым инструкциям ниже, чтобы создать правило белого списка для Starbound и средства запуска Steam, чтобы устранить проблему:
- Нажмите клавиши Windows + R, чтобы открыть диалоговое окно «Выполнить». Затем введите control firewall.cpl и нажмите Enter, чтобы открыть окно брандмауэра Windows.
Доступ к экрану брандмауэра Windows
- Затем перейдите в меню слева в главном меню брандмауэра Защитника Windows и нажмите Разрешить приложение или функцию через брандмауэр Защитника Windows.
Разрешение приложения через брандмауэр Windows
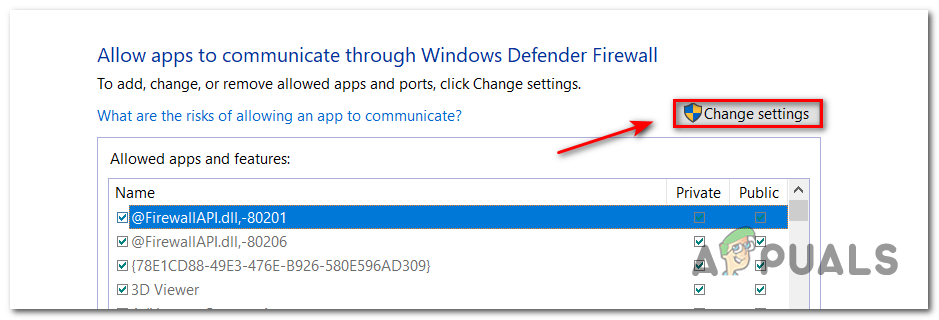
- В меню «Разрешенные приложения» нажмите кнопку «Изменить настройки».
Внесение изменений в брандмауэр Windows
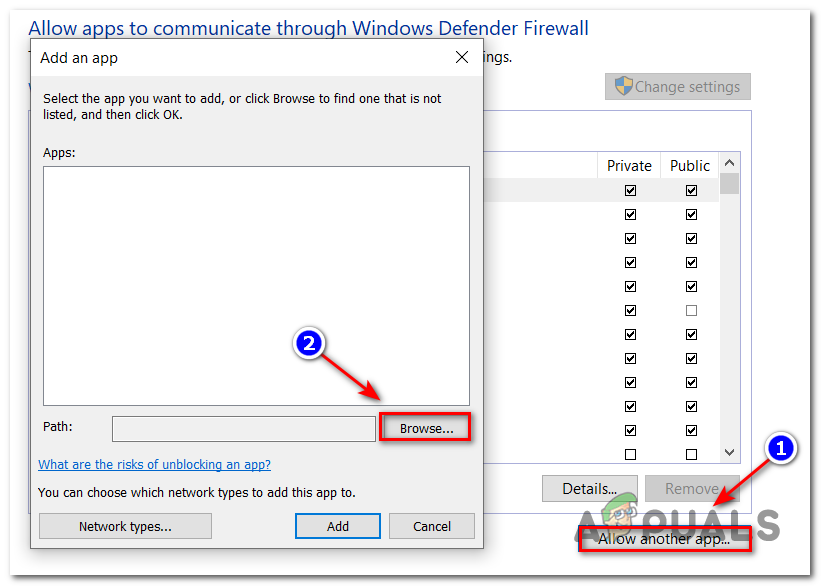
- Нажмите «Разрешить другое приложение» ниже, затем нажмите «Браузер» и найдите место, где установлена игра.
Разрешение Starbound
- После того, как вам удастся найти основной исполняемый файл для Starbound, добавьте его в белый список, затем повторите операцию с исполняемым файлом Steam.
- Наконец, в списке разрешенных приложений убедитесь, что установлены флажки Private и Public двух элементов, которые вы добавили ранее.
- Теперь просто сохраните изменения, затем попробуйте снова загрузить игру, чтобы проверить, возникает ли ошибка.
Если вы видите ту же ошибку записи на диск, даже если вы следовали инструкциям, перейдите к следующему возможному исправлению этой ошибки.
5. Использование Hamachi VPN.
Если ни один из вышеперечисленных методов не позволил вам нормально подключиться к серверу Starbound, скорее всего, вы имеете дело с каким-то типом сетевого ограничения, которое каким-то образом ограничивает обмен данными, который ваш компьютер делает с сервером Starbound.
В этом случае вы сможете решить проблему, используя VPN, чтобы создать впечатление, что вы не используете общее соединение IPv4. Самый простой способ сделать это – просто установить обычную игровую VPN.
Но если вы хотите максимизировать свои шансы на успех, правильный способ сделать это – использовать Hamachi (или аналогичное приложение для туннелирования VPN) для создания выделенной сети VPN, к которой вы и все ваши друзья подключены при присоединении к серверу Starbound.
Примечание: это может повысить ваш пинг, но это все же лучше, чем вообще не играть в игру.
Следуйте приведенным ниже инструкциям, чтобы установить Hamachi и настроить сеть VPN для использования с друзьями во время игры в Starbond:
- Откройте браузер по умолчанию и посетите официальный страница загрузки Hamachi. Оказавшись внутри, нажмите «Загрузить сейчас», чтобы загрузить последнюю версию Hamachi VPN.
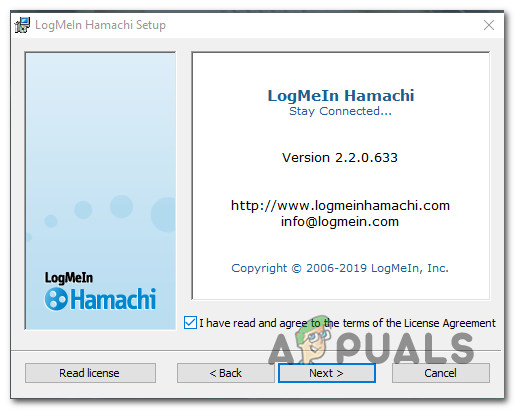
- После завершения загрузки дважды щелкните hamachi.msi, затем следуйте инструкциям на экране, чтобы завершить установку приложения Hamachi.
- Когда появится запрос UAC (Контроль учетных записей пользователей), нажмите Да, чтобы предоставить доступ администратора.
Установка Hamachi VPN
- После завершения установки перезагрузите компьютер и дождитесь завершения следующего запуска, прежде чем снова открыть Hamachi.
- Затем внутри основного экрана Hamachi нажмите кнопку питания и дождитесь успешного подключения.
- После установки соединения войдите в систему (или войдите, если у вас еще нет учетной записи) с помощью Hamachi.
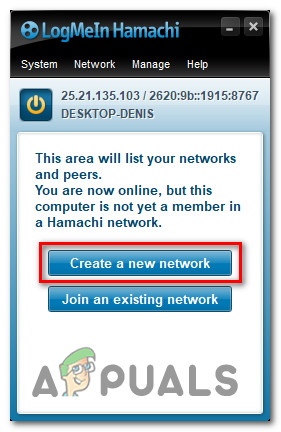
- После успешного подключения к Hamachi нажмите «Создать новую сеть» в меню LogMeIn Hamachi.
Создание сети в Hamachi
- Как только вы перейдете к следующему экрану, установите идентификатор сети и пароль для своей сети Hamachi VPN и запомните или запишите их.
Настройка новой сети в Хамачи
- После успешного создания сети отправьте только что установленные учетные данные другу, с которым вы пытаетесь использовать GameStream, и попросите его также установить Hamachi и нажмите «Присоединиться к существующей сети», прежде чем вводить свои учетные данные.
- После того, как вы и ваш друг / друзья подключитесь к одной сети Hamachi, снова присоединитесь к тому же серверу Starbound и посмотрите, решена ли проблема.
Lately, many game players have complained of Starbound crashes when joining the game server. Before you press the panic button, know that you are not alone in this. The reason for putting this article together is to provide you with working fixes to help you solve the problem.
Fix #1: Run Steam and Starbound as Admin
1. Right-click on the Starbound game from the Steam library.
2. Go to Properties. You will locate this on the local file tab
3. Click Browse Local Files.
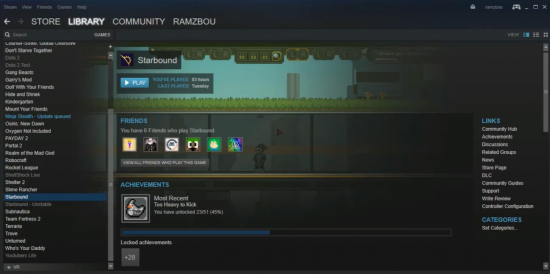
4. Look for the game executable.
5. Right-click on the game executable and go to Properties.
6. Click on the compatibility tab.
7. Select the run this program as administrator.
8. Click Apply.
Fix #2: Port Forwarding
1. Open your web browser, then log into your router.
2. Navigate through to port forwarding.
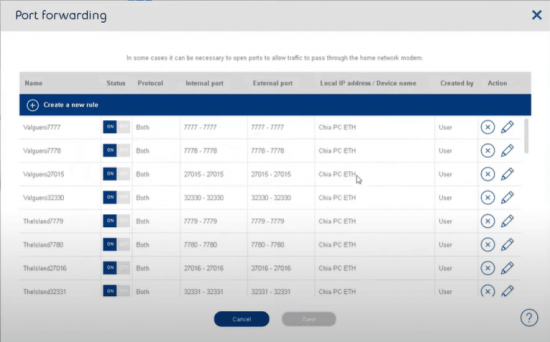
3. Enter the IP address of your computer/game console.
4. Also, don’t forget to add the TCP and UDP.
Note that the TCP port for starbound is 21025. For the local IP, enter that of your system.
Fix #3: Check the IP and Port
You can also fix this issue by checking your IP and Port.
1. To check your IP, click the Windows button on your desktop, then type cmd to open the command prompt.

2. Type ipconfig and press enter
3. You will see the IP address under the Ethernet adapter local area connection.
Fix #4: Delete Files in the Universe Folder
Deleting files in the universe folder will also fix this problem. Your universe will reset.
Here is how to go about it:
- Go to steamLibrary\steamApps\common\starbound\storage.
- This will take you to the universe folder.
- Delete all the files in this folder.
Fix #5: Delete Files in the Player Folder
This is similar to deleting files in your universe folder. What this does is erase all your character and also their universes [1]. The player folder is where all information about your character is.
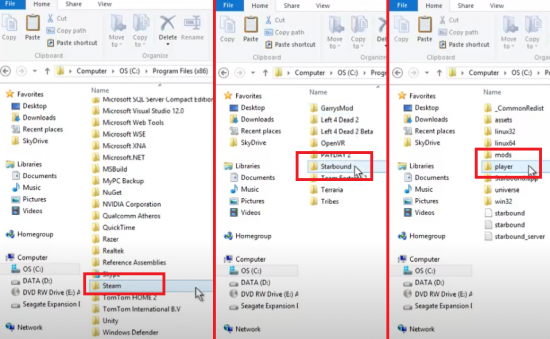
Not only this, the server uses the player folder in the universe. This solution also works great for Starbound and other games like Unturned and ARK. But do note that deleting files will reset everything for you to have a fresh start.
Fix #6: Delete starbound.config
This file also prevents the game from crashing upon connecting to a server. All you have to do is delete the starbound.config file. Here is how to do it:
- Right-click on the Steam library and select properties
- From the local file tab, click on browse local files.
- In the next folder that will load is the config file.
- Delete the folder.
Fix #7: Disable Hamachi and Other Third Party Programs
Enabling Hamachi may most likely get in the way of connecting to the server. The best way to do this is to disable Hamachi and other third-party programs.

To disable Hamachi, right-click on it and then select disable.
Conclusion
There are a lot of reasons why Starbound crashes when joining a server. However, with the surefire fixes in this guide, you can solve this problem with no hassle. You can try any of these fixes to see which one works best for you.
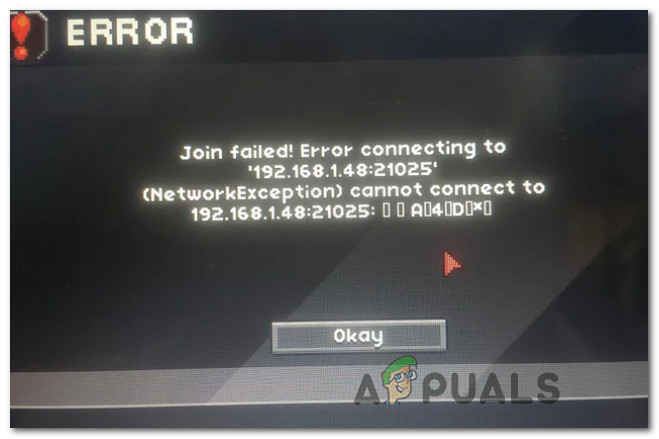
Some Starbound users are reportedly seeing the ‘NetworkException’ (Join Failed)’ error when attempting to connect to a multiplayer server. This issue is reported to occur on Windows 7, Windows 8.1, and Windows 10.
After investigating this issue thoroughly, it turns out that there are several different common scenarios that might cause the game client to behave in this way when trying to connect to an existing multiplayer server. Here’s a list of culprits that might trigger the NetworkException’ (Join Failed) error with Starbound:
- UPnP is Disabled – If you’re using a newer router model, you can expect to see this error if you previously disabled Universal Plug and Play (UPnP). This feature is essential in allowing you to connect to different Starnbound servers since it will automatically forward the ports used by the game.
- Starbound ports are not forwarded – If you’re using an older router model (one that doesn’t support UPnP), you will need to go through the trouble of forwarding the required ports manually from your router settings according to the platform you’re attempting to playing the game on.
- Game file corruption – According to some affected users launching the game through Steam, you can also expect to see this error occurring in those instances where a game file or associated dependency is missing or corrupted. In this case, you can resolve the issue by triggering an integrity check from Steam’s menu.
- Starbound connection is blocked by a firewall – A false positive might convince your security suite to block incoming and outgoing connections with the Starbound server. In this case, you can resolve the issue by whitelisting Starbound as well as the launcher you use to launch the game.
- Underlying Network Restriction – There are some instances where a network restriction (related to the IPv4 connection) imposed at an ISP level is preventing the connection with the Starbound server. Situations like this can typically be resolved by using a VPN tunneling app like Hamachi when connecting to the game server.
Now that you are aware of every potential culprit that might be responsible for this issue, here’s a list of methods that other Starbound games have used to fix this particular issue:
1. Enabling UPnP (if applicable)
One of the most common signaled issues that will produce this Starbound error is a case where the ports used by the game are not forwarded, so the connection with the game server cannot be established by your computer.
Nowadays, the vast majority of routers are perfectly capable of forwarding the ports used by the games we play automatically – via a feature called UPnP (Universal Plug and Play).
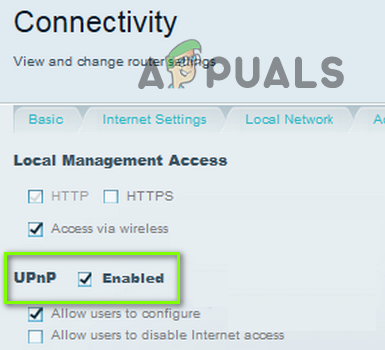
So if your router supports Universal Plug and Play, the solution is extremely easy – Simply access your router settings and enable UPnP to allow your router to automatically forward the ports used by the game you play.
Even though the instructions on how to do this are different from router to router, you need to follow a series of generic instructions to enable UPnP on your router.
Once you have ensured that UPnP is enabled, reboot both your router and the PC you play the game on and see if the issue is now fixed.
In case your router does not support Universal Plug and Play, move down to the next potential fix below.
2. Forwarding StarBound’s Ports Manually
In case you’re using an older router model that doesn’t support UPnP, you’ll need to take some additional steps to forward the ports used by the game manually (depending on the platform you’re playing Starbound on).
Several affected users that we’re dealing with the same kind of issue have reported that the problem was finally fixed after they accessed their router settings manually and forwarded the ports used by Starbound.
Note: Every situation will be slightly different depending on your router manufacturer, but we’ve created a series of generic steps that should walk you through the entire process.
Follow the instructions below to forward the required StarBound ports manually from your router settings:
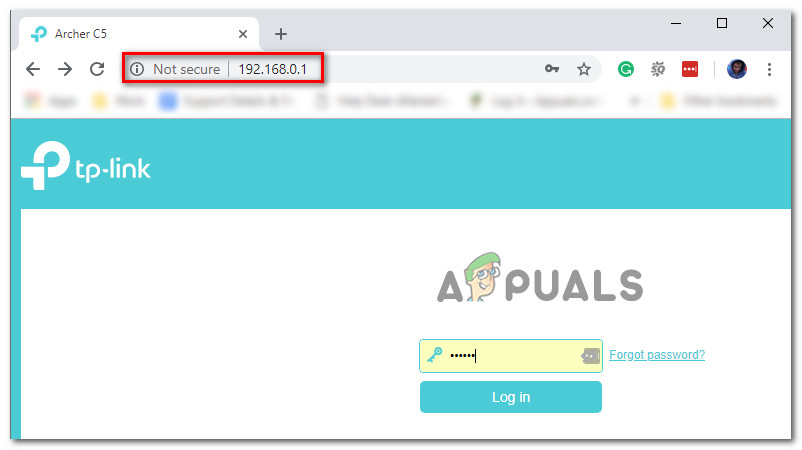
- On a PC that is connecting to the same network you use when playing Starbound, open your default browser, type one of the following addresses and press Enter to open your router settings:
192.168.0.1
192.168.1.1
- After you’re at the initial login screen, enter the login credentials to access your router settings.
Accessing the Router settings Note: With most router models, you’ll be able to get in with the default login credentials – admin as username and 1234 as password. If these generic credentials don’t work, look on the back of your router or search online for the default login credentials according to your router model.
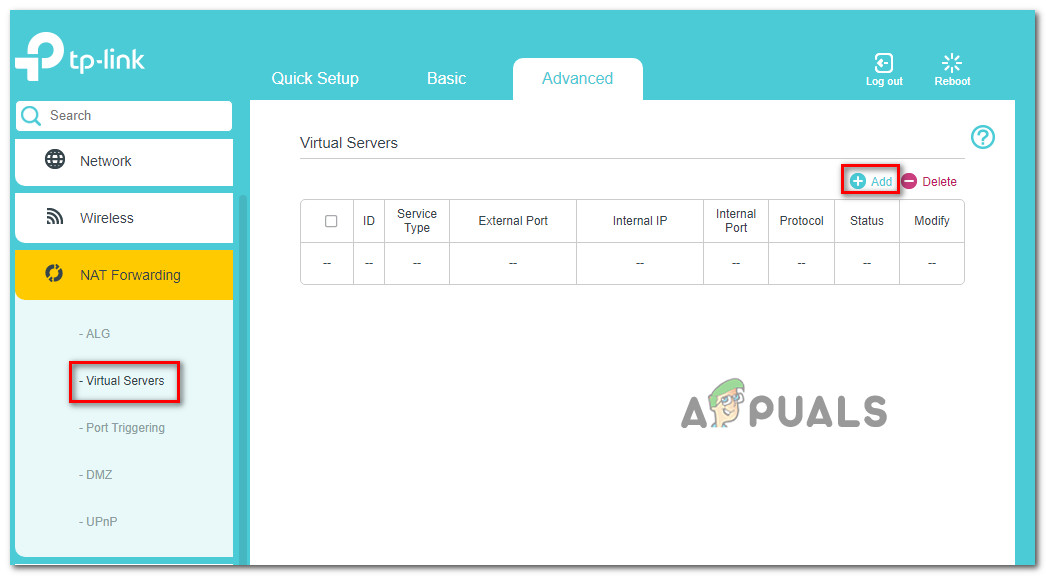
- After you have successfully arrived inside your router settings, expand the Advanced / Expert menu, and look for an option named Port Forwarding / NAT Forwarding.
Forwarding the required ports - Next, go ahead and manually open the ports below to ensure that your network will accept incoming connections from the Starbound according to the platform that you’re playing on:
Starbound - PC
TCP: 21025
UDP:

Starbound - Playstation 4
TCP: 1935,3478-3480
UDP: 3074,3478-3479

Starbound - Xbox One
TCP: 3074
UDP: 88,500,3074,3544,4500

Starbound - Steam
TCP: 21025,27015-27030,27036-27037
UDP: 4380,27000-27031,27036
- Once every port is successfully forwarded, restart your computer, launch the game again, and see if the problem is now fixed.
If the same kind of issue is still occurring even after you forwarded the required ports manually, move down to the next potential fix below.
3.Checking the Game File’s Integrity (Steam Only)
According to some affected users, this issue can also be related to some type of system file corruption that is affecting the local installation of Starbound.
If you’re encountering this issue while launching the game through Steam, you should take the time to perform a file integrity check and repair your Steam installation of Starbound. This operation will check every game file individually and replace every corrupted item with a healthy equivalent – In case an item is missing, this operation will also replace it.
Follow the instructions below to verify the Starbound’s file inside Steam with a file integrity check:
- Start by launching your Steam client, then sign with your Steam account credentials.
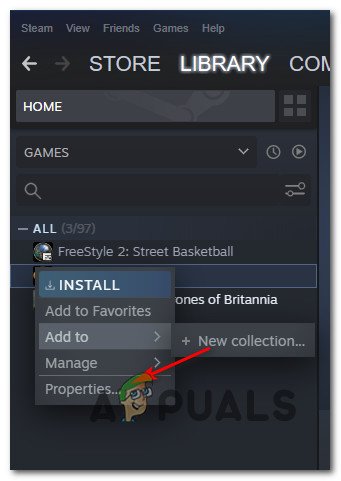
- Once you have successfully signed in with your Steam account, right-click on the listing associated with Starbound from the Library tab, then click click on Properties from the newly appeared context menu.
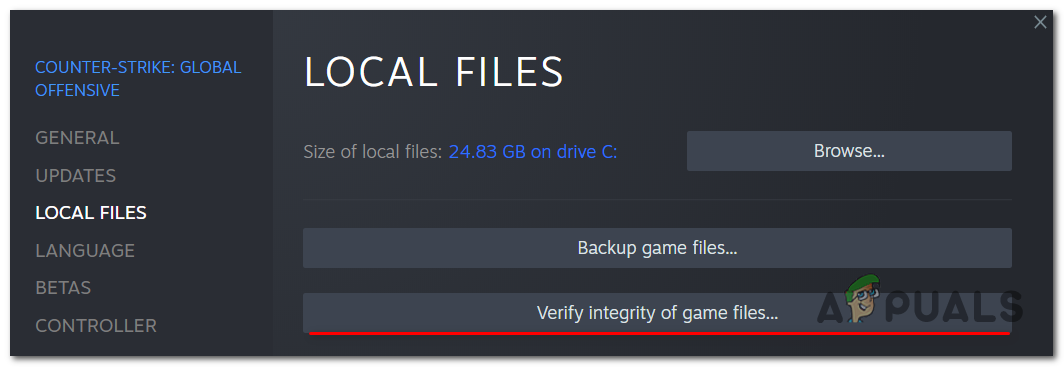
Accessing Properties screen of Starbound - Inside the Properties screen of the affected games, go ahead and click on Local Files, then click on Verify Integrity of Game Cache.
Triggering an integrity check - Finally, confirm the integrity check, then wait until the operation is complete before restarting your computer and launching the game once again to see if the problem is now fixed.
If you still see the same NetworkException error when attempting to connect to a Starbound server, move down to the next fix below.
4. Whitelist Starbound inside Windows Firewall
If none of the other methods above have worked for you and you’re using the Windows Security suite (Windows Defender + Windows Firewall), it’s likely that this issue appears due to an instance where the connection with the game server is treated as a potential security breach and it’s actively being blocked.
If this is a suitable scenario, the fix is simple – You need to whitelist both the main executable and the Steam launcher (if you’re launching through Steam) inside your AV / Firewall settings.
Note: In case you’re using a 3rd party security suite, the instructions you’ll need to follow to create a whitelisting rule will be different from app to app. Search online for instructions on your specific security app.
But if you’re using Windows Defender + Windows Firewall, follow the step-by-step instructions below to create a whitelisting rule for Starbound and the Steam launcher to fix the issue:
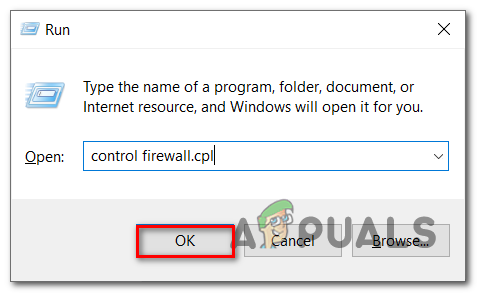
- Press the Windows key + R to open up a Run dialog box. Next, type ‘control firewall.cpl’ and press Enter to open up the Windows Firewall window.
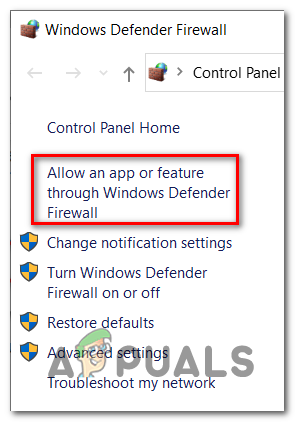
Accessing the Windows firewall screen - Next, go to the left side menu inside the main menu of the Windows Defender Firewall and click on Allow an app or feature through Windows Defender firewall.
Allowing an app through Windows Firewall - Inside the Allowed apps menu, click on the Change Settings button.
Making Changes to Windows Firewall - Click on Allow another app below, then click on Browser and find the location where the game is installed.
Allowing Starbound - After you manage to find the main executable for Starbound, add it to the whitelist, then repeat the operation with the Steam executable.
- Finally, inside the list of Allowed apps, make sure that both the Private and Public checkboxes of the two items you added previously are checked.
- Now just save the changes, then try to download the game again to see if the error still occurs.
If you’re seeing the same disk write error even if you followed the steps, go to the next possible fix for this error.
5. Using a Hamachi VPN
If none of the methods above have allowed you to connect to a Starbound server normally, chances are you’re dealing with some type of network restriction that is somehow restricting the data exchanges your PC makes with Starbound’s server.
In this case, you should be able to fix the problem by using a VPN to make it seem that you’re not using a shared IPv4 connection. The easiest way to do this is to simply install a conventional gaming VPN.
But if you want to maximize your chances of success, the proper way to do it is to use Hamachi (or a similar VPN tunneling app) to create a dedicated VPN network that you and all your friends are connected to when joining a Starbound server.
Note: This might make your ping higher, but it’s still better than not being able to play the game at all.
Follow the instructions below to install hamachi and set up a VPN network to use with your friends when playing Starbond:
- Open your default browser and visit the official download page of Hamachi. Once inside, click on Download now to download the latest version of Hamachi VPN.
- After the download is complete, double-click on hamachi.msi, then follow the on-screen instructions to complete the installation of the Hamachi application.
- When prompted by the UAC (User Account Control) prompt, click Yes to grant admin access.
Installing Hamachi VPN - Once the installation is complete, reboot your computer and wait for the next startup to complete before opening Hamachi once again.
- Next, inside the main Hamachi screen, click on the power button and wait for the connection to succeed.
- After the connection is established, log in (or sign in if you don’t already have an account) with Hamachi.
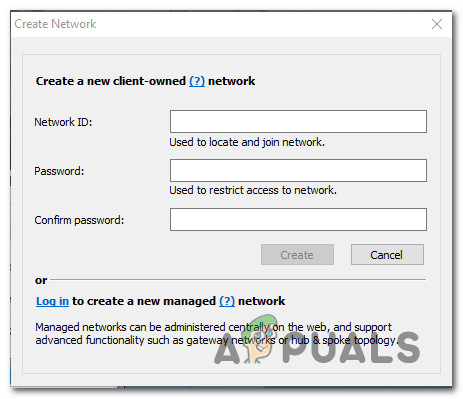
- After you successfully connect with Hamachi, click on Create a New network from the LogMeIn Hamachi menu.
Creating a Network in Hamachi - Once you get to the next screen, set a network ID and password for your Hamachi VPN network and remember it or note it down.
Setting up a new network in Hamachi - After the network is successfully created, go ahead and send the credentials you just established to the friend you’re trying to use GameStream with and ask him to install Hamachi as well and click on Join an existing network before inserting your credentials.
- After you and your friend/s are connected to the same Hamachi network, join the same Starbound server once again and see if the issue is now fixed.
Вы попытались присоединиться к серверу и потерпели неудачу с некоторой ошибкой, которую Вы не знаете, как зафиксировать? Или Вы когда-либо беспорядочно разъединялись откуда ни возьмись? Хорошо вот проблема, снимающая руководство для всех Ваших основанных на сервере проблем!
Проблемы счета
Проблемы счета могут очень, но это — единственное, о котором я знаю.
Проблема и решение № 1
Прежде всего Вы получите сообщение об ошибке по 2 причинам.* Одна причина может пытаться присоединиться, сервер с областью счета/пароля заполнен, когда это, как предполагается, пусто:
Проблема и решение № 2
Другая причина — правописание мисс имени учетной записи или пароля счета. Если Вы не можете решить мисс, записывающую себя, ИЛИ Вы должны считать, сведения об аккаунте связываются с владельцем. Если Вы — владелец, свяжитесь с поставщиками сервера.
* Примечание: Я не делаю 100% знают, есть ли только 2 причины, мог бы быть больше.
Несоответствие актива
Следующий выпуск — Несоответствие Актива. Эта проблема происходит из-за урегулирования в меню опций, насколько я знаю, это — то, только если у Вас или сервера есть модники.
Проблема и решение
Теперь способ решить это, открывая варианты и под графическим счетом будет, «Позволяют коробку тиканья» Несоответствия Активов. Это будет пусто, и Вы будете необходимы к позволенному.
Бездеятельность
Затем у нас есть проблема бездеятельности, есть 2 известных* причины.
Проблема и решение № 1
Первый довольно очевиден, Вы отсутствовали, fro клавиатура слишком долго и сервер загружают Вас. Следующим является немного более неясный.
Я заметил тенденцию, где я ДУМАЮ, что есть клиент к ошибке связи сервера. Иногда это могла быть ошибка клиента, Вы можете сказать, используют ли люди сервер.
Проблема и решение № 2
Другие времена это — проблема сервера, обычно проблема, могут быть определены, если всех на сервере пинают в то же самое время. Чтобы решить это, Вы или должны связаться с владельцем сервера, или если Вы — владелец, Вы должны представить билет.
* Это проблемы, о которых я знаю, не стесняйтесь сообщать о любом, с которым Вы сталкиваетесь.
Исключение пакета клиента
Добро пожаловать в, вероятно, заключительную и самую неясную проблему об этом руководстве.
Исключение Пакета клиента — действительно странное. Это не дает информации о проблеме.
Проблема и решение № 1
Эта проблема вызвана, когда у Вас нет модников для кивнувшего сервера. Для решения спросите модераторов или владельца сервера для собрания модников и установите их.
Проблема и решение № 2
Теперь по второй возможной причине, я не знаю решения. Но эта проблема вызвана (я принимаю) с несовместимыми таможенными сценариями. Теперь эта проблема, скорее всего, вызвана таможенными сценариями, находящимися в противоречии с модниками. Только решения состоят в том, чтобы удалить сценарии, удалить модников или перезапустить Ваш PC. Ни одно из этого не составляет 100%, но его стоящее того, чтобы попытаться. Также то, что Вы можете сделать, Проверяют Целостность Игры, возможно это будет работать.

