- Thread Status:
-
Not open for further replies.
-
I’m having issues joining a server that my friends created. They can all join, but for some reason I am unable to. Wondering if anyone has any information on whats going on. I updated the game multiple times and it seems like an issue possibly online.
PLEASE HELP. THANK YOU
-
I have the same problem. Me and my friend can join our own server fine but it would not let us join each other’s server. It also said:
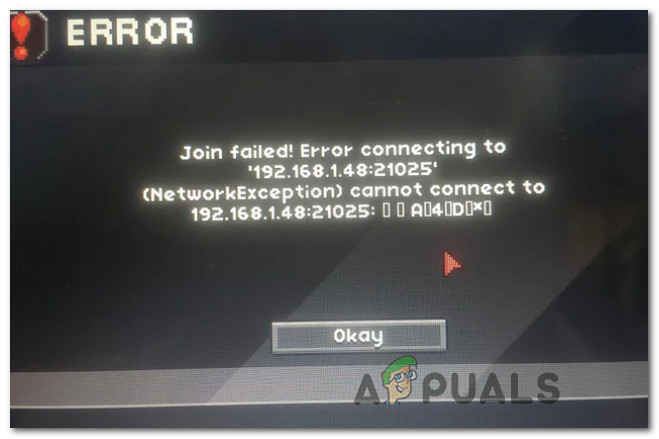
JOIN FAILED! ERROR CONNECTING TO «IP ADDRESS» PORT 21025. -
I MIGHT have the same issue. I know how to forward ports etc. When the game came out I hosted a server for me and my friends. It worked. It also worked the day after. then I wasn’t able to play until Tuesday. Since then I can not host a connectable server. Even Portscanners tell me that the port isn’t open. I AM forwarding, I have resetet my router, changed many settings, closed all other programs, but somehow starbound doesn’t want to open the forwarded port. Maybe there was a change which causes issues for just a few people (most people reporting this issue might just not forward their port). If there is any suggestion or anyway how I can help to narrow down this issue, please give me a hint. I am the only one of my friends with internet good enough to be an host. So we didn’t play since a few days.
-
Go into Steam/steamapps/common/starbound/assets and open up the file called default_configuration.config. The 3rd line down will say «gameport» : #####. Make sure this is the port you are forwarding. Also, make sure it is forwarded in your Windows firewall / Anti-virus software. Also make sure people are using your external IP, unless they are on the same network as you (ie. a roommate/sibling). This is all there really is to hosting/joining a server. If you still have issues, try disabling your Antivirus, or setting it into gamer mode (a feature most AV software has these days).
-
These are all the things I did. I also changed the port to another, tested another game on the same port, closed all other apps, even tried it with some services not running in the background. From one day to the other it just stoped working for me. And I do not know why. I narrowed the possible issues down to a minimum.
-
Me and my buddy are having the same issue and to avoid port forwarding we decided to use tunngle but he still gets the port 21025 error and he and my other friend all do the exact same steps and one can get in and one can’t. Any ideas
-
http://sockettest.sourceforge.net/ will help you verify that the ports are open and that your machines can reach each other.
-
A friend and I are having the same issue. I have to use a different server IP to log into my own server and my ports are all closed apparently. Multiplayer was working fine some days ago, but now my friend can’t join me. I have no idea what the issue is. I do have an antivirus program, but it worked fine when I was playing with my friend last week.
-
same problem, offended koala messed up me with servers, cant join any now
-
It seems like the Culprit Is the Windows Firewall! If you look there you might see the Starbound_server.exe is blocked!
If this is not the Case… Try editing the Starbound.config with an editor of your choice and look for upnpPortForwarding and change True to False.
This change somehow speeds up the Server creation and eliminates some starting bugs. -
Hello, a Friend and me have the same problem with the Connection, the Message is after all reading and trying still the same and i dont know what’s the Problem is.
Is there something that help ?Thanks for even trying it.
-
I am having problems too, we are using hamatchi and it was working fine, I am hosting the server and changed the upnpPortForwarding to false and allowed the Starbound_server.exe through firewall and the wierd thing is that it WAS working we played for a couple hours and I had to restart the server a couple times due to lag, and a little while later it wasn’t working. any help would be appreciated.
-
Sure, we could Help you! But «It wasn’t working and a little while later» is a bit vague for my Taste in Information… Cause of that here some Wild Guess(es).
Maybe the Starbound.config was Changed due to auto update? (and upnpPortForwarding was re-changed to True)
There could be some Culprit’s Informations in the Starbound.log?
Your Antivirus Program could be Updated and has become Paranoid cause of that its Blocking Starbound_server.exe (without telling it…).If you are Lucky one of those Guess(es) could solve the Problem.
-
This happens to me, but honestly…all that me or my friends have to do is KEEP TRYING TO CONNECT and after like the 3rd try it works. I’m using Hamachi, and all I do is disable my firewall :l
-
Same problem. One friend can connect another one cant. I’m using tunngle if that means anything. Disabled UpNp on MY machine and turned off norton completely and the same with firewall. My friend who cant connect turned off his firewall as well. I think windows 8 seems to have a lot of problems with starbound.
A few weeks later I made my one friend who cant connect turn off his upnpAutoPortfowarding and that seemed to do the trick. He can now connect with no lag/problems. Oh and if you have the same problem it might be a good idea to disable upnp for both host and the other players.
Last edited: Jan 12, 2014
-
For me, it happens if I try to re-join a server after losing connection. If I stop for a couple seconds and try again it seems to go away though.
-
I am having the same issue. I am not even hitting my friend’s server. What information is generally needed to figure out what the issue is? My Firewall was turned off in an attempt to connect, and still couldn’t. I have included the Starbound program and port number in my Windows firewall access list.More than happy to give any information needed to help me figure this out
 I am using Microsoft security essentials as my anti-virus.
 -
I do not have this in my assets. And for the life of me I can’t connect to a server. Ports check out, the only way to get it to even recognize the server as actually being a server (and always an error) is to select launch server and then input the IP in in the multiplayer window. I think the problem lies in the fact that I seem to be missing files under the assets section. (and I don’t fully know what Im doing to begin with).
-

Mlah
Starship CaptainWell when the only information the error message gives you is join failed vague information is about all you can give. I am currently experiencing the same problem and have hit a wall since we have checked port forwarding firewalls and all the other common issues but without any other indication of the problem its hard to really dig any deeper.

- Thread Status:
-
Not open for further replies.
Share This Page
Сообщается, что некоторые пользователи Starbound видят ошибку NetworkException (соединение не выполнено) при попытке подключиться к многопользовательскому серверу. Сообщается, что эта проблема возникает в Windows 7, Windows 8.1 и Windows 10.
Ошибка исключения сети StarBound
После тщательного изучения этой проблемы выясняется, что существует несколько различных распространенных сценариев, которые могут привести к такому поведению игрового клиента при попытке подключения к существующему многопользовательскому серверу. Вот список виновников, которые могут вызвать ошибку NetworkException ‘(Join Failed) с Starbound:
- UPnP отключен — если вы используете более новую модель маршрутизатора, вы можете ожидать появления этой ошибки, если ранее вы отключили Universal Plug and Play (UPnP). Эта функция важна для подключения к разным серверам Starnbound, поскольку она автоматически перенаправляет порты, используемые игрой.
- Порты Starbound не перенаправляются — если вы используете более старую модель маршрутизатора (та, которая не поддерживает UPnP), вам нужно будет решить проблему перенаправления требуемых портов вручную из настроек вашего маршрутизатора в соответствии с платформой, на которой вы работаете. пытается продолжить игру.
- Повреждение файла игры. По словам некоторых затронутых пользователей, запускающих игру через Steam, вы также можете ожидать появления этой ошибки в тех случаях, когда файл игры или связанная с ним зависимость отсутствует или поврежден. В этом случае вы можете решить проблему, запустив проверку целостности из меню Steam.
- Соединение Starbound заблокировано брандмауэром — ложное срабатывание может убедить ваш пакет безопасности заблокировать входящие и исходящие соединения с сервером Starbound. В этом случае вы можете решить проблему, добавив в белый список Starbound, а также программу запуска, которую вы используете для запуска игры.
- Основное сетевое ограничение. В некоторых случаях сетевое ограничение (связанное с IPv4-соединением), наложенное на уровне интернет-провайдера, препятствует соединению с сервером Starbound. Подобные ситуации обычно можно решить с помощью приложения VPN-туннелирования, такого как Hamachi, при подключении к игровому серверу.
Теперь, когда вы знаете всех потенциальных виновников, которые могут нести ответственность за эту проблему, вот список методов, которые другие игры Starbound использовали для решения этой конкретной проблемы:
1. Включение UPnP (если применимо)
Одна из наиболее распространенных проблем, о которых сообщается, которая вызывает эту ошибку Starbound, — это случай, когда порты, используемые игрой, не перенаправляются, поэтому соединение с игровым сервером не может быть установлено вашим компьютером.
В настоящее время подавляющее большинство маршрутизаторов могут автоматически перенаправлять порты, используемые играми, в которые мы играем, с помощью функции UPnP (Universal Plug and Play).
Поэтому, если ваш маршрутизатор поддерживает Universal Plug and Play, решение очень простое — просто войдите в настройки маршрутизатора и включите UPnP, чтобы ваш маршрутизатор автоматически переадресовал порты, используемые вашей игрой.
Несмотря на то, что инструкции о том, как это сделать, отличаются от маршрутизатора к маршрутизатору, вам необходимо выполнить ряд общих инструкций, чтобы включить UPnP на вашем маршрутизаторе.
Включение UPnP
Убедившись, что UPnP включен, перезагрузите маршрутизатор и компьютер, на котором вы играете, и посмотрите, устранена ли проблема.
Если ваш маршрутизатор не поддерживает Universal Plug and Play, перейдите к следующему потенциальному исправлению ниже.
Если вы используете более старую модель маршрутизатора, которая не поддерживает UPnP, вам необходимо предпринять некоторые дополнительные шаги для перенаправления портов, используемых игрой, вручную (в зависимости от платформы, на которой вы играете в Starbound).
Несколько затронутых пользователей, с которыми мы сталкиваемся с той же проблемой, сообщили, что проблема была окончательно устранена после того, как они получили доступ к настройкам своего маршрутизатора вручную и перенаправили порты, используемые Starbound.
Примечание. Каждая ситуация будет немного отличаться в зависимости от производителя вашего маршрутизатора, но мы создали серию общих шагов, которые помогут вам пройти весь процесс.
Следуйте инструкциям ниже, чтобы перенаправить необходимые порты StarBound вручную из настроек вашего маршрутизатора:
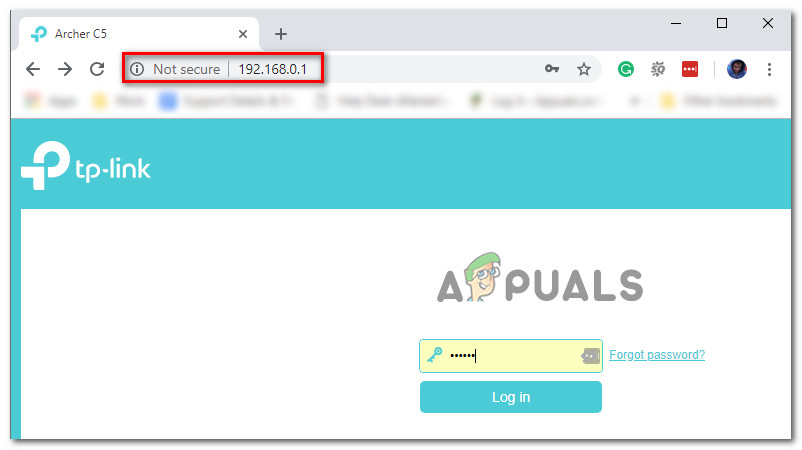
- На ПК, который подключается к той же сети, которую вы используете при игре в Starbound, откройте браузер по умолчанию, введите один из следующих адресов и нажмите Enter, чтобы открыть настройки маршрутизатора: 192.168.0.1 192.168.1.1
- После того, как вы окажетесь на начальном экране входа в систему, введите учетные данные для входа в настройки маршрутизатора.Доступ к настройкам маршрутизатора
Примечание. В большинстве моделей маршрутизаторов вы сможете войти в систему с учетными данными по умолчанию — admin в качестве имени пользователя и 1234 в качестве пароля. Если эти общие учетные данные не работают, посмотрите на заднюю часть маршрутизатора или найдите в Интернете учетные данные для входа по умолчанию в соответствии с моделью вашего маршрутизатора.
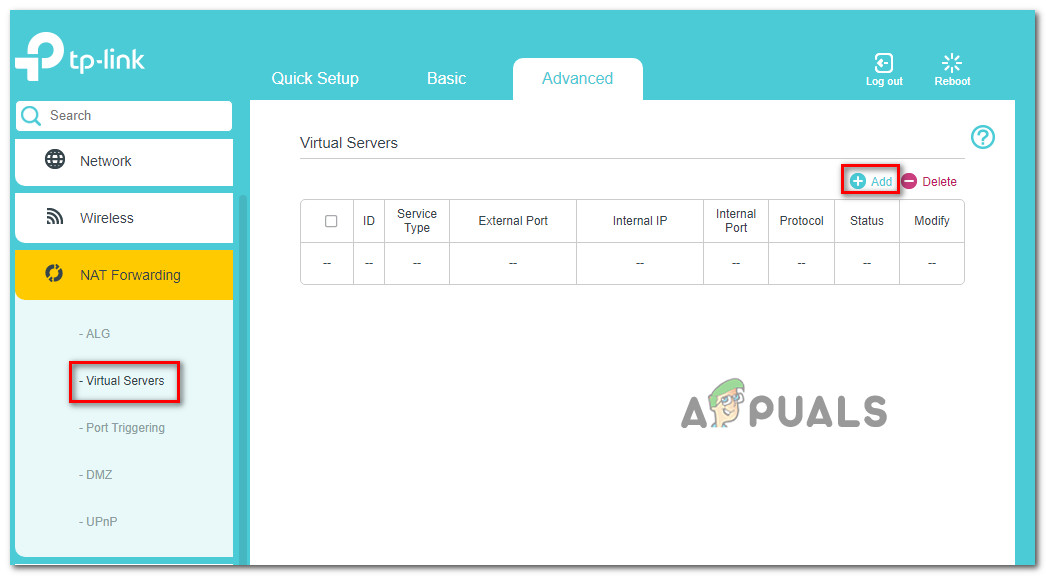
- После того, как вы успешно вошли в настройки вашего маршрутизатора, разверните меню Advanced / Expert и найдите параметр с именем Port Forwarding / NAT Forwarding.
Перенаправление необходимых портов - Затем откройте указанные ниже порты вручную, чтобы убедиться, что ваша сеть будет принимать входящие соединения от Starbound в соответствии с платформой, на которой вы играете: Starbound — PC TCP: 21025 UDP: Starbound — Playstation 4 TCP: 1935,3478 -3480 UDP: 3074,3478-3479 Starbound — Xbox One TCP: 3074 UDP: 88,500,3074,3544,4500 Starbound — Steam TCP: 21025,27015-27030,27036-27037 UDP: 4380,27000-27031,27036
- После того, как каждый порт будет успешно перенаправлен, перезагрузите компьютер, снова запустите игру и посмотрите, устранена ли проблема.
Если такая же проблема все еще возникает даже после того, как вы перенаправили необходимые порты вручную, перейдите к следующему потенциальному исправлению ниже.
3.Проверка целостности игрового файла (только Steam)
По словам некоторых затронутых пользователей, эта проблема также может быть связана с некоторым типом повреждения системных файлов, влияющим на локальную установку Starbound.
Если вы столкнулись с этой проблемой при запуске игры через Steam, вам следует найти время, чтобы выполнить проверку целостности файла и восстановить установку Starbound в Steam. Эта операция проверит каждый файл игры индивидуально и заменит каждый поврежденный элемент исправным эквивалентом — в случае отсутствия элемента эта операция также заменит его.
Следуйте инструкциям ниже, чтобы проверить файл Starbound в Steam с проверкой целостности файла:
- Начните с запуска клиента Steam, а затем войдите в систему, используя учетные данные своей учетной записи Steam.
- После того, как вы успешно вошли в свою учетную запись Steam, щелкните правой кнопкой мыши список, связанный со Starbound, на вкладке «Библиотека», затем нажмите «Свойства» во вновь появившемся контекстном меню.Доступ к экрану свойств Starbound
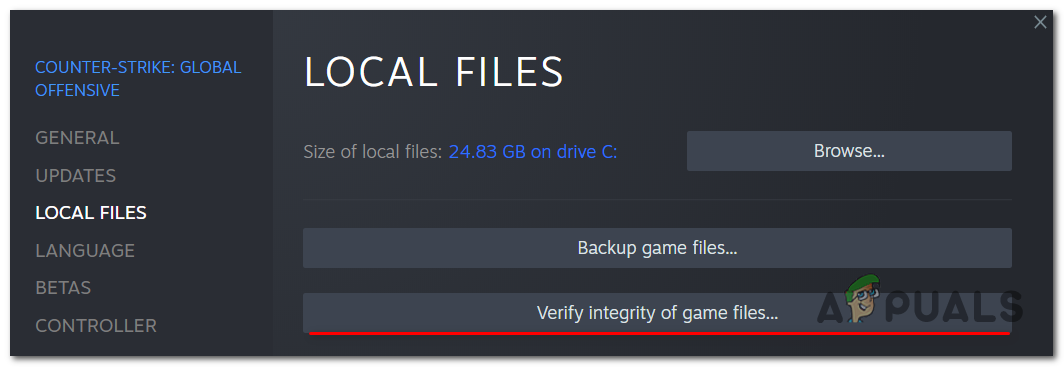
- На экране свойств затронутых игр нажмите «Локальные файлы», затем нажмите «Проверить целостность кэша игры».
Запуск проверки целостности - Наконец, подтвердите проверку целостности, затем дождитесь завершения операции, прежде чем перезапустить компьютер и снова запустить игру, чтобы проверить, устранена ли проблема.
Если вы по-прежнему видите ту же ошибку NetworkException при попытке подключиться к серверу Starbound, перейдите к следующему исправлению ниже.
4. Внесите в белый список Starbound внутри брандмауэра Windows
Если ни один из вышеперечисленных методов не помог вам, и вы используете пакет безопасности Windows (Защитник Windows + брандмауэр Windows), вероятно, эта проблема возникает из-за того, что соединение с игровым сервером рассматривается как потенциальное нарушение безопасности, и оно активно блокируется.
Если это подходящий сценарий, исправление простое — вам нужно внести в белый список как основной исполняемый файл, так и средство запуска Steam (если вы запускаете через Steam) в настройках AV / Firewall.
Примечание. Если вы используете сторонний пакет безопасности, инструкции, которые вам нужно будет выполнить для создания правила белого списка, будут отличаться от приложения к приложению. Найдите в Интернете инструкции по вашему конкретному приложению безопасности.
Но если вы используете Защитник Windows + брандмауэр Windows, следуйте пошаговым инструкциям ниже, чтобы создать правило белого списка для Starbound и средства запуска Steam, чтобы устранить проблему:
- Нажмите клавиши Windows + R, чтобы открыть диалоговое окно «Выполнить». Затем введите control firewall.cpl и нажмите Enter, чтобы открыть окно брандмауэра Windows.Доступ к экрану брандмауэра Windows
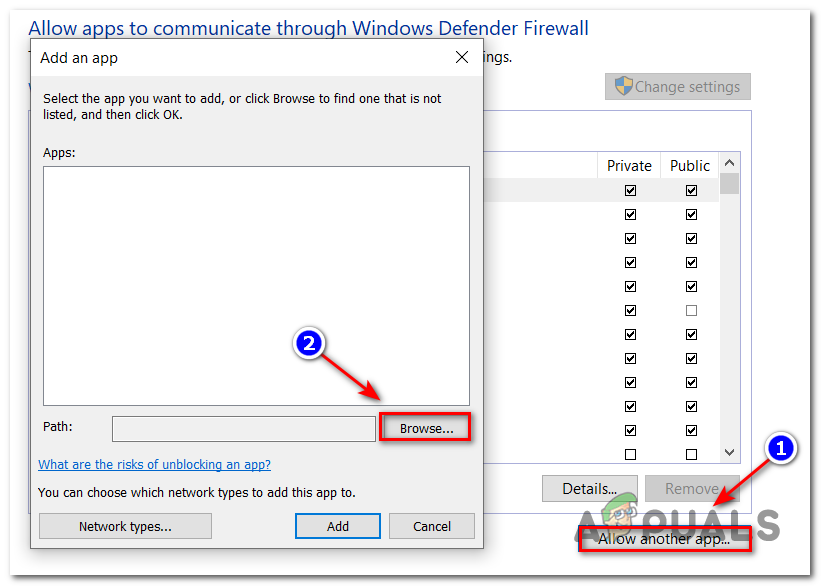
- Затем перейдите в меню слева в главном меню брандмауэра Защитника Windows и нажмите Разрешить приложение или функцию через брандмауэр Защитника Windows.Разрешение приложения через брандмауэр Windows
- В меню «Разрешенные приложения» нажмите кнопку «Изменить настройки».Внесение изменений в брандмауэр Windows
- Нажмите «Разрешить другое приложение» ниже, затем нажмите «Браузер» и найдите место, где установлена игра.Разрешение Starbound
- После того, как вам удастся найти основной исполняемый файл для Starbound, добавьте его в белый список, затем повторите операцию с исполняемым файлом Steam.
- Наконец, в списке разрешенных приложений убедитесь, что установлены флажки Private и Public двух элементов, которые вы добавили ранее.
- Теперь просто сохраните изменения, затем попробуйте снова загрузить игру, чтобы проверить, возникает ли ошибка.
Если вы видите ту же ошибку записи на диск, даже если вы следовали инструкциям, перейдите к следующему возможному исправлению этой ошибки.
5. Использование Hamachi VPN.
Если ни один из вышеперечисленных методов не позволил вам нормально подключиться к серверу Starbound, скорее всего, вы имеете дело с каким-то типом сетевого ограничения, которое каким-то образом ограничивает обмен данными, который ваш компьютер делает с сервером Starbound.
В этом случае вы сможете решить проблему, используя VPN, чтобы создать впечатление, что вы не используете общее соединение IPv4. Самый простой способ сделать это — просто установить обычную игровую VPN.
Но если вы хотите максимизировать свои шансы на успех, правильный способ сделать это — использовать Hamachi (или аналогичное приложение для туннелирования VPN) для создания выделенной сети VPN, к которой вы и все ваши друзья подключены при присоединении к серверу Starbound.
Примечание: это может повысить ваш пинг, но это все же лучше, чем вообще не играть в игру.
Следуйте приведенным ниже инструкциям, чтобы установить Hamachi и настроить сеть VPN для использования с друзьями во время игры в Starbond:
- Откройте браузер по умолчанию и посетите официальный страница загрузки Hamachi. Оказавшись внутри, нажмите «Загрузить сейчас», чтобы загрузить последнюю версию Hamachi VPN.
- После завершения загрузки дважды щелкните hamachi.msi, затем следуйте инструкциям на экране, чтобы завершить установку приложения Hamachi.
- Когда появится запрос UAC (Контроль учетных записей пользователей), нажмите Да, чтобы предоставить доступ администратора.Установка Hamachi VPN
- После завершения установки перезагрузите компьютер и дождитесь завершения следующего запуска, прежде чем снова открыть Hamachi.
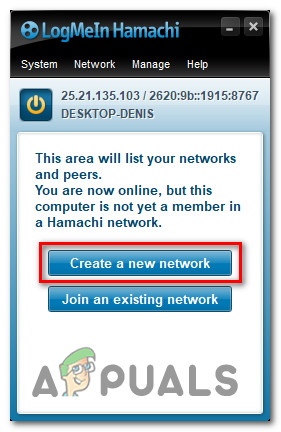
- Затем внутри основного экрана Hamachi нажмите кнопку питания и дождитесь успешного подключения.
- После установки соединения войдите в систему (или войдите, если у вас еще нет учетной записи) с помощью Hamachi.
- После успешного подключения к Hamachi нажмите «Создать новую сеть» в меню LogMeIn Hamachi.Создание сети в Hamachi
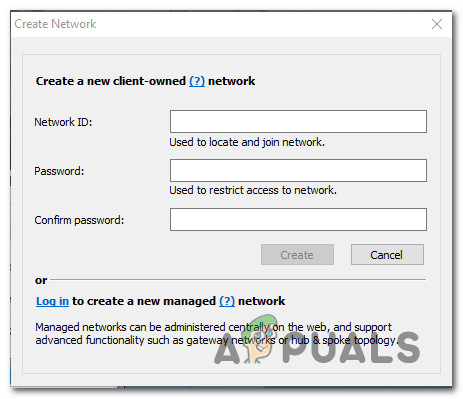
- Как только вы перейдете к следующему экрану, установите идентификатор сети и пароль для своей сети Hamachi VPN и запомните или запишите их.Настройка новой сети в Хамачи
- После успешного создания сети отправьте только что установленные учетные данные другу, с которым вы пытаетесь использовать GameStream, и попросите его также установить Hamachi и нажмите «Присоединиться к существующей сети», прежде чем вводить свои учетные данные.
- После того, как вы и ваш друг / друзья подключитесь к одной сети Hamachi, снова присоединитесь к тому же серверу Starbound и посмотрите, решена ли проблема.
Some Starbound users are reportedly seeing the ‘NetworkException’ (Join Failed)’ error when attempting to connect to a multiplayer server. This issue is reported to occur on Windows 7, Windows 8.1, and Windows 10.
After investigating this issue thoroughly, it turns out that there are several different common scenarios that might cause the game client to behave in this way when trying to connect to an existing multiplayer server. Here’s a list of culprits that might trigger the NetworkException’ (Join Failed) error with Starbound:
- UPnP is Disabled – If you’re using a newer router model, you can expect to see this error if you previously disabled Universal Plug and Play (UPnP). This feature is essential in allowing you to connect to different Starnbound servers since it will automatically forward the ports used by the game.
- Starbound ports are not forwarded – If you’re using an older router model (one that doesn’t support UPnP), you will need to go through the trouble of forwarding the required ports manually from your router settings according to the platform you’re attempting to playing the game on.
- Game file corruption – According to some affected users launching the game through Steam, you can also expect to see this error occurring in those instances where a game file or associated dependency is missing or corrupted. In this case, you can resolve the issue by triggering an integrity check from Steam’s menu.
- Starbound connection is blocked by a firewall – A false positive might convince your security suite to block incoming and outgoing connections with the Starbound server. In this case, you can resolve the issue by whitelisting Starbound as well as the launcher you use to launch the game.
- Underlying Network Restriction – There are some instances where a network restriction (related to the IPv4 connection) imposed at an ISP level is preventing the connection with the Starbound server. Situations like this can typically be resolved by using a VPN tunneling app like Hamachi when connecting to the game server.
Now that you are aware of every potential culprit that might be responsible for this issue, here’s a list of methods that other Starbound games have used to fix this particular issue:
1. Enabling UPnP (if applicable)
One of the most common signaled issues that will produce this Starbound error is a case where the ports used by the game are not forwarded, so the connection with the game server cannot be established by your computer.
Nowadays, the vast majority of routers are perfectly capable of forwarding the ports used by the games we play automatically – via a feature called UPnP (Universal Plug and Play).
So if your router supports Universal Plug and Play, the solution is extremely easy – Simply access your router settings and enable UPnP to allow your router to automatically forward the ports used by the game you play.
Even though the instructions on how to do this are different from router to router, you need to follow a series of generic instructions to enable UPnP on your router.
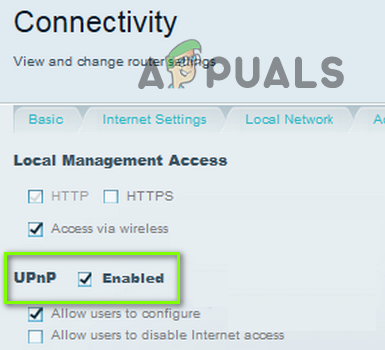
Once you have ensured that UPnP is enabled, reboot both your router and the PC you play the game on and see if the issue is now fixed.
In case your router does not support Universal Plug and Play, move down to the next potential fix below.
2. Forwarding StarBound’s Ports Manually
In case you’re using an older router model that doesn’t support UPnP, you’ll need to take some additional steps to forward the ports used by the game manually (depending on the platform you’re playing Starbound on).
Several affected users that we’re dealing with the same kind of issue have reported that the problem was finally fixed after they accessed their router settings manually and forwarded the ports used by Starbound.
Note: Every situation will be slightly different depending on your router manufacturer, but we’ve created a series of generic steps that should walk you through the entire process.
Follow the instructions below to forward the required StarBound ports manually from your router settings:
- On a PC that is connecting to the same network you use when playing Starbound, open your default browser, type one of the following addresses and press Enter to open your router settings:
192.168.0.1
192.168.1.1
- After you’re at the initial login screen, enter the login credentials to access your router settings.

Accessing the Router settings Note: With most router models, you’ll be able to get in with the default login credentials – admin as username and 1234 as password. If these generic credentials don’t work, look on the back of your router or search online for the default login credentials according to your router model.
- After you have successfully arrived inside your router settings, expand the Advanced / Expert menu, and look for an option named Port Forwarding / NAT Forwarding.

Forwarding the required ports - Next, go ahead and manually open the ports below to ensure that your network will accept incoming connections from the Starbound according to the platform that you’re playing on:
Starbound - PC
TCP: 21025
UDP:

Starbound - Playstation 4
TCP: 1935,3478-3480
UDP: 3074,3478-3479

Starbound - Xbox One
TCP: 3074
UDP: 88,500,3074,3544,4500

Starbound - Steam
TCP: 21025,27015-27030,27036-27037
UDP: 4380,27000-27031,27036
- Once every port is successfully forwarded, restart your computer, launch the game again, and see if the problem is now fixed.
If the same kind of issue is still occurring even after you forwarded the required ports manually, move down to the next potential fix below.
3.Checking the Game File’s Integrity (Steam Only)
According to some affected users, this issue can also be related to some type of system file corruption that is affecting the local installation of Starbound.
If you’re encountering this issue while launching the game through Steam, you should take the time to perform a file integrity check and repair your Steam installation of Starbound. This operation will check every game file individually and replace every corrupted item with a healthy equivalent – In case an item is missing, this operation will also replace it.
Follow the instructions below to verify the Starbound’s file inside Steam with a file integrity check:
- Start by launching your Steam client, then sign with your Steam account credentials.
- Once you have successfully signed in with your Steam account, right-click on the listing associated with Starbound from the Library tab, then click click on Properties from the newly appeared context menu.

Accessing Properties screen of Starbound - Inside the Properties screen of the affected games, go ahead and click on Local Files, then click on Verify Integrity of Game Cache.

Triggering an integrity check - Finally, confirm the integrity check, then wait until the operation is complete before restarting your computer and launching the game once again to see if the problem is now fixed.

If you still see the same NetworkException error when attempting to connect to a Starbound server, move down to the next fix below.
4. Whitelist Starbound inside Windows Firewall
If none of the other methods above have worked for you and you’re using the Windows Security suite (Windows Defender + Windows Firewall), it’s likely that this issue appears due to an instance where the connection with the game server is treated as a potential security breach and it’s actively being blocked.
If this is a suitable scenario, the fix is simple – You need to whitelist both the main executable and the Steam launcher (if you’re launching through Steam) inside your AV / Firewall settings.
Note: In case you’re using a 3rd party security suite, the instructions you’ll need to follow to create a whitelisting rule will be different from app to app. Search online for instructions on your specific security app.
But if you’re using Windows Defender + Windows Firewall, follow the step-by-step instructions below to create a whitelisting rule for Starbound and the Steam launcher to fix the issue:
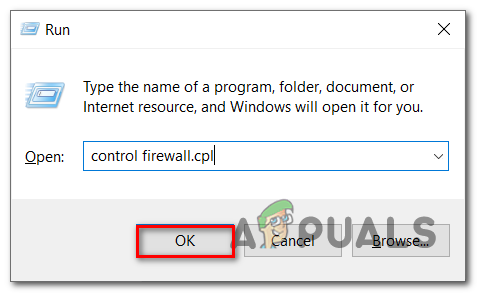
- Press the Windows key + R to open up a Run dialog box. Next, type ‘control firewall.cpl’ and press Enter to open up the Windows Firewall window.

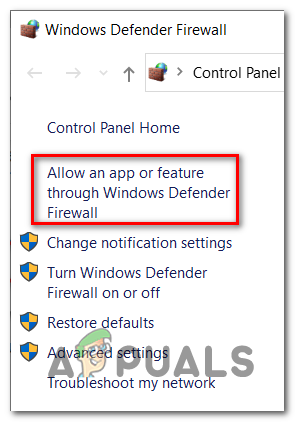
Accessing the Windows firewall screen - Next, go to the left side menu inside the main menu of the Windows Defender Firewall and click on Allow an app or feature through Windows Defender firewall.

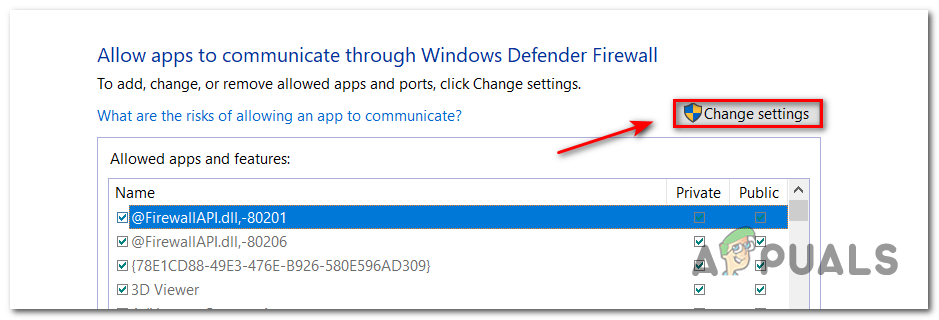
Allowing an app through Windows Firewall - Inside the Allowed apps menu, click on the Change Settings button.

Making Changes to Windows Firewall - Click on Allow another app below, then click on Browser and find the location where the game is installed.

Allowing Starbound - After you manage to find the main executable for Starbound, add it to the whitelist, then repeat the operation with the Steam executable.
- Finally, inside the list of Allowed apps, make sure that both the Private and Public checkboxes of the two items you added previously are checked.
- Now just save the changes, then try to download the game again to see if the error still occurs.
If you’re seeing the same disk write error even if you followed the steps, go to the next possible fix for this error.
5. Using a Hamachi VPN
If none of the methods above have allowed you to connect to a Starbound server normally, chances are you’re dealing with some type of network restriction that is somehow restricting the data exchanges your PC makes with Starbound’s server.
In this case, you should be able to fix the problem by using a VPN to make it seem that you’re not using a shared IPv4 connection. The easiest way to do this is to simply install a conventional gaming VPN.
But if you want to maximize your chances of success, the proper way to do it is to use Hamachi (or a similar VPN tunneling app) to create a dedicated VPN network that you and all your friends are connected to when joining a Starbound server.
Note: This might make your ping higher, but it’s still better than not being able to play the game at all.
Follow the instructions below to install hamachi and set up a VPN network to use with your friends when playing Starbond:
- Open your default browser and visit the official download page of Hamachi. Once inside, click on Download now to download the latest version of Hamachi VPN.
- After the download is complete, double-click on hamachi.msi, then follow the on-screen instructions to complete the installation of the Hamachi application.
- When prompted by the UAC (User Account Control) prompt, click Yes to grant admin access.

Installing Hamachi VPN - Once the installation is complete, reboot your computer and wait for the next startup to complete before opening Hamachi once again.
- Next, inside the main Hamachi screen, click on the power button and wait for the connection to succeed.
- After the connection is established, log in (or sign in if you don’t already have an account) with Hamachi.
- After you successfully connect with Hamachi, click on Create a New network from the LogMeIn Hamachi menu.

Creating a Network in Hamachi - Once you get to the next screen, set a network ID and password for your Hamachi VPN network and remember it or note it down.

Setting up a new network in Hamachi - After the network is successfully created, go ahead and send the credentials you just established to the friend you’re trying to use GameStream with and ask him to install Hamachi as well and click on Join an existing network before inserting your credentials.
- After you and your friend/s are connected to the same Hamachi network, join the same Starbound server once again and see if the issue is now fixed.

I have two computers, one runs starbound fine the other after character creation when attempting to start a single player world gives me: Error connecting locally: Join failed! Timeout while establishing connection.
Log is here: https://pastebin.com/tMWV8TKeThings I’ve tried to fix the issue:
-
Running a local server and trying to join that — Runs without steam workshop mods.
-
Deleting all my mods. — Unmodded game runs fine.
-
Redownloading all mods Fresh — Same error
-
Coping mods over from known woking copies on my other computer. — Same error
System with the error never shows max ram or cpu usage when running the game.I am completely at a loss for how to fix it and the steam discussions have been rather unhelpful.
|
JAMBUILDER Eagle Class Community Leader
confused… I am glad to finally have something to do… I’m am sad its homework from school… k
Posts: 61 |
Post by JAMBUILDER on Dec 30, 2016 10:13:12 GMTas of writing (typing) this post there are 3 people online however when I attempt to join it comes up with a message «Join failed! No server response received» I am not sure what is going on and would like some help identifying the problem. |
|
I’ve heard about a scarecrow that won a prize. What did the sea say to the sand? Why did the balloon go near the needle? More jokes at: www.short-funny.com/best-puns.php#ixzz4KQGqTprv |


|
James Admin Server Administrator
Full-time human
Posts: 120 |
Post by James on Dec 31, 2016 14:46:20 GMT
as of writing (typing) this post there are 3 people online however when I attempt to join it comes up with a message «Join failed! No server response received» I am not sure what is going on and would like some help identifying the problem. You should be able to access the server now! Let me know if you still experience issues. Most likely an update or error. |
|
|


|
JAMBUILDER Eagle Class Community Leader
confused… I am glad to finally have something to do… I’m am sad its homework from school… k
Posts: 61 |
Post by JAMBUILDER on Jan 1, 2017 2:50:24 GMTthanks for the help, happy new year… 2017… it feels anti climactic… |
|
I’ve heard about a scarecrow that won a prize. What did the sea say to the sand? Why did the balloon go near the needle? More jokes at: www.short-funny.com/best-puns.php#ixzz4KQGqTprv |
|
Wolfsong The Jester
|
Post by Wolfsong The Jester on Jun 29, 2017 2:13:35 GMTI’m also experiencing this issue, the instant I click «join» the message stated above pops up. I’ve tried verifying cache, restarting internet, and changing DNS address, no fixes. Any idea what to do? |
|
JAMBUILDER Eagle Class Community Leader
confused… I am glad to finally have something to do… I’m am sad its homework from school… k
Posts: 61 |
Post by JAMBUILDER on Jun 29, 2017 6:07:01 GMTwell it says join failed no server response received… again… ._. Thanks for the help in advance edit: it also says Join Failed, Timeout While establishing connection, as of this edit there are 4 people on, 2 of which are my characters edit2: thx 4 fixing it James! |
|
Last Edit: Jul 24, 2017 23:50:24 GMT by JAMBUILDER I’ve heard about a scarecrow that won a prize. What did the sea say to the sand? Why did the balloon go near the needle? More jokes at: www.short-funny.com/best-puns.php#ixzz4KQGqTprv |
Post by dantheman88 on Jun 29, 2017 7:09:37 GMTI’ve been getting this, too. Usually I just try later and it works but its been like this for me all day. Join Failed. Server connection timed out. |
|
|
James Admin Server Administrator
Full-time human
Posts: 120 |
Post by James on Jun 30, 2017 20:52:26 GMTHey all! I’m sorry about the connection issues — I’ve since restarted the server to help with any errors. We have scheduled server restart at 11:00 p.m. CST each night, but if these issues persist let me know and I can submit a ticket with IT. |
|
|
Post by dantheman88 on Jul 18, 2017 19:21:04 GMTQuick question. What does «Join Failed. Server does not support connections with protocol version 743» mean? I’m using the same version of starbound as always. I installed a couple new mods on my server, but uninstalled them before trying to log onto stardate server so I dont think thats the problem. |
|
|
Last Edit: Jul 18, 2017 19:37:25 GMT by dantheman88 |
|
James Admin Server Administrator
Full-time human
Posts: 120 |
Post by James on Jul 18, 2017 20:01:45 GMT
Quick question. What does «Join Failed. Server does not support connections with protocol version 743» mean? I’m using the same version of starbound as always. I installed a couple new mods on my server, but uninstalled them before trying to log onto stardate server so I dont think thats the problem. I’m honestly not sure! I’ve never experienced that issue with the server :/ I just reset the server in case that helps your issue! (Sorry everyone who was currently just on). Do you have the setting Allow Assets mismatch checked? That does the trick for some servers. |
|
|

|
James Admin Server Administrator
Full-time human
Posts: 120 |
Post by James on Jul 20, 2017 23:38:10 GMTGetting kicked for inactivity, however nothing loads before i get kicked. Fix this please? I just reset the server so you should be good now. This typically only happens when the server is public! Let me know if you have any issues. |
|
|
Post by nindrew on Jul 24, 2017 3:18:22 GMTif anyone can provide a solution for my problem, for some reason whenever I press join server, i get an error message that says assets mismatch between client and server, if anyone has a solution for this, please tell me |
|

Have you tried joining a server and failed with some error you don’t know how to fix? Or have you ever been randomly disconnected out of nowhere? Well here is a trouble shooting guide for all your server based issues!
Contents
- Account Issues
- Problem and Solution #1
- Problem and Solution #2
- Asset Mismatch
- Problem and Solution
- Inactivity
- Problem and Solution #1
- Problem and Solution #2
- Client Packet Exception
- Problem and Solution #1
- Problem and Solution #2
Account Issues
Account issues may very, but this is the only one I know of.
Problem and Solution #1
First off, You will get an error message for 2 reasons.*
One reason can be trying to join a server with the account/password field is filled when it is supposed to be empty:
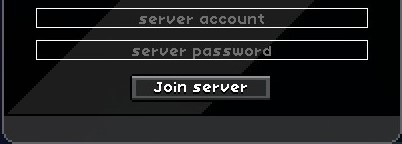
Problem and Solution #2
Another reason is miss spelling of the account name or the account password. If you cannot solve the miss spelling yourself, OR you need account account information contact the owner. If you are the owner, contact the server providers.
* Note: I do not 100% know if there are only 2 reasons, could be more.
Asset Mismatch
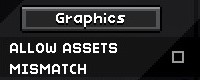
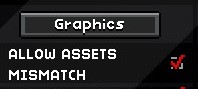
The next issue is Asset Mismatch.
This issue is due to a setting in the options menu, as far as I know, this is only if you or the server has mods.
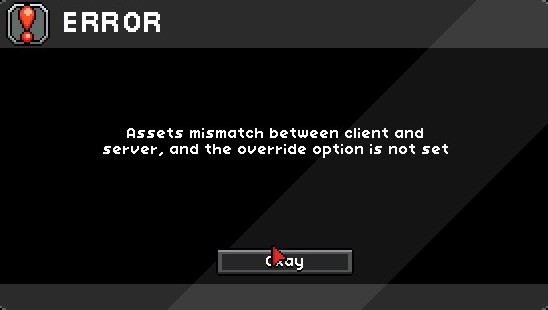
Problem and Solution
Now the way to solve this is by opening the options and under the graphics tab there will be “Allow Assets Mismatch” tick box. It will be empty and you will be needed to enabled.
Inactivity
Next we have the inactivity issue, there are 2 known* causes.

Problem and Solution #1
The first one is quite obvious, you’ve been away fro keyboard for too long and the server boots you.
The next is a bit more obscure one.
I have noticed a trend where I THINK there is a client to server connection error. Sometimes it could be the client’s error, you can tell if people are using the server.
Problem and Solution #2
Other times it’s the server’s issue, commonly the issue can be spotted if everyone on the server gets kicked at the exact same time. To solve this, you either have to contact the server owner, or if you are the owner you must submit a ticket.
* These are issues I know of, feel free to report any you come across.
Client Packet Exception
Welcome to probably the final and most obscure issue on this guide.
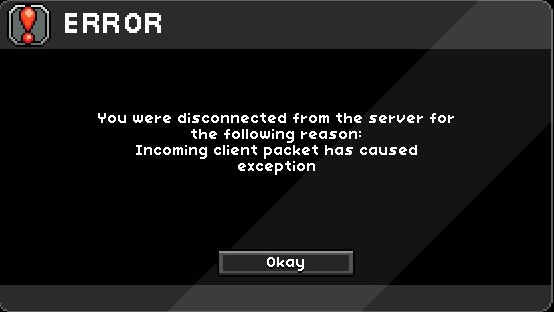
Client Packet Exception is a really weird one. It doesnt give any information about the issue.
Problem and Solution #1
This issue is caused when you don’t have the mods for a modded server. For a solution, ask the moderators or server owner for the collection of mods and install them.
Problem and Solution #2
Now for the second possible cause, I don’t know the solution. But this issue is caused (I assume) with incompatible custom scripts. Now this issue is most likely caused by custom scripts conflicting with mods. Only solutions is to remove the scripts, remove the mods, or restart your PC. None of this is 100% but its worth a shot. Also what you can do is Verify Game Integrity, maybe that’ll work.
Some Starbound users are reportedly seeing the ‘NetworkException’ (Join Failed)’ error when attempting to connect to a multiplayer server. This issue is reported to occur on Windows 7, Windows 8.1, and Windows 10.
After investigating this issue thoroughly, it turns out that there are several different common scenarios that might cause the game client to behave in this way when trying to connect to an existing multiplayer server. Here’s a list of culprits that might trigger the NetworkException’ (Join Failed) error with Starbound:
- UPnP is Disabled – If you’re using a newer router model, you can expect to see this error if you previously disabled Universal Plug and Play (UPnP). This feature is essential in allowing you to connect to different Starnbound servers since it will automatically forward the ports used by the game.
- Starbound ports are not forwarded – If you’re using an older router model (one that doesn’t support UPnP), you will need to go through the trouble of forwarding the required ports manually from your router settings according to the platform you’re attempting to playing the game on.
- Game file corruption – According to some affected users launching the game through Steam, you can also expect to see this error occurring in those instances where a game file or associated dependency is missing or corrupted. In this case, you can resolve the issue by triggering an integrity check from Steam’s menu.
- Starbound connection is blocked by a firewall – A false positive might convince your security suite to block incoming and outgoing connections with the Starbound server. In this case, you can resolve the issue by whitelisting Starbound as well as the launcher you use to launch the game.
- Underlying Network Restriction – There are some instances where a network restriction (related to the IPv4 connection) imposed at an ISP level is preventing the connection with the Starbound server. Situations like this can typically be resolved by using a VPN tunneling app like Hamachi when connecting to the game server.
Now that you are aware of every potential culprit that might be responsible for this issue, here’s a list of methods that other Starbound games have used to fix this particular issue:
1. Enabling UPnP (if applicable)
One of the most common signaled issues that will produce this Starbound error is a case where the ports used by the game are not forwarded, so the connection with the game server cannot be established by your computer.
Nowadays, the vast majority of routers are perfectly capable of forwarding the ports used by the games we play automatically – via a feature called UPnP (Universal Plug and Play).
So if your router supports Universal Plug and Play, the solution is extremely easy – Simply access your router settings and enable UPnP to allow your router to automatically forward the ports used by the game you play.
Even though the instructions on how to do this are different from router to router, you need to follow a series of generic instructions to enable UPnP on your router.
Once you have ensured that UPnP is enabled, reboot both your router and the PC you play the game on and see if the issue is now fixed.
In case your router does not support Universal Plug and Play, move down to the next potential fix below.
2. Forwarding StarBound’s Ports Manually
In case you’re using an older router model that doesn’t support UPnP, you’ll need to take some additional steps to forward the ports used by the game manually (depending on the platform you’re playing Starbound on).
Several affected users that we’re dealing with the same kind of issue have reported that the problem was finally fixed after they accessed their router settings manually and forwarded the ports used by Starbound.
Note: Every situation will be slightly different depending on your router manufacturer, but we’ve created a series of generic steps that should walk you through the entire process.
Follow the instructions below to forward the required StarBound ports manually from your router settings:
- On a PC that is connecting to the same network you use when playing Starbound, open your default browser, type one of the following addresses and press Enter to open your router settings:
192.168.0.1
192.168.1.1
- After you’re at the initial login screen, enter the login credentials to access your router settings.
Accessing the Router settings Note: With most router models, you’ll be able to get in with the default login credentials – admin as username and 1234 as password. If these generic credentials don’t work, look on the back of your router or search online for the default login credentials according to your router model.
- After you have successfully arrived inside your router settings, expand the Advanced / Expert menu, and look for an option named Port Forwarding / NAT Forwarding.
Forwarding the required ports - Next, go ahead and manually open the ports below to ensure that your network will accept incoming connections from the Starbound according to the platform that you’re playing on:
Starbound - PC
TCP: 21025
UDP:

Starbound - Playstation 4
TCP: 1935,3478-3480
UDP: 3074,3478-3479

Starbound - Xbox One
TCP: 3074
UDP: 88,500,3074,3544,4500

Starbound - Steam
TCP: 21025,27015-27030,27036-27037
UDP: 4380,27000-27031,27036
- Once every port is successfully forwarded, restart your computer, launch the game again, and see if the problem is now fixed.
If the same kind of issue is still occurring even after you forwarded the required ports manually, move down to the next potential fix below.
3.Checking the Game File’s Integrity (Steam Only)
According to some affected users, this issue can also be related to some type of system file corruption that is affecting the local installation of Starbound.
If you’re encountering this issue while launching the game through Steam, you should take the time to perform a file integrity check and repair your Steam installation of Starbound. This operation will check every game file individually and replace every corrupted item with a healthy equivalent – In case an item is missing, this operation will also replace it.
Follow the instructions below to verify the Starbound’s file inside Steam with a file integrity check:
- Start by launching your Steam client, then sign with your Steam account credentials.
- Once you have successfully signed in with your Steam account, right-click on the listing associated with Starbound from the Library tab, then click click on Properties from the newly appeared context menu.
Accessing Properties screen of Starbound - Inside the Properties screen of the affected games, go ahead and click on Local Files, then click on Verify Integrity of Game Cache.
Triggering an integrity check - Finally, confirm the integrity check, then wait until the operation is complete before restarting your computer and launching the game once again to see if the problem is now fixed.
If you still see the same NetworkException error when attempting to connect to a Starbound server, move down to the next fix below.
4. Whitelist Starbound inside Windows Firewall
If none of the other methods above have worked for you and you’re using the Windows Security suite (Windows Defender + Windows Firewall), it’s likely that this issue appears due to an instance where the connection with the game server is treated as a potential security breach and it’s actively being blocked.
If this is a suitable scenario, the fix is simple – You need to whitelist both the main executable and the Steam launcher (if you’re launching through Steam) inside your AV / Firewall settings.
Note: In case you’re using a 3rd party security suite, the instructions you’ll need to follow to create a whitelisting rule will be different from app to app. Search online for instructions on your specific security app.
But if you’re using Windows Defender + Windows Firewall, follow the step-by-step instructions below to create a whitelisting rule for Starbound and the Steam launcher to fix the issue:
- Press the Windows key + R to open up a Run dialog box. Next, type ‘control firewall.cpl’ and press Enter to open up the Windows Firewall window.
Accessing the Windows firewall screen - Next, go to the left side menu inside the main menu of the Windows Defender Firewall and click on Allow an app or feature through Windows Defender firewall.
Allowing an app through Windows Firewall - Inside the Allowed apps menu, click on the Change Settings button.
Making Changes to Windows Firewall - Click on Allow another app below, then click on Browser and find the location where the game is installed.
Allowing Starbound - After you manage to find the main executable for Starbound, add it to the whitelist, then repeat the operation with the Steam executable.
- Finally, inside the list of Allowed apps, make sure that both the Private and Public checkboxes of the two items you added previously are checked.
- Now just save the changes, then try to download the game again to see if the error still occurs.
If you’re seeing the same disk write error even if you followed the steps, go to the next possible fix for this error.
5. Using a Hamachi VPN
If none of the methods above have allowed you to connect to a Starbound server normally, chances are you’re dealing with some type of network restriction that is somehow restricting the data exchanges your PC makes with Starbound’s server.
In this case, you should be able to fix the problem by using a VPN to make it seem that you’re not using a shared IPv4 connection. The easiest way to do this is to simply install a conventional gaming VPN.
But if you want to maximize your chances of success, the proper way to do it is to use Hamachi (or a similar VPN tunneling app) to create a dedicated VPN network that you and all your friends are connected to when joining a Starbound server.
Note: This might make your ping higher, but it’s still better than not being able to play the game at all.
Follow the instructions below to install hamachi and set up a VPN network to use with your friends when playing Starbond:
- Open your default browser and visit the official download page of Hamachi. Once inside, click on Download now to download the latest version of Hamachi VPN.
- After the download is complete, double-click on hamachi.msi, then follow the on-screen instructions to complete the installation of the Hamachi application.
- When prompted by the UAC (User Account Control) prompt, click Yes to grant admin access.
Installing Hamachi VPN - Once the installation is complete, reboot your computer and wait for the next startup to complete before opening Hamachi once again.
- Next, inside the main Hamachi screen, click on the power button and wait for the connection to succeed.
- After the connection is established, log in (or sign in if you don’t already have an account) with Hamachi.
- After you successfully connect with Hamachi, click on Create a New network from the LogMeIn Hamachi menu.
Creating a Network in Hamachi - Once you get to the next screen, set a network ID and password for your Hamachi VPN network and remember it or note it down.
Setting up a new network in Hamachi - After the network is successfully created, go ahead and send the credentials you just established to the friend you’re trying to use GameStream with and ask him to install Hamachi as well and click on Join an existing network before inserting your credentials.
- After you and your friend/s are connected to the same Hamachi network, join the same Starbound server once again and see if the issue is now fixed.
Сообщается, что некоторые пользователи Starbound видят ошибку NetworkException (соединение не выполнено) при попытке подключиться к многопользовательскому серверу. Сообщается, что эта проблема возникает в Windows 7, Windows 8.1 и Windows 10.
Ошибка исключения сети StarBound
После тщательного изучения этой проблемы выясняется, что существует несколько различных распространенных сценариев, которые могут привести к такому поведению игрового клиента при попытке подключения к существующему многопользовательскому серверу. Вот список виновников, которые могут вызвать ошибку NetworkException ‘(Join Failed) с Starbound:
- UPnP отключен – если вы используете более новую модель маршрутизатора, вы можете ожидать появления этой ошибки, если ранее вы отключили Universal Plug and Play (UPnP). Эта функция важна для подключения к разным серверам Starnbound, поскольку она автоматически перенаправляет порты, используемые игрой.
- Порты Starbound не перенаправляются – если вы используете более старую модель маршрутизатора (та, которая не поддерживает UPnP), вам нужно будет решить проблему перенаправления требуемых портов вручную из настроек вашего маршрутизатора в соответствии с платформой, на которой вы работаете. пытается продолжить игру.
- Повреждение файла игры. По словам некоторых затронутых пользователей, запускающих игру через Steam, вы также можете ожидать появления этой ошибки в тех случаях, когда файл игры или связанная с ним зависимость отсутствует или поврежден. В этом случае вы можете решить проблему, запустив проверку целостности из меню Steam.
- Соединение Starbound заблокировано брандмауэром – ложное срабатывание может убедить ваш пакет безопасности заблокировать входящие и исходящие соединения с сервером Starbound. В этом случае вы можете решить проблему, добавив в белый список Starbound, а также программу запуска, которую вы используете для запуска игры.
- Основное сетевое ограничение. В некоторых случаях сетевое ограничение (связанное с IPv4-соединением), наложенное на уровне интернет-провайдера, препятствует соединению с сервером Starbound. Подобные ситуации обычно можно решить с помощью приложения VPN-туннелирования, такого как Hamachi, при подключении к игровому серверу.
Теперь, когда вы знаете всех потенциальных виновников, которые могут нести ответственность за эту проблему, вот список методов, которые другие игры Starbound использовали для решения этой конкретной проблемы:
1. Включение UPnP (если применимо)
Одна из наиболее распространенных проблем, о которых сообщается, которая вызывает эту ошибку Starbound, – это случай, когда порты, используемые игрой, не перенаправляются, поэтому соединение с игровым сервером не может быть установлено вашим компьютером.
В настоящее время подавляющее большинство маршрутизаторов могут автоматически перенаправлять порты, используемые играми, в которые мы играем, с помощью функции UPnP (Universal Plug and Play).
Поэтому, если ваш маршрутизатор поддерживает Universal Plug and Play, решение очень простое – просто войдите в настройки маршрутизатора и включите UPnP, чтобы ваш маршрутизатор автоматически переадресовал порты, используемые вашей игрой.
Несмотря на то, что инструкции о том, как это сделать, отличаются от маршрутизатора к маршрутизатору, вам необходимо выполнить ряд общих инструкций, чтобы включить UPnP на вашем маршрутизаторе.
Включение UPnP
Убедившись, что UPnP включен, перезагрузите маршрутизатор и компьютер, на котором вы играете, и посмотрите, устранена ли проблема.
Если ваш маршрутизатор не поддерживает Universal Plug and Play, перейдите к следующему потенциальному исправлению ниже.
Если вы используете более старую модель маршрутизатора, которая не поддерживает UPnP, вам необходимо предпринять некоторые дополнительные шаги для перенаправления портов, используемых игрой, вручную (в зависимости от платформы, на которой вы играете в Starbound).
Несколько затронутых пользователей, с которыми мы сталкиваемся с той же проблемой, сообщили, что проблема была окончательно устранена после того, как они получили доступ к настройкам своего маршрутизатора вручную и перенаправили порты, используемые Starbound.
Примечание. Каждая ситуация будет немного отличаться в зависимости от производителя вашего маршрутизатора, но мы создали серию общих шагов, которые помогут вам пройти весь процесс.
Следуйте инструкциям ниже, чтобы перенаправить необходимые порты StarBound вручную из настроек вашего маршрутизатора:
- На ПК, который подключается к той же сети, которую вы используете при игре в Starbound, откройте браузер по умолчанию, введите один из следующих адресов и нажмите Enter, чтобы открыть настройки маршрутизатора: 192.168.0.1 192.168.1.1
- После того, как вы окажетесь на начальном экране входа в систему, введите учетные данные для входа в настройки маршрутизатора.
Доступ к настройкам маршрутизатора
Примечание. В большинстве моделей маршрутизаторов вы сможете войти в систему с учетными данными по умолчанию – admin в качестве имени пользователя и 1234 в качестве пароля. Если эти общие учетные данные не работают, посмотрите на заднюю часть маршрутизатора или найдите в Интернете учетные данные для входа по умолчанию в соответствии с моделью вашего маршрутизатора.
- После того, как вы успешно вошли в настройки вашего маршрутизатора, разверните меню Advanced / Expert и найдите параметр с именем Port Forwarding / NAT Forwarding.
Перенаправление необходимых портов
- Затем откройте указанные ниже порты вручную, чтобы убедиться, что ваша сеть будет принимать входящие соединения от Starbound в соответствии с платформой, на которой вы играете: Starbound – PC TCP: 21025 UDP: Starbound – Playstation 4 TCP: 1935,3478 -3480 UDP: 3074,3478-3479 Starbound – Xbox One TCP: 3074 UDP: 88,500,3074,3544,4500 Starbound – Steam TCP: 21025,27015-27030,27036-27037 UDP: 4380,27000-27031,27036
- После того, как каждый порт будет успешно перенаправлен, перезагрузите компьютер, снова запустите игру и посмотрите, устранена ли проблема.
Если такая же проблема все еще возникает даже после того, как вы перенаправили необходимые порты вручную, перейдите к следующему потенциальному исправлению ниже.
3.Проверка целостности игрового файла (только Steam)
По словам некоторых затронутых пользователей, эта проблема также может быть связана с некоторым типом повреждения системных файлов, влияющим на локальную установку Starbound.
Если вы столкнулись с этой проблемой при запуске игры через Steam, вам следует найти время, чтобы выполнить проверку целостности файла и восстановить установку Starbound в Steam. Эта операция проверит каждый файл игры индивидуально и заменит каждый поврежденный элемент исправным эквивалентом – в случае отсутствия элемента эта операция также заменит его.
Следуйте инструкциям ниже, чтобы проверить файл Starbound в Steam с проверкой целостности файла:
- Начните с запуска клиента Steam, а затем войдите в систему, используя учетные данные своей учетной записи Steam.
- После того, как вы успешно вошли в свою учетную запись Steam, щелкните правой кнопкой мыши список, связанный со Starbound, на вкладке «Библиотека», затем нажмите «Свойства» во вновь появившемся контекстном меню.
Доступ к экрану свойств Starbound
- На экране свойств затронутых игр нажмите «Локальные файлы», затем нажмите «Проверить целостность кэша игры».
Запуск проверки целостности
- Наконец, подтвердите проверку целостности, затем дождитесь завершения операции, прежде чем перезапустить компьютер и снова запустить игру, чтобы проверить, устранена ли проблема.
Если вы по-прежнему видите ту же ошибку NetworkException при попытке подключиться к серверу Starbound, перейдите к следующему исправлению ниже.
4. Внесите в белый список Starbound внутри брандмауэра Windows
Если ни один из вышеперечисленных методов не помог вам, и вы используете пакет безопасности Windows (Защитник Windows + брандмауэр Windows), вероятно, эта проблема возникает из-за того, что соединение с игровым сервером рассматривается как потенциальное нарушение безопасности, и оно активно блокируется.
Если это подходящий сценарий, исправление простое – вам нужно внести в белый список как основной исполняемый файл, так и средство запуска Steam (если вы запускаете через Steam) в настройках AV / Firewall.
Примечание. Если вы используете сторонний пакет безопасности, инструкции, которые вам нужно будет выполнить для создания правила белого списка, будут отличаться от приложения к приложению. Найдите в Интернете инструкции по вашему конкретному приложению безопасности.
Но если вы используете Защитник Windows + брандмауэр Windows, следуйте пошаговым инструкциям ниже, чтобы создать правило белого списка для Starbound и средства запуска Steam, чтобы устранить проблему:
- Нажмите клавиши Windows + R, чтобы открыть диалоговое окно «Выполнить». Затем введите control firewall.cpl и нажмите Enter, чтобы открыть окно брандмауэра Windows.
Доступ к экрану брандмауэра Windows
- Затем перейдите в меню слева в главном меню брандмауэра Защитника Windows и нажмите Разрешить приложение или функцию через брандмауэр Защитника Windows.
Разрешение приложения через брандмауэр Windows
- В меню «Разрешенные приложения» нажмите кнопку «Изменить настройки».
Внесение изменений в брандмауэр Windows
- Нажмите «Разрешить другое приложение» ниже, затем нажмите «Браузер» и найдите место, где установлена игра.
Разрешение Starbound
- После того, как вам удастся найти основной исполняемый файл для Starbound, добавьте его в белый список, затем повторите операцию с исполняемым файлом Steam.
- Наконец, в списке разрешенных приложений убедитесь, что установлены флажки Private и Public двух элементов, которые вы добавили ранее.
- Теперь просто сохраните изменения, затем попробуйте снова загрузить игру, чтобы проверить, возникает ли ошибка.
Если вы видите ту же ошибку записи на диск, даже если вы следовали инструкциям, перейдите к следующему возможному исправлению этой ошибки.
5. Использование Hamachi VPN.
Если ни один из вышеперечисленных методов не позволил вам нормально подключиться к серверу Starbound, скорее всего, вы имеете дело с каким-то типом сетевого ограничения, которое каким-то образом ограничивает обмен данными, который ваш компьютер делает с сервером Starbound.
В этом случае вы сможете решить проблему, используя VPN, чтобы создать впечатление, что вы не используете общее соединение IPv4. Самый простой способ сделать это – просто установить обычную игровую VPN.
Но если вы хотите максимизировать свои шансы на успех, правильный способ сделать это – использовать Hamachi (или аналогичное приложение для туннелирования VPN) для создания выделенной сети VPN, к которой вы и все ваши друзья подключены при присоединении к серверу Starbound.
Примечание: это может повысить ваш пинг, но это все же лучше, чем вообще не играть в игру.
Следуйте приведенным ниже инструкциям, чтобы установить Hamachi и настроить сеть VPN для использования с друзьями во время игры в Starbond:
- Откройте браузер по умолчанию и посетите официальный страница загрузки Hamachi. Оказавшись внутри, нажмите «Загрузить сейчас», чтобы загрузить последнюю версию Hamachi VPN.
- После завершения загрузки дважды щелкните hamachi.msi, затем следуйте инструкциям на экране, чтобы завершить установку приложения Hamachi.
- Когда появится запрос UAC (Контроль учетных записей пользователей), нажмите Да, чтобы предоставить доступ администратора.
Установка Hamachi VPN
- После завершения установки перезагрузите компьютер и дождитесь завершения следующего запуска, прежде чем снова открыть Hamachi.
- Затем внутри основного экрана Hamachi нажмите кнопку питания и дождитесь успешного подключения.
- После установки соединения войдите в систему (или войдите, если у вас еще нет учетной записи) с помощью Hamachi.
- После успешного подключения к Hamachi нажмите «Создать новую сеть» в меню LogMeIn Hamachi.
Создание сети в Hamachi
- Как только вы перейдете к следующему экрану, установите идентификатор сети и пароль для своей сети Hamachi VPN и запомните или запишите их.
Настройка новой сети в Хамачи
- После успешного создания сети отправьте только что установленные учетные данные другу, с которым вы пытаетесь использовать GameStream, и попросите его также установить Hamachi и нажмите «Присоединиться к существующей сети», прежде чем вводить свои учетные данные.
- После того, как вы и ваш друг / друзья подключитесь к одной сети Hamachi, снова присоединитесь к тому же серверу Starbound и посмотрите, решена ли проблема.
Starbound — популярная компьютерная игра в жанре песочницы, в которой игрокам предоставляется возможность исследовать бесконечные просторы космоса, строить и улучшать свой корабль, а также колонизировать различные планеты. Но как и любая игра, Starbound иногда может столкнуть вас с различными ошибками.
Одной из распространенных проблем, с которой могут столкнуться игроки, является ошибка «Join failed error connecting to starbound». Эта ошибка может возникать при попытке подключиться к серверу или при запуске многопользовательской игры. Хотя причины этой ошибки могут быть разными, существуют несколько способов ее устранения.
Первым шагом, который стоит предпринять, является проверка статуса сервера, к которому вы пытаетесь подключиться. Возможно, сервер временно недоступен или превышено его максимальное количество игроков. В таком случае, достаточно подождать некоторое время и повторить попытку подключения позже.
Если проблема не решается, попробуйте проверить свое интернет-соединение. Возможно, проблема в самом подключении, поэтому убедитесь, что вы подключены к стабильной и надежной сети. Сбросьте роутер и перезапустите компьютер, чтобы устранить неполадки в сетевом оборудовании.
Содержание
- Как исправить ошибку «Join failed error connecting to starbound»
- Возможные причины ошибки
- Решение проблемы
Как исправить ошибку «Join failed error connecting to starbound»
Ошибка «Join failed error connecting to starbound» может возникать при попытке подключиться к игре Starbound. Это часто связано с проблемами с подключением к игровым серверам. Вот несколько способов исправить эту ошибку:
Проверьте интернет-соединение:
Убедитесь, что у вас стабильное и высокоскоростное интернет-соединение. Проверьте, не блокируются ли игровые серверы вашим провайдером интернет-услуг. Попробуйте подключиться к другому игровому серверу, чтобы узнать, работает ли проблема только с конкретным сервером.
Проверьте брандмауэр и антивирусное программное обеспечение:
Брандмауэр или антивирусное программное обеспечение на вашем компьютере могут блокировать подключение к игре. Убедитесь, что Starbound и все его соединения разрешены в настройках брандмауэра и антивирусного программного обеспечения. Если возможно, временно отключите антивирусное программное обеспечение и проверьте, исправит ли это проблему.
Обновите игру и клиент Steam:
Убедитесь, что ваша копия Starbound и клиент Steam обновлены до последней версии. Неактуальные версии игры и Steam могут вызывать проблемы подключения.
Переустановите игру:
Если ничто другое не помогает, попробуйте переустановить игру Starbound. Иногда поврежденные или неправильно установленные файлы могут вызывать ошибки подключения.
Это некоторые из самых распространенных способов исправить ошибку «Join failed error connecting to starbound». Если ни один из этих способов не сработал, рекомендуется обратиться в службу поддержки разработчиков игры.
Возможные причины ошибки
Ошибка «Join failed error connecting to starbound» может возникнуть по следующим причинам:
| 1. Проблемы с интернет-соединением | Проверьте своё интернет-соединение, убедитесь, что оно стабильно и работает корректно. Попробуйте перезагрузить роутер или другие сетевые устройства. |
| 2. Ограничения брендмауэра или антивирусного ПО | Проверьте настройки брендмауэра и антивирусного ПО, возможно они блокируют соединение с сервером. Разрешите доступ для игры в настройках соответствующих программ. |
| 3. Проблемы с сервером | Сервер, к которому вы пытаетесь присоединиться, может работать некорректно или быть недоступным. Попробуйте выбрать другой сервер или связаться с администратором для уточнения информации. |
| 4. Конфликт с другими программами | Некоторые программы могут конфликтовать с Starbound, что может приводить к ошибкам при подключении. Попробуйте временно отключить или закрыть другие программы и запустить игру заново. |
Если после проверки указанных причин проблема не решается, рекомендуется обратиться за помощью к разработчикам игры или сообществу пользователей для получения дополнительной поддержки.
Решение проблемы
Для исправления ошибки «Join failed error connecting to starbound» в игре Starbound, вы можете попробовать следующие решения:
- Проверьте ваше подключение к интернету. Убедитесь, что вы подключены к сети и у вас стабильное соединение.
- Перезагрузите игру и устройство. Иногда перезагрузка может устранить временные проблемы, которые могут быть причиной ошибки.
- Проверьте, есть ли какие-либо обновления для игры. Некоторые ошибки могут быть исправлены с помощью обновлений, выпущенных разработчиками.
- Восстановите файлы игры. Если какие-то файлы игры были повреждены или испорчены, это может вызвать ошибку. Попробуйте восстановить файлы игры через Steam или другую платформу, через которую вы играете в Starbound.
- Отключите файрвол и антивирусное программное обеспечение. Убедитесь, что нет программных ограничений, которые могут блокировать соединение с игрой.
- Убедитесь, что у вас есть достаточно места на жестком диске. Недостаток свободного места на жестком диске может вызывать проблемы при запуске игры.
- Свяжитесь с командой поддержки игры. Если все вышеперечисленные решения не помогли, обратитесь за помощью к разработчикам игры. Они могут предложить дополнительное решение проблемы или помочь вам настроить вашу систему.
Надеемся, что эти решения помогут вам исправить ошибку «Join failed error connecting to starbound» и насладиться игрой без проблем.