The computer runs a SMART Hard Disk test during startup. If there is a potential hard disk issue, you might see an error message
displayed on a black screen.

The SMART Hard Disk test creates a prediction about the potential for hard drive failure, not an actual failure. A SMART Hard
Disk error warning can occur for a variety of reasons, such as the computer having been jarred sharply or the hard disk being
subjected to higher than usual temperatures.
If you receive this error message, perform the following actions:
-
Immediately back up all important data and files. While the SMART hard disk error might not indicate the imminent loss of
the hard disk, it is best to be prepared, just in case the disk does fail. -
Run a Hard Disk Test to verify the condition of the hard disk.
If the error code includes 3F0, then see HP PCs — 3F0 boot device not found error displays on a black screen in Windows 10.
Back up your data
In Windows 10, use the File History backup feature to back up to an external drive or network location.
For more information, see Backup and Restore in Windows 10 (in English).
-
In Windows, search for and open Backup settings.
-
Click Add a drive. Windows searches your computer for usable backup drives.
-
Choose an external drive or network location to store your backup files.
Open the Component Tests menu when Windows won’t start
When Windows won’t start, use the following instructions to open the Component Tests menu.
-
Hold the power button for at least five seconds to turn off the computer.
-
Turn on the computer and immediately press esc repeatedly, about once every second. When the menu is displayed, press the f2 key.
-
On the main menu, click Component Tests.
The Component Tests menu is displayed.
Your Component Tests menu might be different, depending on the components installed on your computer.
Perform hard drive tests in HP PC Hardware Diagnostics
HP PC Hardware Diagnostics provides multiple tests to test the hard drive on your computer and confirm hardware failures.
First, run the Quick Test (two to three minutes). If the Quick Test does not find a problem, run the Extensive Test (two hours
or more). It can run once or loop until an error occurs.
-
On the Component Tests menu, click .
-
Click Run once. The Quick Test begins.
-
If the computer has more than one hard drive, select the drive to test. To test all the hard drives, select Test All Hard Drives.
When the test is complete, the screen displays the results. Test results are also available in the Test Logs on the main menu.
-
If the hard drive passes the Quick Test, but there is still a problem with the hard drive, run the Extensive Test. This test
includes the SMART Check, Short DST, Optimized DST, and Long DST. To run these tests individually, select them from the Hard
Drive Tests menu. -
If the hard drive fails a test, click Troubleshoot.
-
Follow the on-screen instructions to attempt to resolve the problem, and then click Yes.
-
If the problem is not resolved, click Yes to contact HP Customer Support.
-
Write down or copy the failure ID (24-digit code) and product ID for when you contact HP Customer Support. The information
is also available in Test Logs on the main menu. -
If your computer is online, click NEXT to go to the HP Customer Support website.
If your computer is offline, use your mobile device to scan the provided QR Code and access HP Customer Support.
Review the hard drive test results
When the hard drive test is complete, a message indicates the actions that were taken.
|
Test result |
Suggested action |
|---|---|
|
Hard Disk Test passed |
Resume normal computer use. |
|
Problem found and repaired |
Resume normal computer use. |
|
Bad sector found and remapped |
Restart the computer.
|
|
Specific error message and 24-digit failure ID code is displayed |
If the Hard Drive Test displays an error message and a warranty ID code, contact HP. The customer service agent will ask you for the 24-digit code if you need to setup a repair or hard drive replacement. Note: When you contact HP, the agent will verify whether your computer is still under warranty. |
Self-Monitoring Analysis and Reporting Technology or SMART hard disk error 301 is something users do not expect to encounter.
However, at times you may experience this unique error when you turn your PC on, which indicates the failure of the Hard Disk Drive or the Solid-State Drive installed on your PC.
There are some fixes to this specific issue before you go for the inevitable – replacing your hard drive. Continue reading this article to learn all about those solutions.
KEY TAKEAWAYS
- SMART hard disk error 301 can occur due to physical damage, hardware or software issues. It can be averted with proper maintenance and cooling.
- Performing a hard boot on your system is one quick and easy way to fix the SMART hard disk error 301.
- You can also fix this particular issue by running the Check Disk command in the Command Prompt to detect and fix any errors in it.
- Repairing your PC from the boot menu using the Command Prompt is also another way to rectify this problem.
- Changing the boot priority order often can help in fixing the problem and help your PC to function normally again.
What are the Reasons for a SMART Hard Disk Error 301 in Windows?
Hard disk error 301 usually occurs when there is a severe corruption in the drive, HDD or SSD, or the device encounters physical damage.
In addition, there are some other significant reasons for this error to happen. These are:
- Failed SMART hard disk check
- Broken IDE or SATA controller chip on your motherboard
- Malware or virus attack on the drive
- Outdated or improperly configured BIOS
- Sudden shutdown of the PC
- Issues or errors in the directory
- Insufficient cooling
- The boot order priority may need to be changed
Typically, the SMART hard disk error 301 indicates your hard drive is pretty bad and almost unusable.
In most cases, you will need to replace your hard drive with a new one if you get the SMART hard disk error 301.
However, in some instances you can resolve the issue by simply restarting your PC, by performing a hard boot, or by running the CHKDSK command in the Command prompt.
Sometimes, if the ventilation and airflow is insufficient in your system, the hard drive will overheat and cause this issue. To resolve it, make sure the vents are clean and the coolants are working properly.
Also, clean all other internal parts of your PC regularly. This will prevent heat being absorbed by the dust and dirt accumulated in it. It will raise the temperature of the hard drive and cause such issues.
As for the advanced solutions for SMART hard disk error 301, you can try changing the boot priority order from the BIOS settings.
Apart from that, you may also check the hard disk drive for existing errors from its Properties as well as from BIOS and repair your computer from the boot menu by using the Command Prompt.
Method 1: Perform a Hard Reboot
Rebooting the system resolves a lot of issues and helps in dealing with bugs and errors. Therefore, in this case performing a hard reboot should be your first quick and easy solution to try and fix the SMART hard disk error 301.
STEPS TO FOLLOW:
- Shut down your computer system.
- Disconnect the power cord.
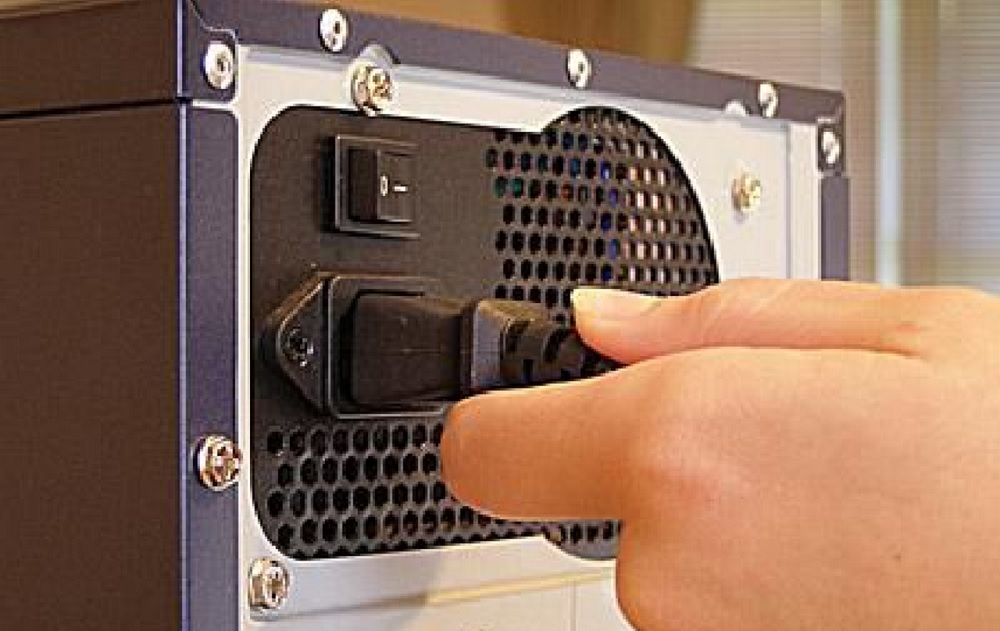
- Now, press and hold the power button for 15 to 20 seconds.
- Repeat this process once more after some time.
- Connect the power plug.
- Turn on your system.
Method 2: Run the Check Disk command in the Command Prompt
If the above method failed to restore normalcy, you should try fixing the issue by running the Check Disk command in the Command Prompt.
This will help in resolving any issues in the directory that is causing such error. It may also remove the bad sectors on the drive causing the same issue.
STEPS TO FOLLOW:
- Press the Windows and R keys together on your keyboard. This will open the Run box.
- Type cmd and press Enter.
- In the Command Prompt window, type in the command chkdsk C: /f/r/x and hit the Enter key.
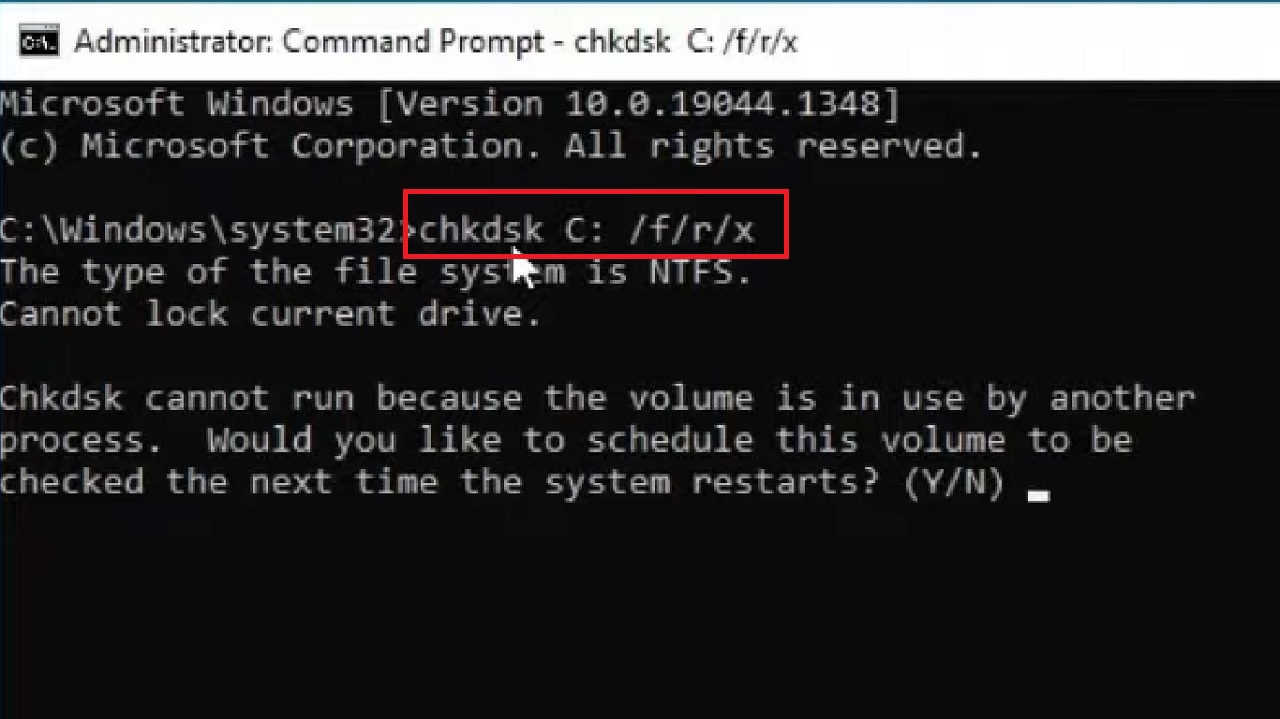
Once the command is executed fully, type exit to close the Command Prompt. Now restart your computer and check whether the issue is resolved or not.
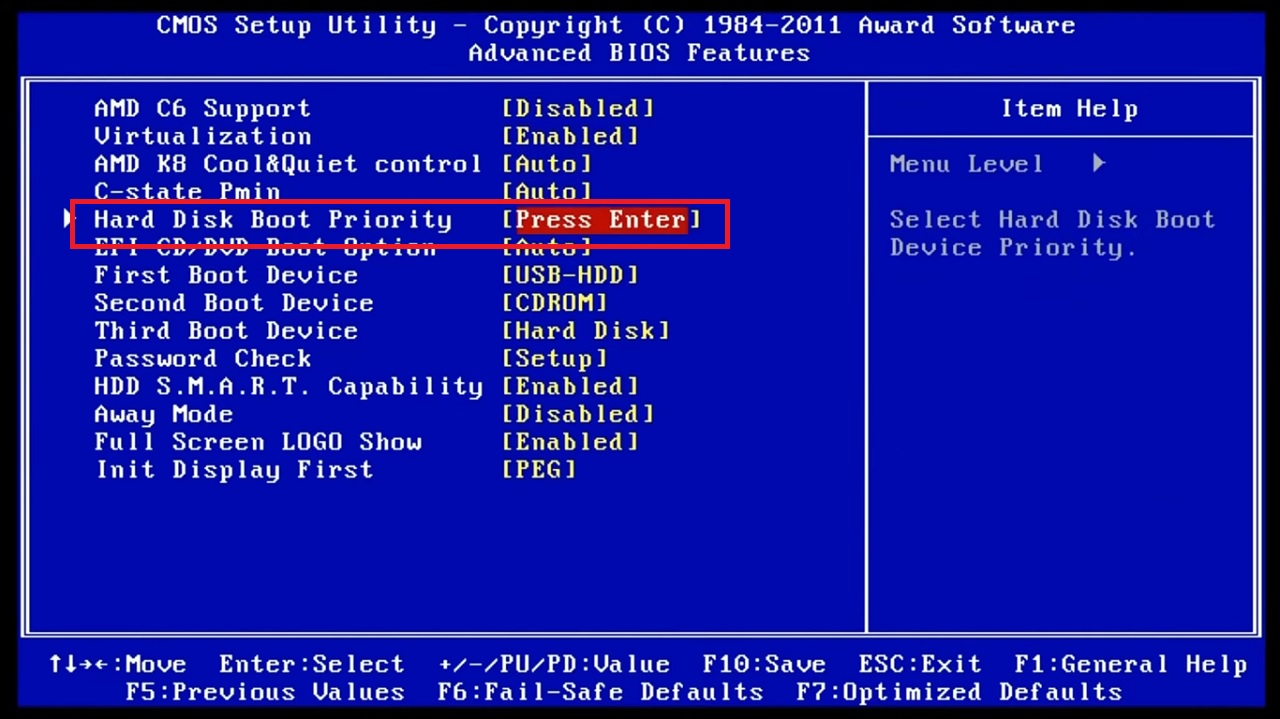
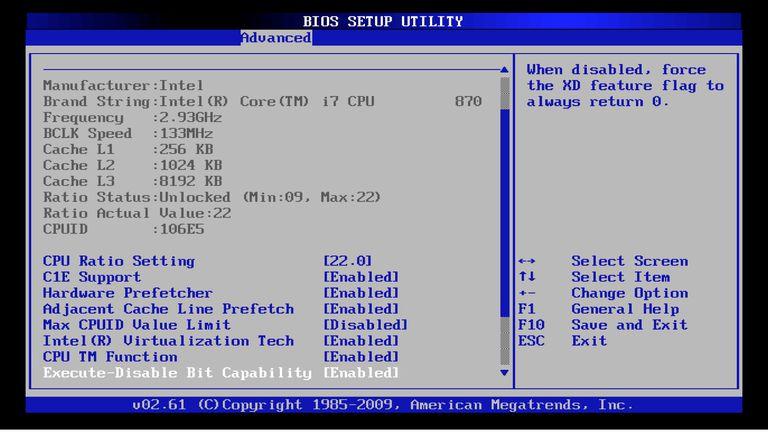
Method 3: Change the Boot Priority Order from BIOS
Changing the order of booting can also resolve the SMART hard disk error 301. You can do it from BIOS or the Basic Input Output System settings.
STEPS TO FOLLOW:
- Shut down your PC.
- Turn it on again but keep pressing the BIOS key.
(Usually, the F1, F2, F10, F12, Del, or Esc keys are the common BIOS keys. It can be different for different PC models. Refer to the manual to know the specific key).
It will open the BIOS screen.
- Use the Left/right arrow keys on your keyboard to go to the Advanced BIOS Feature tab.
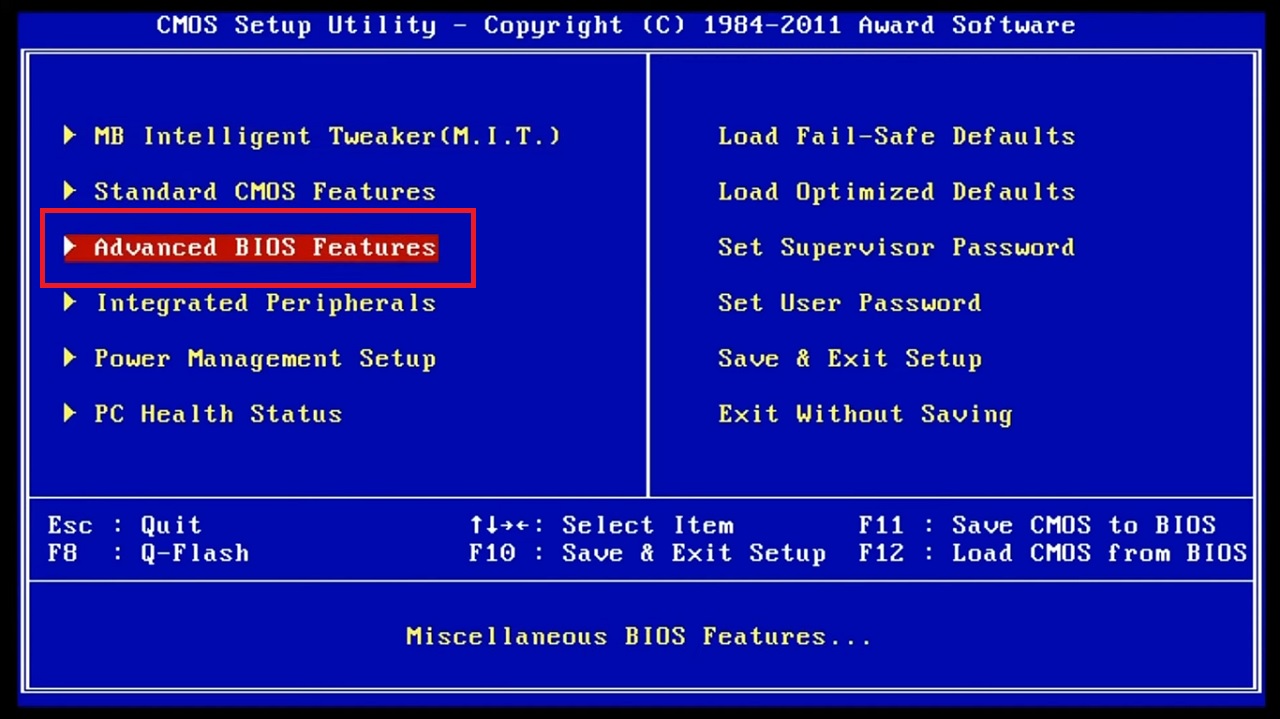
- Now, use the Up/down arrow keys to select the boot device. (First Boot Device [USB-HDD] in this case).
![First Boot Device [USB-HDD]](https://ecomputertips.com/wp-content/uploads/2023/07/word-image-40797-5.jpeg)
- Select the Hard Disk Boot Priority tab.
- Press Enter.
- Select the specific drive from the next window. (Samsung SSD 860 EVO25, for example).
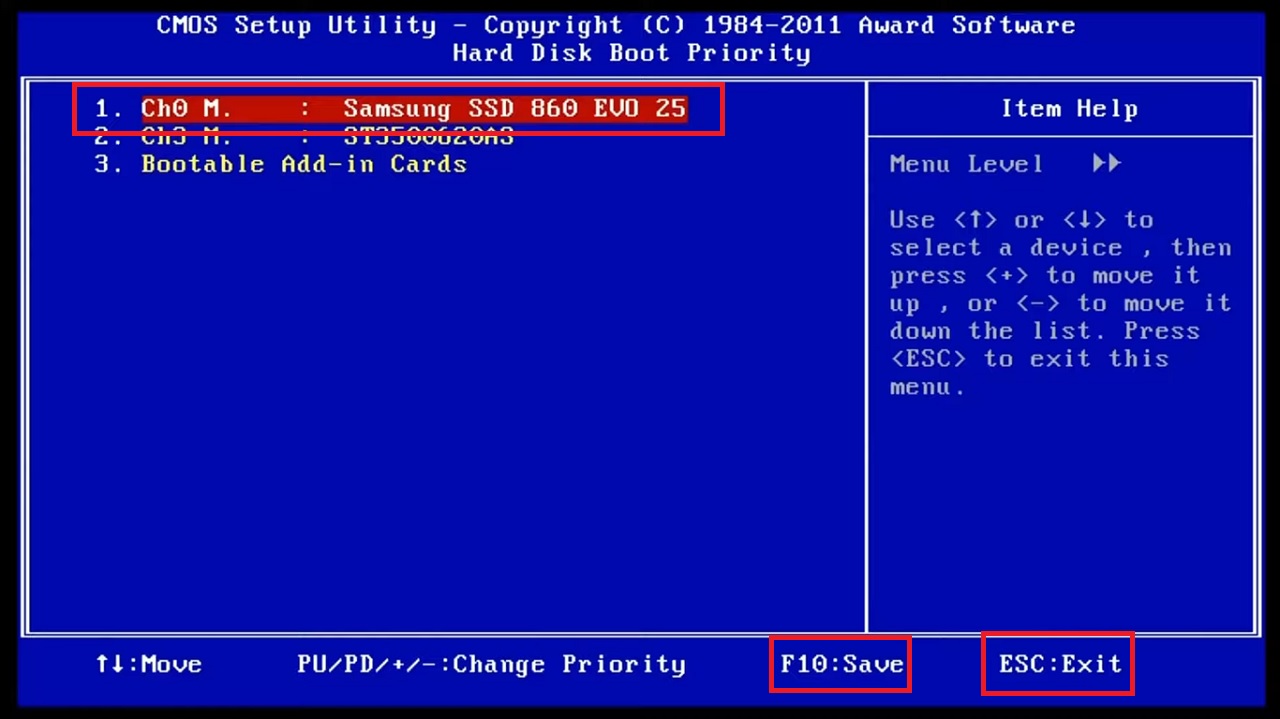
- Press the F10 key to Save the changes.
- Press the ESC key to exit BIOS.
The issue should be resolved now.
Method 4: Repair Your PC from Boot Menu Using the Command Prompt
You can also use the boot menu to run a command and repair your computer, which may fix the problem in the process.
STEPS TO FOLLOW:
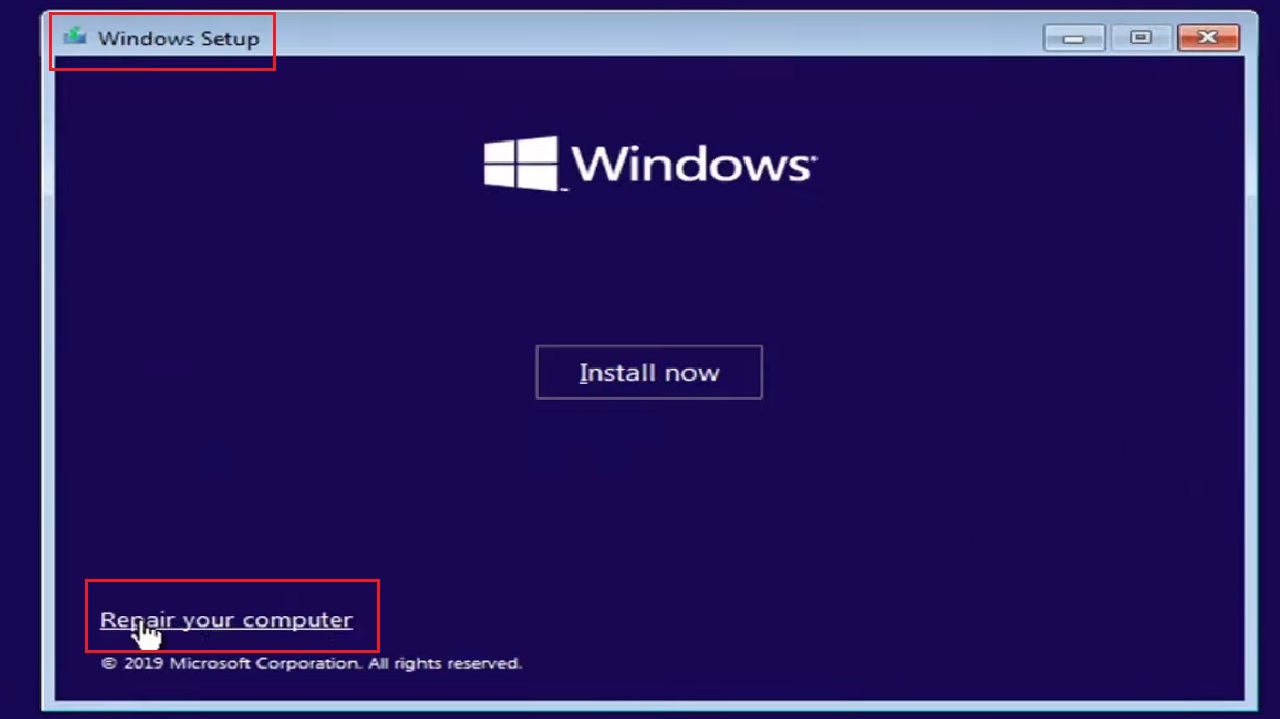
- Go to the Boot menu of your computer as before and choose the booting device.
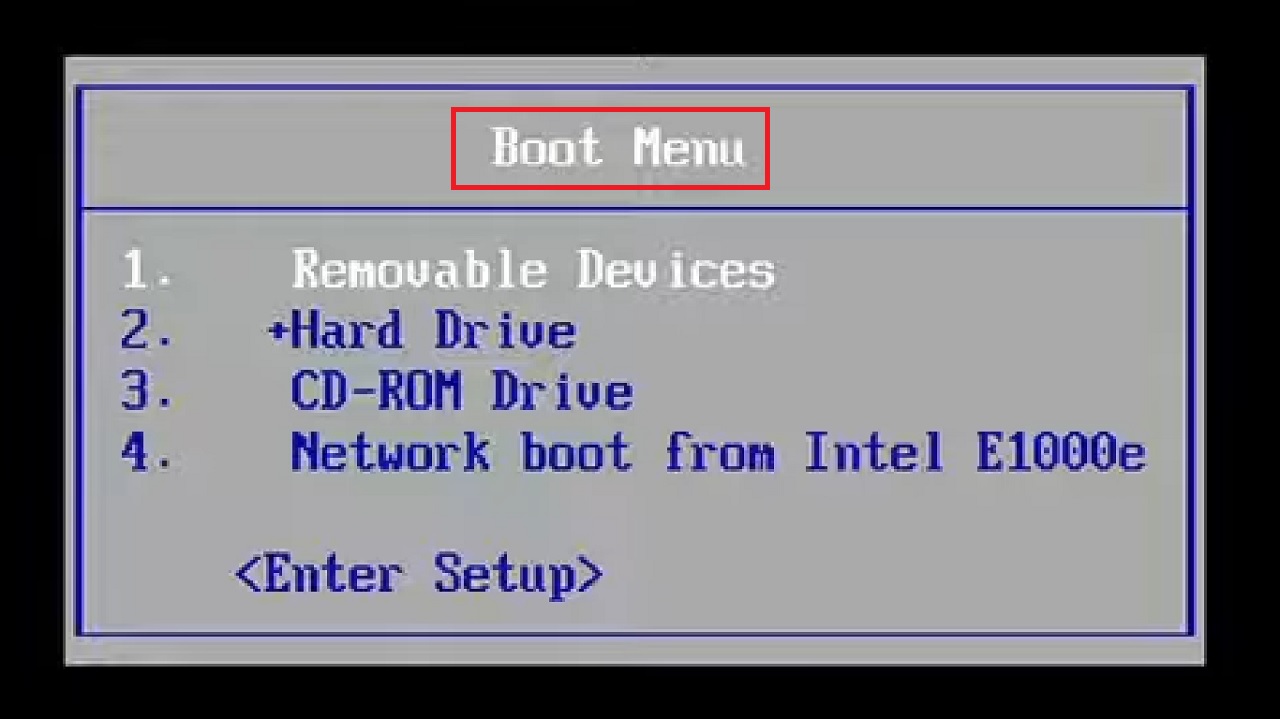
- Wait for the system to boot up and then select Next from the following window.
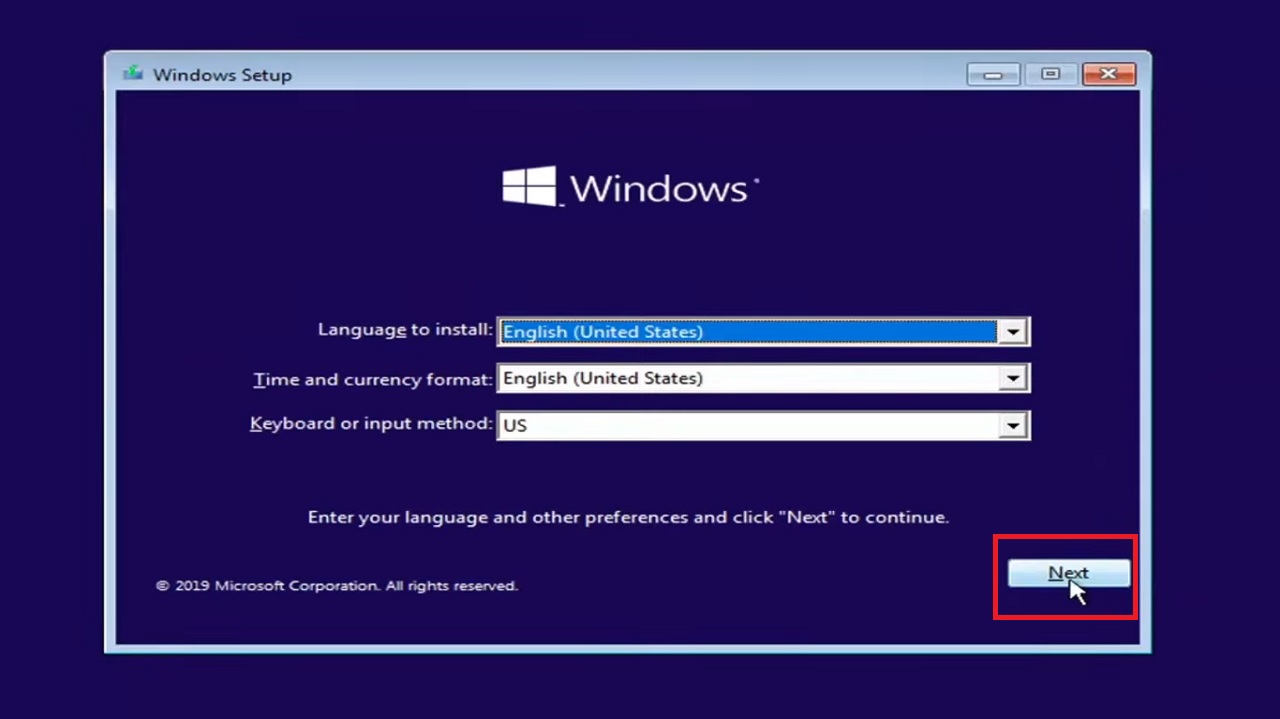
- Select Repair your computer at the bottom of the Windows setup screen.
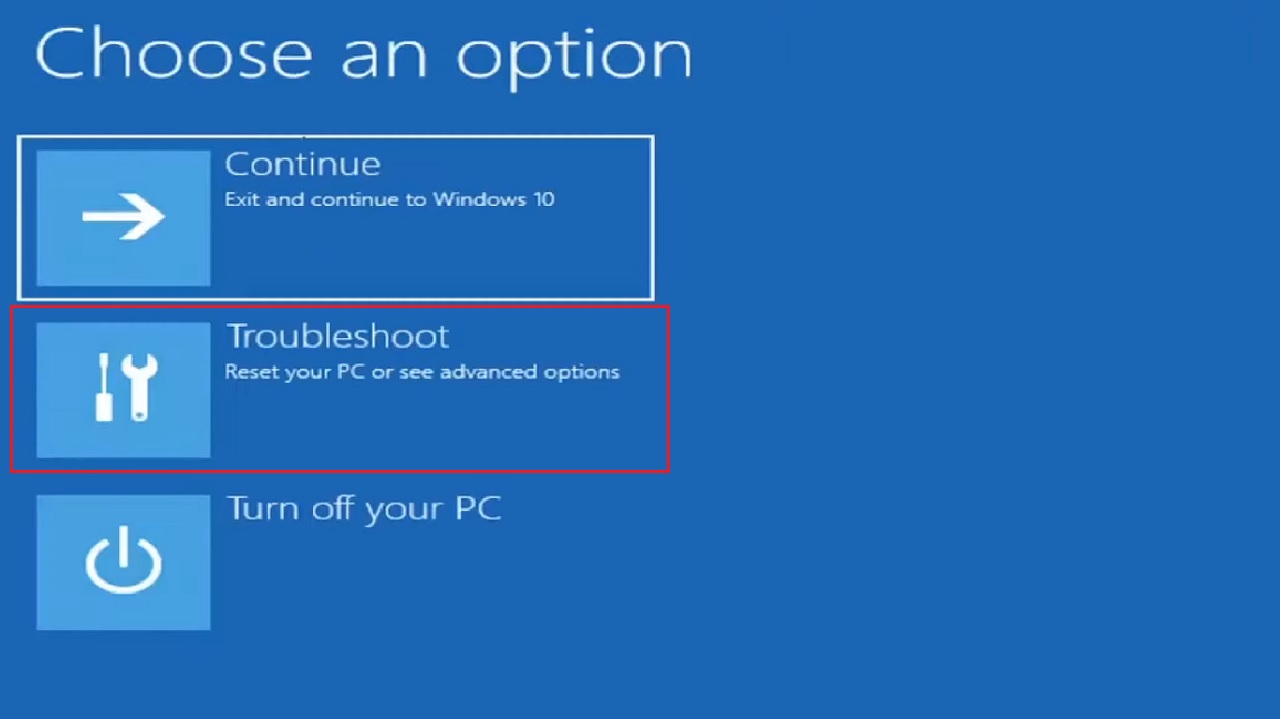
- Select Troubleshoot.
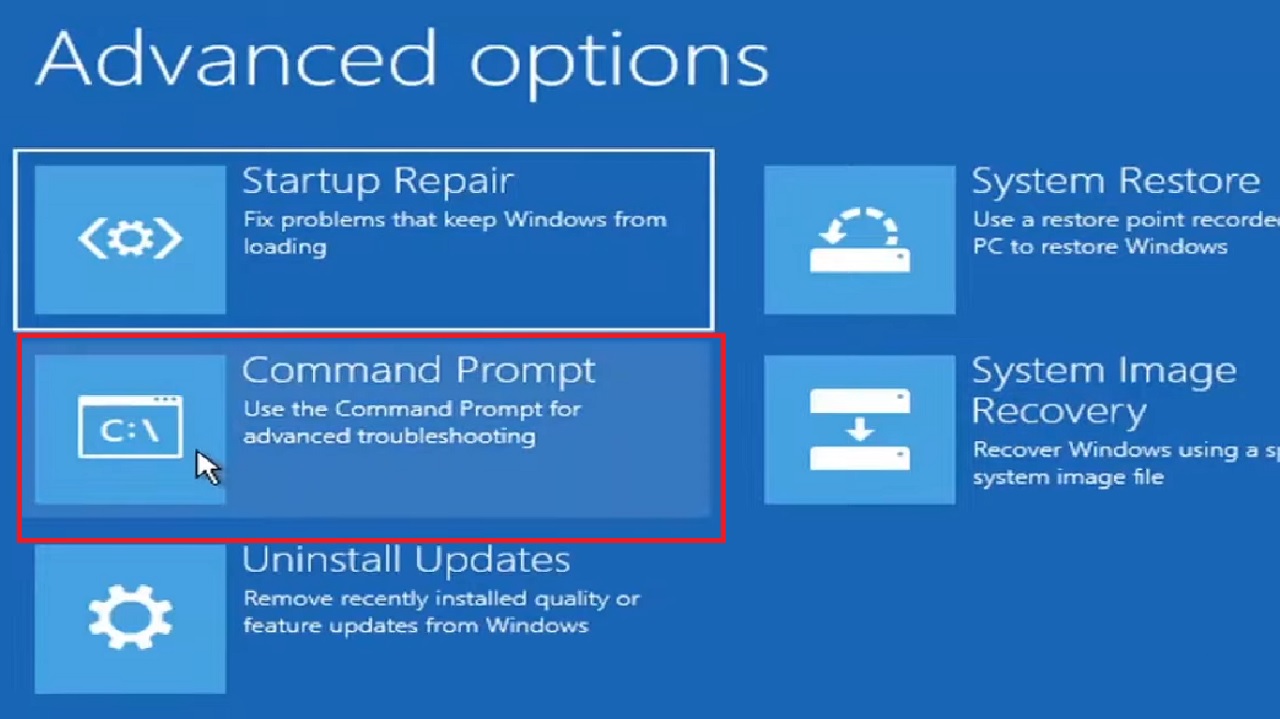
- Select Command Prompt.
- Type in chkdsk C: (Usually, it is the C drive that has the Windows operating system. Yours may be different. So, replace the drive letter accordingly).
- Hit the Enter key on your keyboard.
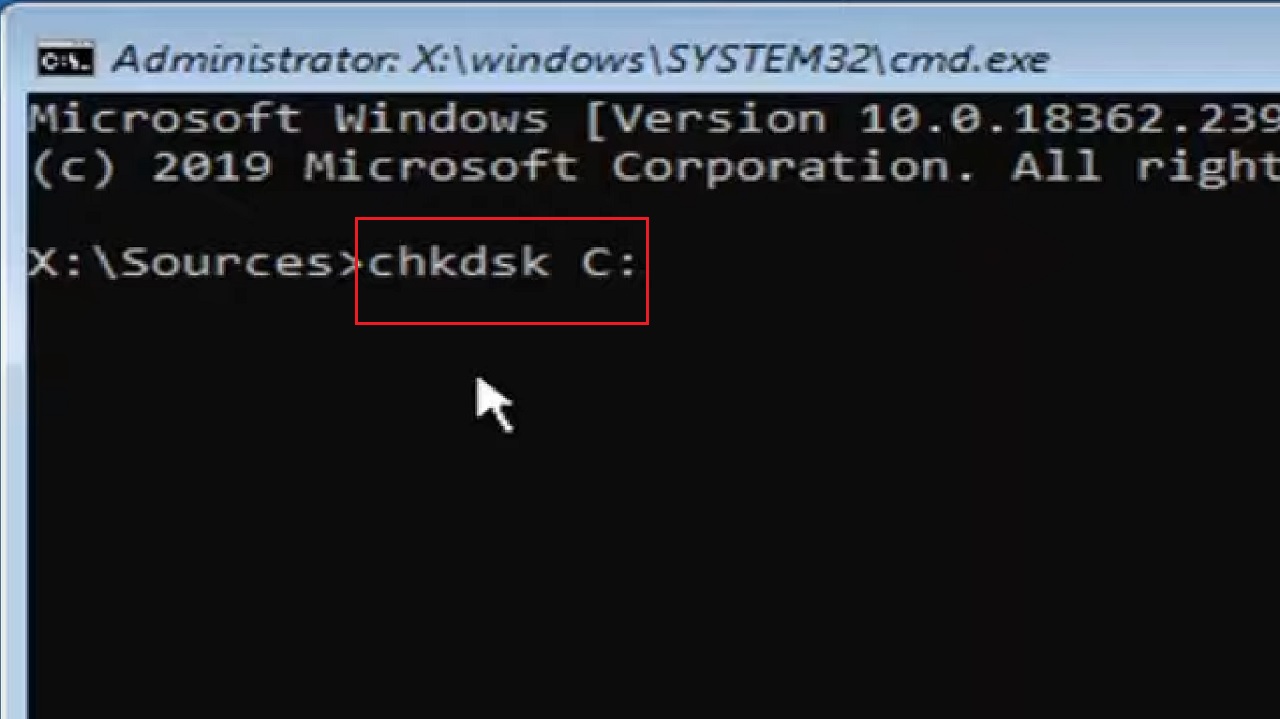
- Let the process be complete, and then type C: and hit Enter.
- Then type in sfc /scannow and hit Enter.
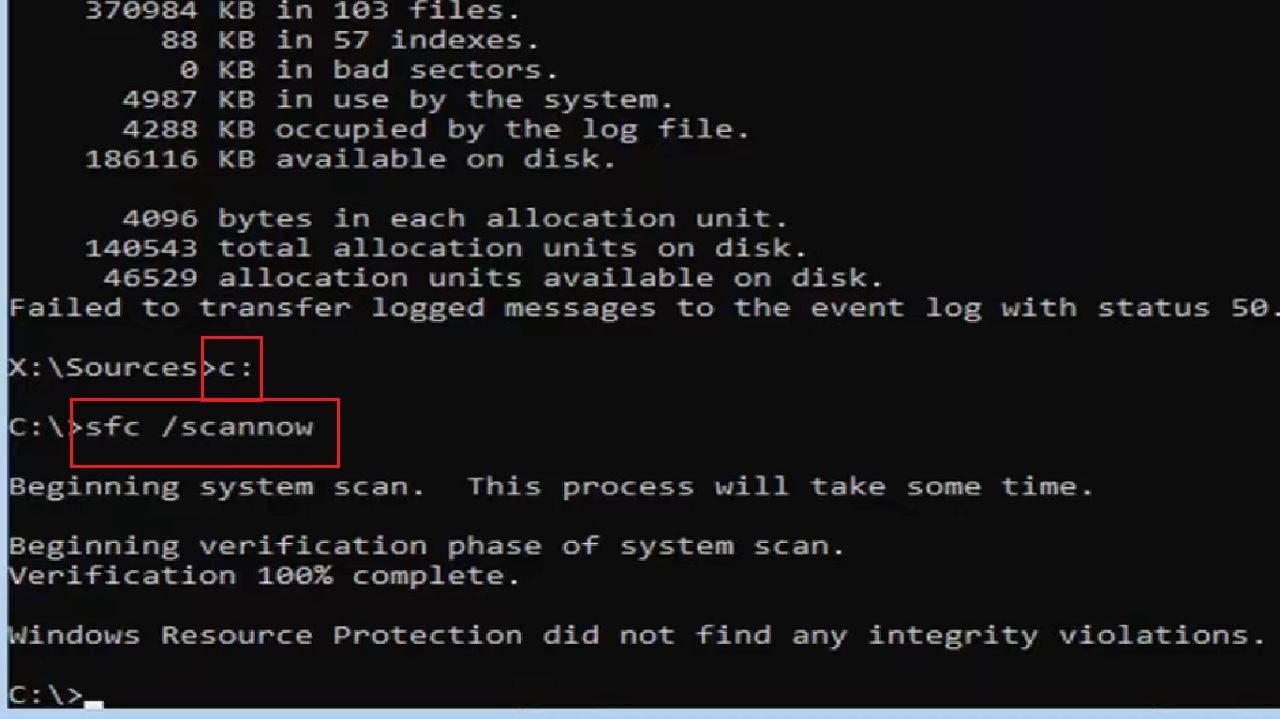
This will start the system scan and take some time.
- Type exit and hit Enter to close the Command Prompt.
- Click on Continue to start using Windows.
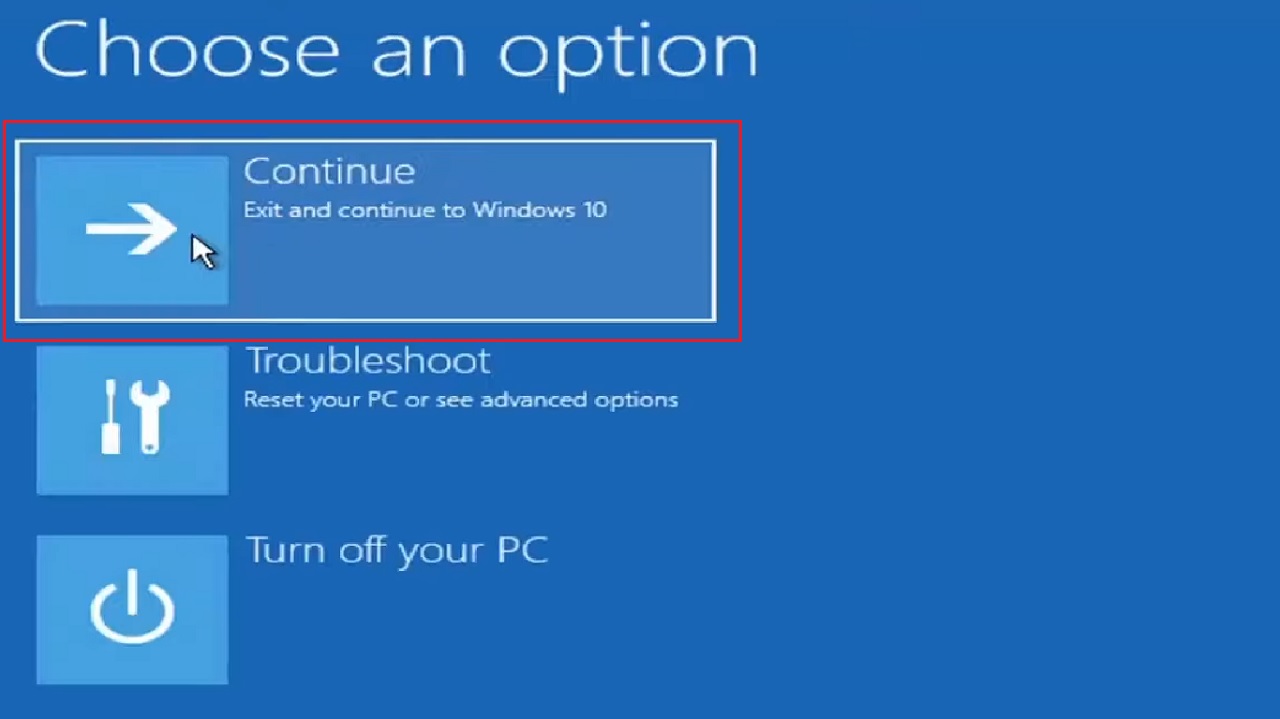
This will resolve the SMART hard disk error 301.
Method 5: Check the Hard Disk and Fix Errors
And finally, like in most issues, you can check the hard disk for any existing errors that may be causing this issue and fix them to rectify the SMART hard disk error 301.
STEPS TO FOLLOW:
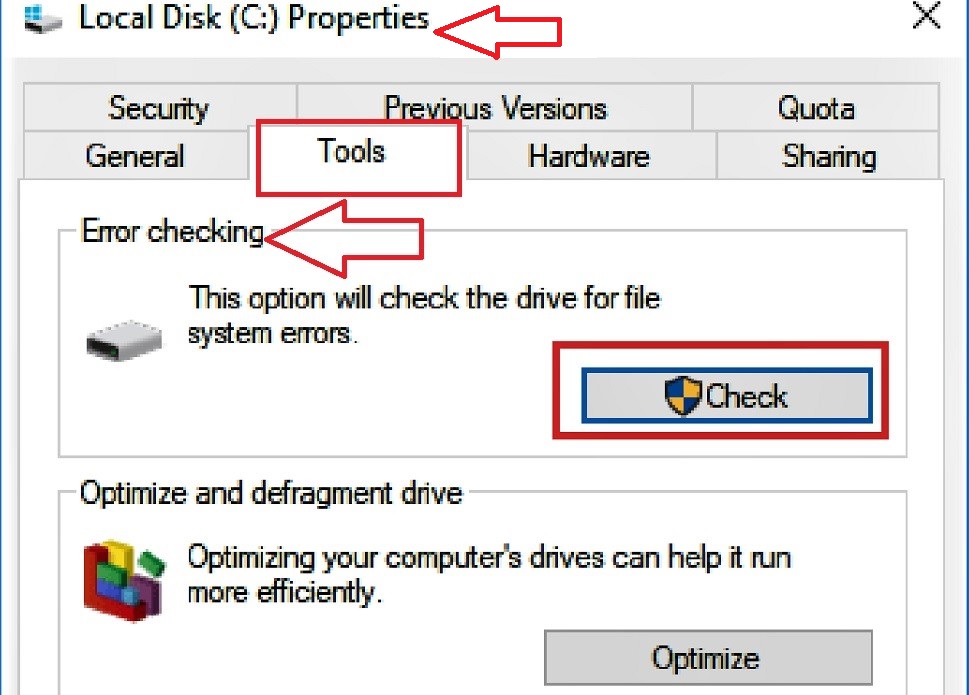
- Go to This PC.
- Select the affected hard drive. (Once again, it is usually Drive C).
- Right-click on it.
- Select Properties from the drop-down options to continue.
- Go to the Tools tab in the Local Disk (C:) Properties window.
- Click on the Check button under the Error checking section.
After the process is complete, if the hard drive has any errors, the system will ask you to check the disk.
On the other hand, if there are no errors found, you will see the following Error Checking (Local Disk (C:)) window saying that You don’t need to scan this drive:
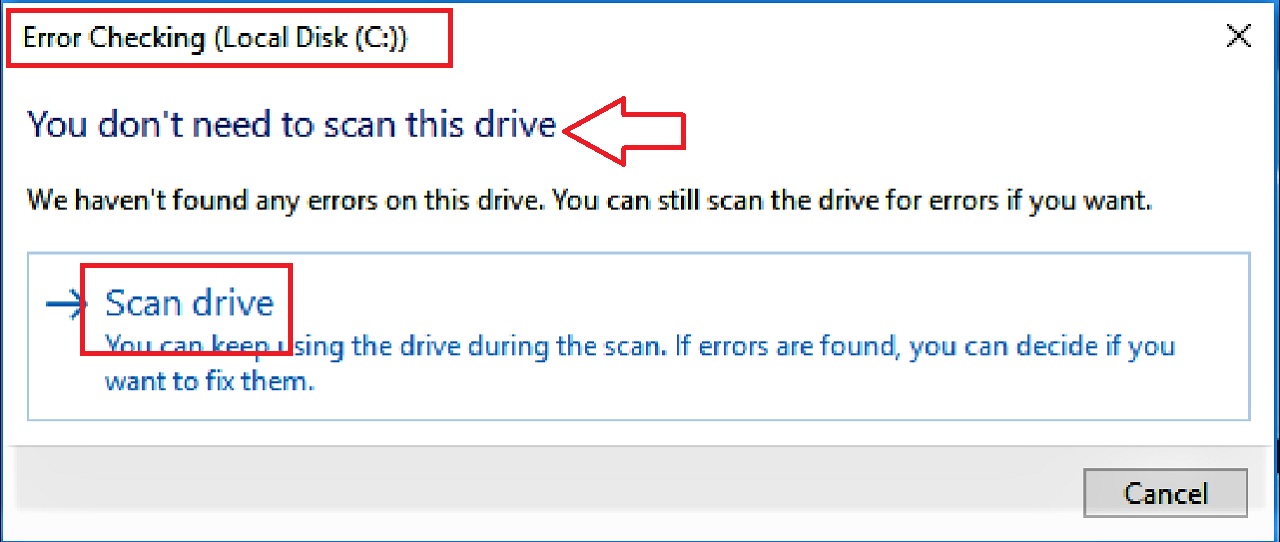
However, there is no harm if you still scan the hard drive. In that case, click on the Scan drive option, shown in the above image.
It will take some time and when this scanning process is complete, you will need to reboot the computer system in order to fix the errors in it, if any. If there aren’t any errors, you can close the window.
Finally, restart your computer. After it restarts go to the File Explorer to find out whether or not the SMART hard disk error 301 has been resolved.
Alternatively, besides the Windows utility, you can also check the hard drive from the BIOS and fix the error.
- Go to BIOS.
- Use the arrow keys on your keyboard to go to the ‘Diagnostics’ tab. The layout may differ depending on your system and its configuration.
- Select the ‘Primary Hard Drive Self Test’ option.
- Press Enter.
This will start checking the hard disk for errors. If there are any errors found, it will fix them as well. This will eventually fix the SMART hard disk error 301.
Conclusion
The hard drive in your PC is its heart and if it fails it will affect the entire workflow.
The SMART hard drive error 301 will let you know that the drive is not working properly.
But you do not have to worry because now you know the way to resolve the issue effectively.
Sometimes, while trying to boot up your HP computer or Laptop, you might encountered a Smart Hard Disk Error 301. This error message usually triggers due to severe drive corruption or hard drive failure. But regardless the reasons, the error can be easily fixed by applying the methods mentioned in this post. Therefore, if you are currently experiencing this same error, just check out this whole article.
This article describes what does 301 hard disk error means, why this error actually occurs & what can be done to fix this error?
Rated Excellent on Trustpilot
Free Hard Drive Recovery Tool.
Recover data from USB drives, Pendrives, SSDs, HDDs, and other devices on Windows. Try now!
So, without wasting any more time, let’s get started….!
What Is SMART 301 Hard Drive Errors?
The “SMART 301 Hard Drive Errors” is an unexpected error that usually occurs while booting up your system or Laptop. This error specifies that your hard disk or SSD (Solid-State-Drive) failed or severe driver corruption.
Hard disk 1 (301) error not only occurs in HP laptops but also takes place on other branded Laptops as well. Nevertheless, the below-shown error is related to the HP laptops which are generally come with HP SMART Check embedded in Firmware.
When SMART Hard Drive Error 301 Code Occurs?
A SMART hard drive error 301 generally arises when a laptop or computer boots.
But, before taking action to fix this problem, it’s very essential to know the exact reason behind receiving this error. So, let’s find out the major factors behind leading smart 301 hard drive errors.
What Causes The Smart Hard Disk Error 301 HP?
There are countless reasons which can be responsible for the occurrence of a 301 hard disk error code. So, below I have listed the most common reasons that can lead to this issue:
- Physical damage to a hard drive
- SMART hard disk check failure
- Broken IDE/SATA controller chip in the Motherboard
- Virus/malware attack
- Outdated/Misconfigured BIOS
- Unexpected shutdown of the system
- More…
Video Guide- SMART Hard Disk Error HP
However, this error is very annoying but still, there is a hope to fix SMART hard drive error 301. So, let’s find out the best solutions to know how to remove SMART hard disk error 301 in a hassle-free manner.
You May Also Read: Fix Smart Hard Disk Error 309 HP [7 Ways]
After figuring out the common reasons behind HP smart hard drive error 301, now you must be curious to know how to fix this. So, let’s see…
Quick Solutions |
Step-By-Step Solutions Guide |
|
Fix 1: Hard Reboot |
Rebooting the system is the first method to deal with several errors and…Complete Steps |
|
Fix 2: Run CHKDSK Command |
The chkdsk command is the best option to solve all the directory errors…Complete Steps |
|
Fix 3: Reset The BIOS |
Sometimes, SMART hard drive error HP occurs when there’s a problem with…Complete Steps |
|
Fix 4: Check The Hard Drive For Errors |
When facing the SMART hard disk error, you’ve to check your drive if there’s…Complete Steps |
|
Fix 5: Cool Down Your Hard Disk |
Sometimes, ventilation issues might also cause this hard disk error…Complete Steps |
|
Fix 6: Reseat the Hard Drive |
Likely the connection between a hard drive & the HP laptop may…Complete Steps |
|
Fix 7: Change The Boot Priority Order |
Simply turn off your laptop & then again turn it on. Instantly start by pressing…Complete Steps |
Hard Reboot
Rebooting the system is the first method to deal with several errors and bugs. So, when you encounter this SMART 301 hard drive error, first of all, you should try to restart your HP system. To hard reboot the HP system, follow the below steps and troubleshoot Smart disk error 301:
Step 1: At first, shut down the PC/laptop
Step 2: Then, disconnect a power cable
Step 3: Next, eliminate the battery
Step 4: Now, press & hold a power button for 15-20 seconds
Step 5: Wait for sometimes & repeat this once again
Step 6: After this, connect a battery & turn on your system.
If this method doesn’t work, then follow the next solution to fix smart hard disk error HP.
Run CHKDSK Command To Fix Hard Disk 301 Error
Running the check disk utility is another helpful ways that mostly employees in fixing the hard drive related issues just like – smart hard disk error, bad sectors on hard drive and others.
- Press the “Windows + X” key together & choose the “Run as Administrator”
- Next, in that opened Command Prompt window, you have to type “Chkdsk /f /r” & hit the “Enter” key to perform it
- Once done, then restart your laptops/PCs.
After completion of these steps check if the SMART hard disk error 301 HP fixed.
Reset The BIOS
Sometimes, smart hard drive error 301 HP occurs when there’s a problem with the BIOS or firmware. To troubleshoot this, you need to update BIOS. If any update isn’t available, I would suggest you reset BIOS configuration by trying the beneath steps:
Step 1: Remove the hard drive from your system. Then, reconnect it.
Step 2: After this, start your PC. Once the computer starts booting, now keep pressing the F10 to simply enter the BIOS menu.
Step 3: At this time, try to run tests on your drive in the Advanced/Diagnostic settings.
After following all the above steps, Wait till the test to finish. Your PC will now restart. Let it boot & fix the error.
You May Also Like: 7 Best Ways To Fix ‘The Directory Name Is Invalid USB’ Error
Check The Hard Drive For Errors
When facing the SMART hard disk error, you’ve to check your drive if there’s a physical problem leading to a HP smart hard disk error 301.
- First of all, go to My Computer/This PC then find your hard disk & right-click on it.
- Then, go to the option Properties. Make a tap on the Tool.
- In the option Error-checking, you have to click on the Check Now. (Only system administrators have this permission).
- After this, tap on the automatically fix file system errors.
- Now, scan for & attempt recovery of bad sectors.
- At last, click on the Start.
Cool Down Your Hard Disk To Fix Smart Hard Disk Error 301 HP
Sometimes, the ventilation issues might also cause the hard disk error 301 HP. For the normal functioning of your hard disk, accurate ventilation requires to be maintained.
However, if there isn’t sufficient ventilation, a hard disk will surely exceed its maximum temperature. Due to this, you might get this error when you turn on your system. So, to eliminate the ventilation issues, ensure that the coolants are functioning properly. Apart from that, always try to clean internal components regularly.
Reseat the Hard Drive
Likely the connection between a hard drive & the HP laptop may have loosened because of physical damage, shock, etc. Make sure that the firm connection between a hard drive & the motherboard via reseating your hard drive.
Though, you should be very careful while you play with the internals of a laptop as it might further harm your system/laptop.
Note: If you’re not aware of a hardware part, just skip this solution.
Change The Boot Priority Order
Simply turn off your laptop & then again turn it on. Instantly start by pressing the BIOS key generally, the F10 key in HP laptops & desktops, continuously till you get the BIOS screen
- Firstly, use the left/right arrow key & go to the ‘Advanced’ tab
- Next, using the up/down arrow key, you can move the selection to the ‘Boot Order.’
- Then, press the F10 key to save the changes & exit a BIOS.
Otherwise, you can also press F9 continuously when pressing a power button to enter the boot priority order. Make use of the up or down arrow key & choose your hard disk to boot Windows.
Recover Files From Hard Disk After Fixing 301 Hard Disk Error Code Issue
If you have tried all the overhead methods, then you would be able to fix HP SMART hard disk error 301. But, in this case, while applying the above methods, if you have found that your system’s hard disk data gets deleted then do not worry anymore.
You can try the best option that is Hard Drive Data Recovery to recover data from hard drives, external HDD, memory cards, USB flash drives, digital cameras, and many more.
This software offers a preview option that is available in a free trial version, it helps you to check if your lost files are recoverable or not from the hard drive. It supports both the OS: Windows and Mac respectively…

* Free version of the program only scans and previews recoverable objects.
Here is the step-by-step guide to recover stuff from an external hard drive in no time using this fully-featured tool.
Frequently Asked Questions:
Can Smart Hard Disk Error Be Fixed?
Yes, of course, the system Smart hard disk error can be fixed by applying the solutions mentioned in this post. But remember that, before going to solve this problem with above fixes, do not forget to take a backup of your crucial data of hard disk.
What Causes SMART Error 301/302/309?
The collection of bad blocks is enough reason to generate such SMART errors 301/302/309. Apart from that, physical damage to a hard drive, outdated or misconfigured BIOS, and virus attacks could also lead to such sorts of error codes.
How Do I Fix Imminent Hard Drive Failure?
To fix imminent hard drive failure, try the below troubleshooting tips:
- Use Command Prompt
- Perform a Quick Disk Check
- Run System File Checker
- Check Bad Sectors of The Hard Disk
- Seek Help from The Experts
Can I Reset My SMART Hard Drive?
Actually, you cannot clear or reset the Smart hard disk because; SMART is an audit of drives history & is upheld by the disk itself.
How Do I Fix HP Smart HDD Error 302?
You can fix SMART HDD error 302 by using Hard Drive Self-Test. For this, you have to turn on your computer >> press the F10 key on the keyboard to boot in to a BIOS Setup. Then, select the Hard Disk Test to check for errors and fix them.
Also Read: Fix “Windows Detected A Hard Disk Problem”
Final Words
I’m sure this blog helped you to know how to fix SMART hard disk error 301 HP with easy approaches. All these solutions are very easy to apply and I am sure one of the fixes will definitely be going to solve the hard disk 301 error HP.
However, after using these methods if you found that your hard disk data gets deleted then you can easily recover data from non-detecting hard disks by trying the best Hard Drive Data Recovery tool. You need to just download & install this software and try the step-by-step guide mentioned in this article.
If you liked this article, then do not forget to share it with your friends and family members.

Taposhi is an expert technical writer with 5+ years of experience. Her in-depth knowledge about data recovery and fascination to explore new DIY tools & technologies have helped many. She has a great interest in photography and loves to share photography tips and tricks with others.
Summary:
If you are on this blog then you must have faced hard disk error 301 and looking for its solution. But before jumping to its solution you should know why this error code appears, what are the root causes of this issue and how many methods are actually available to fix it. This post holds all the required information regarding this 301 hard disk error code issue.

Contents
- Why SMART Hard Disk Error 301 Occurs?
- How to Solve SMART Hard Disk Error 301
- Conclusion
SMART Hard Disk Error 301 is an unpredicted error message that indicates hard drive failure or severe drive corruption. This error is related to HP laptops, which comes with HP SMART check embedded in the firmware. The HP SMART check is a customized version of Power-On-Self-Test (POST) check that scans hardware for issues when you boot the system. During the scan, if it finds a hardware-related issue, the firmware displays error code such as SMART hard disk error 301 when it encounters problems with the internal hard disk.
Also, this error in HP notebooks is quite common and occurs unexpectedly. You never know when your HP laptop might throw this error. Moreover, it doesn’t let you boot Windows OS. Therefore, when the error 301 occurs, you must be prepared as it becomes crucial for you to act immediately and appropriately to prevent data loss. Below we have discussed a few troubleshooting methods along with a few tips and software solution that can probably help you solve the hard drive error before the situation worsens.
Additionally, if the error isn’t fixed, the guide will also help you get your data back securely.
Why SMART Hard Disk Error 301 Occurs?
To solve the issue, we need to first understand the reasons to why SMART hard disk error 301 occurs. Then, accordingly, you can take measures to prevent such issues in future. Following are some of the factors that can lead to SMART hard disk error 301:
- Outdated or Misconfigured BIOS
- Loose connection
- Application or Driver conflicts
- Virus issues
- File corruption
- Unexpected shutdown
- Power surge
- Physical damage
How to Solve SMART Hard Disk Error 301
1. Change Boot Priority Order
Turn off your HP laptop and then turn it on. Immediately start pressing BIOS key, usually F10 in HP laptops and desktops, continuously until you see the BIOS screen
- Use left/right arrow keys and go to ‘Advanced’ tab
- Using up/down arrow key, move the selection to ‘Boot Order.’
- Follow the on-screen instructions and move the hard disk to top in the boot order
- Press F10 key to save changes and exit the BIOS
Alternatively, you can press F9 key continuously after pressing the power button to enter boot priority order. Use up/down arrow key and select your hard drive to boot Windows.
If the Windows starts, log in to your system and immediately backup your data. If it doesn’t boot up, proceed to the next troubleshooting method.
2. Reset BIOS
SMART disk error 301 can also occur when there is an issue with the BIOS/firmware. This issue could arise over a period as you use your system and tweak BIOS settings that sometimes coincide and lead to such errors.
To solve this, you can update BIOS. When an update is not available, we recommend you to reset the BIOS configuration by following these steps:
- Follow steps given above solution to enter the BIOS
- Press F9 key to reset BIOS
- Then press F10 to save and exit the BIOS settings menu
Your system will reboot. Let it boot and if this fixes the error, immediately backup; else follow the next troubleshooting method.
3. Reseat Hard Drive
It’s possible that connection between the hard drive and the laptop might have loosened due to shock, physical damage, etc. Ensure a firm connection between the hard drive and the motherboard by reseating the hard drive.
Be careful while playing with the internals of the laptop as it may further damage your laptop. If you are not familiar with the hardware part, skip this method.
4. Hard Reboot
While system reboot is the first step to troubleshooting, sometimes restarting a system doesn’t necessarily fix some issues such as SMART disk error 301. In such a case, you need to shut down the system and discharge traces of current from the motherboard. This is referred to as a hard reboot.
To hard reboot your HP laptop, follow these steps:
- Shutdown the system
- Disconnect the power cable
- Remove the battery
- Press and hold the power button for 15-20 seconds in order to discharge every bit of current left in the motherboard (inside capacitors, coils, etc.)
- Wait for a few minutes and repeat once again
- Then connect the battery and turn on your laptop
Hopefully, this fixes the issue; if it doesn’t, the drive might have got corrupt. Follow the next method to recover your data and fix the drive error.
5. Use Data Recovery Software
The above-mentioned troubleshooting methods should fix the issue. However, sometimes, the hard drive gets severely corrupt, and common troubleshooting doesn’t work.
So when the described methods fail, you must rely on a data recovery solution such as Stellar Data Recovery Standard. The software helps you recover your inaccessible data securely from a severely corrupt hard drive using the ‘Deep Scan’ functionality.
Follow the steps below to restore your data from an HP hard drive showing SMART disk error 301:
- Remove the hard drive from the system and use an use an HDD enclosure to connect your hard drive to a different Windows PC
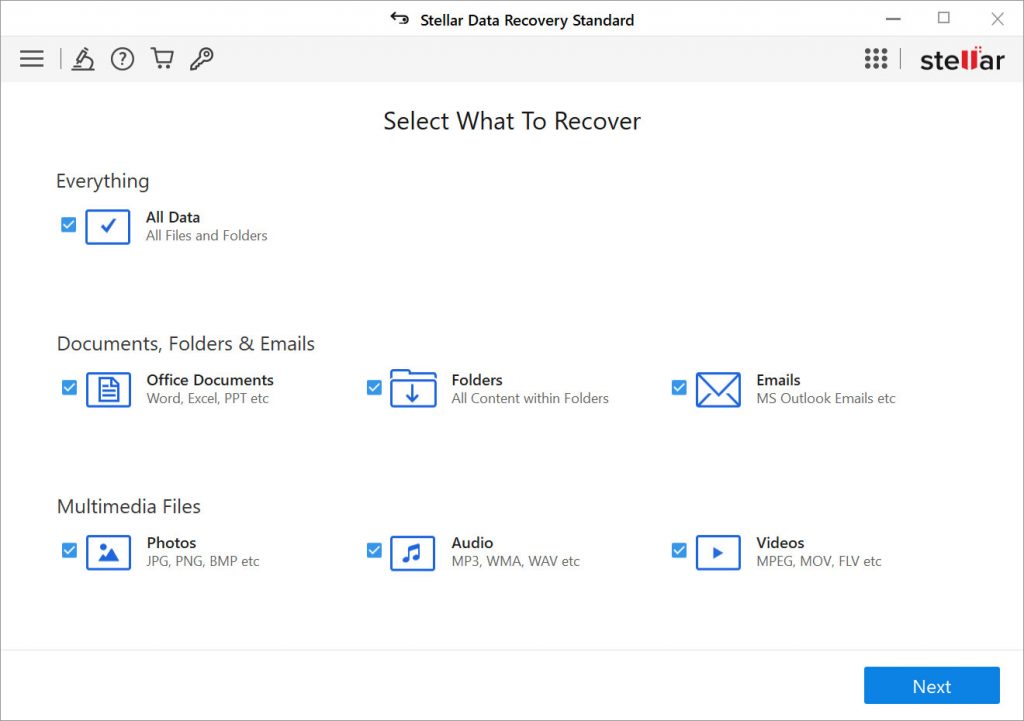
- Download, install and run the Stellar Data Recovery Standard software
- Select ‘All Data’ and click ‘Next.’
- Under ‘Connected Drives’, select your affected hard drive and click ‘Scan.’ If the drive volume isn’t visible, click ‘Can’t Find Drive’, click ‘Scan’ and follow these steps:
- Choose your connected HP hard Drive from the ‘Select Drive’ list and click ‘Search.’
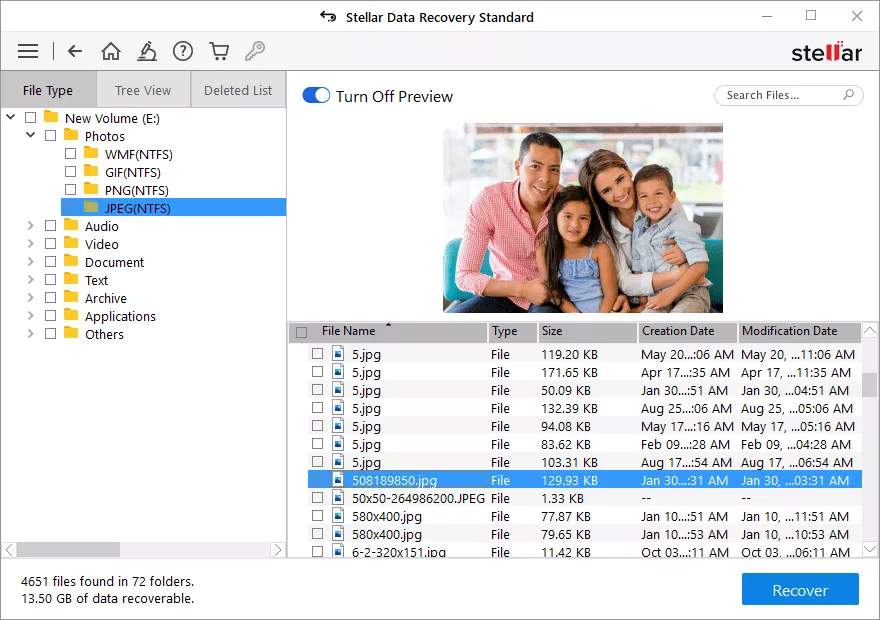
- The software quickly scans your drive for lost, invisible, severely corrupt, or deleted partitions and lists them under ‘Partitions Found’ list box.
- In case the desired partition isn’t listed after the scan, click ‘Deep Scan’ begin thorough partition scan
- Then select the partition from the ‘Partition Found’ list and click ‘Scan’. Resume with the steps given below
- Once the scan is over, the software lists the recoverable files. Use search and filter option to locate important files quickly.
- Further, you can run ‘Deep Scan’ by clicking ‘Click Here’ link at the bottom of the software window if desired files are not found
- After the scan, select the files you wish to recover and click the ‘Recover’ button
- Choose a save location and click ‘Start Saving’ to save files at your desired location
Now you can open the Disk management tool and format your drive. We recommend you not to use the same drive after repair as it may fail again. It’s better to buy a new hard drive and replace the faulty one. You may also choose to upgrade your hard drive to an SSD.
Conclusion
Smart Disk Error 301 is an abrupt error that frequently leads to data loss. Maintaining regular backup is an effective preemptive measure to address data loss situations that arise due to disk error 301.
However, it’s recommended to also have the best Windows data recovery software in case the backup is either obsolete or unavailable.
A software such as Stellar Data Recovery can not only recover inaccessible data but also proactively monitors hard drives to safeguard from impending drive failure and SMART disk error 301.
About The Author

Aruna Attri
Aruna Attri is a Senior Data Recovery Expert at Stellar®. She is a technology blogger and Windows expert. She has experience in Windows data recovery domain. She loves to troubleshoot Windows issue and write technical tips and tutorials.
A sudden failure message on the hard disk drive ( HDD ) or on the solid state drive ( SSD ) after you turn on your desktop or laptop runnin…
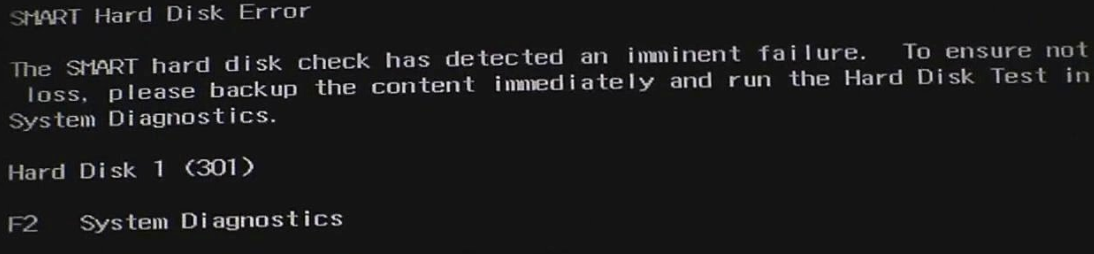
A sudden failure message on the hard disk drive (HDD) or on the solid state drive (SSD) after you turn on your desktop or laptop running Windows or Mac OS X operating systems might lead to an imminent failure. At times, your hard drive starts displaying some uncertain error message:

«The SMART Hard Disk check has detected an imminent failure. To ensure no data lose, please backup the content immediately and run the hard disk test in system diagnostic. Hard Disk 1 SMART (301), want to continue press enter»
This error symbolizes a failure in the device, which could have been taken place or expecting a failure soon. This error usually occurs when your computer device is trying to boot. There could be various causes of this problem that may lead to it, some major ones are:
- The SMART (Self-Monitoring Analysis and Reporting Technology) hard disk check has been failed and asking you to replace the drive.
- If after replacing the drive still you receive the same error, then possibly the motherboard has a broken IDE/SATA controller chip. In this case, each hard drive you connect to the system will show you the same error over and over again.
- At times, the imminent failure message after booting into Windows could also be a spyware or malware effect that pretends your SMART HDD error to be real.
- Well, whenever SMART fails it signifies some physical problem in the hard disk, which is going to fail soon and needs to be replaced. In order to resolve this issue, follow the below mentioned steps:
- First, remove the hard drive and then reconnect again.
- Next, start the Windows system while pressing f10 to enter the bios menu.
- Now, under the ‘Advanced or Diagnostic’, you will find an option to run a test on the Hard Drive and let it complete the test.
- After successful test, if your system still opened with the 301 error then you left with a single choice, which is to replace the hard drive.
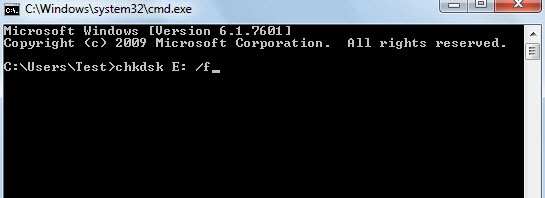
Additionally, you can also use ‘chkdsk’ command in Windows OS that can scan, diagnose, and repair the bad sectors in the hard drives and also create and display a status report for the current disk based on the file system. This command also lists and corrects errors on the disk.
Steps to run ‘chkdsk’:
- Run “chkdsk /f /r” by going to System Recovery Options menu and then selecting Command prompt to initiate repairing of your disk issues like directory errors, lost clusters, bad sectors, and cross-linked files.
Note: Make sure you have backed up complete data before running check disk as it might increases the chances of losing data. - Now, insert the Windows installation disc and restart your system.
- Restart your system. If prompted, press any key to start Windows from the installation disc.
Note: In case your system is not configured to start from a CD or DVD, check the configuration in BIOS. - Now, select the language settings, and then click Next.
- Select Repair option on your computer.
- Now, choose the operating system you want to repair and click Next button.
- On the System Recovery Options menu, click Command prompt.
- At a command prompt, type the below mentioned command and press ENTER
‘Chkdsk /f /r X:( drive letter)’ - Select Y when you are prompted to check the disk the next time that the system restarts.
- Restart the computer again after closing all applications.
Check a drive for errors (Windows 10, Windows 8.1, Windows 8, and Windows 7)
In order to check a hard drive for errors to fix performance issues or physical issues check a drive for errors.
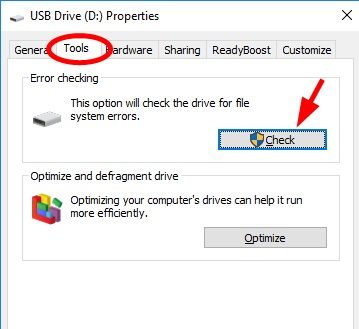
- Go to Start button, and then click Computer.
- Right-click the drive you want to check, and select Properties
- Go to Tools tab, and then click Check now under Error-checking option. To complete this step administrator permission required.
- Now, select ‘Automatically fix file system errors’ to repair problems along with files and folders automatically. You will need to select this option otherwise the disk check will only report issues instead of fixing them.
- Choose ‘Scan for and attempt recovery of bad sectors’ to run thorough check. Such type of scan finds and repairs all the physical errors on the drive, due to which it could be quite time consuming.
- Choose both ‘Automatically fix file system errors’ & ‘Scan for and attempt recovery of bad sectors’ to analyze for both file errors and physical errors.
- Click Start.
This process might take several minutes depending upon the size of your drive. If even after following all above explained solutions, the problem does not resolve, then you can contact to your system manufacturer for more help. Apart from this, you can also use reliable Windows disk recovery software that recovers your precious data from an inaccessible hard drive. Stellar Phoenix Windows Data Recovery is an advanced utility that is highly recommended by most of the professionals due to its high efficiency and accurate results.