By default, Spring Boot shows a white-label error page if it encounters an error during the execution. However, you can easily create your own custom error page and configure the Spring Boot application to display it.
In this short article, you’ll learn how to disable the default white-label error page and display a customized error page in a Spring Boot & Thymeleaf web application.
If you need more information on using Thymeleaf with Spring Boot, read this guide.
Disabling White-label Error Page
To completely disable the default white-label error page, just add the following property to the application.properties file:
server.error.whitelabel.enabled=false
The above property will disable the white-label error page shown by the Spring Boot application. Instead, the default error page from the underlying application server (like Tomcat) will be displayed.
Another way to disable the white-label error page is by excluding the ErrorMvcAutoConfiguration bean by either adding the following property to the application.properties file:
spring.autoconfigure.exclude=org.springframework.boot.autoconfigure.web.servlet.error.ErrorMvcAutoConfiguration
Or the following annotation to the main application class:
@SpringBootApplication(exclude = {ErrorMvcAutoConfiguration.class})
public class Application {
    // ...
}
Displaying Custom Error Page
To display a custom error page in a Spring Boot and Thymeleaf application, just create a new Thymeleaf template called error.html inside the src/main/resources/templates/ folder. Spring Boot default BasicErrorController will automatically pick up this template and display it to the user whenever there is an error or exception.
Here is an example of a generic error.html page:
<!DOCTYPE html>
<html lang="en" xmlns:th="http://www.thymeleaf.org">
<head>
    <meta charset="UTF-8">
    <title>Page Not Found</title>
</head>
<body>
<h1>There's no page here!</h1>
<p>
    We're sorry, the page you are looking for does not exist!
    Go back to <a href="/">home page</a>.
</p>
</body>
</html>
This is all you need to do to display a custom error page. After adding some Bootstrap 4 styling, you’ll have a much nicer error page ready to serve the users:

You can be even more specific by putting the corresponding error page for each status code (such as 404.html in case of a 404 error) inside the src/main/resources/templates/error/ directory.
Spring Boot will look for specific error pages (404.html or 500.html) before displaying the generic error.html page whenever your application encounters an error or exception.
Custom Error Controller
The above error page templates are enough for most of the applications. But, sometimes, you want more control over how the error should be handled and a message displayed to the user. A notable example is sending the error log to a 3rd-party application or storing it in the database for later review.
To achieve this, you need to create a custom error controller that implements the ErrorController interface and overrides its getErrorPath() method to return the path of the custom error page, as shown in the following example:
MyErrorController.java
@Controller
public class MyErrorController implements ErrorController {

    @RequestMapping("/error")
    public String handleError(HttpServletRequest request) {
        // get error status
        Object status = request.getAttribute(RequestDispatcher.ERROR_STATUS_CODE);

        // TODO: log error details here

        if (status != null) {
            int statusCode = Integer.parseInt(status.toString());

            // display specific error page
            if (statusCode == HttpStatus.NOT_FOUND.value()) {
                return "404";
            } else if (statusCode == HttpStatus.INTERNAL_SERVER_ERROR.value()) {
                return "500";
            } else if (statusCode == HttpStatus.FORBIDDEN.value()) {
                return "403";
            }
        }

        // display generic error
        return "error";
    }
}
As you can see above, we have created a custom error controller that handles error requests on the /error endpoint. It tries to find the HTTP status code and returns a corresponding error page if found. Otherwise, it just displays the generic error page.
Conclusion
That’s all for creating and displaying a custom error page in a Spring Boot and Thymeleaf web application. In the first part of this tutorial, we looked at different ways to disable the default white-label error page in Spring Boot.
In the latter half of this tutorial, we discussed multiple ways to handle the Spring Boot application errors and exceptions. For simple use cases, it is enough to create corresponding error page templates inside the templates directory and let the default BasicErrorController does the rest of the work.
For more sophisticated scenarios where you want to track errors, you may want to create a custom error control and run your own custom logic when an error occurs.
✌️ Like this article? Follow me on
Twitter
and LinkedIn.
You can also subscribe to
RSS Feed.
Table of Contents
Usually the unified exception handling we set up in Spring Boot can only handle exceptions thrown by the Controller. Some requests have exceptions before they reach the Controller, and these exceptions cannot be caught by unified exceptions, such as some exceptions in the Servlet container. Today I encountered one in my project development, which irritated me because it returned an error message format that could not be handled uniformly, and I decided to find a solution to this problem.
I’m sure you’ve seen this exception screen many times before, and it’s the default page for Spring Boot whenever there’s an error. If you use a client like Postman to make the request, the exception message is as follows.
|
|
Spring Boot will register an ErrorPageFilter at startup, and when an exception occurs in the Servlet, the filter will intercept the process and handle the exception according to different strategies: When the exception is already being handled, it is handled directly, otherwise it is forwarded to the corresponding error page. If you are interested in the source code, the logic is not complicated, so I will not post it here.
In addition, when a Servlet throws an exception, the Servlet handling the exception can get several properties from HttpServletRequest inside, as follows.
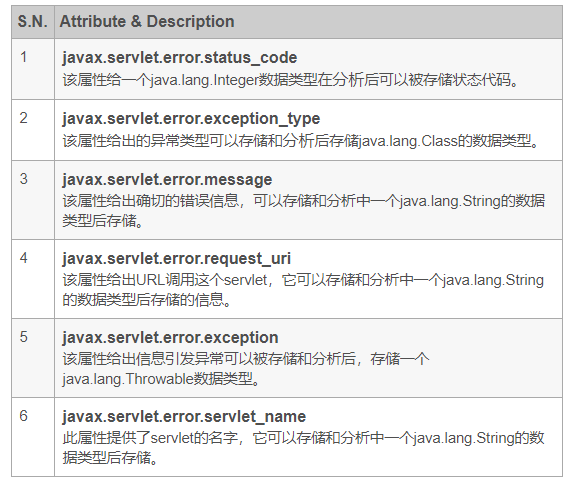
We can get the details of the exception from several properties above.
Default error page
Normally Spring Boot will jump to /error by default to handle exceptions, and the logic for /error is implemented by BasicErrorController.
|
|
And the corresponding configuration.
|
|
So we just need to reimplement an ErrorController and inject Spring IoC to replace the default handling mechanism. And we can clearly see that this BasicErrorController is not only an implementation of ErrorController but also a controller, so if we let the controller’s methods throw exceptions, they can definitely be handled by a custom unified exception handling. So I have modified BasicErrorController.
|
|
Throwing exceptions directly is simple and effortless! Where most of the exceptions caught here have not gone through the Controller, we let these exceptions be handled uniformly through the ExceptionController relay, ensuring that the exception handling of the entire application maintains a uniform facade to the outside world. I don’t know if you have a better way, welcome to discuss in the comments.
Reference
https://felord.cn/spring-boot-error-page.html
- Details
- Written by
- Last Updated on 24 March 2022 | Print Email
In this article, I will help you understand the default error handling in Spring Boot, how to use custom error pages (for common HTTP error codes like 403, 404, 500…) and how to code a custom error controller in order to perform additional code when an error occurred, e.g. logging more information about the error.
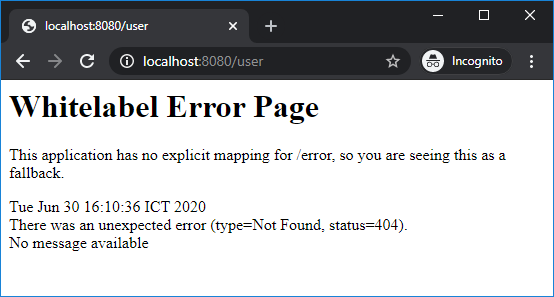
1. Default Whitelabel Error Page
By default, Spring Boot will display the Whitelabel error page when an error occurred. For example, when a page could not be found (HTTP 404 error):
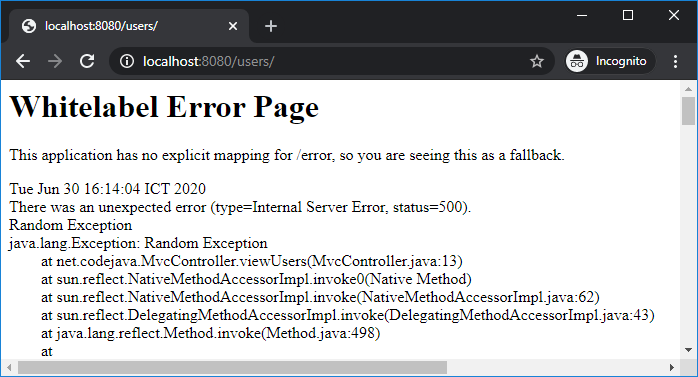
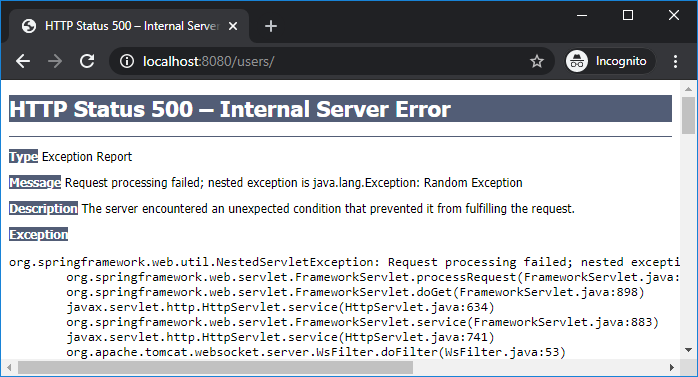
Or when an exception is thrown by Java Virtual Machine, causing HTTP 500 Internal server error – the white label error page gets displayed with the exception stack trace:
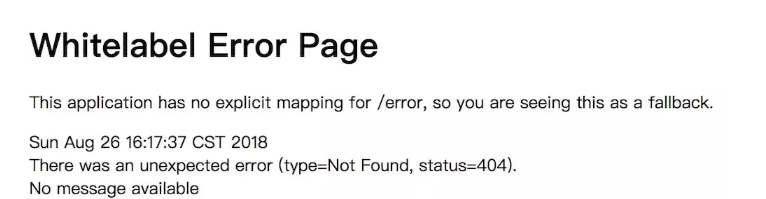
This kind of error page is certainly not friendly to the end users, and Spring Boot prints this statement:
This application has no explicit mapping for /error, so you are seeing this as a fallback.
That means programmers should handle mapping for /error URL and provide custom, user-friendly error pages.
Spring Boot allows programmers to disable the white label error page by setting the following property in the application.properties file:
server.error.whitelabel.enabled=false
Then the raw error page provided by the server gets displayed, i.e. Tomcat like this:
Anyway, we should provide custom error pages instead of the default ones which are very technical to the end users.
2. Use Custom Error Pages
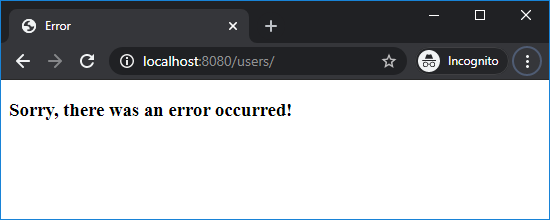
Spring Boot makes it easy to override the default whitelabel error page. Just create the error.html page under the src/main/resources/templates directory. For example, with the following code:
<!DOCTYPE html> <html> <head> <meta charset="ISO-8859-1"> <title>Error</title> </head> <body> <h3>Sorry, there was an error occurred!</h3> </body> </html>
Then when any error occurred, this custom error page will get displayed:
You can also provide custom error page for a specific HTTP status code (403, 404, 500, etc) – just by creating the 403.html (Forbidden error), 404.html (Page not found error), 500.html (Internal server error)… files under the templates/error directory (you must create error directory):
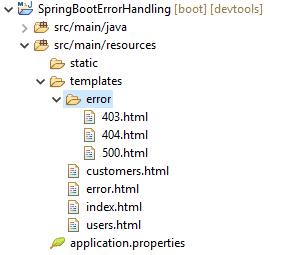
That’s it – very simple! Thanks to Spring Boot’s default configurations do all the details behind the scene.
3. Implement Custom Error Controller
In case you want to perform some tasks before the custom error pages get displayed, you can code a controller class implementing the ErrorController interface like this:
package net.codejava;
import javax.servlet.RequestDispatcher;
import javax.servlet.http.HttpServletRequest;
import org.springframework.boot.web.servlet.error.ErrorController;
import org.springframework.http.HttpStatus;
import org.springframework.stereotype.Controller;
import org.springframework.web.bind.annotation.GetMapping;
@Controller
public class CustomErrorController implements ErrorController {
@GetMapping("/error")
public String handleError(HttpServletRequest request) {
String errorPage = "error"; // default
Object status = request.getAttribute(RequestDispatcher.ERROR_STATUS_CODE);
if (status != null) {
Integer statusCode = Integer.valueOf(status.toString());
if (statusCode == HttpStatus.NOT_FOUND.value()) {
// handle HTTP 404 Not Found error
errorPage = "error/404";
} else if (statusCode == HttpStatus.FORBIDDEN.value()) {
// handle HTTP 403 Forbidden error
errorPage = "error/403";
} else if (statusCode == HttpStatus.INTERNAL_SERVER_ERROR.value()) {
// handle HTTP 500 Internal Server error
errorPage = "error/500";
}
}
return errorPage;
}
@Override
public String getErrorPath() {
return "/error";
}
}
Here, the getErrorPath() method returns a URL to which will be forwarded when an error occurs. And this error path is handled by the handler method right in this class. I showed you the code that returns the corresponding error page name based on HTTP status code, and you can add code to perform the logics you want to execute before the error pages get displayed.
Note that all exceptions are logged by Spring Boot by default, so you don’t have to log the errors again here in this custom controller class.
In case you want to handle specific exception classes rather than HTTP error code, follow this article: Spring Boot Controller-Based Exception Handler Examples
Conclusion
So far you have learned how to provide custom error pages in a Spring Boot application, and how to intercept the requests before those error pages get displayed. Again, Spring Boot makes error handling simple, easy and convenient. For reference, you can download the sample Spring Boot project attached below, and watch the following video to see the code in action:
Related Tutorials:
- Spring Boot Controller-Based Exception Handler Examples
- How to handle exceptions in Spring MVC
Other Spring Boot Tutorials:
- Spring Boot automatic restart using Spring Boot DevTools
- Spring Boot Form Handling Tutorial with Spring Form Tags and JSP
- How to create a Spring Boot Web Application (Spring MVC with JSP/ThymeLeaf)
- Spring Boot — Spring Data JPA — MySQL Example
- Spring Boot Hello World RESTful Web Services Tutorial
- How to use JDBC with Spring Boot
- Spring Boot CRUD Web Application with JDBC — Thymeleaf — Oracle
- Spring Boot RESTful CRUD API Examples with MySQL database
- How to package Spring Boot application to JAR and WAR
- Spring Boot Security Authentication with JPA, Hibernate and MySQL
- Spring Data JPA Paging and Sorting Examples
About the Author:
 Nam Ha Minh is certified Java programmer (SCJP and SCWCD). He started programming with Java in the time of Java 1.4 and has been falling in love with Java since then. Make friend with him on Facebook and watch his Java videos you YouTube.
Add comment
В этом посте будет обсуждаться, как переопределить страницу ошибки Spring Boot с помощью нашей пользовательской HTML-страницы.
По умолчанию Spring Boot отображает Страница ошибки Whitelabel если мы столкнемся с ошибкой сервера. Чтобы указать пользовательскую логику ошибок, нам нужен @Controller который обрабатывает /error путь или представление, которое разрешается с именем ошибки. Давайте подробно обсудим оба подхода:
1. Реализация интерфейса ErrorController
Мы знаем, что Spring Boot автоматически регистрирует BasicErrorController как Spring Bean при реализации ErrorController не предусмотрено. Чтобы полностью заменить поведение по умолчанию, реализуйте ErrorController интерфейс и переопределить его getErrorPath() чтобы вернуть путь к странице с ошибкой, как показано в следующем примере.
|
1 2 3 4 5 6 7 8 9 10 11 12 13 14 15 16 17 18 19 |
import org.springframework.boot.web.servlet.error.ErrorController; import org.springframework.web.bind.annotation.RequestMapping; import org.springframework.web.bind.annotation.RestController; @RestController public class Controller implements ErrorController { // … @RequestMapping(«/error») public String handleError() { return «<h1>Something went wrong!</h1>»; } @Override public String getErrorPath() { return «/error»; } } |
2. Пользовательские страницы ошибок
Мы также можем отобразить пользовательскую HTML-страницу для ошибки.
1. Давайте начнем с добавления зависимости шаблонизатора Thymeleaf к pom.xml.
|
<!— Spring Boot Thymeleaf —> <dependency> <groupId>org.springframework.boot</groupId> <artifactId>spring—boot—starter—thymeleaf</artifactId> </dependency> |
2. Затем создайте пользовательскую HTML-страницу с ошибкой и пометьте ее как error.html.
|
<!DOCTYPE html> <html> <head lang=«en»> <meta charset=«UTF-8»> <title></title> </head> <body> <h1>:—(</h1> <h2>Something went wrong and we couldn‘t complete your request.</h2> <a href=«/»>Go back to home page</a> </body> </html> |
3. Место error.html файл под resources/templates каталог. Структура папок будет следующей:
src/
+- main/
+- java/
| + <source code>
+- resources/
+- templates/
+- error.html
4. Наконец, добавьте bean-компонент, реализующий ErrorViewResolver интерфейс, как показано в следующем примере:
|
1 2 3 4 5 6 7 8 9 10 11 12 13 14 15 16 17 18 19 20 21 22 23 |
import org.springframework.boot.web.servlet.error.ErrorController; import org.springframework.web.bind.annotation.RequestMapping; import org.springframework.web.bind.annotation.RestController; import org.springframework.web.servlet.ModelAndView; @RestController public class Controller implements ErrorController { // … @RequestMapping(«/error») public ModelAndView handleError() { ModelAndView modelAndView = new ModelAndView(); modelAndView.setViewName(«error»); return modelAndView; } @Override public String getErrorPath() { return «/error»; } } |
Мы также можем отображать определенные страницы ошибок для разных типов ошибок. Мы можем сделать это, назвав файл HTML соответствующим кодом состояния HTTP.
В следующем примере разные страницы ошибок отображаются для разных кодов состояния HTTP: error-404.html страница для 404 Not Found, error-403.html страница для 403 Forbidden, error-500.html страница для внутреннего сервера 500 и error.html страница в противном случае.
|
1 2 3 4 5 6 7 8 9 10 11 12 13 14 15 16 17 18 19 20 21 22 23 24 25 26 27 28 29 30 31 32 33 34 35 36 37 38 39 |
import org.springframework.boot.web.servlet.error.ErrorController; import org.springframework.http.HttpStatus; import org.springframework.web.bind.annotation.RequestMapping; import org.springframework.web.bind.annotation.RestController; import org.springframework.web.servlet.ModelAndView; import javax.servlet.http.HttpServletResponse; @RestController public class Controller implements ErrorController { // … @RequestMapping(«/error») public ModelAndView handleError(HttpServletResponse response) { ModelAndView modelAndView = new ModelAndView(); if (response.getStatus() == HttpStatus.NOT_FOUND.value()) { modelAndView.setViewName(«error-404»); } else if (response.getStatus() == HttpStatus.FORBIDDEN.value()) { modelAndView.setViewName(«error-403»); } else if (response.getStatus() == HttpStatus.INTERNAL_SERVER_ERROR.value()) { modelAndView.setViewName(«error-500»); } else { modelAndView.setViewName(«error»); } return modelAndView; } @Override public String getErrorPath() { return «/error»; } } |
Это все, что касается отображения пользовательских страниц ошибок в Spring Boot.
A quick guide to how to add custom error page in spring boot application. Example to disable the default error page and how to customize the Whitelabel error page.
1. Introduction
In this tutorial, We’ll learn how to customize the error page in spring boot application. We are going to cover how to disable the default error page and how we can customize the Whitelabel error page.
By default, Spring Boot shows the Whitelabel error page for any server related errors. But, the default showed the error is not relevant to our application and what is the problem. Actually, We should not use this page in the production environment. So, We need to show our customized and maintenance message on the error page.
Dependencies required:
<dependency>
  <groupId>org.springframework.boot</groupId>
  <artifactId>spring-boot-starter-web</artifactId>
</dependency>

<dependency>
   <groupId>org.springframework.boot</groupId>
   <artifactId>spring-boot-starter-thymeleaf</artifactId>
</dependency>
<dependency>
 <groupId>org.springframework.boot</groupId>
 <artifactId>spring-boot-starter-web</artifactId>
</dependency>
I am running all examples code with spring boot version 2.2.6 release.
Writing example code to display the default Whitelabel error page.
@GetMapping("/error")
 public String getDefaultPage(@RequestHeader(name = "errorcode") String errorCode) {
  logger.info("error code : " + errorCode);
  return "error";
 }

3. Disabling the Whitelabel Error Page
Disabling whilelabel page can be done in two ways using properties file and annotation.
We’ll see one by one with related configurations needed.
3.1 application.properties file
Built-in error page is hidden by using the property «server.error.whitelabel.enabled» in application.properties file. Just set this flag to false to disable the default error page.
server.error.whitelabel.enabled=false
This will disable the default one and will try to find out our customized one.
3.2 Exclude ErrorMvcAutoConfiguration
Even the same can be achieved by using another property «spring.autoconfigure.exclude» in the config file as below.
spring.autoconfigure.exclude=org.springframework.boot.autoconfigure.web.ErrorMvcAutoConfiguration
3.3 Using Annotation
There is another way rather than keeping an entry in the props file. Now, let us add to the main application class @EnableAutoConfiguration annotation by mentioning which to be ignored.
package com.javaprogram.custom.errors;

import org.slf4j.Logger;
import org.slf4j.LoggerFactory;
import org.springframework.boot.SpringApplication;
import org.springframework.boot.autoconfigure.EnableAutoConfiguration;
import org.springframework.boot.autoconfigure.SpringBootApplication;
import org.springframework.boot.autoconfigure.web.servlet.error.ErrorMvcAutoConfiguration;

import com.javaprogram.springbootapp.SpringBootAppApplication;

@SpringBootApplication(scanBasePackages = "com.javaprogram.custom.errors")
@EnableAutoConfiguration(exclude = {ErrorMvcAutoConfiguration.class})
public class CustomErrorApplication {

 private static Logger logger = LoggerFactory.getLogger(CustomErrorApplication.class);

 public static void main(String[] args) {
  logger.info("Container started.....");
  SpringApplication.run(SpringBootAppApplication.class, args);
 }

}
All the above are worked well without any errors. And also I did not get the tomcat server default page because I have used the custom error page in the templates folder.
4. Setting Up Custom Error Page
Configuring the custom error page is easy. Follow the below guidelines step by step.
We are using thymeleaf template. So, Please create all of these files under resources/templates folder.
Create error pages as below.
This is the default error page.
error.html
<!DOCTYPE html>
<html>
<body>
 <h1>Maintenance is in progress</h1>
 <h2>Our Support team is working on it.</h2>
 <p>
  <a href="/">Please visit soon.</a>
 </p>
</body>
</html>
404.html
<!DOCTYPE html>
<html>
<body>
 <h1>You are looking for a page is not found</h1>
 <p>
  <a href="/">Go Home</a>
 </p>
</body>
</html>
400.html
<!DOCTYPE html>
<html>
<body>
 <h1>Sorry, Unexpected high volume.</h1>

 <h2>Please give try after sometime.</h2>
 <p>
  <a href="/">Go Home</a>
 </p>
</body>
</html>
Create a Controller class and implement ErrorController interfaces which shows the use of requested files as below. ErrorController interface has an abstract method that needs to be implemented and provide the error files location. In our case, I have placed in error folder so given as «/error» If you are using another location, please provide it correctly. But I tried to give a different location but for me, it did not consider the location. So, used default «/error» location that worked.
package com.javaprogram.custom.errors.api;

import org.slf4j.Logger;
import org.slf4j.LoggerFactory;
import org.springframework.boot.web.servlet.error.ErrorController;
import org.springframework.stereotype.Controller;
import org.springframework.web.bind.annotation.GetMapping;
import org.springframework.web.bind.annotation.RequestHeader;

import com.javaprogram.api.RequestHeadersAPI;

@Controller
public class CustomErrorController implements ErrorController {

 Logger logger = LoggerFactory.getLogger(RequestHeadersAPI.class);

 @GetMapping("/custom/error")
 public String getCustomError(@RequestHeader(name = "code") String errorCode) {

  logger.info("error code : " + errorCode);
  if ("400".equals(errorCode)) {
   return "400";
  } else if ("404".equals(errorCode)) {
   return "404";
  }

  return "error";
 }

 @Override
 public String getErrorPath() {
  logger.info("setting up the path for error pages.");
  return "/error";
 }

}
For testing purposes, I have passing error code as part of request header using @RequestHeader annotation.
We’ll test the api using postman.
400 error code testing

404 error code:

Other error codes:

Instead of sending the error code in the request, we can get the error code from the actual HTTP request.
 @GetMapping(value = "/custom/errors")
 public String handleError(HttpServletRequest request) {

  Object status = request.getAttribute(RequestDispatcher.ERROR_STATUS_CODE);

  if (status != null) {

   Integer statusCode = Integer.valueOf(status.toString());

   if (statusCode == HttpStatus.NOT_FOUND.value()) {
    return "404";
   } else if (statusCode == HttpStatus.INTERNAL_SERVER_ERROR.value()) {
    return "500";
   }

  return "error";
 }
5. Conclusion
In this article, We’ve seen how to set the custom error page in Spring Boot and how to hide the default Whitelabel error page.
All shows examples are shown in the GitHub
GitHub Code