I’m trying to secure my website using Spring Security following the guides on the web.
So on my server side I have the following classes.
My WebSecurityConfigurerAdapter:
@Configuration
@EnableWebSecurity
public class WebSecurityConfig extends WebSecurityConfigurerAdapter implements ApplicationContextAware {

    @Override
    protected void registerAuthentication(AuthenticationManagerBuilde rauthManagerBuilder) throws Exception {
        authManagerBuilder.inMemoryAuthentication().withUser("user").password("password").roles("ADMIN");
    }
}
My controller:
@Controller
//@RequestMapping("/course")
public class CourseController implements ApplicationContextAware {

    @RequestMapping(value="/course", method = RequestMethod.GET, produces="application/json")
    public @ResponseBody List<Course> get(  // The criterion used to find.
        @RequestParam(value = "what", required = true) String what,
        @RequestParam(value = "value", required = true) String value) {
        //.....
    }

    @RequestMapping(value = "/course", method = RequestMethod.POST, produces = "application/json")
    public List<Course> upload(@RequestBody Course[] cs) {

    }
}
What confused me very much is the server does not respond to the POST/DELETE method, while the GET method works fine. BTW, I’m using RestTemplate on the client side.
Exceptions are:
Exception in thread "main" org.springframework.web.client.HttpClientErrorException: 403 Forbidden
    at org.springframework.web.client.DefaultResponseErrorHandler.handleError(DefaultResponseErrorHandler.java:91)
    at org.springframework.web.client.RestTemplate.handleResponseError(RestTemplate.java:574)
    at org.springframework.web.client.RestTemplate.doExecute(RestTemplate.java:530)
    at org.springframework.web.client.RestTemplate.execute(RestTemplate.java:487)
    at org.springframework.web.client.RestTemplate.delete(RestTemplate.java:385)
    at hello.Application.createRestTemplate(Application.java:149)
    at hello.Application.main(Application.java:99)
I’ve searched the internet for days. Still don’t have a clue. Please help. Thanks so much
This article aims to provide a step-by-step guide on Solving HTTP 403 Forbidden Error in a Spring Boot Post Request. It covers various aspects, including authorization and authentication mechanisms, CSRF protection configuration, request mapping, and endpoint security, testing using the cURL command from a terminal, and, applying the appropriate fixes.
1. Introduction
When developing a Spring boot application, developers could come across the HTTP 403 forbidden error message when performing an HTTP POST request to a resource/endpoint. Some typical reasons for this occurrence could include when access to a resource or endpoint is being denied by a server due to insufficient permissions, custom authorization rules being implemented in the application, or the in-built CSRF (Cross-Site Request Forgery) protection enabled from Spring Security.
1.1 Explanation of the HTTP status code 403 – Forbidden
The 403 forbidden error is a standard HTTP status code that indicates that a server understands a client’s request but refuses to execute it. A 403 error means that a server is denying access to a requested resource or web page.
1.2 Common Scenarios Leading to a 403 Error
Below are some common scenarios that can lead to the HTTP 403 forbidden error in a Spring Boot POST request.
- Insufficient Privileges: Role-based access control (RBAC) is a widely used approach that is used to restrict resource access to authorized users. The 403 error may occur if a user lacks the necessary privilege to perform a POST request on a resource.
- Authentication Failure: Some web applications or APIs require users to log in before accessing certain resources. If the login credentials are missing or invalid, a server will respond with a 403 error, denying access to the resource. Also, if some custom authorization rules have been implemented to deny access to a requested resource, a 403 forbidden error may be returned.
- CRSF Protection: Spring Security provides built-in Cross-Site Request Forgery (CSRF) protection that prevents unauthorized POST requests from external sources and enables it by default. A 403 error may be returned If a CSRF token is missing or invalid in a POST request.
- IP blocking: A Server can be configured to block specific IP addresses for various reasons, such as to restrict access to certain geographical regions or suspected malicious activity. If your IP address is blocked, you’ll receive a 403 error when trying to access a resource.
2. Build a REST API with Spring Boot
In order to demonstrate how to solve the HTTP 403 forbidden error message, we will be building a Spring Boot application and using Spring Security, we would add authentication, authorization, and other security features to protect the resources in the application.
2.1 Create a Spring boot project
Firstly, we will use the Spring Initialzr to generate the base for our project with the following configuration:
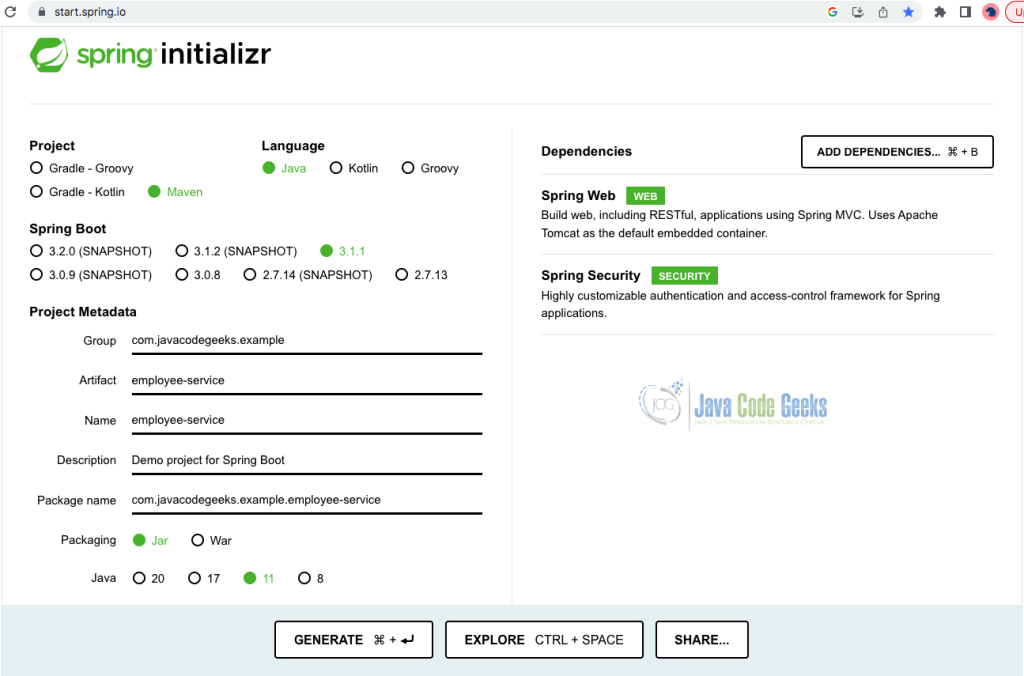
- Project – Maven
- Language – Java
- Spring Boot Version – 2.7.13
- Group –
com.javacodegeeks.example - Artifact – employee-service
- Packaging – Jar
- Java Version – 11
- Dependencies – Spring Web and Spring Security
The following dependencies are added to the project pom.xml as shown below
	<dependencies>
		<dependency>
			<groupId>org.springframework.boot</groupId>
			<artifactId>spring-boot-starter-security</artifactId>
		</dependency>
		<dependency>
			<groupId>org.springframework.boot</groupId>
			<artifactId>spring-boot-starter-web</artifactId>
		</dependency>
		<dependency>
			<groupId>org.springframework.boot</groupId>
			<artifactId>spring-boot-starter-test</artifactId>
			<scope>test</scope>
		</dependency>
		<dependency>
			<groupId>org.springframework.security</groupId>
			<artifactId>spring-security-test</artifactId>
			<scope>test</scope>
		</dependency>
	</dependencies>
Next, Click Generate and expand the.zip file after downloading, and open the project in your IDE. Update the application.properties file located in src/main/resources folder and add the following property server.port=8081. This changes the default server port from 8080 to 8081.
Next, we create a Employee.java class that would be used as our data model. Note that getter, setter and toString methods have been removed for brevity.
public class Employee {

    private int id;
    private String name;
    private String department;

    public Employee() {
    }

    public Employee(int id, String name, String department) {
        this.id = id;
        this.name = name;
        this.department = department;
    }

}
Next, create a EmployeeService.java, a class that would be used as our data repository to manage employees and populates the application with some default data.
@Component
public class EmployeeService {

    public EmployeeService() {
    }

    static List employeeList = new ArrayList();

    static {
        employeeList.add(new Employee(1, "Thomas", "Sales"));
        employeeList.add(new Employee(2, "Bill", "Account"));
        employeeList.add(new Employee(3, "Fela", "Information Technology"));
    }

    public List getAllEmployees() {
        return employeeList;
    }

    public int addEmployee(Employee employee) {
        int newId = employeeList.size() + 1;
        employee.setId(newId);
        employeeList.add(employee);
        return newId;
    }
}
Next, create a EmployeeController.java. A class that will be used to expose our Employee.java class as a resource in the application.
@RestController
@RequestMapping("/api")
public class EmployeeController {

    private EmployeeService service;

    public EmployeeController(EmployeeService service) {
        this.service = service;
    }

    @GetMapping("/employees")
    Collection employees() {
        return service.getAllEmployees();
    }

    @PostMapping("/employee")
    ResponseEntity createEmployee(@RequestBody Employee employee) throws URISyntaxException {
        int newEmployeeId = service.addEmployee(employee);
        return ResponseEntity.created(new URI("/api/employee/" + newEmployeeId))
                .body(employee);
    }
}
In the above code, we have added a @RestController annotation to the class that indicates that the class is a controller and the methods in it are capable of handling HTTP requests and producing HTTP responses. We have also added an @PostMapping annotation to the createEmployee method that indicates that the server would be able to handle a HTTP POST request to this method.
When we added Spring Security to the application, all endpoints were secured by default. Next, we will define our custom security configuration by creating a SecurityConfig.java class to accept unrestricted access to all endpoints. This is done by registering a SecurityFilterChain bean to accept all incoming requests without requiring any form of authentication as shown below.
@Configuration
@EnableWebSecurity
public class SecurityConfig {

@Bean
    public SecurityFilterChain filterChain(HttpSecurity http) throws Exception {
        http.authorizeRequests()
            .anyRequest()
            .permitAll();

        return http.build();
    }
}
To test the REST API service, open a terminal and navigate to the project directory and type the following command
./mvnw spring-boot:run
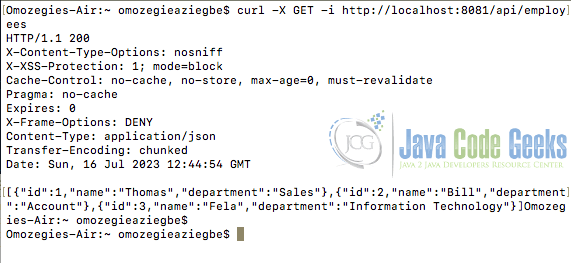
After running the above command, the application will start and be available on port 8081. The application can then be accessible on a web browser by navigating to http://localhost:8081/api/employees or by issuing the curl command curl -X GET -i http://localhost:8081/api/employees on a terminal. The screenshot below shows the data and output returned from a terminal
In this section, we will be providing solutions to the common scenarios that lead to the HTTP 403 forbidden error in a Spring Boot POST request listed in section 1.2 of this article.
3.1 Verify CSRF Protection Configuration
Here, we will take a look at what CSRF is, explain CSRF token and protection, and show how to disable CSRF configuration in Spring boot applications.
3.1.1 What is CSRF
CSRF is an acronym for Cross-Site Request Forgery. Cross-site request forgery is a web security vulnerability that allows authenticated users to perform malicious actions on web applications.
3.1.1 Understanding CSRF Token and Protection
A CSRF token is a unique randomly generated and unpredictable value that is generated by a server-side application and shared with a client. CSRF protection prevents unauthorized HTTP POST requests from external sources. If a CSRF token is invalid or missing when making a POST request, Spring Security may respond with a 403 forbidden error.
3.1.2 Verifying and Configuring CSRF Protection in a Spring Boot Application
Spring Security provides built-in Cross-Site Request Forgery (CSRF) protection enabled by default. To verify CSRF configuration in the application, we would have to make an HTTP POST request to the endpoint http://localhost:8081/api/employee to add a new employee.
3.1.2.1 Test with cURL to Send a POST Request and Observe the Response
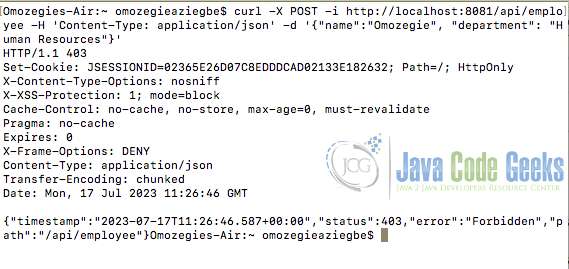
Now let’s make an HTTP POST request to the endpoint at http://localhost:8081/api/employee to observe the response using the cURL command below
curl -X POST -i http://localhost:8081/api/employee -H 'Content-Type: application/json' -d '{"name":"Omozegie", "department": "Human Resources"}'
Performing the above request results in an HTTP 403 Forbidden error as shown in the figure below
To solve the 403 “Forbidden” error message, the built-in CSRF protection in a Spring Boot application has to be disabled. The method proposed here assumes that users won’t be using the application through a web browser else to handle a 403 error in a Spring Boot POST request with CSRF enabled, make sure your POST request includes the appropriate CSRF token which can be obtained from the server and included in the request header or body.
To disable the default CSRF protection, update SecurityConfig.java class to add .and().csrf().disable() method to the SecurityFilterChain bean as shown below. Note that this method is usually not recommended in a production environment.
@Configuration
@EnableWebSecurity
public class SecurityConfig {

@Bean
    public SecurityFilterChain filterChain(HttpSecurity http) throws Exception {
        http.authorizeRequests()
            .anyRequest()
            .permitAll().and()
            .csrf()
            .disable();

        return http.build();
    }

}
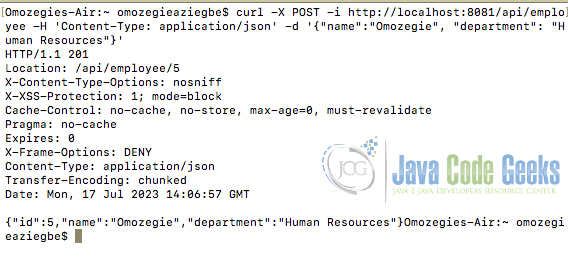
After disabling the in-built CSRF protection and making the same POST request to the server, the server returns with an HTTP 201 message indicating that the POST request was successful as the output shows in the figure below.
3.2 Review Authentication and Authorization mechanisms
Some web applications and REST APIs require authentication before access to certain resources can be granted. Not providing authentication credentials or providing incorrect authentication details can lead to a 403 forbidden error when making a Spring boot HTTP POST request. To provide authentication credentials and enforce access control, let us first modify the SecurityConfig.java class to configure an in-memory user store to add two users. We will also modify the SecurityFilterChain bean to accept all incoming authentication requests to the server before granting access. The modified SecurityConfig.java class is shown below.
@Configuration
@EnableWebSecurity
public class SecurityConfig {

    private static final String ADMIN = "ADMIN";
    private static final String USER = "USER";

    @Bean
    public SecurityFilterChain filterChain(HttpSecurity http) throws Exception {
        http
                .authorizeRequests()
                .antMatchers("/api/employees/**").hasRole(USER)
                .antMatchers("/api/employee/**").hasRole(ADMIN)
                .anyRequest().authenticated()
                .and().httpBasic()
                .and().formLogin()
                .and().logout()
                .and().csrf().disable();

        return http.build();
    }

    @Bean
    public UserDetailsService userDetailsService() throws Exception {
        InMemoryUserDetailsManager manager = new InMemoryUserDetailsManager();
        manager.createUser(User
                .withUsername("thomas")
                .password(encoder().encode("paine"))
                .roles(ADMIN).build());
        manager.createUser(User
                .withUsername("bill")
                .password(encoder().encode("withers"))
                .roles(USER).build());
        return manager;
    }

    @Bean
    public PasswordEncoder encoder() {
        return new BCryptPasswordEncoder();
    }

}
In the code above, We have configured Spring Security to restrict access to specific URL patterns using roles also known as Role Based Access Control (RBAC). The tables below provide an explanation and summary of the code. We also added two users to the in-memory store with username thomas and password paine having an ADMIN role and another user with a username bill and password withers having a USER role.
| URL Pattern | Description |
|---|---|
.antMatchers("/api/employees/**").hasRole(USER) |
Restricts the URL pattern /api/employees/** to users with the USER role. |
.antMatchers("/api/employee/**").hasRole(ADMIN) |
Restricts the URL pattern /api/employee/** to users with the ADMIN role. |
User.withUsername("thomas") |
Defines a user with username thomas, password paine, having an ADMIN role. |
User |
Defines a user with username bill, password withers, and having a USER role. |
Now, if we make a POST Request to the http://localhost:8081/api/employee endpoint without providing any authentication credentials with the previous cURL command, the server responds with an HTTP/1.1 401 Unauthorized status code which is different from an HTTP 403 error message. An HTTP 401 code indicates that a client has not provided any valid authentication credentials for a request to a resource to be granted.
3.2.1 Test with cURL for Authentication and Authorization
To test for Authentication and Authorization using cURL with the authentication details from our in-memory user store, let’s consider a scenario where the user bill with a USER role tries to make a POST request to the http://localhost:8081/api/employee end-point in the application using the following cURL command.
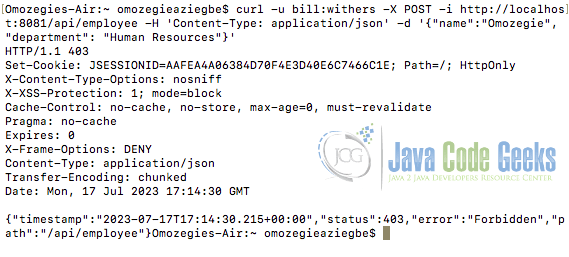
curl -u bill:withers -X POST -i http://localhost:8081/api/employee -H 'Content-Type: application/json' -d '{"name":"Omozegie", "department": "Human Resources"}'
The server responds with a 403 Forbidden error because the user with username bill, does not have the required role of an ADMIN to perform the POST request as configured in the application. The output is shown below.
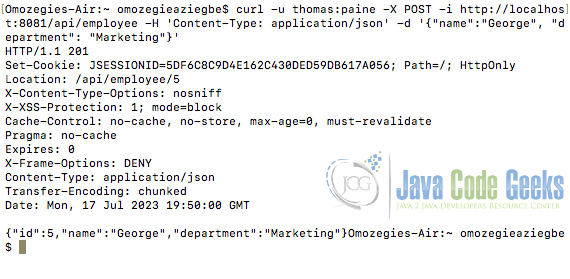
Now let’s use the credentials of the in-memory user with the appropriate authority/role we created to make an HTTP POST request to the http://localhost:8081/api/employee end-point. This will be the user with username thomas and password paine. The cURL command to perform the POST request is
curl -u thomas:paine -X POST -i http://localhost:8081/api/employee -H 'Content-Type: application/json' -d '{"name":"George", "department": "Marketing"}'
The server processes the request and responds with a HTTP 201 status code indicating that the POST request has been fulfilled with one resource created at the location /api/employee/5. This response confirms that the user’s authentication and authorization have been successful as shown in the image below.
4. Conclusion
In this article, we highlighted some scenarios that could lead to a 403 Forbidden error in a Spring Boot application. We explored how to use Spring Security to solve the HTTP 403 Forbidden error in Spring Boot applications. We discussed some of Spring Security features such as CSRF protection and configuration. We learned and configured authentication and authorization using Spring Security and discussed how authorization rules that define access control to resources can be handled in Spring Boot, solving the unauthorized 403 forbidden error.
5. Download the Source Code
This was an article on how to solve the HTTP 403 forbidden error in a Spring Boot application.
New issue
Have a question about this project? Sign up for a free GitHub account to open an issue and contact its maintainers and the community.
By clicking “Sign up for GitHub”, you agree to our terms of service and
privacy statement. We’ll occasionally send you account related emails.
Already on GitHub?
Sign in
to your account
Assignees
![]()
Comments
![]()
Summary
When I try to POST to a resource requiring authentication, I am redirected to a login page (as expected). Upon entering the username and password, I get a 403 access denied error. This works fine if I do a GET to the exact same resource. It’s only for a POST.
Actual Behavior
Receive 403 after successful authentication if authentication trigger is a POST to a protected resource.
Expected Behavior
Resource call should execute same as a GET.
Configuration
@OverRide
protected void configure(HttpSecurity http) throws Exception {
http.authorizeRequests()
.antMatchers(«//action/«).access(«isFullyAuthenticated()»)
.and().formLogin()
.and().csrf().disable();
Version
Tried 5.0.4 and 4.2.4
Sample
![]()
@bleepbleepbleep, the behavior you specify is already supported:
@SpringBootApplication
public class DemoApplication {

	@Controller
	public static class ActionController {
		@GetMapping("/action")
		@ResponseBody
		String getOk() {
			return "<form action='/action' method='post'><button type='submit'>Go</button></form>";
		}

		@PostMapping("/action")
		@ResponseBody
		String postOk() {
			return "ok";
		}
	}

	@EnableWebSecurity
	public static class SecurityConfig extends WebSecurityConfigurerAdapter {
		@Override
		protected void configure(HttpSecurity http) throws Exception {
			http.authorizeRequests()
				.antMatchers("/action/**")
					.access("isFullyAuthenticated()")
					.and()
				.formLogin()
					.and()
				.csrf().disable();
		}

		@Bean
		@Override
		public UserDetailsService userDetailsService() {
			UserDetails user = User.withDefaultPasswordEncoder()
								.username("user")
								.password("password")
								.roles("USER")
								.build()

			return new InMemoryUserDetailsManager(user);
		}
	}

	public static void main(String[] args) {
		SpringApplication.run(DemoApplication.class, args);
	}
}
In the above code, both GET /action and POST /action return a 200 OK once the user is authenticated.
Note the ant syntax for /action, which is where I think I could be misunderstanding your use case. Would you mind clarifying if you feel I’ve misunderstood? Otherwise, I’ll close this issue and recommend that you make a post to StackOverflow for further troubleshooting support.
![]()
@bleepbleepbleep From your statement GET works well and POST throws 403 error, I suspect that CSRF protect is enabled and the post request doesn’t include a valid csrf token.
But your sample code states that csrf is disabled, can you confirm the same from your application configuration to make sure that csrf is disabled?
![]()
this is something I am facing right now with spring security 5.1.5
![]()
@charlie39 would you be able to provide a sample project that reproduces the issue you are experiencing?
![]()
If you would like us to look at this issue, please provide the requested information. If the information is not provided within the next 7 days this issue will be closed.
![]()
Closing due to lack of requested feedback. If you would like us to look at this issue, please provide the requested information and we will re-open the issue.
![]()
Has anyone fixed this error?
I’m facing this issue when I trigger a POST request with couple of fields.
{
«timestamp»: «2020-02-06T19:58:23.636+0000»,
«status»: 403,
«error»: «Forbidden»,
«message»: «Access Denied»,
«path»: «/csor/security/greet»
}
I have CSRF disabled in security config as below:
@OverRide
public void configure(HttpSecurity http) throws Exception {
http
.headers().frameOptions().disable()
.and().sessionManagement().sessionCreationPolicy(SessionCreationPolicy.STATELESS)
.and()
.authorizeRequests()
// .antMatchers(«csor/security/authenticate/»).permitAll()
.antMatchers(«/v2/api-docs»,
«/swagger-resources/«,
«/swagger-ui.html»,
«/webjars/«
).permitAll()
// .anyRequest().authenticated()
.and()
.csrf().disable();
//.and()
//.addFilter(new JwtAuthenticationFilter(authenticationManager()))
//.addFilter(new JwtAuthorizationFilter(authenticationManager()));
}
![]()
I’ve been experiencing this issue for the past 1 week now. I disabled csrf but I still get the same error. Any little help would be appreciated.
![]()
Im having the same issue.
![]()
even i am facing this issue, how to resolve 403 error for POST api
In this article of spring security tutorial, we will see how to create a Spring Security custom 403 access denied page. we will take a look at the steps for spring security custom 403 page.
In Spring security, when an unauthorized user will try to access the secure/ protected page, spring security will throw an access denied exception. There is a default 403 access denied page available with spring security, or if we are using spring boot, it will show the infamous whitelabel error page. Spring security flexible architecture provides the option to customize the 403 access denied page.
1. Application Setup
Before we create spring security custom 403 access denied page, let’s look at our pom.xml file containing the required dependencies.
<?xml version="1.0" encoding="UTF-8"?>
<project xmlns="http://maven.apache.org/POM/4.0.0" xmlns:xsi="http://www.w3.org/2001/XMLSchema-instance" xsi:schemaLocation="http://maven.apache.org/POM/4.0.0 https://maven.apache.org/xsd/maven-4.0.0.xsd">
   <modelVersion>4.0.0</modelVersion>
   <parent>
      <groupId>org.springframework.boot</groupId>
      <artifactId>spring-boot-starter-parent</artifactId>
      <version>2.3.1.RELEASE</version>
      <relativePath />
      <!-- lookup parent from repository -->
   </parent>
   <groupId>com.javadevjournal</groupId>
   <artifactId>spring-security-series</artifactId>
   <version>0.0.1-SNAPSHOT</version>
   <name>Spring Security Tutorial Series</name>
   <description>Series to explain the core Spring security concepts.</description>
   <properties>
      <java.version>1.8</java.version>
   </properties>
   <dependencies>
      <dependency>
         <groupId>org.springframework.boot</groupId>
         <artifactId>spring-boot-starter</artifactId>
      </dependency>
      <dependency>
         <groupId>org.springframework.boot</groupId>
         <artifactId>spring-boot-starter-security</artifactId>
      </dependency>
      <dependency>
         <groupId>org.springframework.boot</groupId>
         <artifactId>spring-boot-starter-web</artifactId>
      </dependency>
      <dependency>
         <groupId>org.springframework.boot</groupId>
         <artifactId>spring-boot-starter-thymeleaf</artifactId>
      </dependency>
      <dependency>
         <groupId>org.springframework.boot</groupId>
         <artifactId>spring-boot-starter-data-jpa</artifactId>
      </dependency>
      <dependency>
         <groupId>org.thymeleaf.extras</groupId>
         <artifactId>thymeleaf-extras-springsecurity5</artifactId>
         <version>3.0.4.RELEASE</version>
      </dependency>
      <dependency>
         <groupId>org.springframework.boot</groupId>
         <artifactId>spring-boot-starter-test</artifactId>
         <scope>test</scope>
         <exclusions>
            <exclusion>
               <groupId>org.junit.vintage</groupId>
               <artifactId>junit-vintage-engine</artifactId>
            </exclusion>
         </exclusions>
      </dependency>
   </dependencies>
   <build>
      <plugins>
         <plugin>
            <groupId>org.springframework.boot</groupId>
            <artifactId>spring-boot-maven-plugin</artifactId>
         </plugin>
      </plugins>
   </build>
</project>
Our pom.xml file contains only required dependencies, and you may need more based on your use case. Also, if you are not using spring boot, the above file is not relevant to you but will give you the idea for the required dependencies.
2. Custom Access Denied Page
To replace the Spring Security custom access denied page, we need to create a custom HTML page for our application. I am using Thymeleaf to build the HTML page, but you can use any other templating engine of your choice. Here is our custom access denied page.
Below HTML is just a sample HTML. You may need different HTML for your production app.
<!DOCTYPE html>
<html xmlns:th="http://www.thymeleaf.org" lang="en">
    <head>
        <meta charset="UTF-8" />
        <meta name="viewport" content="width=device-width, initial-scale=1.0" />
        <meta http-equiv="X-UA-Compatible" content="ie=edge" />
        <link href="https://fonts.googleapis.com/css?family=Raleway:500,800" rel="stylesheet" />
        <title>Access Denied</title>
    </head>
    <body>
        <use>
            <svg version="1.1" xmlns="http://www.w3.org/2000/svg" xmlns:xlink="http://www.w3.org/1999/xlink" x="0px" y="0px" viewBox="0 0 1000 1000" enable-background="new 0 0 1000 1000" xml:space="preserve" class="whistle">
                <metadata></metadata>
                <g>
                    <g transform="translate(0.000000,511.000000) scale(0.100000,-0.100000)">
                        <path
                            d="M4295.8,3963.2c-113-57.4-122.5-107.2-116.8-622.3l5.7-461.4l63.2-55.5c72.8-65.1,178.1-74.7,250.8-24.9c86.2,61.3,97.6,128.3,97.6,584c0,474.8-11.5,526.5-124.5,580.1C4393.4,4001.5,4372.4,4001.5,4295.8,3963.2z"
                        />
                        <path
                            d="M3053.1,3134.2c-68.9-42.1-111-143.6-93.8-216.4c7.7-26.8,216.4-250.8,476.8-509.3c417.4-417.4,469.1-463.4,526.5-463.4c128.3,0,212.5,88.1,212.5,224c0,67-26.8,97.6-434.6,509.3c-241.2,241.2-459.5,449.9-488.2,465.3C3181.4,3180.1,3124,3178.2,3053.1,3134.2z"
                        />
                        <path
                            d="M2653,1529.7C1644,1445.4,765.1,850,345.8-32.7C62.4-628.2,22.2-1317.4,234.8-1960.8C451.1-2621.3,947-3186.2,1584.6-3500.2c1018.6-501.6,2228.7-296.8,3040.5,515.1c317.8,317.8,561,723.7,670.1,1120.1c101.5,369.5,158.9,455.7,360,553.3c114.9,57.4,170.4,65.1,1487.7,229.8c752.5,93.8,1392,181.9,1420.7,193.4C8628.7-857.9,9900,1250.1,9900,1328.6c0,84.3-67,172.3-147.4,195.3c-51.7,15.3-790.8,19.1-2558,15.3l-2487.2-5.7l-55.5-63.2l-55.5-61.3v-344.6V719.8h-411.7h-411.7v325.5c0,509.3,11.5,499.7-616.5,494C2921,1537.3,2695.1,1533.5,2653,1529.7z"
                        />
                    </g>
                </g>
            </svg>
        </use>
        <h1>403</h1>
        <h2>Not this time, access forbidden!</h2>
    </body>
</html>
3. Spring Security Configuration
We have the custom HTML in place. The next step is to configure the Spring Security custom 403 access denied page. To customize this page, Spring security provides the following options while configuring the HttpSecurity element.
- Configure access denied page using the
accessDeniedPage(). - Use
accessDeniedHandler()method.
The accessDeniedHandler() method provides more flexibility and control while customizing the access denied page in spring security, and we will use this option for this article.
3.1 Access Denied Handler
Spring security access denied handler provides us the flexibility and power to run the custom logic before redirecting user to the 403 page.To create a custom access denied handler with spring security, create a class by extending the <a aria-label="AccessDeniedHandler (opens in a new tab)" href="https://docs.spring.io/spring-security/site/docs/current/api/org/springframework/security/web/access/AccessDeniedHandler.html" target="_blank" rel="noreferrer noopener" class="rank-math-link">AccessDeniedHandler</a> interface.
package com.javadevjournal.core.security.handlers;

import org.slf4j.Logger;
import org.slf4j.LoggerFactory;
import org.springframework.security.access.AccessDeniedException;
import org.springframework.security.core.Authentication;
import org.springframework.security.core.context.SecurityContextHolder;
import org.springframework.security.web.access.AccessDeniedHandler;

import javax.servlet.ServletException;
import javax.servlet.http.HttpServletRequest;
import javax.servlet.http.HttpServletResponse;
import java.io.IOException;

public class CustomAccessDeniedHandler implements AccessDeniedHandler {

    private static final Logger LOG = LoggerFactory.getLogger(CustomAccessDeniedHandler.class);

    @Override
    public void handle(HttpServletRequest request, HttpServletResponse response, AccessDeniedException accessDeniedException) throws IOException, ServletException {

        Authentication authentication = SecurityContextHolder.getContext().getAuthentication();
        if (authentication != null) {

            LOG.info("User '" + authentication.getName() +
                "' attempted to access the URL: " +
                request.getRequestURI());
        }
        response.sendRedirect(request.getContextPath() + "/access-denied");
    }
}
The custom handler is only logging the information and redirecting user to the “access-denied” controller. If you look closely, at this point we have access to the request, response, exception and the authentication object. We can build any custom logic based on this information.
3.2. Access Denied Controller.
Next is to create a custom controller to handle the redirect and send use to the access denied page. This is a simple Spring MVC controller, but we have the flexibility to perform any additional logic before showing the page to the customer.
package com.javadevjournal.web.controller.error;

import org.springframework.stereotype.Controller;
import org.springframework.web.bind.annotation.GetMapping;

@Controller
public class AccessDeniedController {

    @GetMapping("/access-denied")
    public String getAccessDenied() {
        return "/error/accessDenied";
    }
}
3.3. Configuring the Custom Access Denied Handler.
We have created the following components for our custom access denied page:
- Custom HTML page.
- Custom access denied handler.
- Spring MVC controller.
The last part of the setup is to let Spring security know about our custom handler. It will do this as part of configuring spring security through the HttpSecurity component. Here is a simplified version of our Spring security configuration (You can check complete configuration on our GitHub Repository)
@EnableWebSecurity
public class AppSecurityConfig extends WebSecurityConfigurerAdapter {

    @Override
    protected void configure(HttpSecurity http) throws Exception {
        http.authorizeRequests()
            .antMatchers("/login", "/register", "/home")
            .permitAll()
            .antMatchers("/account/**").hasAuthority("ADMIN")
            .and()
            .exceptionHandling().accessDeniedHandler(accessDeniedHandler())
            .and()
            ...
    }

    @Bean
    public AccessDeniedHandler accessDeniedHandler() {
        return new CustomAccessDeniedHandler();
    }

}
There are few important things in the above configuration.
- We are only allowing
ADMINauthority to access the/account/**. This means any other user with different authority will get the 403 access denied exception. - Since this is an exception handling, we are using the Spring security
.excepTionHandling()method and telling that we like to handle the access denied use case by passing custom access denied handler to theaccessDeniedHandler()method (.exceptionHandling().accessDeniedHandler(accessDeniedHandler()). - Last part defines our custom handler as a spring managed bean.
4. Testing Application
Our setup is complete, let’s start our application and try to access the page. In the first screen shot (without custom access denied configuration), our application will show the default page.
Once we active the configurations for spring security custom 403 access denied page. Let’s try to access the unauthorized section again by simply login to the system, this time, we will be greeted by our custom access denied page.
Summary
In this article, we saw how to create a Spring Security custom 403 access denied page. We took a deep dive in to the different components to required to customize the access denied page for spring security application. As always, the source code for our Spring Security Course is available on the GitHub.
Table of Contents
1. Overview
In this article, we’ll have a look at how to handle Spring Security exceptions produced by our Spring Security Resource Server . To do so, we’ll also use a practical example where all the necessary configurations will be explained. First of all, let’s make a short introduction to Spring Security.
Spring Security is a library that’s part of the Spring project. It tries to group all the functionalities of user access control on Spring projects . Access control allows limiting the options that can be executed by a given set of users or roles on the application. In this direction, Spring Security controls invocations to business logic or limits the access of HTTP requests to certain URLs . With this in mind, we must configure the application by telling Spring Security how the security layer should behave.
In our case, we’ll focus on the configuration of exception handlers. Spring Security offers three different interfaces to accomplish this purpose and to control the events produced:
- Authentication Success Handler
- Authentication Failure Handler
- Access Denied Handler
Firstly, let’s take a closer look at the configuration.
3. Security Configuration
First of all, we’ve our configuration class that has to extend the WebSecurityConfigurerAdapter class. This will be in charge of managing all the security configurations of the application. So, it’s here where we have to introduce our handlers.
On the one hand, we’ll define the required configuration:
|
|
It’s interesting to note that redirection URLs, such as "/login" , "/customError", and "/access-denied" don’t have to have any type of restriction to access them. So, we annotate them as permitAll().
On the other hand, we’ve to define the Beans that define the types of exceptions that we can handle:
|
|
Since the AuthenticationSuccessHandler handles the happy path, we’ll define the two remaining beans for the exception cases. These two handlers are the ones we now have to adapt and implement to our needs . So, let’s proceed with the implementation of each of them.
4. Authentication Failure Handler
On the one hand, we’ve got the AuthenticationFailureHandler interface. That’s in charge of managing the exceptions produced when the user fails to log in . This interface provides us with the onAuthenticationFailure() method to customize the handler logic. It will be invoked by Spring Security upon a failed login attempt . With this in mind, let’s define our exception handler to redirect us to the error page when a failed login occurs:
|
|
5. Access Denied Handler
On the other hand, when an unauthorized user tries to access the secure or protected page, Spring Security will throw an access denied exception . There’s a default 403 access denied page available with Spring Security which we can customize. This is managed by the AccessDeniedHandler interface. In addition, it provides the handle() method for custom the logic before redirecting the user to the 403 page :
|
|
6. Conclusion
In this quick article, we’ve learned how to handle Spring Security exceptions and how to control them by creating and customizing our classes . In addition, we’ve created a fully functional example that helps us with understanding the concepts explained.
The complete source code of the article is available over on GitHub.
Reference https://www.baeldung.com/spring-security-exceptions