Languages:
English •
Creating an Error 404 Page 日本語
(Add your language)
While you work hard to make sure that every link actually goes to a specific web page on your site, there is always a chance that a link clicked will slam dunk and become a famous 404 ERROR PAGE NOT FOUND.
All is not lost. If your visitors encounter an error, why not be a helpful WordPress site administrator and present them with a message more useful than «NOT FOUND».
This lesson will teach you how to edit your «error» and «page not found» messages so they are more helpful to your visitors. We’ll also show how to ensure your web server displays your helpful custom messages. Finally, we’ll go over how to create a custom error page consistent with your Theme’s style.
Contents
- 1 An Ounce of Prevention
- 2 Understanding Web Error Handling
- 3 Editing an Error 404 Page
- 4 Creating an Error 404 Page
- 5 Tips for Error Pages
- 5.1 Writing Friendly Messages
- 5.2 Add Useful Links
- 6 Testing 404 Error Messages
- 7 Help Your Server Find the 404 Page
- 8 Questions About Error Files
An Ounce of Prevention
Some errors are avoidable, you should regularly check and double check all your links. Also, if you are deleting a popular but out-of-date post, consider deleting the body of the post, and replacing it with a link referring visitors to the new page.
Understanding Web Error Handling
Visitors encounter errors at even the best websites. As site administrator, you may delete out-of-date posts, but another website may have a link to your inside page for that post.
When a user clicks on a link to a missing page, the web server will send the user an error message such as 404 Not Found. Unless your webmaster has already written custom error messages, the standard message will be in plain text and that leaves the users feeling a bit lost.
Most users are quite capable of hitting the back key, but then you’ve lost a visitor who may not care to waste their time hunting for the information. So as not to lose that visitor, at the very least, you’ll want your custom message to provide a link to your home page.
The friendly way to handle errors is to acknowledge the error and help them find their way. This involves creating a custom Error Page or editing the one that came with your WordPress Theme.
Editing an Error 404 Page
Every theme that is shipped with WordPress has a 404.php file, but not all Themes have their own custom 404 error template file. If they do, it will be named 404.php. WordPress will automatically use that page if a Page Not Found error occurs.
The normal 404.php page shipped with your Theme will work, but does it say what you want it to say, and does it offer the kind of help you want it to offer? If the answer is no, you will want to customize the message in the template file.
To edit your Theme’s 404 error template file, open it in your favorite text editor and edit the message text to say what you want it to say. Then save your changes and upload it to the theme directory of your WordPress install.
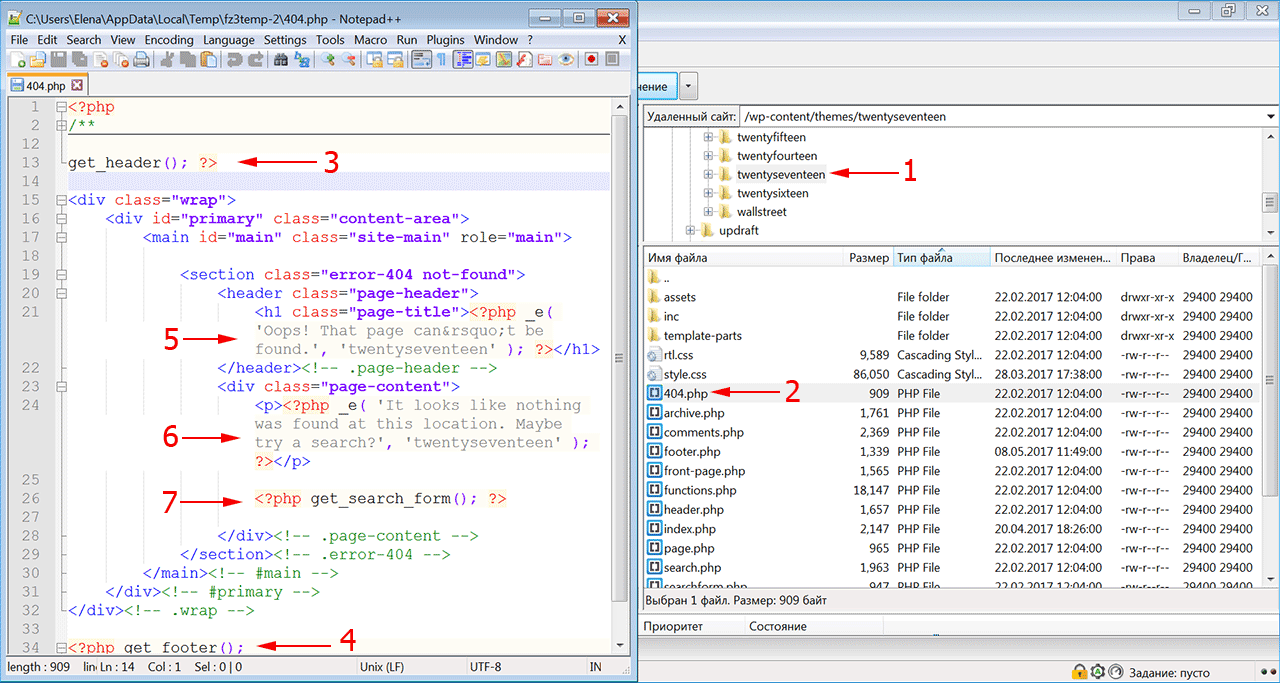
While you are examining and editing your 404 template file, take a look at the simple structure of the 404.php file that is shipped with Twenty Thirteen. It basically features tags that display the header, sidebar, and footer, and also an area for your message:
<?php
/**
 * The template for displaying 404 pages (Not Found)
 *
 * @package WordPress
 * @subpackage Twenty_Thirteen
 * @since Twenty Thirteen 1.0
 */

get_header(); ?>

	<div id="primary" class="content-area">
		<div id="content" class="site-content" role="main">

			<header class="page-header">
				<h1 class="page-title"><?php _e( 'Not Found', 'twentythirteen' ); ?></h1>
			</header>

			<div class="page-wrapper">
				<div class="page-content">
					<h2><?php _e( 'This is somewhat embarrassing, isn’t it?', 'twentythirteen' ); ?></h2>
					<p><?php _e( 'It looks like nothing was found at this location. Maybe try a search?', 'twentythirteen' ); ?></p>

					<?php get_search_form(); ?>
				</div><!-- .page-content -->
			</div><!-- .page-wrapper -->

		</div><!-- #content -->
	</div><!-- #primary -->

<?php get_footer(); ?>
So, to change the error message your visitor sees, revise the text within the h1 heading and within the page-content class; if necessary, add more paragraphs below that.
Creating an Error 404 Page
If your WordPress Theme does not include a template file named 404.php, you can create your own.
Because every theme is different, there is no guarantee that copying over the 404.php template file found in the Twenty Thirteen Theme will work, but it’s a good place to start. The error page you copy from the Twenty Thirteen Theme will adopt the style of the current theme because it actually calls the header and footer of the current theme. That’s less work for you, and you may only have to edit the message to suit your particular needs.
To use the 404.php template file from the WordPress Twenty Thirteen Theme:
- Copy the file /wp-content/themes/twentythirteen/404.php into the directory of your current theme.
- Then, as described in the previous section, edit the error message to present your desired error message.
If copying the default 404.php into your theme directory does not work well with your theme, you can also:
- Change the Default Theme’s 404.php template file’s header, sidebar, footer, and other codes to match the rest of the Theme’s layout.
Or
- Copy the index.php file of your current theme to a file called 404.php.
- Open that file and delete all sections dealing with posts or comments, see The Loop.
- Then, edit your 404 error message.
Tips for Error Pages
There are various improvements you can make to your 404 Error web pages so let’s look at some of your options.
Writing Friendly Messages
When an error message is displayed, you can say many things to help a visitor feel reassured they’ve only encountered a minor glitch, and you’re doing the best you can to help them find the information they want. You can say something clever like:
"Oops, I screwed up and you discovered my fatal flaw.
Well, we're not all perfect, but we try.  Can you try this
again or maybe visit our <a
title="Our Site" href="http://example.com/index.php">Home
Page</a> to start fresh.  We'll do better next time."
You should also attempt to show the user what they want. Check out the AskApache Google 404 Plugin to add google search results to your 404.php
Or, say something shorter and sweeter. Almost anything you say is better than 404 Error Page Not Found. You can find more information about writing 404 Error pages on the Internet, like List Apart’s Perfect 404.
As an implementation of the Perfect 404 page, this solution will tell the user it’s not their fault and email the site admin.
Helpful 404 page
When a visitor gets a 404 error page, it can be intimidating, and unhelpful. Using WordPress, you can take the edge off a 404 and make it helpful to users, and yourself, too, by emailing whenever the user clicks a link to a non-existent page.
<p>You
<?php
#some variables for the script to use
#if you have some reason to change these, do.  but wordpress can handle it
$adminemail = get_option('admin_email'); #the administrator email address, according to wordpress
$website = get_bloginfo('url'); #gets your blog's url from wordpress
$websitename = get_bloginfo('name'); #sets the blog's name, according to wordpress

  if (!isset($_SERVER['HTTP_REFERER'])) {
    #politely blames the user for all the problems they caused
        echo "tried going to "; #starts assembling an output paragraph
	$casemessage = "All is not lost!";
  } elseif (isset($_SERVER['HTTP_REFERER'])) {
    #this will help the user find what they want, and email me of a bad link
	echo "clicked a link to"; #now the message says You clicked a link to...
        #setup a message to be sent to me
	$failuremess = "A user tried to go to $website"
        .$_SERVER['REQUEST_URI']." and received a 404 (page not found) error. ";
	$failuremess .= "It wasn't their fault, so try fixing it.
        They came from ".$_SERVER['HTTP_REFERER'];
	mail($adminemail, "Bad Link To ".$_SERVER['REQUEST_URI'],
        $failuremess, "From: $websitename <noreply@$website>"); #email you about problem
	$casemessage = "An administrator has been emailed
        about this problem, too.";#set a friendly message
  }
  echo " ".$website.$_SERVER['REQUEST_URI']; ?>
and it doesn't exist. <?php echo $casemessage; ?>  You can click back
and try again or search for what you're looking for:
  <?php include(TEMPLATEPATH . "/searchform.php"); ?>
</p>
Add Useful Links
If you encounter a «page not found» situation on the WordPress site, it is filled with helpful links to direct you to the various categories and areas of information within the WordPress site. Check it out at http://wordpress.org/brokenlink.php.
To add similar useful links to your 404 page, create a list, or a paragraph, so the visitor can easily determine which section might be useful to visit. Information of that nature is much better than having the user just reach a dead-end. To help you understand how to link to documents within your site, especially to Pages and Categories, see Linking_Posts_Pages_and_Categories.
Testing 404 Error Messages
To test your custom 404 page and message, just type a URL address into your browser for your website that doesn’t exist. Make one up or use something like:
http://example.com/fred.php
This is sure to result in an error unless you actually have a php file called fred. If your error page doesn’t look «right», you can go back and edit it so it works correctly and matches your Theme’s look and feel.
Help Your Server Find the 404 Page
By default, if WordPress cannot find a particular page it will look for the 404.php web page. However, there may be cases where the web server encounters a problem before WordPress is aware of it. In that case, you can still guarantee that your web server sends the visitor to your 404.php template file by configuring your web server for custom 404 error handling.
To tell your web server to use your custom error files, you’ll need to edit the .htaccess file in the main directory (where main index.php file resides) of your WordPress installation. If you don’t have an .htaccess file, see Editing Rewrite Rules (.htaccess) on how to create an .htaccess file.
To ensure the server finds your 404 page, add the following line to your .htaccess file:
ErrorDocument 404 /index.php?error=404
The url /index.php is root-relative, which means that the forward slash begins with the root folder of your site. If WordPress is in a subfolder or subdirectory of your site’s root folder named ‘wordpress’, the line you add to your .htaccess file might be:
ErrorDocument 404 /wordpress/index.php?error=404
Questions About Error Files
- Why not just hard code the path all the way to the 404.php file?
- By allowing index.php to call the error file, you ensure that the 404.php file used will change automatically as you change your theme.
- What happens if I switch to a theme that does not have a 404.php file?
- Visitors clicking on a broken link will just see a copy of the home page of your WordPress site (index.php), but the URL they see will be the URL of the broken link. That can confuse them, especially since there is no acknowledgement of the error. But this is still better than a getting a «NOT FOUND» message without any links or information that could help them find what they seek.

Рассмотрим, как настроить шаблон ошибки 404 в WordPress, чтобы создать полезную страницу, которая поможет пользователям сориентироваться на вашем сайте и улучшить поведенческие факторы.
Что такое ошибка 404 и почему важно правильно настроить страницу?
Ошибка 404 возникает, когда посетитель пытается получить доступ к странице, которая не существует. Многие склонны игнорировать эту страницу при использовании шаблонов WordPress и не задумываются о ее существовании. Тем не менее, если вы потратите время на создание удобной страницы 404, это поможет задержать пользователя на вашем сайте.
Интернет-адрес, ведущий на страницу с ошибкой 404, может оказаться просто неправильно набранным URL либо возникнуть со временем, если вы удалили проиндексированную страницу и забыли об этом. При выдаче кода 404 WordPress настроен на автоматический поиск файла 404.php. Базовый шаблон с этой ошибкой включен в некоторые темы WordPress. Если же этого файла нет, то будет показано системное сообщение, которое не несет полезной для пользователя информации.
Как создать страницу 404 ошибки, если ее нет в шаблоне — настройка
Не все темы WordPress имеют собственный файл шаблона ошибки 404. Если разработчик темы предусмотрел это, такой файл будет называться 404.php. WordPress автоматически использует эту страницу, когда возникает ошибка 404. Если в вашей теме нет этого файла, его можно создать самостоятельно.
- Первое, что нужно сделать, это сформировать настраиваемый шаблон, например, редактируя файл 404.php, скопированный из другой темы. Если вы редактируете свою тему напрямую, настоятельно рекомендуется сделать резервную копию темы WordPress.
- Файл ошибки 404 расположен по адресу: /wp-content/themes/имя-темы/404.php
- Страница ошибки примет стиль активной темы, поскольку она вызывает шапку
- И подвал текущей темы.
- Понадобится только отредактировать заголовок и сообщение на странице в соответствии с вашими конкретными потребностями.
- Для этого откройте файл шаблона ошибки 404 в редакторе кода и измените текст сообщения на свое усмотрение.
- Добавьте в шаблон строку поиска, если ее там нет. Затем сохраните файл и загрузите его в каталог темы установки WordPress.
Поскольку все темы различаются, нет никакой гарантии, что простое копирование файла шаблона 404.php будет работать. Чтобы сервер нашел страницу 404, добавьте следующую строку в файл .htaccess:
ErrorDocument 404/index.php?error=404
Файл index.php расположен в корневой папке вашего сайта. Если WordPress находится в подкаталоге с именем «wordpress», код, добавляемый в файл .htaccess, должен быть:
ErrorDocument 404/wordpress/index.php?error=404
Что разместить на wordpress странице 404
Когда пользователь обнаруживает вместо искомой страницы сообщение об ошибке 404, разочарование может заставить его покинуть ваш сайт преждевременно. Задача веб-мастера помочь найти посетителю информацию, которую он искал, и тем самым снизить процент отказа и улучшить поведенческие факторы на сайте.
Рекомендуется указать пользователю правильное направление действий, которое заставит его задержаться на сайте. Это можно сделать несколькими способами:
- предоставить информацию о других разделах вашего интернет-ресурса, которые можно посмотреть;
- дать посетителю возможность связаться с вами по указанным контактным данным;
- добавить ссылки на популярные сообщения, последние комментарии, архивы;
- разместить строку поиска, чтобы посетитель сам нашел нужную информацию на сайте.
Чтобы сделать страницу уникальной, вы можете снабдить ее фоновым изображением в стиле оформления сайта. Допустимо также использовать html-теги и css-стили, чтобы придать шаблону индивидуальность.
Как создать в вордпресс 404 страницу при помощи плагина
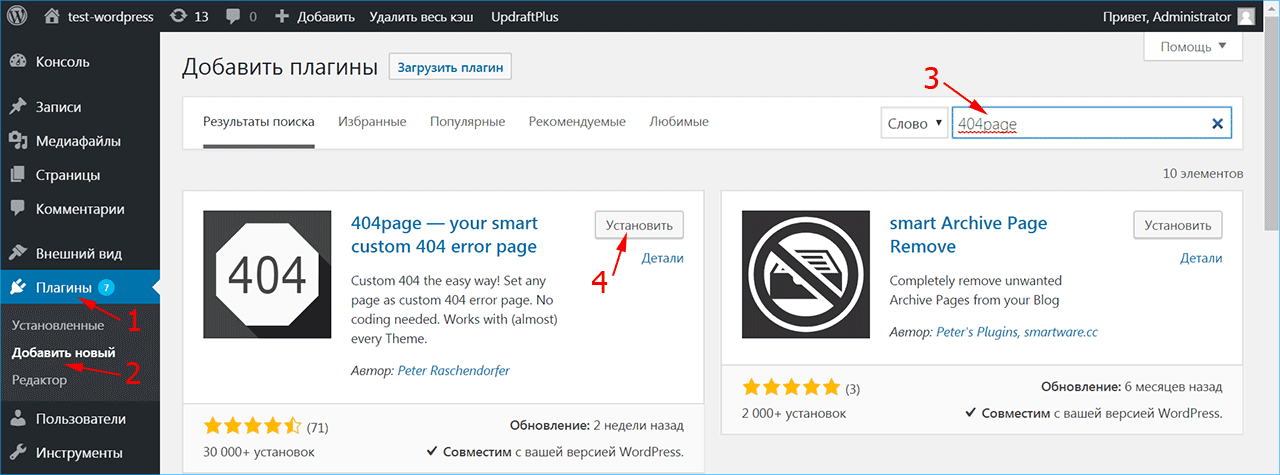
Создать собственную страницу 404, как и любую другую страницу в WordPress можно при помощи плагина 404page (https://wordpress.org/plugins/404page/). Важной особенностью этого плагина является то, что он не создает перенаправление, а формирует правильный ответ сервера с кодом 404. Он сообщает поисковым системам, что страница не существует и должна быть удалена из индексирования, тогда как перенаправление приведет к HTTP-коду 301 или 302 и URL-адрес останется в индексе поиска.
Установите плагин 404page из меню админки «Плагин -> Добавить новый» и активируйте его.
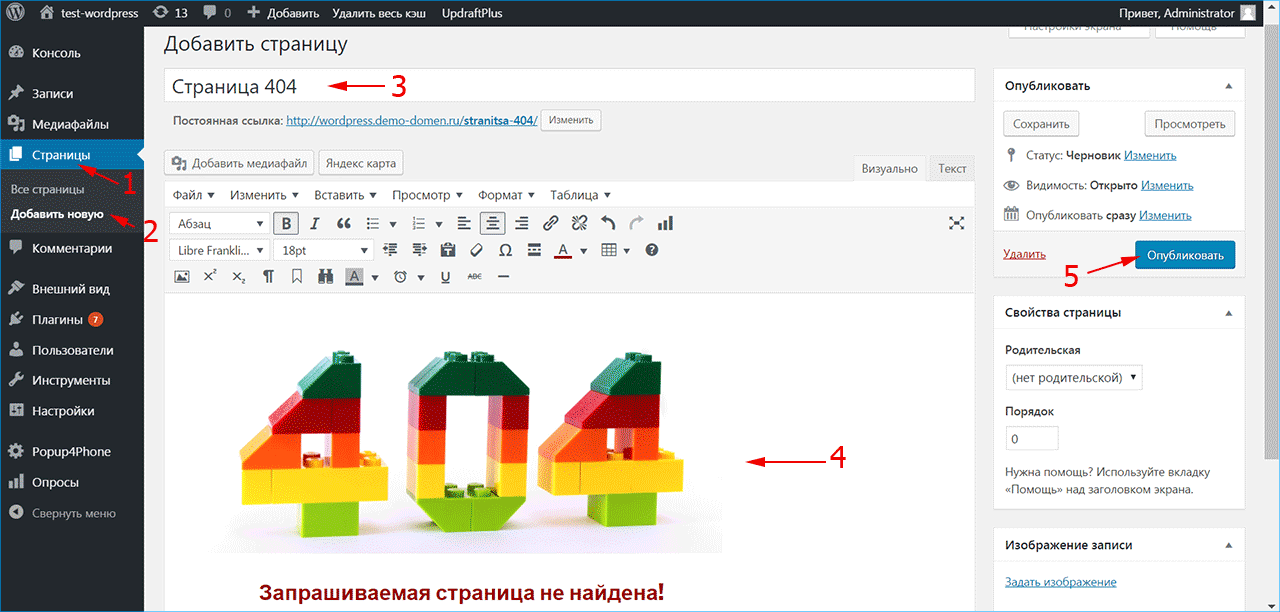
Создайте страницу 404 как обычную страницу WordPress из меню «Страницы -> Добавить новую». Внесите в нее всю необходимую информацию, которую вы хотите показать посетителю, и нажмите кнопку «Опубликовать». Плагин 404page также добавляет CSS-класс error404 в тег <body>, который можно использовать для задания дополнительных стилей на странице.
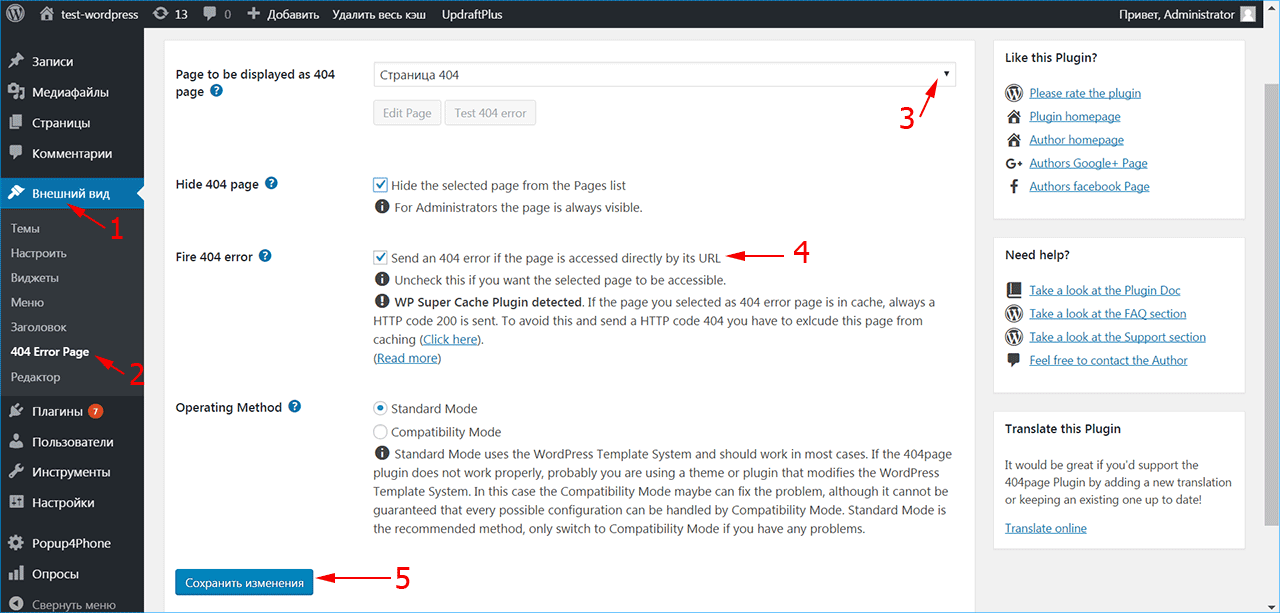
После активирования плагина в меню «Внешний вид» (1) появился раздел «404 Error Page» (2), в котором можно настроить отображение страницы ошибки.
Выберите созданную страницу 404 из списка страниц сайта (3). Убедитесь, что отмечен флажок (4), чтобы сервер отдавал код 404 при доступе к этой странице. Если вы используете кэширование, плагин выдаст предупреждение – страница из кэша будет отдавать код 200, поэтому ее нужно исключить из кэширования.
При возникновении проблем или конфликта с другими плагинами 404page может быть запущен в режиме совместимости. Нажмите кнопку «Сохранить изменения» (5).
Чтобы включить обработку ошибок 404 в WordPress, нужно установить структуру ссылок в меню «Настройки -> Постоянные ссылки» на любой пункт, кроме «По умолчанию». В противном случае ошибка 404 обрабатывается сервером, а не движком WordPress.
iPipe – надёжный хостинг-провайдер с опытом работы более 15 лет.
Мы предлагаем:
- Виртуальные серверы с NVMe SSD дисками от 299 руб/мес
- Безлимитный хостинг на SSD дисках от 142 руб/мес
- Выделенные серверы в наличии и под заказ
- Регистрацию доменов в более 350 зонах

Страница 404 — это техническое решение, применимое в ситуации, когда страница сайта не может быть найдена и предоставлена пользователю.
Причины могут быть разными. Пользователь неправильно ввёл адрес страницы во вкладке браузера, перешёл по битой ссылке или попытался зайти на страницу, которая была удалена.

Интересная страница 404 способна удержать пользователя на сайте и увести его в увлекательное путешествие по другим страницам. Как настроить страницу 404?
- Содержание статьи
- Секрет идеальной страницы 404
- Как настроить страницу 404 WordPress?
- Где в WordPress страница 404?
- Идеальная страница 404 для сайта: добавляем виджеты
- Как сделать 404 страницу с помощью плагина «404page»?
- Привлекательная страница 404 может содержать несколько незаменимых элементов.
- Обращение к посетителям с извинениями смягчит неловкий момент.
- Приветливое сообщение с забавной картинкой поднимет настроение и сделает страницу с ошибкой менее пугающей.
- Окно поиска предоставит пользователям возможность искать нужную им информацию, не уходя со страницы.
- Ссылка на главную страницу быстро перенаправит в комфортную обстановку.
- Ссылки на популярные статьи привлекут внимание к полезным и интересным материалам.
- Главное меню откроет короткий путь к самым важным разделам сайта.
Вот несколько примеров оригинальных страниц ошибки 404.
Справка Scout − надпись и картинка с юмором
Kualo − браузерная игра
MailChimp − удачная анимация
А вот как реализована эта страничка на нашем сайте.
Как настроить страницу 404 WordPress?

Стандартная страница 404 выглядит очень скромно, но её можно сделать намного приветливее.
Почти каждая тема WordPress содержит шаблон страницы 404.php. Файл 404.php вы можете найти в папке установленной темы.
Где в WordPress страница 404?
Где в Вордпрессе страница 404? «Внешний вид» — «Редактор» — правая колонка «Шаблоны» — «404.php».
Скачайте этот файл на компьютер, сохраните его копию в отдельной папке и отредактируйте код на свой вкус, следуя нашим подсказкам.
Как сделать страницу ошибки 404, если в теме WordPress нет файла 404.php?
- Создайте пустой файл 404.php.
- Откройте его на редактирование.
- Вставьте готовый код, представленный ниже.
- Задайте путь к своему собственному изображению в строке #8.
- Измените заголовок в строке #9.
- Напишите своё обращение к посетителям в строке #11.
- Сохраните изменения.
Готовый код выглядит так:
<?php get_header(); ?>
<div id="main-content">
<div class="container">
<div id="content-area" class="clearfix">
<div id="left-area">
<article id="post-0" <?php post_class
( 'et_pb_post not_found' ); ?>>
<img src="/image.jpg">
<h1><?php esc_html_e('Страница не найдена','WP Loop');
?></h1>
<p><?php esc_html_e(' О, нет! Страница, которую вы открыли не существует. Пожалуйста, воспользуйтесь ссылками ниже, чтобы перейдите в более безопасное место.', 'WP Loop'); ?></p>
</article> <!-- .et_pb_post -->
</div> <!-- #left-area -->
<?php get_sidebar(); ?>
</div> <!-- #content-area -->
</div> <!-- .container -->
</div> <!-- #main-content -->
<?php get_footer(); ?>
Как сделать страницу ошибки 404, если в теме WordPress есть готовый файл 404.php?
Скачайте файл на компьютер и откройте его в Блокноте.
В стандартной теме Twenty Eleven в файле 404.php содержится вот такой код.
<?php
/**
 * Template for displaying 404 pages (Not Found)
 *
 * @package WordPress
 * @subpackage Twenty_Eleven
 * @since Twenty Eleven 1.0
 */
get_header(); ?>
	<div id="primary">
		<div id="content" role="main">
			<article id="post-0" class="post error404 not-found">
				<header class="entry-header">
					<h1 class="entry-title"><?php _e( 'This is somewhat embarrassing, isn’t it?', 'twentyeleven' ); ?></h1>
				</header>
				<div class="entry-content">
					<p><?php _e( 'It seems we can’t find what you’re looking for. Perhaps searching, or one of the links below, can help.', 'twentyeleven' ); ?></p>
					<?php get_search_form(); ?>
					<?php the_widget( 'WP_Widget_Recent_Posts', array( 'number' => 10 ), array( 'widget_id' => '404' ) ); ?>
					<div class="widget">
						<h2 class="widgettitle"><?php _e( 'Most Used Categories', 'twentyeleven' ); ?></h2>
						<ul>
						<?php wp_list_categories( array( 'orderby' => 'count', 'order' => 'DESC', 'show_count' => 1, 'title_li' => '', 'number' => 10 ) ); ?>
						</ul>
					</div>
					<?php
					/* translators: %1$s: smilie */
					$archive_content = '<p>' . sprintf( __( 'Try looking in the monthly archives. %1$s', 'twentyeleven' ), convert_smilies( ':)' ) ) . '</p>';
					the_widget( 'WP_Widget_Archives', array( 'count' => 0, 'dropdown' => 1 ), array( 'after_title' => '</h2>' . $archive_content ) );
					?>
					<?php the_widget( 'WP_Widget_Tag_Cloud' ); ?>
				</div><!-- .entry-content -->
			</article><!-- #post-0 -->
		</div><!-- #content -->
	</div><!-- #primary -->
<?php get_footer(); ?>
Вы можете сделать страницу 404 WordPress намного функциональнее. После изменений код будет выглядеть примерно вот так.
<?php
/**
 * Template for displaying 404 pages (Not Found)
 *
 * @package WordPress
 * @subpackage Twenty_Eleven
 * @since Twenty Eleven 1.0
 */
get_header(); ?>
	<div id="primary">
		<div id="content" role="main">
			<article id="post-0" class="post error404 not-found">
				<header class="entry-header">
					<h1 class="entry-title"><?php _e( 'This is somewhat embarrassing, isn’t it?', 'twentyeleven' ); ?></h1>
				</header>
				<div class="entry-content">
<img src="https://foxyforex.ru/wp-content/uploads/2023/06/free-404-error.jpg">
<div>Упс! Мы просмотрели всё, но эта страница пропала из видимости. Попробуйте вернуться на базу, на <a href="https://foxyforex.ru/">Главную</a>, или отправиться в путешествие по одной из ссылок.</div>
<ul id="so"><li><a href="https://foxyforex.ru/zarabotok-v-internete/kak-zarabotat-na-etxt-ru-novichku">"Как заработать на Etxt.ru новичку?"</a></li>
<li><a href="https://foxyforex.ru/motivatory-pro-uspeh">"Мотиваторы на успех"</a></li>
<li><a href="https://foxyforex.ru/sozdanie-saita/kak-sdelat-soderzhanie-stati-na-sajte">"Как сделать содержание для статьи на сайте?"</a></li>	</ul>				</div>
					<?php get_search_form(); ?>
					</div>
				</div><!-- .entry-content -->
			</article><!-- #post-0 -->
		</div><!-- #content -->
	</div><!-- #primary -->
<?php get_footer(); ?>
Создание страницы 404 может сопровождаться маленькой технической трудностью. Если при проверке результата, вы увидели, что текст, записанный русскими буквами, превратился в последовательность из загадочных ромбиков, значит вы сохранили файл не в той кодировке.
Так как настроить страницу 404 в этом случае? Откройте файл 404.php с помощью Блокнота, выберете команду «Сохранить как», отметьте вариант «Все файлы», задайте кодировку UTF-8 и подтвердите изменения. После обновления файла на сайте, у вас появится сообщение на русском языке.
Идеальная страница 404 для сайта: добавляем виджеты

Вы успешно создали простой шаблон страницы 404. На странице 404 вы увидите иллюстрацию, приветственное сообщение и стандартные колонтитулы, присутствующие и на других страницах.
Пока страничка 404 далека от совершенства. На ней нет виджетов.
Чтобы добавить новые виджеты специально для страницы 404, создайте новую расширенную область для размещения виджетов.
В некоторых темах WordPress можно создавать новые расширенные области прямо на панели мониторинга. Проследуйте по пути: «Внешний вид» -> «Виджеты». Если вам повезет, вы сможете создать эту область одним щелчком. Если такой возможности нет, давайте пойдём другим путём.
Скачайте и откройте на редактирование файл functions.php. О том, как это сделать аккуратно и без риска для сайта читайте в этой статье.
В конце содержимого файла вставьте код:
function widget_area_404() {
register_sidebar( array(
'name' => '404 Page',
'id' => '404',
'description' => __( 'Widgets for 404 error page.' ),
'before_widget' => '<div class="et_pb_post">',
'after_widget' => '</div>',
'before_title' => '<h4 class="widgettitle">',
'after_title' => '</h4>',
) );
}
add_action( 'widgets_init', 'widget_area_404' );
Сохраните изменения и закачайте файл на сервер.
Скачайте и откройте 404.php файл.
Скопируйте следующую строчку кода и поместите её в то место, где вы хотите вывести новые виджеты, например, под приветственным обращением к посетителям.
<?php dynamic_sidebar( '404'); ?>
Сохраните изменения и закачайте файл на сервер.
Вы создали в WordPress новую область виджетов. Теперь добавьте в неё нужные виджеты.
Пройдите по пути «Внешний вид» -> «Виджеты». Выберите «Свежие записи», «Популярные публикации» или другой виджет, который вы хотели бы видеть на своей странице 404.
Вы можете придумать что-то более оригинальное, например, разместить бесплатный виджет Google Maps, показывающий ваше местоположение, или виджет для публикации видео или подкаста.
Вы выполнили все рекомендации? Поздравляем! Теперь у вас появилась новая страница 404. Она будет загружена любому посетителю при попытке перехода на несуществующую страницу.
Как сделать 404 страницу с помощью плагина «404page»?

Благодаря плагину «404page» каждый вебмастер может с лёгкостью сделать 404 страницу с интересными возможностями.
Плагин имеет 100 000 активных установок и почти идеальный рейтинг – 4,9 звезды из 5. В этих обстоятельствах разработчик плагина заслуживает особой признательности!
Уникальное достоинство этого плагина в том, что он не перенаправляет пользователя на главную страницу. Такая практика давно считается не самым лучшим решением с точки зрения оптимизации сайта. Плагин просто сообщает поисковым ботам, что конкретная страница отсутствует.

Настройка плагина «404page»
Установите и активируйте плагин.
Создайте страницу 404 так же, как вы делаете остальные страницы вашего сайта.
На панели управления WordPress перейдите в раздел «Внешний вид» -> «Страница ошибки 404» и выберите страницу, которую вы только что создали, для обработки ошибки 404.
Теперь вы знаете, как сделать страницу ошибки 404. Вы можете оформить её в стиле вашего сайта и разместить на ней ссылки на самые интересные статьи.
Пользователь может столкнуться с ошибкой 404 по разным причинам. Как владелец сайта, вы должны быть уверены, что пользователь не будет чувствовать себя потерянным или озадаченным, когда это произойдет.
Чтобы быть уверенным, что посетитель останется на вашем сайте, даже столкнувшись с ошибкой 404, можно создать свою страницу 404, что очень просто сделать с помощью шаблона 404.php в вашей теме.

Что такое страница 404?
 Страница 404 («Не найдена») — это страница, которую генерирует сервер, чтобы сообщить вам, что контент, доступ к которому вы пытались получить, не может быть найден. Обычно вы сталкиваетесь с ошибкой 404, когда что-то было перенесено или удалено, или когда вы переходите по ссылке/набираете адрес сайта с опечаткой.
Я сталкиваюсь со страницей 404 в основном потому, что я часто вручную набираю адрес сайта (не используя закладки), и у меня неуклюжие пальцы. Это часто приводит меня к запросу www.google.com/mial вместо необходимой мне страницы Gmail. Очень раздражает.
Еще несколько лет назад страницы 404 были просто стандартными страницами 404 сервера, но в последнее время разработчики и дизайнеры стараются создавать более дружественные 404 страницы, чтобы дать знать пользователю, где он находится, почему он туда попал, и куда он может пойти сейчас.
Как добавить свою страницу 404 в тему WordPress
Теперь давайте посмотрим, как же добавить 404 страницу, заточенную под вашу тему.
Добавить свою 404 страницу просто: все, что вам необходимо — это наличие в папке темы файла под названием «404.php«.
Конечно, если ваш файл «404.php» пуст, то страница «404», которая будет показываться вашим пользователям, будет пустой.
Быстрый метод создания своей страницы 404, которая будет хорошо подходить к вашей теме – это копирование всего содержимого файла «page.php» вашей темы в ваш новый файл «404.php«. Сделав это, удалите весь код, который относится к циклу, и замените его следующим кодом:
<h1>Page Not Found</h1>
<p>Sorry, but the page you requested has not been found</p>
Как сделать вашу страницу 404 отличной
Если пользователь попал на 404 страницу сайта, что вам действительно нужно — это помочь ему добраться до контента, который он рассчитывал получить. Если показывается стандартная страница 404 сервера, то велика вероятность того, что посетитель нажмет «Назад» и найдет нужный ему контент в другом месте.
Чтобы помочь пользователю получить контент, который он ищет, вам нужно добавить на свою страницу 404 элементы, перечисленные ниже. Эти вещи могут уже быть в вашей теме, и, следовательно, в вашей странице 404 (например, если вы скопировали код со своего файла «page.php«), в таком случае вам необходимо обратить на них внимание пользователя:
- Показать сообщение с извинением, которое объяснит, что контент, который искал пользователь, не найден. Упоминание кода «404» не обязательно, но вы можете его написать, если хотите.
- Предложить пользователю проверить адресную строку и убедиться, что в адресе сайта нет опечаток.
- Показать / обратить внимание пользователя на блок поиска, который поможет ему найти нужный контент на вашем сайте.
- Предложить материалы, которые, возможно, ищет посетитель, основываясь на странице, которую он запрашивал, или на популярных страницах сайта.
- Дать пользователю список вариантов «что теперь делать», например, перейти на главную страницу или посмотреть ваши архивы.
- Наконец, дать возможность пользователю сообщить об ошибке, добавив ссылку на пост / контактную форму / твиттер аккаунт, чтобы вы могли исправить ошибку, где это будет необходимо.
В моей воображаемой теме, я бы сделал это как-то так:
<?php get_header(); ?>
<div id="page">
    <h1>Page Not Found</h1>
    <p>We're very sorry, but the page you requested has not been found! It may have been moved or deleted.</p>
    <p>I'm not blaming you, but have you checked your address bar? There might be a typo in the URL.</p>
    <p>If there isn't, you could try searching my website for the content you were looking for:</p>
    <?php get_search_form(); ?>
    <p>Or maybe you were looking for one of my popular posts:</p>
    <ul>
        <li><a href="http://www.website.com/popular-post1">Popular Post 1</a></li>
        <li><a href="http://www.website.com/popular-post2">Popular Post 2</a></li>
        <li><a href="http://www.website.com/popular-post3">Popular Post 3</a></li>
        <li><a href="http://www.website.com/popular-post4">Popular Post 4</a></li>
    </ul>
    <p>Alternatively, you can go to <a href="http://www.website.com">my home page</a> or <a href="http://www.website.com/archives">browse my archives</a></p>
    <p>One last thing, if you're feeling so kind, please <a href="mailto:webmaster@website.com">tell me</a> about this error, so that I can fix it. Thanks!</p>
</div>
<?php get_sidebar(); get_footer(); ?>

Ключевые элементы
Если вы справитесь с «полезной» частью страницы 404, после этого можете добавить юмора и дизайнерских штук. Только не ставьте телегу впереди лошади. Давайте разберем ключевые элементы, которые мы использовали:
- Базовые: используем имя файла 404.php , чтобы WordPress использовал его как шаблон страницы ошибки
- Наш заголовок страницы (заключенный в тег H1) четко указывает, что страница не найдена.
- Даем короткое текстовое объяснение и предлагаем некоторые альтернативные решения (проверить URL)
- Предоставляем поиск (используя стандартную функцию WP search form)
- В завершение предоставляем ссылку на архивы. Продвинутые пользователи могут добавить сюда также список страниц, категорий или тегов.
- Предоставляем контакты для сообщения об ошибке.
И хотя бывает очень заманчиво добавить смешную картинку или надпись на вашей странице 404 , постарайтесь в первую очередь быть максимально полезными, а уже потом остроумными.
Невзирая на то, что существуют целые сайты, посвященные веселым 404 страницам, ваша основная задача – убедиться, что пользователь останется на вашем сайте и вернется к нему потом (разве что вы вознамерились попасть на один из таких сайтов, в таком случае – дерзайте!)
Другие факторы
Если пользователь попадает на страницу 404 не потому, что он сделал опечатку в URL (большинство пользователей не вводит напрямую адрес), велика вероятность того, что вы что-то перенесли или удалили.
Перенаправление старого контента
При переносе контента, всегда нужно перенаправлять старый URL на новый URL – это простой и эффективный способ убедиться, что все посетители, которые захотят увидеть этот контент, смогут это сделать. Перенаправление в WordPress можно легко сделать с помощью популярного плагина Redirection.
Этот плагин также позволяет отслеживать ошибки 404, сгенерированные вашим сервером, и адреса страниц, запрашиваемые при генерации 404 ошибки. Это позволяет вам перенаправить этот адрес на правильное расположение контента, улучшая общее впечатление пользователя.
Идем еще дальше
Как мы упоминали ранее, действительно хорошая 404 страница даже не обязательно должна быть похожа на 404 страницу. Добавив туда список страниц, категорий и тегов, вы можете дать пользователям непосредственно ссылки для перехода вместо того, чтобы заставлять их тратить время на уточнение поиска.
Также рассмотрите вариант с добавлением «популярного» контента: иногда популярный контент может быть даже лучшим вариантом, чем соответствующий начальному запросу контент, если ваша цель – удержать посетителей 404 страницы на сайте.
Не удаляйте посты. Удаляйте контент
И наконец, удаляя контент, подумайте, может быть стоит просто удалить содержимое поста / страницы (а не удалять весь пост / страницу), и сообщить пользователям, зачем вы удалили контент.
Вы можете пойти дальше и порекомендовать альтернативные источники, где пользователь сможет найти контент, похожий на тот, который вы удалили. Это поможет избежать «мертвых ссылок» на вашем сайте, при этом контент, который вы хотите удалить, будет удален.
Источник: WP Tuts
Смотрите также:

Изучает сайтостроение с 2008 года. Практикующий вебмастер, специализирующий на создание сайтов на WordPress. Задать вопрос Алексею можно на https://profiles.wordpress.org/wpthemeus/
Chances are high that you’ve landed on a 404 page and immediately left the website because it was less than helpful. A 404 page is what WordPress displays when someone enters or clicks on a URL that doesn’t exist on your website. This page is a generic error that just informs the visitor the page wasn’t found. In this article, we’ll explore how to create a custom 404 page for WordPress. Along the way, we’ll see both good and bad designs.
-
1
Why Create a Custom 404 Page for WordPress?-
1.1
Generic 404 Page
-
1.1
-
2
Custom 404 Page Examples-
2.1
1. Google -
2.2
2. WordPress.org -
2.3
3. WordPress.com -
2.4
4. Elegant Themes -
2.5
5. Twenty Twenty-One -
2.6
6. Twenty Twenty -
2.7
7. Slack -
2.8
8. Amazon
-
2.1
-
3
404 Page Content -
4
How to Create a Custom 404 Page in WordPress with the Divi Theme Builder-
4.1
Importing a Custom 404 Page into the Divi Theme Builder -
4.2
Creating a Custom 404 Page with the Divi Theme Builder
-
4.1
-
5
Ending Thoughts on Creating a Custom 404 Page for WordPress
Why Create a Custom 404 Page for WordPress?
It’s tempting to skip designing the 404 page because you hope no one will see it. However, it needs to be helpful to your visitors. It can be just as important as any other page. A general message is a bad user experience. It doesn’t look good and it gives them no reason to stay on your website.
First, let’s look at the generic page we’re trying to avoid.
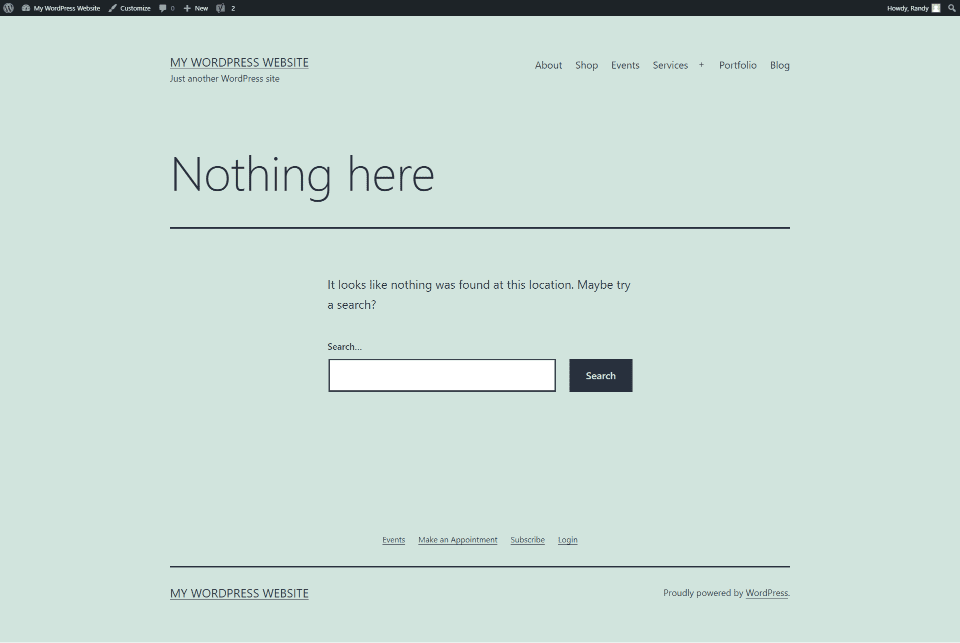
Generic 404 Page
The standard 404 page that WordPress displays is just an error message. It’s placed within the body content area and shows your header, footer, and sidebars if you have them.
Unfortunately, it isn’t helpful. It’s kind of like asking a store worker if something you’re looking for is on the aisle you’re in and they just say no. You want them to point you to the correct aisle. You want more information.
A 404 page should give you more information. It should be helpful. It should provide tools, links, advice, or some form of help. You don’t want to be left alone in the aisle not knowing where to go next.
Custom 404 Page Examples
There are thousands of amazing 404 pages across the web. Some are funny, some are serious. Some are more helpful than others. A few are plain, while others are gorgeous. Here’s a look at a few 404 pages to get an idea of how they’re designed. Some are simple and boring while others are helpful and look great.
1. Google
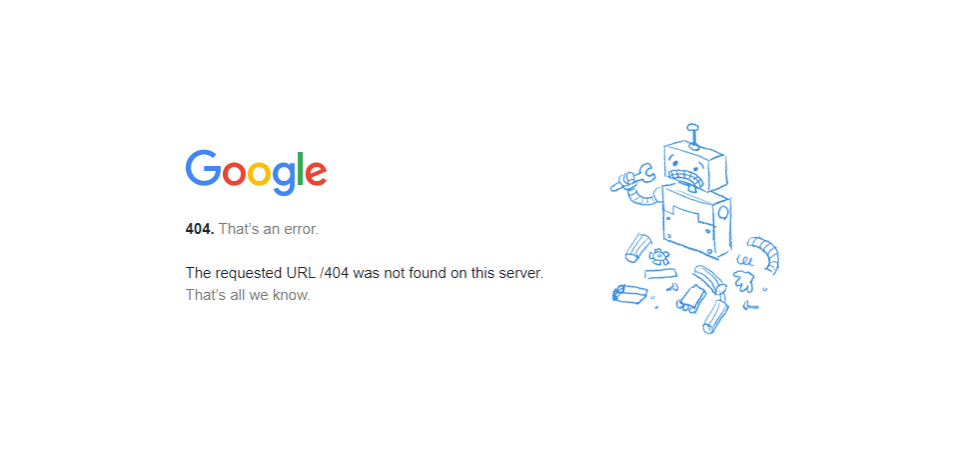
Google’s (not WordPress) 404 page is simple. It’s a small area of content in the center of the screen. The message just tells you there’s an error and provides a graphic of a robot in pieces. It doesn’t provide other information, but it’s Google, so all you have to do is type something else in the search bar.
2. WordPress.org
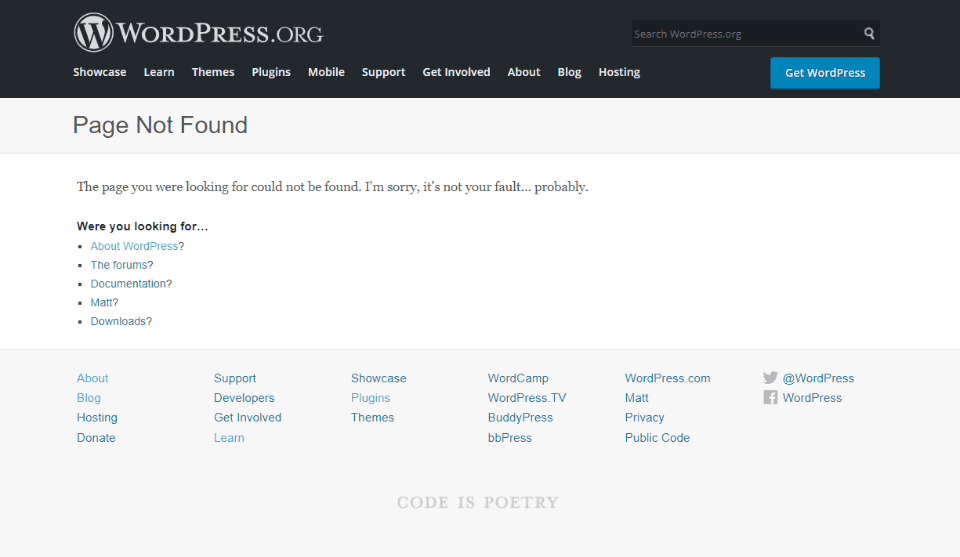
WordPress.org’s 404 page displays their standard header and footer. The body includes a title to show the page wasn’t found, a short explanation with a touch of humor, and then a list of links to help guide you. The links focus on being helpful.
3. WordPress.com
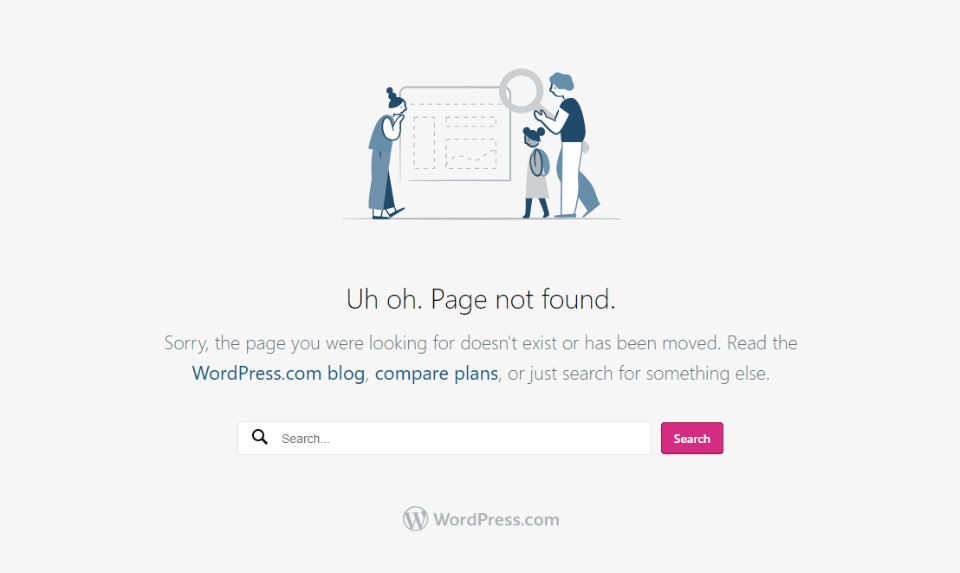
WordPress.com’s 404 page removes the header and footer. It shows a graphic, a title, a description with clickable links, a search box, and the WordPress.com logo. The links are helpful.
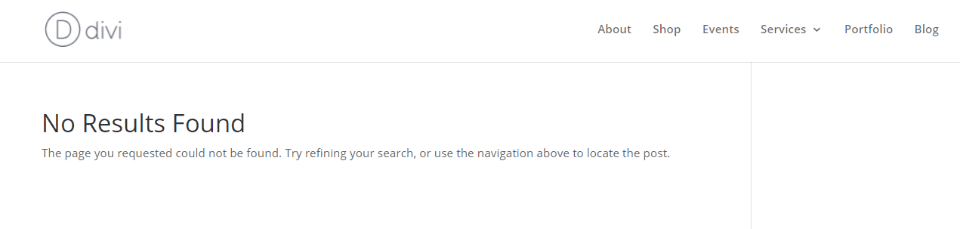
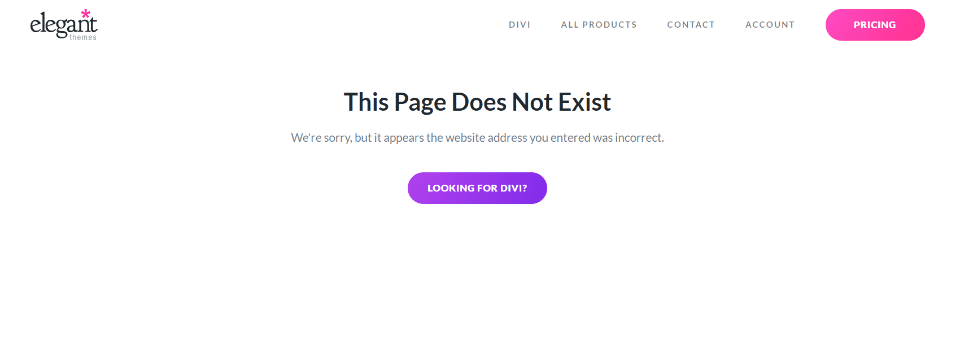
4. Elegant Themes
Elegant Themes’ 404 page (because I know you’re going to look anyway) shows the ET header, a large title with a small explanation, and a button as a CTA. You have access to almost everything from here.
5. Twenty Twenty-One
WordPress’s Twenty Twenty-One theme has a 404 page that uses your primary and footer menus. It has a large title. The body has a short description and a search box. Lines are used for styling. The background matches the site.
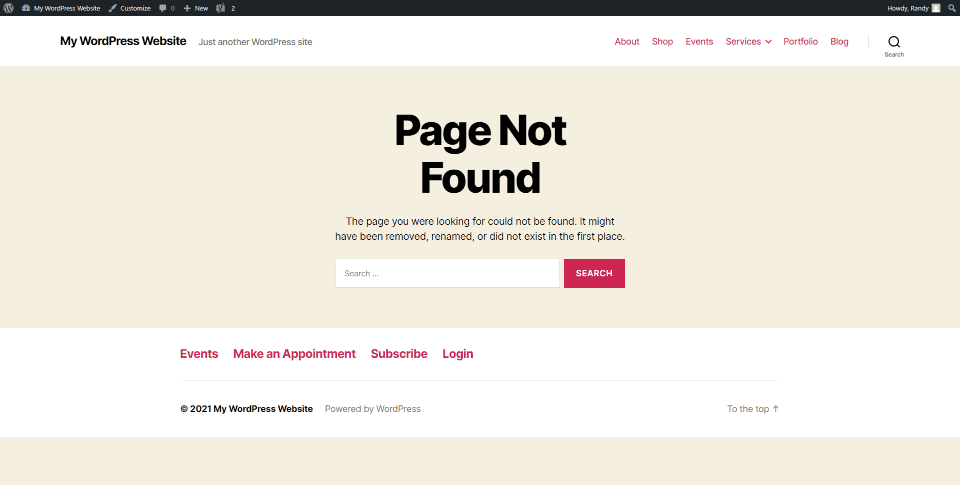
6. Twenty Twenty
WordPress’s Twenty Twenty theme displays the header and footer. The body shows a large title in the center, an explanation, and a search box. All use the theme’s colors.
7. Slack
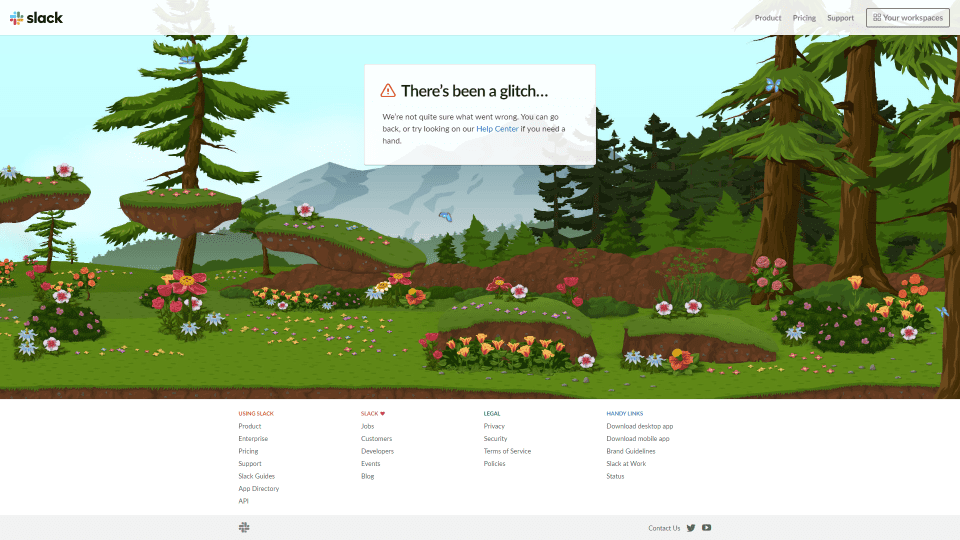
Slack’s (non WordPress) 404 page shows a box in the center with information about the error with a link to the help center. All the menus are here, too. The interesting part is the background. It’s a cartoon background that scrolls right or left to follow your mouse. Animated animals move across the screen.
8. Amazon
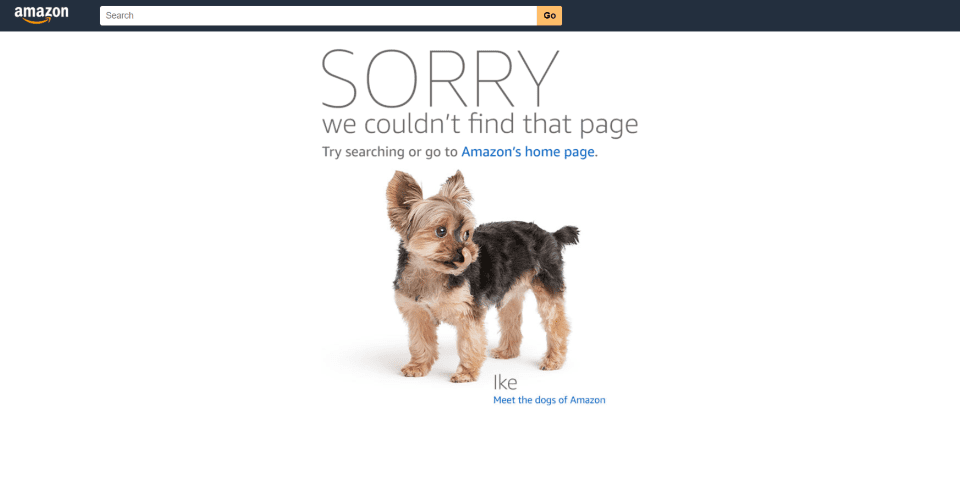
Amazon’s (also not WordPress) 404 page includes the Amazon logo with a search box, a large message, a smaller message with a link to the home page, and a photo of an animal with a link to learn more. It includes lots of different photos that can be displayed. They’re chosen at random.
404 Page Content

So, what does a 404 page need? We see a few common elements in the examples above.
First, it needs to be helpful. It shouldn’t just tell the visitor there is an error. It should tell what the error means. Imagine an error light coming on in your car. Your first question would be “what does that mean?” Not providing useful information about the error is frustrating.
Visitors need to know if they did something wrong or if the content doesn’t exist. If they don’t know, they’ll keep looking for the content until they furiously leave the website, vowing to never return. This is best done with a simple message and possibly an image that catches the eye. Something that stands out from your normal content that would appeal to your audience.
Next, it needs to provide some direction of what to do next. This could be a list of articles, a search box, a list of categories, most popular posts, most recent posts, a way to contact you, etc.
It’s that simple. 404 pages don’t need a lot of content. Just enough to be helpful.
The example above includes:
- Background colors and patterns that would match the website/
- A title with a short message about the error.
- Large text showing that it’s a 404 page.
- A few buttons providing the visitor with some directions.
It’s simple but stylish and helpful. That’s all you need.
Let’s look at how to create a custom 404 page for WordPress using the content ideas we just discussed.
How to Create a Custom 404 Page in WordPress with the Divi Theme Builder

The Divi Theme Builder makes it easy to create and assign a 404 page. Elegant Themes has several premade 404 pages that you can download for free. You can customize them any way you want. They’re a great way to get a head start on a 404 page design. If you prefer, you can build one from scratch.
The example above is from the Fourth Theme Builder layout pack. There are lots of 404 pages available in the ET blog. To find them, search for “theme builder layout pack” or check them out here:
- Download The First FREE Theme Builder Pack For Divi
- Download The Second FREE Theme Builder Pack For Divi
- Download The Third FREE Theme Builder Pack For Divi
- Download the Fourth FREE Theme Builder Pack for Divi
- Download the Fifth FREE Theme Builder Pack for Divi
- Download the Sixth FREE Theme Builder Pack for Divi
Importing a Custom 404 Page into the Divi Theme Builder
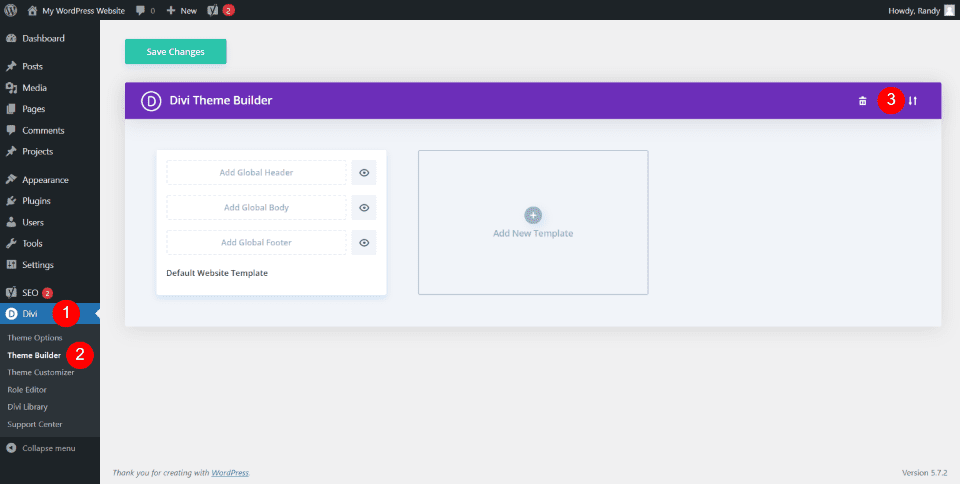
You’ll find the Divi Theme Builder in the WordPress dashboard by going to Divi > Theme Builder. This opens the page where you can create or import templates and assign them. In the upper right corner, you’ll see the import icon. Click this icon to import your 404 page template.
Note – for tutorials on using the Divi Theme Builder, search for “theme builder” here in the Elegant Themes blog.
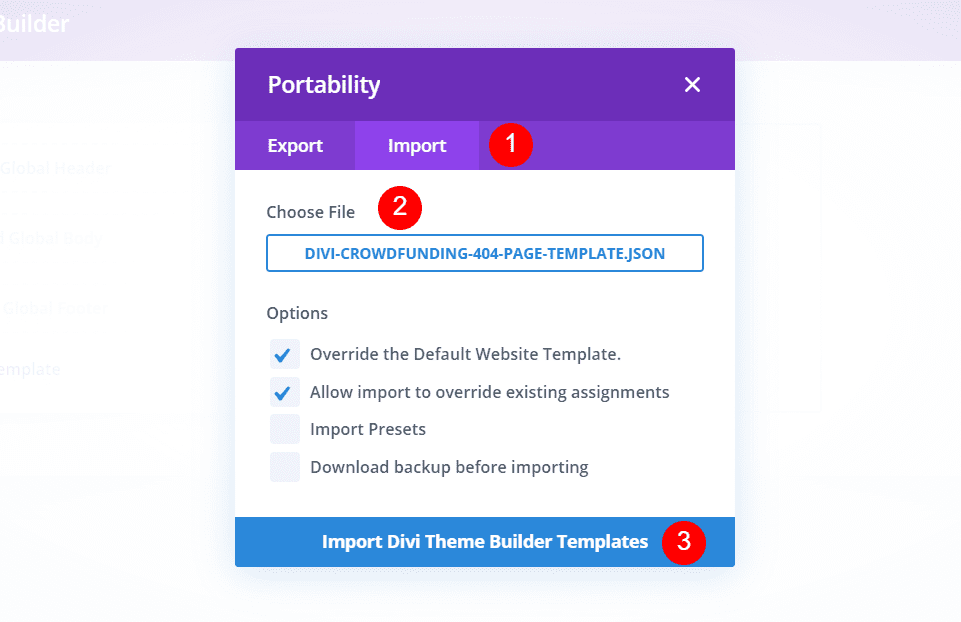
A modal opens where you can import your template. Select Import and navigate to your file under Choose File. The options to override the defaults and assignments are selected by default. I recommend leaving them selected. Click to import the template at the bottom of the modal. I’m importing the 404 page for the Crowdfunding Layout Pack.
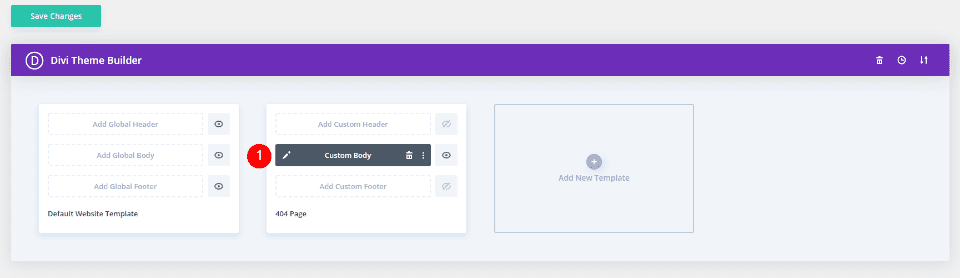
By importing a 404 page, it’s assigned automatically. Next, click on the edit icon to open the builder.
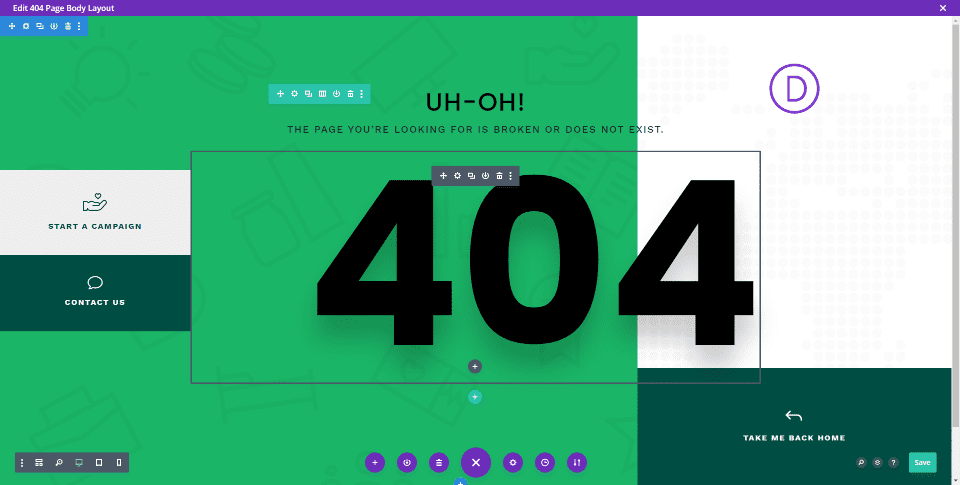
Now, make your edits within each module by adding your links, images, colors, text, etc. Save the layout and click the x in the upper right corner to close the builder.
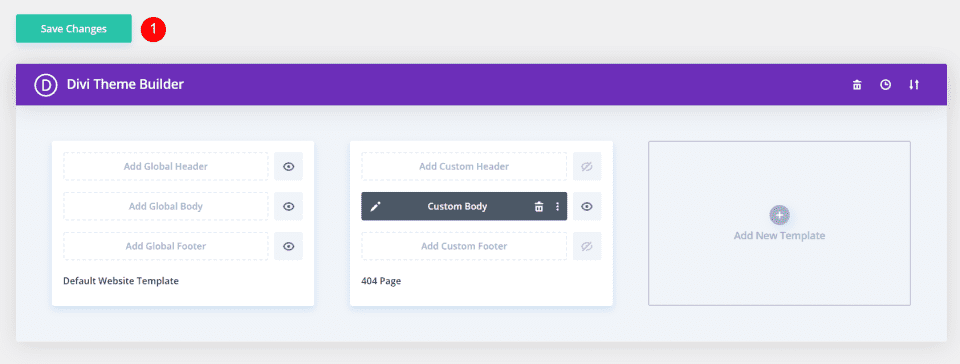
Finally, save the changes to apply the template. You now have a custom 404 page.
Creating a Custom 404 Page with the Divi Theme Builder
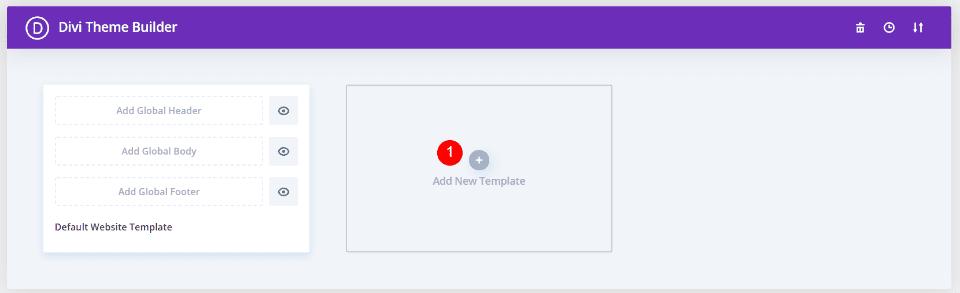
In the Theme Builder, select to add a new template.
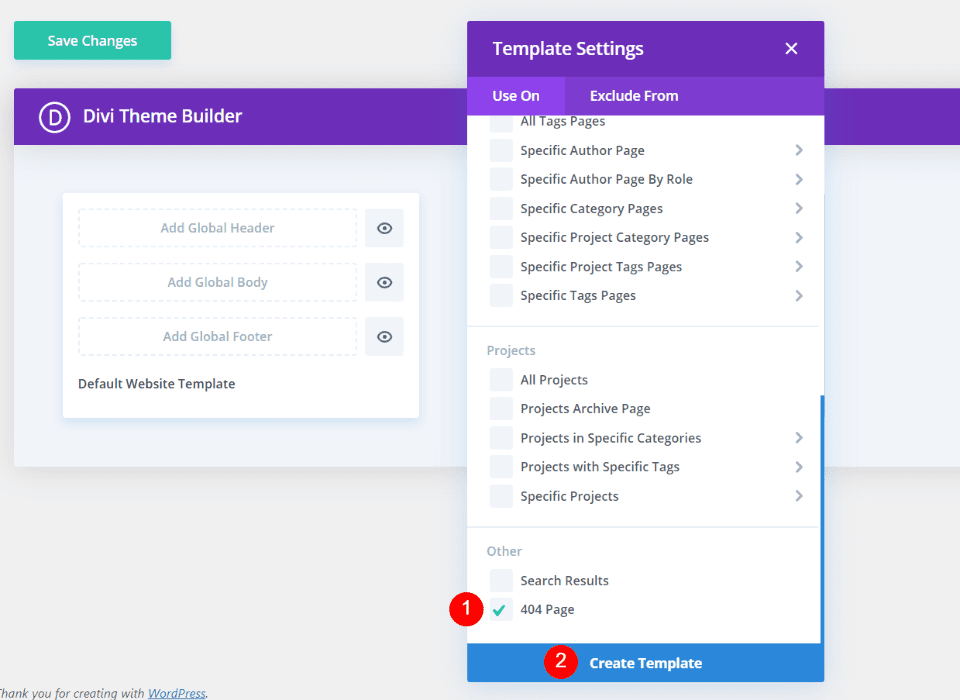
This opens the template settings. Scroll to the bottom and select 404 Page under Other. Next, click Create Template. The template settings will close.
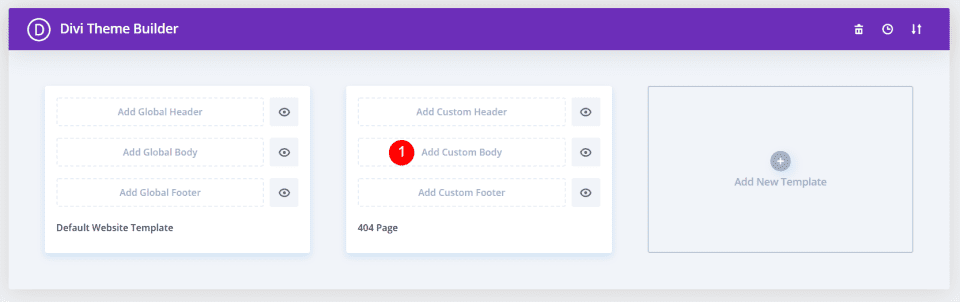
Now, you can create the 404 page. Most don’t use a header or footer. Select Add Custom Body.
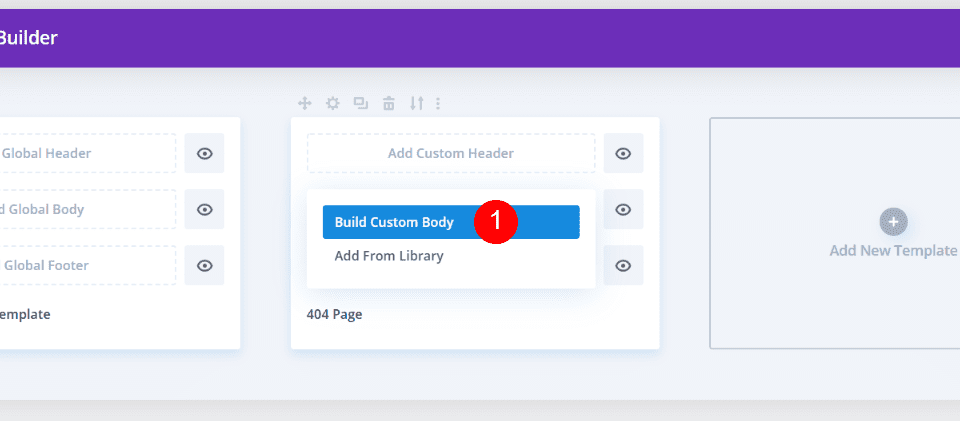
This shows two selections allowing you to build a custom body or add from the library. Select Build Custom Body.
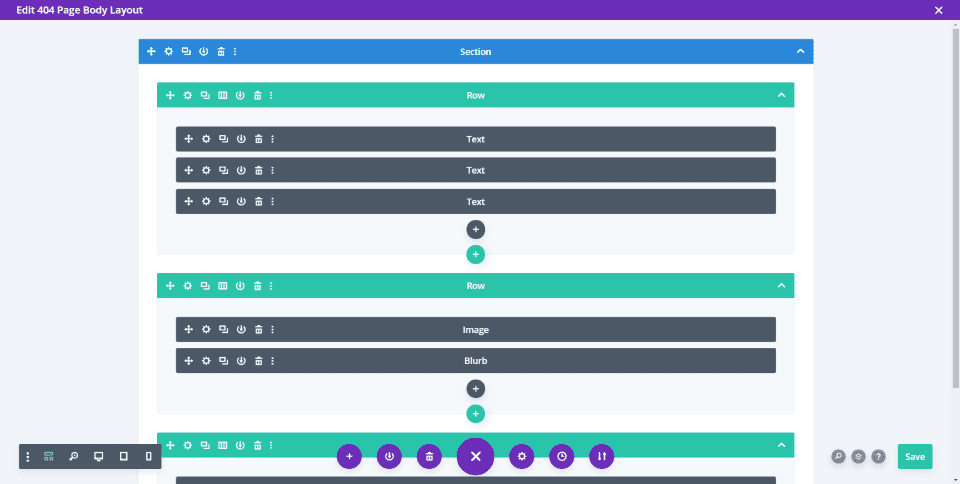
Build the 404 page with the Divi Builder as normal. Save and exit.
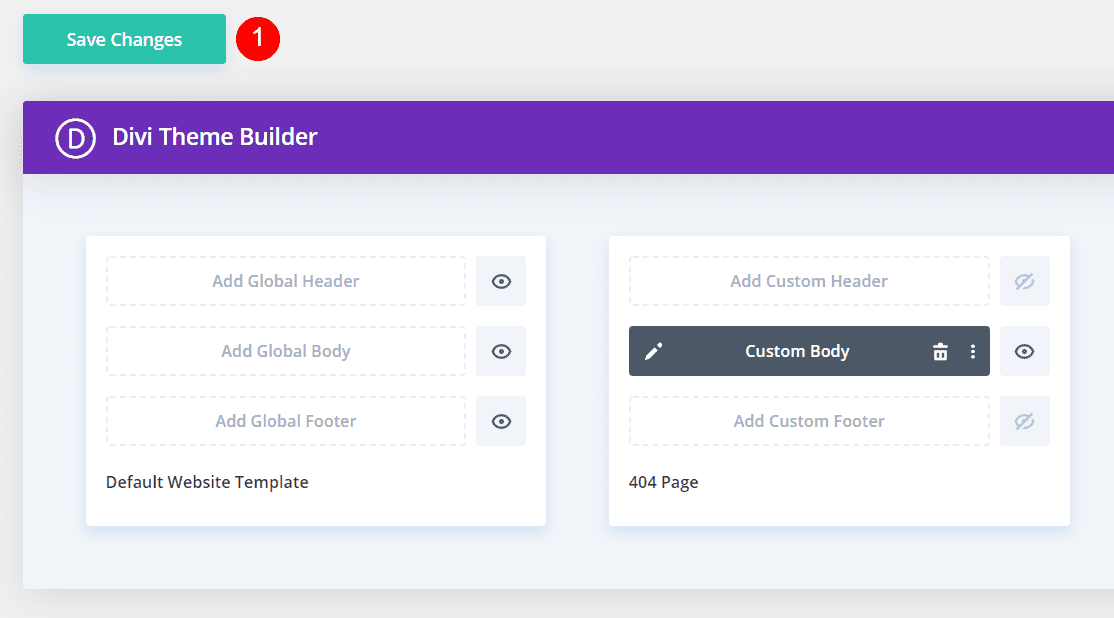
Finally, save your changes. You’re done.
Ending Thoughts on Creating a Custom 404 Page for WordPress
That’s our look at how to create a custom 404 page for WordPress. 404 pages need to be helpful. Unfortunately, the generic WordPress 404 page isn’t helpful, and it provides a poor user experience. Fortunately, you can create your own 404 page using the Divi Theme Builder.
Using the information we’ve provided here, you’re well on your way to create a beautiful 404 page that provides users with a great experience and looks amazing while doing it.
We want to hear from you. Have you created a custom 404 page for your WordPress website? Let us know about our experience in the comments.
Featured Image via Letters-Shmetters / shutterstock.com