На чтение 1 мин Просмотров 1.1к. Опубликовано Обновлено
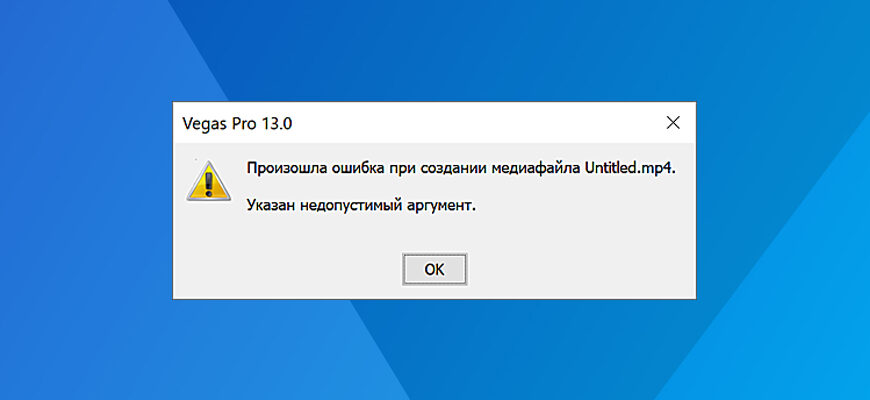
На днях, при рендере (визуализировать как), вылезло диалоговое окно с ошибкой: «Произошла ошибка при создании медиафайла. Указан недопустимый аргумент». Решение этой проблемы довольно-таки простое:
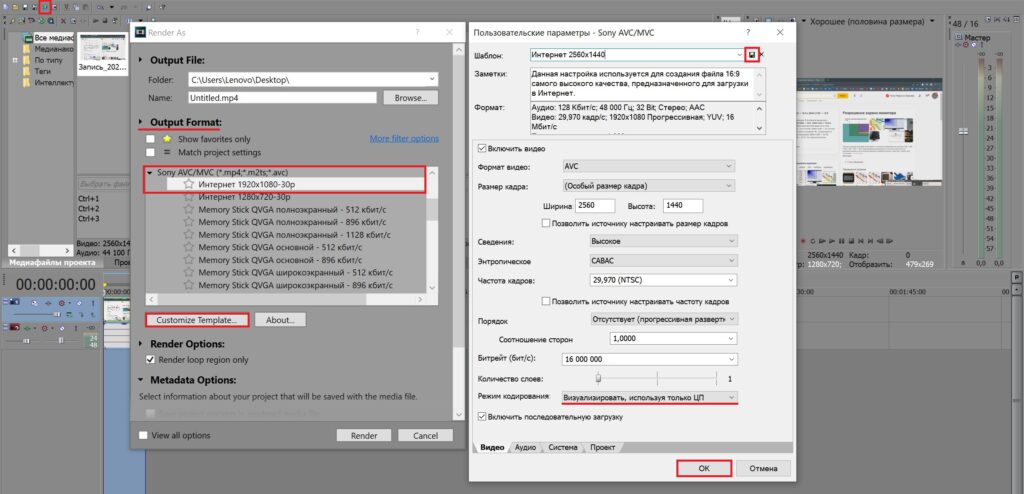
- Выберите область, которую хотите отрендерить.
- Нажмите «Визуализировать как».
- В списке «Формат вывода» («Output Format») найдите «MainConcep AVC/AAC».
- Кликните по «Internet HD 1080p», затем кнопку «Customize Template…»
- Установите свои настройки ролика, которые вам нужны. (Например, если у вас разрешение видео больше чем 1080p, то в выпадающем списке «Размер кадра», выберите «Особый размер кадра» и укажите его соотношение.)
- По окончании, снизу, в строке «Режим кодирования», из выпадающего списка выберите «Визуализировать, используя только ЦП».
- Сохраните шаблон (сверху дискета, рядом с его наименованием).
- Нажмите «Ок», затем «Рендер».
- Готово.

Автор публикации
 6
6
Публикации: 79Комментарии: 4Регистрация: 29-06-2022
Sony Vegas — надежная программа для редактирования видео, которой пользуются миллионы людей во всем мире. Многие создатели контента YouTube используют его для редактирования своих видео. Но иногда инструмент может выдавать досадную ошибку, говоря, что не удалось создать медиафайл. Следуйте инструкциям ниже, чтобы избавиться от ошибки.
Исправлено: Sony Vegas не может создать медиафайл
Сбросить данные
Удерживая клавиши CTRL и Shift, дважды щелкните значок на рабочем столе. Затем сбросьте все свои данные и удалите данные приложения. Перезапустите программу и проверьте, сохраняется ли ошибка.
Обновите Sony Vegas и запустите его от имени администратора
Запуск устаревших версий Sony Vegas может вызвать всевозможные ошибки. Последние обновления Sony Vegas часто содержат исправления известных ошибок, а также различные улучшения. Визит Официальный сайт Sony Vegas и проверьте, доступна ли новая версия.
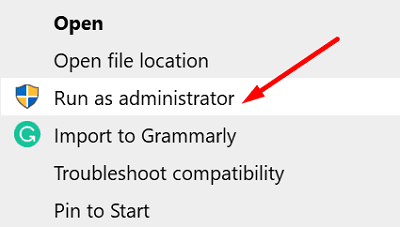
После установки последних обновлений обязательно запускайте Sony Vegas с правами администратора. Щелкните правой кнопкой мыши Sony Vegas и выберите
Запустить от имени администратора. Проверьте, может ли программа сейчас создавать медиафайлы.
Создать новый профиль пользователя
Если ваш профиль пользователя Windows 10 был поврежден, это может объяснить, почему некоторые функции Sony Vegas не работают. Создайте новую учетную запись пользователя и проверьте, исчезла ли проблема.
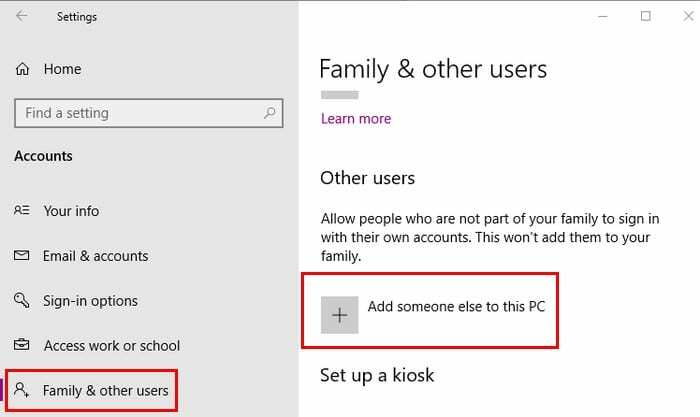
- Перейти к Настройки, Выбрать учетные записи, а затем выберите Семья и другие пользователи.
- Нажмите на Добавить кого-нибудь еще на этот компьютер.
- Выбирать У меня нет данных для входа этого человека, а потом Добавить пользователя без учетной записи Microsoft.
- Следуйте инструкциям на экране, чтобы создать новую учетную запись.
Закройте фоновые приложения
Если в фоновом режиме работают другие программы, закройте их, чтобы убедиться, что они не мешают работе Sony Vegas.
- Полностью закройте Sony Vegas.
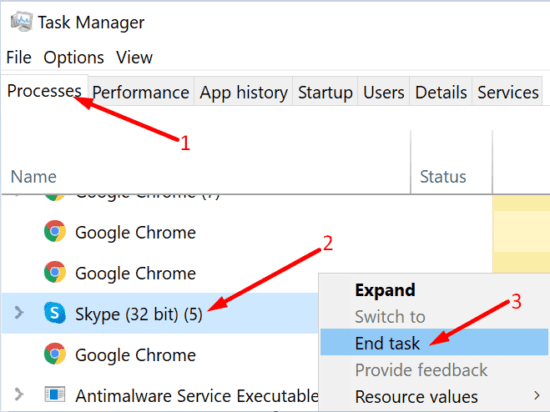
- Запустить Диспетчер задач, и нажмите на Процессы таб.
- Затем щелкните правой кнопкой мыши программы, которые хотите закрыть, и выберите Завершить задачу.
- Перезапустите Sony Vegas и проверьте, исчезла ли ошибка.

В качестве альтернативы, если закрытие ваших программ вручную занимает слишком много времени, вы можете просто чистая загрузка вашего компьютера.
Заключение
Если Sony Vegas не удалось создать медиафайл, закройте все фоновые приложения и перезапустите программу. Затем запустите Sony Vegas от имени администратора и создайте новый профиль пользователя. Вы нашли другие решения для решения этой проблемы? Не стесняйтесь делиться своими идеями в комментариях ниже.
Q: Every time I try to Render it says — An error occurred while creating the media file — the reason could not be determined
Answer: When Movie Studio or Vegas Pro stops processing in the middle of rendering a new video, and gives you an error message like this: «An error occurred while creating the media file — the reason could not be determined», there are a couple of reasons why this has happened.
Here is my check list
1. Re-boot your Computer !
If you have been doing a lot of editing over many hours, then it is often a good idea to SAVE As and then do a RE-BOOT of your computer before you attempt to Render a Video. This will clean out your memory and give you a clean slate.
2. Try a Clean Re-Boot of your Computer
Try a clean boot to start Windows with a minimal set of startup programs. Here is a Windows article on how to perform a clean boot: https://support.microsoft.com/en-us/kb/929135
3. Reset the software back to default values
Sometimes mysterious alien artefacts and corrupt files can build up inside the temporary files cache and cause bizarre behaviour. Resetting the program and deleting the temporary files cache, can often fix weird behaviour and will make your program look like it was just freshly installed. It is safe to do and will not delete any of your saved projects, if you have been remembering to always do regular saves while working on a project.
IMPORTANT — Please read this before attempting a program reset!
If the program crashed while editing your project and you have not been doing regular saves, you can end up losing all your work! However Movie Studio and Vegas Pro may have done an auto-save of your project file, which can be recovered and re-saved if you’re lucky. Auto-saved project files are saved to the Temporary Files Cache, so it is important to first inspect this folder before your do a full program reset and delete of the cache.
The folder address will be different for everyone, but normally looks something like either one of these:
C:UsersUserNameAppDataLocalVEGAS Pro14.0
C:UsersUserNameAppDataLocalMovie Studio Platinum13.0
To find out where the temporary files cache is located on your computer, open Movie Studio or Vegas Pro and go to Options/Preferences/General. Highlight and copy the Temporary Files Folder location using CTRL + C and then open up a Windows Explorer window in Documents. In the address bar located at top of window, press CTRL + V to paste the address.
You are now in the temporary files folder/cache. If any projects were auto-saved, they will normally look something like 00000000.restored.veg. Copy every single .veg or .vf file you can find and then paste them back into a safe folder location on your computer, like Documents/Vegas Projects. Now open each one up in Movie Studio or Vegas Pro and see if you have been lucky enough to find a crashed or missing project. If you want to keep it, make sure to re-save immediately with a new project file name that makes sense to you.
Once you have retrieved anything important from the temporary files cache, you can now perform a full program reset by doing this following:
Hold down the CTRL and SHIFT keys on your keyboard, and at the same time double click the program icon on your desktop to boot the program.
Select Delete Cache and Yes
The cache is now cleaned. After a reset, you will have to reconfigure your favourite settings in Options/Preferences and the Project Properties window!
If you can’t get the reset function to work correctly, please read this FAQ here:
https://www.moviestudiozen.com/doctor-zen-faq/573-how-to-reset-sony-software-to-default-settings
4. Remove unused Media
Remove unused media to help free up resources. You can purge unused media from your Project Media Window in Vegas and Movie Studio. To do this, go to the Project Media tab and you will see a button that looks like a lightning bolt. Clicking on that will remove any unused media from your project and help to free up system resources. Movie Studio 13 Platinum has this feature in Tools -> Clean Project Media.
5. Try working on your project in pieces
Try working on your project in pieces. For example if your timeline is 30 minutes long, save three ten minute sections into three project files using File -> Save As. Edit each section separately, render, and re-import into a new master project to stitch them together into a final audio and video stream.
6. Try replacing the media in your project
If it always hangs at the same frame or place, try deleting the files at that point in your timeline and then replace those with newly transcoded or recaptured clips.
7. Try to avoid any customisation with your rendering templates
If you are using custom settings for rendering, try rendering without any customization applied. If that works, then you can guess that your custom settings are not compatible with your rendering format.
8. File locations
If you’re working in an environment where files are scattered across multiple drives, try placing your media on your local disk drive.
9. Virus Protection program is too aggressive
Try adding the .exe file for the program to the exception list for any anti-virus software you are running on the system.
10. Do you have Apple Quicktime installed ?
You must have the latest version of Apple Quicktime installed if working with .mp4 style formats. There really is no choice with this, please have Quicktime installed at all times for Vegas to work correctly.
11. OLDER VERSIONS OF MOVIE STUDIO HAD PROBLEMS — Which version of Vegas Pro or Movie Studio are you using ?
Older versions of Vegas Movie Studio were susceptible to a Low Memory Error in particular situations. Specifically, Vegas can have a problem accessing enough RAM (memory) for users who had Movie Studio HD Platinum 32bit version installed on Windows 64bit Operating System.
Vegas Movie Studio HD Platinum 11 and all older versions of Movie Studio are only 32bit programs, which means they can only use a Maximum of 4GBs of RAM, even on a 64bit Computer that may a much higher amount of RAM installed. Not only is there a 4GB limit, 64bit users could also experience a glitch which limited there available access to RAM, to just a mere 2GBs. Movie Studio Platinum 12 and 13 now come with a 64bit and 32bit version of the program.
In a project with 720p or 1080p HD Video, this results in Vegas just freezing up. Fortunately this problem for 64bit users was fixed during one of the free Build Updates for Vegas Movie Studio HD Platinum 11 — Build 283.
12. Check for Free Updates and New Build Versions of your Program
Always make sure you are using the latest Build Version of the program you are using. Bugs and updates are continually been fixed and added to the programs. Many times a simple program update may fix your problem.
Please note that in 2016 Sony has sold all their Vegas software to Magix software. If you try an use the function search for updates in any Sony programs now, it will no longer work.
To download old «Sony» versions of Vegas Movie Studio, Vegas Pro and DVD Architect, go to this special download link on the Magix website and enter your Serial Number. If it is a valid number, you will be able to download a fresh copy of your old programs.
Any Vegas programs released during or after 2016, will now be Magix versions and can be re-downloaded directly from your Magix Account or from the Update Links here at Movie Studio Zen.
13. Did you add a Large Number of Video Fx ?
Sometimes if you add too many Video FX into a chain, it can cause an immediate crash.
First step to diagnose this problem is to temporarily TURN OFF all the Video Fx and then try to render again. If it works, then you know one of the Video Fx is causing the problem. Try next to turn ON one Video Fx at a time and do more test renders until you can narrow down the problem child.
14. Are you using the New Blue Fx Titler Pro ?
Older versions of the Titler Pro were very buggy in Vegas Pro and could cause Vegas Pro to freeze or crash. Check updates for the Titler Pro and then do another render.
15. Are you using GPU Acceleration ?
Try turning OFF GPU Acceleartion in the Vegas Pro or Movie Studio Platinum Preferences, which are found in the Video tab.
Go to Options — Preferences — Video
16. How much RAM do you have installed ?
Version 11 and older versions of Vegas Movie Studio can only access a maximum of 4GBs of Memory (RAM). Even though this is the case, please make sure that you DO actually have 4GBs of RAM installed. I have seen time and time again some people on Laptops only having 2GBs of RAM installed. This is just way too low for any Video Editing program to work with properly. Once you throw a couple of HD Video files into Vegas, it’s going to completely freak out.
RAM is cheap, so make sure you have the full 4GBs installled.
17. What type of Video are you trying to Render/Create ?
If you are attempting to Render a 1080p Video from your project with too HIGH a bit rate (on 32bit versions of Vegas Movie Studio) it will crash older and slower computers with low RAM capacity and/or low powered CPUs.
A solution to get around this problem is obviously to lower the Bit Rate you are Rendering to. Anything under 10MBps should be more than enough to create a nice looking video. Trying to render to 20, 30, 40MBps is just silly.
Another solution for people on low powered machines is to switch to 720p settings instead.
18. What type of CPU do you have ?
To have a great experience with Vegas Movie Studio when editing and creating full 1080p HD Video projects, you must have a modern 4x Core CPU (Central Processing Unit) as the «Brain» of your computer. Older Duo Core CPUs just can’t handle processing HD Video files, and can be a reason for Rendering to crash and produce errors.
19. Which format are you rendering to ?
Avoid Windows Media Video .wmv if you don’t have much RAM and very low CPU power, when working with 1080p Video. Windows Media Media will suck up ALL your CPU resources while rendering — it’s just how the codec behaves.
Sony AVC .mp4 or Mainconcept AVC .mp4 are the best formats to render to, on older/slower computers.
If rendering any AVC templates, make sure to use CPU only encoding.
20. What is the condition of your Hard Drive ?
HD Video files are very large, so you need plenty of Hard Disc space for them to be written to. If your Hard Drive is almost full and never been de-fragmented, it can slow up rendering times and in worse case scenarios create a crash.
21. Dynamic RAM Preview amount in the Vegas Preference Settings
Open Vegas and go to Options/Preferences/Video
The first setting says: Dynamic RAM Preview max (MB):
The default value is 200 MB and for most people it is best to leave this at the default 200 MB value.
If you set this too high and don’t have enough RAM (memory) installed, there won’t be enough RAM left to process your videos when you are rendering your final video and this may cause a render freeze or crash.
Sometimes another weird problem may occur, which I call a Vegas X-file. If Vegas crashes and reports an exception error, sometimes setting the Dynamic RAM Preview value to 0 MB (that is zero megabytes) will fix the render crash. However, as I have previously said, 200 MB is normally the safest setting.
22. If none of the above solutions work, you need to pull out the big guns and perform a clean uninstall and reinstall of all your sony programs
Please read one of the following articles for in-depth instructions on what to do:
How to Clean Uninstall and Reinstall Vegas Pro/Movie Studio for Windows 7
How to Clean Uninstall and Reinstall Vegas Pro/Movie Studio for Windows 8/8.1
How to Clean Uninstall and Reinstall Vegas Pro/Movie Studio for Windows 10

Sony Vegas is a reliable video editing program used by millions of people worldwide. Many YouTube content creators use it to edit their videos. But the tool may sometimes throw an annoying error saying it failed to create the media file. Follow the steps below to get rid of the error.
Fix: Sony Vegas Couldn’t Create the Media File
Reset Data
Hold the CTRL and Shift keys while double-clicking the desktop icon. Then reset all your data and delete application data. Restart the program and check if the error persists.
Update Sony Vegas and Run It as Admin
Running outdated Sony Vegas versions may trigger all sorts of errors. The newest Sony Vegas updates often feature fixes for known bugs, as well as various improvements. Visit Sony Vegas’ official website and check if there’s a new version available.
After you install the latest updates, make sure to launch Sony Vegas with administrative rights. Right-click on Sony Vegas and select Run as administrator. Check if the program can create media files now.

Create a New User Profile
If your Windows 10 user profile got corrupted, that could explain why certain Sony Vegas features are not working. Create a new user account, and check if the issue is gone.
- Go to Settings, select Accounts, and then select Family & other users.
- Click on Add someone else to this PC.
- Select I don’t have this person’s sign-in information, and then Add a user without a Microsoft account.
- Follow the on-screen steps to create the new account.

Close Background Apps
If other programs are running in the background, close them to ensure they’re not interfering with Sony Vegas.
- Exit Sony Vegas completely.
- Launch the Task Manager, and click on the Processes tab.
- Then right-click on the programs you want to close and select End task.
- Relaunch Sony Vegas and check if the error is gone.
Alternatively, if closing your programs manually takes too much time, you can simply clean boot your computer.
Conclusion
If Sony Vegas could not create the media file, close all background apps and restart the program. Then, launch Sony Vegas as an administrator and create a new user profile. Did you find other solutions to fix this issue? Feel free to share your ideas in the comments below.
Reader Interactions
VEGAS Pro 16.0 An error occurred while creating the media file. Error 0x800700ce (message missing)Подробнее

sony vegas 19 ошибка An error occurred while creating the media fileПодробнее

Ошибка RENDER (визуализации) в Sony Vegas. ИСПРАВЛЕНИЕ (#SONY VEGAS PRO )Подробнее

Обход ошибки: 0x80131501 Sony VEGAS Pro 19.0 Произошла ошибка при создании файла мультимедиа.Подробнее

Произошла ошибка при создании медиафайла SONY VEGAS PRO [ РЕШЕНИЕ ]Подробнее
![Произошла ошибка при создании медиафайла SONY VEGAS PRO [ РЕШЕНИЕ ]](https://img.youtube.com/vi/7IjxpEHWixg/0.jpg)
An error occurred while creating the media file. SV13 Ошибка при рендере кодеком H264 [РЕШЕНИЕ]Подробнее
![An error occurred while creating the media file. SV13 Ошибка при рендере кодеком H264 [РЕШЕНИЕ]](https://img.youtube.com/vi/DHxJI5JH9J4/0.jpg)
Ошибка An Error Occurred While Opening One Or More FilesПодробнее

Sony Vegas : An error occurred while creating the media fileПодробнее

✅ Исправление ошибок Vegas Pro ✅ Error 0x8066000a & Low on memoryПодробнее

Исправление рендеринга Sony Vegas | Произошла ошибка при создании медиафайлаПодробнее

Как исправить ошибку «An error Occurred While Opening One Or More Files»Подробнее

Как исправить Произошла ошибка при создании медиафайла Компоненту не удалось инициализировать Vegas 17Подробнее

*Работает* Произошла ошибка при загрузке файла проекта 100% FIX 2022 | СОНИ ВЕГАС 15/16Подробнее

КАК ИСПРАВИТЬ VEGAS PRO 15 RENDER ERROR «ПРОИЗОШЛА ОШИБКА ПРИ СОЗДАНИИ ФАЙЛА МЕДИА»Подробнее

An Error Occurred While Creating The Media File Sony Vegas Pro Fix 2022Подробнее

Sony Vegas Pro — Ошибка при создании медиафайлаПодробнее

SONY/MAGIX VEGAS 15 | ИСПРАВИТЬ ОШИБКУ ВИЗУАЛИЗАЦИИ — «Был указан недопустимый аргумент».Подробнее

Sony Vegas Pro 11 — Исправление рендеринга «Произошла ошибка при создании медиафайла»Подробнее

Sony Vegas Pro 13-«произошла ошибка при создании медиафайла»-3 способа исправить это или избежатьПодробнее

Sony Vegas Произошла ошибка при создании медиафайла FIX 2016 (БЫСТРО И ПРОСТО) (WMV и MP4)Подробнее

События
Sony Vegas — надежная программа для редактирования видео, которой пользуются миллионы людей во всем мире. Многие создатели контента YouTube используют его для редактирования своих видео. Но иногда инструмент может выдавать досадную ошибку, говоря, что не удалось создать медиафайл. Следуйте инструкциям ниже, чтобы избавиться от ошибки.
Исправлено: Sony Vegas не может создать медиафайл
Сбросить данные
Удерживая клавиши CTRL и Shift, дважды щелкните значок на рабочем столе. Затем сбросьте все свои данные и удалите данные приложения. Перезапустите программу и проверьте, сохраняется ли ошибка.
Обновите Sony Vegas и запустите его от имени администратора
Запуск устаревших версий Sony Vegas может вызвать всевозможные ошибки. Последние обновления Sony Vegas часто содержат исправления известных ошибок, а также различные улучшения. Визит Официальный сайт Sony Vegas и проверьте, доступна ли новая версия.
После установки последних обновлений обязательно запускайте Sony Vegas с правами администратора. Щелкните правой кнопкой мыши Sony Vegas и выберите
Запустить от имени администратора. Проверьте, может ли программа сейчас создавать медиафайлы.
Создать новый профиль пользователя
Если ваш профиль пользователя Windows 10 был поврежден, это может объяснить, почему некоторые функции Sony Vegas не работают. Создайте новую учетную запись пользователя и проверьте, исчезла ли проблема.
- Перейти к Настройки, Выбрать учетные записи, а затем выберите Семья и другие пользователи.
- Нажмите на Добавить кого-нибудь еще на этот компьютер.
- Выбирать У меня нет данных для входа этого человека, а потом Добавить пользователя без учетной записи Microsoft.
- Следуйте инструкциям на экране, чтобы создать новую учетную запись.
Закройте фоновые приложения
Если в фоновом режиме работают другие программы, закройте их, чтобы убедиться, что они не мешают работе Sony Vegas.
- Полностью закройте Sony Vegas.
- Запустить Диспетчер задач, и нажмите на Процессы таб.
- Затем щелкните правой кнопкой мыши программы, которые хотите закрыть, и выберите Завершить задачу.
- Перезапустите Sony Vegas и проверьте, исчезла ли ошибка.
В качестве альтернативы, если закрытие ваших программ вручную занимает слишком много времени, вы можете просто чистая загрузка вашего компьютера.
Заключение
Если Sony Vegas не удалось создать медиафайл, закройте все фоновые приложения и перезапустите программу. Затем запустите Sony Vegas от имени администратора и создайте новый профиль пользователя. Вы нашли другие решения для решения этой проблемы? Не стесняйтесь делиться своими идеями в комментариях ниже.