Содержание
- ПК ребутается в некоторых играх
- Инициализирован отчет об ошибке iommu windows 10
- X1 Carbon 7 (X1C7): HAL error, event ID 16: The iommu fault reporting has been initialized
- Re:X1 Carbon 7 (X1C7): HAL error, event ID 16: The iommu fault reporting has been initialized
- Re:X1 Carbon 7 (X1C7): HAL error, event ID 16: The iommu fault reporting has been initialized
- Re:X1 Carbon 7 (X1C7): HAL error, event ID 16: The iommu fault reporting has been initialized
- Re:X1 Carbon 7 (X1C7): HAL error, event ID 16: The iommu fault reporting has been initialized
- Re:X1 Carbon 7 (X1C7): HAL error, event ID 16: The iommu fault reporting has been initialized
- Re:X1 Carbon 7 (X1C7): HAL error, event ID 16: The iommu fault reporting has been initialized
- Community Guidelines
- Check out current deals!
- Most Popular Posts
- Welcome to Ideation!
- Проблемы с включением IOMMU
- Как IOMMU работает для связи ЦП и периферийных устройств
- Где находится IOMMU?
- В чем его полезность?
- Использование IOMMU в виртуализированных системах
- Ошибка iommu windows 10
- Проверьте, включен ли VT-D / IOMMU в BIOS/UEFI
- 3 ответа
- Похожие вопросы:
ПК ребутается в некоторых играх
05 Jun 2022 в 01:59

05 Jun 2022 в 01:59 #1
Приветствую работяги!
Подскажите, вдруг кто сталкивался или знает как решить:
Мой пк:
Ryzen 7 3700x
2070 Super
24 RAM
Power supply 700+
Predator: Hunting Grounds(перезагрузка стабильно раз в 2 матча), RUST(перезагрузка где то через 1-2 минуты после захода на сервер), Necromunda:Hired Gun(перезагрузилась 1 раз за 20 часов игры), Biomutant(перезагрузилась пару раз за 10 часов игры)
Почитав в интернете нашел что это нечто связанное с производительностью вирутальной машины, хотя я ее не юзаю.
Думаю еще сделать стресс тест видуху и проца, чтобы наверняка
На этом больше ничего не пробовал. Находил в сети информацию что подобное может быть из за каких то проблем с напряжением, то есть например во время обработки данных условная видеокарта запрашивает большее напряжение чем ей разрешено использовать или типа того. Думал что возможно проблема с процом или видюхой, но чето маловероятно ибо в каких то играх все работает как часы, а в некоторых оно все падает.
Кто то советовал сделать андер волтаж проца, чтобы снизить пиковые частоты работы ЦПУ, но чет идея сомнительная ибо работает только турбобустинг, да и работает он при всех приложениях, так что будь проблем в этом, то он бы отрубался постоянно.
Источник

![]()
United States of America
![]()
X1 Carbon 7 (X1C7): HAL error, event ID 16: The iommu fault reporting has been initialized
Within the last two weeks, with the latest updates from Microsoft and Lenovo, My X1C7 often suddenly halts with the following error in Event Logs
Date: 2020-10-27 15:19:51
Task Category: None@Level: Information
Description: The iommu fault reporting has been initialized.
When X1C7 halted, the keyboard stopped responding to any keying, and the display stopped where it was right before the halt.
Windows 10 Pro, 10.0.19041 Built 19041 with the latest updates on 2020-10-27 (today’s issue: 2020-10-27 15:19:51)
X1C7 Model: 20R10015US
BIOS: NET2QET33W (1.27), 2020-10-08
SMBIOS: 3.2
Embedded Controller Version: 1.14
Hardware Abstraction Layer: 10.0.19041.488
![]()
United States of America
![]()
Re:X1 Carbon 7 (X1C7): HAL error, event ID 16: The iommu fault reporting has been initialized
I am getting the same error on X1E gen 1. My computer crashes randomly, ane each crash is preceded by HAL error, event ID 16. From what I understood from searching on the internet it may be related to memory failure, however when I contacted Lenovo support they told me that it is a software issue. I will see if the issue persists and report my findings. I could not find much about on the internet so it may be a very elusive problem. It seems to be a new problem, so maybe it is caused by some Windows update.
![]()
United States of America
![]()
Re:X1 Carbon 7 (X1C7): HAL error, event ID 16: The iommu fault reporting has been initialized
Maybe this issue is caused by BIOS update NET2QET33W (1.27), 2020-10-08, which has been recently removed from Lenovo website.
![]()
United States of America
![]()
Re:X1 Carbon 7 (X1C7): HAL error, event ID 16: The iommu fault reporting has been initialized
![]()
United States of America
![]()
Re:X1 Carbon 7 (X1C7): HAL error, event ID 16: The iommu fault reporting has been initialized
My X1C7 encounters this issue everyday 🙁
![]()
United States of America
![]()
Re:X1 Carbon 7 (X1C7): HAL error, event ID 16: The iommu fault reporting has been initialized
![]()
United States of America
![]()
Re:X1 Carbon 7 (X1C7): HAL error, event ID 16: The iommu fault reporting has been initialized
Yesterday, after updating Intel Wireless Bluetooth driver 22.10.0.2 via Intel Driver & Support Assistant, I tried to use my Bluetooth mouse, which is Microsoft Modern Mobile Mouse, again, and the issue happened after about 1-2 hours of use.
Please review our Guidelines before posting.
Check out current deals!
Most Popular Posts
Please log in to ‘Like’ this post
Welcome to Ideation!
Ideation sections have been created for customers to engage with us by discussing and promoting ideas and improvements relating to Lenovo’s products and services.
As a reminder, your participation in Ideation is governed by Lenovo’s website Terms of Use and by Lenovo’s Forums Community Guidelines. Additional terms governing the Ideation Program are included in the Ideation Terms and may be found here. For your convenience, here’s a
Quick summary of the highlights:
By clicking on “Yes” below you certify that you have read and agree to the Community Guidelines and the Ideation Terms, and acknowledge that by submitting any ideas, material, or information on the Ideation site you grant Lenovo the right to use any such submissions by you in any way without acknowledging, notifying, or compensating you, as described in those documents.
Источник
Сап, лорчан. Имею мать GA-990FXA-D3, rev 1.2. Биосе присутствуют пункты Virtualization и IOMMU, оба включены. Тем не менее, в dmesg всё время
Написал в саппорт Gigabyte:
Здравствуйте! Год назад приобрел эту материнскую плату, вот возникла проблема: вне зависимости от включенностивыключенности IOMMU в BIOS система просит включить в Биосе поддержку iommu. Проверялось на Gentoo
На что получил ответ:
Благодарим Вас за использование нашей продукции и за обращение в службу технической поддержки GIGABYTE TECHNOLOGY.
Материнские платы компании Gigabyte проходят соответствующую сертификацию на предмет совместимости с операционными системами компании Microsoft (сертификат Windows Hardware Quality Labs/WHQL), так же информацию о совместимости Вы можете найти на сайте Microsoft: http://www.microsoft.com/windows/compatibility/windows-7/en-us/Search.aspx?l=. Вся продукция компании Gigabyte, все программное обеспечение разрабатывается и тестируется только под операционные системы компании Microsoft. В разделе «Спецификации» или «Описание», к любой модели материнской платы есть пункт, в котором указаны поддерживаемые операционные системы, в Вашем случае это Microsoft Windows 7/Vista/XP.
Так же, на сайте отмечено, что: «Из-за особенностей осуществления поддержки семейства ОС Linux со стороны производителей системной логики, пожалуйста, обратитесь за драйверами для Linux на сайты разработчиков.»
Таким образом, мы не можем гарантировать какую-либо стабильную работу компьютера при использовании операционных систем Linux.
С Уважением и Наилучшими пожеланиями, GIGABYTE TECHNOLOGY
Они, блин, совсем там упоролись? Слов нет просто.
Источник
Как IOMMU работает для связи ЦП и периферийных устройств

Как периферийные устройства взаимодействуют с процессором? Использование ОЗУ системы в качестве общей точки для взаимной связи, но это подразумевает ряд механизмов, наиболее важным из которых является тот, который мы собираемся описать ниже.
Где находится IOMMU?

Как видно на схеме выше, периферийные устройства подключены к южному мосту или южному мосту, который, в свою очередь, подключен к северному мосту, который является концентратором, с которым, в основном, обмениваются данными интерфейс оперативной памяти и процессора. каждый. Что ж, IOMMU расположен внутри южного моста, где сосредоточены все интерфейсы ввода-вывода, такие как USB, PCI Express, SATA и т. Д.
Все эти интерфейсы должны находиться под управлением IOMMU для доступа к системной RAM. В этом случае IOMMU действует как своего рода пограничный контроль, который следит за тем, чтобы периферийные устройства не осуществляли незаконный доступ к памяти и не обращаются к той части ОЗУ, которая назначена каждому из них и никуда больше.
Таким образом, IOMMU действует как MMU, но для периферийных устройств ввода-вывода.
В чем его полезность?

Периферийные устройства ввода-вывода не используют MMU (блок управления памятью) совместно с ЦП и, следовательно, не просматривают память так же, как центральный системный процессор. Эта проблема позволяет периферийным устройствам получать доступ к чувствительным частям системной памяти, например тем, которые зарезервированы для функций самой операционной системы, что является проблемой в многозадачных средах.
С другой стороны, IOMMU автоматически и динамически назначает адреса памяти для связи с различными периферийными устройствами, таким образом, ЦП всегда знает, на какие адреса памяти он должен указывать для связи с ними.

В более старых системах IOMMU не было доступно, и вместе с ними была предоставлена карта памяти, где программисты были проинформированы, какие адреса RAM предназначены для связи с устройствами. По этой причине разработчикам в каждой отдельной архитектуре приходилось изучать адресацию памяти, чтобы использовать периферийные устройства и другое поддерживающее оборудование в системе.
Сегодня это уже не так, и наличие IOMMU позволяет разработчикам избавиться от необходимости изучать адреса памяти для связи и расширяет возможности конфигурации и настройки наших ПК, позволяя создавать совершенно разные конфигурации.
Использование IOMMU в виртуализированных системах

IOMMU обеспечивает безопасный доступ к физическим устройствам в виртуализированных средах посредством того, что мы называем сквозной передачей устройств. Тандем между MMU и IOMMU позволяет устройствам, подключенным к ПК, появляться в пространстве виртуальной памяти, которое выполняет функцию физической памяти для виртуальной среды, которая работает в данный момент.
Без IOMMU виртуализированные среды, которые имеют правильный доступ к оборудованию, установленному в системе, были бы невозможны, поэтому сегодня он является незаменимой частью всех процессоров, которым приходится обрабатывать виртуализированные среды.
Источник
Ошибка iommu windows 10
Проверьте, включен ли VT-D / IOMMU в BIOS/UEFI
Чтобы проверить, если корпорации Intel VT-X или AMD от AMD-V включена в BIOS/UEFI, я использую:
Я не мог найти способ проверить, включены ли Intel VT-D или AMD IOMMU в BIOS/UEFI.
3 ответа
При установке Intel HAXM у меня возникает следующая ошибка: Этот компьютер соответствует требованиям для HAXM, но технология виртуализации Intel (VT-x) не включена. HAXM не может быть установлен до тех пор, пока не будет включен VT-x. Итак, я проверил, что мой BiOS, VT-x поддерживается, и включил…
Я видел много сообщений, похожих на мою проблему, и хотя я пытался сделать те же шаги, это все равно не сработало. Intel Core i7 — 2670QM CPU @ 2.20GHz Windows 10 Мне нужно создать эмулятор для Android Studio, чтобы протестировать мои приложения, но он не работает, он говорит, что мне нужен Intel…
Если VT-d включен, то Linux настроит переназначение DMA во время boot. Самый простой способ найти это-поискать в dmesg DMAR записи. Если вы не видите ошибок, то VT-d включен.
Еще один пример с x2apic opt out:
В системе с отключенным VT-d вы либо увидите сообщение об ошибке, либо вообще ничего.
Я просто нашел другой способ, который, кажется, работает, даже если параметры iommu kernel не были установлены:
Основываясь на ответе Джо-Эрленда Шинстада:
Если CPU включен, вы должны увидеть что-то вроде:
В противном случае вы можете увидеть что-то вроде:
Я хочу использовать эмулятор Android, такой как Nox или Bluestacks, чтобы играть в мобильный PUBG на PC. Я знаю, что включение виртуализации в BIOS делает производительность намного, намного лучше. У меня НР примета рабочего стола (RX580 4 Гб, 7-го поколения процессор i5, 12 ГБ памяти DDR4, 128 ГБ…
Похожие вопросы:
Как я могу сказать, есть ли у конкретной машины SecureBoot/UEFI в качестве опции в BIOS, кроме загрузки в BIOS и визуального осмотра ее? Есть ли способ увидеть эту информацию в Windows, даже если…
Мои знания bios довольно низки, но каждый раз, когда я читаю некоторые документы о UEFI, я не понимаю, почему фаза SEC является корнем доверия к процедурам UEFI bios. Фаза SEC выполняет проверку…
Не удалось установить intel HAXM вместо того, что VT включен в BIOS. Я использую процессор intel core2 quad q9550 и windows 7 поверх него. Мой процессор не поддерживает гипер-визор.
При установке Intel HAXM у меня возникает следующая ошибка: Этот компьютер соответствует требованиям для HAXM, но технология виртуализации Intel (VT-x) не включена. HAXM не может быть установлен до…
Я видел много сообщений, похожих на мою проблему, и хотя я пытался сделать те же шаги, это все равно не сработало. Intel Core i7 — 2670QM CPU @ 2.20GHz Windows 10 Мне нужно создать эмулятор для…
Я хочу использовать эмулятор Android, такой как Nox или Bluestacks, чтобы играть в мобильный PUBG на PC. Я знаю, что включение виртуализации в BIOS делает производительность намного, намного лучше….
Id хотел бы прочитать/изменить некоторые настройки меню BIOS/UEFI с помощью скрипта uefi shell. Например, Id хотел бы изменить настройку ’CSM Support’ (Enabled/Disabled). Есть ли какой — нибудь…
Я понимаю, что если устройство PCI хочет сделать DMA RW, а IOMMU включено, драйвер должен сопоставить CPU PA с адресом DMA через pci_map_page(для некогерентного), то устройство PCI может…
Источник
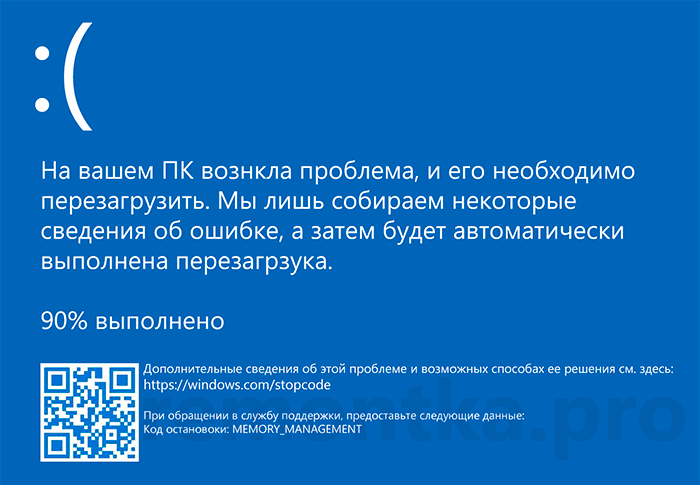
 Синий экран MEMORY_MANAGEMENT в Windows 10 — распространенная, и, одновременно, часто сложная в диагностике проблема, однако, выяснить её причины и устранить обычно оказывается возможным.
В этой инструкции подробно о возможных методах исправить ошибку MEMORY MANAGEMENT в Windows 10 и о том, чем она может быть вызвана.
- Простые способы исправить ошибку MEMORY MANAGEMENT
- Синий экран MEMORY MANAGEMENT — поиск причины и исправление
- Что делать, если ошибка возникает до загрузки Windows 10
Простые способы исправить ошибку MEMORY MANAGEMENT
В связи со сложностью определения причин синего экрана MEMORY MANAGEMENT начинающими пользователями, рекомендую начать с простых подходов, которые, возможно, смогут достичь решения проблемы, не прибегая к более сложным манипуляциям.
Эти методы подойдут в случае, если Windows 10 запускается и какое-то время работает, а синий экран появляется позже:
- Если ошибка возникла после недавних обновлений системы или драйверов, возможно, использования каких-либо программ для оптимизации и ускорения Windows 10, попробуйте использовать точки восстановления системы (Панель управления — Запуск восстановления системы).
- Если точек восстановления нет, а вы обновляли какие-то драйверы, попробуйте зайти в диспетчер устройств (правый клик по кнопке «Пуск» — «Диспетчер устройств»), выбрать устройство, драйвер которого обновлялся, открыть его свойства и на вкладке «Драйвер» проверить доступность кнопки «Откатить».
- Если вы точно знаете, после установки какой программы появилась проблема, а программа работает в фоновом режиме (автоматически загружаясь с системой), возможно, стоит удалить эту программу или убрать её из автозагрузки Windows 10.
- Если устанавливались какие-либо сторонние антивирусы, они могут быть причиной ошибки. Проверьте, будет ли она проявлять себя, если отключить или удалить этот антивирус.
- Если синий экран MEMORY MANAGEMENT стал появляться сразу после чистой установки Windows 10 на компьютер или ноутбук, возможно, причина в том, что те драйверы, которые установила сама система не вполне подходят. Вручную скачайте и установите официальные драйверы с сайта производителя ноутбук или материнской платы (если это ПК) — включая драйверы чипсета и другие драйверы.
- Если вы включали какие-то опции ускорения памяти, процессора, видеокарты в БИОС/UEFI или с помощью сторонних программ, попробуйте отключить их.
- Если ошибка MEMORY_MANAGEMENT появляется только при запуске определенной игры или программы, проблема может быть именно в этой программе или, если игра или программа платная, а вы её не совсем купили, то в антивирусе (попробовать запуск при отключенном антивирусе, в том числе встроенном Защитнике Windows).
К сожалению, не всегда указанные простые подходы к решению проблемы оказываются результативными. В этом случае переходим к более сложным вариантам определения причин проблемы и исправления ошибки.
Синий экран MEMORY_MANAGEMENT — ищем причину и исправляем ошибку
Следующие этапы могут помочь разобраться в том, что именно вызывает появление рассматриваемого синего экрана. Опять же, предполагается, что вы можете зайти в Windows 10 и работать в ней. Если же синий экран MEMORY MANAGEMENT появляется до загрузки системы — об этом в последнем разделе инструкции.
Чистая загрузка Windows 10
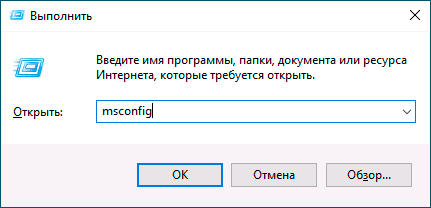
В качестве первого шага следует попробовать выполнить чистую загрузку Windows 10 без сторонних служб и программ в автозагрузке — это позволит выяснить, не являются ли какие-либо сторонние программы причиной ошибки. Для того, чтобы сделать это, выполните следующие шаги:
- Нажмите клавиши Win+R на клавиатуре, введите msconfig в окно «Выполнить» и нажмите Enter.

- На вкладке «Общие» отметьте пункт «Выборочный запуск» и снимите отметку «Загружать элементы автозагрузки».
- Перейдите на вкладку «Службы», отметьте «Не отображать службы Майкрософт», а затем нажмите «Отключить все».

- Желательно также зайти на вкладку «Автозагрузка» перейти в параметры автозагрузки диспетчера задач и там отключить все пункты (даже нужные).
- Примените настройки и перезагрузите компьютер.

Если после перезагрузки ошибка MEMORY_MANAGEMENT больше не появляется, по-видимому, причина в одной из программ в автозагрузке или какой-то сторонней службе. Можно попробовать включать элементы по одному или несколько, пока снова не появится проблема, чтобы выяснить, что именно её вызвало и после этого принимать решения о возможном удалении этого стороннего ПО или других действиях.
Проверка драйверов
Синий экран MEMORY MANAGEMENT часто может быть вызван проблемой с драйверами. Для того, чтобы выявить сбойный драйвер оборудования, можно использовать встроенную утилиту для проверки драйверов:
- Перезагрузите компьютер в безопасном режиме. Самый простой метод сделать это — нажать клавиши Win+R на клавиатуре, ввести msconfig и нажать Enter, отметить «Безопасный режим» на вкладке «Загрузка», применить настройки и перезагрузить компьютер.
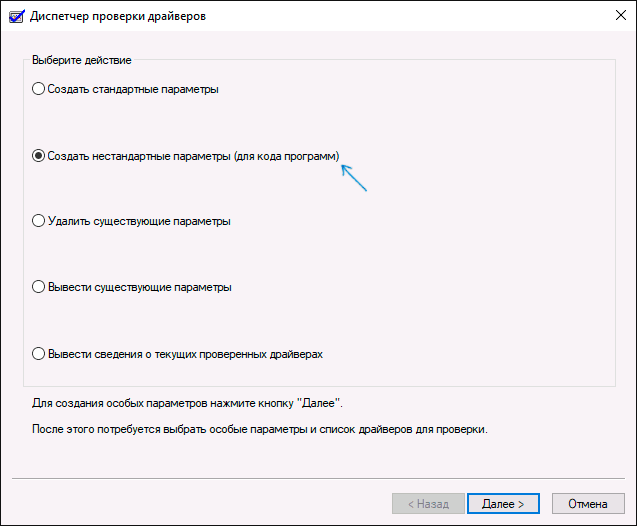
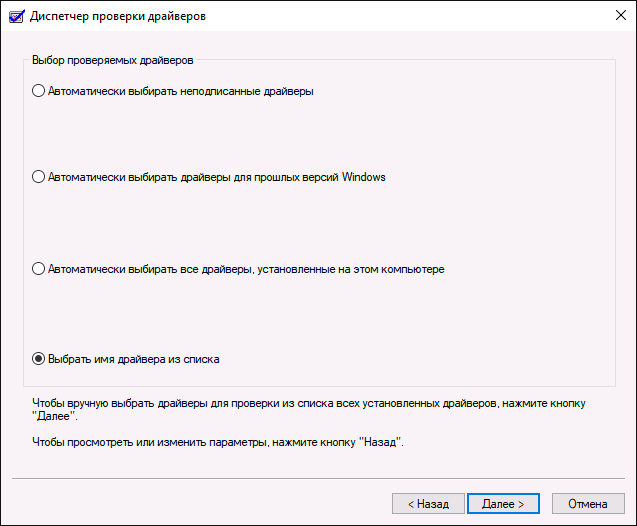
- В безопасном режиме нажмите клавиши Win+R и введите verifier для запуска диспетчера проверки драйверов.
- На первом экране выберите «Создать нестандартные параметры (для кода программ)».

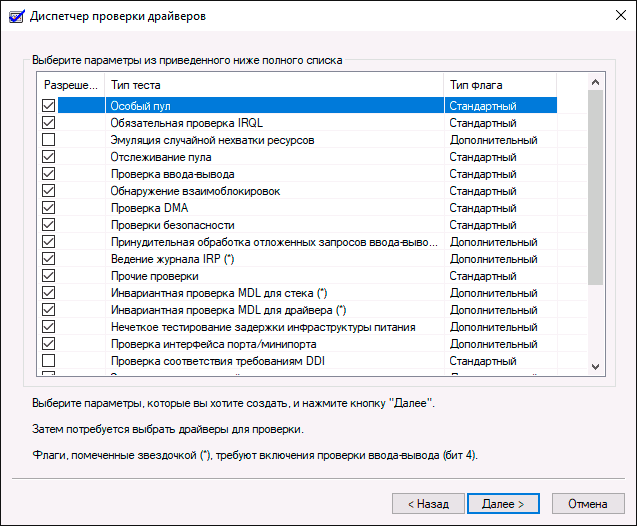
- Далее отметьте все пункты, кроме «Эмуляция случайной нехватки ресурсов» и двух пунктов, связанных с проверкой соответствия требованиям DDI.
- Выберите пункт «Выбрать имя драйвера из списка».
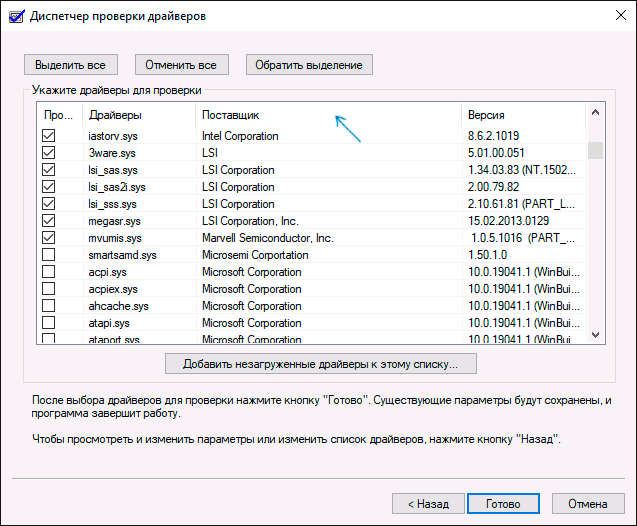
- Отсортируйте драйверы по колонке «Поставщик» (нажав на заголовок столбца) и отметьте все драйверы, кроме предоставленных Microsoft. Нажмите кнопку «Готово».
- Если вы запускали безопасный режим с помощью msconfig, снова зайдите (как на первом шаге) и отключите загрузку в безопасном режиме.
- Перезагрузите компьютер.
После этого возможны следующие варианты развития событий:
- Система загрузится, некоторое время проработает, а затем появится синий экран с прежней ошибкой MEMORY_MANAGEMENT или новой, наподобие DRIVER_VERIFIED_DETECTED_VIOLATION с указанием имени файла .sys (если имя файла указано — запомните или запишите его, это и есть сбойный драйвер).
- Система покажет синий экран еще до загрузки системы.
В первом случае перезагрузите компьютер и отключите проверку драйверов, для этого запустите командную строку от имени администратора и введите команду verifier /reset
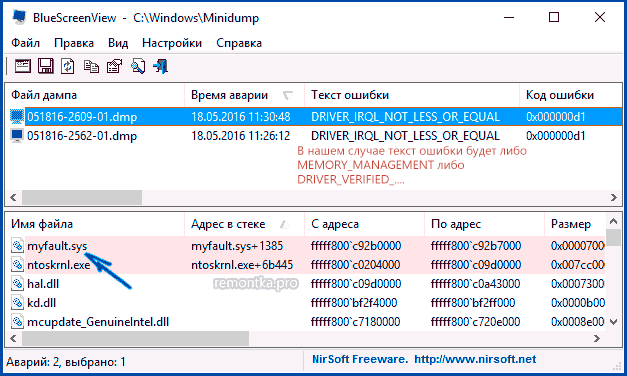
После этого, если на синем экране отображалось имя сбойного драйвера, найдите в Интернете, что это за драйвер — по всей видимости, проблема именно в нем. Если имя драйвера не отображалось, попробуйте использовать бесплатную утилиту BlueScreenView и в ней посмотреть, какой именно файл вызвал последний сбой (на скриншоте пример для другого синего экрана). Утилита доступна на официальном сайте https://www.nirsoft.net/utils/blue_screen_view.html
Если система не запускается, то после двух сбоев загрузки вы получите возможность открыть дополнительные параметры и инструменты восстановления и там, запустив командную строку, отключить проверку драйверов с помощью команды verifier /reset а затем перезагрузить компьютер. Далее, можно использовать действия из предыдущего абзаца.
После выявления вызывающего неполадки драйвера вы можете предпринять действия по его обновлению (в идеале — путем скачивания вручную с официального сайта производителя оборудования) или откату на предыдущую версию.
Проверка оперативной памяти и целостности системных файлов, ошибок диска
Иногда ошибка может быть вызвана проблемами с оперативной памятью. Если у вас есть подозрения на то, что дело в этом, то для начала рекомендую отключить любые ускорения RAM, если раньше вы их применяли, а затем попробовать выполнить проверку оперативной памяти на ошибки.
Еще пара рекомендаций — выполнить проверку целостности системных файлов Windows 10 и проверку жесткого диска на ошибки.
Исправление ошибки, если система не запускается

В случае, если сообщение об ошибке MEMORY MANAGEMENT появляется еще до загрузки системы, то после двух неудачных загрузок вы должны получить доступ в дополнительные параметры восстановления в разделе «Поиск и устранение неисправностей», где вы можете:
- Попробовать загрузку в безопасном режиме (пункт «Параметры загрузки»).
- Выполнить восстановление из точек восстановления (пункт «Восстановление системы»).
- Удалить последние установленные обновления Windows
И в крайнем случае, можно прибегнуть к сбросу системы в исходное состояние.
Содержание
- Ошибка iommu windows 10
- Обновление Windows 10 KB5001330 приносит очередные проблемы, включая BSOD
- реклама
- реклама
- реклама
- реклама
- Fix: HAL_IOMMU_INTERNAL_ERROR BSOD in Windows 10
- HAL_IOMMU_INTERNAL_ERROR Windows 10 Solutions
- 1] Disable Automatic Restart
- 2] Resolve all the Memory problems including poor areas in RAM
- 3] Update Drivers to fix HAL_IOMMU_INTERNAL_ERROR BSOD
- 4] Detect the Malware in Full System and dismiss them using Windows Security
- 5] Load the Basic Programs only by Booting Device in Safe Mode
- 6] Use Windows Blue Screen Troubleshooter to solve HAL_IOMMU_INTERNAL_ERROR
- 7] Delete the temporary and junk files from storage and make more space in it
- 8] Disconnect external Hard drives to fix HAL_IOMMU_INTERNAL_ERROR
- 9] Settle up the bad areas present in Hard Disk
- 10] Install available Update Patches to solve HAL IOMMU INTERNAL ERROR
- 11] Uninstall similar programs to eliminate conflicts
- 12] Undo recent changes by System Restore
- 13] Recover missing DLL files and corrupted resources using System File Checker
- 14] Uninstall the troublesome Windows Update
- 15] Remove all the Third Party Anti-Virus Programs
- 16] Run the DISM tool in Command Prompt for fixing defective Windows image files
Ошибка iommu windows 10
Конфа следующая.
Мама: ASUS ROG Strix Gaming B350-F.
Камень: AMD Ryzen 7 1700, разгон до 3.75 ГГц.
Память: Geil EVO X 16GB, разгон до 3 ГГц.
Охлад камня: Scythe Mugen 5 Rev. B.
Накопители: SSD Samsung EVO 860 Gb, SSD SiliconPower 1Tb на NVMe, HDD 1 Tb Toshiba.
Видеокарта: ASUS Radeon RX 580 AREZ 8 Gb, драйвер последний и свежий.
ОС: Windows 2004, обновился недавно, но на 1909 творилась та же история.
БП: Cougar VTE 600 80 бронза, куплен недавно (март 2020) на смену умирающему старому.
Предыстория. Брал где-то в марте взамен своей старой уже умирающей затычки Radeon HD 6450 (какие-то пропажи изображения и повторное его потом появление) новую — Radeon RX 5500 XT. Поставил, начались регулярные зелёные экраны, чёрные экраны и просто зависы, в журнале значился BSOD 0x0116 (драйвер видяхи), ну и за драйвера серии RX подобное поведение не очень удивительно. По совету, нагугленному в Интернете, вырубил всякие Radeon Anti-Lag и прочие моменты — зависты и экраны смерти прекратились напрочь. Но карточка всё равно очень странно дребезжала каким-то металлическим звуком в нагрузке и наблюдались необъяснимые падения FPS до 15-16, поэтому сдал карту обратно в DNS, взял взамен ASUS Radeon RX 580, окей. Месяц не мог нарадоваться, всё было отлично, и FPS стабильный на ультрах и работа стабильная.
Однако, радость была недолгой. Сейчас примерно раз в 2-3 дня появляется следующее: совершенно рандомно (не зависит от игр, может быть и во время сидения в браузере, и при работе в Кубейсе, а в играх пока за всё это время 1 раз повисло) появляется чёрный экран, звук немного глитчит, потом пропадает, компьютер в перезагрузку НЕ уходит, так и остаётся, пока не сделаешь хард ресет. Сообщения в системном журнале ничего внятного не показывают: БСОДы отсутствуют, т.е. и в журнале их нет, и через BlueScreenView ничего не видно (хотя настройки на сохранение автодампа стоят), в журнале чё-т там время от времени ругается DistributedCOM, но оно было и до начала проблем. После ручного перезапуска появляется в журнале сообщение «Инициализован отчет об ошибке IOMMU.» от источника HAL, но я нагуглить по этому вопросу ничего не смог, да и оно появляется после перезапуска.
Куда дальше копать? Пробовал снижать разгон оперативы и ЦП — разницы не почувствовал. Пока что вместо ультра-свежей версии драйверов на видеокарту установил ту, что предлагает сама Винда (она за сентябрь 2019-ого года), AMD Radeon Software вместе с ней не идёт, поглядим. родной софт там идёт, но тоже старый.
Тестил:
смарт-данные накопителей: без реаллокейтов/пендингов и прочих критических индикаторов;
в Furmark минут 10 — греется, правда, до 80, но без вылетов и бсодов, а так же Doom Eternal на ультрах часа 2 — тоже нормально;
MemTest — нерасширенный тест, пройдено, а ещё и системной утилитой попробовал — пройдено, в системном журнале Memorydiagnostics или как там его написал, что пройдено успешно.
occt, aida64 по минут 20 — пройдено.
UPDATE:
Переделал тест OCCT и Linpack.
В первый раз OCCT показал на 4-ой минуте 157 ошибок, остановил. Максимум: 67 градусов. И хотя на забугорных форумах пишут, что на райзенах первой генерации OCCT регулярно ошибки показывает, всё равно как-то это странно.
Запустил Linpack, 15 минут — чисто. Максимум — 68 градусов.
Второй раз запустил OCCT, 15 минут — чисто. Максимум — 68 градусов.
Power запустил на 6 минут — нагрелась видео до 79 градусов, ЦП примерно до 76, чипсет примерно так же, дальше мучать не стал.
Обновление Windows 10 KB5001330 приносит очередные проблемы, включая BSOD
В некоторых конфигурациях Windows 10 возникают серьезные проблемы из-за недавнего обновления под номером KB5001330. Пользователи сообщают о проблемах с установкой, проблемах с производительностью, временной ошибке профиля пользователя и предупреждении о сбое системы.
реклама
На этой неделе во вторник Microsoft выпустила новые накопительные обновления за апрель 2021 года для поддерживаемых версий ОС. Для версии 20H2/2004 Microsoft выпустила Windows 10 KB5001330, обязательное обновление безопасности, направленное на устранение ряда уязвимостей и проблем, вызванных предыдущим обновлением, включая проблемы с принтерами.
Согласно многочисленным сообщениям на сайтах социальных сетей, растет число пользователей, которые не могут установить последнее обновление Windows на свое оборудование. При попытке это сделать появляются ошибки: 0x800f081f, 0x800f0984.
Об ошибках при загрузке обновления KB5001330 сообщили многие пользователи в Центре отзывов.
реклама
«Я получаю постоянный сбой при установке KP5001330 с кодом ошибки 0x800f0984. Это происходит на Surface Studio 2 и Pro 7. Второй месяц подряд нельзя установить накопительное обновление на моих устройствах. Установка приостанавливается на 20%, затем снова на 73%, потом на 100%, затем происходит сбой», — отметил один из пользователей.
В редких случаях также может повторяться известная ошибка временного профиля пользователя. Последний раз об этой ошибке сообщалось в декабре, она создает новый профиль пользователя при загрузке операционной системы после применения накопительного обновления. В этом случае пользовательские файлы и настройки (например, обои) могут исчезнуть.
«После обновления я больше не могу войти в свой компьютер. В нем говорится, что службе профилей пользователей не удалось войти в систему. Профиль пользователя не может быть загружен», — пожаловался один пользователь.
«После обновления Windows предлагает войти в гостевой профиль», — другой пользователь подтвердил проблему.
реклама
К счастью, есть обходной путь для решения указанной проблемы. Необходимо либо откатить обновление, либо вручную переместить пользовательские файлы.
Кроме того, пользователи сообщают о сбоях в играх: графических артефактах и значительном падении частоты кадров, но проблему можно решить, удалив накопительное обновление вручную. Лишь некоторые пользователи сообщают об этих проблемах на форумах, и, похоже, они не так распространены, как другие ошибки.
Также многие сталкиваются с периодическими появлениями BSOD (синего экрана смерти)/
«Это обновление сломало Windows для меня и других. BSOD при обновлении сообщал, что определенного драйвера больше нет или он не поддерживается. Я восстановил Windows и обновился снова, затем BSOD на моем ПК повторился дважды за несколько часов. Я удалил обновление. Это случилось не только со мной, поэтому я бы посоветовал не устанавливать это обновление», — сообщил один из пользователей.
реклама
Если вы загрузили обновление April 2021 Patch Tuesday и столкнулись с какими-либо проблемами, лучший способ решить проблему — это удалить исправление, выполнив следующие действия:
1. Откройте приложение «Настройки»;
2. Нажмите «Обновление и безопасность»;
3. Нажмите «Центр обновления Windows»;
4. Нажмите «Просмотреть историю обновлений»;
5. Нажмите «Удалить обновления», затем выберите KB5001330, чтобы удалить его;
6. Перезагрузите компьютер.
На данный момент компания Microsoft никак не прокоментировала многочисленные жалобы пользователей.
Fix: HAL_IOMMU_INTERNAL_ERROR BSOD in Windows 10
You will find solutions to HAL_IOMMU_INTERNAL_ERROR Blue Screen of Death error in Windows 10 here. This BSOD issue having bugcheck value 0x000001D9 leads the desktop to freeze and hang. Frequent Reboot of PC also occurs when this stop error appears.
HAL IOMMU INTERNAL ERROR in Windows 10 mostly happens because of corrupt, old and incompatible device drivers. Conflicts between similar applications and malware infection are also the main reasons for this BSOD. Furthermore, if the system runs in memory problems, low disk space, problematic areas in HDD, corrupted Windows Image files even can cause the error. In the below section, we will be discussing some effective and proven workarounds they can potentially help to resolve HAL_IOMMU_INTERNAL_ERROR BSOD in Windows 10. See the list of workarounds first –
HAL_IOMMU_INTERNAL_ERROR Windows 10 Solutions
Here is how to fix HAL_IOMMU_INTERNAL_ERROR BSOD in Windows 10 –
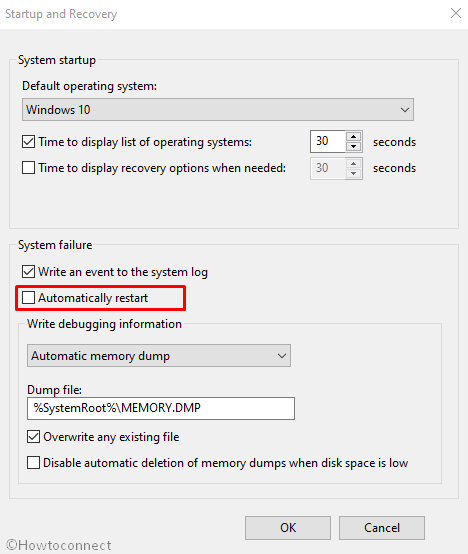
1] Disable Automatic Restart
With a confirmed HAL_IOMMU_INTERNAL_ERROR BSOD, Windows PC will have a tendency to perform Automatic restarting. This will be the most annoying problem you could ever come across. Unless this gets a fix, you cannot deploy other resolutions as well. Therefore, this solution comes at the top of the priority. Disabling the Automatic Restarting is not a complex job and you can proceed in the below steps –
Step-1: Navigate to the Desktop area after saving the running programs. Use Win+D hotkey press together and head to the place immediately.
Step-2: Perform a right click on This PC icon. Choose Properties option from there to allow opening the System window.
Step-3: When it is visible on the screen, select Advanced system settings from the left side of the window.
Step-4: As the System Properties wizard appears, click on Advanced tab.
Step-5: Scroll little down in the tab and reach Startup and Recovery section. When you see the Settings option here, hit straightway.
Step-6: After a new wizard appears, go to its System failure part and uncheck the box for “Automatically restart”
Step-7: Lastly, select the Ok to save these changes.

Now windows will not go for rebooting automatically. Hence, there will be enough opportunity for you to deploy the upcoming resolutions and resolve the issue accordingly.
2] Resolve all the Memory problems including poor areas in RAM
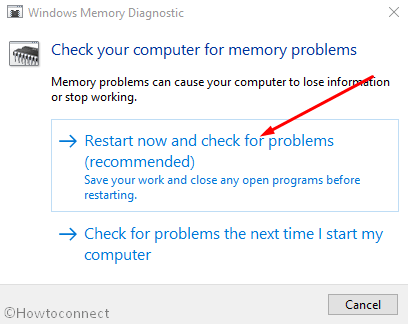
Windows can suffer from memory issue due to wrong allocation of it and the presence of poor segments in the RAM. With these sorts of problems in the Windows, BSOD errors like HAL_IOMMU_INTERNAL_ERROR commonly occur. Luckily, we have the Windows Memory Diagnostic to deal with these troubles and fix the errors. Let’s proceed to the handy utility in the below process –
- Make a together press of Windows and S keys and invoke Taskbar Search.
- In the empty text box located here, type “Memory” and wait for results to load finally.
- Select Windows Memory Diagnostic Desktop app from results to proceed.
- Select the option “Restart now and check for problems (recommended)”.
- Then windows will prepare for the first cycle of rebooting.
- Subsequently, you will find blue screen upfront detecting memory issues with the rate of progress in percentage.
- When the info shows 100%, windows will Restart for the second time.
- Finally, you can check the diagnosis report in the Notification area of the System Tray.
3] Update Drivers to fix HAL_IOMMU_INTERNAL_ERROR BSOD
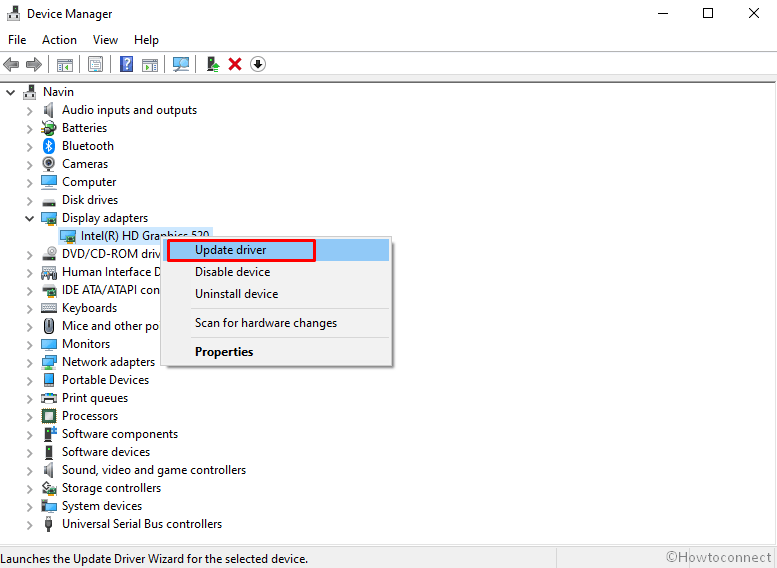
HAL_IOMMU_INTERNAL_ERROR BSOD is the result of outdated and corrupt device drivers mostly. Every time we come across a critical issue, they play a greater role there. We really should not allow such a driver on the computer which is old and defective. The Windows Device Manager is a top-notch app in this regard and it shows them with a yellow accent if needs to be updated. To accomplish the workaround, move with below steps –
- Right click on Start menu and choose Run to invoke the window.
- In the text box provided here, write devmgmt.msc and eventually hit Enter key.
- Device Manager will hit on display and you have to watch closely in the console for any exclamation marks in the device’s list.
- Prior to expanding the device, do a right click on the drivers having Yellow warning icon on it.
- Select Update driver option and follow the other guidelines coming to display until these all get updated.

4] Detect the Malware in Full System and dismiss them using Windows Security
All over the web, Malware is present and often it exists in disguise. You can be easy prey to them after making a visit to a website or clicking link coming in emails. Sometimes inserting a USB can also be risky. Once they get entrance to the system, cause the necessary files to be removed or infected. As a result, many issues come up including HAL_IOMMU_INTERNAL_ERROR. You can avoid this malignant consequence by making regular scanning in Windows security. The default tool can also dismiss all the threats in the most effective way. Follow the below guidelines to complete the task –
- Click on Show hidden icon arrow from the right side of the taskbar.
- Select Shield icon from there and let the system to open Windows Security app.
- Moving on to the App, select Virus & threat protection option.
- Now, perform a click on Scan options link to reveal available methods.
- Check the radio button allocated for Full scan and then select Scan now option.
- After the detection gets over, you will be shown a result. If there is any malware present, hit Clean threats option located here.
- Go to the next page, among three options, select Remove first and then Start actions to dismiss all these viruses.

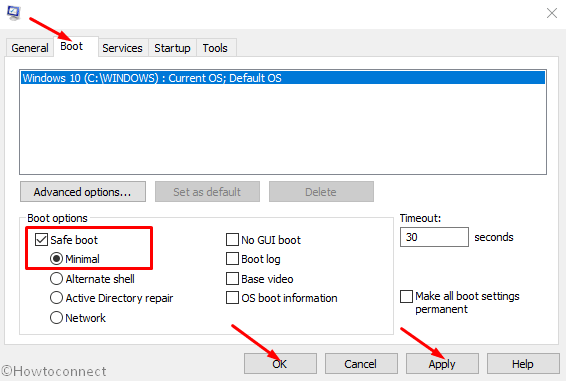
5] Load the Basic Programs only by Booting Device in Safe Mode
In all critical times, Booting in the Safe Mode came out as savior in Windows 10 including previous versions. In this startup procedure, the device starts with only the basic processes and hence, the problems get resolved immediately. Let’s give this renowned utility an attempt following below instruction –
Step#-1: Invoke Run dialog by pressing Win+R hotkeys together.
Step#-2: In the provided typing box, write msconfig using the keyboard and select System Configuration Desktop app once visible.
Step#-3: In the App UI, jump to Boot tab and straightway get at its second half.
Step#-4: Here, you can see the Boot options area. Now, check the box before Safe Boot and activate all the grayed out options.
Step#-5: Hit the radio button before Minimal option and proceed forward.
Step#-6: Select Apply button first and then Ok to save these changes.
Step#-7: Get inside of the Safe Mode on the further move.
6] Use Windows Blue Screen Troubleshooter to solve HAL_IOMMU_INTERNAL_ERROR
Since HAL IOMMU INTERNAL ERROR causes serious damages to the system, Microsoft technicians came up with a built-in tool for resolving this issue effectively. The utility named Blue Screen Troubleshooter and it is accessible through the settings app. Proceed with the below instructions to deploy the tool –
- Open Windows Settings app by pressing Win+I hotkeys altogether.
- From the app UI, head to Update & Security tile and eventually make a click on it.
- When the page loads completely, choose Troubleshoot located in the left pane and jump on the adjacent side.
- Reach out to Blue Screen there and expand it by clicking.
- Hit Run the Troubleshooter option from the extended pane.
The utility will now detect and fix all the Stop errors. In the end, there should not be any HAL_IOMMU_INTERNAL_ERROR in the system.
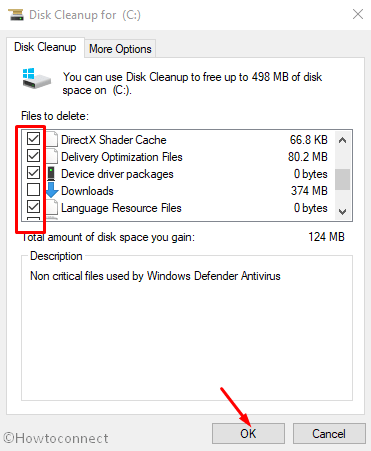
7] Delete the temporary and junk files from storage and make more space in it
Temporary files as stored in the Hard Disk, once grow bigger will occupy huge space in it. The ultimate result is, the storage runs in low space and operation get slow down. In the process, HAL_IOMMU_INTERNAL_ERROR also hitched up. Using Disk Cleanup tool can be thoroughly beneficial to delete the junks in one platform. Here is how to proceed –
- Open Run dialog box.
- In the search box provided, type cleanmgr and press Enter from keyboard.
- A small popup window will float in and ask you to choose preferable Drive to run a cleanup. Select C: by doing a click on dropdown menu and press Enter.
- Disk Cleanup Utility will come ahead slowly after calculating the space it can make free from the drive.
- When the wizard appears, come down to the bottom and do a click on Clean up system files.
- Once again, that small popup window will appear asking for the desired drive. Choose C: like before and press Enter key.
- When Disk Cleanup for C: comes ahead, reach Files to delete area.
- Check all the boxes available here and keep Downloads as it was.
- Hit Ok button and let the Cleanup start.
- Wait until this process ends automatically as this might take several minutes.
![]()
8] Disconnect external Hard drives to fix HAL_IOMMU_INTERNAL_ERROR
Some people come across HAL_IOMMU_INTERNAL_ERROR BSOD when an additional Hard Drive joins the system. Good news folks, Issue resolved easily as well just after disconnecting the external USB or other peripheral only. Follow the below guidelines and give a momentarily pause by disconnecting –
- Isolate all the Hardware accessories including the External HDD.
- Keep them separate and safe location to avoid damage.
- Now, restart the windows in the usual method.
- After completing the rebooting when you can see Desktop, make a check for the error.
- If resolved properly, start connecting them one after another.
- At this moment after connecting all, launch the web browser from windows.
- Perform a visit to Maker’s Webpage for each and Download the Latest drivers.
- Install the drivers in windows to use easily.
9] Settle up the bad areas present in Hard Disk
Prolonged use causes to form problematic areas inside a Disk Drive. When this happens, the system runs in various problems including HAL_IOMMU_INTERNAL_ERROR. The Disk Checking Utility comes handy to resolve these sectors automatically. See the method in details –
- Press Win+S to call in Taskbar search and type cmd.exe. When Command Prompt appears in the result, do a right click on it.
- Choose “Run as Administrator” and also select “Yes” Once UAC prompts for your consent.
- In the Black Elevated Prompt, type following syntax and parameters –
Press the Enter button when you have finished typing. This process will take little longer as we have added three more notations instead of chkdsk only which would show disk status only.
After the task is finished, Restart the device and upon coming back to operation, check if there is an error present.
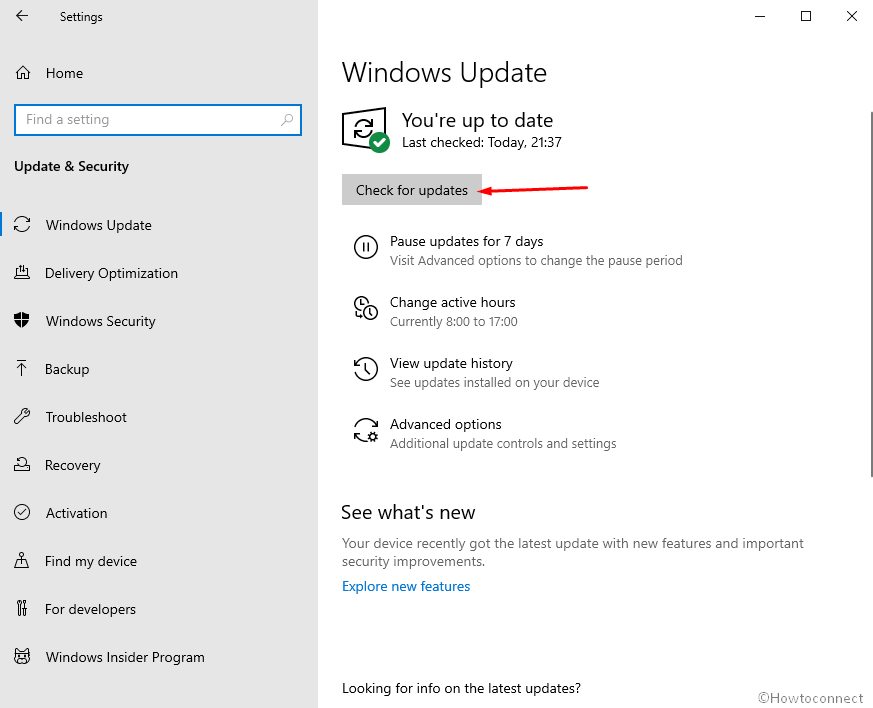
10] Install available Update Patches to solve HAL IOMMU INTERNAL ERROR
Any update patch contains fixing of existing bugs, quality improvements, the introduction of latest features. Installing these will give the OS a big blow and strength to fight with vulnerabilities like HAL IOMMU INTERNAL ERROR. An Outdated Windows 10 is prone to get affected always. Follow the below guidelines to install them –
- Manage to Load the Settings page of Update & Security as shown in the above workaround.
- Select Windows Update available in the left pane.
- Navigating to the corresponding right, make a click on Check for updates link ignoring “You’re up to date” dialogue.
- Upon finishing the downloading, click on Install.
- Reboot the Windows once asked and update the OS.

11] Uninstall similar programs to eliminate conflicts
Having the same applications often become risky they tend to collide with one another. Meanwhile, the necessary OS files get eradicated and HAL_IOMMU_INTERNAL_ERROR evolves. In these cases, Uninstalling comes ahead first. When we remove one of these, the action reduces the risk of collision between them. Follow the below guidelines to uninstall an App –
- Manage Access to Windows Settings app using any convenient method stated above.
- When in the Home page, roll the cursor to Apps and make a click on it eventually.
- On the next page after appears, choose Apps & features on the left wing and shift to the right.
- Once all the Apps be visible, reach out to applications colliding with each other.
- Select each and hit Uninstall option from the expanded pane.
- If User Account Control prompts for authentication, select Yes to proceed.
- Follow the on-screen guidelines until finally removed.
- Restart the device and once powers up next, do check for the error in the system.
- If resolved, you can Launch Microsoft Store and Download the deleted app again.
12] Undo recent changes by System Restore
Performing a System Restore directs you back to the state where you were. We often install an app or uninstall some for the necessity of work. These actions leave marks in Windows Registry and when they go wrong, HAL IOMMU INTERNAL ERROR is imminent. Therefore, to Undo these changes, perform the below tasks –
- Open the Taskbar search (commonly Win+S) using any of the above instruction.
- Type rstrui in the text area and hit the Enter button.
- Once the System Restore Wizard appears on the screen, select Next.
- From the consequent page, make a click on Show more restore points and reveal all the points you have created beforehand.
- Choose the last one in the list and make a click on Next.
- After the following page cuts your view, click Finish.
13] Recover missing DLL files and corrupted resources using System File Checker
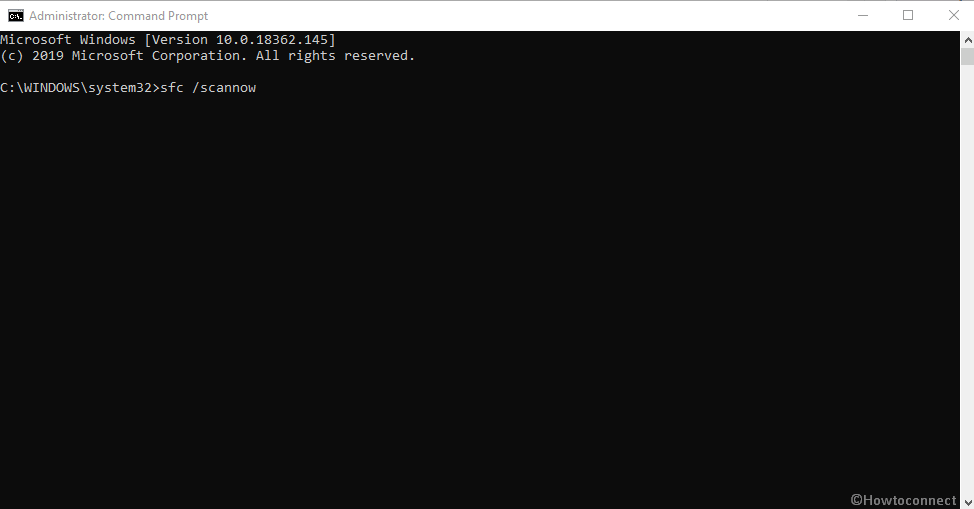
So many vulnerabilities occur in Windows 10 and sometimes in worst extent, system resources are erased. In the same way, DLL files often go missing. When these cases happen, HAL_IOMMU_INTERNAL_ERROR BSOD comes in. System File Checker comes handy to fix these components once executed in the Elevated Command Prompt. To access the utility, follow the below instructions –
- Open the Taskbar search by making together press on Win+S keys.
- In the search box given here, type cmd.exe and select Run as administrator from the right flyout.
- After User Account Control asks for your consent, provide approval by choosing Yes.
- On the Black Elevated Command Prompt window, type underneath code and hit Enter key –
- System File Checker will be activated and start detecting for file corruption and missing DLL ones. Fixing will also start automatically.
- Though this process is little time consuming, do not terminate abnormally and let it end by itself. After all these files are okay, there should not be any.

14] Uninstall the troublesome Windows Update
Sometimes Windows update creates the Blue screen HAL IOMMU INTERNAL ERROR. Uninstalling the files will be enough as to resolve the issue or prevent it. To complete the task, move with the following guidelines –
- Press Windows key.
- Once Start menu becomes visible on display, choose Gear cog.
- From App UI, move ahead to Update & Security and do a click on it.
- From the following page after loaded, select Windows Update and shift to the corresponding side.
- Here, perform a click on View update history link.
- Select Uninstall updates and let a window unroll from Control Panel.
- Reach the last received patch and do a right click on it.
- Select Uninstall and keep and follow on-screen instruction until they get removed completely.

15] Remove all the Third Party Anti-Virus Programs
In virus issues, you might have used a free anti-virus solution as a safeguard. This is okay until Windows Security arrives. Since the tool is the default for Windows 10 and also very effective, there is no need of using a third party program in this regard. Moreover, most of these programs, due to conflict, often cause HAL_IOMMU_INTERNAL_ERROR BSOD. Therefore, if you have such applications, uninstall using the following guidelines –
- Type appwiz.cpl in the Windows search and Enter
- Select Third Party Anti-virus app in the list.
- Hit Uninstall option visible at the top ribbon.
- Next steps will be as shown in the display until it gets uninstalled completely.
16] Run the DISM tool in Command Prompt for fixing defective Windows image files
When Windows Image files fall in corruption, it might cause HAL_IOMMU_INTERNAL_ERROR. As a fix, DISM tool will be best suited utility. Here is the procedure –
- Do a right click on Taskbar and select Task Manager from the appearing menu.
- From the app once loaded fully, select File located at the top left corner.
- Choose Run new task when seen and let Run dialog to appear.
- In the empty writing field, cmd and move down later on.
- Mark the checkbox below the Open saying “Create this task with administrative privileges”.
- After Pressing Enter key, you will be straightaway guided to Elevated Command Prompt.
- At the black window, type following command where a cursor winks –
DISM.exe /Online /Cleanup-image /Restorehealth
- Hit Enter key and let the Tool to fix corrupt Windows image files. The process may be lengthy, wait until it gets over automatically.
- When ends, Restart the windows and after coming back to operation, check of the error resolved.

Till this point, we have elaborated almost all the effective resolutions hoping to resolve HAL IOMMU INTERNAL ERROR in Windows 10. Hopefully, the issue is no more prevalent in your system and you are working smoothly. If the issue still persists, we can suggest only last resort – Reinstalling Windows 10. This will be the ultimate solution of all the existing problems and if done accurately, no issue will be evolving next. Follow – How to Clean Install Windows 10 May 2019 Update Version 1903.
Приветствую работяги!
Подскажите, вдруг кто сталкивался или знает как решить:Где то месяц назад нужно было обновить биос на новую версию. Биос успешно обновил, но после этого начал испытывать проблемы с перезагрузкой ПК в некоторых играх. То есть условно говоря, запускаю какую то игру, все работает, работает — потом БАЦ, перезагрузка. В некоторых играх перезагрузка происходит сразу после захода непосредственно в лобби/сервер/матч. При этом это не синий экран смерти, а просто обычный банальный ребут.
В обычное время ПК не перезагружается и работает в целом как часы. Во всяких программах типа Фотошопа, Лайтрума, для 3д модделинга тоже все нормМой пк:
Ryzen 7 3700x2070 Super
24 RAM
Power supply 700+Протестированные игры:
Спойлер
Warzone/Cold War, Dota 2, Destiny 2, GTFO, Cyberpunk 2077, Red Dead Online, GTA V — перезагрузок нет
Predator: Hunting Grounds(перезагрузка стабильно раз в 2 матча), RUST(перезагрузка где то через 1-2 минуты после захода на сервер), Necromunda:Hired Gun(перезагрузилась 1 раз за 20 часов игры), Biomutant(перезагрузилась пару раз за 10 часов игры)
Смотрел логи винды — никаких ошибок перезагрузки нет. Едиснтвенное что он пишет, так это ошибка в неком IOMMU:
Инициализован отчет об ошибке IOMMU.
Источник — HAL
Инициализован отчет об ошибке IOMMU.Почитав в интернете нашел что это нечто связанное с производительностью вирутальной машины, хотя я ее не юзаю.
Что пробовал еще:
- обновлял драйвера видеокарты — не помогло
- обновлял драйвера чипсета — не помогло
- обновлял винду — не помогло
- пробовал измерять и мониторить температуру проца и видюхи — все в пределах нормы
- пробовал даунгрейдить биос до дефолта и до версии которая была у меня изначально — не помогло
- пробовал запустить проверку памяти — не помогло
- пробовал менять память местами, запускать без одной плажки, менял их — не помогло
Думаю еще сделать стресс тест видуху и проца, чтобы наверняка
На этом больше ничего не пробовал. Находил в сети информацию что подобное может быть из за каких то проблем с напряжением, то есть например во время обработки данных условная видеокарта запрашивает большее напряжение чем ей разрешено использовать или типа того. Думал что возможно проблема с процом или видюхой, но чето маловероятно ибо в каких то играх все работает как часы, а в некоторых оно все падает.
Кто то советовал сделать андер волтаж проца, чтобы снизить пиковые частоты работы ЦПУ, но чет идея сомнительная ибо работает только турбобустинг, да и работает он при всех приложениях, так что будь проблем в этом, то он бы отрубался постоянно.Еще раз говорю, все началось после ОБНОВЛЕНИЯ биоса. То есть вероятно какой то параметр поменялся, но вот какой — история умалчивает
Вообщем вдруг кто сталкивался или знает как решить — буду премного благодарен!
You will find solutions to HAL_IOMMU_INTERNAL_ERROR Blue Screen of Death error in Windows 10 here. This BSOD issue having bugcheck value 0x000001D9 leads the desktop to freeze and hang. Frequent Reboot of PC also occurs when this stop error appears.
HAL IOMMU INTERNAL ERROR in Windows 10 mostly happens because of corrupt, old and incompatible device drivers. Conflicts between similar applications and malware infection are also the main reasons for this BSOD. Furthermore, if the system runs with memory problems, low disk space, problematic areas in HDD, corrupted Windows Image files it can face the error. In the below section, we will be discussing some effective and proven workarounds that can potentially help to resolve HAL_IOMMU_INTERNAL_ERROR BSOD in Windows 10. See the list of workarounds first –
Here is how to fix HAL_IOMMU_INTERNAL_ERROR BSOD in Windows 10 –
1] Disable Automatic Restart
With a confirmed HAL_IOMMU_INTERNAL_ERROR BSOD, Windows PC will have a tendency to perform Automatic restarting. This will be the most annoying problem you could ever come across. Unless this gets a fix, you cannot deploy other resolutions as well. Therefore, this solution comes at the top of the priority. Disabling the Automatic Restarting is not a complex job and you can proceed in the below steps –
Step-1: Navigate to the Desktop area after saving the running programs. Use Win+D hotkey press together and head to the place immediately.
Step-2: Right click on This PC icon. Choose Properties option from there to allow opening the System window.
Step-3: When it is visible on the screen, select Advanced system settings from the left side of the window.
Step-4: As the System Properties wizard appears, click on Advanced tab.
Step-5: Scroll a little down in the tab and reach Startup and Recovery section. When you see the Settings option here, hit it straightway.
Step-6: After a new wizard appears, go to its System failure part and uncheck the box for “Automatically restart”
Step-7: Lastly, select the Ok to save these changes.
Now windows will not go for rebooting automatically. Hence, there will be enough opportunity for you to deploy the upcoming resolutions and resolve the issue accordingly.
2] Resolve all the Memory problems including poor areas in RAM
Windows can suffer from memory issue due to wrong allocation of it and the presence of poor segments in the RAM. With these sorts of problems in the Windows, BSOD errors like HAL_IOMMU_INTERNAL_ERROR commonly occur. Luckily, we have the Windows Memory Diagnostic to deal with these troubles and fix the errors. Let’s proceed to the handy utility in the below process –
- Press Windows and S keys and invoke Taskbar Search.
- In the empty text box located here, type “Memory” and wait for results to load finally.
- Select Windows Memory Diagnostic Desktop app from the results to proceed.
- Select the option “Restart now and check for problems (recommended)”.
- Then windows will prepare for the first cycle of rebooting.
- Subsequently, you will find blue screen upfront detecting memory issues with the rate of progress in percentage.
- When the info shows 100%, windows will Restart for the second time.
- Finally, you can check the diagnosis report in the Notification area of the System Tray.

3] Update Drivers to fix HAL_IOMMU_INTERNAL_ERROR BSOD
HAL_IOMMU_INTERNAL_ERROR BSOD is the result of outdated and corrupt device drivers mostly. Every time we come across a critical issue, they play a greater role there. We really should not allow such a driver on the computer which is old and defective. The Windows Device Manager is a top-notch app in this regard and it shows them with a yellow accent if needs to be updated. To accomplish the workaround, move with below steps –
- Right click on Start menu and choose Run to invoke the window.
- In the text box provided here, write devmgmt.msc and eventually hit Enter key.
- Device Manager will hit on display and you have to watch closely in the console for any exclamation marks in the device’s list.
- Prior to expanding the device, right click on the drivers having Yellow warning icon on it.
- Select Update driver option and follow the other guidelines coming to display until these all get updated.
4] Detect the Malware in Full System and dismiss them using Windows Security
All over the web, Malware is present and often it exists in disguise. You can be easy prey to them after making a visit to a website or clicking link coming in emails. Sometimes inserting a USB can also be risky. Once they get entrance to the system, cause the necessary files to be removed or infected. As a result, many issues come up including HAL_IOMMU_INTERNAL_ERROR. You can avoid this malignant consequence by making regular scanning in Windows security. The default tool can also dismiss all the threats in the most effective way. Follow the below guidelines to complete the task –
- Click on Show hidden icon arrow from the right side of the taskbar.
- Select Shield icon from there and let the system open Windows Security app.
- Moving on to the App, select Virus & threat protection option.
- Now, click on Scan options link to reveal available methods.
- Check the radio button allocated for Full scan and then select Scan now option.
- After the detection gets over, you will be shown a result. If there is any malware present, hit Clean threats option located here.
- Go to the next page, among three options, select Remove first and then Start actions to dismiss all these viruses.

5] Load the Basic Programs only by Booting Device in Safe Mode
In all critical times, Booting in the Safe Mode came out as savior in Windows 10 including previous versions. In this startup procedure, the device starts with only the basic processes and hence, the problems get resolved immediately. Let’s give this renowned utility an attempt following below instructions –
Step#-1: Invoke Run dialog by pressing Win+R hotkeys together.
Step#-2: In the provided typing box, write msconfig using the keyboard and select System Configuration Desktop app once visible.
Step#-3: In the App UI, jump to Boot tab and straightway get at its second half.
Step#-4: Here, you can see the Boot options area. Now, check the box before Safe Boot and activate all the grayed out options.
Step#-5: Hit the radio button before Minimal option and proceed forward.
Step#-6: Select Apply button first and then Ok to save these changes.
Step#-7: Get inside of the Safe Mode on the further move.

6] Use Windows Blue Screen Troubleshooter to solve HAL_IOMMU_INTERNAL_ERROR
Since HAL IOMMU INTERNAL ERROR causes serious damages to the system, Microsoft technicians came up with a built-in tool for resolving this issue effectively. The utility named Blue Screen Troubleshooter and it is accessible through the settings app. Proceed with the below instructions to deploy the tool –
- Open Windows Settings app by pressing Win+I hotkeys altogether.
- From the app UI, head to Update & Security tile and eventually click on it.
- When the page loads completely, choose Troubleshoot located in the left pane, and jump on the adjacent side.
- Reach out to Blue Screen there and expand it by clicking.
- Hit Run the Troubleshooter option from the extended pane.
The utility will now detect and fix all the Stop errors. In the end, there should not be any HAL_IOMMU_INTERNAL_ERROR in the system.
7] Delete the temporary and junk files from storage and make more space in it
Temporary files as stored in the Hard Disk, once grow bigger will occupy huge space in it. The ultimate result is, the storage runs in low space and operation gets slow down. In the process, HAL_IOMMU_INTERNAL_ERROR also hitched up. Using Disk Cleanup tool can be thoroughly beneficial to delete the junks in one platform. Here is how to proceed –
- Open Run dialog box.
- In the search box provided, type cleanmgr and press Enter from keyboard.
- A small popup window will float in and ask you to choose preferable Drive to run a cleanup. Select C: by doing a click on dropdown menu and then press Enter.
- Disk Cleanup Utility will come ahead slowly after calculating the space it can make free from the drive.
- When the wizard appears, come down to the bottom and click on Clean up system files.
- Once again, that small popup window will appear asking for the desired drive. Choose C: like before and press Enter key.
- When Disk Cleanup for C: comes ahead, reach Files to delete area.
- Check all the boxes available here and keep Downloads as it was.
- Hit Ok button and let the Cleanup start.
- Wait until this process ends automatically as this might take several minutes.
8] Disconnect external Hard drives to fix HAL_IOMMU_INTERNAL_ERROR
Some people come across HAL_IOMMU_INTERNAL_ERROR BSOD when an additional Hard Drive joins the system. Good news folks, Issue resolved easily as well just after disconnecting the external USB or other peripheral only. Follow the below guidelines and give a momentarily pause by disconnecting –
- Isolate all the Hardware accessories including the External HDD.
- Keep them at a separate and safe location to avoid damage.
- Now, restart the windows in the usual method.
- After completing the rebooting when you can see Desktop, make a check for the error.
- If resolved properly, start connecting them one after another.
- At this moment after connecting all, launch the web browser from windows.
- Visit Maker’s Webpage for each and Download the Latest drivers.
- Install the drivers in windows to use easily.
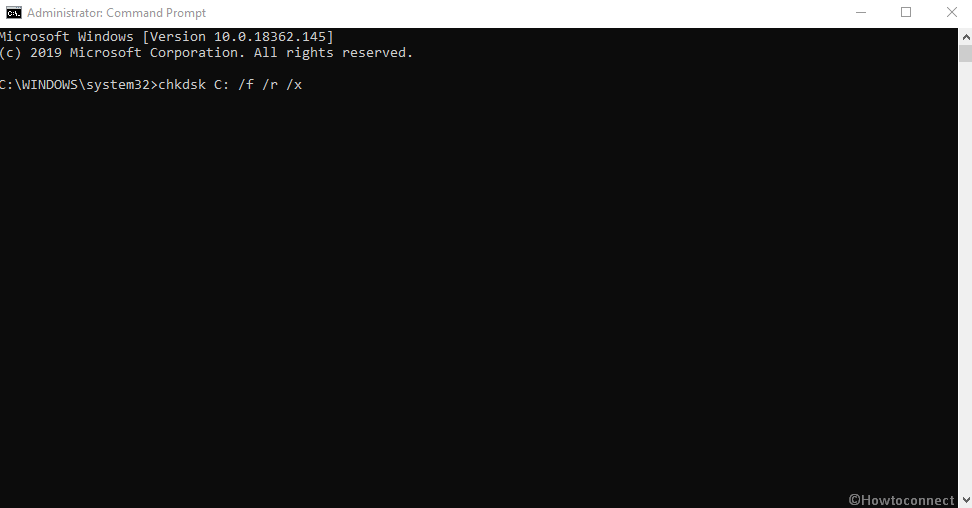
9] Settle up the bad areas present in Hard Disk
Prolonged use causes to form problematic areas inside a Disk Drive. When this happens, the system runs in various problems including HAL_IOMMU_INTERNAL_ERROR. The Disk Checking Utility comes handy to resolve these sectors automatically. See the method in detail –
- Press Win+S to call in Taskbar search and type cmd.exe. When Command Prompt appears in the result, right click on it.
- Choose “Run as Administrator” and also select “Yes” Once UAC prompts for your consent.
- In the Black Elevated Prompt, type following syntax and parameters –
chkdsk C: /f /r /x
- Press the Enter button when you have finished typing. This process will take a little longer as we have added three more notations instead of chkdsk only which would show disk status only.
- After the task is finished, Restart the device and upon coming back to operation, check if there is an error present.

10] Install available Update Patches to solve HAL IOMMU INTERNAL ERROR
Any update patch contains fixing of existing bugs, quality improvements, the introduction of latest features. Installing these will give the OS a big blow and strength to fight vulnerabilities like HAL IOMMU INTERNAL ERROR. An Outdated Windows 10 is prone to get affected always. Follow the below guidelines to install them –
- Manage to Load the Settings page of Update & Security as shown in the above workaround.
- Select Windows Update available in the left pane.
- Navigating to the corresponding right, click on Check for updates link ignoring “You’re up to date” dialogue.
- Upon finishing the downloading, click on Install.
- Reboot the Windows once asked and update the OS.
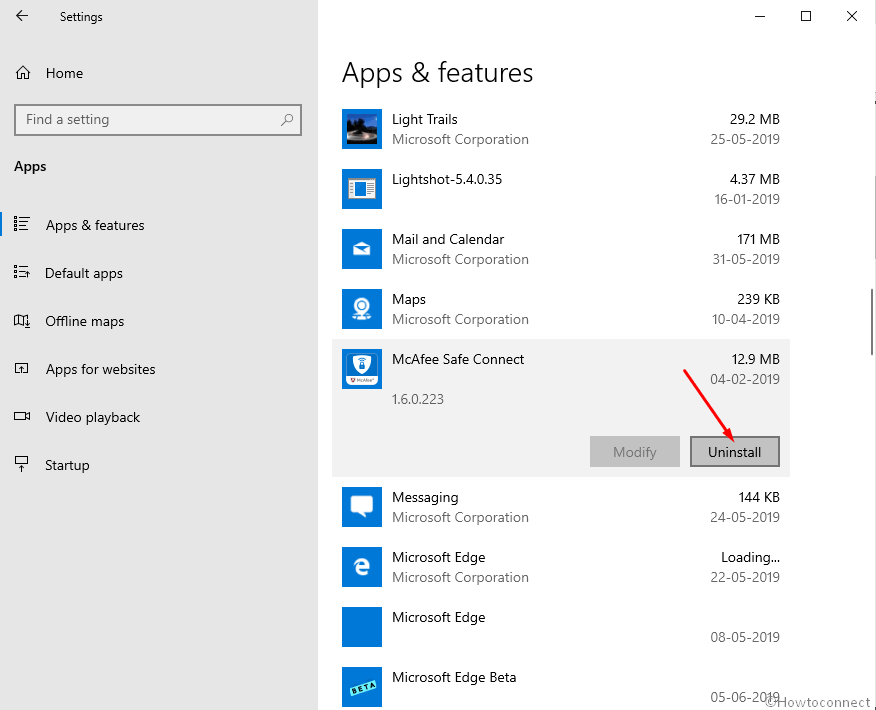
11] Uninstall similar programs to eliminate conflicts
Having the same applications often become risky they tend to collide with one another. Meanwhile, the necessary OS files get eradicated and HAL_IOMMU_INTERNAL_ERROR evolves. In these cases, uninstalling comes ahead first. When we remove one of these, the action reduces the risk of collision between them. Follow the below guidelines to uninstall an App –
- Access Windows Settings app using any convenient method stated above.
- When on the Home page, roll the cursor to Apps and click on it eventually.
- On the next page after appears, choose Apps & features on the left wing and shift to the right.
- Once all the Apps be visible, reach out to applications colliding with each other.
- Select each and hit Uninstall option from the expanded pane.
- If User Account Control prompts for authentication, select Yes to proceed.
- Follow the on-screen guidelines until finally removed.
- Restart the device and once powers up next, do check for the error in the system.
- If resolved, you can Launch Microsoft Store and Download the deleted app again.
12] Undo recent changes by System Restore
Performing a System Restore directs you back to the state where you were. We often install an app or uninstall some for the necessity of work. These actions leave marks in Windows Registry and when they go wrong, HAL IOMMU INTERNAL ERROR is imminent. Therefore, to Undo these changes, perform the below tasks –
- Open the Taskbar search (commonly Win+S) using any of the above instructions.
- Type rstrui in the text area and hit the Enter button.
- Once the System Restore Wizard appears on the screen, select Next.
- From the consequent page, click on Show more restore points and reveal all the points you have created beforehand.
- Choose the last one in the list and click on Next.
- After the following page cuts your view, click Finish.
13] Recover missing DLL files and corrupted resources using System File Checker
So many vulnerabilities occur in Windows 10 and sometimes in worst extent, system resources are erased. In the same way, DLL files often go missing. When these cases happen, HAL_IOMMU_INTERNAL_ERROR BSOD comes in. System File Checker comes handy to fix these components once executed in the Elevated Command Prompt. To access the utility, follow the below instructions –
- Open the Taskbar search by pressing on Win+S keys.
- In the search box given here, type cmd.exe and select Run as administrator from the right flyout.
- After User Account Control asks for your consent, provide approval by choosing Yes.
- On the Black Elevated Command Prompt window, type underneath code and hit Enter key –
sfc /scannow
- System File Checker will be activated and start detecting file corruption and missing DLL ones. Fixing will also start automatically.
- Though this process is a little time-consuming, do not terminate abnormally and let it end by itself. After all these files are okay, there should not be any.
14] Uninstall the troublesome Windows Update
Sometimes Windows update creates the Blue screen HAL IOMMU INTERNAL ERROR. Uninstalling the files will be enough as to resolve the issue or prevent it. To complete the task, move with the following guidelines –
- Press Windows key.
- Once Start menu becomes visible on display, choose Gear cog.
- From App UI, move ahead to Update & Security and click on it.
- From the following page after loaded, select Windows Update and shift to the corresponding side.
- Click on View update history link.
- Select Uninstall updates and let a window unroll from Control Panel.
- Reach the last received patch and do a right click on it.
- Select Uninstall and follow on-screen instructions until they get removed completely.
15] Remove all the Third Party Anti-Virus Programs
In virus issues, you might have used a free anti-virus solution as a safeguard. This is okay until Windows Security arrives. Since the tool is the default for Windows 10 and also very effective, there is no need of using a third party program in this regard. Moreover, most of these programs, due to conflict, often cause HAL_IOMMU_INTERNAL_ERROR BSOD. Therefore, if you have such applications, uninstall using the following guidelines –
- Type appwiz.cpl in the Windows search and Enter
- Select Third Party Anti-virus app in the list.
- Hit Uninstall option visible at the top ribbon.
- Next steps will be as shown in the display until it gets uninstalled completely.

16] Run the DISM tool in Command Prompt for fixing defective Windows image files
When Windows Image files fall into corruption, it might cause HAL_IOMMU_INTERNAL_ERROR. As a fix, DISM tool will be the best-suited utility. Here is the procedure –
- Rght click on Taskbar and select Task Manager from the appearing menu.
- From the app once loaded fully, select File located at the top left corner.
- Choose Run new task when seen and let Run dialog appear.
- In the empty writing field, cmd and move down later on.
- Mark the checkbox below the Open saying “Create this task with administrative privileges”.
- After Pressing Enter key, you will be straightaway guided to Elevated Command Prompt.
- At the black window, type following command where a cursor winks –
DISM.exe /Online /Cleanup-image /Restorehealth
- Hit Enter key and let the Tool fix corrupt Windows image files. The process may be lengthy, wait until it gets over automatically.
- When ends, Restart the windows and after coming back to operation, check if the error resolved.
Till this point, we have elaborated almost all the effective resolutions hoping to resolve HAL IOMMU INTERNAL ERROR in Windows 10. Hopefully, the issue is no more prevalent in your system and you are working smoothly. If the issue still persists, we can suggest only the last resort – Reinstalling Windows 10. This will be the ultimate solution to all the existing problems and if done accurately, no issue will be evolving next.
Methods:
1] Disable Automatic Restart
2] Resolve all the Memory problems
3] Update Drivers
4] Detect the Malware in Full System
5] Load the Basic Programs only by Booting Device in Safe Mode
6] Use Windows Blue Screen Troubleshooter
7] Delete the temporary and junk files
8] Disconnect external Hard drives
9] Settle up the bad areas present in Hard Disk
10] Install available Update Patches
11] Uninstall similar programs to eliminate conflicts
12] Undo recent changes by System Restore
13] Recover missing DLL files and corrupted resources using System File Checker
14] Uninstall the troublesome Windows Update
15] Remove all the Third Party Anti-Virus Programs
16] Run the DISM tool
That’s all!!
Repair any Windows problems such as Blue/Black Screen, DLL, Exe, application, Regisrty error and quickly recover system from issues using Reimage.
Question The iommu fault reporting has been initialized.
-
Thread starterSadz_Mas
-
Start dateMay 5, 2022
You are using an out of date browser. It may not display this or other websites correctly.
You should upgrade or use an alternative browser.
![]()
-
#1
Yesterday while playing valorant i pressed windows button and opened twitch on chrome and the stream got stuck and nothing except my mouse was working and same happed today my pc screen went back i was able to hear background sound but my screen went black until i have to hold power button for 10 sec.Both days i check and the error code i got was ‘The iommu fault reporting has been initialized.’I dont actually what it means please help please
![]()
-
- Jun 12, 2015
-
- 62,268
-
- 5,464
-
- 168,090
-
#2
event ID 16 HAL
Input-Output Memory Management Unit
https://en.wikipedia.org/wiki/Input–output_memory_management_unit
Seems to tie into USB devices, especially Bluetooth mice — could be a conflict with wifi
seems to be linked to a bugcheck
Can you follow option one on the following link — here — and then do this step below: Small memory dumps — Have Windows Create a Small Memory Dump (Minidump) on BSOD — that creates a file in c windows/minidump after the next BSOD
- Open Windows File Explore
- Navigate to C:WindowsMinidump
- Copy the mini-dump files out onto your Desktop
- Do not use Winzip, use the built in facility in Windows
- Select those files on your Desktop, right click them and choose ‘Send to’ — Compressed (zipped) folder
- Upload the zip file to the Cloud (OneDrive, DropBox . . . etc.)
- Then post a link here to the zip file, so we can take a look for you . . .
![]()
-
#3
I cant find a mini dump folder in c/windows folder but i ran memtest86 and found no errors from my ram,And i have these issues after installing an old geforce driver 496.13 so can nvidia drivers cause such freezes and these error(error 16)
![]()
-
- Jun 12, 2015
-
- 62,268
-
- 5,464
-
- 168,090
-
#4
its possible
Try running DDU in safe mode and reinstall GPU drivers.
How To — How to perform a CLEAN install of your video card drivers.
Updated 9-19-19 How to do a CLEAN install of your graphics card drivers using the Wagnard tools Display Driver Uninstaller A major issue on many systems is the presence of multiple graphics card drivers or drivers that have been incompletely uninstalled followed by the installation of…
![]()
forums.tomshardware.com
![]()
![]()
-
- Jun 12, 2015
-
- 62,268
-
- 5,464
-
- 168,090
-
#6
Did you try DDU?
Looking further, I don’t think that message is reason for error, it just occurs at startup. Its not an error.
what events happen before the event 41(63)?
what are specs of the PC?
your discord links don’t work.
how long you run 2 different sticks together?
https://www.userbenchmark.com/UserRun/52380933
do you freeze up using just the 16gb stick?
![]()
-
#7
The events which happened after event 41 are: 6,6,98,6,6,6,6013,6005,6009,6008,16,20,30,27,25,238,20,32,18,32,18,29,153,12
My pc specs are:
Processor-AMD RYZEN 5 5600X
GPU-GTX 1060 6GB
RAM-CORSAIR C18 3600MHZ RAM (16,8)
MOTHERBOARD-ASUS TUF B550 GAMING PLUS
STORAGE-NVME SSD 250GB
I have been using these ram sticks for about three months havent faced any issues before idk what is the issue
![]()
-
- Jun 12, 2015
-
- 62,268
-
- 5,464
-
- 168,090
-
#8
you mean it didn’t fix it?
it probably means cause is hardware
Ryzen 5 5600X
Asus TUF Gaming B550 Gaming (Which BIOS?) appears to be dated 25th Feb 2022
24gb ram
1 x 16gb CMK16GX4M1Z3600C18
1 x 8gb CMK8GX4M1Z3600C18
GPU — GTX 1060
SSD — WD SN750 250gb
how long you used 2 sticks together?
what PSU do you have?
![]()
-
#9
The bios i have been using is 2604,I have been using these ram sticks for about three months now and the psu is corsair vs650 and also to mention i ram memtest86 on each ram individually and found no errors is it my processor causing these freezes
![]()
-
- Jun 12, 2015
-
- 62,268
-
- 5,464
-
- 168,090
![]()
-
#11
For how long should i run the tests and my cpu is just 6 to 7 months old how can it go bad,Did you find anything from the event ids and is this event 29 related to these freeze it says ‘Windows failed fast startup with error status 0xC00000D4.’
![]()
-
- Jun 12, 2015
-
- 62,268
-
- 5,464
-
- 168,090
-
#12
event id alone aren’t enough to tell me anything. A lot of them aren’t problems
I have found age doesn’t really mean a lot when it comes to parts, they can die anytime from 0 to 10 years.
Prime will take a while so I would run it overnight.
if it finishes before you wake up, it will create a file called stress.txt in the folder its installed in.
![]()
-
#13
I forgot to mention a thing everytime my pc freezes i can hear background game audio even i can hear my friends on discord and talk to them as well
![]()
-
- Jun 12, 2015
-
- 62,268
-
- 5,464
-
- 168,090
-
#14
Did you run DDU?
can you look in reliability history at the days it goes blank? it might show errors here.
I don’t know if the freeze is the GPU drivers or the NVMe
what brand NVMe is it?
![]()
-
#15
Yes I ran DDU and installed other driver but same issue,The nvme i use is wd blue sn570.One thing i request you is if the freezes are caused by processor side i would get a blue screen and my pc would completely be frozen but i can still here discord in-game sound etc,How can i test my nvme
![]()
-
- Jun 12, 2015
-
- 62,268
-
- 5,464
-
- 168,090
![]()
![]()
-
- Jun 12, 2015
-
- 62,268
-
- 5,464
-
- 168,090
-
#18
can you look in reliability history at the days it goes blank?
it might show errors here. since windows isn’t freezing completely. you can move mouse around, and hear noise. So its just the GPU?
passes memtest
drives seem okay
ddu doesn’t fix it
latest sane bios (there is a beta)
![]()
![]()
-
- Jun 12, 2015
-
- 62,268
-
- 5,464
-
- 168,090
-
#21
whats the failed windows update?
got latest version of armory’?
no real signs there. the windows shutdowns probably result of you turning PC off to get picture back.
No sign its the gpu driver
41(63) happens after the restart, its a reaction to the shutdown. So you would need to look at events in the moments before it happens, as they probably relate to previous shutdown.
![]()
![]()
-
- Jun 12, 2015
-
- 62,268
-
- 5,464
-
- 168,090
![]()
![]()
-
- Jun 12, 2015
-
- 62,268
-
- 5,464
-
- 168,090
-
#25
Has the problem happened today?
any extra USB devices?
any USB WIFI cards?
any speakers?
any old parts that have always worked fine before?
possible USB is tripping off screen, as the part of system that controls Graphics is also responsible for wifi and and USB. They can all mess with each other.
if windows isn’t seeing a conflict it makes it hard to figure out cause. All we have is symptoms.
I would be tempted to just run with 16gb of ram and just see if it makes any difference.
Similar threads
- Advertising
- Cookies Policies
- Privacy
- Term & Conditions
Crysty
Пользователь
Регистрация:
23.06.2014
Сообщения: 1249
Рейтинг: 440

Регистрация:
23.06.2014
Сообщения: 1249
Рейтинг: 440
Приветствую работяги!
Подскажите, вдруг кто сталкивался или знает как решить:
Где то месяц назад нужно было обновить биос на новую версию. Биос успешно обновил, но после этого начал испытывать проблемы с перезагрузкой ПК в некоторых играх. То есть условно говоря, запускаю какую то игру, все работает, работает — потом БАЦ, перезагрузка. В некоторых играх перезагрузка происходит сразу после захода непосредственно в лобби/сервер/матч. При этом это не синий экран смерти, а просто обычный банальный ребут.
В обычное время ПК не перезагружается и работает в целом как часы. Во всяких программах типа Фотошопа, Лайтрума, для 3д модделинга тоже все норм
Мой пк:
Ryzen 7 3700x
2070 Super
24 RAMPower supply 700+Протестированные игры:
Спойлер
Warzone/Cold War, Dota 2, Destiny 2, GTFO, Cyberpunk 2077, Red Dead Online, GTA V — перезагрузок нет
Predator: Hunting Grounds(перезагрузка стабильно раз в 2 матча), RUST(перезагрузка где то через 1-2 минуты после захода на сервер), Necromunda:Hired Gun(перезагрузилась 1 раз за 20 часов игры), Biomutant(перезагрузилась пару раз за 10 часов игры)
Смотрел логи винды — никаких ошибок перезагрузки нет. Едиснтвенное что он пишет, так это ошибка в неком IOMMU:
Инициализован отчет об ошибке IOMMU.
Источник — HAL
Инициализован отчет об ошибке IOMMU.
Почитав в интернете нашел что это нечто связанное с производительностью вирутальной машины, хотя я ее не юзаю.
Что пробовал еще:
- обновлял драйвера видеокарты — не помогло
- обновлял драйвера чипсета — не помогло
- обновлял винду — не помогло
- пробовал измерять и мониторить температуру проца и видюхи — все в пределах нормы
- пробовал даунгрейдить биос до дефолта и до версии которая была у меня изначально — не помогло
- пробовал запустить проверку памяти — не помогло
- пробовал менять память местами, запускать без одной плажки, менял их — не помогло
Думаю еще сделать стресс тест видуху и проца, чтобы наверняка
На этом больше ничего не пробовал. Находил в сети информацию что подобное может быть из за каких то проблем с напряжением, то есть например во время обработки данных условная видеокарта запрашивает большее напряжение чем ей разрешено использовать или типа того. Думал что возможно проблема с процом или видюхой, но чето маловероятно ибо в каких то играх все работает как часы, а в некоторых оно все падает.Кто то советовал сделать андер волтаж проца, чтобы снизить пиковые частоты работы ЦПУ, но чет идея сомнительная ибо работает только турбобустинг, да и работает он при всех приложениях, так что будь проблем в этом, то он бы отрубался постоянно.Еще раз говорю, все началось после ОБНОВЛЕНИЯ биоса. То есть вероятно какой то параметр поменялся, но вот какой — история умалчиваетВообщем вдруг кто сталкивался или знает как решить — буду премного благодарен!

Регистрация:
06.10.2015
Сообщения: 8624
Рейтинг: 3035
Нарушения: 105

Crysty сказал(а):↑
Приветствую работяги!
Подскажите, вдруг кто сталкивался или знает как решить:
Где то месяц назад нужно было обновить биос на новую версию. Биос успешно обновил, но после этого начал испытывать проблемы с перезагрузкой ПК в некоторых играх. То есть условно говоря, запускаю какую то игру, все работает, работает — потом БАЦ, перезагрузка. В некоторых играх перезагрузка происходит сразу после захода непосредственно в лобби/сервер/матч. При этом это не синий экран смерти, а просто обычный банальный ребут.
В обычное время ПК не перезагружается и работает в целом как часы. Во всяких программах типа Фотошопа, Лайтрума, для 3д модделинга тоже все норм
Мой пк:
Ryzen 7 3700x
2070 Super
24 RAM
Power supply 700+
Протестированные игры:
Спойлер
Warzone/Cold War, Dota 2, Destiny 2, GTFO, Cyberpunk 2077, Red Dead Online, GTA V — перезагрузок нет
Predator: Hunting Grounds(перезагрузка стабильно раз в 2 матча), RUST(перезагрузка где то через 1-2 минуты после захода на сервер), Necromunda:Hired Gun(перезагрузилась 1 раз за 20 часов игры), Biomutant(перезагрузилась пару раз за 10 часов игры)
Смотрел логи винды — никаких ошибок перезагрузки нет. Едиснтвенное что он пишет, так это ошибка в неком IOMMU:
Инициализован отчет об ошибке IOMMU.
Источник — HAL
Инициализован отчет об ошибке IOMMU.
Почитав в интернете нашел что это нечто связанное с производительностью вирутальной машины, хотя я ее не юзаю.
Что пробовал еще:
- обновлял драйвера видеокарты — не помогло
- обновлял драйвера чипсета — не помогло
- обновлял винду — не помогло
- пробовал измерять и мониторить температуру проца и видюхи — все в пределах нормы
- пробовал даунгрейдить биос до дефолта и до версии которая была у меня изначально — не помогло
- пробовал запустить проверку памяти — не помогло
- пробовал менять память местами, запускать без одной плажки, менял их — не помогло
Думаю еще сделать стресс тест видуху и проца, чтобы наверняка
На этом больше ничего не пробовал. Находил в сети информацию что подобное может быть из за каких то проблем с напряжением, то есть например во время обработки данных условная видеокарта запрашивает большее напряжение чем ей разрешено использовать или типа того. Думал что возможно проблема с процом или видюхой, но чето маловероятно ибо в каких то играх все работает как часы, а в некоторых оно все падает.
Кто то советовал сделать андер волтаж проца, чтобы снизить пиковые частоты работы ЦПУ, но чет идея сомнительная ибо работает только турбобустинг, да и работает он при всех приложениях, так что будь проблем в этом, то он бы отрубался постоянно
Вообщем вдруг кто сталкивался или знает как решить — буду премного благодарен!
Нажмите, чтобы раскрыть…
Чо по напряжениям бп? Просадки есть под нагрузкой?
Какой вообще бпшник?

Регистрация:
10.05.2013
Сообщения: 5324
Рейтинг: 2640
![]()
БП вероятнее всего
И вероятность дуратского биоса видюхи тоже есть, но вряд ли на 2070
Crysty
Пользователь
Регистрация:
23.06.2014
Сообщения: 1249
Рейтинг: 440
Регистрация:
23.06.2014
Сообщения: 1249
Рейтинг: 440
Ra(ägyptischer Gott sonne) сказал(а):↑
БП вероятнее всего
И вероятность дуратского биоса видюхи тоже есть, но вряд ли на 2070
Нажмите, чтобы раскрыть…
ну я тоже думал что бп, но проблемы начались именно после апдейта родного биоса матери на более новый. До этого все работало прекрасно
Tizik
Супермодератор
Регистрация:
04.08.2014
Сообщения: 8042
Рейтинг: 5869

Регистрация:
04.08.2014
Сообщения: 8042
Рейтинг: 5869
Crysty сказал(а):↑
ну я тоже думал что бп, но проблемы начались именно после апдейта родного биоса матери на более новый. До этого все работало прекрасно
Нажмите, чтобы раскрыть…
так откати биос
Crysty
Пользователь
Регистрация:
23.06.2014
Сообщения: 1249
Рейтинг: 440
Регистрация:
23.06.2014
Сообщения: 1249
Рейтинг: 440
Tizik сказал(а):↑
Нажмите, чтобы раскрыть…
откатывал до дефолта и до изначальной версии которая была при покупке матери. Проблема не пропала
Регистрация:
10.05.2013
Сообщения: 5324
Рейтинг: 2640
![]()
Сменил биос — появилась проблема
Вернул старый — проблема осталасьСтранноЯ щас совсем тупую банальную хрень предложу.Поменяй сата слот на материнке от дисков, и переставь оперативку местами
Tizik
Супермодератор
Регистрация:
04.08.2014
Сообщения: 8042
Рейтинг: 5869
Регистрация:
04.08.2014
Сообщения: 8042
Рейтинг: 5869
Crysty сказал(а):↑
ну завтра еще проведу пару тестов, сообщу. Блок чифтековский на 700 или на 700+, нужно будет уточнить, а то так не помню
откатывал до дефолта и до изначальной версии которая была при покупке матери. Проблема не пропала
Нажмите, чтобы раскрыть…
А второй биос у материнки есть?
Crysty
Пользователь
Регистрация:
23.06.2014
Сообщения: 1249
Рейтинг: 440
Регистрация:
23.06.2014
Сообщения: 1249
Рейтинг: 440
Ra(ägyptischer Gott sonne) сказал(а):↑
Сменил биос — появилась проблема
Вернул старый — проблема осталась
Странно
Я щас совсем тупую банальную хрень предложу.
Поменяй сата слот на материнке от дисков, и переставь оперативку местами
Нажмите, чтобы раскрыть…
делал, не помогло. Тут больше похоже что при обновлении на новую версию, какие то параметры поменялись, типа настройки электропитания. Прикол в том что часть этих настроек не поменяются обратно при сбросе/даунгрейде биоса
Регистрация:
10.05.2013
Сообщения: 5324
Рейтинг: 2640
![]()
Crysty сказал(а):↑
делал, не помогло. Тут больше похоже что при обновлении на новую версию, какие то параметры поменялись, типа настройки электропитания. Прикол в том что часть этих настроек не поменяются обратно при сбросе/даунгрейде биоса
Нажмите, чтобы раскрыть…
Ну настройки электропитания есть в винде, и в биоса сберегайки всякие, пробовал их шевелить?
Crysty
Пользователь
Регистрация:
23.06.2014
Сообщения: 1249
Рейтинг: 440
Регистрация:
23.06.2014
Сообщения: 1249
Рейтинг: 440
Ra(ägyptischer Gott sonne) сказал(а):↑
Ну настройки электропитания есть в винде, и в биоса сберегайки всякие, пробовал их шевелить?
Нажмите, чтобы раскрыть…
не не, я имел ввиду что могли поменяться настройки напряжения, или какой нибудь уровень LLC. Само электро питание выставлено на макс произхводительность, а смена режима не приносит успехов
Tizik
Супермодератор
Регистрация:
04.08.2014
Сообщения: 8042
Рейтинг: 5869
Регистрация:
04.08.2014
Сообщения: 8042
Рейтинг: 5869
Crysty сказал(а):↑
нет, увы, у меня мать от асусов(асус прайм б450), у них вроде нет такой фишки как у гигабайтов
Нажмите, чтобы раскрыть…
разгонял что-то?
Crysty
Пользователь
Регистрация:
23.06.2014
Сообщения: 1249
Рейтинг: 440
Регистрация:
23.06.2014
Сообщения: 1249
Рейтинг: 440
Что я планирую сделать:
Попробую завтра сделать стресс тесты проца и видюхи и параллельно промониторить напряжение на них, может увижу какие то дропы. Потом думаю поиграться с LLC и отключить IOMMU(по дефолту он вроде включен в биосе) ибо у меня не используются никакие вирутальные машины. Ибо при ребуте он инициирует ошибку именно с IOMMU
Tizik сказал(а):↑
Нажмите, чтобы раскрыть…
сам лично нет. Заметил только что проц по кд работает на максимальной частоте или на близкой к ней, то есть 4,2-4,4, то есть включен турбобустинг, он же вообщем то авторазгон. Это было включено все и до обновы биосы и работало как часы
Crysty
Пользователь
Регистрация:
23.06.2014
Сообщения: 1249
Рейтинг: 440
Регистрация:
23.06.2014
Сообщения: 1249
Рейтинг: 440
Ra(ägyptischer Gott sonne) сказал(а):↑
Ну настройки электропитания есть в винде, и в биоса сберегайки всякие, пробовал их шевелить?
Нажмите, чтобы раскрыть…
забыл ответить нормально на это. Менял это все еще сразу как только появился первый ребут, то есть почти месяц назад — результатов ноль
Регистрация:
10.05.2013
Сообщения: 5324
Рейтинг: 2640
![]()
Crysty сказал(а):↑
вообщем, если до сих пор интересно, то вот делал:
делал стресс тест проца, видюхи и общий стресс тест цпю+гпю+цепи питания матери+блок питания в OCCT. Забавно что проблем при тесте никаких)) Все работает стабильно, без проблем, температруа в норме. Потребляемая энергия на 100% нагрузки у ГПЮ порядка 200-230 W, у проца от 65-75, что тоже в целом в пределах нормы.
Пробовал заново обновить чипсет с оф сайта АМД и после этого отключить PBO(он же буст оввердрайв). Затем протестил еще раз в Predator: Hunting Grounds — увы, безуспешно, каждый раз ловил ребут.
Сейчас перепроверил все на физ повреждения, но ничего интересного не нашел — конденсаторы везде в норме, все кабеля присоединены. На всякий случай все переподключил.
Теперь планирую попробовать заменить совй чифтек на другой чифтек, а также возможно протестировать все на другой матери. Но до сих пор не понимаю как от обновления биоса могло пойти столько проблем, если по идее он не должен затрагивать никакие пользовательские параметры…
забыл ответить нормально на это. Менял это все еще сразу как только появился первый ребут, то есть почти месяц назад — результатов ноль
Нажмите, чтобы раскрыть…
Тебе нужно именно линию по 12 вольтам проверить
Отклонения с 0.5 вроде норм, но больше в одну или другую сторону — капут Это надо уточнить
metro (2)
Пользователь
Регистрация:
08.05.2021
Сообщения: 4
Рейтинг: 0
![]()
Регистрация:
08.05.2021
Сообщения: 4
Рейтинг: 0
по температуре что показывает,охлаждается чем?в пред.биосе такого не было?пробовал сбросить настройки БИОСа?лично я думаю проблема либо в биосе или перегрев если с охладом все норм то откатывай биос,кстати может кому-то спасу время и нервы не обновляйтесь на последнюю версию драйвера нвидиа,через минут 15-20 квадратики крч там накосячили с драйверами так что откатывайтесь если обновили примерно текст ошибки что-то DPC_WATCHDOG_VIOLATION потом винда синий экран показывает и все мертвый вис.
![]()
Регистрация:
23.08.2021
Сообщения: 1
Рейтинг: 0
![]()
Регистрация:
01.08.2022
Сообщения: 1
Рейтинг: 0
Мне тоже было бы интересно узнать о результате. Я столкнулся с такой же проблемой. Но после каких действий неизвестно (так как ребутит только в определенных играх). На многих форумах пишут, что больше всего шансов, что проблема с питанием… Но тут есть 1 но. Проблема была в первый раз замечена в NMS. И периодически проблема сама по себе исчезала после апдейтов игры. Что выглядит очень подозрительно… Если проблема в моей системе, то почему апдейты игры могли это исправить…
Тема закрыта
-
Заголовок
Ответов Просмотров
Последнее сообщение
-

Сообщений: 2
23 Sep 2023 в 05:38
-
Сообщений: 2
23 Sep 2023 в 04:39Сообщений:2
Просмотров:12
-
Сообщений: 5
23 Sep 2023 в 04:27Сообщений:5
Просмотров:20
-
Сообщений: 8
23 Sep 2023 в 04:05Сообщений:8
Просмотров:26
-
Сообщений: 16
23 Sep 2023 в 03:33Сообщений:16
Просмотров:49


Question The iommu fault reporting has been initialized.
-
Thread starterSadz_Mas
-
Start date
You should upgrade or use an alternative browser.
![]()
-
#1
![]()
-
- Jun 12, 2015
-
- 62,839
-
- 5,635
-
- 168,090
-
#2
Input-Output Memory Management Unit
https://en.wikipedia.org/wiki/Input–output_memory_management_unit
Seems to tie into USB devices, especially Bluetooth mice — could be a conflict with wifi
seems to be linked to a bugcheck
Can you follow option one on the following link — here — and then do this step below: Small memory dumps — Have Windows Create a Small Memory Dump (Minidump) on BSOD — that creates a file in c windows/minidump after the next BSOD
- Open Windows File Explore
- Navigate to C:\Windows\Minidump
- Copy the mini-dump files out onto your Desktop
- Do not use Winzip, use the built in facility in Windows
- Select those files on your Desktop, right click them and choose ‘Send to’ — Compressed (zipped) folder
- Upload the zip file to the Cloud (OneDrive, DropBox . . . etc.)
- Then post a link here to the zip file, so we can take a look for you . . .
![]()
-
#3
![]()
-
- Jun 12, 2015
-
- 62,839
-
- 5,635
-
- 168,090
-
#4
Try running DDU in safe mode and reinstall GPU drivers.
How To — How to perform a CLEAN install of your video card drivers.
![]()
forums.tomshardware.com
![]()
![]()
-
- Jun 12, 2015
-
- 62,839
-
- 5,635
-
- 168,090
-
#6
Looking further, I don’t think that message is reason for error, it just occurs at startup. Its not an error.
what events happen before the event 41(63)?
what are specs of the PC?
your discord links don’t work.
how long you run 2 different sticks together?
https://www.userbenchmark.com/UserRun/52380933
do you freeze up using just the 16gb stick?
![]()
-
#7
My pc specs are:
Processor-AMD RYZEN 5 5600X
GPU-GTX 1060 6GB
RAM-CORSAIR C18 3600MHZ RAM (16,8)
MOTHERBOARD-ASUS TUF B550 GAMING PLUS
STORAGE-NVME SSD 250GB
I have been using these ram sticks for about three months havent faced any issues before idk what is the issue
![]()
-
- Jun 12, 2015
-
- 62,839
-
- 5,635
-
- 168,090
-
#8
it probably means cause is hardware
Ryzen 5 5600X
Asus TUF Gaming B550 Gaming (Which BIOS?) appears to be dated 25th Feb 2022
24gb ram
1 x 16gb CMK16GX4M1Z3600C18
1 x 8gb CMK8GX4M1Z3600C18
GPU — GTX 1060
SSD — WD SN750 250gb
how long you used 2 sticks together?
what PSU do you have?
![]()
-
#9
![]()
-
- Jun 12, 2015
-
- 62,839
-
- 5,635
-
- 168,090
![]()
-
#11
![]()
-
- Jun 12, 2015
-
- 62,839
-
- 5,635
-
- 168,090
-
#12
I have found age doesn’t really mean a lot when it comes to parts, they can die anytime from 0 to 10 years.
Prime will take a while so I would run it overnight.
if it finishes before you wake up, it will create a file called stress.txt in the folder its installed in.
![]()
-
#13
![]()
-
- Jun 12, 2015
-
- 62,839
-
- 5,635
-
- 168,090
-
#14
can you look in reliability history at the days it goes blank? it might show errors here.
I don’t know if the freeze is the GPU drivers or the NVMe
what brand NVMe is it?
![]()
-
#15
![]()
-
- Jun 12, 2015
-
- 62,839
-
- 5,635
-
- 168,090
![]()
![]()
-
- Jun 12, 2015
-
- 62,839
-
- 5,635
-
- 168,090
-
#18
can you look in reliability history at the days it goes blank?
it might show errors here. since windows isn’t freezing completely. you can move mouse around, and hear noise. So its just the GPU?
passes memtest
drives seem okay
ddu doesn’t fix it
latest sane bios (there is a beta)
![]()
![]()
-
- Jun 12, 2015
-
- 62,839
-
- 5,635
-
- 168,090
-
#21
got latest version of armory’?
no real signs there. the windows shutdowns probably result of you turning PC off to get picture back.
No sign its the gpu driver
41(63) happens after the restart, its a reaction to the shutdown. So you would need to look at events in the moments before it happens, as they probably relate to previous shutdown.
![]()
![]()
-
- Jun 12, 2015
-
- 62,839
-
- 5,635
-
- 168,090
![]()
![]()
-
- Jun 12, 2015
-
- 62,839
-
- 5,635
-
- 168,090
-
#25
any extra USB devices?
any USB WIFI cards?
any speakers?
any old parts that have always worked fine before?
possible USB is tripping off screen, as the part of system that controls Graphics is also responsible for wifi and and USB. They can all mess with each other.
if windows isn’t seeing a conflict it makes it hard to figure out cause. All we have is symptoms.
I would be tempted to just run with 16gb of ram and just see if it makes any difference.
Similar threads
- Advertising
- Cookies Policies
- Privacy
- Term & Conditions
Содержание
- ПК ребутается в некоторых играх
- Инициализирован отчет об ошибке iommu windows 10
- X1 Carbon 7 (X1C7): HAL error, event ID 16: The iommu fault reporting has been initialized
- Re:X1 Carbon 7 (X1C7): HAL error, event ID 16: The iommu fault reporting has been initialized
- Re:X1 Carbon 7 (X1C7): HAL error, event ID 16: The iommu fault reporting has been initialized
- Re:X1 Carbon 7 (X1C7): HAL error, event ID 16: The iommu fault reporting has been initialized
- Re:X1 Carbon 7 (X1C7): HAL error, event ID 16: The iommu fault reporting has been initialized
- Re:X1 Carbon 7 (X1C7): HAL error, event ID 16: The iommu fault reporting has been initialized
- Re:X1 Carbon 7 (X1C7): HAL error, event ID 16: The iommu fault reporting has been initialized
- Community Guidelines
- Check out current deals!
- Most Popular Posts
- Welcome to Ideation!
- Проблемы с включением IOMMU
- Как IOMMU работает для связи ЦП и периферийных устройств
- Где находится IOMMU?
- В чем его полезность?
- Использование IOMMU в виртуализированных системах
- Ошибка iommu windows 10
- Проверьте, включен ли VT-D / IOMMU в BIOS/UEFI
- 3 ответа
- Похожие вопросы:
ПК ребутается в некоторых играх
05 Jun 2022 в 01:59
05 Jun 2022 в 01:59 #1
Приветствую работяги!
Подскажите, вдруг кто сталкивался или знает как решить:
Мой пк:
Ryzen 7 3700x
2070 Super
24 RAM
Power supply 700+
Predator: Hunting Grounds(перезагрузка стабильно раз в 2 матча), RUST(перезагрузка где то через 1-2 минуты после захода на сервер), Necromunda:Hired Gun(перезагрузилась 1 раз за 20 часов игры), Biomutant(перезагрузилась пару раз за 10 часов игры)
Почитав в интернете нашел что это нечто связанное с производительностью вирутальной машины, хотя я ее не юзаю.
Думаю еще сделать стресс тест видуху и проца, чтобы наверняка
На этом больше ничего не пробовал. Находил в сети информацию что подобное может быть из за каких то проблем с напряжением, то есть например во время обработки данных условная видеокарта запрашивает большее напряжение чем ей разрешено использовать или типа того. Думал что возможно проблема с процом или видюхой, но чето маловероятно ибо в каких то играх все работает как часы, а в некоторых оно все падает.
Кто то советовал сделать андер волтаж проца, чтобы снизить пиковые частоты работы ЦПУ, но чет идея сомнительная ибо работает только турбобустинг, да и работает он при всех приложениях, так что будь проблем в этом, то он бы отрубался постоянно.
Источник
Инициализирован отчет об ошибке iommu windows 10
![]()
United States of America
![]()
X1 Carbon 7 (X1C7): HAL error, event ID 16: The iommu fault reporting has been initialized
Within the last two weeks, with the latest updates from Microsoft and Lenovo, My X1C7 often suddenly halts with the following error in Event Logs
Date: 2020-10-27 15:19:51
Task Category: None@Level: Information
Description: The iommu fault reporting has been initialized.
When X1C7 halted, the keyboard stopped responding to any keying, and the display stopped where it was right before the halt.
Windows 10 Pro, 10.0.19041 Built 19041 with the latest updates on 2020-10-27 (today’s issue: 2020-10-27 15:19:51)
X1C7 Model: 20R10015US
BIOS: NET2QET33W (1.27), 2020-10-08
SMBIOS: 3.2
Embedded Controller Version: 1.14
Hardware Abstraction Layer: 10.0.19041.488
![]()
United States of America
![]()
Re:X1 Carbon 7 (X1C7): HAL error, event ID 16: The iommu fault reporting has been initialized
I am getting the same error on X1E gen 1. My computer crashes randomly, ane each crash is preceded by HAL error, event ID 16. From what I understood from searching on the internet it may be related to memory failure, however when I contacted Lenovo support they told me that it is a software issue. I will see if the issue persists and report my findings. I could not find much about on the internet so it may be a very elusive problem. It seems to be a new problem, so maybe it is caused by some Windows update.
![]()
United States of America
![]()
Re:X1 Carbon 7 (X1C7): HAL error, event ID 16: The iommu fault reporting has been initialized
Maybe this issue is caused by BIOS update NET2QET33W (1.27), 2020-10-08, which has been recently removed from Lenovo website.
![]()
United States of America
![]()
Re:X1 Carbon 7 (X1C7): HAL error, event ID 16: The iommu fault reporting has been initialized
![]()
United States of America
![]()
Re:X1 Carbon 7 (X1C7): HAL error, event ID 16: The iommu fault reporting has been initialized
My X1C7 encounters this issue everyday 🙁
![]()
United States of America
![]()
Re:X1 Carbon 7 (X1C7): HAL error, event ID 16: The iommu fault reporting has been initialized
![]()
United States of America
![]()
Re:X1 Carbon 7 (X1C7): HAL error, event ID 16: The iommu fault reporting has been initialized
Yesterday, after updating Intel Wireless Bluetooth driver 22.10.0.2 via Intel Driver & Support Assistant, I tried to use my Bluetooth mouse, which is Microsoft Modern Mobile Mouse, again, and the issue happened after about 1-2 hours of use.
Please review our Guidelines before posting.
Check out current deals!
Most Popular Posts
Please log in to ‘Like’ this post
Welcome to Ideation!
Ideation sections have been created for customers to engage with us by discussing and promoting ideas and improvements relating to Lenovo’s products and services.
As a reminder, your participation in Ideation is governed by Lenovo’s website Terms of Use and by Lenovo’s Forums Community Guidelines. Additional terms governing the Ideation Program are included in the Ideation Terms and may be found here. For your convenience, here’s a
Quick summary of the highlights:
By clicking on “Yes” below you certify that you have read and agree to the Community Guidelines and the Ideation Terms, and acknowledge that by submitting any ideas, material, or information on the Ideation site you grant Lenovo the right to use any such submissions by you in any way without acknowledging, notifying, or compensating you, as described in those documents.
Источник
Сап, лорчан. Имею мать GA-990FXA-D3, rev 1.2. Биосе присутствуют пункты Virtualization и IOMMU, оба включены. Тем не менее, в dmesg всё время
Написал в саппорт Gigabyte:
Здравствуйте! Год назад приобрел эту материнскую плату, вот возникла проблема: вне зависимости от включенностивыключенности IOMMU в BIOS система просит включить в Биосе поддержку iommu. Проверялось на Gentoo
На что получил ответ:
Благодарим Вас за использование нашей продукции и за обращение в службу технической поддержки GIGABYTE TECHNOLOGY.
Материнские платы компании Gigabyte проходят соответствующую сертификацию на предмет совместимости с операционными системами компании Microsoft (сертификат Windows Hardware Quality Labs/WHQL), так же информацию о совместимости Вы можете найти на сайте Microsoft: http://www.microsoft.com/windows/compatibility/windows-7/en-us/Search.aspx?l=. Вся продукция компании Gigabyte, все программное обеспечение разрабатывается и тестируется только под операционные системы компании Microsoft. В разделе «Спецификации» или «Описание», к любой модели материнской платы есть пункт, в котором указаны поддерживаемые операционные системы, в Вашем случае это Microsoft Windows 7/Vista/XP.
Так же, на сайте отмечено, что: «Из-за особенностей осуществления поддержки семейства ОС Linux со стороны производителей системной логики, пожалуйста, обратитесь за драйверами для Linux на сайты разработчиков.»
Таким образом, мы не можем гарантировать какую-либо стабильную работу компьютера при использовании операционных систем Linux.
С Уважением и Наилучшими пожеланиями, GIGABYTE TECHNOLOGY
Они, блин, совсем там упоролись? Слов нет просто.
Источник
Как IOMMU работает для связи ЦП и периферийных устройств
Как периферийные устройства взаимодействуют с процессором? Использование ОЗУ системы в качестве общей точки для взаимной связи, но это подразумевает ряд механизмов, наиболее важным из которых является тот, который мы собираемся описать ниже.
Где находится IOMMU?
Как видно на схеме выше, периферийные устройства подключены к южному мосту или южному мосту, который, в свою очередь, подключен к северному мосту, который является концентратором, с которым, в основном, обмениваются данными интерфейс оперативной памяти и процессора. каждый. Что ж, IOMMU расположен внутри южного моста, где сосредоточены все интерфейсы ввода-вывода, такие как USB, PCI Express, SATA и т. Д.
Все эти интерфейсы должны находиться под управлением IOMMU для доступа к системной RAM. В этом случае IOMMU действует как своего рода пограничный контроль, который следит за тем, чтобы периферийные устройства не осуществляли незаконный доступ к памяти и не обращаются к той части ОЗУ, которая назначена каждому из них и никуда больше.
Таким образом, IOMMU действует как MMU, но для периферийных устройств ввода-вывода.
В чем его полезность?
Периферийные устройства ввода-вывода не используют MMU (блок управления памятью) совместно с ЦП и, следовательно, не просматривают память так же, как центральный системный процессор. Эта проблема позволяет периферийным устройствам получать доступ к чувствительным частям системной памяти, например тем, которые зарезервированы для функций самой операционной системы, что является проблемой в многозадачных средах.
С другой стороны, IOMMU автоматически и динамически назначает адреса памяти для связи с различными периферийными устройствами, таким образом, ЦП всегда знает, на какие адреса памяти он должен указывать для связи с ними.
В более старых системах IOMMU не было доступно, и вместе с ними была предоставлена карта памяти, где программисты были проинформированы, какие адреса RAM предназначены для связи с устройствами. По этой причине разработчикам в каждой отдельной архитектуре приходилось изучать адресацию памяти, чтобы использовать периферийные устройства и другое поддерживающее оборудование в системе.
Сегодня это уже не так, и наличие IOMMU позволяет разработчикам избавиться от необходимости изучать адреса памяти для связи и расширяет возможности конфигурации и настройки наших ПК, позволяя создавать совершенно разные конфигурации.
Использование IOMMU в виртуализированных системах
IOMMU обеспечивает безопасный доступ к физическим устройствам в виртуализированных средах посредством того, что мы называем сквозной передачей устройств. Тандем между MMU и IOMMU позволяет устройствам, подключенным к ПК, появляться в пространстве виртуальной памяти, которое выполняет функцию физической памяти для виртуальной среды, которая работает в данный момент.
Без IOMMU виртуализированные среды, которые имеют правильный доступ к оборудованию, установленному в системе, были бы невозможны, поэтому сегодня он является незаменимой частью всех процессоров, которым приходится обрабатывать виртуализированные среды.
Источник
Ошибка iommu windows 10
Проверьте, включен ли VT-D / IOMMU в BIOS/UEFI
Чтобы проверить, если корпорации Intel VT-X или AMD от AMD-V включена в BIOS/UEFI, я использую:
Я не мог найти способ проверить, включены ли Intel VT-D или AMD IOMMU в BIOS/UEFI.
3 ответа
При установке Intel HAXM у меня возникает следующая ошибка: Этот компьютер соответствует требованиям для HAXM, но технология виртуализации Intel (VT-x) не включена. HAXM не может быть установлен до тех пор, пока не будет включен VT-x. Итак, я проверил, что мой BiOS, VT-x поддерживается, и включил…
Я видел много сообщений, похожих на мою проблему, и хотя я пытался сделать те же шаги, это все равно не сработало. Intel Core i7 — 2670QM CPU @ 2.20GHz Windows 10 Мне нужно создать эмулятор для Android Studio, чтобы протестировать мои приложения, но он не работает, он говорит, что мне нужен Intel…
Если VT-d включен, то Linux настроит переназначение DMA во время boot. Самый простой способ найти это-поискать в dmesg DMAR записи. Если вы не видите ошибок, то VT-d включен.
Еще один пример с x2apic opt out:
В системе с отключенным VT-d вы либо увидите сообщение об ошибке, либо вообще ничего.
Я просто нашел другой способ, который, кажется, работает, даже если параметры iommu kernel не были установлены:
Основываясь на ответе Джо-Эрленда Шинстада:
Если CPU включен, вы должны увидеть что-то вроде:
В противном случае вы можете увидеть что-то вроде:
Я хочу использовать эмулятор Android, такой как Nox или Bluestacks, чтобы играть в мобильный PUBG на PC. Я знаю, что включение виртуализации в BIOS делает производительность намного, намного лучше. У меня НР примета рабочего стола (RX580 4 Гб, 7-го поколения процессор i5, 12 ГБ памяти DDR4, 128 ГБ…
Похожие вопросы:
Как я могу сказать, есть ли у конкретной машины SecureBoot/UEFI в качестве опции в BIOS, кроме загрузки в BIOS и визуального осмотра ее? Есть ли способ увидеть эту информацию в Windows, даже если…
Мои знания bios довольно низки, но каждый раз, когда я читаю некоторые документы о UEFI, я не понимаю, почему фаза SEC является корнем доверия к процедурам UEFI bios. Фаза SEC выполняет проверку…
Не удалось установить intel HAXM вместо того, что VT включен в BIOS. Я использую процессор intel core2 quad q9550 и windows 7 поверх него. Мой процессор не поддерживает гипер-визор.
При установке Intel HAXM у меня возникает следующая ошибка: Этот компьютер соответствует требованиям для HAXM, но технология виртуализации Intel (VT-x) не включена. HAXM не может быть установлен до…
Я видел много сообщений, похожих на мою проблему, и хотя я пытался сделать те же шаги, это все равно не сработало. Intel Core i7 — 2670QM CPU @ 2.20GHz Windows 10 Мне нужно создать эмулятор для…
Я хочу использовать эмулятор Android, такой как Nox или Bluestacks, чтобы играть в мобильный PUBG на PC. Я знаю, что включение виртуализации в BIOS делает производительность намного, намного лучше….
Id хотел бы прочитать/изменить некоторые настройки меню BIOS/UEFI с помощью скрипта uefi shell. Например, Id хотел бы изменить настройку ’CSM Support’ (Enabled/Disabled). Есть ли какой — нибудь…
Я понимаю, что если устройство PCI хочет сделать DMA RW, а IOMMU включено, драйвер должен сопоставить CPU PA с адресом DMA через pci_map_page(для некогерентного), то устройство PCI может…
Источник
Содержание
- Инициализирован отчет об ошибке iommu что это
- Fix: HAL_IOMMU_INTERNAL_ERROR BSOD in Windows 10
- HAL_IOMMU_INTERNAL_ERROR Windows 10 Solutions
- 1] Disable Automatic Restart
- 2] Resolve all the Memory problems including poor areas in RAM
- 3] Update Drivers to fix HAL_IOMMU_INTERNAL_ERROR BSOD
- 4] Detect the Malware in Full System and dismiss them using Windows Security
- 5] Load the Basic Programs only by Booting Device in Safe Mode
- 6] Use Windows Blue Screen Troubleshooter to solve HAL_IOMMU_INTERNAL_ERROR
- 7] Delete the temporary and junk files from storage and make more space in it
- 8] Disconnect external Hard drives to fix HAL_IOMMU_INTERNAL_ERROR
- 9] Settle up the bad areas present in Hard Disk
- 10] Install available Update Patches to solve HAL IOMMU INTERNAL ERROR
- 11] Uninstall similar programs to eliminate conflicts
- 12] Undo recent changes by System Restore
- 13] Recover missing DLL files and corrupted resources using System File Checker
- 14] Uninstall the troublesome Windows Update
- 15] Remove all the Third Party Anti-Virus Programs
- 16] Run the DISM tool in Command Prompt for fixing defective Windows image files
Инициализирован отчет об ошибке iommu что это
Конфа следующая.
Мама: ASUS ROG Strix Gaming B350-F.
Камень: AMD Ryzen 7 1700, разгон до 3.75 ГГц.
Память: Geil EVO X 16GB, разгон до 3 ГГц.
Охлад камня: Scythe Mugen 5 Rev. B.
Накопители: SSD Samsung EVO 860 Gb, SSD SiliconPower 1Tb на NVMe, HDD 1 Tb Toshiba.
Видеокарта: ASUS Radeon RX 580 AREZ 8 Gb, драйвер последний и свежий.
ОС: Windows 2004, обновился недавно, но на 1909 творилась та же история.
БП: Cougar VTE 600 80 бронза, куплен недавно (март 2020) на смену умирающему старому.
Предыстория. Брал где-то в марте взамен своей старой уже умирающей затычки Radeon HD 6450 (какие-то пропажи изображения и повторное его потом появление) новую — Radeon RX 5500 XT. Поставил, начались регулярные зелёные экраны, чёрные экраны и просто зависы, в журнале значился BSOD 0x0116 (драйвер видяхи), ну и за драйвера серии RX подобное поведение не очень удивительно. По совету, нагугленному в Интернете, вырубил всякие Radeon Anti-Lag и прочие моменты — зависты и экраны смерти прекратились напрочь. Но карточка всё равно очень странно дребезжала каким-то металлическим звуком в нагрузке и наблюдались необъяснимые падения FPS до 15-16, поэтому сдал карту обратно в DNS, взял взамен ASUS Radeon RX 580, окей. Месяц не мог нарадоваться, всё было отлично, и FPS стабильный на ультрах и работа стабильная.
Однако, радость была недолгой. Сейчас примерно раз в 2-3 дня появляется следующее: совершенно рандомно (не зависит от игр, может быть и во время сидения в браузере, и при работе в Кубейсе, а в играх пока за всё это время 1 раз повисло) появляется чёрный экран, звук немного глитчит, потом пропадает, компьютер в перезагрузку НЕ уходит, так и остаётся, пока не сделаешь хард ресет. Сообщения в системном журнале ничего внятного не показывают: БСОДы отсутствуют, т.е. и в журнале их нет, и через BlueScreenView ничего не видно (хотя настройки на сохранение автодампа стоят), в журнале чё-т там время от времени ругается DistributedCOM, но оно было и до начала проблем. После ручного перезапуска появляется в журнале сообщение «Инициализован отчет об ошибке IOMMU.» от источника HAL, но я нагуглить по этому вопросу ничего не смог, да и оно появляется после перезапуска.
Куда дальше копать? Пробовал снижать разгон оперативы и ЦП — разницы не почувствовал. Пока что вместо ультра-свежей версии драйверов на видеокарту установил ту, что предлагает сама Винда (она за сентябрь 2019-ого года), AMD Radeon Software вместе с ней не идёт, поглядим. родной софт там идёт, но тоже старый.
Тестил:
смарт-данные накопителей: без реаллокейтов/пендингов и прочих критических индикаторов;
в Furmark минут 10 — греется, правда, до 80, но без вылетов и бсодов, а так же Doom Eternal на ультрах часа 2 — тоже нормально;
MemTest — нерасширенный тест, пройдено, а ещё и системной утилитой попробовал — пройдено, в системном журнале Memorydiagnostics или как там его написал, что пройдено успешно.
occt, aida64 по минут 20 — пройдено.
UPDATE:
Переделал тест OCCT и Linpack.
В первый раз OCCT показал на 4-ой минуте 157 ошибок, остановил. Максимум: 67 градусов. И хотя на забугорных форумах пишут, что на райзенах первой генерации OCCT регулярно ошибки показывает, всё равно как-то это странно.
Запустил Linpack, 15 минут — чисто. Максимум — 68 градусов.
Второй раз запустил OCCT, 15 минут — чисто. Максимум — 68 градусов.
Power запустил на 6 минут — нагрелась видео до 79 градусов, ЦП примерно до 76, чипсет примерно так же, дальше мучать не стал.
Источник
Fix: HAL_IOMMU_INTERNAL_ERROR BSOD in Windows 10
You will find solutions to HAL_IOMMU_INTERNAL_ERROR Blue Screen of Death error in Windows 10 here. This BSOD issue having bugcheck value 0x000001D9 leads the desktop to freeze and hang. Frequent Reboot of PC also occurs when this stop error appears.
HAL IOMMU INTERNAL ERROR in Windows 10 mostly happens because of corrupt, old and incompatible device drivers. Conflicts between similar applications and malware infection are also the main reasons for this BSOD. Furthermore, if the system runs in memory problems, low disk space, problematic areas in HDD, corrupted Windows Image files even can cause the error. In the below section, we will be discussing some effective and proven workarounds they can potentially help to resolve HAL_IOMMU_INTERNAL_ERROR BSOD in Windows 10. See the list of workarounds first –
HAL_IOMMU_INTERNAL_ERROR Windows 10 Solutions
Here is how to fix HAL_IOMMU_INTERNAL_ERROR BSOD in Windows 10 –
1] Disable Automatic Restart
With a confirmed HAL_IOMMU_INTERNAL_ERROR BSOD, Windows PC will have a tendency to perform Automatic restarting. This will be the most annoying problem you could ever come across. Unless this gets a fix, you cannot deploy other resolutions as well. Therefore, this solution comes at the top of the priority. Disabling the Automatic Restarting is not a complex job and you can proceed in the below steps –
Step-1: Navigate to the Desktop area after saving the running programs. Use Win+D hotkey press together and head to the place immediately.
Step-2: Perform a right click on This PC icon. Choose Properties option from there to allow opening the System window.
Step-3: When it is visible on the screen, select Advanced system settings from the left side of the window.
Step-4: As the System Properties wizard appears, click on Advanced tab.
Step-5: Scroll little down in the tab and reach Startup and Recovery section. When you see the Settings option here, hit straightway.
Step-6: After a new wizard appears, go to its System failure part and uncheck the box for “Automatically restart”
Step-7: Lastly, select the Ok to save these changes.

Now windows will not go for rebooting automatically. Hence, there will be enough opportunity for you to deploy the upcoming resolutions and resolve the issue accordingly.
2] Resolve all the Memory problems including poor areas in RAM
Windows can suffer from memory issue due to wrong allocation of it and the presence of poor segments in the RAM. With these sorts of problems in the Windows, BSOD errors like HAL_IOMMU_INTERNAL_ERROR commonly occur. Luckily, we have the Windows Memory Diagnostic to deal with these troubles and fix the errors. Let’s proceed to the handy utility in the below process –
- Make a together press of Windows and S keys and invoke Taskbar Search.
- In the empty text box located here, type “Memory” and wait for results to load finally.
- Select Windows Memory Diagnostic Desktop app from results to proceed.
- Select the option “Restart now and check for problems (recommended)”.
- Then windows will prepare for the first cycle of rebooting.
- Subsequently, you will find blue screen upfront detecting memory issues with the rate of progress in percentage.
- When the info shows 100%, windows will Restart for the second time.
- Finally, you can check the diagnosis report in the Notification area of the System Tray.

3] Update Drivers to fix HAL_IOMMU_INTERNAL_ERROR BSOD
HAL_IOMMU_INTERNAL_ERROR BSOD is the result of outdated and corrupt device drivers mostly. Every time we come across a critical issue, they play a greater role there. We really should not allow such a driver on the computer which is old and defective. The Windows Device Manager is a top-notch app in this regard and it shows them with a yellow accent if needs to be updated. To accomplish the workaround, move with below steps –
- Right click on Start menu and choose Run to invoke the window.
- In the text box provided here, write devmgmt.msc and eventually hit Enter key.
- Device Manager will hit on display and you have to watch closely in the console for any exclamation marks in the device’s list.
- Prior to expanding the device, do a right click on the drivers having Yellow warning icon on it.
- Select Update driver option and follow the other guidelines coming to display until these all get updated.

4] Detect the Malware in Full System and dismiss them using Windows Security
All over the web, Malware is present and often it exists in disguise. You can be easy prey to them after making a visit to a website or clicking link coming in emails. Sometimes inserting a USB can also be risky. Once they get entrance to the system, cause the necessary files to be removed or infected. As a result, many issues come up including HAL_IOMMU_INTERNAL_ERROR. You can avoid this malignant consequence by making regular scanning in Windows security. The default tool can also dismiss all the threats in the most effective way. Follow the below guidelines to complete the task –
- Click on Show hidden icon arrow from the right side of the taskbar.
- Select Shield icon from there and let the system to open Windows Security app.
- Moving on to the App, select Virus & threat protection option.
- Now, perform a click on Scan options link to reveal available methods.
- Check the radio button allocated for Full scan and then select Scan now option.
- After the detection gets over, you will be shown a result. If there is any malware present, hit Clean threats option located here.
- Go to the next page, among three options, select Remove first and then Start actions to dismiss all these viruses.

5] Load the Basic Programs only by Booting Device in Safe Mode
In all critical times, Booting in the Safe Mode came out as savior in Windows 10 including previous versions. In this startup procedure, the device starts with only the basic processes and hence, the problems get resolved immediately. Let’s give this renowned utility an attempt following below instruction –
Step#-1: Invoke Run dialog by pressing Win+R hotkeys together.
Step#-2: In the provided typing box, write msconfig using the keyboard and select System Configuration Desktop app once visible.
Step#-3: In the App UI, jump to Boot tab and straightway get at its second half.
Step#-4: Here, you can see the Boot options area. Now, check the box before Safe Boot and activate all the grayed out options.
Step#-5: Hit the radio button before Minimal option and proceed forward.
Step#-6: Select Apply button first and then Ok to save these changes.
Step#-7: Get inside of the Safe Mode on the further move.

6] Use Windows Blue Screen Troubleshooter to solve HAL_IOMMU_INTERNAL_ERROR
Since HAL IOMMU INTERNAL ERROR causes serious damages to the system, Microsoft technicians came up with a built-in tool for resolving this issue effectively. The utility named Blue Screen Troubleshooter and it is accessible through the settings app. Proceed with the below instructions to deploy the tool –
- Open Windows Settings app by pressing Win+I hotkeys altogether.
- From the app UI, head to Update & Security tile and eventually make a click on it.
- When the page loads completely, choose Troubleshoot located in the left pane and jump on the adjacent side.
- Reach out to Blue Screen there and expand it by clicking.
- Hit Run the Troubleshooter option from the extended pane.
The utility will now detect and fix all the Stop errors. In the end, there should not be any HAL_IOMMU_INTERNAL_ERROR in the system.
7] Delete the temporary and junk files from storage and make more space in it
Temporary files as stored in the Hard Disk, once grow bigger will occupy huge space in it. The ultimate result is, the storage runs in low space and operation get slow down. In the process, HAL_IOMMU_INTERNAL_ERROR also hitched up. Using Disk Cleanup tool can be thoroughly beneficial to delete the junks in one platform. Here is how to proceed –
- Open Run dialog box.
- In the search box provided, type cleanmgr and press Enter from keyboard.
- A small popup window will float in and ask you to choose preferable Drive to run a cleanup. Select C: by doing a click on dropdown menu and press Enter.
- Disk Cleanup Utility will come ahead slowly after calculating the space it can make free from the drive.
- When the wizard appears, come down to the bottom and do a click on Clean up system files.
- Once again, that small popup window will appear asking for the desired drive. Choose C: like before and press Enter key.
- When Disk Cleanup for C: comes ahead, reach Files to delete area.
- Check all the boxes available here and keep Downloads as it was.
- Hit Ok button and let the Cleanup start.
- Wait until this process ends automatically as this might take several minutes.
![]()
8] Disconnect external Hard drives to fix HAL_IOMMU_INTERNAL_ERROR
Some people come across HAL_IOMMU_INTERNAL_ERROR BSOD when an additional Hard Drive joins the system. Good news folks, Issue resolved easily as well just after disconnecting the external USB or other peripheral only. Follow the below guidelines and give a momentarily pause by disconnecting –
- Isolate all the Hardware accessories including the External HDD.
- Keep them separate and safe location to avoid damage.
- Now, restart the windows in the usual method.
- After completing the rebooting when you can see Desktop, make a check for the error.
- If resolved properly, start connecting them one after another.
- At this moment after connecting all, launch the web browser from windows.
- Perform a visit to Maker’s Webpage for each and Download the Latest drivers.
- Install the drivers in windows to use easily.
9] Settle up the bad areas present in Hard Disk
Prolonged use causes to form problematic areas inside a Disk Drive. When this happens, the system runs in various problems including HAL_IOMMU_INTERNAL_ERROR. The Disk Checking Utility comes handy to resolve these sectors automatically. See the method in details –
- Press Win+S to call in Taskbar search and type cmd.exe. When Command Prompt appears in the result, do a right click on it.
- Choose “Run as Administrator” and also select “Yes” Once UAC prompts for your consent.
- In the Black Elevated Prompt, type following syntax and parameters –
Press the Enter button when you have finished typing. This process will take little longer as we have added three more notations instead of chkdsk only which would show disk status only.
After the task is finished, Restart the device and upon coming back to operation, check if there is an error present.

10] Install available Update Patches to solve HAL IOMMU INTERNAL ERROR
Any update patch contains fixing of existing bugs, quality improvements, the introduction of latest features. Installing these will give the OS a big blow and strength to fight with vulnerabilities like HAL IOMMU INTERNAL ERROR. An Outdated Windows 10 is prone to get affected always. Follow the below guidelines to install them –
- Manage to Load the Settings page of Update & Security as shown in the above workaround.
- Select Windows Update available in the left pane.
- Navigating to the corresponding right, make a click on Check for updates link ignoring “You’re up to date” dialogue.
- Upon finishing the downloading, click on Install.
- Reboot the Windows once asked and update the OS.

11] Uninstall similar programs to eliminate conflicts
Having the same applications often become risky they tend to collide with one another. Meanwhile, the necessary OS files get eradicated and HAL_IOMMU_INTERNAL_ERROR evolves. In these cases, Uninstalling comes ahead first. When we remove one of these, the action reduces the risk of collision between them. Follow the below guidelines to uninstall an App –
- Manage Access to Windows Settings app using any convenient method stated above.
- When in the Home page, roll the cursor to Apps and make a click on it eventually.
- On the next page after appears, choose Apps & features on the left wing and shift to the right.
- Once all the Apps be visible, reach out to applications colliding with each other.
- Select each and hit Uninstall option from the expanded pane.
- If User Account Control prompts for authentication, select Yes to proceed.
- Follow the on-screen guidelines until finally removed.
- Restart the device and once powers up next, do check for the error in the system.
- If resolved, you can Launch Microsoft Store and Download the deleted app again.
12] Undo recent changes by System Restore
Performing a System Restore directs you back to the state where you were. We often install an app or uninstall some for the necessity of work. These actions leave marks in Windows Registry and when they go wrong, HAL IOMMU INTERNAL ERROR is imminent. Therefore, to Undo these changes, perform the below tasks –
- Open the Taskbar search (commonly Win+S) using any of the above instruction.
- Type rstrui in the text area and hit the Enter button.
- Once the System Restore Wizard appears on the screen, select Next.
- From the consequent page, make a click on Show more restore points and reveal all the points you have created beforehand.
- Choose the last one in the list and make a click on Next.
- After the following page cuts your view, click Finish.
13] Recover missing DLL files and corrupted resources using System File Checker
So many vulnerabilities occur in Windows 10 and sometimes in worst extent, system resources are erased. In the same way, DLL files often go missing. When these cases happen, HAL_IOMMU_INTERNAL_ERROR BSOD comes in. System File Checker comes handy to fix these components once executed in the Elevated Command Prompt. To access the utility, follow the below instructions –
- Open the Taskbar search by making together press on Win+S keys.
- In the search box given here, type cmd.exe and select Run as administrator from the right flyout.
- After User Account Control asks for your consent, provide approval by choosing Yes.
- On the Black Elevated Command Prompt window, type underneath code and hit Enter key –
- System File Checker will be activated and start detecting for file corruption and missing DLL ones. Fixing will also start automatically.
- Though this process is little time consuming, do not terminate abnormally and let it end by itself. After all these files are okay, there should not be any.

14] Uninstall the troublesome Windows Update
Sometimes Windows update creates the Blue screen HAL IOMMU INTERNAL ERROR. Uninstalling the files will be enough as to resolve the issue or prevent it. To complete the task, move with the following guidelines –
- Press Windows key.
- Once Start menu becomes visible on display, choose Gear cog.
- From App UI, move ahead to Update & Security and do a click on it.
- From the following page after loaded, select Windows Update and shift to the corresponding side.
- Here, perform a click on View update history link.
- Select Uninstall updates and let a window unroll from Control Panel.
- Reach the last received patch and do a right click on it.
- Select Uninstall and keep and follow on-screen instruction until they get removed completely.

15] Remove all the Third Party Anti-Virus Programs
In virus issues, you might have used a free anti-virus solution as a safeguard. This is okay until Windows Security arrives. Since the tool is the default for Windows 10 and also very effective, there is no need of using a third party program in this regard. Moreover, most of these programs, due to conflict, often cause HAL_IOMMU_INTERNAL_ERROR BSOD. Therefore, if you have such applications, uninstall using the following guidelines –
- Type appwiz.cpl in the Windows search and Enter
- Select Third Party Anti-virus app in the list.
- Hit Uninstall option visible at the top ribbon.
- Next steps will be as shown in the display until it gets uninstalled completely.

16] Run the DISM tool in Command Prompt for fixing defective Windows image files
When Windows Image files fall in corruption, it might cause HAL_IOMMU_INTERNAL_ERROR. As a fix, DISM tool will be best suited utility. Here is the procedure –
- Do a right click on Taskbar and select Task Manager from the appearing menu.
- From the app once loaded fully, select File located at the top left corner.
- Choose Run new task when seen and let Run dialog to appear.
- In the empty writing field, cmd and move down later on.
- Mark the checkbox below the Open saying “Create this task with administrative privileges”.
- After Pressing Enter key, you will be straightaway guided to Elevated Command Prompt.
- At the black window, type following command where a cursor winks –
DISM.exe /Online /Cleanup-image /Restorehealth
- Hit Enter key and let the Tool to fix corrupt Windows image files. The process may be lengthy, wait until it gets over automatically.
- When ends, Restart the windows and after coming back to operation, check of the error resolved.

Till this point, we have elaborated almost all the effective resolutions hoping to resolve HAL IOMMU INTERNAL ERROR in Windows 10. Hopefully, the issue is no more prevalent in your system and you are working smoothly. If the issue still persists, we can suggest only last resort – Reinstalling Windows 10. This will be the ultimate solution of all the existing problems and if done accurately, no issue will be evolving next. Follow – How to Clean Install Windows 10 May 2019 Update Version 1903.
Источник

Оборудование:
Материнская плата: Системная плата MSI MEG B550 Unify (MS-7D13)
Процессор: AMD Ryzen 7 5800X
Видеокарта: Colorful RTX 3080 Vulcan OC LHR
Оперативка: 2х Kingston Fury KF3200C16D4/32GX
БП: Fractal Design Ion+ 2 Platinum 860W
Всем привет!
Летом 2021 была куплена видокарта, через некоторое время в феврале-марте 2022 была были куплены процессор, материнка, БП.
Всё хорошо, всё работает, только периодически очень редко появлялся черный экран на 1-2 секунды.
В середине мая 2023 как обычно чистил пк воздуходувом. Сначала всё было нормально, решил поиграть в Ведьмака. Обычно геймпад от PS4 подключаю по проводу, но тут что то решил подключить по Bluetooth. Компьютер перезагрузился без BSOD, дампы файлы не записались. И так несколько раз. Зашёл в журнал событий там Kernel Power 41 (63). Решил более тщательно почистить ПК, поменял термопасту на процессоре, переставил оперативки, визуально осмотрел всё нормально, только возле м2 SSD жирное пятно от термопрокладки. После этого перезагрузки не прекратились, так же мышь начала периодически подвисать на доли секунды в windows, причём в играх той же Ведьмак всё норм. Полазив в инете, чаще всего встречал что это или БП или оперативка. Оперативка старая была на 32гига, я всё равно собирался её обновлять и купил новую.Проблемы перезагрузок и подлаг мыши не исчесла. Обновил до последней версии bios, поставил чистую windows, убрал все разгоны, настройки электропитания,поставил последние драйвера на материнку с оф.сайта. Проблема не ушла, НО вместо Kernel Power теперь в журнале Eventlog 6008. Так же решил П………ь Windows 11, поначалу всё нормально было, но через пару дней та же проблема. Так несколько раз я переустанавливал Windows, и на некоторых сборках возвращалась ошибка Kernel Power, и один раз перед событием Eventlog появилась HAL код события 16 «Инициализован отчет об ошибке IOMMU. И заметил что перезагрузки при установки новой windows начинались после установки драйверов чипсета и Bluetooth. И вот последний раз поставл windows 10 обратно, специльно не стал устанавливать драйвера чипсета и Bluetooth. Bluetooth удалил вообще из диспечера устройст. Пару дней всё отлично было и думал уже это всё из за Bluetooth. Но перезаргузка с Eventlog 6008 вернулась.
P.S Все возможные тесты проходил, сканирование и лечение системы через cmd тоже, температуры тоже в норме, проц не больше 75 при рендерах
Перезагрузки не зависимо от того что я делаю, могу работать и перезагрузить, может просто на рабочем столе простаивать и перезагрузиться.