In CS:GO, Slam works with Trusted Mode, but there is a lot of confusion about this feature since it stops working right after the “Trusted Mode” update.
Valve has modified the mode since then, and now Slam can be played in Trusted Mode. If you want to know how to get Slam to work again, we’ll explain everything you need to know in this guide:
What to Do If Slam Does Not Work on CS:GO?
Slam is a popular Counter-Strike: Global Offensive mod [1] that allows users to customize their audio experience while playing. If you did everything to get it to work again but to no avail, you should go back and make sure you didn’t miss anything.
Oftentimes, users forget to press “Start” before they launch CS:GO. You can also make sure you have the latest version of Slam installed and not an older version that doesn’t work with CS:GO anymore.

If it still doesn’t work, you can read Slam’s official FAQ. There, they answer some of the most common problems with Slam. The last thing you can do is to ask for help on Slam’s subreddit – r/SourceLiveAudioMixer/.
You can also read about problems other people have had. You might find that someone else has already asked about your problem.
To sum up all the fixes, you should first ensure that you have the latest version installed, then check Slam’s FAQ for troubleshooting tips. You can also post your questions on Slam’s subreddit and read about other people’s experiences.
2
Posted by6 years ago
![]()
System.Exception: Steamapps folder is incorrect. Disable «override folder detection», or select a correct folder. at SLAM.Form1.CreateCfgFiles(SourceGame Game, String SteamappsPath) at SLAM.Form1.PollRelayWorker_DoWork(Object sender, DoWorkEventArgs e) Have it on auto tried it not on auto still doesn’t work.
![]()
level 1
· 6 yr. ago
same problem
level 2
Op · 6 yr. ago
I actually solved this problem. Check if you have a cfg folder in your CSGO for. If not make one.
level 1
· 6 yr. ago
Thanks,it worked
More posts from the SourceLiveAudioMixer community
Continue browsing in r/SourceLiveAudioMixer
Imports NAudio ‘Modified Version which does not write «extraSize»
Imports NAudio.Wave
Imports System.IO
Imports System.Text.RegularExpressions
Imports System.Threading
Imports SLAM.XmlSerialization
Imports SLAM.SourceGame
Imports System.Management
Imports System.Net.Http
Imports NReco.VideoConverter
Public Class Form1
Dim Games As New List(Of SourceGame)
Dim running As Boolean = False
Dim ClosePending As Boolean = False
Dim SteamAppsPath As String
Dim status As Integer = IDLE
Const IDLE = —1
Const SEARCHING = —2
Const WORKING = —3
Private Sub Form1_Load(sender As Object, e As EventArgs) Handles MyBase.Load
RefreshPlayKey()
If My.Settings.PlayKey = My.Settings.RelayKey Then
My.Settings.RelayKey = «=»
My.Settings.Save()
End If
If My.Settings.UpdateCheck Then
CheckForUpdate()
End If
Dim csgo As New SourceGame
csgo.name = «Counter-Strike: Global Offensive»
csgo.id = 730
csgo.directory = «commonCounter-Strike Global Offensive»
csgo.ToCfg = «csgocfg»
csgo.libraryname = «csgo»
csgo.exename = «csgo»
csgo.samplerate = 22050
csgo.blacklist.AddRange({«attack», «attack2», «autobuy», «back», «buy», «buyammo1», «buyammo2», «buymenu», «callvote», «cancelselect», «cheer», «compliment», «coverme», «drop», «duck», «enemydown», «enemyspot», «fallback», «followme», «forward», «getout», «go», «holdpos», «inposition», «invnext», «invprev», «jump», «lastinv», «messagemode», «messagemode2», «moveleft», «moveright», «mute», «negative», «quit», «radio1», «radio2», «radio3», «rebuy», «regroup», «reload», «report», «reportingin», «roger», «sectorclear», «showscores», «slot1», «slot10», «slot2», «slot3», «slot4», «slot5», «slot6», «slot7», «slot8», «slot9», «speed», «sticktog», «takepoint», «takingfire», «teammenu», «thanks», «toggleconsole», «use», «voicerecord»})
csgo.VoiceFadeOut = False
Games.Add(csgo)
Dim css As New SourceGame
css.name = «Counter-Strike: Source»
css.directory = «commonCounter-Strike Source»
css.ToCfg = «cstrikecfg»
css.libraryname = «css»
css.blacklist.AddRange({«attack», «attack2», «back», «boom», «buyammo1», «buyammo2», «buyequip», «buymenu», «cancelselect», «cheer», «chooseteam», «commandmenu», «disconnect», «drop», «duck», «forward», «invnext», «invprev», «jump», «messagemode», «messagemode2», «moveleft», «moveright», «pause», «reload», «showbriefing», «showscores», «slot1», «slot10», «slot2», «slot3», «slot4», «slot5», «slot6», «slot7», «slot8», «slot9», «speed», «toggleconsole», «use»})
Games.Add(css)
Dim tf2 As New SourceGame
tf2.name = «Team Fortress 2»
tf2.directory = «commonTeam Fortress 2»
tf2.ToCfg = «tfcfg»
tf2.libraryname = «tf2»
tf2.samplerate = 22050
tf2.blacklist.AddRange({«attack», «attack2», «attack3», «back», «build», «cancelselect», «centerview», «changeclass», «changeteam», «disguiseteam», «duck», «forward», «grab», «invnext», «invprev», «jump», «kill», «klook», «lastdisguise», «lookdown», «lookup», «moveleft», «moveright», «moveup», «pause», «quit», «reload», «say», «screenshot», «showmapinfo», «showroundinfo», «showscores», «slot1», «slot10», «slot2», «slot3», «slot4», «slot5», «slot6», «slot7», «slot8», «slot9», «strafe», «toggleconsole», «voicerecord»})
Games.Add(tf2)
Dim gmod As New SourceGame
gmod.name = «Garry’s Mod»
gmod.directory = «commonGarrysMod»
gmod.ToCfg = «garrysmodcfg»
gmod.libraryname = «gmod»
Games.Add(gmod)
Dim hl2dm As New SourceGame
hl2dm.name = «Half-Life 2 Deathmatch»
hl2dm.directory = «commonhalf-life 2 deathmatch»
hl2dm.ToCfg = «hl2mpcfg»
hl2dm.libraryname = «hl2dm»
Games.Add(hl2dm)
Dim l4d As New SourceGame
l4d.name = «Left 4 Dead»
l4d.directory = «commonLeft 4 Dead»
l4d.ToCfg = «left4deadcfg»
l4d.libraryname = «l4d»
l4d.exename = «left4dead»
Games.Add(l4d)
Dim l4d2 As New SourceGame
l4d2.name = «Left 4 Dead 2»
l4d2.directory = «commonLeft 4 Dead 2»
l4d2.ToCfg = «left4dead2cfg»
l4d2.libraryname = «l4d2»
l4d2.exename = «left4dead2»
l4d2.VoiceFadeOut = False
Games.Add(l4d2)
Dim dods As New SourceGame
dods.name = «Day of Defeat Source»
dods.directory = «commonday of defeat source»
dods.ToCfg = «dodcfg»
dods.libraryname = «dods»
Games.Add(dods)
‘NEEDS EXENAME!!!
‘Dim goldeye As New SourceGame
‘goldeye.name = «Goldeneye Source»
‘goldeye.directory = «sourcemods»
‘goldeye.ToCfg = «gesourcecfg»
‘goldeye.libraryname = «goldeye»
‘Games.Add(goldeye)
Dim insurg As New SourceGame
insurg.name = «Insurgency»
insurg.directory = «commoninsurgency2»
insurg.ToCfg = «insurgencycfg»
insurg.libraryname = «insurgen»
insurg.exename = «insurgency»
Games.Add(insurg)
For Each Game In Games
GameSelector.Items.Add(Game.name)
Next
If GameSelector.Items.Contains(My.Settings.LastGame) Then
GameSelector.Text = GameSelector.Items(GameSelector.Items.IndexOf(My.Settings.LastGame)).ToString
Else
GameSelector.Text = GameSelector.Items(0).ToString
End If
ReloadTracks(GetCurrentGame)
RefreshTrackList()
If My.Settings.StartEnabled Then
StartPoll()
End If
If My.Settings.StartMinimized Then
WindowState = FormWindowState.Minimized
End If
End Sub
Private Sub WaveCreator(File As String, outputFile As String, Game As SourceGame)
Dim reader As New MediaFoundationReader(File)
Dim outFormat = New WaveFormat(Game.samplerate, Game.bits, Game.channels)
Dim resampler = New MediaFoundationResampler(reader, outFormat)
resampler.ResamplerQuality = 60
WaveFileWriter.CreateWaveFile(outputFile, resampler)
resampler.Dispose()
End Sub
Private Sub FFMPEG_WaveCreator(File As String, outputFile As String, Game As SourceGame)
Dim convert As New FFMpegConverter()
convert.ExtractFFmpeg()
Dim command As String = String.Format(«-i «»{0}»» -n -f wav -flags bitexact -map_metadata -1 -vn -acodec pcm_s16le -ar {1} -ac {2} «»{3}»»», Path.GetFullPath(File), Game.samplerate, Game.channels, Path.GetFullPath(outputFile))
convert.Invoke(command)
End Sub
Private Sub FFMPEG_ConvertAndTrim(inpath As String, outpath As String, samplerate As Integer, channels As Integer, starttrim As Double, length As Double, volume As Double)
Dim convert As New FFMpegConverter()
convert.ExtractFFmpeg()
Dim trimstring As String
If length > 0 Then
trimstring = String.Format(«-ss {0} -t {1} «, starttrim.ToString(«F5», Globalization.CultureInfo.InvariantCulture), length.ToString(«F5», Globalization.CultureInfo.InvariantCulture))
End If
Dim command As String = String.Format(«-i «»{0}»» -n -f wav -flags bitexact -map_metadata -1 -vn -acodec pcm_s16le -ar {1} -ac {2} {3}-af «»volume={4}»» «»{5}»»», Path.GetFullPath(inpath), samplerate, channels, trimstring, volume.ToString(«F5», Globalization.CultureInfo.InvariantCulture), Path.GetFullPath(outpath))
convert.Invoke(command)
End Sub
Private Sub GameSelector_SelectedIndexChanged(sender As Object, e As EventArgs) Handles GameSelector.SelectedIndexChanged
ReloadTracks(GetCurrentGame)
RefreshTrackList()
My.Settings.LastGame = GameSelector.Text
My.Settings.Save()
End Sub
Private Sub ImportButton_Click(sender As Object, e As EventArgs) Handles ImportButton.Click
If (My.Settings.UseFFMPEG = True And File.Exists(«NReco.VideoConverter.dll»)) Or (My.Settings.UseFFMPEG = False And File.Exists(«NAudio.dll»)) Then
DisableInterface()
If ImportDialog.ShowDialog() = DialogResult.OK Then
ProgressBar1.Maximum = ImportDialog.FileNames.Count
Dim WorkerPassthrough() As Object = {GetCurrentGame(), ImportDialog.FileNames, False}
WavWorker.RunWorkerAsync(WorkerPassthrough)
Else
EnableInterface()
End If
Else
MessageBox.Show(«You are missing NAudio.dll or NReco.VideoConverter.dll! Cannot import without it!», «Missing File», MessageBoxButtons.OK, MessageBoxIcon.Error)
End If
End Sub
Private Sub YTButton_Click(sender As Object, e As EventArgs) Handles YTButton.Click
If File.Exists(«NAudio.dll») AndAlso File.Exists(«Newtonsoft.Json.dll») AndAlso File.Exists(«NReco.VideoConverter.dll») AndAlso File.Exists(«YoutubeExtractor.dll») Then
DisableInterface()
Dim YTImporter As New YTImport
If YTImporter.ShowDialog() = DialogResult.OK Then
ProgressBar1.Maximum = 1
Dim WorkerPassthrough() As Object = {GetCurrentGame(), New String() {YTImporter.file}, True}
WavWorker.RunWorkerAsync(WorkerPassthrough)
Else
EnableInterface()
End If
Else
MessageBox.Show(«You are missing either NAudio.dll, Newtonsoft.Json.dll, NReco.VideoConverter.dll, or YoutubeExtractor.dll! Cannot import from YouTube without them!», «Missing File(s)», MessageBoxButtons.OK, MessageBoxIcon.Error)
End If
End Sub
Private Sub WavWorker_DoWork(sender As Object, e As System.ComponentModel.DoWorkEventArgs) Handles WavWorker.DoWork
Dim Game As SourceGame = e.Argument(0)
Dim Files() As String = e.Argument(1)
Dim DeleteSource As Boolean = e.Argument(2)
Dim FailedFiles As New List(Of String)
For Each File In Files
Try
Dim OutFile As String = Path.Combine(Game.libraryname, Path.GetFileNameWithoutExtension(File) & «.wav»)
If My.Settings.UseFFMPEG Then
FFMPEG_WaveCreator(File, OutFile, Game)
Else
WaveCreator(File, OutFile, Game)
End If
If DeleteSource Then
IO.File.Delete(File)
End If
Catch ex As Exception
LogError(ex)
FailedFiles.Add(File)
End Try
WavWorker.ReportProgress(0)
Next
e.Result = FailedFiles
End Sub
Private Sub WavWorker_ProgressChanged(sender As Object, e As System.ComponentModel.ProgressChangedEventArgs) Handles WavWorker.ProgressChanged
ProgressBar1.PerformStep()
ReloadTracks(GetCurrentGame)
RefreshTrackList()
End Sub
Private Sub WavWorker_RunWorkerCompleted(sender As Object, e As System.ComponentModel.RunWorkerCompletedEventArgs) Handles WavWorker.RunWorkerCompleted
ProgressBar1.Value = 0
Dim MsgBoxText As String = «Conversion complete!»
Dim FailedFiles As New List(Of String)
For Each FilePath In e.Result
FailedFiles.Add(Path.GetFileName(FilePath))
Next
If FailedFiles.Count > 0 Then
MsgBoxText = MsgBoxText & » However, the following files failed to convert: « & String.Join(«, «, FailedFiles)
End If
ReloadTracks(GetCurrentGame)
RefreshTrackList()
MsgBox(MsgBoxText)
EnableInterface()
End Sub
Private Function GetCurrentGame() As SourceGame
For Each Game In Games
If Game.name = GameSelector.SelectedItem.ToString Then
Return Game
End If
Next
Return Nothing ‘Null if nothing found
End Function
Private Sub ReloadTracks(Game As SourceGame)
If IO.Directory.Exists(Game.libraryname) Then
Game.tracks.Clear()
For Each File In System.IO.Directory.GetFiles(Game.libraryname)
If Game.FileExtension = Path.GetExtension(File) Then
Dim track As New track
track.name = Path.GetFileNameWithoutExtension(File)
Game.tracks.Add(track)
End If
Next
CreateTags(Game)
LoadTrackKeys(Game)
SaveTrackKeys(Game) ‘To prune hotkeys from non-existing tracks
Else
System.IO.Directory.CreateDirectory(Game.libraryname)
End If
End Sub
Private Sub RefreshTrackList()
TrackList.Items.Clear()
Dim Game As SourceGame = GetCurrentGame()
For Each Track In Game.tracks
Dim trimmed As String = «»
If Track.endpos > 0 Then
trimmed = «Yes»
End If
TrackList.Items.Add(New ListViewItem({«False», Track.name, Track.hotkey, Track.volume & «%», trimmed, «»»» & String.Join(«»», «»», Track.tags) & «»»»}))
Next
TrackList.AutoResizeColumn(0, ColumnHeaderAutoResizeStyle.HeaderSize)
TrackList.AutoResizeColumn(1, ColumnHeaderAutoResizeStyle.ColumnContent)
TrackList.AutoResizeColumn(2, ColumnHeaderAutoResizeStyle.HeaderSize)
TrackList.AutoResizeColumn(3, ColumnHeaderAutoResizeStyle.HeaderSize)
TrackList.AutoResizeColumn(4, ColumnHeaderAutoResizeStyle.HeaderSize)
TrackList.AutoResizeColumn(5, ColumnHeaderAutoResizeStyle.ColumnContent)
End Sub
Private Sub StartButton_Click(sender As Object, e As EventArgs) Handles StartButton.Click
If running Then
StopPoll()
Else
StartPoll()
If Not My.Settings.NoHint Then
If MessageBox.Show(«Don’t forget to type «»exec slam»» in console! Click «»Cancel»» if you don’t ever want to see this message again.», «SLAM», MessageBoxButtons.OKCancel) = Windows.Forms.DialogResult.Cancel Then
My.Settings.NoHint = True
My.Settings.Save()
End If
End If
End If
End Sub
Private Sub StartPoll()
running = True
StartButton.Text = «Stop»
SystemTrayMenu_StartStop.Text = «Stop»
DisableInterface()
StartButton.Enabled = True
TrackList.Enabled = True
SetVolumeToolStripMenuItem.Enabled = True
If PollRelayWorker.IsBusy <> True Then
PollRelayWorker.RunWorkerAsync(GetCurrentGame)
End If
End Sub
Private Sub StopPoll()
running = False
StartButton.Text = «Start»
SystemTrayMenu_StartStop.Text = «Start»
EnableInterface()
PollRelayWorker.CancelAsync()
End Sub
Private Sub CreateCfgFiles(Game As SourceGame, SteamappsPath As String)
Dim GameDir As String = Path.Combine(SteamappsPath, Game.directory)
Dim GameCfgFolder As String = Path.Combine(GameDir, Game.ToCfg)
If Not IO.Directory.Exists(GameCfgFolder) Then
Throw New System.Exception(«Steamapps folder is incorrect. Disable «»override folder detection»», or select a correct folder.»)
End If
‘slam.cfg
Using slam_cfg As StreamWriter = New StreamWriter(GameCfgFolder & «slam.cfg»)
slam_cfg.WriteLine(«alias slam_listtracks «»exec slam_tracklist.cfg»»»)
slam_cfg.WriteLine(«alias list slam_listtracks»)
slam_cfg.WriteLine(«alias tracks slam_listtracks»)
slam_cfg.WriteLine(«alias la slam_listtracks»)
slam_cfg.WriteLine(«alias slam_play slam_play_on»)
slam_cfg.WriteLine(«alias slam_play_on «»alias slam_play slam_play_off; voice_inputfromfile 1; voice_loopback 1; +voicerecord»»»)
slam_cfg.WriteLine(«alias slam_play_off «»-voicerecord; voice_inputfromfile 0; voice_loopback 0; alias slam_play slam_play_on»»»)
slam_cfg.WriteLine(«alias slam_updatecfg «»host_writeconfig slam_relay»»»)
If My.Settings.HoldToPlay Then
slam_cfg.WriteLine(«alias +slam_hold_play slam_play_on»)
slam_cfg.WriteLine(«alias -slam_hold_play slam_play_off»)
slam_cfg.WriteLine(«bind {0} +slam_hold_play», My.Settings.PlayKey)
Else
slam_cfg.WriteLine(«bind {0} slam_play», My.Settings.PlayKey)
End If
slam_cfg.WriteLine(«alias slam_curtrack «»exec slam_curtrack.cfg»»»)
slam_cfg.WriteLine(«alias slam_saycurtrack «»exec slam_saycurtrack.cfg»»»)
slam_cfg.WriteLine(«alias slam_sayteamcurtrack «»exec slam_sayteamcurtrack.cfg»»»)
For Each Track In Game.tracks
Dim index As String = Game.tracks.IndexOf(Track)
slam_cfg.WriteLine(«alias {0} «»bind {1} {0}; slam_updatecfg; echo Loaded: {2}»»», index + 1, My.Settings.RelayKey, Track.name)
For Each TrackTag In Track.tags
slam_cfg.WriteLine(«alias {0} «»bind {1} {2}; slam_updatecfg; echo Loaded: {3}»»», TrackTag, My.Settings.RelayKey, index + 1, Track.name)
Next
If Not String.IsNullOrEmpty(Track.hotkey) Then
slam_cfg.WriteLine(«bind {0} «»bind {1} {2}; slam_updatecfg; echo Loaded: {3}»»», Track.hotkey, My.Settings.RelayKey, index + 1, Track.name)
End If
Next
Dim CfgData As String
CfgData = «voice_enable 1; voice_modenable 1; voice_forcemicrecord 0; con_enable 1»
If Game.VoiceFadeOut Then
CfgData = CfgData + «; voice_fadeouttime 0.0»
End If
slam_cfg.WriteLine(CfgData)
End Using
‘slam_tracklist.cfg
Using slam_tracklist_cfg As StreamWriter = New StreamWriter(GameCfgFolder & «slam_tracklist.cfg»)
slam_tracklist_cfg.WriteLine(«echo «»You can select tracks either by typing a tag, or their track number.»»»)
slam_tracklist_cfg.WriteLine(«echo «»———————Tracks———————«»»)
For Each Track In Game.tracks
Dim index As String = Game.tracks.IndexOf(Track)
If My.Settings.WriteTags Then
slam_tracklist_cfg.WriteLine(«echo «»{0}. {1} [{2}]»»», index + 1, Track.name, «‘» & String.Join(«‘, ‘», Track.tags) & «‘»)
Else
slam_tracklist_cfg.WriteLine(«echo «»{0}. {1}»»», index + 1, Track.name)
End If
Next
slam_tracklist_cfg.WriteLine(«echo «»———————————————-«»»)
End Using
End Sub
Private Function LoadTrack(ByVal Game As SourceGame, ByVal index As Integer) As Boolean
Dim Track As track
If Game.tracks.Count > index Then
Track = Game.tracks(index)
Dim voicefile As String = Path.Combine(SteamAppsPath, Game.directory) & «voice_input.wav»
Try
If File.Exists(voicefile) Then
File.Delete(voicefile)
End If
Dim trackfile As String = Game.libraryname & Track.name & Game.FileExtension
If File.Exists(trackfile) Then
If Track.volume = 100 And Track.startpos <= 0 And Track.endpos <= 0 Then
File.Copy(trackfile, voicefile)
Else
If My.Settings.UseFFMPEG Then
FFMPEG_ConvertAndTrim(trackfile, voicefile, Game.samplerate, Game.channels, Track.startpos / Game.samplerate / 2, (Track.endpos — Track.startpos) / Game.samplerate / 2, (Track.volume / 100) ^ 6) ‘ /2 because SLAM stores Track.startpos and Track.endpos as # of bytes not sample. With 16-bit audio, there are 2 bytes per sample.
Else
Dim WaveFloat As New WaveChannel32(New WaveFileReader(trackfile))
If Not Track.volume = 100 Then
WaveFloat.Volume = (Track.volume / 100) ^ 6
End If
If Not Track.startpos = Track.endpos And Track.endpos > 0 Then
Dim bytes((Track.endpos — Track.startpos) * 4) As Byte
WaveFloat.Position = Track.startpos * 4
WaveFloat.Read(bytes, 0, (Track.endpos — Track.startpos) * 4)
WaveFloat = New WaveChannel32(New RawSourceWaveStream(New MemoryStream(bytes), WaveFloat.WaveFormat))
End If
WaveFloat.PadWithZeroes = False
Dim outFormat = New WaveFormat(Game.samplerate, Game.bits, Game.channels)
Dim resampler = New MediaFoundationResampler(WaveFloat, outFormat)
resampler.ResamplerQuality = 60
WaveFileWriter.CreateWaveFile(voicefile, resampler) ‘wav
resampler.Dispose()
WaveFloat.Dispose()
End If
End If
Dim GameCfgFolder As String = Path.Combine(SteamAppsPath, Game.directory, Game.ToCfg)
Using slam_curtrack As StreamWriter = New StreamWriter(GameCfgFolder & «slam_curtrack.cfg»)
slam_curtrack.WriteLine(«echo «»[SLAM] Track name: {0}»»», Track.name)
End Using
Using slam_saycurtrack As StreamWriter = New StreamWriter(GameCfgFolder & «slam_saycurtrack.cfg»)
slam_saycurtrack.WriteLine(«say «»[SLAM] Track name: {0}»»», Track.name)
End Using
Using slam_sayteamcurtrack As StreamWriter = New StreamWriter(GameCfgFolder & «slam_sayteamcurtrack.cfg»)
slam_sayteamcurtrack.WriteLine(«say_team «»[SLAM] Track name: {0}»»», Track.name)
End Using
End If
Catch ex As Exception
LogError(ex)
Return False
End Try
Else
Return False
End If
Return True
End Function
Private Function recog(ByVal str As String, ByVal reg As String) As String
Dim keyd As Match = Regex.Match(str, reg, RegexOptions.IgnoreCase) ‘RegexOptions.IgnoreCase because bind could be saved as lowercase
Return (keyd.Groups(1).ToString)
End Function
Private Sub PollRelayWorker_DoWork(sender As Object, e As System.ComponentModel.DoWorkEventArgs) Handles PollRelayWorker.DoWork
PollRelayWorker.ReportProgress(SEARCHING) ‘Report that SLAM is searching.
Dim Game As SourceGame = e.Argument
Dim GameDir As String = Game.directory & Game.exename & «.exe»
SteamAppsPath = vbNullString
Dim UserDataPath As String = vbNullString
Try
If Not My.Settings.OverrideFolders Then
Do While Not PollRelayWorker.CancellationPending
Dim GameProcess As String = GetFilepath(Game.exename)
If Not String.IsNullOrEmpty(GameProcess) AndAlso GameProcess.EndsWith(GameDir) Then
SteamAppsPath = GameProcess.Remove(GameProcess.Length — GameDir.Length)
End If
Dim SteamProcess As String = GetFilepath(«Steam»)
If Not String.IsNullOrEmpty(SteamProcess) Then
UserDataPath = SteamProcess.Remove(SteamProcess.Length — «Steam.exe».Length) & «userdata»
End If
If IO.Directory.Exists(SteamAppsPath) Then
If Not Game.id = 0 Then
If IO.Directory.Exists(UserDataPath) Then
Exit Do
End If
Else
Exit Do
End If
End If
Thread.Sleep(Game.PollInterval)
Loop
Else
SteamAppsPath = My.Settings.steamapps
If IO.Directory.Exists(My.Settings.userdata) Then
UserDataPath = My.Settings.userdata
Else
Throw New System.Exception(«Userdata folder does not exist. Disable «»override folder detection»», or select a correct folder.»)
End If
End If
If Not String.IsNullOrEmpty(SteamAppsPath) Then
CreateCfgFiles(Game, SteamAppsPath)
End If
Catch ex As Exception
LogError(ex)
e.Result = ex
Return
End Try
PollRelayWorker.ReportProgress(WORKING) ‘Report that SLAM is working.
Do While Not PollRelayWorker.CancellationPending
Try
Dim GameFolder As String = Path.Combine(SteamAppsPath, Game.directory)
Dim GameCfg As String = Path.Combine(GameFolder, Game.ToCfg) & «slam_relay.cfg»
If Not Game.id = 0 Then
GameCfg = UserDataCFG(Game, UserDataPath)
End If
If File.Exists(GameCfg) Then
Dim RelayCfg As String
Using reader As StreamReader = New StreamReader(GameCfg)
RelayCfg = reader.ReadToEnd
End Using
Dim command As String = recog(RelayCfg, String.Format(«bind «»{0}»» «»(.*?)»»», My.Settings.RelayKey))
If Not String.IsNullOrEmpty(command) Then
‘load audiofile
If IsNumeric(command) Then
If LoadTrack(Game, Convert.ToInt32(command) — 1) Then
PollRelayWorker.ReportProgress(Convert.ToInt32(command) — 1)
End If
End If
File.Delete(GameCfg)
End If
End If
Thread.Sleep(Game.PollInterval)
Catch ex As Exception
If Not ex.HResult = —2147024864 Then ‘-2147024864 = «System.IO.IOException: The process cannot access the file because it is being used by another process.»
LogError(ex)
e.Result = ex
Return
End If
End Try
Loop
If Not String.IsNullOrEmpty(SteamAppsPath) Then
DeleteCFGs(Game, SteamAppsPath)
End If
End Sub
Public Function UserDataCFG(Game As SourceGame, UserdataPath As String) As String
If IO.Directory.Exists(UserdataPath) Then
For Each userdir As String In System.IO.Directory.GetDirectories(UserdataPath)
Dim CFGPath As String = Path.Combine(userdir, Game.id.ToString) & «localcfgslam_relay.cfg»
If File.Exists(CFGPath) Then
Return CFGPath
End If
Next
End If
Return vbNullString
End Function
Private Function GetFilepath(ProcessName As String) As String
Dim wmiQueryString As String = «Select * from Win32_Process Where Name = «»» & ProcessName & «.exe»»»
Using searcher = New ManagementObjectSearcher(wmiQueryString)
Using results = searcher.Get()
Dim Process As ManagementObject = results.Cast(Of ManagementObject)().FirstOrDefault()
If Process IsNot Nothing Then
Dim exePath = Process(«ExecutablePath»)
‘ Check Process(«ExecutablePath») for null before calling ToString.
‘ Fixes error that occurs if you start steam / csgo while SLAM is searching.
Dim procPath = If(exePath IsNot Nothing, exePath.ToString(), vbNullString)
If Not String.IsNullOrWhiteSpace(procPath) Then
Return Process(«ExecutablePath»).ToString
End If
End If
End Using
End Using
Return Nothing
End Function
Private Sub PollRelayWorker_ProgressChanged(sender As Object, e As System.ComponentModel.ProgressChangedEventArgs) Handles PollRelayWorker.ProgressChanged
Select Case e.ProgressPercentage
Case SEARCHING
status = SEARCHING
StatusLabel.Text = «Status: Searching…»
Case WORKING
status = WORKING
StatusLabel.Text = «Status: Working.»
Case Else
DisplayLoaded(e.ProgressPercentage)
End Select
End Sub
Private Sub PollRelayWorker_RunWorkerCompleted(sender As Object, e As System.ComponentModel.RunWorkerCompletedEventArgs) Handles PollRelayWorker.RunWorkerCompleted
If running Then
StopPoll()
End If
status = IDLE
StatusLabel.Text = «Status: Idle.»
RefreshTrackList()
If Not IsNothing(e.Result) Then ‘Result is always an exception
MessageBox.Show(e.Result.Message & » See errorlog.txt for more info.», «Error», MessageBoxButtons.OK, MessageBoxIcon.Error)
End If
If ClosePending Then
Me.Close()
End If
End Sub
Private Sub CreateTags(ByVal Game As SourceGame)
Dim NameWords As New Dictionary(Of String, Integer)
Dim index As Integer
For Each Track In Game.tracks
Dim Words As List(Of String) = Track.name.Split({» «c, «.»c, «-«c, «_»c}).ToList
For Each Word In Words
If Not IsNumeric(Word) And Not Game.blacklist.Contains(Word.ToLower) And Word.Length < 32 Then
If NameWords.ContainsKey(Word) Then
NameWords.Remove(Word)
Else
NameWords.Add(Word, index)
End If
End If
Next
index += 1
Next
For Each Tag As KeyValuePair(Of String, Integer) In NameWords
Game.tracks(Tag.Value).tags.Add(Tag.Key)
Next
End Sub
Private Sub EnableInterface()
For Each Control In Me.Controls
Control.Enabled = True
Next
End Sub
Private Sub DisableInterface()
For Each Control In Me.Controls
Control.Enabled = False
Next
End Sub
Private Sub DisplayLoaded(ByVal track As Integer)
For i As Integer = 0 To TrackList.Items.Count — 1
TrackList.Items(i).SubItems(0).Text = «False»
Next
TrackList.Items(track).SubItems(0).Text = «True»
End Sub
Private Sub LoadTrackKeys(ByVal Game As SourceGame)
Dim SettingsList As New List(Of track)
Dim SettingsFile As String = Path.Combine(Game.libraryname, «TrackSettings.xml»)
If File.Exists(SettingsFile) Then
Dim XmlFile As String
Using reader As StreamReader = New StreamReader(SettingsFile)
XmlFile = reader.ReadToEnd
End Using
SettingsList = Deserialize(Of List(Of track))(XmlFile)
End If
For Each Track In Game.tracks
For Each SetTrack In SettingsList
If Track.name = SetTrack.name Then
‘Please tell me that there is a better way to do the following…
Track.hotkey = SetTrack.hotkey
Track.volume = SetTrack.volume
Track.startpos = SetTrack.startpos
Track.endpos = SetTrack.endpos
End If
Next
Next
End Sub
Private Sub SaveTrackKeys(ByVal Game As SourceGame)
Dim SettingsList As New List(Of track)
Dim SettingsFile As String = Path.Combine(Game.libraryname, «TrackSettings.xml»)
For Each Track In Game.tracks
If Not String.IsNullOrEmpty(Track.hotkey) Or Not Track.volume = 100 Or Track.endpos > 0 Then
SettingsList.Add(Track)
End If
Next
If SettingsList.Count > 0 Then
Using writer As StreamWriter = New StreamWriter(SettingsFile)
writer.Write(Serialize(SettingsList))
End Using
Else
If File.Exists(SettingsFile) Then
File.Delete(SettingsFile)
End If
End If
End Sub
Private Sub TrackList_MouseClick(sender As Object, e As MouseEventArgs) Handles TrackList.MouseClick
If e.Button = MouseButtons.Right Then
If TrackList.FocusedItem.Bounds.Contains(e.Location) Then
For Each Control In TrackContextMenu.Items ‘everything invisible
Control.visible = False
Next
SetVolumeToolStripMenuItem.Visible = True ‘always visible
ContextRefresh.Visible = True
If TrackList.SelectedItems.Count > 1 Then
If Not running Then ‘visible when multiple selected AND is not running
ContextDelete.Visible = True
End If
Else
If running Then
TrimToolStripMenuItem.Visible = True ‘visible when only one selected AND is running
If status = WORKING Then
LoadToolStripMenuItem.Visible = True
End If
Else
For Each Control In TrackContextMenu.Items ‘visible when only one selected AND is not running (all)
Control.visible = True
Next
LoadToolStripMenuItem.Visible = False
End If
End If
‘Maybe I should have used a case… Maybe…
End If
TrackContextMenu.Show(Cursor.Position)
End If
End Sub
Private Sub TrackList_MouseDoubleClick(sender As Object, e As MouseEventArgs) Handles TrackList.MouseDoubleClick
If TrackList.FocusedItem.Bounds.Contains(e.Location) AndAlso status = WORKING Then
LoadTrack(GetCurrentGame, TrackList.SelectedItems(0).Index)
DisplayLoaded(TrackList.SelectedItems(0).Index)
End If
End Sub
Private Sub ContextRefresh_Click(sender As Object, e As EventArgs) Handles ContextRefresh.Click
ReloadTracks(GetCurrentGame)
RefreshTrackList()
End Sub
Private Sub ContextDelete_Click(sender As Object, e As EventArgs) Handles ContextDelete.Click
Dim game As SourceGame = GetCurrentGame()
Dim SelectedNames As New List(Of String)
For Each item In TrackList.SelectedItems
SelectedNames.Add(item.SubItems(1).Text)
Next
If MessageBox.Show(String.Format(«Are you sure you want to delete {0}?», String.Join(«, «, SelectedNames)), «Delete Track?», MessageBoxButtons.YesNo) = Windows.Forms.DialogResult.Yes Then
For Each item In SelectedNames
Dim FilePath As String = Path.Combine(game.libraryname, item & game.FileExtension)
If File.Exists(FilePath) Then
Try
File.Delete(FilePath)
Catch ex As Exception
LogError(ex)
MsgBox(String.Format(«Failed to delete {0}.», FilePath))
End Try
End If
Next
End If
ReloadTracks(GetCurrentGame)
RefreshTrackList()
End Sub
Private Sub ContextHotKey_Click(sender As Object, e As EventArgs) Handles ContextHotKey.Click
Dim SelectKeyDialog As New SelectKey
Dim SelectedIndex = TrackList.SelectedItems(0).Index
If SelectKeyDialog.ShowDialog = Windows.Forms.DialogResult.OK Then
Dim Game = GetCurrentGame()
Dim KeyIsFree As Boolean = True
For Each track In Game.tracks
If track.hotkey = SelectKeyDialog.ChosenKey Then ‘Checking to see if any other track is already using this key
KeyIsFree = False
End If
Next
If KeyIsFree Then
Game.tracks(SelectedIndex).hotkey = SelectKeyDialog.ChosenKey
SaveTrackKeys(GetCurrentGame)
ReloadTracks(GetCurrentGame)
RefreshTrackList()
Else
MessageBox.Show(String.Format(«»»{0}»» has already been assigned!», SelectKeyDialog.ChosenKey), «Invalid Key»)
End If
End If
End Sub
Private Sub RemoveHotkeyToolStripMenuItem_Click(sender As Object, e As EventArgs) Handles RemoveHotkeyToolStripMenuItem.Click
For Each SelectedIndex In TrackList.SelectedItems
Dim Game = GetCurrentGame()
Game.tracks(SelectedIndex.index).hotkey = vbNullString
SaveTrackKeys(GetCurrentGame)
ReloadTracks(GetCurrentGame)
Next
RefreshTrackList()
End Sub
Private Sub GoToToolStripMenuItem_Click(sender As Object, e As EventArgs) Handles GoToToolStripMenuItem.Click
Dim Games As SourceGame = GetCurrentGame()
Dim FilePath As String = Path.Combine(Games.libraryname, Games.tracks(TrackList.SelectedItems(0).Index).name & Games.FileExtension)
Dim Args As String = String.Format(«/Select, «»{0}»»», FilePath)
Dim pfi As New ProcessStartInfo(«Explorer.exe», Args)
System.Diagnostics.Process.Start(pfi)
End Sub
Private Sub SetVolumeToolStripMenuItem_Click(sender As Object, e As EventArgs) Handles SetVolumeToolStripMenuItem.Click
Dim SetVolumeDialog As New SetVolume
If SetVolumeDialog.ShowDialog = Windows.Forms.DialogResult.OK Then
For Each index In TrackList.SelectedIndices
GetCurrentGame.tracks(index).volume = SetVolumeDialog.Volume
Next
SaveTrackKeys(GetCurrentGame)
ReloadTracks(GetCurrentGame)
RefreshTrackList()
End If
End Sub
Private Sub TrimToolStripMenuItem_Click(sender As Object, e As EventArgs) Handles TrimToolStripMenuItem.Click
If File.Exists(«NAudio.dll») Then
Dim Game As SourceGame = GetCurrentGame()
Dim TrimDialog As New TrimForm
TrimDialog.WavFile = Path.Combine(Game.libraryname, Game.tracks(TrackList.SelectedIndices(0)).name & Game.FileExtension)
TrimDialog.startpos = Game.tracks(TrackList.SelectedIndices(0)).startpos
TrimDialog.endpos = Game.tracks(TrackList.SelectedIndices(0)).endpos
If TrimDialog.ShowDialog = Windows.Forms.DialogResult.OK Then
Game.tracks(TrackList.SelectedIndices(0)).startpos = TrimDialog.startpos
Game.tracks(TrackList.SelectedIndices(0)).endpos = TrimDialog.endpos
SaveTrackKeys(GetCurrentGame)
ReloadTracks(GetCurrentGame)
RefreshTrackList()
End If
Else
MessageBox.Show(«You are missing NAudio.dll! Cannot trim without it!», «Missing File», MessageBoxButtons.OK, MessageBoxIcon.Error)
End If
End Sub
Private Sub RenameToolStripMenuItem_Click(sender As Object, e As EventArgs) Handles RenameToolStripMenuItem.Click
Dim Game As SourceGame = GetCurrentGame()
Dim RenameDialog As New RenameForm
Dim SelectedTrack As SourceGame.track = GetCurrentGame.tracks(TrackList.SelectedIndices(0))
RenameDialog.filename = SelectedTrack.name
If RenameDialog.ShowDialog = Windows.Forms.DialogResult.OK Then
Try
FileSystem.Rename(Game.libraryname & SelectedTrack.name & Game.FileExtension, Game.libraryname & RenameDialog.filename & Game.FileExtension)
GetCurrentGame.tracks(TrackList.SelectedIndices(0)).name = RenameDialog.filename
SaveTrackKeys(GetCurrentGame)
ReloadTracks(GetCurrentGame)
RefreshTrackList()
Catch ex As Exception
Select Case ex.HResult
Case —2147024809
MessageBox.Show(«»»» & RenameDialog.filename & «»» contains invalid characters.», «Error», MessageBoxButtons.OK, MessageBoxIcon.Error)
Case —2146232800
MessageBox.Show(«A track with that name already exists.», «Error», MessageBoxButtons.OK, MessageBoxIcon.Error)
Case Else
MessageBox.Show(ex.Message & » See errorlog.txt for more info.», «Error», MessageBoxButtons.OK, MessageBoxIcon.Error)
End Select
End Try
End If
End Sub
Private Async Sub CheckForUpdate()
Dim UpdateText As String
Dim NeatVersion As String = My.Application.Info.Version.ToString.Remove(My.Application.Info.Version.ToString.LastIndexOf(«.»))
Try
Using client As New HttpClient
Dim UpdateTextTask As Task(Of String) = client.GetStringAsync(«http://slam.flankers.net/updates.php?version=» & NeatVersion)
UpdateText = Await UpdateTextTask
End Using
Catch ex As Exception
Return
End Try
Dim NewVersion As New Version(«0.0.0.0») ‘generic
Dim UpdateURL As String = UpdateText.Split()(1)
If Version.TryParse(UpdateText.Split()(0), NewVersion) Then
If My.Application.Info.Version.CompareTo(NewVersion) < 0 Then
If MessageBox.Show(String.Format(«An update ({0}) is available! Click «»OK»» to be taken to the download page.», NewVersion.ToString), «SLAM Update», MessageBoxButtons.OKCancel) = Windows.Forms.DialogResult.OK Then
Process.Start(UpdateURL)
End If
End If
End If
End Sub
Private Sub PlayKeyButton_Click(sender As Object, e As EventArgs) Handles PlayKeyButton.Click
Dim SelectKeyDialog As New SelectKey
If SelectKeyDialog.ShowDialog = Windows.Forms.DialogResult.OK Then
If Not SelectKeyDialog.ChosenKey = My.Settings.RelayKey Then
My.Settings.PlayKey = SelectKeyDialog.ChosenKey
My.Settings.Save()
RefreshPlayKey()
Else
MessageBox.Show(«Play key and relay key can not be the same!», «Error», MessageBoxButtons.OK, MessageBoxIcon.Error)
End If
End If
End Sub
Private Sub RefreshPlayKey()
PlayKeyButton.Text = String.Format(«Play key: «»{0}»» (change)», My.Settings.PlayKey)
End Sub
Public Sub LogError(ByVal ex As Exception)
If My.Settings.LogError Then
Using log As StreamWriter = New StreamWriter(«errorlog.txt», True)
log.WriteLine(«———————{0} UTC———————«, DateTime.Now.ToUniversalTime)
log.WriteLine(ex.ToString)
End Using
End If
End Sub
Private Sub ChangeDirButton_Click(sender As Object, e As EventArgs) Handles ChangeDirButton.Click
SettingsForm.ShowDialog()
End Sub
Private Sub DeleteCFGs(ByVal Game As SourceGame, ByVal SteamappsPath As String)
Dim GameDir As String = Path.Combine(SteamappsPath, Game.directory)
Dim GameCfgFolder As String = Path.Combine(GameDir, Game.ToCfg)
Dim SlamFiles() As String = {«slam.cfg», «slam_tracklist.cfg», «slam_relay.cfg», «slam_curtrack.cfg», «slam_saycurtrack.cfg», «slam_sayteamcurtrack.cfg»}
Dim voicefile As String = Path.Combine(SteamappsPath, Game.directory) & «voice_input.wav»
Try
If File.Exists(voicefile) Then
File.Delete(voicefile)
End If
For Each FileName In SlamFiles
If File.Exists(GameCfgFolder & FileName) Then
File.Delete(GameCfgFolder & FileName)
End If
Next
Catch ex As Exception
LogError(ex)
End Try
End Sub
Private Sub Form1_FormClosing(sender As Object, e As FormClosingEventArgs) Handles Me.FormClosing
If running Then
StopPoll()
ClosePending = True
e.Cancel = True
End If
End Sub
Private Sub LoadToolStripMenuItem_Click(sender As Object, e As EventArgs) Handles LoadToolStripMenuItem.Click
LoadTrack(GetCurrentGame, TrackList.SelectedItems(0).Index)
DisplayLoaded(TrackList.SelectedItems(0).Index)
End Sub
Private Sub Form1_Resize(sender As Object, e As EventArgs) Handles Me.Resize
If My.Settings.MinimizeToSysTray Then
If WindowState = FormWindowState.Minimized Then
SystemTrayIcon.Visible = True
SystemTrayIcon.BalloonTipIcon = ToolTipIcon.Info
SystemTrayIcon.BalloonTipTitle = «SLAM»
SystemTrayIcon.BalloonTipText = «Minimized to tray»
SystemTrayIcon.ShowBalloonTip(50000)
Hide()
ShowInTaskbar = False
End If
End If
End Sub
Private Sub SystemTrayIcon_DoubleClick(sender As Object, e As EventArgs) Handles SystemTrayIcon.DoubleClick
Show()
ShowInTaskbar = True
WindowState = FormWindowState.Normal
SystemTrayIcon.Visible = False
End Sub
Private Sub SystemTrayMenu_OpenHandler(sender As Object, e As EventArgs) Handles SystemTrayMenu_Open.Click
Show()
ShowInTaskbar = True
WindowState = FormWindowState.Normal
SystemTrayIcon.Visible = False
End Sub
Private Sub SystemTrayMenu_StartStopHandler(sender As Object, e As EventArgs) Handles SystemTrayMenu_StartStop.Click
If running Then
StopPoll()
Else
StartPoll()
End If
End Sub
Private Sub SystemTrayMenu_ExitHandler(sender As Object, e As EventArgs) Handles SystemTrayMenu_Exit.Click
If running Then
StopPoll()
ClosePending = True
Else
Me.Close()
End If
End Sub
End Class
FAQs
Warning: Undefined array key «q» in /usr/www/andyserver/public_slam/faq.php on line 6
1. I can’t start SLAM, I keep getting an error. How can I fix this?
You probably have an out-of-date version of .Net. Download v4.5.
Warning: Undefined array key «q» in /usr/www/andyserver/public_slam/faq.php on line 8
Warning: Undefined array key «q» in /usr/www/andyserver/public_slam/faq.php on line 11
2. I started SLAM but none of the commands work. How can I fix this?
You probably have your game installed on a drive other than C:. Click «Settings», under «SteamApps Directory» click «Change», and then select your «steamapps» folder that contains your game. The path should look something like «C:Program Files (x86)Steamsteamapps».
Warning: Undefined array key «q» in /usr/www/andyserver/public_slam/faq.php on line 13
Warning: Undefined array key «q» in /usr/www/andyserver/public_slam/faq.php on line 16
3. After playing a track, I can’t use my mic. How can I fix this?
To play a track you press your play key once, when you are done playing the track (or it’s over), you must press your play key one more time.
Warning: Undefined array key «q» in /usr/www/andyserver/public_slam/faq.php on line 18
Warning: Undefined array key «q» in /usr/www/andyserver/public_slam/faq.php on line 21
4. When I type «exec slam», I get «Unknown command: voice_fadeouttime». What’s wrong?
That error is generally nothing to worry about. Try using SLAM anyway.
Warning: Undefined array key «q» in /usr/www/andyserver/public_slam/faq.php on line 23
Warning: Undefined array key «q» in /usr/www/andyserver/public_slam/faq.php on line 26
5. Can I get VAC banned for using SLAM?
No, SLAM only adds .cfg and .wave files to the game’s the folder. Valve Anti Cheat bans you for cheating, not playing music.
Warning: Undefined array key «q» in /usr/www/andyserver/public_slam/faq.php on line 28
Warning: Undefined array key «q» in /usr/www/andyserver/public_slam/faq.php on line 31
6. Where can I get help?
r/SourceLiveAudioMixer/ is the place to go.
Warning: Undefined array key «q» in /usr/www/andyserver/public_slam/faq.php on line 33
Warning: Undefined array key «q» in /usr/www/andyserver/public_slam/faq.php on line 36
7. Everything works, but my track won’t play in CS:S or TF2. What’s wrong?
To play a track in a CS:S or TF2 server, the server must have «sv_allow_voice_from_file» set to «1» and «sv_use_steam_voice» set to «0».
Warning: Undefined array key «q» in /usr/www/andyserver/public_slam/faq.php on line 38
Warning: Undefined array key «q» in /usr/www/andyserver/public_slam/faq.php on line 41
8. When I type «exec slam», I get «exec: couldn’t exec slam». What’s wrong?
Make sure you clicked the «Start» button. If it is still not working, see FAQ #2.
Warning: Undefined array key «q» in /usr/www/andyserver/public_slam/faq.php on line 43
Warning: Undefined array key «q» in /usr/www/andyserver/public_slam/faq.php on line 46
9. I cannot load tracks from CS:GO’s console. It says the tracks are being loaded, but in SLAM they do not appear loaded.
You probably have Steam or CS:GO installed on a drive other than C:. Click «Settings», under «UserData Directory» click «Change», and then select your true «userdata» folder. The path should look something like «C:Program Files (x86)Steamuserdata».
Warning: Undefined array key «q» in /usr/www/andyserver/public_slam/faq.php on line 48
Warning: Undefined array key «q» in /usr/www/andyserver/public_slam/faq.php on line 51
10. I cannot hear the track that I just loaded from the console. What’s wrong?
It is likely that the tracks aren’t actually being loaded. Please see FAQ #9.
Warning: Undefined array key «q» in /usr/www/andyserver/public_slam/faq.php on line 53
- İşletim sistemi
- Windows 10
-
#1
Merhaba. Canım sıkılmıştı CS:GO gireyim dedim arkadaşlarımı trollemek için slam uygulamasını açtım. Ve start buttonuna bastıktan sonra. System. Exception: Steamapps folder is incorrect. Disable «override folder detection», or select a correct folder. Hatası verdi. Not: Slamı en son 1 hafta önce kullanmıştım, ve çalışıyordu bu konuyu yazmadan önce foruma baktım ve bir şey bulamadım.
-

Screenshot_324.png
1,1 MB
· Görüntüleme: 49
-
#2
Program aç kapa yap exec slamla şarkı ismini gene yaz oluyor olmazsa birkaç kere daha aç kapa düzelio ya da müzik dosyalarının yerini değiştirmiş olabilirsin.
-
#3
Senin dediklerini çoktan denemiştim ben 100 kere.
-
#5
kanka deme sunları ya yaptım bunları hep
-
#6
Hmm WAV dosyalarını Slam’e mi koydunuz? Veya MP3 dosyaları?
kanka deme sunları ya yaptım bunları hep
-
#7
Hmm WAV dosyalarını Slam’e mi koydunuz? Veya MP3 dosyaları?
Evet programda şu an gözükmüyor fakat silip kurdum silmeden önce müzik dosyaları vardı yine aynı hata vardı.
-
#8
Bekliyorum?🙄
SLAM çalışmazsa, muhtemelen CSGO’da bir sorun vardır
Naudio.dll ile Slam’i CS:GO klasörüne koy bunu dene 😌😌😌
-
#9
bekliyorum?🙄
Slam çalışmazsa, muhtemelen CS:GO’da bir sorun vardır.
Naudio.dll ile Slam’i CS:GO klasörüne koy bunu dene 😌😌😌
Discord’unuz var mıdır?

Steam – популярная игровая платформа, которой пользуются миллионы игроков из разных стран. Однако, как и любой другой сервис для геймеров, Стим имеет свои недостатки. Например, многие пользователи сталкиваются со сбоями в работе системы облачного хранения данных (Steam Cloud). Одна из распространенных ошибок – «Steam не удалось синхронизировать ваши файлы». В этой статье мы расскажем, почему она появляется и как от нее избавиться.
Содержание:
- 1. Ошибка «Стим не смог синхронизировать ваши файлы»: основные причины
- 2. Проверка работы серверов Steam
- 3. Удаление папки с данными пользователя Steam
- 4. Проверка целостности файлов игры в Стиме
- 5. Восстановление папки библиотеки Steam
- 6. Отключение брандмауэра
- 7. Добавление Steam в исключения антивирусника
- 8. Включение синхронизации со Steam Cloud
- 9. Обновление файлов программы Стим
1. Ошибка «Стим не смог синхронизировать ваши файлы»: основные причины
В большинстве случаев данная ошибка связана со временными сбоями на серверах Steam. Если вы ранее уже пользовались облачным хранилищем и оно работало у вас без нареканий, но в какой-то определенный момент начали появляться уведомления о невозможности синхронизации файлов, то просто подождите некоторое время. С вероятностью в 90% эта проблема решится без вашего вмешательства.
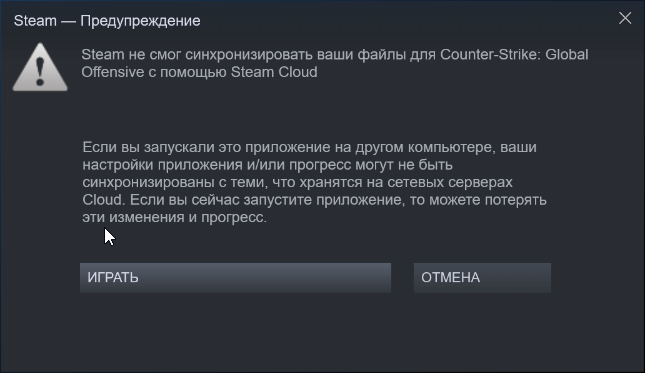
Если же синхронизация со Steam Cloud у вас не работает изначально или прошло уже много времени, а сообщение о том, что Steam не смог синхронизировать файлы, все равно появляется, то стоит проверить, не связано ли это с настройками вашего компьютера или другими факторами. Ниже мы подробно расскажем, как избавиться от ошибки «Стим не удалось синхронизировать файлы».
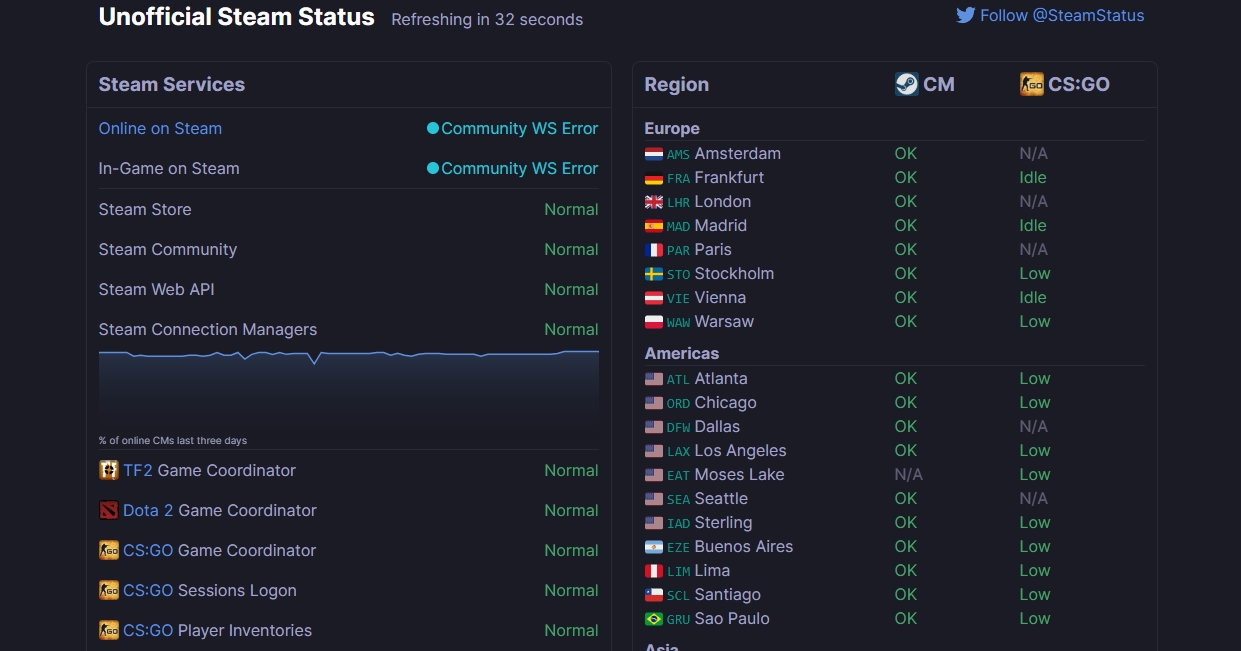
Прежде чем начать копаться в настройках и файлах своего ПК обязательно проверьте, работают ли сервера Steam на данный момент. Проверить статус серверов Стим можно двумя способами:
- Первый вариант: войдите в приложение и проверьте работоспособность магазина, списка друзей и т. д. Если все функционирует как и раньше, значит, с серверами игровой платформы все нормально.
- Второй вариант: воспользуйтесь специальными сервисами для проверки статуса серверов Steam. Например, подробную информацию об этой игровой платформе предоставляет сайт steamstat.us.
В том случае, если сервера Steam работают нормально, но ошибка «Не удалось синхронизировать файлы» все равно появляется, попробуйте избавиться от нее с помощью рекомендаций из этой статьи.
3. Удаление папки с данными пользователя Steam
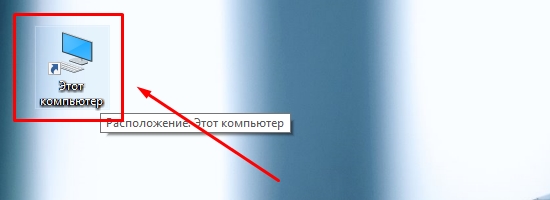
В большинстве случаев ошибка «Steam не смог синхронизировать ваши файлы» решается удалением папки с данными пользователя. Она называется userdata и находится по умолчанию здесь: C:Program Files (x86)Steamsteam. Если же приложение Стим у вас установлено на другой диск и вы не можете найти папку userdata вручную, воспользуйтесь службой поиска файлов на вашем компьютере:
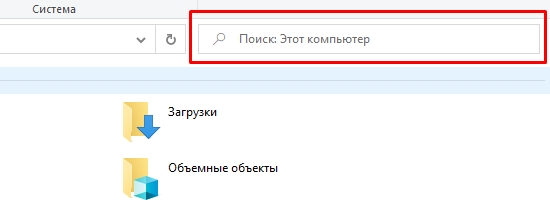
- Перейдите в «Этот компьютер»;

- Выберите строку «Поиск» в верхнем правом углу;
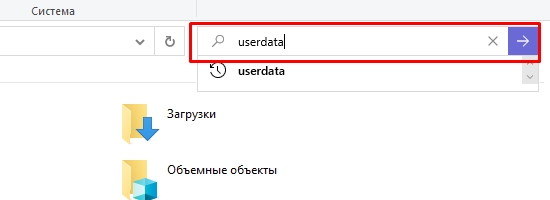
- Введите название папки – userdata и нажмите Enter;
- Дождитесь результатов поиска и выберите в списке папку userdata Стима.

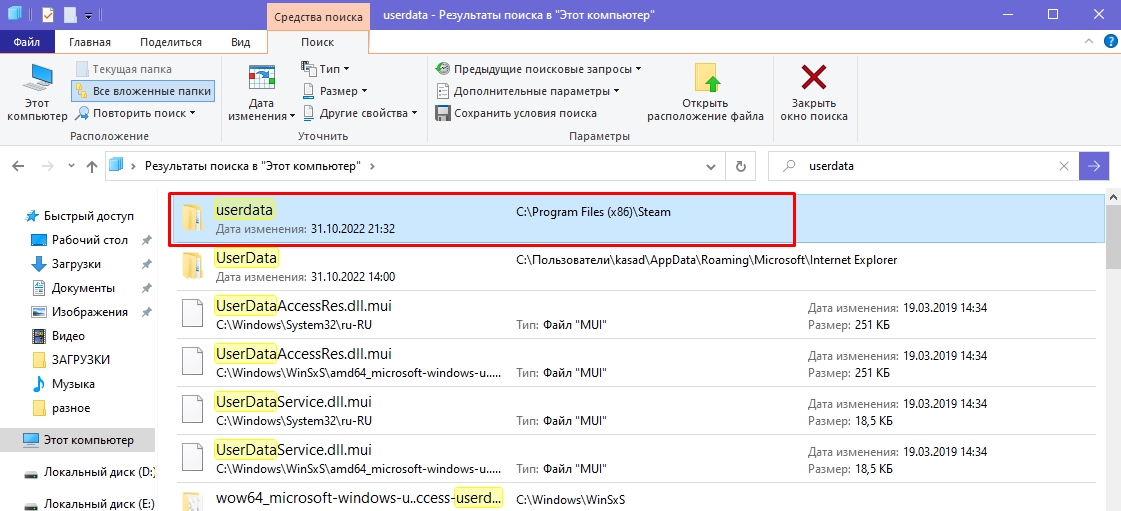
После этого завершите все процессы Steam в диспетчере задача и удалите userdata со своего компьютера. В том случае, если вы переживаете за сохранность каких-то важных данных, можете предварительно скопировать содержимое папки userdata и сохранить его в другом месте, а только потом удалить ее. Выполнив это действие, запустите приложение Стим и проверьте, исчезла ли ошибка «Не удалось синхронизировать файлы в Steam Cloud».
Что хранится в папке userdata Steam?
В папке userdata содержатся следующие сведения о пользователе:
- Данные учетной записи;
- Настройки облачного хранилища;
- Данные о синхронизации с Steam Cloud;
- Данные игр вашего аккаунта и т. д.
Если какие-либо файлы внутри этой папки повреждены, то появляется ошибка «Steam не смог синхронизировать ваши файлы». В этом случае избавиться от нее можно только полным удалением userdata.
4. Проверка целостности файлов игры в Стиме
Игровые файлы нередко повреждаются в процессе скачивания или во время автоматического/ручного обновления через Стим. Это одна из причин, по которой пользователь не может синхронизироваться с облачным хранилищем Steam Cloud. Если вы начали получать сообщения об ошибке при синхронизации файлов, мы рекомендуем вам проверить целостность файлов игры:
- Запустите Steam и перейдите в библиотеку;
- Выберите нужную игру в списке, кликните по ней правой кнопкой мышки и в выпадающем меню нажмите «Свойства»;

- В разделе «Локальные файлы» нажмите «Проверить целостность игровых файлов…»;

- Дождитесь завершения операции.
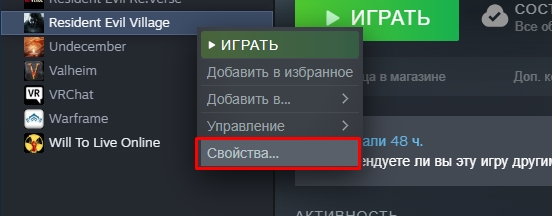
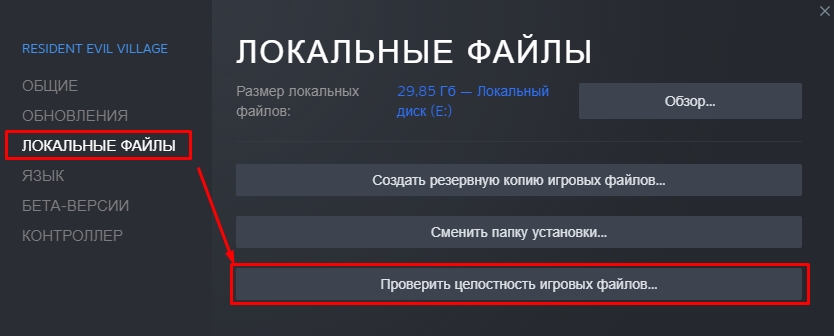
Теперь вы можете проверить, исчезла ли ошибка «Steam не удалось синхронизировать ваши файлы». Если проблема была в поврежденных файлах игры, то такое уведомление больше не появится.
5. Восстановление папки библиотеки Steam
В некоторых случаях невозможность синхронизации со Steam Cloud связана с повреждением содержимого папки SteamLibrary. Вы можете проверить целостность файлов, которые находятся в ней, с помощью программы Стим:
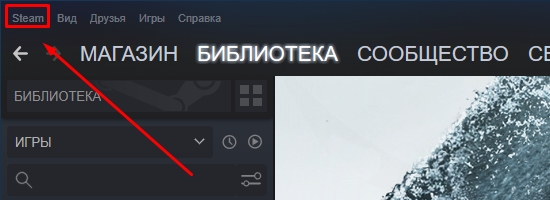
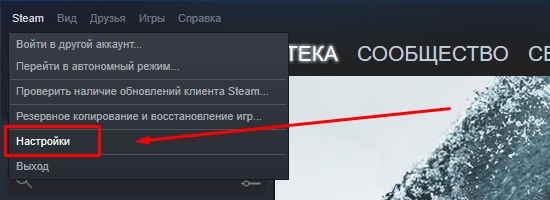
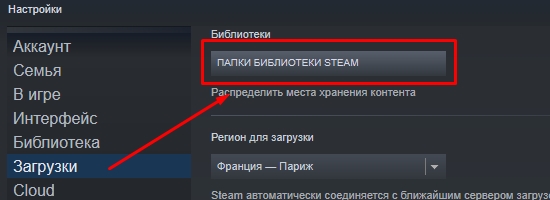
- Запустите Steam и в верхнем левом углу кликните «Steam»;
- В выпадающем меню выберите «Настройки»;
- В новом окне выберите раздел «Загрузки», а потом нажмите на «Папки библиотеки Steam»;
- В следующем окне выберите диск, где находится папка с играми, нажмите на три точки (…) справа и в выпадающем меню кликните по «Восстановить папку».

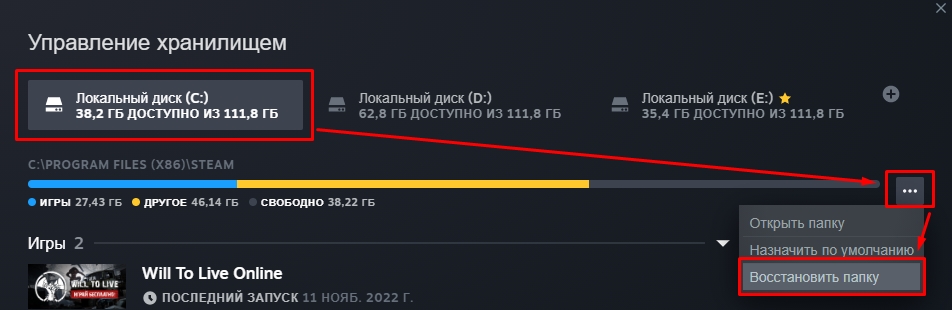
Обратите внимание! Если у вас папки SteamLibrary есть на нескольких разных дисках, восстановите их по очереди.
После того, как восстановление папки/папок SteamLibrary завершится, проверьте, исчезла ли ошибка «Стим не смог синхронизировать ваши файлы».
6. Отключение брандмауэра
Нередко программы, которые отвечают за защиту ПК, блокируют работу некоторых приложений или сервисов, связанных с ними. К примеру, брандмауэр Windows частенько конфликтует со Стимом, и это становится причиной появления ошибки «Steam не смог синхронизировать ваши файлы».
Дело в том, что Steam в фоновом режиме регулярно «перебирает» файлы установленных на ваш компьютер игр: обновляет их, догружает новые и т. д. Эти действия брандмауэр Windows расценивает как подозрительные, поэтому блокирует их, из-за чего связь с облачным хранилищем обрывается и синхронизация не происходит. В этом случае вам нужно отключить брандмауэр Windows:
- Откройте «Панель управления»;
- Выберите в списке «Брандмауэр Защитника Windows»;
- Кликните по «Изменение параметров уведомлений»;
- Выберите «Отключить Брандмауэр Защитника Windows» для Частной и Общественной сети.
Теперь синхронизация файлов с Steam Cloud должна пройти без ошибок.
7. Добавление Steam в исключения антивирусника
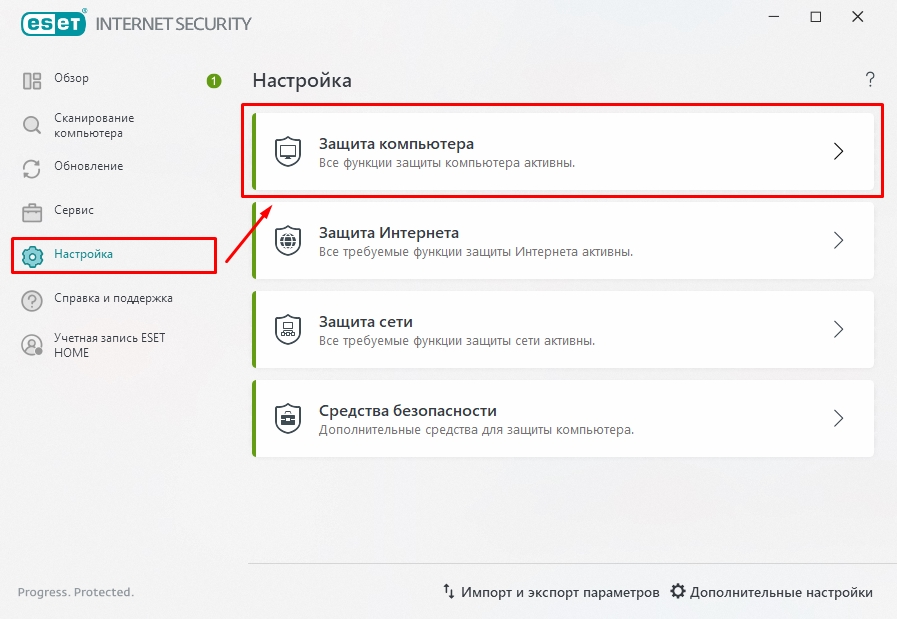
Как и брандмауэр Windows, стороннее антивирусное ПО так же может препятствовать нормальной работе Steam. Если у вас регулярно выскакивает ошибка «Стим не удалось синхронизировать файлы», то добавьте приложение в исключения вашего антивируса. Как это сделать, зависит от того, какой антивирус у вас стоит. Мы покажем на примере ESET NOD32:
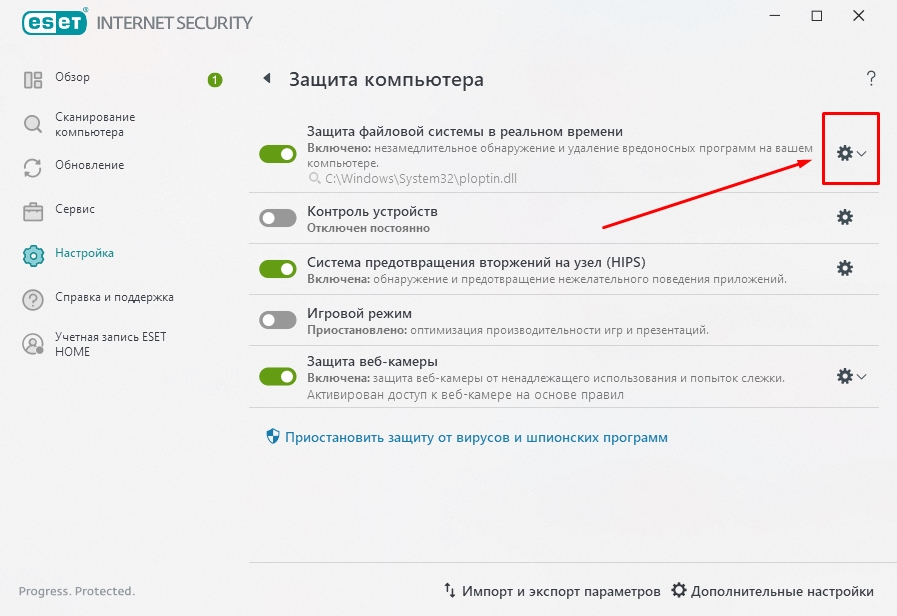
- Откройте программу и перейдите в раздел «Настройки». В правой части окна нажмите на «Защита компьютера»;

- Рядом со строкой «Защита файловой системы в режиме реального времени» кликните по значку в виде шестеренки;

- В выпадающем меню выберите «Изменить исключения…»;

- В окне «Исключить из обнаружения» нажмите «Добавить»;

- Выберите путь к папке Steam и добавьте ее.
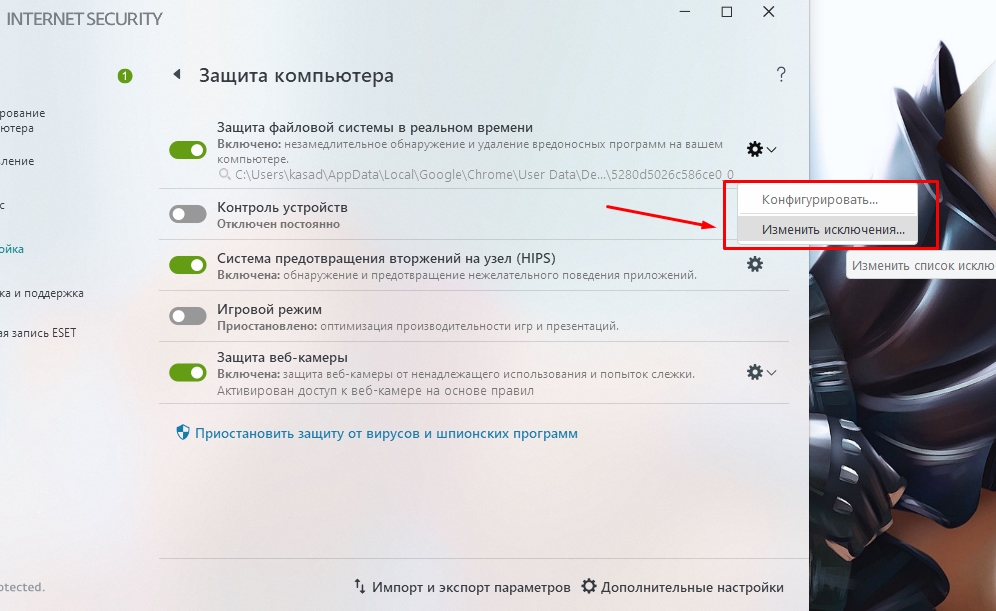

После этого она появится в списке исключений. С этого момента антивирусник не будет проверять ее содержимое и как-либо влиять на работу приложения.
Если у вас на компьютере установлен другой антивирус (Kaspersky Internet Security, Avast и проч.), посетите официальный сайт разработчика и узнайте, как добавить приложения в исключения конкретного защитного ПО.
8. Включение синхронизации со Steam Cloud
Если недавно вы изменяли настройки Стима, то, вероятно, случайно отключили синхронизацию с системой облачного хранения игровых файлов. Из-за этого у вас начали появляется уведомления о том, что синхронизация завершилась неудачей. Чтобы избавиться от ошибки «Не удалось синхронизировать файлы», сделайте следующее:
- Запустите программу и в верхнем левом углу кликните «Steam»;
- В выпадающем меню выберите «Настройки»;
- В новом окне выберите раздел «Cloud», а потом поставьте флажок напротив «Включить синхронизацию со Steam Cloud для поддерживаемых приложений».

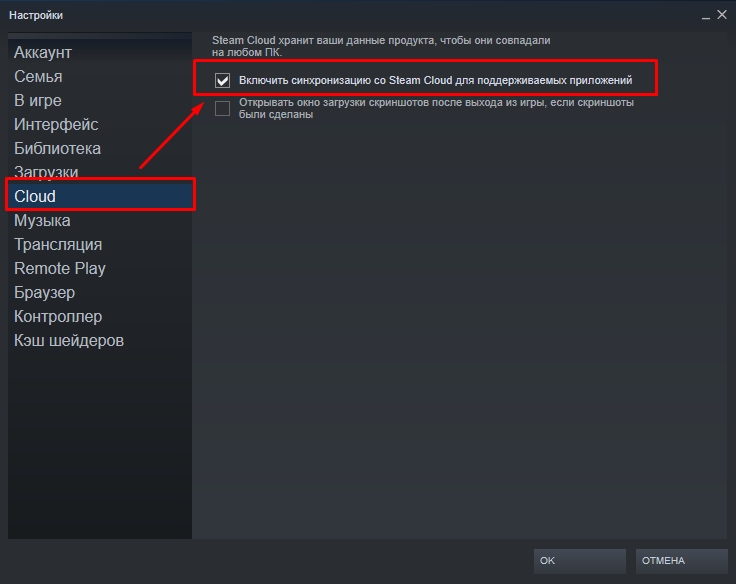
Если в будущем вам потребуется отключить эту функцию, сделайте то же самое, только уберите флажок рядом с «Включить синхронизацию со Steam Cloud для поддерживаемых приложений».
9. Обновление файлов программы Стим
Если перечисленные выше способы не помогли вам исправить ошибку «Steam не смог синхронизировать ваши файлы», обновите программу. После этого все файлы конфигурации клиента Steam будут удалены и установлены заново. Как обновить Стим:
- Откройте диспетчер задач с помощью комбинации клавиш Ctrl + Shift + Esc и завершите все процессы, связанные со Стимом.
- Перейдите в проводник и найдите папку, куда установлен Steam.
- Выберите все файлы и папки, кроме папки steamapps и Steam.exe.
- Удалите все выбранные файлы.
- Перезагрузите компьютер, а затем запустите программу Steam от имени администратора.
- Подождите, пока Стим загрузит недостающие файлы.
После этого ошибка «Steam не смог синхронизировать ваши файлы» должна исчезнуть.
Пользователей Стим с каждым годом становится всё больше. Этому поспособствовали разработчики компьютерных игр, которые ограничивают доступ к сети пиратские копии. Есть ряд других причин, но в этой статье мы поговорим о проблемах клиента, с которыми мы часто сталкиваемся. Вы узнаете, как решить ошибку «Steam cannot run from a folder path with non-ASCII characters».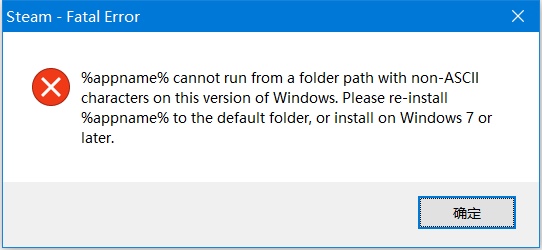
Содержание
- Причина ошибки в Steam
- Как исправить ошибку в Стим
- Переустановка Steam
- Что делать, если ошибка в Steam всё равно появляется
Причина ошибки в Steam
Данная проблема появляется у пользователей сразу после установки клиента популярной игровой библиотеки Steam. Как только мы выбираем иконку на рабочем столе — появляется системное сообщение. Часто в нём описана и причина, и даже решения ошибки. Но запутывает английский язык, который является родным для системы Windows. Есть и русскоязычная версия этого сообщения и оно выглядит приблизительно так: система не может запустить программу из папки, в имени которой есть символы не из английского языка.
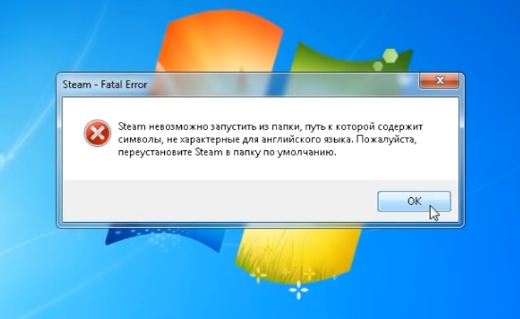
Это значит, что при установке Стима вы указали папку для установки, имя которой на русском. Или по пути к Steam есть такая папка. Запомните — папки в компьютере нужно называть только английскими символами. При этом можно использовать транслитерацию: «Moja Papka» или «Stim». Не исключены и другие причины, которые могут нарушать работу системы и вызывать ошибки.
Это может быть полезным: Steam client not found Dota 2 — что делать?
Как исправить ошибку в Стим
Для того, чтобы исправить ошибку, вы можете попытаться просто переименовать папку на пути к Steam, в которой имя не соответствует требованиям. Есть способы, которые помогут вам быстро определить текущее расположение папки Steam.
- Выберите иконку библиотеки на рабочем столе ПКМ;
- Нажмите в окне пункт «Расположение файла»;

- Откроется окно папки со Steam, в котором вы сможете определить его путь и найти нужную папку.


Этот путь находится в верхней строке окна. Запомните его или не закрывайте эту папку, чтобы видеть, где она расположена. Чтобы дать папке новое имя, нужно снова нажать ПКМ и выбрать «Переименовать». После этого попробуйте запустить Steam. Если ошибка «Cannot run from a folder path with non-ASCII characters» снова появляется, переходим к следующему способу.
Читайте также: Unable to initialize Steam API, как исправить?
Переустановка Steam
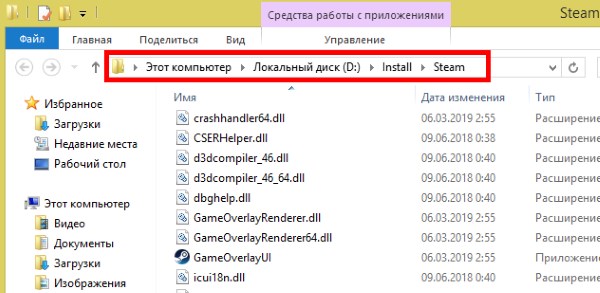
Чтобы вы смогли запустить Стим без ошибок, нужно переустановить клиент. Но сделать это правильно. Каждая система Windows имеет, как правило два локальных диска — один для системы (C), другой для файлов пользователя (D). Это удобно и позволяет не засорять раздел с Виндовс пользовательскими данными. Лучше всего установить новый Стим на не системный том. Но перед установкой нужно удалить старый клиент.
- Нажмите вместе WIN+X и выберите «Панель управления»;
- Затем нажмите «Удаление программ»;
- В списке найдите клиент, выберите его мышью и вверху нажмите кнопку «Удалить»;

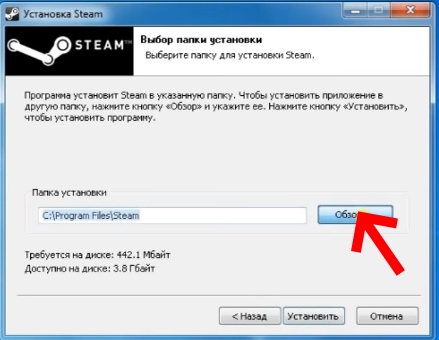
В перечне установленных программ найдите и удалите Стим - Теперь откройте сайт Стима https://store.steampowered.com/?l=russian и скачайте новый клиент;
- Откройте диск D (или С, если он один) и создайте здесь папку «Steam». Только английскими буквами. И новая папка не должна размещаться в другой (должна быть в корне диска);
- Запустите клиент, но не спешите нажимать кнопку установки. Дойдите до момента, когда вам предлагают путь для установки. Выберите кнопку «Обзор» и укажите папку, которую вы только что создали — «Steam»;

- Теперь подтвердите установку и дождитесь её завершения.

После установки попробуйте запустить клиент. Ошибка не появится, так как в новом пути к файлам библиотеки нет непонятных для системы символов.
Узнайте, что делать, если система VAC не смогла проверить вашу игровую сессию в CS:GO.
Что делать, если ошибка в Steam всё равно появляется
Если решить проблему с запуском Стим не удалось вышеизложенными способами,значит причина не в имени папок. Скорее всего в системе появился вирус, который мешает нормальной работе вашего ПК. А это проблема уже серьёзнее той, которую мы пытались решить. Вам нужно вернуться в окно для удаления программ и просмотреть весь список приложений. Найдите здесь все игры и программы, которыми вы не пользуетесь. И удалите их. Почистите также свои папки с файлами: музыку, изображения, видео.
Ваш встроенный антивирус скорее всего уже бессилен. Так как он не реагирует на вирус, поселившийся в компьютере. Поэтому вам нужен сторонний защитник. В таких случаях многие более опытные пользователи применяют сканирующие утилиты от популярных разработчиков. Можем порекомендовать утилиту от Лаборатории Касперского — https://www.kaspersky.com/downloads/thank-you/free-virus-removal-tool. Или одноразовое средство по этой ссылке https://free.drweb.ru/download+cureit+free/ от Dr.WEB.
Предложенные программы являются бесплатными и портативными. Это значит, что их не нужно устанавливать. Загрузите файл утилиты и запустите её, согласившись с правилами использования. Через некоторое время сканирование завершится, и вы сможете узнать результаты. Если подозрение падёт на одну из ваших игр или программ — не задумываясь удаляйте её. Это источник ваших проблем. После чистки ПК от вирусов перегрузите компьютер и запустите Steam. Если ошибка «Steam cannot run from a folder path with non-ASCII characters» снова появляется — переустановите клиент.
На чтение 15 мин. Просмотров 1.1k. Опубликовано 21.04.2021
Пользователи могут столкнуться с ошибкой при попытке обновить/установить свои игры Steam. Появляется сообщение об ошибке, в котором указывается, что отсутствуют права доступа к файлу, а также указывается путь к этому файлу. Эта ошибка может произойти по ряду причин в зависимости от конфигурации оборудования и программного обеспечения плеера. В большинстве случаев это незначительная ошибка, которая исчезает после выполнения перечисленных ниже решений.
Содержание
- Восстановить поврежденные системные файлы
- Решение 1. Остановка процесса igfxEm
- Решение 2. Использование Lockhunter (стороннее приложение 3 rd)
- Решение 3. Изменение региона загрузки
- Решение 4. Перезагрузка ПК
- Решение 5. Предоставление прав администратора Steam
- Решение 6. Предоставление полного контроля над затронутым файлом
- Решение 7. Восстановление папки библиотеки и проверка целостности
- Решение 8. Удаление файлов в безопасном режиме
- Решение 9. Очистка кеша загрузки
- Решение 10. Разрешение через брандмауэр и антивирус
- Решение 11. Диагностика фоновых приложений
- Решение 12. Сортировка файлов
- Окончательное решение: обновление файлов Steam
Восстановить поврежденные системные файлы
Загрузите и запустите Restoro для сканирования поврежденных файлов из здесь , если обнаружено, что файлы повреждены и отсутствуют, восстановите их, а затем проверьте, устраняет ли он проблему, если нет, перейдите к Решениям, перечисленным ниже .
Решение 1. Остановка процесса igfxEm
igfxEM.exe – это программный компонент Общего пользовательского интерфейса Intel, разработанный корпорацией Intel. Он входит в стандартный пакет при установке Microsoft Windows и драйверов для работы графических карт. Это своего рода промежуточное ПО между графикой Intel и пользователем. Он также имеет функцию, позволяющую отображать характеристики и настройки, а также настраивать их с помощью предоставленного графического интерфейса.
igfxEM означает основной исполняемый модуль графики Intel. Это файл с расширением «.exe». Файл не причиняет вреда компьютеру и получен из надежного источника. Он также имеет цифровую подпись. Однако это не файл ядра Windows, и он также не отображается. Расположение файла для igfxEM фиксировано ( C: Windows System32 igdxEm.exe ). Если исполняемый файл найден где-то еще, скорее всего, это вредоносное ПО или троянец, который может нанести вред вашему компьютеру.
Многие пользователи сообщили, что остановка этой службы и перезапуск Steam помогли решить их проблему. Хотя может быть совершенно непонятно, почему отключение службы не причинит вреда, поскольку это совсем не основной процесс и не повлияет на ваш компьютер.
- Нажмите Windows + R и в диалоговом окне введите « taskmgr ». Это запустит диспетчер задач вашего компьютера.
- В диспетчере задач найдите вкладку Процесс и в списке найдите igfxEM .

- Найдя службу, закройте его и перезапустите Steam с правами администратора. Снова запустите загрузку и посмотрите, устранена ли проблема.
Решение 2. Использование Lockhunter (стороннее приложение 3 rd )
Если у вас возникли проблемы с использованием решения 1, мы можем попробовать использовать стороннее приложение, чтобы проверить, какое приложение запрещает доступ к Steam, и остановить его. Обратите внимание, что мы не связаны с какими-либо сторонними приложениями 3 rd , и вы будете использовать их на свой страх и риск.
- Загрузите и установите Lockhunter отсюда.
- После загрузки откройте Lockhunter с правами администратора, щелкнув его правой кнопкой мыши и выбрав Запуск от имени администратора .
- После вы откроете Lockhunter, вы увидите такое окно.

- Чтобы перейти к папке/файлу, который выдает ошибку Steam, выберите вариант поиска файлов и перейдите к SteamApps . Выберите эту папку и нажмите OK.

- После выбора папки приложение определит, какая программа ограничивает доступ к файлу, и вернет вам результаты. Скорее всего, это будет

- Щелкните файл и выберите Разблокировать! . Приложение принудительно удалит все программы, которые могут вызывать конфликт.

- Перезапустите Steam с помощью администратора привилегии, и все будет в порядке.

Решение 3. Изменение региона загрузки
Одно из основных исправлений включает изменение региона загрузки.
Контент Steam Система разделена на разные регионы. Клиент автоматически определяет ваш регион через вашу сеть и устанавливает его по умолчанию. Иногда серверы в определенном регионе могут быть перегружены или могут иметь аппаратный сбой. Поэтому изменение региона загрузки может решить проблему.
- Откройте Steam и нажмите « Настройки » в раскрывающемся меню в левый верхний угол окна.
- Выберите « Загрузки » и перейдите к « Download Region ».
- Выберите другие регионы, кроме вашего, и перезапустите Steam.

Решение 4. Перезагрузка ПК
Иногда на вашем ПК могут возникать технические ошибки, которые могут быть незаметны. В Steam одновременно выполняется несколько процессов. Каждый раз, когда вы видите выпуск обновления, это не просто загрузка. Steam делит все данные игры на разные части по 1 МБ. Затем он демонстрирует, как собрать эти фрагменты, чтобы они могли правильно выполнять свою роль.
Если мы предположим, что ваши игровые файлы имеют размер 1 ГБ каждый и их 3 присутствуют. Выкатывается обновление из 3МБ (по 1МБ на каждый файл игры). Steam загрузит обновление размером 1 МБ и скопирует оставшиеся (1023 МБ). Умножьте это в 3 раза, так как всего есть три игровых файла. Оказывается, много копий и очень меньше скачиваний. Steam использует этот метод, чтобы избежать поврежденных загрузок и сэкономить трафик..
Иногда может случиться так, что в процессе копирования могут возникнуть проблемы, и Steam выдает ошибку, связанную с отсутствием прав доступа к файлу. Перезагрузите компьютер , чтобы увидеть, будет ли устранена ошибка. Кроме того, избегайте запуска любого другого программного обеспечения/программ, которые могут помешать процессу обновления, как указано выше.
Решение 5. Предоставление прав администратора Steam
Steam требует двух вещей для бесперебойной работы. Прочти и напиши. Хотя может показаться, что это не имеет большого значения, если ваш компьютер рассматривает Steam как программу « только для чтения », он не сможет писать в разные файлы и зависать при загрузке/ обновление игры.
Мы можем попробовать предоставить права администратора Steam и проверить, решена ли проблема. Вам не нужно беспокоиться о том, что Steam нанесет вред вашему компьютеру. Он имеет цифровую подпись компании, и все его программы защищены от вредоносных программ.
- Откройте каталог Steam. Расположение по умолчанию для Steam – ( C: Program Files Steam ). Если вы установили Steam в другой каталог, вы также можете перейти в него. Нажмите кнопку Windows + R , чтобы запустить приложение «Выполнить», и в диалоговом окне введите адрес, указанный выше. Это должно запустить каталог Steam.
- Найдя папку Steam, щелкните ее правой кнопкой мыши и выберите Свойства . Перейдите на вкладку Безопасность и нажмите Advanced внизу экрана.

- Теперь вам будет представлена такая таблица. Первые 4 строки доступны для редактирования, а последние две – или нет. Здесь вы можете видеть, что мы предоставили полный доступ к папке. Если ваши настройки могут отличаться, вы можете изменить их с помощью метода, указанного ниже.

- Щелкните строку и нажмите кнопку Изменить . Появится окно, состоящее из всех опций в виде флажков. Отметьте все, включая Полный доступ . Нажмите Применить, сохраните изменения и выйдите. Сделайте это для первых 4 строк и выйдите после изменения.

- Теперь вы можете повторно запустить Steam, щелкнув Steam.exe и выбрав Запуск от имени администратора. Проверьте, устранена ли проблема с загрузкой.
Решение 6. Предоставление полного контроля над затронутым файлом
Мы может выполнить другое исправление, перейдя к затронутому файлу и предоставив ему полный доступ. Метод 4 должен предоставить им полный доступ ко всем папкам и подпапкам в каталоге Steam. Если у вас есть проблема с этим методом, вы можете точно определить файл и предоставить ему только полный доступ; так что ошибка пропущенных файловых привилегий может исчезнуть. Вам не нужно беспокоиться о том, что во время этого процесса что-либо может навредить вашему компьютеру.. Как я объяснял ранее, Steam тщательно тестируется перед запуском, чтобы убедиться в отсутствии программной ошибки.
- Чтобы точно определить файл, посмотрите на ошибку. Там будет указан точный адрес .
 Указан точный адрес:
C: Program Files (x86) Steam steamapps download 47890 EP11 Game.
- Вы можете перейти в это место с помощью приложения «Выполнить» или перейдя в каталог Steam. Другой способ – открыть клиент Steam, перейти на вкладку Библиотека и выбрать игру, в которой возникает ошибка. Щелкните его правой кнопкой мыши и выберите

После открытия свойств выберите вкладку Локальные файлы и в меню нажмите Обзор локальных файлов . Вы будете перенаправлены в локальную папку игры, где сможете найти файл, из-за которого возникла проблема.

- После того, как вы найдете файл, выполните шаги, упомянутые в Решении 4, и предоставьте полный доступ к этому файлу.
- Перезапустите Steam и проверьте, сохраняется ли проблема.
Решение 7. Восстановление папки библиотеки и проверка целостности
Есть возможность того, что ваша папка библиотеки Steam может быть повреждена и неправильно настроена. Также может быть случай, когда ваши игровые файлы могут быть неполными, а некоторые могут отсутствовать по какой-либо причине.
Проверка целостности файлов игры попытается исправить вашу установку, если есть какие-то поврежденные или отсутствующие файлы игры. Опция восстановления библиотеки обновит ваш список файлов и поможет, если некоторые файлы/файлы не зарегистрированы в библиотеке. Выполните шаги, указанные ниже.
- Откройте свой клиент Steam. После открытия нажмите Steam в верхнем левом углу и в раскрывающемся меню нажмите Настройки .

- В настройках перейдите к Загрузки и нажмите Папки библиотеки Steam вверху.

- Перед вами откроется небольшое окно со списком всех мест, где установлен Steam и хранилище/ пространства, которые использует Steam. Щелкните правой кнопкой мыши и выберите Восстановить библиотеку Steam .

- После того, как вы выполнили все шаги по восстановлению библиотеки, мы можем перейти к проверке целостности имеющихся файлов игры. Выйдите из настроек и нажмите вкладку Библиотека в клиенте Steam..
- Щелкните правой кнопкой мыши игру, которая выдает ошибку, и выберите Свойства .
- В свойствах перейдите к откройте вкладку Локальные Файлы и нажмите на параметр, который гласит Проверить целостность файлов игры . Затем Steam начнет проверку всех имеющихся файлов в соответствии с имеющимся у него основным манифестом. Если какой-либо файл отсутствует/поврежден, он снова загрузит эти файлы и заменит их соответствующим образом.

Решение 8. Удаление файлов в безопасном режиме
Если проблема все еще сохраняется, даже после попытки Все методы, мы можем удалить файлы загрузки, чтобы Steam мог загрузить их с нуля. Другое решение – обновить установку Steam, но мы попробуем этот метод перед тем, как пробовать этот утомительный.
Вход в безопасном режиме отключает все дополнительное запущенное программное обеспечение и позволяет гораздо проще выполнять административные действия. Это диагностический режим компьютера. Он предназначен для устранения всех проблем в операционной системе. Вам не о чем беспокоиться, потому что мы не будем вмешиваться в системные файлы. Мы попытаемся удалить файлы, которые застряли при загрузке и не могут продолжить работу из-за возникшей ошибки.
- Прежде всего, запишите путь к файлу. это доставляет вам проблемы, как мы делали ранее в решении 5 ( C: Program Files (x86) Steam steamapps download 47890 EP11 Game). После того, как вы записали ошибку, нам нужно ввести ваш компьютер в безопасный режим.
Переведите компьютер в безопасный режим, выбрав один из различных доступных вариантов. Выберите « Включить безопасный режим с загрузкой сетевых драйверов ». Если вы используете Windows 7, нажмите F8 при запуске компьютера, и вы будете перенаправлены в аналогичное окно, где вы можете выбрать требуемый параметр.

- После того, как вы успешно вошли в безопасный режим, перейдите к местоположению файла, которое мы записали ранее (перейдите к SteamApps ).
- Войдя в Steamapps, щелкните папку с надписью « загрузить ». Удалите все содержимое в нем.
- Перезагрузите компьютер и запустите Steam с правами администратора. Теперь следуйте Решению 6 и проверьте библиотеку и целостность игр, прежде чем снова начать загрузку. Надеюсь, к настоящему времени проблема будет решена.
Решение 9. Очистка кеша загрузки
В некоторых ситуациях Steam мог получить плохой кеш из-за чего возникает эта конкретная проблема. Поэтому на этом этапе мы войдем в свою учетную запись Steam, а затем попытаемся очистить кеш Steam и проверить, решит ли это проблему. Для этого:
- Запустите Steam и войдите со своими учетными данными..
- Нажмите на опцию «Steam» в верхнем левом углу и затем выберите «settings» из списка.

- В настройках Steam выберите «Загрузки» на левой панели. а затем нажмите кнопку «Очистить кеш загрузок» в правой части окна.
- Нажмите «ОК» в приглашении и дождитесь очистки кеша.
- Запустите игру и проверьте, чтобы увидеть если это устранило проблему.


Решение 10. Разрешение через брандмауэр и антивирус
В некоторых ситуациях ваш антивирус или брандмауэр может препятствовать некоторые функции приложения Steam от возможности подключения к Интернету. Поэтому на этом этапе мы разрешим Steam через брандмауэр, а также добавим исключение в Защитник Windows. Не забудьте также повторить эти шаги в своем антивирусе.
- Нажмите «Windows» + «R» , чтобы запустить приглашение.
- Введите «Control Panel» и нажмите «Enter» , чтобы запустить классический интерфейс панели управления.
- Нажмите Кнопка «Просмотр по:» , выберите «Большие значки» , а затем нажмите параметр брандмауэра Защитника Windows.
- Выберите Кнопку «Разрешить приложение или функцию через брандмауэр» на левой панели, а затем нажмите «Изменить Настройки » и примите приглашение.
- Отсюда убедитесь, что вы отметили оба варианта: «Общедоступный» и «Частный» для приложения Steam.
- Сохраните изменения и пр. его из окна.
- После этого нажмите «Windows» + «I» , чтобы запустить настройки, и нажмите в параметре «Обновление и безопасность» .
- На левой панели нажмите « Безопасность Windows », а затем нажмите кнопку « Защита от вирусов и угроз ».
- Нажмите кнопку «Управление настройками» под заголовком «Настройки защиты от вирусов и угроз».
- Прокрутите вниз и нажмите кнопку кнопку «Добавить или удалить исключения» в следующем окне.
- Нажмите «Добавить исключение» и выберите «Папка ‘ из типа файла.
- Обязательно укажите папку установки Steam и выйдите из этого окна после сохранения изменений.


Решение 11. Диагностика фоновых приложений
Некоторые люди заметили, что когда определенные приложения или службы работали в фоновом режиме, Steam получал эту ошибку при попытке работать со Steam. Поэтому на этом этапе мы будем выполнять чистую загрузку, и мы диагностирует стороннее вмешательство в Steam в этом режиме. Для этого выполните следующие действия.
- Нажмите «Windows» + «R» , чтобы открыть окно «Выполнить».
- Введите «taskmgr» и затем нажмите «Enter» , чтобы запустить диспетчер задач.
- В диспетчере задач щелкните на вкладке «Процессы» вверху, и должен быть показан список приложений, которые в данный момент работают на вашем компьютере.
- Задача Диспетчер также покажет текущее использование ЦП, ДИСКА и использования памяти на вашем компьютере.
- Щелкните параметр «ЦП» и убедитесь, что стрелка указывает на лицевой стороной вниз, чтобы отсортировать использование от большего к меньшему.
- Убедитесь, что какое-либо приложение использует ненормальное количество ресурсов на вашем компьютере, и щелкните по нему.
- Нажмите на «Завершить задачу» , чтобы предотвратить ее запуск на вашем компьютере.
- Также не забудьте отключить приложение ETS2, если оно присутствует в диспетчере задач.
- Аналогичным образом щелкните «Память» и «Диск» выбирает один за другим и удаляет все часто используемые приложения.
- Убедитесь, что это решит проблему с отсутствием прав доступа к файлам в Steam.


Выполнение вышеуказанных шагов должно избавить от большинства сторонних приложений, работающих в фоновом режиме. Однако мы также должны убедиться, что системная служба или приложение не мешает. Для этого:
- Нажмите «Windows ‘ + « R », чтобы запустить запрос« Выполнить ».
- Введите «MSConfig» и нажмите «Enter» , чтобы открыть окно настроек загрузки.
- В этом окне щелкните параметр «Службы» , а затем снимите флажок «Скрыть все службы Microsoft» .
- Нажмите кнопку «Отключить все» , чтобы эти службы не запускались при запуске.
- Теперь нажмите вкладку «Запуск» и выберите Параметр «Открыть диспетчер задач» .
- В диспетчере задач Вкладка Автозагрузка, обязательно отключите запуск всех приложений при запуске.
- После этого сохраните изменения и закройте оба окна.
- Перезагрузите компьютер и проверьте, нормально ли работает Steam.
- Если это так, это означает, что служба или приложение мешали нормальному функционированию приложения. Таким образом, вы можете по очереди включать эти службы и приложения и проверять, в каком из них проблема возникает снова.
- После диагностики неисправной службы или приложения вы можете либо попробовать переустановить их, либо оставить. отключен навсегда.


Решение 12. Сортировка файлов
Возможно, вы в какой-то момент отключили свой жесткий диск от компьютера и из-за этого система сортировки файлов на компьютере могла выйти из строя. Поэтому, прежде всего, определите, где Steam, по мнению Steam, установлена игра, перейдя в библиотеку, щелкнув игру правой кнопкой мыши и выбрав «Свойства» , после чего нажмите «Локальные файлы» , а затем нажмите кнопку «Обзор локальных файлов» . Убедитесь, что папка с игрой открывается вместо пустой папки или ошибки. Если открывается пустая папка, обязательно переместите игру в эту папку и повторите попытку.

Окончательное решение: обновление файлов Steam
Если ошибка все еще сохраняется на этом этапе, у нас нет другого выбора, кроме как обновить файлы Steam. При обновлении файлов Steam Steam снова будет переустановлен на вашем компьютере. Мы удалим некоторые из конфигурационных папок, чтобы обеспечить их обновление при установке и удаление всех плохих файлов.
Обратите внимание, что любое прерывание во время процесса копирования приведет к повреждению файлов, и вы будете придется заново загружать весь контент. Используйте это решение только в том случае, если вы уверены, что работа вашего компьютера не будет прервана.
- Перейдите в свой каталог Steam . Местоположение вашего каталога по умолчанию –
C:/Program Files (x86)/Steam.
- Найдите следующие файлы и папки:
Userdata (папка)
Steam.exe ( Приложение)
Steamapps (папка – в ней хранятся только файлы других игр)
Папка пользовательских данных содержит все данные вашего игрового процесса. Нам не нужно его удалять. Кроме того, внутри Steamapps вам нужно будет найти игру, которая вызывает у вас проблему, и удалить только эту папку. Остальные файлы содержат файлы установки и игровые файлы других игр, которые вы установили.
Однако, если установлена только одна игра и она вызывает у вас проблемы, мы рекомендуем вам удалить все Steamapps. папку и перейдите к следующему шагу.

- Удалите все остальные файлы/папки (кроме упомянутых выше) и перезагрузите компьютер.
- Повторно запустите Steam с правами администратора, и, надеюсь, он сам начнет обновляться. После завершения обновления он будет работать должным образом.
Steam users have been recently coming to us with the Steam Corrupt Disk while Downloading an error that shows them the “An error occurred while updating Game (Disk Read Error)” or any other error message with the Steam Corrupt Disk Error. This is mostly triggered due to any interruption or failure while Steam is downloading a game or an update.

In this article, we have dedicated ourselves to fixing this error and have also listed the reasons due to which it is triggered in the first place. Also, we have listed the fixes that the user can implement on their own which will allow them to completely get rid of the error from their PC.
What Causes the Steam Corrupt Disk Error?
After going through a bunch of different users’ feedback, we concluded that the following must be the most prominent reasons due to which this error occurs in the first place.
- Steam Installation: It is possible that your Steam installation has been corrupted due to which you are running into the Steam Corrupt Disk Error and to circumvent this, you can try to relocate the Steam installation and to do this, follow the steps that have been mentioned below.
- Outdated Operating System: The Operating system, if outdated, can also cause this error message. Therefore, we recommend that you try and install the latest available updates to the operating system and then check to see if doing so fixes the Steam Corrupt Disk issue.
- Outdated Drivers: It is also possible that the Drivers installed on your computer might have been outdated and they can sometimes cause this issue because Steam can face errors while trying to scan your Storage device. Therefore, we recommend that you install all the available updates.
- Antivirus Issue: The Antivirus installed on your computer might not be allowing the Steam app from being able to properly read your drives. Therefore, we recommend that you either let the app through your Antivirus or disable it temporarily to fix the Steam Corrupt Disk Error.
- Game File Integrity: The integrity of your game files might be damaged due to which you are getting this issue. Therefore, we recommend that you try and check your game file integrity as mentioned in the solution below and check to see if verifying it lets you fix this issue.
- Steam Beta: The Steam app might be running in the beta mode which uses some unconfirmed updates from Steam to test out new features and this can sometimes cause this error message. Therefore, we recommend that you opt-out of beta and check to see if doing so fixes the issue.
- App Cache: The App cache folder that contains all the cache created by the applications installed on your system might have acquired some corrupted cache. Therefore, we recommend that you clear out the app cache folder and then check to see if doing so fixes your issue.
- Steam Library Folder: The Steam Library folder might not be set properly due to which this error might be triggered. Therefore, we recommend that you repair this folder and confirm that you are able to fix the Steam Download corrupt Windows 10 issue.
- Driver Issue: The Drivers installed on your system might be interfering with some Steam features and due to this the error message can sometimes be seen. Therefore, we recommend that you rollback or reinstall certain drivers that are known to cause conflicts with Steam.
Now that you have been taken through almost all the reasons behind this error, we can finally move on towards implementing the solutions.
Fixing the steam corrupt disk while downloading issue:
Solution 1: Relocate Steam Installation and Game Files
- First, launch the “Steam Client” and click on the “Steam tab” in the upper left corner. Click on the “Settings” option and navigate to the “Downloads” in the left menu pane.
- Click on the “Add Library Folder” option and select a new location for your Steam on your Hard drive. Once selected, click on “Move Folder” to move all your files.

Add library folder - Now press the “Window + E” keys together on your keyboard, and switch to “This PC”. Navigate to the folder where Steam is downloaded. By default, you can find it at “C:Program Files (x86)Steam.”
- Now leaving the “SteamApps, UserData and .exe files and folders,” delete all the other content present in the directory.
- Then press the “Ctrl + X” keys simultaneously on your keyboard to cut the files. Navigate to the new directory of Steam and press “Ctrl + V” to paste these files.
- Afterward, “Restart“ your computer and launch Steam again to check if the corrupt disk steam error got removed.

Solution 2: Update Your Windows
- Go to the “Start Menu” located on the bottom left of the screen, here search for “Settings” and click to select it from the list of search results.
- Then proceed to select “Updates and Security” and in the following window click to select the “Windows Update” option.
- Here click on the “Check For Updates” option available and install any latest updates available if they are present and afterward restart your computer.

Check for updates - When your PC gets updated now proceed to verify if the steam corrupt disk error got resolved.

Solution 3: Update Your Graphics Cards Driver
For this step, you have to know the graphics card you are using on your PC. If you already know this, skip Step 1 and Step 2.
- Press the “Window + R” keys together on your keyboard to open up the “Run” prompt. In the Run prompt type in or paste “devmgmt.msc” to open the “Device Manager” window.

Typing devmgmt.msc in the Run prompt - Here locate the “Display Adapters” option and double click on it to extend it further. This will show you the particular graphics card installed on your PC.
- Once you know your graphics card, open your browser and type in “[your graphics card name] drivers.” Fill in the bracket with the name of your graphics card. If you are directed to your graphics card manufacturer website, navigate to the “Drivers & Utility or Drivers & Support” section, browse for your Graphics Card and download the latest driver present.
- Once downloaded, get back to the “Device Manager” and right-click on your “Graphics Card,” and proceed by clicking on “Update Drivers” in the menu. Then proceed by clicking on “Search Automatically For Updated Driver Software” and wait for a while until the computer finds and installs the updated drivers.

Search automatically for updated driver - It is recommended to “Restart” your computer and try running the game after it restarts.

Solution 4: Disable Antivirus Temporarily
- Open your desktop and right-click on the antivirus icon.
- From the popup context menu, choose to select “Disable”.

Disable antivirus - Once disabled, you can then “Install” or “Update” your game and enable the antivirus back once complete.

Solution 5: Whitelist Steam In Windows Firewall
- Press the “Window + R” keys together on your keyboard to open up the “Run” dialog box. In the Run prompt type in “control firewall.cpl” and press “Enter” to open “Windows Defender Firewall”.

Typing Control firewall Command - Next click on “Allow An App Or Feature Through Windows Defender Firewall” in the menu pane on the left.
- Then click on the “Change Settings” option in the “Allowed Apps” window. Click to select “YES” if you come across any permission prompts.
- Next click on “Allow Another App” at the bottom of the window in the “Allowed apps” and browse the “Steam.exe” file in the “Add An App” window. Typically it is located in “C:Program FilesSteambin.” Do the same with the .exe file of the game causing the problem.
- Then check the “Private and Public” boxes of both of the entries and click to select “OK”.
- Get back to the “Windows Defender Firewall” window and click on “Advanced Settings” in the menu pane on the left. Click on “YES” if you come across any permission prompts.
- Navigate to click the “Inbound Rules,” located on the left side of the window, and under the “Inbound Rules” drop-down menu on the left proceed to select “New Rule” under the “Actions” menu.

Clicking on the “New Rule” option - The “New Inbound Rule Wizard” dialogue box will open up. Click on the “Port” option and click on “Next.”
- At the “Protocols and Ports” step, choose the “TCP” option and then select the “Specific Local Ports” option.
- Now paste the following ports in the order as listed and select “Allow the Connection” each time you press “Next”. Do this for all the following entries:
27015--27030

27036

27015
- Similarly, add another rule for UDP and select the “UDP” and “Specific Local Ports” option instead of “TCP,” this time following the same previous steps:
27015--27030

27000--27100

27031-2703

4380

27015

3478

4379

4380
- Once all the ports are added, click on “Next” and make sure that all three options, “Domain,” “Public,” and “Private,” are checked.
- Hit “Next” and name your rules. Proceed by clicking on “Finish” and finally restart your computer.


Solution 6: Verify Integrity of Game Files
- Right-click on Steam and unselect “Run As Administrator.” Then navigate to the game that failed to update in the “Steam Library.”
- Right-click on the game, select “Properties,” and move to the “Local Files” tab. Click to select the “Verify Integrity of Game Files.”

Verify Integrity of the Game Files - Launch and play the game like normal and check to see if the steam corrupt disk reddit error got eradicated.

Solution 7: Repair Partitions
- Press the “Window + E” keys simultaneously on your keyboard to open up the “File Explorer” window and navigate to “This PC”.
- Right-click on each of the storage drives and select “Properties” from the drop-down menu.
- Move to the “Tools” tab and click on “Check” to start the Error Checking process. Then click on “YES” if you receive any system permissions.

Clicking on Check Option

Solution 8: Run Steam In Admin Mode
- Open the “Steam directory” where you have downloaded Steam, typically the location is “C:Program Files (x86)Steam.”
- Locate the executable file named “steam.exe” and right-click on the file to select “Properties” from the drop-down menu.
- Switch to the “Compatibility” tab and check the “Run This Program As Administrator” option under the “Settings” tab.

Run Steam as administrator - Click on “Apply” for the changes to take effect and now click on the same “steam.exe” file to see if the steam download corrupt windows 10 problem is resolved.
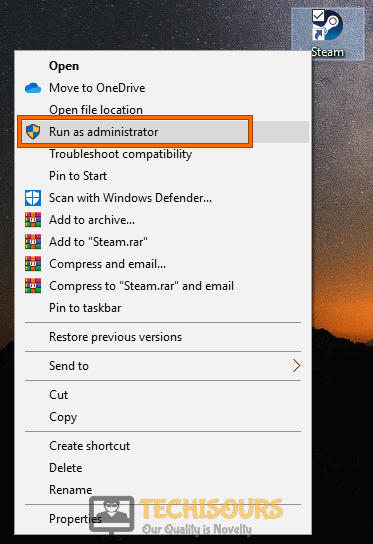
Solution 9: Update the Steam To Beta Client
- First, launch the “Steam client” and click on the “Steam tab” in the upper left corner.
- Next, click on the “Settings” option and navigate to the “Accounts” tab in the left menu pane.
- Under the “Beta Participation” section click to select the “Change” button.
- Then choose the “Steam Beta Update” option in the context menu and click on “OK”.

Choose Steam Beta Update - Finally, click on the “Restart Steam” option to allow the settings to take effect.
Solution 10: Opt Out Of Steam Beta
- First, launch the “Steam client” and click on the “Steam tab” in the upper left corner.
- Click on the “Settings” option and navigate to the “Accounts” tab in the left menu pane.
- Under the “Beta Participation” section click on the “Change” button.
- Choose the “NOTE – Opt-out of all beta programs” option in the context menu and click to select “OK”.

Opt-Out Of All Beta Programs - Restart your computer which will save you from the hassle of ending all steam-related tasks (Steam Client Bootstrapper, Steam Client Web helper, Steam Client Service) individually from the task manager.
- Once your computer has been restarted, open the “Steam Client” again and launch your game from the “Library” tab again.
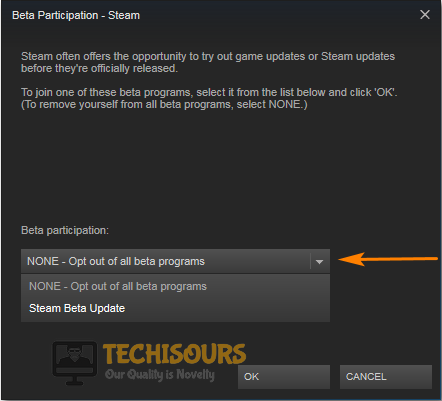
Solution 11: Delete the Contents Of Downloading Folder For CSGO
Though this only works for CSGO players, you can try the same for any Steam game that is giving you this error. Follow the below-listed steps:
- Press the “Window + E” keys together on your keyboard to open up the “File Explorer” window and navigate to “C:Program Files (x86)Steamsteamappsdownloading”.
- Select all the contents from the “Downloading” folder and hit the “Shift + Delete” keys together on your keyboard to delete that folder. You can also name it “download.old” and delete it later after updating.
- Open Steam again and try to update “CSGO” back again. If the error still persists, then you are advised to “Restart” your PC.
- Upon reboot, launch Steam again and try to update. This will re-download the complete “CSGO Update”.
- Once the update is finished, “Verify Integrity of Game Files” by following the steps in “Solution 6” above and then launch CSGO.
Solution 12: Change Download Region and Delete Local Content
- First, launch the “Steam client” and click on the “Steam tab” in the upper left corner. Click on the “Settings” option and navigate to the “Downloads” in the left menu pane.
- Select the region “Closest to You” under the “Download Region” section. Or you can test out different regions to find out what region gives you the best download speed.

Select the Download Region - Also, scroll to the bottom and click on the “Clear Download Cache” button.
- Now move over to the “Steam Library” and right-click on the problematic game.
- Next, click on “Delete Local Content” from the context menu and select “Delete” to confirm.

Delete Local Content - Now select the game again and redownload it once again. Don’t forget to “Verify Game Files” afterward as mentioned in “Solution 6” above.
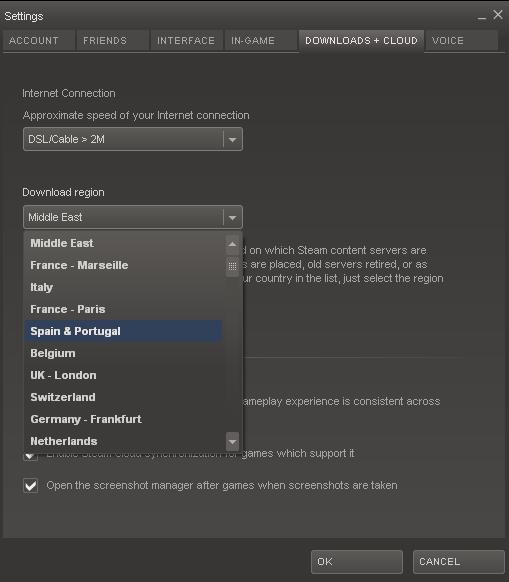

Solution 13: Run CHKDSK Command to Check Disk Error
- Right-click on the “Windows icon” and select “PowerShell (Admin)” from the drop-down menu.
- Paste the command “chkdsk /f /r” ” in the window and hit the “Enter” key.
- Lastly, “Restart” your computer to see if the error exists or not.
Solution 14: Delete the App cache Folder
- Press the “Window + E” keys together on your keyboard, and switch to “This PC”. Navigate to the “appcache folder”. By default, you can find it at the “C:Program Files (x86)Steam” location.
- Locate and delete the “appcache” folder and restart your computer.

Delete the appcache folder - Upon restart, launch Steam again and try updating the problematic game.
- Check to see if the Steam Corrupt Disk Error is gone.
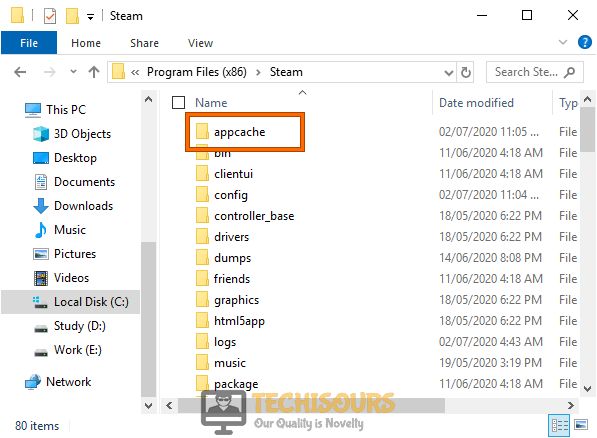
Solution 15: Tweak Power Setting
- Press the “Window + R” keys simultaneously on your keyboard to open up the “Run” dialog box. Here paste or type “powercfg.cpl” in the dialog box and press “Enter” to open up the “Power Options”.

Typing in “powercfg.cpl” - Then click on the “Change Plan Settings” in front of your selected “Power Plan” and then click on the “Change Advanced Power Settings” from the “Edit Plan Settings” window.
- In the pop-up “Power Options” window click on the “Hard Disk” to expand it and then click on “Turn Off Hard Disk After”.
- Now change this value to “Never” and follow the same steps for each “Power Plan” present on your computer.
- Once done now proceed to verify if the steam corrupt disk while downloading error got removed completely.

Solution 16: Backup and Reinstall Steam
Backup Steam:
- First, launch the “Steam client” and click on the “Steam tab” at the upper left. Then click on the “Settings” option, navigate to the “Downloads” in the left menu pane and click on “Steam Library Folders” under the “Settings” window. This will tell you all the libraries you have to backup.
- Next press the “Window + E” keys together on your keyboard, and switch to “This PC.” Locate the “Downloading” folder inside the “steamapps” folder. By default, it is present in “C: program files (x86)Steam steamapps”.
- Select the steamapps folder and right-click on it to select “Copy” from the context menu.
- Navigate on the desktop or in a drive to make another folder. Right-click on your desired location and select “New > Folder” from the context menu. Name the folder as “Steamapps Backup”.
- Repeat the same process for all your game libraries.
Reinstall Steam:
- Press the “Window + X” keys together on your keyboard and in the pop-up menu, click on “Apps and Features/Programs and Features”.
- In the “Apps and Features/Programs and Features” window, locate “Steam”.
- Right-click on it and select “Uninstall or Uninstall/Change”. Click to select “YES” on the “permission prompt” and follow the onscreen instructions to uninstall.

Uninstall Steam - Once uninstalled, click on “Finish” to exit the “Uninstallation Wizard” and download Steam again.
- Execute the “steam.exe” file from the downloaded folder and follow the onscreen instructions to reinstall it.
- After successful installation “Log In” back, launch your game and hopefully steam corrupt disk issue would be resolved by now.
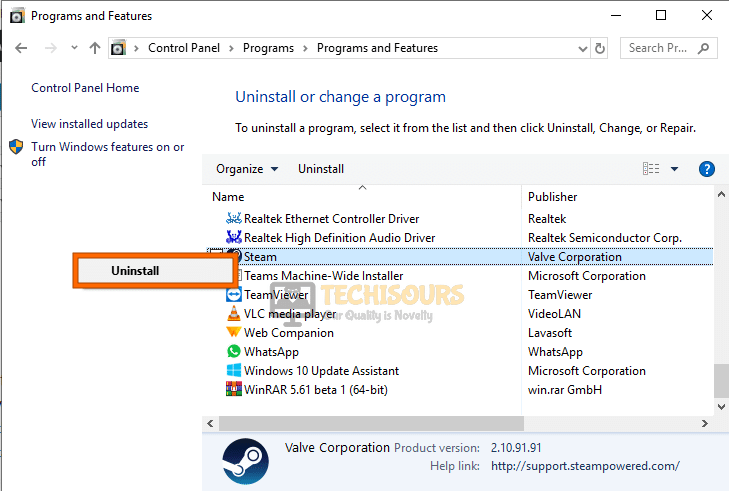
Solution 17: Repair Steam Library Folder
- First, launch the “Steam client” and click on the “Steam tab” at the upper left. Click on the “Settings” option and navigate to the “Downloads” in the left menu pane.
- Click on “Steam Library Folders” located under the “Content Libraries Option.”

Steam library folder - In the “Steam Library Folder” dialogue box, right-click on the default folder and click on “Repair Library Folder.”

Repair Library Folder - Once scanned, try downloading the games again to check whether the steam corrupt disk problem still exists.


Solution 18: Roll Back Your Drivers
- Press the “Window + S” keys simultaneously on your keyboard to open up the “Search” menu. Type or paste “Device Manager” in the search bar to open up the “Device Manager” window.

Typing in Device Manager - Locate the “Display Drivers” menu and double click on it to extend it further. Right-click on the extended option which would technically be your “Graphics card” and then proceed to “Properties”.
- Switch to the “Driver” tab on the “Properties” window, click on “Roll-Back Drivers” and press “OK”.
- Check to see if doing so lets you fix the Steam Corrupt Disk Error.

Solution 19: Turn Off Windows Defender Firewall
- Open the “Start menu” on the bottom left corner of your screen or simply press the “Windows” button on your keyboard. From here locate and open “Settings.”
- Once in the Settings window locate the “Update and Security” option and click to select it. Then select the “Windows Security” from the left menu pane.

Choose Update and Security - Then proceed to “Virus and Threat Protection” under the “Protection Areas” section. In the new dialogue box, navigate to “Virus and Threat Protection Settings” and click on “Manage Settings.”
- Now turn “OFF” the button located under the “Realtime Protection.” Click on “YES” when the permission dialogue box pops up, and you’re good to go.

Disable Real-time protection

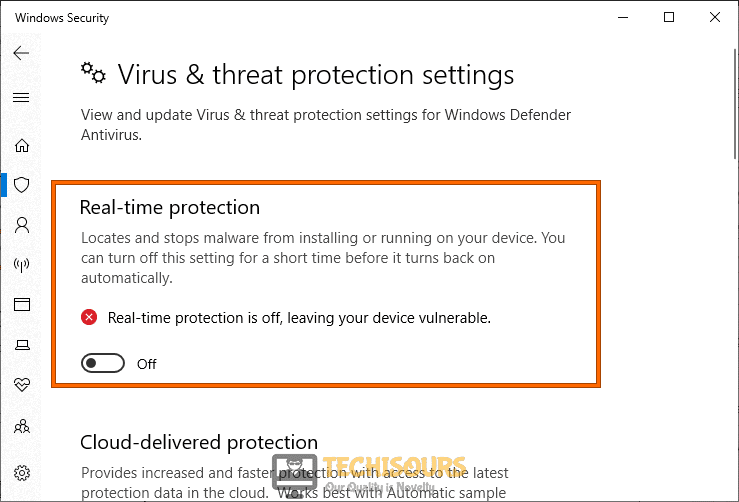
Solution 20: Delete 0 kb Files
- Press the “Window + E” keys together on your keyboard, and switch to “This PC”. Navigate to the “steamapps folder”. By default, it is present in “C: program files (x86)Steam steamapps.”
- Once you have reached the “steamapps folder”, delete any files having “0 Kb” size. You can check it by looking into the “Size” column.
- Afterward, check to see if the steam download corrupt disk error got fixed.
Solution 21: Uninstall the Problematic Software
Any recently installed software might be interfering with Steam and causing it to crash. To avoid such instances, simply uninstall any program that has recently been installed on your computer.
Hopefully, the list of detailed fixes indexed above would be enough to get through the error easily but still if you face any difficulty in resolving it completely you may Contact Us here for assistance.

Alan is a hardcore tech enthusiast that lives and breathes tech. When he is not indulged in playing the latest video games, he helps users with technical problems that they might run into. Alan is a Computer Science Graduate with a Masters in Data Science.
Обновлено: 29.01.2023
Отдельные игроки жалуются на то, что в Red Dead Redemption 2 выскакивает ошибка «Ошибка: 0x99380000» после того, как какое-то время идет загрузка. Сущность ошибки — не удается подключиться к игровым cервисам Rockstar, а пользователю предлагается повторить попытку позже.
На данный момент известно, что практически все, кто столкнулся с такой проблемой, являются абонентами провайдера Ростелеком. Причиной этого является то, что этот самый провайдер по каким-то причинам заблокировал порты Rockstar, а потому у игрока остается не так много вариантов решить проблему: либо сменить провайдеру, либо попробовать позвонить в его службу поддержки, либо же просто использовать VPN, что и подойдет для большинства игроков.
5 дек. 2020 в 1:40
Купил игру, скачал, зашёл, нажал кнопку <<Играть>>. Идёт загрузка, после чего появляется ошибка: «ВНИМАНИЕ Не удалось подключиться к игровым cервисам Rockstar. Повторите попытку позже. [Ошибка: 0x99380000]».
Я весь интернет перерыл, в поиске решения данной проблемы. Я 1000 раз перезагружал роутер, запускал игру от им. Администратора. Всё напрасно. Как была ошибка, так и осталось.
7 mb/s, исходящая — 0,8 mb/s.
Может быть проблема в исходящей скорости интернета?
Заранее спасибо.

Я так понял у меня ростелеком и мне что бы не зависали легендарные преступники нужно произвести кучу манипуляций с роутором что за бред, как они игру делают, через одно место что ли
Девушка купила Red Dead Online в стиме, играла пол дня в покер и по какой то причине он теперь у нее недоступен. При этом у меня на RDR2 купленной в лаунчере Рокстаров, все работает нормально.

Продай, Решил. Написал в саппорт рокстар, через 2 дня подарили стол
А кто на ростелекоме играет, у кого есть баги с легендарными

привет привет, беда с листками навыка, получил 30 лвл охотника за головами, страницы в инвентаре, все плюхи разблокированы, но сам навык не выучивается, ни при перелистывании всех навыков, ни при прочтении, короче не как. такая же хрень была до обновления натуралиста, с другими навыками , при том что у товарища все нормально работает, играю на ПК, системник пушка, винда 10. навыки : бросок через плечо и бросок восьмеркой, в списке все остальные проставлены галками, а на этих двух галочки по ходу в запой ушли, подскажите кто сталкивался с такой херней и как решили проблему


Евгений Смирнов запись закреплена
Подскажите пожалуйста, на PS4 вчера установил RD online и даже чуть поиграл, сейчас запускаю и высвечивается ошибка, что Не удалось подключиться к игровым сервисам Rockstar. Повторите попытку позже (ошибка 0х99380000) может кто знает в чем проблема?

попробуй консоль из розетки на пару минут выдернуть, как не странно, но нередко помогает. Роутер для пущего эффекта тоже перезагрузи
Ничего не помогает..ни прописание днс адресом, ни перезагрузка роутера..не думал что и на ps4 я буду игры через танцы с бубнами запускать..первая игра такая дибильная


Елена Холод
Евгений, я так мучалась с прошлой обновой, тоже танцы с бубнами и все дела, а потом оно само прошло. Это же роки, они сначала сломали, а потом сделают
Читайте также:
- Как запустить авторыбалку в майнкрафт
- Ошибка при запуске for honor appdata folder detection error
- Pubg new state системные требования на ios
- Как включить jei майнкрафт
- Enclave вылетает вин 10
Распространенная ошибка распространяемых компонентов Steamworks характерна не только для одного игрока, с ней сталкивался практически каждый любитель игр.
Этот бесплатный набор инструментов доступен для всех на платформе Steam, и его основная функция — помочь разработчикам игр легко распространять свои продукты. Steamworks — одна из самых популярных онлайн-платформ, на которой игроки могут играть, создавать и управлять различными играми.
Всякий раз, когда вы загружаете игру, ожидается, что она будет оптимизирована для ОС вашего устройства для оптимальной производительности. Steam автоматически добавляет все необходимые файлы для бесперебойной работы на ваше устройство при загрузке игры из своей облачной базы данных.
Как избавиться от распространенных распространяемых файлов Steamworks?
Многие пользователи платформы Steam, увидевшие уведомление об общей ошибке распространяемых файлов Steamworks, находятся в таком же замешательстве, как и вы в данный момент. Они не уверены, нужно ли им беспокоиться об этом или нет.
Вот в чем дело: если у вас нет проблем при запуске какой-либо игры, загруженной или запущенной на платформе Steam, вам не о чем беспокоиться. Однако есть способ скрыть папку, чтобы она не портила удовольствие от игры.
Как исправить распространенные ошибки Steamworks Redistributables?
1. Распространенная ошибка записи на диск распространяемых файлов Steamworks
1.1. Перезапустите приложение Steam.
- Если вы впервые сталкиваетесь с ошибкой, закройте клиент Steam.
- Снова откройте приложение и попробуйте снова загрузить игру.
1.2. Запустите Steam от имени администратора
- Проверьте начальный экран вашей системы, чтобы найти значок Steam.
![]()
- Щелкните правой кнопкой мыши значок, выберите «Запуск от имени администратора».

- Выберите «Да» в окне контроля учетных записей пользователей.
1.3. Снять защиту от записи в приложении Steam
- Откройте проводник, нажав Windowsклавишу + E.
- Найдите папку, в которой Steam хранится на вашем компьютере.
- Щелкните правой кнопкой мыши на. Теперь вы увидите всплывающее окно со списком параметров, выберите «Свойства».

- В свойствах Steam выберите Общие. Затем снимите флажок «Только для чтения» в разделе «Атрибуты», если он отмечен. Затем выберите ОК, чтобы сохранить.

1.4. Избавьтесь от поврежденных файлов
- Найдите значок Steam на главном экране.
![]()
- Щелкните его правой кнопкой мыши. Это вызовет список опций, выберите «Открыть расположение файла».

- В папке Steam найдите папку Steamapps.
- Проверьте папку на наличие файлов размером 0 КБ и с тем же именем, что и игра, которую вы пытаетесь запустить.
- Если вы найдете такие файлы, удалите их и попробуйте перезапустить игру.
1.5. Проверьте системный брандмауэр
- Откройте Настройки, нажав Windows клавишу + I.
- Выберите Конфиденциальность и безопасность. Затем выберите Безопасность Windows.

- Выберите Защита от вирусов и угроз.

- В разделе «Параметры защиты от вирусов и угроз» выберите «Управление параметрами».

- Прокрутите список, чтобы найти «Исключения», затем нажмите «Добавить или удалить исключения».

- Добавьте исключение, щелкнув крестик и выбрав расположение файлов.

Эту проблему также можно решить, полностью отключив брандмауэр (антивирус/антивредоносное ПО), но мы не рекомендуем этого делать, так как это может подвергнуть вашу систему атакам.
2. Распространенные распространяемые файлы Steamworks не загружаются/загружаются медленно
2.1. Проверьте интернет-соединение и скорость
- Проверьте, подключена ли ваша сеть, попытавшись загрузить что-нибудь в браузере.
- Проверьте скорость интернета, используя любую онлайн-проверку, например Fast.

- Проверьте, подключен ли VPN. Отключите его.
- Повторите загрузку.
- Если все так же, попробуйте метод ниже.
2.2. Проверить целостность
- Откройте Стим.

- Щелкните правой кнопкой мыши Общие распространяемые файлы Steamworks.
- Выберите «Библиотека».
- Выберите Свойства. Выберите «Локальные файлы».
- Выберите проверку целостности.
2.3. Очистить кеш загрузки Steam
- Нажмите Windowsклавишу и введите Steam. Затем выберите «Открыть», чтобы запустить Steam.

- Перейти к настройкам.

- Выберите Загрузки.

- Затем выберите Очистить кэш загрузки. Затем выберите, ОК.
![]()
Если какой-либо из методов, выделенных выше, не работает, вы можете переустановить Steam. Некоторые геймеры сообщили, что это устранило проблему после того, как они попробовали разные решения.
3. Распространенные распространяемые файлы Steamworks продолжают загружаться
3.1. Перезапустите клиент Steam.
Если проблема возникает впервые, разрешите приложению завершить загрузку. Эта операция используется Steam для обновления ваших файлов.
Но если повторная загрузка идет последовательно и не завершается, закройте приложение Steam и перезапустите его. Это должно решить любую некритическую проблему.
3.2. Перезагрузите компьютер
Для этого решения вы можете перезагрузить или полностью отключить систему. Это будет иметь тот же эффект.
После перезапуска или перезагрузки системы перезапустите Steam, чтобы проверить, исчезла ли проблема.
3.3. Изменить регион загрузки
- Запустите Стим.
- Выберите Настройки. Далее нажмите на вкладку «Загрузить».

- Проверьте регион загрузки и выберите регион, который, по вашему мнению, ближе всего к вам.

- Попробуйте разные регионы ближе к вам, чтобы увидеть, есть ли разница.
3.4. Запустите команду Steam://flushconfig
- Откройте Run, нажав Windows клавишу + R.
![]()
- Введите команду ниже и нажмите Enter:
Steam://flushconfig

- Подождите несколько минут. Теперь перезагрузите компьютер.
- Запустите Steam.exe из папки Steam в проводнике (прокрутите вверх, чтобы узнать, как найти папку).
3.5. Переустановите Steam
- Перейдите в папку «Загрузки» в проводнике. Затем найдите SteamSetup.

- Щелкните его правой кнопкой мыши и запустите от имени администратора.
- Следуйте подсказкам системы, чтобы переустановить Steam.
4. Общие распространяемые файлы Steamworks имеют общий контент
4.1. Проверьте, доступна ли папка Steamapp
Steam хранит некоторые важные файлы, необходимые для запуска вашей игры, в папке Steamapp. Некоторые геймеры предпочитают иметь эту папку в отдельной папке помимо основной папки Steam.
Проблемы обычно возникают, когда папка удалена по ошибке и Steam больше не может ее найти. Для быстрого исправления создайте папку в основной папке Steam и назовите ее Steamapp, а затем перезапустите приложение.
4.2. Удалить ключ реестра
- Откройте Run, нажав Windows клавишу + R.
- Введите команду ниже:
regedit - Это откроет редактор реестра.
- Найдите любой из ключей реестра ниже (в зависимости от вашего процессора Windows):
HKEY_LOCAL_MACHINESOFTWAREValveSteamAppsCommonRedistHKEY_LOCAL_MACHINESOFTWAREWow6432NodeValveSteamAppsCommonRedist

- При обнаружении удалите его.
Как бы ни раздражали ошибки в Steam, мы надеемся, что вы найдете все решения, описанные до сих пор, простыми в использовании.
Прежде чем идти, прокомментируйте свой опыт использования любого из этих методов, и если вы пытались найти другое решение, поделитесь им с другими ниже.
Get back into your games with these fixes for the «missing file privileges» error on Steam.
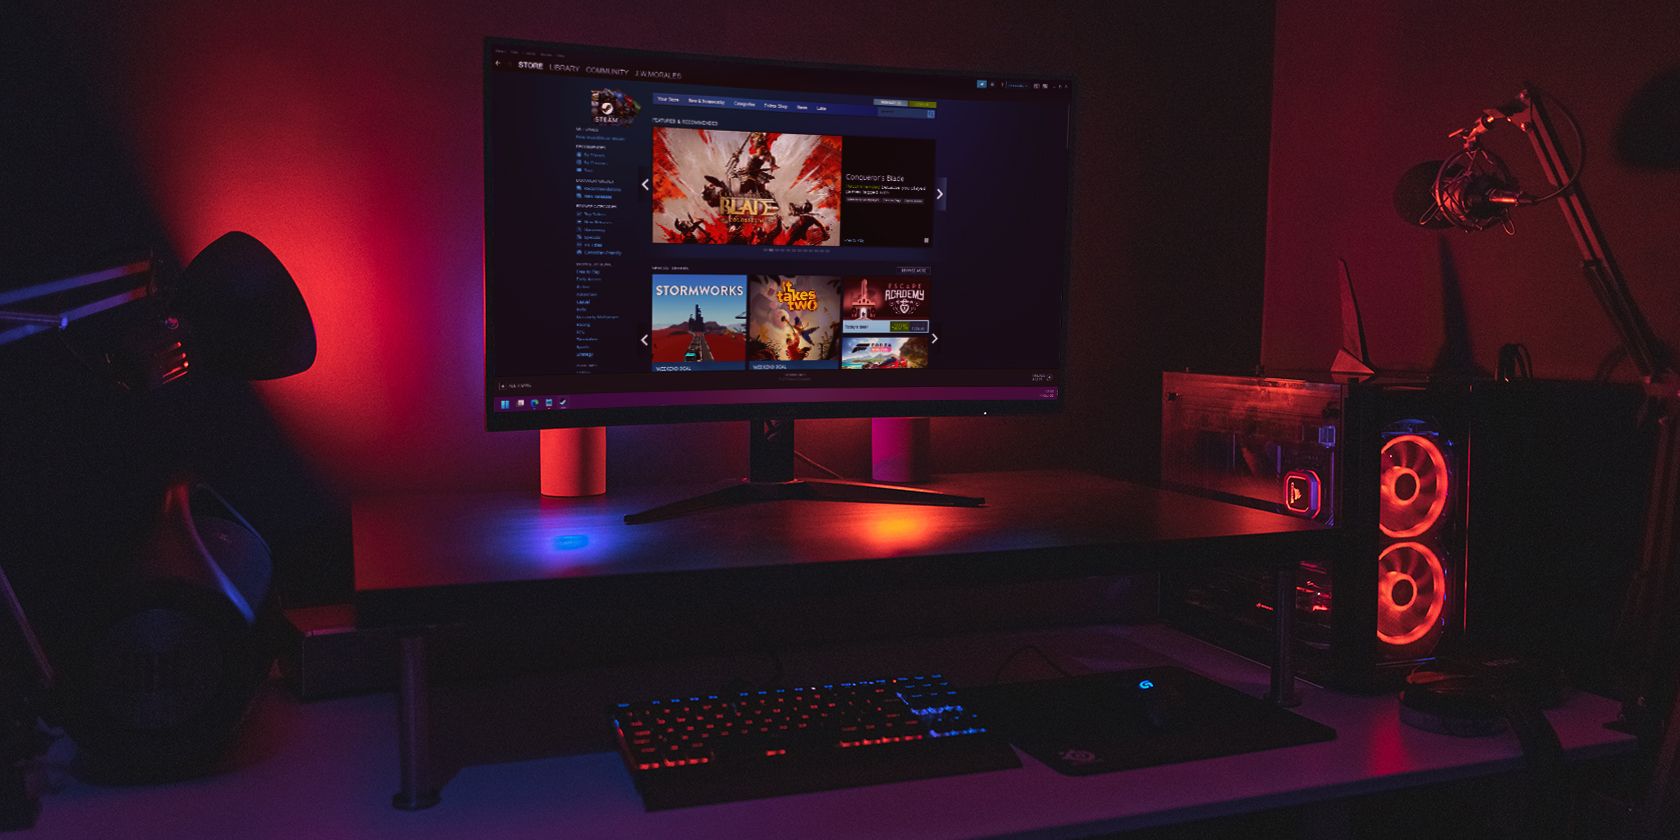
Is Steam showing the “Missing file privileges” error when you try to launch or update one of your games? Most of the time, you have to launch Steam as administrator to grant it the right permissions to work properly. However, there are other reasons such as a corrupted download cache or incorrect Steam settings.
Either way, going through the instructions below should help you fix the issue.
1. Launch Steam as an Administrator
Steam might run into the missing file error if it doesn’t have the right permissions. Right-click the Steam client and select Run as administrator. Then, try to launch the problematic game.
f Steam no longer displays the same error, you should set Steam to always run with administrative privileges.
2. Stop the IgfxEmN Module Process
The Intel Graphic Executable Main Module includes the igfxEM process. There’s a chance the process is conflicting with Steam’s functionality and stop it from updating or opening games from its library. In this case, you should stop the process.
Press Ctrl + Shift + Esc to launch Task Manager and open the Processes tab. There, right-click igfxEM Module and select End task. Once you stop the process, restart Steam and check if the issue is now solved.
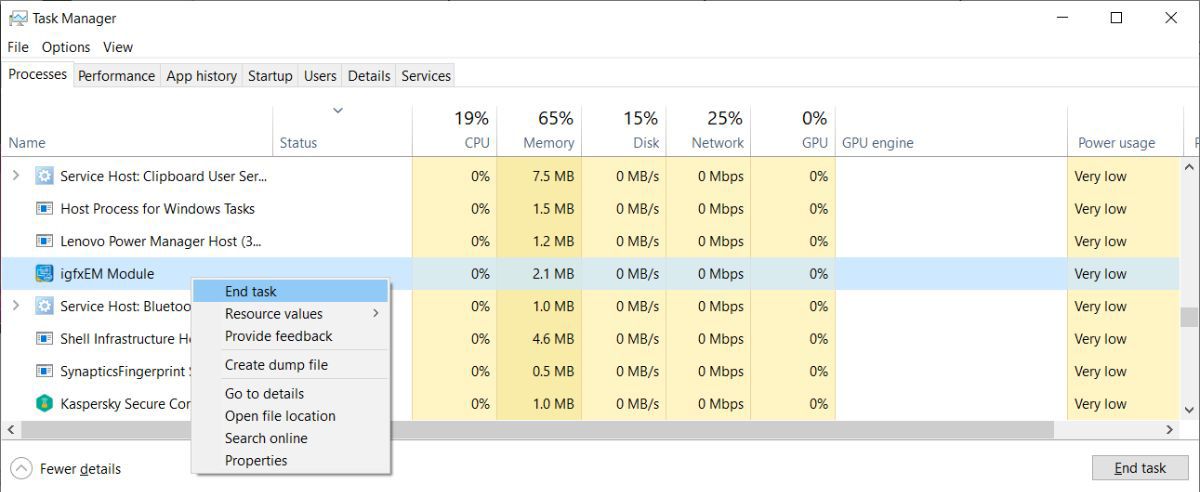
3. Delete Steam’s Cache
Another possible cause for Steam’s “Missing file privileges” error might be a corrupt download cache. Follow these steps to delete Steam’s cache and fix the issue:
- Launch the Steam client.
- Click Steam in the top-left corner and head to Settings.
- From the left pane, select Downloads.
- Click Clear Download Cache.
- Confirm the action.
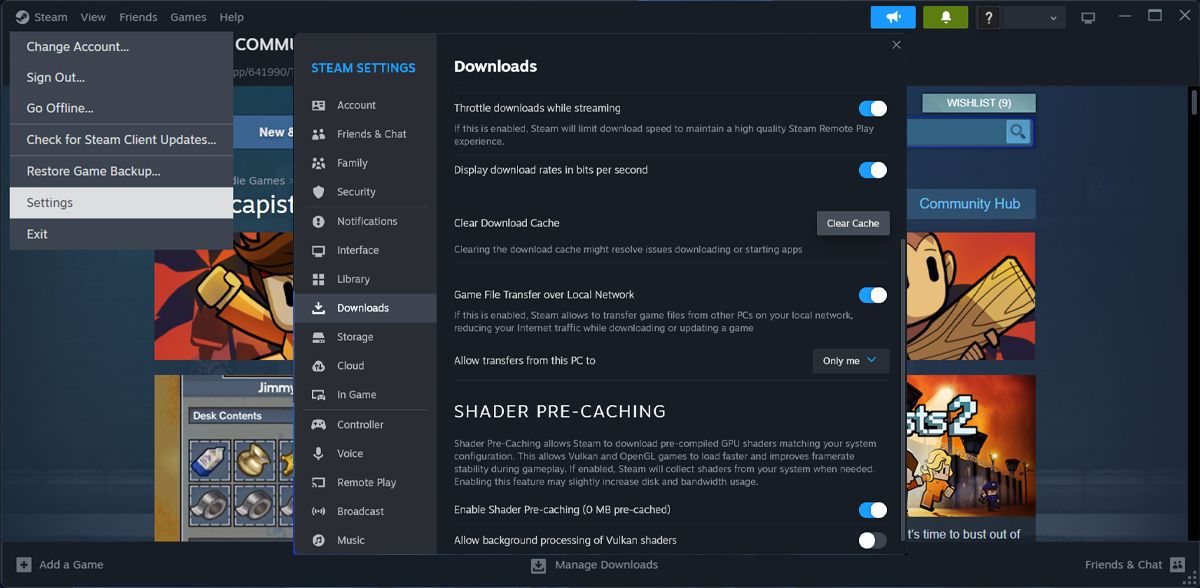
Clearing the Steam cache will not affect any of the installed games. However, you might notice a decrease in the Steam client’s performance as it rebuilds the cache. But it shouldn’t take long.
4. Check Steam Download Settings
To ensure you’ll have no problem connecting to its servers, Steam chooses by default the closest one. But if you’ve been traveling and Steam failed to reconnect to a new server or there’s a malfunction with the current server, you might run into the file privileges error.
Here’s how you can connect to a different Steam download server:
- Launch the Steam app.
- Head to Steam > Settings > Downloads.
- Open the Download region menu and select the server that’s closest to you.
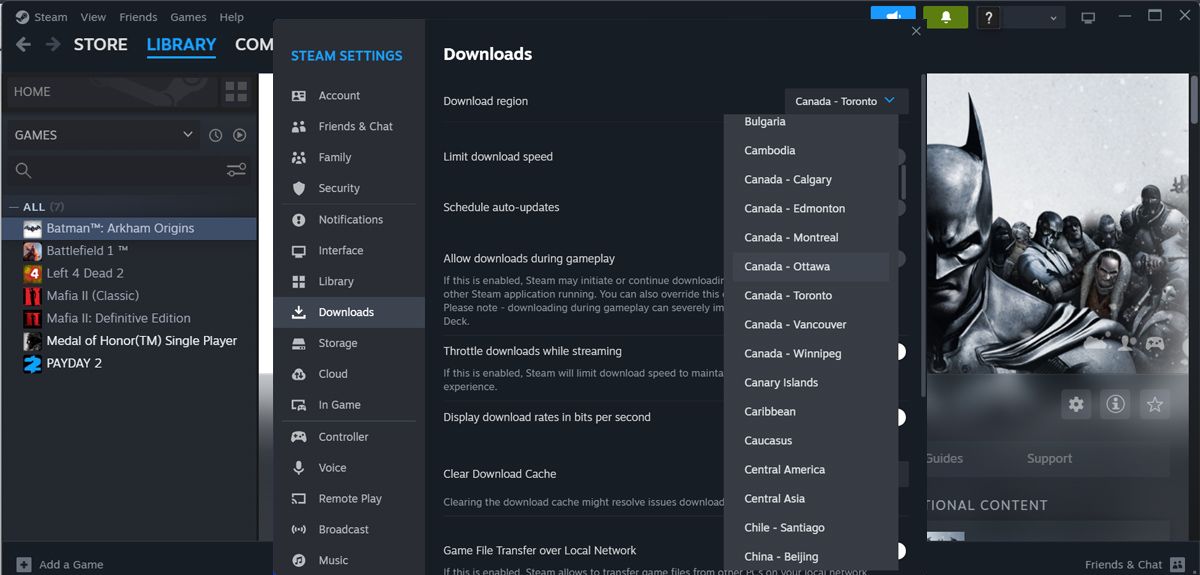
5. Check the Game’s File Integrity
If you run into the «Missing file privileges» error when trying to launch a certain game, probably some of the game files are corrupted or even missing. Fortunately, you don’t have to reinstall the game as Steam can fix the problem for you by checking the files’ integrity.
- Launch the Steam app and go to Library.
- Right-click the malfunctioning game and select Properties.
- From the left pane, open Installed Files.
- Select Verify integrity of game files.
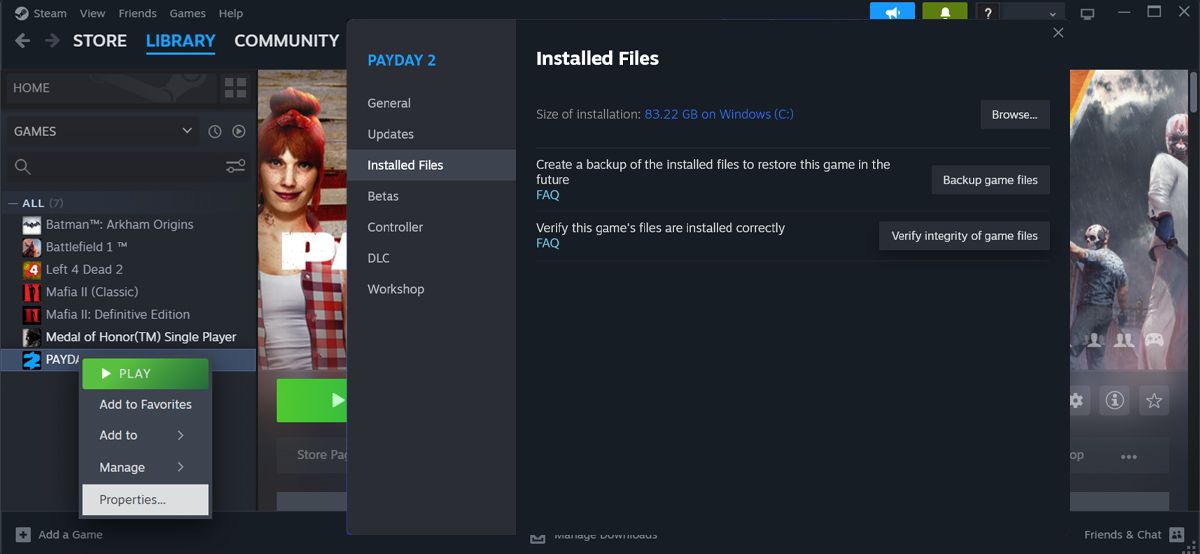
6. Repair the Library Folders
If you’re still having the same problem after fixing the game files, you should repair the Steam library folder. The folder contains the data for every downloaded game so if its content somehow got corrupted, you’ll be unable to launch or update your games.
To repair the folder, head to Steam Settings as we’ve shown before. There, go to Storage > Steam Library Folders. Click the three-dot icon next to the folder path and select Repair Folder. Confirm the action, wait until the process is complete, and restart the Steam app.

7. Reinstall the Game
If the game’s core files are corrupt or something went wrong during the last update, you might have no choice but to uninstall and reinstall the Steam game. In case you can’t launch any game from your library, the problem might be with the Steam app. So, you can take this a step further and reinstall Steam on your computer.
Fix Steam File Privileges on Windows
It can be really frustrating when Steam is stopping you from taking a well-deserved break by playing your favorite games. If it’s not an issue with Steam servers, the above solutions should help you fix Steam’s error message.
Now, if you want to enjoy gaming without any interruptions, you should know that you can appear offline on Steam, even when you’re online.
Содержание статьи
О программе СЛАМ

Специально для CS:GO было создано огромное количество утилит, позволяющих игрокам увеличить спектр своих возможностей в игровом процессе. SLAM – одна из таких программ.
Что такое
SLAM представляет собой утилиту, которая бесплатно распространяется в интернете. Она позволяет проигрывать звуки прямо в матчах CS:GO. С помощью этой программы можно включать союзникам определенную музыку, либо же звуки популярной личности. Тут все зависит от предпочтений конкретного пользователя. С помощью этой утилиты можно изменить игровой процесс в лучшую сторону.
Скачать
Если же пользователь желает начать пользоваться этой утилитой, то ее нужно скачать. Сделать это можно прямо на этом сайте. Именно здесь выложена актуальная версия SLAM.
Как пользоваться
Если же пользователь желает начать эксплуатацию Slam, необходимо скачать утилиту, а затем установить ее. Тут не возникнет особых проблем. Что нужно делать для начала эксплуатации утилиты:
- Нужно запустить на компьютере Slam и перейти в настройке, воспользовавшись разделом Settings.
- Там нужно выбрать клавишу, которая будет использовать для отправки звука в голосовой чат.
- После этого нужно выбрать звук для воспроизведения. Для этого нужно использовать раздел Import. Нажимая эту кнопку, нужно указать путь к звуку.
- Остается нажать на кнопку Start для начала работы.
Теперь же SLAM начнет работать и воспроизводить звуки каждый раз, когда пользователь нажимает выбранную клавишу, находясь в Counter Strike Global Offensive.
Не работает
Конечно же, порой, бывает и такое, что у пользователя не работает Slam. Для того, чтобы решить эту проблему, необходимо перейти в настройки самой CS:GO. Там нужно проверить правильность настройки микрофона. Возможно, он был отключен. Без этого воспроизводить звук невозможно. Именно в этом, как правило, скрывается ошибка из-за которой не работает Slam.
Как включить
Для того, чтобы включить воспроизведение звука, сначала нужно запустить CS:GO. Находясь в конкретном матче, пользователь должен нажать клавишу K, активировав микрофон, а затем ту кнопку, которую он установил для воспроизведения музыки. Нажимать клавиши нужно именно в таком порядке. В противном случае Slam не будет работать.
Many users have reported the Steam Missing File Privileges error in Windows 10 while updating or installing their Steam games. This error message pops up with the path to the mentioned file also.
Check the game’s integrity when encountering The Steam error Missing file privilege error message. To fix the Missing file privileges issue on Steam, end the task related to your graphics card or run it with admin rights.
See also: Steam Error Code 118 Failed to Load Webpage: How To Fix Easily
This error may be caused by some reasons, including the user’s hardware and software configuration. Mostly, this error is a minor one and is quickly resolved with a good solution.
Table of Contents
- 1 How to Fix Steam Missing File Privileges Error in Windows 10
- 1.1 Method 1: Stopping the igfxEm process
- 1.2 Method 2: Changing the download region
- 1.3 Method 3: Rebooting PC
- 1.4 Method 4: Giving administrator privileges to Steam
- 1.5 Method 5: Granting complete control to the affected file
- 1.6 Method 6: Repairing the Library Folder and verifying its integrity
- 1.7 Method 7: Deleting files in safe mode
- 2 FAQ’s
- 2.1 What is the Steam missing file privilege error, and why does it happen?
- 2.2 How can I determine the Steam missing file privilege error?
- 2.3 What steps should I take to run Steam as an executive?
- 2.4 How can I check the integrity of game files on Steam?
- 2.5 Do I need to disable third-party antivirus software to fix the missing file privilege error in Steam?
- 3 Conclusion
How to Fix Steam Missing File Privileges Error in Windows 10
Here we provide you with the best and most potential methods to resolve this error. We recommend that you read the complete article before attempting any of the given ways so that you can choose the best method suited for your system.
See Also: Steam Image Failed To Upload: How To Fix It?
Method 1: Stopping the igfxEm process
The igfxEM.exe is a software component in the Intel Common User Interface. This software comes as a standard package and the installation of Microsoft Windows and its graphics card drivers. This software acts as a middleware between the user and Intel Graphics. This component enables users to view and adjust the characteristics and settings of the Graphic card using the provided GUI.
Bookmark This: 11 Best Graphic Design Software in 2019
igfxEM is an abbreviation for Intel Graphics Executable Main Module. This .exe file is from a trustworthy site and includes a signed digital signature. Therefore it is completely nonharmful for your computer. It is an exe file. But, since the file is not a Windows core file and is not visible, it exists in the fixed location: (C:\\Windows\System32\igdxEm.exe).
We mention the exact location because if you find the .exe file anywhere else, beware because it is probably harmful malware. Since this process is responsible for the graphics processes, it is recommended that stopping and restarting this service may resolve the error you are facing.
1. Press the Windows key + R, and then in the run command dialogue box, type in “taskmgr,” and hit enter.
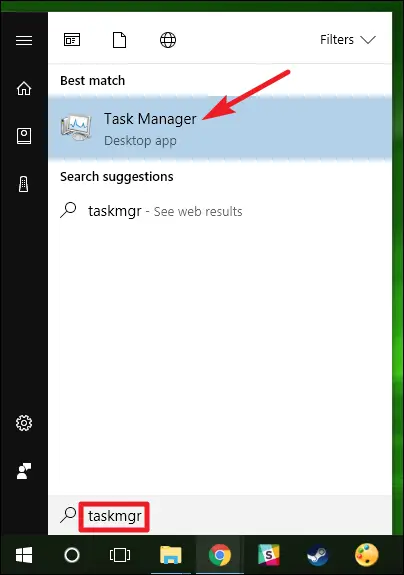
2. When the task manager opens, go to the processes tab and look for the igfxEM process. Once you have found the service, right-click and select end the process, restart your Steam client using administrator, and Start downloading the game again to see if the missing file privileges steam error is resolved.
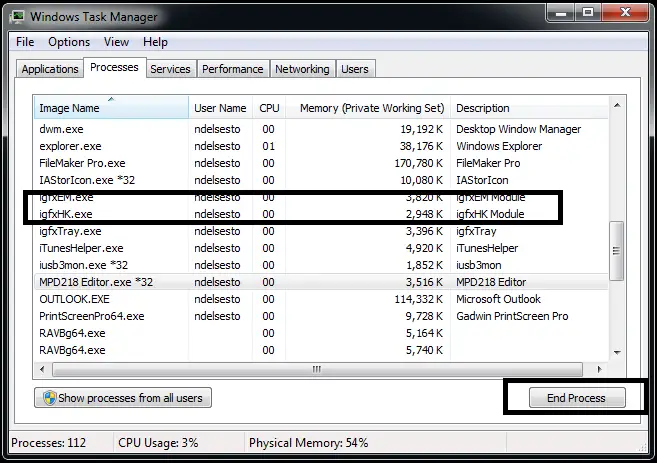
Method 2: Changing the download region
Changing the download region is one of the most fundamental and easy solutions to the steam missing file privileges error in Steam. It is because the Steam content system is divided into many different regions. Your steam client automatically searches and detects your region through the help of your network and then sets the detected region as default.
But this may sometimes cause the error as servers in a specific region may not be working correctly as they are overloaded or may have a hardware failure. In that case, changing your Steam client’s download region may quickly solve the error.
1. Open your Steam client and click ‘Settings’ from the drop-down menu in the upper left corner of the Steam window.
2. Click on the ‘Downloads’ options and then navigate to the ‘Download Region’ option.
3. Select regions other than the currently set as default, then restart Steam and check the error.
Also Read:
- 3 Ways to Fix Windows Update 0x80070422 Error
- 7 Ways to Fix Steam Download Stopping and Restarting Error
- {Solved} Fix Unmountable Boot Volume (STOP: 0x000000ED)
- {Solved} Fix We Can’t Sign In to Your Account in Windows 10
- 5 Ways to Fix IAStorDataSvc High CPU Usage Error
Method 3: Rebooting PC
When Steam is downloading or updating a game, it has multiple processes running simultaneously. Sometimes, something as easy as restarting your PC may solve your problem. It can be a potential solution as your computer may sometimes experience minute technical errors that may not be very visible but are causing these errors.

Whenever you update or download a game in Steam, the software divides the data of these games into small pieces of 1MB and then assembles them so they can perform their roles correctly. Steam used this method to avoid corrupt downloads and save the right amount of your bandwidth.
Fix This: Steam Download Stopping and Restarting Error
So, we recommend restarting your computer to see whether the error steam missing file privileges get resolved. We also strongly suggest that you avoid running any other software or program while Steam is downloading to prevent interference with the download or update process.
Method 4: Giving administrator privileges to Steam
Steam requires two things to perform seamlessly: Reading and Writing on your computer system. It may interfere mainly when your computer treats Steam like a Read Only program. This means Steam won’t write on the different files and therefore gets stuck while trying to Download or Update the program, including writing on the system.
So, if this is the reason, then the best solution we can try is to grant Steam the Administrator Privileges.
1. Open your Steam directory from its default location: (C:\Program Files\Steam). If you have installed Steam in any other custom directory, browse to that location. Once you have reached the Steam folder, right-click on it and select Properties. Go to the Security tab and click the Advanced option on the properties window.

3. In the next window, edit the first four rows and grant complete folder control.
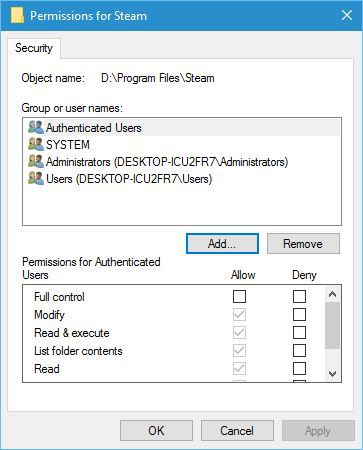
4. To edit a row, click on it and then click the Edit button. A new window will pop up, which includes all the options in the form of checkboxes. Check all of the checkboxes, including the Full Control. Click on Apply to save the changes, and then close everything. Do the same for all four editable rows.
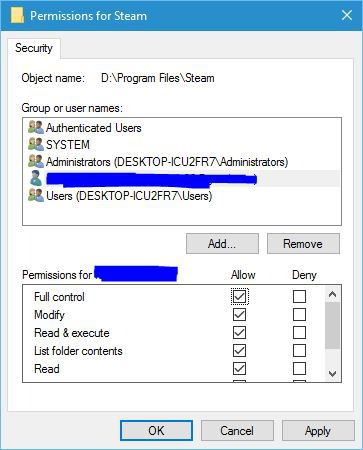
Launch Steam by right-clicking on it and selecting Run as administrator. Check whether the Steam missing file privileges error has been resolved or not.
Method 5: Granting complete control to the affected file
The same error as the one mentioned above can occur with the affected file in the steam directory. You can navigate to the specific file in the steam folder and then grant it full access to resolve the error quickly without issuing full permission to every file in the folder. To use this method, you must pinpoint the exact file affected by this error. The path to the location of the affected file will be mentioned along with the error message. So you don’t have to search anywhere more for it.
1. Browse to the exact location using the Run application or navigate to the location yourself. Another method in the Steam client directory is to go to the library tab in Steam, right-click on the game showing the error, and select properties. The path will be visible there.
2. Once you have located the file affected by the error, follow the steps mentioned in Method 4 to grant full administrator privileges and access to the specific file.
3. Restart Steam and check whether the Steam missing file privileges error persists.
Method 6: Repairing the Library Folder and verifying its integrity
There is an excellent possibility that the Steam Library Folder that you are using may be corrupt and has not been configured correctly. It can also be pointing out the issue that your game files, at times, may not be completely present, which means that some of these game files may be missing for some reason.
The Verify Integrity of Game files is an option that will try to fix your games, and this tool also helps you download and install the game files if any of them are corrupt or missing. To use the Verify Integrity tool, follow the steps below.
Open your Steam client, click on the Steam icon at the upper left corner of the window, and click on settings from the drop-down menu. After the settings open, go to the Downloads tab and click on Steam Library Folders that you found at the top.
A new small window will open that lists all the locations where Steam has been installed in your system. Also, Steam has used storage space. Right-click on it and then select Repair Steam Library. Once you complete these steps, you can move on to the Verify Integrity of the Game Files present.
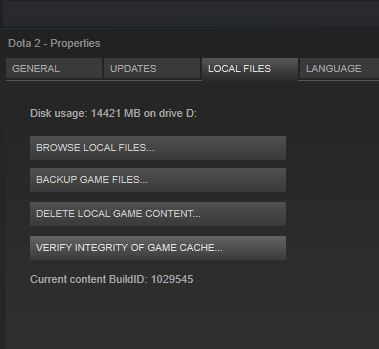
Exit the settings and then go to your games library. Right-click on the game causing the error and then choose Properties.
In the properties, navigate to the Local Files Tab and click on the Verify Integrity of Game Files Option. Steam will then automatically starts to verify all the files present for the games. If there are any missing files, it will download them again. And it would then replace it with the corrupted file accordingly.
Method 7: Deleting files in safe mode
If none of these methods work, you can try to delete all the files related to the game. So Steam can download the files from the beginning, avoiding errors and corruption.
Firstly, you must note down the exact location of the file causing the error in Steam. You can use the same methods we used in Method 5 to pinpoint the location of the affected file. After you have noted down the location, enter your computer safely. Entering your computer using the safe mode disables all the software and processes running. It allows you to perform administrative actions much more efficiently without interruptions.
1. Get your computer to boot in safe mode. You can do this quickly by selecting from the various options available in your startup. Select the ‘Enable Safe Mode with Networking option.

2. Once you have successfully booted your computer and entered safe mode, navigate to the file location you noted earlier.
3. After you reach the Steamapps list, click on the particular folder which says “download.” Delete all the contents of the download folder.
4. Then again, Restart your computer.
5. Launch Steam using administrator access, then again follow the steps mentioned in Method 6 to Verify the Library and Integrity of the Game files before again starting your download,
6. Check whether the Steam Missing File Privileges Error has been resolved or not
Don’t miss these –
3 Ways to Fix Windows Update Service Not Running
{Solved} How to Fix Spotify Error Code 18: Unable to Install
4 Ways to Fix VLC Does Not Support UNDF Format
4 Ways to Fix Kmode Exception Not Handled in Windows Error
FAQ’s
What is the Steam missing file privilege error, and why does it happen?
The Steam missing file privilege error is a typical issue that keeps clients from refreshing or introducing games on the Steam stage. Further, It happens when the client account needs necessary authorizations to get to or adjust specific files and envelopes expected by Steam.
How can I determine the Steam missing file privilege error?
First and foremost, you can run Steam as a chairperson to guarantee it has the expected authorizations. Moreover, checking the trustworthiness of game files, changing the file consents, handicapping outsider antivirus programming, and reinstalling Steam can likewise assist with settling the issue.
What steps should I take to run Steam as an executive?
To fix the missing file privilege error in Steam, follow these steps: First, right-click on the Steam shortcut or the Steam.exe file. Then, select the ’ Run as administrator’ option from the context menu. If prompted by the User Account Control (UAC), click ‘Yes’ to grant administrative privileges. Finally, launch Steam and check if the missing file privilege error persists.
How can I check the integrity of game files on Steam?
a. To begin, Open the Steam client and go to the ‘Library’ tab. b. Right-click on the game. c. Select ‘Properties.’ d. In the Properties window, go to the ‘Neighborhood files’ tab and snap on the ‘Check Trustworthiness of Game files’ button. e. Lastly, Steam will check for missing or debased files and supplant them if they are fundamental.
Do I need to disable third-party antivirus software to fix the missing file privilege error in Steam?
Temporarily interfering with your third-party antivirus program may fix Steam’s missing file permissions errors. In any case, it’s important to note that reducing the functionality of your antivirus program leaves your PC vulnerable for a short period. It is also mandatory to re-authorize once the issue is resolved. Finally, you should consider adding Steam to your antivirus scanning cycle as an exception.
Conclusion
These are the best and proven methods that you can use to resolve the steam missing file privileges error in Steam. Be sure to go through these steps carefully before attempting these methods to avoid any mistakes. We hope that these methods have helped you resolve the problems you are facing with your Steam client.

Gravit Sinha: Founder of ValidEdge, a problem-solving website, driven by his lifelong passion for fixing issues.