Loading
Возможно, файл новее, чем может обработать импортер SU2018. В этом случае вам нужно либо сохранить файлы dwg как более старую версию, либо получить более новую версию SketchUp.
Почему я не могу импортировать файлы DWG в SketchUp?
Примечание. В настоящее время Sketchup не может читать новый формат файлов DWG 2018 года. Поэтому, если вы часто используете Sketchup с файлами DWG, убедитесь, что продукты AutoCAD 2018 (и более поздних версий) настроены на сохранение как «чертеж AutoCAD 2013» или более ранней версии.
Как импортировать файлы в SketchUp?
Импорт файла САПР в SketchUp
- В SketchUp откройте модель SketchUp, в которую вы хотите импортировать файл . …
- Выберите «Файл» > «Импорт». …
- Перейдите к месту на жестком диске, где сохранен файл САПР.
- В раскрывающемся списке «Тип файлов» выберите «Файлы AutoCAD (*. …
- Выберите файл, который хотите импортировать.
Какие модели можно импортировать в SketchUp?
Детали статьи
- Ваша подписка на SketchUp Pro обеспечивает совместимость на профессиональном уровне. …
- Экспорт SketchUp: SKP, 3DS, DAE, DWG, DXF, FBX, IFC, OBJ, KMZ, STL, WRL, XSI, JPG, PNG, TIF, PDF (только для Mac), EPS.
- Импорт LayOut: SKP, BMP, GIF, JPEG, JPG, PNG, TIF, TIFF, RTF, TXT, DWG, DXF, CSV, TSV, XLSX.
Как импортировать DWG в Sketchup 2017?
Файл> Импорт.
Перейдите в «файл» и выберите «импорт» из выпадающего меню. В раскрывающемся списке «Тип файлов» будет список различных типов файлов, которые вы можете импортировать в свою модель Sketchup. Выберите тот, который говорит «ACAD (.dwg)». Затем выберите файл DWG, который вы хотите импортировать из ваших файлов.
Как изменить размер в SketchUp?
Растягивание или сжатие геометрии в масштабе
- С помощью инструмента «Выбор» ( ) выберите геометрию, которую нужно масштабировать. …
- Выберите инструмент Масштаб ( ) или нажмите клавишу S. …
- Щелкните ручку края или грани (не угловую ручку). …
- Переместите курсор, чтобы масштабировать объект. …
- Нажмите, чтобы установить новый масштаб выделения.
Может ли SketchUp импортировать OBJ?
Он может импортировать FBX, OBJ, STL, 3DS, DAE, PLY и VRML в SketchUp за считанные секунды. Но не скорость делает наши функции импорта такими мощными. Skimp дает вам возможность предварительно просмотреть модель и упростить модель ПЕРЕД импортом!
Что означает файл STL?
STL — это формат файла, обычно используемый для 3D-печати и автоматизированного проектирования (САПР). Название STL — это аббревиатура от стереолитографии — популярной технологии 3D-печати. Вы также можете услышать, что его называют стандартным языком треугольников или стандартным языком тесселяции.
Как импортировать файлы STL в SketchUp?
Импорт файла STL в SketchUp
Выберите «Файл» > «Импорт». В открывшемся диалоговом окне «Импорт» перейдите к файлу STL, который вы хотите импортировать, и выберите его. (Необязательно) Выберите «Файлы STereoLithography» (.stl) в раскрывающемся списке типов файлов и нажмите кнопку «Параметры».
PRO If you’re a SketchUp Pro user, you can import or export CAD files, which use the .dwg or .dxf file formats.
Before you import a file, it’s helpful to know what CAD entities SketchUp Pro does and doesn’t support and how to prepare your CAD file for best results. Then, you can walk through the basic importing steps outlined in this article. After you’re done importing, check out Starting with a CAD File in SketchUp Pro, which offers several tips and tricks for handling imported CAD geometry.
If you’re exporting a SketchUp Pro file to a CAD format, how you import a CAD file depends on whether it’s a 2D file, such as a floor plan, or a 3D model. In this article, you also discover how SketchUp data is exported into CAD format.
Table of Contents
Understanding what CAD elements SketchUp can import
The following table outlines what CAD elements SketchUp does and doesn’t support. If an element isn’t supported, SketchUp simply ignores it when you import the CAD file.
| Supported CAD Entities | Unsupported CAD Entities |
|---|---|
| Arcs | Proprietary ADT or ARX objects |
| Circles | Dimensions |
| Entities with thickness | Hatching |
| Faces | Text |
| 3D faces | XREFs |
| Layers | |
| Lines and supported Line Styles | |
| Materials | |
| Polyline-based solids | |
| Nested blocks | |
| AutoCAD regions | |
| Point | |
| Ellipse | |
| Spline | |
| RasterImage |
Preparing a CAD file for import into SketchUp
When you take a few steps to check and prepare your CAD file before import, you can make sure all the data you need imports into SketchUp and streamline the import process. The following sections outline what you need to look for and how to resolve any potential conflicts between CAD elements and SketchUp.
Change unsupported elements
If you need to import unsupported CAD elements into SketchUp, try exploding those elements in CAD so they become primitive CAD drawing elements that SketchUp does support.
For example, when you explode CAD objects into block entities, they import into SketchUp as components. If you explode the CAD block entities into polylines, the polylines import into SketchUp as lines or polylines.
Export to AutoCAD in either of these applications. The resulting CAD file contains lines or faces that you can import into SketchUp.
Delete unnecessary layers
In an imported CAD file, SketchUp automatically discards any entities that have no 3D relevance, such as text, dimensions, hatching, and so on. However, SketchUp won’t discard the layers holding these entities. To avoid a bunch of empty layers in SketchUp, you may want to purge any unused layers through Statistics on the Model Info dialog.
Move geometry close to the origin
In SketchUp, geometry that’s many miles or kilometers away from the origin (0,0) can cause performance problems. To avoid these problems, check the placement of geometry in your CAD file before you import the CAD file into SketchUp.
For example, say you’re importing Autodesk AutoCAD DWG files, such as civil site plans, in order to work with the contour lines. If the graphic or geometry is far away from the origin, move it close to the origin before importing the CAD file into SketchUp.
Alternatively, deselect the Preserve Drawing Origin option in SketchUp’s DWG/DXF import options, as explained in Importing a CAD file into SketchUp, later in this article.
Reduce the file size if needed
Generally, CAD files import into SketchUp successfully when the file size is 15MB or less. When you import larger CAD files, the import can take a long time or may fail. Conversely, the smaller your CAD file size, the quicker and easier the import. Also, after a complex CAD file is imported into SketchUp, you may notice that SketchUp’s performance slows down. That’s because lines and faces in SketchUp contain more data than their CAD equivalents.
Check the unit of measure
If possible, find out the unit of measure used to create the CAD file. When you import the CAD file into SketchUp, you need to know whether your file uses inches, feet, or a metric unit of measurement. That way, you can match the SketchUp model’s units to the CAD file’s units and thus maintain the scale and dimensions of your imported CAD geometry.
In SketchUp 2018 and later, you also have the option to import the model using the units specified in the CAD file. In the Units dropdown, select Model Units from the list, which tells SketchUp to attempt to match the units saved in the CAD file. If SketchUp is unable to determine what unit of measurement was used to create the CAD file, it will default to 1 CAD unit equals 1 inch in SketchUp.
Save in a SketchUp-compatible CAD file format
When SketchUp imports a CAD file, SketchUp strips the information to its basic geometric components. So no matter what AutoCAD file format you use (such as 2013 or 2018), the end result is essentially the same. To maximize compatibility between a CAD file and SketchUp, however, saving your CAD file in the Release 13 or Release 14 format works best.
Importing a CAD file into SketchUp
After you’ve checked and prepared your CAD file, you’re ready to import it into SketchUp. The following steps walk you through the import process for your operating system:
- In SketchUp, open the SketchUp model into which you want to import your .dwg or .dxf file.
- Select File > Import. An Import dialog box appears.
- Navigate the the place your hard drive where your CAD file is saved.
- From the Files of Type drop-down list, select AutoCAD Files (*.dwg, *.dxf).
- Select the file you want to import.
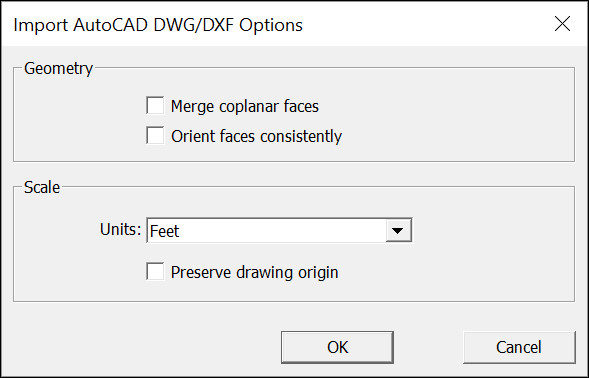
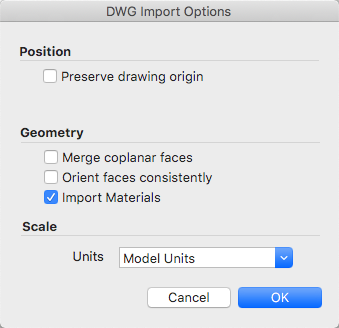
- Click the Options button. The Import AutoCAD DWG/DXF Options dialog box appears, as shown in the following figure.
- (Optional) In the Geometry area, select your preferences for the following options:
- select Merge Coplanar Faces to tell SketchUp to automatically remove triangulated lines from planes.
- Selecting the Orient Faces Consistently box tells SketchUp to analyze the direction of imported faces and orient the faces so that their direction is uniform.
- (Optional) Select the Preserve Drawing Origin checkbox to place the imported geometry at the origin defined in the .dwg or .dxf file. Leave the checkbox deselected if you want to place the imported geometry near the SketchUp origin.
- (Optional) To import geometry at the correct scale, select the unit used in your CAD file from the Units drop-down list. Your options are Model Units, Inches, Feet, Yards, Miles, Millimeters, Centimeters, Meters and Kilometers.

After you’ve checked and prepared your CAD file, you’re ready to import it into SketchUp Shop. The following steps walk you through the import process:
- In SketchUp Shop, open the SketchUp model into which you want to import your .dwg or .dxf file.
- Select the File icon ( ). An File menu appears, select Insert
- You can select the Trimble Connect icon or the Computer icon for a local file.
- (Optional) You can also drag & drop a file from an Explorer or Finder window directly into SketchUp Shop.
- If you choose to open the file locally, navigate to the place on your hard drive where your CAD file is saved.
- Select «All Files» as the desired format.
- Select the file you want to import.
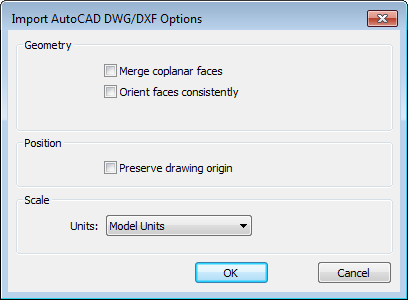
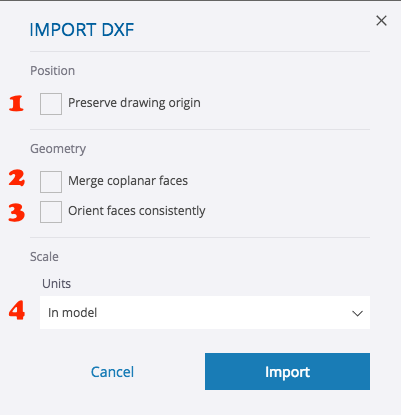
- The Import AutoCAD DWG/DXF Options dialog box appears, as shown in the following figure.

- (Optional) Select the Preserve Drawing Origin (#1 Above) checkbox to place the imported geometry at the origin defined in the .dwg or .dxf file. Leave the checkbox deselected if you want to place the imported geometry near the SketchUp origin.
- (Optional) In the Geometry area, select Merge Coplanar Faces (#2 Above) to tell SketchUp to automatically remove triangulated lines from planes. Selecting the Orient Faces Consistently (#3 Above) box tells SketchUp to analyze the direction of imported faces and orient the faces so that their direction is uniform.
- (Optional) To import geometry at the correct scale, select the unit used in your CAD file from the Units drop-down list (#4 Above). Your options are Model Units, Inches, Feet, Yards, Miles, Millimeters, Centimeters, Meters and Kilometers.
Understanding how SketchUp data is exported to CAD format
Before you export a SketchUp model to a CAD file format ( .dwg or .dxf ), you may find it helpful to understand how SketchUp data is translated into the CAD format that you choose. Here’s what you need to know:
- SketchUp faces are exported as a triangulated polyface mesh with interior splframe hidden lines (if applicable). This conversion helps to simulate the appearance of your SketchUp file, even when all exported faces are triangular.
- SketchUp uses the current units set in the Units pane of the Model Info dialog box as a reference for translation to a .dwg or .dxf file. For example, if the current Model Info unit setting is Decimal and Meters, then AutoCAD must be set to decimal for the units to translate correctly as meters when you open the exported file in AutoCAD.
- Duplicate line entities aren’t created on top of a p-line entity.
Exporting a SketchUp Model as a 2D CAD file
When export your model view as a 2D CAD file, you can choose the scale and a number of line options. The result is a 2D vector file in .dwg or .dxf format that you can open in your CAD program.
Follow these steps to export a 2D CAD file:
- To maintain your model’s scale in the exported file, in SketchUp, select Camera > Parallel Projection. Then set your view to one of SketchUp’s standard views by selecting Camera > Standard Views and selecting an option from the submenu that appears. (See Viewing a Model for details about the model view options.)
- Select File > Export > 2D Graphic.
- Navigate to the place where you want to save your exported file.
- (Optional) Change the file name if you’d like to name the exported file something other than the SketchUp file’s current name.
- Select either the .dwg or .dxf file type. In Microsoft Windows, select this option from the Save As Type drop-down list. On a Mac, use the Format drop-down list.
- Click the Options button to set the scale and line options, which are explained in detail in the upcoming list. When you’re done, click OK in the DWG/DXF Hidden Line Options dialog box (Microsoft Windows) or the Export Options dialog box (Mac OS X).
- Click Export and your CAD file is saved in your selected location.
In the following figure, you see the line options dialog box for your current operating system. The following list introduces your options so that the lines in your exported file meet your needs:
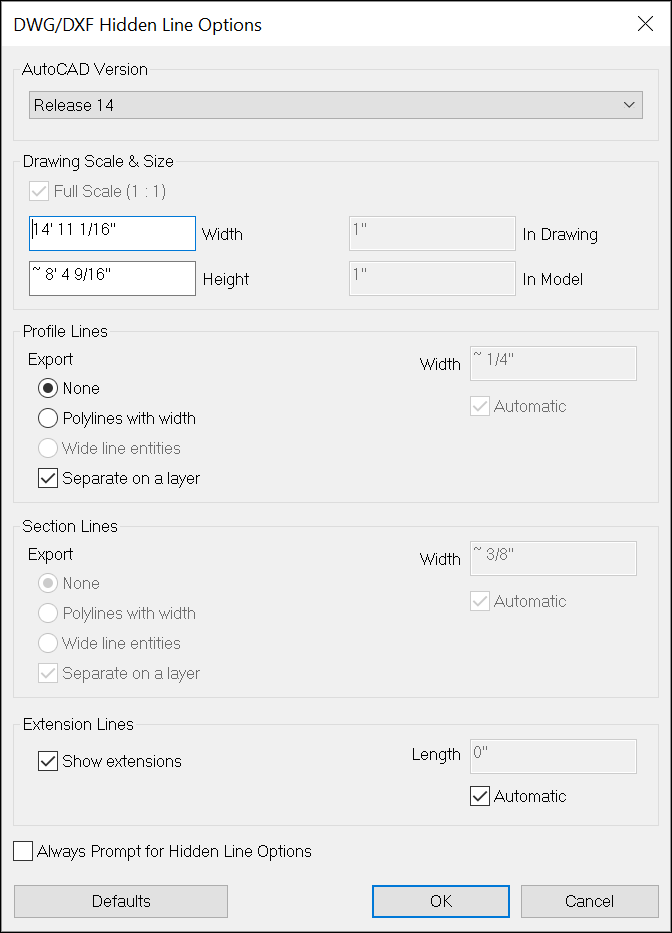
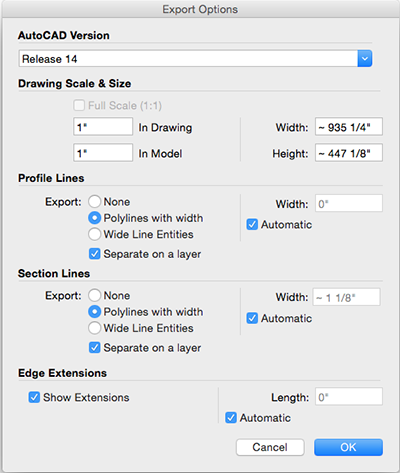

- AutoCAD Version: Select what version of AutoCAD you’d like to use to open the exported file.
- Drawing Scale & Size: The Full Scale checkbox is selected by default. However, if you deselect that checkbox, you can set a custom scale. In the In Drawing box, type the actual measurement you want to use to set your scale. In the In Model box, type the value for scaling your exported model. For example, for a scale of 1:4, type 1′ in the In Model box and 4′ in the In Drawing box.
- Profile Lines: Here, you can customize how profile lines appear in your exported file. You can set the line width as follows:
- Select None to export profile lines at the standard width.
- Select Polylines with Width to export profile lines as AutoCAD polylines. When you select this option, you can leave Automatic selected so that the exported lines match the profile line width. If you deselect Automatic, you can enter a custom width in the Width box.
- Select Wide Line Entities to export profile lines as AutoCAD wide line entities.
The Separate on a Layer checkbox, which is selected by default, creates a layer for profile edges. If you’ve used SketchUp layers to control visibility, note that SketchUp layer assignments don’t translate directly when you export a SketchUp file to a 2D CAD file.
In Microsoft Windows, you can select the Always Prompt for Hidden Line Options if you’d like to set options in this dialog box anytime you export a 2D CAD file. You can also restore the default settings by clicking the Defaults button.
Exporting a SketchUp Model as a 3D CAD file
When you export a SketchUp model as a 3D CAD file, you can select what entities are exported. To export your model, follow these steps:
- In SketchUp, select File > Export > 3D Model. The Export Model dialog box appears.
- Navigate to the location where you want to save your exported file.
- (Optional) Change the file name if you like. By default, the exported file uses the same name as your SketchUp file name.
- Select either .dwg or .dxf as the file format for your exported file. In Microsoft Windows, select your file type from the Save As Type drop-down list. In Mac OS X, use the Format drop-down list.
- Click the Options button to open the Export Options dialog box, shown in the following figure. From the AutoCAD Version drop-down list, select the version of AutoCAD you’d like to use to open the exported file. In the Export area, select the checkbox for each type of entity that you want to include in the exported file. Click OK when you’re done.
- Back in the Export Model dialog box, click Export, and your file appears in the location where you chose to save it.
Введение
Не первый год пытаюсь адекватно перенести чертежи из AutoCAD в Word, так чтобы и веса линий, и кириллический текст отображались должным образом. И еще одно условие, чтобы все линии и размеры были без ярко выраженных пикселей. Первоначально опишу что получится используя тот или иной способ, в конце расскажу про самый верный, где все условия выполняются на отлично. Чертеж был выполнен во вкладке «Модель».
Способы «Копировать – Вставить»
Способ №1.
Выделить необходимы чертеж в автокаде, копировать, вставить в ворд, используя обычную вставку (ctrl + v).
- Форма картинки соответствует форме вашего экрана. То есть чертеж придется подрезать.
- Если кликнуть на рисунке 2 раза, то чертеж откроется в автокаде с возможностью редактирования.
- Все веса линий отображаются тонкими
- Искажения окружностей (эллипсы)
Способ №2.
Выделить необходимый чертеж в автокаде, копировать, вставить в ворд, используя специальную вставку (ctrl + alt + v), в которой выбрать «Вставить как: AutoCAD Drawing«.
Получили результат аналогичный предыдущему.
Способ №3.
Выделить необходимы чертеж в автокаде, копировать, вставить в ворд, используя специальную вставку (ctrl + alt + v), в которой выбрать «Связать как: AutoCAD Drawing«.
Получили что-то подобное, что и в способе 2, только в данном случае, если у вас этот чертеж есть на вкладке «Лист», то получится изображение листа на сером фоне, причем с возможностью редактирования. Так как наш чертеж создан лишь во вкладке «Модель», то отображается рисунок на белом фоне.
Способ №4.
Выделить необходимы чертеж в автокаде, копировать, вставить в ворд, используя специальную вставку (ctrl + alt + v), в которой выбрать «Вставить как: Рисунок (метафайл Windows)«.
- Отображается как рисунок, то есть редактировать нельзя
- Веса линий меньше 0.3 отображаются тонкими линиями.
Способ №5.
Выделить необходимы чертеж в автокаде, копировать, вставить в ворд, используя специальную вставку (ctrl + alt + v), в которой выбрать «Связать как: Рисунок (метафайл Windows)«.
Получили результат аналогичный способу 1.
Способ №6.
Выделить необходимы чертеж в автокаде, копировать, вставить в ворд, используя специальную вставку (ctrl + alt + v), в которой выбрать «Вставить как: Точечный рисунок«.
- Отображается как рисунок, то есть редактировать нельзя
- Веса линий меньше 0.3 отображаются тонкими линиями.
- Фон соответстсвует фону модели (по умолчанию черный)
- Сильные искажения изображения (неровности линий, надписей и т.д.)
Способы «Файл – Экспорт» (в среде AutoCAD)
Способ №7.
Экспортируем чертеж в формате Метафайл (*.wmf). В Word’е «Вставка – Рисунок»
- Отображается как рисунок, то есть редактировать нельзя
- Веса линий меньше 0.3 отображаются тонкими линиями.
Способ №8.
Экспортируем чертеж в формате Encapsulated PS (*.eps). В Word’е «Вставка – Рисунок»
- Все линии тонкие
- Чертеж редактировать нельзя
Способ №9.
Экспортируем чертеж в формате Растровые файлы (*.bmp). В Word’е «Вставка – Рисунок»
- Отображается как рисунок, то есть редактировать нельзя
- Веса линий меньше 0.3 отображаются тонкими линиями.
- Фон соответстсвует фону модели (по умолчанию черный)
- Сильные искажения изображения (неровности линий, надписей и т.д.)
Остальные типы файлов не поддерживаются MS Word.
Способы «Печать в файл» (в среде AutoCAD)
Данные способы заключаются в том, что вы, заходя в печать («Файл – Печать»), выбираете необходимый принтер и печатаете в различных форматах (pdf, jpeg, png, tif, eps и т.д.)
Способ №10. Использование виртуального плоттера от Adobe Illustrator
Для данной операции вам понадобится программа Adobe Illustrator, не обязательно новой версии, можно хоть 10.
- В среде AutoCAD выбираем «Файл – Диспечер плоттеров». В открывшемся окне запускаем «Мастер установки плоттеров».
- Нажимаем Далее
- Далее
- Производители: Adobe, Модели: PostScript Level 1 и жмем Далее
- Далее
- Выбираем Вывод в файл и жмем Далее
- Задаем Имя плоттера (любое, например, Ворд) и жмем Далее
- Готово
- В среде AutoCAD выбираем «Файл – Печать». В открывшемся окне в графе Принтер – Имя выбираем созданный принтер (Ворд). Печатаем в файл, нажав Ок.
- В среде Word выбираем «Вставка – Рисунок».
- Вес линий соблюден (даже толщина 0.05)
- Искажений нет
- Геометрия соблюдена
- Фон отсутствует
- Отображается как рисунок, то есть редактировать нельзя.
- В самом ворде отображается не очень красиво. Чтобы это исправить, открываете файл в самом Adobe Illustrator, копируйте чертеж и вставляйте в Word. Выглядит идеально!
Способ №11. Использование встроенного принтера DWG To PDF.pc3
Способ добавлен 29.10.2011 г.
Выражается благодарность пользователю 658144_Евгений , который предложил чертеж печатать в формате pdf. Ниже предложен вариант без установки дополнительных принтеров, как рекомендовалось в комментариях и простой, в отличии от способа №10.
Для данного способа нам понадобится программа STDU Viewer . Она бесплатна для некоммерческого использования, т.е. только для дома.
- В среде AutoCAD нажимаем на кнопку «Печать«
- Выбираем принтер DWG To PDF.pc3
- Выбираем нужный формат листа, если в Word нужно вставить не рисунок, а чертеж с рамкой, например. Если рисунок, то формат любой.
- Выбираем область печати. Обычно это рамка. Нажимаем на кнопку «Рамка STDU Viewer .
- Нажимаем «Файл» – «Экспортировать» – «как изображение«
- В появившимся окне выбираем тип файла (Обычно gif весит меньше)
- Задаем разрешение (100 DPI хватает с головой)
- Указываем какие страницы и куда сохранить, нажимаем ОК
- В среде Word выбираем » Вставка – Рисунок«
- Вес линий соблюден (даже толщина 0.05, причем линия 0.00 оказалась равносильна 0.20, хотя на работе она тоньше 0.05 (вывод – зависит от принтера))
- Искажений нет
- Геометрия соблюдена
- Фон отсутствует
- Отображается как рисунок, то есть редактировать нельзя.
- В ворде отображается правильно (с толщинами и геометрией).
Заключение
Таким образом, проделав описанные выше действия, можно сделать вывод, что самый лучший результат получается в способе №11. Минусов способа, для его качества и относительно других вариантов, не обнаружено.
Стоит отметить, что помимо описанных 11 способов, в интернете можно найти еще огромное количество вариантов. Как привило, они получаются либо со сторонними программами, либо с работой на виртуальных принтерах. В любом случае, выбор за вами. Успехов!

Только SketchUp Pro может импортировать файлы 2D CAD в формате DWG и DXF; SketchUp Make не включает эту функцию. Есть вероятность, что файл САПР, с которым вы имеете дело, – это тот, который вы сделали сами, но, скорее всего, вы получили его от кого-то другого.
В этом случае самое лучшее, что нужно сделать, это открыть его в том же программном обеспечении, которое его создало. Если у вас есть файл AutoCAD, откройте его в AutoCAD и посмотрите на его структуру слоев. Сделайте копию файла, удалите все, что вам не нужно вводить в SketchUp Pro, и продолжайте оттуда.
Простой, не так ли? Но что, если у вас нет AutoCAD? Все в порядке – большинство людей этого не делают. После того, как вы импортируете данные САПР, в SketchUp будет проведено большое количество работ по очистке, но это управляемо.
SketchUp Pro 2014 может импортировать файлы САПР в формате AutoCAD 2013 и ранее. SketchUp Pro 2013 может импортировать файлы в формате AutoCAD 2010 и ранее. Если кто-то еще отправляет вам файл САПР, обязательно сообщите этому человеку, какая версия вам нужна.
Фактически импорт данных САПР в SketchUp Pro не очень сложный. Выполните следующие действия, и все будет хорошо:
Откройте новый, новый файл SketchUp.
Вы не можете просто открыть файл DWG или DXF в SketchUp Pro; вам необходимо импортировать данные в существующую модель. Начните с нового файла SketchUp, потому что большинство файлов САПР супер сложны. Привлекая всю эту сложность – тысячи ребер и тонны слоев – к уже сложной модели SketchUp, просто нужно беспокоиться. Держите вещи в покое и оставайтесь здоровыми.
Выберите «Файл» → «Импорт».
Откроется диалоговое окно «Импорт файлов».
Выберите файлы AutoCAD (*. Dwg, *. Dxf) в раскрывающемся списке «Форматы».
По какой-то причине вам нужно сообщить SketchUp, какие файлы вы хотите импортировать, прежде чем он позволит вам выбрать их в вашей файловой системе.
Найдите файл САПР (DWG или DXF), который вы хотите импортировать, и выберите его.
Пока еще не нажимайте «Импорт».
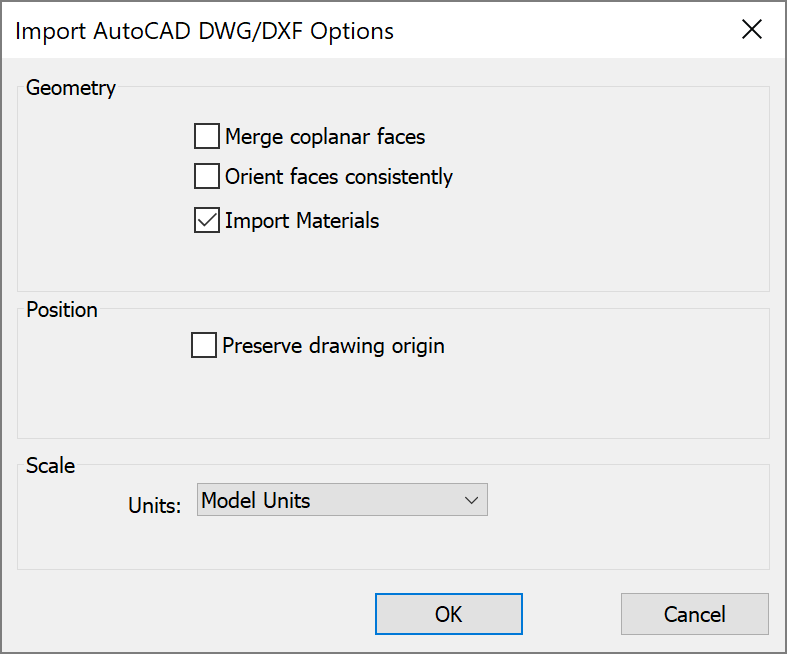
Откроется диалоговое окно Параметры импорта DWG.
Установите единицы измерения, чтобы они соответствовали единицам измерения по умолчанию файла CAD, который вы собираетесь импортировать.
Если файл САПР принадлежит кому-то в США, есть хорошие шансы, что юниты или футы. Другие страны (разумно) используют метрическую систему.
Решите, что делать с тремя другими параметрами в диалоговом окне:
Сохранение чертежа Начало полезно, если вы импортируете более одного файла САПР в ту же модель SketchUp. Вы можете сделать это, если вы принесете несколько этажных планов того же здания, и вы хотите, чтобы они выстроились в линию.
Объединить Coplanar Faces говорит SketchUp автоматически комбинировать смежные грани, которые являются компланарными в одну грань. Это может сократить время очистки, если в файле CAD, который вы импортируете, есть лица. Если вы выберете этот флажок и ваш импорт завершится неудачно (это произойдет), попробуйте отменить его в следующий раз.
Ориентные грани последовательно инструктируют SketchUp делать все возможное, чтобы убедиться, что лица в ваших импортированных данных (если они есть) все одинаковы. Опять же, это может сэкономить вам время на очистку, но также может вызвать ключ в процессе импорта.
Нажмите «ОК», чтобы закрыть диалоговое окно «Параметры импорта DWG».
. и скрестите пальцы. Если вы получите сообщение об ошибке, повторите попытку с другим параметром Units в диалоговом окне «Параметры импорта» (шаг 6). Если это не сработает, файл может быть сохранен в формате САПР, который новее, чем тот, который SketchUp Pro может импортировать. Обратитесь к человеку, который отправил вам файл, и попросите ее сохранить другую копию для вас в более раннем формате САПР.
Посмотрите на диалоговое окно «Результаты импорта», чтобы узнать, где вы стоите.
Если после того, как индикатор хода выполнения достигнет цели вправо, а сам импорт будет успешным, SketchUp Pro представит вам диалоговое окно со статистикой о том, что оно импортировало и что оно игнорировало.
Простая версия заключается в том, что уровни САПР, блоки (которые переводят компоненты в SketchUp) и всевозможные ребра являются импортируемыми. Текстовые объекты, размеры и люки (такого рода, которые обозначают разные материалы) не являются. Когда вы будете удовлетворены, нажмите «ОК» и вздохните с облегчением.
После того, как вы прошли процесс импорта САПР, и SketchUp вытолкнул полученную геометрию в вашу модель, убедитесь, что все идет по плану. Измерьте пару вещей с помощью инструмента «Измерение ленты», чтобы увидеть будь то размеры, которые вы ожидаете от них.
Дверные пути – хорошее место для начала; если вы измеряете один и его во много раз меньше или больше, чем должно быть, ваши единицы (на шаге 6 предыдущих шагов) были установлены неправильно. Закройте файл, откройте новый и повторите попытку.
SketchUp — это популярное программное обеспечение для 3D-моделирования и проектирования, которое позволяет пользователям создавать и редактировать сложные модели. Однако, при импорте моделей из SketchUp в другие приложения могут возникать некоторые проблемы, с которыми стоит ознакомиться.
1. Недостаток деталей или мелкие детали пропали
При импорте модели из SketchUp некоторые программы могут не корректно обрабатывать детали или удалять мелкие элементы. Это может происходить из-за ограничений программного обеспечения, которое импортирует модели. Решением может быть использование другого формата файла, такого как COLLADA (DAE) или 3D Studio Max (3DS), которые обычно более поддерживаемыми.
2. Проблемы с текстурами
Еще одной общей проблемой при импорте моделей из SketchUp может быть неправильное отображение текстур. Это может произойти из-за различных систем координат в SketchUp и программе, в которую вы импортируете модель. В таких случаях рекомендуется проверить настройки текстур после импорта и вручную переназначить текстуры на поверхности модели.
3. Проблемы с масштабированием
В SketchUp моделируются в разных единицах измерения, например в метрах или дюймах. Это может стать причиной проблем с масштабированием при импорте моделей в другие приложения. Чтобы решить эту проблему, рекомендуется убедиться, что модель импортирована с правильными единицами измерения и, если необходимо, вручную изменить единицы измерения в программе назначения.
4. Проблемы с геометрией
Некоторые программы могут иметь ограничения на сложность геометрии, что может повлиять на импортированные модели из SketchUp. Слишком большое количество полигонов или неправильно объединенные поверхности могут привести к проблемам с отображением или даже к сбоям программы. Чтобы избежать этого, рекомендуется перед импортом упростить геометрию в SketchUp и удалить ненужные детали.
Заключение
Импорт моделей из SketchUp в другие приложения может столкнуться с некоторыми распространенными проблемами, включая недостаток деталей, проблемы с текстурами, масштабированием и геометрией. Однако, эти проблемы могут быть решены с помощью правильной настройки программного обеспечения, изменения формата файла или упрощения модели до импорта. Следование этим рекомендациям поможет снизить потенциальные проблемы при импорте моделей из SketchUp и сохранить качество и подробности в созданных проектах.
Примечание. В настоящее время Sketchup не может читать новый формат файлов DWG 2018 года. Поэтому, если вы часто используете Sketchup с файлами DWG, убедитесь, что продукты AutoCAD 2018 (и более поздних версий) настроены на сохранение как «чертеж AutoCAD 2013» или более ранней версии.
Вы можете импортировать файлы САПР в SketchUp Shop, но не в нашу бесплатную веб-версию. Это одна из многих функций, которые вы можете получить, разблокировав подписку на Магазин здесь. В настоящее время единственными доступными форматами для импорта в SketchUp Free for Web являются следующие: CAP.
Если вы получили сообщение об ошибке, попробуйте еще раз с другой настройкой единиц измерения в диалоговое окно «Параметры импорта» (шаг 6). Если это не сработает, возможно, файл был сохранен в формате САПР, более новом, чем те, которые может импортировать SketchUp Pro.
Что такое импорт SketchUp?
Описание. Подключаемый модуль импорта SketchUp позволяет для импорта файлов SKP в чертежи Autodesk® AutoCAD®. Используйте команду IMPORTSKP, чтобы преобразовать файл SketchUp, хранящийся в локальной или общей папке, и вставить модель в текущий чертеж.
Какие файлы может открывать Sketchup?
Использование данных SketchUp с другими программами или инструментами моделирования
| Тип файла | Расширение файла (ов) | Только SketchUp Pro и Магазин? |
|---|---|---|
| Файлы САПР | .dwg, .dxf | Только ПРО и МАГАЗИН |
| Файлы изображений | .jpg, .png, .tif, .bmp, .psd, .tga, .epx, .pdf, .eps | Некоторые типы файлов доступны только PRO и SHOP. |
| Файлы STL | .stl | |
| файлы КОЛЛАДА | .dae |
Как импортировать 3D-файл AutoCAD в Sketchup?
Преобразование DWG в 3D
- Файл > Импорт. Первый шаг — просто импортировать файл DWG. …
- Взорваться. Как только ваше изображение будет импортировано, щелкните правой кнопкой мыши и выберите «взорвать». Это облегчит работу с геометрией в Sketchup.
- Масштабный план этажа. …
- Удалите ненужные слои. …
- Приберись. …
- Сделать группу. …
- Переехать. …
- Нарисуйте прямоугольник.
Может ли Shapr3D импортировать SketchUp?
Вы можете импортировать и редактировать любую модель который был создан в любом другом инструменте 3D-моделирования. … Мало того, вы можете экспортировать данные сетки из Shapr3D и импортировать их в SketchUp.
Можно ли импортировать файлы STEP в SketchUp?
Перейдите в «файл» и выберите «импорт» из выпадающего меню. В раскрывающемся списке «Тип файлов» будет список различных типов файлов, которые вы можете импортировать в свою модель Sketchup. Выберите тот, который говорит: «АКАД (. чертеж)». Затем выберите файл DWG, который вы хотите импортировать из ваших файлов.
Как получить SketchUp Pro бесплатно?
Если вам нужна бесплатная настольная версия SketchUp, это все равно отличный вариант. Вот где это найти. Во-первых, голову на sketchup.com/download/all в веб-браузере, таком как Google Chrome, на ваш компьютер с Windows или Mac. Далее вам нужно будет войти в учетную запись Trimble или создать ее бесплатно.
Contents
- 1 Can you import DWG into SketchUp free?
- 2 Why can’t I import an AutoCAD file into SketchUp?
- 3 How do I convert 3D DWG to SKP?
- 4 Can you import PDF into SketchUp?
- 5 Is SketchUp compatible with AutoCAD?
- 6 What is the AutoCAD file extension?
- 7 Can you use SketchUp for CNC?
- 8 What is SketchUp compatible with?
- 9 Can you import STEP files into SketchUp?
- 10 What 3d files can you import into SketchUp?
- 11 Can DWG files be 3D?
- 12 Can you import images into SketchUp?
- 13 How do I import models into SketchUp?
- 14 What are Collada files?
- 15 Which is easier CAD or SketchUp?
Can you import DWG into SketchUp free?
Go to “file” and select “import” from the dropdown menu. In the “files of type” dropdown there will be a list of different file types you can import into your Sketchup model. Select the one that says “ACAD (. dwg).” Then, select the DWG file that you want to import from your files.
Why can’t I import an AutoCAD file into SketchUp?
Only SketchUp Pro can import 2D CAD files in DWG and DXF format; SketchUp Make doesn’t include this functionality. … If you have an AutoCAD file, open it in AutoCAD and take a look at its layer structure. Make a copy of the file, delete everything you don’t need to bring into SketchUp Pro, and proceed from there.
How do I convert 3D DWG to SKP?
Open the 3D view of the project to export. Click File tab Export CAD Formats (DWG files). In the DWG Export dialog, click (Modify Export Setup). On the Solids tab of the Modify DWG/DXF Export Setup dialog, select Export as AutoCAD Architecture and AutoCAD MEP Objects. …
Can you import PDF into SketchUp?
Currently, you cannot import a PDF directly into Sketchup on the Windows version so the usual way to import something at least is to convert the PDF file into a raster image. In this SketchUp tutorial, we’ll introduce a free tool that you can use to convert PDF’s to DXF files, which you can import into Sketchup Pro.
Is SketchUp compatible with AutoCAD?
You can use both Sketchup and Autodesk AutoCAD for your design needs. They can help you make detailed and precise drawings and models.
What is the AutoCAD file extension?
DWG is the proprietary native file format for AutoCAD, one of the most popular computer-assisted design (CAD) packages. The format is maintained by AutoDesk.
Can you use SketchUp for CNC?
Introduction: From SketchUp to CNC Fabrication The tools we will be using are SketchUp for CAD, CamBam for CAM, Mach3 for gcode reading/CNC control, and a CNC router (greenBull from BuildYourCNC.com) for part fabrication. … Doing so will make your life much easier in the CAD process.
What is SketchUp compatible with?
You can use SketchUp for Web on most internet-connected computers via a recommended browser (Chrome 59+, Firefox 52+ or Microsoft Edge 84+.) To use SketchUp for Web on a Chromebook, your Chromebook needs to meet the minimum specifications.
Can you import STEP files into SketchUp?
Go to “file” and select “import” from the dropdown menu. In the “files of type” dropdown there will be a list of different file types you can import into your Sketchup model. Select the one that says “ACAD (. dwg).” Then, select the DWG file that you want to import from your files.
What 3d files can you import into SketchUp?
SketchUp Pro can import the following file formats: . DWG, . DXF, . 3DS, .
Can DWG files be 3D?
Both DWG and STL are file formats that can be used to create 3D objects. … These files can define shapes other than triangles and can more exactly describe a 3D object.
Can you import images into SketchUp?
Import your image into SketchUp by selecting File > Import. Then navigate to and select the image you want to import. If you don’t see the image you’re looking for, make sure the correct file type is selected (such as JPG or PNG). … Select a drawing tool to start tracing the image.
How do I import models into SketchUp?
Navigate to the page where you want to insert a SketchUp model. Select File > Insert from the menu bar. In the Open dialog box that appears, navigate to the SketchUp model file, select it, and click Open. Your SketchUp model appears in the document area.
What are Collada files?
COLLADA is an XML-based schema that enables you to transfer data among 3D digital content creation tools, such as SketchUp, Maya, 3ds Max, and Rhino. COLLADA files use the . dae file extension, which stands for digital asset exchange. In SketchUp, you can import and export COLLADA files pretty easily.
Which is easier CAD or SketchUp?
Sketchup is easier to use for 3D modeling. AutoCAD however is better for precision than Sketchup. Sketchup is very fast and easy for conceptual modeling, but it falls short when it comes to fine engineering. Also Sketchup’s models do not consist of perfectly curvy, round or spherical surfaces.