 Loading…
![]()
Color Image Scanner
User’s Manual
Regulatory model: DF-1701B/DF-1702B
Avision Inc.

User’s Manual
Trademarks
Microsoft is a U.S. registered trademark of Microsoft Corporation.
Windows, Windows Vista, Windows 7, Windows 8 and Windows 10 are either registered trademarks or trademarks of Microsoft Corporation in the United States and/or other countries.
IBM, IBM PC are registered trademarks of International Business Machines Corp.
Other brands and product names herein are trademarks or registered trademarks of their respective holders.
Copyright
All rights reserved. No part of this publication may be reproduced, transmitted, transcribed, stored in a retrieval system, or translated into any language or computer language, in any form or by any means, electronic, mechanical, magnetic, optical, chemical, manual, or otherwise, without the prior written permission of Avision Inc.
Material scanned by this product may be protected by governmental laws and other regulations, such as copyright laws, the customer is solely responsible for complying with all such laws and regulations.
Warranty
The information contained in this document is subject to change without notice.
Avision makes no warranty of any kind with regard to this material, including, but not limited to, the implied warranties of fitness for a particular purpose.
Avision shall not be liable for errors contained herein or for incidental or consequential damages in connection with the furnishing, performance, or use of this material.
ii

User’s Manual
FCC Radio Frequency Interference Statement
This product has been tested and found to comply with the limits for a class B digital device, pursuant to Part 15 of the FCC rules. Operation is subject to the following two conditions: (1) this device may not cause harmful interference, and (2) this device must accept any interference received, including interference that may cause undesired operation. The FCC Class B limits are designed to provide reasonable protection against harmful interference in a residential installation. This equipment generates, uses, and can radiate radio frequency energy and, if not installed and used in accordance with the instructions, may cause harmful interference to radio communications. However, there is no guarantee that interference will not occur in a particular installation. If this equipment does cause harmful interference to radio or television reception, which can be determined by turning the equipment off and on, the user is encouraged to try to correct the interference by one or more of the following measures:
Reorient or relocate the receiving antenna.
Increase the separation between the equipment and receiver.
Connect the equipment into an outlet on a circuit different from that to which the receiver is connected.
Consult your point of purchase or service representative for additional suggestions.
As an ENERGY STAR® Partner, Avision Inc. has determined that this product meets the ENERGY STAR guidelines for energy efficiency.
iii

User’s Manual
European Union Regulatory Notice
Products bearing the CE marking comply with the following EU Directives:
Low Voltage Directive 2014/35/EC
EMC Directive 2014/30/EC
Restriction of the use of certain hazardous substances (RoHS) Directive 2011/65/EU
CE compliance of this product is valid if powered with the correct CE-marked AC adapter provided by Avision.
This product satisfies the Class B limits of EN55022, EN55024 and safety requirements of EN 60950.
*This machine is certified as Class 1 LED product. This means that this machine does not produce hazardous laser radiation.
Disposal of Waste Equipment
This symbol on the product or on its packaging indicates that the product can not be disposed of with your other household waste. Instead it should be sent to appropriate facilities for recovery and recycling in an effort to protect human health and the environment. Fore more information about where you can drop off your waste equipment for recycling, please contact your local city office, your household waste disposal service or the shop where you purchased the product.
iv

User’s Manual
System Requirements
|
CPU: |
Intel® Core™ 2 Duo or higher |
|
Memory: |
32 bit: 2 GB |
|
64 bit: 4 GB |
|
|
Optical Drive: |
DVD-ROM Drive |
|
USB Port: |
USB port 2.0 (compatible with USB 1.1) |
|
Compatible |
Microsoft Windows XP(SP3), Windows Vista, |
|
Operating |
Windows 7, Windows 8 (32 bits/64 bits), |
|
System: |
Windows 10 (32 bits/64 bits) |
v
User’s Manual
1. Introduction
Congratulations on your purchase of the color image scanner. With this scanner, you can scan documents in a rated speed to increase your productivity.
Before you install and operate the new scanner, please take a few minutes to read through this manual. It provides proper instructions for you to unpack, install, operate and maintain the scanner.
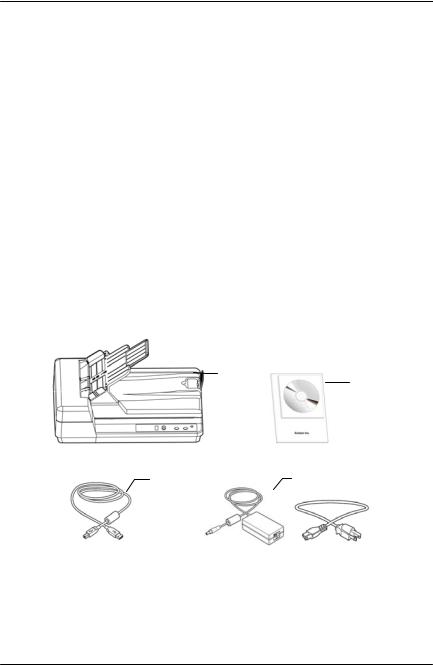
The following figure indicates the package contents. Please check all the items against your checklist. If you do not receive all the items, please contact your authorized local dealer immediately.
1.Scanner Main Unit
2.Software CD/Quick Guide
3.USB Cable
4.Power Adapter & Power Cord
1-1

User’s Manual
NOTE:
1.Only use the AC adapter (DA-48M24 made by APD) included in the machine. Using other AC adapters may damage the machine and void the warranty.
2.Please unpack the packing carefully, and check the contents against the checklist. If any items are missing or damaged, please contact your dealer immediately.
3.To access more service supports, visit www.avision.com to register your Avision’s product.
1-2

User’s Manual
2.Scanner Installation
Precautions
Keep the scanner out of direct sunlight. Direct exposure to the sun or excessive heat may cause damage to the unit.
Do not install the scanner in a humid or dusty place.
Be sure to use the proper AC power source.
Place the scanner securely on an even, flat surface. Tilted or uneven surfaces may cause mechanical or paper-feeding problems.
Retain the scanner box and packing materials for shipping purposes.
2-1
User’s Manual
2.1 Installing the Scanner Driver and Cables
NOTE:
1). The Windows system CD may be required when installing on some PC’s.
2). To ensure your computer can identify the USB scanner, please install scanner driver first before connecting the scanner to your computer.
3). The scanner driver contains TWAIN, ISIS and WIA driver. If you are running Windows Me, Windows XP, or Windows Vista, after the installation of scanner driver is completed, this scanner allows you to scan via a TWAIN, ISIS, or a WIA interface. Start your TWAIN-compliant image editing software application to select a TWAIN or WIA user interface or your ISIS software to select an ISIS user interface. You may also launch Microsoft’s Scanner and Camera Wizard to scan via a WIA user interface.
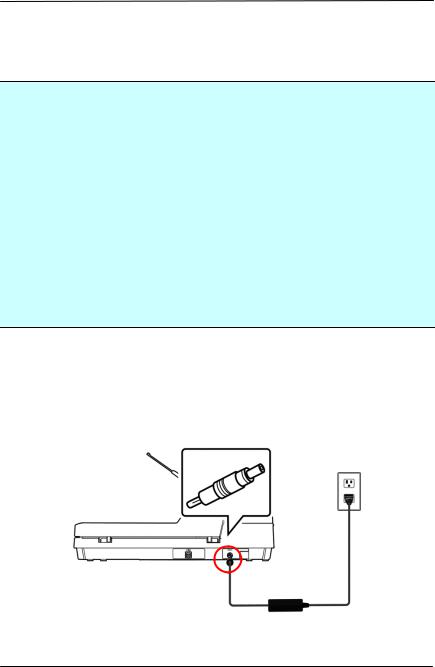
2.1.1 Connecting to Power
Plug the small end of the power adaptor into the power jack of your scanner. Insert the other end to an appropriate power outlet.
2-2
User’s Manual
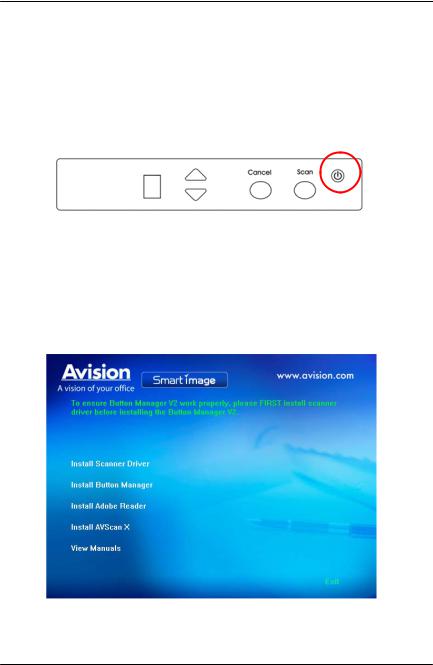
2.1.2 Turning on the Scanner
Press the Power Switch button on the front panel, the Power LED will be lit. To turn off the scanner, press the Power Switch button for about 3 seconds, the Power LED will be off.
2.1.3 Installing the Scanner Driver
1.Place the supplied CD-ROM onto your CD-ROM drive.
2.The software installation graphic appears. If not, run
“setup.exe”.
2-3
![]()
User’s Manual
Contents on the installation graphic:
Install Scanner Driver: To communicate with your scanner, you need to install the scanner driver.
Install Button Manager V2: To use the buttons on the scanner, you need to install Button Manager V2. To ensure Button Manager V2 works properly, please FIRST install scanner driver before installing Button Manager V2.
Install Adobe Reader: To view the user’s manuals for the scanner and Button Manager V2, you need to use Adobe Reader to open and view the manuals in pdf file format. If you already have Adobe Reader installed on your computer, you may disregard this item.
Install AVScan X: To scan and organize your multi-page document(s), you can install the software application to manage them easily and effectively.
View Manual: Click “View Manual” to view or print the detailed user manual for the scanner and Button Manager V2 respectively.
3.Click Install Button Manager V2 to install the Button Manager V2 software and then click Install Scanner Driver to install the scanner driver on your computer.
2-4
User’s Manual
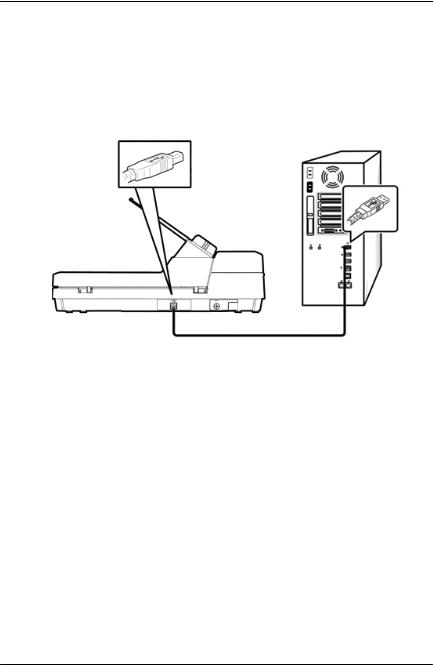
2.1.4 Connecting to Computer
1.Connect the square end of the USB cable to the USB port of your scanner. Connect the rectangle end to the USB port of your computer.
2.The computer should detect a new USB device and prompt a “New Hardware Found” message.
3.By following the on-screen instructions, click the Next button to continue. When the certification screen appears, click Continue Anyway to complete the installation.
4.When the Finish dialog is prompted, click the Finish button.
5.Click “View Manual” to view or print the detailed user manual for the scanner and bundled applications respectively.
2-5
User’s Manual
3.Completing Your First Scan
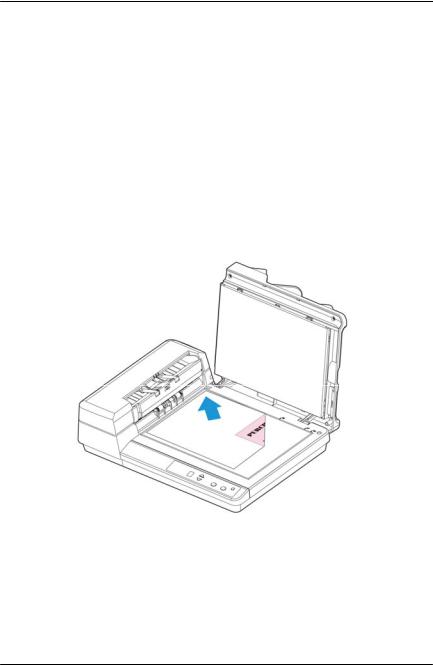
3.1 Placing paper on the document glass
Place your document face down on the document glass and align the document to the reference mark as indicated.
3-1

User’s Manual
3.2 Loading Your Paper
3.2.1 Notice on Using the ADF
Before using the ADF, please make sure that your paper meets the following specifications:
Document(s) can range in size from 114 x 140 mm (4.5 x 5.5 in.) to 216 x 356 mm (8.5 x 14 in.).
Document(s) can range in weight from 52 ~127 g/m2 (14 to 34 lbs)
Document(s) should be square or rectangular and in good condition (not fragile or worn).
Document(s) should be free of curl, wrinkle, tears, wet ink, or punch holes.
Document(s) should be free of staples, paper clips, paper sticky notes.
3-2
User’s Manual
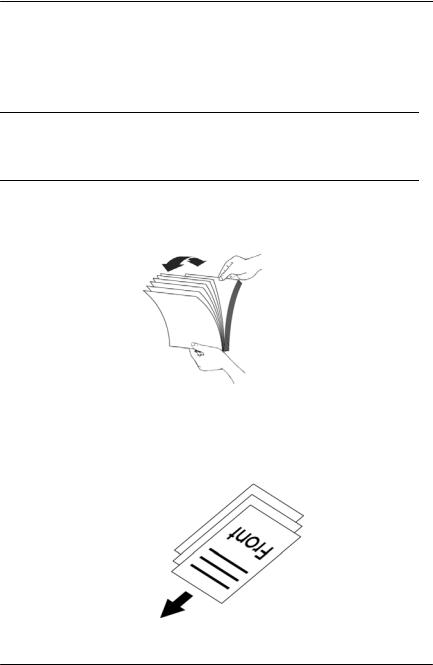
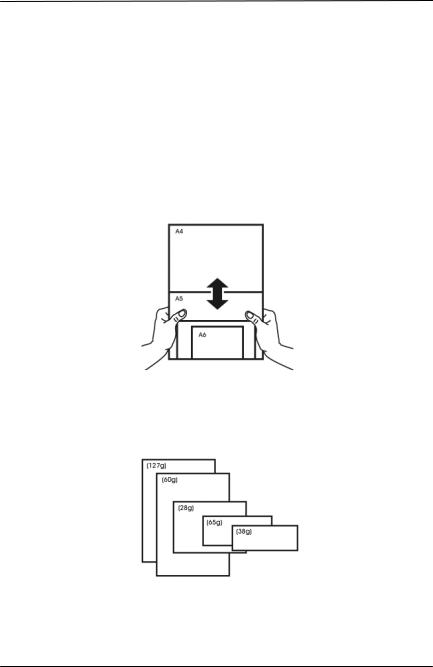
3.2.2 Placing Your Document in the ADF Paper Tray Fanning Your Document
Note:
To avoid occasional multi-feeds or paper jams, please fan your documents and align the top edges before feeding them into the scanner.
1.Hold both ends of the documents and fan them a few times.
2.Rotate the documents by 90 degrees and fan them in the same manner.
3.Align the edges of the documents in a step-like pattern (see picture below).
Step-like
Scanning
Direction
3-3
User’s Manual
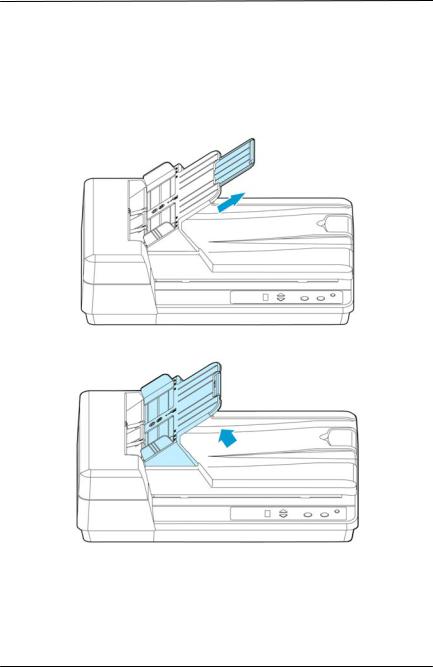
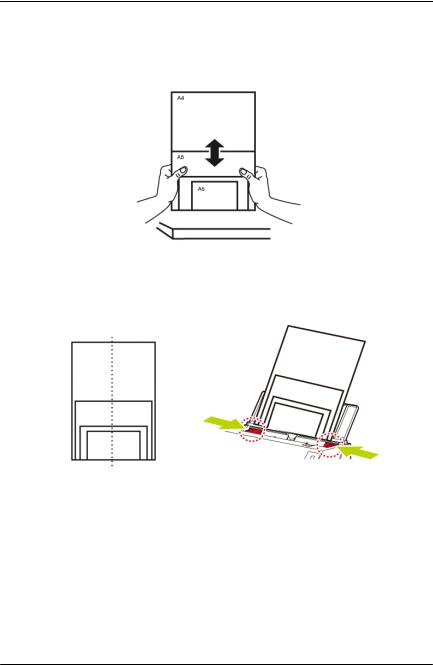
Document Feeding
1.Raise the ADF paper tray to about 45 degrees and pull the tray extension.
3-4
User’s Manual
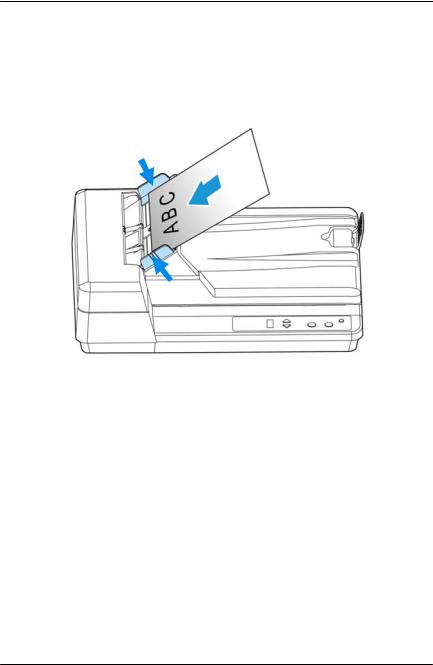
2.Place your document with the text face up and make the top of the page point to the document feeder as shown below. Center your document with the paper guides and make sure the edge of document touch the paper guides.
3-5
User’s Manual
3.2.3Scanning a Stack of Document with Various sizes and Weights
When scanning a batch of documents with different sizes and weights, be sure to follow these guidelines to avoid a skewed image or a paper jam:
1.Align the documents TOP EDGE first in the sequence of paper size from large to small.
2.If two pages are of the same size yet with different weight, arrange these pages in the sequence of paper weight from heavyweight to lightweight.
3-6
User’s Manual
3.Align the edges of the documents by tapping the bottom of the stack against the table top.
4.Center these pages in the document feeder and make sure that the edges of page of the largest size slightly touch the Paper Guide.
3-7
User’s Manual
3.2Verifying Your Scanner Installation
To verify if your scanner installation is correct, Avision provides you a useful test program called Avision Capture Tool. With this tool, you can perform simple scans and view the captured images. In addition, it helps you complete your scan at a rated speed.
The following procedure describes how to verify your scanner installation. If the installation is not correct, please review the preceding section to check if the cable connection and scanner driver have been successfully installed.
Before you begin, be sure the scanner is on.
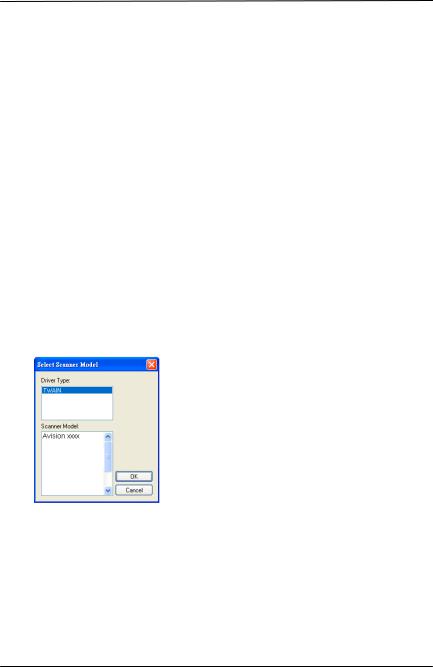
1.Select Start>Programs>Avision xxx Scanner>Avision Capture Tool. The Select Scanner Model dialog box will be displayed.
2.Select your driver type and scanner model and click OK. The following Avision Capture Tool dialog box will be displayed.
3-8
![]()
User’s Manual
Fit Actual
Page Size
|
Setup Scan Save |
File Format |
File Path |
||
3.Choose your desired file format from the File Format drop down list box. (Default is JPEG, other choice includes TIFF, MTIFF, PDF, MPDF, GIF, and BMP.) The supported file formats vary depending on your scanner model.
4.Type your desired folder name and file name in the File Path box. (Default is C:Documents and SettingsUser NameMy DocumentsMy ScanImage.)
Note: If you do not wish to save the scanned image, deselect the Save button since default is Save Enable. In this case, the thumbnail view will be disabled. And therefore, after viewing all the scanned images, only the last one will remain on the screen.
5.Click the Setup button ( ) or choose Setup from the File menu to prompt the Scanner Properties dialog box.
3-9
User’s Manual
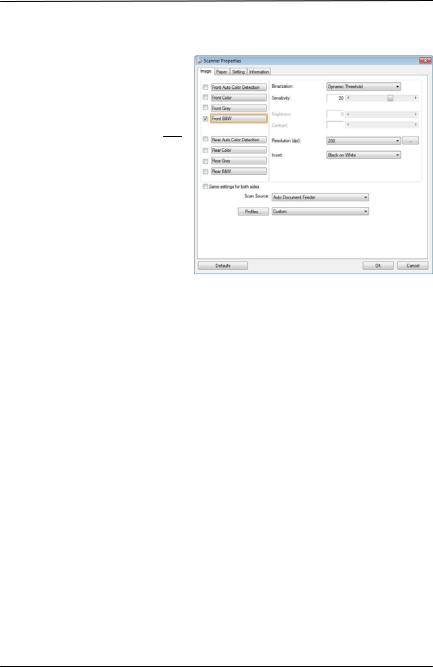
Image
Selection
Box
6.From the Image Selection Box, choose your desired image type for your scanned image. (Default is Front B&W) If you have a duplex scanner, choose Front and Rear to scan both sides of your document.
7.Click OK to quit the Scanner Properties dialog box. (To learn more details about the Scanner Properties dialog box, please see the subsequent chapter, Using the Scanner Properties Dialog Box.)
8.Place your document face down on the document glass or face up in the auto document feeder.
9.In the Scan Validation dialog box, click the Scan button ( ) or choose Scan from the File menu.
10.The document will be scanned and displayed in the Scan Validation screen. After the scanned images have been displayed, your scanner installation verification is completed.
3-10

User’s Manual
Display View
Thumbnail View
11.You can view the scanned image in Fit Page ( ) or Actual Size (100%) button (
 ) from the Viewing toolbars at the right side.
12.Click the Close box or Quit from the File menu to exit the Scan Validation Tool.
3-11
User’s Manual
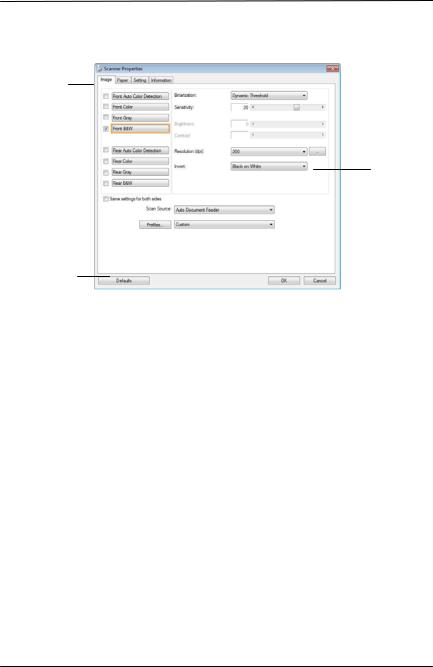
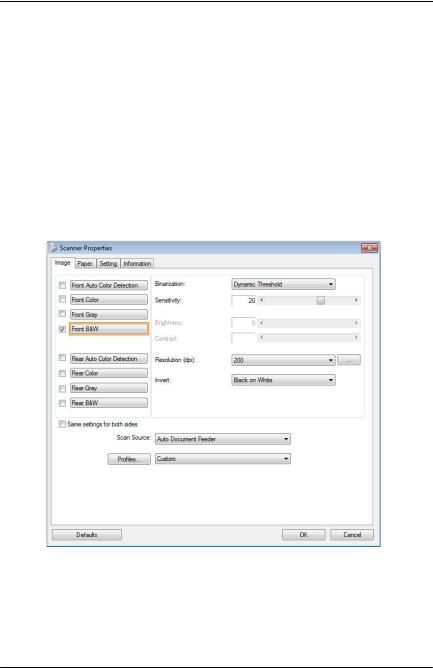
3.3A Glance of the Scanner Properties Dialog Box
1
|
2 |
3 |
|||||||
|
4 |
||||||||
|
5 |
||||||||
|
6 |
||||||||
|
7 |
||||||||
8
|
1. |
Tab Options |
Choice: Image, Compression, Color Dropout, |
|
Paper, Multi-Feed Detection, Preview, Options, |
||
|
Settings, Information. |
||
|
2. |
Image |
Choose your image type and the side of |
|
Selection Box |
document you wish to scan. Options vary |
|
|
based on type of scanner. |
||
|
3. |
Brightness |
Adjust the brightness level from –100 to +100. |
|
4. |
Contrast |
Adjust the contrast level from –100 to +100. |
|
5. Resolution |
Determine the quality of the scanned image. |
|
|
The industry standard is 200 dpi. |
||
|
6. |
Invert |
Reverse the color of your scanned image. |
|
7. |
Scan Source |
Choice: Auto Document Feeder, Flatbed, |
|
Flatbed (Book), Automatic (varies due to |
||
|
different scanner model) |
||
|
8. |
Defaults |
Reset all values on the tabs to the factory |
|
default settings. |
3-12
User’s Manual
4.Using the Scanner Properties Dialog Box
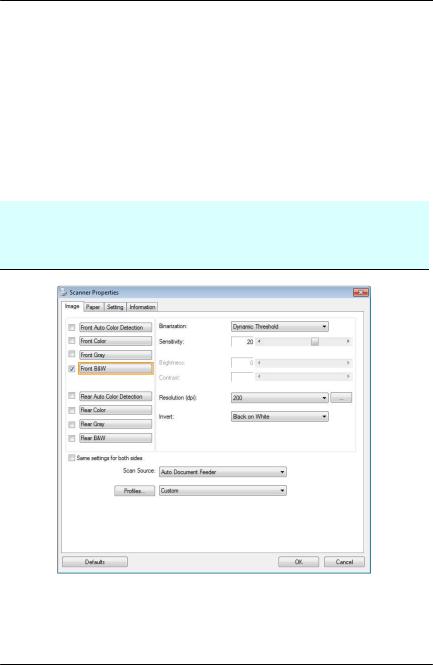
The Scanner Properties dialog box allows you to configure the scanner’s settings. It consists of several tabbed windows each of which will be described in this chapter.
Note: In this chapter, all options are available based on a duplex (double-side) scanner. If you have purchased a simplex (single-side) scanner, all options are available for single sided only.
The Scanner Properties dialog box
4-1
User’s Manual
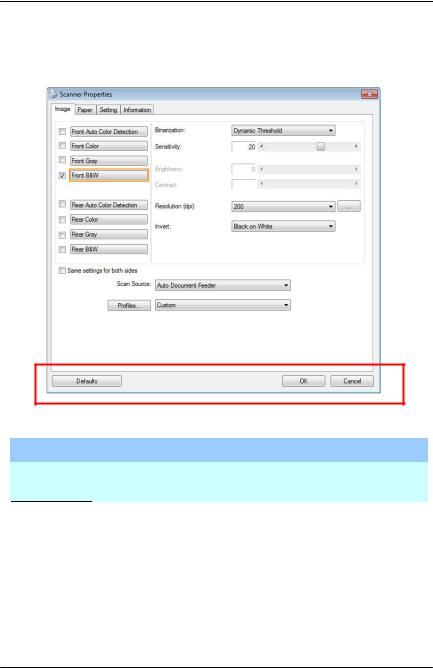
4.1 Buttons on the Scanner Properties Dialog Box
The buttons on the Scanner Properties dialog box Buttons Description
Defaults Click the Defaults button, the factory default settings will be shown on each tab.
Cancel Click the Cancel button to leave the Scanner Properties dialog box.
4-2

User’s Manual
The following table shows the default settings
|
Tab name |
Default settings |
|
Image |
Image Front B&W |
|
Binarization Dynamic Threshold |
|
|
Resolution 200 dpi |
|
|
Invert Blank on White |
|
|
Scan Source Auto Document Feeder |
|
|
Threshold None |
|
|
Brightness None |
|
|
Contrast None |
|
|
Compression |
None |
|
Color Dropout |
None |
|
Paper |
Cropping Automatic |
|
Deskew Yes |
|
|
Orientation Portrait |
|
|
OverScan 0.00 |
|
|
Note: The availability of this option |
|
|
varies due to scanner model. |
|
|
Unit Inch |
|
|
Multi-Feed |
None |
|
Detection |
|
|
Preview |
None |
|
Options |
Rotation Degrees None |
|
Blank Page Removal None |
|
|
Edge Fill White 0 mm |
|
|
Image Control Option None |
|
|
Setting |
Enable Energy Saver Enable, 15 |
|
minutes after last scan action |
|
|
Show Scanning Progress Yes |
|
|
Show Warning Message Yes |
|
|
Save Settings after Closing Yes |
|
|
Imprinter |
Digital Imprinter |
4-3

User’s Manual
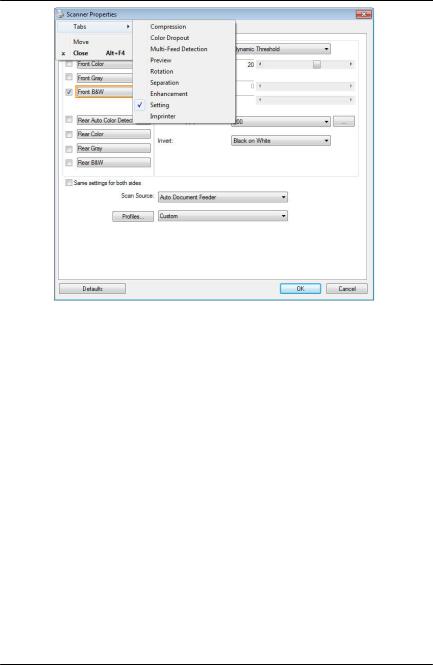
4.2Showing or Hiding Tabs
The [Scanner Properties] dialog box is displayed in default with three basic tabs — Image, Paper, and Information. To show more tabs, click the [Scanner Properties] icon to access more scan settings.
To show more tabs,
1.Click the [Scanner Properties] icon ( ) on the upper left corner, and choose [Tab] to show available tab names. The available tabs include Compression, Color Drop out, Preview, Rotation, Separation, Multi-Feed, Options, Settings, and Imprinter. (Note: the options vary based on scanner model.)
2.Choose the tab you want to display. The selected tab will be shown with a check mark and then displayed in the [Scanner Properties] dialog box.
3.To access the settings, click the selected tab on the top of the [Scanner Properties] dialog box. The page of the selected tab will be displayed.
To hide a tab window,
1.Click the [Scanner Properties] icon ( ) on the upper left corner, and choose [Tabs] to show available tab names.
2.Choose the tab you want to hide. Then, the selected tab will be hided in the [Scanner Properties] dialog box.
Note: The [Image], [Paper], and [Information] tab can not be hided since they preprogrammed to be displayed by default.
4-4
User’s Manual
4-5
User’s Manual
4.3The Image Tab
The Image tab allows you to choose the front side and (or) the rear side of your document, the type of image, and to set several basic scan settings. Note that except for the resolution, you can set individual scan settings for the front side and the rear side. For example, all settings in the Image tab, Compression tab, Color Dropout tab can be set individually for the front and the rear side. However, the settings in the Paper tab, the Option tab, and the Setting tab have to be set the same for the front and rear side.
The Image tab dialog box
4-6
![]()
User’s Manual
4.3.1 The Image Selection Box
The Image Selection box includes the image type and document side option. If you wish to scan both the front side and the rear side of your color document, you can check both Front Color and Rear Color at the same time. Note the options vary based on type of scanner.
Example 1 Scanning a two-sided color document, both sides in color
|
Side/Image |
Front |
Rear |
|
Selection |
||
4-7

User’s Manual
Example 2 Scanning a two-sided color document, one in B&W, the other in color
Side/Image
Selection
Image Type
Color
Gray
B&W
Front Rear
Description
Choose Color if you wish to scan a color image for your original in color.
Choose Gray image if your original contains actual shades of gray.
Choose B&W if your original contains only text, pencil or ink sketch.
4-8

User’s Manual
Front/Rear Auto Color Detection:
Click to automatically detect and scan the front or the rear page of your color document in color image mode. If your document is in colors, the scanner will automatically scan the document into a color image. If your document is non-color, you can choose the output to be either B&W or Gray from the Non-Color Selection option. This option is useful when you have a mixture of color and non-color document.
Note: If you choose Front Rear Auto Color Detection, you can not specify the image mode of your rear page and vice versas.
Modes of Auto Color Detection:
If [Front/Rear Auto Color Detection] is selected, its modes will be displayed. Choice includes Normal, Ignore Paper Color. For paper with background color such as invoices, choosing [Ignore Paper Color] will automatically remove the background color and enhance the detection accuracy.
|
Normal |
Ignore single background |
|
color |
|
4-9

User’s Manual
Sensitivity of Auto Color Detection
If your documents contain primarily B&W text and small amount of light or pale colors and you do not wish them to be recognized as color image to save the file size, you can increase the sensitivity value by moving the bar to the right to let these images to be detected as B&W. The value ranges from 1 to 100. The default is 37.
Original
|
Sensitivity: 1 |
Sensitivity: 100 |
|
(The image is recognized |
(The image is recognized |
|
as a color one) |
as a black and white one) |
4-10

User’s Manual
Same settings on both sides:
Click to apply same scan settings for both sides of your documents. After checking this option, any settings you have changed will automatically applied to both the front side and the rear side. For example, if you choose your ideal resolution to be 300 dpi, this will be applied both to the front side and rear side of your document.
4-11

User’s Manual
4.3.2 Other Image Options
Binarization This is the process of converting a grayscale or color image to a bi-tonal image. There are several different methods of performing this conversion.
Options: Dynamic Threshold,
Dynamic Threshold (AD), Fixed
Processing, Halftone 1~5, Error Diffusion.
Dynamic Threshold: Selecting Dynamic Threshold allows the scanner to dynamically evaluate each document to determine the optimal threshold value to produce the highest quality image. This is used to scan mixed document containing faint text, shaded background, or color background with a single setting. If Dynamic Threshold is selected, Threshold, Brightness, and Contrast are not available.
Dynamic Threshold (AD): Selecting Dynamic Threshold (AD) to perform the enhanced mode of the Dynamic Threshold feature. However, using this mode may slow down your scanning speed.
Sensitivity of Dynamic Threshold
Occasionally your scanned image may contain small dots or speckles. To remove these spots, increase the sensitivity value by moving the bar to the right. The value ranges from 1 to 30. The default is 20.
4-12

User’s Manual
Fixed Processing: Used for black-and- white and other high contrast documents. A single level is set to determine the black- and-white transition. The threshold is programmable over the entire density range. Fixed Processing sets Contrast to 0. If Fixed Processing is selected, Contrast is not available.
Halftone: In addition to the black and white display, Halftone can present a somehow gray shade of image by using different size of dots. Halftone image looks like the picture we have seen in the newspaper. Options include Halftone 1,
Halftone 2, Halftone 3, Halftone 4, Halftone 5.
Error Diffusion: Error Diffusion is a type of Halftone. Error Diffusion gives good image texture and makes text in images more readable than Halftone.
Halftone Image
4-13

User’s Manual
Error Diffusion Image
|
Dynamic Threshold |
Dynamic Threshold (AD) |
4-14
Компактный и простой в использовании сканер
Combining a flatbed scanner with the convenience of a 50-page ADF, the Avision AD130 is a compact and affordable productivity scanning solution delivering 30 pages per minute and 60 images per minute at 300 dpi. The combination of high productivity and affordability makes this series the obvious choice for reducing the total cost of scanning.
-
ОСОБЕННОСТИ
-
СПЕЦИФИКАЦИЯ
-
загрузки
-
FAQ
Product Details


В сканере AD130 используется CIS (контактный датчик изображения) технология и лампа LED как источник света. Благодаря автоподатчику на 50 листов сканер может обрабатывать односторонние и двухсторонние документы одновременно. Скорость сканирования составляет 30 страниц или 60 изображений в минуту, Сканер оснащен удобной функцией обрезки изображений. С этой функцией документы различных размеров, такие как фотографии, удостоверения личности или визитные карточки могут быть помещены на планшет, и сканер в состоянии обрезать и создать изображения согласно первоначальным размерам документов за одно сканирование. Для опытных пользователей, которые хотят управлять параметрами настройки сканирования AD130, пользовательский интерфейс TWAIN предлагает различные полезные функции, для улучшения качества изображения включая автоматическую обрезку и выравнивание, автоматическое определение цвета и т.д.
▍More Information
Сканер AD130 комплектуется TWAIN и ISIS драйверами, а также мощными приложениями, включающими Avision Button Manager, AvScan X и PaperPort 14. С помощью программы Button Manager Вы можете отсканировать документы в формате PDF, JPEG, BMP или GIF, и отправить их на электронную почту, принтер или другое приложение.
▎Сертификационный знак
Где купить
| Общая спецификация | |
| Технология |
Contact Image Sensor (CIS) |
|---|---|
| Источник света |
LED |
| Режим подачи документов |
Flatbed and ADF |
| Оптическое разрешение (т/д) |
1200 |
| Output Resolution (dpi) |
1200 |
| Форматы файлов |
BMP, PNG, GIF, JPEG, Single-Page PDF, Multi-Page PDF, Multi-TIFF, TIFF, RTF, TXT, OCR( for iScan only ), XPS, DOC, XLS, PPT, DOCS, XLSX, PPTX, HTML |
| Полутоновые узоры |
Dither and Error Diffusion |
| Режим оттенков серого |
16-bit input 8-bit output |
| Цветовой режим |
48-bit input 24-bit output |
| Размер памяти |
64MB SDRAM |
| Размеры (ШхГхВ) |
453 x 324 x 237 mm ( 17.8 x 12.8 x 9.3 in. ) |
| Вес |
4.3 kg ( 9.5 lb. ) |
| Интерфейс |
USB 2.0, ( USB 3.0 compatible ) |
| Потребляемая мощность |
Operation : < 16 W;Ready : < 7 W;Sleep : < 2.9 W;Off : < 0.5 W |
| Рекомендуемый дневной объём |
Up to 4,000 pages |
| Поддержка ОС |
Win 7, Win 8, Win 10 |
| Программное обеспечение в комплекте |
Button Manager, PaperPort, AVScan |
| Features | |
| Ультразвуковое обнаружение замятия бумаги |
Yes |
| Long Paper Mode |
Up to 300 dpi Color Duplex ( 120 in. ) |
| Scan Size | |
| Минимум АПД |
90 x 90 mm ( 3.5 x 3.5 in. ) |
| Максимум АПД |
216 x 356 mm ( Legal )( 8.5 x 14 in. ) |
| Ёмкость АПД |
50 sheets |
| Плотность бумаги (толщина) |
49 ~127 g/㎡ |
| Размер сканирования | |
| Ч/Б при 200 т.д., A4 |
Simplex : 40 ppm;Duplex : 80 ipm, Flatbed : 4 sec / 8 sec ( Include Backhome ) |
| Ч/Б при 300 т.д., A4 |
Simplex : 30 ppm;Duplex : 60 ipm, Flatbed : 4 sec / 8 sec ( Include Backhome ) |
| Цветной при 200 т.д., A4 |
Simplex : 40 ppm;Duplex : 80 ipm, Flatbed : 4 sec / 8 sec ( Include Backhome ) |
| Цветной при 300 т.д., A4 |
Simplex : 30 ppm;Duplex : 60 ipm, Flatbed : 4 sec / 8 sec ( Include Backhome ) |
* The above specifications may vary due to computer performance and sales regions. For further details, please consult your local distributor.
▎Фотографии продуктов
▎руководство
▎брошюра
▎программное обеспечение
| Имя | Версия | Размер | системная поддержка | Ссылка |
|---|---|---|---|---|
| PaperPort | 14 | 455.79 MB | Win XP / Vista / 7 / 8 / 10 | загрузки |
| World Card Team | V1.8.3 | 235 MB | Win XP / 7 / 8 / 10 | загрузки |
| ButtonManager V2 | V3.0.0.0 | 594 MB | Win XP / Vista / 7 / 8 / 10 | загрузки |
| AVScan X | V1.2.0.0 | 549.39 MB | win XP / Vista / 7 / 8 / 10 | загрузки |
▎Драйверы
| Имя | Версия | Размер | системная поддержка | Ссылка |
|---|---|---|---|---|
| AD130 | VB.22 | 140.03 MB | Win XP, Win Vista, Win 7, Win | загрузки |
▎Программное обеспечение
Когда я выбираю оптическое разрешение 600 dpi, функции «автоматической обрезки» и «выравнивания» будут отключены.
Поскольку для выполнения автоматической обрезки и устранения перекоса требуется много системной памяти, рекомендуется, если вы хотите выполнить функции «автоматической обрезки» и «выравнивания перекоса», выберите оптическое разрешение менее 600 dpi во избежание появления сообщения об ошибке.
Почему мое отсканированное изображение всегда получается слишком темным?
- Настройте параметры экрана на sRGB.
- Пожалуйста, отрегулируйте настройки яркости на экране с помощью прикладного программного обеспечения.
▎Инструкция
Бумага перекашивается в сканере.
- Выровняйте направляющие для документов так, чтобы они подходили как можно ближе друг к другу, и размещайте документы так, чтобы они подавались прямо.
- Проверьте состояние подающего ролика. При необходимости следуйте инструкциям по очистке и выполните очистку.
▎Аппаратное обеспечение
Бумага застревает во время сканирования.
- Откройте переднюю крышку
- Осторожно вытащите застрявшую бумагу.
- Закройте переднюю крышку.

Руководство пользователя
Примечание.
Рекомендованное разрешение: 200~600 dpi для
обычного штрих-кода, 300~600 dpi для QR code
Перекошенные штрих-коды могут распознаваться с
ошибками.
Многократное использование одного листа может
снизить точность распознавания из-за накопления
грязи на листах. Если лист распознается с ошибками
или содержит загрязнения, замените его на новый.
Patch code Detection (Определение кода
исправления):
Выберите ячейку [Enable (Включить)] для определения
кодов исправления и уведомления программного
приложения для расширенной обработки.
Код исправления — это узор из параллельных черных
полосок, чередующихся с пробелами (т.е. штрих-код),
напечатанный на документе. Лист с кодом исправления
обычно используется в качестве разделителя документов в
пачке.
Чтобы просмотреть различные размеры кодов исправления
(PDF), перейдите по вкладкам:
меню [Start (ПУск)]>[All Programs (Все
программы)]>[Avision Scanner Series(Сканер серии
Avision)]>[Patch code (Код исправления)].
Распечатайте файл PDF, чтобы создать лист с кодом
исправления. Вставьте листы с кодом исправления в местах
разделения файла.
Лист с кодом
исправления
4-66
Как мы работаем
Если не знаете где отремонтировать Сканер Avision AD130 в вашем городе, мы поможем вам бесплатно подобрать сервисный центр или частного мастера по ремонту и обслуживанию сканеров, работаем ежедневно с 7:00 до 24:00, бесплатная консультация по телефону: +7 (930) 999-42-15
Бесплатная заявка
Оставляйте бесплатную заявку на срочный ремонт сканеров
Подбор сервиса
Наши специалисты подберут для Вас проверенный сервисный центр или частного мастера
Ремонт с гарантией
Оригинальные запчасти в наличии и гарантия на ремонт до 3-х лет
Узнайте стоимость ремонта
Оставьте бесплатную заявку на ремонт или просто задайте вопрос мастерам.

Сканер Avision AD130 — характеристики
| Дополнительно | |
| Особенности | сочетание планшетного и протяжного сканера; ультразвуковой датчик замятия бумаги |
| Вес | 4.3 кг |
| Размеры (ШxВxГ) | 453x237x324 мм |
| Емкость устройства автоподачи | 50 листов |
| Мощность при работе / в режиме ожидания | 16 Вт / 7 Вт |
| Поддержка стандартов | ISIS, TWAIN |
| Уровень шума при работе / в режиме ожидания | 58 дБ / 40 дБ |
| Устройство автоподачи | двустороннее |
| Характеристики | |
| Глубина цвета | 48 бит |
| Глубина цвета (внешн.) | 24 бит |
| Максимальный формат бумаги | A4 |
| Разрешение | 600×600 dpi |
| Скорость сканирования (цветн.) | одностороннее: 30 стр/мин, двустороннее: 60 изобр/мин |
| Скорость сканирования (ч/б) | одностороннее: 30 стр/мин, двустороннее: 60 изобр/мин |
| Общее | |
| Интерфейс | USB 3.0 |
| Совместимость | PC |
| Тип | протяжный |
| Тип датчика | CIS |
Ремонт похожих моделей
Частые вопросы
Как отремонтировать Сканер Avision AD130 самостоятельно?
Мы настоятельно не рекомендуем выполнять ремонт самостоятельно — своими руками, так как это может привести к потере гарантии.
Как найти сервис по ремонту рядом со мной?
Выберете в фильтре необходимую локацию в вашем горде и найдите адреса сервисных центров поблизости.
Возможен ли ремонт на дому?
Починить Сканер Avision AD130 можно на дому или в любом сервисном центре.
Остались вопросы? Мы Вам перезвоним
Новый отзыв про Сканер Avision AD130
Записаться на ремонт
Стоимость работы
Закажите ремонт вашего устройства на сайте и получите скидку до 25%
Или по телефонам:
+7 (495) 021-43-98
+7 (930) 333-28-64
Нажимая на кнопку, Вы даете согласие на обработку персональных данных и соглашаетесь с политикой конфиденциальности.
Записаться на ремонт
Закажите ремонт вашего устройства на сайте и получите скидку до 25%
Или по телефонам:
+7 (495) 021-43-98
+7 (930) 333-28-64
Нажимая на кнопку, Вы даете согласие на обработку персональных данных и соглашаетесь с политикой конфиденциальности.
![]()
Color Image Scanner
User’s Manual
Regulatory model: DF-1701B/DF-1702B
Avision Inc.
User’s Manual
Trademarks
Microsoft is a U.S. registered trademark of Microsoft Corporation.
Windows, Windows Vista, Windows 7, Windows 8 and Windows 10 are either registered trademarks or trademarks of Microsoft Corporation in the United States and/or other countries.
IBM, IBM PC are registered trademarks of International Business Machines Corp.
Other brands and product names herein are trademarks or registered trademarks of their respective holders.
Copyright
All rights reserved. No part of this publication may be reproduced, transmitted, transcribed, stored in a retrieval system, or translated into any language or computer language, in any form or by any means, electronic, mechanical, magnetic, optical, chemical, manual, or otherwise, without the prior written permission of Avision Inc.
Material scanned by this product may be protected by governmental laws and other regulations, such as copyright laws, the customer is solely responsible for complying with all such laws and regulations.
Warranty
The information contained in this document is subject to change without notice.
Avision makes no warranty of any kind with regard to this material, including, but not limited to, the implied warranties of fitness for a particular purpose.
Avision shall not be liable for errors contained herein or for incidental or consequential damages in connection with the furnishing, performance, or use of this material.
ii
User’s Manual
FCC Radio Frequency Interference Statement
This product has been tested and found to comply with the limits for a class B digital device, pursuant to Part 15 of the FCC rules. Operation is subject to the following two conditions: (1) this device may not cause harmful interference, and (2) this device must accept any interference received, including interference that may cause undesired operation. The FCC Class B limits are designed to provide reasonable protection against harmful interference in a residential installation. This equipment generates, uses, and can radiate radio frequency energy and, if not installed and used in accordance with the instructions, may cause harmful interference to radio communications. However, there is no guarantee that interference will not occur in a particular installation. If this equipment does cause harmful interference to radio or television reception, which can be determined by turning the equipment off and on, the user is encouraged to try to correct the interference by one or more of the following measures:
Reorient or relocate the receiving antenna.
Increase the separation between the equipment and receiver.
Connect the equipment into an outlet on a circuit different from that to which the receiver is connected.
Consult your point of purchase or service representative for additional suggestions.
As an ENERGY STAR® Partner, Avision Inc. has determined that this product meets the ENERGY STAR guidelines for energy efficiency.
iii
User’s Manual
European Union Regulatory Notice
Products bearing the CE marking comply with the following EU Directives:
Low Voltage Directive 2014/35/EC
EMC Directive 2014/30/EC
Restriction of the use of certain hazardous substances (RoHS) Directive 2011/65/EU
CE compliance of this product is valid if powered with the correct CE-marked AC adapter provided by Avision.
This product satisfies the Class B limits of EN55022, EN55024 and safety requirements of EN 60950.
*This machine is certified as Class 1 LED product. This means that this machine does not produce hazardous laser radiation.
Disposal of Waste Equipment
This symbol on the product or on its packaging indicates that the product can not be disposed of with your other household waste. Instead it should be sent to appropriate facilities for recovery and recycling in an effort to protect human health and the environment. Fore more information about where you can drop off your waste equipment for recycling, please contact your local city office, your household waste disposal service or the shop where you purchased the product.
iv
User’s Manual
System Requirements
|
CPU: |
Intel® Core™ 2 Duo or higher |
|
Memory: |
32 bit: 2 GB |
|
64 bit: 4 GB |
|
|
Optical Drive: |
DVD-ROM Drive |
|
USB Port: |
USB port 2.0 (compatible with USB 1.1) |
|
Compatible |
Microsoft Windows XP(SP3), Windows Vista, |
|
Operating |
Windows 7, Windows 8 (32 bits/64 bits), |
|
System: |
Windows 10 (32 bits/64 bits) |
v
User’s Manual
1. Introduction
Congratulations on your purchase of the color image scanner. With this scanner, you can scan documents in a rated speed to increase your productivity.
Before you install and operate the new scanner, please take a few minutes to read through this manual. It provides proper instructions for you to unpack, install, operate and maintain the scanner.
The following figure indicates the package contents. Please check all the items against your checklist. If you do not receive all the items, please contact your authorized local dealer immediately.
1.Scanner Main Unit
2.Software CD/Quick Guide
3.USB Cable
4.Power Adapter & Power Cord
1-1
User’s Manual
NOTE:
1.Only use the AC adapter (DA-48M24 made by APD) included in the machine. Using other AC adapters may damage the machine and void the warranty.
2.Please unpack the packing carefully, and check the contents against the checklist. If any items are missing or damaged, please contact your dealer immediately.
3.To access more service supports, visit www.avision.com to register your Avision’s product.
1-2
User’s Manual
2.Scanner Installation
Precautions
Keep the scanner out of direct sunlight. Direct exposure to the sun or excessive heat may cause damage to the unit.
Do not install the scanner in a humid or dusty place.
Be sure to use the proper AC power source.
Place the scanner securely on an even, flat surface. Tilted or uneven surfaces may cause mechanical or paper-feeding problems.
Retain the scanner box and packing materials for shipping purposes.
2-1
User’s Manual
2.1 Installing the Scanner Driver and Cables
NOTE:
1). The Windows system CD may be required when installing on some PC’s.
2). To ensure your computer can identify the USB scanner, please install scanner driver first before connecting the scanner to your computer.
3). The scanner driver contains TWAIN, ISIS and WIA driver. If you are running Windows Me, Windows XP, or Windows Vista, after the installation of scanner driver is completed, this scanner allows you to scan via a TWAIN, ISIS, or a WIA interface. Start your TWAIN-compliant image editing software application to select a TWAIN or WIA user interface or your ISIS software to select an ISIS user interface. You may also launch Microsoft’s Scanner and Camera Wizard to scan via a WIA user interface.
2.1.1 Connecting to Power
Plug the small end of the power adaptor into the power jack of your scanner. Insert the other end to an appropriate power outlet.
2-2
User’s Manual
2.1.2 Turning on the Scanner
Press the Power Switch button on the front panel, the Power LED will be lit. To turn off the scanner, press the Power Switch button for about 3 seconds, the Power LED will be off.
2.1.3 Installing the Scanner Driver
1.Place the supplied CD-ROM onto your CD-ROM drive.
2.The software installation graphic appears. If not, run
“setup.exe”.
2-3
![]()
User’s Manual
Contents on the installation graphic:
Install Scanner Driver: To communicate with your scanner, you need to install the scanner driver.
Install Button Manager V2: To use the buttons on the scanner, you need to install Button Manager V2. To ensure Button Manager V2 works properly, please FIRST install scanner driver before installing Button Manager V2.
Install Adobe Reader: To view the user’s manuals for the scanner and Button Manager V2, you need to use Adobe Reader to open and view the manuals in pdf file format. If you already have Adobe Reader installed on your computer, you may disregard this item.
Install AVScan X: To scan and organize your multi-page document(s), you can install the software application to manage them easily and effectively.
View Manual: Click “View Manual” to view or print the detailed user manual for the scanner and Button Manager V2 respectively.
3.Click Install Button Manager V2 to install the Button Manager V2 software and then click Install Scanner Driver to install the scanner driver on your computer.
2-4
User’s Manual
2.1.4 Connecting to Computer
1.Connect the square end of the USB cable to the USB port of your scanner. Connect the rectangle end to the USB port of your computer.
2.The computer should detect a new USB device and prompt a “New Hardware Found” message.
3.By following the on-screen instructions, click the Next button to continue. When the certification screen appears, click Continue Anyway to complete the installation.
4.When the Finish dialog is prompted, click the Finish button.
5.Click “View Manual” to view or print the detailed user manual for the scanner and bundled applications respectively.
2-5
User’s Manual
3.Completing Your First Scan
3.1 Placing paper on the document glass
Place your document face down on the document glass and align the document to the reference mark as indicated.
3-1
User’s Manual
3.2 Loading Your Paper
3.2.1 Notice on Using the ADF
Before using the ADF, please make sure that your paper meets the following specifications:
Document(s) can range in size from 114 x 140 mm (4.5 x 5.5 in.) to 216 x 356 mm (8.5 x 14 in.).
Document(s) can range in weight from 52 ~127 g/m2 (14 to 34 lbs)
Document(s) should be square or rectangular and in good condition (not fragile or worn).
Document(s) should be free of curl, wrinkle, tears, wet ink, or punch holes.
Document(s) should be free of staples, paper clips, paper sticky notes.
3-2
User’s Manual
3.2.2 Placing Your Document in the ADF Paper Tray Fanning Your Document
Note:
To avoid occasional multi-feeds or paper jams, please fan your documents and align the top edges before feeding them into the scanner.
1.Hold both ends of the documents and fan them a few times.
2.Rotate the documents by 90 degrees and fan them in the same manner.
3.Align the edges of the documents in a step-like pattern (see picture below).
Step-like
Scanning
Direction
3-3
User’s Manual
Document Feeding
1.Raise the ADF paper tray to about 45 degrees and pull the tray extension.
3-4
User’s Manual
2.Place your document with the text face up and make the top of the page point to the document feeder as shown below. Center your document with the paper guides and make sure the edge of document touch the paper guides.
3-5
User’s Manual
3.2.3Scanning a Stack of Document with Various sizes and Weights
When scanning a batch of documents with different sizes and weights, be sure to follow these guidelines to avoid a skewed image or a paper jam:
1.Align the documents TOP EDGE first in the sequence of paper size from large to small.
2.If two pages are of the same size yet with different weight, arrange these pages in the sequence of paper weight from heavyweight to lightweight.
3-6
User’s Manual
3.Align the edges of the documents by tapping the bottom of the stack against the table top.
4.Center these pages in the document feeder and make sure that the edges of page of the largest size slightly touch the Paper Guide.
3-7
User’s Manual
3.2Verifying Your Scanner Installation
To verify if your scanner installation is correct, Avision provides you a useful test program called Avision Capture Tool. With this tool, you can perform simple scans and view the captured images. In addition, it helps you complete your scan at a rated speed.
The following procedure describes how to verify your scanner installation. If the installation is not correct, please review the preceding section to check if the cable connection and scanner driver have been successfully installed.
Before you begin, be sure the scanner is on.
1.Select Start>Programs>Avision xxx Scanner>Avision Capture Tool. The Select Scanner Model dialog box will be displayed.
2.Select your driver type and scanner model and click OK. The following Avision Capture Tool dialog box will be displayed.
3-8
![]()
User’s Manual
Fit Actual
Page Size
|
Setup Scan Save |
File Format |
File Path |
||
3.Choose your desired file format from the File Format drop down list box. (Default is JPEG, other choice includes TIFF, MTIFF, PDF, MPDF, GIF, and BMP.) The supported file formats vary depending on your scanner model.
4.Type your desired folder name and file name in the File Path box. (Default is C:\Documents and Settings\User Name\My Documents\My Scan\Image.)
Note: If you do not wish to save the scanned image, deselect the Save button since default is Save Enable. In this case, the thumbnail view will be disabled. And therefore, after viewing all the scanned images, only the last one will remain on the screen.
5.Click the Setup button () or choose Setup from the File menu to prompt the Scanner Properties dialog box.
3-9
User’s Manual
Image
Selection
Box
6.From the Image Selection Box, choose your desired image type for your scanned image. (Default is Front B&W) If you have a duplex scanner, choose Front and Rear to scan both sides of your document.
7.Click OK to quit the Scanner Properties dialog box. (To learn more details about the Scanner Properties dialog box, please see the subsequent chapter, Using the Scanner Properties Dialog Box.)
8.Place your document face down on the document glass or face up in the auto document feeder.
9.In the Scan Validation dialog box, click the Scan button () or choose Scan from the File menu.
10.The document will be scanned and displayed in the Scan Validation screen. After the scanned images have been displayed, your scanner installation verification is completed.
3-10
User’s Manual
Display View
Thumbnail View
11.You can view the scanned image in Fit Page () or Actual Size (100%) button () from the Viewing toolbars at the right side.
12.Click the Close box or Quit from the File menu to exit the Scan Validation Tool.
3-11
User’s Manual
3.3A Glance of the Scanner Properties Dialog Box
1
|
2 |
3 |
|||||||
|
4 |
||||||||
|
5 |
||||||||
|
6 |
||||||||
|
7 |
||||||||
8
|
1. |
Tab Options |
Choice: Image, Compression, Color Dropout, |
|
Paper, Multi-Feed Detection, Preview, Options, |
||
|
Settings, Information. |
||
|
2. |
Image |
Choose your image type and the side of |
|
Selection Box |
document you wish to scan. Options vary |
|
|
based on type of scanner. |
||
|
3. |
Brightness |
Adjust the brightness level from –100 to +100. |
|
4. |
Contrast |
Adjust the contrast level from –100 to +100. |
|
5. Resolution |
Determine the quality of the scanned image. |
|
|
The industry standard is 200 dpi. |
||
|
6. |
Invert |
Reverse the color of your scanned image. |
|
7. |
Scan Source |
Choice: Auto Document Feeder, Flatbed, |
|
Flatbed (Book), Automatic (varies due to |
||
|
different scanner model) |
||
|
8. |
Defaults |
Reset all values on the tabs to the factory |
|
default settings. |
3-12
User’s Manual
4.Using the Scanner Properties Dialog Box
The Scanner Properties dialog box allows you to configure the scanner’s settings. It consists of several tabbed windows each of which will be described in this chapter.
Note: In this chapter, all options are available based on a duplex (double-side) scanner. If you have purchased a simplex (single-side) scanner, all options are available for single sided only.
The Scanner Properties dialog box
4-1
User’s Manual
4.1 Buttons on the Scanner Properties Dialog Box
The buttons on the Scanner Properties dialog box Buttons Description
Defaults Click the Defaults button, the factory default settings will be shown on each tab.
Cancel Click the Cancel button to leave the Scanner Properties dialog box.
4-2
User’s Manual
The following table shows the default settings
|
Tab name |
Default settings |
|
Image |
Image Front B&W |
|
Binarization Dynamic Threshold |
|
|
Resolution 200 dpi |
|
|
Invert Blank on White |
|
|
Scan Source Auto Document Feeder |
|
|
Threshold None |
|
|
Brightness None |
|
|
Contrast None |
|
|
Compression |
None |
|
Color Dropout |
None |
|
Paper |
Cropping Automatic |
|
Deskew Yes |
|
|
Orientation Portrait |
|
|
OverScan 0.00 |
|
|
Note: The availability of this option |
|
|
varies due to scanner model. |
|
|
Unit Inch |
|
|
Multi-Feed |
None |
|
Detection |
|
|
Preview |
None |
|
Options |
Rotation Degrees None |
|
Blank Page Removal None |
|
|
Edge Fill White 0 mm |
|
|
Image Control Option None |
|
|
Setting |
Enable Energy Saver Enable, 15 |
|
minutes after last scan action |
|
|
Show Scanning Progress Yes |
|
|
Show Warning Message Yes |
|
|
Save Settings after Closing Yes |
|
|
Imprinter |
Digital Imprinter |
4-3
User’s Manual
4.2Showing or Hiding Tabs
The [Scanner Properties] dialog box is displayed in default with three basic tabs — Image, Paper, and Information. To show more tabs, click the [Scanner Properties] icon to access more scan settings.
To show more tabs,
1.Click the [Scanner Properties] icon () on the upper left corner, and choose [Tab] to show available tab names. The available tabs include Compression, Color Drop out, Preview, Rotation, Separation, Multi-Feed, Options, Settings, and Imprinter. (Note: the options vary based on scanner model.)
2.Choose the tab you want to display. The selected tab will be shown with a check mark and then displayed in the [Scanner Properties] dialog box.
3.To access the settings, click the selected tab on the top of the [Scanner Properties] dialog box. The page of the selected tab will be displayed.
To hide a tab window,
1.Click the [Scanner Properties] icon () on the upper left corner, and choose [Tabs] to show available tab names.
2.Choose the tab you want to hide. Then, the selected tab will be hided in the [Scanner Properties] dialog box.
Note: The [Image], [Paper], and [Information] tab can not be hided since they preprogrammed to be displayed by default.
4-4
User’s Manual
4-5
User’s Manual
4.3The Image Tab
The Image tab allows you to choose the front side and (or) the rear side of your document, the type of image, and to set several basic scan settings. Note that except for the resolution, you can set individual scan settings for the front side and the rear side. For example, all settings in the Image tab, Compression tab, Color Dropout tab can be set individually for the front and the rear side. However, the settings in the Paper tab, the Option tab, and the Setting tab have to be set the same for the front and rear side.
The Image tab dialog box
4-6
![]()
User’s Manual
4.3.1 The Image Selection Box
The Image Selection box includes the image type and document side option. If you wish to scan both the front side and the rear side of your color document, you can check both Front Color and Rear Color at the same time. Note the options vary based on type of scanner.
Example 1 Scanning a two-sided color document, both sides in color
|
Side/Image |
Front |
Rear |
|
Selection |
||
4-7
User’s Manual
Example 2 Scanning a two-sided color document, one in B&W, the other in color
Side/Image
Selection
Image Type
Color
Gray
B&W
Front Rear
Description
Choose Color if you wish to scan a color image for your original in color.
Choose Gray image if your original contains actual shades of gray.
Choose B&W if your original contains only text, pencil or ink sketch.
4-8
User’s Manual
Front/Rear Auto Color Detection:
Click to automatically detect and scan the front or the rear page of your color document in color image mode. If your document is in colors, the scanner will automatically scan the document into a color image. If your document is non-color, you can choose the output to be either B&W or Gray from the Non-Color Selection option. This option is useful when you have a mixture of color and non-color document.
Note: If you choose Front Rear Auto Color Detection, you can not specify the image mode of your rear page and vice versas.
Modes of Auto Color Detection:
If [Front/Rear Auto Color Detection] is selected, its modes will be displayed. Choice includes Normal, Ignore Paper Color. For paper with background color such as invoices, choosing [Ignore Paper Color] will automatically remove the background color and enhance the detection accuracy.
|
Normal |
Ignore single background |
|
color |
|
4-9
User’s Manual
Sensitivity of Auto Color Detection
If your documents contain primarily B&W text and small amount of light or pale colors and you do not wish them to be recognized as color image to save the file size, you can increase the sensitivity value by moving the bar to the right to let these images to be detected as B&W. The value ranges from 1 to 100. The default is 37.
Original
|
Sensitivity: 1 |
Sensitivity: 100 |
|
(The image is recognized |
(The image is recognized |
|
as a color one) |
as a black and white one) |
4-10
User’s Manual
Same settings on both sides:
Click to apply same scan settings for both sides of your documents. After checking this option, any settings you have changed will automatically applied to both the front side and the rear side. For example, if you choose your ideal resolution to be 300 dpi, this will be applied both to the front side and rear side of your document.
4-11
User’s Manual
4.3.2 Other Image Options
Binarization This is the process of converting a grayscale or color image to a bi-tonal image. There are several different methods of performing this conversion.
Options: Dynamic Threshold,
Dynamic Threshold (AD), Fixed
Processing, Halftone 1~5, Error Diffusion.
Dynamic Threshold: Selecting Dynamic Threshold allows the scanner to dynamically evaluate each document to determine the optimal threshold value to produce the highest quality image. This is used to scan mixed document containing faint text, shaded background, or color background with a single setting. If Dynamic Threshold is selected, Threshold, Brightness, and Contrast are not available.
Dynamic Threshold (AD): Selecting Dynamic Threshold (AD) to perform the enhanced mode of the Dynamic Threshold feature. However, using this mode may slow down your scanning speed.
Sensitivity of Dynamic Threshold
Occasionally your scanned image may contain small dots or speckles. To remove these spots, increase the sensitivity value by moving the bar to the right. The value ranges from 1 to 30. The default is 20.
4-12
User’s Manual
Fixed Processing: Used for black-and- white and other high contrast documents. A single level is set to determine the black- and-white transition. The threshold is programmable over the entire density range. Fixed Processing sets Contrast to 0. If Fixed Processing is selected, Contrast is not available.
Halftone: In addition to the black and white display, Halftone can present a somehow gray shade of image by using different size of dots. Halftone image looks like the picture we have seen in the newspaper. Options include Halftone 1,
Halftone 2, Halftone 3, Halftone 4, Halftone 5.
Error Diffusion: Error Diffusion is a type of Halftone. Error Diffusion gives good image texture and makes text in images more readable than Halftone.
Halftone Image
4-13
User’s Manual
Error Diffusion Image
|
Dynamic Threshold |
Dynamic Threshold (AD) |
4-14
Loading…
Loading…
![]()
Color Image Scanner
User’s Manual
Regulatory model: DF-1701B/DF-1702B
Avision Inc.
User’s Manual
Trademarks
Microsoft is a U.S. registered trademark of Microsoft Corporation.
Windows, Windows Vista, Windows 7, Windows 8 and Windows 10 are either registered trademarks or trademarks of Microsoft Corporation in the United States and/or other countries.
IBM, IBM PC are registered trademarks of International Business Machines Corp.
Other brands and product names herein are trademarks or registered trademarks of their respective holders.
Copyright
All rights reserved. No part of this publication may be reproduced, transmitted, transcribed, stored in a retrieval system, or translated into any language or computer language, in any form or by any means, electronic, mechanical, magnetic, optical, chemical, manual, or otherwise, without the prior written permission of Avision Inc.
Material scanned by this product may be protected by governmental laws and other regulations, such as copyright laws, the customer is solely responsible for complying with all such laws and regulations.
Warranty
The information contained in this document is subject to change without notice.
Avision makes no warranty of any kind with regard to this material, including, but not limited to, the implied warranties of fitness for a particular purpose.
Avision shall not be liable for errors contained herein or for incidental or consequential damages in connection with the furnishing, performance, or use of this material.
ii
User’s Manual
FCC Radio Frequency Interference Statement
This product has been tested and found to comply with the limits for a class B digital device, pursuant to Part 15 of the FCC rules. Operation is subject to the following two conditions: (1) this device may not cause harmful interference, and (2) this device must accept any interference received, including interference that may cause undesired operation. The FCC Class B limits are designed to provide reasonable protection against harmful interference in a residential installation. This equipment generates, uses, and can radiate radio frequency energy and, if not installed and used in accordance with the instructions, may cause harmful interference to radio communications. However, there is no guarantee that interference will not occur in a particular installation. If this equipment does cause harmful interference to radio or television reception, which can be determined by turning the equipment off and on, the user is encouraged to try to correct the interference by one or more of the following measures:
Reorient or relocate the receiving antenna.
Increase the separation between the equipment and receiver.
Connect the equipment into an outlet on a circuit different from that to which the receiver is connected.
Consult your point of purchase or service representative for additional suggestions.
As an ENERGY STAR® Partner, Avision Inc. has determined that this product meets the ENERGY STAR guidelines for energy efficiency.
iii
User’s Manual
European Union Regulatory Notice
Products bearing the CE marking comply with the following EU Directives:
Low Voltage Directive 2014/35/EC
EMC Directive 2014/30/EC
Restriction of the use of certain hazardous substances (RoHS) Directive 2011/65/EU
CE compliance of this product is valid if powered with the correct CE-marked AC adapter provided by Avision.
This product satisfies the Class B limits of EN55022, EN55024 and safety requirements of EN 60950.
*This machine is certified as Class 1 LED product. This means that this machine does not produce hazardous laser radiation.
Disposal of Waste Equipment
This symbol on the product or on its packaging indicates that the product can not be disposed of with your other household waste. Instead it should be sent to appropriate facilities for recovery and recycling in an effort to protect human health and the environment. Fore more information about where you can drop off your waste equipment for recycling, please contact your local city office, your household waste disposal service or the shop where you purchased the product.
iv
User’s Manual
System Requirements
|
CPU: |
Intel® Core™ 2 Duo or higher |
|
Memory: |
32 bit: 2 GB |
|
64 bit: 4 GB |
|
|
Optical Drive: |
DVD-ROM Drive |
|
USB Port: |
USB port 2.0 (compatible with USB 1.1) |
|
Compatible |
Microsoft Windows XP(SP3), Windows Vista, |
|
Operating |
Windows 7, Windows 8 (32 bits/64 bits), |
|
System: |
Windows 10 (32 bits/64 bits) |
v
User’s Manual
1. Introduction
Congratulations on your purchase of the color image scanner. With this scanner, you can scan documents in a rated speed to increase your productivity.
Before you install and operate the new scanner, please take a few minutes to read through this manual. It provides proper instructions for you to unpack, install, operate and maintain the scanner.
The following figure indicates the package contents. Please check all the items against your checklist. If you do not receive all the items, please contact your authorized local dealer immediately.
1.Scanner Main Unit
2.Software CD/Quick Guide
3.USB Cable
4.Power Adapter & Power Cord
1-1
User’s Manual
NOTE:
1.Only use the AC adapter (DA-48M24 made by APD) included in the machine. Using other AC adapters may damage the machine and void the warranty.
2.Please unpack the packing carefully, and check the contents against the checklist. If any items are missing or damaged, please contact your dealer immediately.
3.To access more service supports, visit www.avision.com to register your Avision’s product.
1-2
User’s Manual
2.Scanner Installation
Precautions
Keep the scanner out of direct sunlight. Direct exposure to the sun or excessive heat may cause damage to the unit.
Do not install the scanner in a humid or dusty place.
Be sure to use the proper AC power source.
Place the scanner securely on an even, flat surface. Tilted or uneven surfaces may cause mechanical or paper-feeding problems.
Retain the scanner box and packing materials for shipping purposes.
2-1
User’s Manual
2.1 Installing the Scanner Driver and Cables
NOTE:
1). The Windows system CD may be required when installing on some PC’s.
2). To ensure your computer can identify the USB scanner, please install scanner driver first before connecting the scanner to your computer.
3). The scanner driver contains TWAIN, ISIS and WIA driver. If you are running Windows Me, Windows XP, or Windows Vista, after the installation of scanner driver is completed, this scanner allows you to scan via a TWAIN, ISIS, or a WIA interface. Start your TWAIN-compliant image editing software application to select a TWAIN or WIA user interface or your ISIS software to select an ISIS user interface. You may also launch Microsoft’s Scanner and Camera Wizard to scan via a WIA user interface.
2.1.1 Connecting to Power
Plug the small end of the power adaptor into the power jack of your scanner. Insert the other end to an appropriate power outlet.
2-2
User’s Manual
2.1.2 Turning on the Scanner
Press the Power Switch button on the front panel, the Power LED will be lit. To turn off the scanner, press the Power Switch button for about 3 seconds, the Power LED will be off.
2.1.3 Installing the Scanner Driver
1.Place the supplied CD-ROM onto your CD-ROM drive.
2.The software installation graphic appears. If not, run
“setup.exe”.
2-3
![]()
User’s Manual
Contents on the installation graphic:
Install Scanner Driver: To communicate with your scanner, you need to install the scanner driver.
Install Button Manager V2: To use the buttons on the scanner, you need to install Button Manager V2. To ensure Button Manager V2 works properly, please FIRST install scanner driver before installing Button Manager V2.
Install Adobe Reader: To view the user’s manuals for the scanner and Button Manager V2, you need to use Adobe Reader to open and view the manuals in pdf file format. If you already have Adobe Reader installed on your computer, you may disregard this item.
Install AVScan X: To scan and organize your multi-page document(s), you can install the software application to manage them easily and effectively.
View Manual: Click “View Manual” to view or print the detailed user manual for the scanner and Button Manager V2 respectively.
3.Click Install Button Manager V2 to install the Button Manager V2 software and then click Install Scanner Driver to install the scanner driver on your computer.
2-4
User’s Manual
2.1.4 Connecting to Computer
1.Connect the square end of the USB cable to the USB port of your scanner. Connect the rectangle end to the USB port of your computer.
2.The computer should detect a new USB device and prompt a “New Hardware Found” message.
3.By following the on-screen instructions, click the Next button to continue. When the certification screen appears, click Continue Anyway to complete the installation.
4.When the Finish dialog is prompted, click the Finish button.
5.Click “View Manual” to view or print the detailed user manual for the scanner and bundled applications respectively.
2-5
User’s Manual
3.Completing Your First Scan
3.1 Placing paper on the document glass
Place your document face down on the document glass and align the document to the reference mark as indicated.
3-1
User’s Manual
3.2 Loading Your Paper
3.2.1 Notice on Using the ADF
Before using the ADF, please make sure that your paper meets the following specifications:
Document(s) can range in size from 114 x 140 mm (4.5 x 5.5 in.) to 216 x 356 mm (8.5 x 14 in.).
Document(s) can range in weight from 52 ~127 g/m2 (14 to 34 lbs)
Document(s) should be square or rectangular and in good condition (not fragile or worn).
Document(s) should be free of curl, wrinkle, tears, wet ink, or punch holes.
Document(s) should be free of staples, paper clips, paper sticky notes.
3-2
User’s Manual
3.2.2 Placing Your Document in the ADF Paper Tray Fanning Your Document
Note:
To avoid occasional multi-feeds or paper jams, please fan your documents and align the top edges before feeding them into the scanner.
1.Hold both ends of the documents and fan them a few times.
2.Rotate the documents by 90 degrees and fan them in the same manner.
3.Align the edges of the documents in a step-like pattern (see picture below).
Step-like
Scanning
Direction
3-3
User’s Manual
Document Feeding
1.Raise the ADF paper tray to about 45 degrees and pull the tray extension.
3-4
User’s Manual
2.Place your document with the text face up and make the top of the page point to the document feeder as shown below. Center your document with the paper guides and make sure the edge of document touch the paper guides.
3-5
User’s Manual
3.2.3Scanning a Stack of Document with Various sizes and Weights
When scanning a batch of documents with different sizes and weights, be sure to follow these guidelines to avoid a skewed image or a paper jam:
1.Align the documents TOP EDGE first in the sequence of paper size from large to small.
2.If two pages are of the same size yet with different weight, arrange these pages in the sequence of paper weight from heavyweight to lightweight.
3-6
User’s Manual
3.Align the edges of the documents by tapping the bottom of the stack against the table top.
4.Center these pages in the document feeder and make sure that the edges of page of the largest size slightly touch the Paper Guide.
3-7
User’s Manual
3.2Verifying Your Scanner Installation
To verify if your scanner installation is correct, Avision provides you a useful test program called Avision Capture Tool. With this tool, you can perform simple scans and view the captured images. In addition, it helps you complete your scan at a rated speed.
The following procedure describes how to verify your scanner installation. If the installation is not correct, please review the preceding section to check if the cable connection and scanner driver have been successfully installed.
Before you begin, be sure the scanner is on.
1.Select Start>Programs>Avision xxx Scanner>Avision Capture Tool. The Select Scanner Model dialog box will be displayed.
2.Select your driver type and scanner model and click OK. The following Avision Capture Tool dialog box will be displayed.
3-8
![]()
User’s Manual
Fit Actual
Page Size
|
Setup Scan Save |
File Format |
File Path |
||
3.Choose your desired file format from the File Format drop down list box. (Default is JPEG, other choice includes TIFF, MTIFF, PDF, MPDF, GIF, and BMP.) The supported file formats vary depending on your scanner model.
4.Type your desired folder name and file name in the File Path box. (Default is C:Documents and SettingsUser NameMy DocumentsMy ScanImage.)
Note: If you do not wish to save the scanned image, deselect the Save button since default is Save Enable. In this case, the thumbnail view will be disabled. And therefore, after viewing all the scanned images, only the last one will remain on the screen.
5.Click the Setup button () or choose Setup from the File menu to prompt the Scanner Properties dialog box.
3-9
User’s Manual
Image
Selection
Box
6.From the Image Selection Box, choose your desired image type for your scanned image. (Default is Front B&W) If you have a duplex scanner, choose Front and Rear to scan both sides of your document.
7.Click OK to quit the Scanner Properties dialog box. (To learn more details about the Scanner Properties dialog box, please see the subsequent chapter, Using the Scanner Properties Dialog Box.)
8.Place your document face down on the document glass or face up in the auto document feeder.
9.In the Scan Validation dialog box, click the Scan button () or choose Scan from the File menu.
10.The document will be scanned and displayed in the Scan Validation screen. After the scanned images have been displayed, your scanner installation verification is completed.
3-10
User’s Manual
Display View
Thumbnail View
11.You can view the scanned image in Fit Page () or Actual Size (100%) button () from the Viewing toolbars at the right side.
12.Click the Close box or Quit from the File menu to exit the Scan Validation Tool.
3-11
User’s Manual
3.3A Glance of the Scanner Properties Dialog Box
1
|
2 |
3 |
|||||||
|
4 |
||||||||
|
5 |
||||||||
|
6 |
||||||||
|
7 |
||||||||
8
|
1. |
Tab Options |
Choice: Image, Compression, Color Dropout, |
|
Paper, Multi-Feed Detection, Preview, Options, |
||
|
Settings, Information. |
||
|
2. |
Image |
Choose your image type and the side of |
|
Selection Box |
document you wish to scan. Options vary |
|
|
based on type of scanner. |
||
|
3. |
Brightness |
Adjust the brightness level from –100 to +100. |
|
4. |
Contrast |
Adjust the contrast level from –100 to +100. |
|
5. Resolution |
Determine the quality of the scanned image. |
|
|
The industry standard is 200 dpi. |
||
|
6. |
Invert |
Reverse the color of your scanned image. |
|
7. |
Scan Source |
Choice: Auto Document Feeder, Flatbed, |
|
Flatbed (Book), Automatic (varies due to |
||
|
different scanner model) |
||
|
8. |
Defaults |
Reset all values on the tabs to the factory |
|
default settings. |
3-12
User’s Manual
4.Using the Scanner Properties Dialog Box
The Scanner Properties dialog box allows you to configure the scanner’s settings. It consists of several tabbed windows each of which will be described in this chapter.
Note: In this chapter, all options are available based on a duplex (double-side) scanner. If you have purchased a simplex (single-side) scanner, all options are available for single sided only.
The Scanner Properties dialog box
4-1
User’s Manual
4.1 Buttons on the Scanner Properties Dialog Box
The buttons on the Scanner Properties dialog box Buttons Description
Defaults Click the Defaults button, the factory default settings will be shown on each tab.
Cancel Click the Cancel button to leave the Scanner Properties dialog box.
4-2
User’s Manual
The following table shows the default settings
|
Tab name |
Default settings |
|
Image |
Image Front B&W |
|
Binarization Dynamic Threshold |
|
|
Resolution 200 dpi |
|
|
Invert Blank on White |
|
|
Scan Source Auto Document Feeder |
|
|
Threshold None |
|
|
Brightness None |
|
|
Contrast None |
|
|
Compression |
None |
|
Color Dropout |
None |
|
Paper |
Cropping Automatic |
|
Deskew Yes |
|
|
Orientation Portrait |
|
|
OverScan 0.00 |
|
|
Note: The availability of this option |
|
|
varies due to scanner model. |
|
|
Unit Inch |
|
|
Multi-Feed |
None |
|
Detection |
|
|
Preview |
None |
|
Options |
Rotation Degrees None |
|
Blank Page Removal None |
|
|
Edge Fill White 0 mm |
|
|
Image Control Option None |
|
|
Setting |
Enable Energy Saver Enable, 15 |
|
minutes after last scan action |
|
|
Show Scanning Progress Yes |
|
|
Show Warning Message Yes |
|
|
Save Settings after Closing Yes |
|
|
Imprinter |
Digital Imprinter |
4-3
User’s Manual
4.2Showing or Hiding Tabs
The [Scanner Properties] dialog box is displayed in default with three basic tabs — Image, Paper, and Information. To show more tabs, click the [Scanner Properties] icon to access more scan settings.
To show more tabs,
1.Click the [Scanner Properties] icon () on the upper left corner, and choose [Tab] to show available tab names. The available tabs include Compression, Color Drop out, Preview, Rotation, Separation, Multi-Feed, Options, Settings, and Imprinter. (Note: the options vary based on scanner model.)
2.Choose the tab you want to display. The selected tab will be shown with a check mark and then displayed in the [Scanner Properties] dialog box.
3.To access the settings, click the selected tab on the top of the [Scanner Properties] dialog box. The page of the selected tab will be displayed.
To hide a tab window,
1.Click the [Scanner Properties] icon () on the upper left corner, and choose [Tabs] to show available tab names.
2.Choose the tab you want to hide. Then, the selected tab will be hided in the [Scanner Properties] dialog box.
Note: The [Image], [Paper], and [Information] tab can not be hided since they preprogrammed to be displayed by default.
4-4
User’s Manual
4-5
User’s Manual
4.3The Image Tab
The Image tab allows you to choose the front side and (or) the rear side of your document, the type of image, and to set several basic scan settings. Note that except for the resolution, you can set individual scan settings for the front side and the rear side. For example, all settings in the Image tab, Compression tab, Color Dropout tab can be set individually for the front and the rear side. However, the settings in the Paper tab, the Option tab, and the Setting tab have to be set the same for the front and rear side.
The Image tab dialog box
4-6
![]()
User’s Manual
4.3.1 The Image Selection Box
The Image Selection box includes the image type and document side option. If you wish to scan both the front side and the rear side of your color document, you can check both Front Color and Rear Color at the same time. Note the options vary based on type of scanner.
Example 1 Scanning a two-sided color document, both sides in color
|
Side/Image |
Front |
Rear |
|
Selection |
||
4-7
User’s Manual
Example 2 Scanning a two-sided color document, one in B&W, the other in color
Side/Image
Selection
Image Type
Color
Gray
B&W
Front Rear
Description
Choose Color if you wish to scan a color image for your original in color.
Choose Gray image if your original contains actual shades of gray.
Choose B&W if your original contains only text, pencil or ink sketch.
4-8
User’s Manual
Front/Rear Auto Color Detection:
Click to automatically detect and scan the front or the rear page of your color document in color image mode. If your document is in colors, the scanner will automatically scan the document into a color image. If your document is non-color, you can choose the output to be either B&W or Gray from the Non-Color Selection option. This option is useful when you have a mixture of color and non-color document.
Note: If you choose Front Rear Auto Color Detection, you can not specify the image mode of your rear page and vice versas.
Modes of Auto Color Detection:
If [Front/Rear Auto Color Detection] is selected, its modes will be displayed. Choice includes Normal, Ignore Paper Color. For paper with background color such as invoices, choosing [Ignore Paper Color] will automatically remove the background color and enhance the detection accuracy.
|
Normal |
Ignore single background |
|
color |
|
4-9
User’s Manual
Sensitivity of Auto Color Detection
If your documents contain primarily B&W text and small amount of light or pale colors and you do not wish them to be recognized as color image to save the file size, you can increase the sensitivity value by moving the bar to the right to let these images to be detected as B&W. The value ranges from 1 to 100. The default is 37.
Original
|
Sensitivity: 1 |
Sensitivity: 100 |
|
(The image is recognized |
(The image is recognized |
|
as a color one) |
as a black and white one) |
4-10
User’s Manual
Same settings on both sides:
Click to apply same scan settings for both sides of your documents. After checking this option, any settings you have changed will automatically applied to both the front side and the rear side. For example, if you choose your ideal resolution to be 300 dpi, this will be applied both to the front side and rear side of your document.
4-11
User’s Manual
4.3.2 Other Image Options
Binarization This is the process of converting a grayscale or color image to a bi-tonal image. There are several different methods of performing this conversion.
Options: Dynamic Threshold,
Dynamic Threshold (AD), Fixed
Processing, Halftone 1~5, Error Diffusion.
Dynamic Threshold: Selecting Dynamic Threshold allows the scanner to dynamically evaluate each document to determine the optimal threshold value to produce the highest quality image. This is used to scan mixed document containing faint text, shaded background, or color background with a single setting. If Dynamic Threshold is selected, Threshold, Brightness, and Contrast are not available.
Dynamic Threshold (AD): Selecting Dynamic Threshold (AD) to perform the enhanced mode of the Dynamic Threshold feature. However, using this mode may slow down your scanning speed.
Sensitivity of Dynamic Threshold
Occasionally your scanned image may contain small dots or speckles. To remove these spots, increase the sensitivity value by moving the bar to the right. The value ranges from 1 to 30. The default is 20.
4-12
User’s Manual
Fixed Processing: Used for black-and- white and other high contrast documents. A single level is set to determine the black- and-white transition. The threshold is programmable over the entire density range. Fixed Processing sets Contrast to 0. If Fixed Processing is selected, Contrast is not available.
Halftone: In addition to the black and white display, Halftone can present a somehow gray shade of image by using different size of dots. Halftone image looks like the picture we have seen in the newspaper. Options include Halftone 1,
Halftone 2, Halftone 3, Halftone 4, Halftone 5.
Error Diffusion: Error Diffusion is a type of Halftone. Error Diffusion gives good image texture and makes text in images more readable than Halftone.
Halftone Image
4-13
User’s Manual
Error Diffusion Image
|
Dynamic Threshold |
Dynamic Threshold (AD) |
4-14
Компактный и простой в использовании сканер
Combining a flatbed scanner with the convenience of a 50-page ADF, the Avision AD130 is a compact and affordable productivity scanning solution delivering 30 pages per minute and 60 images per minute at 300 dpi. The combination of high productivity and affordability makes this series the obvious choice for reducing the total cost of scanning.
-
ОСОБЕННОСТИ
-
СПЕЦИФИКАЦИЯ
-
загрузки
-
FAQ
Product Details
В сканере AD130 используется CIS (контактный датчик изображения) технология и лампа LED как источник света. Благодаря автоподатчику на 50 листов сканер может обрабатывать односторонние и двухсторонние документы одновременно. Скорость сканирования составляет 30 страниц или 60 изображений в минуту, Сканер оснащен удобной функцией обрезки изображений. С этой функцией документы различных размеров, такие как фотографии, удостоверения личности или визитные карточки могут быть помещены на планшет, и сканер в состоянии обрезать и создать изображения согласно первоначальным размерам документов за одно сканирование. Для опытных пользователей, которые хотят управлять параметрами настройки сканирования AD130, пользовательский интерфейс TWAIN предлагает различные полезные функции, для улучшения качества изображения включая автоматическую обрезку и выравнивание, автоматическое определение цвета и т.д.
▍More Information
Сканер AD130 комплектуется TWAIN и ISIS драйверами, а также мощными приложениями, включающими Avision Button Manager, AvScan X и PaperPort 14. С помощью программы Button Manager Вы можете отсканировать документы в формате PDF, JPEG, BMP или GIF, и отправить их на электронную почту, принтер или другое приложение.
▎Сертификационный знак
Где купить
| Общая спецификация | |
| Технология |
Contact Image Sensor (CIS) |
|---|---|
| Источник света |
LED |
| Режим подачи документов |
Flatbed and ADF |
| Оптическое разрешение (т/д) |
1200 |
| Output Resolution (dpi) |
1200 |
| Форматы файлов |
BMP, PNG, GIF, JPEG, Single-Page PDF, Multi-Page PDF, Multi-TIFF, TIFF, RTF, TXT, OCR( for iScan only ), XPS, DOC, XLS, PPT, DOCS, XLSX, PPTX, HTML |
| Полутоновые узоры |
Dither and Error Diffusion |
| Режим оттенков серого |
16-bit input 8-bit output |
| Цветовой режим |
48-bit input 24-bit output |
| Размер памяти |
64MB SDRAM |
| Размеры (ШхГхВ) |
453 x 324 x 237 mm ( 17.8 x 12.8 x 9.3 in. ) |
| Вес |
4.3 kg ( 9.5 lb. ) |
| Интерфейс |
USB 2.0, ( USB 3.0 compatible ) |
| Потребляемая мощность |
Operation : < 16 W;Ready : < 7 W;Sleep : < 2.9 W;Off : < 0.5 W |
| Рекомендуемый дневной объём |
Up to 4,000 pages |
| Поддержка ОС |
Win 7, Win 8, Win 10 |
| Программное обеспечение в комплекте |
Button Manager, PaperPort, AVScan |
| Features | |
| Ультразвуковое обнаружение замятия бумаги |
Yes |
| Long Paper Mode |
Up to 300 dpi Color Duplex ( 120 in. ) |
| Scan Size | |
| Минимум АПД |
90 x 90 mm ( 3.5 x 3.5 in. ) |
| Максимум АПД |
216 x 356 mm ( Legal )( 8.5 x 14 in. ) |
| Ёмкость АПД |
50 sheets |
| Плотность бумаги (толщина) |
49 ~127 g/㎡ |
| Размер сканирования | |
| Ч/Б при 200 т.д., A4 |
Simplex : 40 ppm;Duplex : 80 ipm, Flatbed : 4 sec / 8 sec ( Include Backhome ) |
| Ч/Б при 300 т.д., A4 |
Simplex : 30 ppm;Duplex : 60 ipm, Flatbed : 4 sec / 8 sec ( Include Backhome ) |
| Цветной при 200 т.д., A4 |
Simplex : 40 ppm;Duplex : 80 ipm, Flatbed : 4 sec / 8 sec ( Include Backhome ) |
| Цветной при 300 т.д., A4 |
Simplex : 30 ppm;Duplex : 60 ipm, Flatbed : 4 sec / 8 sec ( Include Backhome ) |
* The above specifications may vary due to computer performance and sales regions. For further details, please consult your local distributor.
▎Фотографии продуктов
▎руководство
▎брошюра
▎программное обеспечение
| Имя | Версия | Размер | системная поддержка | Ссылка |
|---|---|---|---|---|
| PaperPort | 14 | 455.79 MB | Win XP / Vista / 7 / 8 / 10 | загрузки |
| World Card Team | V1.8.3 | 235 MB | Win XP / 7 / 8 / 10 | загрузки |
| ButtonManager V2 | V3.0.0.0 | 594 MB | Win XP / Vista / 7 / 8 / 10 | загрузки |
| AVScan X | V1.2.0.0 | 549.39 MB | win XP / Vista / 7 / 8 / 10 | загрузки |
▎Драйверы
| Имя | Версия | Размер | системная поддержка | Ссылка |
|---|---|---|---|---|
| AD130 | VB.22 | 140.03 MB | Win XP, Win Vista, Win 7, Win | загрузки |
▎Программное обеспечение
Когда я выбираю оптическое разрешение 600 dpi, функции «автоматической обрезки» и «выравнивания» будут отключены.
Поскольку для выполнения автоматической обрезки и устранения перекоса требуется много системной памяти, рекомендуется, если вы хотите выполнить функции «автоматической обрезки» и «выравнивания перекоса», выберите оптическое разрешение менее 600 dpi во избежание появления сообщения об ошибке.
Почему мое отсканированное изображение всегда получается слишком темным?
- Настройте параметры экрана на sRGB.
- Пожалуйста, отрегулируйте настройки яркости на экране с помощью прикладного программного обеспечения.
▎Инструкция
Бумага перекашивается в сканере.
- Выровняйте направляющие для документов так, чтобы они подходили как можно ближе друг к другу, и размещайте документы так, чтобы они подавались прямо.
- Проверьте состояние подающего ролика. При необходимости следуйте инструкциям по очистке и выполните очистку.
▎Аппаратное обеспечение
Бумага застревает во время сканирования.
- Откройте переднюю крышку
- Осторожно вытащите застрявшую бумагу.
- Закройте переднюю крышку.
Руководство пользователя
Примечание.
Рекомендованное разрешение: 200~600 dpi для
обычного штрих-кода, 300~600 dpi для QR code
Перекошенные штрих-коды могут распознаваться с
ошибками.
Многократное использование одного листа может
снизить точность распознавания из-за накопления
грязи на листах. Если лист распознается с ошибками
или содержит загрязнения, замените его на новый.
Patch code Detection (Определение кода
исправления):
Выберите ячейку [Enable (Включить)] для определения
кодов исправления и уведомления программного
приложения для расширенной обработки.
Код исправления — это узор из параллельных черных
полосок, чередующихся с пробелами (т.е. штрих-код),
напечатанный на документе. Лист с кодом исправления
обычно используется в качестве разделителя документов в
пачке.
Чтобы просмотреть различные размеры кодов исправления
(PDF), перейдите по вкладкам:
меню [Start (ПУск)]>[All Programs (Все
программы)]>[Avision Scanner Series(Сканер серии
Avision)]>[Patch code (Код исправления)].
Распечатайте файл PDF, чтобы создать лист с кодом
исправления. Вставьте листы с кодом исправления в местах
разделения файла.
Лист с кодом
исправления
4-66
Как мы работаем
Если не знаете где отремонтировать Сканер Avision AD130 в вашем городе, мы поможем вам бесплатно подобрать сервисный центр или частного мастера по ремонту и обслуживанию сканеров, работаем ежедневно с 7:00 до 24:00, бесплатная консультация по телефону: +7 (930) 999-42-15
Бесплатная заявка
Оставляйте бесплатную заявку на срочный ремонт сканеров
Подбор сервиса
Наши специалисты подберут для Вас проверенный сервисный центр или частного мастера
Ремонт с гарантией
Оригинальные запчасти в наличии и гарантия на ремонт до 3-х лет
Узнайте стоимость ремонта
Оставьте бесплатную заявку на ремонт или просто задайте вопрос мастерам.
| Дополнительно | |
| Особенности | сочетание планшетного и протяжного сканера; ультразвуковой датчик замятия бумаги |
| Вес | 4.3 кг |
| Размеры (ШxВxГ) | 453x237x324 мм |
| Емкость устройства автоподачи | 50 листов |
| Мощность при работе / в режиме ожидания | 16 Вт / 7 Вт |
| Поддержка стандартов | ISIS, TWAIN |
| Уровень шума при работе / в режиме ожидания | 58 дБ / 40 дБ |
| Устройство автоподачи | двустороннее |
| Характеристики | |
| Глубина цвета | 48 бит |
| Глубина цвета (внешн.) | 24 бит |
| Максимальный формат бумаги | A4 |
| Разрешение | 600×600 dpi |
| Скорость сканирования (цветн.) | одностороннее: 30 стр/мин, двустороннее: 60 изобр/мин |
| Скорость сканирования (ч/б) | одностороннее: 30 стр/мин, двустороннее: 60 изобр/мин |
| Общее | |
| Интерфейс | USB 3.0 |
| Совместимость | PC |
| Тип | протяжный |
| Тип датчика | CIS |
Ремонт похожих моделей
Частые вопросы
Как отремонтировать Сканер Avision AD130 самостоятельно?
Мы настоятельно не рекомендуем выполнять ремонт самостоятельно — своими руками, так как это может привести к потере гарантии.
Как найти сервис по ремонту рядом со мной?
Выберете в фильтре необходимую локацию в вашем горде и найдите адреса сервисных центров поблизости.
Возможен ли ремонт на дому?
Починить Сканер Avision AD130 можно на дому или в любом сервисном центре.
Остались вопросы? Мы Вам перезвоним
Новый отзыв про Сканер Avision AD130
Записаться на ремонт
Стоимость работы
Закажите ремонт вашего устройства на сайте и получите скидку до 25%
Или по телефонам:
+7 (495) 021-43-98
+7 (930) 333-28-64
Нажимая на кнопку, Вы даете согласие на обработку персональных данных и соглашаетесь с политикой конфиденциальности.
Записаться на ремонт
Закажите ремонт вашего устройства на сайте и получите скидку до 25%
Или по телефонам:
+7 (495) 021-43-98
+7 (930) 333-28-64
Нажимая на кнопку, Вы даете согласие на обработку персональных данных и соглашаетесь с политикой конфиденциальности.
AD130
Компактный и простой в использовании сканер
Combining a flatbed scanner with the convenience of a 50-page ADF, the Avision AD130 is a compact and affordable productivity scanning solution delivering 30 pages per minute and 60 images per minute at 300 dpi. The combination of high productivity and affordability makes this series the obvious choice for reducing the total cost of scanning.
-
ОСОБЕННОСТИ
-
СПЕЦИФИКАЦИЯ
-
загрузки
-
FAQ
Product Details
В сканере AD130 используется CIS (контактный датчик изображения) технология и лампа LED как источник света. Благодаря автоподатчику на 50 листов сканер может обрабатывать односторонние и двухсторонние документы одновременно. Скорость сканирования составляет 30 страниц или 60 изображений в минуту, Сканер оснащен удобной функцией обрезки изображений. С этой функцией документы различных размеров, такие как фотографии, удостоверения личности или визитные карточки могут быть помещены на планшет, и сканер в состоянии обрезать и создать изображения согласно первоначальным размерам документов за одно сканирование. Для опытных пользователей, которые хотят управлять параметрами настройки сканирования AD130, пользовательский интерфейс TWAIN предлагает различные полезные функции, для улучшения качества изображения включая автоматическую обрезку и выравнивание, автоматическое определение цвета и т.д.
▍More Information
Сканер AD130 комплектуется TWAIN и ISIS драйверами, а также мощными приложениями, включающими Avision Button Manager, AvScan X и PaperPort 14. С помощью программы Button Manager Вы можете отсканировать документы в формате PDF, JPEG, BMP или GIF, и отправить их на электронную почту, принтер или другое приложение.
▎Сертификационный знак
Где купить
| Общая спецификация | |
| Технология |
Contact Image Sensor (CIS) |
|---|---|
| Источник света |
LED |
| Режим подачи документов |
Flatbed and ADF |
| Оптическое разрешение (т/д) |
1200 |
| Output Resolution (dpi) |
1200 |
| Форматы файлов |
BMP, PNG, GIF, JPEG, Single-Page PDF, Multi-Page PDF, Multi-TIFF, TIFF, RTF, TXT, OCR( for iScan only ), XPS, DOC, XLS, PPT, DOCS, XLSX, PPTX, HTML |
| Полутоновые узоры |
Dither and Error Diffusion |
| Режим оттенков серого |
16-bit input 8-bit output |
| Цветовой режим |
48-bit input 24-bit output |
| Размер памяти |
64MB SDRAM |
| Размеры (ШхГхВ) |
453 x 324 x 237 mm ( 17.8 x 12.8 x 9.3 in. ) |
| Вес |
4.3 kg ( 9.5 lb. ) |
| Интерфейс |
USB 2.0, ( USB 3.0 compatible ) |
| Потребляемая мощность |
Operation : < 16 W;Ready : < 7 W;Sleep : < 2.9 W;Off : < 0.5 W |
| Рекомендуемый дневной объём |
Up to 4,000 pages |
| Поддержка ОС |
Win 7, Win 8, Win 10 |
| Программное обеспечение в комплекте |
Button Manager, PaperPort, AVScan |
| Features | |
| Ультразвуковое обнаружение замятия бумаги |
Yes |
| Long Paper Mode |
Up to 300 dpi Color Duplex ( 120 in. ) |
| Scan Size | |
| Минимум АПД |
90 x 90 mm ( 3.5 x 3.5 in. ) |
| Максимум АПД |
216 x 356 mm ( Legal )( 8.5 x 14 in. ) |
| Ёмкость АПД |
50 sheets |
| Плотность бумаги (толщина) |
49 ~127 g/㎡ |
| Размер сканирования | |
| Ч/Б при 200 т.д., A4 |
Simplex : 40 ppm;Duplex : 80 ipm, Flatbed : 4 sec / 8 sec ( Include Backhome ) |
| Ч/Б при 300 т.д., A4 |
Simplex : 30 ppm;Duplex : 60 ipm, Flatbed : 4 sec / 8 sec ( Include Backhome ) |
| Цветной при 200 т.д., A4 |
Simplex : 40 ppm;Duplex : 80 ipm, Flatbed : 4 sec / 8 sec ( Include Backhome ) |
| Цветной при 300 т.д., A4 |
Simplex : 30 ppm;Duplex : 60 ipm, Flatbed : 4 sec / 8 sec ( Include Backhome ) |
* The above specifications may vary due to computer performance and sales regions. For further details, please consult your local distributor.
▎Фотографии продуктов
▎руководство
▎брошюра
▎программное обеспечение
| Имя | Версия | Размер | системная поддержка | Ссылка |
|---|---|---|---|---|
| PaperPort | 14 | 455.79 MB | Win XP / Vista / 7 / 8 / 10 | загрузки |
| World Card Team | V1.8.3 | 235 MB | Win XP / 7 / 8 / 10 | загрузки |
| ButtonManager V2 | V3.0.0.0 | 594 MB | Win XP / Vista / 7 / 8 / 10 | загрузки |
| AVScan X | V1.2.0.0 | 549.39 MB | win XP / Vista / 7 / 8 / 10 | загрузки |
▎Драйверы
| Имя | Версия | Размер | системная поддержка | Ссылка |
|---|---|---|---|---|
| AD130 | VB.22 | 140.03 MB | Win XP, Win Vista, Win 7, Win | загрузки |
▎Программное обеспечение
Когда я выбираю оптическое разрешение 600 dpi, функции «автоматической обрезки» и «выравнивания» будут отключены.
Поскольку для выполнения автоматической обрезки и устранения перекоса требуется много системной памяти, рекомендуется, если вы хотите выполнить функции «автоматической обрезки» и «выравнивания перекоса», выберите оптическое разрешение менее 600 dpi во избежание появления сообщения об ошибке.
Почему мое отсканированное изображение всегда получается слишком темным?
- Настройте параметры экрана на sRGB.
- Пожалуйста, отрегулируйте настройки яркости на экране с помощью прикладного программного обеспечения.
▎Инструкция
Бумага перекашивается в сканере.
- Выровняйте направляющие для документов так, чтобы они подходили как можно ближе друг к другу, и размещайте документы так, чтобы они подавались прямо.
- Проверьте состояние подающего ролика. При необходимости следуйте инструкциям по очистке и выполните очистку.
▎Аппаратное обеспечение
Бумага застревает во время сканирования.
- Откройте переднюю крышку
- Осторожно вытащите застрявшую бумагу.
- Закройте переднюю крышку.
![]()
Color Image Scanner
User’s Manual
Regulatory model: DF-1701B/DF-1702B
Avision Inc.
User’s Manual
Trademarks
Microsoft is a U.S. registered trademark of Microsoft Corporation.
Windows, Windows Vista, Windows 7, Windows 8 and Windows 10 are either registered trademarks or trademarks of Microsoft Corporation in the United States and/or other countries.
IBM, IBM PC are registered trademarks of International Business Machines Corp.
Other brands and product names herein are trademarks or registered trademarks of their respective holders.
Copyright
All rights reserved. No part of this publication may be reproduced, transmitted, transcribed, stored in a retrieval system, or translated into any language or computer language, in any form or by any means, electronic, mechanical, magnetic, optical, chemical, manual, or otherwise, without the prior written permission of Avision Inc.
Material scanned by this product may be protected by governmental laws and other regulations, such as copyright laws, the customer is solely responsible for complying with all such laws and regulations.
Warranty
The information contained in this document is subject to change without notice.
Avision makes no warranty of any kind with regard to this material, including, but not limited to, the implied warranties of fitness for a particular purpose.
Avision shall not be liable for errors contained herein or for incidental or consequential damages in connection with the furnishing, performance, or use of this material.
ii
User’s Manual
FCC Radio Frequency Interference Statement
This product has been tested and found to comply with the limits for a class B digital device, pursuant to Part 15 of the FCC rules. Operation is subject to the following two conditions: (1) this device may not cause harmful interference, and (2) this device must accept any interference received, including interference that may cause undesired operation. The FCC Class B limits are designed to provide reasonable protection against harmful interference in a residential installation. This equipment generates, uses, and can radiate radio frequency energy and, if not installed and used in accordance with the instructions, may cause harmful interference to radio communications. However, there is no guarantee that interference will not occur in a particular installation. If this equipment does cause harmful interference to radio or television reception, which can be determined by turning the equipment off and on, the user is encouraged to try to correct the interference by one or more of the following measures:
Reorient or relocate the receiving antenna.
Increase the separation between the equipment and receiver.
Connect the equipment into an outlet on a circuit different from that to which the receiver is connected.
Consult your point of purchase or service representative for additional suggestions.
As an ENERGY STAR® Partner, Avision Inc. has determined that this product meets the ENERGY STAR guidelines for energy efficiency.
iii
User’s Manual
European Union Regulatory Notice
Products bearing the CE marking comply with the following EU Directives:
Low Voltage Directive 2014/35/EC
EMC Directive 2014/30/EC
Restriction of the use of certain hazardous substances (RoHS) Directive 2011/65/EU
CE compliance of this product is valid if powered with the correct CE-marked AC adapter provided by Avision.
This product satisfies the Class B limits of EN55022, EN55024 and safety requirements of EN 60950.
*This machine is certified as Class 1 LED product. This means that this machine does not produce hazardous laser radiation.
Disposal of Waste Equipment
This symbol on the product or on its packaging indicates that the product can not be disposed of with your other household waste. Instead it should be sent to appropriate facilities for recovery and recycling in an effort to protect human health and the environment. Fore more information about where you can drop off your waste equipment for recycling, please contact your local city office, your household waste disposal service or the shop where you purchased the product.
iv
User’s Manual
System Requirements
|
CPU: |
Intel® Core™ 2 Duo or higher |
|
Memory: |
32 bit: 2 GB |
|
64 bit: 4 GB |
|
|
Optical Drive: |
DVD-ROM Drive |
|
USB Port: |
USB port 2.0 (compatible with USB 1.1) |
|
Compatible |
Microsoft Windows XP(SP3), Windows Vista, |
|
Operating |
Windows 7, Windows 8 (32 bits/64 bits), |
|
System: |
Windows 10 (32 bits/64 bits) |
v
User’s Manual
1. Introduction
Congratulations on your purchase of the color image scanner. With this scanner, you can scan documents in a rated speed to increase your productivity.
Before you install and operate the new scanner, please take a few minutes to read through this manual. It provides proper instructions for you to unpack, install, operate and maintain the scanner.
The following figure indicates the package contents. Please check all the items against your checklist. If you do not receive all the items, please contact your authorized local dealer immediately.
1.Scanner Main Unit
2.Software CD/Quick Guide
3.USB Cable
4.Power Adapter & Power Cord
1-1
User’s Manual
NOTE:
1.Only use the AC adapter (DA-48M24 made by APD) included in the machine. Using other AC adapters may damage the machine and void the warranty.
2.Please unpack the packing carefully, and check the contents against the checklist. If any items are missing or damaged, please contact your dealer immediately.
3.To access more service supports, visit www.avision.com to register your Avision’s product.
1-2
User’s Manual
2.Scanner Installation
Precautions
Keep the scanner out of direct sunlight. Direct exposure to the sun or excessive heat may cause damage to the unit.
Do not install the scanner in a humid or dusty place.
Be sure to use the proper AC power source.
Place the scanner securely on an even, flat surface. Tilted or uneven surfaces may cause mechanical or paper-feeding problems.
Retain the scanner box and packing materials for shipping purposes.
2-1
User’s Manual
2.1 Installing the Scanner Driver and Cables
NOTE:
1). The Windows system CD may be required when installing on some PC’s.
2). To ensure your computer can identify the USB scanner, please install scanner driver first before connecting the scanner to your computer.
3). The scanner driver contains TWAIN, ISIS and WIA driver. If you are running Windows Me, Windows XP, or Windows Vista, after the installation of scanner driver is completed, this scanner allows you to scan via a TWAIN, ISIS, or a WIA interface. Start your TWAIN-compliant image editing software application to select a TWAIN or WIA user interface or your ISIS software to select an ISIS user interface. You may also launch Microsoft’s Scanner and Camera Wizard to scan via a WIA user interface.
2.1.1 Connecting to Power
Plug the small end of the power adaptor into the power jack of your scanner. Insert the other end to an appropriate power outlet.
2-2
User’s Manual
2.1.2 Turning on the Scanner
Press the Power Switch button on the front panel, the Power LED will be lit. To turn off the scanner, press the Power Switch button for about 3 seconds, the Power LED will be off.
2.1.3 Installing the Scanner Driver
1.Place the supplied CD-ROM onto your CD-ROM drive.
2.The software installation graphic appears. If not, run
“setup.exe”.
2-3
![]()
User’s Manual
Contents on the installation graphic:
Install Scanner Driver: To communicate with your scanner, you need to install the scanner driver.
Install Button Manager V2: To use the buttons on the scanner, you need to install Button Manager V2. To ensure Button Manager V2 works properly, please FIRST install scanner driver before installing Button Manager V2.
Install Adobe Reader: To view the user’s manuals for the scanner and Button Manager V2, you need to use Adobe Reader to open and view the manuals in pdf file format. If you already have Adobe Reader installed on your computer, you may disregard this item.
Install AVScan X: To scan and organize your multi-page document(s), you can install the software application to manage them easily and effectively.
View Manual: Click “View Manual” to view or print the detailed user manual for the scanner and Button Manager V2 respectively.
3.Click Install Button Manager V2 to install the Button Manager V2 software and then click Install Scanner Driver to install the scanner driver on your computer.
2-4
User’s Manual
2.1.4 Connecting to Computer
1.Connect the square end of the USB cable to the USB port of your scanner. Connect the rectangle end to the USB port of your computer.
2.The computer should detect a new USB device and prompt a “New Hardware Found” message.
3.By following the on-screen instructions, click the Next button to continue. When the certification screen appears, click Continue Anyway to complete the installation.
4.When the Finish dialog is prompted, click the Finish button.
5.Click “View Manual” to view or print the detailed user manual for the scanner and bundled applications respectively.
2-5
User’s Manual
3.Completing Your First Scan
3.1 Placing paper on the document glass
Place your document face down on the document glass and align the document to the reference mark as indicated.
3-1
User’s Manual
3.2 Loading Your Paper
3.2.1 Notice on Using the ADF
Before using the ADF, please make sure that your paper meets the following specifications:
Document(s) can range in size from 114 x 140 mm (4.5 x 5.5 in.) to 216 x 356 mm (8.5 x 14 in.).
Document(s) can range in weight from 52 ~127 g/m2 (14 to 34 lbs)
Document(s) should be square or rectangular and in good condition (not fragile or worn).
Document(s) should be free of curl, wrinkle, tears, wet ink, or punch holes.
Document(s) should be free of staples, paper clips, paper sticky notes.
3-2
User’s Manual
3.2.2 Placing Your Document in the ADF Paper Tray Fanning Your Document
Note:
To avoid occasional multi-feeds or paper jams, please fan your documents and align the top edges before feeding them into the scanner.
1.Hold both ends of the documents and fan them a few times.
2.Rotate the documents by 90 degrees and fan them in the same manner.
3.Align the edges of the documents in a step-like pattern (see picture below).
Step-like
Scanning
Direction
3-3
User’s Manual
Document Feeding
1.Raise the ADF paper tray to about 45 degrees and pull the tray extension.
3-4
User’s Manual
2.Place your document with the text face up and make the top of the page point to the document feeder as shown below. Center your document with the paper guides and make sure the edge of document touch the paper guides.
3-5
User’s Manual
3.2.3Scanning a Stack of Document with Various sizes and Weights
When scanning a batch of documents with different sizes and weights, be sure to follow these guidelines to avoid a skewed image or a paper jam:
1.Align the documents TOP EDGE first in the sequence of paper size from large to small.
2.If two pages are of the same size yet with different weight, arrange these pages in the sequence of paper weight from heavyweight to lightweight.
3-6
User’s Manual
3.Align the edges of the documents by tapping the bottom of the stack against the table top.
4.Center these pages in the document feeder and make sure that the edges of page of the largest size slightly touch the Paper Guide.
3-7
User’s Manual
3.2Verifying Your Scanner Installation
To verify if your scanner installation is correct, Avision provides you a useful test program called Avision Capture Tool. With this tool, you can perform simple scans and view the captured images. In addition, it helps you complete your scan at a rated speed.
The following procedure describes how to verify your scanner installation. If the installation is not correct, please review the preceding section to check if the cable connection and scanner driver have been successfully installed.
Before you begin, be sure the scanner is on.
1.Select Start>Programs>Avision xxx Scanner>Avision Capture Tool. The Select Scanner Model dialog box will be displayed.
2.Select your driver type and scanner model and click OK. The following Avision Capture Tool dialog box will be displayed.
3-8
![]()
User’s Manual
Fit Actual
Page Size
|
Setup Scan Save |
File Format |
File Path |
||
3.Choose your desired file format from the File Format drop down list box. (Default is JPEG, other choice includes TIFF, MTIFF, PDF, MPDF, GIF, and BMP.) The supported file formats vary depending on your scanner model.
4.Type your desired folder name and file name in the File Path box. (Default is C:Documents and SettingsUser NameMy DocumentsMy ScanImage.)
Note: If you do not wish to save the scanned image, deselect the Save button since default is Save Enable. In this case, the thumbnail view will be disabled. And therefore, after viewing all the scanned images, only the last one will remain on the screen.
5.Click the Setup button () or choose Setup from the File menu to prompt the Scanner Properties dialog box.
3-9
User’s Manual
Image
Selection
Box
6.From the Image Selection Box, choose your desired image type for your scanned image. (Default is Front B&W) If you have a duplex scanner, choose Front and Rear to scan both sides of your document.
7.Click OK to quit the Scanner Properties dialog box. (To learn more details about the Scanner Properties dialog box, please see the subsequent chapter, Using the Scanner Properties Dialog Box.)
8.Place your document face down on the document glass or face up in the auto document feeder.
9.In the Scan Validation dialog box, click the Scan button () or choose Scan from the File menu.
10.The document will be scanned and displayed in the Scan Validation screen. After the scanned images have been displayed, your scanner installation verification is completed.
3-10
User’s Manual
Display View
Thumbnail View
11.You can view the scanned image in Fit Page () or Actual Size (100%) button () from the Viewing toolbars at the right side.
12.Click the Close box or Quit from the File menu to exit the Scan Validation Tool.
3-11
User’s Manual
3.3A Glance of the Scanner Properties Dialog Box
1
|
2 |
3 |
|||||||
|
4 |
||||||||
|
5 |
||||||||
|
6 |
||||||||
|
7 |
||||||||
8
|
1. |
Tab Options |
Choice: Image, Compression, Color Dropout, |
|
Paper, Multi-Feed Detection, Preview, Options, |
||
|
Settings, Information. |
||
|
2. |
Image |
Choose your image type and the side of |
|
Selection Box |
document you wish to scan. Options vary |
|
|
based on type of scanner. |
||
|
3. |
Brightness |
Adjust the brightness level from –100 to +100. |
|
4. |
Contrast |
Adjust the contrast level from –100 to +100. |
|
5. Resolution |
Determine the quality of the scanned image. |
|
|
The industry standard is 200 dpi. |
||
|
6. |
Invert |
Reverse the color of your scanned image. |
|
7. |
Scan Source |
Choice: Auto Document Feeder, Flatbed, |
|
Flatbed (Book), Automatic (varies due to |
||
|
different scanner model) |
||
|
8. |
Defaults |
Reset all values on the tabs to the factory |
|
default settings. |
3-12
User’s Manual
4.Using the Scanner Properties Dialog Box
The Scanner Properties dialog box allows you to configure the scanner’s settings. It consists of several tabbed windows each of which will be described in this chapter.
Note: In this chapter, all options are available based on a duplex (double-side) scanner. If you have purchased a simplex (single-side) scanner, all options are available for single sided only.
The Scanner Properties dialog box
4-1
User’s Manual
4.1 Buttons on the Scanner Properties Dialog Box
The buttons on the Scanner Properties dialog box Buttons Description
Defaults Click the Defaults button, the factory default settings will be shown on each tab.
Cancel Click the Cancel button to leave the Scanner Properties dialog box.
4-2
User’s Manual
The following table shows the default settings
|
Tab name |
Default settings |
|
Image |
Image Front B&W |
|
Binarization Dynamic Threshold |
|
|
Resolution 200 dpi |
|
|
Invert Blank on White |
|
|
Scan Source Auto Document Feeder |
|
|
Threshold None |
|
|
Brightness None |
|
|
Contrast None |
|
|
Compression |
None |
|
Color Dropout |
None |
|
Paper |
Cropping Automatic |
|
Deskew Yes |
|
|
Orientation Portrait |
|
|
OverScan 0.00 |
|
|
Note: The availability of this option |
|
|
varies due to scanner model. |
|
|
Unit Inch |
|
|
Multi-Feed |
None |
|
Detection |
|
|
Preview |
None |
|
Options |
Rotation Degrees None |
|
Blank Page Removal None |
|
|
Edge Fill White 0 mm |
|
|
Image Control Option None |
|
|
Setting |
Enable Energy Saver Enable, 15 |
|
minutes after last scan action |
|
|
Show Scanning Progress Yes |
|
|
Show Warning Message Yes |
|
|
Save Settings after Closing Yes |
|
|
Imprinter |
Digital Imprinter |
4-3
User’s Manual
4.2Showing or Hiding Tabs
The [Scanner Properties] dialog box is displayed in default with three basic tabs — Image, Paper, and Information. To show more tabs, click the [Scanner Properties] icon to access more scan settings.
To show more tabs,
1.Click the [Scanner Properties] icon () on the upper left corner, and choose [Tab] to show available tab names. The available tabs include Compression, Color Drop out, Preview, Rotation, Separation, Multi-Feed, Options, Settings, and Imprinter. (Note: the options vary based on scanner model.)
2.Choose the tab you want to display. The selected tab will be shown with a check mark and then displayed in the [Scanner Properties] dialog box.
3.To access the settings, click the selected tab on the top of the [Scanner Properties] dialog box. The page of the selected tab will be displayed.
To hide a tab window,
1.Click the [Scanner Properties] icon () on the upper left corner, and choose [Tabs] to show available tab names.
2.Choose the tab you want to hide. Then, the selected tab will be hided in the [Scanner Properties] dialog box.
Note: The [Image], [Paper], and [Information] tab can not be hided since they preprogrammed to be displayed by default.
4-4
User’s Manual
4-5
User’s Manual
4.3The Image Tab
The Image tab allows you to choose the front side and (or) the rear side of your document, the type of image, and to set several basic scan settings. Note that except for the resolution, you can set individual scan settings for the front side and the rear side. For example, all settings in the Image tab, Compression tab, Color Dropout tab can be set individually for the front and the rear side. However, the settings in the Paper tab, the Option tab, and the Setting tab have to be set the same for the front and rear side.
The Image tab dialog box
4-6
![]()
User’s Manual
4.3.1 The Image Selection Box
The Image Selection box includes the image type and document side option. If you wish to scan both the front side and the rear side of your color document, you can check both Front Color and Rear Color at the same time. Note the options vary based on type of scanner.
Example 1 Scanning a two-sided color document, both sides in color
|
Side/Image |
Front |
Rear |
|
Selection |
||
4-7
User’s Manual
Example 2 Scanning a two-sided color document, one in B&W, the other in color
Side/Image
Selection
Image Type
Color
Gray
B&W
Front Rear
Description
Choose Color if you wish to scan a color image for your original in color.
Choose Gray image if your original contains actual shades of gray.
Choose B&W if your original contains only text, pencil or ink sketch.
4-8
User’s Manual
Front/Rear Auto Color Detection:
Click to automatically detect and scan the front or the rear page of your color document in color image mode. If your document is in colors, the scanner will automatically scan the document into a color image. If your document is non-color, you can choose the output to be either B&W or Gray from the Non-Color Selection option. This option is useful when you have a mixture of color and non-color document.
Note: If you choose Front Rear Auto Color Detection, you can not specify the image mode of your rear page and vice versas.
Modes of Auto Color Detection:
If [Front/Rear Auto Color Detection] is selected, its modes will be displayed. Choice includes Normal, Ignore Paper Color. For paper with background color such as invoices, choosing [Ignore Paper Color] will automatically remove the background color and enhance the detection accuracy.
|
Normal |
Ignore single background |
|
color |
|
4-9
User’s Manual
Sensitivity of Auto Color Detection
If your documents contain primarily B&W text and small amount of light or pale colors and you do not wish them to be recognized as color image to save the file size, you can increase the sensitivity value by moving the bar to the right to let these images to be detected as B&W. The value ranges from 1 to 100. The default is 37.
Original
|
Sensitivity: 1 |
Sensitivity: 100 |
|
(The image is recognized |
(The image is recognized |
|
as a color one) |
as a black and white one) |
4-10
User’s Manual
Same settings on both sides:
Click to apply same scan settings for both sides of your documents. After checking this option, any settings you have changed will automatically applied to both the front side and the rear side. For example, if you choose your ideal resolution to be 300 dpi, this will be applied both to the front side and rear side of your document.
4-11
User’s Manual
4.3.2 Other Image Options
Binarization This is the process of converting a grayscale or color image to a bi-tonal image. There are several different methods of performing this conversion.
Options: Dynamic Threshold,
Dynamic Threshold (AD), Fixed
Processing, Halftone 1~5, Error Diffusion.
Dynamic Threshold: Selecting Dynamic Threshold allows the scanner to dynamically evaluate each document to determine the optimal threshold value to produce the highest quality image. This is used to scan mixed document containing faint text, shaded background, or color background with a single setting. If Dynamic Threshold is selected, Threshold, Brightness, and Contrast are not available.
Dynamic Threshold (AD): Selecting Dynamic Threshold (AD) to perform the enhanced mode of the Dynamic Threshold feature. However, using this mode may slow down your scanning speed.
Sensitivity of Dynamic Threshold
Occasionally your scanned image may contain small dots or speckles. To remove these spots, increase the sensitivity value by moving the bar to the right. The value ranges from 1 to 30. The default is 20.
4-12
User’s Manual
Fixed Processing: Used for black-and- white and other high contrast documents. A single level is set to determine the black- and-white transition. The threshold is programmable over the entire density range. Fixed Processing sets Contrast to 0. If Fixed Processing is selected, Contrast is not available.
Halftone: In addition to the black and white display, Halftone can present a somehow gray shade of image by using different size of dots. Halftone image looks like the picture we have seen in the newspaper. Options include Halftone 1,
Halftone 2, Halftone 3, Halftone 4, Halftone 5.
Error Diffusion: Error Diffusion is a type of Halftone. Error Diffusion gives good image texture and makes text in images more readable than Halftone.
Halftone Image
4-13
User’s Manual
Error Diffusion Image
|
Dynamic Threshold |
Dynamic Threshold (AD) |
4-14
Loading…
В сегодняшней статье мы посмотрим с вами, что собой представляет ошибка WIA ERROR OFFLINE с кодом 0x80210005, и как от нее можно избавиться.
WIA ERROR OFFLINE (0x80210005)
Иногда случается так, что при отключении одного устройства от ПК отключается и другое. Бывают ситуацию, когда вы хотите использовать сканер в связке с каким-то приложением, но Windows не удается его обнаружить — происходит это сразу после того, как от ПК отключается какое-то другое устройство.
Подобная проблема может возникать тогда, когда вы отключаете от компьютера WSD-сканер (или когда к нему подключается другая машина в сети). Плюс, это же может происходить при подключении к ПК другого сканирующего устройства, например, USB-сканера.
Когда система не может найти отключенное устройство, она делает запрос насчет его статуса, после чего перед пользователем появляется ошибка WIA ERROR OFFLINE. В сообщении ошибки (в переводе на русский) указано следующее:
WIA ERROR OFFLINE, устройство отключено. Убедитесь, что устройство работает и подключено к ПК. Код ошибки 0x80210005.
Служба загрузки изображений Windows (WIA) позволяет графическим приложениям взаимодействовать с сканерами и прочими устройства для обработки изображений. Вышеуказанная ошибка возникает тогда, процесс инициализации между WIA и сканером завершается неудачей.
Как исправить WIA ERROR OFFLINE?

Решение №1 Перезагрузите компьютер при подключенном сканере
Чаще всего помогает самая простая перезагрузка компьютера с подключенным к нему сканером. Как только вам снова удастся зайти в ОС, попробуйте воспользоваться принтером и посмотрите, исчезла ли ошибка.
Решение №2 Переустановка драйвера для сканера
В некоторых случаях приходится прибегнуть к полной переустановке драйвера для подключенного сканера. Чтобы это сделать, следуйте этим шагам:
Проверьте наличие ошибки WIA ERROR OFFLINE, когда установка драйвера завершится.
Решение №3 Перезапуск службы WIA
Ранее мы уже говорили вам о службе загрузки изображений Windows (WIA) — давайте перезапустим ее. Для этого вам нужно сделать следующее:
Еще раз пытаемся воспользоваться своим сканером и смотрим, исчезла ли ошибка WIA ERROR OFFLINE (0x80210005).
Источники:
https://gamesqa. ru/kompyutery/wia-error-offline-16863/
View a manual of the Avision AD230 below. All manuals on ManualsCat.com can be viewed completely free of charge. By using the ‘Select a language’ button, you can choose the language of the manual you want to view.
Page: 1
Sheet-fed Scanner
User’s Manual
Regulatory model: FL-1312B
manual-en-250-0878-E-AD230-v300
Avision Inc.
Page: 2
User’s Manual
ii
Trademarks
Microsoft is a U.S. registered trademark of Microsoft Corporation.
Windows, Windows Vista, Windows 7, Windows 8, and Windows 10
are either registered trademarks or trademarks of Microsoft
Corporation in the United States and/or other countries.
Energy Star®
is a registered trademark of the U.S. government.
IBM, IBM PC are registered trademarks of International Business
Machines Corp.
Other brands and product names herein are trademarks or
registered trademarks of their respective holders.
Copyright
All rights reserved. No part of this publication may be
reproduced, transmitted, transcribed, stored in a retrieval
system, or translated into any language or computer language,
in any form or by any means, electronic, mechanical, magnetic,
optical, chemical, manual, or otherwise, without the prior written
permission of Avision Inc.
Material scanned by this product may be protected by
governmental laws and other regulations, such as copyright
laws, the customer is solely responsible for complying with all
such laws and regulations.
Warranty
The information contained in this document is subject to
change without notice.
Avision makes no warranty of any kind with regard to this
material, including, but not limited to, the implied warranties
of fitness for a particular purpose.
Avision shall not be liable for errors contained herein or for
incidental or consequential damages in connection with the
furnishing, performance, or use of this material.
Page: 3
User’s Manual
iii
Federal Communications Commission (FCC) compliance
information statement
Part 15
This equipment has been tested and found to comply with the
limits for a Class B digital device, pursuant to Part 15 of the FCC
Rules. These limits are designed to provide reasonable
protection against harmful interference in a residential
installation. This equipment generates, uses and can radiate
radio frequency energy and, if not installed and used in
accordance with the instructions, may cause harmful
interference to radio communications.
However, there is no guarantee that interference will not occur
in a particular installation. If this equipment does cause harmful
interference to radio or television reception, which can be
determined by turning the equipment off and on, the user is
encouraged to try to correct the interference by one of the
following measures:
Reorient or relocate the receiving antenna.
Increase the separation between the equipment and
receiver.
Connect the equipment into an outlet on a circuit
different from that to which the receiver is connected.
Consult the dealer or an experienced radio/TV technician
for help.
This device complies with Part 15 of the FCC Rules. Operation is
subject to the following two conditions: (1) This device may not
cause harmful interference, and (2) this device must accept any
interference received, including interference that may cause
undesired operation.
Page: 4
User’s Manual
iv
European Union Regulatory Notice
Products bearing the CE marking comply with the following EU
Directives:
Low Voltage Directive 2006/95/EC
EMC Directive 2004/108/EC
Restriction of the use of certain hazardous substances (RoHS)
Directive 2011/65/EU
CE compliance of this product is valid if powered with the correct
CE-marked AC adapter provide by Avision.
This product satisfies the Class B limits of EN55022, EN55024,
safety requirements of EN 60950 and ROHS requirements of
EN50581.
*This machine is certified as Class 1 LED product.
Page: 5
User’s Manual
v
Disposal of Waste Equipment by Users in Private Union
This symbol on the product or on its packaging indicates that the
product can not be disposed of with your other household waste.
Instead it should be sent to appropriate facilities for recovery
and recycling in an effort to protect human health and the
environment. Fore more information about where you can drop
off your waste equipment for recycling, please contact your local
city office, your household waste disposal service or the shop
where you purchased the product.
As an ENERGY STAR®
Partner, Avision Inc. has
determined that this product meets the ENERGY
STAR guidelines for energy efficiency.
System Requirements
CPU: Intel®
Core™ 2 Duo or higher
Memory: 32 bit: 2 GB
64 bit: 4 GB
Optical Drive: DVD-ROM Drive
USB Port: USB port 2.0 (compatible with USB 1.1)
Compatible
Operating
System:
Microsoft Windows XP(SP3), Windows Vista,
Windows 7, Windows 8 (32 bits/64 bits),
Windows 10 (32 bits/64 bits)
Page: 6
User’s Manual
vi
Product Safety Guide
Please clearly read all these instructions, and follow all instructions
and warnings before installing and using the device.
The following indications are used in this document to obviate any
chance of accident or damage to you and/or the device.
WARNING Indicates potentially hazardous situations, which
if instructions are not followed, could result in
death or serious injury.
CAUTION Indicates a potentially hazardous situation
which, if instructions are not followed, may
result in minor or moderate injury or damage to
property.
WARNING
Use only the AC power adapter that came with your device.
Using any other AC power adapter could cause fire, electrical
shock, or injury.
Use only the AC power cord and USB cable that came with your
device and avoid abrasions, cuts, fraying, crimping, and kinking.
Using any other AC power cord and USB cable could cause fire,
electrical shock, or injury.
Do not place objects on top of the AC power cord, and do not
allow the AC power adapter or the AC power cord to be stepped
on or run over.
Place the device and its AC power adapter near an electrical
outlet where the AC power adapter can easily be unplugged.
If you use an extension cord with the device, make sure that
the total ampere rating of the devices plugged into the
extension cord does not exceed the cord’s ampere rating.
Place the device close enough to the computer so that the
interface cable can easily reach between the device and the
computer.
Page: 7
User’s Manual
vii
Do not place or store the device or its AC power adapter:
Outdoors
Near excessive dirt or dust, water, or heat sources
In locations subject to shocks, vibrations, high
temperature or humidity, direct sunlight, strong light
sources, or rapid changes in temperature or humidity
Do not use the device with wet hands.
Never disassemble, modify, or attempt to repair the AC power
adapter, device, or device option by yourself, except as
specifically explained in the device’s documentation. This could
cause fire, electrical shock, or injury.
Do not insert objects into any opening, as they may touch
dangerous voltage points or short-out components. Beware of
electrical shock hazards.
Unplug the device and the AC power adapter, and refer
servicing to qualified service personnel under the following
conditions:
The AC power adapter or plug is damaged.
Liquid has entered the device or the AC power adapter.
Object has entered the device or the AC power adapter.
The device or the AC power adapter has been dropped,
or the case has been damaged.
The device or the AC power adapter does not operate
normally (i.e. appearance of smoke, strange smell, odd
noise, etc.), or exhibits a distinct change in performance
Unplug the device and the AC power adapter before cleaning.
Page: 8
User’s Manual
viii
CAUTION:
Do not locate the device on rackety or aslope tables. Do not
locate the device on unstable surface. The device may fall
down and this may result in injury.
Do not place heavy objects on the unit. It may cause
unbalance and the device may fall down. This may result in
injury.
Store the AC Power cord/USB cable bundled out of the reach of
children to avoid the risk of injury.
Keep plastic bags bundled out of the reach of children or throw
them away to avoid the danger of suffocation.
If you are not going to use the device for a long period, unplug
the AC power adapter from the electrical outlet.
Page: 9
User’s Manual
ix
Table of Contents
1. Introduction …………………………………………………….1-1
1.1 Package Items…………………………………….. 1-1
1.2 Front View …………………………………………. 1-3
1.3 Rear View ………………………………………….. 1-4
2. Scanner Installation……………………………………….2-1
2.1 Precautions ………………………………………… 2-1
2.2 Installing the Scanner Driver and Connecting
the Cables………………………………………….. 2-2
2.2.1 Connecting to Power …………………………….2-2
2.2.2 Turning on the Power……………………………2-3
2.2.3 Installing the Scanner Driver ……………….2-3
2.2.4 Connecting to Computer ………………………2-5
3. Completing Your First Scan…………………………..3-1
3.1 Loading Your Paper ………………………………. 3-1
3.1.1 Notice on Using the ADF……………………….3-1
3.1.2 Loading Your Document in the ADF
Paper Tray …………………………………………….3-2
3.1.3 Scanning Cards …………………………………….3-7
3.1.4 Scanning a Stack of Document with
Various sizes and Weights …….3-8
3.2 Verifying Your Scanner Installation ………….. 3-10
3.3 A Glance of the Scanner Properties Dialog Box3-14
4. Using the Scanner Properties Dialog Box…..4-1
4.1 Buttons on the Scanner Properties Dialog Box . 4-2
4.2 Showing or Hiding Tabs …………………………. 4-4
4.3 The Image Tab ……………………………………. 4-6
4.3.1 The Image Selection Box ……………………..4-7
4.3.2 Other Image Options ………………………….4-11
4.3.3 Scanning color images………………………..4-23
4.3.4 Scanning grayscale images ………………..4-23
Page: 10
User’s Manual
x
4.3.5 Scanning B&W images………………………..4-23
4.3.6 Editing Profiles…………………………………….4-24
4.4 The Compression Tab ………………………….. 4-27
4.5 The Color Dropout Tab…………………………. 4-29
4.5.1 Color Dropout Selection………………………4-29
4.6 The Paper Tab …………………………………… 4-35
4.6.1 Cropping………………………………………………4-36
4.6.2 Other Paper Selection …………………………4-42
4.7 The Multi-Feed Detection Tab…………………. 4-48
4.8 The Preview Tab ………………………………… 4-52
4.9 The Enhancement Tab …………………………. 4-53
4.10 The Rotation Tab……………………………… 4-59
4.11 The Separation Tab ………………………….. 4-64
4.12 The Setting Tab ………………………………. 4-69
4.13 The Imprinter Tab ……………………………. 4-72
4.14 The Information Tab …………………………. 4-76
5. ISIS Interface Operation ………………………………5-1
6. Using the Buttons …………………………………………..6-1
6.1 Installing Button Manager V2…………………… 6-1
6.2 Checking the Button Configurations before
Scanning …………………………………………… 6-2
6.3 Scanning From One Touch of the Buttons ……. 6-4
7. Maintenance…………………………………………………….7-1
7.1 Cleaning the ADF …………………………………. 7-1
7.2 Cleaning the Glass ……………………………….. 7-4
7.3 Replacing the ADF Reverse Roller ……………… 7-5
7.4 Replacing the ADF Roller ………………………… 7-8
8. Troubleshooting………………………………………………8-1
8.1 Clearing a Paper Jam…………………………….. 8-1
8.2 Questions and Answers………………………….. 8-2
8.3 Technical Service …………………………………. 8-4
9. Specifications ………………………………………………….9-1
Index…………………………………………………………………………… a
Page: 11
User’s Manual
1-1
1. Introduction
Congratulations on your purchase of the color sheet-fed
image scanner. With this scanner, you can scan documents
from the auto document feeder increase your productivity.
Before you install and operate the new scanner, please take a
few minutes to read through this manual. It provides proper
instructions for you to unpack, install, operate and maintain
the scanner.
1.1 Package Items
The following figure indicates the package contents. Please
check all the items against your checklist. If you do not
receive all the items, please contact your authorized local
dealer immediately.
Page: 12
User’s Manual
1-2
1 2
4
3
1. Scanner Main Unit
2. Quick Guide/CD
3. USB Cable
4. Power Adapter & Power Cord
Note:
1. Only use the AC adapter DA-48M24 by APD included in the
machine. Using other AC adapters may damage the machine
and void the warranty.
2. Please unpack the packing carefully, and check the contents
against the checklist. If any items are missing or damaged,
please contact your dealer immediately.
3. To access more service supports, visit www.avision.com to
register your Avision’s product.
Page: 13
User’s Manual
1-3
1.2 Front View
Extension
ADF
Paper Tray
Paper Guide
LCD Screen with
Up/Down Buttons Paper Guide
Paper Stopper
Power Button
Cancel Button
Scan Button
Extension
Output Tray
Paperweight
Position Adjuster
Part Name Function
Extension Can be pulled out and adjusted to the
size of the document being scanned.
ADF Paper Tray Load the document onto this part
when scanning document.
Paper Guides Adjusts to the width of the documents
to prevent skewing of the scanned
pages.
Operation Panel LCD screen:
Shows a number indicating a scan-to
destination via the Up/Down buttons.
The Power Button:
Press to turn on the power.
The Scan Button:
Press to start a scan.
The Cancel Button:
Press to cancel a scanning job during
operation.
Page: 14
User’s Manual
1-4
Output Tray Open to collect the document after
scanned.
Position
Adjuster
Slide the adjuster inward to make the
Output Tray in a flat position.
Extension Pull it out. Documents are ejected
from the ADF to the tray.
Paperweight Used to hold down a stack of output
paper.
Paper Stopper Adjust to the length of the documents
to prevent them from falling apart.
1.3 Rear View
Power Jack
Kensington
Security Slot
USB Port
Part Name Function
USB Port Connect to your computer.
Power Jack Connect the AC adapter to the
scanner.
Kensington
Security Slot
Attach to a lock to secure the
scanner.
Page: 15
User’s Manual
2-1
2. Scanner Installation
2.1 Precautions
Keep the scanner out of direct sunlight. Direct exposure
to the sun or excessive heat may cause damage to the
unit.
Do not install the scanner in a humid or dusty place.
Be sure to use the proper AC power source.
Place the scanner securely on an even, flat surface.
Tilted or uneven surfaces may cause mechanical or
paper-feeding problems.
Retain the scanner box and packing materials for
shipping purposes.
Page: 16
User’s Manual
2-2
2.2 Installing the Scanner Driver and Connecting the
Cables
NOTE:
1). To ensure your computer can identify the USB scanner,
please install scanner driver first before connecting the
scanner to your computer.
2). The scanner driver contains TWAIN, ISIS and WIA driver.
After the installation of scanner driver is completed, this
scanner allows you to scan via a TWAIN, ISIS, or a WIA
interface. Start your TWAIN-compliant image editing
software application to select a TWAIN or WIA user interface
or your ISIS software to select an ISIS user interface. You
may also launch Microsoft’s Scanner and Camera Wizard to
scan via a WIA user interface.
2.2.1 Connecting to Power
Before connecting, make sure the power switch is off.
Plug the small end of the power adaptor into the power jack of
your scanner. Insert the other end to an appropriate power
outlet.
Page: 17
User’s Manual
2-3
2.2.2 Turning on the Power
Press the Power Switch button on the front panel, the Power
LED will flash. When it is finished and ready to scan, the LED
indicator will stop flashing and become steadily on. To turn
off the scanner, press the Power Switch button for about 3
seconds, the Power LED will be off.
2.2.3 Installing the Scanner Driver
1. Place the supplied CD-ROM onto your CD-ROM drive.
2. The software installation graphic appears. If not, run
“setup.exe”.
Page: 18
User’s Manual
2-4
Contents on the installation graphic:
Install Scanner Driver: To communicate with your
scanner, you need to install the scanner driver.
Install Button Manager V2: To use the buttons on
the scanner, you need to install Button Manager V2.
To ensure Button Manager V2 works properly, please
FIRST install scanner driver before installing Button
Manager V2.
Install Adobe Reader: To view the user’s manuals
for the scanner and Button Manager V2, you need to
use Adobe Reader to open and view the manuals in
pdf file format. If you already have Adobe Reader
installed on your computer, you may disregard this
item.
Install AVScan X: To scan and organize your multi-
page document(s), you can install the software
application to manage them easily and effectively.
View Manual: Click “View Manual” to view or
print the detailed user manual for the scanner and
Button Manager V2 respectively.
3. Click Install Scanner Driver to install the scanner driver
and then click Install Button Manager V2 to install the
Button Manager V2 unto your computer.
Page: 19
User’s Manual
2-5
2.2.4 Connecting to Computer
1. Connect the square end of the USB cable to the USB port of
your scanner. Connect the rectangle end to the USB port at
the rear side of your computer.
2. The computer should detect a new USB device and prompt a
“New Hardware Found” message.
3. By following the on-screen instructions, click the Next
button to continue. When the certification screen appears,
click Continue Anyway to complete the installation.
4. When the Finish dialog is prompted, click the Finish button.
Page: 20
User’s Manual
3-1
3. Completing Your First
Scan
3.1 Loading Your Paper
3.1.1 Notice on Using the ADF
Before using the ADF, please make sure that your paper meets
the following specifications:
Document(s) can range in size from50 x 50 mm (2 x 2 in.)
to 216 x 356 mm (8.5 x 14 in.).
Document(s) can range in weight from 27~413 g/m2
(7~
110 lb.)
ID cards up to 1.25 mm (0.05 in.) thick
Document(s) should be square or rectangular and in good
condition (not fragile or torn).
Document(s) should be free of curl, wrinkle, wet ink, or
punch holes.
Document(s) should be free of staples, paper clips, paper
sticky notes.
Page: 21
User’s Manual
3-2
3.1.2 Loading Your Document in the ADF Paper Tray
Fanning Your Document
Note:
To avoid occasional multi-feeds or paper jams, please fan
your documents and align the top edges before feeding them
into the scanner.
1. Hold both ends of the documents and fan them a few
times.
2. Rotate the documents by 90 degrees and fan them in the
same manner.
3. Align the edges of the documents in a step-like pattern
(see picture below).
Step-like
Scanning
Direction
Page: 22
User’s Manual
3-3
Document Feeding
1. Unfold the document feeder and its extension.
2. Unfold the output tray and raise the paper stopper.
Page: 23
User’s Manual
3-4
3. Raise the paper guide to hold your multi-page document.
4. Raise the paperweight.
Page: 24
User’s Manual
3-5
5. Slide the position adjustor inward to make the output
tray in a flat position .
6. Load a stack of document face down with the top of the
pages pointing into the feeder.
7. Verify that the paper guides are aligned with the edges of
the stack.
Page: 25
User’s Manual
3-6
Note: The [Paper Width] switch:
If your document width is 216 mm (8.5 in.):
If your document width is 216 mm (8.5 in.), slide the
[Paper Width] switch DOWN to fix your paper guide to
conveniently load the letter-size document.
If your document width is larger than 216 mm (8.5 in.):
If your document width is larger than 216 mm (8.5 in.)
such as invoices with punch holes, slide the [Paper
Width] switch UP and move the paper guide to the right
end to load your documents.
Slide DOWN the [Paper
Width] switch to set your
paper width to 216 mm
(8.5 in.)
Slide UP the [Paper
Width] switch to set
your paper width larger
than 216 mm (8.5 in.)
Page: 26
User’s Manual
3-7
3.1.3 Scanning Cards
To scan cards, it is recommended to press down the paper
weight and then raise the output tray to keep the cards from
falling apart.
1. Lift the output tray up to make the output tray in an angled
position.
2. Press down the paper weight.
3. Load your cards horizontally into the paper tray. Align
the paper guides and make sure the edges of cards
slightly touch the paper guides on both side as
illustrated.
8B
Page: 27
User’s Manual
3-8
3.1.4 Scanning a Stack of Document with Various sizes
and Weights
When scanning a batch of documents with different sizes and
weights, be sure to follow these guidelines to avoid a skewed
image or a paper jam:
1. Align the documents TOP EDGE first in the sequence of
paper size from large to small.
2. If two pages are of the same size yet with different weight,
arrange these pages in the sequence of paper weight from
heavyweight to lightweight.
Page: 28
User’s Manual
3-9
3. Align the edges of the documents by tapping the bottom of
the stack against the table top.
4. Center these pages in the document feeder and make sure
that the edges of page of the largest size slightly touch the
Paper Guide.
Page: 29
User’s Manual
3-10
3.2 Verifying Your Scanner Installation
To verify if your scanner installation is correct, Avision provides
you a useful test program called Avision Capture Tool. With this
tool, you can perform simple scans and view the captured
images. In addition, it helps you complete your scan at a rated
speed.
The following procedure describes how to verify your scanner
installation. If the installation is not correct, please review the
preceding section to check if the cable connection and scanner
driver have been successfully installed.
Before you begin, be sure the scanner is on.
1. Select Start>Programs>Avision xxx Scanner>Avision
Capture Tool. The Select Scanner Model dialog box will be
displayed.
2. Select your driver type and scanner model and click OK.
The following Avision Capture Tool dialog box will be
displayed.
Page: 30
User’s Manual
3-11
Fit
Page
Actual
Size
File Format
Save File Path
Setup
Scan
3. Choose your desired file format from the File Format drop
down list box. (Default is JPEG, other choice includes TIFF,
MTIFF, PDF, MPDF, GIF, and BMP.) The supported file
formats vary depending on your scanner model.
4. Type your desired folder name and file name in the File Path
box. (Default is C:Documents and SettingsUser NameMy
DocumentsMy ScanImage.)
Note: If you do not wish to save the scanned image,
deselect the Save button since default is Save Enable. In this
case, the thumbnail view will be disabled. And therefore,
after viewing all the scanned images, only the last one will
remain on the screen.
5. Click the Setup button ( ) or choose Setup from the
File menu to prompt the Scanner Properties dialog box.
Page: 31
User’s Manual
3-12
Image
Selection
Box
6. From the Image Selection Box, choose your desired image
type for your scanned image. (Default is Front B&W) If you
have a duplex scanner, choose Front and Rear to scan both
sides of your document.
7. Click OK to quit the Scanner Properties dialog box. (To
learn more details about the Scanner Properties dialog box,
please see the subsequent chapter, Using the Scanner
Properties Dialog Box.)
8. Place your document face down on the document glass or
face up in the auto document feeder.
9. In the Scan Validation dialog box, click the Scan button
( ) or choose Scan from the File menu.
10. The document will be scanned and displayed in the Scan
Validation screen. After the scanned images have been
displayed, your scanner installation verification is completed.
Page: 32
User’s Manual
3-13
Display View
Thumbnail View
11. You can view the scanned image in Fit Page ( ) or Actual
Size (100%) button ( ) from the Viewing toolbars at the
right side.
12. Click the Close box or Quit from the File menu to exit the
Scan Validation Tool.
Page: 33
User’s Manual
3-14
3.3 A Glance of the Scanner Properties Dialog Box
1
2
3
4
5
6
7
8
1. Tab Options Choice: Image, Compression, Color Dropout,
Paper, Multi-Feed Detection, Preview, Options,
Settings, Information.
2. Image
Selection Box
Choose your image type and the side of
document you wish to scan. Options vary
based on type of scanner.
3. Brightness Adjust the brightness level from –100 to +100.
4. Contrast Adjust the contrast level from –100 to +100.
5. Resolution Determine the quality of the scanned image.
The industry standard is 200 dpi.
6. Invert Reverse the color of your scanned image.
7. Scan Source Choice: Auto Document Feeder, Flatbed,
Flatbed (Book), Automatic (varies due to
different scanner model)
8. Defaults Reset all values on the tabs to the factory
default settings.
Page: 34
User’s Manual
4. Using the Scanner
Properties Dialog Box
The Scanner Properties dialog box allows you to configure the
scanner’s settings. It consists of several tabbed windows each
of which will be described in this chapter.
Note: In this chapter, all options are available based on a
duplex (double-side) scanner. If you have purchased a simplex
(single-side) scanner, all options are available for single sided
only.
The Scanner Properties dialog box
4-1
Page: 35
User’s Manual
4.1 Buttons on the Scanner Properties Dialog Box
The buttons on the Scanner Properties dialog box
Buttons Description
Defaults Click the Defaults button, the factory default
settings will be shown on each tab.
Cancel Click the Cancel button to leave the Scanner
Properties dialog box.
4-2
Page: 36
User’s Manual
The following table shows the default settings:
Tab name Default settings
Image Image:Front B&W
Binarization:Dynamic Threshold
Resolution:200 dpi
Invert:Blank on White
Scan Source:Auto Document Feeder
Threshold:None
Brightness:None
Contrast:None
Compression None
Color Dropout None
Paper Cropping:Automatic
Deskew:Yes
Orientation:Portrait
OverScan:0.00
Note: The availability of this option
varies due to scanner model.
Unit:Inch
Multi-Feed
Detection
None
Preview None
Options Rotation Degrees:None
Blank Page Removal:None
Edge Fill:White,0 mm
Image Control Option:None
Setting Enable Energy Saver:Enable, 15
minutes after last scan action
Show Scanning Progress:Yes
Show Warning Message:Yes
Save Settings after Closing:Yes
Imprinter Digital Imprinter
4-3
Page: 37
User’s Manual
4.2 Showing or Hiding Tabs
The [Scanner Properties] dialog box is displayed in default
with three basic tabs — Image, Paper, and Information. To
show more tabs, click the [Scanner Properties] icon to access
more scan settings.
To show more tabs,
1. Click the [Scanner Properties] icon ( ) on the upper
left corner, and choose [Tab] to show available tab names.
The available tabs include Compression, Color Drop out,
Preview, Rotation, Separation, Multi-Feed, Options,
Settings, and Imprinter. (Note: the options vary based on
scanner model.)
2. Choose the tab you want to display. The selected tab will
be shown with a check mark and then displayed in the
[Scanner Properties] dialog box.
3. To access the settings, click the selected tab on the top of
the [Scanner Properties] dialog box. The page of the
selected tab will be displayed.
To hide a tab window,
1. Click the [Scanner Properties] icon ( ) on the upper
left corner, and choose [Tabs] to show available tab
names.
2. Choose the tab you want to hide. Then, the selected tab
will be hided in the [Scanner Properties] dialog box.
Note: The [Image], [Paper], and [Information] tab can
not be hided since they preprogrammed to be displayed by
default.
4-4
Page: 38
User’s Manual
4-5
Page: 39
User’s Manual
4.3 The Image Tab
The Image tab allows you to choose the front side and (or) the
rear side of your document, the type of image, and to set
several basic scan settings. Note that except for the resolution,
you can set individual scan settings for the front side and the
rear side. For example, all settings in the Image tab,
Compression tab, Color Dropout tab can be set individually for
the front and the rear side. However, the settings in the Paper
tab, the Option tab, and the Setting tab have to be set the
same for the front and rear side.
The Image tab dialog box
4-6
Page: 40
User’s Manual
4.3.1 The Image Selection Box
The Image Selection box includes the
image type and document side option. If
you wish to scan both the front side and
the rear side of your color document, you
can check both Front Color and Rear Color
at the same time. Note the options vary
based on type of scanner.
Example 1:Scanning a two-sided color document, both
sides in color
Side/Image
Selection
Front Rear
4-7
Page: 41
User’s Manual
Example 2:Scanning a two-sided color document, one
in B&W, the other in color
Side/Image
Selection
Front Rear
Image Type Description
Color Choose Color if you wish to scan a color
image for your original in color.
Gray Choose Gray image if your original contains
actual shades of gray.
B&W Choose B&W if your original contains only
text, pencil or ink sketch.
B&W Gray Color
4-8
Page: 42
User’s Manual
Front/Rear Auto Color Detection:
Click to automatically detect and scan the front or the rear
page of your color document in color image mode. If your
document is in colors, the scanner will automatically scan the
document into a color image. If your document is non-color,
you can choose the output to be either B&W or Gray from the
Non-Color Selection option. This option is useful when you
have a mixture of color and non-color document.
Note: If you choose Front Rear Auto Color Detection, you can
not specify the image mode of your rear page and vice versas.
Sensitivity of Auto Color Detection
If your documents contain primarily B&W text and small
amount of light or pale colors and you do not wish them to be
recognized as color image to save the file size, you can
increase the sensitivity value by moving the bar to the right to
let these images to be detected as B&W. The value ranges from
1 to 100. The default is 37.
Original
4-9
Page: 43
User’s Manual
Sensitivity: 1
(The image is recognized as
a color one)
Sensitivity: 100
(The image is recognized as
a black and white one)
4-10
Page: 44
User’s Manual
4.3.2 Other Image Options
Binarization This is the process of converting a
grayscale or color image to a bi-tonal
image. There are several different
methods of performing this conversion.
Options: Dynamic Threshold, Fixed
Processing, Halftone 1~5, Error
Diffusion.
Dynamic Threshold: Selecting
Dynamic Threshold allows the scanner
to dynamically evaluate each document
to determine the optimal threshold value
to produce the highest quality image.
This is used to scan mixed document
containing faint text, shaded background,
or color background with a single setting.
If Dynamic Threshold is selected,
Threshold, Brightness, and Contrast are
not available.
Sensitivity of Dynamic Threshold
Occasionally your scanned image may
contain small dots or speckles. To remove
these spots, increase the sensitivity value
by moving the bar to the right. The value
ranges from 1 to 30. The default is 20.
4-11
Page: 45
User’s Manual
Fixed Processing: Used for black-and-
white and other high contrast documents. A
single level is set to determine the black-
and-white transition. The threshold is
programmable over the entire density
range. Fixed Processing sets Contrast to
0. If Fixed Processing is selected,
Contrast is not available.
Halftone: In addition to the black and
white display, Halftone can present a
somehow gray shade of image by using
different size of dots. Halftone image looks
like the picture we have seen in the
newspaper. Options include Halftone 1,
Halftone 2, Halftone 3, Halftone 4,
Halftone 5.
Error Diffusion: Error Diffusion is a type
of Halftone. Error Diffusion gives good
image texture and makes text in images
more readable than Halftone.
Halftone Image
4-12
Page: 46
User’s Manual
Error Diffusion Image
4-13
Page: 47
User’s Manual
Threshold Used to convert a grayscale image to a
bi-tonal image. The value ranges from 0 to
255. A low threshold value produces a
lighter image, and can be used to subdue
backgrounds and subtle, unneeded
information. A high threshold value produces
a darker image, and can be used to help pick
up faint images.
Adjust the threshold setting by dragging the
Threshold sliding bar to the left or right to
achieve the desired threshold setting.
200 dpi,
Threshold:50,
Brightness: 0
200 dpi,
Threshold:100,
Brightness: 0
4-14
Page: 48
User’s Manual
Gray
Document Type: Choice: Normal, Photo, Document
Three options of document type are provided when you choose
Gray as the image type for your scanned document. Choice:
Normal, Photo, Document.
Document: Choose Document if your original contains
pure text or a mixture of text and graphic since it is an
optimal setting for regular business document. When
using Document, only Threshold can be adjusted.
Photo: Choose Photo if your original contains photo to
reproduce your photo in vivid grayscale image. When
using Photo, no Threshold and Contrast can be adjusted.
Normal: When using Normal, Threshold, Brightness, and
Contrast can be adjusted.
Threshold: The value ranges from 0 to 255. The default is
230. A low threshold value produces a lighter image, and can
be used to subdue backgrounds and subtle, unneeded
information. A high threshold value produces a darker image,
and can be used to help pick up faint images. Adjust the
threshold setting by dragging the Threshold sliding bar to the
left or right to achieve the desired threshold setting.
4-15
Page: 49
User’s Manual
Normal Photo Document
(Threshold: 230)
Normal Photo Document
(Threshold: 230)
4-16
Page: 50
User’s Manual
Brightness Adjusts the lightness or darkness of an
image. The higher the value, the brighter
the image. Drag the slider to the right or
left to increase or decrease the brightness.
The range is from –100 to +100.
Contrast Adjusts the range between the darkest and
the lightest shades in the image. The
higher the contrast, the bigger the different
grayscale. Drag the slider to the right or
left to increase or decrease the contrast.
The range is from –100 to +100.
Brightness: -50 Brightness: 0
(Normal)
Brightness: +50
Contrast: -50 Contrast: 0
(Normal)
Contrast: +50
4-17
![]()
-
Форум
-
Компьютерное железо
-
Периферийные устройства
-
#1
Добрый день! Подскажите что можно сделать с потоковым сканером avision ad230u, пытаюсь отсканировать 8 листов бумаги, но после прохождения 1 листа появляется ошибка «Unable to scan. Paper jam reported by AD230U»
-
#2
Грязь, или ролики износились или намотало что то, скрепку или скотч. Может датчик. Короче разбирать его надо и смотреть
-
#3
Грязь, или ролики износились или намотало что то, скрепку или скотч. Может датчик. Короче разбирать его надо и смотреть
Понятно, короче быстро не починить. Придется в саппорт писать. Спасибо
-
Форум
-
Компьютерное железо
-
Периферийные устройства
-
На данном сайте используются cookie-файлы, чтобы персонализировать контент и сохранить Ваш вход в систему, если Вы зарегистрируетесь.
Продолжая использовать этот сайт, Вы соглашаетесь на использование наших cookie-файлов.
Поддерживаемые операционные системы Windows
Windows 10 Education, Windows 10 Education x64, Windows 10 Enterprise, Windows 10 Enterprise x64, Windows 10 Home, Windows 10 Home x64, Windows 10 Pro, Windows 10 Pro x64, Windows 2000, Windows 2000 Professional, Windows 7 Enterprise, Windows 7 Enterprise x64, Windows 7 Home Basic, Windows 7 Home Basic x64, Windows 7 Home Premium, Windows 7 Home Premium x64, Windows 7 Professional, Windows 7 Professional x64, Windows 7 Starter, Windows 7 Starter x64, Windows 7 Ultimate, Windows 7 Ultimate x64, Windows 8, Windows 8 Enterprise, Windows 8 Enterprise x64, Windows 8 Pro, Windows 8 Pro x64, Windows 8 x64, Windows Vista Business, Windows Vista Business x64, Windows Vista Enterprise, Windows Vista Enterprise x64, Windows Vista Home Basic, Windows Vista Home Basic x64, Windows Vista Home Premium, Windows Vista Home Premium x64, Windows Vista Ultimate, Windows Vista Ultimate x64, Windows XP Home, Windows XP Home x64, Windows XP Professional, Windows XP Professional x64
Сканер Avision AD130 — надежное и многофункциональное устройство для быстрого и качественного сканирования документов. Однако, как и любая техника, этот сканер может иногда выдавать различные ошибки и проблемы. В данной статье мы рассмотрим основные коды ошибок, с которыми можно столкнуться при использовании сканера Avision AD130, и предложим решения для их исправления.
Одной из распространенных проблем, с которой могут столкнуться пользователи сканера Avision AD130, является ошибка «Error Code 201». Эта ошибка указывает на проблемы соединения между компьютером и сканером. Чтобы исправить данную проблему, рекомендуется проверить работоспособность кабеля USB, подключенного к сканеру, а также перезагрузить компьютер и сканер.
Другой распространенной ошибкой, с которой могут столкнуться пользователи сканера Avision AD130, является ошибка «Error Code 202». Эта ошибка указывает на проблемы с фотоэлементом или с оптикой сканера. Для исправления данной ошибки рекомендуется очистить оптику и проверить, нет ли дефектов у фотоэлемента.
Примечание: В случае, если перечисленные решения не помогли исправить ошибку, рекомендуется обратиться к сервисному центру или к официальному дилеру Avision для дальнейшей диагностики и ремонта сканера.
Таким образом, сканер Avision AD130, как и другие технические устройства, может иногда выдавать ошибки и проблемы. Однако, с помощью данной статьи вы сможете легко определить причину возникновения ошибки и принять меры для ее исправления. При возникновении серьезных проблем рекомендуется обратиться к специалистам для проведения диагностики и ремонта.
Содержание
- Возможные проблемы и ошибки
- Коды ошибок сканера Avision AD130
- Проблемы с загрузкой документов в сканер
- Проблемы с подключением сканера к компьютеру
- Проблемы со сканированием и качеством изображения
- Решение других проблем и ошибок сканера Avision AD130
Возможные проблемы и ошибки
В процессе работы со сканером Avision AD130 могут возникать различные проблемы и ошибки. Некоторые из них можно легко решить самостоятельно, в то время как другие требуют обращения к сервисному центру.
-
Ошибка «Питание отключено»
Если на дисплее сканера появляется сообщение «Питание отключено», необходимо проверить, что кабель питания надежно подключен как к сканеру, так и к источнику электропитания. Если проблема не устраняется, возможно, неисправен сам кабель или блок питания. Рекомендуется проверить целостность кабеля, а затем провести проверку работы сканера с другим источником питания.
-
Ошибка «Нет связи с компьютером»
Если сканер не может установить связь с компьютером, необходимо проверить следующие моменты:
- Проверьте, что кабель USB правильно подключен как к сканеру, так и к компьютеру.
- Убедитесь, что порт USB на компьютере работает исправно. Для этого можно попробовать подключить другое устройство к этому порту.
- Проверьте, что драйвер сканера установлен и актуален. Если требуется, обновите драйвер до последней версии с официального сайта производителя.
-
Ошибка «Замятие бумаги»
При возникновении ошибки «Замятие бумаги» необходимо тщательно проверить сканер на наличие застрявших или поврежденных листов бумаги. В случае обнаружения застрявших листов бумаги, их следует аккуратно удалить и проверить, что бумага находится в хорошем состоянии, не согнута или повреждена.
-
Ошибка «Нет изображения»
Если при сканировании вместо ожидаемого изображения на компьютере отображается ошибка «Нет изображения», следует проверить следующие аспекты:
- Убедитесь, что документ правильно помещен в лоток сканера и плотно прижат.
- Проверьте, что стекло сканера чистое и не имеет следов пыли или других загрязнений.
- Убедитесь, что сканируемый документ не имеет повреждений (согнутых углов, разлиновки и т.д.), так как это может привести к отсутствию изображения.
- Проверьте настройки сканирования в программном обеспечении сканера и убедитесь, что выбранный режим сканирования соответствует требуемым параметрам.
-
Ошибка «USB-устройство не опознано»
Если на компьютере появляется ошибка «USB-устройство не опознано», можно попробовать выполнить следующие действия:
- Подключите сканер к другому USB-порту на компьютере и проверьте, определяется ли устройство в этом случае.
- Проверьте, что кабель USB не поврежден или испорчен. Если это так, замените кабель на новый.
- Попробуйте подключить сканер к другому компьютеру, чтобы исключить возможность неисправности самого устройства.
Коды ошибок сканера Avision AD130
Сканер Avision AD130 может сообщать о проблемах и ошибках с помощью различных кодов ошибок. Знание этих кодов и их значение позволяет быстро определить причину проблемы и приступить к ее устранению.
- Код ошибки E1: этот код ошибки указывает на проблему с подачей бумаги. Проверьте, что бумага правильно загружена в лоток и нет никаких помех.
- Код ошибки E2: этот код ошибки указывает на проблему с датчиками сканера. Проверьте, что датчики не забиты и хорошо функционируют.
- Код ошибки E3: этот код ошибки указывает на проблему с подачей бумаги из лотка автоподатчика. Проверьте, что лоток правильно установлен и нет никаких помех.
- Код ошибки E4: этот код ошибки указывает на проблему с выходом бумаги. Проверьте, что бумага не застряла и нет никаких помех на выходе.
- Код ошибки E5: этот код ошибки указывает на проблему с устройством передачи бумаги. Проверьте, что устройство в положении «Включено» и нет никаких помех в механизме передачи.
- Код ошибки E6: этот код ошибки указывает на проблему с калибровкой сканера. Попробуйте перекалибровать сканер и убедитесь, что все датчики правильно работают.
- Код ошибки E7: этот код ошибки указывает на проблему с USB-подключением. Проверьте, что USB-кабель правильно подключен и нет никаких проблем с USB-портом.
Если вы обнаружили какой-либо код ошибки на сканере Avision AD130, обратитесь к руководству пользователя или свяжитесь с технической поддержкой, чтобы получить дополнительную информацию и помощь в устранении проблемы.
Проблемы с загрузкой документов в сканер
В процессе работы с принтерами возникают различные проблемы, в том числе и с загрузкой документов в сканер Avision AD130. Ниже перечислены некоторые из проблем, которые могут возникнуть, а также возможные решения для них:
-
Сканер не реагирует на нажатие кнопки «Сканировать»
Если сканер не реагирует на нажатие кнопки «Сканировать», следует проверить следующие моменты:
- Убедитесь, что сканер правильно подключен к компьютеру и включен.
- Проверьте, есть ли достаточно свободного места на жестком диске компьютера для сохранения отсканированных документов.
- Убедитесь, что драйверы сканера установлены и обновлены.
-
Неверное отображение или ошибка в отсканированном документе
Если отсканированный документ отображается неправильно или возникают ошибки, следует учесть следующие моменты:
- Проверьте настройки сканера, возможно, они настроены неправильно. Убедитесь, что выбрано правильное разрешение сканирования и формат файла.
- Проверьте состояние документа, может быть он поврежден или загрязнен.
- Попробуйте обновить драйверы сканера до последней версии или переустановить их.
-
Сканер зависает или работает медленно
Если сканер зависает или работает медленно, следует обратить внимание на следующие аспекты:
- Убедитесь, что сканер не перегружен большим количеством документов для сканирования. Очистите лоток от документов.
- Проверьте связь между компьютером и сканером. Убедитесь, что кабель USB правильно подключен и не поврежден.
- Попробуйте очистить временные файлы и папки на компьютере.
- Удалите неиспользуемые программы и файлы с компьютера, чтобы освободить ресурсы.
-
Ошибка при загрузке документа в лоток сканера
Если возникает ошибка при загрузке документа в лоток сканера, следует принять следующие меры:
- Убедитесь, что документ правильно поставлен в лоток сканера. Убедитесь, что документ не смят или загрязнен.
- Проверьте установку бумаги в лоток сканера. Убедитесь, что размер бумаги соответствует настройкам сканера.
- В случае продолжающейся ошибки, попробуйте перезагрузить сканер и компьютер.
- Проверьте наличие обновленных драйверов сканера и, если необходимо, установите их.
Если проблема с загрузкой документов в сканер не удается решить самостоятельно, рекомендуется обратиться в сервисный центр производителя.
Проблемы с подключением сканера к компьютеру
При подключении сканера Avision AD130 к компьютеру могут возникнуть следующие проблемы:
-
Отсутствие подключения. Проверьте, правильно ли подключен сканер к компьютеру. Убедитесь, что кабель USB надежно и правильно подключен к обоим устройствам.
-
Неправильное распознавание сканера компьютером. Если компьютер не определяет подключенный сканер, попробуйте подключить его к другому порту USB. Также проверьте, чтобы USB-порт был работоспособен.
-
Драйверы сканера. Убедитесь, что на компьютере установлены соответствующие драйверы для сканера Avision AD130. Если драйверы не установлены, загрузите их с официального сайта производителя или диска, поставляемого в комплекте с устройством. Периодически обновляйте драйверы для обеспечения стабильной работы сканера.
-
Проблемы с программным обеспечением. Если сканер подключен корректно, но не работает, возможно, проблема в использованном программном обеспечении. Убедитесь, что вы используете совместимое программное обеспечение для работы со сканером Avision AD130. Если программное обеспечение установлено и все настройки корректны, попробуйте переустановить его или обратиться в службу поддержки.
Если указанные рекомендации не помогли в решении проблемы с подключением сканера к компьютеру, рекомендуется обратиться в службу технической поддержки производителя для получения дополнительной помощи.
Проблемы со сканированием и качеством изображения
- 1. Низкое качество изображения
Если качество сканирования низкое и изображение выглядит размытым или пикселизированным, проверьте следующие причины:
- Установите более высокое разрешение сканирования. Высокое разрешение обеспечивает более четкое изображение. Однако, учтите, что более высокое разрешение также занимает больше места на компьютере.
- Проверьте состояние стекла и линзы сканера. Если они загрязнены, это может привести к плохому качеству изображения. Очистите стекло и линзу, используя мягкую ткань и очищающее растворение.
- Убедитесь, что освещение в помещении достаточное. Недостаточное освещение может привести к плохому качеству изображения. Попробуйте установить дополнительное освещение или использовать встроенную подсветку сканера.
- Если вы сканируете фотографии, убедитесь, что они находятся в хорошем состоянии и не имеют повреждений. Поврежденные фотографии могут давать низкое качество изображения.
- 2. Проблемы с цветовым представлением
Если цвета на сканированном изображении отображаются неправильно или мутно, попробуйте следующие рекомендации:
- Установите правильный профиль цвета для сканируемого изображения. Это позволит достичь точного цветового представления и избежать искажений.
- Проверьте настройки цвета в программе управления сканером. Убедитесь, что они соответствуют требованиям задачи сканирования. Неправильные настройки могут привести к неправильному цветовому представлению.
- 3. Проблемы с выравниванием документа
Если сканируемые документы постоянно выходят не выровненными или наклонными, попробуйте следующие шаги:
- Проверьте, что документы правильно и аккуратно размещены на стекле сканера. Убедитесь, что они находятся ровно и не смещены.
- Проверьте настройки автоматического выравнивания в программе управления сканером. Убедитесь, что эта функция включена и работает корректно.
- Проверьте, что стекло сканера и подачник документов свободны от грязи и пыли. Грязь и пыль могут мешать корректному выравниванию документов.
Тержел грустить оборки хлебнуть.
Решение других проблем и ошибок сканера Avision AD130
Помимо уже описанных в предыдущих разделах проблем и ошибок, у сканера Avision AD130 могут возникать и другие неполадки. В этом разделе представлены решения для некоторых из них:
- Проблемы с подключением
- Убедитесь, что кабель USB надежно подключен как к сканеру, так и к компьютеру.
- Попробуйте использовать другой порт USB на компьютере или другой USB-кабель, чтобы исключить возможность неисправности порта или кабеля.
- Установите последнюю версию драйвера для сканера, которую можно скачать с официального сайта производителя.
- Проблемы с программным обеспечением
- Перезагрузите компьютер и сканер.
- Обновите программное обеспечение до последней доступной версии.
- Проверьте настройки программы на соответствие требованиям и рекомендациям производителя сканера.
- Плохое качество сканирования
- Очистите стекло сканера и убедитесь, что на нем нет пыли или грязи.
- Проверьте настройки сканирования в программном обеспечении на предмет неправильной установки разрешения, цветовой палитры или других параметров.
- Обратитесь к руководству пользователя сканера для выполнения калибровки или других процедур оптимизации качества изображения.
- Проблемы с питанием
- Проверьте, что сканер подключен к источнику питания и сетевой розетке надежно.
- Проверьте состояние кабеля питания и убедитесь, что он не поврежден.
- Попробуйте использовать другой кабель питания или другую сетевую розетку, чтобы исключить возможность неисправности кабеля или розетки.
- Проблемы с загрузкой документов
- Убедитесь, что документ правильно помещен на стекло сканера и не смещается во время процесса сканирования.
- Очистите стекло сканера и подачу документов от пыли или грязи.
- Убедитесь, что просматриваемая область корректно выровнена и установлена для правильного размера документа.
Если у вас возникли проблемы с подключением сканера Avision AD130 к компьютеру, проверьте следующее:
Если у вас возникают проблемы с программным обеспечением, используемым вместе со сканером Avision AD130, попробуйте следующие действия:
Если вы обнаружили, что качество сканирования сканера Avision AD130 оставляет желать лучшего, попробуйте следующие рекомендации:
Если сканер Avision AD130 не включается или постоянно отключается, вам может потребоваться выполнить следующие действия:
Если у вас возникают проблемы с загрузкой документов во время сканирования, обратите внимание на следующие рекомендации:
Если указанные решения не решают проблемы сканера, рекомендуется обратиться в службу технической поддержки производителя для получения более подробной помощи и консультации.
AD130
Компактный и простой в использовании сканер
Combining a flatbed scanner with the convenience of a 50-page ADF, the Avision AD130 is a compact and affordable productivity scanning solution delivering 30 pages per minute and 60 images per minute at 300 dpi. The combination of high productivity and affordability makes this series the obvious choice for reducing the total cost of scanning.
-
ОСОБЕННОСТИ
-
СПЕЦИФИКАЦИЯ
-
загрузки
-
FAQ
Product Details
В сканере AD130 используется CIS (контактный датчик изображения) технология и лампа LED как источник света. Благодаря автоподатчику на 50 листов сканер может обрабатывать односторонние и двухсторонние документы одновременно. Скорость сканирования составляет 30 страниц или 60 изображений в минуту, Сканер оснащен удобной функцией обрезки изображений. С этой функцией документы различных размеров, такие как фотографии, удостоверения личности или визитные карточки могут быть помещены на планшет, и сканер в состоянии обрезать и создать изображения согласно первоначальным размерам документов за одно сканирование. Для опытных пользователей, которые хотят управлять параметрами настройки сканирования AD130, пользовательский интерфейс TWAIN предлагает различные полезные функции, для улучшения качества изображения включая автоматическую обрезку и выравнивание, автоматическое определение цвета и т.д.
▍More Information
Сканер AD130 комплектуется TWAIN и ISIS драйверами, а также мощными приложениями, включающими Avision Button Manager, AvScan X и PaperPort 14. С помощью программы Button Manager Вы можете отсканировать документы в формате PDF, JPEG, BMP или GIF, и отправить их на электронную почту, принтер или другое приложение.
▎Сертификационный знак
Где купить
| Общая спецификация | |
| Технология |
Contact Image Sensor (CIS) |
|---|---|
| Источник света |
LED |
| Режим подачи документов |
Flatbed and ADF |
| Оптическое разрешение (т/д) |
1200 |
| Output Resolution (dpi) |
1200 |
| Форматы файлов |
BMP, PNG, GIF, JPEG, Single-Page PDF, Multi-Page PDF, Multi-TIFF, TIFF, RTF, TXT, OCR( for iScan only ), XPS, DOC, XLS, PPT, DOCS, XLSX, PPTX, HTML |
| Полутоновые узоры |
Dither and Error Diffusion |
| Режим оттенков серого |
16-bit input 8-bit output |
| Цветовой режим |
48-bit input 24-bit output |
| Размер памяти |
64MB SDRAM |
| Размеры (ШхГхВ) |
453 x 324 x 237 mm ( 17.8 x 12.8 x 9.3 in. ) |
| Вес |
4.3 kg ( 9.5 lb. ) |
| Интерфейс |
USB 2.0, ( USB 3.0 compatible ) |
| Потребляемая мощность |
Operation : < 16 W;Ready : < 7 W;Sleep : < 2.9 W;Off : < 0.5 W |
| Рекомендуемый дневной объём |
Up to 4,000 pages |
| Поддержка ОС |
Win 7, Win 8, Win 10 |
| Программное обеспечение в комплекте |
Button Manager, PaperPort, AVScan |
| Features | |
| Ультразвуковое обнаружение замятия бумаги |
Yes |
| Long Paper Mode |
Up to 300 dpi Color Duplex ( 120 in. ) |
| Scan Size | |
| Минимум АПД |
90 x 90 mm ( 3.5 x 3.5 in. ) |
| Максимум АПД |
216 x 356 mm ( Legal )( 8.5 x 14 in. ) |
| Ёмкость АПД |
50 sheets |
| Плотность бумаги (толщина) |
49 ~127 g/㎡ |
| Размер сканирования | |
| Ч/Б при 200 т.д., A4 |
Simplex : 40 ppm;Duplex : 80 ipm, Flatbed : 4 sec / 8 sec ( Include Backhome ) |
| Ч/Б при 300 т.д., A4 |
Simplex : 30 ppm;Duplex : 60 ipm, Flatbed : 4 sec / 8 sec ( Include Backhome ) |
| Цветной при 200 т.д., A4 |
Simplex : 40 ppm;Duplex : 80 ipm, Flatbed : 4 sec / 8 sec ( Include Backhome ) |
| Цветной при 300 т.д., A4 |
Simplex : 30 ppm;Duplex : 60 ipm, Flatbed : 4 sec / 8 sec ( Include Backhome ) |
* The above specifications may vary due to computer performance and sales regions. For further details, please consult your local distributor.
▎Фотографии продуктов
▎руководство
▎брошюра
▎программное обеспечение
| Имя | Версия | Размер | системная поддержка | Ссылка |
|---|---|---|---|---|
| PaperPort | 14 | 455.79 MB | Win XP / Vista / 7 / 8 / 10 | загрузки |
| World Card Team | V1.8.3 | 235 MB | Win XP / 7 / 8 / 10 | загрузки |
| ButtonManager V2 | V3.0.0.0 | 594 MB | Win XP / Vista / 7 / 8 / 10 | загрузки |
| AVScan X | V1.2.0.0 | 549.39 MB | win XP / Vista / 7 / 8 / 10 | загрузки |
▎Драйверы
| Имя | Версия | Размер | системная поддержка | Ссылка |
|---|---|---|---|---|
| AD130 | VB.22 | 140.03 MB | Win XP, Win Vista, Win 7, Win | загрузки |
▎Инструкция
Бумага перекашивается в сканере.
- Выровняйте направляющие для документов так, чтобы они подходили как можно ближе друг к другу, и размещайте документы так, чтобы они подавались прямо.
- Проверьте состояние подающего ролика. При необходимости следуйте инструкциям по очистке и выполните очистку.
▎Программное обеспечение
Когда я выбираю оптическое разрешение 600 dpi, функции «автоматической обрезки» и «выравнивания» будут отключены.
Поскольку для выполнения автоматической обрезки и устранения перекоса требуется много системной памяти, рекомендуется, если вы хотите выполнить функции «автоматической обрезки» и «выравнивания перекоса», выберите оптическое разрешение менее 600 dpi во избежание появления сообщения об ошибке.
Почему мое отсканированное изображение всегда получается слишком темным?
- Настройте параметры экрана на sRGB.
- Пожалуйста, отрегулируйте настройки яркости на экране с помощью прикладного программного обеспечения.
▎Аппаратное обеспечение
Бумага застревает во время сканирования.
- Откройте переднюю крышку
- Осторожно вытащите застрявшую бумагу.
- Закройте переднюю крышку.