In Linux, the error “segmentation fault (core dumped)” comes across during the execution of the script file (C, C++, Python, Java) from the terminal. The core dump is when a code performs read and write operations on a free memory location.
This article will provide multiple solutions to the above-stated “segmentation fault (core dumped)” error. The supported content of this guideline is as follows:
- Reason: Attempting the Non-Existing Memory
- Solution 1: Remove the Lock File
- Solution 2: Kill the Specific Process
Reason: Attempting the Non-Existing Memory
The main cause of this error is that you are trying to access a specific portion of memory that does not exist. For instance, when users try to read or write the elements of a non-existent array, do not define the pointer before using it or use a memory address with the same variable value. Therefore, the particular program will crash and display the “segmentation fault” error when executing the file:

The next sections contain several solutions to encounter the above error.
Solution 1: Remove the Lock File
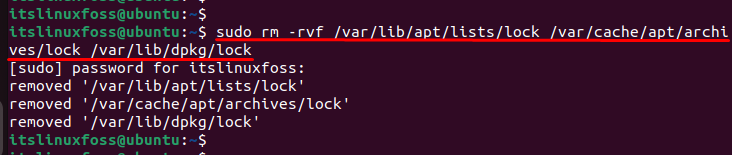
During the execution of a program, locked files are created to make the script files executable. To resolve the error, one of the solutions is to remove the lock file that attempts the non-existent memory. For removing these files, the “rm” command is used to delete the lock files:
$ sudo rm -rvf /var/lib/apt/lists/lock /var/cache/apt/archives/lock /var/lib/dpkg/lock
Let’s head over to another solution.
Solution 2: Kill the Specific Process
Users can consider another solution to resolve errors by killing the specific process. First, locate the process id stored in the “/var/lib/dpkg/lock” directory:
$ sudo lsof /var/lib/dpkg/lock
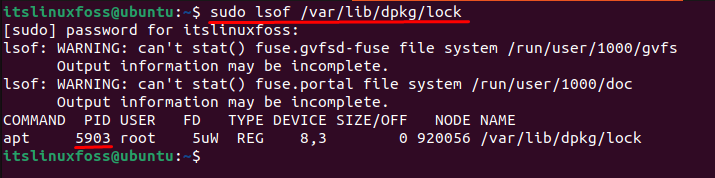
After identifying the specific process id, you can go to terminate the process. For this, the “kill” command is utilized with a “-9” signal that forcefully terminates the running process “5903”:

You can verify that the “kill” command terminates the specific process via “5903” id.
Conclusion
In Linux, the error “segmentation fault (core dumped)” occurs when the process requires additional memory that the operating system does not permit access. It can be resolved by removing the “lock” files through the “rm” command, clearing the cache repository, or killing the process via “process id”. This article has explained all possible solutions to encounter the error mentioned above.
What does it mean?
See AU: What is a segmentation fault? post and also this post which have some examples how reproduce it, SO: What is segmentation fault?.
The simplest description I can come with (may be not the perfect):
The program tried to access a memory area out side its own section. Operating system blocks it.
Some cases: Reading value with uninitialized pointer, Going out of range in an array, Function call (when backward compatibility not maintained), …
However, it is not always easy find the cause with large programs or those which relay on other project lib’s. And most of the cases end up with a bug report, either for target program or one of its dependencies (either upstream project or downstream distribution package).
How can I resolve this issue?
-
Fire a bug report
If you didn’t make any custom configuration/setup and you all updates installed. fire a bug report, see How do I report a bug?
If open source supported by Ubuntu use
ubuntu-bug(apport-bug). For 3rd party closed source, check their help pages how to report bugs and collect related data. -
Take initiative to debug
If you you have even a little programming background, it is recommended that you try your best to resolve it yourself. There many bug reports out there inactive for years. At least, you may be able to collect enough debug data that help resolve the issue when reporting it.
That’s means that you are breaking the user abstraction level and opening the black box! (FLOSS actually has transparent box).
Some Useful Tools for Debugging
Some … I mean there are many other useful tools out there that you gonna find when you dig in more.
-
apport-buglogs / core dump / backtraceIf you don’t have an error message before segmentation fault. Run it with
--saveoption and look for back-trace log:apport-bug program-cmd --save bug-report_output.txt -
gdbbacktrace / debuging source codeIf it didn’t work, use
gdb:$ gdb program-cmd (gdb) run (gdb) backtraceIf you get any error message, check the web, launchpad and in upstream project bug tracker if there any similar cases.
For some advanced users or who are following a c/c++ learning path, they could download the corresponding
-dbgsymbols packages. Then you can usegdbto trace program flow through the source and get the exact function/instruction that raise the runtime error.For Ubuntu(Debian) based distributions, source code of a package can be downloaded using:
apt-get source <package-name> -
stracesystem call tracingAnother tool that may help is
strace, I like it. It’s really a powerful tool.It presents itself:
In the simplest case
straceruns the specified command until it exits. It intercepts and records the system calls which are called by a
process and the signals which are received by a process. The name of each system call, its arguments and its return value are printed on
standard error or to the file specified with the -o option.straceis a useful diagnostic, instructional, and debugging tool. System administrators, diagnosticians and trouble-shooters will find it
invaluable for solving problems with programs for which the source is not readily available since they do not need to be recompiled in
order to trace them. Students, hackers and the overly-curious will find that a great deal can be learned about a system and its system
calls by tracing even ordinary programs. And programmers will find that since system calls and signals are events that happen at the
user/kernel interface, a close examination of this boundary is very useful for bug isolation, sanity checking and attempting to capture
race conditions.Source:
man strace -
ltracedynamic library call tracingltraceis a program that simply runs the specified command until
it
exits. It intercepts and records the dynamic library calls which are
called by the executed process and the signals which are received by
that process. It can also intercept and print the system calls exe‐
cuted by the program.Its use is very similar to
strace(1).Source:
man ltrace
The core file is normally called core and is located in the current working directory of the process. However, there is a long list of reasons why a core file would not be generated, and it may be located somewhere else entirely, under a different name. See the core.5 man page for details:
DESCRIPTION
The default action of certain signals is to cause a process to
terminate and produce a core dump file, a disk file containing an
image of the process’s memory at the time of termination. This image
can be used in a debugger (e.g., gdb(1)) to inspect the state of the
program at the time that it terminated. A list of the signals which
cause a process to dump core can be found in signal(7).…
There are various circumstances in which a core dump file is not produced:
   *  The process does not have permission to write the core file.  (By
      default, the core file is called core or core.pid, where pid is
      the ID of the process that dumped core, and is created in the
      current working directory.  See below for details on naming.)
      Writing the core file will fail if the directory in which it is to
      be created is nonwritable, or if a file with the same name exists
      and is not writable or is not a regular file (e.g., it is a
      directory or a symbolic link).
   *  A (writable, regular) file with the same name as would be used for
      the core dump already exists, but there is more than one hard link
      to that file.
   *  The filesystem where the core dump file would be created is full;
      or has run out of inodes; or is mounted read-only; or the user has
      reached their quota for the filesystem.
   *  The directory in which the core dump file is to be created does
      not exist.
   *  The RLIMIT_CORE (core file size) or RLIMIT_FSIZE (file size)
      resource limits for the process are set to zero; see getrlimit(2)
      and the documentation of the shell's ulimit command (limit in
      csh(1)).
   *  The binary being executed by the process does not have read
      permission enabled.
   *  The process is executing a set-user-ID (set-group-ID) program that
      is owned by a user (group) other than the real user (group) ID of
      the process, or the process is executing a program that has file
      capabilities (see capabilities(7)).  (However, see the description
      of the prctl(2) PR_SET_DUMPABLE operation, and the description of
      the /proc/sys/fs/suid_dumpable file in proc(5).)
   *  (Since Linux 3.7) The kernel was configured without the
      CONFIG_COREDUMP option.
In addition, a core dump may exclude part of the address space of the
process if the madvise(2) MADV_DONTDUMP flag was employed.Naming of core dump files
By default, a core dump file is named core, but the
/proc/sys/kernel/core_pattern file (since Linux 2.6 and 2.4.21) can
be set to define a template that is used to name core dump files.
The template can contain % specifiers which are substituted by the
following values when a core file is created:%% a single % character %c core file size soft resource limit of crashing process (since Linux 2.6.24) %d dump mode—same as value returned by prctl(2) PR_GET_DUMPABLE (since Linux 3.7) %e executable filename (without path prefix) %E pathname of executable, with slashes ('/') replaced by exclamation marks ('!') (since Linux 3.0). %g (numeric) real GID of dumped process %h hostname (same as nodename returned by uname(2)) %i TID of thread that triggered core dump, as seen in the PID namespace in which the thread resides (since Linux 3.18) %I TID of thread that triggered core dump, as seen in the initial PID namespace (since Linux 3.18) %p PID of dumped process, as seen in the PID namespace in which the process resides %P PID of dumped process, as seen in the initial PID namespace (since Linux 3.12) %s number of signal causing dump %t time of dump, expressed as seconds since the Epoch, 1970-01-01 00:00:00 +0000 (UTC) %u (numeric) real UID of dumped process
The «Segmentation fault (core dumped)» error is a common issue encountered by Python users, indicating that a program has attempted to access memory that it is not allowed to access. This can occur for a variety of reasons, including but not limited to accessing an uninitialized variable, attempting to read or write to read-only memory, or dereferencing a null pointer. Solving this error requires understanding the root cause of the issue, which can sometimes be difficult to determine, but with a few methods and solutions, it is possible to resolve the problem and prevent it from occurring in the future.
Method 1: Debugging with core dump
When encountering the error «Segmentation fault (core dumped)» in Python, one way to debug it is by using the core dump file. Here are the steps to do so:
-
Enable core dump file creation by running the following command in the terminal:
-
Reproduce the error that caused the segmentation fault.
-
Locate the core dump file that was created. It should be named something like
core.<process_id>. -
Load the core dump file into
gdb(GNU Debugger) by running the following command in the terminal:gdb python3 <path_to_core_dump_file> -
Once
gdbis loaded, run the following command to analyze the core dump:This will display the backtrace of the program at the time of the segmentation fault.
-
Analyze the backtrace to determine the cause of the error. Look for any function calls or memory operations that may have caused the segmentation fault.
-
Use the
printcommand ingdbto inspect the values of variables and memory addresses at the time of the error. For example, to print the value of a variable namedx, run the following command: -
Once you have identified the cause of the error, make the necessary changes to your code to fix it.
Here is an example of how to use gdb to analyze a core dump file:
$ ulimit -c unlimited
$ python3 my_program.py
Segmentation fault (core dumped)
$ gdb python3 core.1234
(gdb) bt
#0  0x00007f4a7f8d8e1e in ?? ()
#1  0x00007f4a7f8d8f73 in ?? ()
#2  0x00007f4a7f8d8f73 in ?? ()
#3  0x00007f4a7f8d8f73 in ?? ()
#4  0x00007f4a7f8d8f73 in ?? ()
#5  0x00007f4a7f8d8f73 in ?? ()
#6  0x00007f4a7f8d8f73 in ?? ()
#7  0x00007f4a7f8d8f73 in ?? ()
#8  0x00007f4a7f8d8f73 in ?? ()
#9  0x00007f4a7f8d8f73 in ?? ()
#10 0x00007f4a7f8d8f73 in ?? ()
#11 0x00007f4a7f8d8f73 in ?? ()
#12 0x00007f4a7f8d8f73 in ?? ()
#13 0x00007f4a7f8d8f73 in ?? ()
#14 0x00007f4a7f8d8f73 in ?? ()
#15 0x00007f4a7f8d8f73 in ?? ()
#16 0x00007f4a7f8d8f73 in ?? ()
#17 0x00007f4a7f8d8f73 in ?? ()
#18 0x00007f4a7f8d8f73 in ?? ()
#19 0x00007f4a7f8d8f73 in ?? ()
#20 0x00007f4a7f8d8f73 in ?? ()
#21 0x00007f4a7f8d8f73 in ?? ()
#22 0x00007f4a7f8d8f73 in ?? ()
#23 0x00007f4a7f8d8f73 in ?? ()
#24 0x00007f4a7f8d8f73 in ?? ()
#25 0x00007f4a7f8d8f73 in ?? ()
#26 0x00007f4a7f8d8f73 in ?? ()
#27 0x00007f4a7f8d8f73 in ?? ()
#28 0x00007f4a7f8d8f73 in ?? ()
#29 0x00007f4a7f8d8f73 in ?? ()
#30 0x00007f4a7f8d8f73 in ?? ()
#31 0x00007f4a7f8d8f73 in ?? ()
#32 0x00007f4a7f8d8f73 in ?? ()
#33 0x00007f4a7f8d8f73 in ?? ()
#34 0x00007f4a7f8d8f73 in ?? ()
#35 0x00007f4a7f8d8f73 in ?? ()
#36 0x00007f4a7f8d8f73 in ?? ()
#37 0x00007f4a7f8d8f73 in ?? ()
#38 0x00007f4a7f8d8f73 in ?? ()
#39 0x00007f4a7f8d8f73 in ?? ()
#40 0x00007f4a7f8d8f73 in ?? ()
#41 0x00007f4a7f8d8f73 in ?? ()
#42 0x00007f4a7f8d8f73 in ?? ()
#43 0x00007f4a7f8d8f73 in ?? ()
#44 0x00007f4a7f8d8f73 in ?? ()
#45 0x00007f4a7f8d8f73 in ?? ()
#46 0x00007f4a7f8d8f73 in ?? ()
#47 0x00007f4a7f8d8f73 in ?? ()
#48 0x00007f4a7f8d8f73 in ?? ()
#49 0x00007f4a7f8d8f73 in ?? ()
#50 0x00007f4a7f8d8f73 in ?? ()
#51 0x00007f4a7f8d8f73 in ?? ()
#52 0x00007f4a7f8d8f73 in ?? ()
#53 0x00007f4a7f8d8f73 in ?? ()
#54 0x00007f4a7f8d8f73 in ?? ()
#55 0x00007f4a7f8d8f73 in ?? ()
#56 0x00007f4a7f8d8f73 in ?? ()
#57 0x00007f4a7f8d8f73 in ?? ()
#58 0x00007f4a7f8d8f73 in ?? ()
#59 0x00007f4a7f8d8f73 in ?? ()
#60 0x00007f4a7f8d8f73 in ?? ()
#61 0x00007f4a7f8d8f73 in ?? ()
#62 0x00007f4a7f8d8f73 in ?? ()
#63 0x00007f4a7f8d8f73 in ?? ()
#64 0x00007f4a7f8d8f73 in ?? ()
#65 0x00007f4a7f8d8f73 in ?? ()
#66 0x00007f4a7f8d8f73 in ?? ()
#67 0x00007f4a7f8d8f73 in ?? ()
#68 0x00007f4a7f8d8f73 in ?? ()
#69 0x00007f4a7f8d8f73 in ?? ()
#70 0x00007f4a7f8d8f73 in ?? ()
#71 0x00007f4a7f8d8f73 in ?? ()
#72 0x00007f4a7f8d8f73 in ?? ()
#73 0x00007f4a7f8d8f73 in ?? ()
#74 0x00007f4a7f8d8f73 in ?? ()
#75 0x00007f4a7f8d8f73 in ?? ()
#76 0x000

## Method 2: Check for invalid pointers

When encountering an error like "Segmentation fault (core dumped)" in Python, one possible solution is to check for invalid pointers. Here is how to do it:

Step 1: Import ctypes library

```python
import ctypes
Step 2: Use the POINTER function to create a pointer to the Python object
obj = ctypes.py_object(your_object)
ptr = ctypes.POINTER(ctypes.py_object)(obj)
Step 3: Use the cast function to check if the pointer is valid
if ctypes.cast(ptr, ctypes.c_void_p).value == 0:
    print("Invalid pointer!")
else:
    print("Valid pointer!")
Here is an example code that puts all the steps together:
import ctypes

def check_pointer(obj):
    ptr = ctypes.POINTER(ctypes.py_object)(ctypes.py_object(obj))
    if ctypes.cast(ptr, ctypes.c_void_p).value == 0:
        print("Invalid pointer!")
    else:
        print("Valid pointer!")

my_list = [1, 2, 3]
check_pointer(my_list)
This code creates a function check_pointer that takes an object as input and checks if its pointer is valid. The function is then used to check the pointer of a Python list.
Note that this method is not foolproof and may not work in all cases. It is always a good idea to debug the code and identify the root cause of the segmentation fault.
Method 3: Avoid using uninitialized variables
When you encounter the error «Segmentation fault (core dumped)» in Python, it usually means that there is a problem with memory access. One of the common causes is using uninitialized variables. Here is how to fix this error by avoiding uninitialized variables.
Step 1: Declare Variables
First, declare all the variables that you will use in your program. Make sure to initialize them with some values. For example:
Step 2: Use Variables
Next, use the variables in your program. Make sure to assign values to them before using them. For example:
x = 10
y = 20
z = x + y
print(z)
Step 3: Check for Uninitialized Variables
To avoid using uninitialized variables, you can use the is operator to check if a variable has a value assigned to it. For example:
Step 4: Use Default Values
If you have a function that takes arguments, you can use default values to avoid using uninitialized variables. For example:
def my_function(x=0, y=0):
    z = x + y
    return z
Step 5: Initialize Arrays
If you are using arrays, make sure to initialize them with some values. For example:
Step 6: Use Try-Except Blocks
If you are using external libraries or modules, you can use try-except blocks to catch any errors and handle them gracefully. For example:
import some_module

try:
    result = some_module.do_something()
except Exception as e:
    print("Error:", e)
By following these steps, you can avoid using uninitialized variables and fix the «Segmentation fault (core dumped)» error in Python.
Method 4: Use memory-safe functions
When working with Python, you may encounter the error «Segmentation fault (core dumped)» which can be caused by a variety of issues, including memory-related errors. To fix this error, you can use memory-safe functions in your Python code.
Step 1: Import the ctypes Library
The ctypes library provides a way to access C libraries from Python, which can be useful for working with memory-safe functions. To import the ctypes library, use the following code:
Step 2: Define the Memory-Safe Function
To define a memory-safe function, you can use the ctypes library to create a wrapper around a C function. This wrapper will handle memory allocation and deallocation, ensuring that your Python code is safe from memory-related errors.
Here is an example of how to define a memory-safe function:
def safe_function(arg1, arg2):
    c_lib = ctypes.CDLL("libc.so.6")
    c_lib.some_c_function.restype = ctypes.c_int
    c_lib.some_c_function.argtypes = [ctypes.c_int, ctypes.c_int]
    result = c_lib.some_c_function(arg1, arg2)
    return result
In this example, some_c_function is a C function that takes two integer arguments and returns an integer value. The argtypes attribute specifies the types of the arguments, and the restype attribute specifies the return type.
Step 3: Call the Memory-Safe Function
Once you have defined your memory-safe function, you can call it from your Python code. Here is an example of how to call the safe_function defined in Step 2:
result = safe_function(10, 20)
print(result)
In this example, safe_function is called with two integer arguments (10 and 20), and the result is printed to the console.
Method 5: Use a debugger such as gdb
To fix the error «Segmentation fault (core dumped)» in Python, you can use a debugger such as gdb. Here’s a step-by-step guide on how to do it:
-
First, make sure you have gdb installed on your system. You can check by running the command
gdb --version. -
Next, run your Python script with gdb by typing
gdb pythonfollowed by the name of your script. For example,gdb python myscript.py. -
Once you’re in the gdb prompt, set a breakpoint at the start of your script by typing
break main. -
Run your script by typing
run. -
When the program crashes, gdb will stop at the breakpoint you set. Type
btto get a backtrace of the crash. -
Look for the line that caused the crash in the backtrace. It will be marked with an arrow (
=>). For example:
#0 0x0000555555554b01 in main (argc=2, argv=0x7fffffffe1d8) at myscript.py:3
=> #1 0x00007ffff7a3f0b3 in __libc_start_main (main=0x555555554a30, argc=2, argv=0x7fffffffe1d8, init=<optimized out>, fini=<optimized out>, rtld_fini=<optimized out>, stack_end=0x7fffffffe1c8) at ../csu/libc-start.c:308-
Use the
upcommand to move up the stack to the function that caused the crash. For example,up 1will move up one level in the stack. -
Once you’ve found the function that caused the crash, use the
printcommand to inspect the variables and values at that point in the code. For example,print myvarwill print the value of the variablemyvar. -
Use the
stepcommand to step through the code one line at a time. For example,stepwill step to the next line of code. -
Continue stepping through the code until you find the source of the error. Once you’ve found it, you can use the
quitcommand to exit gdb.
That’s it! Using gdb to debug your Python script can be a powerful tool in fixing errors like «Segmentation fault (core dumped)».

This error may strike your Ubuntu at any point at the moment. A few days ago when I was doing my routine work in my Ubuntu laptop, suddenly I encountered with an error “Segmentation fault ( core dumped)” then I got to know that, this error can strike you Ubuntu or any other operating system at any point of the moment as binaries crashing doesn’t depend on us.
Segmentation fault is when your system tries to access a page of memory that doesn’t exist. Core dumped means when a part of code tries to perform read and write operation on a read-only or free location. Segfaults are generally associated with the file named core and It generally happens during up-gradation.

While running some commands during the core-dump situation you may encounter with “Unable to open lock file” this is because the system is trying to capture a bit block which is not existing, This is due to the crashing of binaries of some specific programs.
You may do backtracking or debugging to resolve it but the solution is to repair the broken packages and we can do it by performing the below-mentioned steps:
Command-line:
Step 1: Remove the lock files present at different locations.
sudo rm -rf /var/lib/apt/lists/lock /var/cache/apt/archives/lock /var/lib/dpkg/lock and restart your system h.cdccdc
Step 2: Remove repository cache.
Step 3: Update and upgrade your repository cache.
sudo apt-get update && sudo apt-get upgrade
Step 4: Now upgrade your distribution, it will update your packages.
sudo apt-get dist-upgrade
Step 5: Find the broken packages and delete them forcefully.
sudo dpkg -l | grep ^..r | apt-get purge
Apart from the command line, the best way which will always work is:
Step 1: Run Ubuntu in startup mode by pressing the Esc key after the restart.
Step 2: Select Advanced options for Ubuntu

Step 3: Run Ubuntu in the recovery mode and you will be listed with many options.

Step 4: First select “Repair broken packages”

Step 5: Then select “Resume normal boot”
So, we have two methods of resolving segmentation fault: CLI and the GUI. Sometimes, it may also happen that the “apt” command is not working because of segfault, so our CLI method will not work, in that case also don’t worry as the GUI method gonna work for us always.