You can use the Screaming Frog SEO Spider for free (and paid) to check for broken links (the http response ‘404 not found error’) on your website.
Below is a very quick and easy tutorial on how to use the tool as a broken link checker. First of all, you’ll need to download the SEO Spider which is free for crawling up to 500 URLs. You can download via the green button in the right hand side bar.
You can crawl more than 500 URLs with the paid version. The next steps to find broken links within your website can be viewed in our video, and tutorial below.
1) Crawl The Website
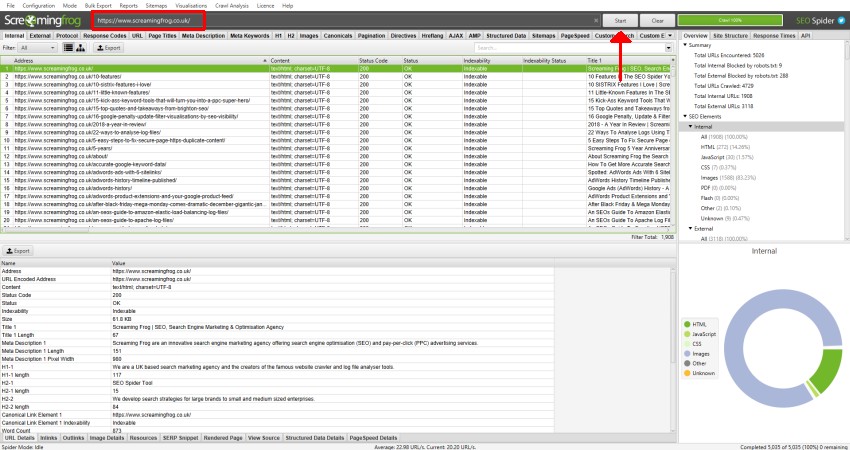
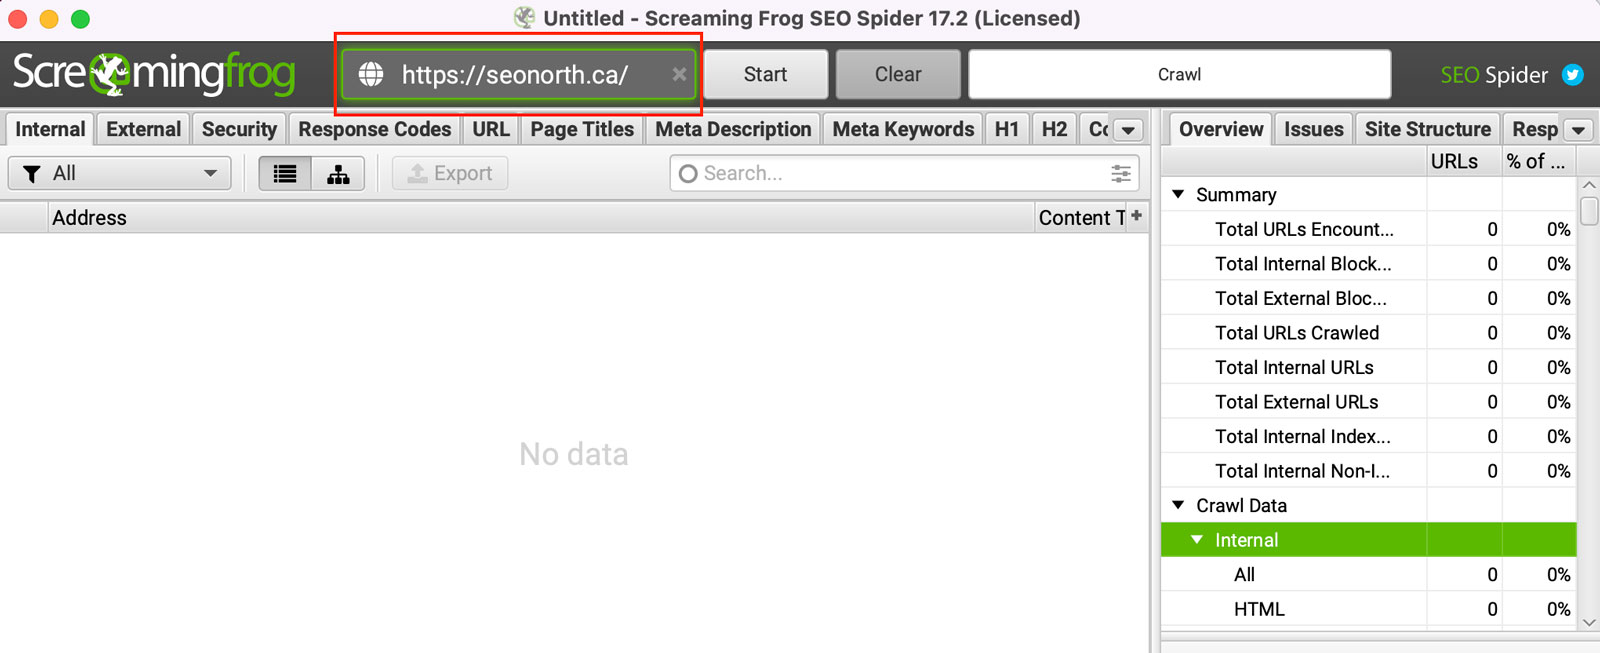
Open up the SEO Spider, type or copy in the website you wish to crawl in the ‘Enter URL to spider’ box and hit ‘Start’.
2) Click The ‘Response Codes’ tab & ‘Client Error (4XX)’ Filter To View Broken Links
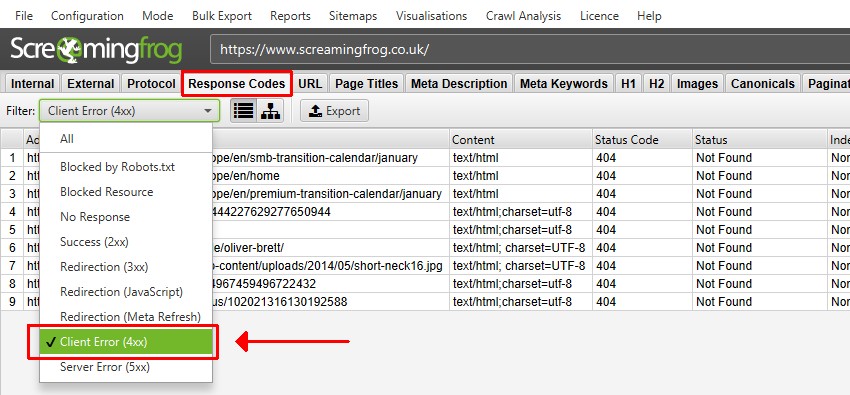
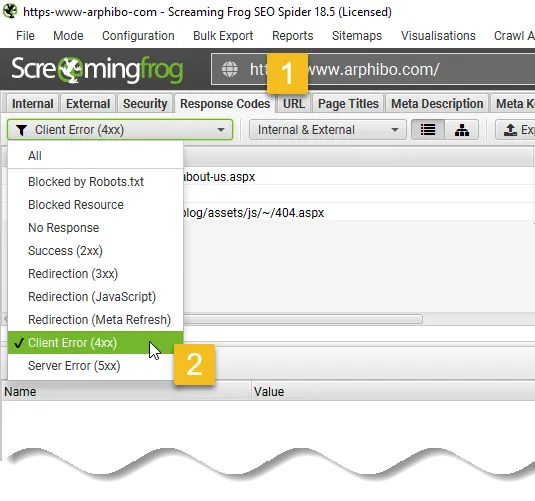
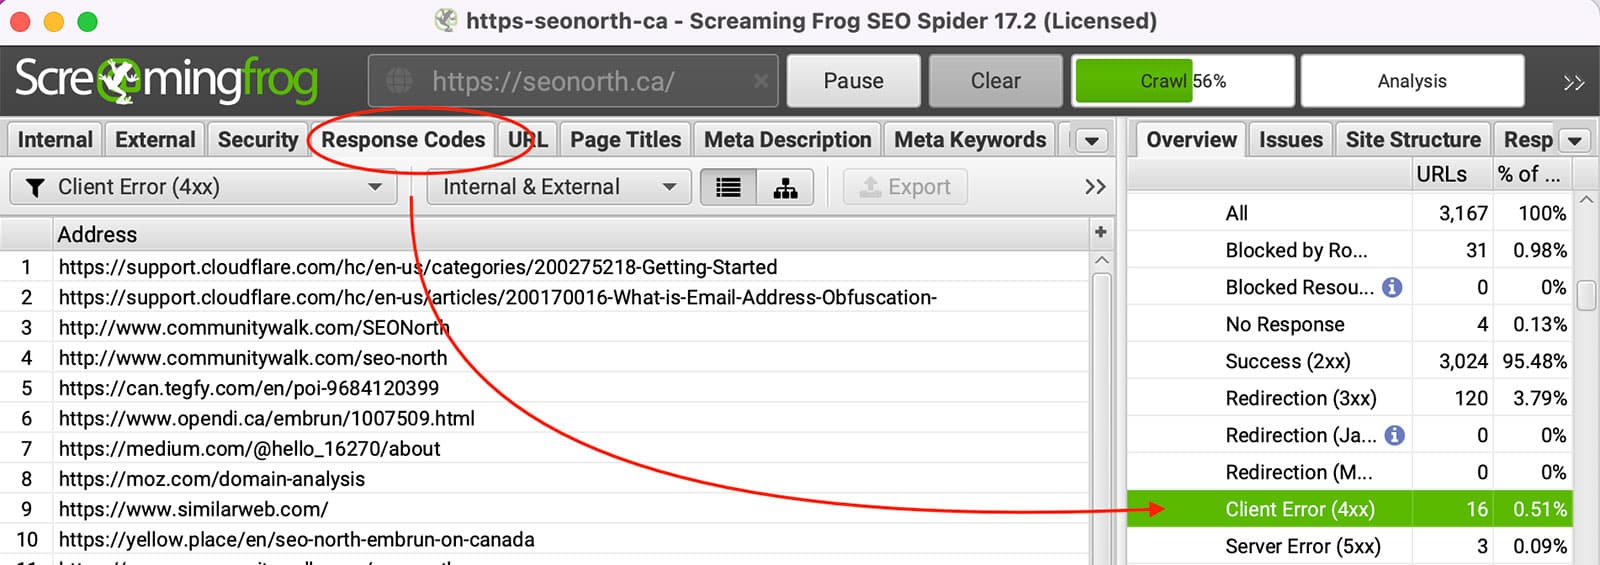
You can wait until the crawl finishes and reaches 100%, or you can just view 404 broken links while crawling by navigating to the ‘Response Codes’ tab and using the filter for ‘Client Error 4XX’.
There are two ways to do this, you can simply click on the ‘tab’ at the top and use the drop down filter –
Alternatively you can use the right-hand window crawl overview pane and just click directly on ‘Client Error (4xx)’ tree view under the ‘Response Codes’ folder. They both show the same results, regardless of which way you navigate.

This crawl overview pane updates while crawling, so you can see there number of client error 4XX links you have at a glance. In the instance above, there are 9 client errors which is 0.18% of the links discovered in the crawl.
3) View The Source Of The Broken Links By Clicking The ‘Inlinks’ Tab
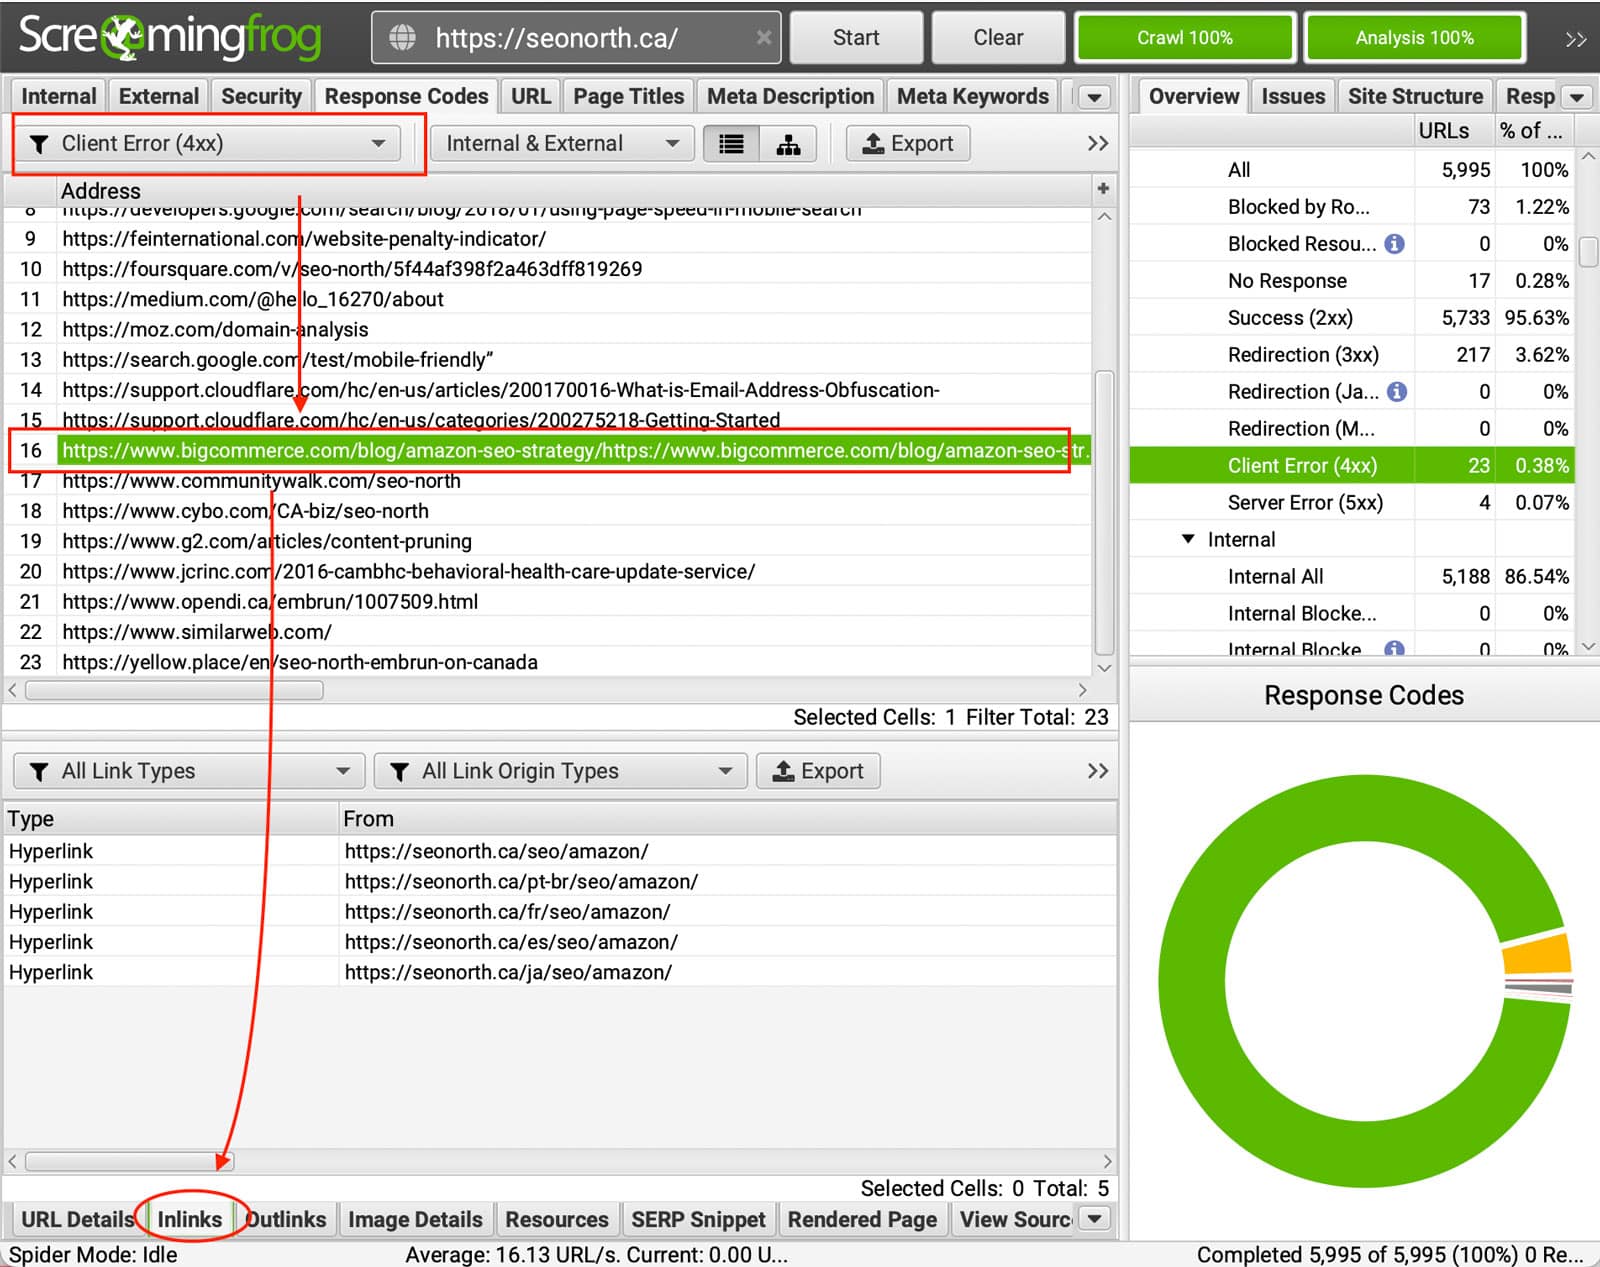
Obviously you’ll want to know the source of the broken links discovered (which URLs on the website link to these broken links), so they can be fixed. To do this, simply click on a URL in the top window pane and then click on the ‘Inlinks’ tab at the bottom to populate the lower window pane.

You can click on the above to view a larger image. As you can see in this example, there is a broken link to the BrightonSEO website (https://www.brightonseo.com/people/oliver-brett/), which is linked to from this page – https://www.screamingfrog.co.uk/2018-a-year-in-review/.
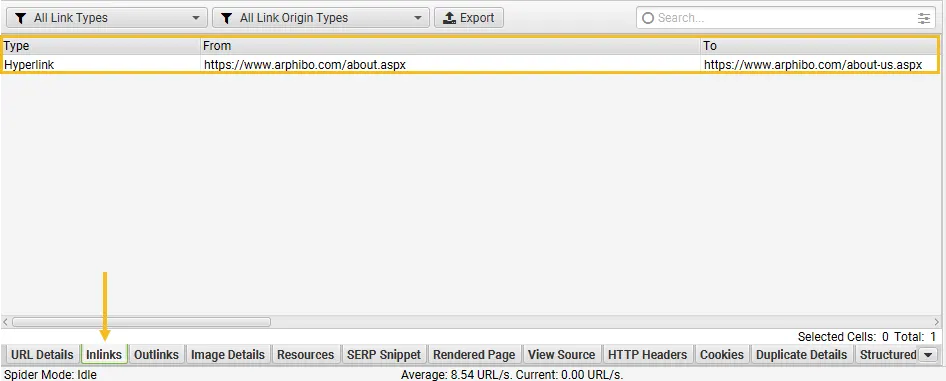
Here’s a closer view of the lower window pane which details the ‘inlinks’ data –

‘From’ is the source where the 404 broken link can be found, while ‘To’ is the broken link. You can also see the anchor text, alt text (if it’s an image which is hyperlinked) and whether the link is followed (true) or nofollow (false).
It looks like the only broken links on our website are external links (sites we link out to), but obviously the SEO Spider will discover any internal broken links if you have any.
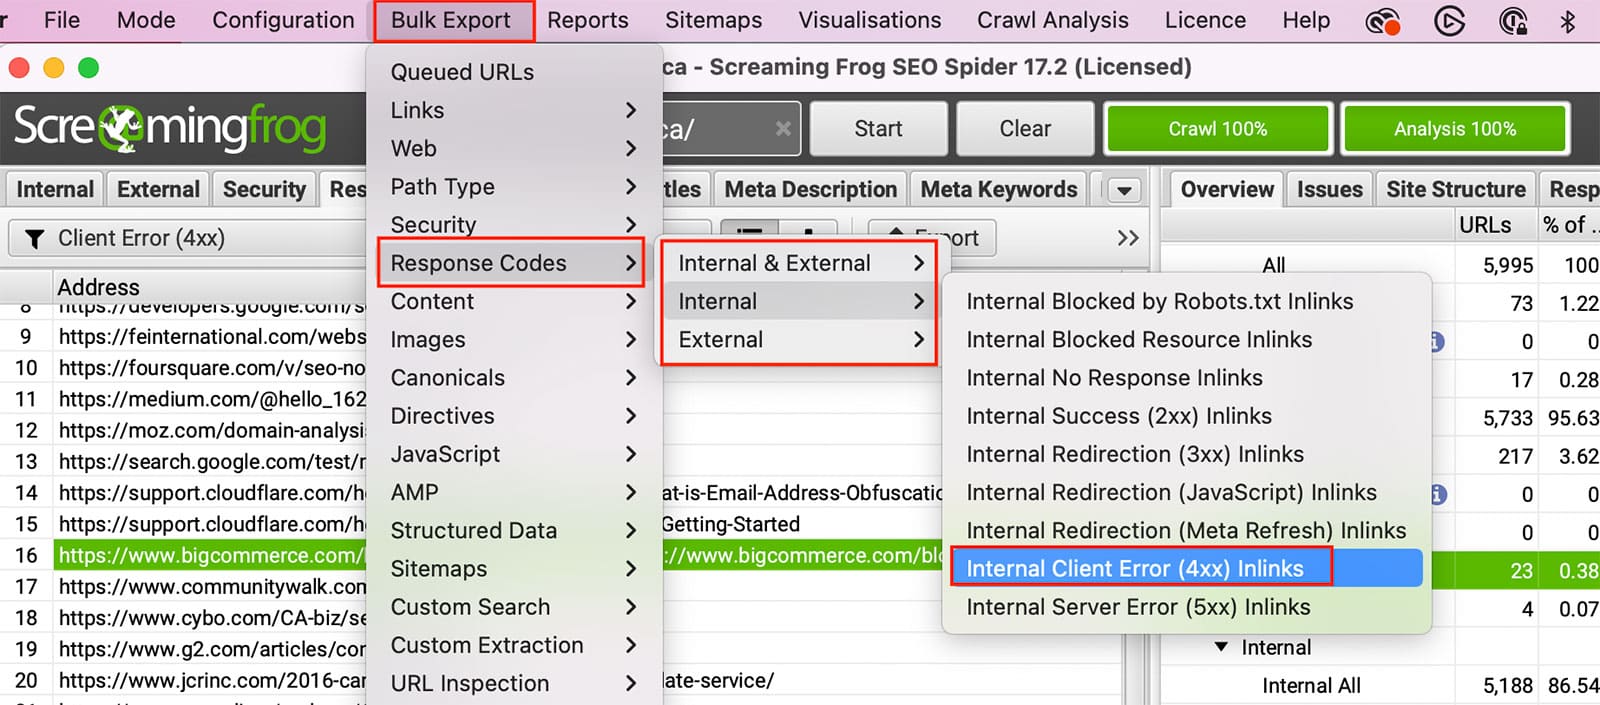
4) Use The ‘Bulk Export > Response Codes > Client Error (4XX) Inlinks’ Export
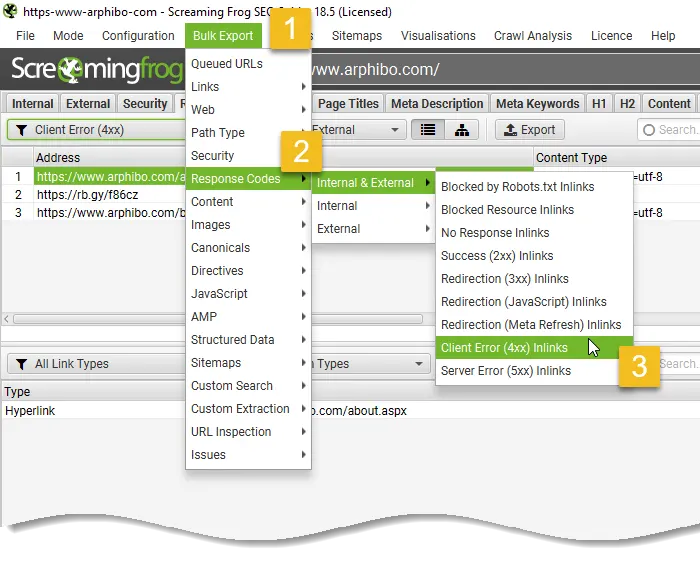
If you’d rather view the data in a spreadsheet you can export both the ‘source’ URLs and ‘broken links’ by using the ‘Bulk Export’, ‘Response Codes’ and ‘Client Error (4XX) Inlinks’ option in the top level menu.

This should cover the majority of cases for finding broken links on a website.
However, the ‘source’ URL is the very last page to link to the 404 error page. So there might be times that the ‘source’ is a redirect (and possibly in a chain of redirects). You can see if the ‘source’ is a redirect as the ‘Type’ column will say ‘HTTP Redirect’ for example.
To quickly find the original source page of these errors, we recommend using the ‘All Redirects‘ export under ‘Reports > Redirects > All Redirects’. Open up the report and filter the ‘final status code’ column to ‘404’. The ‘Source’ is the original source page, the ‘address’ is the last source, and the ‘final address’ is the 404 URL.
There’s a number of ways you can export data from the SEO Spider, so please read our user guide on exporting.
Crawling A List Of URLs For Broken Links
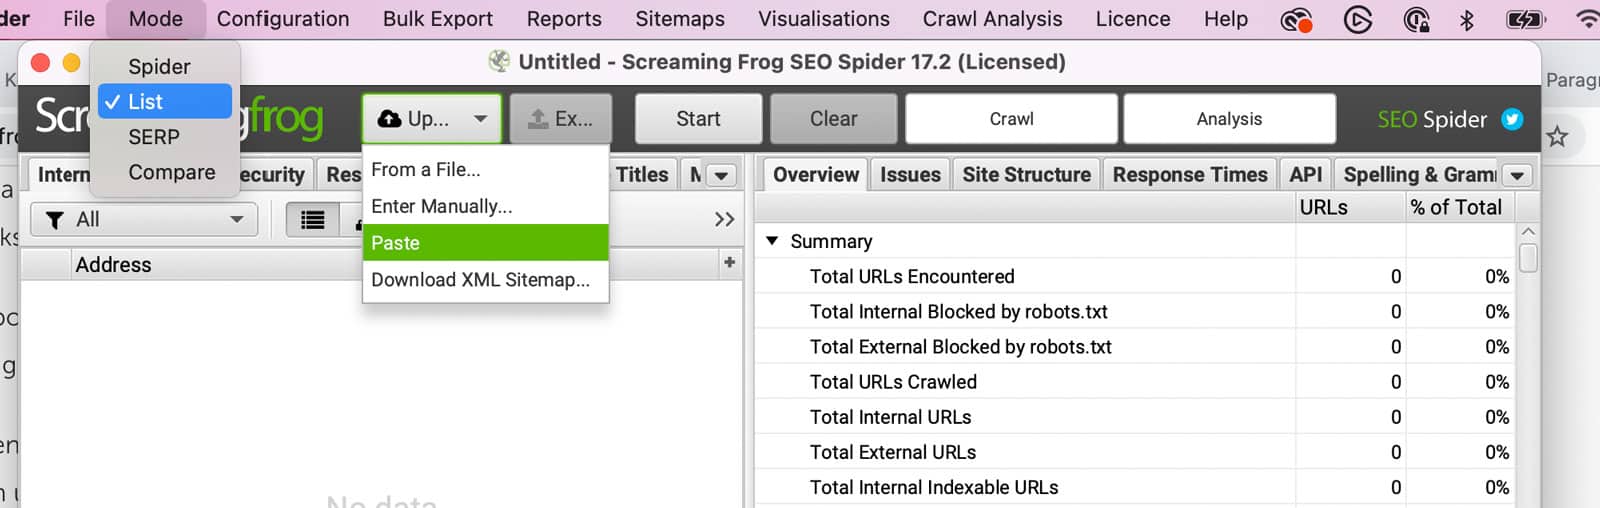
Finally, if you have a list of URLs you’d like to check for broken links instead of crawling a website, then you can simply upload them in list mode.
To switch to ‘list’ mode, simply click on ‘mode > list’ in the top level navigation and you’ll then be able to choose to paste in the URLs or upload via a file.

Find Broken ‘Jump Links’
Jump links are a useful way to link users to a specific part of a webpage using named anchors on a link, also referred to as ‘bookmarks’, ‘named anchors’ and ‘skip links’.
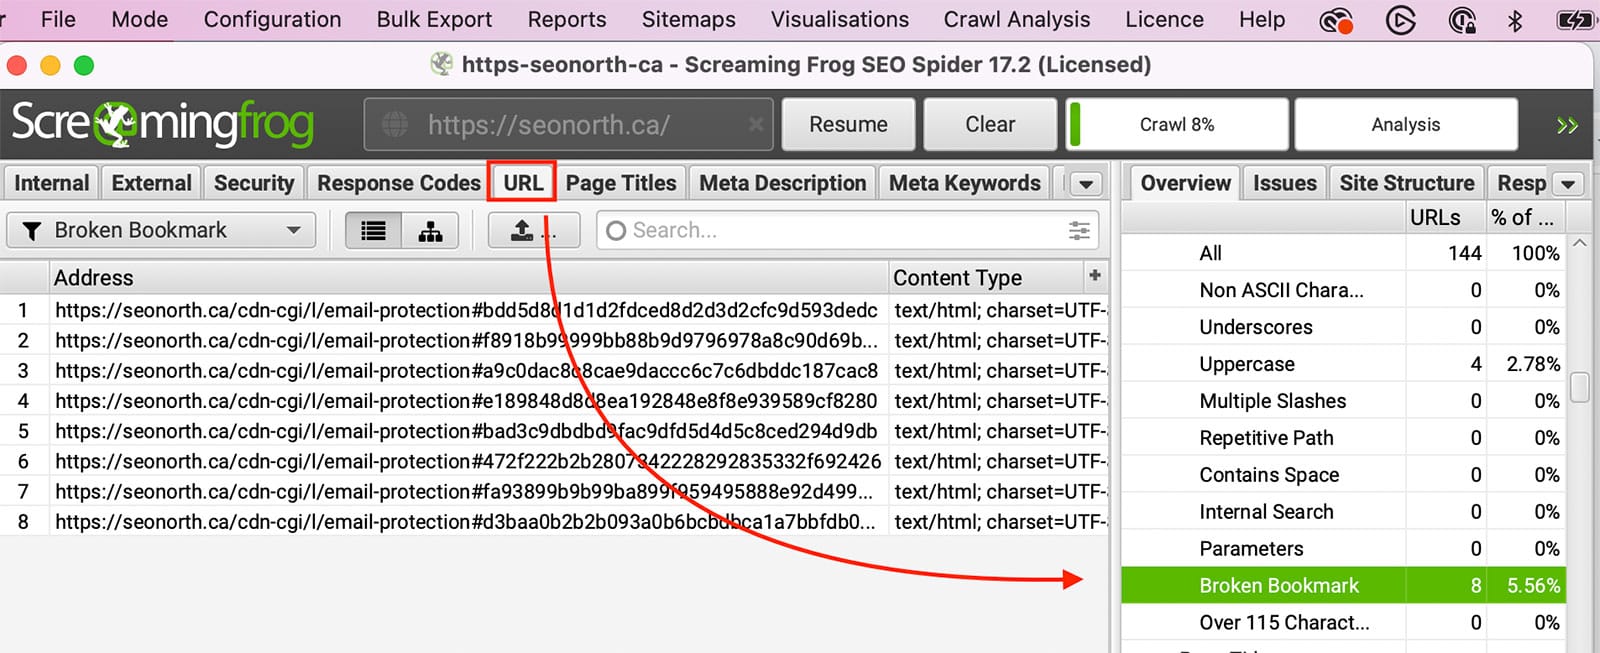
These broken bookmarks can’t be found in the same way as above, as they don’t respond with a 404 status code, and they often go unnoticed.
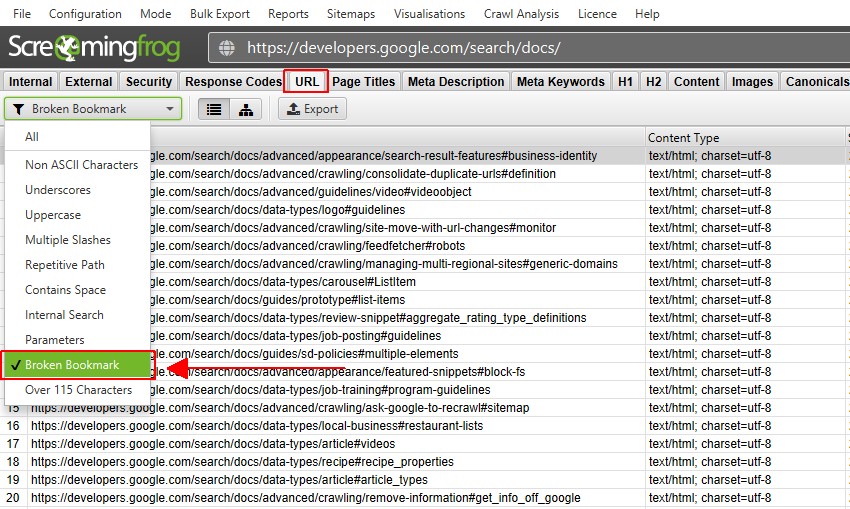
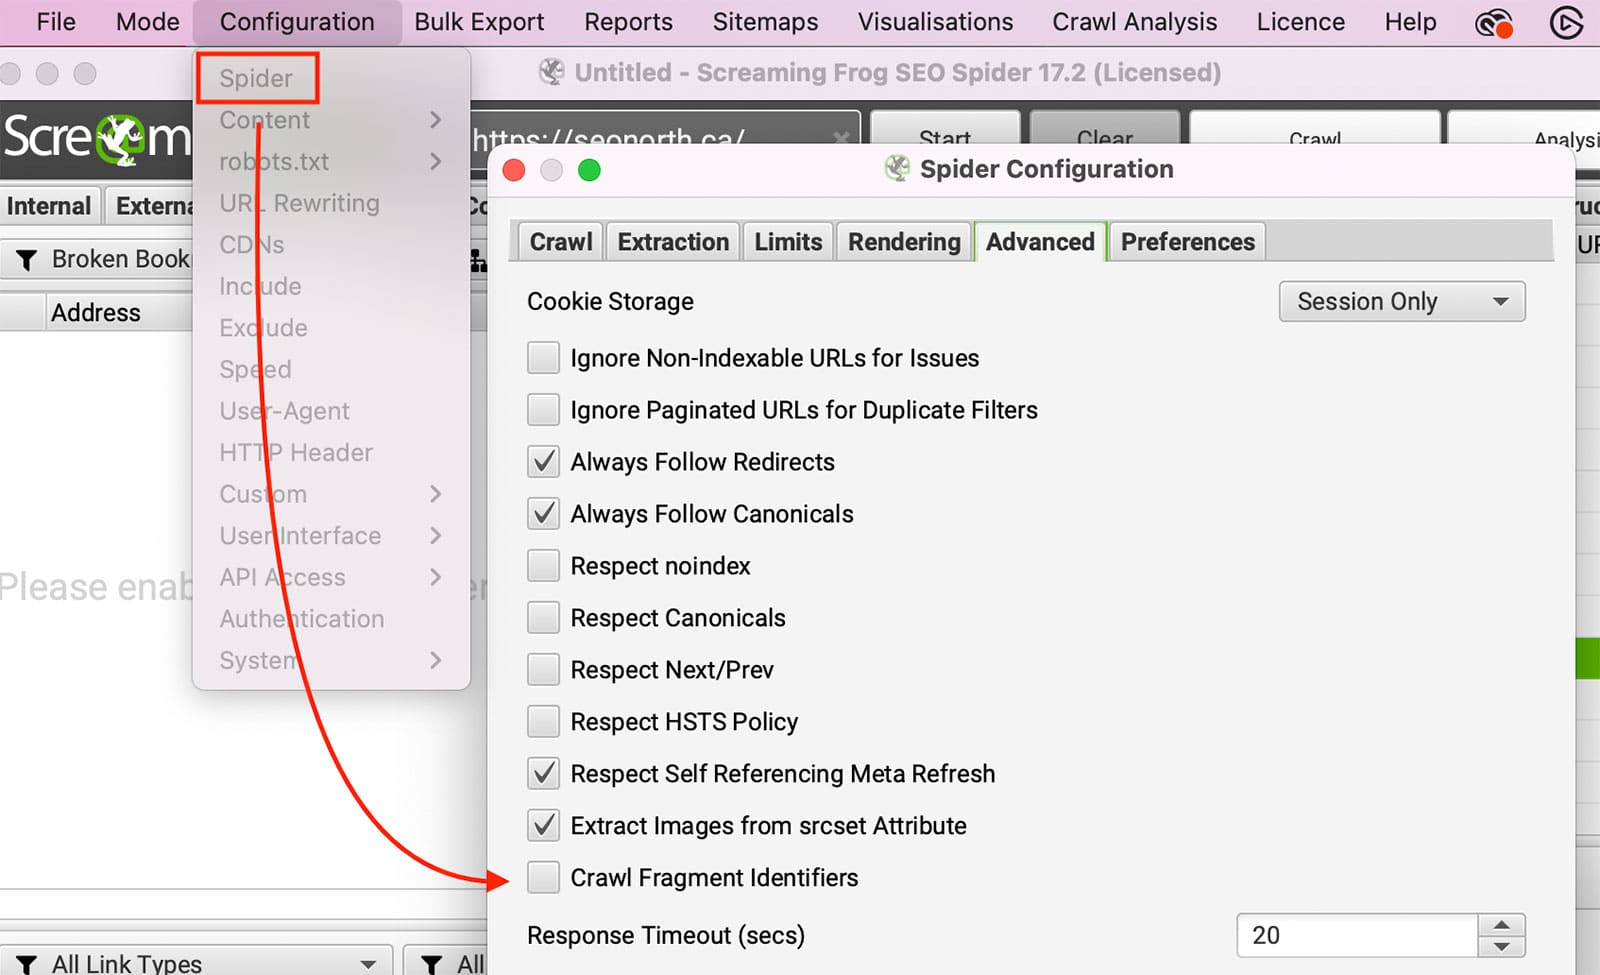
You’ll need to enable ‘Crawl Fragment Identifiers’ located in ‘Config > Spider > Advanced’, crawl the website and then view them under the ‘URL’ tab and ‘Broken Bookmark’ filter.
Read our tutorial on finding broken jump links for a full walk-through.
Hopefully the above guide helps illustrate how to use the SEO Spider tool to check for broken links efficiently.
Please also read our Screaming Frog SEO spider FAQs and full user guide for more information.
If you are like us, then you hate broken links. They can be so frustrating and annoying, not to mention they can hurt your website’s SEO. Lucky for us, a great tool called Screaming Frog can help us find and fix broken links.
Screaming Frog SEO Spider is a website crawler that helps improve onsite SEO. The crawler helps in extracting and auditing website data to fix common SEO issues.
In this post, we will show you how you can use Screaming Frog’s SEO Spider to find and fix these broken links(404). But before we understand how to locate these, let us first understand what they are and why are they bad for SEO.
What are Broken Links?
A broken link directs the user to a web page that can’t be found or can’t be accessed on the server, for various reasons. These links are often called “dead links” or “404 code”.
Also Read: The SEO’s Guide to HTTP Status Codes
There are two types of Broken Links (404):
- Hard 404s: These are the regular type of “404 errors” that you typically find. It tells both the user and the search engines that the page does not exist.
- Soft 404s: A soft 404 occurs when a page displays “404” or “not found” error to the users but returns a 200 OK status to search engines. This makes the search engines assume that there is a page at that location and they waste time crawling such pages.
So lets see how to find out broken links in your website using Screaming Frog’s SEO Spider tool:
Step 1: Crawl your website
The first thing you need to do is crawl your site using Screaming Frog SEO Spider.
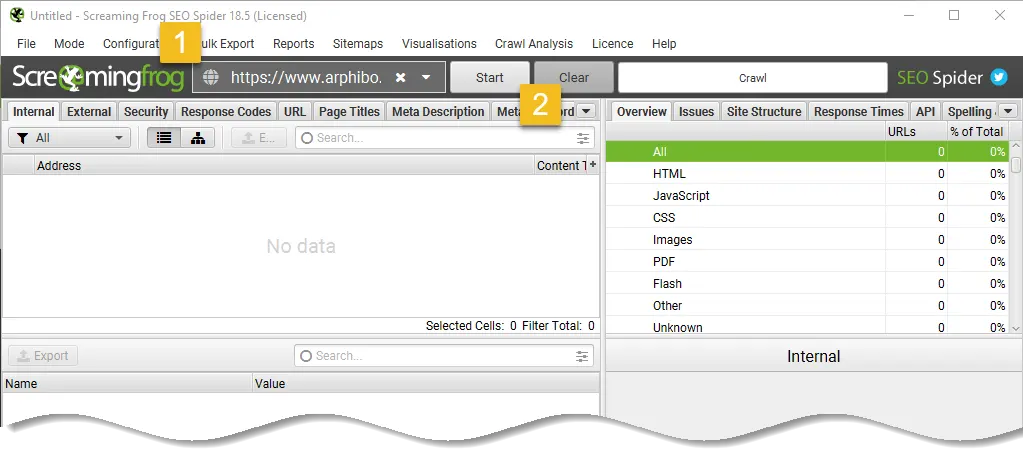
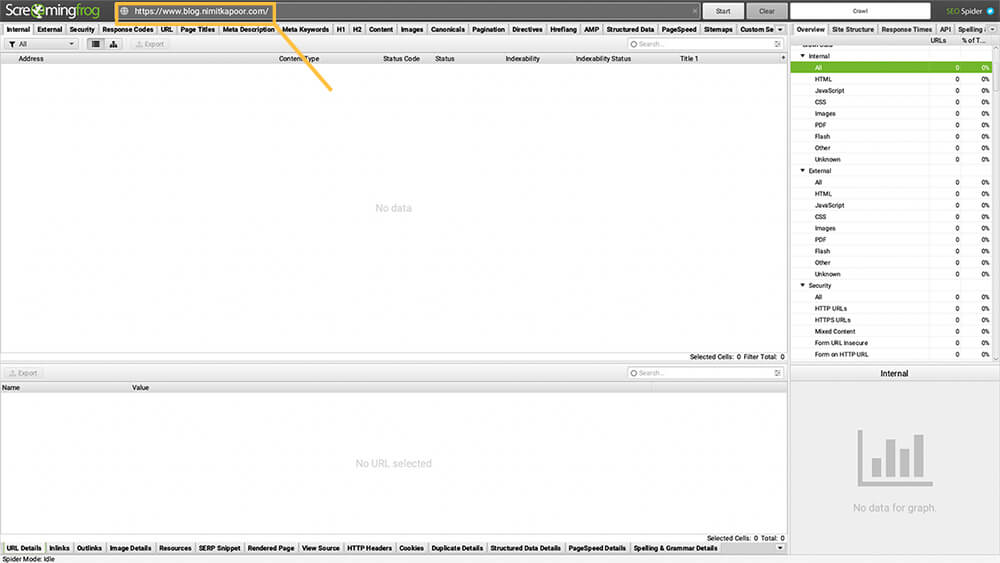
This is simple. Just put in your URL and click the “Start” button at the top of the screen.
When your crawl is done, you will see 100% at the bottom right corner of the application.
Now it’s time for the fun stuff.
Step 2: Set filters to view broken links
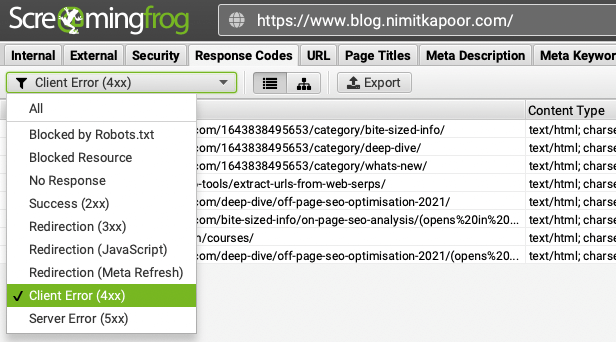
Once the crawling has finished, Click on Response Code at the top navigation and then from the filter select Client Error (4xx).
Step 3: Fixing broken links you found with Screaming Frog
There are two ways to fix broken links you found in Screaming Frog.
Method # 1 – Dealing with broken links manually
If you only have a few 404 entries in your Status Code column, click on one of them. Then click “Inlinks” at the bottom of your screen.
The “From” field shows you the page your bad link is on.
The “To” field shows you where it’s linking to on your site. (“To” isn’t working, hence the 404.)
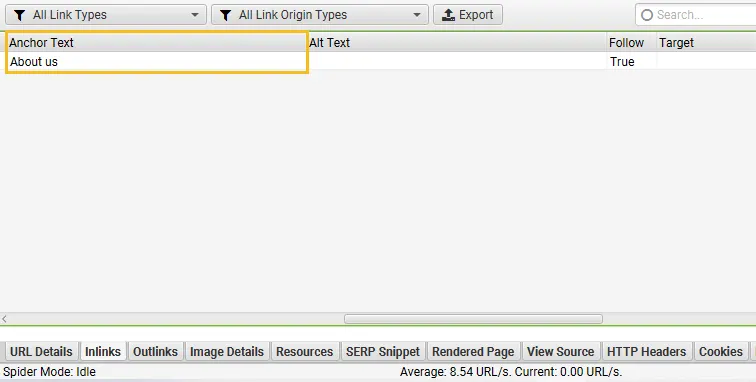
“Anchor Text” is usually the text that contains the link. With this information, go to the page and fix the link. Either remove it or point it somewhere that works.
Method # 2 – Dealing with broken links in bulk
To fix 404 errors in bulk, you’ll want to export your inlinks from Screaming Frog.
To do this, go to “Bulk Export” – it’s in your main navigation, at the top of your screen and choose “Response Codes,” then “Client Error (4xx) Inlinks.”
This will give you a spreadsheet of all broken links you found with Screaming Frog.
Now open this spreadsheet in Excel. Here’s what you’ll see:
“Source” is the page with the broken link on it. “Destination” is the place it’s pointing to that doesn’t work.

Now it’s time to fix this. Either go to the source page and change where it’s pointing, or fix an issue with the destination page.
That’s it! You have now used Screaming Frog to find and fix broken links on your website.
How often should you check for 404 errors?
You should be checking your 404s at least once every month and on a bigger site, every week.
It doesn’t really depend on how much visitors you have but much more on how much content you have and create and how much can go wrong because of that.
The first time you start looking into and trying to fix your 404 error pages you might find out that there are a lot of them and it can take quite a bit of time. Try to make it a habit so you will at least find the important ones quickly.
Similar articles you may like
- Link Google Search Console with Google Analytics
- Bing Webmaster Tools – A Quick tutorial for Beginners
- Set Up Google Analytics 4: A Step-by-Step Guide
- Robots.txt and SEO: Everything You Need to Know
Sunil Pradhan
Hi there 👋 I am a front-end developer passionate about cutting-edge, semantic, pixel-perfect design. Writing helps me to understand things better.

If you’re like me, then you hate broken links. They can be so frustrating and annoying, not to mention they can hurt your website’s SEO. Lucky for us, a great tool called Screaming Frog can help us find and fix broken links. In today’s post, I’ll show you how to use Screaming Frog to find broken links on your website. Stay tuned!
Table of Contents
- How to find and fix Broken Links using Screaming Frog
- Install Screaming Frog
- Crawl The Website
- Response Code Tab >> Client Error 4XX
- Inspecting broken links
- Using Bulk Export to Fix 4XX Errors
- Finding Broken Bookmarks
- Checking Fixed Links
- Conclusion
- FAQ
How to find and fix Broken Links using Screaming Frog
-
Install Screaming Frog

Installing Screaming Frog is a pretty simple process. Just head over to the website and download the latest software version. Once the download is complete, open the file and follow the on-screen instructions. The whole process should only take a few minutes. After installation is complete, launch Screaming Frog. Now that you know how to install Screaming Frog let’s move on to the next section.
-
Crawl The Website

To use screaming frog, enter the URL of the website you want to crawl and hit start. The program will then go through the website and collect data on broken links or other technical errors on a website.
-
Response Code Tab >> Client Error 4XX

Once you have started a crawl of your website, there are several ways to view the progress and results. You can wait until the crawl is finished and has reached 100%, or you can view broken links while the crawl is still in progress by navigating to the “Response Codes” tab and using the “Client Error 4XX” filter.
When you sort by 4XX errors in Screaming Frog, you can see which requests result in errors and take action to fix them. Fixing broken links can help improve your website’s user experience and prevent potential customers from getting frustrated and leaving.
-
Inspecting broken links

To use this tool, click on a URL in the top window pane and click on the “Inlinks” tab at the bottom. This filter will populate the lower window pane with all the pages that link to the broken URL. You can quickly identify which pages on your site link to the broken URL and fix the issue.
-
Using Bulk Export to Fix 4XX Errors

Screaming Frogs GUI is excellent, but sometimes I prefer working in Excel; I like this because when I fix a link, I delete it from the spreadsheet, which is helpful when you have over 100+ broken links to repair.
To Export in Bulk, go to the Navigation >> click on Bulk Export >> Response Codes >> Pick if you want to export Internal, External, or both >> Then select Client Error (4XX) Links.
-
Finding Broken Bookmarks
You can find Broken Bookmarks (jump links); these are typically found in the Table of Contents.
You find broken links by going to URL >> Broken Bookmarks.
If you see this warning:
Please enable ‘Crawl Fragment Identifiers’ option in order to populate this filter.
You’ll need to enable ‘”Crawl Fragment Identifiers” located in Configuration >> Spider >> Advanced tab >> Crawl Fragment Identifiers.

-
Checking Fixed Links

After fixing all the backlinks, you can paste the broken links and the page URLs on which Screaming Frog found the broken links. This crawl will ensure you didn’t miss any broken links and that every page was appropriately fixed.
Conclusion
If you’re still having trouble finding and fixing broken links on your website, please don’t hesitate to contact us. Our team of experts can help you get your website back in perfect working order – and keep it that way. Thanks for reading, and we hope our guide has been helpful!
FAQ
-
Where is the 404 error in Screaming Frog?
-
Where are the broken images in Screaming Frog?
Published on: 2022-09-24
Updated on: 2022-10-28

Isaac Adams-Hands
Isaac Adams-Hands is the SEO Director at SEO North, a company that provides Search Engine Optimization services. As an SEO Professional, Isaac has considerable expertise in On-page SEO, Off-page SEO, and Technical SEO, which gives him a leg up against the competition.
You’re reading an article online and click on one of the links in the post only to find that the page that the article links to cannot be found. This is because of Broken Links and it’s SEO best practice to regularly check your website for such links and fix them.
In this post, I’ll show you how you can use Screaming Frog’s Free SEO Spider to find and fix these broken links/404s. But before we understand how to locate these, let us first understand what they are and why are they bad for SEO.
What are Broken Links?
A broken link directs the user to a web page that can’t be found or can’t be accessed on the server, for various reasons. These links are often called “dead links”, “HTTP 404” or “404 code”.
There are two types of Broken Links or 404s:
- Hard 404s: These are the regular type of “404 errors” that you typically find. It tells both the user and the search engines that the page does not exist.
- Soft 404s: A soft 404 occurs when a page displays “404” or “not found” error to the users but returns a 200 OK status to search engines. This makes the search engines assume that there is a page at that location and they waste time crawling such pages.
What can be the reason for Broken Links?
Broken links can occur due to a various number of reasons:
- The website owner has misspelled the URL.
- The website owner has recently deleted a page without setting up a redirect.
- The site is no longer available (is offline or has been moved to a new location).
- Links to content that has been moved or deleted.
Do Broken Links affect SEO?
Before we talk about whether or not broken links affect your website’s SEO, let’s look at them from the user’s perspective.
Directing users to pages that no longer exist is not a good user experience. And if the user runs into a lot of them on your site, they would probably never want to visit your site again.
Consider this scenario:
You have an events management business. A person looking to host an event lands on your website from Google. They go through the services that you provide and are ready to discuss business with you.
They click on the Contact Us button and are redirected to a page that does not exist. You just lost a potential customer due to a broken link.
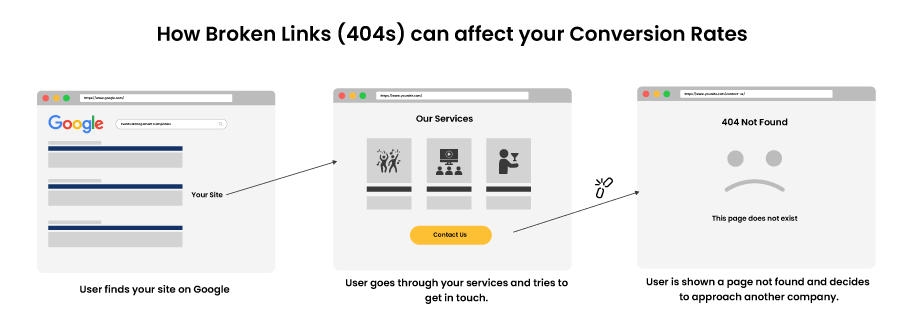
Broken links can negatively impact your conversion rates. So it’s extremely important to find and fix them on a regular basis.
Broken Links or 404 errors are not a ranking factor but they can cause a drop in rankings.
How?
The more broken links your website has, the harder it will be for search engine crawlers to crawl your website. They also won’t be able to pass around link equity. This can negatively impact your website’s SEO.
If users leave your website after encountering a 404 – you can also have extremely high bounce rates.
How to use Screaming Frog to find Broken Links?
Screaming Frog SEO Spider is a website crawler that helps improve onsite SEO. The crawler helps in extracting and auditing website data to fix common SEO issues.
The free version of SEO Spider lets you crawl and analyse up to 500 URLs. So you can use this as a free broken link checker tool.
You can purchase a license and remove this limit or you can analyse your links in batches and make do with the free version.
You can download the Screaming Frog SEO Spider from here.
So lets see how to find out broken links in your website using Screaming Frog’s SEO Spider tool:
Step 1: Crawl your Website
Just enter your website’s URL in the search bar and click on Start to start crawling your website.
Step 2: Set Filters to View Broken Links
Once the crawling has finished, Click on Response Code at the top navigation and then from the filter select Client Error (4xx).
Step 3: Analyse the Broken Links
Now it’s time to start analysing your 404 errors. The thing that you’ll want to know to fix these errors is the source (which pages on your website have these broken links). To find these, simply click on the URL in the list and then select Inlinks in the bottom navigation.
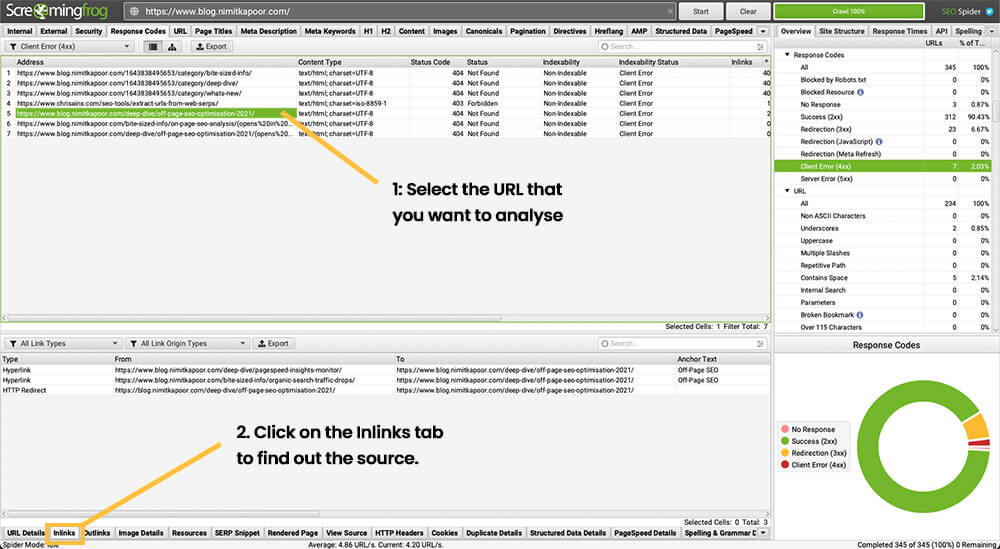
In this example, you can see that 3 pages on my website (https://www.blog.nimitkapoor.com/deep-dive/pagespeed-insights-monitor/), (https://www.blog.nimitkapoor.com/bite-sized-info/organic-search-traffic-drops/) and (https://blog.nimitkapoor.com/deep-dive/off-page-seo-optimisation-2021/) link to a page (https://www.blog.nimitkapoor.com/deep-dive/off-page-seo-optimisation-2021/) that cannot be found.
Note: The last one is a redirect from non-www to www version.
I had moved this page to another URL (updated 2022 version) but forgot to change the links in the other posts that linked to this one. But imagine if there were 50 or 100 posts that had an internal link to this post. It’s extremely time-consuming to go to each of these posts and update the URL there.
The easiest way to fix these errors is to set up a 301 redirect (permanently moved). This type of redirect indicates that the page has permanently moved to another location and all the link equity of the old URL is passed on to the redirected page.
There are different ways to set up a 301 redirect, just jump to the section that works for you:
Jump to Section:
- Set up a 301 redirect using cPanel
- Set up a 301 redirect using htaccess
- Set up a 301 redirect on WordPress
- Set up a 301 redirect on Wix
- Set up a 301 redirect on Shopify
How to set up a 301 redirect using cPanel
If you have access to cPanel through your hosting, then you can add 301/302 redirects easily using cPanel. This will automatically add all the necessary code for the redirect to the htaccess file.
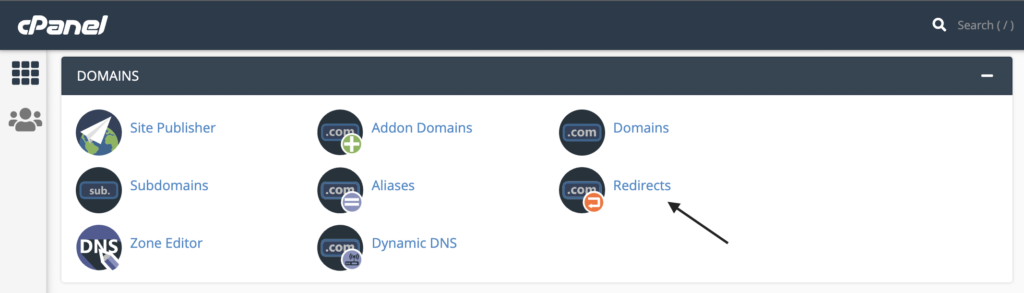
Step 1: Log in to your cPanel and click on Redirects
Step 2: Enter your old and new URL details.
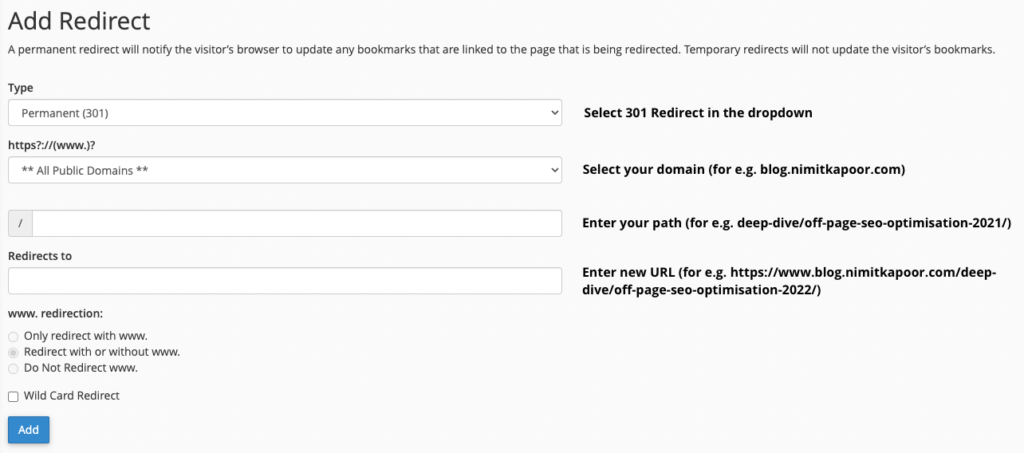
Click on Add/Save and that’s it. Your redirect will start working.
How to set up a 301 redirect using htaccess
Find your .htaccess file and add the following code:
Redirect 301 /oldpage.html http://www.example.com/newpage.htmlReplace oldpage with the URL that you want to redirect and http://www.example.com/newpage.html with the URL that you want the oldpage to be redirected to.
For instance, we want to redirect https://www.blog.nimitkapoor.com/deep-dive/off-page-seo-optimisation-2021/ to https://www.blog.nimitkapoor.com/deep-dive/off-page-seo-optimisation-2022/ so the code will look something like this:
Redirect 301 /deep-dive/off-page-seo-optimisation-2021/ https://www.blog.nimitkapoor.com/deep-dive/off-page-seo-optimisation-2022/How to set up a 301 redirect on WordPress
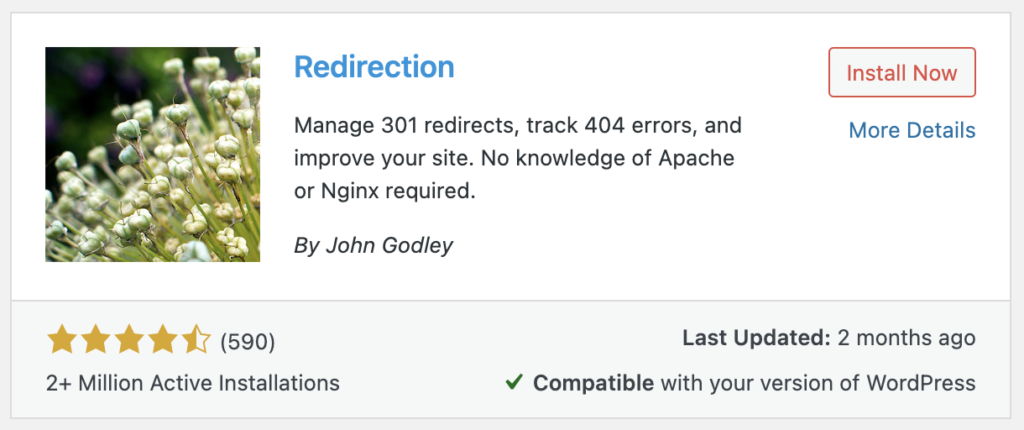
Step 1: Download a Redirection Plugin
Just search for a Redirection plugin and install it.
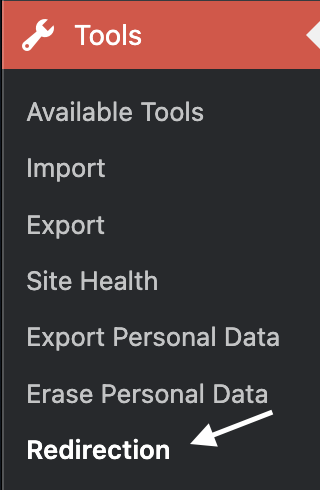
Step 2: Open the Plugin Settings
Step 3: Set up the Redirection
Setting up the redirect is pretty straightforward. Just enter the URL that you want to redirect in the Source URL. And the URL that you want the old URL to be redirected to in the target URL.

How to set up a 301 redirect on Wix
It’s extremely easy to set up a 301 redirect on Wix.
Step 1: Just open your SEO Tools
Go to your SEO Tools section and select the site that you’re working on.
Step 2: Click on URL Redirect Manager

Step 3: Create a New Redirect
Click on Create New Redirect and just enter your Source (old) and Target (new) URLs.
Click on Save and it’s done! Your old URL will now redirect to the new URL.
How to set up a 301 redirect on Shopify
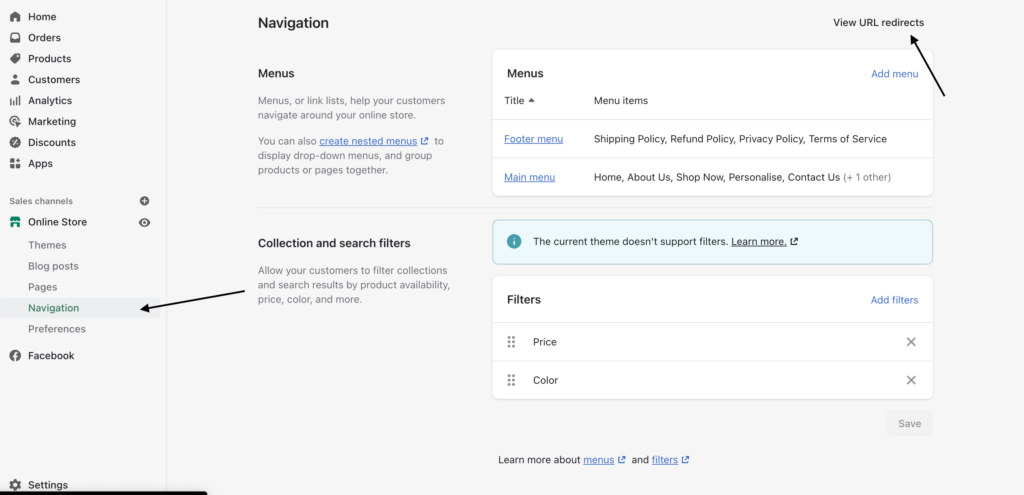
Step 1: Go to your Online Store’s Navigation
Click on Navigation and then Click on View URL Redirects.
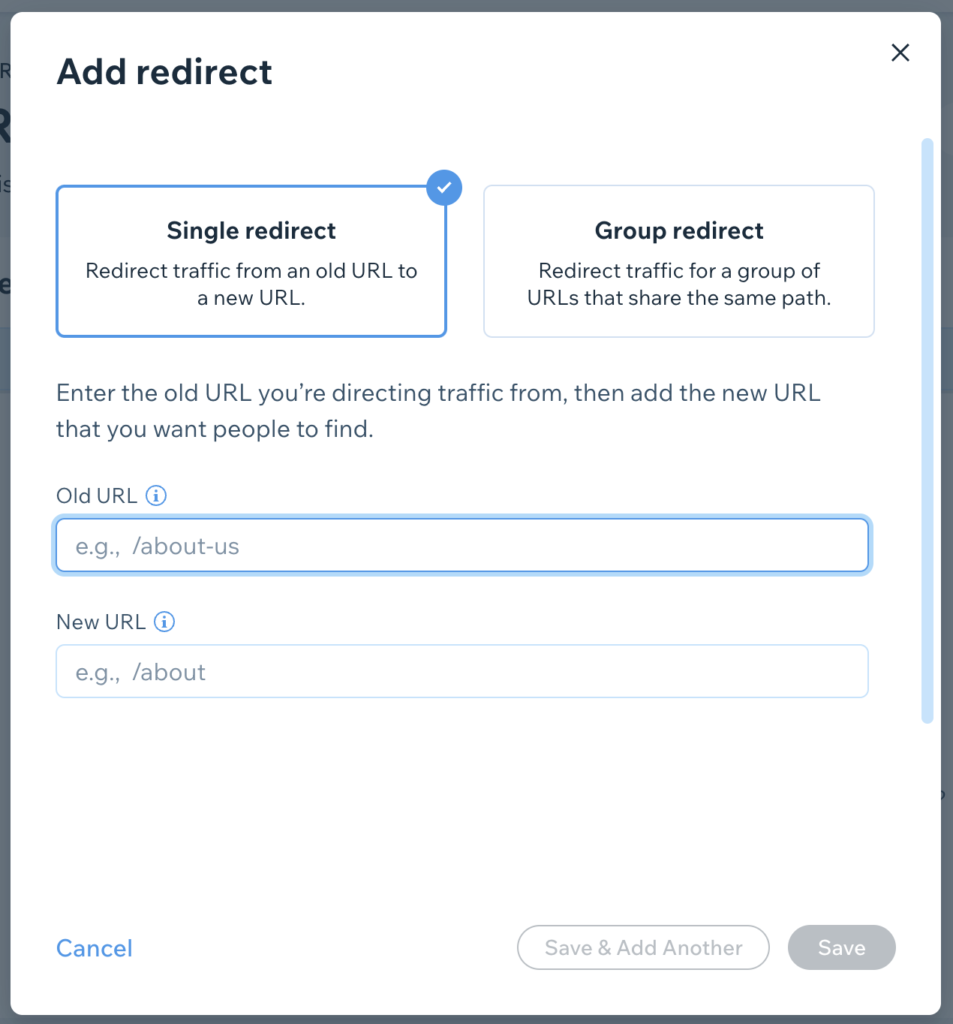
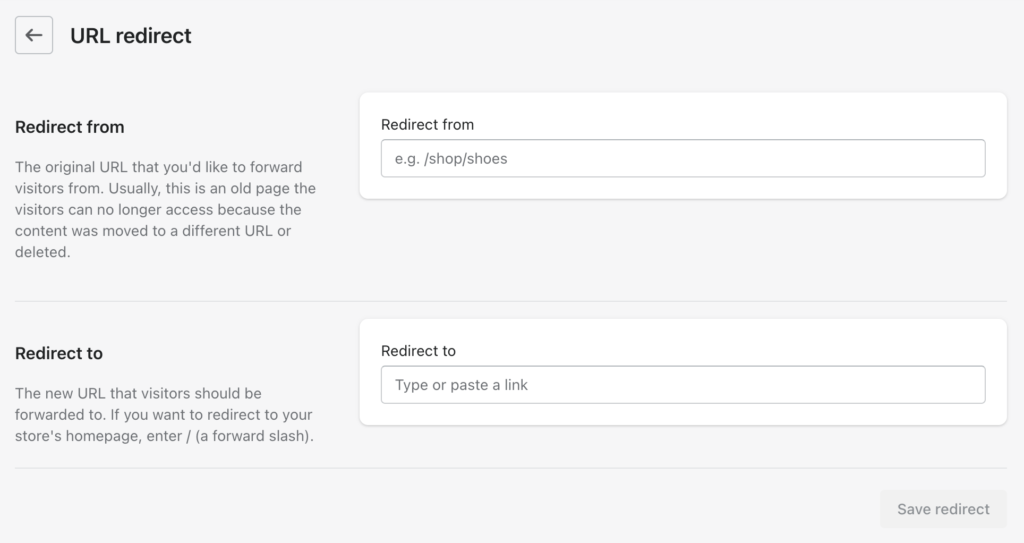
Step 2: Click on Create URL redirect
![]()
Step 3: Enter your Old and New URL
Just enter your old and new URL and Save the Redirect.
Broken Links Best Practice
1. You don’t have to fix all your Broken Links
Broken links are natural and not all of them should be fixed. Big websites have thousands of broken links and it’s not worth spending time and effort in fixing all of them.
If you don’t have a relevant page that you can redirect the old URL to, then don’t do it. Just have a nice and helpful 404 error page that gives the user some guidance on what they can do next.
If you want some inspiration to create your 404 page, here’s a good post on that.
2. Don’t redirect all your Broken Links to the Homepage
It’s not recommended to redirect your Broken links to your homepage as it does not provide a good user experience.
3. Prioritise pages with high authority
If you have pages that have a lot of other pages linking to it, or the page itself has a high value, priortise fixing that first and then move on to your other broken links.
Хорошо, когда у бизнеса есть свой сайт. А ещё лучше – когда он стабильно работает и попадает на высокие позиции в поисковой выдаче. Как и любой технически сложной вещи сайту требуются регулярные проверки и диагностики. Самый простой способ это сделать – поручить поддержку и обслуживание сайта профессионалам.

Но некоторые базовые вещи можно проверить самостоятельно с помощью всего одной программы. Называется она Screaming Frog SEO Spider. Утилита позволит найти конкретные проблемы сайта, требующие решения и исправления. А дальше починить ресурс самостоятельно или составить подробное ТЗ для стороннего исполнителя.
Предупреждаем – если вы опытный SEO-специалист, то скорее всего ничего нового для себя здесь не найдёте. Материал предназначен для людей, которые не разбираются в технических тонкостях работы сайтов и хотят получит хотя бы примерное представление о состоянии их ресурса.
Для владельцев маленьких сайтов достаточно бесплатной версии, в которой стоит ограничение проверки на 500 страниц и недоступны настройки работы сервиса.
Как найти битые ссылки на сайте? Как удалить? (404)
Прежде чем приступить к подробным инструкциям нужно понять, а что собственно Screaming Frog SEO Spider делает? Больше всего это похоже на работу поисковых роботов, сервис обходит доступные страницы сайта и собирает о них информацию.
Сбор информации
Первый шаг очень простой: «Нажми на кнопку, получишь результат»

В специальном поле нужно указать адрес сайта и запустить процесс.
Программа немедленно начнёт обходить ресурс. Внизу появятся ссылки на страницы сайта, картинки и другие составляющие, а справа сверху можно наблюдать прогресс действия.

Проверка состояния страниц
Итак, сбор закончен, куда смотреть? Первым делом обратите внимание на коды ответа страниц сайта. Для удобства рекомендуем их отсортировать.

О чём говорят эти цифры? Разберем самые частые варианты:
200 – OK, успешный запрос. Это значит, что со страницей всё хорошо, она работает так, как надо;
404 – Not found (Не найдено). Сервис не смог найти по ссылке страницу. От таких «битых» ссылок необходимо избавляться, поисковые системы относятся к ним негативно. Тут же в программе можно найти, где 404 ссылка находится.

Чтобы избавиться от проблемы, нужно на странице с «битой» ссылкой её найти и прописать правильно или удалить.
301 – Moved Permanently (Перемещено навсегда). Этот код говорит нам, что страница по этому адресу перемещена и адрес необходимо обновить. Найти нужные страницы с 301 ссылкой можно так же, как и с 404.
502 – Bad Gateway. Появление такого кода означает, что с сервером, на котором находится сайт, возникли какие-то проблемы. В таком случае сайт может быть недоступен для посетителей. Иногда такой код может появляться, если на сайте стоит защита от роботов. Чтобы обойти ограничение нужно сменить поискового агента программы:
How to fix 4xx Errors in Screaming Frog Simple SEO Fixes | Convert The Traffic Limited

Например на бота Яндекс

Существует большое количество других кодов ответа, но в подавляющем большинстве случаев вы увидите именно эти 4 варианта.
Проверка заполнения метатегов
Простым языком метатеги – данные о странице, которые учитываются поисковиками и которые будут показаны пользователю в выдаче. Два главных тега: title и description.

В рамках данной статьи мы не будем останавливаться на том, как правильно их заполнять. Самое главное то, что они должны быть на каждой странице сайта, которая попадёт в поисковые системы.
Как проверить наличие метатегов с помощью Screaming Frog SEO Spider?
Достаточно просто переключиться на одноимённые вкладки:

В списке будут указаны страницы и их метатеги. Если поля Meta Description 1 и Title 1 пустые – значит тегов нет и их нужно заполнить. А во вкладке Length показана длина тега в символах и пикселях, что позволяет выявить слишком длинные или слишком короткие и в дальнейшем оптимизировать.
Проверка sitemap
Sitemap –это XML файл, содержащий для поисковых роботов информацию на сайте. Обычно его можно найти по адресу САЙТ.ru/sitemap.xml.
Для этого в настройках нужно указать ссылку на sitemap. Сделать это можно в настройках сбора:


А дальше запускаем сбор по алгоритму из начала статьи. По его окончанию необходимо включить Crawl Analysis, который проверит sitemap.

Сбор информации закончен, осталось лишь в ней разобраться. Для этого правое поле программы необходимо промотать вниз до вкладки sitemap.

Нажав на вкладку All можно увидеть состояние ссылок в sitemap (в том числе битые) по тому же принципу, который описывался во второй части статьи. Ещё один важный момент – вкладка URLs not in Sitemap. Здесь находятся ссылки, которых нет в sitemap. Очевидно, что если в списке оказались важные ссылки, которые должны видеть поисковики, то их нужно как можно скорее добавить в карту сайта.
В рамках данного материала мы описали лишь малую часть функционала Screaming Frog SEO Spider. Но этого достаточно, чтобы иметь хотя бы базовое представление о состоянии сайта. И что самое удобное – это не займёт много времени, сторонних сервисов и не требует специальных знаний.
Экспресс-аудит сайта за 5 минут с помощью Screaming Frog SEO Spider
Немногим ранее мы выпустили целый обзор на программу Screaming Frog Seo Spider. Сегодня же мы поговорим больше о практической части. Например, о том, как с помощью данной программы провести экспресс-аудит сайта.
Но перед тем как мы начнем, хотим предупредить вот о чем:
- чем больше документов на сайте – тем больше времени потребуется на его сканирование (в некоторых случаях на сканирование может уйти несколько дней);
- на очень крупных сайтах программа может начать вести себя нестабильно, причем настолько, что компьютер может начать лагать (именно компьютер, а не программа).
Именно поэтому хотя бы 1 раз в несколько часов необходимо ставить сканирование на паузу и делать сохранение проекта.
Примечание
Если Скриминг Фрог не сканирует сайт, то просто попробуйте поменять юзерагента в настройках.
Для этого необходимо зайти в Configuration –> User-Agent

Далее выбрать необходимого юзер агента из списка Screaming Frog.

В конце просто запускаем парсинг и радуемся.
Оригинал статьи взят с сайта odba.ru