by Matthew Adams
Matthew is a freelancer who has produced a variety of articles on various topics related to technology. His main focus is the Windows OS and all the things… read more
Updated on
- The Samsung Data Migration Cloning Failed 00001 error arises when users try to clone their hard drives to SSD storage with the software.
- This guide includes some of the more likely resolutions for this error message, so read on to find out more.
- Don’t hesitate to explore our thorough Software section for more useful guides on this topic.
- There are loads more troubleshooting articles at our detailed Fix Hub.
XINSTALL BY CLICKING THE DOWNLOAD FILE
Get rid of malfunctioning drivers on your PC
SPONSORED
Drivers can often become corrupt as they can interfere with malfunctioning system files, thus arriving to be installed but not running correctly. To keep your drivers running smoothly, your Windows OS must run even smoother. Get it in perfect shape by following the steps below:
- Download Fortect and install it on your PC.
- Start the tool’s scanning process to look for corrupt files that are the source of your problem
- Right-click on Start Repair so the tool can start the fixing algorithm
- Fortect has been downloaded by 0 readers this month, rated 4.4 on TrustPilot
Some users utilize the Samsung Data Migration utility to clone their hard drives to Samsung SSD storage. However, numerous users have posted on support forums about a Samsung Data Migration Cloning failed 00001 error, or similar issues with alternative codes.
Consequently, users can’t clone their hard drives to SDD storage when those Samsung Data Migration errors arise.
How can I fix the Samsung Data Migration Cloning failed error?
1. Decrypt BitLocker
- Log into a Windows admin account.
- Next, open Run by pressing the Windows key + R hotkey.
- Type Control Panel in the Open box, and click the OK button.

- Click System and Security in the Control Panel.
- Select the BitLocker Drive Encryption to open further options.
- Click the Turn off BitLocker option.
- Press the Turn off BitLocker button.

2. Defrag the hard drive
- Open the search utility with the Windows key + S keyboard shortcut.
- Input disk defrag in the search box.
- Click Defragment and Optimize Drives to open the window in the screenshot directly below.

- Select a drive, and click the Optimize button. Then wait for the drive defragging to finish.

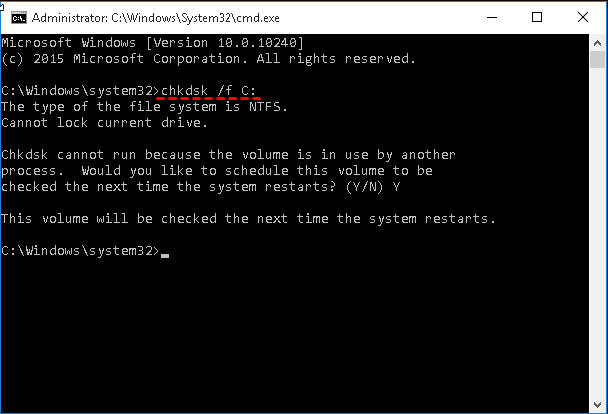
3. Run CHKDSK to fix the Samsung Data Migration Cloning Failed error for bad sectors
- Click Windows 10’s Type here to search button on the taskbar.
- Next, enter the Command Prompt in the search box.
- Right-click Command Prompt and select Run as administrator on the context menu.
- Input this command: chkdsk /f C:

- Thereafter, press Enter to initiate the scan.

4. Turn off automatic page filing
- Press the Windows key + E keyboard shortcut.
- Next, right-click This PC on the left of File Explorer to select Properties.
- Click Advanced system settings to open the window in the snapshot directly below.

- Click the Settings button in the Performance box.
- Next, select the Advanced tab on the Performance Options window.

- Press the Change button.

- Deselect the Automatically manage paging file size for all drives option.
- Finally, select the No paging filing option.
- Click OK on the window.
- Select the Apply option, and click OK to exit.


5. Disable Hibernation mode
- Press Win+R keys to start the Run dialog.
- Type cmd in Run’s text box, and click the OK option.

- Next, input powercfg /hibernate off in the Command Prompt; and press the Enter key.

6. Use backup software
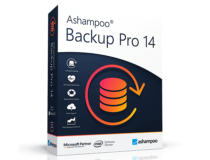
First, remember that there is numerous alternative software to Samsung Data Migration you can clone hard drives to SDD storage with. Ashampoo Backup Pro 14 is among the more comprehensive backup/disk-cloning software utilities for Windows with which you can set up an HDD image.
The latest version of Ashampoo Backup has an overhauled backup engine, new automatic backup verification, and enhanced cloud support. So, maybe you don’t need to fix the cloning error for Samsung Data Migration!
The above resolutions might fix the Samsung Data Migration Cloning Failed 00001 error for some users.
If you still need to fix the issue, however, you might as well check out some of the alternative cloning software.
Don’t hesitate to let us know if this guide was helpful by using the comment section found below this guide.
![]()
Средство Samsung Data Migration может не выполнить клонирование жесткого диска из-за ограничений доступа, реализованных UAC или BitLocker. Более того, поврежденные секторы жесткого диска или наличие важных файлов ОС (например, файлов подкачки или гибернации) на диске также могут вызвать обсуждаемую ошибку.
Затронутый пользователь обнаруживает ошибку, когда пытается клонировать жесткий диск с помощью приложения Samsung Data Migration. От проблемы страдали почти все типы дисков (SSD и HDD) с разной емкостью. Сообщается, что проблема возникает почти на всех моделях ПК.
Ошибка клонирования переноса данных Samsung
Прежде чем переходить к решениям, убедитесь, что вы используете последнюю версию программы Samsung Data Migration. Более того, попробуйте использовать кабель SATA (а не SATA-USB) для подключения дисков к вашей системе.
Решение 1. Запустите Samsung Data Migration с правами администратора.
Microsoft повысила безопасность важных системных ресурсов с помощью UAC. Вы можете столкнуться с данной ошибкой, если приложение миграции не имеет необходимых прав для выполнения операций, необходимых для выполнения всех задач. В этом контексте запуск инструмента переноса данных с правами администратора может решить проблему.
- Щелкните правой кнопкой мыши приложение Samsung Data Migration, а затем в показанном меню выберите Запуск от имени администратора.
Запустите Samsung Data Migration от имени администратора.
- Затем проверьте, решена ли проблема клонирования.
- Если нет, то еще раз щелкните правой кнопкой мыши инструмент переноса данных, а затем в показанном меню выберите Устранение неполадок совместимости.
Нажмите на Устранение неполадок совместимости средства переноса данных Samsung.
- Теперь примените предложенное решение (чтобы запустить программу в более старой версии Windows), а затем проверьте, решена ли проблема клонирования.
Решение 2. Отключите BitLocker для исходного диска
Вы можете не клонировать раздел, если диск зашифрован с помощью BitLocker, поскольку он не может быть прочитан приложением для клонирования. В этом случае удаление шифрования BitLocker с диска может решить проблему клонирования.
- Введите BitLocker в строке поиска Windows (на панели задач вашей системы), а затем в списке результатов щелкните Диспетчер BitLocker.
Управление BitLocker
- Теперь в окне BitLocker отключите BitLocker для каждого раздела исходного диска.
Отключить BitLocker
- Дождитесь завершения процесса расшифровки.
- Затем проверьте, можете ли вы завершить процесс клонирования.
Решение 3. Запустите команду “Проверить диск” на исходном диске.
Инструмент Samsung Data Migration плохо справляется с обработкой поврежденных секторов жесткого диска, и клонирование может не завершиться, если на жестком диске есть поврежденные сектора. В этом контексте запуск команды проверки диска, чтобы устранить проблему с поврежденными секторами на жестком диске, и, таким образом, проблема клонирования может быть решена.
- Запустите команду chkdsk C: / r, где C – проблемный раздел. Вы также можете использовать другое приложение, например SeaTools, для проверки поврежденных секторов.
- Дождитесь завершения процесса (это может занять некоторое время).
Запустите команду ChkDsk / r
- Повторите процесс для всего раздела исходного диска.
- Затем проверьте, можете ли вы клонировать диск.
Решение 4. Отключение модулей и дефрагментация диска
Вы можете столкнуться с текущей ошибкой клонирования, если какие-либо системные процессы (например, файл подкачки или точки восстановления системы) ограничивают доступ к определенным областям диска. В этом случае отключение файла подкачки и модуля восстановления системы может решить проблему.
- Просканируйте исходный жесткий диск на наличие вирусов и т. Д. Вы также можете использовать любые онлайн-инструменты, такие как ESET Online Scanner.
- Отключите файл подкачки всех разделов на исходном диске.
- Затем проверьте, решена ли проблема клонирования.
- Если нет, введите Панель управления в поле поиска Windows, а затем в списке результатов щелкните Панель управления.
Открыть панель управления
- Теперь нажмите «Система и безопасность», а затем нажмите «Система».
Открытая система и безопасность
- Затем на левой панели окна щелкните Защита системы.
Защита открытых систем
- Теперь выберите исходный диск и нажмите «Настроить».
Откройте Configure для исходного диска
- Затем выберите опцию Отключить защиту системы.
- Теперь нажмите кнопку «Удалить», чтобы удалить все точки восстановления диска.
Отключить защиту системы и удалить точку восстановления на диске
- Теперь нажмите Применить, а затем нажмите кнопку ОК.
- Теперь проверьте, решена ли проблема клонирования.
- Если нет, введите Командная строка в поле поиска Windows, а затем в списке результатов щелкните правой кнопкой мыши командную строку и выберите Запуск от имени администратора.
Откройте командную строку от имени администратора
- Нажмите Да, если появится запрос UAC.
- Теперь введите следующую команду в командной строке и нажмите клавишу Enter: powercfg.exe / hibernate off
Отключите гибернацию вашей системы
- Затем выйдите из командной строки и перезапустите систему.
- После перезапуска введите Explorer в строке поиска Windows, а затем в списке результатов щелкните правой кнопкой мыши проводник и выберите Запуск от имени администратора.
Откройте проводник как администратор
- Затем перейдите по следующему пути (ваш системный диск):% SYSTEMDRIVE%
- Теперь удалите файл hiberfil.sys.
Удалить файл hiberfil.sys
- Если вы не можете просмотреть файл hiberfil.sys, возможно, вам придется показать скрытые файлы и системные файлы для просмотра файла.
Показать скрытые файлы и защищенные системные файлы
- Теперь проверьте, решена ли проблема клонирования.
- Если нет, выполните очистку диска всех разделов и проверьте, можно ли клонировать диск.
- Если нет, введите «Дефрагментация» в поле поиска Windows, а затем нажмите «Дефрагментировать и оптимизировать диски».
Откройте дефрагментацию и оптимизируйте диски
- Теперь выберите исходный диск и нажмите кнопку «Оптимизировать».
Оптимизация и дефрагментация жесткого диска
- Затем дождитесь завершения процесса дефрагментации и, надеюсь, вы сможете клонировать диск.
Если до сих пор ничего не помогло, попробуйте уменьшить размер раздела исходного диска (чтобы он соответствовал размеру места назначения). Если даже после этого проблема не исчезнет, попробуйте использовать другое программное обеспечение для клонирования, чтобы клонировать диск. Если проблема не устранена, возможно, вам придется использовать загрузочный компакт-диск, например загрузочный компакт-диск Acronis, для копирования диска. Если ни одно из решений не помогло, возможно, вам придется переустановить ОС и вручную скопировать данные.
- В SamsungПеренос данныхКлонированиеНе смогли 00001 ошибка возникает, когда пользователи попробуй клон их тяжело диски к SSD хранилище с программным обеспечением.
- Это руководство включает некоторые из наиболее вероятных резолюции для этого сообщения об ошибке, так что читайте дальше, чтобы узнать больше.
- Не стесняйтесь изучить наши подробные Раздел программного обеспечения для получения более полезных руководств по этой теме.
- Есть еще множество способов устранения неполадок статьи в нашем подробном Исправить концентратор.

Для решения различных проблем с ПК мы рекомендуем DriverFix:
Это программное обеспечение будет поддерживать ваши драйверы в рабочем состоянии, тем самым защищая вас от распространенных компьютерных ошибок и сбоев оборудования. Проверьте все свои драйверы сейчас за 3 простых шага:
- Скачать DriverFix (проверенный файл загрузки).
- Нажмите Начать сканирование найти все проблемные драйверы.
- Нажмите Обновите драйверы чтобы получить новые версии и избежать сбоев в работе системы.
- DriverFix был загружен 0 читатели в этом месяце.
Некоторые пользователи используют утилиту Samsung Data Migration, чтобы клонировать свои жесткие диски на Samsung. SSD место хранения. Однако многие пользователи писали на форумах поддержки о Ошибка клонирования переноса данных Samsung 00001 ошибка или аналогичные проблемы с альтернативными кодами.
Следовательно, пользователи не могут клонировать свои жесткие диски в хранилище SDD, когда возникают эти ошибки Samsung Data Migration.
Как я могу исправить ошибку Samsung Data Migration Cloning failed?
1. Используйте Ashampoo Backup

Во-первых, помните, что существует множество альтернативных программ Samsung Data Migration, с помощью которых вы можете клонировать жесткие диски в хранилище SDD. Ashampoo Backup Pro 14 является одной из наиболее полных программных утилит для резервного копирования / клонирования дисков для Windows, с помощью которых вы можете создать образ жесткого диска.
Последняя версия Ashampoo Backup имеет обновленный механизм резервного копирования, новую автоматическую проверку резервных копий и расширенную облачную поддержку. Так что, возможно, вам не нужно исправлять ошибку клонирования для Samsung Data Migration!
Резервное копирование Ashampoo
Это невероятное программное обеспечение может помочь вам заменить программное обеспечение Samsung Data Migration и устранить весь набор проблем всего за несколько щелчков мышью.
Бесплатная пробная версия
Посетить вебсайт
2. Расшифровать BitLocker
- Войти в учетная запись администратора Windows.
- Затем откройте Run, нажав кнопку Клавиша Windows + R горячая клавиша.
- Тип Панель управления в поле «Открыть» и щелкните значок ОК кнопка.

- Нажмите Система и безопасность в Панели управления.
- Выберите BitLocker Привод Шифрование, чтобы открыть дополнительные параметры.
- Щелкните значок Отключить BitLocker вариант.
- нажмите Отключить BitLocker кнопка.

3. Дефрагментация жесткого диска
- Открыть утилита поиска с Клавиша Windows + S Сочетание клавиш.
- Вход дефрагментация диска в поле поиска.
- Нажмите Дефрагментация и оптимизация дисков чтобы открыть окно на скриншоте ниже.
- Выберите диск и щелкните значок Оптимизировать кнопка. Затем дождитесь завершения дефрагментации диска.

4. Запустить CHKDSK исправить ошибку Samsung Data Migration Cloning Failed для сбойных секторов
- Нажмите Windows 10 Введите здесь для поиска кнопку на панели задач.
- Далее введите Командная строка в поле поиска.
- Щелкните правой кнопкой мыши Командная строка и выберите Запустить от имени администратора в контекстном меню.
- Введите эту команду: chkdsk / f C:
- После этого нажмите Входить, чтобы начать сканирование.

5. Отключить автоматическое заполнение страниц
- нажмите Клавиша Windows + E Сочетание клавиш.
- Затем щелкните правой кнопкой мыши этот компьютер слева от проводника, чтобы выбрать Характеристики.
- Нажмите Расширенные системные настройки чтобы открыть окно на снимке экрана прямо под ним.
- Щелкните значок Настройки в поле Производительность.
- Затем выберите вкладку «Дополнительно» в окне «Параметры производительности».
- нажмите Изменять кнопка.
- Отмените выбор Автоматически управлять размером файла подкачки для всех дисков вариант.
- Наконец, выберите Нет подкачки вариант.
- Нажмите ОК на окне.
- Выберите Применять вариант и щелкните ОК выйти.


6. Отключить режим гибернации
- Нажмите клавиши Win + R, чтобы открыть диалоговое окно «Выполнить».
- Тип cmd в текстовом поле «Выполнить» и нажмите ОК вариант.
- Затем введите powercfg / спящий режим выключен в командной строке; и нажмите клавишу Enter.

Приведенные выше разрешения могут исправить Ошибка клонирования переноса данных Samsung 00001 ошибка для некоторых пользователей.
Однако, если вам все еще нужно исправить проблему, вы можете также проверить некоторые из альтернативное программное обеспечение для клонирования.
Не стесняйтесь сообщить нам, было ли это руководство полезным, используя раздел комментариев под ним.
«Hi, I am trying to clone a Samsung SSD with SDM, but the Samsung Data Migration stuck at 0%. I have a 250GB Samsung 850 EVO and want to clone it to a 2TB Samsung 870 EVO.»
«I tried changing the SATA cable, turned off device encryption, and ran a health check on both disks. But nothing seems to be working and the Samsung Data Migration stuck at 0. How long should I wait before restarting the process? It’s stuck on 0 for 40 minutes and the transfer speed is 0? What should I do now to solve the issue?» — post from Reddit
Samsung designed the Samsung Data Migration tool to transfer data from your current storage device to a new Samsung SSD quickly and efficiently. The software is only for Samsung SSDs. Many people use SDM to clone hard drives to SSDs, but sometimes during the cloning, you may encounter Samsung Data Migration stuck at 0 or 99 or not working error.
There are a few reasons why the SDM may act up, but we cannot exactly point out why Samsung data migration not working. But, here are some possible causes for the error:
- Issues with the SATA port or SATA-to-USB cables.
- Insufficient storage on the target SSD/ hard drive.
- An outdated Samsung Data Migration cloning tool.
- While transferring corrupt partitions or large files to SSD.
- Trying to transfer data out of a failed drive itself may cause the SDM to act up.
How to Fix Samsung Data Migration Stuck at 0 Error — 5 Solutions
The post lists a total of 5 practical solutions to fix the Samsung Data Migration stuck at 0 and get the data transfer back on.
⏰Important Tip: If you are facing issues like Samsung Data Migration stuck at 0 or any other issues involving data, while doing fixes, you will be at risk of data loss. If you wish to keep your data safe, you have to use a data backup tool like EaseUS Todo Backup to safeguard your data in all types of emergencies.
A quick guide to the 5 solutions
- Check Your Cable Connections
- Run the Check Disk Tool
- Check the Target Disk Storage Space
- Disable Device Encryption
- Update Samsung Data Migration
(1) Check Your Cable Connections
If there are issues with your SATA cable or the SATA to USB connection is not done properly, the Samsung Data Migration stuck at 0 may occur. Make sure you take care of the cables and connection. Take a minute to check if the cables are in good condition and properly connected.
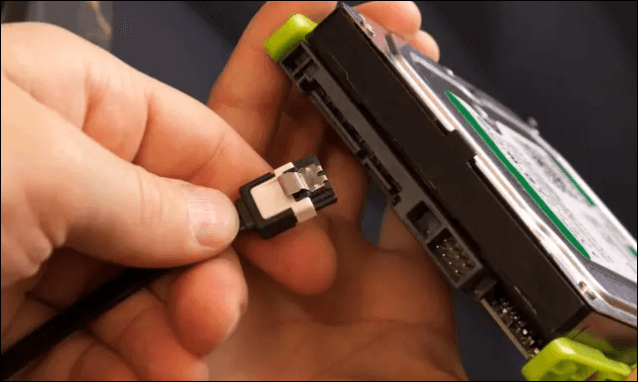
Start with verifying if the SATA/USB cables are properly connected, and check if the problem resolves. If the issue is still there, try using another port with the SATA cable or get another SATA/USB cable to transfer your data from the drive to the Samsung SSD.
(2) Run the Check Disk Tool
Sometimes a bad sector or a wrong partition itself on your source or target disk can cause Samsung Data Migration stuck at 0. To find out, if there’s any issue with the drives, you can run the Check Disk utility on your Windows using the chkdsk command. This hardly takes a few seconds to scan the drives. Follow the instruction below to do so:
Step 1: Make sure your Samsung SSD is connected to your system while running the chkdsk tool.
Step 2: Search for the Command Prompt application and Run it in Administrator mode.
Step 3: Enter the following command and press Enter. Later, follow the prompts on the window to complete the check-up.
chkdsk X: ( X is the letter of the drive or partition, you want to check).
If there is a bad sector or anything on the drive, you can see it on the command prompt. In such a case, you can back up your data and later try transferring your data.
(3) Check the Target Disk Storage Space
If the target disk space is less than the source disk it is impossible to transfer data. So, if you are trying to clone a hard drive to an SSD with less storage, it causes issues like Samsung Data Migration stuck at 0 or 99.
To avoid any such errors, check your target disk storage space before initiating the process. It is recommended that you use a target disk whose storage space is at least 25% more than the source disk. Prefer buying a suitable disk based on your requirements.
(4) Disable Device Encryption
When the Windows OS detects an external drive, it may use the device encryption feature to restrict it from reading the contents of the hard drive by making it unreadable. In such cases, even when the SDM detects the SSD, the data transfer halts at 0. You can try disabling device encryption in just a few clicks and carry on the transfer process.
The instructions to disable device encryption:
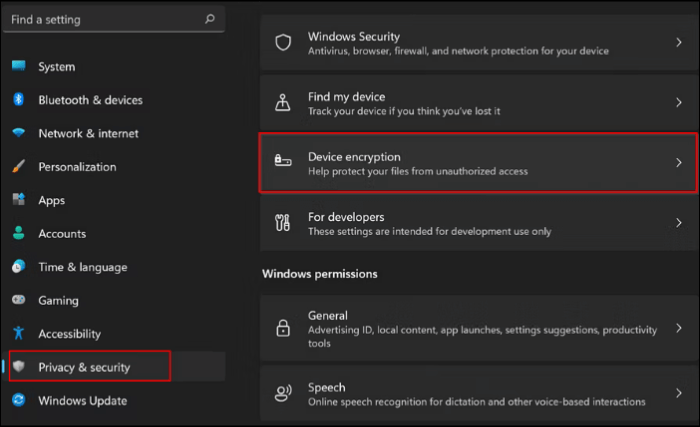
Step 1: Click on the Windows key, search for Settings, and open it.
Step 2: Select Privacy & Security from the left pane and click on Device Encryption.
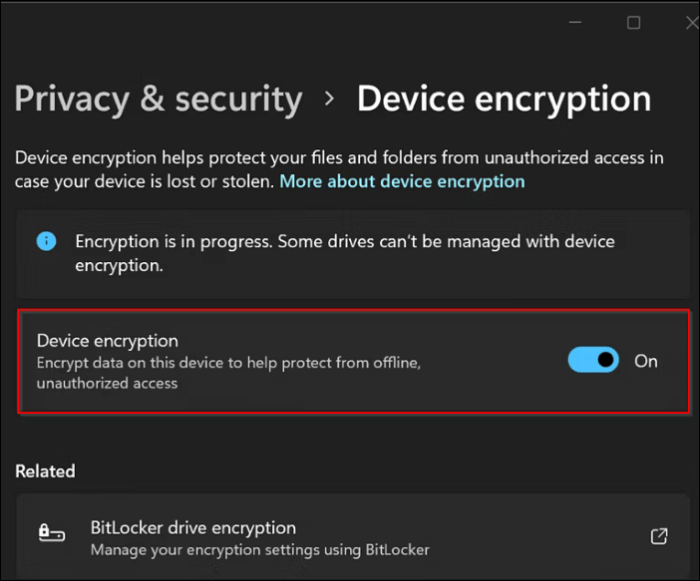
Step 3: Now, disable the toggle next to Device encryption to turn it off. A warning prompt appears, click on Turn off.
Step 4: Now, do a restart, and start the data transfer process now.
Now, see if the Samsung Data Migration works, it will work now. If your PC has BitLocker, disable it as well. After completing the process, re-enable tie device encryption, as it is a vital security feature on your Operating System.
(5) Update Samsung Data Migration
If your Samsung Data Migration tool is outdated, it will cause issues while disk cloning. To fix the Samsung data migration stuck at 0, visit the official website and download the latest version of Samsung data migration.
Steps to get your data migration tool updated to the latest version:
Step 1: Navigate to the Samsung Official website.
Step 2: Scroll down to find Data Migration, later expand Samsung Data Migration software for consumer SSD.
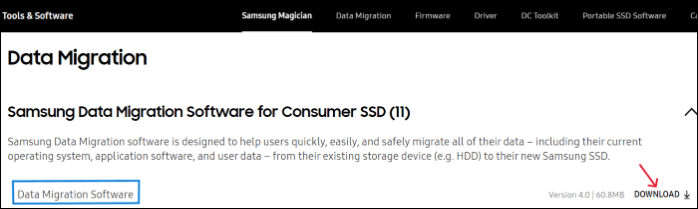
Step 3: To get the latest version of the Samsung Data Migration for Windows, click on Download. The download speed depends on your internet connection.
Alternative Solution for Samsung Data Migration Stuck Issue
If the issues with the Samsung Data Migration persist and you are tired of it, it’s better to use a much easier alternative to transfer your data. EaseUS Disk Copy is the best disk cloning tool, which does the job in just a few clicks and moreover, it works with hard drives of any brand.
EaseUS Disk Copy is an efficient disk cloning tool for faster disk cloning for Windows. You can clone hard drives, update the disks, migrate your data, and even create a copy as a backup in case of emergencies. All the features are bound with seamless navigation and functionality to get the work done in a few steps.
Key Features of EaseUS Disk Copy:
- Supports system clone, disk clone, and partition cloning.
- Create a local backup for the hard drives parallelly.
- Upgrade or transfer copy data from one internal hard drive to another without losing data.
- Supports Windows 11/10/8/7 and Windows Server 2008, 2012, 2016, 2019, and 2022.
- Offers sector-by-sector clone feature to copy only used partition.
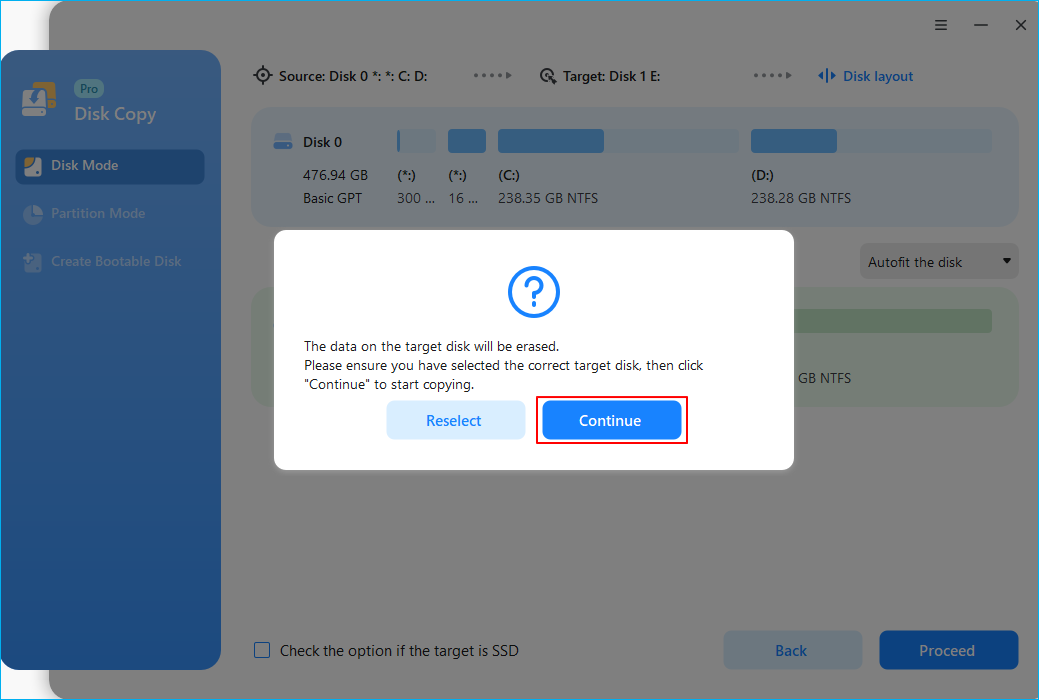
Follow these simple steps to migrate or clone Samsung SSD with EaseUS Disk Copy.
Activate EaseUS Disk Copy for a smooth disk copying or cloning process.
1. Download, install and run EaseUS Disk Copy on your PC.
Click Disk Mode and select the source disk that you want to copy or clone. Click Next to continue.

2. Select the destination disk where you want to clone/copy the old disk and click Next to continue.
Click OK to confirm if the program asks to erase data on the destination disk.
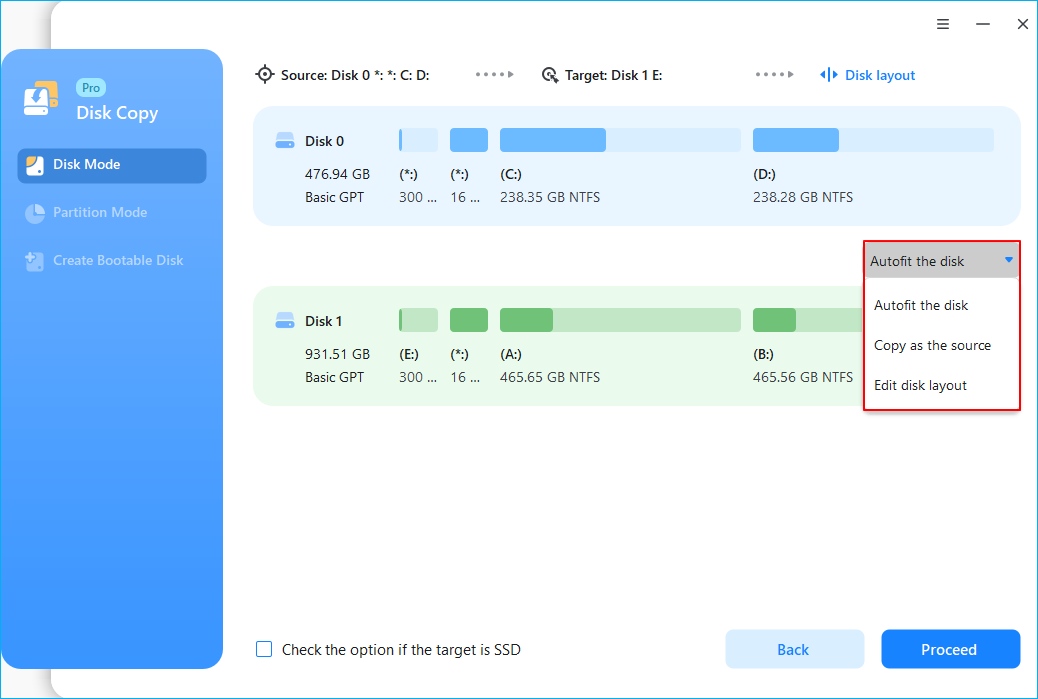
3. Check and edit the disk layout as Autofit the disk, Copy as the source or Edit disk layout.
Autofit the disk is recommended.
- Copy as the source option will copy/clone the same layout of partitions on your source disk to the destination disk.
- Edit disk layout allows you to manually resize or move partition layout on the destination disk.
- If your destination disk is an SSD drive, do remember to tick Check the option if the target is SSD.
Click Proceed to start the disk cloning or disk copying process now.
The Final Verdict
The Samsung Data Migration stuck at 0 might occur due to various reasons, but we can work around some simple fixes (mentioned above) to fix the issue and get back to the data transfer. The errors like being stuck at 0 or 99 and its exclusivity with other SSD brands certainly make one look for better alternatives.
EaseUS Disk Copy applies advanced programs to clone disks and can operate on any hard drive irrespective of brand. Download the tool and check it, you will definitely find the process much easier.
Samsung Data Migration Stuck FAQs
Here are some of the most frequently asked questions on Samsung Data Migration stuck at 0. If you have similar queries hope this will help you.
1. How do I fix Samsung Data Migration Not responding issue?
Here are a few things you can do to fix the Samsung Data Migration Not responding issue:
- Check the source and target disk using the chkdsk command.
- Verify the cable connections.
- Check the hardware condition of your computer.
- Disable device encryption.
- Update Samsung Data Migration.
2. Why is Samsung Data Migration not detecting Samsung SSD?
The reasons why the Samsung Data Migration is not detecting the Samsung SSD are:
- If the SSD is faulty.
- Improper SATA/USB connections.
- Issues with the SATA?USB cables.
- Outdated SDM software.
3. How to know if my data migration was successful?
Check if all the schema changes on the new system are updated and match the old system format. To ensure that the data migration from legacy to the new application has retained its value, compare the values between the old one and the new one.
Samsung provides a utility called Samsung Data Migration for all its SSD users. However, many users report that they encounter the “Samsung Data Migration stuck at 0%, 99%, or 100%” issue when using it to clone SSD. This post from MiniTool offers a guide for you to fix the issue.
Samsung provides all its SSD users with a utility called Samsung Data Migration. It helps you copy data stored on your computer’s current storage device to your new Samsung SSD quickly and easily. However, some users encounter the “Samsung Data Migration Stuck at 0%, 99%, or 100%” error.
The following are the possible reasons for the “Samsung Data Migration stuck at 0%, 99%, or 100%” error:
- Hard drive failure.
- Transfer large files or partitions to Samsung SSD.
- There is a problem with the SATA port or the SATA-to-USB adapter.
- Samsung Data Migration version is not up to date.
- Target SSD has too much data.
Also see: Solutions to Samsung Data Migration Cloning Failed (100% WORKS)
Then, let’s see how to fix the “how to fix Samsung Data Migration stuck at 0%, 99%, or 100%” issue.
Samsung Data Migration Stuck at 0%, 99%, or 100%
Fix 1: Verify Your Cable Connection
Due to your SATA/USB cable connection, the transfer process may be interrupted during data migration. Thus, to fix the “Samsung Data Migration stuck at 0%, 99%, or 100%,” issue, you need to verify that the SATA/USB is properly connected.
If they are connected correctly and the problem persists, you can easily plug the HDD SATA cable into another motherboard port, or try another SATA cable. If it still doesn’t work then you have to move the USB drive to another port.
Fix 2: Check Your HDD and SSD
If your hard drive is damaged, data transfers from a failed hard drive are likely to get stuck and not complete. The chkdsk command checks the health of internal and external storage devices attached to your computer. Here is how to do that:
Step 1: Type cmd in the Search box and choose Run as administrator.
Step 2: Then, type chkdsk /f /x and press the Enter key.
Step 3: Follow the on-screen prompts to complete this operation. After that, you can restart your computer and see if the “Samsung Data Migration stuck at 0%, 99%, or 100%” has been fixed or not.
Fix 3: Check Your Target Disk Space
Another factor that can make your transfer appear to be stuck is that the destination drive may be too full to receive any more data. To be on the safe side, it’s recommended you transfer no more than 75% of the destination drive’s total free space.
Fix 4: Check the Data Capacity of the Files You’re Transferring
You have to pay attention to your data file size and partition. If your Samsung Data Migration is not responding during the transfer, make sure that you don’t move multiple large files or partitions at once. Large data transfers can cause bugs and glitches in the program. Try to transfer your files into smaller batches.
Fix 5: Update Samsung Data Migration
Samsung has rolled out a new update for its data migration tool, and you should always make sure you have the latest version. If you are using an older version of Samsung Data Migration, this may be the reason for the issue.
You can try to update Samsung Data Migration to the latest version to fix the “Samsung Data Migration stuck at 0%, 99%, or 100%” issue. The steps are as follows:
Step 1: Go to the Samsung official website.
Step 2: Under Data Migration, select Samsung Data Migration software for consumer SSD.
Step 3: Click the DOWNLOAD button on the right of the latest Data Migration Software package.

Alternatives to Samsung Data Migration
There is a better solution for the “Samsung Data Migration Software stuck at 0%, 99%, or 100%” issue – try Samsung Data Migration alternatives.
Tool 1: MiniTool ShadowMaker
You can use the professional backup software – MiniTool ShadowMaker to replace Samsung Data Migration. It supports data migration with several SSD brands, not limited to Samsung. As an alternative to Samsung Data Migration, this Samsung SSD software provides you with the Clone Disk feature to transfer all contents from the old hard drive to the new Samsung SSD in Windows 11/10/8/7 without losing data or messing up the cloning process.
This program can also be used to back up the operating system, disk, partition, file, and folder. It offers a Trial Edition that allows a 30-day free trial for all backup features. If you want to use it permanently, get its Pro Edition. Now you can download and try MiniTool ShadowMaker.
MiniTool ShadowMaker TrialClick to Download100%Clean & Safe
Now, let’s see how to migrate SSHD to SSD step by step.
Step 1: Connect the SSD to your computer. Launch MiniTool ShadowMaker, and click Keep Trial to continue to use the Trial edition.
Step 2: After entering the main interface, navigate to the Tools tab. And then choose the Clone Disk feature to continue.
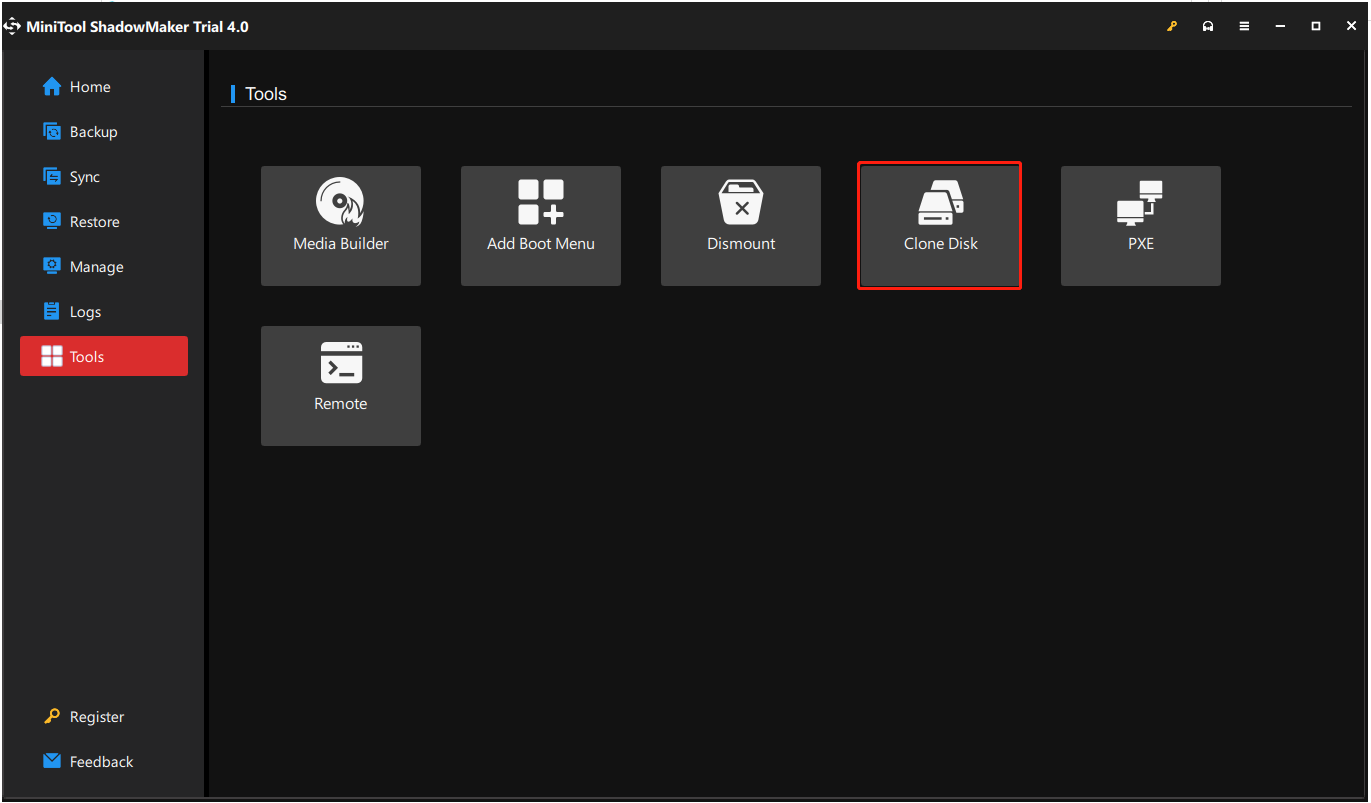
Tips:
Tip: MiniTool ShadowMaker supports you to clone the dynamic disk, but it is just for the simple volume.
Step 3: Next, you are required to choose the source disk and the target disk for cloning. Here, you intend to clone HDD to Samsung SSD, thus, please set the HDD as the source disk and the Samsung SSD as the target disk.
Step 4: After you have successfully selected the disk clone source and destination, click OK to continue.
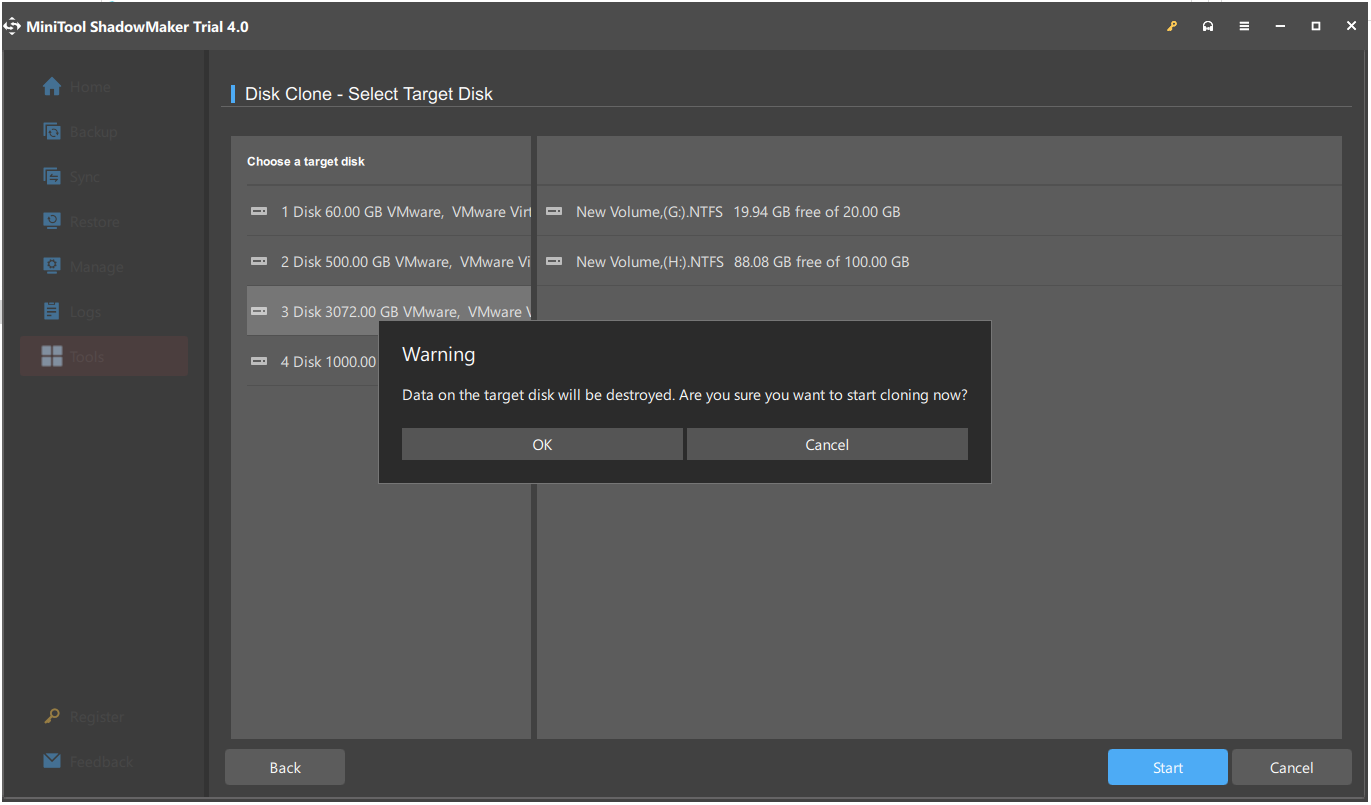
Step 5: Then you will receive a warning message that tells you all data on the target disk will be destroyed during the disk cloning process. Then click OK to continue.
Note:
Note: If there are important data on the target Samsung SSD, you had better back them up in advance.
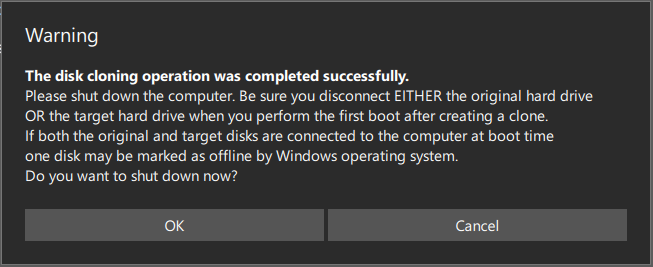
Step 6: Then it will begin to clone HDD to SSD and you need to wait several minutes until the process is finished.
Step 7: When the disk clone process is finished, you will receive a message which tells you that the source disk and the target disk have the same signature. Thus, you need to remove the HDD from your computer and insert the SSD into the Samsung PC.
Tool 2: MiniTool Partition Wizard
In the above part, we show you how to clone the system from HDD to SSD for free with MiniTool ShadowMaker. In addition to MiniTool ShadowMaker, MiniTool Partition Wizard is also a great tool to clone a hard drive. Here is how to clone the system with MiniTool Partition Wizard.
Step 1: Download and install MiniTool Partition Wizard. Then, launch it.
Step 2: Choose the Migrate OS to SSD/HD feature from the left side of the software’s user interface.
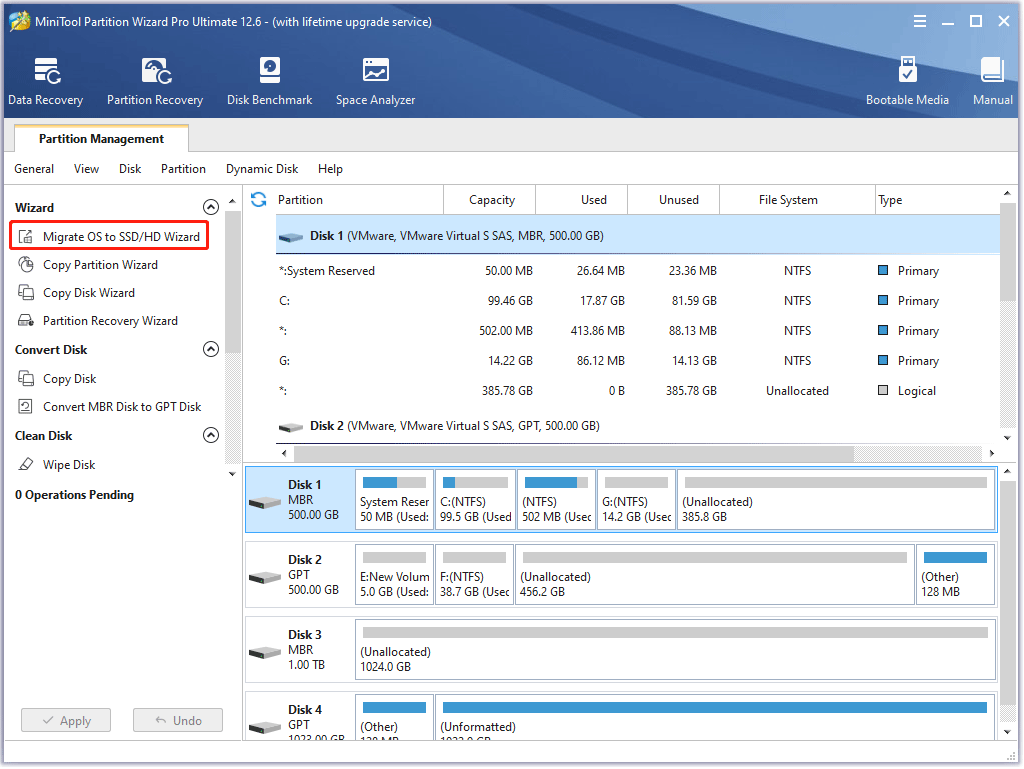
Step 3: Choose Option A or Option B based on your needs and then click the Next button to continue.
Step 4: Find and choose your SSD in the disk list on the Select Destination Disk window and click the Next button. Then, click the Yes button.
Step 5: On the Review the changes window, customize the following options and click the Next button.
- Choose the Fit partitions to entire disk option or the Copy partitions without resizing option.
- Keep the Align partitions to 1 MB checked option checked, which could improve the performance of the SSD.
- Check the Use GUID Partition Table for the target disk option if your computer support UEFI boot mode and the SSD is of more than 2TB capacity.

Step 6: Read the note on the current window and then click the Finish button.

Step 7: Preview the change on the user interface. Then, click the Apply button to start system migration.
Step 8: Wait for MiniTool Partition Wizard to finish the task.
Further Reading: Data Recovery Software
While SSDs do a lot better than HDDs, data stored on SSDs isn’t always safe. For example, you formatted a partition by mistake; you accidentally deleted some important data or partitions; your SSD got infected by a virus or malware, etc.
Therefore, if your SSD data is lost due to various reasons and there is no backup, please keep calm and seek help from MiniTool Power Data Recovery as soon as possible.
MiniTool Power Data Recovery TrialClick to Download100%Clean & Safe
How to fix the “Samsung Data Migration stuck at 0%, 99%, or 100%” issue? This post provides some solutions. If you think this post is useful, please share it on Twitter to let more people know.Click to Tweet
Bottom Line
Are you worried about the “Samsung data migration cloning failed” problem? Take it easy now! MiniTool ShadowMaker and MiniTool Partition Wizard can easily and effectively clone an old/small hard drive to Samsung SSD. Just free download one of them for a try.
As to any question about using MiniTool software or any suggestion for our products, we appreciate it. So, tell us right now by writing an email and sending it to [email protected] or leaving your comment in the following comment zone. Thanks in advance.
Samsung Data Migration Stuck at 0%, 99%, or 100% FAQ
How long should data migration take?
Depending on volumes of data and differences between source and target locations, migration can take from some 30 minutes to months and even years. The complexity of the project and the cost of downtime will define how exactly to unwrap the process.
Why is my Samsung data transfer taking so long?
One of the main reasons why the Samsung Smart Switch takes a long time to transfer your files is due to a total load of data. If possible, transfer files gradually or depending on their file sizes. You can start with the most important files first such as your contacts and messages. Then, work on your photos.
How do I know if my data migration was successful?
Check whether all the schema changes as per the new system are updated. Data migrated from the legacy to the new application should retain its value and format unless it is not specified to do so. To ensure this, compare data values between legacy and new application databases.