Коды ошибок:
A1-1110 — проблема в двигателе платы
C1-1110 — подготовьте новый картридж
C1-1120 — замените картридж
C1-1140 — замените картридж
C1-1411 — установите картридж
C1-1512 — не совместимый тонер картридж
H1-1210 — замятие бумаги в лотке 2
H1-1252 — отсутствует бумага в лотке 2
M1-1110 — замятие бумаги в лотке 1
M1-1610 — замятие бумаги в лотке ручной подачи
M1-5112 — отсутствует бумага в лотке 1
M1-5612 — отсутствует бумага в лотке ручной подачи
M2-1110 — замятие бумаги внутри принтера
M2-2110 — замятие бумаги внутри принтера
M2-2310 — замятие бумаги в нижней части дуплекса
M3-1110 — замятие бумаги на выходе
M3-2130 — выходной лоток заполнен, удалите бумагу
S2-4110 — открыта дверца
S6-3123 — проблема сети
S6-3128 — ошибка сети 802.1x
U1-2320 — ошибка печки (перегрев)
U1-2330 — ошибка печки (низкая температура)
U1-2340 — ошибка печки (перегрев)
U2-1111 — ошибка лазера
U2-1113 — ошибка лазера
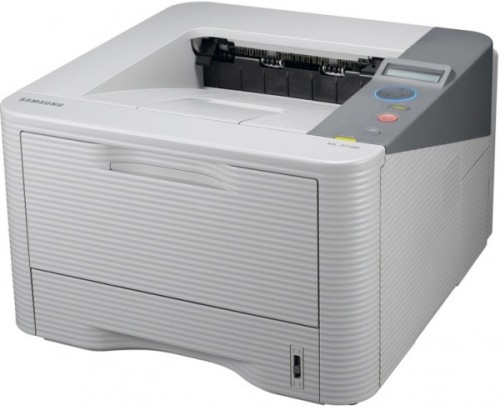
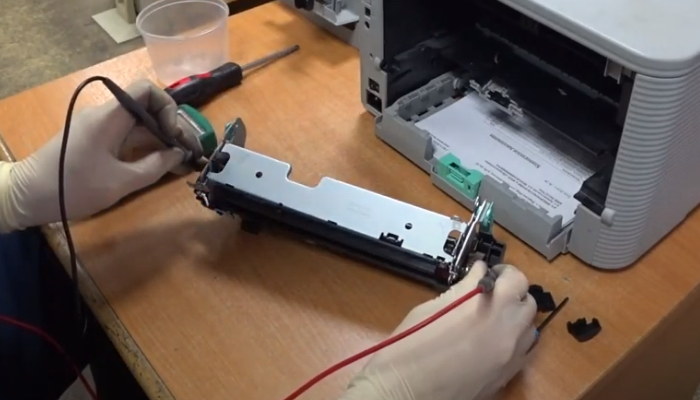
Поступил в ремонт лазерный принтер Samsung ML-3710 . При включении аппарата выпадает ошибка ” U1-2320. Выключите и включите устройство “. Эта проблема связана с термоузлом.
Нужно будет снять термоузел, произвести диагностику и решить проблему.
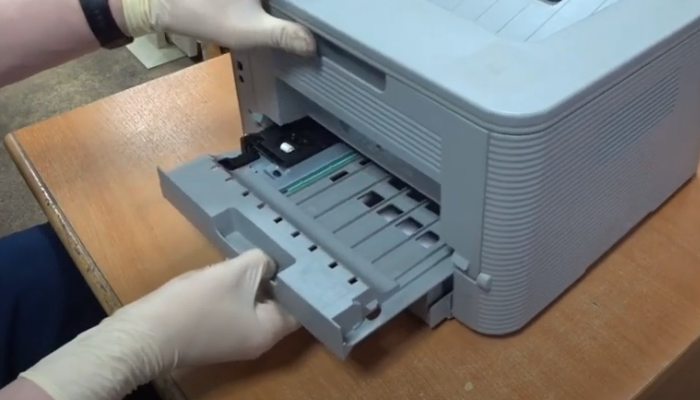
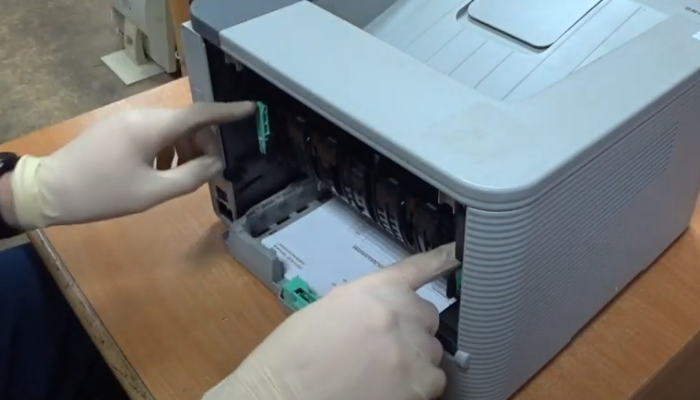
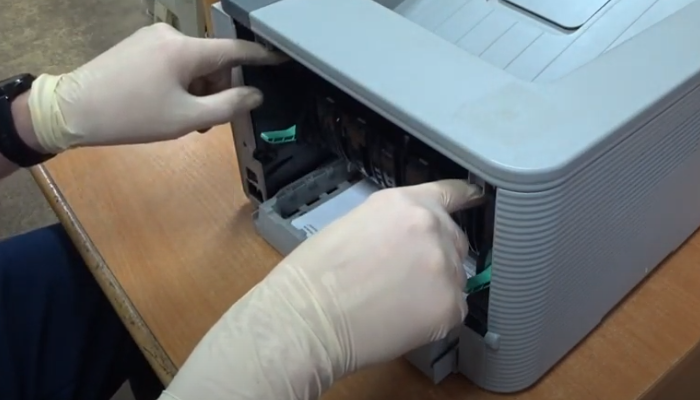
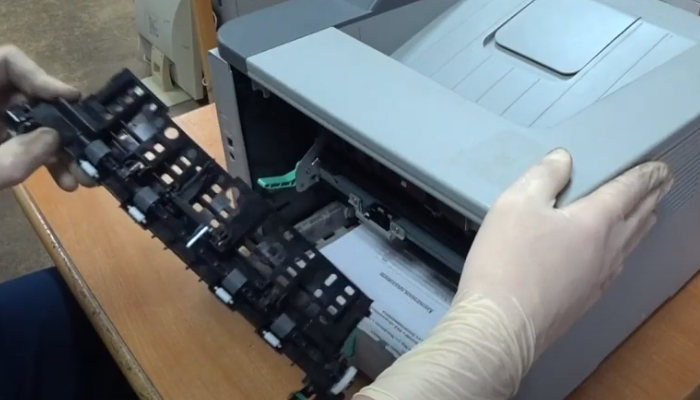
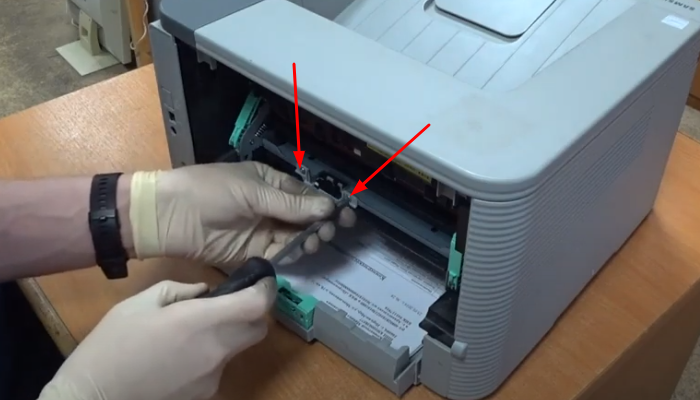
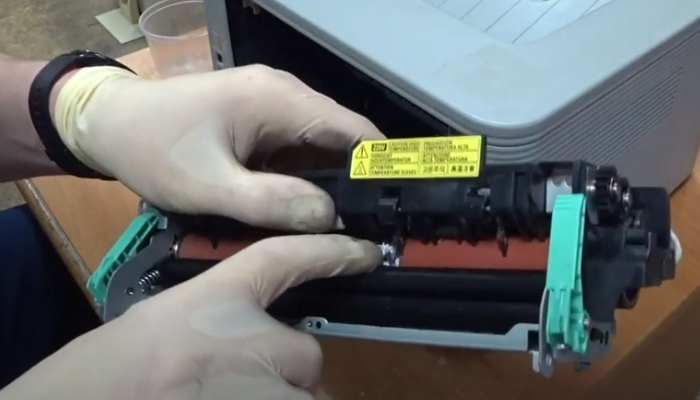
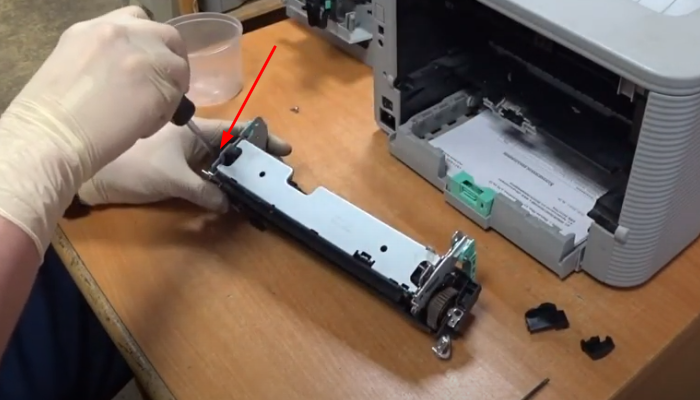
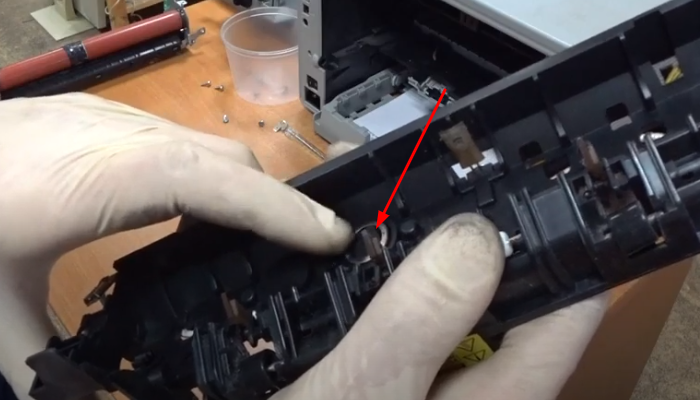
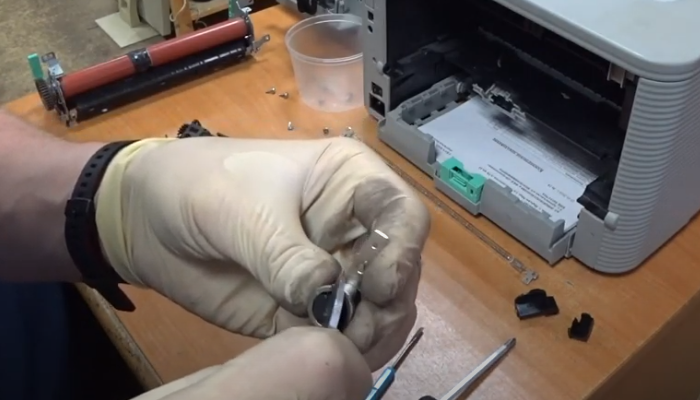
Извлекаем дуплекс, открываем крышку и снимаем ее (фото 2-4). Опускаем прижимную планку термоузла и, приложив небольшое усилие, отводим ее вправо. После чего снимаем прижимную планку термоузла (фото 5-10).

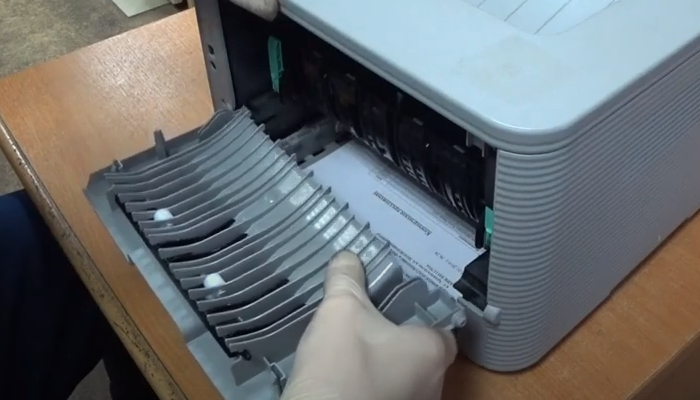
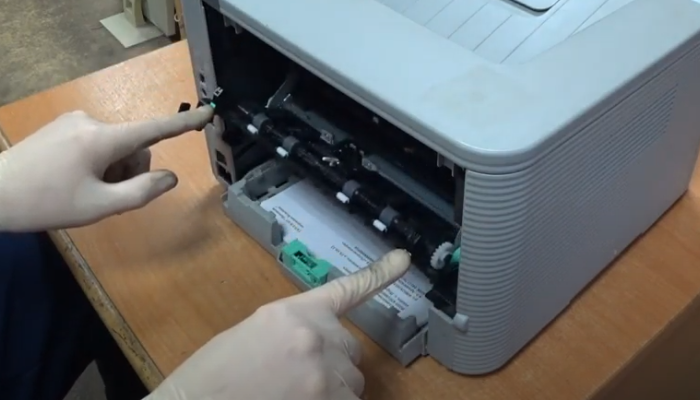
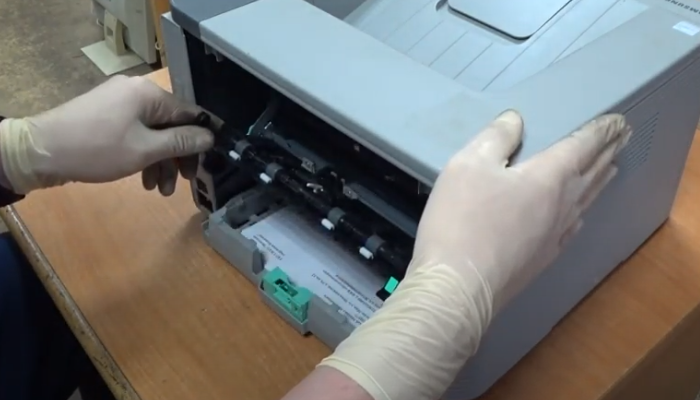
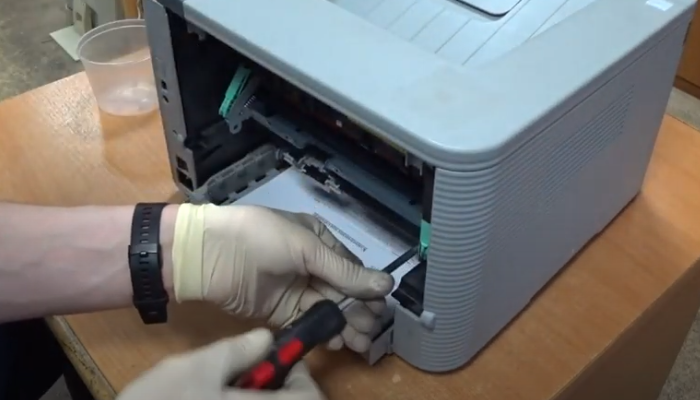
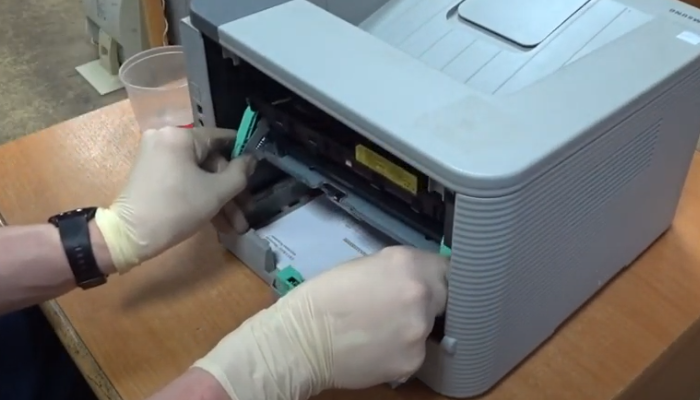
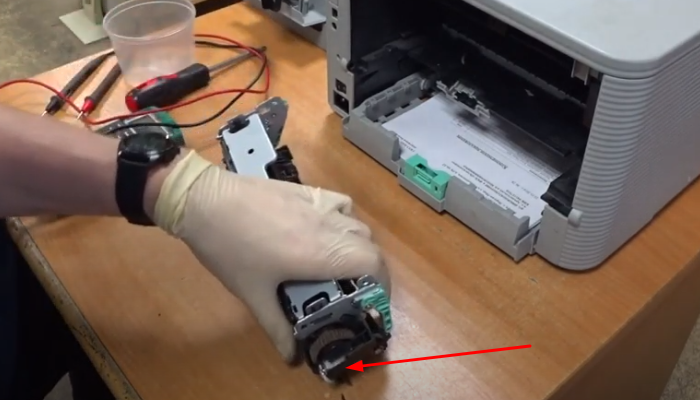
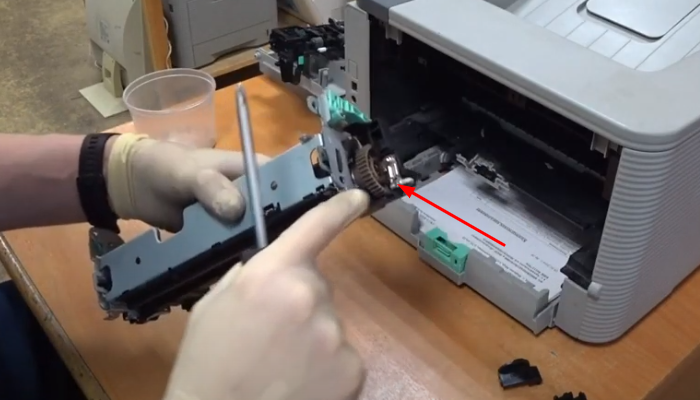
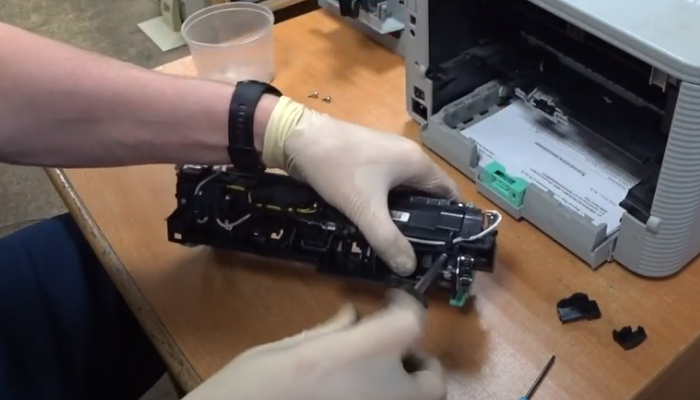
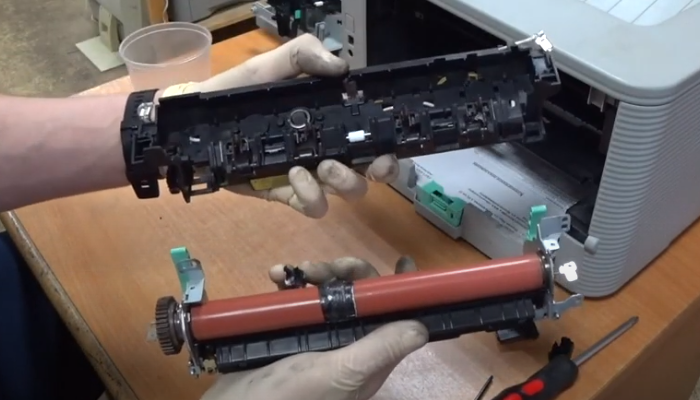
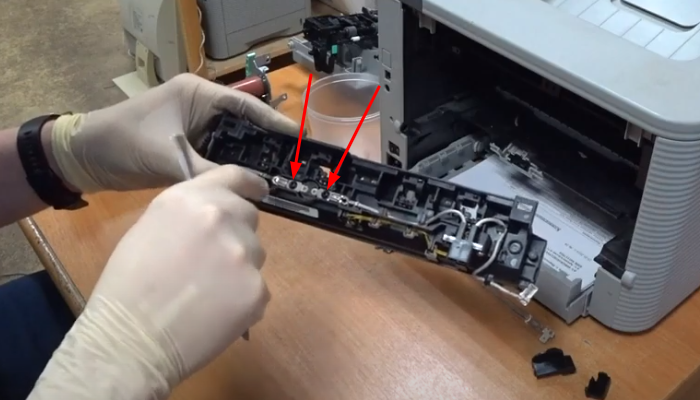
Выкручиваем винты (фото 11-13). Вытаскиваем термоузел на себя. Сразу замечаем, что на тефлоновый вал в районе термопредохранителя намотало бумагу (фото 15).
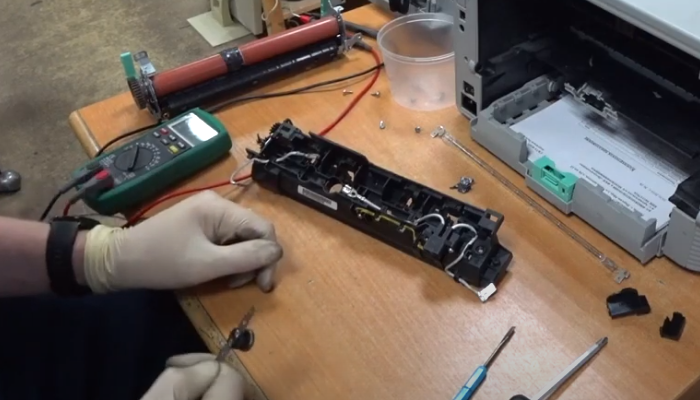
Принтер мы выключили только что, но тефлоновый вал холодный. Это значит, что печка не греется. Это обрыв цепи на лампу.

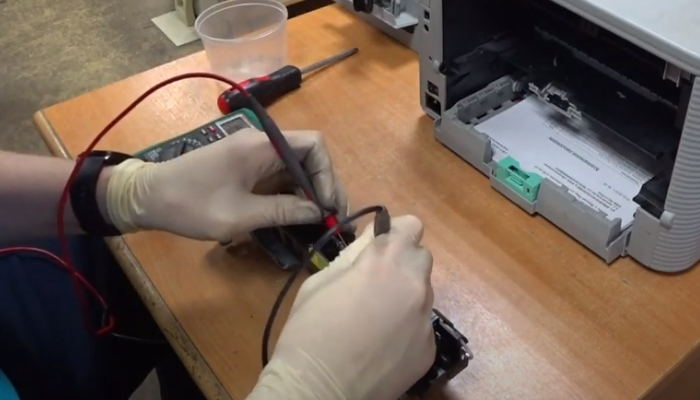
Проверим термопредохранитель. Цепь на термопредохранитель нарушена.
Проверим лампу. Снимаем два защитных колпачка, чтобы появился доступ к контактам лампы. Проверяем ее при помощи тестера. Цепь есть. Лампа исправна. Значит проблема в термопредохранителе.
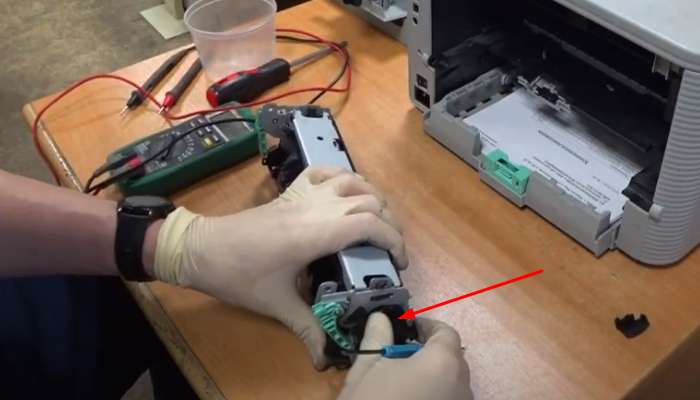
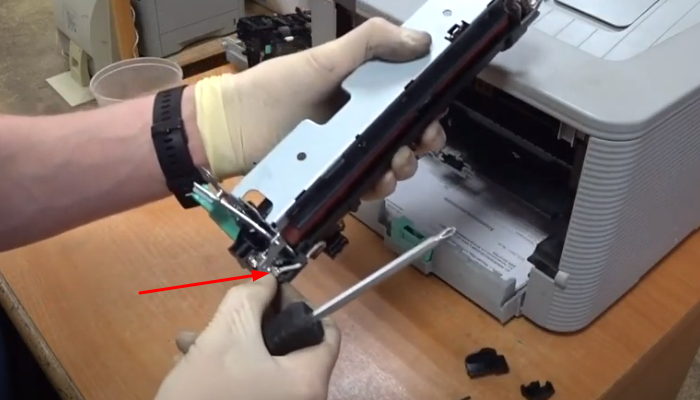
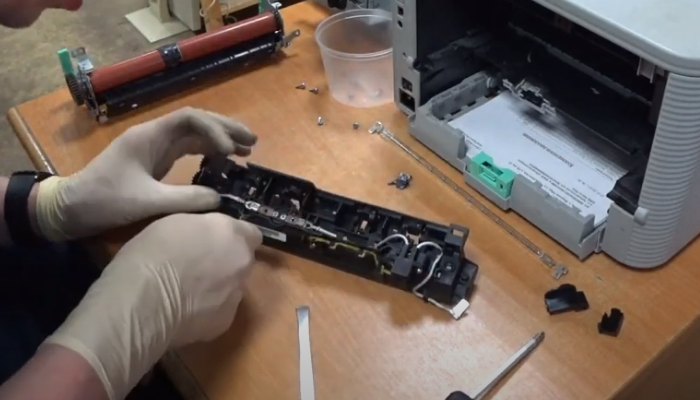
Нужно разобрать термоузел. Снимаем клеммы (фото 20, 21). Выкручиваем два винта (фото 22-25). Снимаем крышку с термоузла.

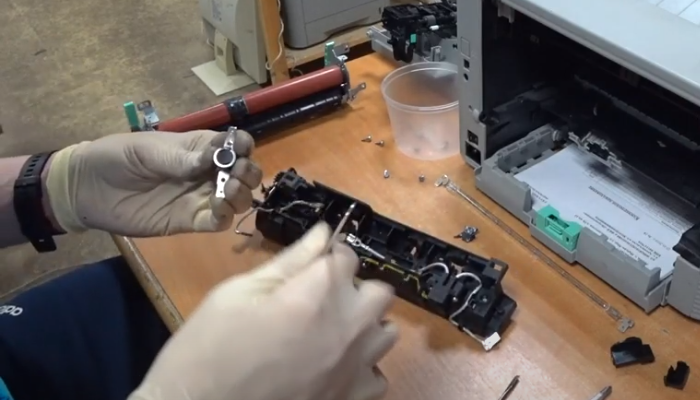
Извлекаем лампу.
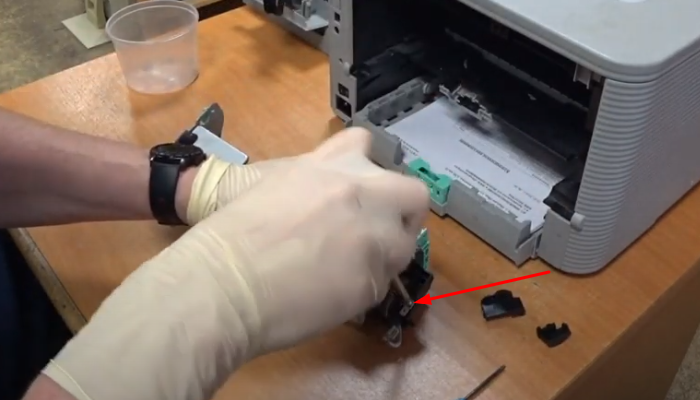
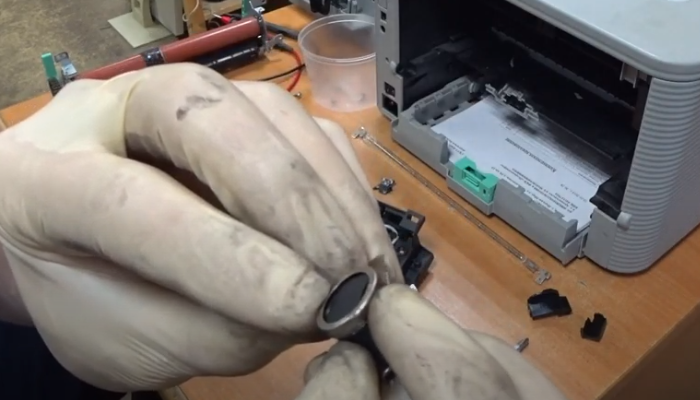
Смотрим на пластину термопредохранителя. Она должна быть выгнута наружу. А здесь пластина вогнута вовнутрь, поэтому цепь разорвалась. Сейчас мы его снимем и отремонтируем. Выкручиваем два винта, снимем клеммы, извлекаем термопредохранитель (фото 29-31).
Аккуратно счищаем с корпуса термопредохранителя запекшийся тонер. При необходимости слегка постукиваем термопредохранителем о твердую поверхность, чтобы запекшиеся комочки отвалились.
Проверяем пластину и видим, что она у нас выгнулась наружу (фото 34). В термоузле застрял кусок бумаги, который выгнул пластину, что привело к разрыву цепи. После удаления инородного предмета пластина приняла правильную форму
Прозваниваем термопредохранитель. Цепь появилась! Если пластина на термопредохранителе выгнулась, как в нашем случае, то менять его на новый нет смысла, ведь сама пластина не повреждена. Менять термопредохранитель нужно только при повреждении пластины. Например, если она поцарапана.
Устанавливаем термопредохранитель обратно. Закручиваем два винта. Чистим пальцы отделений (фото 39). Они отделяют бумагу от тефлонового вала. Закоксованный тонер на пальцах отделений может быть причиной замятия бумаги.
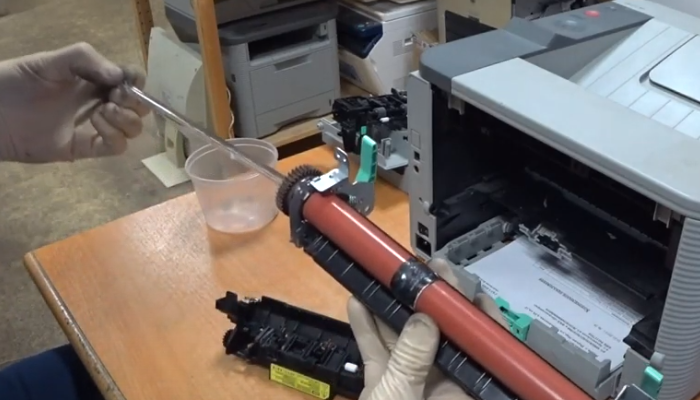
Очищаем термистор при помощи сервисной жидкости Inkmaster .

Перейдем к тефлоновому валу. Нужно снять с него намотанную бумагу. Снимаем тефлоновый вал. Для этого нужно снять фиксирующую скобу, чтобы затем снять шестерню (фото 42).
Мы сняли и показали, как выглядит фиксирующая скоба (фото 43). Снимаем шестерню, снимаем фиксатор, отодвигаем зажимы (фото 44-48). Это мы сделали для того, чтобы расслабить тефлоновый вал.
Аккуратно извлекаем тефлоновый вал. Снимаем с тефлонового вала намотанную бумагу.
Сам тефлоновый вал не поврежден, поэтому мы устанавливаем его обратно.
Собираем все в обратном порядке.
Принтер вышел в готовность, а ошибка U1-2320 пропала.
? По вопросам ремонта и обслуживания принтеров и заправки картриджей обращайтесь к мастерам компании АСТ-Принт.
☎ Звоните по телефону: 8 (495) 205 4748
Статья сделана на основе видео с YouTube канала “ЗаправкинЪ”. Ссылка на первоисточник .
Остались вопросы? Пишите в комментариях или звоните по телефону.
Статья оказалась полезной? Поделитесь ссылкой в социальных сетях, поставьте лайк и подпишитесь на канал! Мы публикуем новые материалы пять дней в неделю.
✅ Ремонт и техническое обслуживание принтеров и МФУ в компании “АСТ-Принт”
Ознакомьтесь с другими нашими публикациями:
The U1-2320 error is a common issue faced by Samsung Printer users. It occurs when the printer’s internal hardware fails to initialize correctly, resulting in the device being unable to process the print job that you have sent it. This can be caused by either a hardware failure or an incorrect configuration of the printer’s settings. Fortunately, there are several methods that you can use to troubleshoot and resolve this issue. Here, we will cover how to identify what’s causing the Samsung Printer Error U1-2320 and provide advice on how to fix it as quickly and efficiently as possible.
Error U1-2320 is a Samsung printer error that occurs when the printer is unable to communicate with the computer. This can be caused by several factors, including a loose or damaged USB cable, an outdated or corrupt driver, or a problem with the printer itself. If you are experiencing this error, there are a few things you can try to resolve it. First, check that the USB cable is securely connected to both the printer and the computer. Next, make sure you have the latest driver for your Samsung printer. Finally, if the problem persists, contact Samsung customer support for further assistance.
Related: Samsung Printer Error Code U1-2330
What Causes Samsung Printer Error U1-2320?
There are various reasons why your Samsung Printer can throw an error U1-2320. You need to configure the exact reason f the problem before jumping to the desired solution. Here is the list below
- The issue might be related to the compatible drivers installed on your system.
- Your printer driver is not updated or corrupted.
- It can be due to the outdated version of firmware used in your Samsung Printer.
- The print spooler service has crashed or stopped working correctly.
- There are some compatibility issues with the printer and other hardware components connected to it like USB cable, router, etc,
- The outdated network connection between your Samsung Printer and computer system can lead to this error code U1-2320.
How to Troubleshoot and Fix Samsung Printer Error U1-2320?
If your Samsung printer is displaying the error code U1-2320, there are a few steps you can take to troubleshoot and resolve the issue.
Restart the Printer
Here are the steps to restart your printer and resolve the issue directly.
- Firstly, turn the printer off by pressing the power button.
- Unplug the power cord from the back of the printer and wait 10 seconds.
- Plug the power cord back into the printer and turn it on again.
- Check to see if your error code is gone.
Check Paper Tray Size
If restarting did not work, then you may have a paper tray size issue causing this problem. Make sure that you always use the correct paper size for your printer model, as using incorrect sizes can cause errors such as this one. You should also make sure that you do not overfill or underfill the paper tray when loading it with paper. This may help to fix Samsung Printer Error U1-2320.
Restart the Print Spooler Service
The print spooler service is responsible for managing the tasks that are sent to the printer. If this service is not running, then your printer will not be able to process any printing jobs. To restart this service, follow the steps below
- Open the Run dialog box by pressing Windows Key + R.
- Type “services.msc” and press enter.
- Find the Print Spooler service in the list of services and double-click it.
- Click on “Restart” to restart the service.
- Check to see if your error code has gone away after restarting the print spooler service.
Check Printer Connections
Before beginning any troubleshooting steps for Samsung Printer Error U1-2320, it’s important to check that your printer is properly connected to your computer. If your printer is wireless, make sure that it’s turned on and properly connected to your wireless network. If you’re using a USB cable, check that it’s securely connected to both your printer and computer.
Check the Printer Driver Version
If you are using a Samsung printer, it is important to check the version of the printer driver that you are using. Outdated or incompatible drivers can cause errors like Samsung Printer Error U1-2320. To check the version of your Samsung printer driver
- Open the Devices and Printers control panel.
- Right-click on your Samsung printer and select Properties.
- Select the Drivers tab.
- The version number will be listed next to Driver Version.
- If you find that you are using an outdated or incompatible driver, you can download and install the latest driver from Samsung’s website.
Update Samsung Printer Drivers
To update the drivers, you can either use the Samsung Printer Driver Update Utility or manually update your drivers.
- If you choose to use the Samsung Printer Driver Update Utility, simply download and install the program on your computer. Once installed, launch the program and follow the prompts to update your drivers.
- If you prefer to update your drivers manually, you can first download the latest drivers from Samsung’s website. Once downloaded, open the file and follow the installation wizard to install the new drivers on your computer.
- Check for the solution of Samsung Printer Error U1-2320.
Remove and Reinstall Printer Software
If you are not sure how to do this, please follow the instructions below
Firstly, click on the Start menu and then select Control Panel.
- Click on Programs and Features.
- Locate your Samsung printer software in the list of installed programs and click on it.
- After that, click on the Uninstall button.
- Follow the prompts to uninstall the software.
- Once the software has been uninstalled, restart your computer.
- After that, download and install the latest version of the Samsung printer software from Samsung’s website.
- Follow the prompts to install the software on your computer.
- Finally, restart your computer again and try printing a document to see if Samsung Printer Error U1-2320 has been resolved.
Reset the Printer Firmware
If you are still facing Samsung Printer Error U1-2320, it means that there is a problem with the printer’s firmware. To resolve this error, you will need to reset the printer’s firmware. To do this, follow these steps
- Firstly, turn off your Samsung printer and unplug it from the power outlet.
- Press and hold the StopReset button on the printer for 10 seconds.
- While still holding the StopReset button, plug in the power cord to the printer and turn it on.
- Keep holding the StopReset button until you see the message Download Mode on the LCD screen of the printer.
- Download and install the latest version of Samsung Printer Firmware from Samsung’s website.
- Lastly, restart your printer and check if the error Samsung Printer Error U1-2320 is still displayed.
Related: Samsung Printer Error Code M2-1317
FAQs
How do you Reset a Samsung Printer?
Here are the quick steps to reset the Samsung Printer so that it does not show any error while working.
- Unplug the power cord from the back of your printer and then plug it back in.
- Press and hold the “Power” button on the front of your printer for 10 seconds, then release it.
- If needed, press the “Reset” button on the back of your printer.
- Lastly, check that all lights on your printer are off before attempting to print again.
How to Fix Error U1-2320 on my Samsung Printer
If you face Samsung Printer Error U1-2320, there are a few things you can do to troubleshoot and resolve the issue. First, check that all of the printer’s cables are securely connected and that there is no damage to the cables. Next, try resetting the printer by unplugging it from the power source for 30 seconds and then plugging it back in. If the error persists, you may need to contact Samsung customer support for further assistance.
More Helpful Guides
Samsung Printer Error Code 11-1112
Fix Samsung Printer Error U2-1112
How to Fix Samsung Printer in Error State?
Samsung is a well-known company that manufactures a number of electronics gadgets including quality printers. Since its inception, the Samsung printers have become a more preferable gadget for millions of users as it maintains it’s quality and performance level. But sometimes it disappoints the users showing Samsung printer error code u1 2320. This particular error code is related to the fuser unit. When you are getting this glitch, you have to resolve this at the earliest possible. Here in this guide, we are going to discuss some apparent fixes that can be reliable for you. So, go through the article and resolve the error on your own.
When you are facing Samsung printer error code, there can be some underlying reason for getting this. Have a look at the possible reasons that cause the error code u1 2320.
Outdated driver: By any chance, if you are using an old driver that is not compatible with your device, then you can face this issue with your printer.
Overheating of Fuser unit: This error code is related to damaged fuser unit. Fuser unit is a removable component of printer that needs to be replaced from time to time. The fuser adjusts the temperature quickly. So, in case, if it gets overheated, then there is a high possibility of confronting this problem.
Virus or malware attack: It is possible that if your Samsung printer’ software gets affected by virus or malware, then it does not allow you to complete the printing job successfully and leave the error code u1 2320. So you need to be very careful about that.
Easy Methods to Fix Samsung Printer Error Code u1 2320
Samsung printer error code u1 2320 might seem to be quite difficult to fix, as it occurs due to some defect inside the printer. Go through the following steps in order to troubleshoot this error code. But, remember that you have to execute exactly the same process as stated below, otherwise, your device may get damaged permanently.
Method 1: Soft Reset Samsung Printer

This is the basic method by which you can surely resolve this particular error code without any delay. To do so, at first, turn on your printer. After that, you need to open the fuser unit and check it. Then, turn on the printer again. Wait for some time and check if the error code is still appearing or not.
Method 2: Perform a Factory Restore

If the above method is not workable for you, then you can go for this one. This will surely help you to fix to glitch. The very first thing you have to do is press the F8 key for some times and tap on “Repair your computer.” Then, click on Next and select your username and password and tap on OK. Now, choose “System Recovery” and again tap on OK.
After that, press and hold down the back, power and home button at the same time. You can see that a message gets displayed on the screen and asking you to press any key to continue the restore process. When the restoration process gets complete, check if the error code gets solved or not.
Method 3: Check Fuser Unit

As an alternative method, this one is really feasible for you to fix Samsung printer error code u1 2320. At first, turn off your printer and remove the fuser unit from it. After that, check whether the fuser connector is attached properly with your printer or not. Now, review and test the input voltage supply, whether it is normal or not. Next, check the thermistor. If you find it is faulty, then you have to replace it with a new one. Never forget to check the SMPS and HVPS board, as well.
Method 4: Update Device Driver

Seldom an outdated driver can restrict your Samsung printer from printing. At that time, you have to update the driver as soon as possible to get rid of the error. First, check whether the driver is corrupted or not. If you find the driver is corrupted, then navigate to the Start icon and tap on it. Then, move to the Search option and click on it. Now, type “Device manager”. A new page will open on the screen and extend the category option. From a number of option, choose the suitable option for you and click on the Update button. After completion of the update, restart your device and check if the error code is still stuck on the screen or not.
Method 5: Check the Temperature of Fuser Unit

By any chance, if the fuser unit of your printer gets heated, then it is also quite possible that you can face “Samsung Printer Error Code u1 2320.” So, you need to check the Temperature Control of the fuser unit. If you find the temperature is not moderate, then low down the temperature and check if the issue gets fixed.
Hopefully, by applying the above fixes you can eliminate Samsung printer error code u1 2320, without any delay. But, if you find any sort of difficulties, then do not forget to share your queries in the feedback section below.

Create an account on the HP Community to personalize your profile and ask a question
Your account also allows you to connect with HP support faster, access a personal dashboard to manage all of your devices in one place, view warranty information, case status and more.

10-28-2019
09:46 PM

HP Recommended
- Mark as New
- Permalink
Product: SL-C483W
Operating System: Microsoft Windows 10 (64-bit)
I bought a Samsung multifunctional printer, named SL-C483W in Korea early this month and brought it in here in Baltimore . When I unbox , connected it with my labtop, and turn it on, it did not work with an error messege «Error #U1-2320» on the screen. I tried to turn off and on several times but nothing is changed. When I searched with the serial number on this site, warranty is due on ~ May, 2020. How can I have a service to solve this problem?
Yoonah Park
1 REPLY 1
10-28-2019
10:37 PM
HP Recommended
- Mark as New
- Permalink
This code is a fuser error. You state that you bought the printer in Korea. Korea distributes power at 220V whereas the US uses 120 Volt. It is possible that the stepup transformer you are using cannot provide enough current to run the device and you will need a bigger one, or you have plugged the 220V device directly into a 120v outlet which can lead to problems as well. the challenge is that while the power supply for the electronics may handle both 120 and 220, the fuser units will be different because they are powered directly from the mains. This will likely not be a warranty issue as you are using the product in a non-supported manner.
If you find the information provided useful or solves your problems, help other users find the solution easier by giving kudos and marking my post as an accepted solution.
I am a volunteer, offering my knowledge to support fellow users, I do not work for HP nor speak for HP.


![]()
Be alert for scammers posting fake support phone numbers and/or email addresses on the community.
If you think you have received a fake HP Support message, please report it to us by clicking on «Flag Post».
† The opinions expressed above are the personal opinions of the authors, not of HP. By using this site, you accept the Terms of Use and Rules of Participation.

-
English
Open Menu

† The opinions expressed above are the personal opinions of the authors, not of HP. By using this site, you accept the <a href=»https://www8.hp.com/us/en/terms-of-use.html» class=»udrlinesmall»>Terms of Use</a> and <a href=»/t5/custom/page/page-id/hp.rulespage» class=»udrlinesmall»> Rules of Participation</a>.