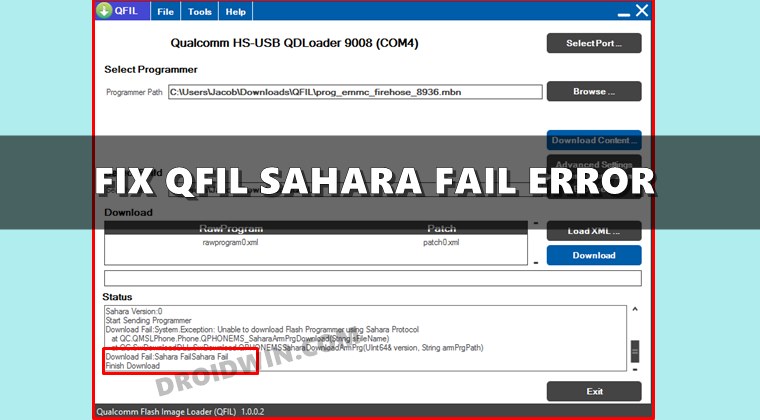
In this guide, we will show you the steps to fix the Sahara Fail/QSaharaServer Fail/Process Fail Error in the QFIL Tool. Qualcomm Flash Image Loader is a software program that is used for flashing the firmware file to the devices with the Qualcomm chipset. However, its main usage comes into the picture when we talk about unbricking a device. While there are a plethora of tools that claim to achieve the said tasks, in our testing, QFIL was the standout performer.
All that you need to do is boot your device to EDL Mode and then flash the associated firmware using this tool. For the unaware, Emergency Download Mode is a special kind of download mode present only in Qualcomm devices that helps you force-flash the firmware when your device is unable to boot to the OS. Making use of this mode and the Image Loader tool, you could easily unbrick your device without much issue.
However, the tool is known to face quite a few errors, most of which stems out from the user side. In this regard, one of the most common ones is the Sahara Fail error. If you are also getting bugged with this issue, then this guide shall help you out. Given here are the various methods to fix the Sahara Fail/QSaharaServer Fail/Process Fail Error in QFIL Tool. Follow along.
- Fix Sahara communication failed error in MSM Download Tool
- How to Fix All ADB and Fastboot Errors
- TWRP Recovery gone after a Reboot: How to Fix
- How to Fix FAILED (remote: Command not allowed)
There isn’t any universal fix as such. You will have to try out each of the below-mentioned workarounds until one of them spells out success. So without further ado, let’s get started.
Fix 1: Enter EDL Mode at the Right Time
EDL Timeout is one of the most common reasons for this error. The thing is that you shouldn’t keep your device lying idle in the EDL mode for too long. What many users do is that they boot the device to EDL and then start setting up the tool. Rather, the reverse should be done.
You should first set up the tool, load the firmware and at the last step, boot your device to EDL mode and connect it to PC to flash the firmware. Try out this advice and see if it fixes the Sahara Fail/QSaharaServer Fail/Process Fail Error in QFIL Tool.
Fix 2: Use the Correct Firmware
Make sure that the firmware that you have loaded to the tool matches your device and also the region.
Fix 3: Use Latest QFIL Version (Standalone or QFIL+QPST)
Using an old our outdated tool could lead to quite a few issues. Therefore, it is always recommended that you use the latest version of the QFIL Tool. Moreover, this tool comes in two variants: a standalone version and the one that is bundled with QPST Tool. So you could also try switching the builds.
For example, if you are using the standalone one, then switch over to the one that comes bundled with QPST. Or if you are already using the bundled one, then switch over to the standalone version. Try out these tweaks and see if they are able to fix the Sahara Fail/QSaharaServer Fail/Process Fail Error in QFIL Tool.
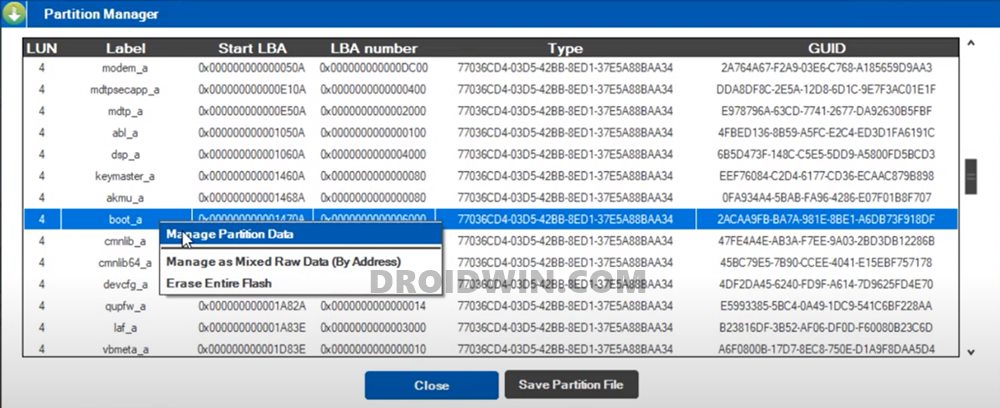
Fix 4: Reverify the Programmer Firehose File
If you have loaded the programmer firehose file, then make sure that it is explicitly for your device and chipset. Loading an incorrect firehose file could lead to disastrous consequences.
Fix 5: Check Installation Directory
Double-check the folder path where you have installed the QFIL Tool and make sure that there are no spaces between the file name.
- For example, below is an example of an incorrect installation directory:
D:\Android Softwares\QFIL
- The corresponding correct file path will be:
D:\Android_Softwares\QFIL
- So check the installation directory and if there are any spaces, make sure to remove them. You may also shift the tool to any other location that doesn’t have spaces between its name.
Try out these renaming tweaks and see if it is able to fix the Sahara Fail/QSaharaServer Fail/Process Fail Error in QFIL Tool.
Fix 6: Disable Driver Signature Enforcement
Windows OS doesn’t allow the installation of unsigned drivers. Unfortunately, most of the tools that we deal with it in the Android Custom Development usually have unsigned drivers.
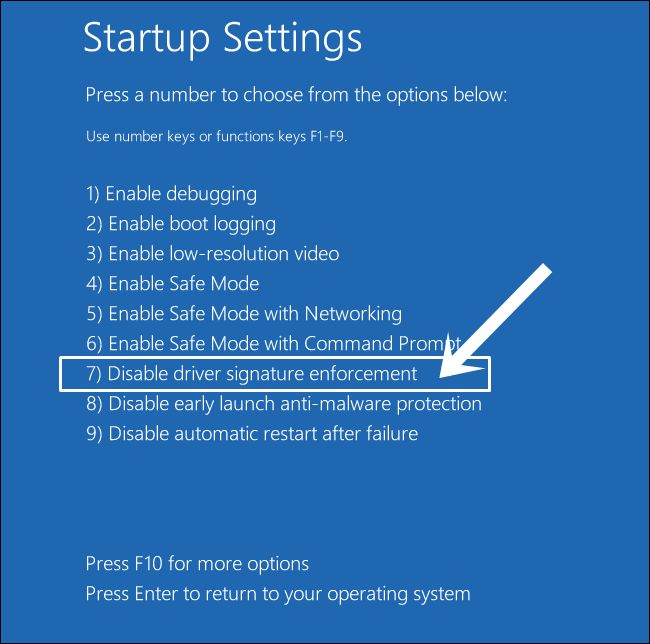
Therefore, before you proceed ahead with the installation of any such tool, make sure to disable the driver signature enforcement on your Windows 10 PC. To do so, please refer to our detailed guide: How to Disable Driver Signature Verification on Windows 10.
Fix 7: Use Official USB Cable | USB 2.0 Port
It is recommended that you only use the USB cable that came shipped with your device (or any other Android device for that matter). You should not use any standalone USB cable as they don’t support executing ADB and Fastboot, let alone supporting EDL Mode.
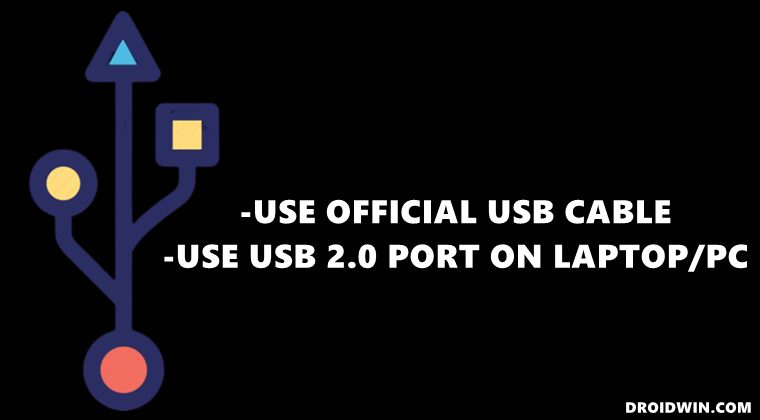
Moreover, make sure to plug in the cable to the USB 2.0 Port on your PC. While the newer USB 3.0 Port are faster, but they more often than not ends up conflicting with the flashing and other related tasks. So use the official USB cable and USB 2.0 Port and see if it is able to fix the Sahara fail error in QFIL Tool.
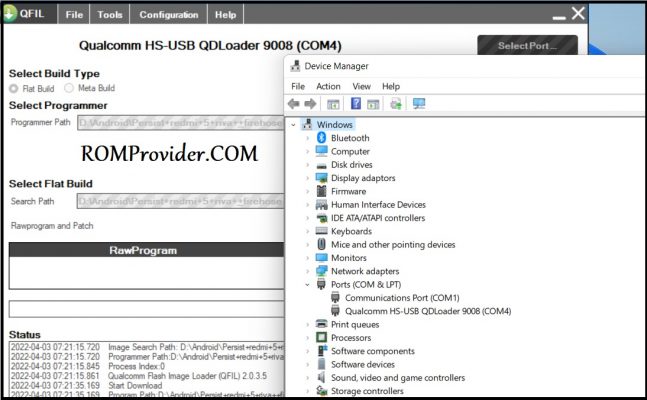
Fix 8: Install Qualcomm HS-USB QDLoader 9008
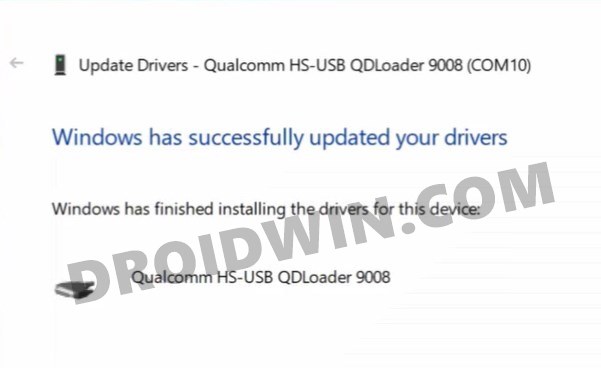
As soon as you boot the device to EDL and connect it to PC, your device should be recognized as Qualcomm HS-USB QDLoader 9008 under Device Manager. However, if it is listed as QHUSB_BULK or Other Device, then it’s due to missing Qualcomm drivers. So head over to our guide and refer to the detailed instructions (with screenshots) to Download and Install the latest Qualcomm HS-USB QDLoader 9008 Drivers.
With this, we conclude the guide on how to fix the Sahara Fail/QSaharaServer Fail/Process Fail Error in the QFIL Tool. We have shared eight different types of fixes, do let us know in the comments which one worked out for you. Likewise, if you were able to rectify the issue using any other workaround, then keep us informed via the comments section.
About Chief Editor

Sadique Hassan
administrator
A technical geek by birth, he always has a keen interest in the Android platform right since the birth of the HTC Dream. The open-source environment always seems to intrigue him with the plethora of options available at his fingertips. “MBA by profession, blogger by choice!”
QFIL – это инструмент для прошивки, специально разработанный для смартфонов с процессорами Qualcomm. Это отличный инструмент, который можно использовать для прошивки файлов прошивки. Однако будет лучше, если вы будете обращаться с ним осторожно.
Использование этого инструмента без соответствующих знаний может привести к блокировке вашего устройства и появлению нескольких ошибок. Одна из распространенных и очевидных ошибок, с которыми сегодня сталкиваются пользователи, – это ошибка Sahara Fail в программном обеспечении QFIL.
Контекст этой ошибки может быть разным для всех в зависимости от версии программного обеспечения QFIL. Некоторые из распространенных префиксов сообщений об ошибках: Sahara Fail, Process fails error, Download Fail и QSaharaServer Fail.
Эта проблема характерна для большинства пользователей, и существует несколько возможных причин этой серьезной проблемы. Если вы используете QFIL и сталкиваетесь с той же ошибкой, это руководство поможет вам решить проблему, связанную с программным обеспечением для перепрошивки QFIL.
Пожалуйста, ознакомьтесь с этими основными шагами по устранению неполадок, и они могут помочь вам исправить ошибку Sahara Fail в QFIL.
Шаги по исправлению ошибки Sahara Fail в QFIL:
Шаг 1. Обновите версию QFIL
Возможно, вы столкнулись с этой ошибкой, потому что используете старую версию QFIL. Однако этот инструмент все еще находится в бета-версии, и в нем много ошибок. Разработчики работают над инструментом и предлагают частые обновления. Это могло быть одной из причин столкнуться с ошибкой.
Если вы используете старую версию QFIL flash со своим последним смартфоном Qualcomm, вы обязательно столкнетесь с ошибкой Sahara Fail. Поэтому лучший способ избежать ошибок – установить последнюю версию этого инструмента.
Шаг 2. Использование нестандартного USB-кабеля
Вы можете столкнуться с этой ошибкой, если используете поврежденный или некачественный USB-кабель для прошивки файлов прошивки на процессор. Важно избегать дешевых или поврежденных кабелей, чтобы избежать ошибок в процессе перепрошивки.
Однако использование нестандартного кабеля может повредить ваше устройство, или вы столкнетесь с ошибкой Sahara Fail в QFIL. Поэтому рекомендуется использовать качественный USB-кабель для передачи данных.
Шаг 3: несовместимый файл программатора
Каждый комплект прошивки имеет уникальный набор файлов программатора, которые можно использовать с различными инструментами. Каждый инструмент поставляется с отдельным набором инструкций для прошивки файлов программиста.
Наиболее распространенными инструментами, используемыми для перепрошивки, являются Img flasher, SP flash tool и QFIL. Каждый из этих инструментов имеет свой подход к флэш-файлам программиста.
Следовательно, вам необходимо убедиться, что вы выбрали совместимый файл программатора в соответствии с инструментом, который вы используете.
Файлы программистов, совместимые с инструментом QFIL, часто содержат в своем имени Qualcomm или QFIL.
Шаг 4: выбор пути к файлу
При прошивке файлов прошивки следует обращать особое внимание на путь к файлу. Если вы неправильно указали путь к файлу, процесс прошивки будет некорректным. Вы можете столкнуться с ошибкой Sahara Fail Error, если вы указали неправильный путь к файлу. Поэтому необходимо указать правильный путь к файлу, чтобы избежать ошибок.
Шаг 5: исправьте файлы прошивки
Перепрошивка вашего смартфона – серьезная работа, и вам нужно быть очень осторожным и внимательным, чтобы правильно перепрограммировать свое устройство. Всегда важно найти и загрузить правильные файлы прошивки, чтобы избежать проблем при перепрошивке устройства.
Если вы загрузили из Интернета файлы, которые повреждены или имеют проблемы с целостностью, вы можете столкнуться с различными ошибками QFIL во время перепрошивки.
Вам необходимо убедиться, что вы скачали файлы прошивки для своего Qualcomm из официальных источников QFIL. Одна из важных вещей – дважды проверить «контрольную сумму» файлов перед прошивкой устройства.
Шаг 6. Слишком ранний ввод EDL
Было бы лучше, если бы вы были осторожны, прежде чем переводить свое устройство в режим EDL. Вы можете столкнуться с ошибкой Sahara, если войдете или оставите свое устройство в EDL для инструмента задолго до того, как процесс перепрограммирования даже начнется.
Эта ошибка возникает из-за тайм-аута. Переход в режим EDL должен быть последним делом в вашем списке дел перед запуском процесса перепрошивки.
Шаг 7. Правильный драйвер Qualcomm
Как было сказано ранее, инструмент QFIL специально разработан только для процессоров Qualcomm. Поэтому вы должны убедиться, что загружаете правильный драйвер для своего устройства. Если вы установите поврежденные или неправильные драйверы, вы столкнетесь с ошибками при перепрошивке.
Шаг 8: Отключение принудительной подписи драйверов
При использовании ОС Windows вы столкнетесь с принудительной подписью драйверов – специальной функцией, которая помогает запретить пользователям устанавливать любое стороннее программное обеспечение из неизвестных источников.
Однако эта функция важна для защиты пользователей от атак вирусов или вредоносных программ. Но инструмент QFIL должен установить все драйверы на ваш компьютер. Если вы используете Windows 10, вы можете отключить принудительное использование подписи драйверов следующим образом:
Откройте командную строку в режиме администратора.
Введите эти команды и нажмите ENTER.
bcdedit.exe -set loadoptions DDISABLE_INTEGRITY_CHECKS
bcdedit.exe -set TESTSIGNING ON
После выполнения этой команды вам необходимо перезагрузить компьютер, а затем нормально открыть инструмент QFIL. Это исправит ошибку Sahara Fail в QFIL.
Заключение
QFIL – это всего лишь инструмент для перепрошивки, и он может вызвать ошибку Sahara или другие типы ошибок, если вы не будете использовать этот инструмент осторожно. Для правильной прошивки рекомендуется использовать USB-кабель хорошего качества и подходящие инструменты для прошивки.
Использование правильного кабеля и подходящих файлов или драйверов поможет вам избежать ошибки Sahara Fail в QFIL. Если у вас есть какие-либо затруднения или вопросы относительно инструмента QFIL, оставьте свой комментарий.
This is most impotent for everyone who flashing in QFIL Flash tool cause some time comes error on displayed which is «Sahara Fail» error for that given here solution if you want. This is for Windows 7 32bit-64bit, Windows 8 32bit-64bit, Windows 10 64-Bit
If want to fix device, can try to repair it by. have to charge a battery with any charger and charged it by 90%. Your data is very important for so it is good to do a backup of data it may consist of contact details, important messages, emails or any other important thing which feel to be the backup in a device. This backup can be done on another device. we have to do the backup because after a format of a device, all data will be gone and it will not be recovered. For backup in other devices, you can use another external device like hard drive, SD card or any other suitable devices. If are doing by own. do it at your own risk as we don’t take any responsibility if a device is damaged
You can easily solve any problem with this method if you are fresher technician or experienced technician in android software related if the error occurs of USB not recognized then your USB is not working.if a battery is not charged,your USB socket will not proper work and you will fail in this method. if any issues please write your questions in the comment box I will try my best to help you.
Disable Driver Signature Enforcement For Windows 7 64bit
- Click on Start button and choose «All Programs», again choose «Accessories», there to be «Command Prompt» right click on from the Mouse that and choose «Run as administrator»
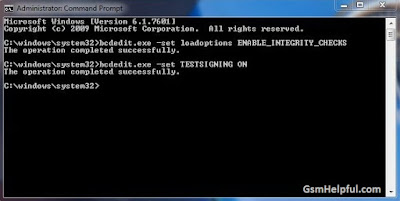
- Type this command
- «bcdedit.exe -set loadoptions DDISABLE_INTEGRITY_CHECKS» and hit Enter key
- Again type «bcdedit.exe -set TESTSIGNING ON» and Hit Enter key
- Reboot your Computer or Laptop
- Now you can see Signing Enforcement is disable on the lower right hang side corner
- If you want to «Enable Driver Signature Enforcement» then following below code
- «bcdedit.exe -set loadoptions ENABLE_INTEGRITY_CHECKS» and hit Enter key
- Again type «bcdedit.exe -set TESTSIGNING OFF» and hit Enter key
For Temporary Disable Driver Signature Enforcement
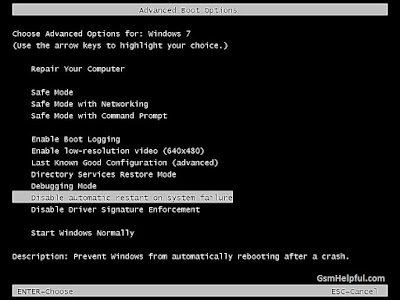
- Reboot your Computer or Laptop, Press «F8» key continuously until «Advanced Boot Options»
- Go Down from the arrow key and choose «Disable Driver Signature Enforcement» and Hit Enter key
- It will be automatically reboot with disable driver signature enforcement mode
Disabling for Windows 8.1 / 10 64-bit
- Right click on Windows button and then click «Command Prompt (Admin)» OR Press Windows key + X see below image

- Type this command
- «bcdedit.exe -set loadoptions DDISABLE_INTEGRITY_CHECKS» and hit Enter key
- Again type «bcdedit.exe -set TESTSIGNING ON» and Hit Enter key
- Reboot your Computer or Laptop
- Now you can see Signing Enforcement is disable on the lower right hang side corner
- If you want to «Enable Driver Signature Enforcement» then following below code
- «bcdedit.exe -set loadoptions ENABLE_INTEGRITY_CHECKS» and hit Enter key
- Again type «bcdedit.exe -set TESTSIGNING OFF» and hit Enter key
For Temporary Disable Driver Signature Enforcement
- Restart Computer or Laptop with hold down the SHIFT key as below image

- After that need to choose «Troubleshoot» option
- Choose «Advanced» options as below image
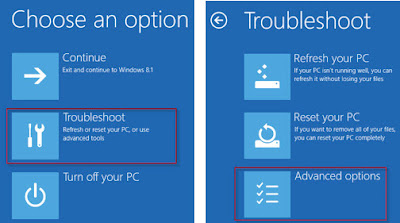
- Choose «Startup Settings» option as below image

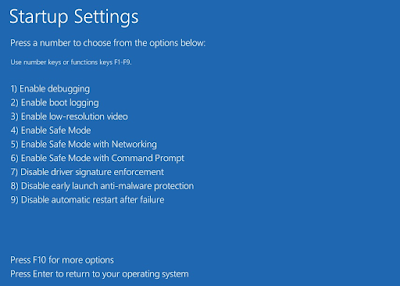
- Click on «Restart» button see below image

- After that restarting again in Startup settings then press F7 key to choose «Disable driver signature enforcement» as below image
- After that your Computer or Laptop will reboot then install necessary unsigned Driers and «Install this driver software anyway» as below image
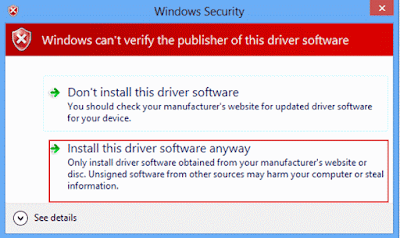
- Congratulation and Enjoy !

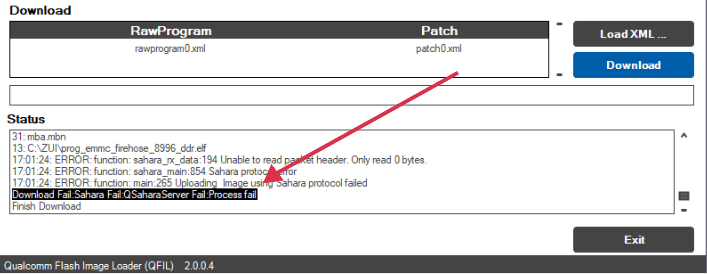
QFIL or qualcomm Flash image Loader is a window tool which allow user to flash their QCOM smartphone via EDL Mod. some times user face a ‘Download Fail: Sahara Fail:QSahara Server Fail error‘ on this tool, so here we share a working solution to fix this error.
Reason of Sahara Fail:QSahara Server Fail error:
after many attempt I have found below listed Reason’s
- EDL timeout
- QFIL Installation
- Wrong Firehose or Programmer File
Solutions:
- Install or Put QFIL under same directory where QPST Installed
C:\Program Files (x86)\Qualcomm\QPST\bin
- after putting the Phone to EDL mod, immediate click Download to avoid any timeout error
- check firehose or Programmer file, make sure you are using Programmer for same board. some vender like Xiaomi implement SLA authentication via firehose, you can fix it by patching the Programmer or firehose file.
Download started after above fixes:
Qualcomm Flash Image Loader (QFIL) is a free tool for flashing Qualcomm-based Android devices. QFIL-flashable firmware come in either Flat or Meta build and require the device in Emergency Download Mode (EDL) / Qualcomm HS-USB QDLoader 9008 for flashing.
What’s the difference between Flat build and Meta build?
The difference is in the content of the firmware and folder structure. Flat build contains patch.xml in the same folder with other files while Meta build contains contents.xml in the root of the folder.
For those who are new to using this tool for flashing, here’s a crash course
We also have a course on Qualcomm Software Repairs so check it out at https://www.hovatek.com/training
Sahara Fail error in QFIL
With QFIL, one error you’ll eventually encounter is the Download Fail:Sahara Fail: QSaharaServer Fail: Process fail error .
There are a number of reasons you might get this error so lets dive into them plus their fixes.
Causes of QFIL Sahara fail and solutions
- Incompatible firmware: If you’re trying to flash a wrong firmware or variant of your device then you could run into this error
- Using an old QFIL version: You might run into this error when using an old version of QFIL relative to your device. Head over to our QFIL collection to download the latest version.
- Using QFIL standalone: There are two formats of QFIL; one which is co-installed with QPST and QFIL standalone . If you’re encountering Sahara fail while using the standalone then install the latest version of QPST and use the QFIL that comes with it.
- Incompatible programmer file: You’ll usually find multiple programmer files (with firehose in the name) in your firmware. If you do then consider trying the others in the firmware. If not, try a different factory firmware.
- Space in file path: Check the file path to your firmware and ensure there’s no space in any of the directory names e.g have C:\Users\Hovatek\Desktop\Hovatek_files\QFIL_Qualcomm instead of C:\Users\Hovatek\Desktop\Hovatek files\QFIL Qualcomm
- Entering EDL too early: Entering and leaving the device in EDL for too long before flash could cause a Sahara error due to timeout. Putting the device into EDL mode should be the last thing you do just before clicking Download (which initiates flashing).