- Page 1
02.2020 New as of: Intego / I ntego Pro Intego Ambidextrous Intego Pro Ambidextrous Operating Instructions (not valid for USA) English… -
Page 2: Table Of Contents
Table of Contents Dentsply Sirona Operating Instructions Intego Table of Contents General Information ………………..Dear customer, ………………. Contact information………………General information on the operating Instructions ……..Scope of these operating Instructions…………Other valid documents …………….. Warranty and liability………………Intended use ………………..
- Page 3
Dentsply Sirona Table of Contents Operating Instructions Intego System overview Intego Pro ……………. System overview Intego / Intego Pro with Ambidextrous option ….Patient chair ………………..Head support ………………..3.7.1 Flat headrest ……………… 3.7.2 Double-jointed head support…………Foot control ………………..3.8.1 Pneumatic foot switch ………….. - Page 4
Table of Contents Dentsply Sirona Operating Instructions Intego Foot control ………………..4.3.1 Pneumatic foot switch …………..4.3.2 C+ electronic foot switch…………..Patient chair ………………..4.4.1 Safety instructions…………….4.4.2 Safety stop ………………4.4.3 Triggering an immediate movement stop……..4.4.4 Armrests………………4.4.5 Vario footrest……………… - Page 5
Dentsply Sirona Table of Contents Operating Instructions Intego 4.5.7.5 Attach/remove the housing and nozzle ……4.5.7.6 Applying air, water, or spray ……… 4.5.8 Turbine / air motor / other air-driven instruments……4.5.8.1 Using the highspeed handpiece ……..4.5.8.2 Setting the light of the highspeed handpiece…. - Page 6
4.7.4 Stand-alone water supply ………….. 165 4.7.4.1 Water supply for the Intego ………. 166 4.7.4.2 Water supply for the Intego pro ……..168 4.7.5 Converting the Ambidextrous water unit for right and left-handed people ……………….. 172 Swiveling tray holder………………178 Cup holder ……………….. - Page 7
Dentsply Sirona Table of Contents Operating Instructions Intego 4.11 Operating light………………..181 4.11.1 Switching the operating light on/off ……….181 4.11.2 Setting the LEDlight brightness…………182 4.11.3 Setting the brightness, color temperature, and sensor control of the LEDview Plus…………….182 4.12… - Page 8
Table of Contents Dentsply Sirona Operating Instructions Intego 4.15.2 Configuring the treatment center on EasyTouch ……208 4.15.2.1 Opening the setup dialogs……….208 4.15.2.2 Setting the time and date……….209 4.15.2.3 Configuring control options……….. 210 4.15.2.4 Configuring the network connection ……213 4.15.2.5… - Page 9
Dentsply Sirona Table of Contents Operating Instructions Intego 5.3.5.5 Clean and disinfect/sterilize the components of the ApexLocator …………..250 5.3.5.6 Cleaning, disinfecting/sterilizing the Cavitron scaler ..251 5.3.5.7 Disinfecting/sterilizing Mini L.E.D. curing light ….251 5.3.5.8 Cleaning/disinfecting the SiroCam F / AF / AF+ intraoral camera………… - Page 10
Table of Contents Dentsply Sirona Operating Instructions Intego Sanitizing ………………… 293 5.6.1 Sanitizing with the fresh water bottle ……….294 5.6.1.1 Sanitizing on the EasyPad……….295 5.6.1.2 Sanitizing on the EasyTouch ……..298 5.6.2 Sanitizing with disinfection system……….301 5.6.2.1 Sanitizing on the EasyPad………. -
Page 11: General Information
These Operating Instructions are designed to assist you prior to initial use and whenever you require information later on. We wish you a great deal of success and pleasure with Intego / Intego Pro. Your Intego team Contact information…
-
Page 12: General Information On The Operating Instructions
● Intego TS (Compact water unit and dentist element with hanging hoses) ● Intego CS (Compact water unit and dentist element with swivel arms) ● Intego Pro TS (Comfort water unit and dentist element with hanging hoses) ● Intego Pro CS (Comfort water unit and dentist element with swivel arms) The treatment centers can be delivered from the factory with the Ambidextrous option.
-
Page 13: Other Valid Documents
Exclusion of liability In the event that the system owner fails to fulfill its obligation to perform maintenance activities or ignores error messages, Dentsply Sirona or your authorized dealer cannot assume any liability for any damage thus incurred.
-
Page 14: Obligation To Notify Authorities
1 General Information Dentsply Sirona 1.8 Obligation to notify authorities Operating Instructions Intego Obligation to notify authorities In the European Union, the operator or user must report all serious events related to the product to the competent authority of the Member State in which he or she is established.
-
Page 15: Safety Instructions
Dentsply Sirona 2 Safety instructions Operating Instructions Intego 2.1 Identification of the danger levels Safety instructions Identification of the danger levels To prevent personal injury and material damage, please observe the warning and safety information provided in these instructions for use.
-
Page 16: On-Site Installation
Alternatively, for Intego the optional fresh water bottle, or for Intego Pro the empty disinfectant tank can be used as a water container for a self-sufficient water supply. For…
-
Page 17: Maintenance And Repair
It can be connected directly to the public drinking water supply. The Intego treatment center, provided it is equipped with a fresh water bottle not connected to the public drinking water supply, also complies with the requirements of EN 1717 and the DVGW German Gas and Water Association).
-
Page 18: Trouble-Free Operation
No restrictions apply when using salt blasting devices in connection with Dentsply Sirona treatment centers. However, in such cases, make sure that the system is subsequently flushed with an adequate amount of water.
-
Page 19: Ventilation Slots
Use only Dentsply Sirona fresh water bottles, see “Spare parts, consumables” [→ 324]! Compressed air is added to the bottle when it is screwed into the holder. Beverage bottles could burst.
-
Page 20: Modifications And Extensions Of The System
For reasons of product safety, this product may be operated only with original Dentsply Sirona parts or third-party parts expressly approved by Dentsply Sirona. In the event of changes which were not foreseen, Dentsply Sirona is not liable for resulting damages.
-
Page 21: Electrostatic Discharge
Dentsply Sirona 2 Safety instructions Operating Instructions Intego 2.19 Electrostatic discharge Electrostatic discharge 2.19 Protective measures Electrostatic discharge (abbreviated: ESD – ElectroStatic Discharge) Electrostatic discharge from people can damage electronic components when the components are touched. Damaged components usually have to be replaced.
-
Page 22: Dismantling/Installation
2 Safety instructions Dentsply Sirona 2.20 Dismantling/Installation Operating Instructions Intego Tip: 1 nanosecond= 1/1,000,000,000 second= 1 billionth of a second Voltage differentials exceeding 30,000 volts per centimeter may lead to a charge transfer (electrostatic discharge, lightning, spark-over). Integrated circuits (logical circuits and microprocessors) are used in order to implement a wide variety of functions in a device.
-
Page 23: Unit Description
“Connection to the public drinking water supply” [→ 16] Original language of this document: German Intego / Intego Pro bear the CE marking in accordance with the provisions of Council Directive 93/42/EEC of June 14, 1993 concerning medical devices.
-
Page 24: Technical Data
3 Unit description Dentsply Sirona 3.2 Technical data Operating Instructions Intego Technical data Model designation: Intego / Intego Pro Power connection: 100 – 240 V AC ± 10% 50/60 Hz Rated current: 3.3 A – 1.5 A at 100 – 240 V also max. 6 A for external devices…
- Page 25
Dentsply Sirona 3 Unit description Operating Instructions Intego 3.2 Technical data 1060 Transport and storage con- Temperature: -40°C – +70°C ditions: (-40°F – 158°F) Relative humidity: 10% – 95% Air pressure: 500 hPa – 1060 hPa 1060 Operating conditions: Ambient temperature: 10°C – 40°C (50°F –… -
Page 26: System Overview Intego
Dentsply Sirona 3.3 System overview Intego Operating Instructions Intego System overview Intego The Intego treatment center comprises the following main components: Intego TS treatment center Patient chair Flat headrest (shown here) or double articulating headrest Pneumatic foot switch (shown here) or C+ electronic foot…
- Page 27
Flat headrest or double articulating headrest (shown here) Pneumatic foot switch or C+ electronic foot switch (shown here) Intego CS dentist element with swivel arms Compact or Comfort (shown here) assistant element Compact water unit Main switch and external device connection (optional) 64 … -
Page 28: System Overview Intego Pro
3 Unit description Dentsply Sirona 3.4 System overview Intego Pro Operating Instructions Intego System overview Intego Pro The Intego Pro treatment center comprises the following main components: Intego Pro TS treatment center Patient chair Flat headrest (shown here) or double articulating headrest…
- Page 29
Patient chair Flat headrest or double articulating headrest (shown here) Pneumatic foot switch or C+ electronic foot switch (shown here) Intego Pro CS dentist element with swivel arms Comfort assistant element Comfort water unit Main switch and external device connection (optional) 64 … -
Page 30: System Overview Intego / Intego Pro With Ambidextrous Option
Ambidextrous option The Intego and Intego Pro treatment centers with the Ambidextrous option comprise the following main components: Intego TS / Intego Pro TS treatment center with Ambidextrous option Patient chair Flat headrest (shown here) or double articulating headrest Pneumatic foot switch (shown here) or C+ electronic foot control…
- Page 31
Dentsply Sirona 3 Unit description Operating Instructions Intego 3.5 System overview Intego / Intego Pro with Ambidextrous option Intego CS / Intego Pro CS treatment center with Ambidextrous option Patient chair Flat headrest or double articulating headrest (shown here) Pneumatic foot switch or C+ electronic foot control (shown… -
Page 32: Patient Chair
3 Unit description Dentsply Sirona 3.6 Patient chair Operating Instructions Intego Patient chair The patient chair features a variety of adjustment options to optimally adjust the patient’s position during treatment. Flat headrest (shown here) or double articulating headrest Backrest Seat…
-
Page 33: Head Support
Dentsply Sirona 3 Unit description Operating Instructions Intego 3.7 Head support Head support 3.7.1 Flat headrest The headrest extension can be pulled in or out depending on the patient’s height. For upper jaw treatment, the magnetic head pad can be rotated and used as a neck rest.
-
Page 34: Foot Control
3 Unit description Dentsply Sirona 3.8 Foot control Operating Instructions Intego Foot control 3.8.1 Pneumatic foot switch With a pneumatic foot control, the compressed air valve for activating the highspeed handpieces is integrated into the foot control. The highspeed handpieces are therefore continuously adjustable. For electric motors and the scaler, the foot control is operated as a direct starter (i.e.
-
Page 35: C+ Electronic Foot Switch
Dentsply Sirona 3 Unit description Operating Instructions Intego 3.8 Foot control 3.8.2 C+ electronic foot switch The C+ electronic foot control can be set as a foot control or direct starter for electric motors and the scaler. The compressed air for high- speed handpieces cannot be adjusted.
-
Page 36: Dentist Element
Operating Instructions Intego Dentist element Intego and Intego Pro can be equipped with a TS dentist element (with hanging hoses) or a CS dentist element (with whip arms). All functions of the treatment center can be controlled via the control panel on the dentist element.
-
Page 37: Cs Dentist Element With Swivel Arms
Dentsply Sirona 3 Unit description Operating Instructions Intego 3.9 Dentist element 3.9.2 CS dentist element with swivel arms On the CS dentist element, instruments are placed on the instrument holder horizontally and facing downwards. The instrument hoses are placed above the dentist element over the whip arms.
-
Page 38: Instrument Positions
• SiroCam AF+ The Standard 3-way syringe is only available for Intego. The Intego / Intego Pro treatment centers can be fitted with a maximum of two motors. A maximum of one scaler and one intraoral camera can be connected.
-
Page 39: Standard Easypad User Interface
Dentsply Sirona 3 Unit description Operating Instructions Intego 3.9 Dentist element 3.9.4 Standard EasyPad user interface EasyPad display Status displays Fixed keys (membrane keyboard) Favorite key pad (membrane keyboard) 3.9.4.1 EasyPad display and status displays EasyPad display For indicating speed, intensity, and torque and for configuring and servicing the treatment center.
- Page 40
3 Unit description Dentsply Sirona 3.9 Dentist element Operating Instructions Intego Pressing the tumbler filling key (> 2 s) displays the setting text for coupling the tumbler filling to mouth rinsing position S and filling time, see «Tumbler filling on the EasyPad» [→ 159]. - Page 41
Dentsply Sirona 3 Unit description Operating Instructions Intego 3.9 Dentist element Endo / Purge With the motor removed: switching the Endo function on/off, see Purge «Switching Endo function on/off» [→ 123] With the ultrasonic handpiece removed: switching the Endo mode on/off (limiting power), see «Setting the intensity on the EasyPad» … -
Page 42: Comfort Easytouch User Interface
Dentsply Sirona 3.9 Dentist element Operating Instructions Intego 3.9.5 Comfort EasyTouch user interface The EasyTouch option is available for the Intego and Intego Pro treatment centers. Touchscreen (pressure-sensitive user interface) Fixed keys (membrane keyboard) 64 5 7 4 98 D3543…
-
Page 43: Touch Screen
Dentsply Sirona 3 Unit description Operating Instructions Intego 3.9 Dentist element 3.9.5.1 Touch screen The touchscreen displays virtual function keys according to the program selected. A list of all function keys is provided in the Appendix of this document, see «Overview of all function keys» [→ 327].
-
Page 44: Fixed Keys Of The Easytouch User Interface
3 Unit description Dentsply Sirona 3.9 Dentist element Operating Instructions Intego 3.9.5.2 Fixed keys of the EasyTouch user interface Clean key Clean Pressing this key deactivates the complete user interface of the dentist element. Pressing it again > 3 s reactivates the user interface.
-
Page 45: Assistant Element
The Intego treatment center and Intego Pro with Ambidextrous option can be equipped with the Compact or Comfort assistant element. Intego Pro without the Ambidextrous option is available only with the Comfort assistant element. The user interface on the assistant element is optional.
- Page 46
3 Unit description Dentsply Sirona 3.10 Assistant element Operating Instructions Intego Support arm and rotary joint Central suction sieve under the removable cuspidor bowl Comfort assistant element with treatment centers without Ambidextrous option The Comfort assistant element is attached to the base of the patient chair by a support arm. - Page 47
Dentsply Sirona 3 Unit description Operating Instructions Intego 3.10 Assistant element Comfort assistant element with treatment centers with Ambidextrous option The Comfort assistant element is attached to the water unit with a support arm. It can be positioned so that the instruments can be reached by the dentist if he/she is performing treatment on his/her own. -
Page 48: Instrument Positions
• SiroCam F • SiroCam AF • SiroCam AF+ The Standard 3-way syringe is only available for Intego. A mini LED curing light, an intraoral camera or an additional spray aspirator can be connected to the treatment center. Changes to holder 2 can only be made by your service engineer.
-
Page 49: User Interface
Dentsply Sirona 3 Unit description Operating Instructions Intego 3.10 Assistant element 3.10.2 User interface 3.10.3 Fixed keys on the assistant element Chair program S Mouth rinsing position with last-position memory function (programmable), seeProgramming chair positions» [→ 80] Chair program 0 Entry/exit position (programmable)
-
Page 50: Water Unit
The Compact water unit can be operated with an air jet pump (Air Venturi) instead of a suction device. The heater for the treatment water is in the water unit. For the Intego, the water heater is optional.
-
Page 51: Compact Water Unit
Dentsply Sirona 3 Unit description Operating Instructions Intego 3.11 Water unit 3.11.1 Compact water unit The Compact water unit is available only without a disinfection system. However, it can be equipped with a fresh water bottle for stand-alone water supply. Switching between the fresh water bottle and public drinking water supply is another equipment option.
-
Page 52: Comfort Water Unit
3 Unit description Dentsply Sirona 3.11 Water unit Operating Instructions Intego 3.11.2 Comfort water unit The water unit can be optionally equipped with a disinfection system. In normal operation, this will automatically inoculate the water that will come into contact with the patient (also called treatment water) with an agent to disinfect the water paths.
- Page 53
Dentsply Sirona 3 Unit description Operating Instructions Intego 3.11 Water unit Suction hose connection for assistant element Manually swiveling cuspidor (removable) Tumbler filler Cover of the storage tank for the disinfectant used to disinfect the water paths or for the stand-alone water supply Cleaning adaptor for water-carrying instruments of the dentist element for sanitizing and auto purge. -
Page 54: Ambidextrous Water Unit
The amalgam separator and sediment container are removed from underneath with the Ambidextrous water unit. Cleaning adapter for the Sprayvit E and for a suction hose of the assistant element Fresh water bottle (only with the Intego) 64 5 7 4 98 D3543 D3543.201.01.08.02 02.2020…
- Page 55
Suction hose connection to the Comfort assistant element Ambidextrous water unit with Intego With the Intego, the Ambidextrous water unit is available only without a disinfection system. However, it can be equipped with a fresh water bottle for stand-alone water supply. Switching between the fresh water bottle and public drinking water supply is another equipment option. - Page 56
3 Unit description Dentsply Sirona 3.11 Water unit Operating Instructions Intego automatically purging the water paths (AutoPurge), and cleaning the suction hoses. To clean the suction system, water is pumped into a tank behind the suction hose intake and suctioned off from there. A cleaning agent is automatically added to the water if the dental treatment center is equipped with the chemical suction hose cleaning option. -
Page 57: External Device Connection
Dentsply Sirona 3 Unit description Operating Instructions Intego 3.12 External device connection External device connection 3.12 External medical accessories can be connected to the external device connection. They must comply with the requirements of IEC 60601-1. NOTE If the treatment center is equipped with a disinfection system or fresh…
- Page 58
3 Unit description Dentsply Sirona 3.12 External device connection Operating Instructions Intego Print Flow rate Water 2.2 ± 0.2 bar max. 300 ml/min 4.4 ± 0.5 bar max. 50 Nl/min IMPORTANT The removal of media at the external device connection can reduce the performance of integrated consumers, e.g., the filling quantity of… -
Page 59: Operation
«Switch spray on/off» [→ 88] and «Purge water paths» [→ 226]. The Intego Pro has the sanitize function if the water unit is equipped with a disinfection system. For sanitizing, the water-carrying lines are filled with the undiluted disinfectant to disinfect the water paths to reduce the bacterial load in the water paths.
-
Page 60: Switching The Treatment Center On/Off
4 Operation Dentsply Sirona 4.1 Starting up the treatment center Operating Instructions Intego 4.1.2 Switching the treatment center on/off The treatment center has a main switch with integrated fuse on the base of the chair. At the end of the working day, the treatment center should be switched off to save energy and for safety reasons.
-
Page 61: Selecting A User Profile
Dentsply Sirona 4 Operation Operating Instructions Intego 4.1 Starting up the treatment center 4.1.3 Selecting a user profile If your treatment center is equipped with the EasyPad standard user interface, it can manage up to two user profiles. The EasyTouch Comfort user interface can manage up to four user profiles.
-
Page 62: Concept Of The User Interface
4 Operation Dentsply Sirona 4.2 Concept of the user interface Operating Instructions Intego Concept of the user interface 4.2.1 Standard EasyPad user interface EasyPad displays The EasyPad user interface is equipped with seven segment displays. Each display can show five digits or letters. Depending on the operating…
- Page 63
Dentsply Sirona 4 Operation Operating Instructions Intego 4.2 Concept of the user interface It may not be possible to activate the Endo function. Purge It is not possible to switch between speed and torque display. Clean Calling functions Functions are triggered by the fixed buttons on the user interface. -
Page 64: Comfort Easytouch User Interface
4 Operation Dentsply Sirona 4.2 Concept of the user interface Operating Instructions Intego 4.2.2 Comfort EasyTouch user interface 4.2.2.1 Virtual function keys The touchscreen displays virtual function keys according to the program selected. Required functions can be activated by touching the function keys with your finger.
-
Page 65: Status Column
Dentsply Sirona 4 Operation Operating Instructions Intego 4.2 Concept of the user interface Settings screens In many cases, functions not only can be switched on or off, but also 10:45:03 can be set. If a function key is pressed and held (> 2 s), the corresponding settings screen appears.
-
Page 66: Foot Control
4 Operation Dentsply Sirona 4.3 Foot control Operating Instructions Intego Foot control The treatment center can be operated with a pneumatic foot switch or the C+ electronic foot switch. 4.3.1 Pneumatic foot switch When the instrument is removed from the holder, the speed or intensity are automatically displayed on the EasyPad.
-
Page 67: C+ Electronic Foot Switch
Dentsply Sirona 4 Operation Operating Instructions Intego 4.3 Foot control 4.3.2 C+ electronic foot switch The C+ electronic foot control operating elements are assigned different functions depending on whether the instruments are all in place or an instrument is removed from its holder.
- Page 68
4 Operation Dentsply Sirona 4.3 Foot control Operating Instructions Intego 4-way switch plate ü All instruments are in their holders. ➢ Move the 4-way foot switch plate to the left or right. Ä Left: Chair program 1 is started. Right: Chair program 2 is started. -
Page 69: Patient Chair
Dentsply Sirona 4 Operation Operating Instructions Intego 4.4 Patient chair Patient chair 4.4.1 Safety instructions CAUTION ü û The free space under the patient couch and up to the water unit can be decreased due to chair movements. Parts of the patient’s or user’s body may be pinched or crushed.
-
Page 70: Safety Stop
4 Operation Dentsply Sirona 4.4 Patient chair Operating Instructions Intego 4.4.2 Safety stop The treatment center is equipped with various safety stops to prevent crushing and damage. The cutoff trigger points are shown in the following illustration: Display of triggered safety switch 2 on the EasyPad…
-
Page 71: Triggering An Immediate Movement Stop
Dentsply Sirona 4 Operation Operating Instructions Intego 4.4 Patient chair 4.4.3 Triggering an immediate movement stop You can stop the movement of the chair to a programmed position as follows: ➢ Touch one of the patient chair keys on the EasyPad or EasyTouch.
-
Page 72: Armrests
4 Operation Dentsply Sirona 4.4 Patient chair Operating Instructions Intego 4.4.4 Armrests Armrests are available for the patient chair. The right armrest can be swiveled forward to facilitate getting in and out of the chair. In treatment centers with the Ambidextrous option, both armrests can be swiveled.
-
Page 73: Adjusting The Flat Headrest
Dentsply Sirona 4 Operation Operating Instructions Intego 4.4 Patient chair 4.4.6 Adjusting the flat headrest The headrest extension can be pulled in or out manually depending on the patient’s height. ➢ Pull the headrest out of the backrest or push it back in at the recessed grip A.
-
Page 74: Adjusting The Double Articulating Headrest
4 Operation Dentsply Sirona 4.4 Patient chair Operating Instructions Intego 4.4.7 Adjusting the double articulating headrest The double articulating headrest is equipped with two rotary joints. They facilitate manual adjustment of head inclination for maxillary/mandibular treatments. The headrest extension can be pushed in or pulled out manually to adjust it to the height of the patient.
-
Page 75: Moving The Patient Chair Via Chair Programs
IMPORTANT Chair movements with cuspidor swiveled in Intego With the cuspidor bowl swiveled in, the chair cannot be moved. This prevents the patient from colliding with the cuspidor. Swing the cuspidor outward before initiating chair movement.
-
Page 76: Moving The Patient Chair To The Mouth Rinsing Position
4 Operation Dentsply Sirona 4.4 Patient chair Operating Instructions Intego Via the assistant element ➢ Press the 0 key on the assistant element briefly (< 2 s). 4.4.8.2 Moving the patient chair to the mouth rinsing position The following functions are factory preset to be activated in the mouth rinsing position: ●…
-
Page 77: Using The Last Position Memory Function
Dentsply Sirona 4 Operation Operating Instructions Intego 4.4 Patient chair 4.4.8.3 Using the last position memory function The last chair position is stored before the patient chair moves to mouth rinsing position S. When mouth rinsing position key S is pressed again, the treatment center returns to the previously set treatment position.
-
Page 78: Moving The Chair Manually
IMPORTANT Chair movements with cuspidor swiveled in Intego With the cuspidor bowl swiveled in, the chair cannot be moved. This prevents the patient from colliding with the cuspidor. Swing the cuspidor outward before initiating chair movement.
-
Page 79: Adjusting The Chair Height
Dentsply Sirona 4 Operation Operating Instructions Intego 4.4 Patient chair 4.4.9.2 Adjusting the chair height Via fixed keys on the EasyPad ➢ Press the Adjust the chair height key. Via the touchscreen on the EasyTouch ü The Start or Instrument program is displayed on the touchscreen.
-
Page 80: Programming Chair Programs
4 Operation Dentsply Sirona 4.4 Patient chair Operating Instructions Intego 4.4.10 Programming chair programs The four chair programs preset in the factory: ● Mouth rinsing position S ● Entry/exit position 0 ● 1 and 2 can be individually programmed for both user profiles (A and B) on the EasyPad and each of the four user profiles (A to D) on the EasyTouch.
-
Page 81: Dentist Element
Dentsply Sirona 4 Operation Operating Instructions Intego 4.5 Dentist element Dentist element 4.5.1 Maximum load capacity TS dentist element The maximum load on the TS dentist element without a tray holder is 1 kg (2.2 lbs). The maximum load on the TS dentist element with a tray holder is 2 kg (4.4 lbs).
-
Page 82: Positioning The Dentist Element
4 Operation Dentsply Sirona 4.5 Dentist element Operating Instructions Intego 4.5.2 Positioning the dentist element WARNING The dentist element could be positioned within the movement range of the patient chair. Moving the patient chair may cause the patient to collide with the dentist element or its support arm.
- Page 83
Dentsply Sirona 4 Operation Operating Instructions Intego 4.5 Dentist element Positioning the CS dentist element (standard position) In the standard position, the support arm of the CS dentist element is attached to the right mount of the Compact water unit and to the rear mount of the Comfort water unit. - Page 84
4 Operation Dentsply Sirona 4.5 Dentist element Operating Instructions Intego Positioning the CS dentist element (special position) Alternatively, the support arm of the CS dentist element can be attached to the left mount on the Compact water unit (special position) and with the Comfort water unit to the front mount. -
Page 85: Fixed Keys On The Dentist Element
Dentsply Sirona 4 Operation Operating Instructions Intego 4.5 Dentist element 4.5.3 Fixed keys on the dentist element An overview of the fixed keys on the EasyPad and EasyTouch can be found in the Description of Device, see «EasyPad standard user interface» …
-
Page 86: Placing The Instruments In Their Holders
4 Operation Dentsply Sirona 4.5 Dentist element Operating Instructions Intego 4.5.4 Placing the instruments in their holders Automatic opening of instrument dialogs On the EasyPad, the speed or intensity is shown automatically on the display depending on which instrument is removed from the holder. On the EasyTouch, the respective instrument program appears on the touchscreen.
- Page 87
Dentsply Sirona 4 Operation Operating Instructions Intego 4.5 Dentist element Cover for TS dentist element A cover can be purchased as an accessory for an instrument holder which is not used. Insert the cover into an unassigned instrument holder. This prevents accidental deposit of an instrument in this holder. -
Page 88: General Instrument Functions
4 Operation Dentsply Sirona 4.5 Dentist element Operating Instructions Intego 4.5.5 General instrument functions EasyPad Settings for the coolant, instrument light, and foot switch can be made for the instrument removed from the holder. EasyTouch Settings for the coolant, instrument light, and foot switch can be made in the sub-screen of the instrument removed from the holder.
- Page 89
Dentsply Sirona 4 Operation Operating Instructions Intego 4.5 Dentist element Ä When the status display Spray lights up on the EasyPad, spray is switched on when the instrument is activated. Activation of the spray is saved on the favorite keys, see section «Setting the speed on the EasyPad» … -
Page 90: Instrument Functions On The Easytouch
4 Operation Dentsply Sirona 4.5 Dentist element Operating Instructions Intego 4.5.5.2 Instrument functions on the EasyTouch 4.5.5.2.1 Opening the sub-screen ü An instrument is removed from the holder. ü The Instrument program of the removed instrument is displayed on the touchscreen.
- Page 91
Dentsply Sirona 4 Operation Operating Instructions Intego 4.5 Dentist element 4.5.5.2.3 Preset and switch coolant on/off by the C+ electronic foot switch. Selecting a coolant Air or spray can be preselected as the instrument coolant in the sub- dialog. The preselected coolant can be switched on/off via the left button on the C+ electronic foot control. - Page 92
4 Operation Dentsply Sirona 4.5 Dentist element Operating Instructions Intego 4.5.5.2.5 Switch instrument light on/off ü The sub-screen of the removed motor is displayed on the touchscreen . ➢ Switch the instrument light on or off. Ä If the key is highlighted orange, the instrument light can be activated using the foot pedal. -
Page 93: Saving Instrument Settings
Dentsply Sirona 4 Operation Operating Instructions Intego 4.5 Dentist element 4.5.5.3 Saving instrument settings DropMode When placing an instrument back in the holder, the instrument settings made are always saved in the user profile (DropMode). The next time the instrument is removed, the last settings made are available again.
-
Page 94: Standard 3-Way Syringe
The standard 3-way syringe is used to clean the treatment areas and blow them dry. It provides the media with air and prewarmed water. The heater for the treatment water is in the water unit. The water heater is optional on the Intego. 4.5.6.1 Safety instructions WARNING The nozzle of the Standard 3-way syringe must lock into the holder.
-
Page 95: Sprayvit E 3-Way Syringe
The Sprayvit E 3-way syringe is used for dental treatment with air and water. The Sprayvit E 3-way syringe is also used to illuminate the preparation field. The heater for the treatment water is in the water unit. The water heater is optional on the Intego. 4.5.7.1 Structure Media lever…
-
Page 96: Safety Instructions
4 Operation Dentsply Sirona 4.5 Dentist element Operating Instructions Intego 4.5.7.3 Safety instructions WARNING A small metal tube protrudes at the tip of the nozzle. Risk of injury and contamination! ➢ Avoid contact with the tip of the nozzle. Do not attempt to handle with the nozzle attached.
-
Page 97: Connecting The Instrument Hose
Dentsply Sirona 4 Operation Operating Instructions Intego 4.5 Dentist element 4.5.7.4 Connecting the instrument hose CAUTION There may be exposed voltage! Risk of electric shock! ➢ Do not operate the media lever when the housing is removed! 1. Attach the valve body A to the supply hose, observing the various tube diameters.
-
Page 98: Turbine / Air Motor / Other Air-Driven Instruments
Setting the light of the highspeed handpiece The instrument light supply is optional in Intego. Halogen lamps cannot be operated with the Intego / Intego Pro treatment centers. The voltage or current can be limited for the LED lamp of the highspeed handpiece.
- Page 99
Dentsply Sirona 4 Operation Operating Instructions Intego 4.5 Dentist element 4.5.8.2.1 Setting the highspeed handpiece lamp on the EasyPad Accessing the turbine light operating context 1. Detach the turbine to be set from the holder. 2. Press and hold the function key 2 / Setup (> 2 s). - Page 100
4 Operation Dentsply Sirona 4.5 Dentist element Operating Instructions Intego 3. Use favorite keys 1 and 3 to set the current (A) for the lamp in the handpiece removed in amperes (0.12 A = 120 mA). Setup 4. Confirm the setting by pressing the function key 2 / Setup . - Page 101
Dentsply Sirona 4 Operation Operating Instructions Intego 4.5 Dentist element 4.5.8.2.2 Setting the highspeed handpiece light on the EasyTouch 1. Detach the turbine to be set from the holder. 2. Press the Sub-dialog fixed key. Ä The Highspeed handpiece sub-dialog is displayed on the touchscreen. -
Page 102: Motor
(without carbon brushes). They are characterized by their precise controllability and durability. The speed range of the motors for Intego / Intego Pro is between 1,200 and 40,000 rpm. If the treatment center features the eControl option, the motor can be down-regulated to 100 rpm.
-
Page 103: Product Labeling
Dentsply Sirona 4 Operation Operating Instructions Intego 4.5 Dentist element BL ISO E motor Handpiece holder O-ring 8.4 x 0.7 Product labeling ISO E motor sleeve Coupling connection (green / 3 guide lugs) The BL ISO E motor is equipped with an ISO coupling. T1 Line handpieces, for example, can thus be used without an adapter.
-
Page 104: Safety Instructions
4 Operation Dentsply Sirona 4.5 Dentist element Operating Instructions Intego Adapter for BL E motor ISO adapter Basic Apex adapter Light function Spray function Apex measurement function — Handpiece holder – ISO 3964 4.5.9.4 Safety instructions WARNING The magnetic field of the electric motor is strengthened when the motor is switched on.
-
Page 105: Connecting The Instrument Hose
Dentsply Sirona 4 Operation Operating Instructions Intego 4.5 Dentist element 4.5.9.5 Connecting the instrument hose ü Colored marks and position of guide lugs on motor and hose coupling of the instrument hose match. 1. Slide back the cap nut at the hose coupling.
-
Page 106: Adjusting The Cooling Spray
4 Operation Dentsply Sirona 4.5 Dentist element Operating Instructions Intego 4.5.9.7 Adjusting the cooling spray The BL ISO E motor is equipped with a control ring for cooling water. With the BL E motor, the amount of water can be set via the water controller on the dentist element, see «Setting the amount of spray water» …
-
Page 107: Setting The Speed On The Easypad
Dentsply Sirona 4 Operation Operating Instructions Intego 4.5 Dentist element 4.5.9.8 Setting the speed on the EasyPad Speeds are stored on the favorite keys 1, 2, and 3 that can be accessed by pressing them. Individual speeds can be saved for each user profile on the favorite keys.
- Page 108
4 Operation Dentsply Sirona 4.5 Dentist element Operating Instructions Intego Saving the speed ü The desired speed is set. ü Via the C+ electronic foot switch: The spray is switched on or off (will be saved). 1. Press and hold the favorite key 2 / Setup (> 2 s). -
Page 109: Setting The Speed On The Easytouch
Dentsply Sirona 4 Operation Operating Instructions Intego 4.5 Dentist element 4.5.9.9 Setting the speed on the EasyTouch Speeds are saved on the three favorite keys that can be accessed by pressing them. Individual speeds can be saved for each user profile on the favorite keys.
- Page 110
4 Operation Dentsply Sirona 4.5 Dentist element Operating Instructions Intego Saving the speed ü The desired speed is set. ü Via the C+ electronic foot switch: The spray is switched on or off (will be saved). 1. Press and hold the middle favorite Set (> 2 s). -
Page 111: Setting The Direction Of Rotation
Dentsply Sirona 4 Operation Operating Instructions Intego 4.5 Dentist element 4.5.9.10 Setting the direction of rotation The direction of rotation can be changed only when the motor is at a standstill. Tip: After starting the electric motor with the foot switch, an audible warning signal sounds 6 times if counterclockwise rotation is activated.
-
Page 112: Apexlocator
4 Operation Dentsply Sirona 4.5 Dentist element Operating Instructions Intego 4.5.10 ApexLocator The ApexLocator is available only with the EasyTouch Comfort user interface. The ApexLocator can be used to measure the working length of the root canal file in endodontic treatments using electrical impedance.
-
Page 113: Preparing To Use The Apexlocator
Dentsply Sirona 4 Operation Operating Instructions Intego 4.5 Dentist element 4.5.10.1 Preparing to use the ApexLocator Apex adapter, mucosal electrode and file clamp The mucosal electrode and the file clamp are connected to the socket of the dentist element using the apex adapter. The socket is located on the left and to the rear, below the dentist element.
- Page 114
Dentsply Sirona 4.5 Dentist element Operating Instructions Intego For endodontic treatments with the ApexLocator, the Dentsply Sirona Endo 6:1 (SN 6407 and above / July 2010) or Endo 6 L contra-angle handpieces are required for the Endo function. When using the ApexLocator in the motor program (without Endo function), the Dentsply Sirona SiroNiTi Apex contra-angle handpiece is required. -
Page 115: Distance Display
Dentsply Sirona 4 Operation Operating Instructions Intego 4.5 Dentist element 4.5.10.2 Distance display The measured root canal depth is shown in the distance display on the touchscreen. A bar with 11 display levels shows the distance from the root canal file to the physiological apex (apical constriction). The root canal is divided into four colored sections in the distance display.
- Page 116
4 Operation Dentsply Sirona 4.5 Dentist element Operating Instructions Intego Green region The tip of the root canal file has reached the physiological apex. Red region The tip of the root canal file has pierced the physiological apex. The instrument overshoot is displayed. -
Page 117: Beeps
Dentsply Sirona 4 Operation Operating Instructions Intego 4.5 Dentist element 4.5.10.3 Beeps In addition to the graphical distance display on the touchscreen, the position of the file in the root canal can also be indicated as an acoustic signal. Apex acoustic signals The ApexLocator always plays the following acoustic signals: ●…
-
Page 118: Performing Manual Measurements With The File Clamp
4 Operation Dentsply Sirona 4.5 Dentist element Operating Instructions Intego 4.5.10.4 Performing manual measurements with the file clamp For an endodontic examination, manual measurements can be made using the file clamp and a root canal file. ü The treatment center is prepared for manual measurements using the file clamp, see section «Preparing to use the ApexLocator» …
-
Page 119: Endodontic Treatment With Apexlocator And Torque Limitation Handpiece
IMPORTANT SiroNiTi Apex Only Dentsply Sirona SiroNiTi Apex must be used to perform apex measurement using a torque-limiting handpiece! The electrical conductivity can be ensured only using this handpiece. The SiroNiTi handpiece can also be used to perform endodontic treatments without the ApexLocator.
- Page 120
4 Operation Dentsply Sirona 4.5 Dentist element Operating Instructions Intego Ä The set distance is displayed to the left of the – and + keys. The preset motor stop position is displayed in the Motor dialog as a black triangle to the right of the distance display under the text «Stop». - Page 121
Dentsply Sirona 4 Operation Operating Instructions Intego 4.5 Dentist element 11. Short the electrical measurement system. Plug in the files and hold them directly against the mucosal electrode. This cancels out any inaccuracies caused by jumps in impedance in the measurement setup (standardization). -
Page 122: Endo Function
Fatigued files may break during treatment. ➢ Use files only for the service life specified by the manufacturer. CAUTION Only the Dentsply Sirona Endo 6:1 (SN 6407 and above / July 2010) and Endo 6 L contra-angle handpieces may be used for the Endo function.
-
Page 123: Endo Function On The Easypad
Dentsply Sirona 4 Operation Operating Instructions Intego 4.5 Dentist element 4.5.11.1 Endo function on the EasyPad 4.5.11.1.1 Switching Endo function on/off Switching on the Endo function The Endo function is assigned to the burr drive removed from the holder. ü The desired electric motor for the Endo function is removed from the holder.
- Page 124
This includes a measurement of motor current at different speeds to assess the properties of the system. CAUTION To ensure proper calibration, use only Dentsply Sirona instruments. ü The Endo function is switched on. The Endo function status display is illuminated. - Page 125
Dentsply Sirona 4 Operation Operating Instructions Intego 4.5 Dentist element 4.5.11.1.3 Setting the torque With the Endo function switched on, torque and speed of the contra- angle handpiece are indicated, but not of the motor. The control electronics of the burr drive calculate the motor control based on the specified contra-handpiece gear reduction and the set torque and speed. - Page 126
4 Operation Dentsply Sirona 4.5 Dentist element Operating Instructions Intego The torque can also be increased or reduced by moving the 4-way switch plate of the C+ electronic foot control up or down. Saving torque ü The desired torque is set. - Page 127
Dentsply Sirona 4 Operation Operating Instructions Intego 4.5 Dentist element 4.5.11.1.4 Setting the speed When the Endo function is switched on, the EasyPad display can be toggled between torque and speed to set the speed. To differentiate between torque and speed settings, the display shows burr drive calibrated/not calibrated and AutoReverse function on/off only for the torque. - Page 128
4 Operation Dentsply Sirona 4.5 Dentist element Operating Instructions Intego 4.5.11.1.5 Switching AutoReverse ON/OFF If the auto-reverse function is switched on, the burr drive automatically switches to counterclockwise rotation when the torque set is reached. If the foot pedal is pressed again, the burr drive switches back to clockwise rotation. -
Page 129: The Endo Function On The Easytouch
Dentsply Sirona 4 Operation Operating Instructions Intego 4.5 Dentist element 4.5.11.2 The Endo function on the EasyTouch 4.5.11.2.1 Switching Endo function on/off Switching on the Endo function The Endo function is assigned to the burr drive removed from the holder.
- Page 130
4 Operation Dentsply Sirona 4.5 Dentist element Operating Instructions Intego ü The electric motor assigned to the Endo function is removed. ü The Endodontics program is displayed on the touchscreen. 1.00 Endo 3 1. Press the Sub-dialog fixed key. Ä The Endodontics sub-dialog is displayed. - Page 131
This includes a measurement of motor current at different speeds to assess the properties of the system. CAUTION To ensure proper calibration, use only Dentsply Sirona instruments. ü The Endodontics dialog or the Endodontics sub-dialog is displayed on the touchscreen. - Page 132
4 Operation Dentsply Sirona 4.5 Dentist element Operating Instructions Intego 4.5.11.2.3 Changing direction of rotation The direction of rotation can be changed only with the motor stopped. Counterclockwise rotation is performed without torque limitation. The torque setting keys are hidden when counterclockwise rotation is selected. - Page 133
Dentsply Sirona 4 Operation Operating Instructions Intego 4.5 Dentist element ü The Endodontics sub-dialog is displayed on the touchscreen. ü The working step with which the speed and torque are to be changed is selected. ➢ Use the – and + keys to set the speed and torque of the contra- angle handpiece. - Page 134
4 Operation Dentsply Sirona 4.5 Dentist element Operating Instructions Intego In the Endodontics screen, a reciprocal symbol is displayed in the top left of the screen when the reciprocal function is activated. 4.5.11.2.7 Switch instrument light on/off The instrument light of the motor can be use when the Endo function is activated if the treatment center is equipped with the Comfort EasyTouch user interface. - Page 135
Dentsply Sirona 4 Operation Operating Instructions Intego 4.5 Dentist element 4.5.11.2.8 Using the ApexLocator ü The treatment center is prepared for apex measurements using the instrument, see section «Preparing to use the ApexLocator» [→ 113]. ü The Endodontics dialog or Endodontics sub-dialog is displayed on Stop the touchscreen. - Page 136
4 Operation Dentsply Sirona 4.5 Dentist element Operating Instructions Intego 2. Use the – and + keys to set the required apex distance from 1.5 to 0. If the distance is 0, the motor does not stop until it reaches the physiological apex. - Page 137
Dentsply Sirona 4 Operation Operating Instructions Intego 4.5 Dentist element ➢ Press the Apex distance acoustic signals key. Ä If the key is highlighted orange, the apex distance acoustic Apex Dist signal is activated. 4.5.11.2.13 Saving settings In the Endodontics sub-dialog, working step-specific settings such as changed speed and torque values … -
Page 138: Sirosonic L Scaler
CAUTION Ultrasonic tips from other manufacturers do not guarantee safe operation. ➢ Use only ultrasonic tips from Dentsply Sirona. 4.5.12.2 Setting the intensity on the EasyPad Intensities are saved on the favorite keys 1, 2, and 3, which can be accessed by pressing them.
- Page 139
Dentsply Sirona 4 Operation Operating Instructions Intego 4.5 Dentist element Changing the intensity ➢ Press and hold the favorite key 1 or 3 (> 1 s). Setup Ä The intensity is increased or reduced. The intensity can also be increased or reduced by moving the 4-way switch plate of the C+ electronic foot control up or down. - Page 140
4 Operation Dentsply Sirona 4.5 Dentist element Operating Instructions Intego 1. Press the Endo / Purge key. Purge Ä The endodontics intensity (Endo mode) is displayed instead of ultrasonic intensity (ultrasonic mode). 2. Use favorite keys 1 and 3 to set the desired endodontics intensity (En 1 to En 5). -
Page 141: Setting The Intensity On The Easytouch
Dentsply Sirona 4 Operation Operating Instructions Intego 4.5 Dentist element 4.5.12.3 Setting the intensity on the EasyTouch Intensities are saved on the three favorite keys that can be accessed by pressing them. Individual intensities can be saved on the favorite keys for each user profile.
- Page 142
4 Operation Dentsply Sirona 4.5 Dentist element Operating Instructions Intego Switching on the Endo mode The intensity of the endodontics function is limited for safety reasons, e.g., in order to prevent broken needles. IMPORTANT Endo intensity values The intensity can be adjusted from 1e to 5e. Please note that the endodontics intensity values of 1e to 5e do not match the values of 1 to 5 in the scaler mode. -
Page 143: Cavitron Scaler
CAUTION Ultrasonic tips from other manufacturers do not guarantee safe operation. ➢ Use only ultrasonic tips from Dentsply Sirona. CAUTION The Cavitron device must not be used on patients if the incoming treatment water is warmer than 25 °C / 77 °F The spray water in the handpiece can heat up further due to ultrasonic vibrations.
-
Page 144: Setting The Intensity On The Easypad
4 Operation Dentsply Sirona 4.5 Dentist element Operating Instructions Intego 4.5.13.3 Setting the intensity on the EasyPad Intensities are saved on the favorite keys 1, 2, and 3, which can be accessed by pressing them. Individual intensities can be saved on the favorite keys for each user profile.
-
Page 145: Setting The Intensity On The Easytouch
Dentsply Sirona 4 Operation Operating Instructions Intego 4.5 Dentist element While the intensity flashes on the EasyPad display, pressing the Counterclockwise rotation / user profile key will interrupt saving to a favorite key. 4.5.13.4 Setting the intensity on the EasyTouch Intensities are saved on the three favorite keys that can be accessed by pressing them.
-
Page 146: Mini Led Curing Light
4 Operation Dentsply Sirona 4.5 Dentist element Operating Instructions Intego 4.5.14 Mini LED curing light The function is described in the chapter on the assistant element, see «Mini LED curing light» [→ 155]. 4.5.15 SiroCam F/AF/AF+ intraoral camera Functionality is described in the «Sivision digital video system» section, see «SiroCam F / AF / AF+ …
-
Page 147: Timer Function
Dentsply Sirona 4 Operation Operating Instructions Intego 4.5 Dentist element 4.5.16 Timer function 4.5.16.1 Timer function on the EasyPad The Fn function key is assigned to the timer function. Presetting the timer A set time can be counted down to zero with the timer function.
- Page 148
4 Operation Dentsply Sirona 4.5 Dentist element Operating Instructions Intego Starting the timer ➢ Press the Timer key on the touchscreen briefly. Ä The preset timer is started immediately. The set and elapsed 10:45:03 time are displayed on the left side of the touchscreen. -
Page 149: Assistant Element
Dentsply Sirona 4 Operation Operating Instructions Intego 4.6 Assistant element Assistant element 4.6.1 Maximum load capacity Compact assistant element The Compact assistant element has no tray. CAUTION To prevent injuries caused by falling objects, never place anything on the support arm of the assistant element.
-
Page 150: Fixed Keys On The Assistant Element
4 Operation Dentsply Sirona 4.6 Assistant element Operating Instructions Intego 4.6.3 Fixed keys on the assistant element The functions assigned to the keys can be switched on/off on the assistant element. The operating contexts or setting screens can be accessed only on the dentist element. To make settings, see «Fixed keys on the dentist element» …
-
Page 151: Flushing The Cuspidor
Dentsply Sirona 4 Operation Operating Instructions Intego 4.6 Assistant element 4.6.3.3 Flushing the cuspidor The flushing function can be used for rough cleaning of the cuspidor during treatment. ➢ Press the Flushing fixed key. Ä The flushing function is activated for the preset flushing time.
-
Page 152: Suction Handpieces
4 Operation Dentsply Sirona 4.6 Assistant element Operating Instructions Intego 4.6.4 Suction handpieces The assistant element can be equipped with up to two spray aspirators and one saliva ejector. CAUTION The tip attaches itself to the oral mucosa. The patient’s oral mucosa can be irritated by the vacuum.
- Page 153
Dentsply Sirona 4 Operation Operating Instructions Intego 4.6 Assistant element Interrupting suction flow with the 4-way foot control If the treatment center is equipped with a position selector valve for the suction system, it can be set so suction flow can be interrupted or restarted by moving the 4-way foot control switch at the base of the chair in any direction, on the EasyPad, see «Coupling suction to the 4-… -
Page 154: Standard And Sprayvit E 3-Way Syringe
4 Operation Dentsply Sirona 4.6 Assistant element Operating Instructions Intego 4.6.5 Standard and Sprayvit E 3-way syringe The function is described in the chapter on the assistant element, see «Standard and Sprayvit E 3-way syringe“ [→ 94]. 64 5 7 4 98 D3543…
-
Page 155: Mini Led Curing Light
Dentsply Sirona 4 Operation Operating Instructions Intego 4.6 Assistant element 4.6.6 Mini LED curing light The curing light is used to cure composite material with short-wave light. IMPORTANT Observe the operating instructions Mini L.E.D. of the Satelec Acteon manufacturer. 4.6.6.1…
-
Page 156: Connecting The Mini L.e.d
4 Operation Dentsply Sirona 4.6 Assistant element Operating Instructions Intego 4.6.6.3 Connecting the Mini L.E.D. The Mini L.E.D. is connected to the assistant element in holder 2. 1. Connect the supply cable A to the treatment center. 2. Screw hose coupling B onto the Mini L.E.D. C.
-
Page 157: Operating The Mini Led
Dentsply Sirona 4 Operation Operating Instructions Intego 4.6 Assistant element Pulsed curing mode In the pulsed curing mode, the Mini L.E.D. radiates in 10 consecutive light pulses of 1 s each. There is a 250 ms break between the individual pulses.
-
Page 158: Technical Data
4 Operation Dentsply Sirona 4.6 Assistant element Operating Instructions Intego 4.6.6.6 Technical data General Technical Data on Mini L.E.D. Model: Mini L.E.D. Weight of handpiece without 105 g hose: Dimensions: Dia. 23 m m x 240 m m Current consumption of hand- 5 V DC / 0.65 A…
-
Page 159: Water Unit
The cuspidor on the water unit can be manually swiveled approx. 110 mm toward the patient chair. IMPORTANT Chair movements with cuspidor swiveled in Intego With the cuspidor bowl swiveled in, the chair cannot be moved. This prevents the patient from colliding with the cuspidor. Swing the cuspidor outward before initiating chair movement.
-
Page 160: Tumbler Filling On The Easytouch
4 Operation Dentsply Sirona 4.7 Water unit Operating Instructions Intego Ä The setting focus Filling time flashes. 3. Set the filling time in seconds. Press the left or right arrow on the favorite key field to prolong or shorten the filling time.
-
Page 161: Tumbler Filling With Automatic Sensor Control
Dentsply Sirona 4 Operation Operating Instructions Intego 4.7 Water unit 4.7.2.3 Tumbler filling with automatic sensor control The automatic sensor control is an option on the Comfort water unit and is not available in all countries. With this tumbler filler, the sensor control automatically detects the filling level of the tumbler.
-
Page 162: Flushing The Cuspidor
4 Operation Dentsply Sirona 4.7 Water unit Operating Instructions Intego 4.7.3 Flushing the cuspidor The flushing function can be used for rough cleaning of the cuspidor during treatment. The cuspidor is always flushed using the public drinking water supply. It is not taken from the fresh water bottle or the tank for stand-alone water supply.
-
Page 163: Flushing The Cuspidor On The Easytouch
Dentsply Sirona 4 Operation Operating Instructions Intego 4.7 Water unit 4.7.3.2 Flushing the cuspidor on the EasyTouch Switching flushing on/off ➢ Press the Flushing fixed key. Ä The flushing function is activated for the preset flushing time. Setting the flushing time 1.
-
Page 164: Adjusting The Water Amount For Flushing
4 Operation Dentsply Sirona 4.7 Water unit Operating Instructions Intego 4.7.3.3 Adjusting the water amount for flushing The water quantity and water pressure for flushing can be set using a valve. 1. Open the maintenance flap A on the base of the water unit.
-
Page 165: Stand-Alone Water Supply
(see “Sanitization” [→ 293]). The stand-alone water supply functionality of the Intego is only available if the treatment center is equipped with a fresh water bottle. The Intego Pro treatment center must be equipped with the integrated water disinfection system.
-
Page 166: Water Supply For The Intego
The fresh water bottle is treated with compressed air when it is screwed into the holder. Unsuitable bottles such as beverage bottles can burst. ➢ Use only Dentsply Sirona fresh water bottles! ➢ Please also observe the general safety instructions (see “Fresh water bottle” [→ 19] section).
- Page 167
Dentsply Sirona 4 Operation Operating Instructions Intego 4.7 Water unit 1. For the water supply from the fresh water bottle, turn the lever clockwise to the bottle symbol. For operation with the public drinking water supply, turn the lever counterclockwise to the faucet symbol. -
Page 168: Water Supply For The Intego Pro
4.7 Water unit Operating Instructions Intego 4.7.4.2 Water supply for the Intego pro In the Comfort and Ambidextrous water units, the stand-alone water supply should be set only as a temporary operating state if the public drinking water is contaminated and not as a permanent operating state.
- Page 169
Dentsply Sirona 4 Operation Operating Instructions Intego 4.7 Water unit 3. A «1» flashes in the selection focus. The treatment center should be switched to stand-alone water supply. 4. Confirm your selection by pressing the favorite key 2 / Setup . - Page 170
4 Operation Dentsply Sirona 4.7 Water unit Operating Instructions Intego IMPORTANT 400 ml are approximately sufficient for: ➢ 6.5 min. spray operation (motor, high-speed handpiece, scaler) or ➢ 2.5 min. Sprayvit Eoperation or ➢ 5 x tumbler fillings The actual values depend on the instrument types and settings used. - Page 171
Dentsply Sirona 4 Operation Operating Instructions Intego 4.7 Water unit 2. Mix distilled water with the agent for disinfecting the water paths at a ratio of 100:1 (1 liter of water, 10 ml of the disinfectant) and fill this into the disinfectant tank of the water unit. The tank has a capacity of approx. -
Page 172: Converting The Ambidextrous Water Unit For Right And Left-Handed People
4 Operation Dentsply Sirona 4.7 Water unit Operating Instructions Intego 4.7.5 Converting the Ambidextrous water unit for right and left- handed people CAUTION There must be no patient in the chair during conversion. The patient would otherwise collide with treatment center components.
- Page 173
Dentsply Sirona 4 Operation Operating Instructions Intego 4.7 Water unit 3. If an additional holder has been installed on the dentist element: turn the additional holder inwards. 4. If armrests have been installed on the treatment center: fold the armrests downwards. - Page 174
4 Operation Dentsply Sirona 4.7 Water unit Operating Instructions Intego 6. Move the dentist element right to the top. 7. Swivel the dentist element so that it is positioned closely in the grip area of the light support bar. 8. Position the operating light above the dentist element. The joint of the support arm must now point towards the head rest. - Page 175
Dentsply Sirona 4 Operation Operating Instructions Intego 4.7 Water unit 9. If a Comfort assistant element is present; swivel the Comfort assistant element to the water unit underneath the cuspidor bowl. Turn the water unit CAUTION The water unit is now guided with a rotary motion to the opposite side of the treatment center. - Page 176
4 Operation Dentsply Sirona 4.7 Water unit Operating Instructions Intego 1. Press the foot pedal and move the water unit slightly upwards. Ä The patient chair will move automatically into a position in which the water unit can be rotated. An acoustic signal will also be given. - Page 177
Dentsply Sirona 4 Operation Operating Instructions Intego 4.7 Water unit 2. If a tray holder on the dentist element is present: remove the screw by hand and take the tray holder out of the dentist element. 3. Install both the tray holder and the additional holder on the other side of the dentist element. -
Page 178: Swiveling Tray Holder
4 Operation Dentsply Sirona 4.8 Swiveling tray holder Operating Instructions Intego Swiveling tray holder Maximum load capacity The TS dentist element can be equipped with a tray. The holder has room for two standard trays. For treatment centers without the Ambidextrous option, the tray is mounted on the left of the assistant element.
-
Page 179: Cup Holder
Dentsply Sirona 4 Operation Operating Instructions Intego 4.9 Cup holder Cup holder A cup holder can be attached to the tray to collect waste. It is suitable for disposable 0.2-liter cups. The cup holder may not be attached to the front edge of the tray.
-
Page 180: X-Ray Image Viewer
4 Operation Dentsply Sirona 4.10 X-ray image viewer Operating Instructions Intego X-ray image viewer 4.10 The TS and CS dentist elements can be equipped with an X-ray viewer. The ON/OFF switch is on the X-ray viewer. It switches off automatically after 10 minutes.
-
Page 181: Operating Light
Dentsply Sirona 4 Operation Operating Instructions Intego 4.11 Operating light Operating light 4.11 The operating light is mounted on a multi-joint support arm. It can be easily adjusted to the operating field using the handles. Brakes in the support arm hold the operating light in the desired position.
-
Page 182: Setting The Ledlight Brightness
4 Operation Dentsply Sirona 4.11 Operating light Operating Instructions Intego ➢ Press the Operating light fixed key on the dentist or assistant element (several times if necessary). Ä The operating light switches to «On», «Composite function» or «Off». At the bottom of the LEDlight Plus and LEDview Plus operating lights, a non-touch sensor is attached.
- Page 183
Dentsply Sirona 4 Operation Operating Instructions Intego 4.11 Operating light 6. Use the left and right arrows on the favorite key pad to adjust the operating distance of the contactless sensor (5 levels). The left Setup arrow key decreases the operating distance, the right arrow key increases it. -
Page 184: X-Ray Tube Unit
Operating Instructions Intego X-ray tube unit 4.12 The Intego and Intego Pro treatment centers can be equipped with the Heliodent Plus X-ray tube unit. No X-ray tube unit is available for treatment centers with the Ambidextrous option. The X-ray tube unit is attached to the light post of the treatment center using a multi-jointed support arm that can be adjusted both horizontally and vertically.
-
Page 185: Sivision Digital Video System
Dentsply Sirona 4 Operation Operating Instructions Intego 4.13 Sivision Digital video system Sivision Digital video system 4.13 The Sivision Digital video system enables intraoral and extraoral images to be made. The SiroCam F / AF / AF+ intraoral camera generates digital image data that can be transmitted via a USB 2.0 port (high- speed universal serial bus) to a connected PC and stored there.
-
Page 186: Sivision Monitor
4 Operation Dentsply Sirona 4.13 Sivision Digital video system Operating Instructions Intego 4.13.1 Sivision monitor 22″ AC Monitor (REF 65 76 248 D3678) The monitor is equipped with loudspeakers. There is an IEC socket on the back of the monitor for the power supply. Please refer to the operating instructions for the 22″…
-
Page 187: Sirocam F/Af/Af+ Intraoral Camera
Dentsply Sirona 4 Operation Operating Instructions Intego 4.13 Sivision Digital video system 4.13.2 SiroCam F/AF/AF+ intraoral camera 4.13.2.1 Safety instructions The SiroCam F / AF / AF+ intraoral camera is a sensitive optical instrument and must therefore always be handled with care.
-
Page 188: Connecting The Sirocam F / Af / Af+ Intraoral Camera
4 Operation Dentsply Sirona 4.13 Sivision Digital video system Operating Instructions Intego 4.13.2.3 Connecting the SiroCam F / AF / AF+ intraoral camera Connecting the intraoral camera to the TS dentist element Depending on the equipment version, the intraoral camera can be placed at instrument position five or in the additional holder.
- Page 189
Dentsply Sirona 4 Operation Operating Instructions Intego 4.13 Sivision Digital video system Connecting the intraoral camera to the assistant element The intraoral camera can be operated at the second instrument position of the assistant element. The camera connection is located underneath the assistant element instead of the connection for the curing light. -
Page 190: Operating Sirocam F / Af / Af+ Intraoral Camera
4 Operation Dentsply Sirona 4.13 Sivision Digital video system Operating Instructions Intego 4.13.2.4 Operating SiroCam F / AF / AF+ intraoral camera An external or internal PC is required in order to display the video images of the SiroCam F / AF / AF+ intraoral camera on the Sivision monitor.
- Page 191
Dentsply Sirona 4 Operation Operating Instructions Intego 4.13 Sivision Digital video system 4.13.2.4.3 Using the camera with SI Video Using SI Video, up to four still images can be generated with the SiroCam F / AF / AF+ intraoral camera. These can be displayed on the Sivision monitor either as a sequence of single images or simultaneously as a quad image. - Page 192
4 Operation Dentsply Sirona 4.13 Sivision Digital video system Operating Instructions Intego ü The intraoral camera must be removed to allow for operation via the foot switch. Purge 1. Press the left button of the C+ electronic foot control. ➢ Press the Endo / Purge key on the EasyPad, on the EasyTouch the Select next quadrant key. - Page 193
Dentsply Sirona 4 Operation Operating Instructions Intego 4.13 Sivision Digital video system 4.13.2.4.4 Using the camera with Sidexis In addition to displaying and processing X-ray images, Sidexis XG and Sidexis 4 can also be used as a video application for the SiroCam F / AF / AF+ intraoral camera. - Page 194
4 Operation Dentsply Sirona 4.13 Sivision Digital video system Operating Instructions Intego Switching the SiroCam F / AF / AF+ intraoral camera on/off ü The PC is in operation and the Sivision Connect or Siucom Plus PC application is started. ➢ Take the SiroCam F / AF / AF+ intraoral camera from the holder. -
Page 195: Technical Camera Data
Dentsply Sirona 4 Operation Operating Instructions Intego 4.13 Sivision Digital video system 4.13.3 Technical camera data General technical data Model: Intraoral camera SiroCam F SiroCam AF SiroCam AF+ Weight of handpiece without cable: approx. 80 g approx. 80 g approx. 85 g Dimensions: diam. 27.5 x 207 mm Operating temperature: +10 to+40 °C…
-
Page 196: Operation With A Pc
For details, please refer to the «Installation and configuration of Siucom Plus / Sivision Connect» manual. CAUTION Integrating the Intego / Intego Pro into an IT network that includes other devices can lead to previously unknown risks. The following changes to the IT network can lead to new risks: •…
-
Page 197: Starting Pc Communication
Dentsply Sirona 4 Operation Operating Instructions Intego 4.14 Operation with a PC The network connection of the treatment center must be configured in the setup program before using the Sivision program, see «Configuring the network connection» [→ 213]. PC applications can be controlled from the treatment center only if they were started via Siucom Plus.
-
Page 198: Communication With The Media Player
4 Operation Dentsply Sirona 4.14 Operation with a PC Operating Instructions Intego 4.14.1.2 Communication with the media player The treatment center has the option of playing back multimedia files stored on the external PC using the Windows Media Player. Audio or video files can be selected from the file system and the Media Player can be controlled from the treatment center.
-
Page 199: Communication With Sidexis
Dentsply Sirona 4 Operation Operating Instructions Intego 4.14 Operation with a PC 4.14.1.4 Communication with Sidexis The Sidexis 4 and Sidexis XG PC applications can display X-ray and intraoral camera images on the Sivision monitor. They can save images taken with the SiroCam F / AF / AF+ intraoral camera in the patient database.
- Page 200
4 Operation Dentsply Sirona 4.14 Operation with a PC Operating Instructions Intego Contrast optimization filter This image filter analyses and optimizes the current grayscale distribution of an image. In this way, for instance, details within a very low-contrast, “faint” image can be made visible. -
Page 201: Communication With Video Plugin
Dentsply Sirona 4 Operation Operating Instructions Intego 4.14 Operation with a PC Cancel/confirm entry Accept an order Accepts an order that was placed and is waiting in Sidexis, e.g. for creating an intraoral image with the X-ray unit of the treatment center or a video recording with the intraoral camera.
-
Page 202: Usb Interfaces
➢ Only type BF medical devices and applied parts according to IEC Type BF 60601-1, e.g., the Dentsply Sirona Xios XG USB module intraoral X-ray system, may be connected to the USB interface. ➢ Do not connect extension cables to the USB interface.
-
Page 203: Configuration Of The Treatment Center (Setup)
Dentsply Sirona 4 Operation Operating Instructions Intego 4.15 Configuration of the treatment center (setup) Configuration of the treatment center (setup) 4.15 Various treatment center functions can be individually configured via the Setup settings. The treatment center can therefore be adapted to match each user’s personal method of treatment.
-
Page 204: Setting The Time And Date
4 Operation Dentsply Sirona 4.15 Configuration of the treatment center (setup) Operating Instructions Intego 4.15.1.2 Setting the time and date Setting the time Time is shown in the format hour.minute. ü The hour setting focus flashes. 1. Use favorite keys 1 and 3 to set the hour.
-
Page 205: Switching The Key Sound On/Off
2. Confirm with the 2 / Setup favorite key. 4.15.1.8 Setting the purging time for the autopurge function The autopurge function is only available on the Intego Pro treatment center. The purging time for the autopurge function can be set between 60 and 180 seconds.
-
Page 206: Adjusting The Cleaning Agent Mixture For Chemical Suction Hose Cleaning
4 Operation Dentsply Sirona 4.15 Configuration of the treatment center (setup) Operating Instructions Intego 4.15.1.9 Adjusting the cleaning agent mixture for chemical suction hose cleaning The chemical suction hose cleaning option is only available for the Intego Pro. The suction system can be automatically cleaned by pumping water into a tank behind the receptacle of the suction hoses and extracting it from there.
-
Page 207: Opening The Service Function
Dentsply Sirona 4 Operation Operating Instructions Intego 4.15 Configuration of the treatment center (setup) latest version of the SIUCOM Plus / Sivision Connect application must be installed on the PC. For details, please refer to the «Installation and configuration of Siucom Plus / Sivision Connect» manual.
-
Page 208: Configuring The Treatment Center On Easytouch
4 Operation Dentsply Sirona 4.15 Configuration of the treatment center (setup) Operating Instructions Intego 4.15.2 Configuring the treatment center on EasyTouch 4.15.2.1 Opening the setup dialogs ü All instruments are in place. The Start dialog is displayed on the 10:45:03 touchscreen.
-
Page 209: Setting The Time And Date
Dentsply Sirona 4 Operation Operating Instructions Intego 4.15 Configuration of the treatment center (setup) 4.15.2.2 Setting the time and date ➢ In the setup dialog touch the key Date and time . Ä The sub-dialog opens. Setting the date The date is displayed in the format day/month/year.
-
Page 210: Configuring Control Options
4 Operation Dentsply Sirona 4.15 Configuration of the treatment center (setup) Operating Instructions Intego 4.15.2.3 Configuring control options Operation of the entire treatment center operation can be configured in this dialog. ➢ Touch the Control options key in the setup program.
- Page 211
Dentsply Sirona 4 Operation Operating Instructions Intego 4.15 Configuration of the treatment center (setup) 4.15.2.3.4 Coupling suction to the 4-way foot switch. If the treatment center is equipped with a position selector valve for the suction system, it can be set so suction flow can be interrupted or restarted by moving the 4-way foot control switch at the base of the chair in any direction. - Page 212
4 Operation Dentsply Sirona 4.15 Configuration of the treatment center (setup) Operating Instructions Intego 4.15.2.3.7 Adjusting the cleaning agent mixture for chemical suction hose cleaning The chemical suction hose cleaning option is only available for the Intego Pro. The suction system can be automatically cleaned by pumping water into a tank behind the receptacle of the suction hoses and extracting it from there. -
Page 213: Configuring The Network Connection
MAC address of the center are shown. Name Call in your data processing specialist for network configuration. Ethernet Network configuration is described in detail in the «Intego / Intego Pro 13-E7-15-31-A3-0C installation instructions». 4.15.2.5 Opening the service function The Service domain is intended to be used only by service engineers.
-
Page 214: Care, Cleaning And Maintenance By The Practice Team
5 Care, cleaning and maintenance by the practice team Dentsply Sirona 5.1 Basics Operating Instructions Intego Care, cleaning and maintenance by the practice team Basics Reprocessing mainly involves the following steps: ● Cleaning ● Disinfection ● Sterilization if possible The treatment center must be reprocessed immediately, or at the latest, one hour after treatment.
- Page 215
Dentsply Sirona 5 Care, cleaning and maintenance by the practice team Operating Instructions Intego 5.1 Basics Sterilize the suction cannula [→ 269] Clean/disinfect surfaces [→ 219] Disinfecting the upholstery [→ 224] Disinfect the user interface [→ 220] Disinfect handles [→ 221] Maintaining and cleaning the operating light (see separate instructions… -
Page 216: Care, Cleaning, And Disinfecting Agents
5 Care, cleaning and maintenance by the practice team Dentsply Sirona 5.1 Basics Operating Instructions Intego For a quick overview of the work involved, see the “Maintenance, cleaning, and disinfection schedule” for the Intego / Intego Pro treatment center. 5.1.2 Care, cleaning, and disinfecting agents NOTE…
-
Page 217: General Handling Instructions
Dentsply Sirona 5 Care, cleaning and maintenance by the practice team Operating Instructions Intego 5.1 Basics 5. Immerse the tester in the filled container for 30 seconds. Ä The cardboard disk with the culture medium will now absorb 1 ml of the water sample.
-
Page 218: Inspection, Maintenance And Testing
5 Care, cleaning and maintenance by the practice team Dentsply Sirona 5.1 Basics Operating Instructions Intego Manual drying No drying is required following wiping with disinfectants since surplus disinfectant evaporates. Surplus water from the cleaning process can be removed with a soft cloth.
-
Page 219: Surfaces
Dentsply Sirona 5 Care, cleaning and maintenance by the practice team Operating Instructions Intego 5.2 Surfaces Surfaces 5.2.1 Clean/disinfect surfaces The surfaces can be disinfected by wiping with surface disinfectants. NOTE Drugs have a chemical reaction with the surface of the unit.
-
Page 220: Disinfect User Interfaces
NOTE Approved care, cleaning, and disinfecting agents Use only care, cleaning, and disinfecting agents that have been approved by Dentsply Sirona, see «Care, cleaning, and disinfecting agents» [→ 216]. Switching off functions on the EasyPad user interface On the EasyPad, this function also protects the treatment center and the Sivision monitor from disturbances from HF fields.
-
Page 221: Sterilize Silicone Mats And Handle Covers
NOTE Approved care, cleaning, and disinfecting agents Use only care, cleaning, and disinfecting agents that have been approved by Dentsply Sirona, see «Care, cleaning, and disinfecting agents» [→ 216]. The dentist element features a removable silicone mat and silicone covers for the handles. A removable silicone mat is available for the Comfort assistant element.
- Page 222
5 Care, cleaning and maintenance by the practice team Dentsply Sirona 5.2 Surfaces Operating Instructions Intego Assistant element The silicone mat of the Comfort assistant element is identical with that of the CS dentist element. 1. Switch the treatment center off and remove the suction hoses and instruments from the holders of the assistant element. -
Page 223: Disinfect The Tray
NOTE Approved care, cleaning, and disinfecting agents Use only care, cleaning, and disinfecting agents that have been approved by Dentsply Sirona, see «Care, cleaning, and disinfecting agents» [→ 216]. 1. Hold the tray tightly. 2. Open the lock by swiveling the lever downwards.
-
Page 224: Care For, Clean, And Disinfect Upholstery
Operating Instructions Intego 5.2.6 Care for, clean, and disinfect upholstery Special care, cleaning, and disinfecting agents are recommended by Dentsply Sirona for the care, cleaning, and disinfection of the upholstery. NOTE Approved care, cleaning, and disinfecting agents Use only agents approved by Dentsply Sirona for the upholstery, see»Care, cleaning, and disinfecting agents» …
-
Page 225: Clean The Foot Switch
Dentsply Sirona 5 Care, cleaning and maintenance by the practice team Operating Instructions Intego 5.2 Surfaces 5.2.8 Clean the foot switch Regular cleaning of the foot control improves its stability. ➢ Clean the bottom plate of the foot control with a moist cloth (water).
-
Page 226: Instruments And Instrument Hoses
● Before starting work ● the used instruments after each patient ● At the end of the work day With the Intego Pro treatment center, it is also possible to automatically purge the water paths, see «Automatically purge water paths (autopurge function)». [→ 232].
-
Page 227: Purge Function On The Easypad
100:1 (1 liter of water, 10 ml of the agent) and fill this into the disinfectant tank of the water unit. For more information, please refer to the section «Self-sufficient water supply with Intego» [→ 166]. Ä When sufficient water has been refilled, the purge program continues.
- Page 228
5 Care, cleaning and maintenance by the practice team Dentsply Sirona 5.3 Instruments and instrument hoses Operating Instructions Intego 1. Remove the instruments to be purged from the holder and hold max. max. them over the cuspidor or over a watertight container with sufficient capacity. -
Page 229: Purging Function On The Easytouch
100:1 (1 liter of water, 10 ml of the disinfectant) and fill this into the disinfectant tank of the water unit. For more information please refer to the section «Water supply for Intego Pro» [→ 168]. Ä When sufficient water has been refilled, the purge program continues.
- Page 230
5 Care, cleaning and maintenance by the practice team Dentsply Sirona 5.3 Instruments and instrument hoses Operating Instructions Intego Setting the purge time and starting the purge function The purge time of the removed instruments can be set between 20 and 120 seconds. - Page 231
Dentsply Sirona 5 Care, cleaning and maintenance by the practice team Operating Instructions Intego 5.3 Instruments and instrument hoses 4. Touch the Stop key to end the purge program. Stop Ä After all instruments have been put back in their holders, the Purge function activated display disappears. -
Page 232: Automatically Purge Water Paths (Autopurge Function)
Operating Instructions Intego 5.3.3 Automatically purge water paths (autopurge function) The AutoPurge function is only available on the Intego Pro treatment center. The autopurge function enables automatic purging of all water-carrying instruments in the dentist element, of the 3-way Sprayvit E syringe in the dentist and assistant elements and of the tumbler filling.
- Page 233
Cleaning adapters for water-carrying instruments are integrated into the Comfort and Ambidextrous (with Intego Pro) water units. These enable all instruments to be purged with water. For this purpose, water-carrying instruments must be inserted into adapters on the water unit. - Page 234
5 Care, cleaning and maintenance by the practice team Dentsply Sirona 5.3 Instruments and instrument hoses Operating Instructions Intego 3. Dentist element side: Insert the couplings of all water-carrying treatment instruments into the adapter in the Comfort water unit (for Sprayvit E: valve lever in up position, locking knob in the down position). - Page 235
Dentsply Sirona 5 Care, cleaning and maintenance by the practice team Operating Instructions Intego 5.3 Instruments and instrument hoses There are now two options for continuing: ● Leave the instruments in the water unit The autopurge function remains activated. The instruments remain in the Comfort water unit and the treatment center can be switched off at the mains. -
Page 236: Autopurge Function On The Easytouch
5 Care, cleaning and maintenance by the practice team Dentsply Sirona 5.3 Instruments and instrument hoses Operating Instructions Intego 5.3.3.2 Autopurge function on the EasyTouch Opening the AutoPurge screen ü All instruments are in their holders. ü The Start dialog is displayed on the touchscreen.
- Page 237
Sprayvit E: valve lever in the up position, locking knob in the down position). Also for Intego Pro CS: Move the swivel arm of the instruments to be purged into the operating position so the weight of the instrument hoses keeps them in this position. - Page 238
5 Care, cleaning and maintenance by the practice team Dentsply Sirona 5.3 Instruments and instrument hoses Operating Instructions Intego IMPORTANT Pinching of the instrument hoses Be careful not to pinch the instrument hoses when inserting the instruments. With treatment centers with the Ambidextrous option: convert the water unit to the left side so that the adapters on the water unit point towards the patient chair, see «Converting the Ambidextrous water… - Page 239
Dentsply Sirona 5 Care, cleaning and maintenance by the practice team Operating Instructions Intego 5.3 Instruments and instrument hoses Ä When all of the instruments have been put in the holders, the Purge function activated display disappears. The Start program is shown. -
Page 240: Purging Water Paths Manually
Operating Instructions Intego 5.3.4 Purging water paths manually With the Intego treatment center, the purge and sanitize function is optional. If this function is not available, purging of the water paths must be carried out manually. The water-carrying instruments of the dentist element, the 3-way syringe of the dentist and assistant element and the tumbler filling must be purged.
- Page 241
Dentsply Sirona 5 Care, cleaning and maintenance by the practice team Operating Instructions Intego 5.3 Instruments and instrument hoses 5. Activate the spray. Toggle the switch on the pneumatic foot switch to the right. Activate the left key on the C+ electronic foot control. -
Page 242: Lubricate, Disinfect/Sterilize The Treatment Instruments
5 Care, cleaning and maintenance by the practice team Dentsply Sirona 5.3 Instruments and instrument hoses Operating Instructions Intego 5.3.5 Lubricate, disinfect/sterilize the treatment instruments 5.3.5.1 Treatment instruments with separate instructions for use The procedures required for the following treatment instruments are described in the following separate instructions for use: ●…
-
Page 243: Lubricate, Disinfect/Sterilize Sprayvit E 3-Way Syringe
NOTE Approved care, cleaning, and disinfecting agents Use only care, cleaning, and disinfecting agents that have been approved by Dentsply Sirona, see «Care, cleaning, and disinfecting agents» [→ 216]! All disinfectants must be approved in your country and have proven bactericidal, fungicidal and virucidal properties. Use only disinfectants with no protein-fixing properties.
- Page 244
5.3 Instruments and instrument hoses Operating Instructions Intego Automated cleaning and disinfecting We recommend using the Dentsply Sirona DAC Universal for automated cleaning and disinfection (inside and outside) of the nozzles. For further details, please refer to the instructions for use supplied with the unit. - Page 245
Dentsply Sirona 5 Care, cleaning and maintenance by the practice team Operating Instructions Intego 5.3 Instruments and instrument hoses Manual cleaning and disinfection Manual reprocessing is possible in exceptional cases if the national/ local regulations are followed. The national/local regulations are to be checked before. -
Page 246: Disinfecting/Sterilizing Motors And Adapters
NOTE Approved care, cleaning, and disinfecting agents Use only care, cleaning, and disinfecting agents that have been approved by Dentsply Sirona, see «Care, cleaning, and disinfecting agents» [→ 216]! Use disinfectants and other agents that contain no corrosive components such as chloride.
- Page 247
Apply the following steps for the adapter only. NOTE Do not clean the motors automatically. We recommend using Dentsply Sirona DAC Universal for automated cleaning, disinfection, and care. For further details, please refer to the instructions for use supplied with the unit. - Page 248
5 Care, cleaning and maintenance by the practice team Dentsply Sirona 5.3 Instruments and instrument hoses Operating Instructions Intego Ä For further reprocessing, the adapter should be dry and free of residue. 3. If necessary, pack the adapter in packaging suitable for sterilization and storage, e.g., soft packaging (paper/film) or a container in… - Page 249
2. Store all motors/adapters so that they are protected from contamination. 3. Sterilize again once the storage period has elapsed. Sterilize regularly and have the motors serviced after approx. 2 years in a workshop authorized by Dentsply Sirona. 64 5 7 4 98 D3543 D3543.201.01.08.02 02.2020… -
Page 250: Clean And Disinfect/Sterilize The Components Of The Apexlocator
NOTE Approved care, cleaning, and disinfecting agents Use only care, cleaning, and disinfecting agents that have been approved by Dentsply Sirona, see «Care, cleaning, and disinfecting agents» [→ 216]. ➢ Disconnect the mucosal electrode from the connection cable. The metal hook and the connection cable can be sterilized.
-
Page 251: Cleaning, Disinfecting/Sterilizing The Cavitron Scaler
NOTE Approved care, cleaning, and disinfecting agents Use only care, cleaning, and disinfecting agents that have been approved by Dentsply Sirona, see «Care, cleaning, and disinfecting agents» [→ 216]. 1. Remove the connection cable of the Mini L.E.D. by turning the 134°C 274°F…
-
Page 252: Cleaning/Disinfecting The Sirocam F / Af / Af+ Intraoral Camera
It can be wipe disinfected. NOTE Approved care, cleaning, and disinfecting agents Use only care, cleaning, and disinfecting agents that have been approved by Dentsply Sirona, see «Care, cleaning, and disinfecting agents» [→ 216]. NOTE The lens window is sensitive to scratches.
-
Page 253: Maintaining Treatment Instruments
4. Insert the O-ring. Do not use any sharp objects. 5. Repeat steps 3-4. 6. Screw ring A tightly onto the nozzle. Protect O-rings regularly 1. Soak a Q-tip in Dentsply Sirona’s T1 spray. 2. Wipe the housing at the separating joint with the Q-tip. 5.3.6.1.2 Replacing lamps CAUTION The lamp can be hot.
-
Page 254: Maintaining The Motors
A LED is built into the BL E and BL ISO E motor. This LED is designed for the service life of the motor and may be replaced only by Dentsply Sirona or a service technician trained by Dentsply Sirona. Safe operation is no longer guaranteed in case of improper replacement.
- Page 255
Dentsply Sirona 5 Care, cleaning and maintenance by the practice team Operating Instructions Intego 5.3 Instruments and instrument hoses 1. Remove the defective O-rings. 2. Insert the O-rings one after another. Start with the first groove. 3. Lightly oil the O-ring with T1 Spray. -
Page 256: Change The Cotton Wool Roll On The Turbine Hose And Oil Collector
5 Care, cleaning and maintenance by the practice team Dentsply Sirona 5.3 Instruments and instrument hoses Operating Instructions Intego 5.3.7 Change the cotton wool roll on the turbine hose and oil collector At the unit end of the high-speed handpiece hose, return air leaks out along with a small amount of high-speed handpiece oil.
- Page 257
Dentsply Sirona 5 Care, cleaning and maintenance by the practice team Operating Instructions Intego 5.3 Instruments and instrument hoses Oil collector The CS dentist element is also equipped with an oil collector. It is located below the instrument connections and collects any liquids that leak out. -
Page 258: Vacuum System
5 Care, cleaning and maintenance by the practice team Dentsply Sirona 5.4 Vacuum system Operating Instructions Intego Vacuum system 5.4.1 Purge the vacuum system. If the treatment center is equipped with the suction hose cleaning option, proceed according to the instruction in section «Cleaning the suction hoses»…
- Page 259
Dentsply Sirona 5 Care, cleaning and maintenance by the practice team Operating Instructions Intego 5.4 Vacuum system 3. Attach the open suction handpiece to the receptacle. 4. Press the button. Ä Water is pumped into the suction hose cleaning container and suctioned out of the suction hoses. -
Page 260: Suction Hose Cleaning On The Comfort Water Unit
5 Care, cleaning and maintenance by the practice team Dentsply Sirona 5.4 Vacuum system Operating Instructions Intego 5.4.2.2 Suction hose cleaning on the Comfort water unit The Comfort water unit is always equipped with an adapter for the suction hose cleaning function. This can be used to purge the suction hoses consecutively.
- Page 261
➢ Do not fill the agent for disinfecting the water paths into the cleaning agent tank for chemical suction hose cleaning! Use only 1d 41d «Agents for the suction lines» approved by Dentsply Sirona, see «Care, cleaning, and disinfecting agents» [→ 216]. Amalg… -
Page 262: Suction Hose Cleaning On The Ambidextrous Water Unit
Ambidextrous water unit is optional. Chemical suction hose cleaning for the Intego treatment center is not available. If the Intego treatment center is not equipped with the suction hose cleaning option, a large glass of cold, clear water must be regularly aspirated instead, see «Purging the suction system» …
- Page 263
5 Care, cleaning and maintenance by the practice team Operating Instructions Intego 5.4 Vacuum system Refill cleaning agent (for the Intego Pro with chemical suction hose cleaning option) When the adjacent display appears on the EasyPad display or in the status column of the touchscreen, the cleaning agent for cleaning the suction system is almost finished. -
Page 264: Central Supply For Chemical Suction Hose Cleaning
5.4.2.4 Central supply for chemical suction hose cleaning For clinical use, Intego / Intego Pro treatment centers can be equipped with a central cleaning agent supply for chemical suction hose cleaning. The CDS 60 system of Dürr Dental is intended for this purpose.
-
Page 265: Cleaning Vacuum System Using Cleaning Adapter In The Cuspidor Or Via External Container
NOTE Approved care, cleaning, and disinfecting agents Use only care, cleaning, and disinfecting agents that have been approved by Dentsply Sirona, see «Care, cleaning, and disinfecting agents» [→ 216]. NOTE Domestic cleaning agents foam up. Foaming cleaning agents often cause foam and water to be sucked into the dry suction system.
-
Page 266: Cleaning Vacuum System Using Cleaning Adapter In The Cuspidor
5 Care, cleaning and maintenance by the practice team Dentsply Sirona 5.4 Vacuum system Operating Instructions Intego 5.4.3.1 Cleaning vacuum system using cleaning adapter in the cuspidor Preparation for cleaning 1. Prepare 1 liter of cleaning solution in a separate container according to the manufacturer’s instructions and mix it thoroughly.
- Page 267
Dentsply Sirona 5 Care, cleaning and maintenance by the practice team Operating Instructions Intego 5.4 Vacuum system Cleaning procedure 1. Pour 1 liter of cleaning solution into the cuspidor. 2. Remove the suction hoses from their holders and attach them to the side of the cleaning adapter as simultaneously as possible. -
Page 268: Cleaning The Suction System Via External Container
5 Care, cleaning and maintenance by the practice team Dentsply Sirona 5.4 Vacuum system Operating Instructions Intego 5.4.3.2 Cleaning the suction system via external container If the treatment center is not equipped with a cuspidor, the suction system must be cleaned via external container.
-
Page 269: Sterilizing/Disinfecting And Lubricating The Suction Handpieces
Rubber materials such as O-rings are corroded by unsuitable lubricants. ➢ Never use petroleum jelly or similar lubricants. ➢ Use only lubricants approved by Dentsply Sirona. 1. Detach the handpiece of the spray aspirator and the saliva ejector from the suction hoses.
-
Page 270: Empty The Central Suction Sieve
5 Care, cleaning and maintenance by the practice team Dentsply Sirona 5.4 Vacuum system Operating Instructions Intego 5.4.5 Empty the central suction sieve. Depending on the options, there is a central suction sieve in the Compact water unit or Comfort assistant element to retain solid materials (e.g.
-
Page 271: Cleaning And Disinfecting The Suction Hoses
Dentsply Sirona 5 Care, cleaning and maintenance by the practice team Operating Instructions Intego 5.4 Vacuum system Emptying the central suction sieve in the Comfort assistant element 1. Open the cover on the suction sieve on the assistant element and remove it.
-
Page 272: Components Of The Water Unit
5 Care, cleaning and maintenance by the practice team Dentsply Sirona 5.5 Components of the water unit Operating Instructions Intego Components of the water unit 5.5.1 Clean the gold trap The gold trap retains larger solid particles to prevent them from being washed down the drain in the cuspidor bowl.
-
Page 273: Clean/Disinfect The Cuspidor
This can cause damage to the suction machine. ➢ Use only care, cleaning, and disinfecting agents approved by Dentsply Sirona, see»Care, cleaning, and disinfecting agents» [→ 216]. The cuspidor bowl is attached to the water unit via a bayonet catch and can be removed for thorough cleaning.
-
Page 274: Cleaning The Outlet Lines Of The Cuspidor
Use the same agent as for the suction lines. NOTE Approved care, cleaning, and disinfecting agents Use only care, cleaning, and disinfecting agents that have been approved by Dentsply Sirona, see «Care, cleaning, and disinfecting agents» [→ 216]. NOTE Domestic cleaning agents foam up.
- Page 275
Dentsply Sirona 5 Care, cleaning and maintenance by the practice team Operating Instructions Intego 5.5 Components of the water unit 2. Fill the cuspidor with the cleaning solution and leave it to take effect. Observe the reaction time specified for the cleaning solution by the manufacturer. -
Page 276: Filling With Agent For Disinfecting The Water Paths
5 Care, cleaning and maintenance by the practice team Dentsply Sirona 5.5 Components of the water unit Operating Instructions Intego 5.5.4 Filling with agent for disinfecting the water paths The Comfort and Ambidextrous water units can be optionally equipped with a disinfection system. In normal operation, this will automatically inoculate the water that will come into contact with the patient (also called treatment water) with an agent to disinfect the water paths.
- Page 277
NOTE Approved care, cleaning, and disinfecting agents Use only the agent for disinfecting the water paths that has been approved by Dentsply Sirona for the disinfection system; see «Care, cleaning, and disinfecting agents» [→ 216]. 64 5 7 4 98 D3543… -
Page 278: Change The Water And Air Filters
5 Care, cleaning and maintenance by the practice team Dentsply Sirona 5.5 Components of the water unit Operating Instructions Intego 5.5.5 Change the water and air filters If you notice any changes in media flows, check the water and air filters for permeability.
- Page 279
Dentsply Sirona 5 Care, cleaning and maintenance by the practice team Operating Instructions Intego 5.5 Components of the water unit 5. Put the sealD back on the filter E. Then insert both into the screw cap B, C as shown. -
Page 280: Change The Amalgam Rotor
5 Care, cleaning and maintenance by the practice team Dentsply Sirona 5.5 Components of the water unit Operating Instructions Intego 5.5.6 Change the amalgam rotor Amalgam residues and other solid particles are trapped in the amalgam rotor according to the centrifugal principle.
- Page 281
6. Place the container in the special packaging and ship it for disposal or authorize a certified waste management company. Installing the amalgam rotor Use only original Dentsply Sirona accessories. Never use a used or recycled amalgam rotor. To reorder the amalgam rotor, see «Spare parts and consumables» … - Page 282
5 Care, cleaning and maintenance by the practice team Dentsply Sirona 5.5 Components of the water unit Operating Instructions Intego 3. Hold the lower part of the amalgam separator B so that the latching noses of the bayonet catch are positioned transverse to the water unit. -
Page 283: Check The Message System Of The Amalgam Separator
Dentsply Sirona 5 Care, cleaning and maintenance by the practice team Operating Instructions Intego 5.5 Components of the water unit 5.5.7 Check the message system of the amalgam separator An electronic control monitors the function of the amalgam separator. SIt detects any mechanical blocking or failure of the drive motor. The error is indicated by the Amalg display on the user interface and by an acoustic signal.
- Page 284
5 Care, cleaning and maintenance by the practice team Dentsply Sirona 5.5 Components of the water unit Operating Instructions Intego Testing the message system on the EasyTouch ü All instruments are in place. The Start dialog is displayed on the 10:45:03 touchscreen. -
Page 285: Empty The Sediment Container
Dentsply Sirona 5 Care, cleaning and maintenance by the practice team Operating Instructions Intego 5.5 Components of the water unit Press the Back key to exit the service dialog. 5.5.8 Empty the sediment container In addition to other solid particles, a large proportion of the amalgam residues are trapped in the sediment container by gravitational force.
- Page 286
5 Care, cleaning and maintenance by the practice team Dentsply Sirona 5.5 Components of the water unit Operating Instructions Intego 1. Open the flap A on the base of the water unit. 2. Loosen the bayonet catch by turning the sediment container B counterclockwise. - Page 287
Dentsply Sirona 5 Care, cleaning and maintenance by the practice team Operating Instructions Intego 5.5 Components of the water unit 2. Hold the sediment container B so that the latching noses of the bayonet catch are positioned transverse to the water unit. Rotate the sediment container B clockwise. -
Page 288: Cleaning The Filter Insert Of The Wet Suction Device With Cuspidor Valve
5 Care, cleaning and maintenance by the practice team Dentsply Sirona 5.5 Components of the water unit Operating Instructions Intego 5.5.9 Cleaning the filter insert of the wet suction device with cuspidor valve The automatic separator and amalgam separator / sediment container or air jet pump are not installed in the water unit for standard wet suction.
- Page 289
Dentsply Sirona 5 Care, cleaning and maintenance by the practice team Operating Instructions Intego 5.5 Components of the water unit 1. Open the flap A on the base of the water unit. 2. Allow the remaining water to be extracted completely. Press button B on the standard wet suction. - Page 290
5 Care, cleaning and maintenance by the practice team Dentsply Sirona 5.5 Components of the water unit Operating Instructions Intego 6. Reinsert the filter insert in the filter housing. Rotate the filter insert C clockwise. 7. Close the flap A. -
Page 291: Emptying The Collector Of The Air Jet Pump
Dentsply Sirona 5 Care, cleaning and maintenance by the practice team Operating Instructions Intego 5.5 Components of the water unit 5.5.10 Emptying the collector of the air jet pump The air jet pump (Air Venturi) is an option available for the Compact water unit.
- Page 292
5 Care, cleaning and maintenance by the practice team Dentsply Sirona 5.5 Components of the water unit Operating Instructions Intego 3. Pour the excess water out of the container and collect the amalgam residue. Dispose of it properly with the amalgam residue collected from the cuspidor and central sieve, see «Cleaning the gold trap» … -
Page 293: Sanitizing
Sanitizing with the Intego Pro With the Intego Pro, the water paths can only be sanitized if the Comfort or Ambidextrous water unit is equipped with an integrated water disinfection system. Operation with a stand-alone water supply is also possible only with a disinfection system.
-
Page 294: Sanitizing With The Fresh Water Bottle
Turn the lever clockwise to the bottle symbol, For more information, please refer to the section Water supply for Intego» [→ 166]. 64 5 7 4 98 D3543…
-
Page 295: Sanitizing On The Easypad
Dentsply Sirona 5 Care, cleaning and maintenance by the practice team Operating Instructions Intego 5.6 Sanitizing 5. Unscrew the fresh water bottle from the holder on the water unit and empty the fresh water bottle completely. 6. Fill the fresh water bottle with approx. 0.4 to 0.5 liters of the undiluted agent for disinfecting the water paths.
- Page 296
5 Care, cleaning and maintenance by the practice team Dentsply Sirona 5.6 Sanitizing Operating Instructions Intego 4. Afterward, return the instrument to the instrument holder. 5. Repeat the procedure for all other instruments. NOTE Splashes of undiluted disinfectant for sanitizing the water paths can result in discoloration of surfaces if left for too long. - Page 297
Dentsply Sirona 5 Care, cleaning and maintenance by the practice team Operating Instructions Intego 5.6 Sanitizing 1. Hold the 3-way syringe over the cuspidor or over a watertight container with sufficient capacity and press the water key for at least 15 seconds. -
Page 298: Sanitizing On The Easytouch
5 Care, cleaning and maintenance by the practice team Dentsply Sirona 5.6 Sanitizing Operating Instructions Intego 5.6.1.2 Sanitizing on the EasyTouch Opening the sanitization dialog via the touchscreen ü All instruments are in their holders. ü The Start dialog is displayed on the touchscreen.
- Page 299
Dentsply Sirona 5 Care, cleaning and maintenance by the practice team Operating Instructions Intego 5.6 Sanitizing 2. Remove a single instrument from holder and hold it over the max. cuspidor or over a watertight container with sufficient capacity. For the CS dentist element, move the swivel arm of the instrument into the working position. - Page 300
5 Care, cleaning and maintenance by the practice team Dentsply Sirona 5.6 Sanitizing Operating Instructions Intego ü The tumbler filler was automatically flushed with water. 1. Hold the 3-way syringe over the cuspidor or over a watertight container with sufficient capacity and press the water key for at least 15 seconds. -
Page 301: Sanitizing With Disinfection System
Dentsply Sirona 5 Care, cleaning and maintenance by the practice team Operating Instructions Intego 5.6 Sanitizing 5.6.2 Sanitizing with disinfection system Sanitizing, that is the disinfection of the treatment water paths can be performed by using the disinfection system. During this sanitation, the…
-
Page 302: Sanitizing On The Easypad
5 Care, cleaning and maintenance by the practice team Dentsply Sirona 5.6 Sanitizing Operating Instructions Intego 5.6.2.1 Sanitizing on the EasyPad Displaying the sanitizing operating context ü All instruments are in their holders. 1. Press the fixed key Endo / Purge .
- Page 303
Dentsply Sirona 5 Care, cleaning and maintenance by the practice team Operating Instructions Intego 5.6 Sanitizing Inserting instruments into the cleaning adapters of the water unit The Comfort water unit has integrated cleaning adapters for water- carrying instruments. This allows all instruments to be simultaneously treated with a high concentration of sanitation solution and then rinsed with water. - Page 304
5 Care, cleaning and maintenance by the practice team Dentsply Sirona 5.6 Sanitizing Operating Instructions Intego IMPORTANT Pinching of the instrument hoses Be careful not to pinch the instrument hoses when inserting the instruments. With treatment centers with the Ambidextrous option: convert the water unit to the left side so that the adapters on the water unit point towards the patient chair, see «Converting the Ambidextrous water… - Page 305
Dentsply Sirona 5 Care, cleaning and maintenance by the practice team Operating Instructions Intego 5.6 Sanitizing Allow 24 hours reaction time In order to effectively combat bacteria, you must let the disinfectant for the water paths react for at least 24 hours and not longer than 3 days (maximum sanitization time). - Page 306
5 Care, cleaning and maintenance by the practice team Dentsply Sirona 5.6 Sanitizing Operating Instructions Intego Returning instruments to their holders After the water paths have been rinsed, the instruments can be removed from the cleaning adapters on the water unit and returned to their holders. -
Page 307: Sanitizing On The Easytouch
Dentsply Sirona 5 Care, cleaning and maintenance by the practice team Operating Instructions Intego 5.6 Sanitizing 5.6.2.2 Sanitizing on the EasyTouch Opening the sanitization dialog via the touchscreen ü All instruments are in their holders. ü The Start dialog is displayed on the touchscreen.
- Page 308
5 Care, cleaning and maintenance by the practice team Dentsply Sirona 5.6 Sanitizing Operating Instructions Intego Start sanitization ➢ Touch the Start key. Start Ä The sanitization process starts. Error message: Filling with agent for disinfecting the water paths If the Disinf display appears after the sanitization process has been… - Page 309
Sprayvit E: valve lever in the up position, locking knob in the down position). Also for Intego Pro CS: Move the swivel arm of the instruments to be purged into the operating position so the weight of the instrument hoses keeps them in this position. - Page 310
5 Care, cleaning and maintenance by the practice team Dentsply Sirona 5.6 Sanitizing Operating Instructions Intego IMPORTANT Pinching of the instrument hoses Be careful not to pinch the instrument hoses when inserting the instruments. With treatment centers with the Ambidextrous option: convert the water unit to the left side so that the adapters on the water unit point towards the patient chair, see «Converting the Ambidextrous water… - Page 311
Dentsply Sirona 5 Care, cleaning and maintenance by the practice team Operating Instructions Intego 5.6 Sanitizing Sanitizing phase 3 — Treating the water paths with the agent for disinfecting the water paths The water is pumped out of the water tank of the water unit using the tumbler filling function. - Page 312
5 Care, cleaning and maintenance by the practice team Dentsply Sirona 5.6 Sanitizing Operating Instructions Intego Error message: Inserting instruments in the water unit If an instrument is accidentally deposited in its holder during the reaction time, the message Insert instruments into water unit is displayed on the touchscreen after the treatment center is switched on. - Page 313
Dentsply Sirona 5 Care, cleaning and maintenance by the practice team Operating Instructions Intego 5.6 Sanitizing Displays in case of incomplete sanitation The sanitization program detects whether the sanitization of all instruments and the tumbler filling was completed. Errors that occurred during sanitization will be displayed on the touchscreen as follows: ●… -
Page 314: Display Sanitation Report
5 Care, cleaning and maintenance by the practice team Dentsply Sirona 5.6 Sanitizing Operating Instructions Intego 5.6.3 Display sanitation report If the treatment center is equipped with the EasyTouch comfort user interface, sanitation processes with a reaction time of at least 24 hours can also be displayed on the touchscreen.
-
Page 315: Thermally Disinfect The Sanitization Adapter
Dentsply Sirona 5 Care, cleaning and maintenance by the practice team Operating Instructions Intego 5.6 Sanitizing 5.6.4 Thermally disinfect the sanitization adapter With the Comfort water unit and Ambidextrous, the sanitization adapter can be removed from the water unit for cleaning and thermal disinfection.
-
Page 316: Fuse Of The External Device Connection
5 Care, cleaning and maintenance by the practice team Dentsply Sirona 5.7 Fuse of the external device connection Operating Instructions Intego Fuse of the external device connection The inlet connector remains live even when the power switch is turned off. The fuse can nevertheless be changed.
-
Page 317: Maintenance By The Service Engineer
Dentsply Sirona 6 Maintenance by the service engineer Operating Instructions Intego 6.1 Inspection and maintenance Maintenance by the service engineer Inspection and maintenance In order to ensure the operational safety and reliability of your treatment center and to avoid damage due to natural wear, annual inspection and maintenance must be performed on your treatment center.
-
Page 318: Maintenance Manual
6 Maintenance by the service engineer Dentsply Sirona 6.3 Maintenance Manual Operating Instructions Intego Maintenance Manual Keep this Maintenance Manual near your treatment center. Any inspection and maintenance work as well as all safety tests are documented by the service engineer in the Maintenance Manual.
-
Page 319: Malfunctions
Dentsply Sirona 7 Malfunctions Operating Instructions Intego 7.1 Messages on the EasyPad Malfunctions Messages on the EasyPad Errors on the EasyPad display Messages are shown on the EasyPad display, such as: Safety switch triggered [→ 70] Days until next sanitation [→ 293] Days until next maintenance date …
-
Page 320: Messages On The Easytouch
7 Malfunctions Dentsply Sirona 7.2 Messages on the EasyTouch Operating Instructions Intego 1. Press favorite key 3. Ä The next message is displayed. 2. Acknowledge the individual messages by pressing the favorite key 2 / Setup or pressing the favorite key 3 several times until all the Setup messages have been shown.
-
Page 321: Error Messages
“Changing the water and air filters” [→ 278]. Check whether the public drinking water supply has the necessary wa- ter pressure, see the document on Intego / Intego Pro installation re- quirements. Emergency pump opera- Malfunctioning of pump sensors in Inform your service technician.
- Page 322
7 Malfunctions Dentsply Sirona 7.3 Error Messages Operating Instructions Intego Code Anomaly Description Measure Software inconsistency An error must be acknowledged af- Inform your service technician. ter the treatment center is switched on. The functions of the treatment center may be impaired. -
Page 323: Remote Diagnosis
Dentsply Sirona 7 Malfunctions Operating Instructions Intego 7.4 Remote diagnosis Remote diagnosis Functional description With remote diagnosis, you enable the staff of your dental depot or our Customer Service Center, see «Contact data» [→ 11], to connect to the PC of your treatment center. The contents of your PC monitor are then transmitted to the computer of the service specialist and remote access to your PC is enabled.
-
Page 324: Spare Parts And Consumables
Casing, left water path 60 02 187 Keyboard 63 21 728 Small cleaning wires 24 00 232 63 22 007 O-ring set Sprayvit nozzle 41 76 751 1 x attachment tool and 10 x O-rings 5.5×1.03 Dentsply Sirona T1 Spray (6 x 250 ml cans) 59 01 665 64 5 7 4 98 D3543 D3543.201.01.08.02 02.2020…
- Page 325
Dentsply Sirona 8 Spare parts and consumables Operating Instructions Intego BL E motor BL ISO C/E/S sealing washer, green 63 11 240 Basic Apex adapter 59 83 072 ISO adapter 60 00 793 BL ISO E motor BL ISO E motor sleeve 63 49 851 BL ISO C/E/S sealing washer, green 63 11 240… -
Page 326: Disposal
9 Disposal Dentsply Sirona Operating Instructions Intego Disposal In accordance with Directive 2012/19/EU and national disposal regulations regarding old electrical and electronic devices, please be advised that such items must be disposed of in a special way within the European Union (EU). These regulations require the environmentally friendly recycling/disposal of old electrical and electronic devices.
-
Page 327: Overview Of All Function Keys
Dentsply Sirona 10 Overview of all function keys Operating Instructions Intego 10.1 Fixed keys Overview of all function keys The following contains a brief description of the fixed keys on the dentist and assistant elements and the function keys on the touchscreen and to provide the reader with a quick overview of the significance of the symbols on the keys.
- Page 328
10 Overview of all function keys Dentsply Sirona 10.1 Fixed keys Operating Instructions Intego Chair height Counterclockwise rotation / User profile Switches counterclockwise rotation ON/OFF Changes the user profile Switches AutoReverse function ON/OFF when the maximum torque is reached Counterclockwise rotation ON/OFF… - Page 329
Dentsply Sirona 10 Overview of all function keys Operating Instructions Intego 10.1 Fixed keys 10.1.2 Dentist element with EasyTouch Clean key Clean Deactivates the complete user interface of the dentist element. This is used to clean the surface and protect from interference from an external HF surgical device. - Page 330
10 Overview of all function keys Dentsply Sirona 10.2 Start dialog Operating Instructions Intego 10.1.3 Assistant element Chair program S Mouth rinsing position with last-position memory function (programmable) Chair program 0 Entry/exit position (programmable) Tumbler filling On/Off Flushing the cuspidor… - Page 331
Dentsply Sirona 10 Overview of all function keys Operating Instructions Intego 10.3 Start dialog for removed instruments Purging water lines Starts the purge function Purging water paths automatically Auto Starts the autopurge function Sanitization Starts the treatment center sanitation program… - Page 332
10 Overview of all function keys Dentsply Sirona 10.3 Start dialog for removed instruments Operating Instructions Intego Preselecting air coolant For cooling the treatment area with air Setting the automatic motor stop of the ApexLocator Apex Stop Apex When the Apex Stop key is pressed, the – and + keys are displayed. - Page 333
Dentsply Sirona 10 Overview of all function keys Operating Instructions Intego 10.4 Endo function Endo function 10.4 Endo function Activating the Endo function Memory button Saving all settings of the Endo function Calibrating the bur drive A calibration must be performed each time you change or lubricate the contra-angle handpiece. - Page 334
10 Overview of all function keys Dentsply Sirona 10.5 Other dialogs Operating Instructions Intego Apex acoustic signals Switching the apex acoustic signals on/off. If the signal tones are Apex Dist switched on, a beep is issued when the apex or a set motor stop position is reached. - Page 335
Dentsply Sirona 10 Overview of all function keys Operating Instructions Intego 10.5 Other dialogs 10.5.5 Operating light setting program Sensor control for switching the operating light on/off If the key is highlighted orange, the operating light can be switched on/ off or changed to the Composite function by a hand movement. - Page 336
10 Overview of all function keys Dentsply Sirona 10.6 Sivision program Operating Instructions Intego Sivision program 10.6 10.6.1 Media Player Start Media Player M.player M.player Media Player is started on the external PC. The keys corresponding to the Media Player PC application are displayed on the right side of the… - Page 337
Dentsply Sirona 10 Overview of all function keys Operating Instructions Intego 10.6 Sivision program Overview layout The opened image windows are scaled in the display area so that no scroll bars or as few scroll bars as possible must be displayed. The image windows are arranged without overlapping. - Page 338
10 Overview of all function keys Dentsply Sirona 10.6 Sivision program Operating Instructions Intego Filter black dots Single pixel errors may occur when taking digital X-rays. These pixel errors appear as individual black dots when the optimum resolution (100%) is selected. They are removed by Sidexis. - Page 339
Dentsply Sirona 10 Overview of all function keys Operating Instructions Intego 10.6 Sivision program 10.6.5 Video plugin Start the video plugin Sidexis 4 and the video plugin are started on the PC. The fixed keys for the video plugin are displayed on the right side of the touchscreen. - Page 340
10 Overview of all function keys Dentsply Sirona 10.7 Setup program Operating Instructions Intego Setup program 10.7 10.7.1 Date and time Date and time Opens the Date and Time setup program. Date 15 04 14 Time 12/24 hour display 12 h 10.7.2… - Page 341
Dentsply Sirona 10 Overview of all function keys Operating Instructions Intego 10.7 Setup program Focusing the intraoral camera using the foot control If the treatment center is equipped with an autofocus camera and the C + electronic foot control, it can be configured in setup that the camera image can be focused with the foot switch. -
Page 342: Index
Index Dentsply Sirona Operating Instructions Intego Index Armrest, 72 Numeric Articulating headrest, 33, 74 4-way foot switch, 205, 211 Assistant element 4-way foot switch plate, 68 Instrument positions, 48 Maximum load capacity, 149 Access the start program with the foot control, 67 Mini L.E.D., 155, 251 Acoustic signals, 117 Overview, 45…
- Page 343
Dentsply Sirona Index Operating Instructions Intego Chip blower, 66, 67, 89, 91 Sprayvit E, 95 Clean key, 220 Standard 3-way syringe, 94 Cleaning adapter, 266, 309 Dentist element with hanging hoses, 36 Cleaning agent for hose cleaning, 261, 263 Dentist element with whip arms, 37 Coding of motor hoses, 102 Deutscher Verein für Gas und Wasser (DVGW) =… - Page 344
Index Dentsply Sirona Operating Instructions Intego Foot switch Chip blower, 66 Favorite key pad, 68 Chip blower , 67 Favorites keypad, 62 Spray, 66, 88, 90 File clamp, 113 Fresh water bottle, 51, 55, 166 Filter Air and water, 278 Central suction sieve, 270 Gold trap, 272 Gold trap, 272 Guide rollers on the CS dentist element, 86 Standard wet suction, 288… - Page 345
Dentsply Sirona Index Operating Instructions Intego Clockwise/counterclockwise rotation, 68 Cooling medium, 90 Last Position Memory function, 77 Cover, 87 LEDlight Plus, 181 CW/CC rotation, 111 LEDview Plus, 181 Drive motors, 18 Live image, 191, 193 Endo function, 122 Load capacity Holder/positions on assistant element, 48 Assistant element, 149 Holder/positions on the dentist element, 38 Cup holder, 179… - Page 346
Index Dentsply Sirona Operating Instructions Intego Mouth rinsing position S, 67, 76, 150 Mucosal electrode, 113 Reciprocal rotating files, 133 Municipal water, 165 Remote access, 323 Remote diagnosis, 323 RoHS Directive, 23 NaCl, 67 Name of the treatment center in the practice network, 213 Safety checks, 317 Network configuration, 213 Safety instructions, 15 Safety switch, 70… - Page 347
Dentsply Sirona Index Operating Instructions Intego Spray, 67, 88, 91 Transport conditions, 25 Spray aspirator, 152, 205, 269 Tray, 178, 223 Spray water quantity, 93 Tumbler filling, 150, 159 Sprayvit E, 95 Tumbler filling with automatic sensor control, 161 Sprayvit E 3-way syringe, 95 Turbine, 98 Stand-alone water supply, 51, 55 Standard 3-way syringe, 94… - Page 348
Index Dentsply Sirona Operating Instructions Intego White screen on the Sivision monitor, 180, 212 Wireless phones, 20 Work steps for the Endo function, 132 X-ray image viewer, 180, 212 64 5 7 4 98 D3543 D3543.201.01.08.02 02.2020… - Page 350
We reserve the right to make any alterations which may be required due to technical improvements. © Sirona Dental Systems GmbH Sprache: englisch Printed in Germany D3543.201.01.08.02 02.2020 Ä.-Nr.: 128 5 62 Sirona Dental Systems GmbH 64 5 7 4 98 D3543 Fabrikstr.
7 Неисправности
7.1 Сообщения об ошибках
Ошибка
Воздух не всасывается, хотя вса-
сыватель работает с выключа-
телем питания в положении Вкл.
Программное сообщение об
ошибке:
Выключатель разрежения всасы-
ватель
26
7
Неисправности
Сообщения об ошибках
7.1
Возможная причина
Забился всасывающий шланг
Утечка во всасывающем шланге
или на разъеме
Неисправность обрабатывающего
станка
Регулятор мощности всасывания
на панели управления стоит в по-
ложении мин.
Фильтровальный мешок/фильтр
HEPA забился
Забился всасывающий шланг
Неисправен интерфейсный ка-
бель
Неисправность обрабатывающего
станка
Инструкция по эксплуатации всасывающих устройств
Устранение
Проверить прохождение воздуха
во всасывающем шланге, при
необходимости удалить заторы.
Проверить герметичность всасы-
вающего шланга, а также уплот-
нения на всасывателе и обраба-
тывающем станке, при необходи-
мости загерметизировать или
сменить уплотнение.
Обратиться в службу технической
поддержки.
Перевести регулятор мощности
всасывания в положение макс.
Заменить фильтровальный ме-
шок.
Заменить фильтр HEPA.
Проверить прохождение воздуха
во всасывающем шланге, при
необходимости удалить заторы.
Заменить интерфейсный кабель.
Обратиться в службу технической
поддержки.
D3608.201.02.05.12 10.2020
Dentsply Sirona
66 25 540 D3608
Июль 16, 2018

На смену установки Сирона С8+, которую знал весь стоматологический мир, пришла установка Интего. безусловно, Sirona стремиться сделать свою продукцию все более качественной и удобной для пользователей, при этом оставить ее доступной по цене, однако нам хочется знать, в чем состоит принципиальное отличие установок Sirona c8+ и Intego.
Что изменилось в ИНТЕГО по сравнению с С8+?
1. Дизайн стал более современным.
— Кресло пациента утратило свою «гармошку» и выйграло по эстетичности и гигиене. В базовую комплектацию уже входит мягкая обивка кресла.
— Появился компактные гидроблок и блок ассистента для оптимального использования пространства.
2. Пользовательский интерфейс EasyPad позволяет интуитивного управлять установкой (теперь есть цифровая шкала регулировки оборотов мотора )
3. В базовой комплектации установка сразу оснащается бесщеточным мотором.
1. Как определяется стоимость базовой комплектации?
Intego, как и ее предшественницу стоматологическую установку С8+ можно конфигурировать по своему желанию. То есть выбирать широкую или узкую спинку кресла пациента, верхнюю или нижнюю подачу шлангов блока врача, сепарационную систему или воздушную помпу в гидроблоке, более мощный светильник или менее, электрический или пневматический мотор и т.д. Поэтому стоимость даже минимального рабочего комплекта установки будет сильно варьироваться. Минимальная рабочая комплектация установки INTEGO обойдется Вам в 11700 EUR (без компрессора и наконечников)
2. Каков срок поставки?
Установка в более или менее стандартной комплектации практически всегда есть в наличии. Иначе срок поставки составляет в среднем – 1,5 месяца.
3. Особенности установки INTEGO
Отличительной особенностью фирмы SIRONA всегда была гигиена. Концепция гигиены INTEGO разработана так, чтобы вы могли легко и быстро выполнить все гигиенические требования. Конструкция модуля ассистента и гидроблока делает гигиенические процедуры еще проще и быстрее. Все это гарантирует полное отсутствие опасности инфекции для вас, ваших пациентов и персонала.
Следующая отличительная характеристика Интего — это комфорт в работе врача и пациента.
Кресло пациента имеет функцию памяти на 4 положения кресла, и возможность сохранять настройки кресла для двух врачей. Кресло рассчитано на 140 кг. Стандартно кресло пациента оснащено плоским подголовником и мягкой обивкой Премиум. Но вы можете оснастить кресло двухшарнирным подголовником и подлокотниками по желанию.
Модуль врача оснащен регулируемым по высоте кронштейном с пневматическим тормозом и рассчитан на 5 инструментов. EasyPad -Понятный и интуитивный стандарт пользовательского интерфейса

Модуль врача вы можете оснастить, как пожелаете. В стандартной комплектации идет бесщеточный мотор, пистолет вода-воздух, шланг турбинный с подсветкой.
Модуль ассистента закреплен на поворотном держателе на гидроблоке, имеет 2 свободных места для размещения инструментов (например, полимеризационной лампы и пистолета), слюноотсос и пылесос. Вы можете выбрать при заказе вариант «Комфорт» на кронштейне с широким диапазоном поворота.
Светильник
Два варианта выбора светодиодного светильника с гибким позиционированием для оптимального освещения обрабатываемого участка. Гигиеничность использования обеспечивается благодаря бесконтактному сенсору.
LEDlight и LEDview


Стул врача представлен в трех вариантах:
— Стул HUGO
Умный стул для стоматологов, гарантирующий интуитивное поддержание здоровой осанки во время процесса лечения.
— Стул CARL
Всесторонний комфорт: спинка вращается на 360° и может служить как подлокотником, так и опорой для всего корпуса.
— Стул PAUL
Удобная базовая модель с боковым рычагом регулировки высоты сиденья и возможностью поворота спинки/подлокотника на 90°.
В базовой комплектации идет стул PAUL

То есть стоматологическая установка INTEGO позволяет вам с легкостью производить сложнейшие манипуляции. SIRONA продумала, как сделать вашу работу максимально комфортной.
4. Каковы сроки поставки запчастей?
Самые ходовые запасные части (шланги, лампочки, прокладки, роторы) как правило, есть на складе. Иначе срок поставки запасных частей из Германии в среднем составляет1,5 месяца
5. Какой компрессор подходит к установке.
Для работы одной установки требуется компрессор:
— производительностью 60 л/мин., если в гидроблоке стоит автоматический сепаратор (для обработки сточной воды/аспирации при центральной системе сухой аспирации)
— производительностью 120 л/мин, если стоит воздушный эжектор
С уважением, компания АЛЬДЕРА
Вернуться назад
- Page 1
02.2020 New as of: Intego / I ntego Pro Intego Ambidextrous Intego Pro Ambidextrous Operating Instructions (not valid for USA) English… -
Page 2: Table Of Contents
Table of Contents Dentsply Sirona Operating Instructions Intego Table of Contents General Information ………………..Dear customer, ………………. Contact information………………General information on the operating Instructions ……..Scope of these operating Instructions…………Other valid documents …………….. Warranty and liability………………Intended use ………………..
- Page 3
Dentsply Sirona Table of Contents Operating Instructions Intego System overview Intego Pro ……………. System overview Intego / Intego Pro with Ambidextrous option ….Patient chair ………………..Head support ………………..3.7.1 Flat headrest ……………… 3.7.2 Double-jointed head support…………Foot control ………………..3.8.1 Pneumatic foot switch ………….. - Page 4
Table of Contents Dentsply Sirona Operating Instructions Intego Foot control ………………..4.3.1 Pneumatic foot switch …………..4.3.2 C+ electronic foot switch…………..Patient chair ………………..4.4.1 Safety instructions…………….4.4.2 Safety stop ………………4.4.3 Triggering an immediate movement stop……..4.4.4 Armrests………………4.4.5 Vario footrest……………… - Page 5
Dentsply Sirona Table of Contents Operating Instructions Intego 4.5.7.5 Attach/remove the housing and nozzle ……4.5.7.6 Applying air, water, or spray ……… 4.5.8 Turbine / air motor / other air-driven instruments……4.5.8.1 Using the highspeed handpiece ……..4.5.8.2 Setting the light of the highspeed handpiece…. - Page 6
4.7.4 Stand-alone water supply ………….. 165 4.7.4.1 Water supply for the Intego ………. 166 4.7.4.2 Water supply for the Intego pro ……..168 4.7.5 Converting the Ambidextrous water unit for right and left-handed people ……………….. 172 Swiveling tray holder………………178 Cup holder ……………….. - Page 7
Dentsply Sirona Table of Contents Operating Instructions Intego 4.11 Operating light………………..181 4.11.1 Switching the operating light on/off ……….181 4.11.2 Setting the LEDlight brightness…………182 4.11.3 Setting the brightness, color temperature, and sensor control of the LEDview Plus…………….182 4.12… - Page 8
Table of Contents Dentsply Sirona Operating Instructions Intego 4.15.2 Configuring the treatment center on EasyTouch ……208 4.15.2.1 Opening the setup dialogs……….208 4.15.2.2 Setting the time and date……….209 4.15.2.3 Configuring control options……….. 210 4.15.2.4 Configuring the network connection ……213 4.15.2.5… - Page 9
Dentsply Sirona Table of Contents Operating Instructions Intego 5.3.5.5 Clean and disinfect/sterilize the components of the ApexLocator …………..250 5.3.5.6 Cleaning, disinfecting/sterilizing the Cavitron scaler ..251 5.3.5.7 Disinfecting/sterilizing Mini L.E.D. curing light ….251 5.3.5.8 Cleaning/disinfecting the SiroCam F / AF / AF+ intraoral camera………… - Page 10
Table of Contents Dentsply Sirona Operating Instructions Intego Sanitizing ………………… 293 5.6.1 Sanitizing with the fresh water bottle ……….294 5.6.1.1 Sanitizing on the EasyPad……….295 5.6.1.2 Sanitizing on the EasyTouch ……..298 5.6.2 Sanitizing with disinfection system……….301 5.6.2.1 Sanitizing on the EasyPad………. -
Page 11: General Information
These Operating Instructions are designed to assist you prior to initial use and whenever you require information later on. We wish you a great deal of success and pleasure with Intego / Intego Pro. Your Intego team Contact information…
-
Page 12: General Information On The Operating Instructions
● Intego TS (Compact water unit and dentist element with hanging hoses) ● Intego CS (Compact water unit and dentist element with swivel arms) ● Intego Pro TS (Comfort water unit and dentist element with hanging hoses) ● Intego Pro CS (Comfort water unit and dentist element with swivel arms) The treatment centers can be delivered from the factory with the Ambidextrous option.
-
Page 13: Other Valid Documents
Exclusion of liability In the event that the system owner fails to fulfill its obligation to perform maintenance activities or ignores error messages, Dentsply Sirona or your authorized dealer cannot assume any liability for any damage thus incurred.
-
Page 14: Obligation To Notify Authorities
1 General Information Dentsply Sirona 1.8 Obligation to notify authorities Operating Instructions Intego Obligation to notify authorities In the European Union, the operator or user must report all serious events related to the product to the competent authority of the Member State in which he or she is established.
-
Page 15: Safety Instructions
Dentsply Sirona 2 Safety instructions Operating Instructions Intego 2.1 Identification of the danger levels Safety instructions Identification of the danger levels To prevent personal injury and material damage, please observe the warning and safety information provided in these instructions for use.
-
Page 16: On-Site Installation
Alternatively, for Intego the optional fresh water bottle, or for Intego Pro the empty disinfectant tank can be used as a water container for a self-sufficient water supply. For…
-
Page 17: Maintenance And Repair
It can be connected directly to the public drinking water supply. The Intego treatment center, provided it is equipped with a fresh water bottle not connected to the public drinking water supply, also complies with the requirements of EN 1717 and the DVGW German Gas and Water Association).
-
Page 18: Trouble-Free Operation
No restrictions apply when using salt blasting devices in connection with Dentsply Sirona treatment centers. However, in such cases, make sure that the system is subsequently flushed with an adequate amount of water.
-
Page 19: Ventilation Slots
Use only Dentsply Sirona fresh water bottles, see “Spare parts, consumables” [→ 324]! Compressed air is added to the bottle when it is screwed into the holder. Beverage bottles could burst.
-
Page 20: Modifications And Extensions Of The System
For reasons of product safety, this product may be operated only with original Dentsply Sirona parts or third-party parts expressly approved by Dentsply Sirona. In the event of changes which were not foreseen, Dentsply Sirona is not liable for resulting damages.
-
Page 21: Electrostatic Discharge
Dentsply Sirona 2 Safety instructions Operating Instructions Intego 2.19 Electrostatic discharge Electrostatic discharge 2.19 Protective measures Electrostatic discharge (abbreviated: ESD – ElectroStatic Discharge) Electrostatic discharge from people can damage electronic components when the components are touched. Damaged components usually have to be replaced.
-
Page 22: Dismantling/Installation
2 Safety instructions Dentsply Sirona 2.20 Dismantling/Installation Operating Instructions Intego Tip: 1 nanosecond= 1/1,000,000,000 second= 1 billionth of a second Voltage differentials exceeding 30,000 volts per centimeter may lead to a charge transfer (electrostatic discharge, lightning, spark-over). Integrated circuits (logical circuits and microprocessors) are used in order to implement a wide variety of functions in a device.
-
Page 23: Unit Description
“Connection to the public drinking water supply” [→ 16] Original language of this document: German Intego / Intego Pro bear the CE marking in accordance with the provisions of Council Directive 93/42/EEC of June 14, 1993 concerning medical devices.
-
Page 24: Technical Data
3 Unit description Dentsply Sirona 3.2 Technical data Operating Instructions Intego Technical data Model designation: Intego / Intego Pro Power connection: 100 – 240 V AC ± 10% 50/60 Hz Rated current: 3.3 A – 1.5 A at 100 – 240 V also max. 6 A for external devices…
- Page 25
Dentsply Sirona 3 Unit description Operating Instructions Intego 3.2 Technical data 1060 Transport and storage con- Temperature: -40°C – +70°C ditions: (-40°F – 158°F) Relative humidity: 10% – 95% Air pressure: 500 hPa – 1060 hPa 1060 Operating conditions: Ambient temperature: 10°C – 40°C (50°F –… -
Page 26: System Overview Intego
Dentsply Sirona 3.3 System overview Intego Operating Instructions Intego System overview Intego The Intego treatment center comprises the following main components: Intego TS treatment center Patient chair Flat headrest (shown here) or double articulating headrest Pneumatic foot switch (shown here) or C+ electronic foot…
- Page 27
Flat headrest or double articulating headrest (shown here) Pneumatic foot switch or C+ electronic foot switch (shown here) Intego CS dentist element with swivel arms Compact or Comfort (shown here) assistant element Compact water unit Main switch and external device connection (optional) 64 … -
Page 28: System Overview Intego Pro
3 Unit description Dentsply Sirona 3.4 System overview Intego Pro Operating Instructions Intego System overview Intego Pro The Intego Pro treatment center comprises the following main components: Intego Pro TS treatment center Patient chair Flat headrest (shown here) or double articulating headrest…
- Page 29
Patient chair Flat headrest or double articulating headrest (shown here) Pneumatic foot switch or C+ electronic foot switch (shown here) Intego Pro CS dentist element with swivel arms Comfort assistant element Comfort water unit Main switch and external device connection (optional) 64 … -
Page 30: System Overview Intego / Intego Pro With Ambidextrous Option
Ambidextrous option The Intego and Intego Pro treatment centers with the Ambidextrous option comprise the following main components: Intego TS / Intego Pro TS treatment center with Ambidextrous option Patient chair Flat headrest (shown here) or double articulating headrest Pneumatic foot switch (shown here) or C+ electronic foot control…
- Page 31
Dentsply Sirona 3 Unit description Operating Instructions Intego 3.5 System overview Intego / Intego Pro with Ambidextrous option Intego CS / Intego Pro CS treatment center with Ambidextrous option Patient chair Flat headrest or double articulating headrest (shown here) Pneumatic foot switch or C+ electronic foot control (shown… -
Page 32: Patient Chair
3 Unit description Dentsply Sirona 3.6 Patient chair Operating Instructions Intego Patient chair The patient chair features a variety of adjustment options to optimally adjust the patient’s position during treatment. Flat headrest (shown here) or double articulating headrest Backrest Seat…
-
Page 33: Head Support
Dentsply Sirona 3 Unit description Operating Instructions Intego 3.7 Head support Head support 3.7.1 Flat headrest The headrest extension can be pulled in or out depending on the patient’s height. For upper jaw treatment, the magnetic head pad can be rotated and used as a neck rest.
-
Page 34: Foot Control
3 Unit description Dentsply Sirona 3.8 Foot control Operating Instructions Intego Foot control 3.8.1 Pneumatic foot switch With a pneumatic foot control, the compressed air valve for activating the highspeed handpieces is integrated into the foot control. The highspeed handpieces are therefore continuously adjustable. For electric motors and the scaler, the foot control is operated as a direct starter (i.e.
-
Page 35: C+ Electronic Foot Switch
Dentsply Sirona 3 Unit description Operating Instructions Intego 3.8 Foot control 3.8.2 C+ electronic foot switch The C+ electronic foot control can be set as a foot control or direct starter for electric motors and the scaler. The compressed air for high- speed handpieces cannot be adjusted.
-
Page 36: Dentist Element
Operating Instructions Intego Dentist element Intego and Intego Pro can be equipped with a TS dentist element (with hanging hoses) or a CS dentist element (with whip arms). All functions of the treatment center can be controlled via the control panel on the dentist element.
-
Page 37: Cs Dentist Element With Swivel Arms
Dentsply Sirona 3 Unit description Operating Instructions Intego 3.9 Dentist element 3.9.2 CS dentist element with swivel arms On the CS dentist element, instruments are placed on the instrument holder horizontally and facing downwards. The instrument hoses are placed above the dentist element over the whip arms.
-
Page 38: Instrument Positions
• SiroCam AF+ The Standard 3-way syringe is only available for Intego. The Intego / Intego Pro treatment centers can be fitted with a maximum of two motors. A maximum of one scaler and one intraoral camera can be connected.
-
Page 39: Standard Easypad User Interface
Dentsply Sirona 3 Unit description Operating Instructions Intego 3.9 Dentist element 3.9.4 Standard EasyPad user interface EasyPad display Status displays Fixed keys (membrane keyboard) Favorite key pad (membrane keyboard) 3.9.4.1 EasyPad display and status displays EasyPad display For indicating speed, intensity, and torque and for configuring and servicing the treatment center.
- Page 40
3 Unit description Dentsply Sirona 3.9 Dentist element Operating Instructions Intego Pressing the tumbler filling key (> 2 s) displays the setting text for coupling the tumbler filling to mouth rinsing position S and filling time, see «Tumbler filling on the EasyPad» [→ 159]. - Page 41
Dentsply Sirona 3 Unit description Operating Instructions Intego 3.9 Dentist element Endo / Purge With the motor removed: switching the Endo function on/off, see Purge «Switching Endo function on/off» [→ 123] With the ultrasonic handpiece removed: switching the Endo mode on/off (limiting power), see «Setting the intensity on the EasyPad» … -
Page 42: Comfort Easytouch User Interface
Dentsply Sirona 3.9 Dentist element Operating Instructions Intego 3.9.5 Comfort EasyTouch user interface The EasyTouch option is available for the Intego and Intego Pro treatment centers. Touchscreen (pressure-sensitive user interface) Fixed keys (membrane keyboard) 64 5 7 4 98 D3543…
-
Page 43: Touch Screen
Dentsply Sirona 3 Unit description Operating Instructions Intego 3.9 Dentist element 3.9.5.1 Touch screen The touchscreen displays virtual function keys according to the program selected. A list of all function keys is provided in the Appendix of this document, see «Overview of all function keys» [→ 327].
-
Page 44: Fixed Keys Of The Easytouch User Interface
3 Unit description Dentsply Sirona 3.9 Dentist element Operating Instructions Intego 3.9.5.2 Fixed keys of the EasyTouch user interface Clean key Clean Pressing this key deactivates the complete user interface of the dentist element. Pressing it again > 3 s reactivates the user interface.
-
Page 45: Assistant Element
The Intego treatment center and Intego Pro with Ambidextrous option can be equipped with the Compact or Comfort assistant element. Intego Pro without the Ambidextrous option is available only with the Comfort assistant element. The user interface on the assistant element is optional.
- Page 46
3 Unit description Dentsply Sirona 3.10 Assistant element Operating Instructions Intego Support arm and rotary joint Central suction sieve under the removable cuspidor bowl Comfort assistant element with treatment centers without Ambidextrous option The Comfort assistant element is attached to the base of the patient chair by a support arm. - Page 47
Dentsply Sirona 3 Unit description Operating Instructions Intego 3.10 Assistant element Comfort assistant element with treatment centers with Ambidextrous option The Comfort assistant element is attached to the water unit with a support arm. It can be positioned so that the instruments can be reached by the dentist if he/she is performing treatment on his/her own. -
Page 48: Instrument Positions
• SiroCam F • SiroCam AF • SiroCam AF+ The Standard 3-way syringe is only available for Intego. A mini LED curing light, an intraoral camera or an additional spray aspirator can be connected to the treatment center. Changes to holder 2 can only be made by your service engineer.
-
Page 49: User Interface
Dentsply Sirona 3 Unit description Operating Instructions Intego 3.10 Assistant element 3.10.2 User interface 3.10.3 Fixed keys on the assistant element Chair program S Mouth rinsing position with last-position memory function (programmable), seeProgramming chair positions» [→ 80] Chair program 0 Entry/exit position (programmable)
-
Page 50: Water Unit
The Compact water unit can be operated with an air jet pump (Air Venturi) instead of a suction device. The heater for the treatment water is in the water unit. For the Intego, the water heater is optional.
-
Page 51: Compact Water Unit
Dentsply Sirona 3 Unit description Operating Instructions Intego 3.11 Water unit 3.11.1 Compact water unit The Compact water unit is available only without a disinfection system. However, it can be equipped with a fresh water bottle for stand-alone water supply. Switching between the fresh water bottle and public drinking water supply is another equipment option.
-
Page 52: Comfort Water Unit
3 Unit description Dentsply Sirona 3.11 Water unit Operating Instructions Intego 3.11.2 Comfort water unit The water unit can be optionally equipped with a disinfection system. In normal operation, this will automatically inoculate the water that will come into contact with the patient (also called treatment water) with an agent to disinfect the water paths.
- Page 53
Dentsply Sirona 3 Unit description Operating Instructions Intego 3.11 Water unit Suction hose connection for assistant element Manually swiveling cuspidor (removable) Tumbler filler Cover of the storage tank for the disinfectant used to disinfect the water paths or for the stand-alone water supply Cleaning adaptor for water-carrying instruments of the dentist element for sanitizing and auto purge. -
Page 54: Ambidextrous Water Unit
The amalgam separator and sediment container are removed from underneath with the Ambidextrous water unit. Cleaning adapter for the Sprayvit E and for a suction hose of the assistant element Fresh water bottle (only with the Intego) 64 5 7 4 98 D3543 D3543.201.01.08.02 02.2020…
- Page 55
Suction hose connection to the Comfort assistant element Ambidextrous water unit with Intego With the Intego, the Ambidextrous water unit is available only without a disinfection system. However, it can be equipped with a fresh water bottle for stand-alone water supply. Switching between the fresh water bottle and public drinking water supply is another equipment option. - Page 56
3 Unit description Dentsply Sirona 3.11 Water unit Operating Instructions Intego automatically purging the water paths (AutoPurge), and cleaning the suction hoses. To clean the suction system, water is pumped into a tank behind the suction hose intake and suctioned off from there. A cleaning agent is automatically added to the water if the dental treatment center is equipped with the chemical suction hose cleaning option. -
Page 57: External Device Connection
Dentsply Sirona 3 Unit description Operating Instructions Intego 3.12 External device connection External device connection 3.12 External medical accessories can be connected to the external device connection. They must comply with the requirements of IEC 60601-1. NOTE If the treatment center is equipped with a disinfection system or fresh…
- Page 58
3 Unit description Dentsply Sirona 3.12 External device connection Operating Instructions Intego Print Flow rate Water 2.2 ± 0.2 bar max. 300 ml/min 4.4 ± 0.5 bar max. 50 Nl/min IMPORTANT The removal of media at the external device connection can reduce the performance of integrated consumers, e.g., the filling quantity of… -
Page 59: Operation
«Switch spray on/off» [→ 88] and «Purge water paths» [→ 226]. The Intego Pro has the sanitize function if the water unit is equipped with a disinfection system. For sanitizing, the water-carrying lines are filled with the undiluted disinfectant to disinfect the water paths to reduce the bacterial load in the water paths.
-
Page 60: Switching The Treatment Center On/Off
4 Operation Dentsply Sirona 4.1 Starting up the treatment center Operating Instructions Intego 4.1.2 Switching the treatment center on/off The treatment center has a main switch with integrated fuse on the base of the chair. At the end of the working day, the treatment center should be switched off to save energy and for safety reasons.
-
Page 61: Selecting A User Profile
Dentsply Sirona 4 Operation Operating Instructions Intego 4.1 Starting up the treatment center 4.1.3 Selecting a user profile If your treatment center is equipped with the EasyPad standard user interface, it can manage up to two user profiles. The EasyTouch Comfort user interface can manage up to four user profiles.
-
Page 62: Concept Of The User Interface
4 Operation Dentsply Sirona 4.2 Concept of the user interface Operating Instructions Intego Concept of the user interface 4.2.1 Standard EasyPad user interface EasyPad displays The EasyPad user interface is equipped with seven segment displays. Each display can show five digits or letters. Depending on the operating…
- Page 63
Dentsply Sirona 4 Operation Operating Instructions Intego 4.2 Concept of the user interface It may not be possible to activate the Endo function. Purge It is not possible to switch between speed and torque display. Clean Calling functions Functions are triggered by the fixed buttons on the user interface. -
Page 64: Comfort Easytouch User Interface
4 Operation Dentsply Sirona 4.2 Concept of the user interface Operating Instructions Intego 4.2.2 Comfort EasyTouch user interface 4.2.2.1 Virtual function keys The touchscreen displays virtual function keys according to the program selected. Required functions can be activated by touching the function keys with your finger.
-
Page 65: Status Column
Dentsply Sirona 4 Operation Operating Instructions Intego 4.2 Concept of the user interface Settings screens In many cases, functions not only can be switched on or off, but also 10:45:03 can be set. If a function key is pressed and held (> 2 s), the corresponding settings screen appears.
-
Page 66: Foot Control
4 Operation Dentsply Sirona 4.3 Foot control Operating Instructions Intego Foot control The treatment center can be operated with a pneumatic foot switch or the C+ electronic foot switch. 4.3.1 Pneumatic foot switch When the instrument is removed from the holder, the speed or intensity are automatically displayed on the EasyPad.
-
Page 67: C+ Electronic Foot Switch
Dentsply Sirona 4 Operation Operating Instructions Intego 4.3 Foot control 4.3.2 C+ electronic foot switch The C+ electronic foot control operating elements are assigned different functions depending on whether the instruments are all in place or an instrument is removed from its holder.
- Page 68
4 Operation Dentsply Sirona 4.3 Foot control Operating Instructions Intego 4-way switch plate ü All instruments are in their holders. ➢ Move the 4-way foot switch plate to the left or right. Ä Left: Chair program 1 is started. Right: Chair program 2 is started. -
Page 69: Patient Chair
Dentsply Sirona 4 Operation Operating Instructions Intego 4.4 Patient chair Patient chair 4.4.1 Safety instructions CAUTION ü û The free space under the patient couch and up to the water unit can be decreased due to chair movements. Parts of the patient’s or user’s body may be pinched or crushed.
-
Page 70: Safety Stop
4 Operation Dentsply Sirona 4.4 Patient chair Operating Instructions Intego 4.4.2 Safety stop The treatment center is equipped with various safety stops to prevent crushing and damage. The cutoff trigger points are shown in the following illustration: Display of triggered safety switch 2 on the EasyPad…
-
Page 71: Triggering An Immediate Movement Stop
Dentsply Sirona 4 Operation Operating Instructions Intego 4.4 Patient chair 4.4.3 Triggering an immediate movement stop You can stop the movement of the chair to a programmed position as follows: ➢ Touch one of the patient chair keys on the EasyPad or EasyTouch.
-
Page 72: Armrests
4 Operation Dentsply Sirona 4.4 Patient chair Operating Instructions Intego 4.4.4 Armrests Armrests are available for the patient chair. The right armrest can be swiveled forward to facilitate getting in and out of the chair. In treatment centers with the Ambidextrous option, both armrests can be swiveled.
-
Page 73: Adjusting The Flat Headrest
Dentsply Sirona 4 Operation Operating Instructions Intego 4.4 Patient chair 4.4.6 Adjusting the flat headrest The headrest extension can be pulled in or out manually depending on the patient’s height. ➢ Pull the headrest out of the backrest or push it back in at the recessed grip A.
-
Page 74: Adjusting The Double Articulating Headrest
4 Operation Dentsply Sirona 4.4 Patient chair Operating Instructions Intego 4.4.7 Adjusting the double articulating headrest The double articulating headrest is equipped with two rotary joints. They facilitate manual adjustment of head inclination for maxillary/mandibular treatments. The headrest extension can be pushed in or pulled out manually to adjust it to the height of the patient.
-
Page 75: Moving The Patient Chair Via Chair Programs
IMPORTANT Chair movements with cuspidor swiveled in Intego With the cuspidor bowl swiveled in, the chair cannot be moved. This prevents the patient from colliding with the cuspidor. Swing the cuspidor outward before initiating chair movement.
-
Page 76: Moving The Patient Chair To The Mouth Rinsing Position
4 Operation Dentsply Sirona 4.4 Patient chair Operating Instructions Intego Via the assistant element ➢ Press the 0 key on the assistant element briefly (< 2 s). 4.4.8.2 Moving the patient chair to the mouth rinsing position The following functions are factory preset to be activated in the mouth rinsing position: ●…
-
Page 77: Using The Last Position Memory Function
Dentsply Sirona 4 Operation Operating Instructions Intego 4.4 Patient chair 4.4.8.3 Using the last position memory function The last chair position is stored before the patient chair moves to mouth rinsing position S. When mouth rinsing position key S is pressed again, the treatment center returns to the previously set treatment position.
-
Page 78: Moving The Chair Manually
IMPORTANT Chair movements with cuspidor swiveled in Intego With the cuspidor bowl swiveled in, the chair cannot be moved. This prevents the patient from colliding with the cuspidor. Swing the cuspidor outward before initiating chair movement.
-
Page 79: Adjusting The Chair Height
Dentsply Sirona 4 Operation Operating Instructions Intego 4.4 Patient chair 4.4.9.2 Adjusting the chair height Via fixed keys on the EasyPad ➢ Press the Adjust the chair height key. Via the touchscreen on the EasyTouch ü The Start or Instrument program is displayed on the touchscreen.
-
Page 80: Programming Chair Programs
4 Operation Dentsply Sirona 4.4 Patient chair Operating Instructions Intego 4.4.10 Programming chair programs The four chair programs preset in the factory: ● Mouth rinsing position S ● Entry/exit position 0 ● 1 and 2 can be individually programmed for both user profiles (A and B) on the EasyPad and each of the four user profiles (A to D) on the EasyTouch.
-
Page 81: Dentist Element
Dentsply Sirona 4 Operation Operating Instructions Intego 4.5 Dentist element Dentist element 4.5.1 Maximum load capacity TS dentist element The maximum load on the TS dentist element without a tray holder is 1 kg (2.2 lbs). The maximum load on the TS dentist element with a tray holder is 2 kg (4.4 lbs).
-
Page 82: Positioning The Dentist Element
4 Operation Dentsply Sirona 4.5 Dentist element Operating Instructions Intego 4.5.2 Positioning the dentist element WARNING The dentist element could be positioned within the movement range of the patient chair. Moving the patient chair may cause the patient to collide with the dentist element or its support arm.
- Page 83
Dentsply Sirona 4 Operation Operating Instructions Intego 4.5 Dentist element Positioning the CS dentist element (standard position) In the standard position, the support arm of the CS dentist element is attached to the right mount of the Compact water unit and to the rear mount of the Comfort water unit. - Page 84
4 Operation Dentsply Sirona 4.5 Dentist element Operating Instructions Intego Positioning the CS dentist element (special position) Alternatively, the support arm of the CS dentist element can be attached to the left mount on the Compact water unit (special position) and with the Comfort water unit to the front mount. -
Page 85: Fixed Keys On The Dentist Element
Dentsply Sirona 4 Operation Operating Instructions Intego 4.5 Dentist element 4.5.3 Fixed keys on the dentist element An overview of the fixed keys on the EasyPad and EasyTouch can be found in the Description of Device, see «EasyPad standard user interface» …
-
Page 86: Placing The Instruments In Their Holders
4 Operation Dentsply Sirona 4.5 Dentist element Operating Instructions Intego 4.5.4 Placing the instruments in their holders Automatic opening of instrument dialogs On the EasyPad, the speed or intensity is shown automatically on the display depending on which instrument is removed from the holder. On the EasyTouch, the respective instrument program appears on the touchscreen.
- Page 87
Dentsply Sirona 4 Operation Operating Instructions Intego 4.5 Dentist element Cover for TS dentist element A cover can be purchased as an accessory for an instrument holder which is not used. Insert the cover into an unassigned instrument holder. This prevents accidental deposit of an instrument in this holder. -
Page 88: General Instrument Functions
4 Operation Dentsply Sirona 4.5 Dentist element Operating Instructions Intego 4.5.5 General instrument functions EasyPad Settings for the coolant, instrument light, and foot switch can be made for the instrument removed from the holder. EasyTouch Settings for the coolant, instrument light, and foot switch can be made in the sub-screen of the instrument removed from the holder.
- Page 89
Dentsply Sirona 4 Operation Operating Instructions Intego 4.5 Dentist element Ä When the status display Spray lights up on the EasyPad, spray is switched on when the instrument is activated. Activation of the spray is saved on the favorite keys, see section «Setting the speed on the EasyPad» … -
Page 90: Instrument Functions On The Easytouch
4 Operation Dentsply Sirona 4.5 Dentist element Operating Instructions Intego 4.5.5.2 Instrument functions on the EasyTouch 4.5.5.2.1 Opening the sub-screen ü An instrument is removed from the holder. ü The Instrument program of the removed instrument is displayed on the touchscreen.
- Page 91
Dentsply Sirona 4 Operation Operating Instructions Intego 4.5 Dentist element 4.5.5.2.3 Preset and switch coolant on/off by the C+ electronic foot switch. Selecting a coolant Air or spray can be preselected as the instrument coolant in the sub- dialog. The preselected coolant can be switched on/off via the left button on the C+ electronic foot control. - Page 92
4 Operation Dentsply Sirona 4.5 Dentist element Operating Instructions Intego 4.5.5.2.5 Switch instrument light on/off ü The sub-screen of the removed motor is displayed on the touchscreen . ➢ Switch the instrument light on or off. Ä If the key is highlighted orange, the instrument light can be activated using the foot pedal. -
Page 93: Saving Instrument Settings
Dentsply Sirona 4 Operation Operating Instructions Intego 4.5 Dentist element 4.5.5.3 Saving instrument settings DropMode When placing an instrument back in the holder, the instrument settings made are always saved in the user profile (DropMode). The next time the instrument is removed, the last settings made are available again.
-
Page 94: Standard 3-Way Syringe
The standard 3-way syringe is used to clean the treatment areas and blow them dry. It provides the media with air and prewarmed water. The heater for the treatment water is in the water unit. The water heater is optional on the Intego. 4.5.6.1 Safety instructions WARNING The nozzle of the Standard 3-way syringe must lock into the holder.
-
Page 95: Sprayvit E 3-Way Syringe
The Sprayvit E 3-way syringe is used for dental treatment with air and water. The Sprayvit E 3-way syringe is also used to illuminate the preparation field. The heater for the treatment water is in the water unit. The water heater is optional on the Intego. 4.5.7.1 Structure Media lever…
-
Page 96: Safety Instructions
4 Operation Dentsply Sirona 4.5 Dentist element Operating Instructions Intego 4.5.7.3 Safety instructions WARNING A small metal tube protrudes at the tip of the nozzle. Risk of injury and contamination! ➢ Avoid contact with the tip of the nozzle. Do not attempt to handle with the nozzle attached.
-
Page 97: Connecting The Instrument Hose
Dentsply Sirona 4 Operation Operating Instructions Intego 4.5 Dentist element 4.5.7.4 Connecting the instrument hose CAUTION There may be exposed voltage! Risk of electric shock! ➢ Do not operate the media lever when the housing is removed! 1. Attach the valve body A to the supply hose, observing the various tube diameters.
-
Page 98: Turbine / Air Motor / Other Air-Driven Instruments
Setting the light of the highspeed handpiece The instrument light supply is optional in Intego. Halogen lamps cannot be operated with the Intego / Intego Pro treatment centers. The voltage or current can be limited for the LED lamp of the highspeed handpiece.
- Page 99
Dentsply Sirona 4 Operation Operating Instructions Intego 4.5 Dentist element 4.5.8.2.1 Setting the highspeed handpiece lamp on the EasyPad Accessing the turbine light operating context 1. Detach the turbine to be set from the holder. 2. Press and hold the function key 2 / Setup (> 2 s). - Page 100
4 Operation Dentsply Sirona 4.5 Dentist element Operating Instructions Intego 3. Use favorite keys 1 and 3 to set the current (A) for the lamp in the handpiece removed in amperes (0.12 A = 120 mA). Setup 4. Confirm the setting by pressing the function key 2 / Setup . - Page 101
Dentsply Sirona 4 Operation Operating Instructions Intego 4.5 Dentist element 4.5.8.2.2 Setting the highspeed handpiece light on the EasyTouch 1. Detach the turbine to be set from the holder. 2. Press the Sub-dialog fixed key. Ä The Highspeed handpiece sub-dialog is displayed on the touchscreen. -
Page 102: Motor
(without carbon brushes). They are characterized by their precise controllability and durability. The speed range of the motors for Intego / Intego Pro is between 1,200 and 40,000 rpm. If the treatment center features the eControl option, the motor can be down-regulated to 100 rpm.
-
Page 103: Product Labeling
Dentsply Sirona 4 Operation Operating Instructions Intego 4.5 Dentist element BL ISO E motor Handpiece holder O-ring 8.4 x 0.7 Product labeling ISO E motor sleeve Coupling connection (green / 3 guide lugs) The BL ISO E motor is equipped with an ISO coupling. T1 Line handpieces, for example, can thus be used without an adapter.
-
Page 104: Safety Instructions
4 Operation Dentsply Sirona 4.5 Dentist element Operating Instructions Intego Adapter for BL E motor ISO adapter Basic Apex adapter Light function Spray function Apex measurement function — Handpiece holder – ISO 3964 4.5.9.4 Safety instructions WARNING The magnetic field of the electric motor is strengthened when the motor is switched on.
-
Page 105: Connecting The Instrument Hose
Dentsply Sirona 4 Operation Operating Instructions Intego 4.5 Dentist element 4.5.9.5 Connecting the instrument hose ü Colored marks and position of guide lugs on motor and hose coupling of the instrument hose match. 1. Slide back the cap nut at the hose coupling.
-
Page 106: Adjusting The Cooling Spray
4 Operation Dentsply Sirona 4.5 Dentist element Operating Instructions Intego 4.5.9.7 Adjusting the cooling spray The BL ISO E motor is equipped with a control ring for cooling water. With the BL E motor, the amount of water can be set via the water controller on the dentist element, see «Setting the amount of spray water» …
-
Page 107: Setting The Speed On The Easypad
Dentsply Sirona 4 Operation Operating Instructions Intego 4.5 Dentist element 4.5.9.8 Setting the speed on the EasyPad Speeds are stored on the favorite keys 1, 2, and 3 that can be accessed by pressing them. Individual speeds can be saved for each user profile on the favorite keys.
- Page 108
4 Operation Dentsply Sirona 4.5 Dentist element Operating Instructions Intego Saving the speed ü The desired speed is set. ü Via the C+ electronic foot switch: The spray is switched on or off (will be saved). 1. Press and hold the favorite key 2 / Setup (> 2 s). -
Page 109: Setting The Speed On The Easytouch
Dentsply Sirona 4 Operation Operating Instructions Intego 4.5 Dentist element 4.5.9.9 Setting the speed on the EasyTouch Speeds are saved on the three favorite keys that can be accessed by pressing them. Individual speeds can be saved for each user profile on the favorite keys.
- Page 110
4 Operation Dentsply Sirona 4.5 Dentist element Operating Instructions Intego Saving the speed ü The desired speed is set. ü Via the C+ electronic foot switch: The spray is switched on or off (will be saved). 1. Press and hold the middle favorite Set (> 2 s). -
Page 111: Setting The Direction Of Rotation
Dentsply Sirona 4 Operation Operating Instructions Intego 4.5 Dentist element 4.5.9.10 Setting the direction of rotation The direction of rotation can be changed only when the motor is at a standstill. Tip: After starting the electric motor with the foot switch, an audible warning signal sounds 6 times if counterclockwise rotation is activated.
-
Page 112: Apexlocator
4 Operation Dentsply Sirona 4.5 Dentist element Operating Instructions Intego 4.5.10 ApexLocator The ApexLocator is available only with the EasyTouch Comfort user interface. The ApexLocator can be used to measure the working length of the root canal file in endodontic treatments using electrical impedance.
-
Page 113: Preparing To Use The Apexlocator
Dentsply Sirona 4 Operation Operating Instructions Intego 4.5 Dentist element 4.5.10.1 Preparing to use the ApexLocator Apex adapter, mucosal electrode and file clamp The mucosal electrode and the file clamp are connected to the socket of the dentist element using the apex adapter. The socket is located on the left and to the rear, below the dentist element.
- Page 114
Dentsply Sirona 4.5 Dentist element Operating Instructions Intego For endodontic treatments with the ApexLocator, the Dentsply Sirona Endo 6:1 (SN 6407 and above / July 2010) or Endo 6 L contra-angle handpieces are required for the Endo function. When using the ApexLocator in the motor program (without Endo function), the Dentsply Sirona SiroNiTi Apex contra-angle handpiece is required. -
Page 115: Distance Display
Dentsply Sirona 4 Operation Operating Instructions Intego 4.5 Dentist element 4.5.10.2 Distance display The measured root canal depth is shown in the distance display on the touchscreen. A bar with 11 display levels shows the distance from the root canal file to the physiological apex (apical constriction). The root canal is divided into four colored sections in the distance display.
- Page 116
4 Operation Dentsply Sirona 4.5 Dentist element Operating Instructions Intego Green region The tip of the root canal file has reached the physiological apex. Red region The tip of the root canal file has pierced the physiological apex. The instrument overshoot is displayed. -
Page 117: Beeps
Dentsply Sirona 4 Operation Operating Instructions Intego 4.5 Dentist element 4.5.10.3 Beeps In addition to the graphical distance display on the touchscreen, the position of the file in the root canal can also be indicated as an acoustic signal. Apex acoustic signals The ApexLocator always plays the following acoustic signals: ●…
-
Page 118: Performing Manual Measurements With The File Clamp
4 Operation Dentsply Sirona 4.5 Dentist element Operating Instructions Intego 4.5.10.4 Performing manual measurements with the file clamp For an endodontic examination, manual measurements can be made using the file clamp and a root canal file. ü The treatment center is prepared for manual measurements using the file clamp, see section «Preparing to use the ApexLocator» …
-
Page 119: Endodontic Treatment With Apexlocator And Torque Limitation Handpiece
IMPORTANT SiroNiTi Apex Only Dentsply Sirona SiroNiTi Apex must be used to perform apex measurement using a torque-limiting handpiece! The electrical conductivity can be ensured only using this handpiece. The SiroNiTi handpiece can also be used to perform endodontic treatments without the ApexLocator.
- Page 120
4 Operation Dentsply Sirona 4.5 Dentist element Operating Instructions Intego Ä The set distance is displayed to the left of the – and + keys. The preset motor stop position is displayed in the Motor dialog as a black triangle to the right of the distance display under the text «Stop». - Page 121
Dentsply Sirona 4 Operation Operating Instructions Intego 4.5 Dentist element 11. Short the electrical measurement system. Plug in the files and hold them directly against the mucosal electrode. This cancels out any inaccuracies caused by jumps in impedance in the measurement setup (standardization). -
Page 122: Endo Function
Fatigued files may break during treatment. ➢ Use files only for the service life specified by the manufacturer. CAUTION Only the Dentsply Sirona Endo 6:1 (SN 6407 and above / July 2010) and Endo 6 L contra-angle handpieces may be used for the Endo function.
-
Page 123: Endo Function On The Easypad
Dentsply Sirona 4 Operation Operating Instructions Intego 4.5 Dentist element 4.5.11.1 Endo function on the EasyPad 4.5.11.1.1 Switching Endo function on/off Switching on the Endo function The Endo function is assigned to the burr drive removed from the holder. ü The desired electric motor for the Endo function is removed from the holder.
- Page 124
This includes a measurement of motor current at different speeds to assess the properties of the system. CAUTION To ensure proper calibration, use only Dentsply Sirona instruments. ü The Endo function is switched on. The Endo function status display is illuminated. - Page 125
Dentsply Sirona 4 Operation Operating Instructions Intego 4.5 Dentist element 4.5.11.1.3 Setting the torque With the Endo function switched on, torque and speed of the contra- angle handpiece are indicated, but not of the motor. The control electronics of the burr drive calculate the motor control based on the specified contra-handpiece gear reduction and the set torque and speed. - Page 126
4 Operation Dentsply Sirona 4.5 Dentist element Operating Instructions Intego The torque can also be increased or reduced by moving the 4-way switch plate of the C+ electronic foot control up or down. Saving torque ü The desired torque is set. - Page 127
Dentsply Sirona 4 Operation Operating Instructions Intego 4.5 Dentist element 4.5.11.1.4 Setting the speed When the Endo function is switched on, the EasyPad display can be toggled between torque and speed to set the speed. To differentiate between torque and speed settings, the display shows burr drive calibrated/not calibrated and AutoReverse function on/off only for the torque. - Page 128
4 Operation Dentsply Sirona 4.5 Dentist element Operating Instructions Intego 4.5.11.1.5 Switching AutoReverse ON/OFF If the auto-reverse function is switched on, the burr drive automatically switches to counterclockwise rotation when the torque set is reached. If the foot pedal is pressed again, the burr drive switches back to clockwise rotation. -
Page 129: The Endo Function On The Easytouch
Dentsply Sirona 4 Operation Operating Instructions Intego 4.5 Dentist element 4.5.11.2 The Endo function on the EasyTouch 4.5.11.2.1 Switching Endo function on/off Switching on the Endo function The Endo function is assigned to the burr drive removed from the holder.
- Page 130
4 Operation Dentsply Sirona 4.5 Dentist element Operating Instructions Intego ü The electric motor assigned to the Endo function is removed. ü The Endodontics program is displayed on the touchscreen. 1.00 Endo 3 1. Press the Sub-dialog fixed key. Ä The Endodontics sub-dialog is displayed. - Page 131
This includes a measurement of motor current at different speeds to assess the properties of the system. CAUTION To ensure proper calibration, use only Dentsply Sirona instruments. ü The Endodontics dialog or the Endodontics sub-dialog is displayed on the touchscreen. - Page 132
4 Operation Dentsply Sirona 4.5 Dentist element Operating Instructions Intego 4.5.11.2.3 Changing direction of rotation The direction of rotation can be changed only with the motor stopped. Counterclockwise rotation is performed without torque limitation. The torque setting keys are hidden when counterclockwise rotation is selected. - Page 133
Dentsply Sirona 4 Operation Operating Instructions Intego 4.5 Dentist element ü The Endodontics sub-dialog is displayed on the touchscreen. ü The working step with which the speed and torque are to be changed is selected. ➢ Use the – and + keys to set the speed and torque of the contra- angle handpiece. - Page 134
4 Operation Dentsply Sirona 4.5 Dentist element Operating Instructions Intego In the Endodontics screen, a reciprocal symbol is displayed in the top left of the screen when the reciprocal function is activated. 4.5.11.2.7 Switch instrument light on/off The instrument light of the motor can be use when the Endo function is activated if the treatment center is equipped with the Comfort EasyTouch user interface. - Page 135
Dentsply Sirona 4 Operation Operating Instructions Intego 4.5 Dentist element 4.5.11.2.8 Using the ApexLocator ü The treatment center is prepared for apex measurements using the instrument, see section «Preparing to use the ApexLocator» [→ 113]. ü The Endodontics dialog or Endodontics sub-dialog is displayed on Stop the touchscreen. - Page 136
4 Operation Dentsply Sirona 4.5 Dentist element Operating Instructions Intego 2. Use the – and + keys to set the required apex distance from 1.5 to 0. If the distance is 0, the motor does not stop until it reaches the physiological apex. - Page 137
Dentsply Sirona 4 Operation Operating Instructions Intego 4.5 Dentist element ➢ Press the Apex distance acoustic signals key. Ä If the key is highlighted orange, the apex distance acoustic Apex Dist signal is activated. 4.5.11.2.13 Saving settings In the Endodontics sub-dialog, working step-specific settings such as changed speed and torque values … -
Page 138: Sirosonic L Scaler
CAUTION Ultrasonic tips from other manufacturers do not guarantee safe operation. ➢ Use only ultrasonic tips from Dentsply Sirona. 4.5.12.2 Setting the intensity on the EasyPad Intensities are saved on the favorite keys 1, 2, and 3, which can be accessed by pressing them.
- Page 139
Dentsply Sirona 4 Operation Operating Instructions Intego 4.5 Dentist element Changing the intensity ➢ Press and hold the favorite key 1 or 3 (> 1 s). Setup Ä The intensity is increased or reduced. The intensity can also be increased or reduced by moving the 4-way switch plate of the C+ electronic foot control up or down. - Page 140
4 Operation Dentsply Sirona 4.5 Dentist element Operating Instructions Intego 1. Press the Endo / Purge key. Purge Ä The endodontics intensity (Endo mode) is displayed instead of ultrasonic intensity (ultrasonic mode). 2. Use favorite keys 1 and 3 to set the desired endodontics intensity (En 1 to En 5). -
Page 141: Setting The Intensity On The Easytouch
Dentsply Sirona 4 Operation Operating Instructions Intego 4.5 Dentist element 4.5.12.3 Setting the intensity on the EasyTouch Intensities are saved on the three favorite keys that can be accessed by pressing them. Individual intensities can be saved on the favorite keys for each user profile.
- Page 142
4 Operation Dentsply Sirona 4.5 Dentist element Operating Instructions Intego Switching on the Endo mode The intensity of the endodontics function is limited for safety reasons, e.g., in order to prevent broken needles. IMPORTANT Endo intensity values The intensity can be adjusted from 1e to 5e. Please note that the endodontics intensity values of 1e to 5e do not match the values of 1 to 5 in the scaler mode. -
Page 143: Cavitron Scaler
CAUTION Ultrasonic tips from other manufacturers do not guarantee safe operation. ➢ Use only ultrasonic tips from Dentsply Sirona. CAUTION The Cavitron device must not be used on patients if the incoming treatment water is warmer than 25 °C / 77 °F The spray water in the handpiece can heat up further due to ultrasonic vibrations.
-
Page 144: Setting The Intensity On The Easypad
4 Operation Dentsply Sirona 4.5 Dentist element Operating Instructions Intego 4.5.13.3 Setting the intensity on the EasyPad Intensities are saved on the favorite keys 1, 2, and 3, which can be accessed by pressing them. Individual intensities can be saved on the favorite keys for each user profile.
-
Page 145: Setting The Intensity On The Easytouch
Dentsply Sirona 4 Operation Operating Instructions Intego 4.5 Dentist element While the intensity flashes on the EasyPad display, pressing the Counterclockwise rotation / user profile key will interrupt saving to a favorite key. 4.5.13.4 Setting the intensity on the EasyTouch Intensities are saved on the three favorite keys that can be accessed by pressing them.
-
Page 146: Mini Led Curing Light
4 Operation Dentsply Sirona 4.5 Dentist element Operating Instructions Intego 4.5.14 Mini LED curing light The function is described in the chapter on the assistant element, see «Mini LED curing light» [→ 155]. 4.5.15 SiroCam F/AF/AF+ intraoral camera Functionality is described in the «Sivision digital video system» section, see «SiroCam F / AF / AF+ …
-
Page 147: Timer Function
Dentsply Sirona 4 Operation Operating Instructions Intego 4.5 Dentist element 4.5.16 Timer function 4.5.16.1 Timer function on the EasyPad The Fn function key is assigned to the timer function. Presetting the timer A set time can be counted down to zero with the timer function.
- Page 148
4 Operation Dentsply Sirona 4.5 Dentist element Operating Instructions Intego Starting the timer ➢ Press the Timer key on the touchscreen briefly. Ä The preset timer is started immediately. The set and elapsed 10:45:03 time are displayed on the left side of the touchscreen. -
Page 149: Assistant Element
Dentsply Sirona 4 Operation Operating Instructions Intego 4.6 Assistant element Assistant element 4.6.1 Maximum load capacity Compact assistant element The Compact assistant element has no tray. CAUTION To prevent injuries caused by falling objects, never place anything on the support arm of the assistant element.
-
Page 150: Fixed Keys On The Assistant Element
4 Operation Dentsply Sirona 4.6 Assistant element Operating Instructions Intego 4.6.3 Fixed keys on the assistant element The functions assigned to the keys can be switched on/off on the assistant element. The operating contexts or setting screens can be accessed only on the dentist element. To make settings, see «Fixed keys on the dentist element» …
-
Page 151: Flushing The Cuspidor
Dentsply Sirona 4 Operation Operating Instructions Intego 4.6 Assistant element 4.6.3.3 Flushing the cuspidor The flushing function can be used for rough cleaning of the cuspidor during treatment. ➢ Press the Flushing fixed key. Ä The flushing function is activated for the preset flushing time.
-
Page 152: Suction Handpieces
4 Operation Dentsply Sirona 4.6 Assistant element Operating Instructions Intego 4.6.4 Suction handpieces The assistant element can be equipped with up to two spray aspirators and one saliva ejector. CAUTION The tip attaches itself to the oral mucosa. The patient’s oral mucosa can be irritated by the vacuum.
- Page 153
Dentsply Sirona 4 Operation Operating Instructions Intego 4.6 Assistant element Interrupting suction flow with the 4-way foot control If the treatment center is equipped with a position selector valve for the suction system, it can be set so suction flow can be interrupted or restarted by moving the 4-way foot control switch at the base of the chair in any direction, on the EasyPad, see «Coupling suction to the 4-… -
Page 154: Standard And Sprayvit E 3-Way Syringe
4 Operation Dentsply Sirona 4.6 Assistant element Operating Instructions Intego 4.6.5 Standard and Sprayvit E 3-way syringe The function is described in the chapter on the assistant element, see «Standard and Sprayvit E 3-way syringe“ [→ 94]. 64 5 7 4 98 D3543…
-
Page 155: Mini Led Curing Light
Dentsply Sirona 4 Operation Operating Instructions Intego 4.6 Assistant element 4.6.6 Mini LED curing light The curing light is used to cure composite material with short-wave light. IMPORTANT Observe the operating instructions Mini L.E.D. of the Satelec Acteon manufacturer. 4.6.6.1…
-
Page 156: Connecting The Mini L.e.d
4 Operation Dentsply Sirona 4.6 Assistant element Operating Instructions Intego 4.6.6.3 Connecting the Mini L.E.D. The Mini L.E.D. is connected to the assistant element in holder 2. 1. Connect the supply cable A to the treatment center. 2. Screw hose coupling B onto the Mini L.E.D. C.
-
Page 157: Operating The Mini Led
Dentsply Sirona 4 Operation Operating Instructions Intego 4.6 Assistant element Pulsed curing mode In the pulsed curing mode, the Mini L.E.D. radiates in 10 consecutive light pulses of 1 s each. There is a 250 ms break between the individual pulses.
-
Page 158: Technical Data
4 Operation Dentsply Sirona 4.6 Assistant element Operating Instructions Intego 4.6.6.6 Technical data General Technical Data on Mini L.E.D. Model: Mini L.E.D. Weight of handpiece without 105 g hose: Dimensions: Dia. 23 m m x 240 m m Current consumption of hand- 5 V DC / 0.65 A…
-
Page 159: Water Unit
The cuspidor on the water unit can be manually swiveled approx. 110 mm toward the patient chair. IMPORTANT Chair movements with cuspidor swiveled in Intego With the cuspidor bowl swiveled in, the chair cannot be moved. This prevents the patient from colliding with the cuspidor. Swing the cuspidor outward before initiating chair movement.
-
Page 160: Tumbler Filling On The Easytouch
4 Operation Dentsply Sirona 4.7 Water unit Operating Instructions Intego Ä The setting focus Filling time flashes. 3. Set the filling time in seconds. Press the left or right arrow on the favorite key field to prolong or shorten the filling time.
-
Page 161: Tumbler Filling With Automatic Sensor Control
Dentsply Sirona 4 Operation Operating Instructions Intego 4.7 Water unit 4.7.2.3 Tumbler filling with automatic sensor control The automatic sensor control is an option on the Comfort water unit and is not available in all countries. With this tumbler filler, the sensor control automatically detects the filling level of the tumbler.
-
Page 162: Flushing The Cuspidor
4 Operation Dentsply Sirona 4.7 Water unit Operating Instructions Intego 4.7.3 Flushing the cuspidor The flushing function can be used for rough cleaning of the cuspidor during treatment. The cuspidor is always flushed using the public drinking water supply. It is not taken from the fresh water bottle or the tank for stand-alone water supply.
-
Page 163: Flushing The Cuspidor On The Easytouch
Dentsply Sirona 4 Operation Operating Instructions Intego 4.7 Water unit 4.7.3.2 Flushing the cuspidor on the EasyTouch Switching flushing on/off ➢ Press the Flushing fixed key. Ä The flushing function is activated for the preset flushing time. Setting the flushing time 1.
-
Page 164: Adjusting The Water Amount For Flushing
4 Operation Dentsply Sirona 4.7 Water unit Operating Instructions Intego 4.7.3.3 Adjusting the water amount for flushing The water quantity and water pressure for flushing can be set using a valve. 1. Open the maintenance flap A on the base of the water unit.
-
Page 165: Stand-Alone Water Supply
(see “Sanitization” [→ 293]). The stand-alone water supply functionality of the Intego is only available if the treatment center is equipped with a fresh water bottle. The Intego Pro treatment center must be equipped with the integrated water disinfection system.
-
Page 166: Water Supply For The Intego
The fresh water bottle is treated with compressed air when it is screwed into the holder. Unsuitable bottles such as beverage bottles can burst. ➢ Use only Dentsply Sirona fresh water bottles! ➢ Please also observe the general safety instructions (see “Fresh water bottle” [→ 19] section).
- Page 167
Dentsply Sirona 4 Operation Operating Instructions Intego 4.7 Water unit 1. For the water supply from the fresh water bottle, turn the lever clockwise to the bottle symbol. For operation with the public drinking water supply, turn the lever counterclockwise to the faucet symbol. -
Page 168: Water Supply For The Intego Pro
4.7 Water unit Operating Instructions Intego 4.7.4.2 Water supply for the Intego pro In the Comfort and Ambidextrous water units, the stand-alone water supply should be set only as a temporary operating state if the public drinking water is contaminated and not as a permanent operating state.
- Page 169
Dentsply Sirona 4 Operation Operating Instructions Intego 4.7 Water unit 3. A «1» flashes in the selection focus. The treatment center should be switched to stand-alone water supply. 4. Confirm your selection by pressing the favorite key 2 / Setup . - Page 170
4 Operation Dentsply Sirona 4.7 Water unit Operating Instructions Intego IMPORTANT 400 ml are approximately sufficient for: ➢ 6.5 min. spray operation (motor, high-speed handpiece, scaler) or ➢ 2.5 min. Sprayvit Eoperation or ➢ 5 x tumbler fillings The actual values depend on the instrument types and settings used. - Page 171
Dentsply Sirona 4 Operation Operating Instructions Intego 4.7 Water unit 2. Mix distilled water with the agent for disinfecting the water paths at a ratio of 100:1 (1 liter of water, 10 ml of the disinfectant) and fill this into the disinfectant tank of the water unit. The tank has a capacity of approx. -
Page 172: Converting The Ambidextrous Water Unit For Right And Left-Handed People
4 Operation Dentsply Sirona 4.7 Water unit Operating Instructions Intego 4.7.5 Converting the Ambidextrous water unit for right and left- handed people CAUTION There must be no patient in the chair during conversion. The patient would otherwise collide with treatment center components.
- Page 173
Dentsply Sirona 4 Operation Operating Instructions Intego 4.7 Water unit 3. If an additional holder has been installed on the dentist element: turn the additional holder inwards. 4. If armrests have been installed on the treatment center: fold the armrests downwards. - Page 174
4 Operation Dentsply Sirona 4.7 Water unit Operating Instructions Intego 6. Move the dentist element right to the top. 7. Swivel the dentist element so that it is positioned closely in the grip area of the light support bar. 8. Position the operating light above the dentist element. The joint of the support arm must now point towards the head rest. - Page 175
Dentsply Sirona 4 Operation Operating Instructions Intego 4.7 Water unit 9. If a Comfort assistant element is present; swivel the Comfort assistant element to the water unit underneath the cuspidor bowl. Turn the water unit CAUTION The water unit is now guided with a rotary motion to the opposite side of the treatment center. - Page 176
4 Operation Dentsply Sirona 4.7 Water unit Operating Instructions Intego 1. Press the foot pedal and move the water unit slightly upwards. Ä The patient chair will move automatically into a position in which the water unit can be rotated. An acoustic signal will also be given. - Page 177
Dentsply Sirona 4 Operation Operating Instructions Intego 4.7 Water unit 2. If a tray holder on the dentist element is present: remove the screw by hand and take the tray holder out of the dentist element. 3. Install both the tray holder and the additional holder on the other side of the dentist element. -
Page 178: Swiveling Tray Holder
4 Operation Dentsply Sirona 4.8 Swiveling tray holder Operating Instructions Intego Swiveling tray holder Maximum load capacity The TS dentist element can be equipped with a tray. The holder has room for two standard trays. For treatment centers without the Ambidextrous option, the tray is mounted on the left of the assistant element.
-
Page 179: Cup Holder
Dentsply Sirona 4 Operation Operating Instructions Intego 4.9 Cup holder Cup holder A cup holder can be attached to the tray to collect waste. It is suitable for disposable 0.2-liter cups. The cup holder may not be attached to the front edge of the tray.
-
Page 180: X-Ray Image Viewer
4 Operation Dentsply Sirona 4.10 X-ray image viewer Operating Instructions Intego X-ray image viewer 4.10 The TS and CS dentist elements can be equipped with an X-ray viewer. The ON/OFF switch is on the X-ray viewer. It switches off automatically after 10 minutes.
-
Page 181: Operating Light
Dentsply Sirona 4 Operation Operating Instructions Intego 4.11 Operating light Operating light 4.11 The operating light is mounted on a multi-joint support arm. It can be easily adjusted to the operating field using the handles. Brakes in the support arm hold the operating light in the desired position.
-
Page 182: Setting The Ledlight Brightness
4 Operation Dentsply Sirona 4.11 Operating light Operating Instructions Intego ➢ Press the Operating light fixed key on the dentist or assistant element (several times if necessary). Ä The operating light switches to «On», «Composite function» or «Off». At the bottom of the LEDlight Plus and LEDview Plus operating lights, a non-touch sensor is attached.
- Page 183
Dentsply Sirona 4 Operation Operating Instructions Intego 4.11 Operating light 6. Use the left and right arrows on the favorite key pad to adjust the operating distance of the contactless sensor (5 levels). The left Setup arrow key decreases the operating distance, the right arrow key increases it. -
Page 184: X-Ray Tube Unit
Operating Instructions Intego X-ray tube unit 4.12 The Intego and Intego Pro treatment centers can be equipped with the Heliodent Plus X-ray tube unit. No X-ray tube unit is available for treatment centers with the Ambidextrous option. The X-ray tube unit is attached to the light post of the treatment center using a multi-jointed support arm that can be adjusted both horizontally and vertically.
-
Page 185: Sivision Digital Video System
Dentsply Sirona 4 Operation Operating Instructions Intego 4.13 Sivision Digital video system Sivision Digital video system 4.13 The Sivision Digital video system enables intraoral and extraoral images to be made. The SiroCam F / AF / AF+ intraoral camera generates digital image data that can be transmitted via a USB 2.0 port (high- speed universal serial bus) to a connected PC and stored there.
-
Page 186: Sivision Monitor
4 Operation Dentsply Sirona 4.13 Sivision Digital video system Operating Instructions Intego 4.13.1 Sivision monitor 22″ AC Monitor (REF 65 76 248 D3678) The monitor is equipped with loudspeakers. There is an IEC socket on the back of the monitor for the power supply. Please refer to the operating instructions for the 22″…
-
Page 187: Sirocam F/Af/Af+ Intraoral Camera
Dentsply Sirona 4 Operation Operating Instructions Intego 4.13 Sivision Digital video system 4.13.2 SiroCam F/AF/AF+ intraoral camera 4.13.2.1 Safety instructions The SiroCam F / AF / AF+ intraoral camera is a sensitive optical instrument and must therefore always be handled with care.
-
Page 188: Connecting The Sirocam F / Af / Af+ Intraoral Camera
4 Operation Dentsply Sirona 4.13 Sivision Digital video system Operating Instructions Intego 4.13.2.3 Connecting the SiroCam F / AF / AF+ intraoral camera Connecting the intraoral camera to the TS dentist element Depending on the equipment version, the intraoral camera can be placed at instrument position five or in the additional holder.
- Page 189
Dentsply Sirona 4 Operation Operating Instructions Intego 4.13 Sivision Digital video system Connecting the intraoral camera to the assistant element The intraoral camera can be operated at the second instrument position of the assistant element. The camera connection is located underneath the assistant element instead of the connection for the curing light. -
Page 190: Operating Sirocam F / Af / Af+ Intraoral Camera
4 Operation Dentsply Sirona 4.13 Sivision Digital video system Operating Instructions Intego 4.13.2.4 Operating SiroCam F / AF / AF+ intraoral camera An external or internal PC is required in order to display the video images of the SiroCam F / AF / AF+ intraoral camera on the Sivision monitor.
- Page 191
Dentsply Sirona 4 Operation Operating Instructions Intego 4.13 Sivision Digital video system 4.13.2.4.3 Using the camera with SI Video Using SI Video, up to four still images can be generated with the SiroCam F / AF / AF+ intraoral camera. These can be displayed on the Sivision monitor either as a sequence of single images or simultaneously as a quad image. - Page 192
4 Operation Dentsply Sirona 4.13 Sivision Digital video system Operating Instructions Intego ü The intraoral camera must be removed to allow for operation via the foot switch. Purge 1. Press the left button of the C+ electronic foot control. ➢ Press the Endo / Purge key on the EasyPad, on the EasyTouch the Select next quadrant key. - Page 193
Dentsply Sirona 4 Operation Operating Instructions Intego 4.13 Sivision Digital video system 4.13.2.4.4 Using the camera with Sidexis In addition to displaying and processing X-ray images, Sidexis XG and Sidexis 4 can also be used as a video application for the SiroCam F / AF / AF+ intraoral camera. - Page 194
4 Operation Dentsply Sirona 4.13 Sivision Digital video system Operating Instructions Intego Switching the SiroCam F / AF / AF+ intraoral camera on/off ü The PC is in operation and the Sivision Connect or Siucom Plus PC application is started. ➢ Take the SiroCam F / AF / AF+ intraoral camera from the holder. -
Page 195: Technical Camera Data
Dentsply Sirona 4 Operation Operating Instructions Intego 4.13 Sivision Digital video system 4.13.3 Technical camera data General technical data Model: Intraoral camera SiroCam F SiroCam AF SiroCam AF+ Weight of handpiece without cable: approx. 80 g approx. 80 g approx. 85 g Dimensions: diam. 27.5 x 207 mm Operating temperature: +10 to+40 °C…
-
Page 196: Operation With A Pc
For details, please refer to the «Installation and configuration of Siucom Plus / Sivision Connect» manual. CAUTION Integrating the Intego / Intego Pro into an IT network that includes other devices can lead to previously unknown risks. The following changes to the IT network can lead to new risks: •…
-
Page 197: Starting Pc Communication
Dentsply Sirona 4 Operation Operating Instructions Intego 4.14 Operation with a PC The network connection of the treatment center must be configured in the setup program before using the Sivision program, see «Configuring the network connection» [→ 213]. PC applications can be controlled from the treatment center only if they were started via Siucom Plus.
-
Page 198: Communication With The Media Player
4 Operation Dentsply Sirona 4.14 Operation with a PC Operating Instructions Intego 4.14.1.2 Communication with the media player The treatment center has the option of playing back multimedia files stored on the external PC using the Windows Media Player. Audio or video files can be selected from the file system and the Media Player can be controlled from the treatment center.
-
Page 199: Communication With Sidexis
Dentsply Sirona 4 Operation Operating Instructions Intego 4.14 Operation with a PC 4.14.1.4 Communication with Sidexis The Sidexis 4 and Sidexis XG PC applications can display X-ray and intraoral camera images on the Sivision monitor. They can save images taken with the SiroCam F / AF / AF+ intraoral camera in the patient database.
- Page 200
4 Operation Dentsply Sirona 4.14 Operation with a PC Operating Instructions Intego Contrast optimization filter This image filter analyses and optimizes the current grayscale distribution of an image. In this way, for instance, details within a very low-contrast, “faint” image can be made visible. -
Page 201: Communication With Video Plugin
Dentsply Sirona 4 Operation Operating Instructions Intego 4.14 Operation with a PC Cancel/confirm entry Accept an order Accepts an order that was placed and is waiting in Sidexis, e.g. for creating an intraoral image with the X-ray unit of the treatment center or a video recording with the intraoral camera.
-
Page 202: Usb Interfaces
➢ Only type BF medical devices and applied parts according to IEC Type BF 60601-1, e.g., the Dentsply Sirona Xios XG USB module intraoral X-ray system, may be connected to the USB interface. ➢ Do not connect extension cables to the USB interface.
-
Page 203: Configuration Of The Treatment Center (Setup)
Dentsply Sirona 4 Operation Operating Instructions Intego 4.15 Configuration of the treatment center (setup) Configuration of the treatment center (setup) 4.15 Various treatment center functions can be individually configured via the Setup settings. The treatment center can therefore be adapted to match each user’s personal method of treatment.
-
Page 204: Setting The Time And Date
4 Operation Dentsply Sirona 4.15 Configuration of the treatment center (setup) Operating Instructions Intego 4.15.1.2 Setting the time and date Setting the time Time is shown in the format hour.minute. ü The hour setting focus flashes. 1. Use favorite keys 1 and 3 to set the hour.
-
Page 205: Switching The Key Sound On/Off
2. Confirm with the 2 / Setup favorite key. 4.15.1.8 Setting the purging time for the autopurge function The autopurge function is only available on the Intego Pro treatment center. The purging time for the autopurge function can be set between 60 and 180 seconds.
-
Page 206: Adjusting The Cleaning Agent Mixture For Chemical Suction Hose Cleaning
4 Operation Dentsply Sirona 4.15 Configuration of the treatment center (setup) Operating Instructions Intego 4.15.1.9 Adjusting the cleaning agent mixture for chemical suction hose cleaning The chemical suction hose cleaning option is only available for the Intego Pro. The suction system can be automatically cleaned by pumping water into a tank behind the receptacle of the suction hoses and extracting it from there.
-
Page 207: Opening The Service Function
Dentsply Sirona 4 Operation Operating Instructions Intego 4.15 Configuration of the treatment center (setup) latest version of the SIUCOM Plus / Sivision Connect application must be installed on the PC. For details, please refer to the «Installation and configuration of Siucom Plus / Sivision Connect» manual.
-
Page 208: Configuring The Treatment Center On Easytouch
4 Operation Dentsply Sirona 4.15 Configuration of the treatment center (setup) Operating Instructions Intego 4.15.2 Configuring the treatment center on EasyTouch 4.15.2.1 Opening the setup dialogs ü All instruments are in place. The Start dialog is displayed on the 10:45:03 touchscreen.
-
Page 209: Setting The Time And Date
Dentsply Sirona 4 Operation Operating Instructions Intego 4.15 Configuration of the treatment center (setup) 4.15.2.2 Setting the time and date ➢ In the setup dialog touch the key Date and time . Ä The sub-dialog opens. Setting the date The date is displayed in the format day/month/year.
-
Page 210: Configuring Control Options
4 Operation Dentsply Sirona 4.15 Configuration of the treatment center (setup) Operating Instructions Intego 4.15.2.3 Configuring control options Operation of the entire treatment center operation can be configured in this dialog. ➢ Touch the Control options key in the setup program.
- Page 211
Dentsply Sirona 4 Operation Operating Instructions Intego 4.15 Configuration of the treatment center (setup) 4.15.2.3.4 Coupling suction to the 4-way foot switch. If the treatment center is equipped with a position selector valve for the suction system, it can be set so suction flow can be interrupted or restarted by moving the 4-way foot control switch at the base of the chair in any direction. - Page 212
4 Operation Dentsply Sirona 4.15 Configuration of the treatment center (setup) Operating Instructions Intego 4.15.2.3.7 Adjusting the cleaning agent mixture for chemical suction hose cleaning The chemical suction hose cleaning option is only available for the Intego Pro. The suction system can be automatically cleaned by pumping water into a tank behind the receptacle of the suction hoses and extracting it from there. -
Page 213: Configuring The Network Connection
MAC address of the center are shown. Name Call in your data processing specialist for network configuration. Ethernet Network configuration is described in detail in the «Intego / Intego Pro 13-E7-15-31-A3-0C installation instructions». 4.15.2.5 Opening the service function The Service domain is intended to be used only by service engineers.
-
Page 214: Care, Cleaning And Maintenance By The Practice Team
5 Care, cleaning and maintenance by the practice team Dentsply Sirona 5.1 Basics Operating Instructions Intego Care, cleaning and maintenance by the practice team Basics Reprocessing mainly involves the following steps: ● Cleaning ● Disinfection ● Sterilization if possible The treatment center must be reprocessed immediately, or at the latest, one hour after treatment.
- Page 215
Dentsply Sirona 5 Care, cleaning and maintenance by the practice team Operating Instructions Intego 5.1 Basics Sterilize the suction cannula [→ 269] Clean/disinfect surfaces [→ 219] Disinfecting the upholstery [→ 224] Disinfect the user interface [→ 220] Disinfect handles [→ 221] Maintaining and cleaning the operating light (see separate instructions… -
Page 216: Care, Cleaning, And Disinfecting Agents
5 Care, cleaning and maintenance by the practice team Dentsply Sirona 5.1 Basics Operating Instructions Intego For a quick overview of the work involved, see the “Maintenance, cleaning, and disinfection schedule” for the Intego / Intego Pro treatment center. 5.1.2 Care, cleaning, and disinfecting agents NOTE…
-
Page 217: General Handling Instructions
Dentsply Sirona 5 Care, cleaning and maintenance by the practice team Operating Instructions Intego 5.1 Basics 5. Immerse the tester in the filled container for 30 seconds. Ä The cardboard disk with the culture medium will now absorb 1 ml of the water sample.
-
Page 218: Inspection, Maintenance And Testing
5 Care, cleaning and maintenance by the practice team Dentsply Sirona 5.1 Basics Operating Instructions Intego Manual drying No drying is required following wiping with disinfectants since surplus disinfectant evaporates. Surplus water from the cleaning process can be removed with a soft cloth.
-
Page 219: Surfaces
Dentsply Sirona 5 Care, cleaning and maintenance by the practice team Operating Instructions Intego 5.2 Surfaces Surfaces 5.2.1 Clean/disinfect surfaces The surfaces can be disinfected by wiping with surface disinfectants. NOTE Drugs have a chemical reaction with the surface of the unit.
-
Page 220: Disinfect User Interfaces
NOTE Approved care, cleaning, and disinfecting agents Use only care, cleaning, and disinfecting agents that have been approved by Dentsply Sirona, see «Care, cleaning, and disinfecting agents» [→ 216]. Switching off functions on the EasyPad user interface On the EasyPad, this function also protects the treatment center and the Sivision monitor from disturbances from HF fields.
-
Page 221: Sterilize Silicone Mats And Handle Covers
NOTE Approved care, cleaning, and disinfecting agents Use only care, cleaning, and disinfecting agents that have been approved by Dentsply Sirona, see «Care, cleaning, and disinfecting agents» [→ 216]. The dentist element features a removable silicone mat and silicone covers for the handles. A removable silicone mat is available for the Comfort assistant element.
- Page 222
5 Care, cleaning and maintenance by the practice team Dentsply Sirona 5.2 Surfaces Operating Instructions Intego Assistant element The silicone mat of the Comfort assistant element is identical with that of the CS dentist element. 1. Switch the treatment center off and remove the suction hoses and instruments from the holders of the assistant element. -
Page 223: Disinfect The Tray
NOTE Approved care, cleaning, and disinfecting agents Use only care, cleaning, and disinfecting agents that have been approved by Dentsply Sirona, see «Care, cleaning, and disinfecting agents» [→ 216]. 1. Hold the tray tightly. 2. Open the lock by swiveling the lever downwards.
-
Page 224: Care For, Clean, And Disinfect Upholstery
Operating Instructions Intego 5.2.6 Care for, clean, and disinfect upholstery Special care, cleaning, and disinfecting agents are recommended by Dentsply Sirona for the care, cleaning, and disinfection of the upholstery. NOTE Approved care, cleaning, and disinfecting agents Use only agents approved by Dentsply Sirona for the upholstery, see»Care, cleaning, and disinfecting agents» …
-
Page 225: Clean The Foot Switch
Dentsply Sirona 5 Care, cleaning and maintenance by the practice team Operating Instructions Intego 5.2 Surfaces 5.2.8 Clean the foot switch Regular cleaning of the foot control improves its stability. ➢ Clean the bottom plate of the foot control with a moist cloth (water).
-
Page 226: Instruments And Instrument Hoses
● Before starting work ● the used instruments after each patient ● At the end of the work day With the Intego Pro treatment center, it is also possible to automatically purge the water paths, see «Automatically purge water paths (autopurge function)». [→ 232].
-
Page 227: Purge Function On The Easypad
100:1 (1 liter of water, 10 ml of the agent) and fill this into the disinfectant tank of the water unit. For more information, please refer to the section «Self-sufficient water supply with Intego» [→ 166]. Ä When sufficient water has been refilled, the purge program continues.
- Page 228
5 Care, cleaning and maintenance by the practice team Dentsply Sirona 5.3 Instruments and instrument hoses Operating Instructions Intego 1. Remove the instruments to be purged from the holder and hold max. max. them over the cuspidor or over a watertight container with sufficient capacity. -
Page 229: Purging Function On The Easytouch
100:1 (1 liter of water, 10 ml of the disinfectant) and fill this into the disinfectant tank of the water unit. For more information please refer to the section «Water supply for Intego Pro» [→ 168]. Ä When sufficient water has been refilled, the purge program continues.
- Page 230
5 Care, cleaning and maintenance by the practice team Dentsply Sirona 5.3 Instruments and instrument hoses Operating Instructions Intego Setting the purge time and starting the purge function The purge time of the removed instruments can be set between 20 and 120 seconds. - Page 231
Dentsply Sirona 5 Care, cleaning and maintenance by the practice team Operating Instructions Intego 5.3 Instruments and instrument hoses 4. Touch the Stop key to end the purge program. Stop Ä After all instruments have been put back in their holders, the Purge function activated display disappears. -
Page 232: Automatically Purge Water Paths (Autopurge Function)
Operating Instructions Intego 5.3.3 Automatically purge water paths (autopurge function) The AutoPurge function is only available on the Intego Pro treatment center. The autopurge function enables automatic purging of all water-carrying instruments in the dentist element, of the 3-way Sprayvit E syringe in the dentist and assistant elements and of the tumbler filling.
- Page 233
Cleaning adapters for water-carrying instruments are integrated into the Comfort and Ambidextrous (with Intego Pro) water units. These enable all instruments to be purged with water. For this purpose, water-carrying instruments must be inserted into adapters on the water unit. - Page 234
5 Care, cleaning and maintenance by the practice team Dentsply Sirona 5.3 Instruments and instrument hoses Operating Instructions Intego 3. Dentist element side: Insert the couplings of all water-carrying treatment instruments into the adapter in the Comfort water unit (for Sprayvit E: valve lever in up position, locking knob in the down position). - Page 235
Dentsply Sirona 5 Care, cleaning and maintenance by the practice team Operating Instructions Intego 5.3 Instruments and instrument hoses There are now two options for continuing: ● Leave the instruments in the water unit The autopurge function remains activated. The instruments remain in the Comfort water unit and the treatment center can be switched off at the mains. -
Page 236: Autopurge Function On The Easytouch
5 Care, cleaning and maintenance by the practice team Dentsply Sirona 5.3 Instruments and instrument hoses Operating Instructions Intego 5.3.3.2 Autopurge function on the EasyTouch Opening the AutoPurge screen ü All instruments are in their holders. ü The Start dialog is displayed on the touchscreen.
- Page 237
Sprayvit E: valve lever in the up position, locking knob in the down position). Also for Intego Pro CS: Move the swivel arm of the instruments to be purged into the operating position so the weight of the instrument hoses keeps them in this position. - Page 238
5 Care, cleaning and maintenance by the practice team Dentsply Sirona 5.3 Instruments and instrument hoses Operating Instructions Intego IMPORTANT Pinching of the instrument hoses Be careful not to pinch the instrument hoses when inserting the instruments. With treatment centers with the Ambidextrous option: convert the water unit to the left side so that the adapters on the water unit point towards the patient chair, see «Converting the Ambidextrous water… - Page 239
Dentsply Sirona 5 Care, cleaning and maintenance by the practice team Operating Instructions Intego 5.3 Instruments and instrument hoses Ä When all of the instruments have been put in the holders, the Purge function activated display disappears. The Start program is shown. -
Page 240: Purging Water Paths Manually
Operating Instructions Intego 5.3.4 Purging water paths manually With the Intego treatment center, the purge and sanitize function is optional. If this function is not available, purging of the water paths must be carried out manually. The water-carrying instruments of the dentist element, the 3-way syringe of the dentist and assistant element and the tumbler filling must be purged.
- Page 241
Dentsply Sirona 5 Care, cleaning and maintenance by the practice team Operating Instructions Intego 5.3 Instruments and instrument hoses 5. Activate the spray. Toggle the switch on the pneumatic foot switch to the right. Activate the left key on the C+ electronic foot control. -
Page 242: Lubricate, Disinfect/Sterilize The Treatment Instruments
5 Care, cleaning and maintenance by the practice team Dentsply Sirona 5.3 Instruments and instrument hoses Operating Instructions Intego 5.3.5 Lubricate, disinfect/sterilize the treatment instruments 5.3.5.1 Treatment instruments with separate instructions for use The procedures required for the following treatment instruments are described in the following separate instructions for use: ●…
-
Page 243: Lubricate, Disinfect/Sterilize Sprayvit E 3-Way Syringe
NOTE Approved care, cleaning, and disinfecting agents Use only care, cleaning, and disinfecting agents that have been approved by Dentsply Sirona, see «Care, cleaning, and disinfecting agents» [→ 216]! All disinfectants must be approved in your country and have proven bactericidal, fungicidal and virucidal properties. Use only disinfectants with no protein-fixing properties.
- Page 244
5.3 Instruments and instrument hoses Operating Instructions Intego Automated cleaning and disinfecting We recommend using the Dentsply Sirona DAC Universal for automated cleaning and disinfection (inside and outside) of the nozzles. For further details, please refer to the instructions for use supplied with the unit. - Page 245
Dentsply Sirona 5 Care, cleaning and maintenance by the practice team Operating Instructions Intego 5.3 Instruments and instrument hoses Manual cleaning and disinfection Manual reprocessing is possible in exceptional cases if the national/ local regulations are followed. The national/local regulations are to be checked before. -
Page 246: Disinfecting/Sterilizing Motors And Adapters
NOTE Approved care, cleaning, and disinfecting agents Use only care, cleaning, and disinfecting agents that have been approved by Dentsply Sirona, see «Care, cleaning, and disinfecting agents» [→ 216]! Use disinfectants and other agents that contain no corrosive components such as chloride.
- Page 247
Apply the following steps for the adapter only. NOTE Do not clean the motors automatically. We recommend using Dentsply Sirona DAC Universal for automated cleaning, disinfection, and care. For further details, please refer to the instructions for use supplied with the unit. - Page 248
5 Care, cleaning and maintenance by the practice team Dentsply Sirona 5.3 Instruments and instrument hoses Operating Instructions Intego Ä For further reprocessing, the adapter should be dry and free of residue. 3. If necessary, pack the adapter in packaging suitable for sterilization and storage, e.g., soft packaging (paper/film) or a container in… - Page 249
2. Store all motors/adapters so that they are protected from contamination. 3. Sterilize again once the storage period has elapsed. Sterilize regularly and have the motors serviced after approx. 2 years in a workshop authorized by Dentsply Sirona. 64 5 7 4 98 D3543 D3543.201.01.08.02 02.2020… -
Page 250: Clean And Disinfect/Sterilize The Components Of The Apexlocator
NOTE Approved care, cleaning, and disinfecting agents Use only care, cleaning, and disinfecting agents that have been approved by Dentsply Sirona, see «Care, cleaning, and disinfecting agents» [→ 216]. ➢ Disconnect the mucosal electrode from the connection cable. The metal hook and the connection cable can be sterilized.
-
Page 251: Cleaning, Disinfecting/Sterilizing The Cavitron Scaler
NOTE Approved care, cleaning, and disinfecting agents Use only care, cleaning, and disinfecting agents that have been approved by Dentsply Sirona, see «Care, cleaning, and disinfecting agents» [→ 216]. 1. Remove the connection cable of the Mini L.E.D. by turning the 134°C 274°F…
-
Page 252: Cleaning/Disinfecting The Sirocam F / Af / Af+ Intraoral Camera
It can be wipe disinfected. NOTE Approved care, cleaning, and disinfecting agents Use only care, cleaning, and disinfecting agents that have been approved by Dentsply Sirona, see «Care, cleaning, and disinfecting agents» [→ 216]. NOTE The lens window is sensitive to scratches.
-
Page 253: Maintaining Treatment Instruments
4. Insert the O-ring. Do not use any sharp objects. 5. Repeat steps 3-4. 6. Screw ring A tightly onto the nozzle. Protect O-rings regularly 1. Soak a Q-tip in Dentsply Sirona’s T1 spray. 2. Wipe the housing at the separating joint with the Q-tip. 5.3.6.1.2 Replacing lamps CAUTION The lamp can be hot.
-
Page 254: Maintaining The Motors
A LED is built into the BL E and BL ISO E motor. This LED is designed for the service life of the motor and may be replaced only by Dentsply Sirona or a service technician trained by Dentsply Sirona. Safe operation is no longer guaranteed in case of improper replacement.
- Page 255
Dentsply Sirona 5 Care, cleaning and maintenance by the practice team Operating Instructions Intego 5.3 Instruments and instrument hoses 1. Remove the defective O-rings. 2. Insert the O-rings one after another. Start with the first groove. 3. Lightly oil the O-ring with T1 Spray. -
Page 256: Change The Cotton Wool Roll On The Turbine Hose And Oil Collector
5 Care, cleaning and maintenance by the practice team Dentsply Sirona 5.3 Instruments and instrument hoses Operating Instructions Intego 5.3.7 Change the cotton wool roll on the turbine hose and oil collector At the unit end of the high-speed handpiece hose, return air leaks out along with a small amount of high-speed handpiece oil.
- Page 257
Dentsply Sirona 5 Care, cleaning and maintenance by the practice team Operating Instructions Intego 5.3 Instruments and instrument hoses Oil collector The CS dentist element is also equipped with an oil collector. It is located below the instrument connections and collects any liquids that leak out. -
Page 258: Vacuum System
5 Care, cleaning and maintenance by the practice team Dentsply Sirona 5.4 Vacuum system Operating Instructions Intego Vacuum system 5.4.1 Purge the vacuum system. If the treatment center is equipped with the suction hose cleaning option, proceed according to the instruction in section «Cleaning the suction hoses»…
- Page 259
Dentsply Sirona 5 Care, cleaning and maintenance by the practice team Operating Instructions Intego 5.4 Vacuum system 3. Attach the open suction handpiece to the receptacle. 4. Press the button. Ä Water is pumped into the suction hose cleaning container and suctioned out of the suction hoses. -
Page 260: Suction Hose Cleaning On The Comfort Water Unit
5 Care, cleaning and maintenance by the practice team Dentsply Sirona 5.4 Vacuum system Operating Instructions Intego 5.4.2.2 Suction hose cleaning on the Comfort water unit The Comfort water unit is always equipped with an adapter for the suction hose cleaning function. This can be used to purge the suction hoses consecutively.
- Page 261
➢ Do not fill the agent for disinfecting the water paths into the cleaning agent tank for chemical suction hose cleaning! Use only 1d 41d «Agents for the suction lines» approved by Dentsply Sirona, see «Care, cleaning, and disinfecting agents» [→ 216]. Amalg… -
Page 262: Suction Hose Cleaning On The Ambidextrous Water Unit
Ambidextrous water unit is optional. Chemical suction hose cleaning for the Intego treatment center is not available. If the Intego treatment center is not equipped with the suction hose cleaning option, a large glass of cold, clear water must be regularly aspirated instead, see «Purging the suction system» …
- Page 263
5 Care, cleaning and maintenance by the practice team Operating Instructions Intego 5.4 Vacuum system Refill cleaning agent (for the Intego Pro with chemical suction hose cleaning option) When the adjacent display appears on the EasyPad display or in the status column of the touchscreen, the cleaning agent for cleaning the suction system is almost finished. -
Page 264: Central Supply For Chemical Suction Hose Cleaning
5.4.2.4 Central supply for chemical suction hose cleaning For clinical use, Intego / Intego Pro treatment centers can be equipped with a central cleaning agent supply for chemical suction hose cleaning. The CDS 60 system of Dürr Dental is intended for this purpose.
-
Page 265: Cleaning Vacuum System Using Cleaning Adapter In The Cuspidor Or Via External Container
NOTE Approved care, cleaning, and disinfecting agents Use only care, cleaning, and disinfecting agents that have been approved by Dentsply Sirona, see «Care, cleaning, and disinfecting agents» [→ 216]. NOTE Domestic cleaning agents foam up. Foaming cleaning agents often cause foam and water to be sucked into the dry suction system.
-
Page 266: Cleaning Vacuum System Using Cleaning Adapter In The Cuspidor
5 Care, cleaning and maintenance by the practice team Dentsply Sirona 5.4 Vacuum system Operating Instructions Intego 5.4.3.1 Cleaning vacuum system using cleaning adapter in the cuspidor Preparation for cleaning 1. Prepare 1 liter of cleaning solution in a separate container according to the manufacturer’s instructions and mix it thoroughly.
- Page 267
Dentsply Sirona 5 Care, cleaning and maintenance by the practice team Operating Instructions Intego 5.4 Vacuum system Cleaning procedure 1. Pour 1 liter of cleaning solution into the cuspidor. 2. Remove the suction hoses from their holders and attach them to the side of the cleaning adapter as simultaneously as possible. -
Page 268: Cleaning The Suction System Via External Container
5 Care, cleaning and maintenance by the practice team Dentsply Sirona 5.4 Vacuum system Operating Instructions Intego 5.4.3.2 Cleaning the suction system via external container If the treatment center is not equipped with a cuspidor, the suction system must be cleaned via external container.
-
Page 269: Sterilizing/Disinfecting And Lubricating The Suction Handpieces
Rubber materials such as O-rings are corroded by unsuitable lubricants. ➢ Never use petroleum jelly or similar lubricants. ➢ Use only lubricants approved by Dentsply Sirona. 1. Detach the handpiece of the spray aspirator and the saliva ejector from the suction hoses.
-
Page 270: Empty The Central Suction Sieve
5 Care, cleaning and maintenance by the practice team Dentsply Sirona 5.4 Vacuum system Operating Instructions Intego 5.4.5 Empty the central suction sieve. Depending on the options, there is a central suction sieve in the Compact water unit or Comfort assistant element to retain solid materials (e.g.
-
Page 271: Cleaning And Disinfecting The Suction Hoses
Dentsply Sirona 5 Care, cleaning and maintenance by the practice team Operating Instructions Intego 5.4 Vacuum system Emptying the central suction sieve in the Comfort assistant element 1. Open the cover on the suction sieve on the assistant element and remove it.
-
Page 272: Components Of The Water Unit
5 Care, cleaning and maintenance by the practice team Dentsply Sirona 5.5 Components of the water unit Operating Instructions Intego Components of the water unit 5.5.1 Clean the gold trap The gold trap retains larger solid particles to prevent them from being washed down the drain in the cuspidor bowl.
-
Page 273: Clean/Disinfect The Cuspidor
This can cause damage to the suction machine. ➢ Use only care, cleaning, and disinfecting agents approved by Dentsply Sirona, see»Care, cleaning, and disinfecting agents» [→ 216]. The cuspidor bowl is attached to the water unit via a bayonet catch and can be removed for thorough cleaning.
-
Page 274: Cleaning The Outlet Lines Of The Cuspidor
Use the same agent as for the suction lines. NOTE Approved care, cleaning, and disinfecting agents Use only care, cleaning, and disinfecting agents that have been approved by Dentsply Sirona, see «Care, cleaning, and disinfecting agents» [→ 216]. NOTE Domestic cleaning agents foam up.
- Page 275
Dentsply Sirona 5 Care, cleaning and maintenance by the practice team Operating Instructions Intego 5.5 Components of the water unit 2. Fill the cuspidor with the cleaning solution and leave it to take effect. Observe the reaction time specified for the cleaning solution by the manufacturer. -
Page 276: Filling With Agent For Disinfecting The Water Paths
5 Care, cleaning and maintenance by the practice team Dentsply Sirona 5.5 Components of the water unit Operating Instructions Intego 5.5.4 Filling with agent for disinfecting the water paths The Comfort and Ambidextrous water units can be optionally equipped with a disinfection system. In normal operation, this will automatically inoculate the water that will come into contact with the patient (also called treatment water) with an agent to disinfect the water paths.
- Page 277
NOTE Approved care, cleaning, and disinfecting agents Use only the agent for disinfecting the water paths that has been approved by Dentsply Sirona for the disinfection system; see «Care, cleaning, and disinfecting agents» [→ 216]. 64 5 7 4 98 D3543… -
Page 278: Change The Water And Air Filters
5 Care, cleaning and maintenance by the practice team Dentsply Sirona 5.5 Components of the water unit Operating Instructions Intego 5.5.5 Change the water and air filters If you notice any changes in media flows, check the water and air filters for permeability.
- Page 279
Dentsply Sirona 5 Care, cleaning and maintenance by the practice team Operating Instructions Intego 5.5 Components of the water unit 5. Put the sealD back on the filter E. Then insert both into the screw cap B, C as shown. -
Page 280: Change The Amalgam Rotor
5 Care, cleaning and maintenance by the practice team Dentsply Sirona 5.5 Components of the water unit Operating Instructions Intego 5.5.6 Change the amalgam rotor Amalgam residues and other solid particles are trapped in the amalgam rotor according to the centrifugal principle.
- Page 281
6. Place the container in the special packaging and ship it for disposal or authorize a certified waste management company. Installing the amalgam rotor Use only original Dentsply Sirona accessories. Never use a used or recycled amalgam rotor. To reorder the amalgam rotor, see «Spare parts and consumables» … - Page 282
5 Care, cleaning and maintenance by the practice team Dentsply Sirona 5.5 Components of the water unit Operating Instructions Intego 3. Hold the lower part of the amalgam separator B so that the latching noses of the bayonet catch are positioned transverse to the water unit. -
Page 283: Check The Message System Of The Amalgam Separator
Dentsply Sirona 5 Care, cleaning and maintenance by the practice team Operating Instructions Intego 5.5 Components of the water unit 5.5.7 Check the message system of the amalgam separator An electronic control monitors the function of the amalgam separator. SIt detects any mechanical blocking or failure of the drive motor. The error is indicated by the Amalg display on the user interface and by an acoustic signal.
- Page 284
5 Care, cleaning and maintenance by the practice team Dentsply Sirona 5.5 Components of the water unit Operating Instructions Intego Testing the message system on the EasyTouch ü All instruments are in place. The Start dialog is displayed on the 10:45:03 touchscreen. -
Page 285: Empty The Sediment Container
Dentsply Sirona 5 Care, cleaning and maintenance by the practice team Operating Instructions Intego 5.5 Components of the water unit Press the Back key to exit the service dialog. 5.5.8 Empty the sediment container In addition to other solid particles, a large proportion of the amalgam residues are trapped in the sediment container by gravitational force.
- Page 286
5 Care, cleaning and maintenance by the practice team Dentsply Sirona 5.5 Components of the water unit Operating Instructions Intego 1. Open the flap A on the base of the water unit. 2. Loosen the bayonet catch by turning the sediment container B counterclockwise. - Page 287
Dentsply Sirona 5 Care, cleaning and maintenance by the practice team Operating Instructions Intego 5.5 Components of the water unit 2. Hold the sediment container B so that the latching noses of the bayonet catch are positioned transverse to the water unit. Rotate the sediment container B clockwise. -
Page 288: Cleaning The Filter Insert Of The Wet Suction Device With Cuspidor Valve
5 Care, cleaning and maintenance by the practice team Dentsply Sirona 5.5 Components of the water unit Operating Instructions Intego 5.5.9 Cleaning the filter insert of the wet suction device with cuspidor valve The automatic separator and amalgam separator / sediment container or air jet pump are not installed in the water unit for standard wet suction.
- Page 289
Dentsply Sirona 5 Care, cleaning and maintenance by the practice team Operating Instructions Intego 5.5 Components of the water unit 1. Open the flap A on the base of the water unit. 2. Allow the remaining water to be extracted completely. Press button B on the standard wet suction. - Page 290
5 Care, cleaning and maintenance by the practice team Dentsply Sirona 5.5 Components of the water unit Operating Instructions Intego 6. Reinsert the filter insert in the filter housing. Rotate the filter insert C clockwise. 7. Close the flap A. -
Page 291: Emptying The Collector Of The Air Jet Pump
Dentsply Sirona 5 Care, cleaning and maintenance by the practice team Operating Instructions Intego 5.5 Components of the water unit 5.5.10 Emptying the collector of the air jet pump The air jet pump (Air Venturi) is an option available for the Compact water unit.
- Page 292
5 Care, cleaning and maintenance by the practice team Dentsply Sirona 5.5 Components of the water unit Operating Instructions Intego 3. Pour the excess water out of the container and collect the amalgam residue. Dispose of it properly with the amalgam residue collected from the cuspidor and central sieve, see «Cleaning the gold trap» … -
Page 293: Sanitizing
Sanitizing with the Intego Pro With the Intego Pro, the water paths can only be sanitized if the Comfort or Ambidextrous water unit is equipped with an integrated water disinfection system. Operation with a stand-alone water supply is also possible only with a disinfection system.
-
Page 294: Sanitizing With The Fresh Water Bottle
Turn the lever clockwise to the bottle symbol, For more information, please refer to the section Water supply for Intego» [→ 166]. 64 5 7 4 98 D3543…
-
Page 295: Sanitizing On The Easypad
Dentsply Sirona 5 Care, cleaning and maintenance by the practice team Operating Instructions Intego 5.6 Sanitizing 5. Unscrew the fresh water bottle from the holder on the water unit and empty the fresh water bottle completely. 6. Fill the fresh water bottle with approx. 0.4 to 0.5 liters of the undiluted agent for disinfecting the water paths.
- Page 296
5 Care, cleaning and maintenance by the practice team Dentsply Sirona 5.6 Sanitizing Operating Instructions Intego 4. Afterward, return the instrument to the instrument holder. 5. Repeat the procedure for all other instruments. NOTE Splashes of undiluted disinfectant for sanitizing the water paths can result in discoloration of surfaces if left for too long. - Page 297
Dentsply Sirona 5 Care, cleaning and maintenance by the practice team Operating Instructions Intego 5.6 Sanitizing 1. Hold the 3-way syringe over the cuspidor or over a watertight container with sufficient capacity and press the water key for at least 15 seconds. -
Page 298: Sanitizing On The Easytouch
5 Care, cleaning and maintenance by the practice team Dentsply Sirona 5.6 Sanitizing Operating Instructions Intego 5.6.1.2 Sanitizing on the EasyTouch Opening the sanitization dialog via the touchscreen ü All instruments are in their holders. ü The Start dialog is displayed on the touchscreen.
- Page 299
Dentsply Sirona 5 Care, cleaning and maintenance by the practice team Operating Instructions Intego 5.6 Sanitizing 2. Remove a single instrument from holder and hold it over the max. cuspidor or over a watertight container with sufficient capacity. For the CS dentist element, move the swivel arm of the instrument into the working position. - Page 300
5 Care, cleaning and maintenance by the practice team Dentsply Sirona 5.6 Sanitizing Operating Instructions Intego ü The tumbler filler was automatically flushed with water. 1. Hold the 3-way syringe over the cuspidor or over a watertight container with sufficient capacity and press the water key for at least 15 seconds. -
Page 301: Sanitizing With Disinfection System
Dentsply Sirona 5 Care, cleaning and maintenance by the practice team Operating Instructions Intego 5.6 Sanitizing 5.6.2 Sanitizing with disinfection system Sanitizing, that is the disinfection of the treatment water paths can be performed by using the disinfection system. During this sanitation, the…
-
Page 302: Sanitizing On The Easypad
5 Care, cleaning and maintenance by the practice team Dentsply Sirona 5.6 Sanitizing Operating Instructions Intego 5.6.2.1 Sanitizing on the EasyPad Displaying the sanitizing operating context ü All instruments are in their holders. 1. Press the fixed key Endo / Purge .
- Page 303
Dentsply Sirona 5 Care, cleaning and maintenance by the practice team Operating Instructions Intego 5.6 Sanitizing Inserting instruments into the cleaning adapters of the water unit The Comfort water unit has integrated cleaning adapters for water- carrying instruments. This allows all instruments to be simultaneously treated with a high concentration of sanitation solution and then rinsed with water. - Page 304
5 Care, cleaning and maintenance by the practice team Dentsply Sirona 5.6 Sanitizing Operating Instructions Intego IMPORTANT Pinching of the instrument hoses Be careful not to pinch the instrument hoses when inserting the instruments. With treatment centers with the Ambidextrous option: convert the water unit to the left side so that the adapters on the water unit point towards the patient chair, see «Converting the Ambidextrous water… - Page 305
Dentsply Sirona 5 Care, cleaning and maintenance by the practice team Operating Instructions Intego 5.6 Sanitizing Allow 24 hours reaction time In order to effectively combat bacteria, you must let the disinfectant for the water paths react for at least 24 hours and not longer than 3 days (maximum sanitization time). - Page 306
5 Care, cleaning and maintenance by the practice team Dentsply Sirona 5.6 Sanitizing Operating Instructions Intego Returning instruments to their holders After the water paths have been rinsed, the instruments can be removed from the cleaning adapters on the water unit and returned to their holders. -
Page 307: Sanitizing On The Easytouch
Dentsply Sirona 5 Care, cleaning and maintenance by the practice team Operating Instructions Intego 5.6 Sanitizing 5.6.2.2 Sanitizing on the EasyTouch Opening the sanitization dialog via the touchscreen ü All instruments are in their holders. ü The Start dialog is displayed on the touchscreen.
- Page 308
5 Care, cleaning and maintenance by the practice team Dentsply Sirona 5.6 Sanitizing Operating Instructions Intego Start sanitization ➢ Touch the Start key. Start Ä The sanitization process starts. Error message: Filling with agent for disinfecting the water paths If the Disinf display appears after the sanitization process has been… - Page 309
Sprayvit E: valve lever in the up position, locking knob in the down position). Also for Intego Pro CS: Move the swivel arm of the instruments to be purged into the operating position so the weight of the instrument hoses keeps them in this position. - Page 310
5 Care, cleaning and maintenance by the practice team Dentsply Sirona 5.6 Sanitizing Operating Instructions Intego IMPORTANT Pinching of the instrument hoses Be careful not to pinch the instrument hoses when inserting the instruments. With treatment centers with the Ambidextrous option: convert the water unit to the left side so that the adapters on the water unit point towards the patient chair, see «Converting the Ambidextrous water… - Page 311
Dentsply Sirona 5 Care, cleaning and maintenance by the practice team Operating Instructions Intego 5.6 Sanitizing Sanitizing phase 3 — Treating the water paths with the agent for disinfecting the water paths The water is pumped out of the water tank of the water unit using the tumbler filling function. - Page 312
5 Care, cleaning and maintenance by the practice team Dentsply Sirona 5.6 Sanitizing Operating Instructions Intego Error message: Inserting instruments in the water unit If an instrument is accidentally deposited in its holder during the reaction time, the message Insert instruments into water unit is displayed on the touchscreen after the treatment center is switched on. - Page 313
Dentsply Sirona 5 Care, cleaning and maintenance by the practice team Operating Instructions Intego 5.6 Sanitizing Displays in case of incomplete sanitation The sanitization program detects whether the sanitization of all instruments and the tumbler filling was completed. Errors that occurred during sanitization will be displayed on the touchscreen as follows: ●… -
Page 314: Display Sanitation Report
5 Care, cleaning and maintenance by the practice team Dentsply Sirona 5.6 Sanitizing Operating Instructions Intego 5.6.3 Display sanitation report If the treatment center is equipped with the EasyTouch comfort user interface, sanitation processes with a reaction time of at least 24 hours can also be displayed on the touchscreen.
-
Page 315: Thermally Disinfect The Sanitization Adapter
Dentsply Sirona 5 Care, cleaning and maintenance by the practice team Operating Instructions Intego 5.6 Sanitizing 5.6.4 Thermally disinfect the sanitization adapter With the Comfort water unit and Ambidextrous, the sanitization adapter can be removed from the water unit for cleaning and thermal disinfection.
-
Page 316: Fuse Of The External Device Connection
5 Care, cleaning and maintenance by the practice team Dentsply Sirona 5.7 Fuse of the external device connection Operating Instructions Intego Fuse of the external device connection The inlet connector remains live even when the power switch is turned off. The fuse can nevertheless be changed.
-
Page 317: Maintenance By The Service Engineer
Dentsply Sirona 6 Maintenance by the service engineer Operating Instructions Intego 6.1 Inspection and maintenance Maintenance by the service engineer Inspection and maintenance In order to ensure the operational safety and reliability of your treatment center and to avoid damage due to natural wear, annual inspection and maintenance must be performed on your treatment center.
-
Page 318: Maintenance Manual
6 Maintenance by the service engineer Dentsply Sirona 6.3 Maintenance Manual Operating Instructions Intego Maintenance Manual Keep this Maintenance Manual near your treatment center. Any inspection and maintenance work as well as all safety tests are documented by the service engineer in the Maintenance Manual.
-
Page 319: Malfunctions
Dentsply Sirona 7 Malfunctions Operating Instructions Intego 7.1 Messages on the EasyPad Malfunctions Messages on the EasyPad Errors on the EasyPad display Messages are shown on the EasyPad display, such as: Safety switch triggered [→ 70] Days until next sanitation [→ 293] Days until next maintenance date …
-
Page 320: Messages On The Easytouch
7 Malfunctions Dentsply Sirona 7.2 Messages on the EasyTouch Operating Instructions Intego 1. Press favorite key 3. Ä The next message is displayed. 2. Acknowledge the individual messages by pressing the favorite key 2 / Setup or pressing the favorite key 3 several times until all the Setup messages have been shown.
-
Page 321: Error Messages
“Changing the water and air filters” [→ 278]. Check whether the public drinking water supply has the necessary wa- ter pressure, see the document on Intego / Intego Pro installation re- quirements. Emergency pump opera- Malfunctioning of pump sensors in Inform your service technician.
- Page 322
7 Malfunctions Dentsply Sirona 7.3 Error Messages Operating Instructions Intego Code Anomaly Description Measure Software inconsistency An error must be acknowledged af- Inform your service technician. ter the treatment center is switched on. The functions of the treatment center may be impaired. -
Page 323: Remote Diagnosis
Dentsply Sirona 7 Malfunctions Operating Instructions Intego 7.4 Remote diagnosis Remote diagnosis Functional description With remote diagnosis, you enable the staff of your dental depot or our Customer Service Center, see «Contact data» [→ 11], to connect to the PC of your treatment center. The contents of your PC monitor are then transmitted to the computer of the service specialist and remote access to your PC is enabled.
-
Page 324: Spare Parts And Consumables
Casing, left water path 60 02 187 Keyboard 63 21 728 Small cleaning wires 24 00 232 63 22 007 O-ring set Sprayvit nozzle 41 76 751 1 x attachment tool and 10 x O-rings 5.5×1.03 Dentsply Sirona T1 Spray (6 x 250 ml cans) 59 01 665 64 5 7 4 98 D3543 D3543.201.01.08.02 02.2020…
- Page 325
Dentsply Sirona 8 Spare parts and consumables Operating Instructions Intego BL E motor BL ISO C/E/S sealing washer, green 63 11 240 Basic Apex adapter 59 83 072 ISO adapter 60 00 793 BL ISO E motor BL ISO E motor sleeve 63 49 851 BL ISO C/E/S sealing washer, green 63 11 240… -
Page 326: Disposal
9 Disposal Dentsply Sirona Operating Instructions Intego Disposal In accordance with Directive 2012/19/EU and national disposal regulations regarding old electrical and electronic devices, please be advised that such items must be disposed of in a special way within the European Union (EU). These regulations require the environmentally friendly recycling/disposal of old electrical and electronic devices.
-
Page 327: Overview Of All Function Keys
Dentsply Sirona 10 Overview of all function keys Operating Instructions Intego 10.1 Fixed keys Overview of all function keys The following contains a brief description of the fixed keys on the dentist and assistant elements and the function keys on the touchscreen and to provide the reader with a quick overview of the significance of the symbols on the keys.
- Page 328
10 Overview of all function keys Dentsply Sirona 10.1 Fixed keys Operating Instructions Intego Chair height Counterclockwise rotation / User profile Switches counterclockwise rotation ON/OFF Changes the user profile Switches AutoReverse function ON/OFF when the maximum torque is reached Counterclockwise rotation ON/OFF… - Page 329
Dentsply Sirona 10 Overview of all function keys Operating Instructions Intego 10.1 Fixed keys 10.1.2 Dentist element with EasyTouch Clean key Clean Deactivates the complete user interface of the dentist element. This is used to clean the surface and protect from interference from an external HF surgical device. - Page 330
10 Overview of all function keys Dentsply Sirona 10.2 Start dialog Operating Instructions Intego 10.1.3 Assistant element Chair program S Mouth rinsing position with last-position memory function (programmable) Chair program 0 Entry/exit position (programmable) Tumbler filling On/Off Flushing the cuspidor… - Page 331
Dentsply Sirona 10 Overview of all function keys Operating Instructions Intego 10.3 Start dialog for removed instruments Purging water lines Starts the purge function Purging water paths automatically Auto Starts the autopurge function Sanitization Starts the treatment center sanitation program… - Page 332
10 Overview of all function keys Dentsply Sirona 10.3 Start dialog for removed instruments Operating Instructions Intego Preselecting air coolant For cooling the treatment area with air Setting the automatic motor stop of the ApexLocator Apex Stop Apex When the Apex Stop key is pressed, the – and + keys are displayed. - Page 333
Dentsply Sirona 10 Overview of all function keys Operating Instructions Intego 10.4 Endo function Endo function 10.4 Endo function Activating the Endo function Memory button Saving all settings of the Endo function Calibrating the bur drive A calibration must be performed each time you change or lubricate the contra-angle handpiece. - Page 334
10 Overview of all function keys Dentsply Sirona 10.5 Other dialogs Operating Instructions Intego Apex acoustic signals Switching the apex acoustic signals on/off. If the signal tones are Apex Dist switched on, a beep is issued when the apex or a set motor stop position is reached. - Page 335
Dentsply Sirona 10 Overview of all function keys Operating Instructions Intego 10.5 Other dialogs 10.5.5 Operating light setting program Sensor control for switching the operating light on/off If the key is highlighted orange, the operating light can be switched on/ off or changed to the Composite function by a hand movement. - Page 336
10 Overview of all function keys Dentsply Sirona 10.6 Sivision program Operating Instructions Intego Sivision program 10.6 10.6.1 Media Player Start Media Player M.player M.player Media Player is started on the external PC. The keys corresponding to the Media Player PC application are displayed on the right side of the… - Page 337
Dentsply Sirona 10 Overview of all function keys Operating Instructions Intego 10.6 Sivision program Overview layout The opened image windows are scaled in the display area so that no scroll bars or as few scroll bars as possible must be displayed. The image windows are arranged without overlapping. - Page 338
10 Overview of all function keys Dentsply Sirona 10.6 Sivision program Operating Instructions Intego Filter black dots Single pixel errors may occur when taking digital X-rays. These pixel errors appear as individual black dots when the optimum resolution (100%) is selected. They are removed by Sidexis. - Page 339
Dentsply Sirona 10 Overview of all function keys Operating Instructions Intego 10.6 Sivision program 10.6.5 Video plugin Start the video plugin Sidexis 4 and the video plugin are started on the PC. The fixed keys for the video plugin are displayed on the right side of the touchscreen. - Page 340
10 Overview of all function keys Dentsply Sirona 10.7 Setup program Operating Instructions Intego Setup program 10.7 10.7.1 Date and time Date and time Opens the Date and Time setup program. Date 15 04 14 Time 12/24 hour display 12 h 10.7.2… - Page 341
Dentsply Sirona 10 Overview of all function keys Operating Instructions Intego 10.7 Setup program Focusing the intraoral camera using the foot control If the treatment center is equipped with an autofocus camera and the C + electronic foot control, it can be configured in setup that the camera image can be focused with the foot switch. -
Page 342: Index
Index Dentsply Sirona Operating Instructions Intego Index Armrest, 72 Numeric Articulating headrest, 33, 74 4-way foot switch, 205, 211 Assistant element 4-way foot switch plate, 68 Instrument positions, 48 Maximum load capacity, 149 Access the start program with the foot control, 67 Mini L.E.D., 155, 251 Acoustic signals, 117 Overview, 45…
- Page 343
Dentsply Sirona Index Operating Instructions Intego Chip blower, 66, 67, 89, 91 Sprayvit E, 95 Clean key, 220 Standard 3-way syringe, 94 Cleaning adapter, 266, 309 Dentist element with hanging hoses, 36 Cleaning agent for hose cleaning, 261, 263 Dentist element with whip arms, 37 Coding of motor hoses, 102 Deutscher Verein für Gas und Wasser (DVGW) =… - Page 344
Index Dentsply Sirona Operating Instructions Intego Foot switch Chip blower, 66 Favorite key pad, 68 Chip blower , 67 Favorites keypad, 62 Spray, 66, 88, 90 File clamp, 113 Fresh water bottle, 51, 55, 166 Filter Air and water, 278 Central suction sieve, 270 Gold trap, 272 Gold trap, 272 Guide rollers on the CS dentist element, 86 Standard wet suction, 288… - Page 345
Dentsply Sirona Index Operating Instructions Intego Clockwise/counterclockwise rotation, 68 Cooling medium, 90 Last Position Memory function, 77 Cover, 87 LEDlight Plus, 181 CW/CC rotation, 111 LEDview Plus, 181 Drive motors, 18 Live image, 191, 193 Endo function, 122 Load capacity Holder/positions on assistant element, 48 Assistant element, 149 Holder/positions on the dentist element, 38 Cup holder, 179… - Page 346
Index Dentsply Sirona Operating Instructions Intego Mouth rinsing position S, 67, 76, 150 Mucosal electrode, 113 Reciprocal rotating files, 133 Municipal water, 165 Remote access, 323 Remote diagnosis, 323 RoHS Directive, 23 NaCl, 67 Name of the treatment center in the practice network, 213 Safety checks, 317 Network configuration, 213 Safety instructions, 15 Safety switch, 70… - Page 347
Dentsply Sirona Index Operating Instructions Intego Spray, 67, 88, 91 Transport conditions, 25 Spray aspirator, 152, 205, 269 Tray, 178, 223 Spray water quantity, 93 Tumbler filling, 150, 159 Sprayvit E, 95 Tumbler filling with automatic sensor control, 161 Sprayvit E 3-way syringe, 95 Turbine, 98 Stand-alone water supply, 51, 55 Standard 3-way syringe, 94… - Page 348
Index Dentsply Sirona Operating Instructions Intego White screen on the Sivision monitor, 180, 212 Wireless phones, 20 Work steps for the Endo function, 132 X-ray image viewer, 180, 212 64 5 7 4 98 D3543 D3543.201.01.08.02 02.2020… - Page 350
We reserve the right to make any alterations which may be required due to technical improvements. © Sirona Dental Systems GmbH Sprache: englisch Printed in Germany D3543.201.01.08.02 02.2020 Ä.-Nr.: 128 5 62 Sirona Dental Systems GmbH 64 5 7 4 98 D3543 Fabrikstr.
Июль 16, 2018
На смену установки Сирона С8+, которую знал весь стоматологический мир, пришла установка Интего. безусловно, Sirona стремиться сделать свою продукцию все более качественной и удобной для пользователей, при этом оставить ее доступной по цене, однако нам хочется знать, в чем состоит принципиальное отличие установок Sirona c8+ и Intego.
Что изменилось в ИНТЕГО по сравнению с С8+?
1. Дизайн стал более современным.
— Кресло пациента утратило свою «гармошку» и выйграло по эстетичности и гигиене. В базовую комплектацию уже входит мягкая обивка кресла.
— Появился компактные гидроблок и блок ассистента для оптимального использования пространства.
2. Пользовательский интерфейс EasyPad позволяет интуитивного управлять установкой (теперь есть цифровая шкала регулировки оборотов мотора )
3. В базовой комплектации установка сразу оснащается бесщеточным мотором.
1. Как определяется стоимость базовой комплектации?
Intego, как и ее предшественницу стоматологическую установку С8+ можно конфигурировать по своему желанию. То есть выбирать широкую или узкую спинку кресла пациента, верхнюю или нижнюю подачу шлангов блока врача, сепарационную систему или воздушную помпу в гидроблоке, более мощный светильник или менее, электрический или пневматический мотор и т.д. Поэтому стоимость даже минимального рабочего комплекта установки будет сильно варьироваться. Минимальная рабочая комплектация установки INTEGO обойдется Вам в 11700 EUR (без компрессора и наконечников)
2. Каков срок поставки?
Установка в более или менее стандартной комплектации практически всегда есть в наличии. Иначе срок поставки составляет в среднем – 1,5 месяца.
3. Особенности установки INTEGO
Отличительной особенностью фирмы SIRONA всегда была гигиена. Концепция гигиены INTEGO разработана так, чтобы вы могли легко и быстро выполнить все гигиенические требования. Конструкция модуля ассистента и гидроблока делает гигиенические процедуры еще проще и быстрее. Все это гарантирует полное отсутствие опасности инфекции для вас, ваших пациентов и персонала.
Следующая отличительная характеристика Интего — это комфорт в работе врача и пациента.
Кресло пациента имеет функцию памяти на 4 положения кресла, и возможность сохранять настройки кресла для двух врачей. Кресло рассчитано на 140 кг. Стандартно кресло пациента оснащено плоским подголовником и мягкой обивкой Премиум. Но вы можете оснастить кресло двухшарнирным подголовником и подлокотниками по желанию.
Модуль врача оснащен регулируемым по высоте кронштейном с пневматическим тормозом и рассчитан на 5 инструментов. EasyPad -Понятный и интуитивный стандарт пользовательского интерфейса
Модуль врача вы можете оснастить, как пожелаете. В стандартной комплектации идет бесщеточный мотор, пистолет вода-воздух, шланг турбинный с подсветкой.
Модуль ассистента закреплен на поворотном держателе на гидроблоке, имеет 2 свободных места для размещения инструментов (например, полимеризационной лампы и пистолета), слюноотсос и пылесос. Вы можете выбрать при заказе вариант «Комфорт» на кронштейне с широким диапазоном поворота.
Светильник
Два варианта выбора светодиодного светильника с гибким позиционированием для оптимального освещения обрабатываемого участка. Гигиеничность использования обеспечивается благодаря бесконтактному сенсору.
LEDlight и LEDview
Стул врача представлен в трех вариантах:
— Стул HUGO
Умный стул для стоматологов, гарантирующий интуитивное поддержание здоровой осанки во время процесса лечения.
— Стул CARL
Всесторонний комфорт: спинка вращается на 360° и может служить как подлокотником, так и опорой для всего корпуса.
— Стул PAUL
Удобная базовая модель с боковым рычагом регулировки высоты сиденья и возможностью поворота спинки/подлокотника на 90°.
В базовой комплектации идет стул PAUL
То есть стоматологическая установка INTEGO позволяет вам с легкостью производить сложнейшие манипуляции. SIRONA продумала, как сделать вашу работу максимально комфортной.
4. Каковы сроки поставки запчастей?
Самые ходовые запасные части (шланги, лампочки, прокладки, роторы) как правило, есть на складе. Иначе срок поставки запасных частей из Германии в среднем составляет1,5 месяца
5. Какой компрессор подходит к установке.
Для работы одной установки требуется компрессор:
— производительностью 60 л/мин., если в гидроблоке стоит автоматический сепаратор (для обработки сточной воды/аспирации при центральной системе сухой аспирации)
— производительностью 120 л/мин, если стоит воздушный эжектор
С уважением, компания АЛЬДЕРА
Вернуться назад
7 Неисправности
7.1 Сообщения об ошибках
Ошибка
Воздух не всасывается, хотя вса-
сыватель работает с выключа-
телем питания в положении Вкл.
Программное сообщение об
ошибке:
Выключатель разрежения всасы-
ватель
26
7
Неисправности
Сообщения об ошибках
7.1
Возможная причина
Забился всасывающий шланг
Утечка во всасывающем шланге
или на разъеме
Неисправность обрабатывающего
станка
Регулятор мощности всасывания
на панели управления стоит в по-
ложении мин.
Фильтровальный мешок/фильтр
HEPA забился
Забился всасывающий шланг
Неисправен интерфейсный ка-
бель
Неисправность обрабатывающего
станка
Инструкция по эксплуатации всасывающих устройств
Устранение
Проверить прохождение воздуха
во всасывающем шланге, при
необходимости удалить заторы.
Проверить герметичность всасы-
вающего шланга, а также уплот-
нения на всасывателе и обраба-
тывающем станке, при необходи-
мости загерметизировать или
сменить уплотнение.
Обратиться в службу технической
поддержки.
Перевести регулятор мощности
всасывания в положение макс.
Заменить фильтровальный ме-
шок.
Заменить фильтр HEPA.
Проверить прохождение воздуха
во всасывающем шланге, при
необходимости удалить заторы.
Заменить интерфейсный кабель.
Обратиться в службу технической
поддержки.
D3608.201.02.05.12 10.2020
Dentsply Sirona
66 25 540 D3608
- Page 1
02.2020 New as of: Intego / I ntego Pro Intego Ambidextrous Intego Pro Ambidextrous Operating Instructions (not valid for USA) English… -
Page 2: Table Of Contents
Table of Contents Dentsply Sirona Operating Instructions Intego Table of Contents General Information ………………..Dear customer, ………………. Contact information………………General information on the operating Instructions ……..Scope of these operating Instructions…………Other valid documents …………….. Warranty and liability………………Intended use ………………..
- Page 3
Dentsply Sirona Table of Contents Operating Instructions Intego System overview Intego Pro ……………. System overview Intego / Intego Pro with Ambidextrous option ….Patient chair ………………..Head support ………………..3.7.1 Flat headrest ……………… 3.7.2 Double-jointed head support…………Foot control ………………..3.8.1 Pneumatic foot switch ………….. - Page 4
Table of Contents Dentsply Sirona Operating Instructions Intego Foot control ………………..4.3.1 Pneumatic foot switch …………..4.3.2 C+ electronic foot switch…………..Patient chair ………………..4.4.1 Safety instructions…………….4.4.2 Safety stop ………………4.4.3 Triggering an immediate movement stop……..4.4.4 Armrests………………4.4.5 Vario footrest……………… - Page 5
Dentsply Sirona Table of Contents Operating Instructions Intego 4.5.7.5 Attach/remove the housing and nozzle ……4.5.7.6 Applying air, water, or spray ……… 4.5.8 Turbine / air motor / other air-driven instruments……4.5.8.1 Using the highspeed handpiece ……..4.5.8.2 Setting the light of the highspeed handpiece…. - Page 6
4.7.4 Stand-alone water supply ………….. 165 4.7.4.1 Water supply for the Intego ………. 166 4.7.4.2 Water supply for the Intego pro ……..168 4.7.5 Converting the Ambidextrous water unit for right and left-handed people ……………….. 172 Swiveling tray holder………………178 Cup holder ……………….. - Page 7
Dentsply Sirona Table of Contents Operating Instructions Intego 4.11 Operating light………………..181 4.11.1 Switching the operating light on/off ……….181 4.11.2 Setting the LEDlight brightness…………182 4.11.3 Setting the brightness, color temperature, and sensor control of the LEDview Plus…………….182 4.12… - Page 8
Table of Contents Dentsply Sirona Operating Instructions Intego 4.15.2 Configuring the treatment center on EasyTouch ……208 4.15.2.1 Opening the setup dialogs……….208 4.15.2.2 Setting the time and date……….209 4.15.2.3 Configuring control options……….. 210 4.15.2.4 Configuring the network connection ……213 4.15.2.5… - Page 9
Dentsply Sirona Table of Contents Operating Instructions Intego 5.3.5.5 Clean and disinfect/sterilize the components of the ApexLocator …………..250 5.3.5.6 Cleaning, disinfecting/sterilizing the Cavitron scaler ..251 5.3.5.7 Disinfecting/sterilizing Mini L.E.D. curing light ….251 5.3.5.8 Cleaning/disinfecting the SiroCam F / AF / AF+ intraoral camera………… - Page 10
Table of Contents Dentsply Sirona Operating Instructions Intego Sanitizing ………………… 293 5.6.1 Sanitizing with the fresh water bottle ……….294 5.6.1.1 Sanitizing on the EasyPad……….295 5.6.1.2 Sanitizing on the EasyTouch ……..298 5.6.2 Sanitizing with disinfection system……….301 5.6.2.1 Sanitizing on the EasyPad………. -
Page 11: General Information
These Operating Instructions are designed to assist you prior to initial use and whenever you require information later on. We wish you a great deal of success and pleasure with Intego / Intego Pro. Your Intego team Contact information…
-
Page 12: General Information On The Operating Instructions
● Intego TS (Compact water unit and dentist element with hanging hoses) ● Intego CS (Compact water unit and dentist element with swivel arms) ● Intego Pro TS (Comfort water unit and dentist element with hanging hoses) ● Intego Pro CS (Comfort water unit and dentist element with swivel arms) The treatment centers can be delivered from the factory with the Ambidextrous option.
-
Page 13: Other Valid Documents
Exclusion of liability In the event that the system owner fails to fulfill its obligation to perform maintenance activities or ignores error messages, Dentsply Sirona or your authorized dealer cannot assume any liability for any damage thus incurred.
-
Page 14: Obligation To Notify Authorities
1 General Information Dentsply Sirona 1.8 Obligation to notify authorities Operating Instructions Intego Obligation to notify authorities In the European Union, the operator or user must report all serious events related to the product to the competent authority of the Member State in which he or she is established.
-
Page 15: Safety Instructions
Dentsply Sirona 2 Safety instructions Operating Instructions Intego 2.1 Identification of the danger levels Safety instructions Identification of the danger levels To prevent personal injury and material damage, please observe the warning and safety information provided in these instructions for use.
-
Page 16: On-Site Installation
Alternatively, for Intego the optional fresh water bottle, or for Intego Pro the empty disinfectant tank can be used as a water container for a self-sufficient water supply. For…
-
Page 17: Maintenance And Repair
It can be connected directly to the public drinking water supply. The Intego treatment center, provided it is equipped with a fresh water bottle not connected to the public drinking water supply, also complies with the requirements of EN 1717 and the DVGW German Gas and Water Association).
-
Page 18: Trouble-Free Operation
No restrictions apply when using salt blasting devices in connection with Dentsply Sirona treatment centers. However, in such cases, make sure that the system is subsequently flushed with an adequate amount of water.
-
Page 19: Ventilation Slots
Use only Dentsply Sirona fresh water bottles, see “Spare parts, consumables” [→ 324]! Compressed air is added to the bottle when it is screwed into the holder. Beverage bottles could burst.
-
Page 20: Modifications And Extensions Of The System
For reasons of product safety, this product may be operated only with original Dentsply Sirona parts or third-party parts expressly approved by Dentsply Sirona. In the event of changes which were not foreseen, Dentsply Sirona is not liable for resulting damages.
-
Page 21: Electrostatic Discharge
Dentsply Sirona 2 Safety instructions Operating Instructions Intego 2.19 Electrostatic discharge Electrostatic discharge 2.19 Protective measures Electrostatic discharge (abbreviated: ESD – ElectroStatic Discharge) Electrostatic discharge from people can damage electronic components when the components are touched. Damaged components usually have to be replaced.
-
Page 22: Dismantling/Installation
2 Safety instructions Dentsply Sirona 2.20 Dismantling/Installation Operating Instructions Intego Tip: 1 nanosecond= 1/1,000,000,000 second= 1 billionth of a second Voltage differentials exceeding 30,000 volts per centimeter may lead to a charge transfer (electrostatic discharge, lightning, spark-over). Integrated circuits (logical circuits and microprocessors) are used in order to implement a wide variety of functions in a device.
-
Page 23: Unit Description
“Connection to the public drinking water supply” [→ 16] Original language of this document: German Intego / Intego Pro bear the CE marking in accordance with the provisions of Council Directive 93/42/EEC of June 14, 1993 concerning medical devices.
-
Page 24: Technical Data
3 Unit description Dentsply Sirona 3.2 Technical data Operating Instructions Intego Technical data Model designation: Intego / Intego Pro Power connection: 100 – 240 V AC ± 10% 50/60 Hz Rated current: 3.3 A – 1.5 A at 100 – 240 V also max. 6 A for external devices…
- Page 25
Dentsply Sirona 3 Unit description Operating Instructions Intego 3.2 Technical data 1060 Transport and storage con- Temperature: -40°C – +70°C ditions: (-40°F – 158°F) Relative humidity: 10% – 95% Air pressure: 500 hPa – 1060 hPa 1060 Operating conditions: Ambient temperature: 10°C – 40°C (50°F –… -
Page 26: System Overview Intego
Dentsply Sirona 3.3 System overview Intego Operating Instructions Intego System overview Intego The Intego treatment center comprises the following main components: Intego TS treatment center Patient chair Flat headrest (shown here) or double articulating headrest Pneumatic foot switch (shown here) or C+ electronic foot…
- Page 27
Flat headrest or double articulating headrest (shown here) Pneumatic foot switch or C+ electronic foot switch (shown here) Intego CS dentist element with swivel arms Compact or Comfort (shown here) assistant element Compact water unit Main switch and external device connection (optional) 64 … -
Page 28: System Overview Intego Pro
3 Unit description Dentsply Sirona 3.4 System overview Intego Pro Operating Instructions Intego System overview Intego Pro The Intego Pro treatment center comprises the following main components: Intego Pro TS treatment center Patient chair Flat headrest (shown here) or double articulating headrest…
- Page 29
Patient chair Flat headrest or double articulating headrest (shown here) Pneumatic foot switch or C+ electronic foot switch (shown here) Intego Pro CS dentist element with swivel arms Comfort assistant element Comfort water unit Main switch and external device connection (optional) 64 … -
Page 30: System Overview Intego / Intego Pro With Ambidextrous Option
Ambidextrous option The Intego and Intego Pro treatment centers with the Ambidextrous option comprise the following main components: Intego TS / Intego Pro TS treatment center with Ambidextrous option Patient chair Flat headrest (shown here) or double articulating headrest Pneumatic foot switch (shown here) or C+ electronic foot control…
- Page 31
Dentsply Sirona 3 Unit description Operating Instructions Intego 3.5 System overview Intego / Intego Pro with Ambidextrous option Intego CS / Intego Pro CS treatment center with Ambidextrous option Patient chair Flat headrest or double articulating headrest (shown here) Pneumatic foot switch or C+ electronic foot control (shown… -
Page 32: Patient Chair
3 Unit description Dentsply Sirona 3.6 Patient chair Operating Instructions Intego Patient chair The patient chair features a variety of adjustment options to optimally adjust the patient’s position during treatment. Flat headrest (shown here) or double articulating headrest Backrest Seat…
-
Page 33: Head Support
Dentsply Sirona 3 Unit description Operating Instructions Intego 3.7 Head support Head support 3.7.1 Flat headrest The headrest extension can be pulled in or out depending on the patient’s height. For upper jaw treatment, the magnetic head pad can be rotated and used as a neck rest.
-
Page 34: Foot Control
3 Unit description Dentsply Sirona 3.8 Foot control Operating Instructions Intego Foot control 3.8.1 Pneumatic foot switch With a pneumatic foot control, the compressed air valve for activating the highspeed handpieces is integrated into the foot control. The highspeed handpieces are therefore continuously adjustable. For electric motors and the scaler, the foot control is operated as a direct starter (i.e.
-
Page 35: C+ Electronic Foot Switch
Dentsply Sirona 3 Unit description Operating Instructions Intego 3.8 Foot control 3.8.2 C+ electronic foot switch The C+ electronic foot control can be set as a foot control or direct starter for electric motors and the scaler. The compressed air for high- speed handpieces cannot be adjusted.
-
Page 36: Dentist Element
Operating Instructions Intego Dentist element Intego and Intego Pro can be equipped with a TS dentist element (with hanging hoses) or a CS dentist element (with whip arms). All functions of the treatment center can be controlled via the control panel on the dentist element.
-
Page 37: Cs Dentist Element With Swivel Arms
Dentsply Sirona 3 Unit description Operating Instructions Intego 3.9 Dentist element 3.9.2 CS dentist element with swivel arms On the CS dentist element, instruments are placed on the instrument holder horizontally and facing downwards. The instrument hoses are placed above the dentist element over the whip arms.
-
Page 38: Instrument Positions
• SiroCam AF+ The Standard 3-way syringe is only available for Intego. The Intego / Intego Pro treatment centers can be fitted with a maximum of two motors. A maximum of one scaler and one intraoral camera can be connected.
-
Page 39: Standard Easypad User Interface
Dentsply Sirona 3 Unit description Operating Instructions Intego 3.9 Dentist element 3.9.4 Standard EasyPad user interface EasyPad display Status displays Fixed keys (membrane keyboard) Favorite key pad (membrane keyboard) 3.9.4.1 EasyPad display and status displays EasyPad display For indicating speed, intensity, and torque and for configuring and servicing the treatment center.
- Page 40
3 Unit description Dentsply Sirona 3.9 Dentist element Operating Instructions Intego Pressing the tumbler filling key (> 2 s) displays the setting text for coupling the tumbler filling to mouth rinsing position S and filling time, see «Tumbler filling on the EasyPad» [→ 159]. - Page 41
Dentsply Sirona 3 Unit description Operating Instructions Intego 3.9 Dentist element Endo / Purge With the motor removed: switching the Endo function on/off, see Purge «Switching Endo function on/off» [→ 123] With the ultrasonic handpiece removed: switching the Endo mode on/off (limiting power), see «Setting the intensity on the EasyPad» … -
Page 42: Comfort Easytouch User Interface
Dentsply Sirona 3.9 Dentist element Operating Instructions Intego 3.9.5 Comfort EasyTouch user interface The EasyTouch option is available for the Intego and Intego Pro treatment centers. Touchscreen (pressure-sensitive user interface) Fixed keys (membrane keyboard) 64 5 7 4 98 D3543…
-
Page 43: Touch Screen
Dentsply Sirona 3 Unit description Operating Instructions Intego 3.9 Dentist element 3.9.5.1 Touch screen The touchscreen displays virtual function keys according to the program selected. A list of all function keys is provided in the Appendix of this document, see «Overview of all function keys» [→ 327].
-
Page 44: Fixed Keys Of The Easytouch User Interface
3 Unit description Dentsply Sirona 3.9 Dentist element Operating Instructions Intego 3.9.5.2 Fixed keys of the EasyTouch user interface Clean key Clean Pressing this key deactivates the complete user interface of the dentist element. Pressing it again > 3 s reactivates the user interface.
-
Page 45: Assistant Element
The Intego treatment center and Intego Pro with Ambidextrous option can be equipped with the Compact or Comfort assistant element. Intego Pro without the Ambidextrous option is available only with the Comfort assistant element. The user interface on the assistant element is optional.
- Page 46
3 Unit description Dentsply Sirona 3.10 Assistant element Operating Instructions Intego Support arm and rotary joint Central suction sieve under the removable cuspidor bowl Comfort assistant element with treatment centers without Ambidextrous option The Comfort assistant element is attached to the base of the patient chair by a support arm. - Page 47
Dentsply Sirona 3 Unit description Operating Instructions Intego 3.10 Assistant element Comfort assistant element with treatment centers with Ambidextrous option The Comfort assistant element is attached to the water unit with a support arm. It can be positioned so that the instruments can be reached by the dentist if he/she is performing treatment on his/her own. -
Page 48: Instrument Positions
• SiroCam F • SiroCam AF • SiroCam AF+ The Standard 3-way syringe is only available for Intego. A mini LED curing light, an intraoral camera or an additional spray aspirator can be connected to the treatment center. Changes to holder 2 can only be made by your service engineer.
-
Page 49: User Interface
Dentsply Sirona 3 Unit description Operating Instructions Intego 3.10 Assistant element 3.10.2 User interface 3.10.3 Fixed keys on the assistant element Chair program S Mouth rinsing position with last-position memory function (programmable), seeProgramming chair positions» [→ 80] Chair program 0 Entry/exit position (programmable)
-
Page 50: Water Unit
The Compact water unit can be operated with an air jet pump (Air Venturi) instead of a suction device. The heater for the treatment water is in the water unit. For the Intego, the water heater is optional.
-
Page 51: Compact Water Unit
Dentsply Sirona 3 Unit description Operating Instructions Intego 3.11 Water unit 3.11.1 Compact water unit The Compact water unit is available only without a disinfection system. However, it can be equipped with a fresh water bottle for stand-alone water supply. Switching between the fresh water bottle and public drinking water supply is another equipment option.
-
Page 52: Comfort Water Unit
3 Unit description Dentsply Sirona 3.11 Water unit Operating Instructions Intego 3.11.2 Comfort water unit The water unit can be optionally equipped with a disinfection system. In normal operation, this will automatically inoculate the water that will come into contact with the patient (also called treatment water) with an agent to disinfect the water paths.
- Page 53
Dentsply Sirona 3 Unit description Operating Instructions Intego 3.11 Water unit Suction hose connection for assistant element Manually swiveling cuspidor (removable) Tumbler filler Cover of the storage tank for the disinfectant used to disinfect the water paths or for the stand-alone water supply Cleaning adaptor for water-carrying instruments of the dentist element for sanitizing and auto purge. -
Page 54: Ambidextrous Water Unit
The amalgam separator and sediment container are removed from underneath with the Ambidextrous water unit. Cleaning adapter for the Sprayvit E and for a suction hose of the assistant element Fresh water bottle (only with the Intego) 64 5 7 4 98 D3543 D3543.201.01.08.02 02.2020…
- Page 55
Suction hose connection to the Comfort assistant element Ambidextrous water unit with Intego With the Intego, the Ambidextrous water unit is available only without a disinfection system. However, it can be equipped with a fresh water bottle for stand-alone water supply. Switching between the fresh water bottle and public drinking water supply is another equipment option. - Page 56
3 Unit description Dentsply Sirona 3.11 Water unit Operating Instructions Intego automatically purging the water paths (AutoPurge), and cleaning the suction hoses. To clean the suction system, water is pumped into a tank behind the suction hose intake and suctioned off from there. A cleaning agent is automatically added to the water if the dental treatment center is equipped with the chemical suction hose cleaning option. -
Page 57: External Device Connection
Dentsply Sirona 3 Unit description Operating Instructions Intego 3.12 External device connection External device connection 3.12 External medical accessories can be connected to the external device connection. They must comply with the requirements of IEC 60601-1. NOTE If the treatment center is equipped with a disinfection system or fresh…
- Page 58
3 Unit description Dentsply Sirona 3.12 External device connection Operating Instructions Intego Print Flow rate Water 2.2 ± 0.2 bar max. 300 ml/min 4.4 ± 0.5 bar max. 50 Nl/min IMPORTANT The removal of media at the external device connection can reduce the performance of integrated consumers, e.g., the filling quantity of… -
Page 59: Operation
«Switch spray on/off» [→ 88] and «Purge water paths» [→ 226]. The Intego Pro has the sanitize function if the water unit is equipped with a disinfection system. For sanitizing, the water-carrying lines are filled with the undiluted disinfectant to disinfect the water paths to reduce the bacterial load in the water paths.
-
Page 60: Switching The Treatment Center On/Off
4 Operation Dentsply Sirona 4.1 Starting up the treatment center Operating Instructions Intego 4.1.2 Switching the treatment center on/off The treatment center has a main switch with integrated fuse on the base of the chair. At the end of the working day, the treatment center should be switched off to save energy and for safety reasons.
-
Page 61: Selecting A User Profile
Dentsply Sirona 4 Operation Operating Instructions Intego 4.1 Starting up the treatment center 4.1.3 Selecting a user profile If your treatment center is equipped with the EasyPad standard user interface, it can manage up to two user profiles. The EasyTouch Comfort user interface can manage up to four user profiles.
-
Page 62: Concept Of The User Interface
4 Operation Dentsply Sirona 4.2 Concept of the user interface Operating Instructions Intego Concept of the user interface 4.2.1 Standard EasyPad user interface EasyPad displays The EasyPad user interface is equipped with seven segment displays. Each display can show five digits or letters. Depending on the operating…
- Page 63
Dentsply Sirona 4 Operation Operating Instructions Intego 4.2 Concept of the user interface It may not be possible to activate the Endo function. Purge It is not possible to switch between speed and torque display. Clean Calling functions Functions are triggered by the fixed buttons on the user interface. -
Page 64: Comfort Easytouch User Interface
4 Operation Dentsply Sirona 4.2 Concept of the user interface Operating Instructions Intego 4.2.2 Comfort EasyTouch user interface 4.2.2.1 Virtual function keys The touchscreen displays virtual function keys according to the program selected. Required functions can be activated by touching the function keys with your finger.
-
Page 65: Status Column
Dentsply Sirona 4 Operation Operating Instructions Intego 4.2 Concept of the user interface Settings screens In many cases, functions not only can be switched on or off, but also 10:45:03 can be set. If a function key is pressed and held (> 2 s), the corresponding settings screen appears.
-
Page 66: Foot Control
4 Operation Dentsply Sirona 4.3 Foot control Operating Instructions Intego Foot control The treatment center can be operated with a pneumatic foot switch or the C+ electronic foot switch. 4.3.1 Pneumatic foot switch When the instrument is removed from the holder, the speed or intensity are automatically displayed on the EasyPad.
-
Page 67: C+ Electronic Foot Switch
Dentsply Sirona 4 Operation Operating Instructions Intego 4.3 Foot control 4.3.2 C+ electronic foot switch The C+ electronic foot control operating elements are assigned different functions depending on whether the instruments are all in place or an instrument is removed from its holder.
- Page 68
4 Operation Dentsply Sirona 4.3 Foot control Operating Instructions Intego 4-way switch plate ü All instruments are in their holders. ➢ Move the 4-way foot switch plate to the left or right. Ä Left: Chair program 1 is started. Right: Chair program 2 is started. -
Page 69: Patient Chair
Dentsply Sirona 4 Operation Operating Instructions Intego 4.4 Patient chair Patient chair 4.4.1 Safety instructions CAUTION ü û The free space under the patient couch and up to the water unit can be decreased due to chair movements. Parts of the patient’s or user’s body may be pinched or crushed.
-
Page 70: Safety Stop
4 Operation Dentsply Sirona 4.4 Patient chair Operating Instructions Intego 4.4.2 Safety stop The treatment center is equipped with various safety stops to prevent crushing and damage. The cutoff trigger points are shown in the following illustration: Display of triggered safety switch 2 on the EasyPad…
-
Page 71: Triggering An Immediate Movement Stop
Dentsply Sirona 4 Operation Operating Instructions Intego 4.4 Patient chair 4.4.3 Triggering an immediate movement stop You can stop the movement of the chair to a programmed position as follows: ➢ Touch one of the patient chair keys on the EasyPad or EasyTouch.
-
Page 72: Armrests
4 Operation Dentsply Sirona 4.4 Patient chair Operating Instructions Intego 4.4.4 Armrests Armrests are available for the patient chair. The right armrest can be swiveled forward to facilitate getting in and out of the chair. In treatment centers with the Ambidextrous option, both armrests can be swiveled.
-
Page 73: Adjusting The Flat Headrest
Dentsply Sirona 4 Operation Operating Instructions Intego 4.4 Patient chair 4.4.6 Adjusting the flat headrest The headrest extension can be pulled in or out manually depending on the patient’s height. ➢ Pull the headrest out of the backrest or push it back in at the recessed grip A.
-
Page 74: Adjusting The Double Articulating Headrest
4 Operation Dentsply Sirona 4.4 Patient chair Operating Instructions Intego 4.4.7 Adjusting the double articulating headrest The double articulating headrest is equipped with two rotary joints. They facilitate manual adjustment of head inclination for maxillary/mandibular treatments. The headrest extension can be pushed in or pulled out manually to adjust it to the height of the patient.
-
Page 75: Moving The Patient Chair Via Chair Programs
IMPORTANT Chair movements with cuspidor swiveled in Intego With the cuspidor bowl swiveled in, the chair cannot be moved. This prevents the patient from colliding with the cuspidor. Swing the cuspidor outward before initiating chair movement.
-
Page 76: Moving The Patient Chair To The Mouth Rinsing Position
4 Operation Dentsply Sirona 4.4 Patient chair Operating Instructions Intego Via the assistant element ➢ Press the 0 key on the assistant element briefly (< 2 s). 4.4.8.2 Moving the patient chair to the mouth rinsing position The following functions are factory preset to be activated in the mouth rinsing position: ●…
-
Page 77: Using The Last Position Memory Function
Dentsply Sirona 4 Operation Operating Instructions Intego 4.4 Patient chair 4.4.8.3 Using the last position memory function The last chair position is stored before the patient chair moves to mouth rinsing position S. When mouth rinsing position key S is pressed again, the treatment center returns to the previously set treatment position.
-
Page 78: Moving The Chair Manually
IMPORTANT Chair movements with cuspidor swiveled in Intego With the cuspidor bowl swiveled in, the chair cannot be moved. This prevents the patient from colliding with the cuspidor. Swing the cuspidor outward before initiating chair movement.
-
Page 79: Adjusting The Chair Height
Dentsply Sirona 4 Operation Operating Instructions Intego 4.4 Patient chair 4.4.9.2 Adjusting the chair height Via fixed keys on the EasyPad ➢ Press the Adjust the chair height key. Via the touchscreen on the EasyTouch ü The Start or Instrument program is displayed on the touchscreen.
-
Page 80: Programming Chair Programs
4 Operation Dentsply Sirona 4.4 Patient chair Operating Instructions Intego 4.4.10 Programming chair programs The four chair programs preset in the factory: ● Mouth rinsing position S ● Entry/exit position 0 ● 1 and 2 can be individually programmed for both user profiles (A and B) on the EasyPad and each of the four user profiles (A to D) on the EasyTouch.
-
Page 81: Dentist Element
Dentsply Sirona 4 Operation Operating Instructions Intego 4.5 Dentist element Dentist element 4.5.1 Maximum load capacity TS dentist element The maximum load on the TS dentist element without a tray holder is 1 kg (2.2 lbs). The maximum load on the TS dentist element with a tray holder is 2 kg (4.4 lbs).
-
Page 82: Positioning The Dentist Element
4 Operation Dentsply Sirona 4.5 Dentist element Operating Instructions Intego 4.5.2 Positioning the dentist element WARNING The dentist element could be positioned within the movement range of the patient chair. Moving the patient chair may cause the patient to collide with the dentist element or its support arm.
- Page 83
Dentsply Sirona 4 Operation Operating Instructions Intego 4.5 Dentist element Positioning the CS dentist element (standard position) In the standard position, the support arm of the CS dentist element is attached to the right mount of the Compact water unit and to the rear mount of the Comfort water unit. - Page 84
4 Operation Dentsply Sirona 4.5 Dentist element Operating Instructions Intego Positioning the CS dentist element (special position) Alternatively, the support arm of the CS dentist element can be attached to the left mount on the Compact water unit (special position) and with the Comfort water unit to the front mount. -
Page 85: Fixed Keys On The Dentist Element
Dentsply Sirona 4 Operation Operating Instructions Intego 4.5 Dentist element 4.5.3 Fixed keys on the dentist element An overview of the fixed keys on the EasyPad and EasyTouch can be found in the Description of Device, see «EasyPad standard user interface» …
-
Page 86: Placing The Instruments In Their Holders
4 Operation Dentsply Sirona 4.5 Dentist element Operating Instructions Intego 4.5.4 Placing the instruments in their holders Automatic opening of instrument dialogs On the EasyPad, the speed or intensity is shown automatically on the display depending on which instrument is removed from the holder. On the EasyTouch, the respective instrument program appears on the touchscreen.
- Page 87
Dentsply Sirona 4 Operation Operating Instructions Intego 4.5 Dentist element Cover for TS dentist element A cover can be purchased as an accessory for an instrument holder which is not used. Insert the cover into an unassigned instrument holder. This prevents accidental deposit of an instrument in this holder. -
Page 88: General Instrument Functions
4 Operation Dentsply Sirona 4.5 Dentist element Operating Instructions Intego 4.5.5 General instrument functions EasyPad Settings for the coolant, instrument light, and foot switch can be made for the instrument removed from the holder. EasyTouch Settings for the coolant, instrument light, and foot switch can be made in the sub-screen of the instrument removed from the holder.
- Page 89
Dentsply Sirona 4 Operation Operating Instructions Intego 4.5 Dentist element Ä When the status display Spray lights up on the EasyPad, spray is switched on when the instrument is activated. Activation of the spray is saved on the favorite keys, see section «Setting the speed on the EasyPad» … -
Page 90: Instrument Functions On The Easytouch
4 Operation Dentsply Sirona 4.5 Dentist element Operating Instructions Intego 4.5.5.2 Instrument functions on the EasyTouch 4.5.5.2.1 Opening the sub-screen ü An instrument is removed from the holder. ü The Instrument program of the removed instrument is displayed on the touchscreen.
- Page 91
Dentsply Sirona 4 Operation Operating Instructions Intego 4.5 Dentist element 4.5.5.2.3 Preset and switch coolant on/off by the C+ electronic foot switch. Selecting a coolant Air or spray can be preselected as the instrument coolant in the sub- dialog. The preselected coolant can be switched on/off via the left button on the C+ electronic foot control. - Page 92
4 Operation Dentsply Sirona 4.5 Dentist element Operating Instructions Intego 4.5.5.2.5 Switch instrument light on/off ü The sub-screen of the removed motor is displayed on the touchscreen . ➢ Switch the instrument light on or off. Ä If the key is highlighted orange, the instrument light can be activated using the foot pedal. -
Page 93: Saving Instrument Settings
Dentsply Sirona 4 Operation Operating Instructions Intego 4.5 Dentist element 4.5.5.3 Saving instrument settings DropMode When placing an instrument back in the holder, the instrument settings made are always saved in the user profile (DropMode). The next time the instrument is removed, the last settings made are available again.
-
Page 94: Standard 3-Way Syringe
The standard 3-way syringe is used to clean the treatment areas and blow them dry. It provides the media with air and prewarmed water. The heater for the treatment water is in the water unit. The water heater is optional on the Intego. 4.5.6.1 Safety instructions WARNING The nozzle of the Standard 3-way syringe must lock into the holder.
-
Page 95: Sprayvit E 3-Way Syringe
The Sprayvit E 3-way syringe is used for dental treatment with air and water. The Sprayvit E 3-way syringe is also used to illuminate the preparation field. The heater for the treatment water is in the water unit. The water heater is optional on the Intego. 4.5.7.1 Structure Media lever…
-
Page 96: Safety Instructions
4 Operation Dentsply Sirona 4.5 Dentist element Operating Instructions Intego 4.5.7.3 Safety instructions WARNING A small metal tube protrudes at the tip of the nozzle. Risk of injury and contamination! ➢ Avoid contact with the tip of the nozzle. Do not attempt to handle with the nozzle attached.
-
Page 97: Connecting The Instrument Hose
Dentsply Sirona 4 Operation Operating Instructions Intego 4.5 Dentist element 4.5.7.4 Connecting the instrument hose CAUTION There may be exposed voltage! Risk of electric shock! ➢ Do not operate the media lever when the housing is removed! 1. Attach the valve body A to the supply hose, observing the various tube diameters.
-
Page 98: Turbine / Air Motor / Other Air-Driven Instruments
Setting the light of the highspeed handpiece The instrument light supply is optional in Intego. Halogen lamps cannot be operated with the Intego / Intego Pro treatment centers. The voltage or current can be limited for the LED lamp of the highspeed handpiece.
- Page 99
Dentsply Sirona 4 Operation Operating Instructions Intego 4.5 Dentist element 4.5.8.2.1 Setting the highspeed handpiece lamp on the EasyPad Accessing the turbine light operating context 1. Detach the turbine to be set from the holder. 2. Press and hold the function key 2 / Setup (> 2 s). - Page 100
4 Operation Dentsply Sirona 4.5 Dentist element Operating Instructions Intego 3. Use favorite keys 1 and 3 to set the current (A) for the lamp in the handpiece removed in amperes (0.12 A = 120 mA). Setup 4. Confirm the setting by pressing the function key 2 / Setup . - Page 101
Dentsply Sirona 4 Operation Operating Instructions Intego 4.5 Dentist element 4.5.8.2.2 Setting the highspeed handpiece light on the EasyTouch 1. Detach the turbine to be set from the holder. 2. Press the Sub-dialog fixed key. Ä The Highspeed handpiece sub-dialog is displayed on the touchscreen. -
Page 102: Motor
(without carbon brushes). They are characterized by their precise controllability and durability. The speed range of the motors for Intego / Intego Pro is between 1,200 and 40,000 rpm. If the treatment center features the eControl option, the motor can be down-regulated to 100 rpm.
-
Page 103: Product Labeling
Dentsply Sirona 4 Operation Operating Instructions Intego 4.5 Dentist element BL ISO E motor Handpiece holder O-ring 8.4 x 0.7 Product labeling ISO E motor sleeve Coupling connection (green / 3 guide lugs) The BL ISO E motor is equipped with an ISO coupling. T1 Line handpieces, for example, can thus be used without an adapter.
-
Page 104: Safety Instructions
4 Operation Dentsply Sirona 4.5 Dentist element Operating Instructions Intego Adapter for BL E motor ISO adapter Basic Apex adapter Light function Spray function Apex measurement function — Handpiece holder – ISO 3964 4.5.9.4 Safety instructions WARNING The magnetic field of the electric motor is strengthened when the motor is switched on.
-
Page 105: Connecting The Instrument Hose
Dentsply Sirona 4 Operation Operating Instructions Intego 4.5 Dentist element 4.5.9.5 Connecting the instrument hose ü Colored marks and position of guide lugs on motor and hose coupling of the instrument hose match. 1. Slide back the cap nut at the hose coupling.
-
Page 106: Adjusting The Cooling Spray
4 Operation Dentsply Sirona 4.5 Dentist element Operating Instructions Intego 4.5.9.7 Adjusting the cooling spray The BL ISO E motor is equipped with a control ring for cooling water. With the BL E motor, the amount of water can be set via the water controller on the dentist element, see «Setting the amount of spray water» …
-
Page 107: Setting The Speed On The Easypad
Dentsply Sirona 4 Operation Operating Instructions Intego 4.5 Dentist element 4.5.9.8 Setting the speed on the EasyPad Speeds are stored on the favorite keys 1, 2, and 3 that can be accessed by pressing them. Individual speeds can be saved for each user profile on the favorite keys.
- Page 108
4 Operation Dentsply Sirona 4.5 Dentist element Operating Instructions Intego Saving the speed ü The desired speed is set. ü Via the C+ electronic foot switch: The spray is switched on or off (will be saved). 1. Press and hold the favorite key 2 / Setup (> 2 s). -
Page 109: Setting The Speed On The Easytouch
Dentsply Sirona 4 Operation Operating Instructions Intego 4.5 Dentist element 4.5.9.9 Setting the speed on the EasyTouch Speeds are saved on the three favorite keys that can be accessed by pressing them. Individual speeds can be saved for each user profile on the favorite keys.
- Page 110
4 Operation Dentsply Sirona 4.5 Dentist element Operating Instructions Intego Saving the speed ü The desired speed is set. ü Via the C+ electronic foot switch: The spray is switched on or off (will be saved). 1. Press and hold the middle favorite Set (> 2 s). -
Page 111: Setting The Direction Of Rotation
Dentsply Sirona 4 Operation Operating Instructions Intego 4.5 Dentist element 4.5.9.10 Setting the direction of rotation The direction of rotation can be changed only when the motor is at a standstill. Tip: After starting the electric motor with the foot switch, an audible warning signal sounds 6 times if counterclockwise rotation is activated.
-
Page 112: Apexlocator
4 Operation Dentsply Sirona 4.5 Dentist element Operating Instructions Intego 4.5.10 ApexLocator The ApexLocator is available only with the EasyTouch Comfort user interface. The ApexLocator can be used to measure the working length of the root canal file in endodontic treatments using electrical impedance.
-
Page 113: Preparing To Use The Apexlocator
Dentsply Sirona 4 Operation Operating Instructions Intego 4.5 Dentist element 4.5.10.1 Preparing to use the ApexLocator Apex adapter, mucosal electrode and file clamp The mucosal electrode and the file clamp are connected to the socket of the dentist element using the apex adapter. The socket is located on the left and to the rear, below the dentist element.
- Page 114
Dentsply Sirona 4.5 Dentist element Operating Instructions Intego For endodontic treatments with the ApexLocator, the Dentsply Sirona Endo 6:1 (SN 6407 and above / July 2010) or Endo 6 L contra-angle handpieces are required for the Endo function. When using the ApexLocator in the motor program (without Endo function), the Dentsply Sirona SiroNiTi Apex contra-angle handpiece is required. -
Page 115: Distance Display
Dentsply Sirona 4 Operation Operating Instructions Intego 4.5 Dentist element 4.5.10.2 Distance display The measured root canal depth is shown in the distance display on the touchscreen. A bar with 11 display levels shows the distance from the root canal file to the physiological apex (apical constriction). The root canal is divided into four colored sections in the distance display.
- Page 116
4 Operation Dentsply Sirona 4.5 Dentist element Operating Instructions Intego Green region The tip of the root canal file has reached the physiological apex. Red region The tip of the root canal file has pierced the physiological apex. The instrument overshoot is displayed. -
Page 117: Beeps
Dentsply Sirona 4 Operation Operating Instructions Intego 4.5 Dentist element 4.5.10.3 Beeps In addition to the graphical distance display on the touchscreen, the position of the file in the root canal can also be indicated as an acoustic signal. Apex acoustic signals The ApexLocator always plays the following acoustic signals: ●…
-
Page 118: Performing Manual Measurements With The File Clamp
4 Operation Dentsply Sirona 4.5 Dentist element Operating Instructions Intego 4.5.10.4 Performing manual measurements with the file clamp For an endodontic examination, manual measurements can be made using the file clamp and a root canal file. ü The treatment center is prepared for manual measurements using the file clamp, see section «Preparing to use the ApexLocator» …
-
Page 119: Endodontic Treatment With Apexlocator And Torque Limitation Handpiece
IMPORTANT SiroNiTi Apex Only Dentsply Sirona SiroNiTi Apex must be used to perform apex measurement using a torque-limiting handpiece! The electrical conductivity can be ensured only using this handpiece. The SiroNiTi handpiece can also be used to perform endodontic treatments without the ApexLocator.
- Page 120
4 Operation Dentsply Sirona 4.5 Dentist element Operating Instructions Intego Ä The set distance is displayed to the left of the – and + keys. The preset motor stop position is displayed in the Motor dialog as a black triangle to the right of the distance display under the text «Stop». - Page 121
Dentsply Sirona 4 Operation Operating Instructions Intego 4.5 Dentist element 11. Short the electrical measurement system. Plug in the files and hold them directly against the mucosal electrode. This cancels out any inaccuracies caused by jumps in impedance in the measurement setup (standardization). -
Page 122: Endo Function
Fatigued files may break during treatment. ➢ Use files only for the service life specified by the manufacturer. CAUTION Only the Dentsply Sirona Endo 6:1 (SN 6407 and above / July 2010) and Endo 6 L contra-angle handpieces may be used for the Endo function.
-
Page 123: Endo Function On The Easypad
Dentsply Sirona 4 Operation Operating Instructions Intego 4.5 Dentist element 4.5.11.1 Endo function on the EasyPad 4.5.11.1.1 Switching Endo function on/off Switching on the Endo function The Endo function is assigned to the burr drive removed from the holder. ü The desired electric motor for the Endo function is removed from the holder.
- Page 124
This includes a measurement of motor current at different speeds to assess the properties of the system. CAUTION To ensure proper calibration, use only Dentsply Sirona instruments. ü The Endo function is switched on. The Endo function status display is illuminated. - Page 125
Dentsply Sirona 4 Operation Operating Instructions Intego 4.5 Dentist element 4.5.11.1.3 Setting the torque With the Endo function switched on, torque and speed of the contra- angle handpiece are indicated, but not of the motor. The control electronics of the burr drive calculate the motor control based on the specified contra-handpiece gear reduction and the set torque and speed. - Page 126
4 Operation Dentsply Sirona 4.5 Dentist element Operating Instructions Intego The torque can also be increased or reduced by moving the 4-way switch plate of the C+ electronic foot control up or down. Saving torque ü The desired torque is set. - Page 127
Dentsply Sirona 4 Operation Operating Instructions Intego 4.5 Dentist element 4.5.11.1.4 Setting the speed When the Endo function is switched on, the EasyPad display can be toggled between torque and speed to set the speed. To differentiate between torque and speed settings, the display shows burr drive calibrated/not calibrated and AutoReverse function on/off only for the torque. - Page 128
4 Operation Dentsply Sirona 4.5 Dentist element Operating Instructions Intego 4.5.11.1.5 Switching AutoReverse ON/OFF If the auto-reverse function is switched on, the burr drive automatically switches to counterclockwise rotation when the torque set is reached. If the foot pedal is pressed again, the burr drive switches back to clockwise rotation. -
Page 129: The Endo Function On The Easytouch
Dentsply Sirona 4 Operation Operating Instructions Intego 4.5 Dentist element 4.5.11.2 The Endo function on the EasyTouch 4.5.11.2.1 Switching Endo function on/off Switching on the Endo function The Endo function is assigned to the burr drive removed from the holder.
- Page 130
4 Operation Dentsply Sirona 4.5 Dentist element Operating Instructions Intego ü The electric motor assigned to the Endo function is removed. ü The Endodontics program is displayed on the touchscreen. 1.00 Endo 3 1. Press the Sub-dialog fixed key. Ä The Endodontics sub-dialog is displayed. - Page 131
This includes a measurement of motor current at different speeds to assess the properties of the system. CAUTION To ensure proper calibration, use only Dentsply Sirona instruments. ü The Endodontics dialog or the Endodontics sub-dialog is displayed on the touchscreen. - Page 132
4 Operation Dentsply Sirona 4.5 Dentist element Operating Instructions Intego 4.5.11.2.3 Changing direction of rotation The direction of rotation can be changed only with the motor stopped. Counterclockwise rotation is performed without torque limitation. The torque setting keys are hidden when counterclockwise rotation is selected. - Page 133
Dentsply Sirona 4 Operation Operating Instructions Intego 4.5 Dentist element ü The Endodontics sub-dialog is displayed on the touchscreen. ü The working step with which the speed and torque are to be changed is selected. ➢ Use the – and + keys to set the speed and torque of the contra- angle handpiece. - Page 134
4 Operation Dentsply Sirona 4.5 Dentist element Operating Instructions Intego In the Endodontics screen, a reciprocal symbol is displayed in the top left of the screen when the reciprocal function is activated. 4.5.11.2.7 Switch instrument light on/off The instrument light of the motor can be use when the Endo function is activated if the treatment center is equipped with the Comfort EasyTouch user interface. - Page 135
Dentsply Sirona 4 Operation Operating Instructions Intego 4.5 Dentist element 4.5.11.2.8 Using the ApexLocator ü The treatment center is prepared for apex measurements using the instrument, see section «Preparing to use the ApexLocator» [→ 113]. ü The Endodontics dialog or Endodontics sub-dialog is displayed on Stop the touchscreen. - Page 136
4 Operation Dentsply Sirona 4.5 Dentist element Operating Instructions Intego 2. Use the – and + keys to set the required apex distance from 1.5 to 0. If the distance is 0, the motor does not stop until it reaches the physiological apex. - Page 137
Dentsply Sirona 4 Operation Operating Instructions Intego 4.5 Dentist element ➢ Press the Apex distance acoustic signals key. Ä If the key is highlighted orange, the apex distance acoustic Apex Dist signal is activated. 4.5.11.2.13 Saving settings In the Endodontics sub-dialog, working step-specific settings such as changed speed and torque values … -
Page 138: Sirosonic L Scaler
CAUTION Ultrasonic tips from other manufacturers do not guarantee safe operation. ➢ Use only ultrasonic tips from Dentsply Sirona. 4.5.12.2 Setting the intensity on the EasyPad Intensities are saved on the favorite keys 1, 2, and 3, which can be accessed by pressing them.
- Page 139
Dentsply Sirona 4 Operation Operating Instructions Intego 4.5 Dentist element Changing the intensity ➢ Press and hold the favorite key 1 or 3 (> 1 s). Setup Ä The intensity is increased or reduced. The intensity can also be increased or reduced by moving the 4-way switch plate of the C+ electronic foot control up or down. - Page 140
4 Operation Dentsply Sirona 4.5 Dentist element Operating Instructions Intego 1. Press the Endo / Purge key. Purge Ä The endodontics intensity (Endo mode) is displayed instead of ultrasonic intensity (ultrasonic mode). 2. Use favorite keys 1 and 3 to set the desired endodontics intensity (En 1 to En 5). -
Page 141: Setting The Intensity On The Easytouch
Dentsply Sirona 4 Operation Operating Instructions Intego 4.5 Dentist element 4.5.12.3 Setting the intensity on the EasyTouch Intensities are saved on the three favorite keys that can be accessed by pressing them. Individual intensities can be saved on the favorite keys for each user profile.
- Page 142
4 Operation Dentsply Sirona 4.5 Dentist element Operating Instructions Intego Switching on the Endo mode The intensity of the endodontics function is limited for safety reasons, e.g., in order to prevent broken needles. IMPORTANT Endo intensity values The intensity can be adjusted from 1e to 5e. Please note that the endodontics intensity values of 1e to 5e do not match the values of 1 to 5 in the scaler mode. -
Page 143: Cavitron Scaler
CAUTION Ultrasonic tips from other manufacturers do not guarantee safe operation. ➢ Use only ultrasonic tips from Dentsply Sirona. CAUTION The Cavitron device must not be used on patients if the incoming treatment water is warmer than 25 °C / 77 °F The spray water in the handpiece can heat up further due to ultrasonic vibrations.
-
Page 144: Setting The Intensity On The Easypad
4 Operation Dentsply Sirona 4.5 Dentist element Operating Instructions Intego 4.5.13.3 Setting the intensity on the EasyPad Intensities are saved on the favorite keys 1, 2, and 3, which can be accessed by pressing them. Individual intensities can be saved on the favorite keys for each user profile.
-
Page 145: Setting The Intensity On The Easytouch
Dentsply Sirona 4 Operation Operating Instructions Intego 4.5 Dentist element While the intensity flashes on the EasyPad display, pressing the Counterclockwise rotation / user profile key will interrupt saving to a favorite key. 4.5.13.4 Setting the intensity on the EasyTouch Intensities are saved on the three favorite keys that can be accessed by pressing them.
-
Page 146: Mini Led Curing Light
4 Operation Dentsply Sirona 4.5 Dentist element Operating Instructions Intego 4.5.14 Mini LED curing light The function is described in the chapter on the assistant element, see «Mini LED curing light» [→ 155]. 4.5.15 SiroCam F/AF/AF+ intraoral camera Functionality is described in the «Sivision digital video system» section, see «SiroCam F / AF / AF+ …
-
Page 147: Timer Function
Dentsply Sirona 4 Operation Operating Instructions Intego 4.5 Dentist element 4.5.16 Timer function 4.5.16.1 Timer function on the EasyPad The Fn function key is assigned to the timer function. Presetting the timer A set time can be counted down to zero with the timer function.
- Page 148
4 Operation Dentsply Sirona 4.5 Dentist element Operating Instructions Intego Starting the timer ➢ Press the Timer key on the touchscreen briefly. Ä The preset timer is started immediately. The set and elapsed 10:45:03 time are displayed on the left side of the touchscreen. -
Page 149: Assistant Element
Dentsply Sirona 4 Operation Operating Instructions Intego 4.6 Assistant element Assistant element 4.6.1 Maximum load capacity Compact assistant element The Compact assistant element has no tray. CAUTION To prevent injuries caused by falling objects, never place anything on the support arm of the assistant element.
-
Page 150: Fixed Keys On The Assistant Element
4 Operation Dentsply Sirona 4.6 Assistant element Operating Instructions Intego 4.6.3 Fixed keys on the assistant element The functions assigned to the keys can be switched on/off on the assistant element. The operating contexts or setting screens can be accessed only on the dentist element. To make settings, see «Fixed keys on the dentist element» …
-
Page 151: Flushing The Cuspidor
Dentsply Sirona 4 Operation Operating Instructions Intego 4.6 Assistant element 4.6.3.3 Flushing the cuspidor The flushing function can be used for rough cleaning of the cuspidor during treatment. ➢ Press the Flushing fixed key. Ä The flushing function is activated for the preset flushing time.
-
Page 152: Suction Handpieces
4 Operation Dentsply Sirona 4.6 Assistant element Operating Instructions Intego 4.6.4 Suction handpieces The assistant element can be equipped with up to two spray aspirators and one saliva ejector. CAUTION The tip attaches itself to the oral mucosa. The patient’s oral mucosa can be irritated by the vacuum.
- Page 153
Dentsply Sirona 4 Operation Operating Instructions Intego 4.6 Assistant element Interrupting suction flow with the 4-way foot control If the treatment center is equipped with a position selector valve for the suction system, it can be set so suction flow can be interrupted or restarted by moving the 4-way foot control switch at the base of the chair in any direction, on the EasyPad, see «Coupling suction to the 4-… -
Page 154: Standard And Sprayvit E 3-Way Syringe
4 Operation Dentsply Sirona 4.6 Assistant element Operating Instructions Intego 4.6.5 Standard and Sprayvit E 3-way syringe The function is described in the chapter on the assistant element, see «Standard and Sprayvit E 3-way syringe“ [→ 94]. 64 5 7 4 98 D3543…
-
Page 155: Mini Led Curing Light
Dentsply Sirona 4 Operation Operating Instructions Intego 4.6 Assistant element 4.6.6 Mini LED curing light The curing light is used to cure composite material with short-wave light. IMPORTANT Observe the operating instructions Mini L.E.D. of the Satelec Acteon manufacturer. 4.6.6.1…
-
Page 156: Connecting The Mini L.e.d
4 Operation Dentsply Sirona 4.6 Assistant element Operating Instructions Intego 4.6.6.3 Connecting the Mini L.E.D. The Mini L.E.D. is connected to the assistant element in holder 2. 1. Connect the supply cable A to the treatment center. 2. Screw hose coupling B onto the Mini L.E.D. C.
-
Page 157: Operating The Mini Led
Dentsply Sirona 4 Operation Operating Instructions Intego 4.6 Assistant element Pulsed curing mode In the pulsed curing mode, the Mini L.E.D. radiates in 10 consecutive light pulses of 1 s each. There is a 250 ms break between the individual pulses.
-
Page 158: Technical Data
4 Operation Dentsply Sirona 4.6 Assistant element Operating Instructions Intego 4.6.6.6 Technical data General Technical Data on Mini L.E.D. Model: Mini L.E.D. Weight of handpiece without 105 g hose: Dimensions: Dia. 23 m m x 240 m m Current consumption of hand- 5 V DC / 0.65 A…
-
Page 159: Water Unit
The cuspidor on the water unit can be manually swiveled approx. 110 mm toward the patient chair. IMPORTANT Chair movements with cuspidor swiveled in Intego With the cuspidor bowl swiveled in, the chair cannot be moved. This prevents the patient from colliding with the cuspidor. Swing the cuspidor outward before initiating chair movement.
-
Page 160: Tumbler Filling On The Easytouch
4 Operation Dentsply Sirona 4.7 Water unit Operating Instructions Intego Ä The setting focus Filling time flashes. 3. Set the filling time in seconds. Press the left or right arrow on the favorite key field to prolong or shorten the filling time.
-
Page 161: Tumbler Filling With Automatic Sensor Control
Dentsply Sirona 4 Operation Operating Instructions Intego 4.7 Water unit 4.7.2.3 Tumbler filling with automatic sensor control The automatic sensor control is an option on the Comfort water unit and is not available in all countries. With this tumbler filler, the sensor control automatically detects the filling level of the tumbler.
-
Page 162: Flushing The Cuspidor
4 Operation Dentsply Sirona 4.7 Water unit Operating Instructions Intego 4.7.3 Flushing the cuspidor The flushing function can be used for rough cleaning of the cuspidor during treatment. The cuspidor is always flushed using the public drinking water supply. It is not taken from the fresh water bottle or the tank for stand-alone water supply.
-
Page 163: Flushing The Cuspidor On The Easytouch
Dentsply Sirona 4 Operation Operating Instructions Intego 4.7 Water unit 4.7.3.2 Flushing the cuspidor on the EasyTouch Switching flushing on/off ➢ Press the Flushing fixed key. Ä The flushing function is activated for the preset flushing time. Setting the flushing time 1.
-
Page 164: Adjusting The Water Amount For Flushing
4 Operation Dentsply Sirona 4.7 Water unit Operating Instructions Intego 4.7.3.3 Adjusting the water amount for flushing The water quantity and water pressure for flushing can be set using a valve. 1. Open the maintenance flap A on the base of the water unit.
-
Page 165: Stand-Alone Water Supply
(see “Sanitization” [→ 293]). The stand-alone water supply functionality of the Intego is only available if the treatment center is equipped with a fresh water bottle. The Intego Pro treatment center must be equipped with the integrated water disinfection system.
-
Page 166: Water Supply For The Intego
The fresh water bottle is treated with compressed air when it is screwed into the holder. Unsuitable bottles such as beverage bottles can burst. ➢ Use only Dentsply Sirona fresh water bottles! ➢ Please also observe the general safety instructions (see “Fresh water bottle” [→ 19] section).
- Page 167
Dentsply Sirona 4 Operation Operating Instructions Intego 4.7 Water unit 1. For the water supply from the fresh water bottle, turn the lever clockwise to the bottle symbol. For operation with the public drinking water supply, turn the lever counterclockwise to the faucet symbol. -
Page 168: Water Supply For The Intego Pro
4.7 Water unit Operating Instructions Intego 4.7.4.2 Water supply for the Intego pro In the Comfort and Ambidextrous water units, the stand-alone water supply should be set only as a temporary operating state if the public drinking water is contaminated and not as a permanent operating state.
- Page 169
Dentsply Sirona 4 Operation Operating Instructions Intego 4.7 Water unit 3. A «1» flashes in the selection focus. The treatment center should be switched to stand-alone water supply. 4. Confirm your selection by pressing the favorite key 2 / Setup . - Page 170
4 Operation Dentsply Sirona 4.7 Water unit Operating Instructions Intego IMPORTANT 400 ml are approximately sufficient for: ➢ 6.5 min. spray operation (motor, high-speed handpiece, scaler) or ➢ 2.5 min. Sprayvit Eoperation or ➢ 5 x tumbler fillings The actual values depend on the instrument types and settings used. - Page 171
Dentsply Sirona 4 Operation Operating Instructions Intego 4.7 Water unit 2. Mix distilled water with the agent for disinfecting the water paths at a ratio of 100:1 (1 liter of water, 10 ml of the disinfectant) and fill this into the disinfectant tank of the water unit. The tank has a capacity of approx. -
Page 172: Converting The Ambidextrous Water Unit For Right And Left-Handed People
4 Operation Dentsply Sirona 4.7 Water unit Operating Instructions Intego 4.7.5 Converting the Ambidextrous water unit for right and left- handed people CAUTION There must be no patient in the chair during conversion. The patient would otherwise collide with treatment center components.
- Page 173
Dentsply Sirona 4 Operation Operating Instructions Intego 4.7 Water unit 3. If an additional holder has been installed on the dentist element: turn the additional holder inwards. 4. If armrests have been installed on the treatment center: fold the armrests downwards. - Page 174
4 Operation Dentsply Sirona 4.7 Water unit Operating Instructions Intego 6. Move the dentist element right to the top. 7. Swivel the dentist element so that it is positioned closely in the grip area of the light support bar. 8. Position the operating light above the dentist element. The joint of the support arm must now point towards the head rest. - Page 175
Dentsply Sirona 4 Operation Operating Instructions Intego 4.7 Water unit 9. If a Comfort assistant element is present; swivel the Comfort assistant element to the water unit underneath the cuspidor bowl. Turn the water unit CAUTION The water unit is now guided with a rotary motion to the opposite side of the treatment center. - Page 176
4 Operation Dentsply Sirona 4.7 Water unit Operating Instructions Intego 1. Press the foot pedal and move the water unit slightly upwards. Ä The patient chair will move automatically into a position in which the water unit can be rotated. An acoustic signal will also be given. - Page 177
Dentsply Sirona 4 Operation Operating Instructions Intego 4.7 Water unit 2. If a tray holder on the dentist element is present: remove the screw by hand and take the tray holder out of the dentist element. 3. Install both the tray holder and the additional holder on the other side of the dentist element. -
Page 178: Swiveling Tray Holder
4 Operation Dentsply Sirona 4.8 Swiveling tray holder Operating Instructions Intego Swiveling tray holder Maximum load capacity The TS dentist element can be equipped with a tray. The holder has room for two standard trays. For treatment centers without the Ambidextrous option, the tray is mounted on the left of the assistant element.
-
Page 179: Cup Holder
Dentsply Sirona 4 Operation Operating Instructions Intego 4.9 Cup holder Cup holder A cup holder can be attached to the tray to collect waste. It is suitable for disposable 0.2-liter cups. The cup holder may not be attached to the front edge of the tray.
-
Page 180: X-Ray Image Viewer
4 Operation Dentsply Sirona 4.10 X-ray image viewer Operating Instructions Intego X-ray image viewer 4.10 The TS and CS dentist elements can be equipped with an X-ray viewer. The ON/OFF switch is on the X-ray viewer. It switches off automatically after 10 minutes.
-
Page 181: Operating Light
Dentsply Sirona 4 Operation Operating Instructions Intego 4.11 Operating light Operating light 4.11 The operating light is mounted on a multi-joint support arm. It can be easily adjusted to the operating field using the handles. Brakes in the support arm hold the operating light in the desired position.
-
Page 182: Setting The Ledlight Brightness
4 Operation Dentsply Sirona 4.11 Operating light Operating Instructions Intego ➢ Press the Operating light fixed key on the dentist or assistant element (several times if necessary). Ä The operating light switches to «On», «Composite function» or «Off». At the bottom of the LEDlight Plus and LEDview Plus operating lights, a non-touch sensor is attached.
- Page 183
Dentsply Sirona 4 Operation Operating Instructions Intego 4.11 Operating light 6. Use the left and right arrows on the favorite key pad to adjust the operating distance of the contactless sensor (5 levels). The left Setup arrow key decreases the operating distance, the right arrow key increases it. -
Page 184: X-Ray Tube Unit
Operating Instructions Intego X-ray tube unit 4.12 The Intego and Intego Pro treatment centers can be equipped with the Heliodent Plus X-ray tube unit. No X-ray tube unit is available for treatment centers with the Ambidextrous option. The X-ray tube unit is attached to the light post of the treatment center using a multi-jointed support arm that can be adjusted both horizontally and vertically.
-
Page 185: Sivision Digital Video System
Dentsply Sirona 4 Operation Operating Instructions Intego 4.13 Sivision Digital video system Sivision Digital video system 4.13 The Sivision Digital video system enables intraoral and extraoral images to be made. The SiroCam F / AF / AF+ intraoral camera generates digital image data that can be transmitted via a USB 2.0 port (high- speed universal serial bus) to a connected PC and stored there.
-
Page 186: Sivision Monitor
4 Operation Dentsply Sirona 4.13 Sivision Digital video system Operating Instructions Intego 4.13.1 Sivision monitor 22″ AC Monitor (REF 65 76 248 D3678) The monitor is equipped with loudspeakers. There is an IEC socket on the back of the monitor for the power supply. Please refer to the operating instructions for the 22″…
-
Page 187: Sirocam F/Af/Af+ Intraoral Camera
Dentsply Sirona 4 Operation Operating Instructions Intego 4.13 Sivision Digital video system 4.13.2 SiroCam F/AF/AF+ intraoral camera 4.13.2.1 Safety instructions The SiroCam F / AF / AF+ intraoral camera is a sensitive optical instrument and must therefore always be handled with care.
-
Page 188: Connecting The Sirocam F / Af / Af+ Intraoral Camera
4 Operation Dentsply Sirona 4.13 Sivision Digital video system Operating Instructions Intego 4.13.2.3 Connecting the SiroCam F / AF / AF+ intraoral camera Connecting the intraoral camera to the TS dentist element Depending on the equipment version, the intraoral camera can be placed at instrument position five or in the additional holder.
- Page 189
Dentsply Sirona 4 Operation Operating Instructions Intego 4.13 Sivision Digital video system Connecting the intraoral camera to the assistant element The intraoral camera can be operated at the second instrument position of the assistant element. The camera connection is located underneath the assistant element instead of the connection for the curing light. -
Page 190: Operating Sirocam F / Af / Af+ Intraoral Camera
4 Operation Dentsply Sirona 4.13 Sivision Digital video system Operating Instructions Intego 4.13.2.4 Operating SiroCam F / AF / AF+ intraoral camera An external or internal PC is required in order to display the video images of the SiroCam F / AF / AF+ intraoral camera on the Sivision monitor.
- Page 191
Dentsply Sirona 4 Operation Operating Instructions Intego 4.13 Sivision Digital video system 4.13.2.4.3 Using the camera with SI Video Using SI Video, up to four still images can be generated with the SiroCam F / AF / AF+ intraoral camera. These can be displayed on the Sivision monitor either as a sequence of single images or simultaneously as a quad image. - Page 192
4 Operation Dentsply Sirona 4.13 Sivision Digital video system Operating Instructions Intego ü The intraoral camera must be removed to allow for operation via the foot switch. Purge 1. Press the left button of the C+ electronic foot control. ➢ Press the Endo / Purge key on the EasyPad, on the EasyTouch the Select next quadrant key. - Page 193
Dentsply Sirona 4 Operation Operating Instructions Intego 4.13 Sivision Digital video system 4.13.2.4.4 Using the camera with Sidexis In addition to displaying and processing X-ray images, Sidexis XG and Sidexis 4 can also be used as a video application for the SiroCam F / AF / AF+ intraoral camera. - Page 194
4 Operation Dentsply Sirona 4.13 Sivision Digital video system Operating Instructions Intego Switching the SiroCam F / AF / AF+ intraoral camera on/off ü The PC is in operation and the Sivision Connect or Siucom Plus PC application is started. ➢ Take the SiroCam F / AF / AF+ intraoral camera from the holder. -
Page 195: Technical Camera Data
Dentsply Sirona 4 Operation Operating Instructions Intego 4.13 Sivision Digital video system 4.13.3 Technical camera data General technical data Model: Intraoral camera SiroCam F SiroCam AF SiroCam AF+ Weight of handpiece without cable: approx. 80 g approx. 80 g approx. 85 g Dimensions: diam. 27.5 x 207 mm Operating temperature: +10 to+40 °C…
-
Page 196: Operation With A Pc
For details, please refer to the «Installation and configuration of Siucom Plus / Sivision Connect» manual. CAUTION Integrating the Intego / Intego Pro into an IT network that includes other devices can lead to previously unknown risks. The following changes to the IT network can lead to new risks: •…
-
Page 197: Starting Pc Communication
Dentsply Sirona 4 Operation Operating Instructions Intego 4.14 Operation with a PC The network connection of the treatment center must be configured in the setup program before using the Sivision program, see «Configuring the network connection» [→ 213]. PC applications can be controlled from the treatment center only if they were started via Siucom Plus.
-
Page 198: Communication With The Media Player
4 Operation Dentsply Sirona 4.14 Operation with a PC Operating Instructions Intego 4.14.1.2 Communication with the media player The treatment center has the option of playing back multimedia files stored on the external PC using the Windows Media Player. Audio or video files can be selected from the file system and the Media Player can be controlled from the treatment center.
-
Page 199: Communication With Sidexis
Dentsply Sirona 4 Operation Operating Instructions Intego 4.14 Operation with a PC 4.14.1.4 Communication with Sidexis The Sidexis 4 and Sidexis XG PC applications can display X-ray and intraoral camera images on the Sivision monitor. They can save images taken with the SiroCam F / AF / AF+ intraoral camera in the patient database.
- Page 200
4 Operation Dentsply Sirona 4.14 Operation with a PC Operating Instructions Intego Contrast optimization filter This image filter analyses and optimizes the current grayscale distribution of an image. In this way, for instance, details within a very low-contrast, “faint” image can be made visible. -
Page 201: Communication With Video Plugin
Dentsply Sirona 4 Operation Operating Instructions Intego 4.14 Operation with a PC Cancel/confirm entry Accept an order Accepts an order that was placed and is waiting in Sidexis, e.g. for creating an intraoral image with the X-ray unit of the treatment center or a video recording with the intraoral camera.
-
Page 202: Usb Interfaces
➢ Only type BF medical devices and applied parts according to IEC Type BF 60601-1, e.g., the Dentsply Sirona Xios XG USB module intraoral X-ray system, may be connected to the USB interface. ➢ Do not connect extension cables to the USB interface.
-
Page 203: Configuration Of The Treatment Center (Setup)
Dentsply Sirona 4 Operation Operating Instructions Intego 4.15 Configuration of the treatment center (setup) Configuration of the treatment center (setup) 4.15 Various treatment center functions can be individually configured via the Setup settings. The treatment center can therefore be adapted to match each user’s personal method of treatment.
-
Page 204: Setting The Time And Date
4 Operation Dentsply Sirona 4.15 Configuration of the treatment center (setup) Operating Instructions Intego 4.15.1.2 Setting the time and date Setting the time Time is shown in the format hour.minute. ü The hour setting focus flashes. 1. Use favorite keys 1 and 3 to set the hour.
-
Page 205: Switching The Key Sound On/Off
2. Confirm with the 2 / Setup favorite key. 4.15.1.8 Setting the purging time for the autopurge function The autopurge function is only available on the Intego Pro treatment center. The purging time for the autopurge function can be set between 60 and 180 seconds.
-
Page 206: Adjusting The Cleaning Agent Mixture For Chemical Suction Hose Cleaning
4 Operation Dentsply Sirona 4.15 Configuration of the treatment center (setup) Operating Instructions Intego 4.15.1.9 Adjusting the cleaning agent mixture for chemical suction hose cleaning The chemical suction hose cleaning option is only available for the Intego Pro. The suction system can be automatically cleaned by pumping water into a tank behind the receptacle of the suction hoses and extracting it from there.
-
Page 207: Opening The Service Function
Dentsply Sirona 4 Operation Operating Instructions Intego 4.15 Configuration of the treatment center (setup) latest version of the SIUCOM Plus / Sivision Connect application must be installed on the PC. For details, please refer to the «Installation and configuration of Siucom Plus / Sivision Connect» manual.
-
Page 208: Configuring The Treatment Center On Easytouch
4 Operation Dentsply Sirona 4.15 Configuration of the treatment center (setup) Operating Instructions Intego 4.15.2 Configuring the treatment center on EasyTouch 4.15.2.1 Opening the setup dialogs ü All instruments are in place. The Start dialog is displayed on the 10:45:03 touchscreen.
-
Page 209: Setting The Time And Date
Dentsply Sirona 4 Operation Operating Instructions Intego 4.15 Configuration of the treatment center (setup) 4.15.2.2 Setting the time and date ➢ In the setup dialog touch the key Date and time . Ä The sub-dialog opens. Setting the date The date is displayed in the format day/month/year.
-
Page 210: Configuring Control Options
4 Operation Dentsply Sirona 4.15 Configuration of the treatment center (setup) Operating Instructions Intego 4.15.2.3 Configuring control options Operation of the entire treatment center operation can be configured in this dialog. ➢ Touch the Control options key in the setup program.
- Page 211
Dentsply Sirona 4 Operation Operating Instructions Intego 4.15 Configuration of the treatment center (setup) 4.15.2.3.4 Coupling suction to the 4-way foot switch. If the treatment center is equipped with a position selector valve for the suction system, it can be set so suction flow can be interrupted or restarted by moving the 4-way foot control switch at the base of the chair in any direction. - Page 212
4 Operation Dentsply Sirona 4.15 Configuration of the treatment center (setup) Operating Instructions Intego 4.15.2.3.7 Adjusting the cleaning agent mixture for chemical suction hose cleaning The chemical suction hose cleaning option is only available for the Intego Pro. The suction system can be automatically cleaned by pumping water into a tank behind the receptacle of the suction hoses and extracting it from there. -
Page 213: Configuring The Network Connection
MAC address of the center are shown. Name Call in your data processing specialist for network configuration. Ethernet Network configuration is described in detail in the «Intego / Intego Pro 13-E7-15-31-A3-0C installation instructions». 4.15.2.5 Opening the service function The Service domain is intended to be used only by service engineers.
-
Page 214: Care, Cleaning And Maintenance By The Practice Team
5 Care, cleaning and maintenance by the practice team Dentsply Sirona 5.1 Basics Operating Instructions Intego Care, cleaning and maintenance by the practice team Basics Reprocessing mainly involves the following steps: ● Cleaning ● Disinfection ● Sterilization if possible The treatment center must be reprocessed immediately, or at the latest, one hour after treatment.
- Page 215
Dentsply Sirona 5 Care, cleaning and maintenance by the practice team Operating Instructions Intego 5.1 Basics Sterilize the suction cannula [→ 269] Clean/disinfect surfaces [→ 219] Disinfecting the upholstery [→ 224] Disinfect the user interface [→ 220] Disinfect handles [→ 221] Maintaining and cleaning the operating light (see separate instructions… -
Page 216: Care, Cleaning, And Disinfecting Agents
5 Care, cleaning and maintenance by the practice team Dentsply Sirona 5.1 Basics Operating Instructions Intego For a quick overview of the work involved, see the “Maintenance, cleaning, and disinfection schedule” for the Intego / Intego Pro treatment center. 5.1.2 Care, cleaning, and disinfecting agents NOTE…
-
Page 217: General Handling Instructions
Dentsply Sirona 5 Care, cleaning and maintenance by the practice team Operating Instructions Intego 5.1 Basics 5. Immerse the tester in the filled container for 30 seconds. Ä The cardboard disk with the culture medium will now absorb 1 ml of the water sample.
-
Page 218: Inspection, Maintenance And Testing
5 Care, cleaning and maintenance by the practice team Dentsply Sirona 5.1 Basics Operating Instructions Intego Manual drying No drying is required following wiping with disinfectants since surplus disinfectant evaporates. Surplus water from the cleaning process can be removed with a soft cloth.
-
Page 219: Surfaces
Dentsply Sirona 5 Care, cleaning and maintenance by the practice team Operating Instructions Intego 5.2 Surfaces Surfaces 5.2.1 Clean/disinfect surfaces The surfaces can be disinfected by wiping with surface disinfectants. NOTE Drugs have a chemical reaction with the surface of the unit.
-
Page 220: Disinfect User Interfaces
NOTE Approved care, cleaning, and disinfecting agents Use only care, cleaning, and disinfecting agents that have been approved by Dentsply Sirona, see «Care, cleaning, and disinfecting agents» [→ 216]. Switching off functions on the EasyPad user interface On the EasyPad, this function also protects the treatment center and the Sivision monitor from disturbances from HF fields.
-
Page 221: Sterilize Silicone Mats And Handle Covers
NOTE Approved care, cleaning, and disinfecting agents Use only care, cleaning, and disinfecting agents that have been approved by Dentsply Sirona, see «Care, cleaning, and disinfecting agents» [→ 216]. The dentist element features a removable silicone mat and silicone covers for the handles. A removable silicone mat is available for the Comfort assistant element.
- Page 222
5 Care, cleaning and maintenance by the practice team Dentsply Sirona 5.2 Surfaces Operating Instructions Intego Assistant element The silicone mat of the Comfort assistant element is identical with that of the CS dentist element. 1. Switch the treatment center off and remove the suction hoses and instruments from the holders of the assistant element. -
Page 223: Disinfect The Tray
NOTE Approved care, cleaning, and disinfecting agents Use only care, cleaning, and disinfecting agents that have been approved by Dentsply Sirona, see «Care, cleaning, and disinfecting agents» [→ 216]. 1. Hold the tray tightly. 2. Open the lock by swiveling the lever downwards.
-
Page 224: Care For, Clean, And Disinfect Upholstery
Operating Instructions Intego 5.2.6 Care for, clean, and disinfect upholstery Special care, cleaning, and disinfecting agents are recommended by Dentsply Sirona for the care, cleaning, and disinfection of the upholstery. NOTE Approved care, cleaning, and disinfecting agents Use only agents approved by Dentsply Sirona for the upholstery, see»Care, cleaning, and disinfecting agents» …
-
Page 225: Clean The Foot Switch
Dentsply Sirona 5 Care, cleaning and maintenance by the practice team Operating Instructions Intego 5.2 Surfaces 5.2.8 Clean the foot switch Regular cleaning of the foot control improves its stability. ➢ Clean the bottom plate of the foot control with a moist cloth (water).
-
Page 226: Instruments And Instrument Hoses
● Before starting work ● the used instruments after each patient ● At the end of the work day With the Intego Pro treatment center, it is also possible to automatically purge the water paths, see «Automatically purge water paths (autopurge function)». [→ 232].
-
Page 227: Purge Function On The Easypad
100:1 (1 liter of water, 10 ml of the agent) and fill this into the disinfectant tank of the water unit. For more information, please refer to the section «Self-sufficient water supply with Intego» [→ 166]. Ä When sufficient water has been refilled, the purge program continues.
- Page 228
5 Care, cleaning and maintenance by the practice team Dentsply Sirona 5.3 Instruments and instrument hoses Operating Instructions Intego 1. Remove the instruments to be purged from the holder and hold max. max. them over the cuspidor or over a watertight container with sufficient capacity. -
Page 229: Purging Function On The Easytouch
100:1 (1 liter of water, 10 ml of the disinfectant) and fill this into the disinfectant tank of the water unit. For more information please refer to the section «Water supply for Intego Pro» [→ 168]. Ä When sufficient water has been refilled, the purge program continues.
- Page 230
5 Care, cleaning and maintenance by the practice team Dentsply Sirona 5.3 Instruments and instrument hoses Operating Instructions Intego Setting the purge time and starting the purge function The purge time of the removed instruments can be set between 20 and 120 seconds. - Page 231
Dentsply Sirona 5 Care, cleaning and maintenance by the practice team Operating Instructions Intego 5.3 Instruments and instrument hoses 4. Touch the Stop key to end the purge program. Stop Ä After all instruments have been put back in their holders, the Purge function activated display disappears. -
Page 232: Automatically Purge Water Paths (Autopurge Function)
Operating Instructions Intego 5.3.3 Automatically purge water paths (autopurge function) The AutoPurge function is only available on the Intego Pro treatment center. The autopurge function enables automatic purging of all water-carrying instruments in the dentist element, of the 3-way Sprayvit E syringe in the dentist and assistant elements and of the tumbler filling.
- Page 233
Cleaning adapters for water-carrying instruments are integrated into the Comfort and Ambidextrous (with Intego Pro) water units. These enable all instruments to be purged with water. For this purpose, water-carrying instruments must be inserted into adapters on the water unit. - Page 234
5 Care, cleaning and maintenance by the practice team Dentsply Sirona 5.3 Instruments and instrument hoses Operating Instructions Intego 3. Dentist element side: Insert the couplings of all water-carrying treatment instruments into the adapter in the Comfort water unit (for Sprayvit E: valve lever in up position, locking knob in the down position). - Page 235
Dentsply Sirona 5 Care, cleaning and maintenance by the practice team Operating Instructions Intego 5.3 Instruments and instrument hoses There are now two options for continuing: ● Leave the instruments in the water unit The autopurge function remains activated. The instruments remain in the Comfort water unit and the treatment center can be switched off at the mains. -
Page 236: Autopurge Function On The Easytouch
5 Care, cleaning and maintenance by the practice team Dentsply Sirona 5.3 Instruments and instrument hoses Operating Instructions Intego 5.3.3.2 Autopurge function on the EasyTouch Opening the AutoPurge screen ü All instruments are in their holders. ü The Start dialog is displayed on the touchscreen.
- Page 237
Sprayvit E: valve lever in the up position, locking knob in the down position). Also for Intego Pro CS: Move the swivel arm of the instruments to be purged into the operating position so the weight of the instrument hoses keeps them in this position. - Page 238
5 Care, cleaning and maintenance by the practice team Dentsply Sirona 5.3 Instruments and instrument hoses Operating Instructions Intego IMPORTANT Pinching of the instrument hoses Be careful not to pinch the instrument hoses when inserting the instruments. With treatment centers with the Ambidextrous option: convert the water unit to the left side so that the adapters on the water unit point towards the patient chair, see «Converting the Ambidextrous water… - Page 239
Dentsply Sirona 5 Care, cleaning and maintenance by the practice team Operating Instructions Intego 5.3 Instruments and instrument hoses Ä When all of the instruments have been put in the holders, the Purge function activated display disappears. The Start program is shown. -
Page 240: Purging Water Paths Manually
Operating Instructions Intego 5.3.4 Purging water paths manually With the Intego treatment center, the purge and sanitize function is optional. If this function is not available, purging of the water paths must be carried out manually. The water-carrying instruments of the dentist element, the 3-way syringe of the dentist and assistant element and the tumbler filling must be purged.
- Page 241
Dentsply Sirona 5 Care, cleaning and maintenance by the practice team Operating Instructions Intego 5.3 Instruments and instrument hoses 5. Activate the spray. Toggle the switch on the pneumatic foot switch to the right. Activate the left key on the C+ electronic foot control. -
Page 242: Lubricate, Disinfect/Sterilize The Treatment Instruments
5 Care, cleaning and maintenance by the practice team Dentsply Sirona 5.3 Instruments and instrument hoses Operating Instructions Intego 5.3.5 Lubricate, disinfect/sterilize the treatment instruments 5.3.5.1 Treatment instruments with separate instructions for use The procedures required for the following treatment instruments are described in the following separate instructions for use: ●…
-
Page 243: Lubricate, Disinfect/Sterilize Sprayvit E 3-Way Syringe
NOTE Approved care, cleaning, and disinfecting agents Use only care, cleaning, and disinfecting agents that have been approved by Dentsply Sirona, see «Care, cleaning, and disinfecting agents» [→ 216]! All disinfectants must be approved in your country and have proven bactericidal, fungicidal and virucidal properties. Use only disinfectants with no protein-fixing properties.
- Page 244
5.3 Instruments and instrument hoses Operating Instructions Intego Automated cleaning and disinfecting We recommend using the Dentsply Sirona DAC Universal for automated cleaning and disinfection (inside and outside) of the nozzles. For further details, please refer to the instructions for use supplied with the unit. - Page 245
Dentsply Sirona 5 Care, cleaning and maintenance by the practice team Operating Instructions Intego 5.3 Instruments and instrument hoses Manual cleaning and disinfection Manual reprocessing is possible in exceptional cases if the national/ local regulations are followed. The national/local regulations are to be checked before. -
Page 246: Disinfecting/Sterilizing Motors And Adapters
NOTE Approved care, cleaning, and disinfecting agents Use only care, cleaning, and disinfecting agents that have been approved by Dentsply Sirona, see «Care, cleaning, and disinfecting agents» [→ 216]! Use disinfectants and other agents that contain no corrosive components such as chloride.
- Page 247
Apply the following steps for the adapter only. NOTE Do not clean the motors automatically. We recommend using Dentsply Sirona DAC Universal for automated cleaning, disinfection, and care. For further details, please refer to the instructions for use supplied with the unit. - Page 248
5 Care, cleaning and maintenance by the practice team Dentsply Sirona 5.3 Instruments and instrument hoses Operating Instructions Intego Ä For further reprocessing, the adapter should be dry and free of residue. 3. If necessary, pack the adapter in packaging suitable for sterilization and storage, e.g., soft packaging (paper/film) or a container in… - Page 249
2. Store all motors/adapters so that they are protected from contamination. 3. Sterilize again once the storage period has elapsed. Sterilize regularly and have the motors serviced after approx. 2 years in a workshop authorized by Dentsply Sirona. 64 5 7 4 98 D3543 D3543.201.01.08.02 02.2020… -
Page 250: Clean And Disinfect/Sterilize The Components Of The Apexlocator
NOTE Approved care, cleaning, and disinfecting agents Use only care, cleaning, and disinfecting agents that have been approved by Dentsply Sirona, see «Care, cleaning, and disinfecting agents» [→ 216]. ➢ Disconnect the mucosal electrode from the connection cable. The metal hook and the connection cable can be sterilized.
-
Page 251: Cleaning, Disinfecting/Sterilizing The Cavitron Scaler
NOTE Approved care, cleaning, and disinfecting agents Use only care, cleaning, and disinfecting agents that have been approved by Dentsply Sirona, see «Care, cleaning, and disinfecting agents» [→ 216]. 1. Remove the connection cable of the Mini L.E.D. by turning the 134°C 274°F…
-
Page 252: Cleaning/Disinfecting The Sirocam F / Af / Af+ Intraoral Camera
It can be wipe disinfected. NOTE Approved care, cleaning, and disinfecting agents Use only care, cleaning, and disinfecting agents that have been approved by Dentsply Sirona, see «Care, cleaning, and disinfecting agents» [→ 216]. NOTE The lens window is sensitive to scratches.
-
Page 253: Maintaining Treatment Instruments
4. Insert the O-ring. Do not use any sharp objects. 5. Repeat steps 3-4. 6. Screw ring A tightly onto the nozzle. Protect O-rings regularly 1. Soak a Q-tip in Dentsply Sirona’s T1 spray. 2. Wipe the housing at the separating joint with the Q-tip. 5.3.6.1.2 Replacing lamps CAUTION The lamp can be hot.
-
Page 254: Maintaining The Motors
A LED is built into the BL E and BL ISO E motor. This LED is designed for the service life of the motor and may be replaced only by Dentsply Sirona or a service technician trained by Dentsply Sirona. Safe operation is no longer guaranteed in case of improper replacement.
- Page 255
Dentsply Sirona 5 Care, cleaning and maintenance by the practice team Operating Instructions Intego 5.3 Instruments and instrument hoses 1. Remove the defective O-rings. 2. Insert the O-rings one after another. Start with the first groove. 3. Lightly oil the O-ring with T1 Spray. -
Page 256: Change The Cotton Wool Roll On The Turbine Hose And Oil Collector
5 Care, cleaning and maintenance by the practice team Dentsply Sirona 5.3 Instruments and instrument hoses Operating Instructions Intego 5.3.7 Change the cotton wool roll on the turbine hose and oil collector At the unit end of the high-speed handpiece hose, return air leaks out along with a small amount of high-speed handpiece oil.
- Page 257
Dentsply Sirona 5 Care, cleaning and maintenance by the practice team Operating Instructions Intego 5.3 Instruments and instrument hoses Oil collector The CS dentist element is also equipped with an oil collector. It is located below the instrument connections and collects any liquids that leak out. -
Page 258: Vacuum System
5 Care, cleaning and maintenance by the practice team Dentsply Sirona 5.4 Vacuum system Operating Instructions Intego Vacuum system 5.4.1 Purge the vacuum system. If the treatment center is equipped with the suction hose cleaning option, proceed according to the instruction in section «Cleaning the suction hoses»…
- Page 259
Dentsply Sirona 5 Care, cleaning and maintenance by the practice team Operating Instructions Intego 5.4 Vacuum system 3. Attach the open suction handpiece to the receptacle. 4. Press the button. Ä Water is pumped into the suction hose cleaning container and suctioned out of the suction hoses. -
Page 260: Suction Hose Cleaning On The Comfort Water Unit
5 Care, cleaning and maintenance by the practice team Dentsply Sirona 5.4 Vacuum system Operating Instructions Intego 5.4.2.2 Suction hose cleaning on the Comfort water unit The Comfort water unit is always equipped with an adapter for the suction hose cleaning function. This can be used to purge the suction hoses consecutively.
- Page 261
➢ Do not fill the agent for disinfecting the water paths into the cleaning agent tank for chemical suction hose cleaning! Use only 1d 41d «Agents for the suction lines» approved by Dentsply Sirona, see «Care, cleaning, and disinfecting agents» [→ 216]. Amalg… -
Page 262: Suction Hose Cleaning On The Ambidextrous Water Unit
Ambidextrous water unit is optional. Chemical suction hose cleaning for the Intego treatment center is not available. If the Intego treatment center is not equipped with the suction hose cleaning option, a large glass of cold, clear water must be regularly aspirated instead, see «Purging the suction system» …
- Page 263
5 Care, cleaning and maintenance by the practice team Operating Instructions Intego 5.4 Vacuum system Refill cleaning agent (for the Intego Pro with chemical suction hose cleaning option) When the adjacent display appears on the EasyPad display or in the status column of the touchscreen, the cleaning agent for cleaning the suction system is almost finished. -
Page 264: Central Supply For Chemical Suction Hose Cleaning
5.4.2.4 Central supply for chemical suction hose cleaning For clinical use, Intego / Intego Pro treatment centers can be equipped with a central cleaning agent supply for chemical suction hose cleaning. The CDS 60 system of Dürr Dental is intended for this purpose.
-
Page 265: Cleaning Vacuum System Using Cleaning Adapter In The Cuspidor Or Via External Container
NOTE Approved care, cleaning, and disinfecting agents Use only care, cleaning, and disinfecting agents that have been approved by Dentsply Sirona, see «Care, cleaning, and disinfecting agents» [→ 216]. NOTE Domestic cleaning agents foam up. Foaming cleaning agents often cause foam and water to be sucked into the dry suction system.
-
Page 266: Cleaning Vacuum System Using Cleaning Adapter In The Cuspidor
5 Care, cleaning and maintenance by the practice team Dentsply Sirona 5.4 Vacuum system Operating Instructions Intego 5.4.3.1 Cleaning vacuum system using cleaning adapter in the cuspidor Preparation for cleaning 1. Prepare 1 liter of cleaning solution in a separate container according to the manufacturer’s instructions and mix it thoroughly.
- Page 267
Dentsply Sirona 5 Care, cleaning and maintenance by the practice team Operating Instructions Intego 5.4 Vacuum system Cleaning procedure 1. Pour 1 liter of cleaning solution into the cuspidor. 2. Remove the suction hoses from their holders and attach them to the side of the cleaning adapter as simultaneously as possible. -
Page 268: Cleaning The Suction System Via External Container
5 Care, cleaning and maintenance by the practice team Dentsply Sirona 5.4 Vacuum system Operating Instructions Intego 5.4.3.2 Cleaning the suction system via external container If the treatment center is not equipped with a cuspidor, the suction system must be cleaned via external container.
-
Page 269: Sterilizing/Disinfecting And Lubricating The Suction Handpieces
Rubber materials such as O-rings are corroded by unsuitable lubricants. ➢ Never use petroleum jelly or similar lubricants. ➢ Use only lubricants approved by Dentsply Sirona. 1. Detach the handpiece of the spray aspirator and the saliva ejector from the suction hoses.
-
Page 270: Empty The Central Suction Sieve
5 Care, cleaning and maintenance by the practice team Dentsply Sirona 5.4 Vacuum system Operating Instructions Intego 5.4.5 Empty the central suction sieve. Depending on the options, there is a central suction sieve in the Compact water unit or Comfort assistant element to retain solid materials (e.g.
-
Page 271: Cleaning And Disinfecting The Suction Hoses
Dentsply Sirona 5 Care, cleaning and maintenance by the practice team Operating Instructions Intego 5.4 Vacuum system Emptying the central suction sieve in the Comfort assistant element 1. Open the cover on the suction sieve on the assistant element and remove it.
-
Page 272: Components Of The Water Unit
5 Care, cleaning and maintenance by the practice team Dentsply Sirona 5.5 Components of the water unit Operating Instructions Intego Components of the water unit 5.5.1 Clean the gold trap The gold trap retains larger solid particles to prevent them from being washed down the drain in the cuspidor bowl.
-
Page 273: Clean/Disinfect The Cuspidor
This can cause damage to the suction machine. ➢ Use only care, cleaning, and disinfecting agents approved by Dentsply Sirona, see»Care, cleaning, and disinfecting agents» [→ 216]. The cuspidor bowl is attached to the water unit via a bayonet catch and can be removed for thorough cleaning.
-
Page 274: Cleaning The Outlet Lines Of The Cuspidor
Use the same agent as for the suction lines. NOTE Approved care, cleaning, and disinfecting agents Use only care, cleaning, and disinfecting agents that have been approved by Dentsply Sirona, see «Care, cleaning, and disinfecting agents» [→ 216]. NOTE Domestic cleaning agents foam up.
- Page 275
Dentsply Sirona 5 Care, cleaning and maintenance by the practice team Operating Instructions Intego 5.5 Components of the water unit 2. Fill the cuspidor with the cleaning solution and leave it to take effect. Observe the reaction time specified for the cleaning solution by the manufacturer. -
Page 276: Filling With Agent For Disinfecting The Water Paths
5 Care, cleaning and maintenance by the practice team Dentsply Sirona 5.5 Components of the water unit Operating Instructions Intego 5.5.4 Filling with agent for disinfecting the water paths The Comfort and Ambidextrous water units can be optionally equipped with a disinfection system. In normal operation, this will automatically inoculate the water that will come into contact with the patient (also called treatment water) with an agent to disinfect the water paths.
- Page 277
NOTE Approved care, cleaning, and disinfecting agents Use only the agent for disinfecting the water paths that has been approved by Dentsply Sirona for the disinfection system; see «Care, cleaning, and disinfecting agents» [→ 216]. 64 5 7 4 98 D3543… -
Page 278: Change The Water And Air Filters
5 Care, cleaning and maintenance by the practice team Dentsply Sirona 5.5 Components of the water unit Operating Instructions Intego 5.5.5 Change the water and air filters If you notice any changes in media flows, check the water and air filters for permeability.
- Page 279
Dentsply Sirona 5 Care, cleaning and maintenance by the practice team Operating Instructions Intego 5.5 Components of the water unit 5. Put the sealD back on the filter E. Then insert both into the screw cap B, C as shown. -
Page 280: Change The Amalgam Rotor
5 Care, cleaning and maintenance by the practice team Dentsply Sirona 5.5 Components of the water unit Operating Instructions Intego 5.5.6 Change the amalgam rotor Amalgam residues and other solid particles are trapped in the amalgam rotor according to the centrifugal principle.
- Page 281
6. Place the container in the special packaging and ship it for disposal or authorize a certified waste management company. Installing the amalgam rotor Use only original Dentsply Sirona accessories. Never use a used or recycled amalgam rotor. To reorder the amalgam rotor, see «Spare parts and consumables» … - Page 282
5 Care, cleaning and maintenance by the practice team Dentsply Sirona 5.5 Components of the water unit Operating Instructions Intego 3. Hold the lower part of the amalgam separator B so that the latching noses of the bayonet catch are positioned transverse to the water unit. -
Page 283: Check The Message System Of The Amalgam Separator
Dentsply Sirona 5 Care, cleaning and maintenance by the practice team Operating Instructions Intego 5.5 Components of the water unit 5.5.7 Check the message system of the amalgam separator An electronic control monitors the function of the amalgam separator. SIt detects any mechanical blocking or failure of the drive motor. The error is indicated by the Amalg display on the user interface and by an acoustic signal.
- Page 284
5 Care, cleaning and maintenance by the practice team Dentsply Sirona 5.5 Components of the water unit Operating Instructions Intego Testing the message system on the EasyTouch ü All instruments are in place. The Start dialog is displayed on the 10:45:03 touchscreen. -
Page 285: Empty The Sediment Container
Dentsply Sirona 5 Care, cleaning and maintenance by the practice team Operating Instructions Intego 5.5 Components of the water unit Press the Back key to exit the service dialog. 5.5.8 Empty the sediment container In addition to other solid particles, a large proportion of the amalgam residues are trapped in the sediment container by gravitational force.
- Page 286
5 Care, cleaning and maintenance by the practice team Dentsply Sirona 5.5 Components of the water unit Operating Instructions Intego 1. Open the flap A on the base of the water unit. 2. Loosen the bayonet catch by turning the sediment container B counterclockwise. - Page 287
Dentsply Sirona 5 Care, cleaning and maintenance by the practice team Operating Instructions Intego 5.5 Components of the water unit 2. Hold the sediment container B so that the latching noses of the bayonet catch are positioned transverse to the water unit. Rotate the sediment container B clockwise. -
Page 288: Cleaning The Filter Insert Of The Wet Suction Device With Cuspidor Valve
5 Care, cleaning and maintenance by the practice team Dentsply Sirona 5.5 Components of the water unit Operating Instructions Intego 5.5.9 Cleaning the filter insert of the wet suction device with cuspidor valve The automatic separator and amalgam separator / sediment container or air jet pump are not installed in the water unit for standard wet suction.
- Page 289
Dentsply Sirona 5 Care, cleaning and maintenance by the practice team Operating Instructions Intego 5.5 Components of the water unit 1. Open the flap A on the base of the water unit. 2. Allow the remaining water to be extracted completely. Press button B on the standard wet suction. - Page 290
5 Care, cleaning and maintenance by the practice team Dentsply Sirona 5.5 Components of the water unit Operating Instructions Intego 6. Reinsert the filter insert in the filter housing. Rotate the filter insert C clockwise. 7. Close the flap A. -
Page 291: Emptying The Collector Of The Air Jet Pump
Dentsply Sirona 5 Care, cleaning and maintenance by the practice team Operating Instructions Intego 5.5 Components of the water unit 5.5.10 Emptying the collector of the air jet pump The air jet pump (Air Venturi) is an option available for the Compact water unit.
- Page 292
5 Care, cleaning and maintenance by the practice team Dentsply Sirona 5.5 Components of the water unit Operating Instructions Intego 3. Pour the excess water out of the container and collect the amalgam residue. Dispose of it properly with the amalgam residue collected from the cuspidor and central sieve, see «Cleaning the gold trap» … -
Page 293: Sanitizing
Sanitizing with the Intego Pro With the Intego Pro, the water paths can only be sanitized if the Comfort or Ambidextrous water unit is equipped with an integrated water disinfection system. Operation with a stand-alone water supply is also possible only with a disinfection system.
-
Page 294: Sanitizing With The Fresh Water Bottle
Turn the lever clockwise to the bottle symbol, For more information, please refer to the section Water supply for Intego» [→ 166]. 64 5 7 4 98 D3543…
-
Page 295: Sanitizing On The Easypad
Dentsply Sirona 5 Care, cleaning and maintenance by the practice team Operating Instructions Intego 5.6 Sanitizing 5. Unscrew the fresh water bottle from the holder on the water unit and empty the fresh water bottle completely. 6. Fill the fresh water bottle with approx. 0.4 to 0.5 liters of the undiluted agent for disinfecting the water paths.
- Page 296
5 Care, cleaning and maintenance by the practice team Dentsply Sirona 5.6 Sanitizing Operating Instructions Intego 4. Afterward, return the instrument to the instrument holder. 5. Repeat the procedure for all other instruments. NOTE Splashes of undiluted disinfectant for sanitizing the water paths can result in discoloration of surfaces if left for too long. - Page 297
Dentsply Sirona 5 Care, cleaning and maintenance by the practice team Operating Instructions Intego 5.6 Sanitizing 1. Hold the 3-way syringe over the cuspidor or over a watertight container with sufficient capacity and press the water key for at least 15 seconds. -
Page 298: Sanitizing On The Easytouch
5 Care, cleaning and maintenance by the practice team Dentsply Sirona 5.6 Sanitizing Operating Instructions Intego 5.6.1.2 Sanitizing on the EasyTouch Opening the sanitization dialog via the touchscreen ü All instruments are in their holders. ü The Start dialog is displayed on the touchscreen.
- Page 299
Dentsply Sirona 5 Care, cleaning and maintenance by the practice team Operating Instructions Intego 5.6 Sanitizing 2. Remove a single instrument from holder and hold it over the max. cuspidor or over a watertight container with sufficient capacity. For the CS dentist element, move the swivel arm of the instrument into the working position. - Page 300
5 Care, cleaning and maintenance by the practice team Dentsply Sirona 5.6 Sanitizing Operating Instructions Intego ü The tumbler filler was automatically flushed with water. 1. Hold the 3-way syringe over the cuspidor or over a watertight container with sufficient capacity and press the water key for at least 15 seconds. -
Page 301: Sanitizing With Disinfection System
Dentsply Sirona 5 Care, cleaning and maintenance by the practice team Operating Instructions Intego 5.6 Sanitizing 5.6.2 Sanitizing with disinfection system Sanitizing, that is the disinfection of the treatment water paths can be performed by using the disinfection system. During this sanitation, the…
-
Page 302: Sanitizing On The Easypad
5 Care, cleaning and maintenance by the practice team Dentsply Sirona 5.6 Sanitizing Operating Instructions Intego 5.6.2.1 Sanitizing on the EasyPad Displaying the sanitizing operating context ü All instruments are in their holders. 1. Press the fixed key Endo / Purge .
- Page 303
Dentsply Sirona 5 Care, cleaning and maintenance by the practice team Operating Instructions Intego 5.6 Sanitizing Inserting instruments into the cleaning adapters of the water unit The Comfort water unit has integrated cleaning adapters for water- carrying instruments. This allows all instruments to be simultaneously treated with a high concentration of sanitation solution and then rinsed with water. - Page 304
5 Care, cleaning and maintenance by the practice team Dentsply Sirona 5.6 Sanitizing Operating Instructions Intego IMPORTANT Pinching of the instrument hoses Be careful not to pinch the instrument hoses when inserting the instruments. With treatment centers with the Ambidextrous option: convert the water unit to the left side so that the adapters on the water unit point towards the patient chair, see «Converting the Ambidextrous water… - Page 305
Dentsply Sirona 5 Care, cleaning and maintenance by the practice team Operating Instructions Intego 5.6 Sanitizing Allow 24 hours reaction time In order to effectively combat bacteria, you must let the disinfectant for the water paths react for at least 24 hours and not longer than 3 days (maximum sanitization time). - Page 306
5 Care, cleaning and maintenance by the practice team Dentsply Sirona 5.6 Sanitizing Operating Instructions Intego Returning instruments to their holders After the water paths have been rinsed, the instruments can be removed from the cleaning adapters on the water unit and returned to their holders. -
Page 307: Sanitizing On The Easytouch
Dentsply Sirona 5 Care, cleaning and maintenance by the practice team Operating Instructions Intego 5.6 Sanitizing 5.6.2.2 Sanitizing on the EasyTouch Opening the sanitization dialog via the touchscreen ü All instruments are in their holders. ü The Start dialog is displayed on the touchscreen.
- Page 308
5 Care, cleaning and maintenance by the practice team Dentsply Sirona 5.6 Sanitizing Operating Instructions Intego Start sanitization ➢ Touch the Start key. Start Ä The sanitization process starts. Error message: Filling with agent for disinfecting the water paths If the Disinf display appears after the sanitization process has been… - Page 309
Sprayvit E: valve lever in the up position, locking knob in the down position). Also for Intego Pro CS: Move the swivel arm of the instruments to be purged into the operating position so the weight of the instrument hoses keeps them in this position. - Page 310
5 Care, cleaning and maintenance by the practice team Dentsply Sirona 5.6 Sanitizing Operating Instructions Intego IMPORTANT Pinching of the instrument hoses Be careful not to pinch the instrument hoses when inserting the instruments. With treatment centers with the Ambidextrous option: convert the water unit to the left side so that the adapters on the water unit point towards the patient chair, see «Converting the Ambidextrous water… - Page 311
Dentsply Sirona 5 Care, cleaning and maintenance by the practice team Operating Instructions Intego 5.6 Sanitizing Sanitizing phase 3 — Treating the water paths with the agent for disinfecting the water paths The water is pumped out of the water tank of the water unit using the tumbler filling function. - Page 312
5 Care, cleaning and maintenance by the practice team Dentsply Sirona 5.6 Sanitizing Operating Instructions Intego Error message: Inserting instruments in the water unit If an instrument is accidentally deposited in its holder during the reaction time, the message Insert instruments into water unit is displayed on the touchscreen after the treatment center is switched on. - Page 313
Dentsply Sirona 5 Care, cleaning and maintenance by the practice team Operating Instructions Intego 5.6 Sanitizing Displays in case of incomplete sanitation The sanitization program detects whether the sanitization of all instruments and the tumbler filling was completed. Errors that occurred during sanitization will be displayed on the touchscreen as follows: ●… -
Page 314: Display Sanitation Report
5 Care, cleaning and maintenance by the practice team Dentsply Sirona 5.6 Sanitizing Operating Instructions Intego 5.6.3 Display sanitation report If the treatment center is equipped with the EasyTouch comfort user interface, sanitation processes with a reaction time of at least 24 hours can also be displayed on the touchscreen.
-
Page 315: Thermally Disinfect The Sanitization Adapter
Dentsply Sirona 5 Care, cleaning and maintenance by the practice team Operating Instructions Intego 5.6 Sanitizing 5.6.4 Thermally disinfect the sanitization adapter With the Comfort water unit and Ambidextrous, the sanitization adapter can be removed from the water unit for cleaning and thermal disinfection.
-
Page 316: Fuse Of The External Device Connection
5 Care, cleaning and maintenance by the practice team Dentsply Sirona 5.7 Fuse of the external device connection Operating Instructions Intego Fuse of the external device connection The inlet connector remains live even when the power switch is turned off. The fuse can nevertheless be changed.
-
Page 317: Maintenance By The Service Engineer
Dentsply Sirona 6 Maintenance by the service engineer Operating Instructions Intego 6.1 Inspection and maintenance Maintenance by the service engineer Inspection and maintenance In order to ensure the operational safety and reliability of your treatment center and to avoid damage due to natural wear, annual inspection and maintenance must be performed on your treatment center.
-
Page 318: Maintenance Manual
6 Maintenance by the service engineer Dentsply Sirona 6.3 Maintenance Manual Operating Instructions Intego Maintenance Manual Keep this Maintenance Manual near your treatment center. Any inspection and maintenance work as well as all safety tests are documented by the service engineer in the Maintenance Manual.
-
Page 319: Malfunctions
Dentsply Sirona 7 Malfunctions Operating Instructions Intego 7.1 Messages on the EasyPad Malfunctions Messages on the EasyPad Errors on the EasyPad display Messages are shown on the EasyPad display, such as: Safety switch triggered [→ 70] Days until next sanitation [→ 293] Days until next maintenance date …
-
Page 320: Messages On The Easytouch
7 Malfunctions Dentsply Sirona 7.2 Messages on the EasyTouch Operating Instructions Intego 1. Press favorite key 3. Ä The next message is displayed. 2. Acknowledge the individual messages by pressing the favorite key 2 / Setup or pressing the favorite key 3 several times until all the Setup messages have been shown.
-
Page 321: Error Messages
“Changing the water and air filters” [→ 278]. Check whether the public drinking water supply has the necessary wa- ter pressure, see the document on Intego / Intego Pro installation re- quirements. Emergency pump opera- Malfunctioning of pump sensors in Inform your service technician.
- Page 322
7 Malfunctions Dentsply Sirona 7.3 Error Messages Operating Instructions Intego Code Anomaly Description Measure Software inconsistency An error must be acknowledged af- Inform your service technician. ter the treatment center is switched on. The functions of the treatment center may be impaired. -
Page 323: Remote Diagnosis
Dentsply Sirona 7 Malfunctions Operating Instructions Intego 7.4 Remote diagnosis Remote diagnosis Functional description With remote diagnosis, you enable the staff of your dental depot or our Customer Service Center, see «Contact data» [→ 11], to connect to the PC of your treatment center. The contents of your PC monitor are then transmitted to the computer of the service specialist and remote access to your PC is enabled.
-
Page 324: Spare Parts And Consumables
Casing, left water path 60 02 187 Keyboard 63 21 728 Small cleaning wires 24 00 232 63 22 007 O-ring set Sprayvit nozzle 41 76 751 1 x attachment tool and 10 x O-rings 5.5×1.03 Dentsply Sirona T1 Spray (6 x 250 ml cans) 59 01 665 64 5 7 4 98 D3543 D3543.201.01.08.02 02.2020…
- Page 325
Dentsply Sirona 8 Spare parts and consumables Operating Instructions Intego BL E motor BL ISO C/E/S sealing washer, green 63 11 240 Basic Apex adapter 59 83 072 ISO adapter 60 00 793 BL ISO E motor BL ISO E motor sleeve 63 49 851 BL ISO C/E/S sealing washer, green 63 11 240… -
Page 326: Disposal
9 Disposal Dentsply Sirona Operating Instructions Intego Disposal In accordance with Directive 2012/19/EU and national disposal regulations regarding old electrical and electronic devices, please be advised that such items must be disposed of in a special way within the European Union (EU). These regulations require the environmentally friendly recycling/disposal of old electrical and electronic devices.
-
Page 327: Overview Of All Function Keys
Dentsply Sirona 10 Overview of all function keys Operating Instructions Intego 10.1 Fixed keys Overview of all function keys The following contains a brief description of the fixed keys on the dentist and assistant elements and the function keys on the touchscreen and to provide the reader with a quick overview of the significance of the symbols on the keys.
- Page 328
10 Overview of all function keys Dentsply Sirona 10.1 Fixed keys Operating Instructions Intego Chair height Counterclockwise rotation / User profile Switches counterclockwise rotation ON/OFF Changes the user profile Switches AutoReverse function ON/OFF when the maximum torque is reached Counterclockwise rotation ON/OFF… - Page 329
Dentsply Sirona 10 Overview of all function keys Operating Instructions Intego 10.1 Fixed keys 10.1.2 Dentist element with EasyTouch Clean key Clean Deactivates the complete user interface of the dentist element. This is used to clean the surface and protect from interference from an external HF surgical device. - Page 330
10 Overview of all function keys Dentsply Sirona 10.2 Start dialog Operating Instructions Intego 10.1.3 Assistant element Chair program S Mouth rinsing position with last-position memory function (programmable) Chair program 0 Entry/exit position (programmable) Tumbler filling On/Off Flushing the cuspidor… - Page 331
Dentsply Sirona 10 Overview of all function keys Operating Instructions Intego 10.3 Start dialog for removed instruments Purging water lines Starts the purge function Purging water paths automatically Auto Starts the autopurge function Sanitization Starts the treatment center sanitation program… - Page 332
10 Overview of all function keys Dentsply Sirona 10.3 Start dialog for removed instruments Operating Instructions Intego Preselecting air coolant For cooling the treatment area with air Setting the automatic motor stop of the ApexLocator Apex Stop Apex When the Apex Stop key is pressed, the – and + keys are displayed. - Page 333
Dentsply Sirona 10 Overview of all function keys Operating Instructions Intego 10.4 Endo function Endo function 10.4 Endo function Activating the Endo function Memory button Saving all settings of the Endo function Calibrating the bur drive A calibration must be performed each time you change or lubricate the contra-angle handpiece. - Page 334
10 Overview of all function keys Dentsply Sirona 10.5 Other dialogs Operating Instructions Intego Apex acoustic signals Switching the apex acoustic signals on/off. If the signal tones are Apex Dist switched on, a beep is issued when the apex or a set motor stop position is reached. - Page 335
Dentsply Sirona 10 Overview of all function keys Operating Instructions Intego 10.5 Other dialogs 10.5.5 Operating light setting program Sensor control for switching the operating light on/off If the key is highlighted orange, the operating light can be switched on/ off or changed to the Composite function by a hand movement. - Page 336
10 Overview of all function keys Dentsply Sirona 10.6 Sivision program Operating Instructions Intego Sivision program 10.6 10.6.1 Media Player Start Media Player M.player M.player Media Player is started on the external PC. The keys corresponding to the Media Player PC application are displayed on the right side of the… - Page 337
Dentsply Sirona 10 Overview of all function keys Operating Instructions Intego 10.6 Sivision program Overview layout The opened image windows are scaled in the display area so that no scroll bars or as few scroll bars as possible must be displayed. The image windows are arranged without overlapping. - Page 338
10 Overview of all function keys Dentsply Sirona 10.6 Sivision program Operating Instructions Intego Filter black dots Single pixel errors may occur when taking digital X-rays. These pixel errors appear as individual black dots when the optimum resolution (100%) is selected. They are removed by Sidexis. - Page 339
Dentsply Sirona 10 Overview of all function keys Operating Instructions Intego 10.6 Sivision program 10.6.5 Video plugin Start the video plugin Sidexis 4 and the video plugin are started on the PC. The fixed keys for the video plugin are displayed on the right side of the touchscreen. - Page 340
10 Overview of all function keys Dentsply Sirona 10.7 Setup program Operating Instructions Intego Setup program 10.7 10.7.1 Date and time Date and time Opens the Date and Time setup program. Date 15 04 14 Time 12/24 hour display 12 h 10.7.2… - Page 341
Dentsply Sirona 10 Overview of all function keys Operating Instructions Intego 10.7 Setup program Focusing the intraoral camera using the foot control If the treatment center is equipped with an autofocus camera and the C + electronic foot control, it can be configured in setup that the camera image can be focused with the foot switch. -
Page 342: Index
Index Dentsply Sirona Operating Instructions Intego Index Armrest, 72 Numeric Articulating headrest, 33, 74 4-way foot switch, 205, 211 Assistant element 4-way foot switch plate, 68 Instrument positions, 48 Maximum load capacity, 149 Access the start program with the foot control, 67 Mini L.E.D., 155, 251 Acoustic signals, 117 Overview, 45…
- Page 343
Dentsply Sirona Index Operating Instructions Intego Chip blower, 66, 67, 89, 91 Sprayvit E, 95 Clean key, 220 Standard 3-way syringe, 94 Cleaning adapter, 266, 309 Dentist element with hanging hoses, 36 Cleaning agent for hose cleaning, 261, 263 Dentist element with whip arms, 37 Coding of motor hoses, 102 Deutscher Verein für Gas und Wasser (DVGW) =… - Page 344
Index Dentsply Sirona Operating Instructions Intego Foot switch Chip blower, 66 Favorite key pad, 68 Chip blower , 67 Favorites keypad, 62 Spray, 66, 88, 90 File clamp, 113 Fresh water bottle, 51, 55, 166 Filter Air and water, 278 Central suction sieve, 270 Gold trap, 272 Gold trap, 272 Guide rollers on the CS dentist element, 86 Standard wet suction, 288… - Page 345
Dentsply Sirona Index Operating Instructions Intego Clockwise/counterclockwise rotation, 68 Cooling medium, 90 Last Position Memory function, 77 Cover, 87 LEDlight Plus, 181 CW/CC rotation, 111 LEDview Plus, 181 Drive motors, 18 Live image, 191, 193 Endo function, 122 Load capacity Holder/positions on assistant element, 48 Assistant element, 149 Holder/positions on the dentist element, 38 Cup holder, 179… - Page 346
Index Dentsply Sirona Operating Instructions Intego Mouth rinsing position S, 67, 76, 150 Mucosal electrode, 113 Reciprocal rotating files, 133 Municipal water, 165 Remote access, 323 Remote diagnosis, 323 RoHS Directive, 23 NaCl, 67 Name of the treatment center in the practice network, 213 Safety checks, 317 Network configuration, 213 Safety instructions, 15 Safety switch, 70… - Page 347
Dentsply Sirona Index Operating Instructions Intego Spray, 67, 88, 91 Transport conditions, 25 Spray aspirator, 152, 205, 269 Tray, 178, 223 Spray water quantity, 93 Tumbler filling, 150, 159 Sprayvit E, 95 Tumbler filling with automatic sensor control, 161 Sprayvit E 3-way syringe, 95 Turbine, 98 Stand-alone water supply, 51, 55 Standard 3-way syringe, 94… - Page 348
Index Dentsply Sirona Operating Instructions Intego White screen on the Sivision monitor, 180, 212 Wireless phones, 20 Work steps for the Endo function, 132 X-ray image viewer, 180, 212 64 5 7 4 98 D3543 D3543.201.01.08.02 02.2020… - Page 350
We reserve the right to make any alterations which may be required due to technical improvements. © Sirona Dental Systems GmbH Sprache: englisch Printed in Germany D3543.201.01.08.02 02.2020 Ä.-Nr.: 128 5 62 Sirona Dental Systems GmbH 64 5 7 4 98 D3543 Fabrikstr.
-
Page 1
02.2020 New as of: Intego / I ntego Pro Intego Ambidextrous Intego Pro Ambidextrous Operating Instructions (not valid for USA) English… -
Page 2: Table Of Contents
Table of Contents Dentsply Sirona Operating Instructions Intego Table of Contents General Information ………………..Dear customer, ………………. Contact information………………General information on the operating Instructions ……..Scope of these operating Instructions…………Other valid documents …………….. Warranty and liability………………Intended use ………………..
-
Page 3
Dentsply Sirona Table of Contents Operating Instructions Intego System overview Intego Pro ……………. System overview Intego / Intego Pro with Ambidextrous option ….Patient chair ………………..Head support ………………..3.7.1 Flat headrest ……………… 3.7.2 Double-jointed head support…………Foot control ………………..3.8.1 Pneumatic foot switch ………….. -
Page 4
Table of Contents Dentsply Sirona Operating Instructions Intego Foot control ………………..4.3.1 Pneumatic foot switch …………..4.3.2 C+ electronic foot switch…………..Patient chair ………………..4.4.1 Safety instructions…………….4.4.2 Safety stop ………………4.4.3 Triggering an immediate movement stop……..4.4.4 Armrests………………4.4.5 Vario footrest……………… -
Page 5
Dentsply Sirona Table of Contents Operating Instructions Intego 4.5.7.5 Attach/remove the housing and nozzle ……4.5.7.6 Applying air, water, or spray ……… 4.5.8 Turbine / air motor / other air-driven instruments……4.5.8.1 Using the highspeed handpiece ……..4.5.8.2 Setting the light of the highspeed handpiece…. -
Page 6
4.7.4 Stand-alone water supply ………….. 165 4.7.4.1 Water supply for the Intego ………. 166 4.7.4.2 Water supply for the Intego pro ……..168 4.7.5 Converting the Ambidextrous water unit for right and left-handed people ……………….. 172 Swiveling tray holder………………178 Cup holder ……………….. -
Page 7
Dentsply Sirona Table of Contents Operating Instructions Intego 4.11 Operating light………………..181 4.11.1 Switching the operating light on/off ……….181 4.11.2 Setting the LEDlight brightness…………182 4.11.3 Setting the brightness, color temperature, and sensor control of the LEDview Plus…………….182 4.12… -
Page 8
Table of Contents Dentsply Sirona Operating Instructions Intego 4.15.2 Configuring the treatment center on EasyTouch ……208 4.15.2.1 Opening the setup dialogs……….208 4.15.2.2 Setting the time and date……….209 4.15.2.3 Configuring control options……….. 210 4.15.2.4 Configuring the network connection ……213 4.15.2.5… -
Page 9
Dentsply Sirona Table of Contents Operating Instructions Intego 5.3.5.5 Clean and disinfect/sterilize the components of the ApexLocator …………..250 5.3.5.6 Cleaning, disinfecting/sterilizing the Cavitron scaler ..251 5.3.5.7 Disinfecting/sterilizing Mini L.E.D. curing light ….251 5.3.5.8 Cleaning/disinfecting the SiroCam F / AF / AF+ intraoral camera………… -
Page 10
Table of Contents Dentsply Sirona Operating Instructions Intego Sanitizing ………………… 293 5.6.1 Sanitizing with the fresh water bottle ……….294 5.6.1.1 Sanitizing on the EasyPad……….295 5.6.1.2 Sanitizing on the EasyTouch ……..298 5.6.2 Sanitizing with disinfection system……….301 5.6.2.1 Sanitizing on the EasyPad………. -
Page 11: General Information
These Operating Instructions are designed to assist you prior to initial use and whenever you require information later on. We wish you a great deal of success and pleasure with Intego / Intego Pro. Your Intego team Contact information…
-
Page 12: General Information On The Operating Instructions
● Intego TS (Compact water unit and dentist element with hanging hoses) ● Intego CS (Compact water unit and dentist element with swivel arms) ● Intego Pro TS (Comfort water unit and dentist element with hanging hoses) ● Intego Pro CS (Comfort water unit and dentist element with swivel arms) The treatment centers can be delivered from the factory with the Ambidextrous option.
-
Page 13: Other Valid Documents
Exclusion of liability In the event that the system owner fails to fulfill its obligation to perform maintenance activities or ignores error messages, Dentsply Sirona or your authorized dealer cannot assume any liability for any damage thus incurred.
-
Page 14: Obligation To Notify Authorities
1 General Information Dentsply Sirona 1.8 Obligation to notify authorities Operating Instructions Intego Obligation to notify authorities In the European Union, the operator or user must report all serious events related to the product to the competent authority of the Member State in which he or she is established.
-
Page 15: Safety Instructions
Dentsply Sirona 2 Safety instructions Operating Instructions Intego 2.1 Identification of the danger levels Safety instructions Identification of the danger levels To prevent personal injury and material damage, please observe the warning and safety information provided in these instructions for use.
-
Page 16: On-Site Installation
Alternatively, for Intego the optional fresh water bottle, or for Intego Pro the empty disinfectant tank can be used as a water container for a self-sufficient water supply. For…
-
Page 17: Maintenance And Repair
It can be connected directly to the public drinking water supply. The Intego treatment center, provided it is equipped with a fresh water bottle not connected to the public drinking water supply, also complies with the requirements of EN 1717 and the DVGW German Gas and Water Association).
-
Page 18: Trouble-Free Operation
No restrictions apply when using salt blasting devices in connection with Dentsply Sirona treatment centers. However, in such cases, make sure that the system is subsequently flushed with an adequate amount of water.
-
Page 19: Ventilation Slots
Use only Dentsply Sirona fresh water bottles, see “Spare parts, consumables” [→ 324]! Compressed air is added to the bottle when it is screwed into the holder. Beverage bottles could burst.
-
Page 20: Modifications And Extensions Of The System
For reasons of product safety, this product may be operated only with original Dentsply Sirona parts or third-party parts expressly approved by Dentsply Sirona. In the event of changes which were not foreseen, Dentsply Sirona is not liable for resulting damages.
-
Page 21: Electrostatic Discharge
Dentsply Sirona 2 Safety instructions Operating Instructions Intego 2.19 Electrostatic discharge Electrostatic discharge 2.19 Protective measures Electrostatic discharge (abbreviated: ESD – ElectroStatic Discharge) Electrostatic discharge from people can damage electronic components when the components are touched. Damaged components usually have to be replaced.
-
Page 22: Dismantling/Installation
2 Safety instructions Dentsply Sirona 2.20 Dismantling/Installation Operating Instructions Intego Tip: 1 nanosecond= 1/1,000,000,000 second= 1 billionth of a second Voltage differentials exceeding 30,000 volts per centimeter may lead to a charge transfer (electrostatic discharge, lightning, spark-over). Integrated circuits (logical circuits and microprocessors) are used in order to implement a wide variety of functions in a device.
-
Page 23: Unit Description
“Connection to the public drinking water supply” [→ 16] Original language of this document: German Intego / Intego Pro bear the CE marking in accordance with the provisions of Council Directive 93/42/EEC of June 14, 1993 concerning medical devices.
-
Page 24: Technical Data
3 Unit description Dentsply Sirona 3.2 Technical data Operating Instructions Intego Technical data Model designation: Intego / Intego Pro Power connection: 100 – 240 V AC ± 10% 50/60 Hz Rated current: 3.3 A – 1.5 A at 100 – 240 V also max. 6 A for external devices…
-
Page 25
Dentsply Sirona 3 Unit description Operating Instructions Intego 3.2 Technical data 1060 Transport and storage con- Temperature: -40°C – +70°C ditions: (-40°F – 158°F) Relative humidity: 10% – 95% Air pressure: 500 hPa – 1060 hPa 1060 Operating conditions: Ambient temperature: 10°C – 40°C (50°F –… -
Page 26: System Overview Intego
Dentsply Sirona 3.3 System overview Intego Operating Instructions Intego System overview Intego The Intego treatment center comprises the following main components: Intego TS treatment center Patient chair Flat headrest (shown here) or double articulating headrest Pneumatic foot switch (shown here) or C+ electronic foot…
-
Page 27
Flat headrest or double articulating headrest (shown here) Pneumatic foot switch or C+ electronic foot switch (shown here) Intego CS dentist element with swivel arms Compact or Comfort (shown here) assistant element Compact water unit Main switch and external device connection (optional) 64 … -
Page 28: System Overview Intego Pro
3 Unit description Dentsply Sirona 3.4 System overview Intego Pro Operating Instructions Intego System overview Intego Pro The Intego Pro treatment center comprises the following main components: Intego Pro TS treatment center Patient chair Flat headrest (shown here) or double articulating headrest…
-
Page 29
Patient chair Flat headrest or double articulating headrest (shown here) Pneumatic foot switch or C+ electronic foot switch (shown here) Intego Pro CS dentist element with swivel arms Comfort assistant element Comfort water unit Main switch and external device connection (optional) 64 … -
Page 30: System Overview Intego / Intego Pro With Ambidextrous Option
Ambidextrous option The Intego and Intego Pro treatment centers with the Ambidextrous option comprise the following main components: Intego TS / Intego Pro TS treatment center with Ambidextrous option Patient chair Flat headrest (shown here) or double articulating headrest Pneumatic foot switch (shown here) or C+ electronic foot control…
-
Page 31
Dentsply Sirona 3 Unit description Operating Instructions Intego 3.5 System overview Intego / Intego Pro with Ambidextrous option Intego CS / Intego Pro CS treatment center with Ambidextrous option Patient chair Flat headrest or double articulating headrest (shown here) Pneumatic foot switch or C+ electronic foot control (shown… -
Page 32: Patient Chair
3 Unit description Dentsply Sirona 3.6 Patient chair Operating Instructions Intego Patient chair The patient chair features a variety of adjustment options to optimally adjust the patient’s position during treatment. Flat headrest (shown here) or double articulating headrest Backrest Seat…
-
Page 33: Head Support
Dentsply Sirona 3 Unit description Operating Instructions Intego 3.7 Head support Head support 3.7.1 Flat headrest The headrest extension can be pulled in or out depending on the patient’s height. For upper jaw treatment, the magnetic head pad can be rotated and used as a neck rest.
-
Page 34: Foot Control
3 Unit description Dentsply Sirona 3.8 Foot control Operating Instructions Intego Foot control 3.8.1 Pneumatic foot switch With a pneumatic foot control, the compressed air valve for activating the highspeed handpieces is integrated into the foot control. The highspeed handpieces are therefore continuously adjustable. For electric motors and the scaler, the foot control is operated as a direct starter (i.e.
-
Page 35: C+ Electronic Foot Switch
Dentsply Sirona 3 Unit description Operating Instructions Intego 3.8 Foot control 3.8.2 C+ electronic foot switch The C+ electronic foot control can be set as a foot control or direct starter for electric motors and the scaler. The compressed air for high- speed handpieces cannot be adjusted.
-
Page 36: Dentist Element
Operating Instructions Intego Dentist element Intego and Intego Pro can be equipped with a TS dentist element (with hanging hoses) or a CS dentist element (with whip arms). All functions of the treatment center can be controlled via the control panel on the dentist element.
-
Page 37: Cs Dentist Element With Swivel Arms
Dentsply Sirona 3 Unit description Operating Instructions Intego 3.9 Dentist element 3.9.2 CS dentist element with swivel arms On the CS dentist element, instruments are placed on the instrument holder horizontally and facing downwards. The instrument hoses are placed above the dentist element over the whip arms.
-
Page 38: Instrument Positions
• SiroCam AF+ The Standard 3-way syringe is only available for Intego. The Intego / Intego Pro treatment centers can be fitted with a maximum of two motors. A maximum of one scaler and one intraoral camera can be connected.
-
Page 39: Standard Easypad User Interface
Dentsply Sirona 3 Unit description Operating Instructions Intego 3.9 Dentist element 3.9.4 Standard EasyPad user interface EasyPad display Status displays Fixed keys (membrane keyboard) Favorite key pad (membrane keyboard) 3.9.4.1 EasyPad display and status displays EasyPad display For indicating speed, intensity, and torque and for configuring and servicing the treatment center.
-
Page 40
3 Unit description Dentsply Sirona 3.9 Dentist element Operating Instructions Intego Pressing the tumbler filling key (> 2 s) displays the setting text for coupling the tumbler filling to mouth rinsing position S and filling time, see «Tumbler filling on the EasyPad» [→ 159]. -
Page 41
Dentsply Sirona 3 Unit description Operating Instructions Intego 3.9 Dentist element Endo / Purge With the motor removed: switching the Endo function on/off, see Purge «Switching Endo function on/off» [→ 123] With the ultrasonic handpiece removed: switching the Endo mode on/off (limiting power), see «Setting the intensity on the EasyPad» … -
Page 42: Comfort Easytouch User Interface
Dentsply Sirona 3.9 Dentist element Operating Instructions Intego 3.9.5 Comfort EasyTouch user interface The EasyTouch option is available for the Intego and Intego Pro treatment centers. Touchscreen (pressure-sensitive user interface) Fixed keys (membrane keyboard) 64 5 7 4 98 D3543…
-
Page 43: Touch Screen
Dentsply Sirona 3 Unit description Operating Instructions Intego 3.9 Dentist element 3.9.5.1 Touch screen The touchscreen displays virtual function keys according to the program selected. A list of all function keys is provided in the Appendix of this document, see «Overview of all function keys» [→ 327].
-
Page 44: Fixed Keys Of The Easytouch User Interface
3 Unit description Dentsply Sirona 3.9 Dentist element Operating Instructions Intego 3.9.5.2 Fixed keys of the EasyTouch user interface Clean key Clean Pressing this key deactivates the complete user interface of the dentist element. Pressing it again > 3 s reactivates the user interface.
-
Page 45: Assistant Element
The Intego treatment center and Intego Pro with Ambidextrous option can be equipped with the Compact or Comfort assistant element. Intego Pro without the Ambidextrous option is available only with the Comfort assistant element. The user interface on the assistant element is optional.
-
Page 46
3 Unit description Dentsply Sirona 3.10 Assistant element Operating Instructions Intego Support arm and rotary joint Central suction sieve under the removable cuspidor bowl Comfort assistant element with treatment centers without Ambidextrous option The Comfort assistant element is attached to the base of the patient chair by a support arm. -
Page 47
Dentsply Sirona 3 Unit description Operating Instructions Intego 3.10 Assistant element Comfort assistant element with treatment centers with Ambidextrous option The Comfort assistant element is attached to the water unit with a support arm. It can be positioned so that the instruments can be reached by the dentist if he/she is performing treatment on his/her own. -
Page 48: Instrument Positions
• SiroCam F • SiroCam AF • SiroCam AF+ The Standard 3-way syringe is only available for Intego. A mini LED curing light, an intraoral camera or an additional spray aspirator can be connected to the treatment center. Changes to holder 2 can only be made by your service engineer.
-
Page 49: User Interface
Dentsply Sirona 3 Unit description Operating Instructions Intego 3.10 Assistant element 3.10.2 User interface 3.10.3 Fixed keys on the assistant element Chair program S Mouth rinsing position with last-position memory function (programmable), seeProgramming chair positions» [→ 80] Chair program 0 Entry/exit position (programmable)
-
Page 50: Water Unit
The Compact water unit can be operated with an air jet pump (Air Venturi) instead of a suction device. The heater for the treatment water is in the water unit. For the Intego, the water heater is optional.
-
Page 51: Compact Water Unit
Dentsply Sirona 3 Unit description Operating Instructions Intego 3.11 Water unit 3.11.1 Compact water unit The Compact water unit is available only without a disinfection system. However, it can be equipped with a fresh water bottle for stand-alone water supply. Switching between the fresh water bottle and public drinking water supply is another equipment option.
-
Page 52: Comfort Water Unit
3 Unit description Dentsply Sirona 3.11 Water unit Operating Instructions Intego 3.11.2 Comfort water unit The water unit can be optionally equipped with a disinfection system. In normal operation, this will automatically inoculate the water that will come into contact with the patient (also called treatment water) with an agent to disinfect the water paths.
-
Page 53
Dentsply Sirona 3 Unit description Operating Instructions Intego 3.11 Water unit Suction hose connection for assistant element Manually swiveling cuspidor (removable) Tumbler filler Cover of the storage tank for the disinfectant used to disinfect the water paths or for the stand-alone water supply Cleaning adaptor for water-carrying instruments of the dentist element for sanitizing and auto purge. -
Page 54: Ambidextrous Water Unit
The amalgam separator and sediment container are removed from underneath with the Ambidextrous water unit. Cleaning adapter for the Sprayvit E and for a suction hose of the assistant element Fresh water bottle (only with the Intego) 64 5 7 4 98 D3543 D3543.201.01.08.02 02.2020…
-
Page 55
Suction hose connection to the Comfort assistant element Ambidextrous water unit with Intego With the Intego, the Ambidextrous water unit is available only without a disinfection system. However, it can be equipped with a fresh water bottle for stand-alone water supply. Switching between the fresh water bottle and public drinking water supply is another equipment option. -
Page 56
3 Unit description Dentsply Sirona 3.11 Water unit Operating Instructions Intego automatically purging the water paths (AutoPurge), and cleaning the suction hoses. To clean the suction system, water is pumped into a tank behind the suction hose intake and suctioned off from there. A cleaning agent is automatically added to the water if the dental treatment center is equipped with the chemical suction hose cleaning option. -
Page 57: External Device Connection
Dentsply Sirona 3 Unit description Operating Instructions Intego 3.12 External device connection External device connection 3.12 External medical accessories can be connected to the external device connection. They must comply with the requirements of IEC 60601-1. NOTE If the treatment center is equipped with a disinfection system or fresh…
-
Page 58
3 Unit description Dentsply Sirona 3.12 External device connection Operating Instructions Intego Print Flow rate Water 2.2 ± 0.2 bar max. 300 ml/min 4.4 ± 0.5 bar max. 50 Nl/min IMPORTANT The removal of media at the external device connection can reduce the performance of integrated consumers, e.g., the filling quantity of… -
Page 59: Operation
«Switch spray on/off» [→ 88] and «Purge water paths» [→ 226]. The Intego Pro has the sanitize function if the water unit is equipped with a disinfection system. For sanitizing, the water-carrying lines are filled with the undiluted disinfectant to disinfect the water paths to reduce the bacterial load in the water paths.
-
Page 60: Switching The Treatment Center On/Off
4 Operation Dentsply Sirona 4.1 Starting up the treatment center Operating Instructions Intego 4.1.2 Switching the treatment center on/off The treatment center has a main switch with integrated fuse on the base of the chair. At the end of the working day, the treatment center should be switched off to save energy and for safety reasons.
-
Page 61: Selecting A User Profile
Dentsply Sirona 4 Operation Operating Instructions Intego 4.1 Starting up the treatment center 4.1.3 Selecting a user profile If your treatment center is equipped with the EasyPad standard user interface, it can manage up to two user profiles. The EasyTouch Comfort user interface can manage up to four user profiles.
-
Page 62: Concept Of The User Interface
4 Operation Dentsply Sirona 4.2 Concept of the user interface Operating Instructions Intego Concept of the user interface 4.2.1 Standard EasyPad user interface EasyPad displays The EasyPad user interface is equipped with seven segment displays. Each display can show five digits or letters. Depending on the operating…
-
Page 63
Dentsply Sirona 4 Operation Operating Instructions Intego 4.2 Concept of the user interface It may not be possible to activate the Endo function. Purge It is not possible to switch between speed and torque display. Clean Calling functions Functions are triggered by the fixed buttons on the user interface. -
Page 64: Comfort Easytouch User Interface
4 Operation Dentsply Sirona 4.2 Concept of the user interface Operating Instructions Intego 4.2.2 Comfort EasyTouch user interface 4.2.2.1 Virtual function keys The touchscreen displays virtual function keys according to the program selected. Required functions can be activated by touching the function keys with your finger.
-
Page 65: Status Column
Dentsply Sirona 4 Operation Operating Instructions Intego 4.2 Concept of the user interface Settings screens In many cases, functions not only can be switched on or off, but also 10:45:03 can be set. If a function key is pressed and held (> 2 s), the corresponding settings screen appears.
-
Page 66: Foot Control
4 Operation Dentsply Sirona 4.3 Foot control Operating Instructions Intego Foot control The treatment center can be operated with a pneumatic foot switch or the C+ electronic foot switch. 4.3.1 Pneumatic foot switch When the instrument is removed from the holder, the speed or intensity are automatically displayed on the EasyPad.
-
Page 67: C+ Electronic Foot Switch
Dentsply Sirona 4 Operation Operating Instructions Intego 4.3 Foot control 4.3.2 C+ electronic foot switch The C+ electronic foot control operating elements are assigned different functions depending on whether the instruments are all in place or an instrument is removed from its holder.
-
Page 68
4 Operation Dentsply Sirona 4.3 Foot control Operating Instructions Intego 4-way switch plate ü All instruments are in their holders. ➢ Move the 4-way foot switch plate to the left or right. Ä Left: Chair program 1 is started. Right: Chair program 2 is started. -
Page 69: Patient Chair
Dentsply Sirona 4 Operation Operating Instructions Intego 4.4 Patient chair Patient chair 4.4.1 Safety instructions CAUTION ü û The free space under the patient couch and up to the water unit can be decreased due to chair movements. Parts of the patient’s or user’s body may be pinched or crushed.
-
Page 70: Safety Stop
4 Operation Dentsply Sirona 4.4 Patient chair Operating Instructions Intego 4.4.2 Safety stop The treatment center is equipped with various safety stops to prevent crushing and damage. The cutoff trigger points are shown in the following illustration: Display of triggered safety switch 2 on the EasyPad…
-
Page 71: Triggering An Immediate Movement Stop
Dentsply Sirona 4 Operation Operating Instructions Intego 4.4 Patient chair 4.4.3 Triggering an immediate movement stop You can stop the movement of the chair to a programmed position as follows: ➢ Touch one of the patient chair keys on the EasyPad or EasyTouch.
-
Page 72: Armrests
4 Operation Dentsply Sirona 4.4 Patient chair Operating Instructions Intego 4.4.4 Armrests Armrests are available for the patient chair. The right armrest can be swiveled forward to facilitate getting in and out of the chair. In treatment centers with the Ambidextrous option, both armrests can be swiveled.
-
Page 73: Adjusting The Flat Headrest
Dentsply Sirona 4 Operation Operating Instructions Intego 4.4 Patient chair 4.4.6 Adjusting the flat headrest The headrest extension can be pulled in or out manually depending on the patient’s height. ➢ Pull the headrest out of the backrest or push it back in at the recessed grip A.
-
Page 74: Adjusting The Double Articulating Headrest
4 Operation Dentsply Sirona 4.4 Patient chair Operating Instructions Intego 4.4.7 Adjusting the double articulating headrest The double articulating headrest is equipped with two rotary joints. They facilitate manual adjustment of head inclination for maxillary/mandibular treatments. The headrest extension can be pushed in or pulled out manually to adjust it to the height of the patient.
-
Page 75: Moving The Patient Chair Via Chair Programs
IMPORTANT Chair movements with cuspidor swiveled in Intego With the cuspidor bowl swiveled in, the chair cannot be moved. This prevents the patient from colliding with the cuspidor. Swing the cuspidor outward before initiating chair movement.
-
Page 76: Moving The Patient Chair To The Mouth Rinsing Position
4 Operation Dentsply Sirona 4.4 Patient chair Operating Instructions Intego Via the assistant element ➢ Press the 0 key on the assistant element briefly (< 2 s). 4.4.8.2 Moving the patient chair to the mouth rinsing position The following functions are factory preset to be activated in the mouth rinsing position: ●…
-
Page 77: Using The Last Position Memory Function
Dentsply Sirona 4 Operation Operating Instructions Intego 4.4 Patient chair 4.4.8.3 Using the last position memory function The last chair position is stored before the patient chair moves to mouth rinsing position S. When mouth rinsing position key S is pressed again, the treatment center returns to the previously set treatment position.
-
Page 78: Moving The Chair Manually
IMPORTANT Chair movements with cuspidor swiveled in Intego With the cuspidor bowl swiveled in, the chair cannot be moved. This prevents the patient from colliding with the cuspidor. Swing the cuspidor outward before initiating chair movement.
-
Page 79: Adjusting The Chair Height
Dentsply Sirona 4 Operation Operating Instructions Intego 4.4 Patient chair 4.4.9.2 Adjusting the chair height Via fixed keys on the EasyPad ➢ Press the Adjust the chair height key. Via the touchscreen on the EasyTouch ü The Start or Instrument program is displayed on the touchscreen.
-
Page 80: Programming Chair Programs
4 Operation Dentsply Sirona 4.4 Patient chair Operating Instructions Intego 4.4.10 Programming chair programs The four chair programs preset in the factory: ● Mouth rinsing position S ● Entry/exit position 0 ● 1 and 2 can be individually programmed for both user profiles (A and B) on the EasyPad and each of the four user profiles (A to D) on the EasyTouch.
-
Page 81: Dentist Element
Dentsply Sirona 4 Operation Operating Instructions Intego 4.5 Dentist element Dentist element 4.5.1 Maximum load capacity TS dentist element The maximum load on the TS dentist element without a tray holder is 1 kg (2.2 lbs). The maximum load on the TS dentist element with a tray holder is 2 kg (4.4 lbs).
-
Page 82: Positioning The Dentist Element
4 Operation Dentsply Sirona 4.5 Dentist element Operating Instructions Intego 4.5.2 Positioning the dentist element WARNING The dentist element could be positioned within the movement range of the patient chair. Moving the patient chair may cause the patient to collide with the dentist element or its support arm.
-
Page 83
Dentsply Sirona 4 Operation Operating Instructions Intego 4.5 Dentist element Positioning the CS dentist element (standard position) In the standard position, the support arm of the CS dentist element is attached to the right mount of the Compact water unit and to the rear mount of the Comfort water unit. -
Page 84
4 Operation Dentsply Sirona 4.5 Dentist element Operating Instructions Intego Positioning the CS dentist element (special position) Alternatively, the support arm of the CS dentist element can be attached to the left mount on the Compact water unit (special position) and with the Comfort water unit to the front mount. -
Page 85: Fixed Keys On The Dentist Element
Dentsply Sirona 4 Operation Operating Instructions Intego 4.5 Dentist element 4.5.3 Fixed keys on the dentist element An overview of the fixed keys on the EasyPad and EasyTouch can be found in the Description of Device, see «EasyPad standard user interface» …
-
Page 86: Placing The Instruments In Their Holders
4 Operation Dentsply Sirona 4.5 Dentist element Operating Instructions Intego 4.5.4 Placing the instruments in their holders Automatic opening of instrument dialogs On the EasyPad, the speed or intensity is shown automatically on the display depending on which instrument is removed from the holder. On the EasyTouch, the respective instrument program appears on the touchscreen.
-
Page 87
Dentsply Sirona 4 Operation Operating Instructions Intego 4.5 Dentist element Cover for TS dentist element A cover can be purchased as an accessory for an instrument holder which is not used. Insert the cover into an unassigned instrument holder. This prevents accidental deposit of an instrument in this holder. -
Page 88: General Instrument Functions
4 Operation Dentsply Sirona 4.5 Dentist element Operating Instructions Intego 4.5.5 General instrument functions EasyPad Settings for the coolant, instrument light, and foot switch can be made for the instrument removed from the holder. EasyTouch Settings for the coolant, instrument light, and foot switch can be made in the sub-screen of the instrument removed from the holder.
-
Page 89
Dentsply Sirona 4 Operation Operating Instructions Intego 4.5 Dentist element Ä When the status display Spray lights up on the EasyPad, spray is switched on when the instrument is activated. Activation of the spray is saved on the favorite keys, see section «Setting the speed on the EasyPad» … -
Page 90: Instrument Functions On The Easytouch
4 Operation Dentsply Sirona 4.5 Dentist element Operating Instructions Intego 4.5.5.2 Instrument functions on the EasyTouch 4.5.5.2.1 Opening the sub-screen ü An instrument is removed from the holder. ü The Instrument program of the removed instrument is displayed on the touchscreen.
-
Page 91
Dentsply Sirona 4 Operation Operating Instructions Intego 4.5 Dentist element 4.5.5.2.3 Preset and switch coolant on/off by the C+ electronic foot switch. Selecting a coolant Air or spray can be preselected as the instrument coolant in the sub- dialog. The preselected coolant can be switched on/off via the left button on the C+ electronic foot control. -
Page 92
4 Operation Dentsply Sirona 4.5 Dentist element Operating Instructions Intego 4.5.5.2.5 Switch instrument light on/off ü The sub-screen of the removed motor is displayed on the touchscreen . ➢ Switch the instrument light on or off. Ä If the key is highlighted orange, the instrument light can be activated using the foot pedal. -
Page 93: Saving Instrument Settings
Dentsply Sirona 4 Operation Operating Instructions Intego 4.5 Dentist element 4.5.5.3 Saving instrument settings DropMode When placing an instrument back in the holder, the instrument settings made are always saved in the user profile (DropMode). The next time the instrument is removed, the last settings made are available again.
-
Page 94: Standard 3-Way Syringe
The standard 3-way syringe is used to clean the treatment areas and blow them dry. It provides the media with air and prewarmed water. The heater for the treatment water is in the water unit. The water heater is optional on the Intego. 4.5.6.1 Safety instructions WARNING The nozzle of the Standard 3-way syringe must lock into the holder.
-
Page 95: Sprayvit E 3-Way Syringe
The Sprayvit E 3-way syringe is used for dental treatment with air and water. The Sprayvit E 3-way syringe is also used to illuminate the preparation field. The heater for the treatment water is in the water unit. The water heater is optional on the Intego. 4.5.7.1 Structure Media lever…
-
Page 96: Safety Instructions
4 Operation Dentsply Sirona 4.5 Dentist element Operating Instructions Intego 4.5.7.3 Safety instructions WARNING A small metal tube protrudes at the tip of the nozzle. Risk of injury and contamination! ➢ Avoid contact with the tip of the nozzle. Do not attempt to handle with the nozzle attached.
-
Page 97: Connecting The Instrument Hose
Dentsply Sirona 4 Operation Operating Instructions Intego 4.5 Dentist element 4.5.7.4 Connecting the instrument hose CAUTION There may be exposed voltage! Risk of electric shock! ➢ Do not operate the media lever when the housing is removed! 1. Attach the valve body A to the supply hose, observing the various tube diameters.
-
Page 98: Turbine / Air Motor / Other Air-Driven Instruments
Setting the light of the highspeed handpiece The instrument light supply is optional in Intego. Halogen lamps cannot be operated with the Intego / Intego Pro treatment centers. The voltage or current can be limited for the LED lamp of the highspeed handpiece.
-
Page 99
Dentsply Sirona 4 Operation Operating Instructions Intego 4.5 Dentist element 4.5.8.2.1 Setting the highspeed handpiece lamp on the EasyPad Accessing the turbine light operating context 1. Detach the turbine to be set from the holder. 2. Press and hold the function key 2 / Setup (> 2 s). -
Page 100
4 Operation Dentsply Sirona 4.5 Dentist element Operating Instructions Intego 3. Use favorite keys 1 and 3 to set the current (A) for the lamp in the handpiece removed in amperes (0.12 A = 120 mA). Setup 4. Confirm the setting by pressing the function key 2 / Setup . -
Page 101
Dentsply Sirona 4 Operation Operating Instructions Intego 4.5 Dentist element 4.5.8.2.2 Setting the highspeed handpiece light on the EasyTouch 1. Detach the turbine to be set from the holder. 2. Press the Sub-dialog fixed key. Ä The Highspeed handpiece sub-dialog is displayed on the touchscreen. -
Page 102: Motor
(without carbon brushes). They are characterized by their precise controllability and durability. The speed range of the motors for Intego / Intego Pro is between 1,200 and 40,000 rpm. If the treatment center features the eControl option, the motor can be down-regulated to 100 rpm.
-
Page 103: Product Labeling
Dentsply Sirona 4 Operation Operating Instructions Intego 4.5 Dentist element BL ISO E motor Handpiece holder O-ring 8.4 x 0.7 Product labeling ISO E motor sleeve Coupling connection (green / 3 guide lugs) The BL ISO E motor is equipped with an ISO coupling. T1 Line handpieces, for example, can thus be used without an adapter.
-
Page 104: Safety Instructions
4 Operation Dentsply Sirona 4.5 Dentist element Operating Instructions Intego Adapter for BL E motor ISO adapter Basic Apex adapter Light function Spray function Apex measurement function — Handpiece holder – ISO 3964 4.5.9.4 Safety instructions WARNING The magnetic field of the electric motor is strengthened when the motor is switched on.
-
Page 105: Connecting The Instrument Hose
Dentsply Sirona 4 Operation Operating Instructions Intego 4.5 Dentist element 4.5.9.5 Connecting the instrument hose ü Colored marks and position of guide lugs on motor and hose coupling of the instrument hose match. 1. Slide back the cap nut at the hose coupling.
-
Page 106: Adjusting The Cooling Spray
4 Operation Dentsply Sirona 4.5 Dentist element Operating Instructions Intego 4.5.9.7 Adjusting the cooling spray The BL ISO E motor is equipped with a control ring for cooling water. With the BL E motor, the amount of water can be set via the water controller on the dentist element, see «Setting the amount of spray water» …
-
Page 107: Setting The Speed On The Easypad
Dentsply Sirona 4 Operation Operating Instructions Intego 4.5 Dentist element 4.5.9.8 Setting the speed on the EasyPad Speeds are stored on the favorite keys 1, 2, and 3 that can be accessed by pressing them. Individual speeds can be saved for each user profile on the favorite keys.
-
Page 108
4 Operation Dentsply Sirona 4.5 Dentist element Operating Instructions Intego Saving the speed ü The desired speed is set. ü Via the C+ electronic foot switch: The spray is switched on or off (will be saved). 1. Press and hold the favorite key 2 / Setup (> 2 s). -
Page 109: Setting The Speed On The Easytouch
Dentsply Sirona 4 Operation Operating Instructions Intego 4.5 Dentist element 4.5.9.9 Setting the speed on the EasyTouch Speeds are saved on the three favorite keys that can be accessed by pressing them. Individual speeds can be saved for each user profile on the favorite keys.
-
Page 110
4 Operation Dentsply Sirona 4.5 Dentist element Operating Instructions Intego Saving the speed ü The desired speed is set. ü Via the C+ electronic foot switch: The spray is switched on or off (will be saved). 1. Press and hold the middle favorite Set (> 2 s). -
Page 111: Setting The Direction Of Rotation
Dentsply Sirona 4 Operation Operating Instructions Intego 4.5 Dentist element 4.5.9.10 Setting the direction of rotation The direction of rotation can be changed only when the motor is at a standstill. Tip: After starting the electric motor with the foot switch, an audible warning signal sounds 6 times if counterclockwise rotation is activated.
-
Page 112: Apexlocator
4 Operation Dentsply Sirona 4.5 Dentist element Operating Instructions Intego 4.5.10 ApexLocator The ApexLocator is available only with the EasyTouch Comfort user interface. The ApexLocator can be used to measure the working length of the root canal file in endodontic treatments using electrical impedance.
-
Page 113: Preparing To Use The Apexlocator
Dentsply Sirona 4 Operation Operating Instructions Intego 4.5 Dentist element 4.5.10.1 Preparing to use the ApexLocator Apex adapter, mucosal electrode and file clamp The mucosal electrode and the file clamp are connected to the socket of the dentist element using the apex adapter. The socket is located on the left and to the rear, below the dentist element.
-
Page 114
Dentsply Sirona 4.5 Dentist element Operating Instructions Intego For endodontic treatments with the ApexLocator, the Dentsply Sirona Endo 6:1 (SN 6407 and above / July 2010) or Endo 6 L contra-angle handpieces are required for the Endo function. When using the ApexLocator in the motor program (without Endo function), the Dentsply Sirona SiroNiTi Apex contra-angle handpiece is required. -
Page 115: Distance Display
Dentsply Sirona 4 Operation Operating Instructions Intego 4.5 Dentist element 4.5.10.2 Distance display The measured root canal depth is shown in the distance display on the touchscreen. A bar with 11 display levels shows the distance from the root canal file to the physiological apex (apical constriction). The root canal is divided into four colored sections in the distance display.
-
Page 116
4 Operation Dentsply Sirona 4.5 Dentist element Operating Instructions Intego Green region The tip of the root canal file has reached the physiological apex. Red region The tip of the root canal file has pierced the physiological apex. The instrument overshoot is displayed. -
Page 117: Beeps
Dentsply Sirona 4 Operation Operating Instructions Intego 4.5 Dentist element 4.5.10.3 Beeps In addition to the graphical distance display on the touchscreen, the position of the file in the root canal can also be indicated as an acoustic signal. Apex acoustic signals The ApexLocator always plays the following acoustic signals: ●…
-
Page 118: Performing Manual Measurements With The File Clamp
4 Operation Dentsply Sirona 4.5 Dentist element Operating Instructions Intego 4.5.10.4 Performing manual measurements with the file clamp For an endodontic examination, manual measurements can be made using the file clamp and a root canal file. ü The treatment center is prepared for manual measurements using the file clamp, see section «Preparing to use the ApexLocator» …
-
Page 119: Endodontic Treatment With Apexlocator And Torque Limitation Handpiece
IMPORTANT SiroNiTi Apex Only Dentsply Sirona SiroNiTi Apex must be used to perform apex measurement using a torque-limiting handpiece! The electrical conductivity can be ensured only using this handpiece. The SiroNiTi handpiece can also be used to perform endodontic treatments without the ApexLocator.
-
Page 120
4 Operation Dentsply Sirona 4.5 Dentist element Operating Instructions Intego Ä The set distance is displayed to the left of the – and + keys. The preset motor stop position is displayed in the Motor dialog as a black triangle to the right of the distance display under the text «Stop». -
Page 121
Dentsply Sirona 4 Operation Operating Instructions Intego 4.5 Dentist element 11. Short the electrical measurement system. Plug in the files and hold them directly against the mucosal electrode. This cancels out any inaccuracies caused by jumps in impedance in the measurement setup (standardization). -
Page 122: Endo Function
Fatigued files may break during treatment. ➢ Use files only for the service life specified by the manufacturer. CAUTION Only the Dentsply Sirona Endo 6:1 (SN 6407 and above / July 2010) and Endo 6 L contra-angle handpieces may be used for the Endo function.
-
Page 123: Endo Function On The Easypad
Dentsply Sirona 4 Operation Operating Instructions Intego 4.5 Dentist element 4.5.11.1 Endo function on the EasyPad 4.5.11.1.1 Switching Endo function on/off Switching on the Endo function The Endo function is assigned to the burr drive removed from the holder. ü The desired electric motor for the Endo function is removed from the holder.
-
Page 124
This includes a measurement of motor current at different speeds to assess the properties of the system. CAUTION To ensure proper calibration, use only Dentsply Sirona instruments. ü The Endo function is switched on. The Endo function status display is illuminated. -
Page 125
Dentsply Sirona 4 Operation Operating Instructions Intego 4.5 Dentist element 4.5.11.1.3 Setting the torque With the Endo function switched on, torque and speed of the contra- angle handpiece are indicated, but not of the motor. The control electronics of the burr drive calculate the motor control based on the specified contra-handpiece gear reduction and the set torque and speed. -
Page 126
4 Operation Dentsply Sirona 4.5 Dentist element Operating Instructions Intego The torque can also be increased or reduced by moving the 4-way switch plate of the C+ electronic foot control up or down. Saving torque ü The desired torque is set. -
Page 127
Dentsply Sirona 4 Operation Operating Instructions Intego 4.5 Dentist element 4.5.11.1.4 Setting the speed When the Endo function is switched on, the EasyPad display can be toggled between torque and speed to set the speed. To differentiate between torque and speed settings, the display shows burr drive calibrated/not calibrated and AutoReverse function on/off only for the torque. -
Page 128
4 Operation Dentsply Sirona 4.5 Dentist element Operating Instructions Intego 4.5.11.1.5 Switching AutoReverse ON/OFF If the auto-reverse function is switched on, the burr drive automatically switches to counterclockwise rotation when the torque set is reached. If the foot pedal is pressed again, the burr drive switches back to clockwise rotation. -
Page 129: The Endo Function On The Easytouch
Dentsply Sirona 4 Operation Operating Instructions Intego 4.5 Dentist element 4.5.11.2 The Endo function on the EasyTouch 4.5.11.2.1 Switching Endo function on/off Switching on the Endo function The Endo function is assigned to the burr drive removed from the holder.
-
Page 130
4 Operation Dentsply Sirona 4.5 Dentist element Operating Instructions Intego ü The electric motor assigned to the Endo function is removed. ü The Endodontics program is displayed on the touchscreen. 1.00 Endo 3 1. Press the Sub-dialog fixed key. Ä The Endodontics sub-dialog is displayed. -
Page 131
This includes a measurement of motor current at different speeds to assess the properties of the system. CAUTION To ensure proper calibration, use only Dentsply Sirona instruments. ü The Endodontics dialog or the Endodontics sub-dialog is displayed on the touchscreen. -
Page 132
4 Operation Dentsply Sirona 4.5 Dentist element Operating Instructions Intego 4.5.11.2.3 Changing direction of rotation The direction of rotation can be changed only with the motor stopped. Counterclockwise rotation is performed without torque limitation. The torque setting keys are hidden when counterclockwise rotation is selected. -
Page 133
Dentsply Sirona 4 Operation Operating Instructions Intego 4.5 Dentist element ü The Endodontics sub-dialog is displayed on the touchscreen. ü The working step with which the speed and torque are to be changed is selected. ➢ Use the – and + keys to set the speed and torque of the contra- angle handpiece. -
Page 134
4 Operation Dentsply Sirona 4.5 Dentist element Operating Instructions Intego In the Endodontics screen, a reciprocal symbol is displayed in the top left of the screen when the reciprocal function is activated. 4.5.11.2.7 Switch instrument light on/off The instrument light of the motor can be use when the Endo function is activated if the treatment center is equipped with the Comfort EasyTouch user interface. -
Page 135
Dentsply Sirona 4 Operation Operating Instructions Intego 4.5 Dentist element 4.5.11.2.8 Using the ApexLocator ü The treatment center is prepared for apex measurements using the instrument, see section «Preparing to use the ApexLocator» [→ 113]. ü The Endodontics dialog or Endodontics sub-dialog is displayed on Stop the touchscreen. -
Page 136
4 Operation Dentsply Sirona 4.5 Dentist element Operating Instructions Intego 2. Use the – and + keys to set the required apex distance from 1.5 to 0. If the distance is 0, the motor does not stop until it reaches the physiological apex. -
Page 137
Dentsply Sirona 4 Operation Operating Instructions Intego 4.5 Dentist element ➢ Press the Apex distance acoustic signals key. Ä If the key is highlighted orange, the apex distance acoustic Apex Dist signal is activated. 4.5.11.2.13 Saving settings In the Endodontics sub-dialog, working step-specific settings such as changed speed and torque values … -
Page 138: Sirosonic L Scaler
CAUTION Ultrasonic tips from other manufacturers do not guarantee safe operation. ➢ Use only ultrasonic tips from Dentsply Sirona. 4.5.12.2 Setting the intensity on the EasyPad Intensities are saved on the favorite keys 1, 2, and 3, which can be accessed by pressing them.
-
Page 139
Dentsply Sirona 4 Operation Operating Instructions Intego 4.5 Dentist element Changing the intensity ➢ Press and hold the favorite key 1 or 3 (> 1 s). Setup Ä The intensity is increased or reduced. The intensity can also be increased or reduced by moving the 4-way switch plate of the C+ electronic foot control up or down. -
Page 140
4 Operation Dentsply Sirona 4.5 Dentist element Operating Instructions Intego 1. Press the Endo / Purge key. Purge Ä The endodontics intensity (Endo mode) is displayed instead of ultrasonic intensity (ultrasonic mode). 2. Use favorite keys 1 and 3 to set the desired endodontics intensity (En 1 to En 5). -
Page 141: Setting The Intensity On The Easytouch
Dentsply Sirona 4 Operation Operating Instructions Intego 4.5 Dentist element 4.5.12.3 Setting the intensity on the EasyTouch Intensities are saved on the three favorite keys that can be accessed by pressing them. Individual intensities can be saved on the favorite keys for each user profile.
-
Page 142
4 Operation Dentsply Sirona 4.5 Dentist element Operating Instructions Intego Switching on the Endo mode The intensity of the endodontics function is limited for safety reasons, e.g., in order to prevent broken needles. IMPORTANT Endo intensity values The intensity can be adjusted from 1e to 5e. Please note that the endodontics intensity values of 1e to 5e do not match the values of 1 to 5 in the scaler mode. -
Page 143: Cavitron Scaler
CAUTION Ultrasonic tips from other manufacturers do not guarantee safe operation. ➢ Use only ultrasonic tips from Dentsply Sirona. CAUTION The Cavitron device must not be used on patients if the incoming treatment water is warmer than 25 °C / 77 °F The spray water in the handpiece can heat up further due to ultrasonic vibrations.
-
Page 144: Setting The Intensity On The Easypad
4 Operation Dentsply Sirona 4.5 Dentist element Operating Instructions Intego 4.5.13.3 Setting the intensity on the EasyPad Intensities are saved on the favorite keys 1, 2, and 3, which can be accessed by pressing them. Individual intensities can be saved on the favorite keys for each user profile.
-
Page 145: Setting The Intensity On The Easytouch
Dentsply Sirona 4 Operation Operating Instructions Intego 4.5 Dentist element While the intensity flashes on the EasyPad display, pressing the Counterclockwise rotation / user profile key will interrupt saving to a favorite key. 4.5.13.4 Setting the intensity on the EasyTouch Intensities are saved on the three favorite keys that can be accessed by pressing them.
-
Page 146: Mini Led Curing Light
4 Operation Dentsply Sirona 4.5 Dentist element Operating Instructions Intego 4.5.14 Mini LED curing light The function is described in the chapter on the assistant element, see «Mini LED curing light» [→ 155]. 4.5.15 SiroCam F/AF/AF+ intraoral camera Functionality is described in the «Sivision digital video system» section, see «SiroCam F / AF / AF+ …
-
Page 147: Timer Function
Dentsply Sirona 4 Operation Operating Instructions Intego 4.5 Dentist element 4.5.16 Timer function 4.5.16.1 Timer function on the EasyPad The Fn function key is assigned to the timer function. Presetting the timer A set time can be counted down to zero with the timer function.
-
Page 148
4 Operation Dentsply Sirona 4.5 Dentist element Operating Instructions Intego Starting the timer ➢ Press the Timer key on the touchscreen briefly. Ä The preset timer is started immediately. The set and elapsed 10:45:03 time are displayed on the left side of the touchscreen. -
Page 149: Assistant Element
Dentsply Sirona 4 Operation Operating Instructions Intego 4.6 Assistant element Assistant element 4.6.1 Maximum load capacity Compact assistant element The Compact assistant element has no tray. CAUTION To prevent injuries caused by falling objects, never place anything on the support arm of the assistant element.
-
Page 150: Fixed Keys On The Assistant Element
4 Operation Dentsply Sirona 4.6 Assistant element Operating Instructions Intego 4.6.3 Fixed keys on the assistant element The functions assigned to the keys can be switched on/off on the assistant element. The operating contexts or setting screens can be accessed only on the dentist element. To make settings, see «Fixed keys on the dentist element» …
-
Page 151: Flushing The Cuspidor
Dentsply Sirona 4 Operation Operating Instructions Intego 4.6 Assistant element 4.6.3.3 Flushing the cuspidor The flushing function can be used for rough cleaning of the cuspidor during treatment. ➢ Press the Flushing fixed key. Ä The flushing function is activated for the preset flushing time.
-
Page 152: Suction Handpieces
4 Operation Dentsply Sirona 4.6 Assistant element Operating Instructions Intego 4.6.4 Suction handpieces The assistant element can be equipped with up to two spray aspirators and one saliva ejector. CAUTION The tip attaches itself to the oral mucosa. The patient’s oral mucosa can be irritated by the vacuum.
-
Page 153
Dentsply Sirona 4 Operation Operating Instructions Intego 4.6 Assistant element Interrupting suction flow with the 4-way foot control If the treatment center is equipped with a position selector valve for the suction system, it can be set so suction flow can be interrupted or restarted by moving the 4-way foot control switch at the base of the chair in any direction, on the EasyPad, see «Coupling suction to the 4-… -
Page 154: Standard And Sprayvit E 3-Way Syringe
4 Operation Dentsply Sirona 4.6 Assistant element Operating Instructions Intego 4.6.5 Standard and Sprayvit E 3-way syringe The function is described in the chapter on the assistant element, see «Standard and Sprayvit E 3-way syringe“ [→ 94]. 64 5 7 4 98 D3543…
-
Page 155: Mini Led Curing Light
Dentsply Sirona 4 Operation Operating Instructions Intego 4.6 Assistant element 4.6.6 Mini LED curing light The curing light is used to cure composite material with short-wave light. IMPORTANT Observe the operating instructions Mini L.E.D. of the Satelec Acteon manufacturer. 4.6.6.1…
-
Page 156: Connecting The Mini L.e.d
4 Operation Dentsply Sirona 4.6 Assistant element Operating Instructions Intego 4.6.6.3 Connecting the Mini L.E.D. The Mini L.E.D. is connected to the assistant element in holder 2. 1. Connect the supply cable A to the treatment center. 2. Screw hose coupling B onto the Mini L.E.D. C.
-
Page 157: Operating The Mini Led
Dentsply Sirona 4 Operation Operating Instructions Intego 4.6 Assistant element Pulsed curing mode In the pulsed curing mode, the Mini L.E.D. radiates in 10 consecutive light pulses of 1 s each. There is a 250 ms break between the individual pulses.
-
Page 158: Technical Data
4 Operation Dentsply Sirona 4.6 Assistant element Operating Instructions Intego 4.6.6.6 Technical data General Technical Data on Mini L.E.D. Model: Mini L.E.D. Weight of handpiece without 105 g hose: Dimensions: Dia. 23 m m x 240 m m Current consumption of hand- 5 V DC / 0.65 A…
-
Page 159: Water Unit
The cuspidor on the water unit can be manually swiveled approx. 110 mm toward the patient chair. IMPORTANT Chair movements with cuspidor swiveled in Intego With the cuspidor bowl swiveled in, the chair cannot be moved. This prevents the patient from colliding with the cuspidor. Swing the cuspidor outward before initiating chair movement.
-
Page 160: Tumbler Filling On The Easytouch
4 Operation Dentsply Sirona 4.7 Water unit Operating Instructions Intego Ä The setting focus Filling time flashes. 3. Set the filling time in seconds. Press the left or right arrow on the favorite key field to prolong or shorten the filling time.
-
Page 161: Tumbler Filling With Automatic Sensor Control
Dentsply Sirona 4 Operation Operating Instructions Intego 4.7 Water unit 4.7.2.3 Tumbler filling with automatic sensor control The automatic sensor control is an option on the Comfort water unit and is not available in all countries. With this tumbler filler, the sensor control automatically detects the filling level of the tumbler.
-
Page 162: Flushing The Cuspidor
4 Operation Dentsply Sirona 4.7 Water unit Operating Instructions Intego 4.7.3 Flushing the cuspidor The flushing function can be used for rough cleaning of the cuspidor during treatment. The cuspidor is always flushed using the public drinking water supply. It is not taken from the fresh water bottle or the tank for stand-alone water supply.
-
Page 163: Flushing The Cuspidor On The Easytouch
Dentsply Sirona 4 Operation Operating Instructions Intego 4.7 Water unit 4.7.3.2 Flushing the cuspidor on the EasyTouch Switching flushing on/off ➢ Press the Flushing fixed key. Ä The flushing function is activated for the preset flushing time. Setting the flushing time 1.
-
Page 164: Adjusting The Water Amount For Flushing
4 Operation Dentsply Sirona 4.7 Water unit Operating Instructions Intego 4.7.3.3 Adjusting the water amount for flushing The water quantity and water pressure for flushing can be set using a valve. 1. Open the maintenance flap A on the base of the water unit.
-
Page 165: Stand-Alone Water Supply
(see “Sanitization” [→ 293]). The stand-alone water supply functionality of the Intego is only available if the treatment center is equipped with a fresh water bottle. The Intego Pro treatment center must be equipped with the integrated water disinfection system.
-
Page 166: Water Supply For The Intego
The fresh water bottle is treated with compressed air when it is screwed into the holder. Unsuitable bottles such as beverage bottles can burst. ➢ Use only Dentsply Sirona fresh water bottles! ➢ Please also observe the general safety instructions (see “Fresh water bottle” [→ 19] section).
-
Page 167
Dentsply Sirona 4 Operation Operating Instructions Intego 4.7 Water unit 1. For the water supply from the fresh water bottle, turn the lever clockwise to the bottle symbol. For operation with the public drinking water supply, turn the lever counterclockwise to the faucet symbol. -
Page 168: Water Supply For The Intego Pro
4.7 Water unit Operating Instructions Intego 4.7.4.2 Water supply for the Intego pro In the Comfort and Ambidextrous water units, the stand-alone water supply should be set only as a temporary operating state if the public drinking water is contaminated and not as a permanent operating state.
-
Page 169
Dentsply Sirona 4 Operation Operating Instructions Intego 4.7 Water unit 3. A «1» flashes in the selection focus. The treatment center should be switched to stand-alone water supply. 4. Confirm your selection by pressing the favorite key 2 / Setup . -
Page 170
4 Operation Dentsply Sirona 4.7 Water unit Operating Instructions Intego IMPORTANT 400 ml are approximately sufficient for: ➢ 6.5 min. spray operation (motor, high-speed handpiece, scaler) or ➢ 2.5 min. Sprayvit Eoperation or ➢ 5 x tumbler fillings The actual values depend on the instrument types and settings used. -
Page 171
Dentsply Sirona 4 Operation Operating Instructions Intego 4.7 Water unit 2. Mix distilled water with the agent for disinfecting the water paths at a ratio of 100:1 (1 liter of water, 10 ml of the disinfectant) and fill this into the disinfectant tank of the water unit. The tank has a capacity of approx. -
Page 172: Converting The Ambidextrous Water Unit For Right And Left-Handed People
4 Operation Dentsply Sirona 4.7 Water unit Operating Instructions Intego 4.7.5 Converting the Ambidextrous water unit for right and left- handed people CAUTION There must be no patient in the chair during conversion. The patient would otherwise collide with treatment center components.
-
Page 173
Dentsply Sirona 4 Operation Operating Instructions Intego 4.7 Water unit 3. If an additional holder has been installed on the dentist element: turn the additional holder inwards. 4. If armrests have been installed on the treatment center: fold the armrests downwards. -
Page 174
4 Operation Dentsply Sirona 4.7 Water unit Operating Instructions Intego 6. Move the dentist element right to the top. 7. Swivel the dentist element so that it is positioned closely in the grip area of the light support bar. 8. Position the operating light above the dentist element. The joint of the support arm must now point towards the head rest. -
Page 175
Dentsply Sirona 4 Operation Operating Instructions Intego 4.7 Water unit 9. If a Comfort assistant element is present; swivel the Comfort assistant element to the water unit underneath the cuspidor bowl. Turn the water unit CAUTION The water unit is now guided with a rotary motion to the opposite side of the treatment center. -
Page 176
4 Operation Dentsply Sirona 4.7 Water unit Operating Instructions Intego 1. Press the foot pedal and move the water unit slightly upwards. Ä The patient chair will move automatically into a position in which the water unit can be rotated. An acoustic signal will also be given. -
Page 177
Dentsply Sirona 4 Operation Operating Instructions Intego 4.7 Water unit 2. If a tray holder on the dentist element is present: remove the screw by hand and take the tray holder out of the dentist element. 3. Install both the tray holder and the additional holder on the other side of the dentist element. -
Page 178: Swiveling Tray Holder
4 Operation Dentsply Sirona 4.8 Swiveling tray holder Operating Instructions Intego Swiveling tray holder Maximum load capacity The TS dentist element can be equipped with a tray. The holder has room for two standard trays. For treatment centers without the Ambidextrous option, the tray is mounted on the left of the assistant element.
-
Page 179: Cup Holder
Dentsply Sirona 4 Operation Operating Instructions Intego 4.9 Cup holder Cup holder A cup holder can be attached to the tray to collect waste. It is suitable for disposable 0.2-liter cups. The cup holder may not be attached to the front edge of the tray.
-
Page 180: X-Ray Image Viewer
4 Operation Dentsply Sirona 4.10 X-ray image viewer Operating Instructions Intego X-ray image viewer 4.10 The TS and CS dentist elements can be equipped with an X-ray viewer. The ON/OFF switch is on the X-ray viewer. It switches off automatically after 10 minutes.
-
Page 181: Operating Light
Dentsply Sirona 4 Operation Operating Instructions Intego 4.11 Operating light Operating light 4.11 The operating light is mounted on a multi-joint support arm. It can be easily adjusted to the operating field using the handles. Brakes in the support arm hold the operating light in the desired position.
-
Page 182: Setting The Ledlight Brightness
4 Operation Dentsply Sirona 4.11 Operating light Operating Instructions Intego ➢ Press the Operating light fixed key on the dentist or assistant element (several times if necessary). Ä The operating light switches to «On», «Composite function» or «Off». At the bottom of the LEDlight Plus and LEDview Plus operating lights, a non-touch sensor is attached.
-
Page 183
Dentsply Sirona 4 Operation Operating Instructions Intego 4.11 Operating light 6. Use the left and right arrows on the favorite key pad to adjust the operating distance of the contactless sensor (5 levels). The left Setup arrow key decreases the operating distance, the right arrow key increases it. -
Page 184: X-Ray Tube Unit
Operating Instructions Intego X-ray tube unit 4.12 The Intego and Intego Pro treatment centers can be equipped with the Heliodent Plus X-ray tube unit. No X-ray tube unit is available for treatment centers with the Ambidextrous option. The X-ray tube unit is attached to the light post of the treatment center using a multi-jointed support arm that can be adjusted both horizontally and vertically.
-
Page 185: Sivision Digital Video System
Dentsply Sirona 4 Operation Operating Instructions Intego 4.13 Sivision Digital video system Sivision Digital video system 4.13 The Sivision Digital video system enables intraoral and extraoral images to be made. The SiroCam F / AF / AF+ intraoral camera generates digital image data that can be transmitted via a USB 2.0 port (high- speed universal serial bus) to a connected PC and stored there.
-
Page 186: Sivision Monitor
4 Operation Dentsply Sirona 4.13 Sivision Digital video system Operating Instructions Intego 4.13.1 Sivision monitor 22″ AC Monitor (REF 65 76 248 D3678) The monitor is equipped with loudspeakers. There is an IEC socket on the back of the monitor for the power supply. Please refer to the operating instructions for the 22″…
-
Page 187: Sirocam F/Af/Af+ Intraoral Camera
Dentsply Sirona 4 Operation Operating Instructions Intego 4.13 Sivision Digital video system 4.13.2 SiroCam F/AF/AF+ intraoral camera 4.13.2.1 Safety instructions The SiroCam F / AF / AF+ intraoral camera is a sensitive optical instrument and must therefore always be handled with care.
-
Page 188: Connecting The Sirocam F / Af / Af+ Intraoral Camera
4 Operation Dentsply Sirona 4.13 Sivision Digital video system Operating Instructions Intego 4.13.2.3 Connecting the SiroCam F / AF / AF+ intraoral camera Connecting the intraoral camera to the TS dentist element Depending on the equipment version, the intraoral camera can be placed at instrument position five or in the additional holder.
-
Page 189
Dentsply Sirona 4 Operation Operating Instructions Intego 4.13 Sivision Digital video system Connecting the intraoral camera to the assistant element The intraoral camera can be operated at the second instrument position of the assistant element. The camera connection is located underneath the assistant element instead of the connection for the curing light. -
Page 190: Operating Sirocam F / Af / Af+ Intraoral Camera
4 Operation Dentsply Sirona 4.13 Sivision Digital video system Operating Instructions Intego 4.13.2.4 Operating SiroCam F / AF / AF+ intraoral camera An external or internal PC is required in order to display the video images of the SiroCam F / AF / AF+ intraoral camera on the Sivision monitor.
-
Page 191
Dentsply Sirona 4 Operation Operating Instructions Intego 4.13 Sivision Digital video system 4.13.2.4.3 Using the camera with SI Video Using SI Video, up to four still images can be generated with the SiroCam F / AF / AF+ intraoral camera. These can be displayed on the Sivision monitor either as a sequence of single images or simultaneously as a quad image. -
Page 192
4 Operation Dentsply Sirona 4.13 Sivision Digital video system Operating Instructions Intego ü The intraoral camera must be removed to allow for operation via the foot switch. Purge 1. Press the left button of the C+ electronic foot control. ➢ Press the Endo / Purge key on the EasyPad, on the EasyTouch the Select next quadrant key. -
Page 193
Dentsply Sirona 4 Operation Operating Instructions Intego 4.13 Sivision Digital video system 4.13.2.4.4 Using the camera with Sidexis In addition to displaying and processing X-ray images, Sidexis XG and Sidexis 4 can also be used as a video application for the SiroCam F / AF / AF+ intraoral camera. -
Page 194
4 Operation Dentsply Sirona 4.13 Sivision Digital video system Operating Instructions Intego Switching the SiroCam F / AF / AF+ intraoral camera on/off ü The PC is in operation and the Sivision Connect or Siucom Plus PC application is started. ➢ Take the SiroCam F / AF / AF+ intraoral camera from the holder. -
Page 195: Technical Camera Data
Dentsply Sirona 4 Operation Operating Instructions Intego 4.13 Sivision Digital video system 4.13.3 Technical camera data General technical data Model: Intraoral camera SiroCam F SiroCam AF SiroCam AF+ Weight of handpiece without cable: approx. 80 g approx. 80 g approx. 85 g Dimensions: diam. 27.5 x 207 mm Operating temperature: +10 to+40 °C…
-
Page 196: Operation With A Pc
For details, please refer to the «Installation and configuration of Siucom Plus / Sivision Connect» manual. CAUTION Integrating the Intego / Intego Pro into an IT network that includes other devices can lead to previously unknown risks. The following changes to the IT network can lead to new risks: •…
-
Page 197: Starting Pc Communication
Dentsply Sirona 4 Operation Operating Instructions Intego 4.14 Operation with a PC The network connection of the treatment center must be configured in the setup program before using the Sivision program, see «Configuring the network connection» [→ 213]. PC applications can be controlled from the treatment center only if they were started via Siucom Plus.
-
Page 198: Communication With The Media Player
4 Operation Dentsply Sirona 4.14 Operation with a PC Operating Instructions Intego 4.14.1.2 Communication with the media player The treatment center has the option of playing back multimedia files stored on the external PC using the Windows Media Player. Audio or video files can be selected from the file system and the Media Player can be controlled from the treatment center.
-
Page 199: Communication With Sidexis
Dentsply Sirona 4 Operation Operating Instructions Intego 4.14 Operation with a PC 4.14.1.4 Communication with Sidexis The Sidexis 4 and Sidexis XG PC applications can display X-ray and intraoral camera images on the Sivision monitor. They can save images taken with the SiroCam F / AF / AF+ intraoral camera in the patient database.
-
Page 200
4 Operation Dentsply Sirona 4.14 Operation with a PC Operating Instructions Intego Contrast optimization filter This image filter analyses and optimizes the current grayscale distribution of an image. In this way, for instance, details within a very low-contrast, “faint” image can be made visible. -
Page 201: Communication With Video Plugin
Dentsply Sirona 4 Operation Operating Instructions Intego 4.14 Operation with a PC Cancel/confirm entry Accept an order Accepts an order that was placed and is waiting in Sidexis, e.g. for creating an intraoral image with the X-ray unit of the treatment center or a video recording with the intraoral camera.
-
Page 202: Usb Interfaces
➢ Only type BF medical devices and applied parts according to IEC Type BF 60601-1, e.g., the Dentsply Sirona Xios XG USB module intraoral X-ray system, may be connected to the USB interface. ➢ Do not connect extension cables to the USB interface.
-
Page 203: Configuration Of The Treatment Center (Setup)
Dentsply Sirona 4 Operation Operating Instructions Intego 4.15 Configuration of the treatment center (setup) Configuration of the treatment center (setup) 4.15 Various treatment center functions can be individually configured via the Setup settings. The treatment center can therefore be adapted to match each user’s personal method of treatment.
-
Page 204: Setting The Time And Date
4 Operation Dentsply Sirona 4.15 Configuration of the treatment center (setup) Operating Instructions Intego 4.15.1.2 Setting the time and date Setting the time Time is shown in the format hour.minute. ü The hour setting focus flashes. 1. Use favorite keys 1 and 3 to set the hour.
-
Page 205: Switching The Key Sound On/Off
2. Confirm with the 2 / Setup favorite key. 4.15.1.8 Setting the purging time for the autopurge function The autopurge function is only available on the Intego Pro treatment center. The purging time for the autopurge function can be set between 60 and 180 seconds.
-
Page 206: Adjusting The Cleaning Agent Mixture For Chemical Suction Hose Cleaning
4 Operation Dentsply Sirona 4.15 Configuration of the treatment center (setup) Operating Instructions Intego 4.15.1.9 Adjusting the cleaning agent mixture for chemical suction hose cleaning The chemical suction hose cleaning option is only available for the Intego Pro. The suction system can be automatically cleaned by pumping water into a tank behind the receptacle of the suction hoses and extracting it from there.
-
Page 207: Opening The Service Function
Dentsply Sirona 4 Operation Operating Instructions Intego 4.15 Configuration of the treatment center (setup) latest version of the SIUCOM Plus / Sivision Connect application must be installed on the PC. For details, please refer to the «Installation and configuration of Siucom Plus / Sivision Connect» manual.
-
Page 208: Configuring The Treatment Center On Easytouch
4 Operation Dentsply Sirona 4.15 Configuration of the treatment center (setup) Operating Instructions Intego 4.15.2 Configuring the treatment center on EasyTouch 4.15.2.1 Opening the setup dialogs ü All instruments are in place. The Start dialog is displayed on the 10:45:03 touchscreen.
-
Page 209: Setting The Time And Date
Dentsply Sirona 4 Operation Operating Instructions Intego 4.15 Configuration of the treatment center (setup) 4.15.2.2 Setting the time and date ➢ In the setup dialog touch the key Date and time . Ä The sub-dialog opens. Setting the date The date is displayed in the format day/month/year.
-
Page 210: Configuring Control Options
4 Operation Dentsply Sirona 4.15 Configuration of the treatment center (setup) Operating Instructions Intego 4.15.2.3 Configuring control options Operation of the entire treatment center operation can be configured in this dialog. ➢ Touch the Control options key in the setup program.
-
Page 211
Dentsply Sirona 4 Operation Operating Instructions Intego 4.15 Configuration of the treatment center (setup) 4.15.2.3.4 Coupling suction to the 4-way foot switch. If the treatment center is equipped with a position selector valve for the suction system, it can be set so suction flow can be interrupted or restarted by moving the 4-way foot control switch at the base of the chair in any direction. -
Page 212
4 Operation Dentsply Sirona 4.15 Configuration of the treatment center (setup) Operating Instructions Intego 4.15.2.3.7 Adjusting the cleaning agent mixture for chemical suction hose cleaning The chemical suction hose cleaning option is only available for the Intego Pro. The suction system can be automatically cleaned by pumping water into a tank behind the receptacle of the suction hoses and extracting it from there. -
Page 213: Configuring The Network Connection
MAC address of the center are shown. Name Call in your data processing specialist for network configuration. Ethernet Network configuration is described in detail in the «Intego / Intego Pro 13-E7-15-31-A3-0C installation instructions». 4.15.2.5 Opening the service function The Service domain is intended to be used only by service engineers.
-
Page 214: Care, Cleaning And Maintenance By The Practice Team
5 Care, cleaning and maintenance by the practice team Dentsply Sirona 5.1 Basics Operating Instructions Intego Care, cleaning and maintenance by the practice team Basics Reprocessing mainly involves the following steps: ● Cleaning ● Disinfection ● Sterilization if possible The treatment center must be reprocessed immediately, or at the latest, one hour after treatment.
-
Page 215
Dentsply Sirona 5 Care, cleaning and maintenance by the practice team Operating Instructions Intego 5.1 Basics Sterilize the suction cannula [→ 269] Clean/disinfect surfaces [→ 219] Disinfecting the upholstery [→ 224] Disinfect the user interface [→ 220] Disinfect handles [→ 221] Maintaining and cleaning the operating light (see separate instructions… -
Page 216: Care, Cleaning, And Disinfecting Agents
5 Care, cleaning and maintenance by the practice team Dentsply Sirona 5.1 Basics Operating Instructions Intego For a quick overview of the work involved, see the “Maintenance, cleaning, and disinfection schedule” for the Intego / Intego Pro treatment center. 5.1.2 Care, cleaning, and disinfecting agents NOTE…
-
Page 217: General Handling Instructions
Dentsply Sirona 5 Care, cleaning and maintenance by the practice team Operating Instructions Intego 5.1 Basics 5. Immerse the tester in the filled container for 30 seconds. Ä The cardboard disk with the culture medium will now absorb 1 ml of the water sample.
-
Page 218: Inspection, Maintenance And Testing
5 Care, cleaning and maintenance by the practice team Dentsply Sirona 5.1 Basics Operating Instructions Intego Manual drying No drying is required following wiping with disinfectants since surplus disinfectant evaporates. Surplus water from the cleaning process can be removed with a soft cloth.
-
Page 219: Surfaces
Dentsply Sirona 5 Care, cleaning and maintenance by the practice team Operating Instructions Intego 5.2 Surfaces Surfaces 5.2.1 Clean/disinfect surfaces The surfaces can be disinfected by wiping with surface disinfectants. NOTE Drugs have a chemical reaction with the surface of the unit.
-
Page 220: Disinfect User Interfaces
NOTE Approved care, cleaning, and disinfecting agents Use only care, cleaning, and disinfecting agents that have been approved by Dentsply Sirona, see «Care, cleaning, and disinfecting agents» [→ 216]. Switching off functions on the EasyPad user interface On the EasyPad, this function also protects the treatment center and the Sivision monitor from disturbances from HF fields.
-
Page 221: Sterilize Silicone Mats And Handle Covers
NOTE Approved care, cleaning, and disinfecting agents Use only care, cleaning, and disinfecting agents that have been approved by Dentsply Sirona, see «Care, cleaning, and disinfecting agents» [→ 216]. The dentist element features a removable silicone mat and silicone covers for the handles. A removable silicone mat is available for the Comfort assistant element.
-
Page 222
5 Care, cleaning and maintenance by the practice team Dentsply Sirona 5.2 Surfaces Operating Instructions Intego Assistant element The silicone mat of the Comfort assistant element is identical with that of the CS dentist element. 1. Switch the treatment center off and remove the suction hoses and instruments from the holders of the assistant element. -
Page 223: Disinfect The Tray
NOTE Approved care, cleaning, and disinfecting agents Use only care, cleaning, and disinfecting agents that have been approved by Dentsply Sirona, see «Care, cleaning, and disinfecting agents» [→ 216]. 1. Hold the tray tightly. 2. Open the lock by swiveling the lever downwards.
-
Page 224: Care For, Clean, And Disinfect Upholstery
Operating Instructions Intego 5.2.6 Care for, clean, and disinfect upholstery Special care, cleaning, and disinfecting agents are recommended by Dentsply Sirona for the care, cleaning, and disinfection of the upholstery. NOTE Approved care, cleaning, and disinfecting agents Use only agents approved by Dentsply Sirona for the upholstery, see»Care, cleaning, and disinfecting agents» …
-
Page 225: Clean The Foot Switch
Dentsply Sirona 5 Care, cleaning and maintenance by the practice team Operating Instructions Intego 5.2 Surfaces 5.2.8 Clean the foot switch Regular cleaning of the foot control improves its stability. ➢ Clean the bottom plate of the foot control with a moist cloth (water).
-
Page 226: Instruments And Instrument Hoses
● Before starting work ● the used instruments after each patient ● At the end of the work day With the Intego Pro treatment center, it is also possible to automatically purge the water paths, see «Automatically purge water paths (autopurge function)». [→ 232].
-
Page 227: Purge Function On The Easypad
100:1 (1 liter of water, 10 ml of the agent) and fill this into the disinfectant tank of the water unit. For more information, please refer to the section «Self-sufficient water supply with Intego» [→ 166]. Ä When sufficient water has been refilled, the purge program continues.
-
Page 228
5 Care, cleaning and maintenance by the practice team Dentsply Sirona 5.3 Instruments and instrument hoses Operating Instructions Intego 1. Remove the instruments to be purged from the holder and hold max. max. them over the cuspidor or over a watertight container with sufficient capacity. -
Page 229: Purging Function On The Easytouch
100:1 (1 liter of water, 10 ml of the disinfectant) and fill this into the disinfectant tank of the water unit. For more information please refer to the section «Water supply for Intego Pro» [→ 168]. Ä When sufficient water has been refilled, the purge program continues.
-
Page 230
5 Care, cleaning and maintenance by the practice team Dentsply Sirona 5.3 Instruments and instrument hoses Operating Instructions Intego Setting the purge time and starting the purge function The purge time of the removed instruments can be set between 20 and 120 seconds. -
Page 231
Dentsply Sirona 5 Care, cleaning and maintenance by the practice team Operating Instructions Intego 5.3 Instruments and instrument hoses 4. Touch the Stop key to end the purge program. Stop Ä After all instruments have been put back in their holders, the Purge function activated display disappears. -
Page 232: Automatically Purge Water Paths (Autopurge Function)
Operating Instructions Intego 5.3.3 Automatically purge water paths (autopurge function) The AutoPurge function is only available on the Intego Pro treatment center. The autopurge function enables automatic purging of all water-carrying instruments in the dentist element, of the 3-way Sprayvit E syringe in the dentist and assistant elements and of the tumbler filling.
-
Page 233
Cleaning adapters for water-carrying instruments are integrated into the Comfort and Ambidextrous (with Intego Pro) water units. These enable all instruments to be purged with water. For this purpose, water-carrying instruments must be inserted into adapters on the water unit. -
Page 234
5 Care, cleaning and maintenance by the practice team Dentsply Sirona 5.3 Instruments and instrument hoses Operating Instructions Intego 3. Dentist element side: Insert the couplings of all water-carrying treatment instruments into the adapter in the Comfort water unit (for Sprayvit E: valve lever in up position, locking knob in the down position). -
Page 235
Dentsply Sirona 5 Care, cleaning and maintenance by the practice team Operating Instructions Intego 5.3 Instruments and instrument hoses There are now two options for continuing: ● Leave the instruments in the water unit The autopurge function remains activated. The instruments remain in the Comfort water unit and the treatment center can be switched off at the mains. -
Page 236: Autopurge Function On The Easytouch
5 Care, cleaning and maintenance by the practice team Dentsply Sirona 5.3 Instruments and instrument hoses Operating Instructions Intego 5.3.3.2 Autopurge function on the EasyTouch Opening the AutoPurge screen ü All instruments are in their holders. ü The Start dialog is displayed on the touchscreen.
-
Page 237
Sprayvit E: valve lever in the up position, locking knob in the down position). Also for Intego Pro CS: Move the swivel arm of the instruments to be purged into the operating position so the weight of the instrument hoses keeps them in this position. -
Page 238
5 Care, cleaning and maintenance by the practice team Dentsply Sirona 5.3 Instruments and instrument hoses Operating Instructions Intego IMPORTANT Pinching of the instrument hoses Be careful not to pinch the instrument hoses when inserting the instruments. With treatment centers with the Ambidextrous option: convert the water unit to the left side so that the adapters on the water unit point towards the patient chair, see «Converting the Ambidextrous water… -
Page 239
Dentsply Sirona 5 Care, cleaning and maintenance by the practice team Operating Instructions Intego 5.3 Instruments and instrument hoses Ä When all of the instruments have been put in the holders, the Purge function activated display disappears. The Start program is shown. -
Page 240: Purging Water Paths Manually
Operating Instructions Intego 5.3.4 Purging water paths manually With the Intego treatment center, the purge and sanitize function is optional. If this function is not available, purging of the water paths must be carried out manually. The water-carrying instruments of the dentist element, the 3-way syringe of the dentist and assistant element and the tumbler filling must be purged.
-
Page 241
Dentsply Sirona 5 Care, cleaning and maintenance by the practice team Operating Instructions Intego 5.3 Instruments and instrument hoses 5. Activate the spray. Toggle the switch on the pneumatic foot switch to the right. Activate the left key on the C+ electronic foot control. -
Page 242: Lubricate, Disinfect/Sterilize The Treatment Instruments
5 Care, cleaning and maintenance by the practice team Dentsply Sirona 5.3 Instruments and instrument hoses Operating Instructions Intego 5.3.5 Lubricate, disinfect/sterilize the treatment instruments 5.3.5.1 Treatment instruments with separate instructions for use The procedures required for the following treatment instruments are described in the following separate instructions for use: ●…
-
Page 243: Lubricate, Disinfect/Sterilize Sprayvit E 3-Way Syringe
NOTE Approved care, cleaning, and disinfecting agents Use only care, cleaning, and disinfecting agents that have been approved by Dentsply Sirona, see «Care, cleaning, and disinfecting agents» [→ 216]! All disinfectants must be approved in your country and have proven bactericidal, fungicidal and virucidal properties. Use only disinfectants with no protein-fixing properties.
-
Page 244
5.3 Instruments and instrument hoses Operating Instructions Intego Automated cleaning and disinfecting We recommend using the Dentsply Sirona DAC Universal for automated cleaning and disinfection (inside and outside) of the nozzles. For further details, please refer to the instructions for use supplied with the unit. -
Page 245
Dentsply Sirona 5 Care, cleaning and maintenance by the practice team Operating Instructions Intego 5.3 Instruments and instrument hoses Manual cleaning and disinfection Manual reprocessing is possible in exceptional cases if the national/ local regulations are followed. The national/local regulations are to be checked before. -
Page 246: Disinfecting/Sterilizing Motors And Adapters
NOTE Approved care, cleaning, and disinfecting agents Use only care, cleaning, and disinfecting agents that have been approved by Dentsply Sirona, see «Care, cleaning, and disinfecting agents» [→ 216]! Use disinfectants and other agents that contain no corrosive components such as chloride.
-
Page 247
Apply the following steps for the adapter only. NOTE Do not clean the motors automatically. We recommend using Dentsply Sirona DAC Universal for automated cleaning, disinfection, and care. For further details, please refer to the instructions for use supplied with the unit. -
Page 248
5 Care, cleaning and maintenance by the practice team Dentsply Sirona 5.3 Instruments and instrument hoses Operating Instructions Intego Ä For further reprocessing, the adapter should be dry and free of residue. 3. If necessary, pack the adapter in packaging suitable for sterilization and storage, e.g., soft packaging (paper/film) or a container in… -
Page 249
2. Store all motors/adapters so that they are protected from contamination. 3. Sterilize again once the storage period has elapsed. Sterilize regularly and have the motors serviced after approx. 2 years in a workshop authorized by Dentsply Sirona. 64 5 7 4 98 D3543 D3543.201.01.08.02 02.2020… -
Page 250: Clean And Disinfect/Sterilize The Components Of The Apexlocator
NOTE Approved care, cleaning, and disinfecting agents Use only care, cleaning, and disinfecting agents that have been approved by Dentsply Sirona, see «Care, cleaning, and disinfecting agents» [→ 216]. ➢ Disconnect the mucosal electrode from the connection cable. The metal hook and the connection cable can be sterilized.
-
Page 251: Cleaning, Disinfecting/Sterilizing The Cavitron Scaler
NOTE Approved care, cleaning, and disinfecting agents Use only care, cleaning, and disinfecting agents that have been approved by Dentsply Sirona, see «Care, cleaning, and disinfecting agents» [→ 216]. 1. Remove the connection cable of the Mini L.E.D. by turning the 134°C 274°F…
-
Page 252: Cleaning/Disinfecting The Sirocam F / Af / Af+ Intraoral Camera
It can be wipe disinfected. NOTE Approved care, cleaning, and disinfecting agents Use only care, cleaning, and disinfecting agents that have been approved by Dentsply Sirona, see «Care, cleaning, and disinfecting agents» [→ 216]. NOTE The lens window is sensitive to scratches.
-
Page 253: Maintaining Treatment Instruments
4. Insert the O-ring. Do not use any sharp objects. 5. Repeat steps 3-4. 6. Screw ring A tightly onto the nozzle. Protect O-rings regularly 1. Soak a Q-tip in Dentsply Sirona’s T1 spray. 2. Wipe the housing at the separating joint with the Q-tip. 5.3.6.1.2 Replacing lamps CAUTION The lamp can be hot.
-
Page 254: Maintaining The Motors
A LED is built into the BL E and BL ISO E motor. This LED is designed for the service life of the motor and may be replaced only by Dentsply Sirona or a service technician trained by Dentsply Sirona. Safe operation is no longer guaranteed in case of improper replacement.
-
Page 255
Dentsply Sirona 5 Care, cleaning and maintenance by the practice team Operating Instructions Intego 5.3 Instruments and instrument hoses 1. Remove the defective O-rings. 2. Insert the O-rings one after another. Start with the first groove. 3. Lightly oil the O-ring with T1 Spray. -
Page 256: Change The Cotton Wool Roll On The Turbine Hose And Oil Collector
5 Care, cleaning and maintenance by the practice team Dentsply Sirona 5.3 Instruments and instrument hoses Operating Instructions Intego 5.3.7 Change the cotton wool roll on the turbine hose and oil collector At the unit end of the high-speed handpiece hose, return air leaks out along with a small amount of high-speed handpiece oil.
-
Page 257
Dentsply Sirona 5 Care, cleaning and maintenance by the practice team Operating Instructions Intego 5.3 Instruments and instrument hoses Oil collector The CS dentist element is also equipped with an oil collector. It is located below the instrument connections and collects any liquids that leak out. -
Page 258: Vacuum System
5 Care, cleaning and maintenance by the practice team Dentsply Sirona 5.4 Vacuum system Operating Instructions Intego Vacuum system 5.4.1 Purge the vacuum system. If the treatment center is equipped with the suction hose cleaning option, proceed according to the instruction in section «Cleaning the suction hoses»…
-
Page 259
Dentsply Sirona 5 Care, cleaning and maintenance by the practice team Operating Instructions Intego 5.4 Vacuum system 3. Attach the open suction handpiece to the receptacle. 4. Press the button. Ä Water is pumped into the suction hose cleaning container and suctioned out of the suction hoses. -
Page 260: Suction Hose Cleaning On The Comfort Water Unit
5 Care, cleaning and maintenance by the practice team Dentsply Sirona 5.4 Vacuum system Operating Instructions Intego 5.4.2.2 Suction hose cleaning on the Comfort water unit The Comfort water unit is always equipped with an adapter for the suction hose cleaning function. This can be used to purge the suction hoses consecutively.
-
Page 261
➢ Do not fill the agent for disinfecting the water paths into the cleaning agent tank for chemical suction hose cleaning! Use only 1d 41d «Agents for the suction lines» approved by Dentsply Sirona, see «Care, cleaning, and disinfecting agents» [→ 216]. Amalg… -
Page 262: Suction Hose Cleaning On The Ambidextrous Water Unit
Ambidextrous water unit is optional. Chemical suction hose cleaning for the Intego treatment center is not available. If the Intego treatment center is not equipped with the suction hose cleaning option, a large glass of cold, clear water must be regularly aspirated instead, see «Purging the suction system» …
-
Page 263
5 Care, cleaning and maintenance by the practice team Operating Instructions Intego 5.4 Vacuum system Refill cleaning agent (for the Intego Pro with chemical suction hose cleaning option) When the adjacent display appears on the EasyPad display or in the status column of the touchscreen, the cleaning agent for cleaning the suction system is almost finished. -
Page 264: Central Supply For Chemical Suction Hose Cleaning
5.4.2.4 Central supply for chemical suction hose cleaning For clinical use, Intego / Intego Pro treatment centers can be equipped with a central cleaning agent supply for chemical suction hose cleaning. The CDS 60 system of Dürr Dental is intended for this purpose.
-
Page 265: Cleaning Vacuum System Using Cleaning Adapter In The Cuspidor Or Via External Container
NOTE Approved care, cleaning, and disinfecting agents Use only care, cleaning, and disinfecting agents that have been approved by Dentsply Sirona, see «Care, cleaning, and disinfecting agents» [→ 216]. NOTE Domestic cleaning agents foam up. Foaming cleaning agents often cause foam and water to be sucked into the dry suction system.
-
Page 266: Cleaning Vacuum System Using Cleaning Adapter In The Cuspidor
5 Care, cleaning and maintenance by the practice team Dentsply Sirona 5.4 Vacuum system Operating Instructions Intego 5.4.3.1 Cleaning vacuum system using cleaning adapter in the cuspidor Preparation for cleaning 1. Prepare 1 liter of cleaning solution in a separate container according to the manufacturer’s instructions and mix it thoroughly.
-
Page 267
Dentsply Sirona 5 Care, cleaning and maintenance by the practice team Operating Instructions Intego 5.4 Vacuum system Cleaning procedure 1. Pour 1 liter of cleaning solution into the cuspidor. 2. Remove the suction hoses from their holders and attach them to the side of the cleaning adapter as simultaneously as possible. -
Page 268: Cleaning The Suction System Via External Container
5 Care, cleaning and maintenance by the practice team Dentsply Sirona 5.4 Vacuum system Operating Instructions Intego 5.4.3.2 Cleaning the suction system via external container If the treatment center is not equipped with a cuspidor, the suction system must be cleaned via external container.
-
Page 269: Sterilizing/Disinfecting And Lubricating The Suction Handpieces
Rubber materials such as O-rings are corroded by unsuitable lubricants. ➢ Never use petroleum jelly or similar lubricants. ➢ Use only lubricants approved by Dentsply Sirona. 1. Detach the handpiece of the spray aspirator and the saliva ejector from the suction hoses.
-
Page 270: Empty The Central Suction Sieve
5 Care, cleaning and maintenance by the practice team Dentsply Sirona 5.4 Vacuum system Operating Instructions Intego 5.4.5 Empty the central suction sieve. Depending on the options, there is a central suction sieve in the Compact water unit or Comfort assistant element to retain solid materials (e.g.
-
Page 271: Cleaning And Disinfecting The Suction Hoses
Dentsply Sirona 5 Care, cleaning and maintenance by the practice team Operating Instructions Intego 5.4 Vacuum system Emptying the central suction sieve in the Comfort assistant element 1. Open the cover on the suction sieve on the assistant element and remove it.
-
Page 272: Components Of The Water Unit
5 Care, cleaning and maintenance by the practice team Dentsply Sirona 5.5 Components of the water unit Operating Instructions Intego Components of the water unit 5.5.1 Clean the gold trap The gold trap retains larger solid particles to prevent them from being washed down the drain in the cuspidor bowl.
-
Page 273: Clean/Disinfect The Cuspidor
This can cause damage to the suction machine. ➢ Use only care, cleaning, and disinfecting agents approved by Dentsply Sirona, see»Care, cleaning, and disinfecting agents» [→ 216]. The cuspidor bowl is attached to the water unit via a bayonet catch and can be removed for thorough cleaning.
-
Page 274: Cleaning The Outlet Lines Of The Cuspidor
Use the same agent as for the suction lines. NOTE Approved care, cleaning, and disinfecting agents Use only care, cleaning, and disinfecting agents that have been approved by Dentsply Sirona, see «Care, cleaning, and disinfecting agents» [→ 216]. NOTE Domestic cleaning agents foam up.
-
Page 275
Dentsply Sirona 5 Care, cleaning and maintenance by the practice team Operating Instructions Intego 5.5 Components of the water unit 2. Fill the cuspidor with the cleaning solution and leave it to take effect. Observe the reaction time specified for the cleaning solution by the manufacturer. -
Page 276: Filling With Agent For Disinfecting The Water Paths
5 Care, cleaning and maintenance by the practice team Dentsply Sirona 5.5 Components of the water unit Operating Instructions Intego 5.5.4 Filling with agent for disinfecting the water paths The Comfort and Ambidextrous water units can be optionally equipped with a disinfection system. In normal operation, this will automatically inoculate the water that will come into contact with the patient (also called treatment water) with an agent to disinfect the water paths.
-
Page 277
NOTE Approved care, cleaning, and disinfecting agents Use only the agent for disinfecting the water paths that has been approved by Dentsply Sirona for the disinfection system; see «Care, cleaning, and disinfecting agents» [→ 216]. 64 5 7 4 98 D3543… -
Page 278: Change The Water And Air Filters
5 Care, cleaning and maintenance by the practice team Dentsply Sirona 5.5 Components of the water unit Operating Instructions Intego 5.5.5 Change the water and air filters If you notice any changes in media flows, check the water and air filters for permeability.
-
Page 279
Dentsply Sirona 5 Care, cleaning and maintenance by the practice team Operating Instructions Intego 5.5 Components of the water unit 5. Put the sealD back on the filter E. Then insert both into the screw cap B, C as shown. -
Page 280: Change The Amalgam Rotor
5 Care, cleaning and maintenance by the practice team Dentsply Sirona 5.5 Components of the water unit Operating Instructions Intego 5.5.6 Change the amalgam rotor Amalgam residues and other solid particles are trapped in the amalgam rotor according to the centrifugal principle.
-
Page 281
6. Place the container in the special packaging and ship it for disposal or authorize a certified waste management company. Installing the amalgam rotor Use only original Dentsply Sirona accessories. Never use a used or recycled amalgam rotor. To reorder the amalgam rotor, see «Spare parts and consumables» … -
Page 282
5 Care, cleaning and maintenance by the practice team Dentsply Sirona 5.5 Components of the water unit Operating Instructions Intego 3. Hold the lower part of the amalgam separator B so that the latching noses of the bayonet catch are positioned transverse to the water unit. -
Page 283: Check The Message System Of The Amalgam Separator
Dentsply Sirona 5 Care, cleaning and maintenance by the practice team Operating Instructions Intego 5.5 Components of the water unit 5.5.7 Check the message system of the amalgam separator An electronic control monitors the function of the amalgam separator. SIt detects any mechanical blocking or failure of the drive motor. The error is indicated by the Amalg display on the user interface and by an acoustic signal.
-
Page 284
5 Care, cleaning and maintenance by the practice team Dentsply Sirona 5.5 Components of the water unit Operating Instructions Intego Testing the message system on the EasyTouch ü All instruments are in place. The Start dialog is displayed on the 10:45:03 touchscreen. -
Page 285: Empty The Sediment Container
Dentsply Sirona 5 Care, cleaning and maintenance by the practice team Operating Instructions Intego 5.5 Components of the water unit Press the Back key to exit the service dialog. 5.5.8 Empty the sediment container In addition to other solid particles, a large proportion of the amalgam residues are trapped in the sediment container by gravitational force.
-
Page 286
5 Care, cleaning and maintenance by the practice team Dentsply Sirona 5.5 Components of the water unit Operating Instructions Intego 1. Open the flap A on the base of the water unit. 2. Loosen the bayonet catch by turning the sediment container B counterclockwise. -
Page 287
Dentsply Sirona 5 Care, cleaning and maintenance by the practice team Operating Instructions Intego 5.5 Components of the water unit 2. Hold the sediment container B so that the latching noses of the bayonet catch are positioned transverse to the water unit. Rotate the sediment container B clockwise. -
Page 288: Cleaning The Filter Insert Of The Wet Suction Device With Cuspidor Valve
5 Care, cleaning and maintenance by the practice team Dentsply Sirona 5.5 Components of the water unit Operating Instructions Intego 5.5.9 Cleaning the filter insert of the wet suction device with cuspidor valve The automatic separator and amalgam separator / sediment container or air jet pump are not installed in the water unit for standard wet suction.
-
Page 289
Dentsply Sirona 5 Care, cleaning and maintenance by the practice team Operating Instructions Intego 5.5 Components of the water unit 1. Open the flap A on the base of the water unit. 2. Allow the remaining water to be extracted completely. Press button B on the standard wet suction. -
Page 290
5 Care, cleaning and maintenance by the practice team Dentsply Sirona 5.5 Components of the water unit Operating Instructions Intego 6. Reinsert the filter insert in the filter housing. Rotate the filter insert C clockwise. 7. Close the flap A. -
Page 291: Emptying The Collector Of The Air Jet Pump
Dentsply Sirona 5 Care, cleaning and maintenance by the practice team Operating Instructions Intego 5.5 Components of the water unit 5.5.10 Emptying the collector of the air jet pump The air jet pump (Air Venturi) is an option available for the Compact water unit.
-
Page 292
5 Care, cleaning and maintenance by the practice team Dentsply Sirona 5.5 Components of the water unit Operating Instructions Intego 3. Pour the excess water out of the container and collect the amalgam residue. Dispose of it properly with the amalgam residue collected from the cuspidor and central sieve, see «Cleaning the gold trap» … -
Page 293: Sanitizing
Sanitizing with the Intego Pro With the Intego Pro, the water paths can only be sanitized if the Comfort or Ambidextrous water unit is equipped with an integrated water disinfection system. Operation with a stand-alone water supply is also possible only with a disinfection system.
-
Page 294: Sanitizing With The Fresh Water Bottle
Turn the lever clockwise to the bottle symbol, For more information, please refer to the section Water supply for Intego» [→ 166]. 64 5 7 4 98 D3543…
-
Page 295: Sanitizing On The Easypad
Dentsply Sirona 5 Care, cleaning and maintenance by the practice team Operating Instructions Intego 5.6 Sanitizing 5. Unscrew the fresh water bottle from the holder on the water unit and empty the fresh water bottle completely. 6. Fill the fresh water bottle with approx. 0.4 to 0.5 liters of the undiluted agent for disinfecting the water paths.
-
Page 296
5 Care, cleaning and maintenance by the practice team Dentsply Sirona 5.6 Sanitizing Operating Instructions Intego 4. Afterward, return the instrument to the instrument holder. 5. Repeat the procedure for all other instruments. NOTE Splashes of undiluted disinfectant for sanitizing the water paths can result in discoloration of surfaces if left for too long. -
Page 297
Dentsply Sirona 5 Care, cleaning and maintenance by the practice team Operating Instructions Intego 5.6 Sanitizing 1. Hold the 3-way syringe over the cuspidor or over a watertight container with sufficient capacity and press the water key for at least 15 seconds. -
Page 298: Sanitizing On The Easytouch
5 Care, cleaning and maintenance by the practice team Dentsply Sirona 5.6 Sanitizing Operating Instructions Intego 5.6.1.2 Sanitizing on the EasyTouch Opening the sanitization dialog via the touchscreen ü All instruments are in their holders. ü The Start dialog is displayed on the touchscreen.
-
Page 299
Dentsply Sirona 5 Care, cleaning and maintenance by the practice team Operating Instructions Intego 5.6 Sanitizing 2. Remove a single instrument from holder and hold it over the max. cuspidor or over a watertight container with sufficient capacity. For the CS dentist element, move the swivel arm of the instrument into the working position. -
Page 300
5 Care, cleaning and maintenance by the practice team Dentsply Sirona 5.6 Sanitizing Operating Instructions Intego ü The tumbler filler was automatically flushed with water. 1. Hold the 3-way syringe over the cuspidor or over a watertight container with sufficient capacity and press the water key for at least 15 seconds. -
Page 301: Sanitizing With Disinfection System
Dentsply Sirona 5 Care, cleaning and maintenance by the practice team Operating Instructions Intego 5.6 Sanitizing 5.6.2 Sanitizing with disinfection system Sanitizing, that is the disinfection of the treatment water paths can be performed by using the disinfection system. During this sanitation, the…
-
Page 302: Sanitizing On The Easypad
5 Care, cleaning and maintenance by the practice team Dentsply Sirona 5.6 Sanitizing Operating Instructions Intego 5.6.2.1 Sanitizing on the EasyPad Displaying the sanitizing operating context ü All instruments are in their holders. 1. Press the fixed key Endo / Purge .
-
Page 303
Dentsply Sirona 5 Care, cleaning and maintenance by the practice team Operating Instructions Intego 5.6 Sanitizing Inserting instruments into the cleaning adapters of the water unit The Comfort water unit has integrated cleaning adapters for water- carrying instruments. This allows all instruments to be simultaneously treated with a high concentration of sanitation solution and then rinsed with water. -
Page 304
5 Care, cleaning and maintenance by the practice team Dentsply Sirona 5.6 Sanitizing Operating Instructions Intego IMPORTANT Pinching of the instrument hoses Be careful not to pinch the instrument hoses when inserting the instruments. With treatment centers with the Ambidextrous option: convert the water unit to the left side so that the adapters on the water unit point towards the patient chair, see «Converting the Ambidextrous water… -
Page 305
Dentsply Sirona 5 Care, cleaning and maintenance by the practice team Operating Instructions Intego 5.6 Sanitizing Allow 24 hours reaction time In order to effectively combat bacteria, you must let the disinfectant for the water paths react for at least 24 hours and not longer than 3 days (maximum sanitization time). -
Page 306
5 Care, cleaning and maintenance by the practice team Dentsply Sirona 5.6 Sanitizing Operating Instructions Intego Returning instruments to their holders After the water paths have been rinsed, the instruments can be removed from the cleaning adapters on the water unit and returned to their holders. -
Page 307: Sanitizing On The Easytouch
Dentsply Sirona 5 Care, cleaning and maintenance by the practice team Operating Instructions Intego 5.6 Sanitizing 5.6.2.2 Sanitizing on the EasyTouch Opening the sanitization dialog via the touchscreen ü All instruments are in their holders. ü The Start dialog is displayed on the touchscreen.
-
Page 308
5 Care, cleaning and maintenance by the practice team Dentsply Sirona 5.6 Sanitizing Operating Instructions Intego Start sanitization ➢ Touch the Start key. Start Ä The sanitization process starts. Error message: Filling with agent for disinfecting the water paths If the Disinf display appears after the sanitization process has been… -
Page 309
Sprayvit E: valve lever in the up position, locking knob in the down position). Also for Intego Pro CS: Move the swivel arm of the instruments to be purged into the operating position so the weight of the instrument hoses keeps them in this position. -
Page 310
5 Care, cleaning and maintenance by the practice team Dentsply Sirona 5.6 Sanitizing Operating Instructions Intego IMPORTANT Pinching of the instrument hoses Be careful not to pinch the instrument hoses when inserting the instruments. With treatment centers with the Ambidextrous option: convert the water unit to the left side so that the adapters on the water unit point towards the patient chair, see «Converting the Ambidextrous water… -
Page 311
Dentsply Sirona 5 Care, cleaning and maintenance by the practice team Operating Instructions Intego 5.6 Sanitizing Sanitizing phase 3 — Treating the water paths with the agent for disinfecting the water paths The water is pumped out of the water tank of the water unit using the tumbler filling function. -
Page 312
5 Care, cleaning and maintenance by the practice team Dentsply Sirona 5.6 Sanitizing Operating Instructions Intego Error message: Inserting instruments in the water unit If an instrument is accidentally deposited in its holder during the reaction time, the message Insert instruments into water unit is displayed on the touchscreen after the treatment center is switched on. -
Page 313
Dentsply Sirona 5 Care, cleaning and maintenance by the practice team Operating Instructions Intego 5.6 Sanitizing Displays in case of incomplete sanitation The sanitization program detects whether the sanitization of all instruments and the tumbler filling was completed. Errors that occurred during sanitization will be displayed on the touchscreen as follows: ●… -
Page 314: Display Sanitation Report
5 Care, cleaning and maintenance by the practice team Dentsply Sirona 5.6 Sanitizing Operating Instructions Intego 5.6.3 Display sanitation report If the treatment center is equipped with the EasyTouch comfort user interface, sanitation processes with a reaction time of at least 24 hours can also be displayed on the touchscreen.
-
Page 315: Thermally Disinfect The Sanitization Adapter
Dentsply Sirona 5 Care, cleaning and maintenance by the practice team Operating Instructions Intego 5.6 Sanitizing 5.6.4 Thermally disinfect the sanitization adapter With the Comfort water unit and Ambidextrous, the sanitization adapter can be removed from the water unit for cleaning and thermal disinfection.
-
Page 316: Fuse Of The External Device Connection
5 Care, cleaning and maintenance by the practice team Dentsply Sirona 5.7 Fuse of the external device connection Operating Instructions Intego Fuse of the external device connection The inlet connector remains live even when the power switch is turned off. The fuse can nevertheless be changed.
-
Page 317: Maintenance By The Service Engineer
Dentsply Sirona 6 Maintenance by the service engineer Operating Instructions Intego 6.1 Inspection and maintenance Maintenance by the service engineer Inspection and maintenance In order to ensure the operational safety and reliability of your treatment center and to avoid damage due to natural wear, annual inspection and maintenance must be performed on your treatment center.
-
Page 318: Maintenance Manual
6 Maintenance by the service engineer Dentsply Sirona 6.3 Maintenance Manual Operating Instructions Intego Maintenance Manual Keep this Maintenance Manual near your treatment center. Any inspection and maintenance work as well as all safety tests are documented by the service engineer in the Maintenance Manual.
-
Page 319: Malfunctions
Dentsply Sirona 7 Malfunctions Operating Instructions Intego 7.1 Messages on the EasyPad Malfunctions Messages on the EasyPad Errors on the EasyPad display Messages are shown on the EasyPad display, such as: Safety switch triggered [→ 70] Days until next sanitation [→ 293] Days until next maintenance date …
-
Page 320: Messages On The Easytouch
7 Malfunctions Dentsply Sirona 7.2 Messages on the EasyTouch Operating Instructions Intego 1. Press favorite key 3. Ä The next message is displayed. 2. Acknowledge the individual messages by pressing the favorite key 2 / Setup or pressing the favorite key 3 several times until all the Setup messages have been shown.
-
Page 321: Error Messages
“Changing the water and air filters” [→ 278]. Check whether the public drinking water supply has the necessary wa- ter pressure, see the document on Intego / Intego Pro installation re- quirements. Emergency pump opera- Malfunctioning of pump sensors in Inform your service technician.
-
Page 322
7 Malfunctions Dentsply Sirona 7.3 Error Messages Operating Instructions Intego Code Anomaly Description Measure Software inconsistency An error must be acknowledged af- Inform your service technician. ter the treatment center is switched on. The functions of the treatment center may be impaired. -
Page 323: Remote Diagnosis
Dentsply Sirona 7 Malfunctions Operating Instructions Intego 7.4 Remote diagnosis Remote diagnosis Functional description With remote diagnosis, you enable the staff of your dental depot or our Customer Service Center, see «Contact data» [→ 11], to connect to the PC of your treatment center. The contents of your PC monitor are then transmitted to the computer of the service specialist and remote access to your PC is enabled.
-
Page 324: Spare Parts And Consumables
Casing, left water path 60 02 187 Keyboard 63 21 728 Small cleaning wires 24 00 232 63 22 007 O-ring set Sprayvit nozzle 41 76 751 1 x attachment tool and 10 x O-rings 5.5×1.03 Dentsply Sirona T1 Spray (6 x 250 ml cans) 59 01 665 64 5 7 4 98 D3543 D3543.201.01.08.02 02.2020…
-
Page 325
Dentsply Sirona 8 Spare parts and consumables Operating Instructions Intego BL E motor BL ISO C/E/S sealing washer, green 63 11 240 Basic Apex adapter 59 83 072 ISO adapter 60 00 793 BL ISO E motor BL ISO E motor sleeve 63 49 851 BL ISO C/E/S sealing washer, green 63 11 240… -
Page 326: Disposal
9 Disposal Dentsply Sirona Operating Instructions Intego Disposal In accordance with Directive 2012/19/EU and national disposal regulations regarding old electrical and electronic devices, please be advised that such items must be disposed of in a special way within the European Union (EU). These regulations require the environmentally friendly recycling/disposal of old electrical and electronic devices.
-
Page 327: Overview Of All Function Keys
Dentsply Sirona 10 Overview of all function keys Operating Instructions Intego 10.1 Fixed keys Overview of all function keys The following contains a brief description of the fixed keys on the dentist and assistant elements and the function keys on the touchscreen and to provide the reader with a quick overview of the significance of the symbols on the keys.
-
Page 328
10 Overview of all function keys Dentsply Sirona 10.1 Fixed keys Operating Instructions Intego Chair height Counterclockwise rotation / User profile Switches counterclockwise rotation ON/OFF Changes the user profile Switches AutoReverse function ON/OFF when the maximum torque is reached Counterclockwise rotation ON/OFF… -
Page 329
Dentsply Sirona 10 Overview of all function keys Operating Instructions Intego 10.1 Fixed keys 10.1.2 Dentist element with EasyTouch Clean key Clean Deactivates the complete user interface of the dentist element. This is used to clean the surface and protect from interference from an external HF surgical device. -
Page 330
10 Overview of all function keys Dentsply Sirona 10.2 Start dialog Operating Instructions Intego 10.1.3 Assistant element Chair program S Mouth rinsing position with last-position memory function (programmable) Chair program 0 Entry/exit position (programmable) Tumbler filling On/Off Flushing the cuspidor… -
Page 331
Dentsply Sirona 10 Overview of all function keys Operating Instructions Intego 10.3 Start dialog for removed instruments Purging water lines Starts the purge function Purging water paths automatically Auto Starts the autopurge function Sanitization Starts the treatment center sanitation program… -
Page 332
10 Overview of all function keys Dentsply Sirona 10.3 Start dialog for removed instruments Operating Instructions Intego Preselecting air coolant For cooling the treatment area with air Setting the automatic motor stop of the ApexLocator Apex Stop Apex When the Apex Stop key is pressed, the – and + keys are displayed. -
Page 333
Dentsply Sirona 10 Overview of all function keys Operating Instructions Intego 10.4 Endo function Endo function 10.4 Endo function Activating the Endo function Memory button Saving all settings of the Endo function Calibrating the bur drive A calibration must be performed each time you change or lubricate the contra-angle handpiece. -
Page 334
10 Overview of all function keys Dentsply Sirona 10.5 Other dialogs Operating Instructions Intego Apex acoustic signals Switching the apex acoustic signals on/off. If the signal tones are Apex Dist switched on, a beep is issued when the apex or a set motor stop position is reached. -
Page 335
Dentsply Sirona 10 Overview of all function keys Operating Instructions Intego 10.5 Other dialogs 10.5.5 Operating light setting program Sensor control for switching the operating light on/off If the key is highlighted orange, the operating light can be switched on/ off or changed to the Composite function by a hand movement. -
Page 336
10 Overview of all function keys Dentsply Sirona 10.6 Sivision program Operating Instructions Intego Sivision program 10.6 10.6.1 Media Player Start Media Player M.player M.player Media Player is started on the external PC. The keys corresponding to the Media Player PC application are displayed on the right side of the… -
Page 337
Dentsply Sirona 10 Overview of all function keys Operating Instructions Intego 10.6 Sivision program Overview layout The opened image windows are scaled in the display area so that no scroll bars or as few scroll bars as possible must be displayed. The image windows are arranged without overlapping. -
Page 338
10 Overview of all function keys Dentsply Sirona 10.6 Sivision program Operating Instructions Intego Filter black dots Single pixel errors may occur when taking digital X-rays. These pixel errors appear as individual black dots when the optimum resolution (100%) is selected. They are removed by Sidexis. -
Page 339
Dentsply Sirona 10 Overview of all function keys Operating Instructions Intego 10.6 Sivision program 10.6.5 Video plugin Start the video plugin Sidexis 4 and the video plugin are started on the PC. The fixed keys for the video plugin are displayed on the right side of the touchscreen. -
Page 340
10 Overview of all function keys Dentsply Sirona 10.7 Setup program Operating Instructions Intego Setup program 10.7 10.7.1 Date and time Date and time Opens the Date and Time setup program. Date 15 04 14 Time 12/24 hour display 12 h 10.7.2… -
Page 341
Dentsply Sirona 10 Overview of all function keys Operating Instructions Intego 10.7 Setup program Focusing the intraoral camera using the foot control If the treatment center is equipped with an autofocus camera and the C + electronic foot control, it can be configured in setup that the camera image can be focused with the foot switch. -
Page 342: Index
Index Dentsply Sirona Operating Instructions Intego Index Armrest, 72 Numeric Articulating headrest, 33, 74 4-way foot switch, 205, 211 Assistant element 4-way foot switch plate, 68 Instrument positions, 48 Maximum load capacity, 149 Access the start program with the foot control, 67 Mini L.E.D., 155, 251 Acoustic signals, 117 Overview, 45…
-
Page 343
Dentsply Sirona Index Operating Instructions Intego Chip blower, 66, 67, 89, 91 Sprayvit E, 95 Clean key, 220 Standard 3-way syringe, 94 Cleaning adapter, 266, 309 Dentist element with hanging hoses, 36 Cleaning agent for hose cleaning, 261, 263 Dentist element with whip arms, 37 Coding of motor hoses, 102 Deutscher Verein für Gas und Wasser (DVGW) =… -
Page 344
Index Dentsply Sirona Operating Instructions Intego Foot switch Chip blower, 66 Favorite key pad, 68 Chip blower , 67 Favorites keypad, 62 Spray, 66, 88, 90 File clamp, 113 Fresh water bottle, 51, 55, 166 Filter Air and water, 278 Central suction sieve, 270 Gold trap, 272 Gold trap, 272 Guide rollers on the CS dentist element, 86 Standard wet suction, 288… -
Page 345
Dentsply Sirona Index Operating Instructions Intego Clockwise/counterclockwise rotation, 68 Cooling medium, 90 Last Position Memory function, 77 Cover, 87 LEDlight Plus, 181 CW/CC rotation, 111 LEDview Plus, 181 Drive motors, 18 Live image, 191, 193 Endo function, 122 Load capacity Holder/positions on assistant element, 48 Assistant element, 149 Holder/positions on the dentist element, 38 Cup holder, 179… -
Page 346
Index Dentsply Sirona Operating Instructions Intego Mouth rinsing position S, 67, 76, 150 Mucosal electrode, 113 Reciprocal rotating files, 133 Municipal water, 165 Remote access, 323 Remote diagnosis, 323 RoHS Directive, 23 NaCl, 67 Name of the treatment center in the practice network, 213 Safety checks, 317 Network configuration, 213 Safety instructions, 15 Safety switch, 70… -
Page 347
Dentsply Sirona Index Operating Instructions Intego Spray, 67, 88, 91 Transport conditions, 25 Spray aspirator, 152, 205, 269 Tray, 178, 223 Spray water quantity, 93 Tumbler filling, 150, 159 Sprayvit E, 95 Tumbler filling with automatic sensor control, 161 Sprayvit E 3-way syringe, 95 Turbine, 98 Stand-alone water supply, 51, 55 Standard 3-way syringe, 94… -
Page 348
Index Dentsply Sirona Operating Instructions Intego White screen on the Sivision monitor, 180, 212 Wireless phones, 20 Work steps for the Endo function, 132 X-ray image viewer, 180, 212 64 5 7 4 98 D3543 D3543.201.01.08.02 02.2020… -
Page 350
We reserve the right to make any alterations which may be required due to technical improvements. © Sirona Dental Systems GmbH Sprache: englisch Printed in Germany D3543.201.01.08.02 02.2020 Ä.-Nr.: 128 5 62 Sirona Dental Systems GmbH 64 5 7 4 98 D3543 Fabrikstr.
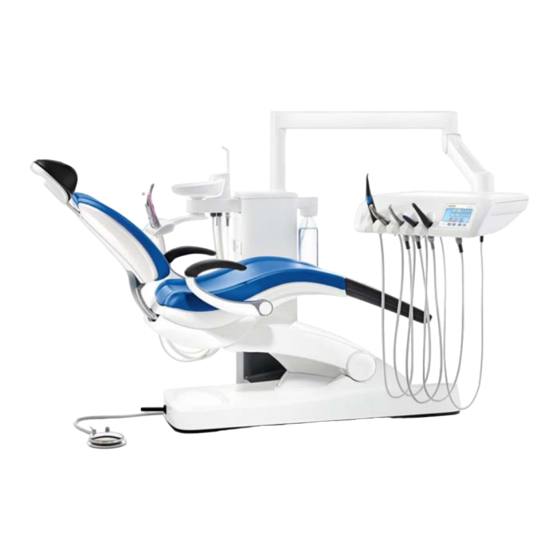
- Manuals
- Brands
- Sirona Manuals
- Dental equipment
- Intego
- Operating instructions manual
-
Contents
-
Table of Contents
-
Bookmarks
Quick Links
NMKOMNS
kÉï=~ë=çÑW
fkqbdl=L=fkqbdl=éêç=
fkqbdl=éêç=^ãÄáÇÉñíêçìë
léÉê~íáåÖ=fåëíêìÅíáçåë=Erp^F
båÖäáëÜ
Operating Instructions INTEGO / INTEGO turn, INTEGO pro / INTEGO pro turn
=
Related Manuals for Sirona INTEGO
Summary of Contents for Sirona INTEGO
-
Page 1
NMKOMNS kÉï=~ë=çÑW fkqbdl=L=fkqbdl=éêç= fkqbdl=éêç=^ãÄáÇÉñíêçìë léÉê~íáåÖ=fåëíêìÅíáçåë=Erp^F båÖäáëÜ Operating Instructions INTEGO / INTEGO turn, INTEGO pro / INTEGO pro turn… -
Page 3: Table Of Contents
Sirona Dental Systems GmbH Table of Contents Operating Instructions (USA) INTEGO Table of Contents General Information………………..Dear customer, ……………….. Contact information ………………Notes on these operating Instructions…………1.3.1 General information on the operating Instructions ……1.3.2 Scope of these operating Instructions ……….
-
Page 4
Operating Instructions (USA) INTEGO Unit description………………….Standards/Approvals ………………Technical data………………..System overview INTEGO …………….System overview INTEGO pro …………..System overview of INTEGO pro with Ambidextrous option ……Patient chair ………………..Head support………………..3.7.1 Flat headrest ………………3.7.2 Double-jointed head support ………… -
Page 5
Sirona Dental Systems GmbH Table of Contents Operating Instructions (USA) INTEGO Foot control ………………..4.3.1 Pneumatic foot switch …………..4.3.2 C+ electronic foot switch …………..Patient chair ………………..4.4.1 Safety instructions …………….4.4.2 Safety stop ………………4.4.3 Triggering an immediate movement stop …….. -
Page 6
4.7.4 Stand-alone water supply…………..136 4.7.4.1 Water supply for the INTEGO ……….. 137 4.7.4.2 Water supply for the INTEGO pro ……..139 4.7.5 Converting the Turn water unit for right and left-handed people..141 65 47 686 D3543 D3543.201.03.02.23 10.2016… -
Page 7
Sirona Dental Systems GmbH Table of Contents Operating Instructions (USA) INTEGO Swiveling tray holder ………………X-ray image viewer………………4.10 Operating light ………………..4.10.1 Switching the operating light on/off ……….4.10.2 Setting the LEDlight brightness …………4.10.3 Setting the brightness and sensor control of the LEDview…. -
Page 8
Table of Contents Sirona Dental Systems GmbH Operating Instructions (USA) INTEGO 5.2.4 Disinfect the tray …………….185 5.2.5 Care for, clean, and disinfect upholstery ………. 186 5.2.6 Cleaning the bottom surface of the mount for the backrest component 5.2.7 Clean the foot switch……………. 186 Instruments and instrument hoses ………….. -
Page 9
Sirona Dental Systems GmbH Table of Contents Operating Instructions (USA) INTEGO 5.5.9 Cleaning the filter insert of the wet suction device with cuspidor valve 5.5.10 Emptying the collector of the air jet pump ……..Sanitizing…………………. 5.6.1 Sanitizing with the fresh water bottle………. -
Page 10: General Information
These Operating Instructions are designed to assist you prior to initial use and whenever you require information later on. We wish you a great deal of success and pleasure with INTEGO / INTEGO pro. ®…
-
Page 11: Notes On These Operating Instructions
● INTEGO TS (Compact water unit and dentist element with hanging hoses) ● INTEGO CS (Compact water unit and dentist element with swivel arms) ● INTEGO pro TS (Comfort water unit and dentist element with hanging hoses) ● INTEGO pro CS (Comfort water unit and dentist element with swivel arms) The dental treatment units can be delivered from the factory with the Ambidextrous option.
-
Page 12: Other Valid Documents
The instructions as well as any warning and safety information contained therein also must be observed. There are separate operating instructions for each of the following Sirona products: ● Treatment instruments and accessories…
-
Page 13: Indication And Contraindication
Sirona Dental Systems GmbH 1 General Information Operating Instructions (USA) INTEGO 1.7 Indication and contraindication Indication and contraindication Indication The dental treatment unit is suitable for following treatments: Indication without implantology ● caries ● periodontitis ● endodontics ● misaligned teeth ● dental care (teeth cleaning, etc.) ●…
-
Page 14: Safety Instructions
2 Safety instructions Sirona Dental Systems GmbH 2.1 Identification of the danger levels Operating Instructions (USA) INTEGO Safety instructions Identification of the danger levels To prevent personal injury and material damage, please observe the warning and safety information provided in these operating instructions.
-
Page 15: On-Site Installation
Alternatively, a self- sufficient water supply can also be installed. In addition, with the INTEGO an optional fresh water bottle, or with the INTEGO pro the empty tank for waterline treatment solution can be used as a water container. For dental…
-
Page 16: Connection To The Public Drinking Water System
The INTEGO pro dental treatment unit, if it is equipped with a waterline treatment system, complies with the requirements of EN 1717 (free discharge with an air gap ≥…
-
Page 17: Trouble-Free Operation
No restrictions apply when using salt blasting devices in connection with Suction of steel abrasives permissible Sirona dental treatment units. However, in such cases, make sure that the system is subsequently flushed with an adequate amount of water. 2.10 Patient chair Please observe the maximum load capacity for the patient chair.
-
Page 18: Intermittent Operation
Unsuitable care and cleaning agents may corrode the surface of the unit or impair function. Use only care, cleaning and disinfecting agents approved by Sirona! For more information, see «Care, cleaning, and disinfecting agents» [ → 178]. 65 47 686 D3543…
-
Page 19: Care And Cleaning Instructions For The Practice Team
For reasons of product safety, this product may be operated only with original Sirona accessories or third-party accessories expressly approved by Sirona. The user is responsible for any damage resulting from the use of non-approved accessories. If any units not approved by Sirona are connected, they must comply with the applicable standards, e.g.:…
-
Page 20: Electrostatic Discharge
2 Safety instructions Sirona Dental Systems GmbH 2.19 Electrostatic discharge Operating Instructions (USA) INTEGO ray image viewer. Electromagnetic interference can often be reduced by operating the external HF surgical device with a neutral electrode. Turn on the dental treatment unit with the Clean button inactive, to avoid malfunction, see section «Clean button»…
-
Page 21: Dismantling/Installation
Sirona Dental Systems GmbH 2 Safety instructions Operating Instructions (USA) INTEGO 2.20 Dismantling/Installation The amount of charge depends on several factors: The charge is: ● higher at low air humidity than at high air humidity, and ● higher with synthetic materials than with natural materials (clothing, floor coverings).
-
Page 22: Unit Description
«Connection to the public drinking water supply» [ → 16] Original language of this document: German INTEGO / INTEGO pro bear the CE marking in accordance with the CE marking, INTEGO / INTEGO pro provisions of Council Directive 93/42/EEC of June 14, 1993 concerning medical devices.
-
Page 23
EN 1717; see also the chapter entitled «Connection to the public drinking water system» [ → 16]. ® INTEGO is a registered trademark of Sirona Dental Systems GmbH. Product name is a registered trademark, INTEGO 65 47 686 D3543 D3543.201.03.02.23 10.2016… -
Page 24: Technical Data
3 Unit description Sirona Dental Systems GmbH 3.2 Technical data Operating Instructions (USA) INTEGO Technical data Model designation: INTEGO / INTEGO pro Model designation, power ratings Power connection: 100 – 240 V AC ± 10% 50/60 Hz Rated current: 3.3 A – 1.5 A at 100 – 240 V also max.
-
Page 25
Sirona Dental Systems GmbH 3 Unit description Operating Instructions (USA) INTEGO 3.2 Technical data Transport and storage Temperature: -40 °C – +70 °C Operating and transport conditions 1060 conditions: (-40 °F – 158 °F) Relative humidity: 10% – 95% Air pressure: 500 hPa – 1,060 hPa Operating conditions: Ambient temperature: 10 °C –… -
Page 26: System Overview Intego
3 Unit description Sirona Dental Systems GmbH 3.3 System overview INTEGO Operating Instructions (USA) INTEGO System overview INTEGO The INTEGO dental treatment unit comprises the following main components: INTEGO TS dental treatment unit Patient chair Flat headrest (shown here) or double articulating headrest…
-
Page 27
Patient chair Flat headrest or double articulating headrest (shown here) Pneumatic foot switch or C+ electronic foot switch (shown here) INTEGO CS dentist element with swivel arms Compact or Comfort (shown here) assistant element Compact water unit Main switch and external device connection (optional) 65 47 686 D3543 D3543.201.03.02.23 10.2016… -
Page 28: System Overview Intego Pro
Sirona Dental Systems GmbH 3.4 System overview INTEGO pro Operating Instructions (USA) INTEGO System overview INTEGO pro The INTEGO pro dental treatment unit comprises the following main components: INTEGO pro TS dental treatment unit Patient chair Flat headrest (shown here) or double articulating headrest…
-
Page 29
Patient chair Flat headrest or double articulating headrest (shown here) Pneumatic foot switch or C+ electronic foot switch (shown here) INTEGO pro CS dentist element with swivel arms Comfort assistant element Comfort water unit Main switch and external device connection (optional) 65 47 686 D3543 D3543.201.03.02.23 10.2016… -
Page 30: System Overview Of Intego Pro With Ambidextrous Option
Operating Instructions (USA) INTEGO System overview of INTEGO pro with Ambidextrous option The INTEGO and INTEGO pro dental treatment units with the Ambidextrous option comprise the following main components: INTEGO pro TS dental treatment unit with Ambidextrous option Patient chair…
-
Page 31
Sirona Dental Systems GmbH 3 Unit description Operating Instructions (USA) INTEGO 3.5 System overview of INTEGO / INTEGO pro with Turn option INTEGO pro CS dental treatment unit with Ambidextrous option Patient chair Flat headrest or double articulating headrest (shown here) Pneumatic foot switch or C+ electronic foot control (shown here) -
Page 32: Patient Chair
3 Unit description Sirona Dental Systems GmbH 3.6 Patient chair Operating Instructions (USA) INTEGO Patient chair The patient chair features a variety of adjustment options to optimally adjust the patient’s position during treatment. Flat headrest (shown here) or double articulating headrest Backrest…
-
Page 33: Head Support
Sirona Dental Systems GmbH 3 Unit description Operating Instructions (USA) INTEGO 3.7 Head support Head support 3.7.1 Flat headrest The headrest extension can be pulled in or out depending on the patient’s height. For upper jaw treatment, the magnetic head pad can be rotated and used as a neck rest.
-
Page 34: Foot Control
3 Unit description Sirona Dental Systems GmbH 3.8 Foot control Operating Instructions (USA) INTEGO Foot control 3.8.1 Pneumatic foot switch With a pneumatic foot switch, the compressed air valve for activating the high-speed handpieces is integrated into the foot switch. The high-speed handpieces are therefore continuously adjustable.
-
Page 35: C+ Electronic Foot Switch
Sirona Dental Systems GmbH 3 Unit description Operating Instructions (USA) INTEGO 3.8 Foot control 3.8.2 C+ electronic foot switch The C+ electronic foot control can be set as a speed foot control or direct starter for electric motors and the SIROSONIC L scaler. The compressed air for turbines cannot be adjusted.
-
Page 36: Dentist Element
Operating Instructions (USA) INTEGO Dentist element INTEGO and INTEGO pro can be equipped with a TS dentist element (with hanging hoses) or a CS dentist element (with whip arms). All functions of the dental treatment unit can be controlled via the control panel on the dentist element.
-
Page 37: Cs Dentist Element With Swivel Arms
The instrument hoses are placed above the dentist element over the whip arms. Instrument holder (max. 5 instruments) EasyTouch for INTEGO and INTEGO pro Swiveling tray holder on the CS dentist element for one or two (shown here) standard trays…
-
Page 38: Instrument Positions
• SiroCam AF+ The Standard 3-way syringe is only available for INTEGO. The INTEGO / INTEGO pro dental treatment units can be fitted with a maximum of two motors. A maximum of one SIROSONIC L scaler and one intraoral camera can be connected.
-
Page 39: User Interface
Sirona Dental Systems GmbH 3 Unit description Operating Instructions (USA) INTEGO 3.9 Dentist element 3.9.4 User interface The EasyTouch option is available for the INTEGO and INTEGO pro EasyTouch for INTEGO and INTEGO pro dental treatment units. INTEGO 10:45:03 Clean Touchscreen (pressure-sensitive user interface)
-
Page 40: Touch Screen
3 Unit description Sirona Dental Systems GmbH 3.9 Dentist element Operating Instructions (USA) INTEGO Touch screen 3.9.4.1 The touchscreen displays virtual function keys according to the program selected. A list of all function keys is provided in the Appendix of this document, see «Overview of all function keys».
-
Page 41: Fixed Keys
Sirona Dental Systems GmbH 3 Unit description Operating Instructions (USA) INTEGO 3.9 Dentist element Fixed keys 3.9.4.2 Clean key Clean Pressing this key deactivates the complete user interface of the dentist element. Pressing it again > 3 s reactivates the user interface.
-
Page 42: Assistant Element
The scope of functions of the assistant element is adapted to the dental assistant’s field of activity. The INTEGO / INTEGO pro dental treatment unit and INTEGO pro with Ambidextrous option can be equipped with the Compact or Comfort assistant element.
-
Page 43
Sirona Dental Systems GmbH 3 Unit description Operating Instructions (USA) INTEGO 3.10 Assistant element Comfort assistant element with dental treatment units without Ambidextrous option The Comfort assistant element is attached to the base of the patient chair by a support arm. It can be positioned so that the instruments can be reached by the dentist if he/she is performing treatment on his/her own. -
Page 44
3 Unit description Sirona Dental Systems GmbH 3.10 Assistant element Operating Instructions (USA) INTEGO Comfort assistant element with dental treatment units with Ambidextrous option The Comfort assistant element is attached to the water unit with a support arm. It can be positioned so that the instruments can be reached by the dentist if he/she is performing treatment on his/her own. -
Page 45: Instrument Positions
• SiroCam F • SiroCam AF • SiroCam AF+ The Standard 3-way syringe is only available for INTEGO. A Mini L.E.D. curing light, an intraoral camera or an additional spray aspirator can be connected to the dental treatment unit. Changes to holder 2 can only be made by your service engineer.
-
Page 46: User Interface
3 Unit description Sirona Dental Systems GmbH 3.10 Assistant element Operating Instructions (USA) INTEGO 3.10.2 User interface 3.10.3 Fixed keys on the assistant element Chair program S Fixed keys on the assistant element Mouth rinsing position with last-position memory function (programmable), seeProgramming chair positions» [ → 75]…
-
Page 47: Water Unit
The Compact water unit can be operated with an air jet pump (Air Venturi) instead of a suction device. The heater for the treatment water is in the water unit. For the INTEGO, the water heater is optional.
-
Page 48: Compact Water Unit
3 Unit description Sirona Dental Systems GmbH 3.11 Water unit Operating Instructions (USA) INTEGO 3.11.1 Compact water unit The Compact water unit is available only without a waterline treatment system. However, it can be equipped with a fresh water bottle for stand- alone water supply.
-
Page 49: Comfort Water Unit
Sirona Dental Systems GmbH 3 Unit description Operating Instructions (USA) INTEGO 3.11 Water unit 3.11.2 Comfort water unit The water unit can be optionally equipped with a waterline treatment system. It automatically adds a waterline treatment solution to the water that comes in contact with patients. This reduces the amount of bacteria in the water lines.
-
Page 50
3 Unit description Sirona Dental Systems GmbH 3.11 Water unit Operating Instructions (USA) INTEGO Suction hose connection for assistant element only tumbler filler Manually swiveling cuspidor (removable) Tumbler filler Cover of the storage tank for waterline treatment solution or stand-alone water supply Cleaning adaptor for water-carrying instruments of the dentist element for sanitizing and auto purge. -
Page 51: Ambidextrous Water Unit
Manually swiveling cuspidor (removable) Tumbler filler Cover of the storage tank for waterline treatment solution or stand-alone water supply (only with the INTEGO pro) Cleaning adaptor for water-carrying instruments of the dentist element for sanitizing and auto purge. Maintenance flap for accessing the cleaning agent tank to…
-
Page 52
Operating Instructions (USA) INTEGO Water unit INTEGO pro Ambidextrous with fresh water bottle With the INTEGO pro, the Ambidextrous water unit is available only without a waterline treatment system. However, it can be equipped with a fresh water bottle for stand-alone water supply. Switching between the fresh water bottle and public drinking water supply is another equipment option. -
Page 53
Sirona Dental Systems GmbH 3 Unit description Operating Instructions (USA) INTEGO 3.11 Water unit with the chemical suction hose cleaning option. For more information, see»Suction hose cleaning on the Turn water unit» [ → 207]. 65 47 686 D3543 D3543.201.03.02.23 10.2016… -
Page 54: External Device Connection
3 Unit description Sirona Dental Systems GmbH 3.12 External device connection Operating Instructions (USA) INTEGO 3.12 External device connection External medical accessories can be connected to external device connection. They must comply with the requirements of the Medical Device Directive 93/42/EEC. NOTICE Additional devices, hydrogen peroxide up to 0.2‰, waterline treatment system, and fresh water bottle are optional…
-
Page 55
Sirona Dental Systems GmbH 3 Unit description Operating Instructions (USA) INTEGO 3.12 External device connection IEC outlet socket with power supply (max. 6 A) Fuse for inlet connector (6.3 A slow-blow) Quick coupling for air Quick coupling for water Pressure Flow rate Water 2.2 ±… -
Page 56: Operation
Sanitizing must be performed prior to initial startup of your dental treatment unit if the dental treatment unit is equipped with this option. In the INTEGO, the purging and sanitizing functions and the fresh water bottle are available as options. Both options must be present to sanitize the water lines.
-
Page 57: Switching The Dental Treatment Unit On/Off
Sirona Dental Systems GmbH 4 Operation Operating Instructions (USA) INTEGO 4.1 Starting up the dental treatment unit 4.1.2 Switching the dental treatment unit on/off The dental treatment unit has a main switch with integrated fuse on the base of the chair. At the end of the working day, the dental treatment unit should be switched off to save energy and for safety reasons.
-
Page 58: Selecting A User Profile
4 Operation Sirona Dental Systems GmbH 4.1 Starting up the dental treatment unit Operating Instructions (USA) INTEGO 4.1.3 Selecting a user profile The EasyTouch comfort user interface can manage up to four user profiles. This way, multiple users can operate the dental treatment unit without having to forego their own individual treatment and operation related settings.
-
Page 59: Concept Of The User Interface
Sirona Dental Systems GmbH 4 Operation Operating Instructions (USA) INTEGO 4.2 Concept of the user interface Concept of the user interface 4.2.1 User interface 4.2.1.1 Virtual function keys The touchscreen displays virtual function keys according to the program selected. Required functions can be activated by touching the function keys with your finger.
-
Page 60: Status Column
4 Operation Sirona Dental Systems GmbH 4.2 Concept of the user interface Operating Instructions (USA) INTEGO Sub-screens usually are generally hidden automatically after a certain Return period has elapsed. The key (return arrow) closes the opened sub-screen immediately. Settings screens In many cases, functions not only can be switched on or off, but also can 10:45:03 be set.
-
Page 61: Foot Control
Sirona Dental Systems GmbH 4 Operation Operating Instructions (USA) INTEGO 4.3 Foot control Foot control The dental treatment unit can be operated with a pneumatic foot switch or the C+ electronic foot switch. 4.3.1 Pneumatic foot switch When the instrument is removed from the holder, on the EasyTouch, the instrument dialog is called up.
-
Page 62: C+ Electronic Foot Switch
4 Operation Sirona Dental Systems GmbH 4.3 Foot control Operating Instructions (USA) INTEGO 4.3.2 C+ electronic foot switch The C+ electronic foot switch operating elements are assigned different functions depending on whether the instruments are all in place or an instrument is removed from its holder.
-
Page 63
Sirona Dental Systems GmbH 4 Operation Operating Instructions (USA) INTEGO 4.3 Foot control 4-way foot control plate ✔ All instruments are in place. ➢ Move the 4-way foot switch plate to the left or right. Left: Chair program 1 is started. -
Page 64: Patient Chair
4 Operation Sirona Dental Systems GmbH 4.4 Patient chair Operating Instructions (USA) INTEGO Patient chair 4.4.1 Safety instructions ü û Patient chair, chair movements CAUTION The free space under the patient couch and up to the water unit can be decreased due to chair movements.
-
Page 65: Safety Stop
Sirona Dental Systems GmbH 4 Operation Operating Instructions (USA) INTEGO 4.4 Patient chair 4.4.2 Safety stop The dental treatment unit is equipped with various safety stops to prevent crushing and damage. The cutoff trigger points are shown in the following illustration: Display of triggered safety switches (all shown in one illustration)
-
Page 66: Triggering An Immediate Movement Stop
4 Operation Sirona Dental Systems GmbH 4.4 Patient chair Operating Instructions (USA) INTEGO 4.4.3 Triggering an immediate movement stop You can stop the movement of the chair to a programmed position as follows: ➢ Touch one of the patient chair keys on the EasyTouch.
-
Page 67: Armrests
Sirona Dental Systems GmbH 4 Operation Operating Instructions (USA) INTEGO 4.4 Patient chair 4.4.4 Armrests Armrests are available for the patient chair. The right armrest can be swiveled forward to facilitate getting in and out Both armrests can be swiveled of the chair. In dental treatment units with the Ambidextrous option, both armrests can be swiveled.
-
Page 68: Adjusting The Flat Headrest
4 Operation Sirona Dental Systems GmbH 4.4 Patient chair Operating Instructions (USA) INTEGO 4.4.6 Adjusting the flat headrest The headrest extension can be pulled in or out manually depending on the patient’s height. ➢ Pull the headrest out of the backrest or push it back in at the recessed grip A.
-
Page 69: Adjusting The Double Articulating Headrest
Sirona Dental Systems GmbH 4 Operation Operating Instructions (USA) INTEGO 4.4 Patient chair 4.4.7 Adjusting the double articulating headrest The double articulating headrest is equipped with two rotary joints. They facilitate manual adjustment of head inclination for maxillary/mandibular treatments. The headrest extension can be pushed in or pulled out manually to adjust it to the height of the patient.
-
Page 70: Moving The Patient Chair Via Chair Programs
IMPORTANT Cuspidor, manual, starting position Chair movements with cuspidor swiveled in INTEGO With the cuspidor bowl swiveled in, the chair cannot be moved. This prevents the patient from colliding with the cuspidor. Swing the cuspidor outward before initiating chair movement.
-
Page 71: Moving The Patient Chair To The Mouth Rinsing Position
Sirona Dental Systems GmbH 4 Operation Operating Instructions (USA) INTEGO 4.4 Patient chair Moving the patient chair to the mouth rinsing position 4.4.8.2 The following functions are factory preset to be activated in the mouth rinsing position: ● The operating light switches off ●…
-
Page 72: Activating Other Chair Programs
4 Operation Sirona Dental Systems GmbH 4.4 Patient chair Operating Instructions (USA) INTEGO Activating other chair programs 4.4.8.4 Via the touchscreen on the EasyTouch ✔ Start Instrument dialog is displayed on the touchscreen. ➢ Touch the key or the key briefly (< 2 s).
-
Page 73: Moving The Chair Manually
IMPORTANT Cuspidor, manual, starting position Chair movements with cuspidor swiveled in INTEGO With the cuspidor bowl swiveled in, the chair cannot be moved. This prevents the patient from colliding with the cuspidor. Swing the cuspidor outward before initiating chair movement.
-
Page 74: Adjusting The Chair Height
4 Operation Sirona Dental Systems GmbH 4.4 Patient chair Operating Instructions (USA) INTEGO Adjusting the chair height 4.4.9.2 Via the touchscreen on the EasyTouch ✔ Start Instrument dialog is displayed on the touchscreen. Adjust the chair height ➢ Touch the key. Via the 4-way foot switch ✔…
-
Page 75: Programming Chair Programs
Sirona Dental Systems GmbH 4 Operation Operating Instructions (USA) INTEGO 4.4 Patient chair 4.4.10 Programming chair programs The four chair programs preset in the factory: ● Mouth rinsing position S ● Entry/exit position 0 ● 1 and 2 can be individually programmed for each of the four user profiles (A to D) on the EasyTouch.
-
Page 76: Dentist Element
4 Operation Sirona Dental Systems GmbH 4.5 Dentist element Operating Instructions (USA) INTEGO Dentist element 4.5.1 Maximum load capacity TS dentist element The maximum load on the TS dentist element without a tray holder is 1 kg (2.2 lbs). The maximum load on the TS dentist element with a tray holder is 2 kg (4.4 lbs).
-
Page 77: Positioning The Dentist Element
Sirona Dental Systems GmbH 4 Operation Operating Instructions (USA) INTEGO 4.5 Dentist element 4.5.2 Positioning the dentist element Dentist element on support arm, collision, manual movement WARNING The dentist element could be positioned within the movement range of the patient chair. Moving the patient chair may cause the patient to collide with the dentist element or its support arm.
-
Page 78
4 Operation Sirona Dental Systems GmbH 4.5 Dentist element Operating Instructions (USA) INTEGO Positioning the CS dentist element (standard position) In the standard position, the support arm of the CS dentist element is attached to the right mount of the Compact water unit and to the rear mount of the Comfort water unit. -
Page 79
Sirona Dental Systems GmbH 4 Operation Operating Instructions (USA) INTEGO 4.5 Dentist element Positioning the CS dentist element (special position) Alternatively, the support arm of the CS dentist element can be attached to the left mount on the Compact water unit (special position) and with the Comfort water unit to the front mount. -
Page 80: Fixed Keys On The Dentist Element
4 Operation Sirona Dental Systems GmbH 4.5 Dentist element Operating Instructions (USA) INTEGO 4.5.3 Fixed keys on the dentist element An overview of the fixed keys on the EasyTouch can be found in the Description of Device, see «User interface» [ → 39].
-
Page 81: Placing The Instruments In Their Holders
Sirona Dental Systems GmbH 4 Operation Operating Instructions (USA) INTEGO 4.5 Dentist element 4.5.4 Placing the instruments in their holders Automatic opening of instrument dialogs On the EasyTouch, the respective instrument program appears on the touchscreen. If more than one instrument is removed from the holder, the speed or intensity or instrument dialog of the instrument removed first is displayed.
-
Page 82
4 Operation Sirona Dental Systems GmbH 4.5 Dentist element Operating Instructions (USA) INTEGO Cover for TS dentist element A cover can be purchased as an accessory for an instrument holder Cover which is not used. Insert the cover into an unassigned instrument holder. This prevents accidental deposit of an instrument in this holder. -
Page 83: General Instrument Functions
Sirona Dental Systems GmbH 4 Operation Operating Instructions (USA) INTEGO 4.5 Dentist element 4.5.5 General instrument functions Settings for the coolant, instrument light, and foot switch can be made in the sub-screen of the instrument removed from the holder. The sub-screens vary according to the instrument removed. Functions not available for the respective instrument are not displayed in the sub- screen.
-
Page 84: Instrument Functions
4 Operation Sirona Dental Systems GmbH 4.5 Dentist element Operating Instructions (USA) INTEGO 4.5.5.1.2 Activating the chip blower With the chip blower, an air jet comes out of the burr instrument nozzle. ✔ A highspeed handpiece or motor is removed from the holder.
-
Page 85
Sirona Dental Systems GmbH 4 Operation Operating Instructions (USA) INTEGO 4.5 Dentist element 4.5.5.2.2 Switch spray on/off on the pneumatic foot switch. The spray is switched on when the foot switch is activated in combination with the instrument. The spray can be switched on/off via the foot switch. -
Page 86
4 Operation Sirona Dental Systems GmbH 4.5 Dentist element Operating Instructions (USA) INTEGO ✔ An instrument is removed from the holder. ➢ Press the left button of the C+ electronic foot switch. If the preselected coolant is switched on, it will be displayed in the status column of the start and instrument dialog with a spray or air symbol. -
Page 87
Sirona Dental Systems GmbH 4 Operation Operating Instructions (USA) INTEGO 4.5 Dentist element The second sub-dialog is displayed. Direct starter/control foot switch 2. Touch the key. If the key is highlighted gray, the direct starter function is switched on. If the key is highlighted orange, the speed control foot switch function is switched on. -
Page 88: Saving Instrument Settings
4 Operation Sirona Dental Systems GmbH 4.5 Dentist element Operating Instructions (USA) INTEGO Saving instrument settings 4.5.5.3 DropMode When placing an instrument back in the holder, the instrument settings made are always saved in the user profile (DropMode). The next time the instrument is removed, the last settings made are available again.
-
Page 89: 3-Way Standard And Sprayvit E Syringe
The 3-way syringe is used to clean the treatment areas and blow them dry. It supplies air and preheated water media. The heater for the treatment water is in the water unit. For the INTEGO, the water heater is optional. IMPORTANT Also note the SPRAYVIT operating instructions as well as the infomation on care of the 3-way syringe Standard in the section «Sterilizing the standard 3-way syringe»…
-
Page 90: Using The Standard 3-Way Syringe
4 Operation Sirona Dental Systems GmbH 4.5 Dentist element Operating Instructions (USA) INTEGO Using the standard 3-way syringe 4.5.6.2 ➢ Press the key A. Air flows out of the instrument tip. Water ➢ Press the key B. Water flows out of the instrument tip.
-
Page 91: Turbine / Air Motor / Other Air-Driven Instruments
Operation of a highspeed handpiece with the pneumatic foot switch the drive air for the turbine can be regulated by the foot pedal. If instruments with a high air flow rate (e.g., SIROBoost from Sirona) are operated with the pneumatic foot switch, the operating pressure is reduced from 2.9 bar to 2.7 bar.
-
Page 92: Setting The Light Of The Highspeed Handpiece
4 Operation Sirona Dental Systems GmbH 4.5 Dentist element Operating Instructions (USA) INTEGO 4.5.7.2.2 Setting the highspeed handpiece light 1. Detach the turbine to be set from the holder. Sub-dialog 2. Press the fixed key. Highspeed handpiece The sub-dialog is displayed on the touchscreen.
-
Page 93: Electric Motor
(without carbon brushes). They are characterized by their precise controllability and durability. The speed range of the motors for INTEGO / INTEGO pro is between 1,200 and 40,000 rpm. If the dental treatment unit features the eControl option, the motor can be down-regulated to 100 rpm.
-
Page 94: Setting The Speed
4 Operation Sirona Dental Systems GmbH 4.5 Dentist element Operating Instructions (USA) INTEGO Setting the speed 4.5.8.2 Speeds are saved on the three favorite keys that can be accessed by pressing them. Individual speeds can be saved for each user profile on the favorite keys.
-
Page 95
Sirona Dental Systems GmbH 4 Operation Operating Instructions (USA) INTEGO 4.5 Dentist element IMPORTANT Electric motor, increments with favorite keys Increments The size of the increments depends on the speed range setting. From 100 to 1,000 rpm = 100 rpm increments (with eControl option) -
Page 96: Setting The Direction Of Rotation
4 Operation Sirona Dental Systems GmbH 4.5 Dentist element Operating Instructions (USA) INTEGO Setting the direction of rotation 4.5.8.3 The direction of rotation can be changed only when the motor is at a standstill. Tip: After starting the electric motor with the foot switch, an audible warning signal sounds 6 times if counterclockwise rotation is activated.
-
Page 97: Integrated Torque Control
Instruments from other manufacturers can lead to malfunctions. Third- party instruments may be improperly calibrated for endodontics. ➢ Use the Sirona ENDO 6:1 (from SN 6407 / July 2010) contra-angle handpiece for integrated torque control. 65 47 686 D3543…
-
Page 98
4 Operation Sirona Dental Systems GmbH 4.5 Dentist element Operating Instructions (USA) INTEGO Switching integrated torque control on/off 4.5.9.1 Switching torque control on Torque control is assigned to the burr drive removed from the holder. ✔ The desired electric motor for torque control is removed from the holder. -
Page 99
Sirona Dental Systems GmbH 4 Operation Operating Instructions (USA) INTEGO 4.5 Dentist element ✔ Endodontics dialog is displayed on the touchscreen. 1.00 Endo 3 Sub-dialog 1. Press the fixed key. Endodontics The sub-dialog is displayed. 1.00 Endo 3 Integrated torque control 2. -
Page 100
The contra-angle handpiece is automatically checked during calibration. This includes a measurement of motor current at different speeds to assess the properties of the system. Calibration only with Sirona instruments CAUTION Use only Sirona instruments to guarantee correct calibration. ✔ Endodontics dialog Endodontics or the sub-dialog is displayed on the touchscreen. -
Page 101
Sirona Dental Systems GmbH 4 Operation Operating Instructions (USA) INTEGO 4.5 Dentist element Changing direction of rotation 4.5.9.3 The direction of rotation can be changed only with the motor stopped. Counterclockwise rotation is performed without torque limitation. The torque setting keys are hidden when counterclockwise rotation is selected. -
Page 102
4 Operation Sirona Dental Systems GmbH 4.5 Dentist element Operating Instructions (USA) INTEGO Setting the speed and torque 4.5.9.5 With the torque control switched on, torque and speed of the contra-angle handpiece are indicated, but not of the motor. The control electronics of the bur drive calculate the motor control based on the specified contra- handpiece gear reduction and the set torque and speed. -
Page 103
Sirona Dental Systems GmbH 4 Operation Operating Instructions (USA) INTEGO 4.5 Dentist element Using the ApexLocator 4.5.9.6 ✔ The dental treatment unit is prepared for apex measurements using the instrument, see section «Preparing to use the ApexLocator» [ → 107]. ✔ Endodontics dialog… -
Page 104
4 Operation Sirona Dental Systems GmbH 4.5 Dentist element Operating Instructions (USA) INTEGO 2. Use the – and + keys to set the required apex distance from 1.5 to 0. Stop If the distance is 0, the motor does not stop until it reaches the physiological apex. -
Page 105
Sirona Dental Systems GmbH 4 Operation Operating Instructions (USA) INTEGO 4.5 Dentist element Endodontics The second sub-dialog is displayed. Torque signal and apex acoustic signals 2. Press the key. If the key is marked in orange, the torque signal and the apex acoustic signals are switched on. -
Page 106: Apexlocator
4 Operation Sirona Dental Systems GmbH 4.5 Dentist element Operating Instructions (USA) INTEGO 4.5.10 ApexLocator The ApexLocator is available only with the EasyTouch Comfort user interface. The ApexLocator can be used to measure the working length of the root canal file in endodontic treatments using electrical impedance.
-
Page 107: Preparing To Use The Apexlocator
Sirona Dental Systems GmbH 4 Operation Operating Instructions (USA) INTEGO 4.5 Dentist element Preparing to use the ApexLocator 4.5.10.1 Apex adapter, mucosal electrode and file clamp The mucosal electrode and the file clamp are connected to the socket of the dentist element using the apex adapter. The socket is located on the left and to the rear, below the dentist element.
-
Page 108
Sirona Dental Systems GmbH 4.5 Dentist element Operating Instructions (USA) INTEGO For endodontic treatments with the ApexLocator, the Sirona handpiece Sirona ENDO 6:1 handpiece or torque-limiting handpiece ENDO 6:1 (from SN 6407 / July 2010) is required when using the integrated torque control and a torque-limiting handpiece is required when using in the motor dialog (without torque control). -
Page 109: Distance Display
Sirona Dental Systems GmbH 4 Operation Operating Instructions (USA) INTEGO 4.5 Dentist element Distance display 4.5.10.2 The measured root canal depth is shown in the distance display on the touchscreen. A bar with 11 display levels shows the distance from the root canal file to the physiological apex (apical constriction). The root canal is divided into four colored sections in the distance display.
-
Page 110
4 Operation Sirona Dental Systems GmbH 4.5 Dentist element Operating Instructions (USA) INTEGO Green region The tip of the root canal file has reached the physiological apex. Red region The tip of the root canal file has pierced the physiological apex. The instrument overshoot is displayed. -
Page 111: Beeps
Sirona Dental Systems GmbH 4 Operation Operating Instructions (USA) INTEGO 4.5 Dentist element Beeps 4.5.10.3 In addition to the graphical distance display on the touchscreen, the position of the file in the root canal can also be indicated as an acoustic signal.
-
Page 112: Performing Manual Measurements With The File Clamp
4 Operation Sirona Dental Systems GmbH 4.5 Dentist element Operating Instructions (USA) INTEGO Performing manual measurements with the file clamp 4.5.10.4 For endodontic examination, a manual measurement can be performed using the file clamp and a root canal file. ✔ The dental treatment unit is prepared for manual measurements using the file clamp, see section «Preparing to use the ApexLocator»…
-
Page 113: Endodontic Treatment With Apexlocator And Torque
IMPORTANT ApexLocator, SIRONiTi APEX SIRONiTi APEX Only Sirona SIRONiTi APEX must be used to perform apex measurement using a torque-limiting handpiece! The electrical conductivity can only be ensured using this handpiece. SIRONiTi APEX is not available in the USA.
-
Page 114
4 Operation Sirona Dental Systems GmbH 4.5 Dentist element Operating Instructions (USA) INTEGO The set distance is displayed to the left of the – and + keys. The Stop Motor dialog preset motor stop position is displayed in the as a black triangle to the right of the distance display under the text «Stop». -
Page 115
Sirona Dental Systems GmbH 4 Operation Operating Instructions (USA) INTEGO 4.5 Dentist element CAUTION Preventing incorrect measurements When performing the apex measurement, wear non-conductive gloves to avoid measurement errors caused by unwanted leakage current. During the measurement, the instrument must not come into contact with the patient’s mucosa, metallic tooth restorations, or the mucosal electrode. -
Page 116: Sirosonic L Scaler
Ultrasonic handpiece, only Sirona tips CAUTION In some cases, ultrasonic tips from other manufacturers do not guarantee safe operation. ➢ Use only ultrasonic tips from Sirona. 4.5.11.2 Setting the intensity Intensities are saved on the three favorite keys that can be accessed by pressing them.
-
Page 117
Sirona Dental Systems GmbH 4 Operation Operating Instructions (USA) INTEGO 4.5 Dentist element Changing the intensity ➢ Press and hold the left or right favorite key (> 1 s). The intensity is increased or reduced. The favorite keys are shaded gray for intermediate values. -
Page 118
4 Operation Sirona Dental Systems GmbH 4.5 Dentist element Operating Instructions (USA) INTEGO The key is highlighted orange. In the ultrasonic dialog, the 10:45:03 endodontics intensity is displayed instead of the ultrasonic intensity. Endo 65 47 686 D3543 D3543.201.03.02.23 10.2016… -
Page 119: Mini L.e.d. Curing Light
Sirona Dental Systems GmbH 4 Operation Operating Instructions (USA) INTEGO 4.5 Dentist element 4.5.12 Mini L.E.D. curing light The function is described in the chapter on the assistant element, see «Mini L.E.D. curing light» [ → 127]. 4.5.13 SiroCam F/AF/AF+ intraoral camera Functionality is described in the «SIVISION digital video system»…
-
Page 120: Timer Function
4 Operation Sirona Dental Systems GmbH 4.5 Dentist element Operating Instructions (USA) INTEGO 4.5.14 Timer function A set time can be counted down to zero with the timer function. A time loop (automatic restart of the countdown) and an acoustic signal (when the set time has expired) can be added to each timer.
-
Page 121: Assistant Element
Sirona Dental Systems GmbH 4 Operation Operating Instructions (USA) INTEGO 4.6 Assistant element Assistant element 4.6.1 Maximum load capacity Compact assistant element The Compact assistant element has no tray. Assistant element, support arm CAUTION To prevent injuries caused by falling objects, never place anything on the support arm of the assistant element.
-
Page 122: Fixed Keys On The Assistant Element
4 Operation Sirona Dental Systems GmbH 4.6 Assistant element Operating Instructions (USA) INTEGO 4.6.3 Fixed keys on the assistant element The functions assigned to the keys can be switched on/off on the assistant element. The operating contexts or setting screens can be accessed only on the dentist element.
-
Page 123: Flushing The Cuspidor
Sirona Dental Systems GmbH 4 Operation Operating Instructions (USA) INTEGO 4.6 Assistant element Flushing the cuspidor 4.6.3.3 The flushing function can be used for rough cleaning of the cuspidor during treatment. Flushing ➢ Press the fixed key. The flushing function is activated for the preset flushing time.
-
Page 124: Suction Handpieces
➢ Make sure that you hold the suction tip in such a way that the opening cannot accidentally attach to the oral mucous membranes. Sirona recommends using spray aspirator cannulas with additional air intake, see «Spare parts, Consumables» [ → 258].
-
Page 125
Sirona Dental Systems GmbH 4 Operation Operating Instructions (USA) INTEGO 4.6 Assistant element Saliva ejector A curved tip that can be placed in the corner of the mouth is provided for saliva ejection. The suction flow can be stopped and regulated using the A rotating knob. -
Page 126: 3-Way Standard And Sprayvit E Syringe
4 Operation Sirona Dental Systems GmbH 4.6 Assistant element Operating Instructions (USA) INTEGO 4.6.5 3-way standard and SPRAYVIT E syringe The function is described in the chapter on the assistant element, see «Standard and SPRAYVIT E 3-way syringe» [ → 89]. 65 47 686 D3543…
-
Page 127: Mini L.e.d. Curing Light
Sirona Dental Systems GmbH 4 Operation Operating Instructions (USA) INTEGO 4.6 Assistant element 4.6.6 Mini L.E.D. curing light The curing light is used to cure composite material with short-wave light. 4.6.6.1 Safety instructions Curing light, laser radiation CAUTION The curing light contains powerful LEDs. In accordance with IEC 62471, they are classified in risk group 2 with the light bar removed.
-
Page 128: Connecting The Mini L.e.d
4 Operation Sirona Dental Systems GmbH 4.6 Assistant element Operating Instructions (USA) INTEGO Connecting the Mini L.E.D. 4.6.6.3 The Mini L.E.D. is connected to the assistant element in holder 2. 1. Connect the supply cable A to the dental treatment unit. 2. Screw the hose coupling B onto the Mini L.E.D. C.
-
Page 129
Sirona Dental Systems GmbH 4 Operation Operating Instructions (USA) INTEGO 4.6 Assistant element Quick curing mode In the quick curing mode, the Mini L.E.D. operates at full power for 10 seconds. In this mode, the light intensity output is as follows: Sec. -
Page 130: Operating The Mini L.e.d
4 Operation Sirona Dental Systems GmbH 4.6 Assistant element Operating Instructions (USA) INTEGO Operating the Mini L.E.D. 4.6.6.5 IMPORTANT Curing light, contact with the material to be cured Contact with the material to be cured Make sure that the light guide never touches the material to be cured, as this may cause damage to the light guide and reduce its effectiveness.
-
Page 131: Technical Data
Sirona Dental Systems GmbH 4 Operation Operating Instructions (USA) INTEGO 4.6 Assistant element Technical data 4.6.6.6 General Technical Data on Mini L.E.D. Model: Mini L.E.D. Weight of handpiece without hose: 105 g Dimensions: Dia. 23mm x 240mm Current consumption of handpiece: 5 V DC / 0.65 A…
-
Page 132: Water Unit
4.7.2 Tumbler filling The heater for the treatment water is in the water unit. The water heater Water heater in the water unit, optional with INTEGO is optional in the INTEGO. 4.7.2.1 Tumbler filling Filling the tumbler 1.
-
Page 133: Tumbler Filling With Automatic Sensor Control
Sirona Dental Systems GmbH 4 Operation Operating Instructions (USA) INTEGO 4.7 Water unit time when the mouth rinsing position chair program (S) is activated. 3. Use the – and + keys to set the filling time. 4.7.2.2 Tumbler filling with automatic sensor control…
-
Page 134: Flushing The Cuspidor
4 Operation Sirona Dental Systems GmbH 4.7 Water unit Operating Instructions (USA) INTEGO 4.7.3 Flushing the cuspidor The flushing function can be used for rough cleaning of the cuspidor during treatment. The cuspidor is always flushed using the public drinking water supply. It is not taken from the fresh water bottle or the tank for stand-alone water supply.
-
Page 135: Adjusting The Water Amount For Flushing
Sirona Dental Systems GmbH 4 Operation Operating Instructions (USA) INTEGO 4.7 Water unit Adjusting the water amount for flushing 4.7.3.2 The water quantity and water pressure for flushing can be set using a valve. 1. Open the maintenance flap A on the base of the water unit.
-
Page 136: Stand-Alone Water Supply
The stand-alone water supply functionality of the INTEGO is only available if the dental treatment unit is equipped with a fresh water bottle. The INTEGO pro dental treatment unit must be equipped with the integrated water waterline treatment system. In every mode, the cuspidor is flushed from the public drinking water supply.
-
Page 137: Water Supply For The Intego
The fresh water bottle is treated with compressed air when it is attached to the holder. Unsuitable bottles such as beverage bottles can burst. ➢ Use only Sirona fresh water bottles! ➢ Please also observe the general safety instructions, see section «Fresh water bottle» [ → 18].
-
Page 138
4 Operation Sirona Dental Systems GmbH 4.7 Water unit Operating Instructions (USA) INTEGO Switching between the public drinking water supply and fresh water bottle If the dental treatment unit is equipped with the optional fresh water bottle in the version which allows switching to the public drinking water supply, the water supply can be switched by turning a lever. -
Page 139: Water Supply For The Intego Pro
Sirona Dental Systems GmbH 4 Operation Operating Instructions (USA) INTEGO 4.7 Water unit Water supply for the INTEGO pro 4.7.4.2 In the Comfort and Ambidextrous water units, the stand-alone water supply should be set only as a temporary operating state if the public drinking water is contaminated and not as a permanent operating state.
-
Page 140
4 Operation Sirona Dental Systems GmbH 4.7 Water unit Operating Instructions (USA) INTEGO If there is still waterline treatment solution in the tank, it is rinsed Auto Refill water down the drain. This can take up to 6 minutes. The display then appears on the touchscreen. -
Page 141: Converting The Turn Water Unit For Right And Left-Handed People
Sirona Dental Systems GmbH 4 Operation Operating Instructions (USA) INTEGO 4.7 Water unit 4.7.5 Converting the Ambidextrous water unit for right and left- handed people CAUTION There must be no patient in the chair during conversion. The patient would otherwise collide with dental treatment unit components.
-
Page 142
4 Operation Sirona Dental Systems GmbH 4.7 Water unit Operating Instructions (USA) INTEGO 2. If a tray is available on the dentist element: remove the tray from the holder. 3. If an additional holder has been installed on the dentist element: turn the additional holder inwards. -
Page 143
Sirona Dental Systems GmbH 4 Operation Operating Instructions (USA) INTEGO 4.7 Water unit 6. Move the dentist element right to the top. 7. Swivel the dentist element so that it is positioned closely in the grip area of the light support bar. -
Page 144
4 Operation Sirona Dental Systems GmbH 4.7 Water unit Operating Instructions (USA) INTEGO 9. If a Comfort assistant element is present; swivel the Comfort assistant element to the water unit underneath the cuspidor bowl. Turn the water unit CAUTION The water unit is now guided with a rotary motion to the opposite side of the dental treatment unit. -
Page 145
Sirona Dental Systems GmbH 4 Operation Operating Instructions (USA) INTEGO 4.7 Water unit 1. Press the foot pedal and move the water unit slightly upwards. The patient chair will move automatically into a position in which the water unit can be rotated. An acoustic signal will also be given. -
Page 146
4 Operation Sirona Dental Systems GmbH 4.7 Water unit Operating Instructions (USA) INTEGO 2. If a tray holder on the dentist element is present: remove the screw by hand and take the tray holder out of the dentist element. 3. Install both the tray holder and the additional holder on the other side of the dentist element. -
Page 147: Swiveling Tray Holder
Sirona Dental Systems GmbH 4 Operation Operating Instructions (USA) INTEGO 4.8 Swiveling tray holder Swiveling tray holder Maximum load capacity The TS dentist element can be equipped with a tray. The holder has room Tray on the TS dentist element with Turn option for two standard trays.
-
Page 148: X-Ray Image Viewer
4 Operation Sirona Dental Systems GmbH 4.9 X-ray image viewer Operating Instructions (USA) INTEGO X-ray image viewer The TS and CS dentist elements can be equipped with an X-ray viewer. The ON/OFF switch is on the X-ray viewer. It switches off automatically after 10 minutes.
-
Page 149: Operating Light
Sirona Dental Systems GmbH 4 Operation Operating Instructions (USA) INTEGO 4.10 Operating light 4.10 Operating light The operating light is attached to a multi-jointed support arm. It can be Operating lights LEDlight, LEDview and LEDviewPLUS easily adjusted to illuminate the treatment area using the handles. Brakes in the support arm hold the operating light in the position to which it has been adjusted.
-
Page 150: Switching The Operating Light On/Off
4 Operation Sirona Dental Systems GmbH 4.10 Operating light Operating Instructions (USA) INTEGO 4.10.1 Switching the operating light on/off Operating light Repeatedly press the fixed key to set the following switching positions at the assistant element: 1. Switched on: The operating light is switched on at the preset brightness level.
-
Page 151: Setting The Brightness, Color Temperature And Sensor Control Of The
Sirona Dental Systems GmbH 4 Operation Operating Instructions (USA) INTEGO 4.10 Operating light If the key is highlighted in orange, the operating light can be controlled with the contactless sensor. The keys for adjusting the operating distance are displayed. 4. Use the – and + keys to set the desired operating distance (5 levels).
-
Page 152: X-Ray Tube Unit
4.11 X-ray tube unit Operating Instructions (USA) INTEGO 4.11 X-ray tube unit The dental treatment units INTEGO and INTEGO pro can be equipped PLUS with the HELIODENT X-ray tube unit. No X-ray tube unit is available for dental treatment units with the Ambidextrous option.
-
Page 153: Sivision Digital Video System
Sirona Dental Systems GmbH 4 Operation Operating Instructions (USA) INTEGO 4.12 SIVISION digital video system 4.12 SIVISION digital video system The SIVISION digital video system enables intraoral and extraoral images to be made. The SiroCam F / AF / AF+ intraoral camera generates digital image data which can be transmitted via a USB 2.0 port (high-speed Universal Serial Bus) to a connected PC and stored there.
-
Page 154: Sivision Monitor
4 Operation Sirona Dental Systems GmbH 4.12 SIVISION digital video system Operating Instructions (USA) INTEGO 4.12.1 SIVISION monitor 22″ AC monitor The monitor is equipped with loudspeakers. There is an IEC socket on the back of the monitor for the power supply. Please refer to the operating instructions for the 22″…
-
Page 155: Sirocam F / Af / Af+ Intraoral Camera
Sirona Dental Systems GmbH 4 Operation Operating Instructions (USA) INTEGO 4.12 SIVISION digital video system 4.12.2 SiroCam F / AF / AF+ intraoral camera Safety instructions 4.12.2.1 The SiroCam F / AF / AF+ intraoral camera is a sensitive optical instrument and must therefore always be handled with care.
-
Page 156: Connecting The Sirocam F / Af / Af+ Intraoral Camera
4 Operation Sirona Dental Systems GmbH 4.12 SIVISION digital video system Operating Instructions (USA) INTEGO Connecting the SiroCam F / AF / AF+ intraoral camera 4.12.2.3 Connecting the intraoral camera to the TS dentist element Depending on the equipment version, the intraoral camera can be placed at instrument position five or in the additional holder.
-
Page 157
Sirona Dental Systems GmbH 4 Operation Operating Instructions (USA) INTEGO 4.12 SIVISION digital video system Connecting the intraoral camera to the assistant element The intraoral camera can be operated at the second instrument position of the assistant element. The camera connection is located underneath the assistant element instead of the connection for the curing light. -
Page 158: Operating Sirocam F / Af / Af+ Intraoral Camera
4 Operation Sirona Dental Systems GmbH 4.12 SIVISION digital video system Operating Instructions (USA) INTEGO Operating SiroCam F / AF / AF+ intraoral camera 4.12.2.4 An external or internal PC is required in order to display the video images of the SiroCam F / AF / AF+ intraoral camera on the SIVISION monitor.
-
Page 159
Sirona Dental Systems GmbH 4 Operation Operating Instructions (USA) INTEGO 4.12 SIVISION digital video system 4.12.2.4.3 Using the camera with SI Video Using SI Video, up to four still images can be generated with the SiroCam F / AF / AF+ intraoral camera. These can be displayed on the SIVISION monitor either as a sequence of single images or simultaneously as a quad image. -
Page 160
4 Operation Sirona Dental Systems GmbH 4.12 SIVISION digital video system Operating Instructions (USA) INTEGO Selecting the next quadrant In order to produce another still image, another quadrant must be selected. If a still image is already contained in the desired quadrant, it can be replaced by a new image. -
Page 161
Sirona Dental Systems GmbH 4 Operation Operating Instructions (USA) INTEGO 4.12 SIVISION digital video system 4.12.2.4.4 Using the camera with SIDEXIS Besides the display and processing of X-ray images, SIDEXIS XG or SIDEXIS 4 can be used additionally as a video application for the SiroCam F / AF / AF+ intraoral camera. -
Page 162: Technical Camera Data
4 Operation Sirona Dental Systems GmbH 4.12 SIVISION digital video system Operating Instructions (USA) INTEGO Generating a still image ✔ The live image is displayed on the SIVISION monitor. 1. Step on the foot pedal. The display switches from live to still image.
-
Page 163: Operation With A Pc
/ SIVISION connect» manual. IT network CAUTION Integrating the INTEGO / INTEGO pro into an IT network that includes other devices can lead to previously unknown risks. The following changes to the IT network can lead to new risks: •…
-
Page 164: Sivision Program
4 Operation Sirona Dental Systems GmbH 4.13 Operation with a PC Operating Instructions (USA) INTEGO 4.13.1 SIVISION program Various PC applications of the PC can be started and operated in the SIVISION program. You can select the PC applications to be operable via the dental treatment unit in SIUCOM plus.
-
Page 165: Communication With The Media Player
Sirona Dental Systems GmbH 4 Operation Operating Instructions (USA) INTEGO 4.13 Operation with a PC The dental treatment unit starts the PC applications automatically. An orange square located in front of the respective PC application on the M.player touchscreen indicates whether the application has been started and is ready for operation on the PC.
-
Page 166: Communication With Sidexis
4 Operation Sirona Dental Systems GmbH 4.13 Operation with a PC Operating Instructions (USA) INTEGO Communication with SIDEXIS 4.13.1.4 The SIDEXIS PC application enables you e.g. to display X-ray and intraoral camera images and transmit them to the SIVISION monitor. The live image of the SiroCam F / AF / AF+ intraoral camera is displayed in SIDEXIS and can be saved as a still image in the patient database.
-
Page 167
Sirona Dental Systems GmbH 4 Operation Operating Instructions (USA) INTEGO 4.13 Operation with a PC Overview layout The opened image windows are scaled in the display area so that no scroll bars or as few scroll bars as possible must be displayed. The image windows are arranged without overlapping. -
Page 168
4 Operation Sirona Dental Systems GmbH 4.13 Operation with a PC Operating Instructions (USA) INTEGO Filter black dots Single pixel errors may occur when taking digital X-rays. These pixel errors appear as individual black dots when the optimum resolution (100%) is selected. They are removed by SIDEXIS. -
Page 169: Usb Interfaces
USB interface, only units of type BF CAUTION Only type BF medical devices and applied parts according to IEC 60601-1, e.g. the Sirona XIOS XG USB module intraoral X-ray system, may be connected to the USB interface. Type BF USB interface, only units without power supply unit CAUTION USB devices with their own voltage supply (e.g., via a power supply unit)
-
Page 170: Configuration Of The Dental Treatment Unit (Setup)
4 Operation Sirona Dental Systems GmbH 4.14 Configuration of the dental treatment unit (setup) Operating Instructions (USA) INTEGO 4.14 Configuration of the dental treatment unit (setup) Various dental treatment unit functions can be individually configured via the Setup settings. The dental treatment unit can therefore be adapted to match each user’s personal method of treatment.
-
Page 171: Setting The Time And Date
Sirona Dental Systems GmbH 4 Operation Operating Instructions (USA) INTEGO 4.14 Configuration of the dental treatment unit (setup) IMPORTANT Missing function keys Missing function keys Function keys for functions which the dental treatment unit equipment does not include are not displayed on the touchscreen.
-
Page 172: Configuring Control Options
4 Operation Sirona Dental Systems GmbH 4.14 Configuration of the dental treatment unit (setup) Operating Instructions (USA) INTEGO 4.14.3 Configuring control options Operation of the entire dental treatment unit operation can be configured in this dialog. Control options ➢ Touch the key in the setup program.
-
Page 173
Sirona Dental Systems GmbH 4 Operation Operating Instructions (USA) INTEGO 4.14 Configuration of the dental treatment unit (setup) Coupling suction to the 4-way foot switch. 4.14.3.4 If the dental treatment unit is equipped with a position selector valve for the suction system, it can be set so suction flow can be interrupted or restarted by moving the 4-way foot control switch at the base of the chair in any direction. -
Page 174
4 Operation Sirona Dental Systems GmbH 4.14 Configuration of the dental treatment unit (setup) Operating Instructions (USA) INTEGO Adjusting the cleaning agent mixture for chemical suction hose 4.14.3.8 cleaning The chemical suction hose cleaning option is only available for the INTEGO pro. -
Page 175: Configuring The Network Connection
MAC address of the center are shown. Intego Nr 2 Name Call in your data processing specialist for network configuration. Ethernet Network configuration is described in detail in the «INTEGO / INTEGO pro 13-E7-15-31-A3-0C installation instructions». 4.14.5 Opening the service function The Service domain is intended to be used only by service engineers.
-
Page 176: Care, Cleaning And Maintenance By The Practice Team
5 Care, cleaning and maintenance by the practice team Sirona Dental Systems GmbH 5.1 Basics Operating Instructions (USA) INTEGO Care, cleaning and maintenance by the practice team Basics Handling mainly involves the following steps: ● Cleaning ● Disinfection ● Sterilization if possible It is recommended to clean the unit as soon as possible after use.
-
Page 177
[ → 235] Check the message system of the amalgam separator [ → 227] For a quick overview of the work involved, see the “Maintenance, cleaning, and disinfection schedule” for the INTEGO / INTEGO pro dental treatment unit. 65 47 686 D3543… -
Page 178: Care, Cleaning, And Disinfecting Agents
Approved care, cleaning, and disinfecting agents Approved care, cleaning, and disinfecting agents Use only care, cleaning and disinfecting agents approved by Sirona! For a continuously updated list of approved agents, please visit Care, cleaning, and disinfecting agents, with REF number «www.sirona.com»…
-
Page 179: General Handling Instructions
Sirona Dental Systems GmbH 5 Care, cleaning and maintenance by the practice team Operating Instructions (USA) INTEGO 5.1 Basics 5. Immerse the tester in the filled container for 30 seconds. The cardboard disk with the culture medium will now absorb 1 ml of the water sample.
-
Page 180: Inspection, Maintenance And Testing
Sterilization Sterilization may be done for components that are marked accordingly. Sirona recommends sterilization in a steam sterilizer (autoclave) according to ISO 13060, Class B (e.g., DAC PREMIUM/DAC PROFESSIONAL). The sterilization must be carried out with a multiple fractionated suction system (Class B sterilizer).
-
Page 181: Surfaces
Sirona Dental Systems GmbH 5 Care, cleaning and maintenance by the practice team Operating Instructions (USA) INTEGO 5.2 Surfaces Surfaces 5.2.1 Clean/disinfect surfaces The surfaces can be disinfected by spraying and wiping with surface disinfectants. NOTICE Surfaces, medication Drugs have a chemical reaction with the surface of the unit.
-
Page 182: Disinfect User Interfaces
NOTICE Care, cleaning, and disinfecting agents Approved care, cleaning, and disinfecting agents Use only care, cleaning and disinfecting agents approved by Sirona, see «Care, cleaning, and disinfecting agents» [ → 178]. Clean 1. Actuate the fixed key on the dentist element.
-
Page 183: Sterilize Silicone Mats And Handle Covers
Care, cleaning, and disinfecting agents Approved care, cleaning, and disinfecting agents Use only care, cleaning and disinfecting agents approved by Sirona, see «Care, cleaning, and disinfecting agents» [ → 178]. The dentist element features a removable silicone mat and silicone covers for the handles.
-
Page 184
5 Care, cleaning and maintenance by the practice team Sirona Dental Systems GmbH 5.2 Surfaces Operating Instructions (USA) INTEGO Assistant element The silicone mat of the Comfort assistant element is identical with that of the CS dentist element. 1. Switch the dental treatment unit off and remove the suction hoses and instruments from the holders of the assistant element. -
Page 185
NOTICE Care, cleaning, and disinfecting agents Approved care, cleaning, and disinfecting agents Use only care, cleaning and disinfecting agents approved by Sirona, see «Care, cleaning, and disinfecting agents» [ → 178]. 1. Hold the tray tightly. 2. Open the lock by swiveling the lever downwards. -
Page 186
Operating Instructions (USA) INTEGO 5.2.5 Care for, clean, and disinfect upholstery Special care, cleaning, and disinfecting agents are recommended by Sirona for the care, cleaning, and disinfection of the upholstery. NOTICE Care, cleaning, and disinfecting agents, reference Approved care, cleaning, and disinfecting agents Use only agents approved by Sirona for the upholstery, see»Care,… -
Page 187
● the used instruments after each patient ● At the end of the work day With the INTEGO pro dental treatment unit, it is also possible to automatically purge the water lines, see «Automatically purge water lines (autopurge function)». [ → 191]. -
Page 188
5 Care, cleaning and maintenance by the practice team Sirona Dental Systems GmbH 5.3 Instruments and instrument hoses Operating Instructions (USA) INTEGO 2. Set all of the instruments to be purged to their maximum water flow max. rate. The water regulators under the instrument holder must be turned counterclockwise. -
Page 189
Sirona Dental Systems GmbH 5 Care, cleaning and maintenance by the practice team Operating Instructions (USA) INTEGO 5.3 Instruments and instrument hoses Error message: Refill water (only for stand-alone water supply) Refill water If the display appears after the purge function has been… -
Page 190
5 Care, cleaning and maintenance by the practice team Sirona Dental Systems GmbH 5.3 Instruments and instrument hoses Operating Instructions (USA) INTEGO CAUTION Do not purge more than two burs simultaneously. If the dental treatment unit features the option of a third burr drive, the water flow rate is reduced when purging simultaneously. -
Page 191
5.3 Instruments and instrument hoses 5.3.3 Automatically purge water lines (autopurge function) The autopurge function is only available on the INTEGO pro dental treatment unit. The autopurge function enables automatic purging of all water-carrying instruments in the dentist element, of the 3-way SPRAYVIT E syringe in the dentist and assistant elements and of the tumbler filling. -
Page 192
5 Care, cleaning and maintenance by the practice team Sirona Dental Systems GmbH 5.3 Instruments and instrument hoses Operating Instructions (USA) INTEGO Start The sub-dialog is displayed. Auto Aqua Apex Dist Setup Autopurge function 2. Touch the key. Auto Error message: Deposit instruments… -
Page 193
SPRAYVIT E: valve lever in the up position, locking knob in the down position). Also for INTEGO pro CS: Move the swivel arm of the instruments to be purged into the operating position so that the weight of the instrument hoses keeps them in this position. -
Page 194
5 Care, cleaning and maintenance by the practice team Sirona Dental Systems GmbH 5.3 Instruments and instrument hoses Operating Instructions (USA) INTEGO IMPORTANT Pinching the instrument hoses Be careful not to pinch the instrument hoses when inserting the instruments. With dental treatment units with the Ambidextrous option: convert the water unit to the left side so that the adapters on the water unit point towards the patient chair, see «Converting the Turn water unit for right-… -
Page 195
Sirona Dental Systems GmbH 5 Care, cleaning and maintenance by the practice team Operating Instructions (USA) INTEGO 5.3 Instruments and instrument hoses ➢ Remove the instruments from the water unit and put them back in place. When all of the instruments have been put in the holders, the Purge function activated display disappears. -
Page 196
5.3.4 Purging water lines manually With the INTEGO dental treatment unit, the purge and sanitize function is optional. If this function is not available, purging of the water lines must be carried out manually. The water-carrying instruments of the dentist element, the 3-way syringe of the dentist and assistant element and the tumbler filling must be purged. -
Page 197
Sirona Dental Systems GmbH 5 Care, cleaning and maintenance by the practice team Operating Instructions (USA) INTEGO 5.3 Instruments and instrument hoses 5. Activate the spray. Toggle the switch on the pneumatic foot switch to the right. Activate the left key on the C+ electronic foot control. -
Page 198
5 Care, cleaning and maintenance by the practice team Sirona Dental Systems GmbH 5.3 Instruments and instrument hoses Operating Instructions (USA) INTEGO 5.3.5 Lubricate, disinfect/sterilize the treatment instruments Treatment instruments 5.3.5.1 The procedures required for the following treatment instruments are described in the following separate operating instructions: ●… -
Page 199
Care, cleaning, and disinfecting agents Approved care, cleaning, and disinfecting agents Use only care, cleaning and disinfecting agents approved by Sirona, see «Care, cleaning, and disinfecting agents» [ → 178]. Disconnect the mucosal electrode from the connection cable. The metal hook can be sterilized, and the connection cable can be disinfected by wiping. -
Page 200
Care, cleaning, and disinfecting agents Approved care, cleaning, and disinfecting agents Use only care, cleaning and disinfecting agents approved by Sirona, see «Care, cleaning, and disinfecting agents» [ → 178]. 1. Remove the connection cable of the Mini L.E.D. by turning the 132°C –… -
Page 201
Sirona Dental Systems GmbH 5 Care, cleaning and maintenance by the practice team Operating Instructions (USA) INTEGO 5.3 Instruments and instrument hoses 5.3.6 Change the cotton wool roll on the turbine hose and oil collector Return air containing a small amount of highspeed handpiece oil is emitted at the unit end of the highspeed handpiece hose. -
Page 202
5 Care, cleaning and maintenance by the practice team Sirona Dental Systems GmbH 5.3 Instruments and instrument hoses Operating Instructions (USA) INTEGO Oil collector The CS dentist element is also equipped with an oil collector. It is located below the instrument connections and collects any liquids that leak out. -
Page 203
Sirona Dental Systems GmbH 5 Care, cleaning and maintenance by the practice team Operating Instructions (USA) INTEGO 5.4 Vacuum system Vacuum system 5.4.1 Purge the vacuum system. If the dental treatment unit is equipped with the suction hose cleaning option, proceed according to the instruction in section «Cleaning the suction hoses»… -
Page 204
5 Care, cleaning and maintenance by the practice team Sirona Dental Systems GmbH 5.4 Vacuum system Operating Instructions (USA) INTEGO Cleaning the suction hose on the Compact water unit 5.4.2.1 In the Compact water unit, the suction hose cleaning is optional. The suction hose cleaning option is not available in combination with an air jet pump (Air Venturi). -
Page 205
➢ Do not fill DENTOSEPT P waterline treatment solution into the cleaning agent tank for chemical suction hose cleaning! Use only «Agents for the suction lines» approved by Sirona, see Care, cleaning and disinfecting agents» [ → 178]. 65 47 686 D3543… -
Page 206
5 Care, cleaning and maintenance by the practice team Sirona Dental Systems GmbH 5.4 Vacuum system Operating Instructions (USA) INTEGO 1. Open the maintenance flap on the base of the water unit. The cleaning agent tank for chemical suction hose cleaning is located on the left side. -
Page 207
Suction hose cleaning on the Ambidextrous water unit 5.4.2.3 With the INTEGO pro dental treatment unit, the Ambidextrous water unit is always equipped with an adapter for the suction hose cleaning function. This can be used to purge the suction hoses consecutively. A cleaning agent is automatically added to the water if the dental treatment unit is equipped with the chemical suction hose cleaning option. -
Page 208
Sirona Dental Systems GmbH 5.4 Vacuum system Operating Instructions (USA) INTEGO Refill cleaning agent (for the INTEGO pro with chemical suction hose cleaning option) When the adjacent display appears in the status column of the touchscreen, the cleaning agent for cleaning the suction system is almost all gone. -
Page 209
Central supply for chemical suction hose cleaning 5.4.2.4 For clinical use, INTEGO / INTEGO pro dental treatment units can be fitted with a central cleaning agent supply for chemical suction hose cleaning. The CDS 60 system of Dürr Dental is intended for this purpose. -
Page 210
NOTICE Care, cleaning, and disinfecting agents Approved care, cleaning, and disinfecting agents Use only care, cleaning and disinfecting agents approved by Sirona, see «Care, cleaning, and disinfecting agents» [ → 178]. NOTICE Vacuum system, foaming cleaning agents Domestic cleaning agents foam up. -
Page 211
Sirona Dental Systems GmbH 5 Care, cleaning and maintenance by the practice team Operating Instructions (USA) INTEGO 5.4 Vacuum system 5. Remove the suction tips from the suction hoses. 6. Set maximum suction flow on the suction handpieces. 7. Attach the adapter C to the saliva ejector. -
Page 212
5 Care, cleaning and maintenance by the practice team Sirona Dental Systems GmbH 5.4 Vacuum system Operating Instructions (USA) INTEGO Rinsing the cleaning agent 1. Following the cleaning process, pour at least 1 liter of water into the cuspidor. The water is drawn off, thus preventing any cleaning agent residues from remaining in the suction hoses. -
Page 213
Rubber materials such as e.g. O-rings are corroded by unsuitable greases. ➢ Do not under any circumstances use vaseline or silicone greases. ➢ Use only greases approved by Sirona. 1. Detach the handpiece of the spray aspirator and the saliva ejector No surgical suction device option from the suction hoses. -
Page 214
5 Care, cleaning and maintenance by the practice team Sirona Dental Systems GmbH 5.4 Vacuum system Operating Instructions (USA) INTEGO 5.4.5 Empty the central suction sieve Depending on the options, there is a central suction sieve in the Compact water unit or Comfort assistant element to retain solid materials (e.g. -
Page 215
Sirona Dental Systems GmbH 5 Care, cleaning and maintenance by the practice team Operating Instructions (USA) INTEGO 5.4 Vacuum system Emptying the central suction sieve in the Comfort assistant element 1. Open the cover on the suction sieve on the assistant element and remove it. -
Page 216
5 Care, cleaning and maintenance by the practice team Sirona Dental Systems GmbH 5.5 Components of the water unit Operating Instructions (USA) INTEGO Components of the water unit 5.5.1 Clean the gold trap The gold trap retains larger solid particles to prevent them from being washed down the drain in the cuspidor bowl. -
Page 217
Foaming cleaning agents often cause foam and water to be sucked into the dry suction system. This can cause damage to the suction machine. ➢ Use only care, cleaning and disinfecting agents approved by Sirona, see»Care, cleaning, and disinfecting agents» [ → 178]. -
Page 218
Use the same agent as for the suction lines. NOTICE Care, cleaning, and disinfecting agents Approved care, cleaning, and disinfecting agents Use only care, cleaning and disinfecting agents approved by Sirona, see «Care, cleaning, and disinfecting agents» [ → 178]. NOTICE Vacuum system, foaming cleaning agents Domestic cleaning agents foam up. -
Page 219
Sirona Dental Systems GmbH 5 Care, cleaning and maintenance by the practice team Operating Instructions (USA) INTEGO 5.5 Components of the water unit 2. Fill the cuspidor with the cleaning solution and leave it to take effect. Observe the reaction time specified for the cleaning solution by the manufacturer. -
Page 220
5 Care, cleaning and maintenance by the practice team Sirona Dental Systems GmbH 5.5 Components of the water unit Operating Instructions (USA) INTEGO 5.5.4 Refilling DENTOSEPT P waterline treatment solution The Comfort and Ambidextrous water units can be optionally equipped waterline treatment system option with the Comfort and Turn water unit with a waterline treatment system. -
Page 221
Disinfectants for water lines Approved care, cleaning, and disinfecting agents Use only disinfectants which have been approved for water lines by Sirona for the waterline treatment system; see «Care, cleaning, and disinfecting agents» [ → 178]. 65 47 686 D3543… -
Page 222
5 Care, cleaning and maintenance by the practice team Sirona Dental Systems GmbH 5.5 Components of the water unit Operating Instructions (USA) INTEGO 5.5.5 Change the water and air filters If you notice any changes in media flows, check the water and air filters for permeability. -
Page 223
Sirona Dental Systems GmbH 5 Care, cleaning and maintenance by the practice team Operating Instructions (USA) INTEGO 5.5 Components of the water unit 5. Reinsert the rubber ring E in the screw-on cap B, C. Then plug on the filter D as shown in the drawing. -
Page 224
5 Care, cleaning and maintenance by the practice team Sirona Dental Systems GmbH 5.5 Components of the water unit Operating Instructions (USA) INTEGO 5.5.6 Change the amalgam rotor Amalgam residues and other solid particles are trapped in the amalgam rotor according to the centrifugal principle. -
Page 225
6. Place the container in the special packaging and ship it for disposal or authorize a certified waste management company. Installing the amalgam rotor Use only original Sirona accessories. Never use a used or recycled amalgam rotor. To reorder the amalgam rotor, see «Spare parts and consumables»… -
Page 226
5 Care, cleaning and maintenance by the practice team Sirona Dental Systems GmbH 5.5 Components of the water unit Operating Instructions (USA) INTEGO 3. Hold the lower part of the amalgam separator B so that the latching noses of the bayonet catch are positioned transverse to the water unit. -
Page 227
Sirona Dental Systems GmbH 5 Care, cleaning and maintenance by the practice team Operating Instructions (USA) INTEGO 5.5 Components of the water unit 5.5.7 Check the message system of the amalgam separator An electronic control monitors the function of the amalgam separator. SIt detects any mechanical blocking or failure of the drive motor. -
Page 228
5 Care, cleaning and maintenance by the practice team Sirona Dental Systems GmbH 5.5 Components of the water unit Operating Instructions (USA) INTEGO The service dialog is shown. Amalg Test Test Info Amalg 4. Test the message system. Press and hold the key for an extended period. -
Page 229
Sirona Dental Systems GmbH 5 Care, cleaning and maintenance by the practice team Operating Instructions (USA) INTEGO 5.5 Components of the water unit 5.5.8 Empty the sediment container In addition to other solid particles, a large proportion of the amalgam residues are trapped in the sediment container by gravitational force. -
Page 230
5 Care, cleaning and maintenance by the practice team Sirona Dental Systems GmbH 5.5 Components of the water unit Operating Instructions (USA) INTEGO 1. Open the flap A on the base of the water unit. 2. Loosen the bayonet catch by turning the sediment container B counterclockwise. -
Page 231
Sirona Dental Systems GmbH 5 Care, cleaning and maintenance by the practice team Operating Instructions (USA) INTEGO 5.5 Components of the water unit 2. Hold the sediment container B so that the latching noses of the bayonet catch are positioned transverse to the water unit. Rotate the sediment container B clockwise. -
Page 232: Cleaning The Filter Insert Of The Wet Suction Device With Cuspidor
5 Care, cleaning and maintenance by the practice team Sirona Dental Systems GmbH 5.5 Components of the water unit Operating Instructions (USA) INTEGO 5.5.9 Cleaning the filter insert of the wet suction device with cuspidor valve The automatic separator and amalgam separator / sediment container or air jet pump are not installed in the water unit for standard wet suction.
-
Page 233
Sirona Dental Systems GmbH 5 Care, cleaning and maintenance by the practice team Operating Instructions (USA) INTEGO 5.5 Components of the water unit 1. Open the flap A on the base of the water unit. 2. Allow the remaining water to be extracted completely. Press button B on the standard wet suction. -
Page 234
5 Care, cleaning and maintenance by the practice team Sirona Dental Systems GmbH 5.5 Components of the water unit Operating Instructions (USA) INTEGO 5. Grease the O-ring C of the filter insert. Lubricants, see «Care, cleaning, and disinfecting agents» [ → 178]. -
Page 235: Emptying The Collector Of The Air Jet Pump
Sirona Dental Systems GmbH 5 Care, cleaning and maintenance by the practice team Operating Instructions (USA) INTEGO 5.5 Components of the water unit 5.5.10 Emptying the collector of the air jet pump The air jet pump (Air Venturi) is an option available for the Compact water unit.
-
Page 236
5 Care, cleaning and maintenance by the practice team Sirona Dental Systems GmbH 5.5 Components of the water unit Operating Instructions (USA) INTEGO 3. Pour the excess water out of the container and collect the amalgam residues. Properly dispose of the amalgam residues together with the amalgam residues collected from the cuspidor and from the central suction sieve, see Cleaning the gold trap»… -
Page 237: Sanitizing
Sirona Dental Systems GmbH 5 Care, cleaning and maintenance by the practice team Operating Instructions (USA) INTEGO 5.6 Sanitizing Sanitizing Sanitizing effectively combats the reproduction of microorganisms in the water lines. Sanitizing using fresh water bottle Sanitizing with the fresh water bottle on the Compact or Comfort water unit.
-
Page 238: Sanitizing With The Fresh Water Bottle
5 Care, cleaning and maintenance by the practice team Sirona Dental Systems GmbH 5.6 Sanitizing Operating Instructions (USA) INTEGO 5.6.1 Sanitizing with the fresh water bottle If the Compact or the Ambidextrous water unit is fitted with a fresh water Sanitizing with the fresh water bottle with the Compact and Turn water unit bottle, manual sanitation must be performed: ●…
-
Page 239
Sirona Dental Systems GmbH 5 Care, cleaning and maintenance by the practice team Operating Instructions (USA) INTEGO 5.6 Sanitizing 5. Unscrew the fresh water bottle from the holder on the water unit and empty the fresh water bottle completely. 6. Fill the fresh water bottle with approx. 0.4 to 0.5 liters of pure DENTOSEPT P. -
Page 240
5 Care, cleaning and maintenance by the practice team Sirona Dental Systems GmbH 5.6 Sanitizing Operating Instructions (USA) INTEGO Stop The program for sanitation starts. The key flashes orange on the touchscreen. The tumbler filling switches on and is supplied with DENTOSEPT P waterline treatment solution. -
Page 241
Sirona Dental Systems GmbH 5 Care, cleaning and maintenance by the practice team Operating Instructions (USA) INTEGO 5.6 Sanitizing Filling the fresh water bottle with water ✔ Refill water The display appears on the touchscreen. 1. Unscrew the fresh water bottle counterclockwise from the holder on the water unit and empty the fresh water bottle completely. -
Page 242
5 Care, cleaning and maintenance by the practice team Sirona Dental Systems GmbH 5.6 Sanitizing Operating Instructions (USA) INTEGO 6. After you have flushed the last instrument, press the orange flashing Stop key. The sanitation process is finished. The dental treatment unit is again ready for operation. -
Page 243: Sanitizing With Waterline Treatment System
Sirona Dental Systems GmbH 5 Care, cleaning and maintenance by the practice team Operating Instructions (USA) INTEGO 5.6 Sanitizing 5.6.2 Sanitizing with waterline treatment system Sanitizing must be performed: ● Regularly every 4 weeks when operating with the public drinking water supply or if stand-alone water supply is used more than 28 days…
-
Page 244
5 Care, cleaning and maintenance by the practice team Sirona Dental Systems GmbH 5.6 Sanitizing Operating Instructions (USA) INTEGO Opening the sanitation dialog via the touchscreen ✔ All instruments are in their holders. ✔ Start dialog is displayed on the touchscreen. Sub-dialog 1. -
Page 245
Sirona Dental Systems GmbH 5 Care, cleaning and maintenance by the practice team Operating Instructions (USA) INTEGO 5.6 Sanitizing Starting sanitation Start ➢ Touch the key. Start The sanitation process starts. Error message: Refill with DENTOSEPT P waterline treatment solution Disinf… -
Page 246
SPRAYVIT E: valve lever in the up position, locking knob in the down position). Also for INTEGO pro CS: Move the swivel arm of the instruments to be purged into the operating position so that the weight of the instrument hoses keeps them in this position. -
Page 247
Sirona Dental Systems GmbH 5 Care, cleaning and maintenance by the practice team Operating Instructions (USA) INTEGO 5.6 Sanitizing IMPORTANT Pinching the instrument hoses Be careful not to pinch the instrument hoses when inserting the instruments. With dental treatment units with the Ambidextrous option: convert the water unit to the left side so that the adapters on the water unit point towards the patient chair, see «Converting the Turn water unit for right-… -
Page 248
5 Care, cleaning and maintenance by the practice team Sirona Dental Systems GmbH 5.6 Sanitizing Operating Instructions (USA) INTEGO Sanitation phase 3 – Treating water lines with DENTOSEPT P waterline treatment solution The water is pumped out of the water tank of the water unit via the tumbler filler. -
Page 249
Sirona Dental Systems GmbH 5 Care, cleaning and maintenance by the practice team Operating Instructions (USA) INTEGO 5.6 Sanitizing Error message: Inserting instruments in the water unit If an instrument is accidentally deposited in its holder during the reaction Insert instruments into water unit… -
Page 250
5 Care, cleaning and maintenance by the practice team Sirona Dental Systems GmbH 5.6 Sanitizing Operating Instructions (USA) INTEGO Displays in case of incomplete sanitation The sanitation dialog detects whether the sanitation of all instruments and the tumbler filling was completed. Errors that occurred during sanitation… -
Page 251: Display Sanitation Report
Sirona Dental Systems GmbH 5 Care, cleaning and maintenance by the practice team Operating Instructions (USA) INTEGO 5.6 Sanitizing 5.6.3 Display sanitation report If the dental treatment unit is equipped with the EasyTouch comfort user Sanitation process with Comfort user interface interface, sanitation processes with a reaction time of at least 24 hours can also be displayed on the touchscreen.
-
Page 252: Fuse Of The External Device Connection
5 Care, cleaning and maintenance by the practice team Sirona Dental Systems GmbH 5.7 Fuse of the external device connection Operating Instructions (USA) INTEGO Fuse of the external device connection The inlet connector remains live even when the power switch is turned off.
-
Page 253: Maintenance By The Service Engineer
Sirona Dental Systems GmbH 6 Maintenance by the service engineer Operating Instructions (USA) INTEGO 6.1 Inspection and maintenance Maintenance by the service engineer Inspection and maintenance In order to ensure the operational safety and reliability of your dental treatment unit and to avoid damage due to natural wear, annual inspection and maintenance must be performed on your dental treatment unit.
-
Page 254: Maintenance Manual
6 Maintenance by the service engineer Sirona Dental Systems GmbH 6.3 Maintenance Manual Operating Instructions (USA) INTEGO Maintenance Manual Keep this Maintenance Manual near your dental treatment unit. Any inspection and maintenance work as well as all safety tests are Documentation of the maintenance documented by the service engineer in the Maintenance Manual.
-
Page 255: Malfunctions
[ → 222]. Check whether the public drinking water supply has the necessary water pressure, see the document on INTEGO / INTEGO pro installation requirements. Emergency pump operation Malfunctioning of pump sensors in the Inform your service technician. water unit.
-
Page 256
7 Malfunctions Sirona Dental Systems GmbH 7.3 Error Messages Operating Instructions (USA) INTEGO Code Error Description Measure Injection valve for waterline No waterline treatment solution is Inform your service technician. treatment solution defective added if the injection valve is defective. ApexLocator After switching on the dental… -
Page 257: Remote Diagnosis
Sirona Dental Systems GmbH 7 Malfunctions Operating Instructions (USA) INTEGO 7.4 Remote diagnosis Remote diagnosis Functional description With remote diagnosis, you enable the staff of your dental depot or our Customer Service Center, see «Contact data» [ → 10], to connect to the PC of your dental treatment unit.
-
Page 258: Spare Parts And Consumables
Sirona Dental Systems GmbH Operating Instructions (USA) INTEGO Spare parts and consumables Use only original accessories and original spare parts from Sirona! Please order the materials listed below from a specialized dental dealer. Care, cleaning, and disinfecting Care, cleaning agents, and disinfectants…
-
Page 259
Sirona Dental Systems GmbH 8 Spare parts and consumables Operating Instructions (USA) INTEGO Miscellaneous Cover, TS dentist element Cover For sealing the instrument holder of the TS dentist element REF 64 55 823 Silicone isolation sleeve for endodontics with the ApexLocator… -
Page 260: Disposal
9 Disposal Sirona Dental Systems GmbH Operating Instructions (USA) INTEGO Disposal In accordance with Directive 2012/19/EU and national disposal regulations regarding old electrical and electronic devices, please be advised that such items must be disposed of in a special way within the European Union (EU).
-
Page 261: Overview Of All Function Keys
Sirona Dental Systems GmbH 10 Overview of all function keys Operating Instructions (USA) INTEGO 10.1 Fixed keys Overview of all function keys The following contains a brief description of the fixed keys on the dentist For Instructions for Use and assistant elements and the function keys on the touchscreen and to provide the reader with a quick overview of the significance of the symbols on the keys.
-
Page 262
10 Overview of all function keys Sirona Dental Systems GmbH 10.2 Start dialog Operating Instructions (USA) INTEGO 10.1.3 Assistant element Chair program S Mouth rinsing position with last-position memory function (programmable) Chair program 0 Entry/exit position (programmable) Tumbler filling on/off Flushing the cuspidor… -
Page 263
Sirona Dental Systems GmbH 10 Overview of all function keys Operating Instructions (USA) INTEGO 10.3 Start dialog for removed instruments Purging water lines automatically Auto Starts the autopurge function Sanitizing Starts the dental treatment unit sanitation program Stand-alone water supply Aqua The waterline treatment system switches to stand-alone water supply… -
Page 264
10 Overview of all function keys Sirona Dental Systems GmbH 10.3 Start dialog for removed instruments Operating Instructions (USA) INTEGO Setting the automatic motor stop of the ApexLocator Apex Stop Apex Stop When the key is pressed, the – and + keys are displayed. The Apex automatic motor stop can be switched off or set to four different levels. -
Page 265
Sirona Dental Systems GmbH 10 Overview of all function keys Operating Instructions (USA) INTEGO 10.4 Integrated torque control 10.4 Integrated torque control Integrated torque control Activation of the integrated torque control function Calibrating the burr drive A calibration must be performed each time you change or lubricate the contra-angle handpiece. -
Page 266
10 Overview of all function keys Sirona Dental Systems GmbH 10.5 Other dialogs Operating Instructions (USA) INTEGO 10.5 Other dialogs 10.5.1 Timer screen Time loop If the key is highlighted orange, the countdown will automatically be restarted when the set time has expired. -
Page 267
Sirona Dental Systems GmbH 10 Overview of all function keys Operating Instructions (USA) INTEGO 10.6 SIVISION program 10.5.5 Operating light setting program Sensor control for switching the operating light on/off If the key is highlighted orange, the operating light can be switched on/off or changed to the Composite function by a hand movement. -
Page 268
10 Overview of all function keys Sirona Dental Systems GmbH 10.6 SIVISION program Operating Instructions (USA) INTEGO 10.6.3 SIDEXIS Start SIDEXIS SIDEXIS SIDEXIS is started on the PC. The keys belonging to the SIDEXIS PC application are displayed on the right side of the touchscreen:… -
Page 269
Sirona Dental Systems GmbH 10 Overview of all function keys Operating Instructions (USA) INTEGO 10.6 SIVISION program Relief display filter Image details with high contrast are displayed brighter or darker. Thus edges or contours within the image are clearly accentuated. The result is a relief-like image distortion. -
Page 270
10 Overview of all function keys Sirona Dental Systems GmbH 10.6 SIVISION program Operating Instructions (USA) INTEGO Close current media window Close all media windows 10.6.4 SI Video Start SI Video SI-Video SI Video is started on the PC, if SIDEXIS is not installed on it. The keys… -
Page 271
Sirona Dental Systems GmbH 10 Overview of all function keys Operating Instructions (USA) INTEGO 10.7 Setup program 10.7 Setup program 10.7.1 Date and time Date and time Date and Time Opens the setup program. Date 15 04 14 Time 12/24 hour display 12 h 10.7.2… -
Page 272
10 Overview of all function keys Sirona Dental Systems GmbH 10.7 Setup program Operating Instructions (USA) INTEGO When this function is switched off, the display switches between a still or live image when the foot pedal is pressed. The knob on the camera is used to focus the image. -
Page 273: Index
Sirona Dental Systems GmbH Index Operating Instructions (USA) INTEGO Index Numerical Standardization, 103, 112, 115 with integrated torque control, 103 4-way foot switch, 173 Approvals, 22 4-way foot switch plate, 63 Armrest, 67 Articulating headrest, 33, 69 Accessories, 19, 258…
-
Page 274
Index Sirona Dental Systems GmbH Operating Instructions (USA) INTEGO Chip blower, 61, 62, 84, 86 Deutscher Verein für Gas und Wasser (DVGW) = German Gas and Water Association, 23 Clean key, 182 Device ON/OFF switch, 57 Cleaning adapter, 210, 246… -
Page 275
Sirona Dental Systems GmbH Index Operating Instructions (USA) INTEGO Fixed key Highspeed handpiece hose, 201 Chair programs, 122 Hose coding, 93 Clean, 182 Composite function, 123, 150 IEC socket, 54 Cuspidor flushing, 134 Immunosuppressed patients, 15 Flushing cuspidor, 123 Indication, 13… -
Page 276
Index Sirona Dental Systems GmbH Operating Instructions (USA) INTEGO Torque limitation, 102 Maintenance Service , 12 Turbine / air motor / other air-driven instruments, 91 Maintenance, cleaning, and disinfecting intervals, 176 Integrated torque control, 97 Manual measurement with the file clamp, 112… -
Page 277
Sirona Dental Systems GmbH Index Operating Instructions (USA) INTEGO SaveMode and DropMode, 88 Sediment container, 229 Patient chair Self-test for chair drive, 57 Chair programs, 70, 75 Settings dialog, 60 Drive motors, 18 Setup key, 170 External device connector, 54… -
Page 278
Index Sirona Dental Systems GmbH Operating Instructions (USA) INTEGO Suction sieve, 214 Suction system, 203, 210 Warning triangle, 255 Cleaning, 203 Warranty, 253 Cleaning agent mixture, 174 Water and air connection, 54 Suction hoses, 215 Water connection external device, 54… -
Page 280
tÉ=êÉëÉêîÉ=íÜÉ=êáÖÜí=íç=ã~âÉ=~åó=~äíÉê~íáçåë=ïÜáÅÜ=ã~ó=ÄÉ=êÉèìáêÉÇ=ÇìÉ=íç=íÉÅÜåáÅ~ä=áãéêçîÉãÉåíëK «=páêçå~=aÉåí~ä=póëíÉãë=dãÄe== péê~ÅÜÉW ÉåÖäáëÅÜ=ErpF mêáåíÉÇ=áå=dÉêã~åó aPRQPKOMNKMPKMOKOP NMKOMNS ûKJkêKW= NOO=VOS páêçå~=aÉåí~ä=póëíÉãë=dãÄe `çåí~Åí=áå=íÜÉ=rp^W páêçå~=aÉåí~äI=fåÅK SR=QT=SUS=aPRQP c~Äêáâëíê~≈É=PN QUPR=páêçå~=aêáîÉ lêÇÉê=kç aJSQSOR=_ÉåëÜÉáã `Ü~êäçííÉI=k`=OUOTP dÉêã~åó ïïïKëáêçå~KÅçã…
На чтение 4 мин Опубликовано Обновлено
При установке популярной программы Сирона многие пользователи сталкиваются с ошибкой Saf 2, которая может помешать успешной установке. Эта ошибка связана с конфликтом некоторых настроек системы и требует некоторых действий для ее устранения.
Во-первых, перед началом установки Сироны рекомендуется убедиться, что на компьютере установлена последняя версия программы Saf. Если у вас старая версия Saf или ее вообще нет, то необходимо скачать последнюю версию программы с официального сайта разработчика и установить ее на компьютер.
Если у вас установлена последняя версия Saf, но ошибка все равно возникает, то возможно проблема связана с конфликтом настроек системы. В этом случае рекомендуется выполнить следующие действия:
- Перезагрузите компьютер и попробуйте установить Сирону повторно.
- Произведите очистку временных файлов и папок на компьютере. Для этого можно воспользоваться программами для очистки системы, такими как CCleaner.
- Отключите антивирусное программное обеспечение и фаервол на время установки Сироны. Они могут блокировать некоторые файлы, которые необходимы для успешной установки.
- Установите Сирону от имени администратора. Для этого щелкните правой кнопкой мыши на файле установки и выберите пункт «Запустить от имени администратора».
Если после выполнения всех этих действий ошибка Saf 2 при установке Сироны все равно возникает, то стоит обратиться в службу поддержки разработчика для получения более подробной информации и помощи.
Необходимо отметить, что ошибка Saf 2 при установке Сироны может иметь и другие причины, и вышеописанные методы могут не работать во всех случаях. Поэтому рекомендуется также обратить внимание на официальную документацию по установке и настройке Сироны, а также изучить форумы и обсуждения, где пользователи могут предложить другие способы решения данной проблемы.
Как устранить ошибку Saf 2 при установке Сироны
Ошибка Saf 2 при установке Сироны может возникнуть по разным причинам, но чаще всего она связана с несовместимостью программного обеспечения или неправильной установкой.
Вот несколько шагов, которые помогут вам устранить эту ошибку и успешно установить Сирону:
- Убедитесь, что ваше устройство соответствует минимальным системным требованиям Сироны. Проверьте, поддерживает ли ваше устройство операционную систему, требуемую для работы Сироны.
- Проверьте, обновлена ли ваша операционная система до последней версии. Если нет, обновите ее и повторите попытку установки Сироны.
- Убедитесь, что вы скачали последнюю версию Сироны с официального сайта. Старые версии программы могут содержать ошибки, которые были исправлены в последующих версиях.
- Перезагрузите ваше устройство и повторите попытку установки. Иногда простая перезагрузка помогает устранить временные ошибки и сбои.
- Если ошибка Saf 2 возникает только при установке Сироны, попробуйте установить другое приложение и проверьте, возникает ли ошибка. Если ошибка сохраняется, возможно, проблема связана с другим ПО или настройками вашего устройства.
- Если все вышеперечисленные методы не помогли устранить ошибку, обратитесь в техническую поддержку Сироны или на форумы, посвященные данной программе. Там вам смогут дать более конкретные инструкции и решения для вашей конкретной ситуации.
Не забывайте делать резервные копии данных перед установкой новых программ или обновлений, чтобы избежать потери важных файлов.
Надеемся, что эти шаги помогут вам устранить ошибку Saf 2 и успешно установить Сирону на ваше устройство. Удачи!
Причины и последствия ошибки Saf 2
Ошибка Saf 2 может возникать при установке программы Сирона и имеет свои причины и последствия. Рассмотрим основные причины и возможные последствия этой ошибки.
- Неправильный файл установки Сироны. Одной из причин ошибки Saf 2 может быть неправильно загруженный или поврежденный файл установки программы. Это может произойти, если файл загрузки был поврежден во время скачивания или не полностью загружен.
- Неправильные настройки системы. Ошибка Saf 2 также может возникать из-за неправильных настроек системы. Это может включать недостаток свободного места на жестком диске, неправильную конфигурацию системы или проблемы с установленными драйверами.
- Конфликт с другими программами. Иногда ошибка Saf 2 может возникать из-за конфликта с другими программами, установленными на компьютере. Это может быть вызвано несовместимостью версий программ или неправильной установкой других программ.
Последствия ошибки Saf 2
- Невозможность установки Сироны. Ошибка Saf 2 препятствует корректной установке программы Сирона. Это может быть проблемой, если вы хотите использовать функциональность Сироны или полагаетесь на нее для своей работы.
- Сбои в работе программы. Если ошибку Saf 2 не устранить, она может привести к нестабильной работе Сироны. Это может проявляться в работе программы, такой как ошибки, вылеты или неправильное отображение информации.
- Потеря данных. В некоторых случаях, ошибка Saf 2 может привести к потере данных, если программу Сирона не удается работать корректно из-за этой ошибки. Поэтому рекомендуется решить проблему с ошибкой Saf 2 как можно скорее, чтобы избежать потери важной информации.
Исправление ошибки Saf 2 может потребовать нескольких шагов в зависимости от конкретной ситуации. Рекомендуется обратиться к документации программы Сирона или обратиться в техническую поддержку для получения более точных инструкций по устранению этой ошибки.